the nbx non-bridging external fixatorthe center post and lift arm beneath the shaft of the distal...
TRANSCRIPT


The NBX Non-Bridging External
FixatorA Non-Bridging External Fixator/Locking Plate
capturing a series of .062mm K-wires and 3mm half-pins that are inserted in a multi-
planar and multi-directional fashion providing an interlocking matrix securing
ALL fracture fragments.


The First Assistant Wrist
Reduction DeviceTwo radiolucent plastic paddles or arms (A) that articulate at
the wrist joint and allow for ulnar deviation and
ligamentotaxis of the wrist, coupled with an ulnar buttress
post (B) and volar lift arm (C) that helps recreate and
maintain anatomic reduction of the wrist fracture.

Patient Positioning
The patient can be positioned one of two ways:
lateral with the operative arm up and extended off the table
or
in a ‘beach chair’ position with the operative side and arm at/over
the edge of the table
The key is make sure that the forearm is in a neutral position
The surgeon can then simply place a sterile drape over the c-arm
and use it as the “table” or use a hand table and bring the c-arm in
as needed.

Assemble the First Assistant fracture reduction device by
threading the center post through the hinge, leaving the
connection loose enough to manipulate both paddles.
The teeth on the underside and top side of the paddles should
engage loosely.

Position the hand on the First Assistant with the radial side away from
the center post and lift arm beneath the shaft of the distal radius (A)
proximal to the fracture for a Colles Fracture and underneath the
fracture for a Smith’s fracture.
Secure the forearm and hand to the two arms of the reduction device
with Coban, making sure to capture the base of the thumb (B).

Smith’s Fracture Colle’s Fracture

Reduce the fracture by ligamentotaxis, pulling the hand into ulnar
deviation to re-establish radial height (9mm +/- 2mm) and
inclination (22-24 degrees).

Secure the reduction in ulnar deviation by tightening the TOP
knob to lock the arms of the First Assistant in place.

Turn the lower knob on the center post clockwise to elevate the
distal end of the radial shaft proximal to the fracture for a Colles
fracture, and the distal portion of the radius in a Smith’s fracture,
to restore volar tilt.

Full Reduction AP View

Full Reduction Lateral View

X-Ray Tips
Remember the anatomy and orient the fluoroscopy accordingly:
Volar tilt averages 11-12 degrees
Radial inclination averages 22-24 degrees
Radial height averages 9mm +/- 2mm

Position the NBX fixator body over the distal radius to act as a template
for the insertion of all K-wires and half-pins, with the distal row of holes
over the radial styloid and parallel to the joint covering the fracture site
(A), making sure that the proximal arm is centered over the shaft of the
radius (B),

Place the first .062” k-wire into the ulnar side of the distal radius,
taking care not to over penetrate the volar cortex.
With the distal row of holes over the radial styloid, this first k-wire
will go into either the second or third row of holes.
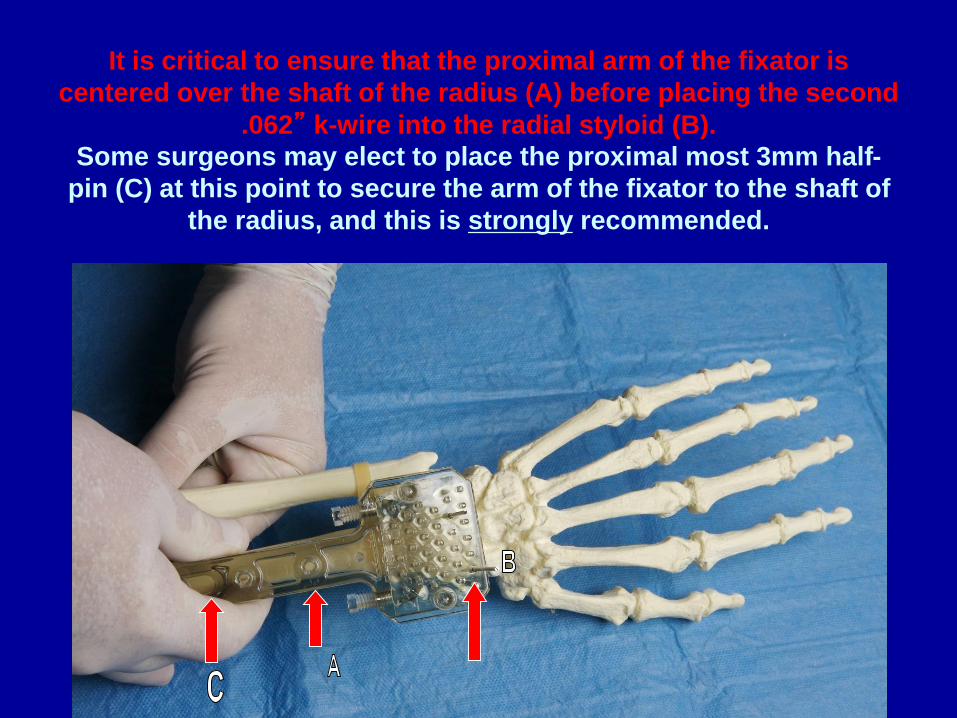
It is critical to ensure that the proximal arm of the fixator is
centered over the shaft of the radius (A) before placing the second
.062” k-wire into the radial styloid (B).
Some surgeons may elect to place the proximal most 3mm half-
pin (C) at this point to secure the arm of the fixator to the shaft of
the radius, and this is strongly recommended.

Place additional .062” k-wires into remaining fracture fragments
as desired.


Raise the NBX fixator ½” to ¾” off of the skin to allow clearance
for wound and pin site care.

Tighten both locking screws on either side of the fixator body to
secure the dorsal pins to the NBX fixator.
In tightening these 2 screws, the surgeon is pushing the internal
plate forward within the fixator.

(A) Slide the side clamp onto the radial side of the NBX fixator.
The side clamp can be moved proximally or distally before final
locking to the fixator once the radial pins are placed and captured
by the pin clamps
(B) Insert two or three .062” k-wires from radial to ulnar, with the
first parallel to the distal articular surface and the others into
fracture fragments as desired to interlock with the dorsal pins and
secure the fracture in 3 dimensions.
TAKE CARE TO AVOID THE RADIAL NERVE

(A) Loosen each of the appropriate locking screws on the side of the side
clamp to allow the pin clamps to slide easily into the side clamp.
(B) Slide each pin clamp into the slot on the side clamp from volar
to dorsal and drop it down onto the k-wire.
(C) Secure each radial k-wire to a pin clamp with the pin clamp nut
and wrench, making sure that the shaft of the pin clamp is in either
the proximal or distal slot of the side clamp and that the shaft of
the pin clamp is not “bent” in any plane.

Secure the pin clamps to the side clamp with the wrench by
tightening each locking screw, making sure that the shaft of the
pin clamp is in either the proximal or distal portion of the hole in
the side clamp and not “bent” in any plane.

Secure the side clamp to the NBX fixator body by tightening the
dorsal locking screw in the radial side.

Remove the foam piece holding the proximal collet in place and insert
the proximal 3mm half-pin into the distraction pin collet, with the pin
collet in the distal end of the slot (A) to allow for final distraction of the
fracture, and through the radial shaft taking care not to over penetrate
the volar cortex (B).DO NOT USE POWER UNTIL THE THREADED PORTION OF THE HALF-PIN IS
FULLY THROUGH THE COLLET AND ON BONE AS IT MAY CATCH ON THE
COLLET(A small stab incision is normally made and blunt dissection with a small clamp down to bone for all
3mm hal-pins to protect neuro-vascular structures, with a suture on either side of each pin.)

Apply the distraction device to the proximal 3mm half-pin, with
both arms around the pin above and below the arm of the fixator
and distraction screw at the distal end of the fixator (A).
Turn the distraction screw clockwise (B) to force the fixator body
and secured fracture complex distally (C) to restore normal length.

With the final distraction held in place by the distraction device,
insert a second 3mm half-pin into the distal radius through one of
the two remaining holes on the shaft of the NBX fixator arm.
DO NOT USE POWER UNTIL THE THREADED PORTION OF THE HALF-
PIN IS FULLY THROUGH THE COLLET AND ON BONE AS IT MAY CATCH
ON THE COLLET

Tighten the pin collet for the distal 3mm half-pin clockwise to
secure the distraction.

Remove the distraction device and secure the proximal 3mm half-
pin by tightening the pin collet clockwise.

Cut the radial k-wires and apply pin covers, then cut the dorsal
pins and secure the pin cover by tightening the locking screw on
the ulnar dorsal side of the NBX fixator.

Installation of the NBX fixator is complete.

Prior to waking the patient up, and after removing the arm from
the First Assistant, the surgeon MUST place the wrist through a
full range of motion:
Volar and dorsal felxion
Radial and Ulnar Deviation
Pronation and Supination
Have the surgeon save and print copies like the 2 below to show
to the patient in Recovery to “implant” the idea that they can move
their hand, fingers and wrist!

By placing the hand, wrist and fingers through the entire range of
motion, the surgeon will free up any extensor tendons that may
have been “speared” by a K-wire. The fibers of the tendons run
longitudinally and the range of motion creates a split in line with
the fibers that allows full range of motion and heals following
removal of the NBX fixator.
In well over 140 cases done to date, there has not been a single
report of tendon rupture or tenosynovitis.

Post-Operative Care• Normal closure and dressing will usually consist of a stitch on
either side of the proximal half-pins and sterile dressing wrapped under the fixator around all pins and K-wires, with cast padding wrapped around the arm, finally covered with an Ace bandage.
• Patient is advised to move the fingers and wrist as tolerated.
• The first post-operative visit usually occurs from 3 to 5 days after surgery, at which time the above dressing and stitches are removed.
• Patient is instructed in pin tract cleaning and care ( from soap and water to peroxide, etc., based on surgeon preference) and is informed they can shower with the device and resume activities of daily living, with NO heavy lifting or undue stress to be placed on the wrist.
• Depending on radiographic evidence of healing, the NBX fixator is removed from 6-8 weeks after surgery.