the legendary erformance of -...
TRANSCRIPT

THE LEGENDARY PERFORMANCE O FYOUR ADVENTURE UNFOLDS
TM
Feathercraft Products Ltd. 4-1244 Cartwright Street on Granville Island, Vancouver, British Columbia, Canada V6H 3R8 Telephone: (604) 681-8437 Fax: (604) 681-7282 www.feathercraft.com [email protected]
Kahuna
FOLDING KAYAKS
ContentsKahuna Folding Kayak...........................................................Page 2
Specifications ........................................................................Page 3
Kahuna Frame .......................................................................Page 4
Care and Maintenance ..........................................................Page 5
Disassembly ..........................................................................Page 6
Kahuna Assembly Instructions ..............................................Page 8
The Feathercraft Sea Sock......................................................Page 21
Optional Rudder Installation .................................................Page 22
Optional Hatch Installation ...................................................Page 26
Feathercraft Kahuna 1
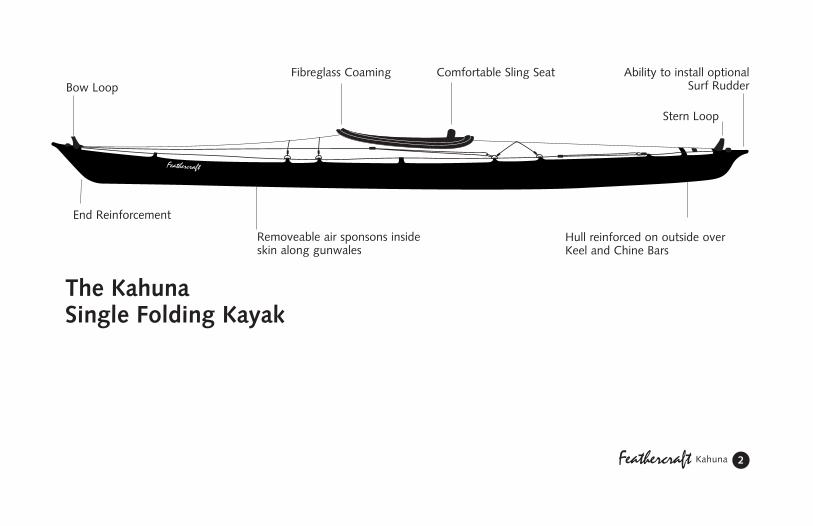
The KahunaSingle Folding Kayak
Feathercraft Kahuna 2
Bow LoopFibreglass Coaming Comfortable Sling Seat
Stern Loop
Ability to install optionalSurf Rudder
End Reinforcement
Removeable air sponsons insideskin along gunwales
Hull reinforced on outside overKeel and Chine Bars

Feathercraft Kahuna 3
Accessories: Included in every kayak:Nylon Spray SkirtSea Sock Adjustable Foot Braces/Rudder ControlsRepair KitPack BagAssembly Video Illustrated Instructions
Options: Access hatchesSurf rudder
SpecificationsLength: 4.5 m (14'9")Beam: 64 cm (25")Weight: 16 kg (35 lbs)Pack size: 90 x 50 x 25 cm (36 x 20 x 10")Storage Volume: MediumFrame: 5/8" Round
6063 - T832 Extruded AluminumMagnesium Tubing with clear Anodized Coating
Crossribs: Injected Molded PolycarbonateDeck Material: Polytech Hull Material: Duratek

Feathercraft Kahuna 4
Kahuna Frame
stern deck bar/lever bar
fibreglass cockpit coaming
chines, gunwales and deckbarsthrough-bolted permanently
to injection-moldedpolypropylene keel plate
(same for bow and stern)
crossribs are injection-moldedpolycarbonate
5 extension bars: chines, gunwales, keel
adjustable foot braces
shockcorded tubing
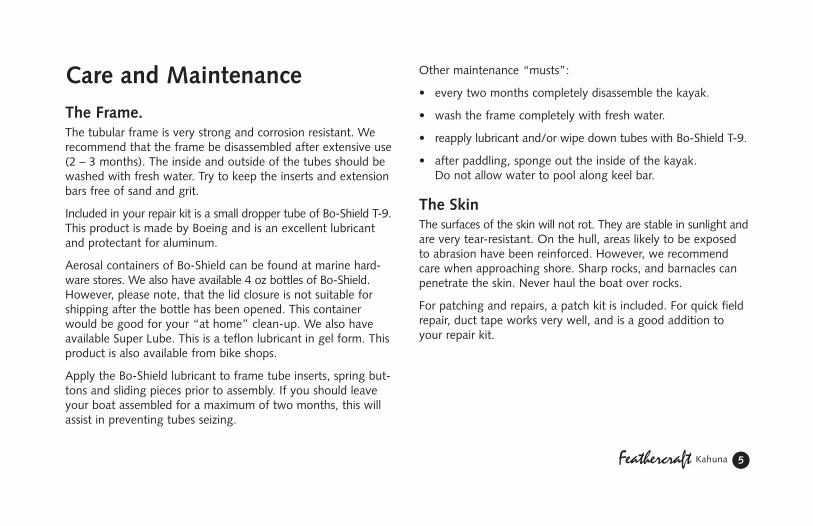
Care and MaintenanceThe Frame.The tubular frame is very strong and corrosion resistant. Werecommend that the frame be disassembled after extensive use(2 – 3 months). The inside and outside of the tubes should bewashed with fresh water. Try to keep the inserts and extensionbars free of sand and grit.
Included in your repair kit is a small dropper tube of Bo-Shield T-9.This product is made by Boeing and is an excellent lubricantand protectant for aluminum.
Aerosal containers of Bo-Shield can be found at marine hard-ware stores. We also have available 4 oz bottles of Bo-Shield.However, please note, that the lid closure is not suitable forshipping after the bottle has been opened. This containerwould be good for your “at home” clean-up. We also haveavailable Super Lube. This is a teflon lubricant in gel form. Thisproduct is also available from bike shops.
Apply the Bo-Shield lubricant to frame tube inserts, spring but-tons and sliding pieces prior to assembly. If you should leaveyour boat assembled for a maximum of two months, this willassist in preventing tubes seizing.
Other maintenance “musts”:
• every two months completely disassemble the kayak.
• wash the frame completely with fresh water.
• reapply lubricant and/or wipe down tubes with Bo-Shield T-9.
• after paddling, sponge out the inside of the kayak. Do not allow water to pool along keel bar.
The SkinThe surfaces of the skin will not rot. They are stable in sunlight andare very tear-resistant. On the hull, areas likely to be exposedto abrasion have been reinforced. However, we recommendcare when approaching shore. Sharp rocks, and barnacles canpenetrate the skin. Never haul the boat over rocks.
For patching and repairs, a patch kit is included. For quick fieldrepair, duct tape works very well, and is a good addition toyour repair kit.
Feathercraft Kahuna 5

Welded Sealskin.The Polytech deck and Duratek hull are urethane. Seams arepermanently sealed.
A patch kit is provided for deck, hull or sponson punctures.One urethane glue will work for repairs to all of these fabrics.Glue does have a shelf life and it should be fluid and not thickand gummy. We have replacement cans available.
SponsonsDue to the tight fit of the skin, the sponsons are under considerable pressure and some seepage of air may occur. It isadvisable to periodically reinflate the sponsons. After paddlingon hot days, release air from sponsons.
To Repair/Replace SponsonThe sponsons can be completely removed from the sleevesewn to the inside of the skin. Turn the skin inside out. Thesponson chamber is open at bow and stern ends. Tie a longstring through the hole in the tab at the end of sponson. Pullsponson through the center opening of the chamber (wheresponson hose is attached). To reinstall, pull the cord attached tothe new sponson back through the chamber. Ensure sponson isnot twisted in the chamber. Repeat with the opposite side.Urethane glue and patches are included in the repair kit. Ducttape works well on the sponsons.
Feathercraft Kahuna 6

DisassemblyLet the air out of the sponsons. Remove Cockpit Coaming.Remove deck bars. Remove Gunwale and Chine Extension barsusing the lever bars to release the spring buttons. Release theKeel Extension Bar last. Follow the rest of the assembly steps inreverse order.
Packing the kayak in the bagPut the seat cushion in the bag first, with the cushion facingdown, to give padding for your back. Next arrange the whiteplastic crossribs over the seat. Stretch the sprayskirt over thefibreglass coaming. Place this in the bag, over the crossribs. Roll the kayak skin up tightly–fold the ends to the center of thekayak; fold in half; roll tightly; secure with webbing ties. Placethis bundle in one side of the bag. Put aluminum frame partsalong side of the rolled up skin. Tuck all additional pieces (ie: sea sock, repair kit) into any available space.
Lifting the KayakThe webbing handles at the bow and stern ends can be usedto lift or carry. Never lift or carry a fully loaded kayak.
StorageOnce clean and dry, the kayak can be stored assembled or disassembled in a shaded, dry place. When storing the kayakdisassembled, take extension bars apart.
Feathercraft Kahuna 7
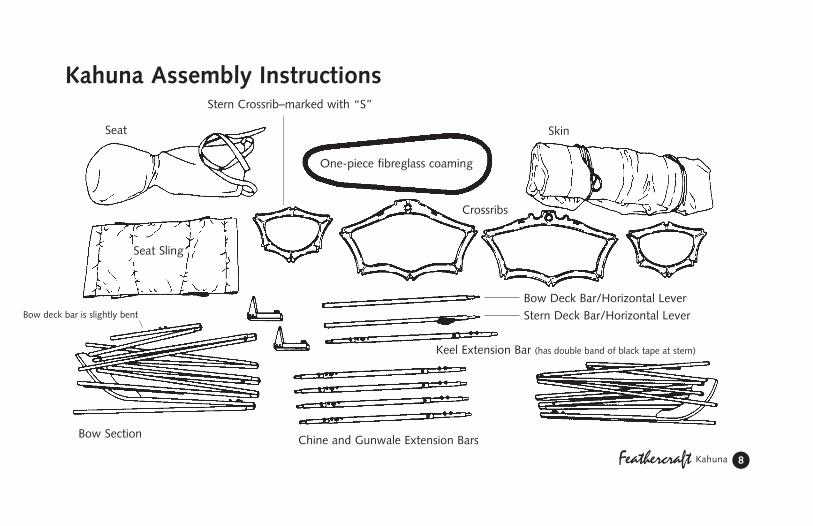
Kahuna Assembly Instructions
Feathercraft Kahuna 8
Seat
Bow Section Chine and Gunwale Extension Bars
Keel Extension Bar (has double band of black tape at stern)
Skin
Crossribs
One-piece fibreglass coaming
Stern Crossrib–marked with “S”
Bow Deck Bar/Horizontal LeverStern Deck Bar/Horizontal Lever
Seat Sling
Bow deck bar is slightly bent

1 SET OUT FRAME PARTS AS ILLUSTRATED ON THE PREVIOUS PAGE
2 BOW SECTION
(has foot track installed on chine bars).
• “Shake out” bow section. Shock corded tubes take shape.
Feathercraft Kahuna 9

3 ATTACH SMALL CROSSRIB TO BOW SECTION.
• Pin on small crossrib is inserted into hole in plastic block onkeel tube; fit into place.
• Snap chine and gunwale tubes on to crossrib. When the crossrib is in position, the white spacers are onthe “cockpit” side of the crossrib.
4 COMPLETE BOW SECTION.
• Slide foot braces on to track. If necessary, the foot plate onthe brace can be reversed.
5 STERN SECTION.
• Repeat Step #2 and #3.
6 UNFOLD SKIN.
• There are two Velcro-tab closures on the inside of thehull. These are located throughthe main cockpit opening, bow and stern.
Feathercraft Kahuna 10
White spacers
Bow Frame Section

Variations do occur with the fabric skin. For this reason,the stern frame section has adjustable members. The initialset-up of the kayak has the spring button in the hole closest to the cockpit.
In Step 12, as you are extending the frame, if the skinfeels too tight, the frame can be shortened to accommodate the fit. Have all adjustments on the samesetting, with the spring buttons facing away from the hull.
7 INSERTING FRAME SECTIONS TO SKIN.
• Before inserting the frame into the skin, ensure the velcrotabs are open. Slide the bow and stern frame sections intothe skin. (Feathercraft label is on the bow end.)
• When inserting the frame sections, align and centre theframe using the tabs as guides. Snug the frame sections tothe very tip of the skin.Secure Velcro closure around thekeel bar.
Feathercraft Kahuna 11Bow Stern
Stern Frame Section
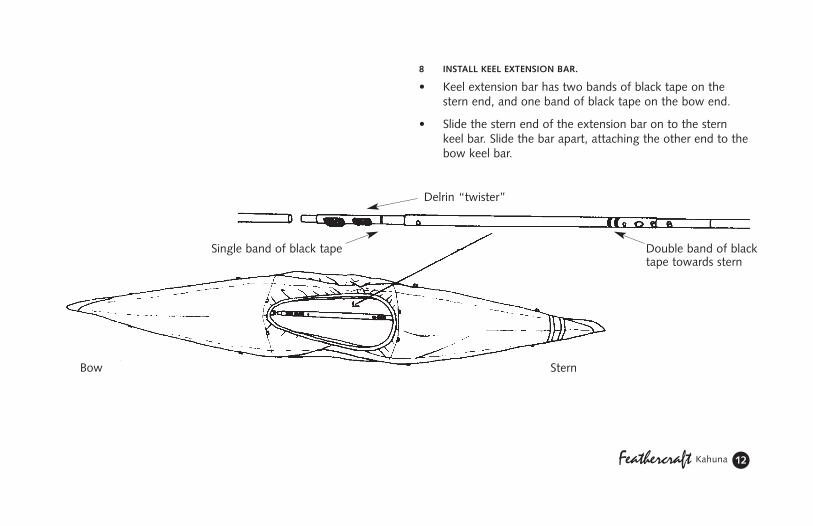
8 INSTALL KEEL EXTENSION BAR.
• Keel extension bar has two bands of black tape on thestern end, and one band of black tape on the bow end.
• Slide the stern end of the extension bar on to the sternkeel bar. Slide the bar apart, attaching the other end to thebow keel bar.
Feathercraft Kahuna 12
Delrin “twister”
Bow Stern
Single band of black tape Double band of blacktape towards stern
Feathercraft Kahuna 13
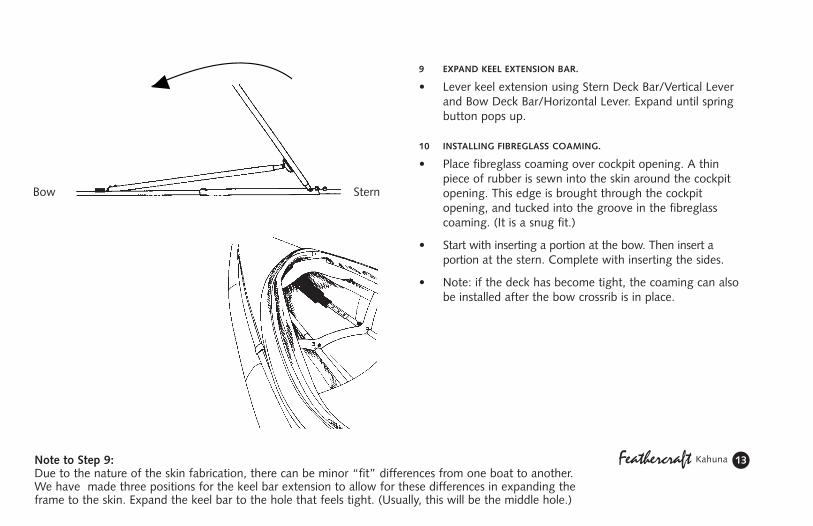
9 EXPAND KEEL EXTENSION BAR.
• Lever keel extension using Stern Deck Bar/Vertical Leverand Bow Deck Bar/Horizontal Lever. Expand until springbutton pops up.
10 INSTALLING FIBREGLASS COAMING.
• Place fibreglass coaming over cockpit opening. A thinpiece of rubber is sewn into the skin around the cockpitopening. This edge is brought through the cockpit opening, and tucked into the groove in the fibreglasscoaming. (It is a snug fit.)
• Start with inserting a portion at the bow. Then insert a portion at the stern. Complete with inserting the sides.
• Note: if the deck has become tight, the coaming can alsobe installed after the bow crossrib is in place.
Note to Step 9:Due to the nature of the skin fabrication, there can be minor “fit” differences from one boat to another.We have made three positions for the keel bar extension to allow for these differences in expanding theframe to the skin. Expand the keel bar to the hole that feels tight. (Usually, this will be the middle hole.)
Bow Stern

11 INSTALL SEAT SLING.
• The seat sling will be suspended from the chine and gun-wale extension bars. These extension bars are all the same.Stern end of seat sling has narrower stitching. Whileinstalling and expanding these extension bars, you maywish to slide the seat sling over the chine and gunwalebars on the stern section of the frame. Otherwise, slideExtension Bars through loops in sling with the black delrinblocks oriented towards the bow.
Feathercraft Kahuna 14
Bow Stern
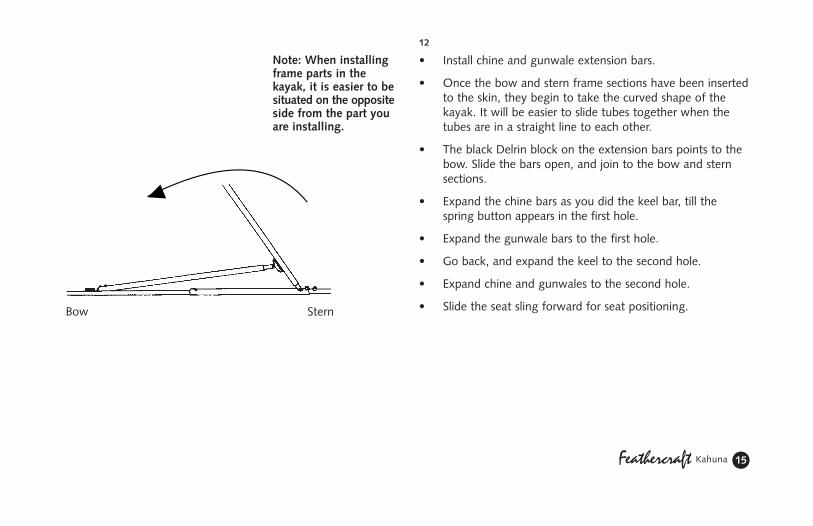
12
• Install chine and gunwale extension bars.
• Once the bow and stern frame sections have been insertedto the skin, they begin to take the curved shape of thekayak. It will be easier to slide tubes together when thetubes are in a straight line to each other.
• The black Delrin block on the extension bars points to thebow. Slide the bars open, and join to the bow and sternsections.
• Expand the chine bars as you did the keel bar, till thespring button appears in the first hole.
• Expand the gunwale bars to the first hole.
• Go back, and expand the keel to the second hole.
• Expand chine and gunwales to the second hole.
• Slide the seat sling forward for seat positioning.
Feathercraft Kahuna 15
Note: When installingframe parts in thekayak, it is easier to besituated on the oppositeside from the part youare installing.
Bow Stern
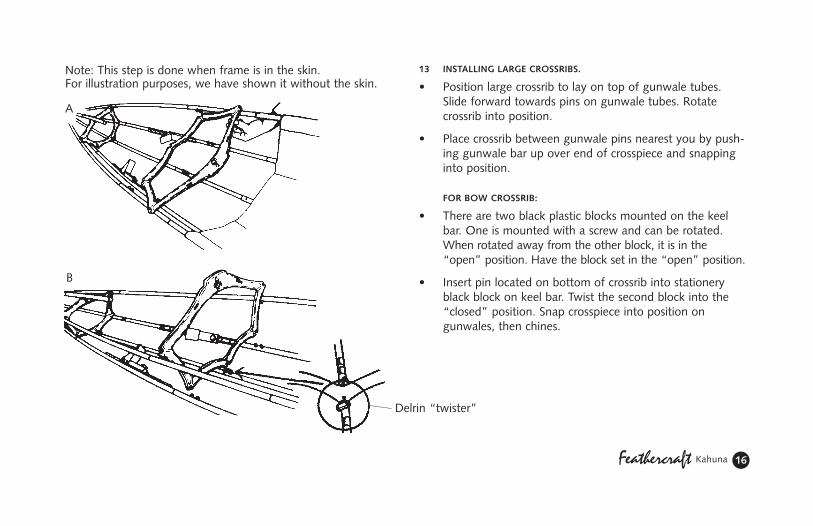
13 INSTALLING LARGE CROSSRIBS.
• Position large crossrib to lay on top of gunwale tubes.Slide forward towards pins on gunwale tubes. Rotatecrossrib into position.
• Place crossrib between gunwale pins nearest you by push-ing gunwale bar up over end of crosspiece and snappinginto position.
FOR BOW CROSSRIB:
• There are two black plastic blocks mounted on the keelbar. One is mounted with a screw and can be rotated. When rotated away from the other block, it is in the“open” position. Have the block set in the “open” position.
• Insert pin located on bottom of crossrib into stationeryblack block on keel bar. Twist the second block into the“closed” position. Snap crosspiece into position on gunwales, then chines.
Feathercraft Kahuna 16
A
B
Note: This step is done when frame is in the skin. For illustration purposes, we have shown it without the skin.
Delrin “twister”

Feathercraft Kahuna 17
14 REPEAT STEP 13 FOR INSTALLATION OF STERN CROSSRIB.
• Procedure is the same, except for twister.
ALTERNATE SEQUENCE TO INSTALLING EXTENSION BARS & CROSSRIBS.
• Slide the keel extension bar into place. Using the leverbars, extend to the first hole.
• Install chine and gunwale bars with seat sling. Connect tothe bow and stern sections, but do not use lever bars toextend yet.
• Install large bow and stern crossribs as described, snappingthe tubes onto crossribs.
• Now, return to the chine and gunwale extension bars. Use the lever bars to extend each of the four bars to thesecond hole. Extend both extension bars on one side, thenthe other.
• Extend the keel bar to the second hole.
15. SECURE DECK-WEBBING TO CROSSRIB.
• Attached to the underside of the deck, behind the largecrossribs, are pieces of webbing with buckles.
• Clip to the corresponding buckle attached to the crossribs.Same for bow and stern large crossribs.
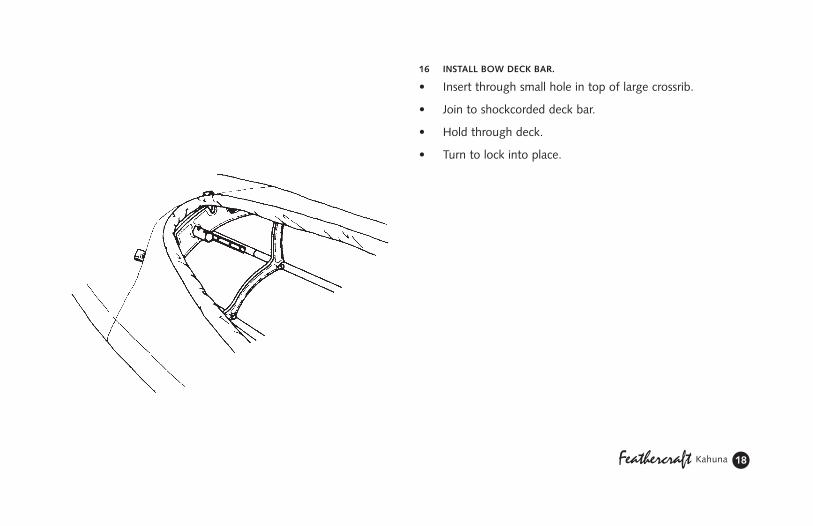
16 INSTALL BOW DECK BAR.
• Insert through small hole in top of large crossrib.
• Join to shockcorded deck bar.
• Hold through deck.
• Turn to lock into place.
Feathercraft Kahuna 18
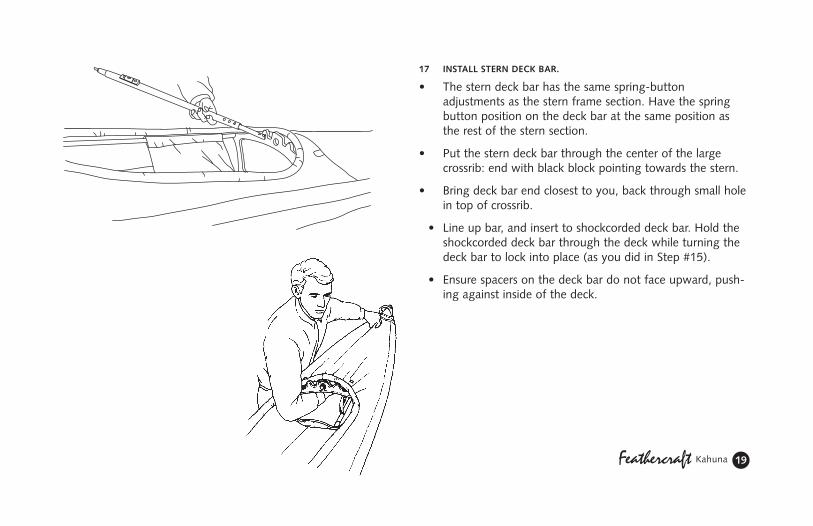
17 INSTALL STERN DECK BAR.
• The stern deck bar has the same spring-button adjustments as the stern frame section. Have the springbutton position on the deck bar at the same position asthe rest of the stern section.
• Put the stern deck bar through the center of the largecrossrib: end with black block pointing towards the stern.
• Bring deck bar end closest to you, back through small holein top of crossrib.
• Line up bar, and insert to shockcorded deck bar. Hold theshockcorded deck bar through the deck while turning thedeck bar to lock into place (as you did in Step #15).
• Ensure spacers on the deck bar do not face upward, push-ing against inside of the deck.
Feathercraft Kahuna 19
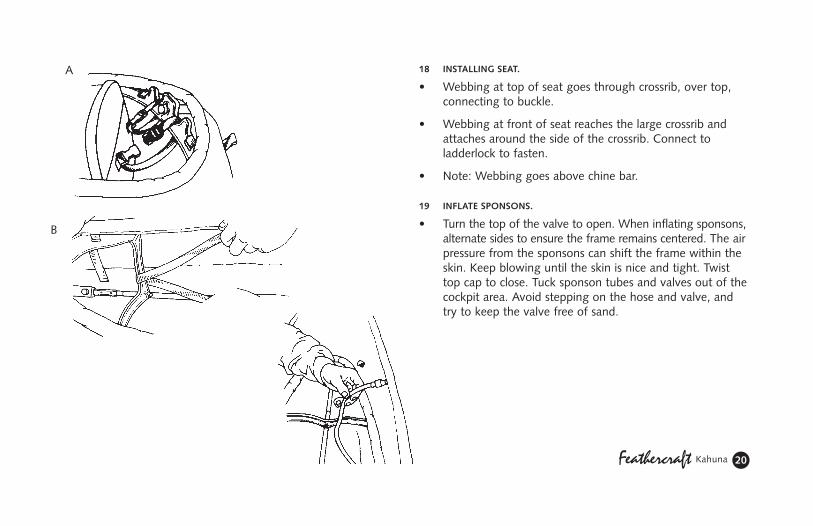
18 INSTALLING SEAT.
• Webbing at top of seat goes through crossrib, over top,connecting to buckle.
• Webbing at front of seat reaches the large crossrib andattaches around the side of the crossrib. Connect to ladderlock to fasten.
• Note: Webbing goes above chine bar.
19 INFLATE SPONSONS.
• Turn the top of the valve to open. When inflating sponsons,alternate sides to ensure the frame remains centered. The airpressure from the sponsons can shift the frame within theskin. Keep blowing until the skin is nice and tight. Twisttop cap to close. Tuck sponson tubes and valves out of thecockpit area. Avoid stepping on the hose and valve, andtry to keep the valve free of sand.
Feathercraft Kahuna 20
A
B

Feathercraft Kahuna 21
The Feathercraft Sea SockMade from high-quality coated nylon, the sea sock is a greatsafety item. The top of the sock fits tightly around the cockpitcoaming rim. Contoured to fit along the seatback and bottom,the “foot” is loose through the cockpit, creating a “pod”. Thepaddler then sits in the sock. Legs and feet are not constricted.The spray skirt fits as usual. In the event of a capsize, water willonly enter the sock, and not the whole boat. It’s also great for keeping the inside of your kayak clean.
As an optional upgrade, the Sea Sock can be ordered with aneoprene rim-grip. This gives an extra tight fit for paddling inextreme weather conditions.
Tips on Usage and Installation• The shiny side of the fabric faces in towards the
kayak frame.
• When facing the bow of the kayak, the Feathercraft labelshould be on the right side.
• The center seam on the up-side of the Sea Sock should becentered on the bow point of the coaming.
• Once the Sea Sock is in place, sit in the sock, and “burp”it by lifting the edges, releasing trapped air that causes thesock to billow up.

Installation of Optional Accessories
TO INSTALL THE OPTIONAL SURF RUDDER
The rudder casting is permanently attached to the stern of thekayak.
Feathercraft Kahuna 22

INSTALL RUDDER.
• Insert the rudder pin through the “key hole”. Rotate rudder 180º.
• Attach rudder cables with sister clips. White haulcord isattached to clip at the side of the cockpit.
Feathercraft Kahuna 23
Sister Clips (two of theseclips are mounted on eachside of the rudder).

A CONNECTING RUDDER CONTROL TO FOOT BRACE
• Red webbing adjusters are connected to the foot brace.Unscrew thumb-knob on foot brace; stem of knob goesthrough grommet. To make the adjuster shorter, fold webbing over to second grommet. Re-attach knob to footbrace. Slide brace on to track. Ensure brace can slide easilyon track. (If not, check knob that you re-attached.)
Feathercraft Kahuna 24
GrommetFold over to shorten
Thumb screw knob
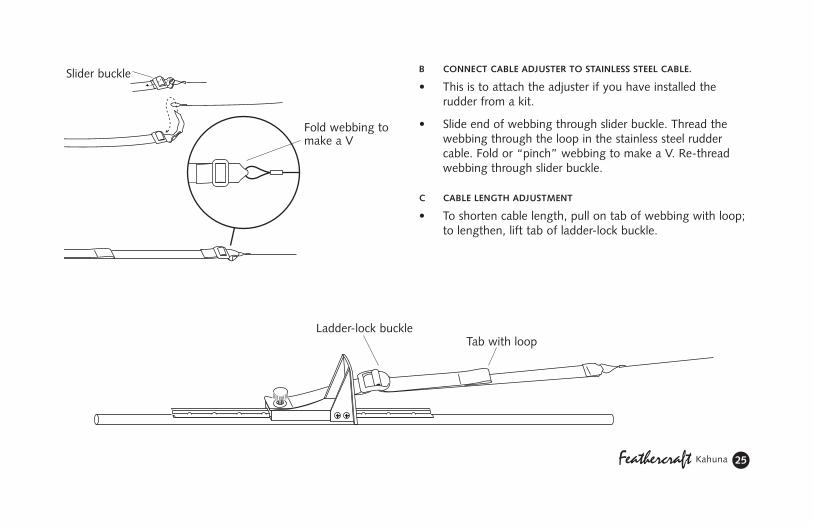
B CONNECT CABLE ADJUSTER TO STAINLESS STEEL CABLE.
• This is to attach the adjuster if you have installed the rudder from a kit.
• Slide end of webbing through slider buckle. Thread thewebbing through the loop in the stainless steel ruddercable. Fold or “pinch” webbing to make a V. Re-threadwebbing through slider buckle.
C CABLE LENGTH ADJUSTMENT
• To shorten cable length, pull on tab of webbing with loop;to lengthen, lift tab of ladder-lock buckle.
Feathercraft Kahuna 25
Slider buckle
Fold webbing tomake a V
Ladder-lock buckleTab with loop

To install optional hatches
ATTACH HATCH RIMS.
• Attach hatch rims by folding the fabric sleeves sewn to the deck over the rim. Roll down inner closure and close with buckels. Place hatch cover over rim and securewith B-locks.
• During disassembly, don’t forget to take the plastic rimsoff. Don’t roll the skin up with the rims still in place.
Feathercraft Kahuna 26
© Feathercraft Products Limited 2001Printed in Canada 05.2001Recycled paper

Feathercraft Kahuna 28

Feathercraft Kahuna 29