the juggler double - user manual d00059.2 · the juggler is designed to store and dispense cold...
TRANSCRIPT
User Manual
This User Manual applies to systems based on
The Juggler Double dispenserFor instructions on how to install The Juggler, refer to our Installation Guide or visit our website.
www.thejuggler.com.au
D00059.2 A01
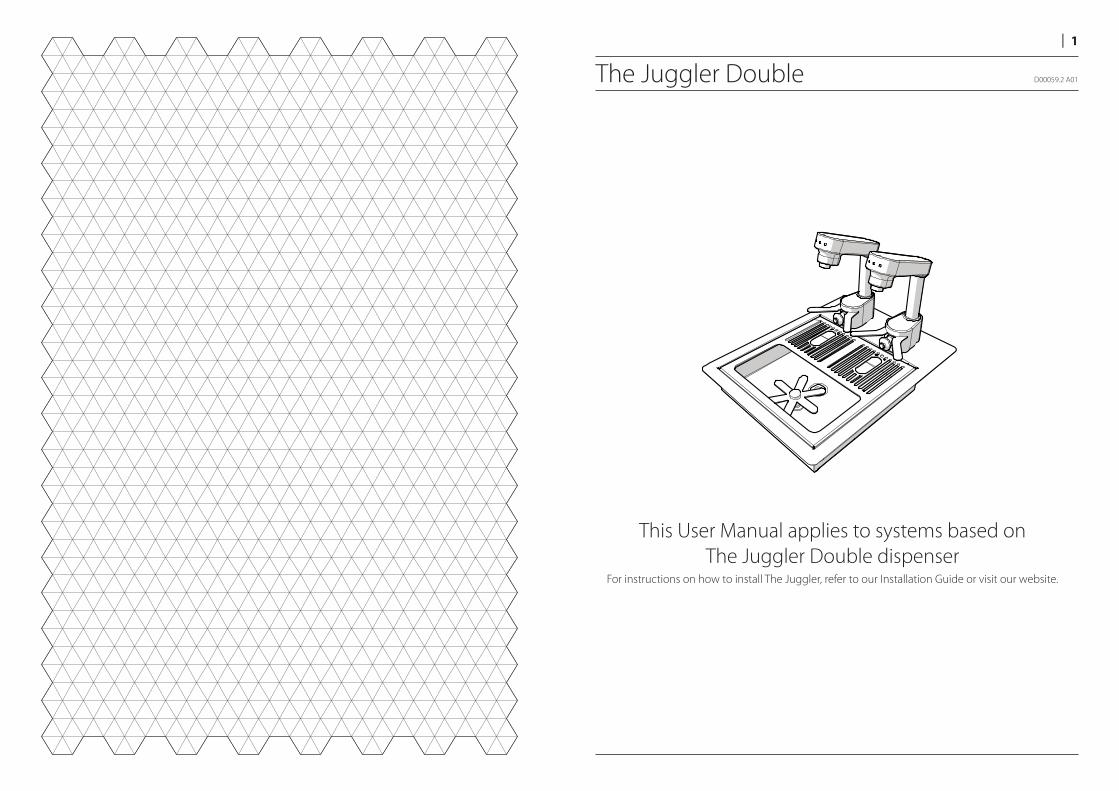
This User Manual applies to systems based on
The Juggler Double dispenserFor instructions on how to install The Juggler, refer to our Installation Guide or visit our website.
The Juggler Double D00059.2 A01
l 1
INTRODUCTION
About this guide 2
HACCP 2
IMPORTANT INFORMATION
Safety First! 5
Cleaning 5
Refrigeration 5
Airfl ow 5
Lifting 5
Environment 5
1. PRODUCT OVERVIEW
System Components 6
Overview 7
Basic Dosing Functions 7
Automatic Jug Sense and dispense 7
Adjusting the Doses 7
2. OPERATING THE JUGGLER
Operating Modes 8
Auto Mode 8
Off Mode 8
Manual Backup Mode 8
Bladders 8
Handling Bladders 8
Daily Set-up Procedure 9
Dispensing Milk 10
Primary Dosing 10
Secondary Dosing 18
Manual Dosing 10
Correct Dosing Action 10
Lights 10
Reloading During Service 11
Reloading a 'Connect 4' Fridge 11
Reloading a 'Connect 8' Fridge 11
Contents l 3
The Juggler Double
2 l
Contents
Thank you for choosing to install The Juggler cafe milk tap system.
The Juggler has been designed to effi ciently dispense cold milk in a busy cafe environment. It is simple to use, clean and maintain. In order to ensure the system remains hygienic and in top working order it is important that you read and understand this manual before connecting The Juggler to a power outlet.
Keep this manual in a safe place for future reference.
ABOUT THIS GUIDE
This User Manual contains all the information you will require to use The Juggler Double and the Chiller.
The manual is set out in 5 sections:
1. Product Overview
This section will introduce you to The Juggler.
2. Operating The Juggler
This section shows how to operate the machine.
3. System Settings
This section contains detailed information regarding the set-up and use of the machine. It shows you how to adjust milk dose volumes, operate the chiller and also how to calibrate the jug size sensor so that The Juggler recognises your small, medium and large jugs.
4. Maintenance
Shows how to maintain your unit.
5. Troubleshooting
Shows how to solve minor issues.
HACCP
HACCP Australia Pty Ltd endorses The Juggler as food-safe and suitable for dispensing pasteurised or ultra-heat treated milk in food facilities that operate in accordance with a HACCP based Food Safety Programme.
This HACCP endorsement is conditional to the following requirements:
1. The Juggler must not be operated for more than one day without performing a full clean-sanitise using the supplied cleaning solution and equipment.
2. The Juggler must not be operated for more than six months without deep cleaning and sanitising, which requires dismantling the unit.
The Juggler is designed to store and dispense cold pasteurised milk.
Australian food laws require that the temperature of milk is 5ºC or colder when it is received, displayed, transported or stored. You should check the temperature of milk when it is delivered and reject the order if the milk is warmer than 5ºC.
After receiving a delivery of milk, immediately place milk bladders into The Juggler, your cold room or an alternative refrigeration unit.
Check the temperature displayed on The Juggler fridge unit every two hours during the day. A temperature of more than 5ºC may indicate a problem which requires action.
You should record the temperature of the milk at least once per day. Local government health inspectors or environment offi cers may request to see these records.
If the temperature of the milk inside The Juggler is warmer than 5ºC you are breaking the law and could make people sick.

Important Information
Product Overview l 54 l Contents
SAFETY FIRST!
Carefully read all instructions and ensure The Juggler is properly assembled before connecting to a power outlet and operating.
This appliance is not intended for use by persons (including children) with reduced physical, sensory or mental capabilities, or lack of experience or knowledge, unless they have been given supervision or instruction concerning use of the appliance by a person responsible for their safety. Children should be supervised to ensure they do not play with the appliance.
Do not use this appliance for other than its intended use.
Do not probe any opening.
Do not cover the grilles or block the entry or exhaust or airfl ow by placing objects up against the refrigerator.
To protect against electric shock, do not immerse cord, plug or appliance in water or any other liquid.
The power cables and power outlet must be in a safe visible position for connection.
It is recommended to regularly inspect the appliance. Do not use the appliance if power supply cord, power plug, or appliance becomes damaged in anyway.
The installation of a residual current device (safety switch) is recommended to provide additional safety protection when using electrical appliances. It is advisable that a safety switch with a rated residual operating current not exceeding 30mA be installed in the electrical circuit supplying the appliance. See your electrician for professional advice.
All electrical work must be performed by authorised personnel.
CLEANING
The milk lines must be sanitised daily using The Juggler milk line cleaner.
Use of The Juggler Milk Line Cleaner is a condition
of our HACCP endorsement and our warranty.
REFRIGERATION
The Juggler Chiller contains R134A refrigerant under pressure.
No part of the unit should be exposed to a naked fl ame.
Maintenance of the refrigeration unit must be carried out by an accredited service provider or qualifi ed refrigeration mechanic.
Always disconnect the cabinet from the mains power supply before any cleaning or maintenance.
It is important that you clean the condenser coil air fi lter at least once a week to minimise service costs, electricity usage and prolong the life of the compressor.
In addition to this, the condenser coil should be brushed down and blown clean by qualifi ed service personnel every 6 months.
Failure to keep the fi lter and condenser coil clean
will void the warranty on The Juggler Chiller.
AIRFLOW
To ensure effi cient and safe operation of the system, adequate air circulation must be provided for the Chiller and Pump and Control unit.
Refer to the page 10 for ventilation requirements for the The Juggler Chiller.
LIFTING
Take care when lifting The Juggler. Parts of the system exceed safe lifting limits and require more than one person to lift.
Do not lift the chiller by the doors. Where the Control and Pump Unit are fi xed to the chiller Unit, do not lift the unit by the Control and Pump Unit.
ENVIRONMENT
This unit is intended for indoor use only and should not be installed outdoors or exposed to the elements of nature. This unit should not be installed in an area that may be cleaned by a water jet and must not be cleaned by a water jet.
Blanking 11
Daily Cleaning Routine 12
Leaving The Juggler Overnight 13
Clean the Condenser Filter 13
Inspect the Condenser 13
3. SYSTEM SETTINGS
The Juggler Dispenser 14
Adjusting Doses 14
Adjust Primary Doses 14
Adjust Secondary Doses 14
Jug Calibration 15
Accessing The Hidden Setup Menu 15
Calibrating the Jugs 15
The Juggler Chiller 16
Carel Easy Electronic Controller 16
Stand-By Mode 16
Temperature Setpoint 16
Carel Easy - Icons and Functions 17
Carel Easy - Messages and Alarms 17
4. MAINTENANCE
Cleaning 18
Flush and Sanitise Milk Lines 18
Deep Clean 18
Condenser Coil 18
Cleaning the condenser fi lter 19
Cleaning the condenser coil 19
5. TROUBLESHOOTING 20
1 2
3
4
5
6
7
8
9
1
2
4
5
6
7
3
1
2
3
4
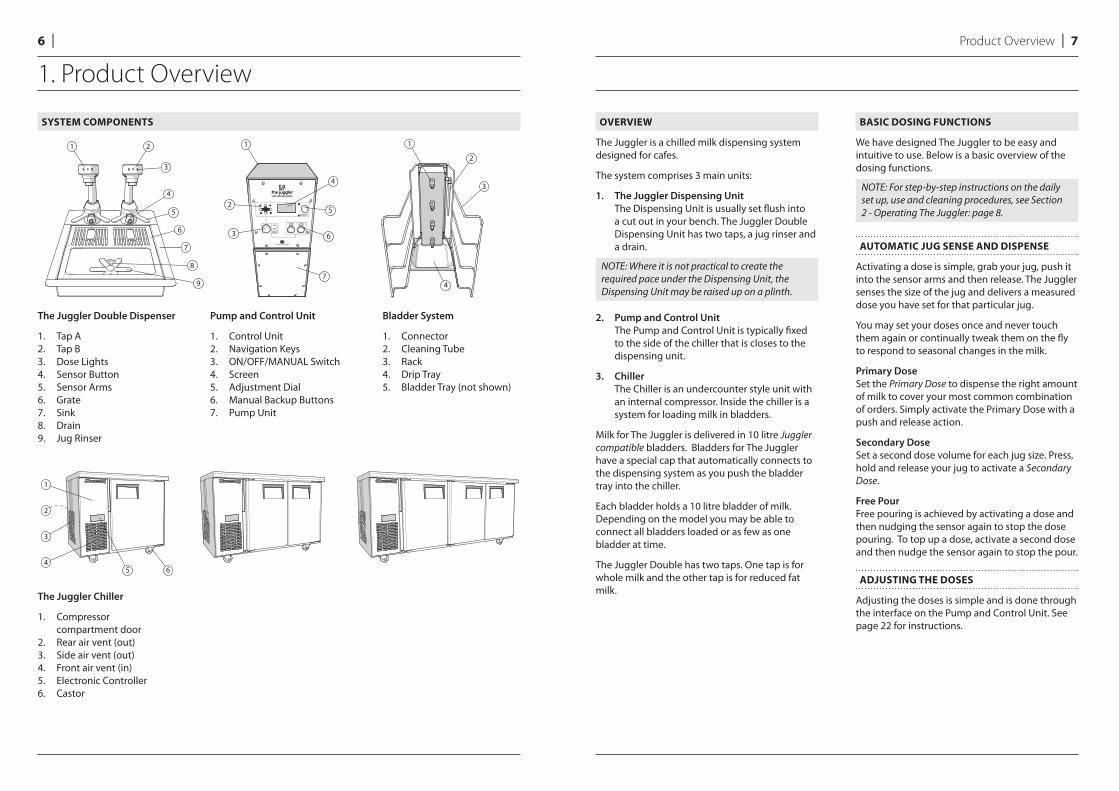
SYSTEM COMPONENTS
The Juggler Double Dispenser
1. Tap A2. Tap B3. Dose Lights4. Sensor Button5. Sensor Arms6. Grate7. Sink8. Drain9. Jug Rinser
Pump and Control Unit
1. Control Unit2. Navigation Keys3. ON/OFF/MANUAL Switch4. Screen5. Adjustment Dial6. Manual Backup Buttons7. Pump Unit
Bladder System
1. Connector2. Cleaning Tube3. Rack4. Drip Tray5. Bladder Tray (not shown)
1. Product Overview
Product Overview l 76 l
The Juggler Chiller
1. Compressor compartment door
2. Rear air vent (out)3. Side air vent (out)4. Front air vent (in)5. Electronic Controller6. Castor
5 6
3
4
1
2
OVERVIEW
The Juggler is a chilled milk dispensing system designed for cafes.
The system comprises 3 main units:
1. The Juggler Dispensing Unit
The Dispensing Unit is usually set fl ush into a cut out in your bench. The Juggler Double Dispensing Unit has two taps, a jug rinser and a drain.
NOTE: Where it is not practical to create the required pace under the Dispensing Unit, the Dispensing Unit may be raised up on a plinth.
2. Pump and Control Unit
The Pump and Control Unit is typically fi xed to the side of the chiller that is closes to the dispensing unit.
3. Chiller
The Chiller is an undercounter style unit with an internal compressor. Inside the chiller is a system for loading milk in bladders.
Milk for The Juggler is delivered in 10 litre Juggler compatible bladders. Bladders for The Juggler have a special cap that automatically connects to the dispensing system as you push the bladder tray into the chiller.
Each bladder holds a 10 litre bladder of milk. Depending on the model you may be able to connect all bladders loaded or as few as one bladder at time.
The Juggler Double has two taps. One tap is for whole milk and the other tap is for reduced fat milk.
BASIC DOSING FUNCTIONS
We have designed The Juggler to be easy and intuitive to use. Below is a basic overview of the dosing functions.
NOTE: For step-by-step instructions on the daily set up, use and cleaning procedures, see Section 2 - Operating The Juggler: page 8.
AUTOMATIC JUG SENSE AND DISPENSE
Activating a dose is simple, grab your jug, push it into the sensor arms and then release. The Juggler senses the size of the jug and delivers a measured dose you have set for that particular jug.
You may set your doses once and never touch them again or continually tweak them on the fl y to respond to seasonal changes in the milk.
Primary Dose
Set the Primary Dose to dispense the right amount of milk to cover your most common combination of orders. Simply activate the Primary Dose with a push and release action.
Secondary Dose
Set a second dose volume for each jug size. Press, hold and release your jug to activate a Secondary Dose.
Free Pour
Free pouring is achieved by activating a dose and then nudging the sensor again to stop the dose pouring. To top up a dose, activate a second dose and then nudge the sensor again to stop the pour.
ADJUSTING THE DOSES
Adjusting the doses is simple and is done through the interface on the Pump and Control Unit. See page 22 for instructions.

Cap correctly
clipped in
Cap NOT correctly
clipped in
Flip centre of
cap open
Twist to remove
centre completly
Cap face down Cap face up
Tray end past
rack end
Tray NOT past
rack end
2. Operating The Juggler
8 l
Before service
Operating The Juggler l 9
DAILY SET-UP PROCEDURE
1. Remove red caps from the black connectors inside the Chiller.
2. Remove, empty and clean the internal drip tray(s). Replace the drip tray(s).
3. Load bladders into trays and remove the centre of the cap.
4. Load the trays into the Chiller, starting at the top position.
NOTE: Push the tray in quickly so milk does not leak from the cap during connection.
IMPORTANT: Ensure the tray is fi rmly pushed past the rack ends. If the tray is not pushed all the way in a bladder may not be connected properly and may leak.
NOTE: If there are partially used bladders from the day before, load these into the top positions so they are used before full bladders loaded in the lower positions.
5. Inspect the internal drip trays for evidence of leaks caused by poorly connected bladders.
6. Turn The Juggler ON at the Control Unit.
7. Use the large jug to activate a dose to prime the system ready for use.
OPERATING MODES
Use the ‘ON-OFF-MANUAL’ switch to select between the following 3 operating modes:
AUTO MODE
The standard ‘ON’ mode for The Juggler. All dosing and programming features are active.
Auto milk dispensing:
ON-OFF-MANUAL Switch must be in the ‘ON’ Position.
1. Push and release a jug into the jug size sensor,
2. A dose set for that size of jug will be dispensed.
OFF MODE
Switches the unit OFF.
MANUAL BACKUP MODE
To be used in the event of a fault. No dosing and programming functions are active.
Manual milk dispensing:
ON-OFF-MANUAL Switch must be in the ‘MANUAL BACKUP' Position.
1. Place a jug under a tap,
2. Press and hold the Manual Backup button on the Control Unit that corresponds with the tap (tap A or tap B). Release the button to stop the fl ow of milk.
BLADDERS
To work well in The Juggler, bladders must:
1. Hold exactly 10L of milk
If overfi lled bladders are forced into the Chiller, they may leak.
2. Contain as little air as possible
If a bladder contains too much air, dosing becomes inconsistent and bubbly as each bladder empties.
NOTE: If a bladder contains a large air bubble, it is possible to manually bleed the air out before loading the bladder into the Chiller.
To do this:1. Place the bladder on a fl at surface with the
cap facing up and remove the centre of the cap,
2. With the cap held so it is higher than the bladder, use a teaspoon to slightly open the valve as you slowly squeeze out the air.
HANDLING BLADDERS
Bladders are tougher than they appear but may develop a leak if handled or stored incorrectly.
When handling bladders, always:1. Carry a bladder using 2 hands;2. Do not carry a bladder by the cap;3. Be careful of sharp objects or edges;4. Be careful not to pinch bladder between tray
and racks when loading.
Small air bubble Large air bubble
Bladder fits well
in tray
Bladder bulges higher
than the top of the tray

2. HOLD
3. RELEASE
1. PUSH
SECONDARY DOSE POURS
RELOADING DURING SERVICE
1. Remove a tray holding an empty bladder. Remove and discard the bladder.
2. Load a new bladder into the tray and load the tray into the Chiller.
RELOADING A 'CONNECT 4' CHILLER
In a 'Connect 4' Chiller, two bladders are usually dedicated to whole milk and two bladders are dedicated to reduced fat milk.
Both bladders of a milk type empty at roughly the same rate. Reload once both bladders are empty.
RELOADING A 'CONNECT 8' CHILLER
In a 'Connect 8' Chiller, four bladders are dedicated to whole milk and four bladders are dedicated to reduced fat milk.
The bladders empty from the top position to the lowest position in an overlapping sequence. Reload when the bladder in the lowest position is almost empty.
BLANKING
The Juggler can be run partially loaded. A red cap must be placed over unused connectors in the BLANK orientation.
IMPORTANT: Never place a red cap in the BLANK orientation on the connectors shown below. When in dispensing mode, these connectors should always have a bladder connected.
!
!!
‘Connect 4’ Chiller
‘Connect 8’ Chiller
Jug straight Jug NOT straight
Jug level Jug NOT level
DISPENSING MILK
PRIMARY DOSING
Select a jug and activate a dose using the sensor with a PUSH/RELEASE action.
NOTE: The dose starts pouring as you release the jug.
SECONDARY DOSING
Select a jug and activate a dose using the sensor with a PUSH+HOLD/RELEASE action.
NOTE: When activating the SECONDARY DOSE, hold the jug in until you see light(s) turn on in the tap. The dose starts pouring as you release the jug.
MANUAL DOSING
Manually top-up or cancel a dose with a PUSH/RELEASE action.
CORRECT DOSING ACTION
To ensure the correct dose is activated (or cancelled) for a particular size jug, the jug must be pushed in straight and level so that it makes contact with both sensor arms.
LIGHTS
Lights in the tap confi rm the correct dose has been activated for the jug size you are using:
1 Light Small Jug Small Dose
2 Lights Medium Jug Medium Dose
3 Lights Large Jug Large Dose
Solid light(s) confi rm the PRIMARY DOSE for that jug size has been selected.
Flashing light(s) confi rm the SECONDARY DOSE for that jug size has been selected.
Operating The Juggler l 11
During Service
10 l Operating The Juggler
Wholemilk
Reducedfat milk
Whole milk Reduced fat milk
PRIMARY DOSE POURS
1. PUSH 2. RELEASE
Red cap on black connector
and bladder flipped on back
Red cap NOT on black connector
and bladder NOT flipped on back
Operating The Juggler l 13
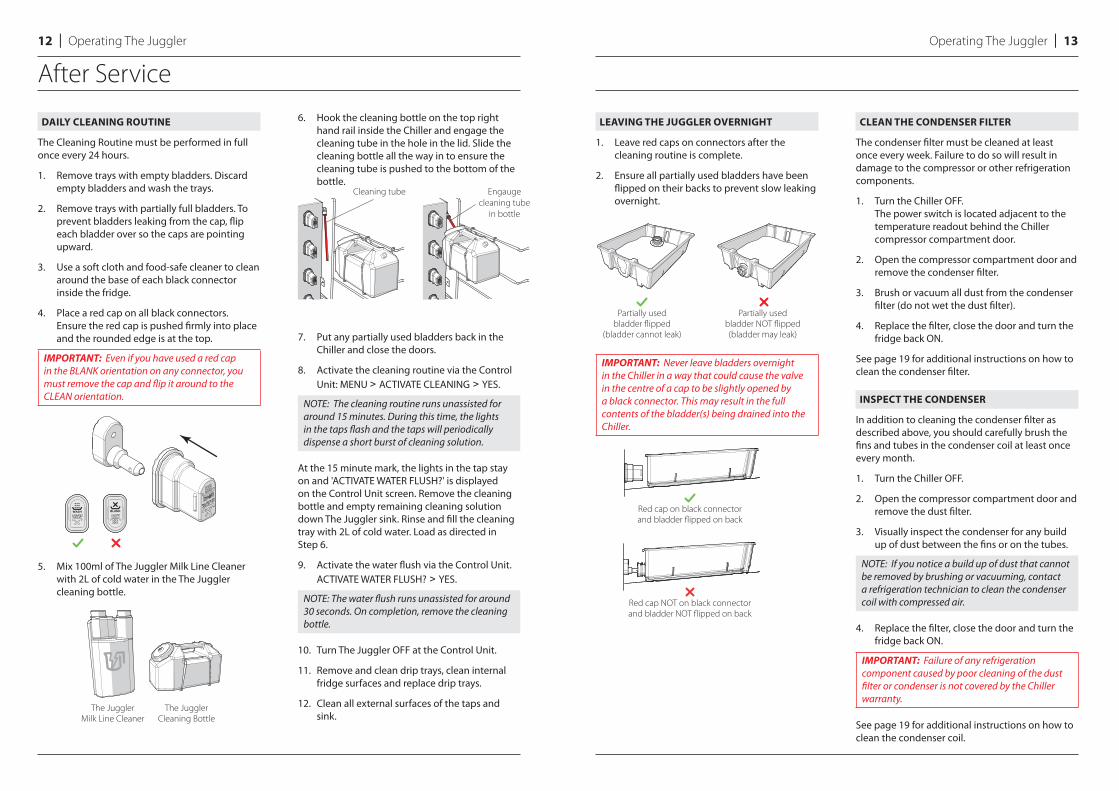
LEAVING THE JUGGLER OVERNIGHT
1. Leave red caps on connectors after the cleaning routine is complete.
2. Ensure all partially used bladders have been fl ipped on their backs to prevent slow leaking overnight.
IMPORTANT: Never leave bladders overnight in the Chiller in a way that could cause the valve in the centre of a cap to be slightly opened by a black connector. This may result in the full contents of the bladder(s) being drained into the Chiller.
CLEAN THE CONDENSER FILTER
The condenser fi lter must be cleaned at least once every week. Failure to do so will result in damage to the compressor or other refrigeration components.
1. Turn the Chiller OFF.The power switch is located adjacent to the temperature readout behind the Chiller compressor compartment door.
2. Open the compressor compartment door and remove the condenser fi lter.
3. Brush or vacuum all dust from the condenser fi lter (do not wet the dust fi lter).
4. Replace the fi lter, close the door and turn the fridge back ON.
See page 19 for additional instructions on how to clean the condenser fi lter.
INSPECT THE CONDENSER
In addition to cleaning the condenser fi lter as described above, you should carefully brush the fi ns and tubes in the condenser coil at least once every month.
1. Turn the Chiller OFF.
2. Open the compressor compartment door and remove the dust fi lter.
3. Visually inspect the condenser for any build up of dust between the fi ns or on the tubes.
NOTE: If you notice a build up of dust that cannot be removed by brushing or vacuuming, contact a refrigeration technician to clean the condenser coil with compressed air.
4. Replace the fi lter, close the door and turn the fridge back ON.
IMPORTANT: Failure of any refrigeration component caused by poor cleaning of the dust fi lter or condenser is not covered by the Chiller warranty.
See page 19 for additional instructions on how to clean the condenser coil.
After Service
12 l Operating The Juggler
DAILY CLEANING ROUTINE
The Cleaning Routine must be performed in full once every 24 hours.
1. Remove trays with empty bladders. Discard empty bladders and wash the trays.
2. Remove trays with partially full bladders. To prevent bladders leaking from the cap, fl ip each bladder over so the caps are pointing upward.
3. Use a soft cloth and food-safe cleaner to clean around the base of each black connector inside the fridge.
4. Place a red cap on all black connectors. Ensure the red cap is pushed fi rmly into place and the rounded edge is at the top.
IMPORTANT: Even if you have used a red cap in the BLANK orientation on any connector, you must remove the cap and fl ip it around to the CLEAN orientation.
5. Mix 100ml of The Juggler Milk Line Cleaner with 2L of cold water in the The Juggler cleaning bottle.
6. Hook the cleaning bottle on the top right hand rail inside the Chiller and engage the cleaning tube in the hole in the lid. Slide the cleaning bottle all the way in to ensure the cleaning tube is pushed to the bottom of the bottle.
7. Put any partially used bladders back in the Chiller and close the doors.
8. Activate the cleaning routine via the Control Unit: MENU > ACTIVATE CLEANING > YES.
NOTE: The cleaning routine runs unassisted for around 15 minutes. During this time, the lights in the taps fl ash and the taps will periodically dispense a short burst of cleaning solution.
At the 15 minute mark, the lights in the tap stay on and 'ACTIVATE WATER FLUSH?' is displayed on the Control Unit screen. Remove the cleaning bottle and empty remaining cleaning solution down The Juggler sink. Rinse and fi ll the cleaning tray with 2L of cold water. Load as directed in Step 6.
9. Activate the water fl ush via the Control Unit. ACTIVATE WATER FLUSH? > YES.
NOTE: The water fl ush runs unassisted for around 30 seconds. On completion, remove the cleaning bottle.
10. Turn The Juggler OFF at the Control Unit.
11. Remove and clean drip trays, clean internal fridge surfaces and replace drip trays.
12. Clean all external surfaces of the taps and sink.
Cleaning tube Engauge
cleaning tube
in bottle
The Juggler
Milk Line Cleaner
The Juggler
Cleaning Bottle
Partially used
bladder flipped
(bladder cannot leak)
Partially used
bladder NOT flipped
(bladder may leak)

3. System Settings
System Settings l 1514 l
THE JUGGLER DISPENSER
Changing settings that relate to the operation of the dispenser is performed through the interface on the Control Unit.
The Juggler controller is pre-programmed so most settings do not need to be changed.
Settings you will need to change are:1. Primary and secondary dose volumes,2. Jug size calibration.
ADJUSTING DOSES
ADJUST PRIMARY DOSES
'INDIVIDUAL DOSE ADJUST' sets a Primary Dose for each jug size. Set the primary dose to suit your most common combination of orders.
How to change the Primary Doses:
1. Press to enter MENU.
2. Use to INDIVIDUAL DOSE ADJ and press to enter.
3. Use to select Tap A: Small, Medium or Large doses; or Tap B: Small, Medium or Large doses.
4. Use ADJUST Dial to enter desired dose time displayed in seconds.
5. Press to the SIX SIMPLE MACHINES screen to save changes and exit.
ADJUST SECONDARY DOSES
‘Adjust secondary doses’ allows you to set a second dose volume for each jug size.
How to change the Primary Doses:
1. Press to enter MENU.
2. Use to ADVANCED and press to enter.
3. Use to ADJUST SECONDARY DOSES and press to enter.
4. Use to select Tap A: Small, Medium or Large doses; or Tap B: Small, Medium or Large doses.
5. Use ADJUST Dial to enter desired dose time displayed in seconds.
6. Press to the SIX SIMPLE MACHINES screen to save changes and exit.
JUG CALIBRATION
Variations in jug design and manufacturing tolerances mean that the factory set SMALL, MEDIUM and LARGE values may not work for all jugs. In this case the sensor may need re-calibrating to trigger the correct doses.
NOTE: Some jugs may be outside of the sensor's range and will be unusable with The Juggler. This is usually only true for jugs with unusually large diameters at the base.
ACCESSING THE HIDDEN SETUP MENU
In order to calibrate the jugs you need to use the hidden SETUP menu.
To display the Technical Support Menu:
1. Switch The Juggler to OFF using the 'ON-OFF-MANUAL' switch on the Control module.
2. With The Juggler OFF, press and hold the UP and DOWN navigation keys.
3. Switch The Juggler to the ON position.
4. Wait to see 'DEBUG MODE' appear briefl y on the screen, then release the UP and DOWN navigation keys.
WARNING: We do not recommend changing any other settings in the SETUP menu.
CALIBRATING THE JUGS
1. Press to SETUP.
2. Use to JUG SIZES and press to enter.
3. Use to scroll through: HEAD A: Small, Medium, Large, and HEAD B: Small Medium, Large.
4. Starting with Tap A: Small, push and hold a small jug into the Jug Size Sensor. Ensure the jug is being pushed in straight and level.
5. Take note of the ADC value being displayed. If the ADC value is within about 5 units of the JUG SIZE SETTING displayed, no further adjustment is necessary (skip Step 6).
6. If the ADC value is more than about 5 units greater or less than the JUG SIZE SETTING displayed, use the ADJUST dial to change the JUG SIZE SETTING to match the ADC value being displayed.
7. Release the Jug. The ADC value should return to zero. The small jug is now calibrated.
8. Use to scroll to the next jug size.
9. To save the new calibration settings use to the SIX SIMPLE MACHINES screen.
10. Switch the Juggler OFF and back ON to hide the 'SETUP' menu.
IMPORTANT: Do not set the Large JUG SIZE SETTING less than 21 (i.e. it must be 21 or larger).
IMPORTANT: Each JUG SIZE SETTING must be at least 41 units away from it's neighbour (i.e. if the Large jug is set at 40, the Medium jug must be 81 or more).
ACCESSING THE HIDDEN SETUP MENU
In order to calibrate the jugs you need to use thehidden SETUP menu.
To display the Technical Support Menu:
Menu with SETUP hidden
Menu with SETUP revealed
CALIBRATING THE JUGS
1. Jug Size Setting Value
2. Head/Jug Size Selection
3. ADC Value
1
2
3
System Settings l 1716 l System Settings
THE JUGGLER CHILLER
Changing settings that relate to the operation of the Chiller is performed through the electronic controller.
The electronic controller is visible through a cut-out in the front panel. It controls and displays the cabinet interior temperature and signals temperature alarms. It uses temperature probes around diff erent areas of the refrigeration system to collect data and runs the cabinet accordingly .
The electronic controller is pre-programmed and requires no initial setup or additional programming. We do not recommend that the settings be changed unless it is absolutely necessary.
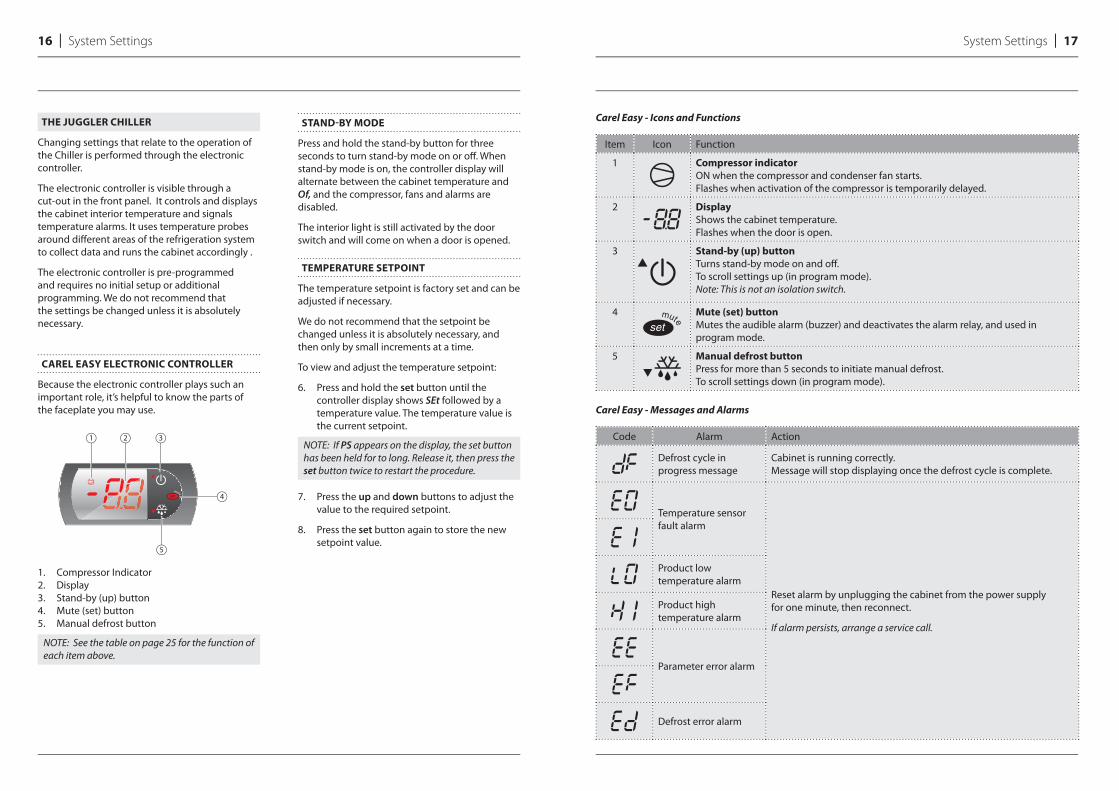
CAREL EASY ELECTRONIC CONTROLLER
Because the electronic controller plays such an important role, it’s helpful to know the parts of the faceplate you may use.
1. Compressor Indicator2. Display3. Stand-by (up) button4. Mute (set) button5. Manual defrost button
NOTE: See the table on page 25 for the function of each item above.
STAND-BY MODE
Press and hold the stand-by button for three seconds to turn stand-by mode on or off . When stand-by mode is on, the controller display will alternate between the cabinet temperature and Of, and the compressor, fans and alarms are disabled.
The interior light is still activated by the door switch and will come on when a door is opened.
TEMPERATURE SETPOINT
The temperature setpoint is factory set and can be adjusted if necessary.
We do not recommend that the setpoint be changed unless it is absolutely necessary, and then only by small increments at a time.
To view and adjust the temperature setpoint:
6. Press and hold the set button until the controller display shows SEt followed by a temperature value. The temperature value is the current setpoint.
NOTE: If PS appears on the display, the set button has been held for to long. Release it, then press the set button twice to restart the procedure.
7. Press the up and down buttons to adjust the value to the required setpoint.
8. Press the set button again to store the new setpoint value.
Carel Easy - Icons and Functions
Item Icon Function
1 Compressor indicator
ON when the compressor and condenser fan starts. Flashes when activation of the compressor is temporarily delayed.
2 Display
Shows the cabinet temperature. Flashes when the door is open.
3 Stand-by (up) button Turns stand-by mode on and off . To scroll settings up (in program mode).Note: This is not an isolation switch.
4 Mute (set) button
Mutes the audible alarm (buzzer) and deactivates the alarm relay, and used in program mode.
5 Manual defrost button
Press for more than 5 seconds to initiate manual defrost. To scroll settings down (in program mode).
Carel Easy - Messages and Alarms
Code Alarm Action
Defrost cycle in progress message
Cabinet is running correctly. Message will stop displaying once the defrost cycle is complete.
Temperature sensor fault alarm
Reset alarm by unplugging the cabinet from the power supply for one minute, then reconnect.
If alarm persists, arrange a service call.
Product low temperature alarm
Product high temperature alarm
Parameter error alarm
Defrost error alarm
1 2 3
5
4
4. Maintenance
Maintenance l 1918 l
Item Frequency
Surface cleaning Daily
Flush and Sanitise milk lines Daily
Deep Clean 6 monthly intervals
Clean Chiller condenser fi lter At least once per week
Clean Chiller condenser coil Brush clean: Once a month
Blow clean: 6 monthly intervals
CLEANING
Stainless Steel surfaces are easily scratched by poor cleaning practices. Proper cleaning of stainless steel requires soft cloths. Never use scourers, steel pads, wire brushes or scrapers.
The black parts on the taps are anodised aluminium. Like the stainless steel components, they are easily scratched by poor cleaning practices. They are also easily damaged by certain cleaning chemicals. Clean the taps with a mild solution of soapy water, rinse with clean water and dry thoroughly.
Wipe both the interior and exterior of the chiller cabinet with a damp cloth.
IMPORTANT: Ensure the cabinet is unplugged from the mains power supply before cleaning the Chiller cabinet with water.
FLUSH AND SANITISE MILK LINES
Refer to page 20 for instructions on how to run the Daily Cleaning Routine.
DEEP CLEAN
The Deep Clean procedure is performed by a qualifi ed service technician.
Contact Six Simple Machines to arrange for a Six Simple Machines authorised service agent to perform the Deep Clean.
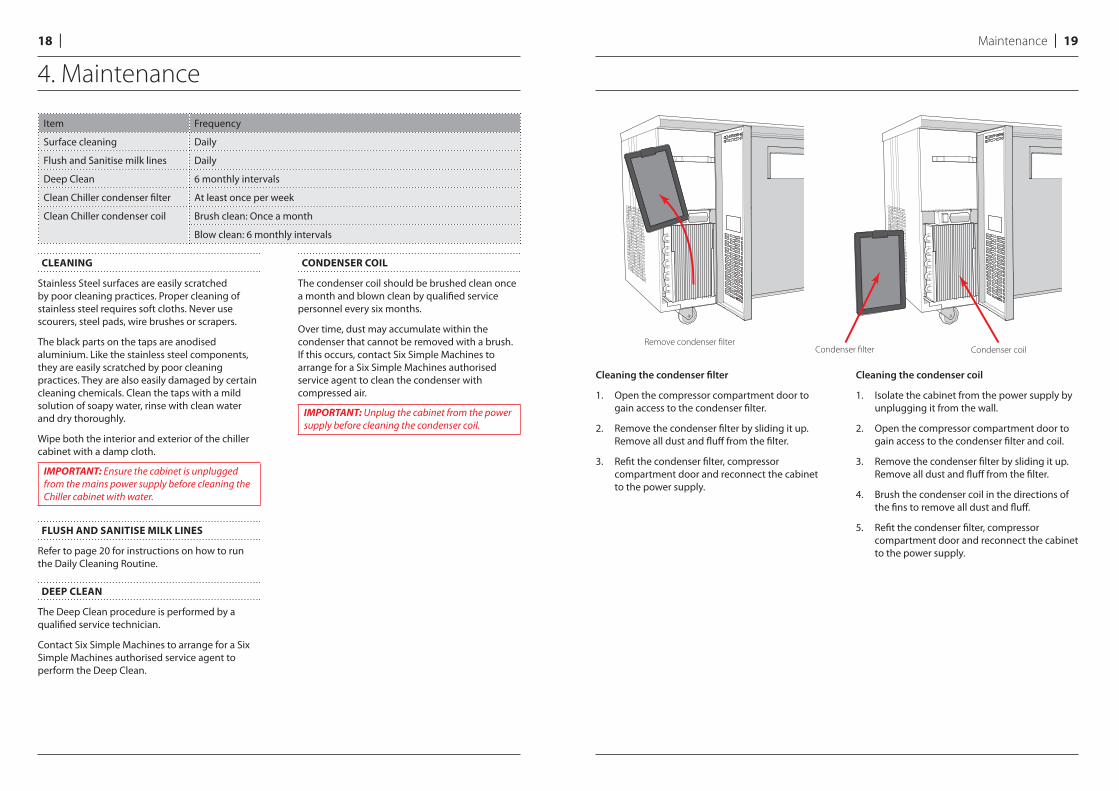
CONDENSER COIL
The condenser coil should be brushed clean once a month and blown clean by qualifi ed service personnel every six months.
Over time, dust may accumulate within the condenser that cannot be removed with a brush. If this occurs, contact Six Simple Machines to arrange for a Six Simple Machines authorised service agent to clean the condenser with compressed air.
IMPORTANT: Unplug the cabinet from the power supply before cleaning the condenser coil.
Cleaning the condenser fi lter
1. Open the compressor compartment door to gain access to the condenser fi lter.
2. Remove the condenser fi lter by sliding it up. Remove all dust and fl uff from the fi lter.
3. Refi t the condenser fi lter, compressor compartment door and reconnect the cabinet to the power supply.
Cleaning the condenser coil
1. Isolate the cabinet from the power supply by unplugging it from the wall.
2. Open the compressor compartment door to gain access to the condenser fi lter and coil.
3. Remove the condenser fi lter by sliding it up. Remove all dust and fl uff from the fi lter.
4. Brush the condenser coil in the directions of the fi ns to remove all dust and fl uff .
5. Refi t the condenser fi lter, compressor compartment door and reconnect the cabinet to the power supply.
Remove condenser filterCondenser filter Condenser coil

5. Troubleshooting
20 l
Issue Possible Cause Solution
The system does not turn on Power point is switched off Turn on power
Power cord is loose or disconnected Check both ends of cord
No power available to the unit Check cafe circuit breakers
Possible internal fault Contact Service Agent
Jug(s) will not activate/cancel a dose Activation action incorrect See Page 10 of this guide
Jug(s) not correctly calibrated Contact Service Agent
Audible 'gurgling' sound but no milk is dispensed (in Dispensing Mode)
Red caps are being used incorrectly See Page 11 (Blanking) of this guide
Bladder(s) not connected correctly See Page 9 (step 3) of this guide
Audible 'gurgling' sound but no cleaning solution is dispensed (in Cleaning Mode)
Red caps are being used incorrectly See Page 12 (step 4) of this guide
Incorrect dose is activated by a jugi.e. Medium jug activates a Large dose
Activation action incorrect See Page 10 of this guide
Jug(s) not correctly calibrated See Page 15 or Contact Service Agent
A dose volume is constantly incorrect Dose is set incorrectly See Page 14
A dose volume is occasionally less than usual and 'bubbly'
Small pockets of air in bladders Use manual top-up feature for the few doses this may aff ect
Prolonged 'bubbly' dosing Large pockets of air in bladders Report the issue to your milk companyNote: It is possible to remove air before loading a bladder into The Juggler. Method: Use a straw or something similar to open the valve, then squeeze the bladder to expel the air.
'Bubbly' dosing after a minute or longer pause between doses
Foreign matter in caught in valve(s) Contact Service Agent for instructions on how to fl ush a blockage out
Milk in fridge (During Service) Bladder(s) not connected correctly See Page 9 (step 3) of this guide
Red caps are being used in the BLANK orientation on connectors where this is not allowed
See Page 11 (Blanking) of this guide
Leaking bladder caused by poor handling or loading
See Page 8 (Bladders) andPage 9 (step 3) of this guide
Leaking bladder caused in transit Contact your milk company
Milk in fridge (After Service) Partially fi lled bladders being stored incorrectly
See Page 13 (step 2) of this guide
Leaking bladder caused by poor handling or loading
Page 9 (Bladders) of this guide
Leaking bladder caused in transit Contact your milk company
Below are some possible issues and suggested solutions. For any issue that is not listed, or if the issue persists, please contact your service agent. Or, visit our website to view training videos.

At Six Simple Machines we are always looking for ways to improve our products.The illustrations in this guide may differ slightly from the actual product.
Patent Pending l Made in AustraliaD00059.2 A01 l © 2016 SIX SIMPLE MACHINES Pty Ltd