the jamaica rural economy and ecosystem adapting …
TRANSCRIPT

Ja REEACH – COCOA NURSERY MANUAL (PART 1) 1
THE JAMAICA RURAL ECONOMY AND ECOSYSTEM
ADAPTING TO CLIMATE CHANGE (JA REEACH) PROJECT
COCOA NURSERY MANUAL (PART 1)
February 2013
This publication was produced by ACDI/VOCA for review by the United States Agency for International
Development.

Ja REEACH – COCOA NURSERY MANUAL (PART 1) 2
JAMAICA RURAL ECONOMY AND ECOSYSTEM
ADAPTING TO CLIMATE CHANGE (JA REEACH)
PROJECT
COCOA NURSERY MANUAL (PART 1)
(FEBRUARY 2013)
AGREEMENT #: 532-A- 00-08-00006-00
Prepared for: USAID/Jamaica
142 Old Hope Road Kingston 6
ACDI/VOCA
Unit E 23 Lady Musgrave Road
Kingston 6
Tel: (876) 946-1602/3 Fax: (876) 946-1604
Government of Jamaica
Cocoa Industry Board Hope Gardens
Kingston 6
Prepared by: Sheldon Scott Consultant

Ja REEACH – COCOA NURSERY MANUAL (PART 1) 3
Table of Contents
ACKNOWLEDGEMENTS ...........................................................................................................6
SITE SELECTION CRITERIA .....................................................................................................7
NURSERY CONSTRUCTION AND DESIGN ..............................................................................7
Nursery Layout .................................................................................................................................. 8
Types of Designs .............................................................................................................................. 9
Design Considerations .................................................................................................................... 11
Nursery Materials ............................................................................................................................ 12
Site Preparation .............................................................................................................................. 12
Water Supply .................................................................................................................................. 13
Nursery Drainage System................................................................................................................ 13
Tools, Equipment and Materials for Nursery Operations .................................................................. 14
Instruments and Their Use .............................................................................................................. 15
Planting Media ................................................................................................................................ 16
Selection of Potting Bags ................................................................................................................ 17
Sexual/Seed Propagation ................................................................................................................ 18
Seed Selection ................................................................................................................................ 18
Seed Preparation ............................................................................................................................ 18
Seed Pre-Germination ..................................................................................................................... 19
Planting of Pre-Germinated Seeds .................................................................................................. 19
Culling of Seedling .......................................................................................................................... 19
Vegetative Propagation ................................................................................................................... 20
Super Trees .................................................................................................................................... 21
Clonal Garden ................................................................................................................................. 22
Fine and Flavoured Varieties ........................................................................................................... 22
Selection of Rootstock ..................................................................................................................... 23
Selection of Scion (Bud Wood) ........................................................................................................ 23
BASAL Grafting/Top Grafting/Cleft Graft .......................................................................................... 24
Terminal Hypocotyl Grafting (Micro-Grafting) ................................................................................... 25 Materials ............................................................................................................................ 25
Micro-Grafting Grafting Procedures ................................................................................................. 26
Side Grafting ................................................................................................................................... 26
Benefits of Grafting.......................................................................................................................... 27
Patch Budding ................................................................................................................................. 28 Stem Cuttings ................................................................................................................................. 28

Ja REEACH – COCOA NURSERY MANUAL (PART 1) 4
Selecting Grafted Plant .................................................................................................................... 29
Integrated Pest Management........................................................................................................... 30
Common Pest and Seedling Disease Problems ............................................................................... 31
Damping-Off .................................................................................................................................... 31
Evaluation for Black Pod ................................................................................................................. 31
Chemical Control of Nursery Pests .................................................................................................. 31
Chemical Control of Nursery Diseases ............................................................................................ 32
Plant Nutrients And Deficiency Symptoms ....................................................................................... 33 ENVIRONMENTAL HYGIENE ..................................................................................................34
Nursery Waste Disposal .................................................................................................................. 34
Storage of Chemicals ...................................................................................................................... 34
Safety ............................................................................................................................................. 35
Records .......................................................................................................................................... 35
Hygiene........................................................................................................................................... 36
Environmental ................................................................................................................................. 36
Pesticide Usage .............................................................................................................................. 36
Protective Clothing, Their Use and Function and Safe Use and Handling of Pesticides .................... 36
First Aid Tips ................................................................................................................................... 37
Safety Equipment ............................................................................................................................ 38
Application of Chemicals ................................................................................................................. 39
NURSERY MANAGEMENT ......................................................................................................40
Quality Control and Management .................................................................................................... 40
Records .......................................................................................................................................... 41
Check List ....................................................................................................................................... 42
APPENDICES
Appendix 1: Do‟s and Don‟ts of Grafting................................................................................................. 43
Appendix 2: Standards/Indicators of Average Production Efficiency ....................................................... 44
Appendix 3: Technical Terms Used........................................................................................................ 45
Appendix 4: Computing SEEDS to SEEDLING Ratio ............................................................................. 47
Appendix 5: Picture of ICS Varieties ...................................................................................................... 47
BIBLIOGRAPHY ......................................................................................................................51 FIGURES
Figure 1: Igloo style, Steel Framed Nursery ...................................................................................... 9
Figure 2: PVC Framed Structure....................................................................................................... 9 Figure 3: Green House Design ....................................................................................................... 10

Ja REEACH – COCOA NURSERY MANUAL (PART 1) 5
Figure 4: Simple Structure .............................................................................................................. 10
Figure 5: Wooden Framed Structure ............................................................................................... 10
Figure 6: Wooden Framed Structure Covered ................................................................................. 11
Figure 7: Inside a Completed Structure ........................................................................................... 11
Figure 8: Layout of Nursery ............................................................................................................ 12
Figure 9: Drainage System ............................................................................................................. 14
Figure 10: Illustration of Root Disorder.............................................................................................. 17
Figure 11: Black Polythene Plastic.................................................................................................... 18
Figure 12: Rootstock ........................................................................................................................ 20
Figure 13: Scion ............................................................................................................................... 21
Figure 14: Labeled IMC 67 Plant ...................................................................................................... 23
Figure 15: Size of Plant Selected for Grafting ................................................................................... 25
Figure 16-19: Scalpel Used for Grafting ................................................................................................. 26
Figure 20: Prepared Scion ................................................................................................................ 27
Figure 21: Insertion of scion ............................................................................................................. 27
Figure 22: Side Grafted Rootstock .................................................................................................... 27
Figure 23: Secured Bud Wood.......................................................................................................... 27
Figure 24: Removal of Bark and Rootstock ....................................................................................... 28
Figure 25: Bud Patch from Scion ...................................................................................................... 28
Figure 26: Insertion of bud Patch ...................................................................................................... 28
Figure 27: Bound Union.................................................................................................................... 28

Ja REEACH – COCOA NURSERY MANUAL (PART 1) 6
Acknowledgements This manual contains the thought, ideas and suggestions of many prominent individual in the Nursery/Agricultural industry. Deep appreciation is extended to: Wayne Ganpat, Don McGlashan, Dennis Buddo, Frances Bekele, Joseph Johnson, Locksley Waites, Clifton Wilson, Fernis Edwards, Dianne Dormer for their technical expertise in various aspects of nursery management, also for granting permission to reproduce photographs, charts and other illustrations. Special thanks to Cocoa Industry Board, Rural Agricultural Development Authority, Bureau of Standard, Jamaica Cocoa Farmers Association for their input. They bear no responsibility at all for any errors you may find. Sheldon Scott
Consultant Special thanks to the sponsor, ACDI-VOCA, Jamaica

Ja REEACH – COCOA NURSERY MANUAL (PART 1) 7
Site Selection Criteria
Proper Site selection is a key influence for profitability and sustainability of nursery facility. The minimum area for plant production should be 1600 square meters i.e. 30m x 20 m or similar. This can accommodate about 24,000 plants. A good bag density and lining of bags, is about 40 plants per square metre of nursery floor. Additional area (about 5%) for potting mix preparation, bag filling, and grafting operations and so on is required. Environmental conservation and the preservation of flora, fauna and wildlife are also of great concern. 1. The site must be easily accessed by road and services such telecommunication, labour,
markets and security should be available.
2. Site should be well drained and not prone to flooding and protected from wind.
3. Entry and exit points should be easily identified and controlled.
4. The site must have a good supply of fresh water, not salty at any time.
5. The nursery must be reasonably close to cocoa growing areas.
6. The nursery area should be fenced off.
7. The nursery should be 100 metres or more from existing cocoa trees
8. A buffer zone of 10M should be maintained and a safe distance between rivers or tributaries maintained.
9. Nursery should be oriented in East to west direction depending on topography.
10. Locations that have a high water table or the potential for water logging should be avoided.
11. Should not be close to the ocean.
12. Site should provide ease of vehicular movement and allow for potential expansion.
Nursery Construction and Design The most basic function of the nursery is to provide an environment that allows cocoa seedlings to develop quickly, into healthy plants ready for field planting. The nursery must provide: Protection from sun (70% shade is best i.e. 30% of full sunlight), wind and rain;
Water and nutrients frequently, and in response to plant growth needs;
Protection from pests, diseases and weeds;
1 Smaller nursery areas than this tend to have problems such as: poor growth, harder to control pest, diseases
and shade, not enough space for working in, access through the nursery is difficult and uneven growth pattern

Ja REEACH – COCOA NURSERY MANUAL (PART 1) 8
Nursery Layout

Ja REEACH – COCOA NURSERY MANUAL (PART 1) 9
Types of Designs Style would depend on economics, location and topography, some designs includes: Gable stand alone or ridge and furrow Arched stand alone or multi bays Igloo style Quonset Gothic Ridge/eave A-frame
Figure 1: Igloo style, steel framed nursery
Figure 2: PVC framed structure

Ja REEACH – COCOA NURSERY MANUAL (PART 1) 10
Figure 3: Green house design
Figure 4: Simple Structure
Figure 5: Wooden Framed Structure

Ja REEACH – COCOA NURSERY MANUAL (PART 1) 11
Figure 6: Wooden Framed Structure Covered
Design Considerations At least 40% ventilating area;
As tall a height as possible 10 ft recommended;
Controllable air movement and exchange capacity;
Appropriate covering with 70 % artificial shading;
Adjustable side and end ventilating areas;
Oriental of unit in conjunction with wind movement;
Arrange in east to west where possible;
25-28 degree Celsius temperature; and
75-80 % relative humidity.
Figure 7: Inside a Completed Structure

Ja REEACH – COCOA NURSERY MANUAL (PART 1) 12
Figure 8: Layout of Nursery
Nursery Materials For smaller units, log posts, PVC plastic pipes, and wire may be used to make the frame Timber posts is susceptible to termites and rotting. For a longer lasting nurseries and commercial type operations, steel posts embedded in concrete, with a wire frame or steel tubing framework. In all cases, green or black shade cloth with 30% sunlight strength is used i.e. 70% shaded. The shade cloth must cover all sides of the nursery.
Type Lifespan Remarks
Bamboo Short Term The time bamboo last is influence by time it was cut (dark night recommended)
PVC piping Medium term Recommended for small units
Glyricidia and Erythrina
Short term (less than 12 months)
Require regular pruning (not recommended)
Concrete post Long term (5 years) Most suitable
Steel Long term (3-10 years) Depends on material and location
Log post (treated) Medium term (5 years) Weather pattern and location is a factor
Site Preparation Remove trees, debris, and other obstacles;
Level area;
Install effective drainage system;
Design layout, check for area and specifications, plan for storage, budding and grafting area, meeting, mixing and staff quarter and restroom facilities;
Line out nursery beds, potting, grafting tents;
Mark out positions and install nursery poles;

Ja REEACH – COCOA NURSERY MANUAL (PART 1) 13
Provide 2m access path through center for easy access and operations;
Building should be designed to suit type and size of operation;
Mark out the four corners, the entrance, the fence line and water supply inlet;
Construct nursery framework (cross members, wire);
Install shade material- side to side and roof. Use moveable wire frame or similar;
Construct grafting tents OR plastic covers;
Make grafting/ budding tables or benches for staff doing budding/ grafting;
Hardening off area; and
An even distribution of gravel with 8cm thickness maybe considered.
Water Supply This needs to be permanent or readily available, and of sufficient quantity and good quality. To estimate your maximum water needs, use the following rule: Number plants x volume each bag x 0.05 = litres water per day maximum required. So for 25,000 bags with 1.8 L volume, watered twice per day with 5% volume watered, we need about 2250 litres of water per day. This is about 225 buckets of water, or about 20 minutes with a pump and hose. For only one irrigation per day, half this amount. Water quality to be tested; pH range desired = 5.5 – 6.5 Install irrigation supply pipe and hoses for watering. The design capacity of the storage pond should, at minimum, be equivalent to 4 months water supply based on an average daily water requirement of 1 litre per plant per day. Good quality water is necessary to produce quality, healthy plants. The simplest indicator of water quality is the electrical conductivity, measured with a simple conductivity meter. The reading should be less than 700 micro Siemens per centimetre (uS/cm) for cocoa seedling irrigation. This is equal to about 0.5 g salt / litre of water. If water greater than this level of conductivity is used, salts will accumulate on plant leaves and in the potting mix, leading to death ultimately.
Nursery Drainage System
Good drainage network: Assists in nutrient absorption;
Promotes effective water movement;
Prevent erosion or removal of topsoil;

Ja REEACH – COCOA NURSERY MANUAL (PART 1) 14
Facilitate the desired water movement necessary to maintain field capacity;
Drain water away from the nursery site;
Provides moisture control (humidity control);
Makes it easier to move around and work inside the nursery; and
Reduce incidence of soil borne, water borne pest and disease. The drainage network consists of surface trenches that are geared towards removing floodwater and must be designed during the nursery construction phase, not after the nursery it is built and drainage becomes a problem. Another way to improve drainage is to have raised nursery beds. These can be built up using layers of crushed stone, or having steel racks to hold pots on. Both these methods are more expensive, but may be suitable for long term nurseries. Drains should be strategically constructed at least 1 m from building foundation in order to collect and remove water from roof and prevent water from entering structure.
Figure 9: Drainage system
Tools, Equipment and Materials for Nursery Operations Disposable scalpel
Bio-degradable plastic tape
Alcohol
Grafting knives
Secateurs
Knapsack sprayer
Pesticides
Fertilizer
Irrigation system/watering can
Poly bags
Labels
Plastic (for solarization)
Measuring tape
Respirator
Cover all
Goggles

Ja REEACH – COCOA NURSERY MANUAL (PART 1) 15
Hard hats
Gloves
Hard boots
Stationeries
Pruning shears
Plant media
Shovel
Wheel borrow
Commercial Soil Sterilizer
First Aid kit
Cement mixer(optional)
Instruments and Their Use
Instrument Type Purpose
Anemometers
Measures speed and direction of wind.
Used in determining ideal orientation of structures.
Used to measure level of wind movement and air circulation.
Used to estimate evapo-transpiration potential of crop growing environment.
Light Meters
Measures the amount of light entering the crop growing environment.
Light is essential to the process of photosynthesis which is the basis of plant growth and food production.
Measured in Lux (l) and Foot Candles (fc) 10.76 lux =1 foot candle.
Crop production requires 3000 - 4000 fc.
Jamaican environment exhibits 10,000 – 12,000 fc at peak illumination around noon.
Jamaica‟s issue is therefore, excess light.
Tensiometers/ Lysimeters
Provides a direct measure of the tension at which water is held in the growing media.
Indicates the suction pressure plant roots need to exert in order to extract water.
Comprises vacuum gauge, water filled tube sealed at one end and a porous ceramic filter at other end. When buried in media the filter tip will allow water and not air to flow freely.
Suction of water in tube = tension at which water is being held by surrounding media.
Calculator converts pressure (< 0.9 bars) to soil moisture deficit (mm).
Thermometer
Records temperature of the Crop growing environment. ( Ideally 22-250C
in tropics)
Temperature affects nutrient uptake, plant growth, pollination, and fruit set and fruit quality.
Located at centre of house at plant level, protected from direct sunlight.
Temperature should be read and recorded at least once per day.
pH/EC Meters
Measures the reaction (acidity or basicity) of the plant nutrient solution and media.
Scale of 0 - 14; 0-6 = Acid reaction 7=Neutral reaction 8-14 = Basic reaction.
pH too acid = Macro nutrient unavailable

Ja REEACH – COCOA NURSERY MANUAL (PART 1) 16
The recommended formula for
preparing on farm mix is as follows:
2 part top soil(preferably sand loam
soil);
1 part organic matter;
1 part sand;
5 grams 10-30-10 fertilizer per
kilogram of potting mix;
Enough sawdust or rice husks to
cover potting mix in bag for each
seedling up to 2 cm.
Instrument Type Purpose
pH too basic = Micronutrient unavailable.
Ideal pH for maximum availability of nutrients ranges between 5.5 –6.5.
To Lower pH – Nitric or Phosphoric Acids
To Increase pH – Calcium or Potassium Carbonate
Should be monitored and recorded at least twice per day.
Hygrometers
Measures the amounts of moisture (humidity) present in the air inside the nursery.
Relative humidity (RH) affects pollination and disease infestation.
Pollination requires RH of 60-80%.
Disease Infestation encouraged at RH > 90% under high temperature conditions
Fungal spores require water to germinate and infect plant tissues.
Planting Media
Selection of planting medium would depend largely
on type of operation, location, and availability. There
are two categories: on- farm mix; and artificial media
(these include perlite, vermiculite, peat, etc). It is
important to note that your medium can be a source
of pest and disease. Top soil of good physical
properties (loams) is used, when artificial potting
mixes are not available. Manure should be well
decomposed and tested for germs example E. coli.
Artificial potting mix components suitable for cocoa seedlings include- 20% coco peat, 20% rice husks, 20% CRH (carbonized rice hull), and 20% soil,10% sand and 10% manure. To this add about 2 kgs limestone or dolomite per cubic meter of mixture, to balance acidity. All potting mixes should be sterilized before use. It is important to rid the plant media of bacteria and fungi that can infect plant roots, and also weed seeds that can germinate and become a problem. The easiest and cheapest way is to spread the mix onto clear plastic sheets and cover with clear plastic and leave in the sun for a day or two. This is called solarization. Lightly wet the mix so that steam is produced inside the plastic cover, and make sure the mix is no more than 7 centimeters deep.
Soil Sterilization Process
Spread soil mix on clear plastic sheets (7-
10 cm);
Lightly wet soil mix;
Cover and seal off plastic for 1-2 days;
Heat soil to 56°Celcius for 30 minutes.

Ja REEACH – COCOA NURSERY MANUAL (PART 1) 17
Also ensure the plastic cover is well sealed to prevent heat loss. The mixture should be heated to 56 degrees centigrade for at least 30 minutes during this process.
Selection of Potting Bags Size and design of potting bags are critical to health of the plants, they should be durable enough to withstand time in the nursery. There are a few conditions that are associated with bag size and type of bags such as: Poor root development; Bent tap roots; Twisted tap root; Deformed root system; and Retarded growth in small bags due to lack moisture or nutrients. Black polythene plastic bag with thickness of 250 gauges and size is recommended to facilitate
good root development and production of healthier plants.
Operation
Dimension of Poly Bag
Width (inch) Length (inch) Height (inch)
Seedling 4 7 9
Grafted Plant 5 9 11
Figure 10: Illustration of root disorder

Ja REEACH – COCOA NURSERY MANUAL (PART 1) 18
Figure 11: Black polythene plastic
Sexual/Seed Propagation This refers to the process of raising seedlings from seeds. There are a number of steps to do this successfully to ensure good results, to minimize diseases and to reduce wastage.
Seed Selection Seed selected for propagation, must come from healthy ripe pods. Some seeds that should NOT be used for propagation include:
Damaged and defective seeds; Diseased seeds (e.g. from infected pods); Seeds from black pod infested trees; Flat and very small seeds; Seeds from deformed, diseases, damaged, green or over ripe pods; Seed from poor quality trees; Seeds older than 4 days (outside pod); Seed stored in heat or very dry condition; and Seeds with long (more than ½ inch) or bent radicle or “pig tail”.
Seed Preparation The main steps in seed preparation are: Select pods that are ripe and healthy.
Open the pods using a wooded mallet. Do not use a knife as you may cut the seed.
Remove seed from pods and separate seeds from placenta and pulp.

Ja REEACH – COCOA NURSERY MANUAL (PART 1) 19
Discard any unsuitable seeds.
Remove pulp from outside of the seeds by rubbing the seed in saw dust, fine bag or coconut fiber.
Wash the seeds in water and drain.
Soak the seed in a fungicide solution for about one minute – manzate.
Drain the seeds and place onto a tray or sack in a shaded and cool area, protected from wind and rain, to drain for about 10 minutes.
Seed Pre-Germination The pre-germination is done to reduce germination time, allow for quality control and time management during the selection process. The steps are as follows: Place the seed in a single layer on clean jute bags or moist burlap out of the wind, sun and
rain.
Cover with moist burlap or jute bag for three days until roots starts to emerge for seed (record date of germination initiation).
Within four days remove germinated seeds instantly (showing a white „button‟ on one end of the seed).
Planting of Pre-Germinated Seeds Bags with potting mixture should have been previously prepared. Make a small hole about 1 cm deep in centre of soil mix in plastic bag.
Place the pre-germinated seed with the root tip pointing down, into the potting mix in the bag.
Allow about half of the seed poking out of the potting mix after planting.
Cover with saw dust or rice husks.
Use a fine spray to water the potting mix twice per day (early morning and again before 3 pm) until seedling emerges (DO NOT OVER WATER).
Culling of Seedling There is an average rejection rate of about 20% due to disease, loss or poor or inferior quality. Start to remove rejected plants (culling) from about week 2 after planting and repeat regularly (fortnightly thereafter). Before you do destroy the culled plants; make absolutely sure that they are rejected plants and not suffering from lack of water, nutrients or sunlight. The following are conditions under which seedlings should be culled: Bent and twisted roots or stem collars; Retarded growth or unhealthy plants; Plants with white or very pale yellow leaves, genetic mutants; Plants with weak root systems; and Damping off or seedling dieback.
Ja REEACH – COCOA NURSERY MANUAL (PART 1) 20
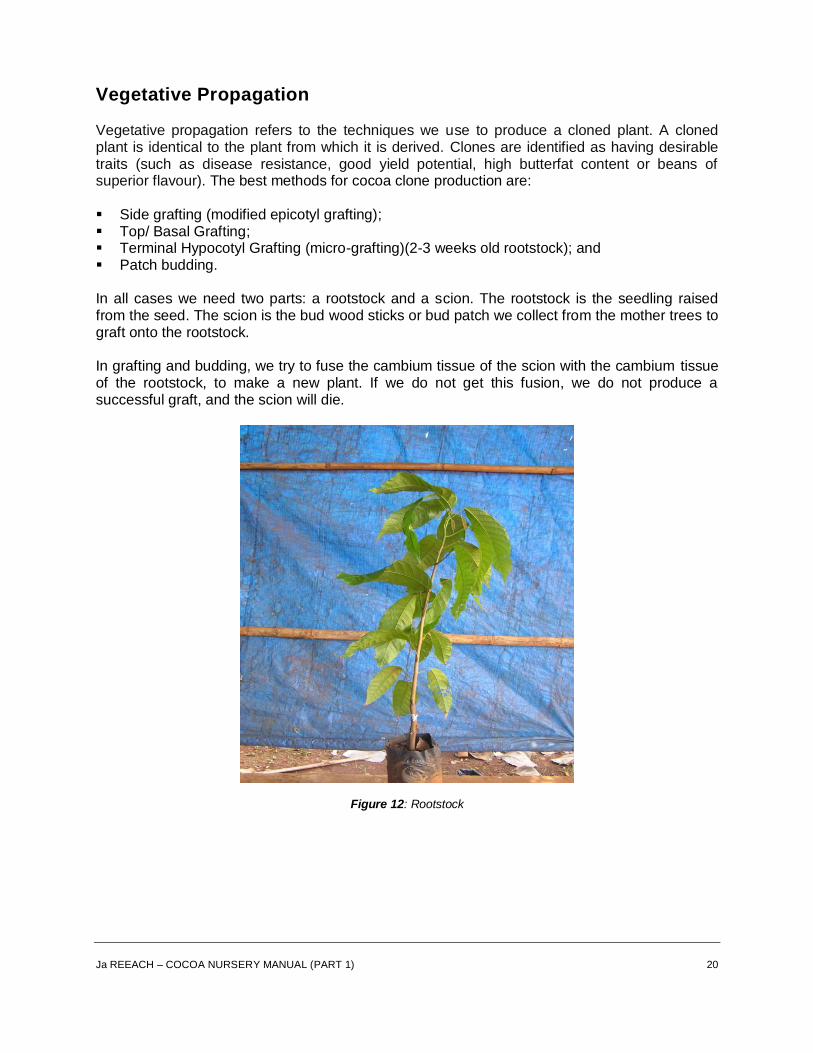
Vegetative Propagation Vegetative propagation refers to the techniques we use to produce a cloned plant. A cloned plant is identical to the plant from which it is derived. Clones are identified as having desirable traits (such as disease resistance, good yield potential, high butterfat content or beans of superior flavour). The best methods for cocoa clone production are: Side grafting (modified epicotyl grafting); Top/ Basal Grafting; Terminal Hypocotyl Grafting (micro-grafting)(2-3 weeks old rootstock); and Patch budding. In all cases we need two parts: a rootstock and a scion. The rootstock is the seedling raised from the seed. The scion is the bud wood sticks or bud patch we collect from the mother trees to graft onto the rootstock. In grafting and budding, we try to fuse the cambium tissue of the scion with the cambium tissue of the rootstock, to make a new plant. If we do not get this fusion, we do not produce a successful graft, and the scion will die.
Figure 12: Rootstock

Ja REEACH – COCOA NURSERY MANUAL (PART 1) 21
Figure 13: Scion
Root Stock - Identification of preferred root stock is critical process; especially as it relates to intention to produce cloned cocoa. The ability to identify of “Super Trees”, for the selection of proper seeds, appropriately pre-germinate seeds and growing seedling in a nursery are important skills needed for this operation. A clone is a genetic duplicate, leaf or cuttings from healthy, quality and high production trees are grafted unto rootstock. The Iquitos Mixed Calabacillo (IMC) 67 is the rootstock currently being used by the CIB. Identification and proper selection bud wood is critical as there are incompatibilities with some varieties.
Super Trees Exceptional trees or super trees are not located at edge of field where it may receive better sunlight or care but in the middle of field where they exposed greater disease pressure and higher humidity and still performs exceptionally well. Super trees can be identified by their ability to: Produce very high quantity of fruit every year; Consistently produce good quality beans; Fast growing; Pest and disease free; and Remain in good health even with poor management.

Ja REEACH – COCOA NURSERY MANUAL (PART 1) 22
Cocoa Tree Production Rating Scale
Unproductive Below Average Acceptable Very Good Exceptional Super Tree
0 – 10
pods / year
11 – 20
pods / year
21 – 30
pods / year
31 – 80
pods / year
81 and above
pods / year
Clonal Garden This refers to plant museum with germplasm that are true to type, and provides the source for clean clonal materials for propagation. The clonal garden must: Containing cocoa trees that were identified by morphological descriptors and molecular
analysis;
Identifiable by label on each plant;
Approved by CIB;
Well maintained to protect the integrity of the germplasm;
Contain 50 or more plants; and
Contain desired varieties.
Fine and Flavoured Varieties Jamaica is an exclusive (100 %) fine/flavour cocoa producer; we continue to cultivate clones of the ICS hybrids. The Trinidad Selected Hybrids (TSH) was introduced to Jamaica as this variety will allow the country to maintain the fine/flavour status. Criollos from Venezuela such as Guasare, Porcelana, Chuao, Pentagona and Ocumare (OC 61) produce highly valued fine/flavour cocoa The Trinitarios such as ICS, United Fruit (UF) clones and Matina from Costa Rica, Ocumare (OC 67 and 77) clones from Venezuela and all other Trinitarios also yield fine/flavour cocoa.
Grenada Selections (of ICS parentage) also constitute fine/flavour cocoa planting material and Grenada is one of the five West Indian exclusive fine/flavour cocoa producers. Haiti has/had a Trinitario called GA 1; Arriba cocoa from Ecuador is also a specialty cocoa and is produced from their National varieties (now less than 50% of the cocoa cultivated there). There are also Java (from Indonesia) Criollos, UIT (Unidentifed Trinitarios) from Papua New Guinea, LAFI from Samoa and Djati Roengo (DR) clones from Indonesia that also produce fine/flavour cocoa. Madagascar has some Trinitarios that produce a cocoa similar to Trinidad &Tobago. These clones most likely originated in Trinidad and Tobago, the birthplace of Trinitario cocoa. Countries exporting exclusively or partially fine or flavor cocoa: Jamaica St Lucia Colombia
Madagascar Grenada Costa Rica
Trinidad and Tobago Papua New Guinea Dominica.

Ja REEACH – COCOA NURSERY MANUAL (PART 1) 23
Selection of Rootstock Iquitos Mixed Calabacillo (IMC) 67 is the recommended variety because of its universal adaptability. Varieties selected for rootstock should be: Rootstock of choice that is available in Jamaica;
It has universal compatibility;
Tolerant/resistant to the root disease Cocoa Wilt (Ceratocystis cacaofunesta); and
Deep rooting, thrifty plant; making it suitable as a rootstock.
Figure 14: Labeled IMC 67 plant
Selection of Scion (bud wood) One week before making graft, tip the branch from which scion will be taken to stimulate and activate buds. Imperial College Selection (ICS) is a range of crosses between Forastero and Criollo, called Trinitario. ICS 1 is: Resistant to Black pod (Phytophthora spp.); Tolerant/resistant to Witches Broom (Moniliophthora perniciosa); Resistant to Cocoa Wilt. ICS 95: High level of resistance to Witches Broom and Cocoa Wilt; Moderate resistance to Black Pod and Frosty Pod Rot (Moniliophthora roreri). Reference is made to the International Cocoa Germplasm Database, Reading University, for information reported on fungal diseases of Cocoa. http://www.icgd.reading.ac.uk/index.php

Ja REEACH – COCOA NURSERY MANUAL (PART 1) 24
Scope of Reaction to Disease:
R = Resistant MR = Moderately Resistance T = Tolerant MS = Moderately Susceptible S = Susceptible N/A = Data not available
Table 1 – Cocoa Varieties in Jamaica
Variety
Disease
Black Pod
Phytophthora P.
Witches Broom
Moniliophthora
P.
Frosty Pod Rot
Moniliophthora R
Cocoa Wilt
Ceratocystis C
ICS 1 T T-R N/A R
IMC 67 S-M/R R S T-R
ICS 95 MR-R T-R MR R
ICS 60 S-M/R S-T N/A S
BASAL Grafting/Top Grafting/Cleft Graft This requires older rootstock seedlings, usually at least four months old, as the bud wood is inserted much higher in the stem, at the „top‟ of the plant. Typical height and size for a rootstock ready for side grafting at about 20 cm height. It is important to make sure that the diameter of the rootstock and the scion is of similar size, and that the wedge of the scion lines up neatly with the split in the rootstock. The rootstock is opened by splitting the top, and the wedge of bud wood is inserted into it. The scion is then bound onto the rootstock by wrapping with tape. The plant needs about two months after grafting in the nursery. Prepare material and equipment needed for this activity, these include: Seedling (rootstock) Bud wood from tree with desired
qualities Pruning shears (secateurs) Grafting knife (scalpel) Sharpening stone/emery sand paper
Plastic strips, Grafting tape(buddy tape) Alcohol (in spray bottle) Water Marker labels First aid kit in reasonable proximity

Ja REEACH – COCOA NURSERY MANUAL (PART 1) 25
Figure 15: Size of plant selected for grafting
Terminal Hypocotyl Grafting (Micro-Grafting) This technique that uses mainly green tissue material, the graft union is below the cotyledon seed leaf. Growth from the rootstock is minimize and done when rootstock is about three 3 weeks old or when the first true leaves are about 2 inches long.
Materials Rootstock seedling (IMC 67 variety); Diseased free, healthy, vigorous rootstock, properly watered; Secateurs; Sewing thread; Budding tape (plastic); Rubber band; Clear plastic bag about 1.5 times size of potting bag; Scalpel set (blade number 11 and handle); Alcohol or sterilizing agent; Cotton wool; Appropriate scion material from desired mother, must consist of recently harden last flush
green stem tissue; Plastic plant labels; Pencil, pens and permanent markers; Two small benches;

Ja REEACH – COCOA NURSERY MANUAL (PART 1) 26
Micro-Grafting Grafting Procedures Select seedling 2-3 week old with cotyledons are firmly attached.
Wipe the stem of the seedling and fingers of hand with alcohol.
Sterilized tools and work area.
Use sterilized scalpel to cut off shoot just above cotyledon seed leaf (½” above the hypocotyl).
Insert the scalpel at 3 cms from the lateral cut and slip the blade upwards, parting the hypocotyl stem evenly (two equal halves).
Hold halves together to reduce moisture loss
Prepare scion material 8- 10 cm with 3-4 buds and same diameter as rootstock.
Only two 2 youngest leaves should remain(cut leaf to half its length).
Wipe the scion material with sterilizing agent.
With one motion, slice a 3 cm cut, terminating half way through the stem.
Turn the stem over and cut a second slice, to make a sharp wedge cut.
Wedge should be 2- 2.5 cm long.
Gently separate the cut rootstock and fit the wedge shape scion into the open V of the rootstock.
Using sewing tie the graft union firmly to maintain firm contact between two cut surfaces and to minimize disturbance.
Tie the graft together starting from below the graft union and moving upwards, overlapping each wrap and stopping about above the union. (This is done with light grade grafting tape).
Grafted plant is then covered (enclosed)by inverting a clear plastic bag over the entire plant, use rubber band to fasten clear plastic bag onto potting bag 9 cm above ground.
1. Plant is stored in a 70% shaded area, with minimum wind disturbance (no watering is done during the phase).
2. Clear plastic bag is removed in two weeks, grafting tape a month later (thread remain) seedling can be plant in 4-5 months.
Side Grafting Side grafting is probably the most reliable method to use and can be done on rootstock plants as young as two and a half months old. It involves fusing the bud wood stick (usually one bud with
Figure 16: Scalpel used for
grafting
Figure 17
Figure 18
Figure 19

Ja REEACH – COCOA NURSERY MANUAL (PART 1) 27
one third leaf intact) into a narrow cut low on the stem. The bud wood should be green/brown, i.e. near where the flush has hardened into mature leaves and the wood is greenish brown in colour. The plant needs about 3 months in the nursery after grafting.
Figure 20: Prepared Scion
Figure 21: Insertion of scion
Well wrapped and secured scion with grafting film.
Figure 22: Side grafted rootstock
Figure 23: Secured bud wood
Benefits of Grafting Plants are grafted to: Change the variety, form and size of a plant; Produce plants which cannot be produced by other asexual methods; Produce early flowering and fruiting plants; Produce adaptable plants by providing them with a resistant rootstook; Develop a plant which is tolerant to a wider range of environmental conditions; Repair damaged plants; and Increase the supply of new varieties rapidly.

Ja REEACH – COCOA NURSERY MANUAL (PART 1) 28
Patch Budding This method usually requires older rootstock seedlings, as the plant must be thick enough (pencil thickness) to hold the bud wood patch securely. However, skilled budders can use seedlings from as young as two months old. The advantage of budding over grafting is that older bud wood (brown/ green) can be used, compared with grafting methods. It is generally thought to be slower and more difficult to perform than grafting, but does not need grafting tents. It uses less bud wood and older bud wood, and needs about 2 months in the nursery after budding.
Figure 24: Removal of bark and Rootstock
Figure 25: Bud Patch from Scion
Figure 26: Insertion of bud patch
Figure 27: Bound union
Stem Cuttings Procedures Select the desired mother plant;
Choose the appropriate type of cuttings (i.e. soft, semi and hardwood);
Prepare leafy cuttings of 8-15 cm (3-6 in), which has 4-6 leaves, using a secateurs;
Cut leaves in half to reduce moisture loss;
Treat cuttings with rooting hormone and fungicide;
Place cuttings in a „sterile‟ or new propagating media:

Ja REEACH – COCOA NURSERY MANUAL (PART 1) 29
- The medium used in the mist house should be porous(gravel or coarse sand) since irrigation is frequent
- Care must be taken to prevent damage to the cuttings when they are being placed in the medium-first make holes of similar size as the cuttings; place cuttings inside hole, deep enough so that they remain upright-approximately 12.5-25.0 mm(1/2 to 1 in)
Mist often to maintain 100% relative humidity (keep leaves moist at all times);
Pot cuttings when roots have been established(usually within 6 to 8 weeks); and
Harden plants by gradually reducing the frequency of misting.
The success factors for all types of grafting and budding are: Nursery should be evenly and adequately shaded (70%).
Use healthy bud wood with active buds.
Use bud wood within 2 days of collection and store and transport in moist and cool conditions
Do not collect bud wood from trees that are recovering from heavy cropping/bearing.
Make sure bud wood is of right age and thickness for the rootstock.
Only use a sharp knife and keep it only for grafting or budding- nothing else.
Clean knives and secateurs and other tools with alcohol, before and after grafting and budding, to minimize disease transfer.
Do not place tools onto the ground.
Avoid grafting in very hot and very dry periods, and also in very wet periods.
Make sure rootstock are the right age and condition for grafting and budding.
Manage shade and water very carefully.
The grafted plant should be kept under cover for 15 days (binding period) after grafting to protect from excess moisture.
Cleaning schedule and programme for work station, tools and equipment must be prepared and followed.
Selecting Grafted Plant Selecting plants for sale is an important factor in maintaining market, the industry and sustainability of your nursery operation: Plants should be clean and healthy (leaves green, glossy, clean, turgid and showing signs of
good nutrition);
Free from pest and disease;
Mature and strong graft and bud union;
Free from root disorders such as bench or fork root;
Clean stem(free from swans neck);

Ja REEACH – COCOA NURSERY MANUAL (PART 1) 30
Properly labeled;
Plant should be mature for field condition;
Has healthy white roots;
Show vigorous healthy growth; and
Uniform appearance (indicating adequate light, water and nutrition).
Integrated Pest Management Pests is any organism that injures, spreads disease, feeds on ornamental plants of aesthetic or economic value, or competes for food and water with humans, domestic animals or crops. The proper identification of a pest is an essential component of all good pest management strategies. There is a need to fully understand the morphology and biology of the pest, and how it relates to the economic impact of the pest. Integrated Pest Management utilizes different strategies to decrease pest numbers & damage to economically tolerable levels. The options available for the control of pests are legislative, physical, cultural, ecological management, biological and chemical control. All Nursery operations personnel should be: Provided with heightened awareness of pest
presence, activity and control;
Able to locate and identify insect, mite and disease problems, and to observe changes in the severity of infestation.
Reduce pesticide use by eliminating unnecessary, routine applications and apply pesticides at the proper life-cycle stage for effectiveness
Conduct random plant inspections daily during the entire production cycle and scout starting from the doorway, the location where disease and pest problems begin;
Spend at least 20 minutes inspecting 20 or more plants from every 1,000 square feet, inspection should begin at the bottom of the plant and proceeds upwards, from older leaves to younger leaves to new growth, buds and blooms
Isolate and treat affected nursery plants.
Diseased seedlings should be removed and destroyed
Personnel’s in a nursery should be able
to:
Identify the major pests of cocoa.
Identify early symptoms of pest attack
Know what options are available
using IPM and ICM.
Know what steps can prevent pests
attack.
To determine essential plant nutrients
and their role in plant development.
To be able to identify nutrient
deficiency symptoms.
Identify the common varieties.
Know the key steps in land
preparation.
Choose the best type of fertilizer, time
and method of applying fertilizers.
Understand the importance of weed
control.
Know what options available for weed
control.
How to select planting material.

Ja REEACH – COCOA NURSERY MANUAL (PART 1) 31
Common Pest and Seedling Disease Problems Seedling rots; Seedling blight; Vascular streak dieback VSD; Mites; Thrips example Selenothrips rubrocinctus; Aphids; Ceratocystis wilt; Scale insect; and Fungi (phytopthora spp, fusarium spp, phytium spp,) or Black pod.
Damping-off In damping-off the seedling collapses and eventually dies due to infestation of fungi, it can be caused by soil fungi such as Pythium spp., Fusarium spp., and or Rhizoctonia spp. Management includes soil drench with systemic fungicides, and treatment of media by steam sterilization, solarization or fumigation. Preventative measures may include hot water and or fungal treatment of seeds.
Evaluation for Black Pod Seedlings can be evaluated for Black Pod at an early stage using a leaf disc inoculation method and, by grafting the parental clones onto rootstocks, tests on young leaves from the parents can be compared with those from the progeny. Segregation in the progeny provides the possibility of selecting seedlings with more resistance to Black Pod than the parents. Bacteria (rhizoctonia spp); Plant parasitic nematodes (pratylenchus and helicotylenchus).
Chemical Control of Nursery Pests
Active
ingredient
Mode of
Action
Chemical
Group
Toxicity Class &
Mode of Action Pests Controlled Dose Rates
Thiamethoxa
m
Contact &
systemic
III Wide range of
sucking pests
(aphids, leafminers,
mealybugs,
leafhoppers and
scale)
Used for drenching
of seedlings @ 25
ml/plant.
Use sachet of 13 g in
20 Liters of water (=
5 gallons)
Acetamiprid
Contact &
systemic
Chloro-
nicotinyl
II Moths, worms,
whiteflies, leafminers
etc.
2.5-5.0 ml/3.8 litre
water
Imidacloprid III Aphids, leafhoppers,
whiteflies, leaf
miners
500 gm/ha
(0.5 gm/litre)
Or 13 gm / 20 liters
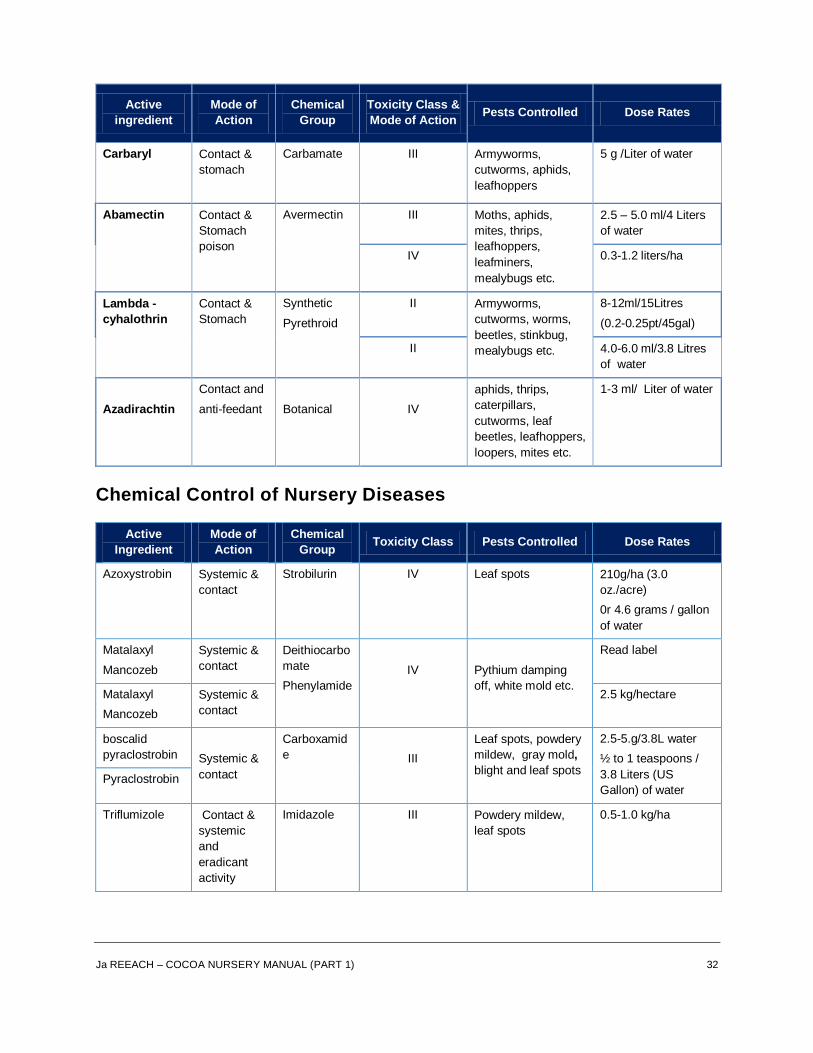
Ja REEACH – COCOA NURSERY MANUAL (PART 1) 32
Active
ingredient
Mode of
Action
Chemical
Group
Toxicity Class &
Mode of Action Pests Controlled Dose Rates
Carbaryl Contact &
stomach
Carbamate
III Armyworms,
cutworms, aphids,
leafhoppers
5 g /Liter of water
Abamectin Contact &
Stomach
poison
Avermectin III Moths, aphids,
mites, thrips,
leafhoppers,
leafminers,
mealybugs etc.
2.5 – 5.0 ml/4 Liters
of water
IV
0.3-1.2 liters/ha
Lambda -
cyhalothrin
Contact &
Stomach
Synthetic
Pyrethroid
II Armyworms,
cutworms, worms,
beetles, stinkbug,
mealybugs etc.
8-12ml/15Litres
(0.2-0.25pt/45gal)
II 4.0-6.0 ml/3.8 Litres
of water
Azadirachtin
Contact and
anti-feedant
Botanical
IV
aphids, thrips,
caterpillars,
cutworms, leaf
beetles, leafhoppers,
loopers, mites etc.
1-3 ml/ Liter of water
Chemical Control of Nursery Diseases
Active
Ingredient
Mode of
Action
Chemical
Group Toxicity Class Pests Controlled Dose Rates
Azoxystrobin Systemic &
contact
Strobilurin IV Leaf spots 210g/ha (3.0
oz./acre)
0r 4.6 grams / gallon
of water
Matalaxyl
Mancozeb
Systemic &
contact
Deithiocarbo
mate
Phenylamide
IV
Pythium damping
off, white mold etc.
Read label
Matalaxyl
Mancozeb
Systemic &
contact
2.5 kg/hectare
boscalid
pyraclostrobin
Systemic &
contact
Carboxamid
e
III
Leaf spots, powdery
mildew, gray mold,
blight and leaf spots
2.5-5.g/3.8L water
½ to 1 teaspoons /
3.8 Liters (US
Gallon) of water Pyraclostrobin
Triflumizole Contact &
systemic
and
eradicant
activity
Imidazole III Powdery mildew,
leaf spots
0.5-1.0 kg/ha

Ja REEACH – COCOA NURSERY MANUAL (PART 1) 33
Plant Nutrients and Deficiency Symptoms
Nutrient Deficiency Symptoms
Nitrogen Stunted growth of tops and lateral shoots with small, stiff pale yellow-green leaves.
Older leaves become yellow with pinkish veins and die prematurely.
Younger leaves may be yellowish green with purple veins
Phosphorous Leaves have very dull dark green to bluish green or purplish coloration
Plant stems become thin and stunted
Purpling of both veins and inter-venal areas of undersides of younger leaves
Small mature leaves with down-curled leaflets
Potassium Intervenal chlorosis and necrosis of margins of older leaves progress upwards to younger leaves
with severity
Calcium Inter venal chlorosis, leaf margin necrosis in new leaf tips and death of growin
Stunted growth of plants.
Dead root tips with roots branching behind dead root tips.
Magnesium Interveinal yellowing patches and chlorosis of older leaves with veins remaining green.
Chlorotic patches occurring towards centre of leaves with margins the last to turn yellow
Yellow patches are followed by necrotic patches and scorching of leaf margins
Sulphur Yellowish- green coloration of older leaves
Hard thin and woody stems which increase in length but not diameter
Iron Leaf tip chlorosis causing top of plant to have pale yellow appearance.
Young leaves become pale green and develop interveinal yellowing spreading from the base
towards the tip of the leaflets giving the effect of a yellow streak in the middle of the leaves.
Severe leaf chlorosis becoming necrotic leading to death of plants in extreme cases
Zinc Stunted growth of leaves with malformed, small leaflets becoming curled downwards and
inwards.
White and necrotic inter-veinal spotting of older leaves spreading to younger leaves.
Brown necrotic areas develop near midrib
Boron From slight chlorosis to brown or black scorching of young leaf tips and die back of growing
points.
Stunted growth of plants.
Profuse growth of lateral shoots and shortening of plant internodes.
Corky areas developing near the calyx or on the shoulders of the fruits.

Ja REEACH – COCOA NURSERY MANUAL (PART 1) 34
Nutrient Deficiency Symptoms
Copper Leaves at top of plant wilt easily followed by chlorotic and necrotic patches.
Leaves at the top half of plant showing unusual puckering and veinal chlorosis.
The margins of mature leaves tend to curl upwards and inwards.
Environmental Hygiene
Nursery Waste Disposal The preservation of the environment and bio diversity should be major consideration of the nursery management team and staff. Proper disposal of nursery waste is a one positive contribution towards environmental sustainability. Composting is recommended for organic materials. Glass containers should be broken and plastic or metal containers punctured or crushed. Containers can then be buried in an isolated area at least 50 cm below ground surface All empty pesticide containers must be destroyed, and never re-used. It is extremely dangerous to use them for anything else. Consult the pesticide label, the manufacturer, or the manufacturer„s representative for specific recommendations regarding container cleanup and disposal. Empty organophosphate and carbamate containers can be neutralized by adding alkaline substances.
Container Type
Metal Containers (non-aerosol)
Triple rinse (or equivalent). Then offer for recycling or reconditioning, or puncture and dispose of container in a sanitary landfill, or by other procedures approved by state and local authorities.
Paper and Plastic Bags Completely empty bag into application equipment. Then dispose of empty bag in a sanitary landfill or by incineration, or, if allowed by state and local authorities, by burning. If burned, stay out of smoke.
Glass Containers Triple rinse (or equivalent). Then dispose of in a sanitary landfill or by other approved state and local procedures.
Fiber Drums with Liners Completely empty liner by shaking and tapping sides and bottom to loosen clinging particles. Empty residue into application equipment. Then dispose of liner in a sanitary landfill or by incineration if allowed by state and local authorities. If drum is contaminated and cannot be reused, dispose of it in the manner required for its liner.
Plastic Containers Triple rinse (or equivalent). Then offer for recycling or reconditioning, or puncture and dispose of in a sanitary landfill, or incineration, or, if allowed by state and local authorities, by burning. If burned, stay out of smoke.
Foil outer pouches of water soluble packets (WSP)
Dispose of the empty outer foil pouch in the trash, as long as WSP is unbroken.
Storage of Chemicals Plant protection products must be stored in accordance with local regulations. Stored in a location that is: Structurally sound and robust.

Ja REEACH – COCOA NURSERY MANUAL (PART 1) 35
Secure, fire-resistant, well ventilated and lit.
Appropriate to the temperature conditions.
Located away from other materials and able to retain spillage. Physical barrier.
Storage shelving should be made of non-absorbent material.
All chemicals are to be stored in a manner, which poses minimum risk of contamination to water sources.
Products must be stored in their original package.
Liquids not stored on shelves above powders.
Use only approved chemicals at correct application rates and intervals.
Safety
Presence of first aid kit in the vicinity of fieldwork
Potential hazards are clearly identified by warning signs
Workers, visitors and sub-contractors equipped with suitable protective clothing in
accordance with legal requirements and/or label instructions. Rubber boots or other appropriate footwear, waterproof clothing, rubber gloves, face masks
Smoking, eating and drinking are confined to designated areas
Products have to kept locked and physical access is only granted in the presence of persons who can demonstrate formal training in the safe handling and use of plant protection products
Accident procedure notice should be clearly visible within 10 meters or building
Only use plant protection products authorized in the country of use for the target crop
Accident and emergency procedure have to exist. Instructions are available in predominant language(s) of the workforce and/or pictograms. The procedures must
identify the following:
- Farm‟s map reference or farm address; - Contact person(s); and - An up-date list of relevant phone numbers (police, ambulance, hospital, electricity and
water and gas supplier.
Records
Need to keep detailed record of pest control inspections and necessary action taken;
A stock inventory must be available and it is updated at least once every 3 months;
The producer keeps records on seeds and planting date; and
Temperature and humidity (where applicable) controls have to be maintained and documented.

Ja REEACH – COCOA NURSERY MANUAL (PART 1) 36
Hygiene
One-site living quarters must be habitable and must have the basic services and facilities.
Basic services of running water, toilets and drains. In case of no drains, septic pits can be accepted if conditions are in compliance with local regulations.
All person working on the farm should have received annual basic hygiene training according to the hygiene instructions.
Workers must have access to:
- Clean food storage areas; - Designated rest areas; and - Hand washing facilities, and potable drinking water.
Environmental
There must be a written action plan that aims to enhance habitats and maintain biodiversity on the farm. The action will include knowledge of integrated pest management practice, nutrients use of crop, conservation sites, water supplies the impact on other users.
No human sewage sludge is used on the farm.
There should be a management of wildlife and conservation plan for the enterprise that acknowledges the impact of farming activities on the environment.
Observation of all local regulations regarding disposal or destruction containers should be adhered to.
Pesticide Usage
The label instructions should be followed to ensure successful application, avoid risks to operators, consumers and the environment.
An anti-resistance strategy should be adopted to avoid reliance on any one chemical.
A current list of all products that are used and approved for use on cocoa being grown must be kept.
Ensure appropriate tools are used and proper calibrations are done for safe and efficient use.
Protective Clothing, Their Use and Function and Safe Use and Handling of Pesticides Agricultural chemicals can enter the body in three ways: 1. Ingestion (swallowing). This can occur if hands are not properly washed prior to eating,
smoking, chewing gum etc.
2. Breathing. Pesticide dust or fumes can be inhaled through the mouth or nose.

Ja REEACH – COCOA NURSERY MANUAL (PART 1) 37
3. Absorption. Chemicals can be taken in through the skin or eyes. Spills, splashes and contaminated clothing are sources of exposure. Workers need to wash their hands before using the bathroom and to cover cuts and wear proper protective clothing.
Short term poisoning symptoms include: Nausea Vomiting Diarrhea Chest pain, coughing Excessive sweating Headache Eye, skin, throat irritation
Itching, skin rash Blurred vision Small pupils Stomach and/or muscle cramps Drooling Weakness, dizziness Edginess
Long term health effects: Allergies Skin damage and irritation Nervous system damage Cancer
Birth defects Reproductive problems (sterility or
miscarriage)
First Aid Tips If any of the above symptoms are experienced immediately: Leave the site of exposure;
Tell someone;
Follow the advice on the chemical label;
If the eyes have been affected, rinse with clean water for 15 minutes;
If fumes re inhaled, get to fresh air or an uncontaminated area; sit down, remain calm and breath as normally as possible;
If chemicals have been ingested follow the first aid instructions of the label;
Seek medical attention; and
Tell the doctor that you have been exposed to a chemical, provide the pesticide name and label.
Pesticides remain in the field after application. Therefore workers should always: Wear clothing that covers the skin. Long sleeve shirt, long pants, socks and shoes. Hats
and gloves are also advisable.
Wash hands before eating, drinking, smoking or chewing gum.
Use a clean cloth to wipe sweat.
Wash work clothes before wearing them again.

Ja REEACH – COCOA NURSERY MANUAL (PART 1) 38
Safety Equipment Gloves Pesticide labels frequently specify use of either waterproof or chemical-resistant gloves. Keep in mind that waterproof materials are not necessarily chemical-resistant. Always wear unlined gloves and never wear cotton, leather or canvas gloves when applying pesticides. Investing in a pair of chemical-resistant gloves can go a long way toward preventing dermal exposure. Footwear Some pesticide labels state that the only footwear required for applying certain pesticides is "shoes plus socks." Other labels may direct the applicator to wear "chemical-resistant footwear plus socks." Chemical-resistant boots are made principally of natural rubber, which may be coated with polyurethane, polyvinyl chloride or blends of these materials. An important consideration when selecting boots is their height, which can range from 6 inches for ankle boots to 16 inches or more for over-the-knee models. Regardless of how high the boots are, pant legs should not be tucked into them but should be worn outside so that pesticides cannot be funneled down into the boot. Eye and Face Protection Although pesticide contact on the face typically occurs less frequently than, say, contact on the hands, the health consequences of facial contact are potentially more serious, especially for contact with the eyes. There are several types of safety glasses. The user should keep in mind that safety glasses are generally recommended for use with the least toxic pesticides and provide only minimal protection. Goggles are available in two styles - cup goggles, which cover the eye sockets completely, and cover goggles, which may be worn over prescription eyeglasses. Head Protection Situations that call for overhead pesticide application require the use of chemical-resistant headgear. There are two basic choices: hats and hoods. Respiratory Protection Respirators are the most specialized piece of personal protective equipment and proper selection is complicated. Specific information on choosing the appropriate respirator will be supplied by pesticide labels. One of the two common types of respirators is the air-purifying respirator. These respirators should be used only where there is sufficient oxygen. Air-purifying respirators remove airborne contaminants as air enters the respirator through chemical cartridges or mechanical filters.

Ja REEACH – COCOA NURSERY MANUAL (PART 1) 39
The second basic type of respirator is the atmosphere-supplying respirator. This kind of respirator supplies an independent source of breathable air and is used in conditions where oxygen is deficient or the applicator is exposed to high concentrations of very toxic pesticides in enclosed areas. Breathable air is supplied to the wearer from an independent source through an air line, or the wearer carries oxygen in a tank. An applicator should perform a fit test to determine correct size of a respirator face piece because a respirator that does not provide a proper seal is of little value. Chemical cartridges should be replaced according to the manufacturer's recommendations or the pesticide label or when odor or irritation is noticed. Pre-filters will extend the life of chemical cartridges in dusty conditions. Mechanical filters should be replaced when breathing becomes difficult or the filter is damaged or as specified by the manufacturer or the pesticide label. If no instructions are provided, replace cartridges and filters when the workday is over. Recommended Mitigation Measures All protective gear shall be washed after each use. Washing of protective gear should not be done within a house nor near or in natural water bodies.
Application of Chemicals Before a spraying operation is started, rinse out the sprayer; remove and clean all nozzles, nozzle screens and strainers. Make sure strainers and nozzle screens are 50 mesh or larger when wettable powders are used. All of the nozzles should be of the same type, size and fan angle for most applications. Check all lines, valves, seals and the tank after filling the sprayer with water and during calibration to be sure there are no leaks in the spray system. For the operator's safety, replace weather-cracked or worn hoses. Adjust the nozzle height and spacing as suggested by the nozzle manufacturer or as specified on the pesticide label. Only water that is clean enough to drink should be used in the sprayer. A small amount of silt or sand in the water rapidly wears pumps and other parts of the sprayer system. Operating a pump dry or with a restricted inlet may damage the pump. Take precautions to avoid exposure when wettable powders, dust or granules are added to the sprayer tank. When you add materials to the sprayer tank, air is forced out and carries some of the pesticide particles with it. If the solvent in the pesticide is toxic or flammable (or both), be sure the mixing operation is performed in an area where ventilation is adequate. The addition of small amounts of materials such as emulsifiers or thickeners will drastically alter the physical properties of the spray solution. Therefore, the applicator should check the pesticide label to be sure she or he is operating according to label instructions. Many types of solvents, some of which are chlorinated, are used in the pesticide formulation processes. Vapors of chlorinated solvents are very dangerous to breathe. Always be aware of the meteorological conditions existing during pesticide application. Loss of spray from a treated area increases during high winds or low humidity. If these areas must be sprayed, do not spray during windy or low humidity conditions and always spray downwind from the sensitive area. If possible, begin spraying in the end of the field that will permit any drift from the sprayer to be blown away from the next area to be treated. Be alert for nozzle clogging and changes in nozzle patterns. If nozzles clog or other troubles occur in the field, shut the sprayer off and move to an unsprayed area. Check the pesticide label for re-entry intervals. The re-entry

Ja REEACH – COCOA NURSERY MANUAL (PART 1) 40
interval is the elapsed time after a pesticide application before workers can safely re-enter a field. All containers, regardless of their type, should be rinsed three times before disposal. The rinse water should be dumped into the sprayer tank. Otherwise, the rinse water must be treated as a surplus pesticide and disposed of properly. Rinse water should never be dumped on the ground. Use the following rinse-and-drain procedure to prepare containers for disposal: Empty the container into the spray tank and drain in a vertical position for 30 seconds.
Refill the container one-fifth to one-fourth full with rinse water or other recommended solution.
Rinse thoroughly, pour into the spray tank and drain in a vertical position for 30 seconds.
Repeat steps 2 and 3 until the container has been rinsed three times. Empty the container into the spray tank and drain in a vertical position for 30 seconds.
Nursery Management
Quality Control and Management
Effect routine seed and seedling inspection weekly, record results and ensure proper procedure for culling and rejection is done.
Check nursery record books weekly for compliance.
Conduct inspection of nursery facility weekly for structural problems and effect repairs.
Conduct periodic assessment water quality and supply.
Tools and equipment should properly sterilized and stored.
Use of tools and equipment outside of nursery is forbidden.
Monitor budding/ grafting techniques and success rate.
Adjust/confirm delivery schedules of seedlings.
Area for quarantine or screening must be functional and activities recorded.
Introduction of any plant material from outside regular source should be tested, approved, authorized by management, recorded and monitored.
Assessment of techniques, quality, tools and equipment should be carried out bi-annually
Bathroom facility should be located within the parameter.
Clearly defined labels displayed.
Guideline for proper pesticide usage and disposal should be adhered to.
Proper storage area must be available.
Training of staff should be ongoing.
The nursery will use only approved planting seed and bud wood.

Ja REEACH – COCOA NURSERY MANUAL (PART 1) 41
The operator must be prepared to change nursery layout and design to match CIB design specifications, including type and level of shade, drainage, plant spacing and support, bag size and potting mix, seed planting, grafting methods, plant maintenance.
Records Maintain records of: Tools and equipment;
Attendance;
Daily activities:
- plants culled - plants died - seeds planted - Seed germination rates - Fertilizer type and application
Varieties/clones used and where located in nursery;
Grafter, Grafting/ budding success rates;
Locations and count of each batch grafted and location of seed batch in nursery;
Date and symptoms of disease and treatment administered; and
Environmental conditions and monitor plant health and vigor.
Pesticide Usage Record Sheet Farm: Address:
Date of
Application Block
Name of
Pesticide
Volume of
Mixture Used
Quantity Used
(dose rate)
Date of Next
Spraying
Name of spray
man & Remarks
Type of Spray
Equipment Used

Ja REEACH – COCOA NURSERY MANUAL (PART 1) 42
Check List
Category Specifications Value
Layout
Records
Production
Pesticide use
Pesticide storage and disposal
Environmental considerations
Quality of seedling
Disease control
Labeling

Ja REEACH – COCOA NURSERY MANUAL (PART 1) 43
Appendix 1: Do‟s and Don‟ts of Grafting
os DONTs
Make a secure nursery, evenly and adequately shaded (70%).
Do not collect bud wood from trees that are recovering from heavy cropping.
Use bud wood within 2 days of collection and store and transport in moist and cool conditions.
Do not place tools onto the ground.
Only use a sharp knife and keep it only for grafting or budding- nothing else.
Don‟t Practice Grafting in very hot and very dry periods, and also in very wet periods.
Clean knives and secateurs and other tools with alcohol, before and after grafting and budding, to minimize disease transfer.
Don‟t use bud wood with no active buds.
Make sure rootstock are the right age, thickness and condition for grafting and budding.
Bud woods should not be taken from gormandizer.
Manage shade and water very carefully.
Exposure areas of scion or root stock should not be contaminated during grafting.

Ja REEACH – COCOA NURSERY MANUAL (PART 1) 44
Appendix 2: Standards/Indicators of Average Production Efficiency
Activities/Practices Standards/Indicators
Rootstock age Side grafting - 2-3 months old
Top grafting
Patch budding - 3 months +
Rootstock preparation Side grafting - cut leaves to 1/3 rd size and remove growing tip,
just before grafting
Top grafting - cut tip off near to where bud wood and rootstock are same thickness
Patch budding - cut off tip only
Bud wood collection Same day collected is used, wrapped in paper toweling and keep in shade, labeled with clone ID
Green brown wood (recently hardened flush) for grafting, more mature wood for budding
Grafting tents used or plastic
sleeves Large nurseries use tents, small nurseries tents or large plastic
bags
Not required for patch budding, or for top grafting.
Type grafting tent used Clear plastic on wire or bamboo frame
Tent Size 5 sq. m- 400 plants, 15 sq. m – 1200 plants
How tents are shaded 2 layers of shade cloth across the top
Number of days plants stay in
tents 21 days before opening tents
Grafted plant bag lining Do this about 10 – 15 days after tent is opened (i.e. end of rest
period). For one month keep two layers of shade material, then remove 1 layer.
Plants watered - before grafting
- after grafting
1 day before grafting fully wetted
When tents are opened, carefully water without wetting leaves
All types of grafting/ budding: keep scions dry at all times
Grafting/ budding team At least 5 people, split tasks
Plants grafted in one day 300- 400 per person, grafting skilled or about 200 per person
budding.
Clone marking Recorded on tents and in rows when transferred to nursery bed
Total number months required
to produce grafted or budded
plants, from rootstock seed
planting
Side grafted: 4-5 months
Top grafted: 5-7 months check

Ja REEACH – COCOA NURSERY MANUAL (PART 1) 45
Appendix 3: Technical Terms Used
Technical Terms Definitions
Basidium (pl.) basidia Sexual produced spore of a BASIDIOMYCETE fungus
Biotroph Organism that lives in living tissue
Cherelle Small and immature pod
Chlorotic Partial or complete absence of green colour in plants
Chupon Vertical stems or shoots
Clone Group of plants produced vegetatively from one original plant
Conidium (pl.) conidia Spore of anamorph stage in the life cycle of a fungus
Cultivar A variety of a cultivated plant species
Fruit body A non-technical term for a fungus structure that contains asexual
or sexual spores
Hyperplasia Enlargement of cells through uncontrolled cell division.
Hypertrophy Enlargement of host tissue through uncontrolled cell enlargement
Hypha (pl. hyphae) Threads of a fungus
Instar Development stage in insect life-cycle
Intracellular Within the cells
Intercellular Between the cells
Jorquette The point at which the vertical chupon stem changes to fan
growth
Larva (pl. larvae) An insect in its first stage after hatching from the egg, the
caterpillar state
Mycelium (pl. mycelia) A mass or mat of fungal threads
Necrosis Death of a plant part or of clearly defined area of plant tissue
Necrotroph An organism that lives on decaying tissues
Nymph Development stage of insect life-cycle that resembles the adult
form
Pest Any living organism causing a problem on plants
Saprobe A microorganism living on decaying organic matter
Saprophyte A plant living on decaying or dead plant material
Spore Propagating structure of a fungus
Sporophore Fungal fruiting body that produces sexual spores

Ja REEACH – COCOA NURSERY MANUAL (PART 1) 46
Technical Terms Definitions
Stoma (pl. stomata) Minute openings in the surface of leaves and green stems for
plant respiration
Stylet Needle-like piercing mouth part of an insect
Systemic (i) of a disease –occurring throughout the plant
(ii) of a fungicide –absorbed into the plant through roots or
foliage, then translocated throughout the plant
Teleomorph Sexual or perfect stage in the life cycle of a fungus

Ja REEACH – COCOA NURSERY MANUAL (PART 1) 47
Appendix 4: Computing SEEDS to SEEDLING Ratio
I need 100
grafted cocoa
seedlings and
have secured
100 seeds, what
else do I need?
Well, Mr. Wong, If you start with 100 seeds you will be able to get about 95 seedlings which is 95% germination rate. From these you can cull about 10 seedlings or 10% due to defects or growth problems to leave 85 plants. You then graft or bud these and at 90% success rate we get about 75 plants. (Some of these may be grafted a second time to reduce seedling losses) You may also expect about 5% loss during post grafting culling. This reduces your plants to about 70 survivors from 100 seeds So you might need about 30 % more seed than
seedlings for grafting, and about 20% more for
hybrid seedling production.

Ja REEACH – COCOA NURSERY MANUAL (PART 1) 48
Appendix 5: Picture of ICS Varieties
Variety Description
ICS 1
ICS 95
ICS 95
Variety Description
ICS 60
ICS 39

Ja REEACH – COCOA NURSERY MANUAL (PART 1) 49
Variety Description
ICS 8
mature
and ripe
Variety Description
ICS 100
ICS 7
Clone Area Occupied
by Tree
Pods Per
Annum Excerpts from F.J. Pounds Notes
ICS 48 3.6 m x 3.6 m 50 Nicaraguan ancestry. Possible sib of ICS 46 and ICS 47.
ICS 50 6.1 m x 6.1 m 150 Used as supply to replace trees. Tolerates flooding.
ICS 51 5.4 m x 6.1 m 200 Known a heavy bearer for several years.
ICS 57 3 m x 3 m Sib of heavy bearing tree.
ICS 59 100 Exceptional bearer.
ICS 60 3.6 m x 3.6 m 54 Nicaraguan or Venezuelan Criollo ancestry. Thrives without
windbreak or shade.
ICS 63 4.8 m x 4.8 m 86 Tall tree. Pods are usually bottlenecked.
ICS 65 3.6 m x 3.6 m 70 Prone to Cherelle wilt. Beans are fairly plump.
ICS 66 96 Heavy bearer indicated by masses of cushions.

Ja REEACH – COCOA NURSERY MANUAL (PART 1) 50
Clone Area Occupied
by Tree
Pods Per
Annum Excerpts from F.J. Pounds Notes
ICS 69 4.5 m x 4.5 m 89 Was late in setting 1935-36 crop.
ICS 70 4.2 m x 4.2 m 78 Only 5 furrows in mature pods. Flooded for half the year.
ICS 71 Large Tree 92 Beans are Large (6 g to 7 g each). Pods attached by Squirrels.
ICS 72 4.2 m x 4.2 m 80 Low bean number like ICS 71.
ICS 73 80 Only 5 furrows in mature pods. Beans up to standard.
ICS 75 5.1 m x 5.1 m 100 Sib of ICS 74.
ICS 77 4.5 m x 4.5 m 88
ICS 80 4.2 m x 4.5 m 72 Large tree.
ICS 81 5.4 m x 5.4 m 200 Large and vigorous tree. Beans are large and plump.
ICS 82 5.4 m x 5.4 m 100 Exceptional vegetative vigour and good cropping powers.
ICS 84 4.8 m x 4.8 m 198 Similar to ICS 83 in growth habit and bearing. Yields fluctuates
from 150 to 246 pods per annum.
ICS 86 5.4 m x 5.4 m 140 Yields are consistent.
ICS 87 5.1 m x 5.1 m 152 Beans are large and plump. Good bearer.
ICS 89 170 Large tree.
ICS 92 3.6 m x 3.6 m 73 Fairly large pod to pod variation.
ICS 93 3 m x 3 m 36 Seedling supply. Tree was only 9 years old.
ICS 94 7.2 m x 7.2 m 252 Tree was located on bad gravel soil.
ICS 95 4.2 m x 4.2 m 85 Described as an efficient type of tree.
ICS 97** 6 m x 6 m 200 Shell is thin. Yields will in potash deficient soils.
ICS 98* 6.1 m x 6.1 m 200 Tolerates flooding.
ICS 100* 5.4 m x 5.4 m 191 Yield per annum over 10 years. Beans are very large. Not
recognized as Criollo type.

Ja REEACH – COCOA NURSERY MANUAL (PART 1) 51
Bibliography
Bureau of Standard Jamaica, October 2010. Certification of Agricultural Produce [CAP] Programme Guideline Dennis Buddo, Cocoa Nursery Establishment and Management Elizabeth Johnson, Francis Bekele, Raymond Schnell, Field Guide to the ICS Clones of Trinidad. Don McGlashan, Ministry of Agriculture, Food & Agriculture Organization, November 2007. Fruit tree Crop Production Best Practices and Modern Approach. The Cocoa Industry Board Act Janny G. M. Vos, Barbara J. Ritchie and Julie Flood, CABI Bioscience September 2003, Discovery Learning About Cocoa Webster W. McPherson, May 2010. Mineral Nutrition Management in Greenhouse Crop Production Nicholas Richards, © ACDI/VOCA June 2011. Cocoa Nursery Manual Philippines Roger Turner, December 2011. Cocoa Propagation Manual