the izpack tutorial - izforge.comizforge.com/izpack/izpack-tutorial.pdf · the izpack tutorial ......
TRANSCRIPT

Introduction Making an installer Conclusion
The IzPack tutorialGetting started with a basic installer for your software.
Julien Ponge1
1<[email protected]>http://www.izforge.com/
IzPack project founder and current maintainer.
11th January 2005
1 / 28

Copyright c© 2004, 2005 Julien Ponge - All Rights Reserved.
This work is licensed under the Creative Commons Attribution - NonCommercial -ShareAlike License. To view a copy of this license, visithttp://creativecommons.org/licenses/by-nc-sa/2.0/ or send a letter to CreativeCommons, 559 Nathan Abbott Way, Stanford, California 94305, USA.

Introduction Making an installer Conclusion
Outline
1 IntroductionThe IzPack projectTechnical overview
2 Making an installerPreliminary stepsCreating the installation filesBuilding the installer
3 Conclusion
3 / 28
Introduction Making an installer Conclusion
The IzPack project
Outline
1 IntroductionThe IzPack projectTechnical overview
2 Making an installerPreliminary stepsCreating the installation filesBuilding the installer
3 Conclusion
4 / 28

Introduction Making an installer Conclusion
The IzPack project
IzWhat ?
Fast facts:
An open-sourced JavaTM -based cross-platform installer generator.
Published under the GNU GPL license.
Project started in 2001 by myself, now developed with the help ofseveral developers and contributors (Thanks.txt contains about 90lines).
Used by various companies and projects around the world (see thereferences page.
Available for about 22 languages.
One of the most active projects at BerliOS.
5 / 28

Introduction Making an installer Conclusion
The IzPack project
Features
Cross-platform (tested on Win32, Mac OS X, Linux/i386 andFreeBSD/i386).
XML-based, modular and extensible (you choose what your installerwill be made of).
Integrates with Jakarta Ant.
Can create shortcuts for Win32 and X11 (FreeDesktop.org-compliantenvironments and window managers).
Not dependent on native code (but can use it in a smart way).
Creates uninstallers.
Can get user input, substitute tokens in files, call scripts and muchmore...
6 / 28

Introduction Making an installer Conclusion
The IzPack project
Project life
Online resources:
hosted on my website at http://www.izforge.com/izpack/BerliOS hosts the developer tools (CVS, SVN, bugs tracking, wiki,mailing-lists, file releases, FTP, ...).
The development is very open and contributions are always welcome.
Major releases (ex: 3.7.x) are maintained in branches while thedevelopment occurs in CVS HEAD.
Minor releases occur depending on fixes inclusion.
Major releases happen depending on new features inclusion.
7 / 28
Introduction Making an installer Conclusion
Technical overview
Outline
1 IntroductionThe IzPack projectTechnical overview
2 Making an installerPreliminary stepsCreating the installation filesBuilding the installer
3 Conclusion
8 / 28

Introduction Making an installer Conclusion
Technical overview
IzPack
An installer is described by an XMLinstallation file that:
arranges files into packscan be customized by some resources(depending on what you choose).
The compiler takes the XML file as itsinput to build an installer as anexecutable Jar archive.
ResourcesFiles
Compiler
XMLinstallation
file
describespacks
uses forcustomization
Installer
input to
produces
9 / 28

Introduction Making an installer Conclusion
Technical overview
Installers
An installer contains:
the real files in packsthe langpacks.
An installer offers a set of panels thatdefine the steps to perform aninstallation.
Resources can be needed by panels andGUI preferences can change the lookdepending on the OS (size, L&F, ...).
GUIpreferences
Langpacks Panels
Resources
Packs
Installer
need
10 / 28

Introduction Making an installer Conclusion
Preliminary steps
Outline
1 IntroductionThe IzPack projectTechnical overview
2 Making an installerPreliminary stepsCreating the installation filesBuilding the installer
3 Conclusion
11 / 28
Introduction Making an installer Conclusion
Preliminary steps
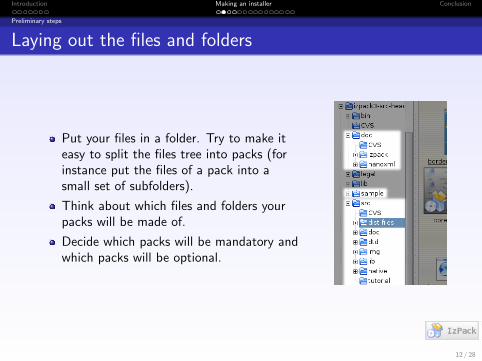
Laying out the files and folders
Put your files in a folder. Try to make iteasy to split the files tree into packs (forinstance put the files of a pack into asmall set of subfolders).
Think about which files and folders yourpacks will be made of.
Decide which packs will be mandatory andwhich packs will be optional.
12 / 28

Introduction Making an installer Conclusion
Preliminary steps
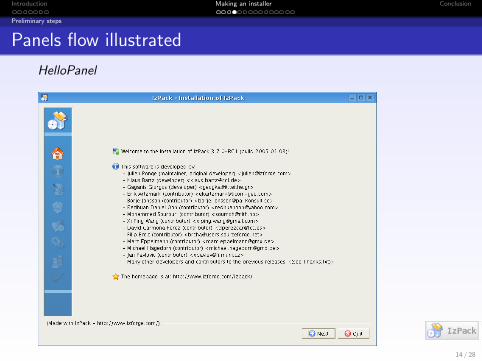
Installation panels flow
Panels define the installation steps. Several panels are available,some even do the same functional task. You decide which panelsyou want and in which order.
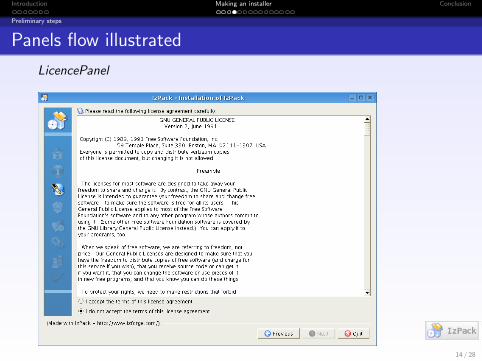
For this tutorial, we will use the following panels:1 HelloPanel : welcome our user to the installation process2 HTMLInfoPanel : display some informations with a structured text3 LicencePanel : the legal terms that must be agreed to reach the next
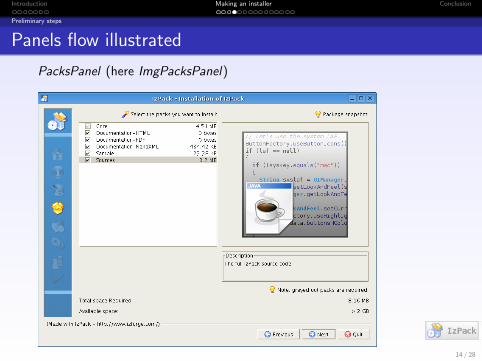
installation steps4 PacksPanel : allow the user to pick the packs that she/he wants to
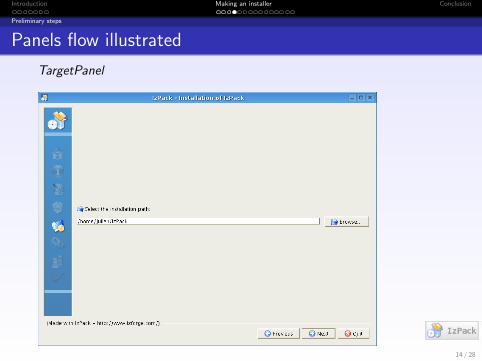
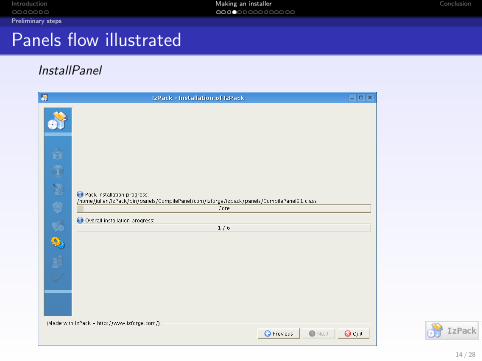
install or not5 TargetPanel : choose where to install the files6 InstallPanel : performs the actual files installation7 SimpleFinishPanel : conclude the installation with a success.
13 / 28
Introduction Making an installer Conclusion
Preliminary steps
Panels flow illustrated
HelloPanel
14 / 28

Introduction Making an installer Conclusion
Preliminary steps
Panels flow illustrated
HTMLInfoPanel
14 / 28
Introduction Making an installer Conclusion
Preliminary steps
Panels flow illustrated
LicencePanel
14 / 28
Introduction Making an installer Conclusion
Preliminary steps
Panels flow illustrated
PacksPanel (here ImgPacksPanel)
14 / 28
Introduction Making an installer Conclusion
Preliminary steps
Panels flow illustrated
TargetPanel
14 / 28
Introduction Making an installer Conclusion
Preliminary steps
Panels flow illustrated
InstallPanel
14 / 28
Introduction Making an installer Conclusion
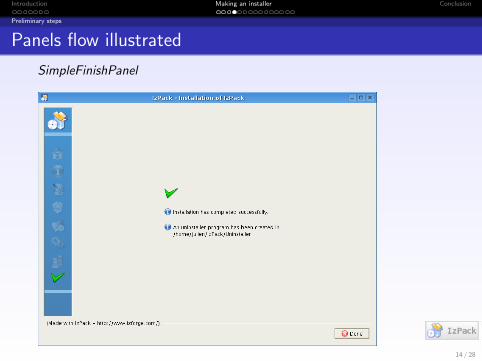
Preliminary steps
Panels flow illustrated
SimpleFinishPanel
14 / 28

Introduction Making an installer Conclusion
Creating the installation files
Outline
1 IntroductionThe IzPack projectTechnical overview
2 Making an installerPreliminary stepsCreating the installation filesBuilding the installer
3 Conclusion
15 / 28
Introduction Making an installer Conclusion
Creating the installation files
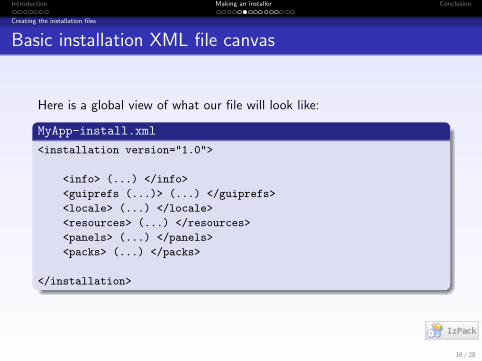
Basic installation XML file canvas
Here is a global view of what our file will look like:
MyApp-install.xml
<installation version="1.0">
<info> (...) </info>
<guiprefs (...)> (...) </guiprefs>
<locale> (...) </locale>
<resources> (...) </resources>
<panels> (...) </panels>
<packs> (...) </packs>
</installation>
16 / 28

Introduction Making an installer Conclusion
Creating the installation files
Global informations
We will specify here:
the authors of the application to install
the application name, version and url
the minimum JavaTM version required (optional).
The info section<info>
<appname>MyApp</appname>
<appversion>1.2.3</appversion>
<authors>
<author name="Snoopy" email="[email protected]" />
<author name="Foo Bar" email="[email protected]" />
</authors>
<url>http://www.myapp.org/</url>
<javaversion>1.4</javaversion>
</info>
17 / 28

Introduction Making an installer Conclusion
Creating the installation files
GUI tweakings
We can customise the default size.
We can specify a Look & Feel for a given OS, including:
Metal (hum hum ...)Kunststoff, Metouia, LiquidJGoodies variants.
The default is to pick the native emulation L&F.
The guiprefs section<guiprefs height="600" resizable="yes" width="800">
<laf name="metouia">
<os family="unix" />
</laf>
</guiprefs>
18 / 28

Introduction Making an installer Conclusion
Creating the installation files
Choosing the available languages
This step is quite easy. Just pick the ISO3 codes among the availablelanguages, for instance:
The locale section<locale>
<langpack iso3="eng"/>
<langpack iso3="fra"/>
<langpack iso3="deu"/>
<langpack iso3="ita"/>
<langpack iso3="jpn"/>
<langpack iso3="spa"/>
</locale>
19 / 28

Introduction Making an installer Conclusion
Creating the installation files
Including the needed resources
Each panel needs resources (see the IzPack documentation). Aresource associates a path to a file and an identifier.
Here, we have the following resources:
the text for HTMLInfoPanelthe legal terms for LicencePanelan optional picture for the language selection box.
The resources section<resources>
<res src="install-readme.html" id="HTMLInfoPanel.info"/>
<res src="Licence.txt" id="LicencePanel.licence"/>
<res src="langsel.jpg" id="installer.langsel.img"/>
</resources>
20 / 28

Introduction Making an installer Conclusion
Creating the installation files
Specifying the panels
Simply put the panels names in the obvious order:
The panels section<panels>
<panel classname="HelloPanel"/>
<panel classname="HTMLInfoPanel"/>
<panel classname="LicencePanel"/>
<panel classname="PacksPanel"/>
<panel classname="TargetPanel"/>
<panel classname="InstallPanel"/>
<panel classname="SimpleFinishPanel"/>
</panels>
21 / 28
Introduction Making an installer Conclusion
Creating the installation files
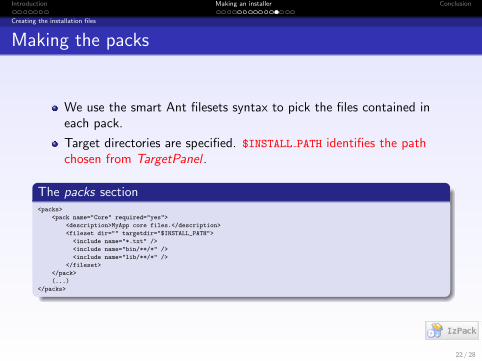
Making the packs
We use the smart Ant filesets syntax to pick the files contained ineach pack.
Target directories are specified. $INSTALL PATH identifies the pathchosen from TargetPanel .
The packs section<packs>
<pack name="Core" required="yes">
<description>MyApp core files.</description>
<fileset dir="" targetdir="$INSTALL_PATH">
<include name="*.txt" />
<include name="bin/**/*" />
<include name="lib/**/*" />
</fileset>
</pack>
(...)
</packs>
22 / 28

Introduction Making an installer Conclusion
Building the installer
Outline
1 IntroductionThe IzPack projectTechnical overview
2 Making an installerPreliminary stepsCreating the installation filesBuilding the installer
3 Conclusion
23 / 28

Introduction Making an installer Conclusion
Building the installer
Ant integration
Ant is perfect for software tasks automation.
IzPack can be integrated with Ant in a simple and elegant manner.
IzPack needs the following informations (the same holds true for acommand-line invocation):
the input installation XML filethe name of the output installer Jar filethe kind of installer (standard or web-based)the base directory, to resolve the relative paths specified for thevarious files of the XML installation file (files, resources, ...)the directory where IzPack is installed.
24 / 28
Introduction Making an installer Conclusion
Building the installer
Calling IzPack from Ant
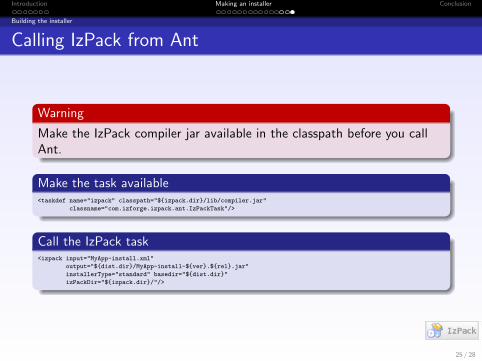
Warning
Make the IzPack compiler jar available in the classpath before you callAnt.
Make the task available<taskdef name="izpack" classpath="${izpack.dir}/lib/compiler.jar"
classname="com.izforge.izpack.ant.IzPackTask"/>
Call the IzPack task<izpack input="MyApp-install.xml"
output="${dist.dir}/MyApp-install-${ver}.${rel}.jar"
installerType="standard" basedir="${dist.dir}"
izPackDir="${izpack.dir}/"/>
25 / 28

Introduction Making an installer Conclusion
Summary
You have now made a simple installer for your application. Youshould now feel more confident with IzPack, however you can getmuch more from it.
You can now try some more advanced features (such as desktopshortcuts generation or scripts token replacement) or play with someother panels as well.
The following resources will be of a great help:
the IzPack documentationthe wiki at BerliOSthe mailing-lists archivesreal-life examples (such as IzPack itself or open-source projects thatuse it).
26 / 28

Introduction Making an installer Conclusion
Supporting IzPack
If IzPack is useful to you and/or your company, please considersupporting it financially. Just think about how expensive are itsproprietary competitors...
I accept donations through PayPal with my email [email protected].
Missing a feature ? Then you can offer a bounty to an IzPack developerfor implementing it. Ask for the feature and see if a developer wants tomake it for a donation that you can negotiate at your own discretion withher/him.
27 / 28

Introduction Making an installer Conclusion
Credits
The LATEX Beamer class.
The BerliOS crew.
The numerous past and present IzPack developers and contributors.
28 / 28