the inventory of historic battlefields – battle of...
TRANSCRIPT

The Inventory of Historic Battlefields – Battle of Stirling Bridge The Inventory of Historic Battlefields is a list of nationally important battlefields in Scotland. A battlefield is of national importance if it makes a contribution to the understanding of the archaeology and history of the nation as a whole, or has the potential to do so, or holds a particularly significant place in the national consciousness. For a battlefield to be included in the Inventory, it must be considered to be of national importance either for its association with key historical events or figures; or for the physical remains and/or archaeological potential it contains; or for its landscape context. In addition, it must be possible to define the site on a modern map with a reasonable degree of accuracy. The aim of the Inventory is to raise awareness of the significance of these nationally important battlefield sites and to assist in their protection and management for the future. Inventory battlefields are a material consideration in the planning process. The Inventory is also a major resource for enhancing the understanding, appreciation and enjoyment of historic battlefields, for promoting education and stimulating further research, and for developing their potential as attractions for visitors.
Designation Record and Summary Report Contents Name Alternative Name(s) Date of Battle Local Authority NGR Centred Date of Addition to Inventory Date of Last Update Overview and Statement of Significance
Inventory Boundary Historical Background to the Battle Events and Participants Battlefield Landscape Archaeological and Physical Remains and Potential Cultural Association Select Bibliography

Inventory of Historic Battlefields
STIRLING BRIDGE
Alternative Names: Stirling Brig
11 September 1297
Local Authority: Stirling
NGR centred: NS 800 949
Date of Addition to Inventory: 30 November 2011
Date of last update: 14 December 2012
Overview and Statement of Significance
The Battle of Stirling Bridge is significant as one of the most prominent Scottish victories of the Wars of Independence. It is the high point of the campaign of William Wallace and Andrew Moray on behalf of the exiled John Balliol, and leads to Wallace’s appointment as Guardian of the Realm of Scotland. It also holds a prominent cultural legacy, both in its connection to Wallace and in the wider legacy of the Wars of Independence within Scotland. Finally, the heavy nature of their defeat is an immense shock to the English, and Edward I himself returns to Scotland the following year in another attempt to crush the Scot’s resistance.
A large English army, moving north to deal with Moray’s successes, attempted to cross the Forth at Stirling using the single narrow bridge. Moray and Wallace were a little to the north-east at Abbey Craig awaiting them, from where they allowed some of the English troops to cross, and then swept down on them.
One of the English commanders, Hugh de Cressingham, was killed, along with many of his men. The victory bolstered Wallace’s position, particularly as Moray later died of wounds received in the battle, while the English drew back temporarily. However, the following year, Edward’s armies returned and defeated Wallace at the Battle of Falkirk.
Inventory Boundary
The Inventory boundary defines the area in which the main events of the battle are considered to have taken place (landscape context) and where associated physical remains and archaeological evidence occur or may be expected (specific qualities). The landscape context is described under battlefield landscape: it encompasses areas of fighting, key movements of troops across the landscape and other important locations, such as the positions of camps or vantage points. Although the landscape has changed since the time of the battle, key characteristics of the terrain at the time of the battle can normally still be identified, enabling events to be more fully understood and interpreted in their landscape context. Specific qualities are described under physical remains and potential: these include landscape features that played a significant role in the battle, other physical remains, such as enclosures or built structures, and areas of known or potential archaeological evidence.
1

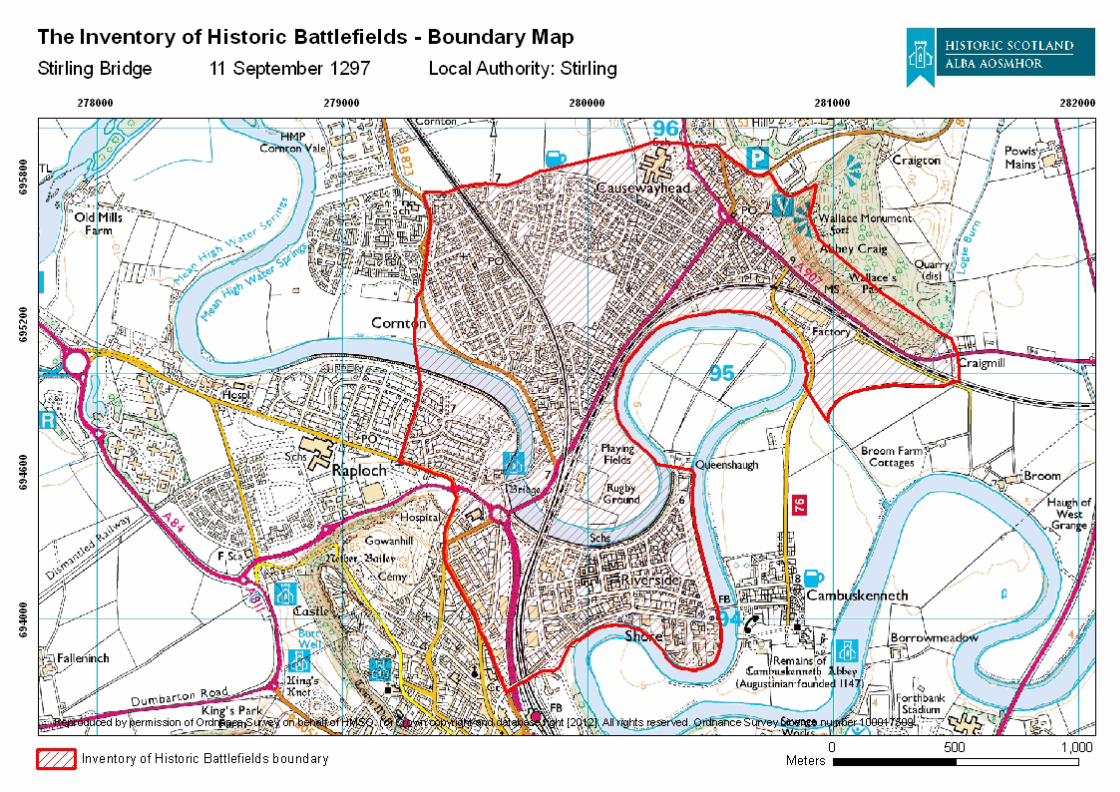
Inventory of Historic Battlefields The Inventory boundary for the Battle of Stirling Bridge is defined on the accompanying map and includes the following areas:
The area of the bridges across the River Forth, including the location of the known wooden Medieval bridge, as the likely crossing point for the English army.
The floodplain of the Forth on the northern side, where the rugby club and surrounding development now lie and where much of the fighting is likely to have occurred.
Causewayhead Road, which was the route the English intended to take northwards.
Abbey Craig, at the foot of which Wallace and Moray were mustered.
The area on the south side of the river at Raploch where de Warenne had camped with his army.
The area of Riverside where Lundie intended to ford the river to attack Wallace in the rear.
Historical Background to the Battle
The English army was assembled on the south side of the River Forth at Stirling, and the Scots were positioned on the north of the river at Abbey Craig. The only bridge across, which stood half a mile below Stirling Castle, was a narrow, wooden structure and was situated at the bottom of the closed end of a huge horseshoe loop in the river, with a causeway running north-east from the bridge across the horseshoe from bottom left and almost touching the top right of the horseshoe as it ran on towards the hill now called the Abbey Craig a mile north-east of the bridge. The land it crossed was flat and soft, very unsuitable terrain for heavily armoured horses and riders. Once across the bridge, the English army would be surrounded on all sides by the river except for the north where the Scots army awaited them.
The English began to cross the bridge in the morning of 11 September 1297, probably moving east from the bridge to muster on the northern side of the river. When the Scots saw as many had crossed as they could deal with, they came down from the high ground and sent spearmen to occupy the foot of the bridge so that no passage or retreat remained open; this would suggest that the English had moved into the area east of the bridge as they crossed. As the English turned back and tried to escape over the bridge, many were thrown headlong and drowned. About 100 men-at-arms and 5,000 foot soldiers fell, including 300 Welshmen. Some of the English escaped by swimming the river. Cressingham was killed and the Scots divided his skin into small parts, not as relics but as an insult. The Steward of Scotland and the Earl of Lennox, who had been negotiating with the English and were not part of Wallace and Moray’s army, when they saw the way the battle was going, joined their men who were hidden in woods nearby on the Carse. They killed many of the fleeing English and took the army’s baggage train.
2
Inventory of Historic Battlefields
Events & Participants
The battle was fought as Edward I of England attempted to quell rebellion across Scotland. He was busy with France and could not come north himself, instead sending an army led by the Viceroy of Scotland, John de Warenne. Separate rebellions in south-west Scotland under William Wallace and the north-east under Andrew Moray had coalesced into a nationwide rebellion that brought most of the Scottish nobility out in defiance of Edward. The main effect of this was to bring Wallace and Moray together in the north, waiting for the English assault. The English army headed towards Stirling, intending to cross the Forth and head north to confront the Scottish troops. However, the crossing of the Forth was across a narrow wooden bridge leading onto a causeway towards the Ochil hills to the north. It was at this bottleneck that Wallace and Moray decided to hit the English army, the bridge negating the advantage in numbers of the English.
John de Warenne, 6th Earl of Surrey, was an efficient military commander, and had served in Edward’s Welsh campaigns in 1277, 1282 and 1283, for which he was well rewarded with estates and titles in Wales. He was also an able diplomat and had served as a negotiator for the treaties of Salisbury and of Bigham in 1298 and 1290 respectively, both of which ensured independent status for Scotland on the death of Alexander III, with the proviso that his heir, Margaret, the Maid of Norway, marry Edward’s son (later to be Edward II). Following his success at both the battle and siege of Dunbar he was appointed Warden of the Kingdom and Land of Scotland by Edward. Alas, the Scottish climate did not agree with him and he returned to England just a few months later citing ill health caused by the damp climate. Much against his will, even to the point of initially defying the king’s orders, he was back in early 1297 at the head of an army tasked with putting down Wallace’s rebellion. He suffered defeat at Stirling Bridge on 11 September 1297 and fled to York. He was re-appointed for the next Scottish campaign in early 1298 and had better luck raising the siege of Roxburgh and retaking Berwick Castle. Edward joined the campaign and Warenne’s return to form was further underscored by his role as a commander in the victorious English army at the Battle of Falkirk on 22 July 1298. He finally died in Kent in 1304, at the age of around 73.
Hugh de Cressingham was appointed Treasurer of Scotland after the Battle of Dunbar. He was tasked with raising funds for Edward’s war against France, which he did by taxation and sequestration. He was naturally hated by the Scots, which probably explains the gruesome treatment of his body after the battle, but none of the chroniclers on the English side were very complimentary about him either and generally blamed him for the defeat.
Andrew Moray was from a baronial family in Morayshire, who fought against Edward I at Dunbar alongside his father. Both were captured in the battle, although the elder Sir Andrew was sent to the Tower of London where he eventually died. The younger Andrew was held at Chester Castle, but was able to escape in the winter of 1296. He made his way home to north-east Scotland, where he proclaimed his defiance of Edward at Avoch. He quickly gained support and brought open warfare to the north-east, taking control of many major castles in the area around his homeland. John Comyn, Earl of
3

Inventory of Historic Battlefields Buchan, was released from captivity to suppress Moray; when they encountered one another, Buchan made no attempt to attack him and allowed Moray to march away. His efforts soon brought Moray into contact with William Wallace, and Moray and Wallace would fight together at Stirling Bridge in September 1297. Moray was badly wounded in the battle however, and he appears to have died of these wounds before the end of the year.
William Wallace was from a minor noble family in either Ayrshire or Renfrewshire. He first came to prominence as being responsible for the killing of the High Sheriff of Lanark in May 1297; there are traditions of earlier activities but none is historically attested. The killing of the High Sheriff was recorded by Thomas Grey in the Scalachronicon, and the veracity of the account is underlined by the fact that Grey’s father was present and barely escaped with his life. Wallace went on from this to attack targets across the south-west, although his relatively low social status appears to have made it difficult for him to be accepted by the leading Scottish nobles such as the Comyns or the Stewarts. However, this was not a problem for Andrew Moray, and the two joined forces in the summer of 1297. Following their success at Stirling Bridge, Wallace was made Guardian of the Realm of Scotland. However, with his heavy defeat by Edward I at Falkirk in July the following, he resigned this position, although he continued to oppose Edward’s rule. In 1299, he is recorded as spending time in France petitioning Philip IV for aid, and in his time their he is said to have made a name for himself in France fighting both pirates and the English. He returned to Scotland unable to secure any real aid, although he was able to secure the release of John Balliol from Pope Boniface’s custody into Philip’s. He subsequently returned to Scotland and may have fought in the Battle of Roslin in 1303. However, Edward I by this stage had long held a personal enmity for Wallace, and never ceased hunting him. The English King gained his prize in 1305 when Wallace was captured at Robroyston by Sir John Menteith, the warden of Dumbarton Castle. Wallace was first sent to Carlisle before being marched to London. He was found guilty of treason in a sham trial on 23 August 1305 before being brutally executed.
Battlefield Landscape
The battlefield has been heavily developed with the spread of Stirling through Causewayhead towards Bridge of Allan. The location of the English camp now lies under the eastern end of Raploch, while the Scottish position will have been covered by the houses of Causewayhead. The likely location of the English once they had crossed the bridge was to the east of the bridge, which would mean that the main area of fighting may now be under the current Stirling County rugby ground. This may have preserved part of the battlefield, although there has been ground disturbance here as well. There are some open spaces closer to the bridge, in particular between the A9 road bridge and the 15/16th century foot bridge. This is an area that has been flooded on occasion.
4

Inventory of Historic Battlefields
Archaeological and Physical Remains and Potential
The only remains associated with the battle relate to a bridge that is assumed to be the one standing in 1297. This was first located in 1905 about 60 m upstream of the current old bridge, built in the late 15th or early 16th century.. Stone piers survive on the bed of the River Forth that relate to the earlier bridge; there are four of these that form a straight line across the river, and an area of large mortared stones was revealed through excavation at NS 7966 9456 that lies on line with the piers (Page & Main 1997). No artefacts relating to the battle have been found in association with the remains of the bridge, and indeed none is reported elsewhere in the vicinity.
The fighting is likely to have left artefactual remains in the soil. It was a hand to hand fight, where spearmen and swordsmen fought at close quarters. As men struggled with one another and fell to the ground, pieces of armour and fittings would have become detached and lost. For the nobles, much of this will be non-ferrous, while the foot soldiers will have had more in the way of ferrous objects. Much of this will have been collected at the time when the bodies were removed after the battle, but some will have been trampled into the soil and will have been missed. There is no indication in the sources of there having been any major archery exchanges, so there is a low probability of finding arrowheads.
Cultural Association
The battle has been incorporated into Stirling’s corporate imagery, with a Medieval seal of the town depicting the bridge with soldiers. The battle is also an important part of the story of Wallace that is portrayed in the displays in the Wallace Monument.
The battle was described in Blind Harry’s The Wallace, which is a late fifteenth century hagiography of Wallace of doubtful veracity. There are numerous songs about the battle by authors varying from Robert Burns to William Sinclair, and songs about the battle are still being written in the modern era.
There is a depiction of the Battle of Stirling Bridge in the film Braveheart, although it presents a version of events that is not supported by the contemporary chroniclers; in a piece of cinematic licence, the battle is shown as taking place in an open field with the bridge playing no part in events. Despite the major inaccuracies, the depiction of the battle in this film has undoubtedly kept the battle well-known and has given it a level of recognition far in excess of many other, later battles.
Select Bibliography
Armstrong, P. 2003. Stirling Bridge and Falkirk 1297-98. William Wallace’s Rebellion. Osprey Direct UK, Wellingborough.
McNair Scott, R. 1996. Robert the Bruce, King of Scots. Canongate, Edinburgh.3-52.
5
Inventory of Historic Battlefields
6
Reid, S. 2004. Battles of the Scottish Lowlands. Pen and Sword, Barnsley.14-18
Traquair, P. 1998. Freedom’s Sword. Harper Collins, London.73-78