the intuitive web-based wi-fi planning tool intuitive web-based wi-fi planning tool user manual v...
TRANSCRIPT

0
The Intuitive Web-Based Wi-Fi Planning Tool User Manual V 1.0
ezWIFI Planner

The ezWIFI Planner is a predictive modeling tool. We highly recommend that every predictive model be followed up with a site survey.
2
Overview Tools to simulate wireless deployment with EnGenius wireless products. ● Upload floor plan & set up environment parameters
● Place APs on floor plan (auto / manual)
● Adjust AP location and parameters
● View planned result (inventory / heatmap)
● Export report

The ezWIFI Planner is a predictive modeling tool. We highly recommend that every predictive model be followed up with a site survey.
3
Managing Wireless Projects You can create different projects for different customer sites and deployments.
● Create Your Project
a. Click the “CREATE PROJECT” button to create a new project
b. Add a name for this project
c. Specify the country for this project, this would apply different Wi-Fi regulations when
system optimize Wi-Fi channels for AP placement.
d. After creating the project, mouseover the project info card and click “VIEW
PROJECT” to start your upload for floor plan
● Manage Your Project
a. Quick Overview of Project Mouseover to each project’s info card and you would see a list of general project information: ● Country of project
● Total floor plans within the project

The ezWIFI Planner is a predictive modeling tool. We highly recommend that every predictive model be followed up with a site survey.
4
● Total APs placed on floor plans of project
b. Duplicate Project
Mouseover project info card and click “ ”
c. Delete Project
Mouseover project info card and click “ ”

The ezWIFI Planner is a predictive modeling tool. We highly recommend that every predictive model be followed up with a site survey.
5
Creating Floor Plan For Project You can upload multiple floor plans for your project based on the requirements of the customer’s deployment. Floor plans can be subject to: areas, floors and buildings.
● Upload Floor Plan
○ Click “ ” to upload image of floor plan ○ Add a name for the floor plan
○ Select image file from your PC or drag & drop image to screen
■ Supported image format: PNG, JPG and GIF image size limitation is10MB
○ Click the corner of the blue rectangle and crop your floor plan for deployment if
necessary
○ Click Apply

The ezWIFI Planner is a predictive modeling tool. We highly recommend that every predictive model be followed up with a site survey.
6
● Scale Floor Plan
○ Click “SET SCALE” and draw a line on floor plan
■ You will want to set the scale based on the longest vertical distance on your
project. Ex: The longest wall within your project
○ Specify the length of the drawn line in “feet” or “meter”
○ Click Apply to set the scale for your project
○ If you need to reset you scale at any point, click on “reset scale”
● Modify Project
○ Right-click your “floor plan” and you can rename/ duplicate/ delete this floor plan
The ezWIFI Planner is a predictive modeling tool. We highly recommend that every predictive model be followed up with a site survey.
7
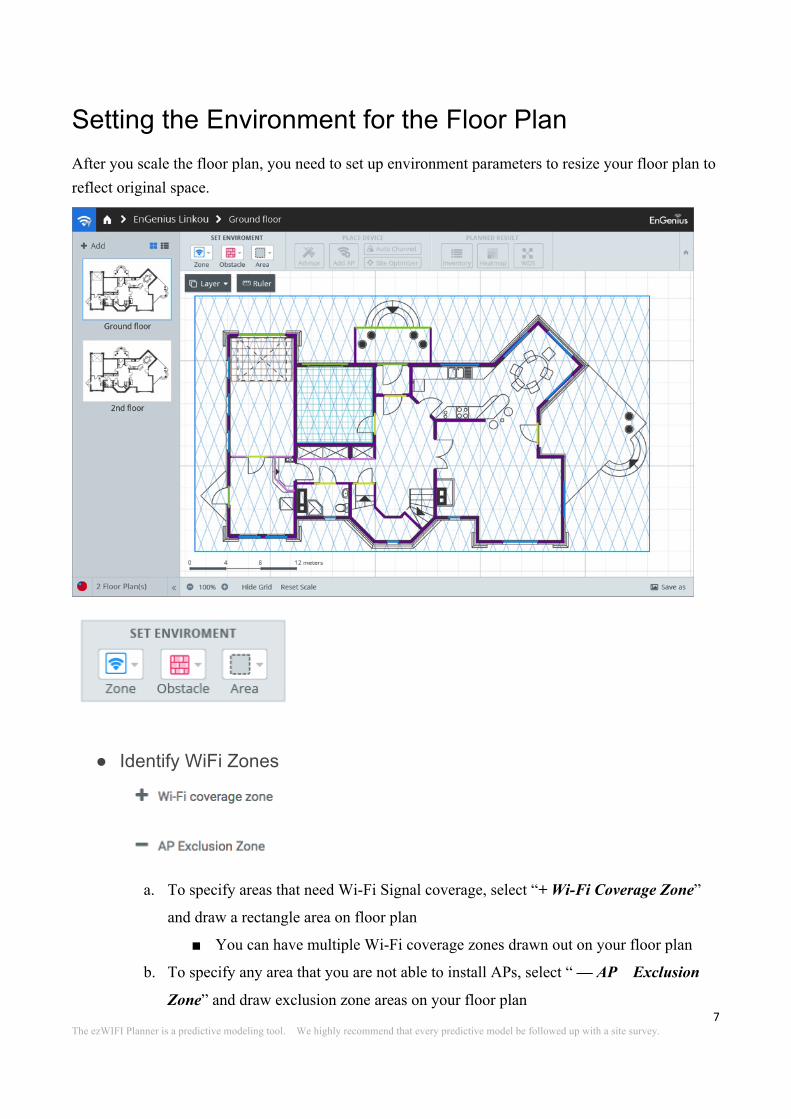
Setting the Environment for the Floor Plan After you scale the floor plan, you need to set up environment parameters to resize your floor plan to reflect original space.
● Identify WiFi Zones
a. To specify areas that need Wi-Fi Signal coverage, select “+ Wi-Fi Coverage Zone”
and draw a rectangle area on floor plan
■ You can have multiple Wi-Fi coverage zones drawn out on your floor plan
b. To specify any area that you are not able to install APs, select “ — AP Exclusion
Zone” and draw exclusion zone areas on your floor plan

The ezWIFI Planner is a predictive modeling tool. We highly recommend that every predictive model be followed up with a site survey.
8
● Setup Environment Obstacles Different interior textures and materials have different impacts on constricting Wi-Fi signals
a. To set up obstacles on the floor plan, click “Obstacle” and select specific obstacle
type
b. Click & hold any point on floor plan to draw obstacle line.

The ezWIFI Planner is a predictive modeling tool. We highly recommend that every predictive model be followed up with a site survey.
9
● Identify Specific Area Types in Floor Plan Different types of areas have different attenuation impacts on Wi-Fi signal
a. To specify those spaces which might have Wi-Fi attenuation, click “Area” and select
different types of space and draw those areas on your floor plan

The ezWIFI Planner is a predictive modeling tool. We highly recommend that every predictive model be followed up with a site survey.
10
Placing APs On Floor Plan The Wi-Fi Planner provides different ways to manage APs on floor plan. If you are not familiar with wireless deployment, there is an intelligent algorithm to place APs on the floor plan without channel conflict, reflect zone, obstacles and area settings. After using auto-placement, you can add more APs, adjust AP locations and parameters to optimize your deployment.
● Place Access Points on Floor Plan
○ To automatically place APs on floor plan, click “Advisor” and adjust parameters for
auto-placement if necessary

The ezWIFI Planner is a predictive modeling tool. We highly recommend that every predictive model be followed up with a site survey.
11
■ AP model: Specify AP model for auto-placement
■ Radio: Specify radio band for auto-placement EnGenius recommends planning your projects to 5GHz
■ Transmit Power: Specify AP transmit power to run auto-placement
■ Minimum Signal Strength (RSSI): Specify the minimum RSSI for entire area with Wi-Fi signal
○ To add APs manually, click “Add APs” and choose specific model to add on floor
plan

The ezWIFI Planner is a predictive modeling tool. We highly recommend that every predictive model be followed up with a site survey.
12
● Adjust AP Locations and Parameters
○ To move APs on floor plan, click and drag the AP icon to any location you want
○ To delete AP on floor plan, click the upper-right icon “ ”
○ To change AP parameters, double click on the AP icon and a pop-up window will
slide out from the right for further information

The ezWIFI Planner is a predictive modeling tool. We highly recommend that every predictive model be followed up with a site survey.
13
■ AP Property
● 2.4G&5G Enable/ Disable
● Specify Channel Size for AP
● Specify particular Channel for AP
● Adjust transmit power of AP
■ Radio Pattern Show vertical & horizontal radio patterns for 2.4GHz and 5GHz bands
■ Antenna Attach external antenna to AP for heatmap calculation
Note: When making any changes on the AP, you need to click within the panel before leaving the pop-up window for data to save

The ezWIFI Planner is a predictive modeling tool. We highly recommend that every predictive model be followed up with a site survey.
14
● Auto-Channel Adjustment If you move APs to different locations or manually add APs on the floor plan after running the “Advisor” option, auto-placement, you can run auto-channel adjustment to avoid any channel conflict. ○ To run auto-channel adjustment, click “auto-channel” whenever you want to add APs
on floor plan.
● Auto-Position Adjustment Whenever you add one or multiple APs on floor plan, you need to adjust AP locations for optimized Wi-Fi coverage on floor plan. ○ To run auto-location adjustment, click “Site Optimizer” to adjust all AP’s location for
optimized Wi-Fi Coverage.
NOTE: If you have added various AP models to your floor plan, do not click
back on “advisor” as it will change all APs back to a single model
NOTE: Site optimizer will only optimize location. Be sure to select “auto
channel” to channelize manually placed APs.
Viewing Options On Floor Plan
● Turn On/Off Different Object Layers You might add on different type of environment objects on floor plan, it’s handy to turn on/ off particular object layers for better manipulation of objects on floor plan.

The ezWIFI Planner is a predictive modeling tool. We highly recommend that every predictive model be followed up with a site survey.
15
● Device Information For each AP placed on floor plan, there are couple options for device information shown next to the AP icon.
● Switch Radio Bands Whenever you finish planning a floor plan with APs on it, you can switch to different radio bands to have different heatmap results based current radio band.
● Specify Channel Whenever you are finished planning on the floor plan with APs on it, you can have different heatmap results by specify different radio channel.

The ezWIFI Planner is a predictive modeling tool. We highly recommend that every predictive model be followed up with a site survey.
16
● Ruler Tool Ruler is a handy tool to let you know the actual distance of planned environment drawing a line on floor plan.

The ezWIFI Planner is a predictive modeling tool. We highly recommend that every predictive model be followed up with a site survey.
17
Viewing The Result You can get a quick view on APs deployed on your projects as well as see heatmap and WDS coverage.
● See AP Inventory On Floor Plan
○ To view all information on APs, click the inventory icon “ ” for more
information. You can adjust parameters for each AP as well within the inventory
view.
■ Name: AP name
■ Model Name: EnGenius AP model name
■ Radio Band: Working radio on AP
The ezWIFI Planner is a predictive modeling tool. We highly recommend that every predictive model be followed up with a site survey.
18
■ Mode: AP operation mode
■ Channel: Current channel AP is working on
■ Channel Size: Current AP channel size
■ Power: Current transmission power of AP
■ Location: Default page is blank and you can comment on each AP as an
installation cheat sheet.
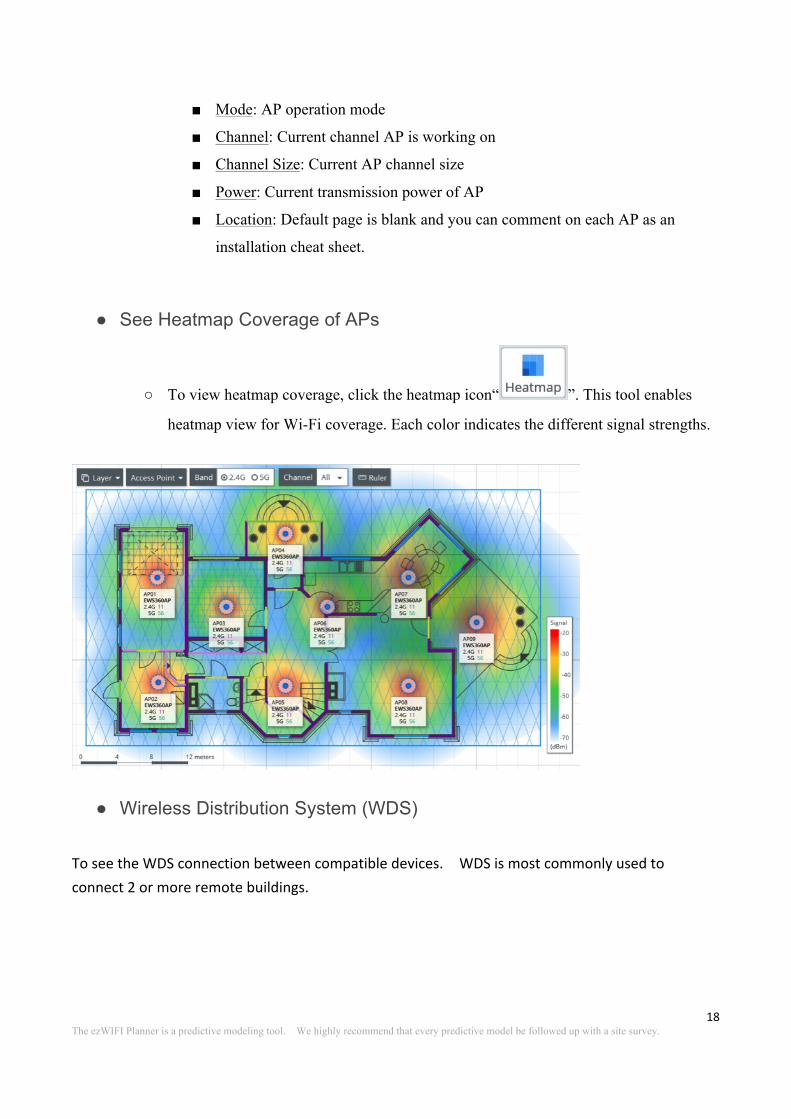
● See Heatmap Coverage of APs
○ To view heatmap coverage, click the heatmap icon“ ”. This tool enables
heatmap view for Wi-Fi coverage. Each color indicates the different signal strengths.
● Wireless Distribution System (WDS) ToseetheWDSconnectionbetweencompatibledevices. WDSismostcommonlyusedtoconnect2ormoreremotebuildings.

The ezWIFI Planner is a predictive modeling tool. We highly recommend that every predictive model be followed up with a site survey.
19
- Clickon“WDS”
o ClickonAPyouwanttostarttheWDSconnectionat
§ Youwillseea+appearovertheAP
o DragittotheotherAPyouareconnecting
- TheWDStoolwillautocalculateRSSIanddistance.
o YoucansetupforPtPorPtMP
§ ItwillappearREDiftheAPsaretoofarindistance.
§ ItwillappearBLUEtoindicateapositivesignalstrengthbetweenAPs
o WDScanbeusedwithanyEnGeniusWDSenableddevice
Note:PleaseensureWDSlinkshaveadequateRFlineofsite

The ezWIFI Planner is a predictive modeling tool. We highly recommend that every predictive model be followed up with a site survey.
20
Creating a Report The ezWIFI planner comes with a project-based report generator which covers all floor plans and perspectives. Users can choose from any specific floor plan and download them as a Word Document or a PDF.
● Run Report Generator for Project
○ To view project report, click the “REPORT” button for all floor plans and various
reports will display on the left panel
■ Environment Settings: To view all existing environment parameters that has
been set on floor plan, such as Wi-Fi Zones, Obstacles, etc.

The ezWIFI Planner is a predictive modeling tool. We highly recommend that every predictive model be followed up with a site survey.
21
■ AP Location: View all locations for APs on the floor plan without heatmap
coverage
■ AP List: A table of contents for all APs on floor plan
■ Signal Coverage: Heatmap view for all APs on floor plan
● Download as PDF
○ To download report, click “DOWNLOAD REPORT”. You can customize content
by selecting specific floor plans within your project.