the inspectorate of government online …
TRANSCRIPT

THE INSPECTORATE OF GOVERNMENT ONLINE
DECLARATION SYSTEM (IG-ODS)
USER MANUAL
MARCH, 2016
Page 1 of 93
Contents
CHAPTER 1
CHAPTER 1: BACKGROUND ........................................................................................................................... 4
1.0 INTRODUCTION ................................................................................................................................. 4
CHAPTER 2: OBJECTIVES OF THE IG - ODS USER MANUAL ........................................................................... 6
CHAPTER 3: REGISTRATION INTO THE IG-ODS .............................................................................................. 7
CHAPTER 4: ACCESS AND LOGIN TO THE IG-ODS........................................................................................ 11
4.2.0 Start/Complete declaration ........................................................................................................ 15
4.2.1 Navigating the Declaration form ................................................................................................. 17
CHAPTER 5: FILLING IN THE DECLARATION FORM ..................................................................................... 24
5.1 Filling in the Personal Details .......................................................................................................... 25
5.1.1 Personal Information .................................................................................................................. 27
5.1.2 Employment Details .................................................................................................................... 28
5.1.2.1 Current Employment Details ....................................................................................................... 29
5.1.2.2 Filling in Previous Employment Details ....................................................................................... 32
5.1.3 Spouses & Children ..................................................................................................................... 33
5.1.3.1 Spouse Details ............................................................................................................................. 33
5.1.3.2 Children and Dependants Details ............................................................................................... 35
5.2 Bank Accounts in Financial Institutions .......................................................................................... 37
5.2.1 Personal Bank Account Details ................................................................................................... 37
5.2.2 Spouse Bank Account Details ...................................................................................................... 40
5.2.3 Children/Dependant’s Bank Account Details .............................................................................. 41
5.3 Assets inside and outside Uganda .................................................................................................. 41
5.3.1 Filling in the Asset form Details. ................................................................................................. 42
5.3.2 Land inside and outside Uganda (Personal, Spouse, Children/Dependants) ............................. 44
5.3.2.1 Personal Land Details .................................................................................................................. 44
5.3.2.2 Spouse Land Details .................................................................................................................... 49
5.3.2.3 Filling in Children/Dependant’s Land Details .............................................................................. 50
5.3.3 Vehicles inside and outside Uganda (Personal, Spouse, Children/Dependants) ........................ 51
CHAPTER 6: CONFIRMATION AND SUBMISSION OF DECLARATION ........................................................... 89
CHAPTER 7: COMMUNICATION AND SUPPORT .......................................................................................... 92
Page 2 of 93
LIST OF FIGURES
Figure 001 - Invitation to Declare
Figure 002 - Email invitation to Declare
Figure 003 - Creating a password
Figure 004 - Login form
Figure 005 - IG-ODS Homepage
Figure 006 - Login form
Figure 007 - Login Token form
Figure 008 - Leader's profile page
Figure 009 - Declaration Form
Figure 010 - Sections of the form
Figure 011 - Form Content Area
Figure 012 - Add Button
Figure 013 - Edit Button
Figure 014 - Delete Button
Figure 015 - Save Button
Figure 016 - Next & Previous buttons
Figure 017 - Personal Details Form
Figure 018 - Add current employment
Figure 019 - Add Spouse
Figure 020 - select if you have no spouse
Figure 021 - select if you have no child / dependant
Figure 022 - Add Personal Bank Details
Figure 023 - Asset Details Form
Figure 024 - Add Personal Land
Figure 025 - Add Personal Vehicle
Figure 026 - Add securities
Figure 027 - Add Businesses inside and outside Uganda
Figure 028 - Add Debtor Details
Figure 029 - Add other assets inside and outside Uganda
Figure 030 - Add Personal Liabilties details
Figure 031 - Add other incomes and benefits
Page 3 of 93
ABREVIATIONS AND ACRYNOMS
IG - Inspectorate of Government
IGG - Inspector General of Governemet
LGs - Local Govermnents
MDAs - Ministries, Departments and Agencies
ODS - Online Declaration system
ODS NO - Online Declarations System Number
SMS - Short Message Services
Page 4 of 93
CHAPTER 1: BACKGROUND
1.0 INTRODUCTION
1.1 The Inspectorate of Government is a Constitutional body
established under Chapter 13 of the Constitution and
operationalised under the Inspectorate of Government Act, 2002.
One of the functions of the Inspectorate of Government as provided
under Chapter 14 of the Constitution, and specifically Article 234
thereof, is to enforce the Leadership Code of Conduct.
The Leadership Code Act, 2002 whose provisions constitute the
Leadership Code of Conduct commenced on 12th July 2002.
Specified Leaders submitted their declarations in October 2002 and
thereafter every two years in the month of March.
Article 233 (2) (a) of the Constitution and Section 4 of the
Leadership Code Act, 2002 requires specified leaders to declare to
the Inspector General of Government (IGG) their incomes, assets
and liabilities including those of their spouses, children and
dependants.
1.2 The submissions of Leader‟s declarations from 2002 to 2015 were
done manually. The system of using hard copies of declarations
forms was expensive to both the IG and the leaders. The physical
forms had to be procured and delivered to the leaders and this
process required a lot of money, time and man power. The leaders
had to physically return the forms and the IG had to engage man
power to receive them. There was need for data entrants to enter
Page 5 of 93
the information on the forms into the data base and these forms
needed a lot of space for their storage.
Due to the challenges experienced by the submission of manual
declaration forms, there was need to start receiving, processing and
managing declarations online.
1.3 The IG has developed an Online Declaration System that will
electronically receive and enter declarations into the Leadership
Code of Conduct (LCC) database. An electronic Declaration Form
has been designed and with effect from March 2016, Leaders shall
be required to submit their declarations of income, assets and
liabilities online.
An electronic Declaration Form has been designed and with effect
from March 2016 Leaders shall be required to submit their
declarations of income, assets and liabilities online. The Electronic
Declaration Form is operationalised by Section 4, and 38(1) of the
Leadership Code Act 2002, and General notice No. 125 of 2016.
1.4 An operational/User Manual for the Online Declaration System has
been developed to enable Leaders fill their declarations of income,
assets and liabilities online.
Page 6 of 93
CHAPTER 2: OBJECTIVES OF THE IG - ODS USER MANUAL
2.1 The objectives of the User Manual are;
To enable the leaders to access and register into the IG-Online
Declaration System and explain how the system operates.
To guide the leaders to fill the declaration forms online.
To ensure that leaders are able to accurately complete and
submit their declarations online.
To explain to the leaders the best security practices.
.
Page 7 of 93
CHAPTER 3: REGISTRATION INTO THE IG-ODS
3.1 Updating the leaders Register
(i) The Accounting Officers of the MDAs and LGs will submit to
the IG, names and reliable contacts specifically mobile phone
numbers and email addresses, of all leaders who are specified
in the Second Schedule of the Leadership Code Act, 2002. The
Accounting Officer is required to submit this information to IG
before 30th November prior to the declaration period using the
template appended.(Appendix 1)
(ii) Using the information provided by the Accounting officer, the
IG will update the Leaders‟ Register and create an IG-ODS
Number for each leader.
3.2 Invitation to Declare
(i) The Leader will receive an invitation to declare from the
Inspectorate of Government through his or her email address
that was provided.
(ii) The leader will also receive a notification of the invitation to
declare from 6009 on his or her mobile phone, bringing to
their attention the email.
Note: Make sure you are checking the correct email
address that was provided to the IG. If you do not find
the email in the inbox folder, check the spam/junk folder.

Page 8 of 93
(iii) The invitation email from the IG will appear as shown in the
figure below;
Figure 001
(iv) Click on the received email to open. The opened email will
appear as shown in the figure below:
Figure 002(figure to be updated)
This email will contain the following information:
1) IG-ODS Number (This a leader‟s login ID)
2) Link to create a PASSWORD
3) Link to access the system and start declaring
4) Link to the IG-ODS USER MANUAL
5) The deadline for declaration.

Page 9 of 93
3.3 IG-ODS NUMBER
The IG-ODS Number is your unique and login Identification
number created by the system during registration. It is a numeric
number with at least fourteen (14) digits. Do not forget your IG-
ODS Number because you need it to access the system during
the declaration period. Your IG-ODS Number will remain the
same even if your Leadership position changes but you remain a
specified officer required to declare.
3.4 Creating a Password
To create a password, follow the steps below;
(i) Open the email „Invitation to declare‟ sent by IG, click on the
“password set link” (See figure 002 above).
(ii) The set password page will open as seen in the figure below;
Figure 003

Page 10 of 93
(iii) Type your preferred PASSWORD in the “NEW PASSWORD”
field. Note that the Password should have a minimum of 8
characters. Please do not forget your password.
(iv) Re-type your preferred PASSWORD in the “CONFIRM
PASSWORD” field.
(v) Click “CHANGE MY PASSWORD” button to confirm your set
password.
(vi) After successfully creating a password, a leader is now ready
to log in.
(vii) Click the “Login” button to proceed.
(viii) The Login form will appear as shown in the figure below:
Figure 004

Page 11 of 93
CHAPTER 4: ACCESS AND LOGIN TO THE IG-ODS
4.1.1 Accessing the IG-ODS Form.
You can access the online declaration system in two ways:
a) Through the email “Invitation to declare to the IGG”
sent by the IG: Click the IG-ODS link to access the
system.
b) Through the IG website www.igg.go.ug: Click on the
„Declaration‟ Button to access the online declaration
system.
4.1.2 After clicking on the IG-ODS link or the Declaration button on the
IG website, the homepage /Login page will appear as shown in the
figure below:
Figure 005

Page 12 of 93
4.1.3 Click on the “Login to declare” button and the Login form will
appear as shown in the figure below:
Figure 006

Page 13 of 93
4.1.4 Fill in the Login form:
(a) Enter your IG-ODS NO that was received in the email
“invitation to declare to IGG” sent by the IG.
(b) Enter the PASSWORD that you created. (If you have
forgotten your password, please click the “Reset Password”
link and follow instructions to set a new password)
(c) Click LOGIN to proceed.
Upon clicking the Login button, you will receive a
LOGIN TOKEN from 6009 by SMS on your mobile
phone number.
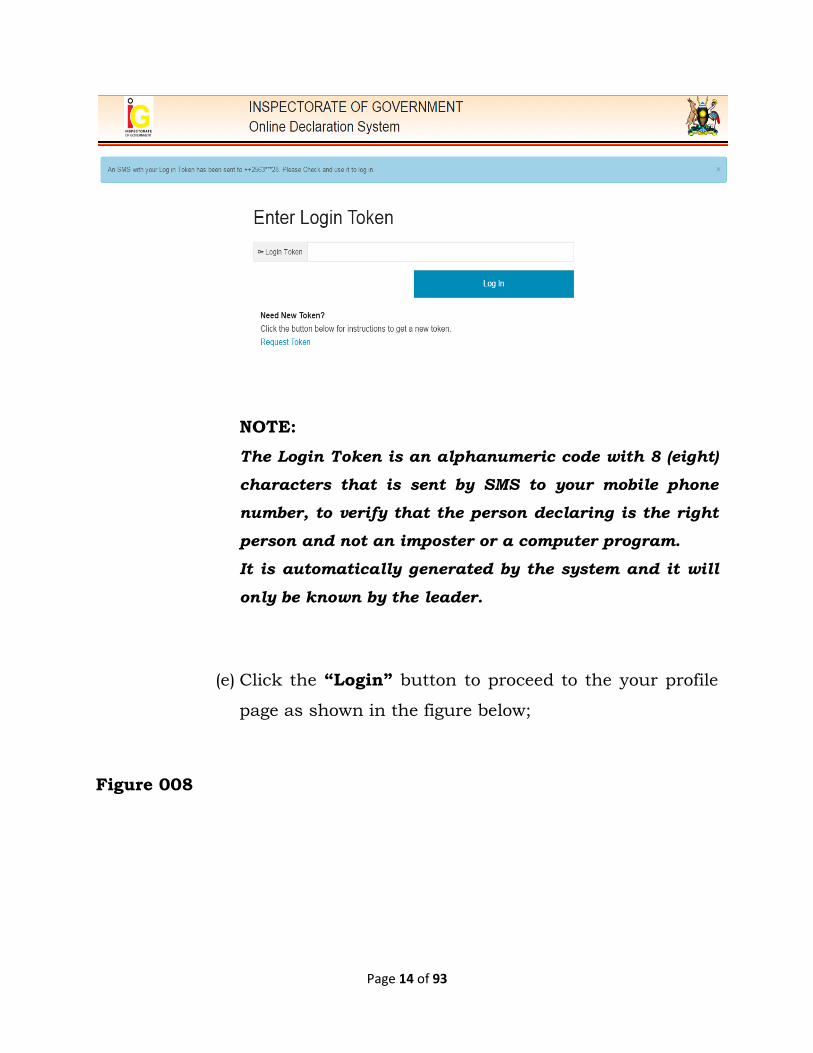
(d) Enter the received Login token in the Login Token form
as seen in the figure below;
Figure 007
Page 14 of 93
NOTE:
The Login Token is an alphanumeric code with 8 (eight)
characters that is sent by SMS to your mobile phone
number, to verify that the person declaring is the right
person and not an imposter or a computer program.
It is automatically generated by the system and it will
only be known by the leader.
(e) Click the “Login” button to proceed to the your profile
page as shown in the figure below;
Figure 008

Page 15 of 93
The User profile will display the following;
A welcome note with the leader‟s name e.g Welcome
Mukasa Mukasa.
IG-ODS Number/Login ID.
Name and Title of Leader e.g. Mukasa John, Director
Human Resource.
The current/ongoing declaration.
Notifications for the attention of the declarant.
A link to „help & manuals‟. (This will appear on
every page)
A button to start/Complete declaration
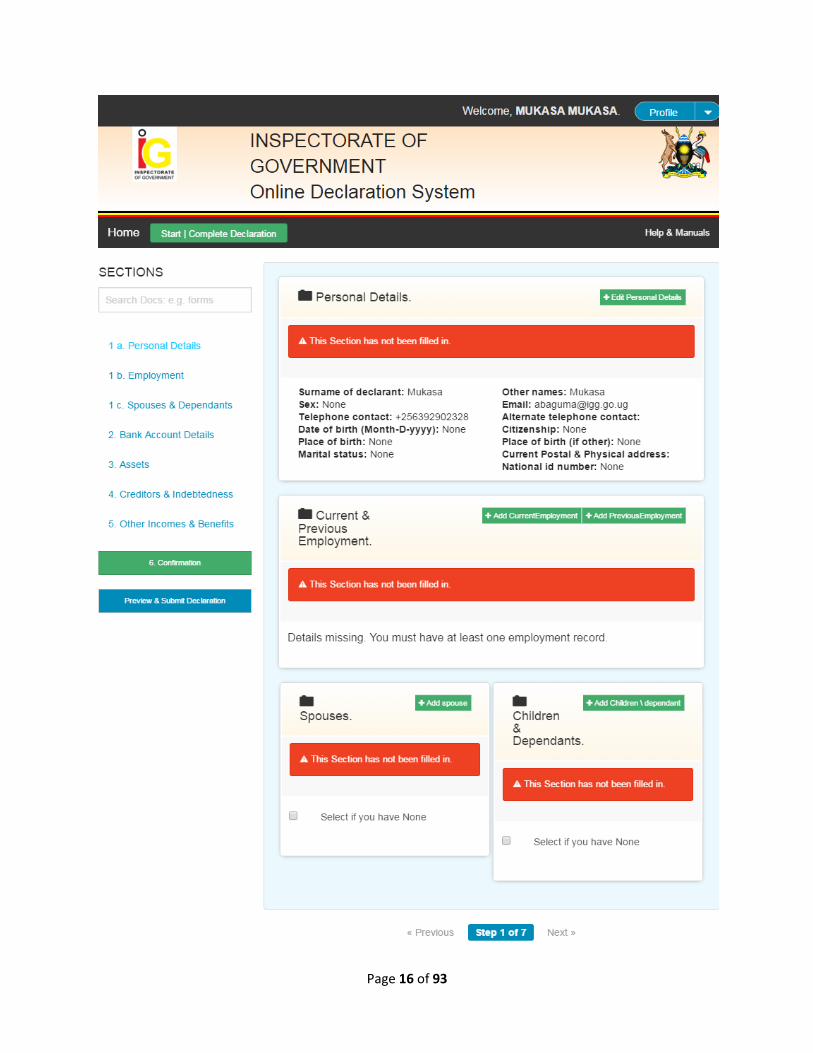
4.2.0 Start/Complete declaration
Click the “Start/Complete declaration” button to access the
declaration form which will appear as shown below:
Figure 009
Page 16 of 93

Page 17 of 93
Note: A leader can fill some sections of the form, save
and exit. A leader will be able to return later to
complete the filling in until the form is fully completed
and submitted. Please ensure that whatever you fill in
is saved.
4.2.1 Navigating the Declaration form
The declaration form page shown in figure 009 above is divided
into two namely; Sections of the form and the Form itself as
explained below;
4.2.1 Sections of the form
On the left hand side of the screen, is a Menu showing a list of the
different sections of the declaration form. It provides the quick links
to the different sections of the form as shown in the figure below;
Figure 010 - Sections of the form (add pen mark to show section)

Page 18 of 93
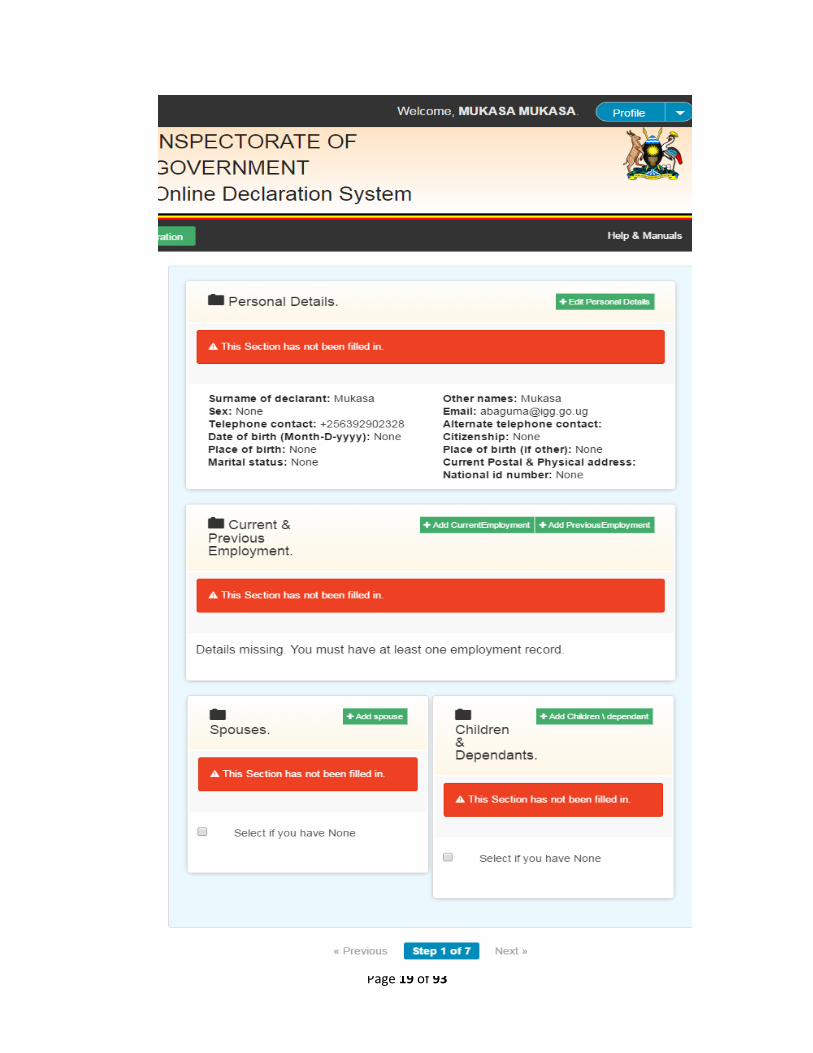
4.2.2 The Form
The active part of the Form to be filled will be displayed as shown
in the figure below;
Figure 011 - Form Content Area
Page 19 of 93
Page 20 of 93
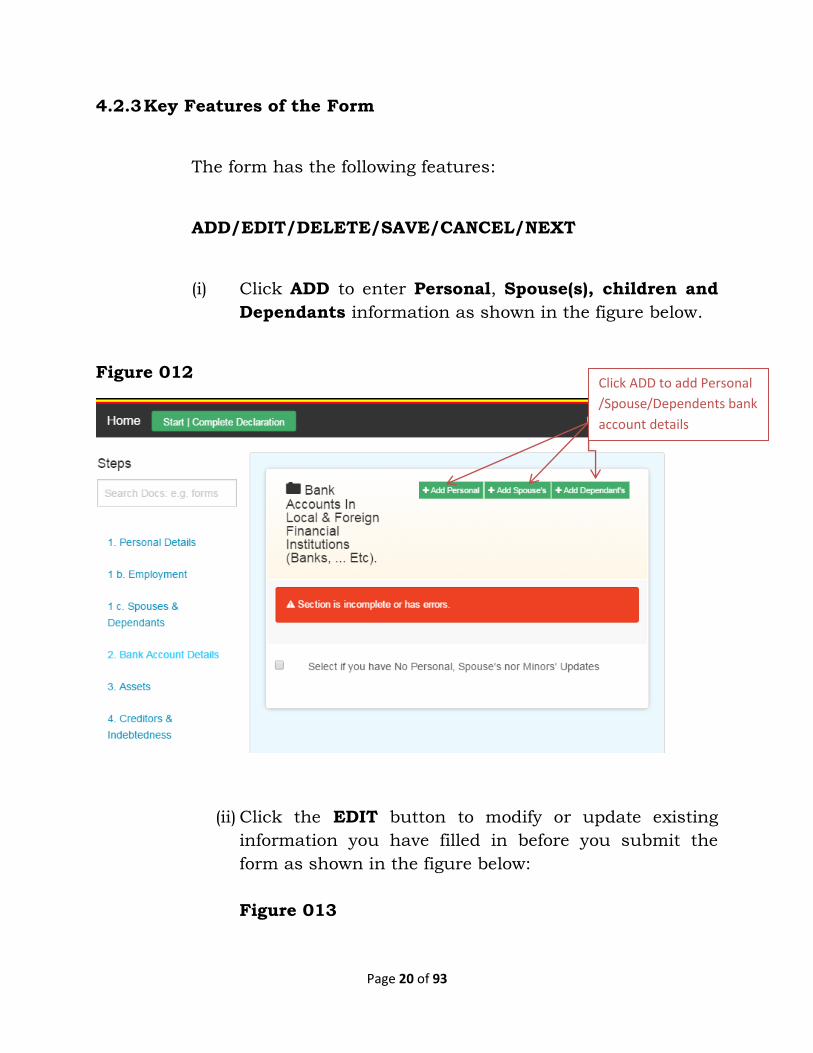
4.2.3 Key Features of the Form
The form has the following features:
ADD/EDIT/DELETE/SAVE/CANCEL/NEXT
(i) Click ADD to enter Personal, Spouse(s), children and
Dependants information as shown in the figure below.
Figure 012
(ii) Click the EDIT button to modify or update existing
information you have filled in before you submit the
form as shown in the figure below:
Figure 013
Click ADD to add Personal
/Spouse/Dependents bank
account details

Page 21 of 93
(iii) DELETE
In the event that you have entered and saved incorrect
information, use the Delete button to remove the
information. Unlike the „Edit button‟, if you click the
„Delete button‟ the selected information will be
completely removed or lost as shown in the figure below;
Figure 014
Click Edit to modify entered details.
You can edit Personal, Spouse,
children and Dependents details
Click to delete the selected record.
Page 22 of 93
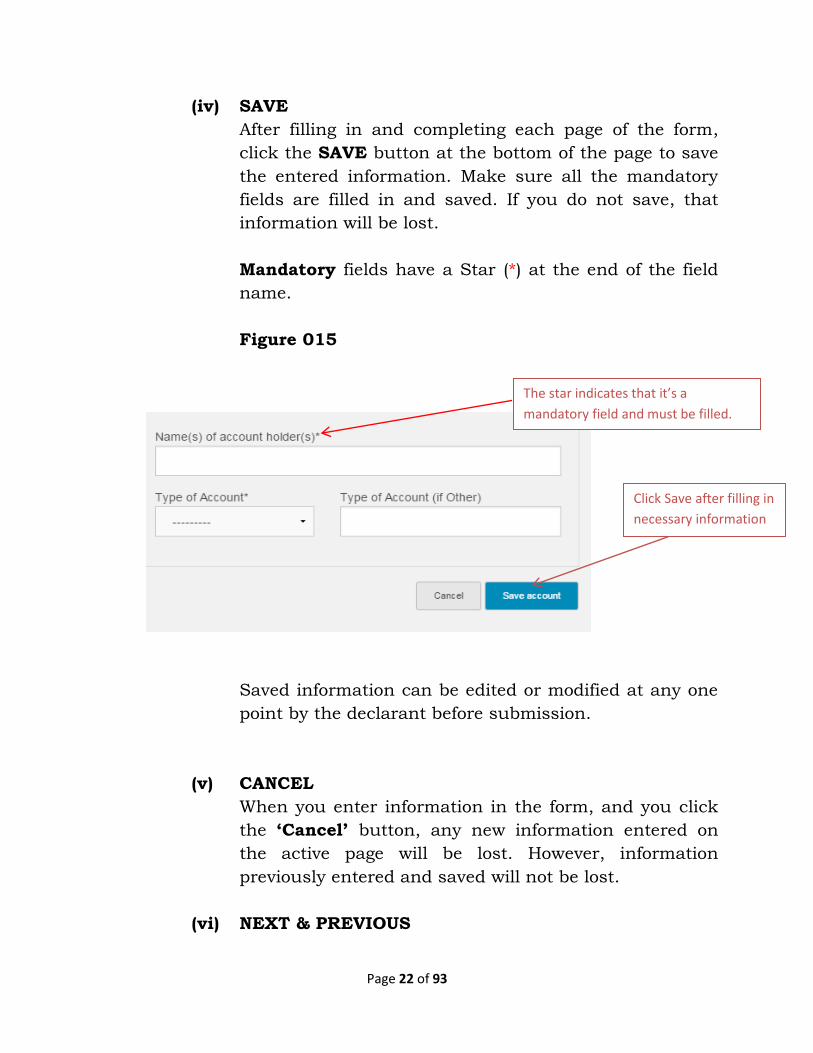
(iv) SAVE
After filling in and completing each page of the form,
click the SAVE button at the bottom of the page to save
the entered information. Make sure all the mandatory
fields are filled in and saved. If you do not save, that
information will be lost.
Mandatory fields have a Star (*) at the end of the field
name.
Figure 015
Saved information can be edited or modified at any one
point by the declarant before submission.
(v) CANCEL
When you enter information in the form, and you click
the „Cancel‟ button, any new information entered on
the active page will be lost. However, information
previously entered and saved will not be lost.
(vi) NEXT & PREVIOUS
Click Save after filling in
necessary information
The star indicates that it’s a
mandatory field and must be filled.

Page 23 of 93
Click “NEXT” button at the bottom of each section in
order to proceed to the next section.
Click “PREVIOUS” button at the bottom of each section
in order to go back to the previous section.(see figure
below)
Figure 016 (modify with pen)

Page 24 of 93
CHAPTER 5: FILLING IN THE DECLARATION FORM
The Declaration Form has 10 sections as detailed hereunder:
Section 1 - Personal Details with the following sub sections;
(a) Personal Information
(b) Employment
(c) Spouses and Children/dependants.
Section 2 - Bank Accounts in Financial Institutions
Section 3 - Land inside and outside Uganda
Section 4 - Vehicles inside and outside Uganda
Section 5 - Securities within and outside
Section 6 - Businesses within and outside Uganda
Section 7 - Debtors
Section 8 - Other assets within and outside Uganda
Section 9 - Creditors and Liabilities
Section 10 - Other Income and Benefits
Note: All these sections must be filled before submission.
Remember to save each section by clicking the save
button at the bottom of the page. If you click the
cancel button, the information entered will not be
saved.

Page 25 of 93
SECTION 1
5.1 Filling in the Personal Details
Under this section a Leader is required to fill in his/her personal
information, his/her spouse(s), children (below 18 years) and all
Dependants(regardless of age) as well his/her current and previous
employment record.
The Leadership Code Act defines:
A spouse as “a wife or husband” to the leader.
A dependant as “a person whose means of support is
partially or wholly from the leader”.
A Child as “a person under eighteen years of age”.
To add personal details click „Personal Details‟ from the quick
menu on the left hand side of the Computer Screen. The personal
details form will appear as shown in the figure below:
Figure 017

Page 26 of 93

Page 27 of 93
By default the personal details form will appear when you click the
button „Start|Complete Declaration‟.
5.1.1 Personal Information
To add personal information, please follow the steps below:
i. Click “Edit Personal Details” button and the form for
personal details will be displayed
Note: The Surname of declarant, Other Names, Email
and Telephone contacts are prefilled and cannot be
edited by the Declarant.
ii. Fill in the blank fields as guided here under:
a) Alternate telephone contact – Type in another
mobile telephone number that can be used to
contact you (if any).
b) Sex – Click to select the appropriate option.
c) Date of Birth – Type in your Date of Birth in the
following order Day-Month-Year (DD-MM-YYYY) or
select it from the calendar that appears.
d) Marital Status – Click to select the appropriate
option. If none of the given options apply to you,
select “other”.
e) Citizenship – click the drop down arrow select the
country of citizenship.

Page 28 of 93
f) Place of birth – Type the village or parish where
you were born in the “Place of birth” field and a
drop down of Country, District Sub-county, Parish
and Village will appear. Select and click on the
relevant place of birth. If your place of birth does
not appear in the drop down, proceed to the next
field name “Place of birth other” and type
Country, District, Sub-County, Parish and Village
in that order.
g) Current Postal & Physical address–Type your
current postal and physical address.
h) Save the Form – After correctly filling in the form,
click on the “Save” button to save the entered
information.
Note: If you have filled in all the fields, save and
close to proceed to next section of the form. If you
do not fill in all the fields, you will not be able to
save or proceed to the other sections of the form.
The form will display the incorrectly entered and
missing field(s) marked in red. Fill all the fields
marked red and save again.
5.1.2 Employment Details
In the employment section, a leader is required to fill in
current and previous employment details.

Page 29 of 93
It is advisable to have your employment documents like
appointment letters, employment contracts, current pay slips
among others to be able to accurately fill this section.
5.1.2.1 Current Employment Details
To add employment details follow the steps below:
i) Click “Employment” from the quick menu on the left
hand side of computer screen.
ii) Click “Add Current Employment” button and the form
for current employment details will be displayed as
shown in the figure below;
Figure 018

Page 30 of 93
(iii) Fill in the blank fields as guided here under:
a) Name of employer – Type your current employer
and select the relevant institution from the drop
down. If your current employer does not appear in
the drop down, proceed to the next field “Name of

Page 31 of 93
employer (if other)” and type the name of your
current employer
b) Rank/position/title – Type your current job title
whether substantive or acting.
c) Nature of employment - Click to select the
appropriate option.
d) Duration in years (if contract) – Type the
number of years of your current contract in
figures eg 1,2,3 etc.
e) Date appointed (Month-D-yyyy) – Click to select
the appropriate date of appointment in the
following order; Month-Day-Year (Month-D-YYYY).
f) Gross Salary per annum – Type in the gross
salary in figures. Note that gross salary per
annum is the total amount earned for 12 months
before Tax. Uganda Shillings is the default
currency. Click and specify the currency if you are
not paid in Uganda Shillings.
g) Allowances per Annum (approximate) – Type in
figures, the total amount of allowances earned in a
year. Uganda Shillings is the default currency.
Click and specify the currency if you are not paid
in Uganda Shillings.
h) Save employment record – After filling in all the
fields on the page, click on the “Save
employment record” button to save the entered
information.
Page 32 of 93
Note:
If you have filled in all the fields, save and
close to proceed to next section of the form.
If you do not fill in all the fields, you will not
be able to save or proceed to the other
sections of the form. The form will display
the incorrectly entered and missing field(s)
marked in red.
If you hold any other positions of leadership
e.g Board member, Member Contracts
Committee among others, you are required
to fill in details of those other positions. To
do this, repeat the above steps by clicking
“Add Current Employment”. Fill the form
and save. Repeat until all leadership
positions that you hold are declared.
5.1.2.2 Filling in Previous Employment Details
A leader is required to fill in the immediate last employment
details.
To do this Click “Add Previous Employment” and a form
similar to that of current employment will appear with the
title “Add Previous Employment”
Fill this form using the same steps as listed under the current
employment details form.

Page 33 of 93
NOTE: You may add various previous employment details.
5.1.3 Spouses & Children
Spouse
A spouse means a wife or husband to the leader. In case of
polygamous families a leader is required to declare all the
spouses.
5.1.3.1 Spouse Details
i. Click “Add Spouse” button and the form for Spouse
details will be displayed as shown in the figure below:
Figure 019
ii. Fill in the blank fields as guided here under:

Page 34 of 93
a) Full name – Type in the names of your Spouse.
b) Date of birth (Month-D-yyyy) – Click to select the
appropriate date of birth of the spouse in the
following order; Month-Day-Year (Month-D-YYYY).
c) Gender – Select the appropriate option.
d) Occupation – Type in your spouse‟s occupation.
e) Save spouse – After correctly filling in the form,
click on the “Save spouse” button to save the
entered information.
A leader is able to add as many spouses. To do this, after
saving, click the “Add Spouse” button again and follow the
steps above. Repeat the above steps until all the spouses are
declared.
If you have no spouse, click on the button with the words
“Select if you have none” as displayed in figure 17 below.
Confirm in order to proceed to the next section of the form.
Figure 020

Page 35 of 93
5.1.3.2 Children and Dependants Details
A child means a person under eighteen (18) years of age. If a
leader declares a child who is above 18 years the system will
reject the entry. Children above 18 years of age are
considered as dependants.
A dependant means a person whose means of support is
partially or wholly from the leader.
Filling in Children & Dependant Details
i. Click “Add Child/Dependant” button and the form for
Children and Dependants details will be displayed.
ii. Fill in the blank fields as guided here under:
a) Full name – Type in the names of your Child or
Dependant.
f) Date of birth (Month-D-yyyy) – Click to select the
appropriate date of birth of the child / dependant
in the following order; Month-Day-Year (Month-D-
YYYY).
Select this option if
you have none

Page 36 of 93
b) Gender – Select the appropriate option.
c) Relationship – Select the appropriate option.
d) Save Child/Dependant – After filling in all the
fields of the form, click on the “Save
Child/Dependant” button to save the entered
information
A leader is able to add as many children and dependants. To
do this, after saving, click the “add Child/Dependant”
button again and follow the steps above. Repeat the above
steps until all the children and dependants are declared.
If you have neither children nor dependants, click on the
button with the words “Select if you have none” and
confirm in order to proceed to the next section of the form as
shown in the figure below;
Figure 021
Select this option if
you have none

Page 37 of 93
SECTION 2
5.2 Bank Accounts in Financial Institutions
A leader is required to declare;
His or her personal bank accounts in both local and
foreign financial institutions.
His or her spouse(s) accounts in both local and foreign
financial institutions.
His or her children/dependants‟ bank accounts in both
local and foreign financial institutions.
Jointly held bank / financial accounts within and
outside Uganda.
Bank accounts include those held in banks, saving societies,
Micro Finance Institutions, electronic accounts among others.
5.2.1 Personal Bank Account Details
To add personal bank accounts follow the steps below;
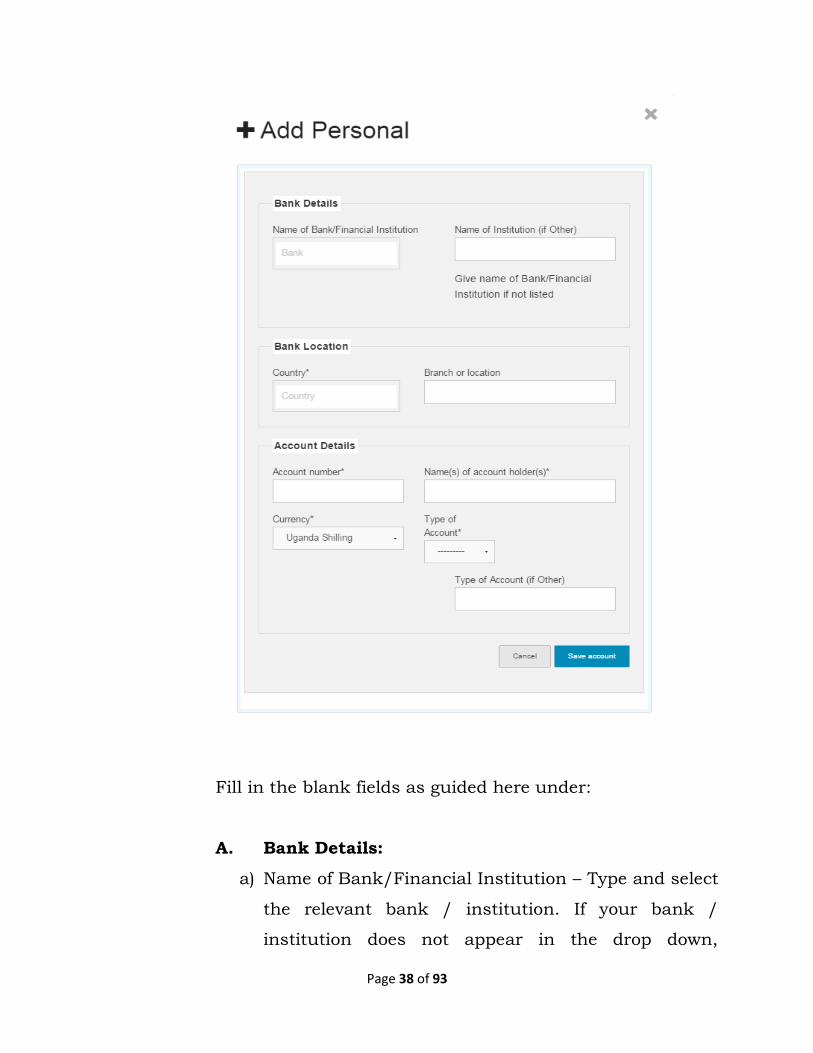
(i) Click “Add Personal” button and the form for personal bank
details will be displayed as shown in the figure below;
Figure 022
Page 38 of 93
Fill in the blank fields as guided here under:
A. Bank Details:
a) Name of Bank/Financial Institution – Type and select
the relevant bank / institution. If your bank /
institution does not appear in the drop down,
Page 39 of 93
proceed to the next field name “Name of institution
(if other)” and type the name of your Bank or
institution.
B. Bank Location:
a) Country – Click the drop down to select the country
where the bank / financial institution is located.
b) Branch or Location: Type your bank / institution
branch name and location.
C. Account Details:
a) Account number - Type in your bank /institution
account number.
b) Name(s) of account holder(s) – Type in the name(s) in
which the account is held.
c) Currency - Uganda Shillings is the default currency.
Click and specify the currency if your account is not
held in Uganda Shillings.
d) Type of account - Click and select from the dropdown
options. If your account type does not appear in the
drop down, select “other” and proceed to the next
field name “Type of Account (if other)” and enter
the appropriate account type.

Page 40 of 93
(ii) Save Account – After filling in all the fields of the form, click
on the “Save Account” button to save the entered
information.
You can add as many personal bank/financial accounts. To
do this, after saving, click the “Add Personal” button again
and follow the steps above. Repeat the above steps until all
the personal bank/financial accounts have been added.
5.2.2 Spouse Bank Account Details
A leader is required to fill in the bank/financial account
details of his or her spouse. To do this click “Add Spouse‟s”
and a form similar to that of Personal Bank Details will
appear with the title “Add Spouse‟s”.
Fill this form following the same steps as listed under the
personal bank details form except that you select the name of
the spouse from the dropdown.
Note: The names of spouse(s) entered in the personal
details form are automatically saved. Thus, on clicking
the spouse field under Bank details, a dropdown of
name(s) of the spouse(s) will appear. Select and click the
relevant name, fill the form and save.
Page 41 of 93
5.2.3 Children/Dependant‟s Bank Account Details
A leader is required to fill in the bank/financial account
details of his or her children / dependants. To do this click
“Add Dependant‟s” and a form similar to that of Personal
Bank Details will appear with the title “Add Dependant‟s”
Fill this form following the same steps as listed under the
personal bank details form except that you select the name of
the child/dependant from the dropdown.
Note: The names of children/dependant(s) entered in the
personal details form are automatically saved. Thus,
upon clicking the Child/Dependant field under Bank
detail a dropdown of name(s) of the Child(ren)
/dependant(s) will appear. Select and click the relevant
name, fill the form and save.
If you have no personal bank / financial accounts, click on
the button with the words “Select if you have none” and
confirm in order to proceed to the next section of the
Declaration form.
SECTION 3
5.3 Assets inside and outside Uganda
Asset means a thing owned by a person such as property which
has value and can be sold or used to pay a debt.
In this section, a leader is required to declare the following
i. Land inside and outside Uganda

Page 42 of 93
ii. Vehicles inside and outside Uganda
iii. Securities inside and outside Uganda iv. Businesses inside and outside Uganda v. Debtors inside and outside Uganda
vi. Other Assets inside and outside Uganda
A leader is also required to declare all assets belonging to him or
her, those of his or her spouse(s), children and dependants and the
jointly owned assets.
While filling in details of these sections please make sure you fill all
the mandatory fields. It is advisable to refer to documents like
Certificates of Title, Sale and Purchase Agreements, Vehicle Log
Books, Share Certificates, among others, to be able to give accurate
information.
5.3.1 Filling in the Asset form Details.
To add asset details click “Assets” from the quick menu on
the left hand side of the Computer Screen. The assets details
form will appear as shown in the figure below:
Figure 023

Page 43 of 93
In order to fill all sections of the form scroll down to show all
the sections you must fill.

Page 44 of 93
5.3.2 Land inside and outside Uganda (Personal, Spouse,
Children/Dependants)
The form for land details includes both developed and undeveloped land. To add Land inside and outside Uganda follow the steps
below;
5.3.2.1 Personal Land Details
(i) Click “Add Personal” button and the form for Land details
will be displayed as shown below;
Figure 024

Page 45 of 93
Fill in the blank fields as guided here under:
A. Location and Size
Tenure Type: Click to select the relevant tenure type. If the
relevant tenure type does not appear in the drop down select
“Other”, to proceed to the next field name “Tenure type
other” and enter the relevant tenure type.
Block number: Type in the Block number that appears on
the Certificate of Title of the Land (applies to Mailo and
Freehold Tenure systems).
Plot number: Type in the Plot number that appears on the
Certificate of Title of the Land (applies to Mailo, Leasehold
and Freehold Tenure systems).
Folio number: Type in the Folio number that appears on the
Certificate of Title of the Land (applies to Leasehold and
Freehold Tenure systems).
Volume number: Type in the Volume number that appears
on the Certificate of Title of the Land (applies to Leasehold
and Freehold Tenure systems).
Land Size: Type in the correct size of the Land e.g. 0.1, 0.25,
1.0, 2.0 etc. Do not type in the units e.g. Acres, hectares etc.

Page 46 of 93
Land Size Unit: Click to select the correct Land size unit e.g.
Acres, hectares, Square Kilometers, Square Miles etc.
Street or Road: Type in the street, road, avenue, close, link,
lane, as the case may be, where the Land is located.
Country: Click the dropdown to select the country where the
Land is located.
Location: Click the dropdown to select the country where the
Land is located. On clicking the drop down, you can type the
village or parish where the Land is located in the “Location”
field and a drop down of Country, District Sub-county, Parish
and Village will appear. Select and click on the relevant
Location. If the Location does not appear in the drop down,
proceed to the next field name “Location other” and type
Country, District, Sub-County, Parish and Village in that
order.
District as per land title: Type in the District of location as
indicated on the Certificate of Title.
County as per land title: Type in the County of location as
indicated on the Certificate of Title.
B. Details of ownership
Page 47 of 93
Name(s) of owner(s): Type in the name(s) of owner(s) of the
Land.
C. Details of acquisition and Price
Date Acquired (Month-D-yyyy) – Click to select the
appropriate date of acquisition of the land in the following
order; Month-Day-Year (Month-D-YYYY).
Acquisition type: Click to select the appropriate way in
which the land was acquired. If the relevant acquisition type
does not appear in the drop down, select “Other”, to proceed
to the next field name “Acquisition type other” and enter
the relevant acquisition type.
Cost at acquisition (approx.): Type in figures the amount of
money or the price at which the land was acquired.
Sources of Funds (if purchased): State the source of funds
used to purchase this Land.
Name of donor (if donated): If the Land was donated or
given to you as a gift, state the names of the person(s) who
donated it to you.
Relationship to donor (if donated): State your relationship
with the person who gave you the Land.

Page 48 of 93
Name of decedent (if inherited): If the Land was inherited
state the names of the person who bequeathed or left it to you
Relationship to decedent (if inherited): State your
relationship with the person who gave you the Land.
D. Details of development
Nature of developments: Click to select the relevant
developments on the Land.
Specify Nature of developments: If the Land is developed
describe the developments there on e.g. if you have selected;
o Buildings specify whether it is a school, residential
house(s), office block, and hotel as the case may be.
o Agriculture specify the type of agricultural activities
being carried out e.g. livestock farming, crop growing,
plantations (coffee, tea, sugar cane, banana ….) etc.
If developed by self, fill in the following fields;
Development costs: Type in the estimated cost incurred to
carry out the developments on the Land.
Date development started: (Month-D-yyyy) – Click to select
the appropriate date development of this land started in the
following order; Month-Day-Year (Month-D-YYYY).
Date development ended: (Month-D-yyyy) – Click to select
the appropriate date development of the land ended in the
following order; Month-Day-Year (Month-D-YYYY).

Page 49 of 93
Source of funds for development: State the source of funds
used to develop this Land.
E. Usage and Income details
Usage type: Click and select the relevant usage type from the
dropdown. If the usage does not appear in the Drop down,
select “other” and proceed.
Income per annum: If the Land is used for commercial
purposes type is the amount of money generated per annum/
year.
Currency - Uganda Shillings is the default currency. Click
and specify the currency if the income is received in another
currency.
Save Land – After filling in all the fields of the form, click on
the “Save Land” button to save the entered information.
You can add as many pieces of Land as you own. To do this,
after saving, click the “add Personal” button again and follow
the steps above. Repeat the above steps until all the pieces of
Land that belong to you have been declared.
5.3.2.2 Spouse Land Details

Page 50 of 93
A leader is required to fill in the Land details of his or her
spouse. To do this click on the “Add Spouse‟s” button and a
form similar to that of Personal Land Details will appear with
the title “Add Spouse‟s”.
Fill this form following the same steps as listed under the
personal Land details form except that you select the name of
the spouse from the dropdown.
Note: The name of spouses(s) entered in the personal
details form are automatically saved. Thus, on clicking
the spouse field under Land details, a dropdown of
name(s) of the spouse(s) will appear. Click to select the
relevant name, fill the form and save. Repeat the steps
until all pieces of land belonging to your spouse(s) are
declared.
5.3.2.3 Filling in Children/Dependant‟s Land Details
A leader is required to fill in the Land details of his or her
children / dependants. To do this click the “Add
Dependant‟s” button and a form similar to that of Personal
Land Details will appear with the title “Add Dependant‟s”.
Fill this form following the same steps as listed under the
Personal Land details form except that you select the name of
the child/dependant from the dropdown.
Note: The names of children/ dependant(s) entered in the
personal details form are automatically saved. Thus, on
clicking the Child/Dependant field under Land details, a
dropdown of name(s) of the Child(ren) /dependant(s) will
Page 51 of 93
appear. Click and select the relevant names, fill the form and
save. Repeat the steps until all pieces of land belonging to your
Children / Dependants are declared.
If there is no Land inside or outside Uganda belonging to you,
your spouse(s), Children and Dependants, click on the button
with the words “Select if you have none” and confirm in
order to proceed to the next section of the Declaration form.
SECTION 4
5.3.3 Vehicles inside and outside Uganda (Personal, Spouse,
Children/Dependants)
To add vehicles inside and outside Uganda follow the steps
below;
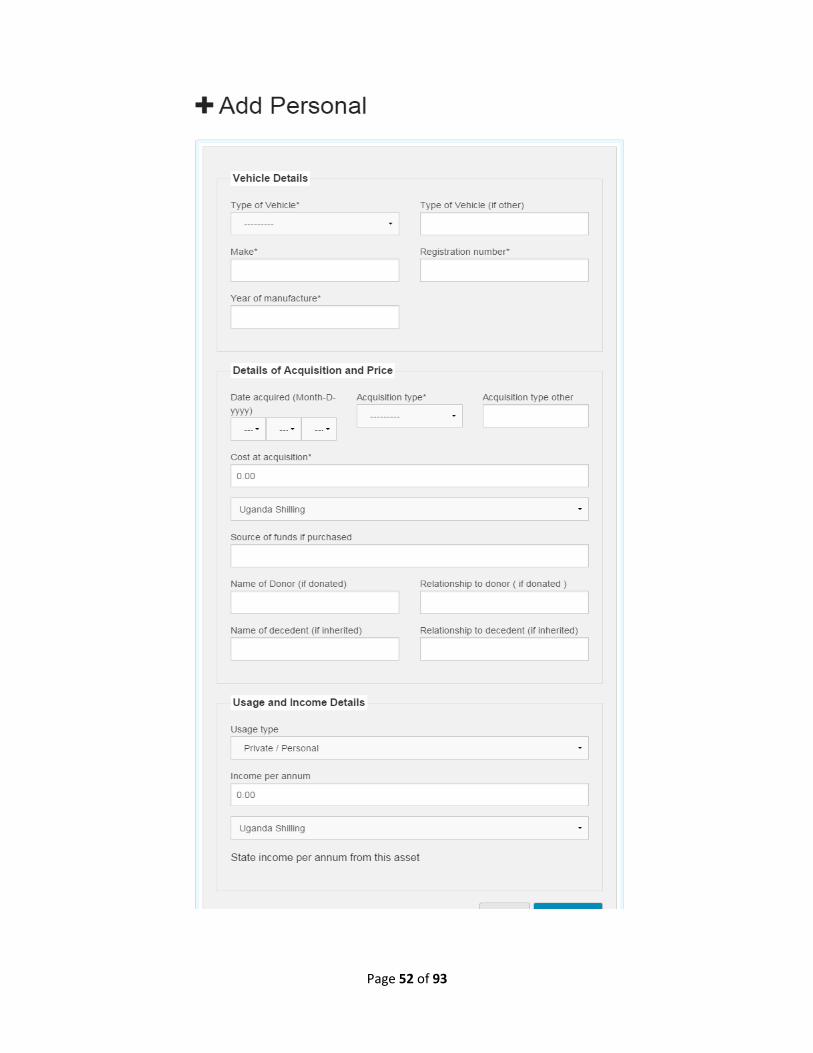
5.4.1 Click “Add Personal” button and the form for Personal
vehicle details will be displayed as shown in figure below:
Figure 025
Page 52 of 93

Page 53 of 93
Fill in the blank fields as guided here under:
(A) Vehicle Details:
Type of vehicle: Click to select from the dropdown options. If the
type of vehicle does not appear in the drop down, select “other”
and proceed to the next field name “Type of vehicle (if other)”
and enter the appropriate type of vehicle.
Make: Type in the make of the vehicle as indicated in the log book.
Registration number: Type in the registration number of the
vehicle as indicated in the log book.
Year of manufacture: Type in the year of manufacture of the
motor vehicle.
(B) Details of acquisition and Price
Date Acquired (Month-D-yyyy) – Click to select the
appropriate date of acquisition of the vehicle in the following
order; Month-Day-Year (Month-D-YYYY).
Acquisition type: Click to select the appropriate way in
which the vehicle was acquired. If the relevant acquisition
type does not appear in the drop down select “Other”, to
proceed to the next field name “Acquisition type other” and
enter the relevant acquisition type.
Page 54 of 93
Cost at acquisition (approx.): Type in figures the cost or the
price at which the vehicle was acquired.
Source of Funds (if purchased): State the source of funds
used to purchase the vehicle.
Name of donor (if donated): If the vehicle was donated or
given to you as a gift, state the names of the person who
donated it to you.
Relationship to donor (if donated): state your relationship
with the person who gave you the vehicle.
Name of decedent (if inherited): If the vehicle was inherited
state the names of the person who bequeathed or left it to you
Relationship to decedent (if inherited): state your
relationship with the person who gave you the vehicle.
(C) Usage and Income details
Usage type: Click and select the relevant usage type from the
dropdown. If your usage type does not appear in the drop down, select “other” and proceed.
Income per annum: If the vehicle is used for commercial purposes type in the amount of money generated per annum/
year.

Page 55 of 93
Currency: Uganda Shillings is the default currency. Click and
specify the currency if the income is received in another currency.
Save Vehicle: After filling in all the fields of the form, click on the “Save Vehicle” button to save the entered
information.
You can add as many vehicles. To do this, after saving, click
the “add Personal” button again and follow the steps above.
Repeat the above steps until all the vehicles that belong to
you have been declared.
5.4.2 Filling in Spouse Vehicle Details
A leader is required to fill in the vehicle details of his or her
spouse. To do this click “Add Spouse‟s” and a form similar
to that of Personal Vehicle Details will appear with the title
“Add Spouse‟s”.
Fill this form following the same steps as listed under the
personal Vehicle details form except that you select the name
of the spouse from the dropdown.
Note: The names of spouse(s) entered in the personal
details form are automatically saved. Thus, on clicking
the spouse field under Vehicle details, a dropdown of
name(s) of the spouse(s) will appear. Select and click the
relevant name, fill the form and save. Repeat the steps
until all vehicles belonging to your spouse(s) are
declared.

Page 56 of 93
5.5.3 Filling in Children/Dependant‟s Vehicle Details
A leader is required to fill in the Vehicle details of his or her
children / dependants. To do this click “Add Dependant‟s”
and a form similar to that of Personal Vehicle Details will
appear with the title “Add Dependant‟s”.
Fill this form following the same steps as listed under the
personal vehicle details form except that you select the name
of the child/dependant from the dropdown.
Note: The names of children/dependant(s) entered in the
personal details form are automatically saved. Thus, on
clicking the Child/Dependant field under Vehicle details,
a dropdown of name(s) of the Child/dependant(s) will
appear. Select and click the relevant name, fill the form
and save. Repeat the steps until all vehicles belonging to
your Children / Dependants are declared.
If there is no vehicle inside or outside Uganda belonging to you,
your spouse(s), Children and Dependants, click on the button with
the words “Select if you have No Personal, Spouse‟s nor
Children‟s updates” and confirm in order to proceed to the next
section of the Declaration form.

Page 57 of 93
SECTION 5
5.3.0 Securities inside and outside Uganda (Personal, Spouse,
Children/Dependants)
To add Securities inside and outside Uganda follow the steps below;
5.3.1 Click “Add Personal” button and the form for Personal securities
will be displayed as shown below;
Figure 026

Page 58 of 93
Page 59 of 93
Fill in the blank fields as guided here under:
A) Details of Investment in Securities:
(i) Company name – Type in the name of the company or
institution in which the securities are held.
(ii) Security type - Click and select the appropriate type of security
that you hold. If the relevant type of security does not appear in
the drop down select “Other”, to proceed to the next field name
“Security type other” and enter the relevant type of security.
(iii) Name of security holder(s) - Type in the names of the security
holders.
B) Details of acquisition and Price
(i) Date Acquired (Month-D-yyyy) – Click to select the appropriate date of acquisition of the security in the following order; Month-Day-Year (Month-D-YYYY).
(ii) Acquisition type: Click and select the appropriate way in which the security was acquired. If the relevant acquisition type does not appear in the drop down select “Other”, to proceed to the next field name “Acquisition type other” and enter the relevant acquisition type.
(iii) Price at acquisition (approx.): Type in figures the amount of money or the price at which the security was acquired.
(iv) Sources of Funds (if purchased): State the source of funds used to purchase this security.
(v) Name of donor (if donated): If the security was donated or given to you as a gift, state the names of the person who donated it to you.
(vi) Relationship to donor (if donated): state your relationship with
the person who gave you the security.

Page 60 of 93
(vii) Name of decedent (if inherited): If the security was inherited state the names of the person who bequeathed or left it to you.
(viii) Relationship to decedent (if inherited): state your relationship with the person who gave you the security.
C) Location
(i) Country: Click, type and select the country where the securities are held.
D) Income details
(i) Income per annum: type in the amount of money generated per
annum/ year from the investment in the securities.
(ii) Currency: Uganda Shillings is the default currency. Click and specify the currency if the income is received in another currency.
(iii) Save Investment in Securities: After filling in all the fields in the form, click on the “Save Investment in Securities” button
to save the entered information.
You can add as many investments in securities. To do this,
after saving, click the “add Personal” button again and follow
the steps above. Repeat the above steps until all the
investments in securities that belong to you have been
declared.
5.6.2 Filling in Spouse Investment in Securities

Page 61 of 93
A leader is required to fill in details of the investment in securities
of his or her spouse. To do this click “Add Spouse‟s” and a form
similar to that of Personal Investments in Securities will appear
with the title “Add Spouse‟s”.
Fill this form following the same steps as listed under the Personal
Investments in Securities form except that you select the name of
the spouse from the dropdown.
Note: The names of spouse(s) entered in the personal
details form are automatically saved. Thus, on clicking
the spouse field under Personal Investments in
Securities, a dropdown of name(s) of the spouse(s) will
appear. Select and click the relevant name, fill the form
and save. Repeat the steps until all Investments in
Securities belonging to your spouse(s) are declared.
5.6.3 Filling in Children/Dependant‟s Investments in Securities
A leader is required to fill in the Investments in securities of
his or her children / dependants. To do this click “Add
Dependant‟s” and a form similar to that of Personal
Investments in Securities will appear with the title “Add
Dependant‟s”.
Fill this form following the same steps as listed under the
Personal Investments in Securities form except that you select
the name of the child/dependant from the dropdown.
Note: The name of children/dependant(s) entered in the
personal details form are automatically saved. Thus, on
clicking the Child/Dependant field under Investments in

Page 62 of 93
Securities, a dropdown of name(s) of the
Child/dependant(s) will appear. Select and click the
relevant name, fill the form and save. Repeat the steps
until all investments in securities belonging to your
Children / Dependants are declared.
5.6.4 If there are no investments in securities inside or outside Uganda
belonging to you, your Spouse(s), Children and Dependants, click
on the button with the words “Select if you have No Personal,
Spouse‟s nor Children‟s updates” and confirm in order to proceed
to the next section of the Declaration form.

Page 63 of 93
SECTION 6
5.4.0 Businesses inside and outside Uganda(Personal, Spouse,
Children/Dependants)
To add Businesses inside and outside Uganda follow the steps
below;
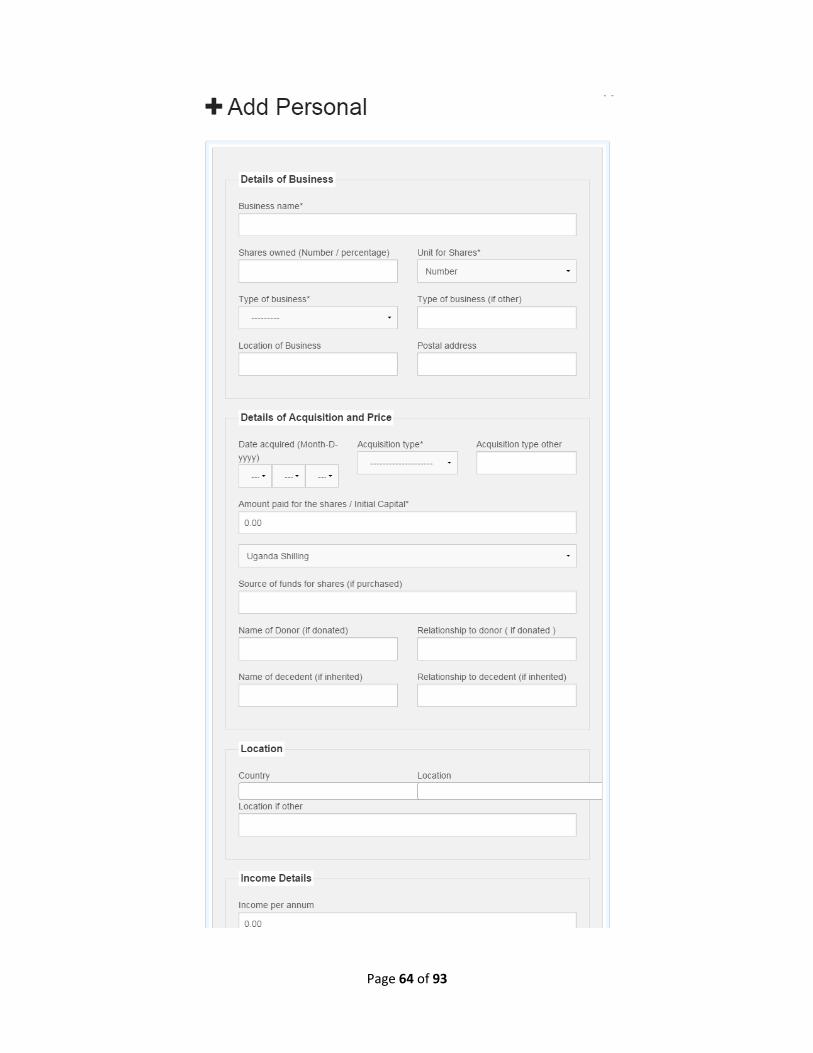
5.4.1 Click “Add Personal” button and the form for Personal Business‟
details will be displayed as shown in below;
Figure 027
Page 64 of 93

Page 65 of 93
Fill in the blanks as guided here under:
(A) Details of Business:
(i) Company name – Type in the name of the
company or business.
(ii) Shares owned (Number / Percentage) – Type in
the number of shares you own in the business.
Type in number or percentage of shares owned.
(iii) Unit for shares – Click and select the appropriate
unit in which the shares are owned.
(iv) Type of business - Click and select the
appropriate type of business that you own. If the
relevant type of business does not appear in the
drop down select “Other”, to proceed to the next
field name “Type of business (if other)” and
enter the relevant type of Business.
(v) Location of business - Type the location where
the business is located.
(vi) Postal address – Type the postal address of the
business.
(B) Details of acquisition and Price
(i) Date Acquired (Month-D-yyyy) – Click to select
the appropriate date of acquisition of the business
in the following order; Month-Day-Year (Month-D-
YYYY).
(ii) Acquisition type: Click and select the appropriate
way in which the business was acquired. If the
relevant acquisition type does not appear in the

Page 66 of 93
drop down select “Other”, to proceed to the next
field name “Acquisition type other” and enter the
relevant acquisition type.
(iii) Amount paid for the shares / Initial
Capital: Type in figures the amount of money paid
for the shares or the initial capital to acquire the
business.
(iv) Source of Funds (if purchased): State the
source of funds used to acquire this business.
(v) Name of donor (if donated): If the business was
donated or given to you as a gift, state the names
of the person who donated it to you.
(vi) Relationship to donor (if donated): state
your relationship with the person who gave you
the business.
(vii) Name of decedent (if inherited): If the
business was inherited state the names of the
person who bequeathed or left it to you
(viii) Relationship to decedent (if inherited):
state your relationship with the person who gave
you the business.

Page 67 of 93
C) Location
(i) Country: Click, type and select the country where the business
is located.
(ii) Location: Click and type the village or parish where the Land is
located in the “Location” field. A drop down of Country, District
Sub-county, Parish and Village will appear. Select and click on
the relevant Location. If the Location does not appear in the
drop down, proceed to the next field name “Location other”
and type Country, District, Sub-County, Parish and Village in
that order.
D) Income details
(i) Income per annum: type in the amount of money generated per
annum/ year from the business.
(ii) Currency - Uganda Shillings is the default currency. Click and
specify the currency if the income is received in another
currency.
(iii) Save Business – After correctly filling in the form, click on the
“Save business” button to save the entered information.
NOTE: You can add many more personal businesses. To do
this, after saving, click the “add Personal” button again and
Page 68 of 93
follow the steps above. Repeat the above steps until all the
businesses that belong to you have been declared.
5.7.2 Filling in Spouse Businesses
A leader is required to fill in details of businesses of his or her
spouse. To do this click “Add Spouse‟s” and a form similar
to that of Personal businesses Securities will appear with the
title “Add Spouse‟s”.
Fill this form following the same steps as listed under the
Personal business form except that you select the name of the
spouse from the dropdown.
Note: The name of spouses(s) entered in the personal
details form are automatically saved. Thus, on clicking
the spouse field under details of business, a dropdown of
name(s) of the spouse(s) will appear. Select and click the
relevant name, fill the form and save. Repeat the steps
until all businesses belonging to your spouse(s) are
declared.
5.7.3 Filling in Children/Dependant‟s Businesses
A leader is required to fill in the details of the businesses of
his or her children / dependants. To do this click “Add
Dependant‟s” and a form similar to that of Personal business
will appear with the title “Add Dependant‟s”.

Page 69 of 93
Fill in this form following the same steps as listed under the
Personal business form except that you select the name of the
child/ dependant from the dropdown.
Note: The names of children/dependant(s) entered in the
personal details form are automatically saved. Thus, on
clicking the Child/Dependant field under Details of
Business, a dropdown of name(s) of the
Child/dependant(s) will appear. Select and click the
relevant name, fill the form and save. Repeat the steps
until all businesses belonging to your Children /
Dependants are declared.
If there are no business inside or outside Uganda belonging to you,
your spouse(s), Children and Dependants, click on the button with
the words “Select if you have No Personal, Spouse‟s nor
Children‟s updates” and confirm in order to proceed to the next
section of the Declaration form.

Page 70 of 93
SECTION 7 5.5.0 Debtors inside and outside Uganda (Personal, Spouse,
Children/Dependants)
5.5.1 To add Debtors inside and outside Uganda follow the steps below;
Click “Add Personal” button and the form for Personal Debtors‟
details will be displayed as shown below;
Figure 028

Page 71 of 93
Fill in the blanks as guided here under:
A) Details of Debtor:
(i) Full name – Type in the name(s) of your debtor.
(ii) Country – Click, type and select the country where your debtor
is located.
(iii) Amount lent to the debtor - Type in figures the amount of
money lent to your debtor.

Page 72 of 93
(iv) Outstanding amount of loan – Type in figures the outstanding
amount of the loan.
(v) Interest rate (%)–Type in percentage the interest charged on the
loan.
(vi) Due date - Click to select the appropriate date when complete
recovery of the debt is expected in the following order; Month-
Day-Year (Month-D-YYYY).
B) Details of Acquisition:
(i) Date acquired (Month-D-yyyy): Click to select the appropriate
date on which the loan was given out in the following order
Day-Month-Year (DD-MM-YYYY) or select it from the calendar
that appears.
(vii) Source of funds lent out: State the source of the funds lent out
to the debtor.
(viii) Save debtor: After filling in all the fields of the form, click on the
“Save debtor” button to save the entered information.
You can add many more personal debtors. To do this, after
saving, click the “add Personal” button again and follow the
steps above. Repeat the above steps until all the personal
debtors that have been declared.
Page 73 of 93
5.7.2 Filling in Spouse‟s debtors
A leader is required to fill in details of debtors belonging to his or
her spouse. To do this click “Add Spouse‟s” and a form similar to
that of Personal debtors will appear with the title “Add Spouse‟s”.
Fill this form following the same steps as listed under the Personal
debtors form except that you select the name of the spouse from
the dropdown.
Note: The name of spouses(s) entered in the personal details
form are automatically saved. Thus, on clicking the spouse
field under details of debtor, a dropdown of name(s) of the
spouse(s) will appear. Select and click the relevant name, fill
the form and save. Repeat the steps until all debtors
belonging to your spouse(s) are declared.
5.7.3 Filling in Children/Dependant‟s debtors
A leader is required to fill in details of debtors belonging to his or
her children / dependants. To do this click “Add Dependant‟s”
and a form similar to that of Personal debtors will appear with the
title “Add Dependant‟s”.
Fill this form following the same steps as listed under the Personal
debtor‟s form except that you select the name of the child/
dependant from the dropdown.
Note: The names of child (ren) /dependant(s) entered in the
personal details form are automatically saved. Thus, on

Page 74 of 93
clicking the Child/Dependant field under Details of Debtor, a
dropdown of name(s) of the Child/dependant(s) will appear.
Select and click the relevant name, fill the form and save.
Repeat the steps until all debtors belonging to your Children /
Dependants are declared.
If there are no debtors inside or outside Uganda belonging to you,
your spouse(s), Children and Dependants, click on the button with
the words “Select if you have No Personal, Spouse‟s nor
Children‟s updates” and confirm in order to proceed to the next
section of the Declaration form.

Page 75 of 93
SECTION 8
5.6.0 Other assets inside and outside Uganda (Personal, Spouse,
Children/Dependants)
5.6.1 To add other assets inside and outside Uganda follow the steps
below;
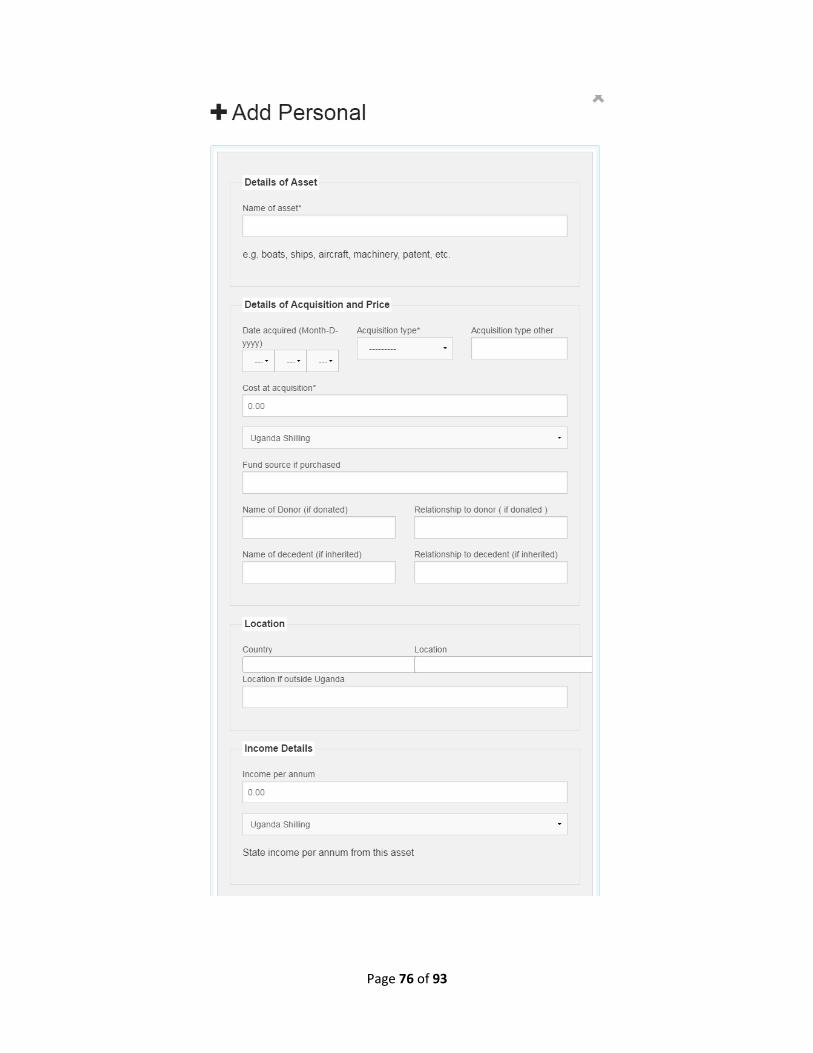
(i) Click “Add Personal” button and the form for other Personal
Assets‟ details will be displayed as shown below:
Figure 029
Page 76 of 93

Page 77 of 93
Fill in the blank fields as guided here under:
A. Details of Asset:
(i) Name of asset – Type in the name of the asset.
B. Details of acquisition and Price
(i) Date acquired (Month-D-YYYY): Click to select the appropriate
date on which the asset was acquired in the following order
Month-Day-Year (Month-D-YYYY).
(ii) Acquisition type: Click to select the appropriate way in which
the asset was acquired. If the relevant acquisition type does not
appear in the drop down select “Other”, to proceed to the next
field name “Acquisition type other” and enter the relevant
acquisition type.
(iii) Cost at acquisition: Type in figures the cost or the price at
which the asset was acquired.
(iv) Sources of Funds (if purchased): State the source of funds
used to acquire this asset.
(v) Name of donor (if donated): If the asset was donated or given to
you as a gift, state the names of the person who donated it to
you.
(vi) Relationship to donor (if donated): state your relationship with
the person who gave you the asset.

Page 78 of 93
(vii) Name of decedent (if inherited): If the asset was inherited state
the names of the person who bequeathed or left it to you
(viii) Relationship to decedent (if inherited): state your relationship
with the person who gave you the asset.
C. Location
(i) Country: Click, type and select the country where the asset is
located.
(ii) Location: Click, type the village or parish where the asset is
located in the “Location” field and a drop down of Country,
District Sub-county, Parish and Village will appear. Select and
click on the relevant Location. If the Location does not appear in
the drop down, proceed to the next field name “Location other”
and type Country, District, Sub-County, Parish and Village in
that order.
D. Income details
(i) Income per annum: type in the amount of money generated per
annum/ year from the asset
(ii) Currency: Uganda Shillings is the default currency. Click and
specify the currency if the income is received in another
currency.
Page 79 of 93
(iii) Save other asset: – After correctly filling in the form, click on
the “Save other asset” button to save the entered information.
You can add many more other assets. To do this, after
saving, click the “add Personal” button again and follow the
steps above. Repeat the above steps until all the other assets
that belong to you have been declared.
5.8.2 Filling in Spouse(s)‟ other assets
A leader is required to fill in details of other assets belonging
to his or her spouse. To do this click “Add Spouse‟s” and a
form similar to that of Personal other assets will appear with
the title “Add Spouse‟s”.
Fill this form following the same steps as listed under the
Personal other assets form except that you select the name of
the spouse from the dropdown.
Note: The name of spouses(s) entered in the personal
details form are automatically saved. Thus, on clicking
the spouse field under details of Asset, a dropdown of
name(s) of the spouse(s) will appear. Select and click the
relevant name, fill the form and save. Repeat the steps
until all other assets belonging to your spouse(s) are
declared.

Page 80 of 93
5.8.3 Filling in Children/Dependant‟s other assets
A leader is required to fill in details of other assets belonging
to his or her children / dependants. To do this click “Add
Dependant‟s” and a form similar to that of Personal other
assetswill appear with the title “Add Dependant‟s”.
Fill this form following the same steps as listed under the
Personal other assetsform except that you select the name of
the child/ dependant from the dropdown.
Note: The names of child(ren) /dependant(s) entered in
the personal details form are automatically saved.
Thus, on clicking the Child/Dependant field under
Details of Asset, a dropdown of name(s) of the
Child/dependant(s) will appear. Select and click the
relevant name, fill the form and save. Repeat the steps
until all other assets belonging to your Children /
Dependants are declared.
If there are no other assets inside or outside Uganda belonging to
you, your spouse(s), Children and Dependants, click on the button
with the words “Select if you have No Personal, Spouse‟s nor
Children‟s updates” and confirm in order to proceed to the next
section of the Declaration form.

Page 81 of 93
SECTION 9
5.9.0 Creditors & Indebtedness
Liabilities Inside and Outside Uganda
5.9.1 To add liabilities inside and outside Uganda follow the steps below;
(i) Click “Add Personal” button and the form for Personal
Liabilities details will be displayed as shown below;
Figure 030
Page 82 of 93
Fill in the blanks fields as guided here under:
(A) Details of Liability:
(i) Name of creditor: Type in the name(s) of your creditor.
(ii) Type of liability: Click to select the appropriate type of liability.
If the relevant type of liability does not appear in the drop down
select “Other”, to proceed to the next field name “Liability type
other” and enter the relevant type of liability.
(iii) Address of creditor: Type in the address of the creditor.
(iv) Amount incurred: Type in figures of the amount of money
incurred from the creditor.
(v) Uganda Shillings: is the default currency. Click and specify the
currency if the liability is incurred in another currency.
(vi) Date incurred (Month-D-YYYY): Click to select the appropriate
date when the liability was incurred in the following order
Month-Day-Year (Month-D-YYYY).
(vii) Purpose of liability: Type in the purpose of the liability.
(viii) Terms of repayment: Type in the terms of repayment of the
liability e.g. monthly, quarterly, semi annually repayments etc.
(ix) Source of funds for repayment: State the source of funds for
repayment of the liability
Page 83 of 93
(x) Save liability – After filling in all the fields of the form, click on
the “Save liability” button to save the entered information.
You can add many more personal liabilities. To do this, after
saving, click the “add Personal” button again and follow the
steps above. Repeat the above steps until all the personal
liabilities have been declared.
5.9.2 Filling in Spouse‟s liabilities
A leader is required to fill in details of liabilities belonging to his or
her spouse. To do this click “Add Spouse‟s” and a form similar to
that of Personal liabilities will appear with the title “Add
Spouse‟s”.
Fill this form following the same steps as listed under the Personal
liabilities form except that you select the name of the spouse from
the dropdown.
Note: The name of spouses(s) entered in the personal details
form are automatically saved. Thus, on clicking the spouse
field under details of liability, a dropdown of name(s) of the
spouse(s) will appear. Select and click the relevant name, fill
the form and save. Repeat the steps until all liabilities
belonging to your spouse(s) are declared.

Page 84 of 93
5.9.3 Filling in Children/Dependant‟s debtors
A leader is required to fill in details of liabilities belonging to his or
her children / dependants. To do this click “Add Dependant‟s”
and a form similar to that of Personal liabilities will appear with the
title “Add Dependant‟s”.
Fill this form following the same steps as listed under the Personal
liabilities‟ form except that you select the name of the child/
dependant from the dropdown.
Note: The names of child(ren) /dependant(s) entered in the
personal details form are automatically saved. Thus, on
clicking the Child/Dependant field under Details of liability, a
dropdown of name(s) of the Child/dependant(s) will appear.
Select and click the relevant name, fill the form and save.
Repeat the steps until all liabilities belonging to your
Children / Dependants are declared.
If there are no Liabilities inside and outside Uganda belonging to
you, your spouse(s), Children and Dependants, click on the button
with the words “Select if you have No Personal, Spouse‟s nor
Children‟s updates” and confirm in order to proceed to the next
section of the Declaration form.

Page 85 of 93
SECTION 10
5.10.0 Other incomes & Benefits
5.10.1 To add other Incomes & Benefits inside and outside Uganda
follow the steps below;
(i) Click “Add Personal” button and the form for other Personal
incomes & benefits‟ details will be displayed as shown below;
Figure 031
(ii) Fill in the blank fields as guided here under:
A. Details of Other income:
(i) Name of income source – Type in the name of the income
source.

Page 86 of 93
(ii) Type of income - Click and select the appropriate type of
income. If the relevant type of income does not appear in the
drop down select “Other”, to proceed to the next field name
“Type of income other” and enter the relevant income type.
(iii) Price/Amount of income- Type in figures the amount of money
received from the source of income. Uganda Shillings is the
default currency. Click and specify the currency if the liability is
incurred in another currency.
(iv) Date acquired (dd-mm-yyyy): Click to select the appropriate
date on which the income was acquired in the following order;
Month-Day-Year (Month-D-YYYY).
(v) Save Other Income/Benefit – After filling in all the fields of the
form, click on the “Save Other Income/Benefit” button to save
the entered information.
You can add many more other Incomes/Benefits. To do this,
after saving, click the “add Personal” button again and follow
the steps above. Repeat the above steps until all the other
incomes/ Benefits that belong to you have been declared.
5.10.2 Filling in Spouse other Incomes & Benefits
A leader is required to fill in details of other incomes &
benefits earned by his or her spouse. To do this click “Add
Page 87 of 93
Spouse‟s” and a form similar to that of other personal
incomes & benefits will appear with the title “Add Spouse‟s”.
Fill this form following the same steps as listed under the
other personal incomes & benefits form except that you select
the name of the spouse from the dropdown.
Note: The name of spouses(s) entered in the personal
details form are automatically saved. Thus, on clicking
the spouse field under Details of Other Income, a
dropdown of name(s) of the spouse(s) will appear. Select
and click the relevant name, fill the form and save.
Repeat the steps until all other incomes & benefits
belonging to your spouse(s) are declared.
5.10.3 Filling in Children/Dependant‟s other incomes & benefits
A leader is required to fill in details of other incomes &
benefits belonging to his or her children / dependants. To do
this click “Add Dependant‟s” and a form similar to that of
other personal incomes & benefits will appear with the title
“Add Dependant‟s”.
Fill this form following the same steps as listed under the
other personal incomes & benefits form except that you select
the name of the child/ dependant from the dropdown.
Note: The names of child(ren) /dependant(s) entered in
the personal details form are automatically saved.
Thus, on clicking the Child/Dependant field under
Details of Other Income, a dropdown of name(s) of the

Page 88 of 93
Child/dependant(s) will appear. Select and click the
relevant name, fill the form and save. Repeat the steps
until all other income & benefits belonging to your
Children / Dependants are declared.
If there are no other Incomes & Benefits inside or outside Uganda
earned by you, your spouse(s), Children and Dependants, click on
the button with the words “Select if you have No Personal,
Spouse‟s nor Children‟s updates” and confirm in order to proceed
to the next section of the Declaration form.
Page 89 of 93
CHAPTER 6: CONFIRMATION AND SUBMISSION OF DECLARATION
6.0 Confirmation
Confirmation of the declaration form is done when all the sections of
the form have been filled.
To confirm declaration follow the steps below;
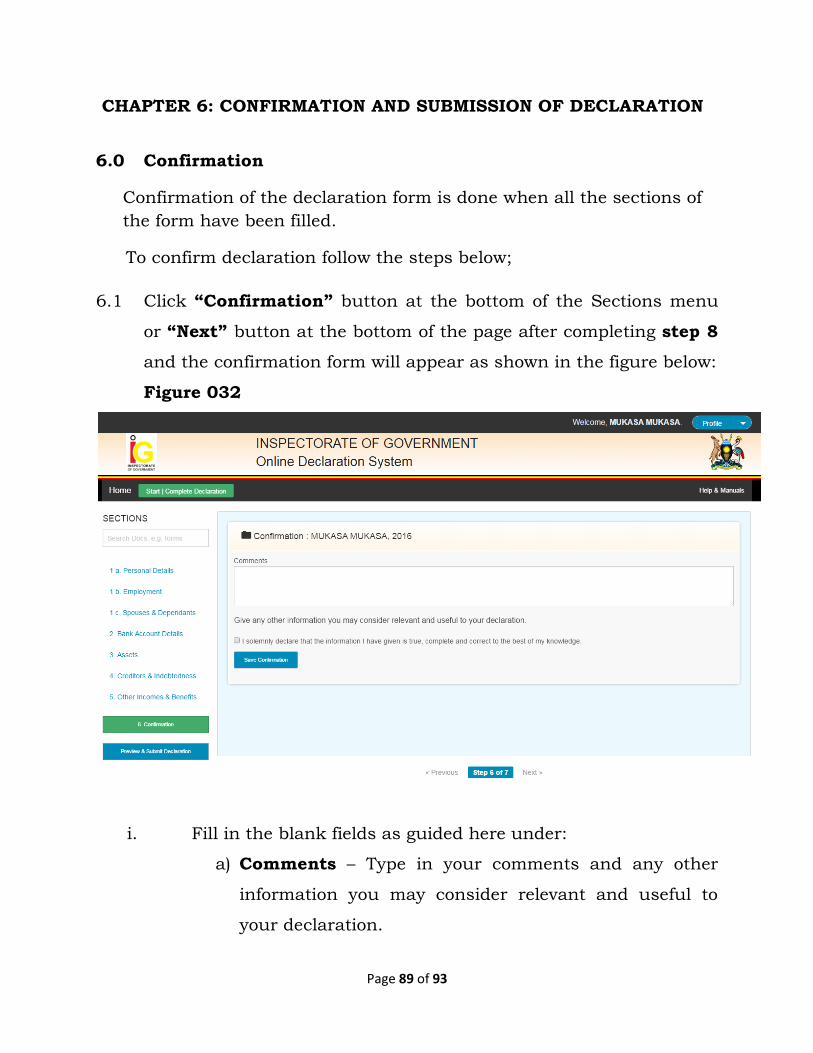
6.1 Click “Confirmation” button at the bottom of the Sections menu
or “Next” button at the bottom of the page after completing step 8
and the confirmation form will appear as shown in the figure below:
Figure 032
i. Fill in the blank fields as guided here under:
a) Comments – Type in your comments and any other
information you may consider relevant and useful to
your declaration.
Page 90 of 93
b) Click the check box with the words “ I solemnly
declare that the information I have given is true,
complete and correct to the best of my knowledge”
c) Click on the “Save Confirmation” button to confirm
and save your declaration.
A report of the declared form is displayed. Read through
it thoroughly.
d) Scroll down to the bottom of the report.
e) Click the button “Print before submission (last
chance) to print a copy of the form. The printed copy
belongs to you.
f) Submit declaration – Click on the “Submit
declaration” button to submit your declaration. You
will immediately receive a submission Token on your
phone.
g) Type the submission Token in the IG-ODS token
submission token form. (see figure 033 below)
Figure 033

Page 91 of 93
h) Click “Submit” to complete submission of declaration.
“Cancel” – You can click “Cancel” in order to review
your information, and print out a copy for filing.
However, if you click “Cancel”, your declaration will not
be submitted. The declaration will only be submitted
when you click the “Submit” button again.
i) You will receive an acknowledgement slip on your email
address.
Page 92 of 93
CHAPTER 7: COMMUNICATION AND SUPPORT
A leader can get help through the following options;
(i) Click the Help & Manuals button on the top right hand corner
of the IG-ODS system to access the user‟s manual which
provides a step by step guide on how to fill the form.
(ii) Contact the Accounting Officer of your institution e.g.
Permanent Secretary, Chief Administration Officer, Town
Clerk etc or the IG-ODS Focal Person of your institution
(iii) Contact or visit the nearest Regional Inspectorate of
Government Office.
(iv) Visit the IG headquarters, Directorate of Leadership Code
For more information, please call 0414-231183 or send an email to
[email protected] or visit the IG website www.igg.go.ug.
Notes (recommendations):
List of acronyms
Contacts (At the beginning of the manual – refer to Parliament report
HQ, DLC, Land line, 2 Mobile numbers, Website, Email address)