the incubation handbook - brinsea products ltd. introduction 1.1. preface this handbook has been...
TRANSCRIPT

Incubation Specialists
The INCUBATION HANDBOOK

CONTENTS
1. Introduction Page Describes the characteristics of the two types of hatched chick and the conditions
required by eggs for successful incubation.
1.1. Preface 2 1.2. Incubation Basics 2 1.3. Precocial and Altricial Species 2
2. The Egg Details the stages of development of the embryo, the dietary requirements of the parent
birds and correct conditions for storing eggs prior to incubation.
2.1. Embryo Development 3 2.2. Nutrition of the Egg 5 2.3. Storage and Handling of Eggs 6
3. Incubator Construction and Function Describes the general form and construction of commercially available incubators and how
they work. Temperature, humidity and egg turning requirements are discussed in detail
3.1. Introduction 7 3.2. Still Air Incubators 7 3.3. Forced Draft Incubators 8 3.4. Contact Incubators 9 3.5. Design Requirements for Successful Hatching 11
4. Monitoring of Eggs and the Incubator Describes the techniques and calculations used to measure the development of the egg
and the incubator conditions.
4.1. Candling 15 4.2. Measuring Humidity and Weight Loss 16
5. Troubleshooting Table of problems likely to be encountered and the possible causes of these problems. 18
6. Species Reference Table Incubation data for commonly bred species. 21
2
Brinsea – The Incubation Specialists Incubation Handbook
1. Introduction
1.1. Preface
This handbook has been written to provide the reader with a knowledge of incubation principles and a practical guide to incubation techniques. It describes the process of embryo development and how incubators are designed to provide the ideal conditions for this process. The handbook deals with problems likely to be encountered and gives recommendations for overcoming them as well as useful calculation tools for monitoring the development of the egg. Although much of the scientific data is based on poultry eggs it is generally applicable to all species. Where differences exist these are explained.
1.2. Incubation basics
All bird eggs require five environmental conditions to be controlled to enable the correct development of the embryo:
• The egg must be maintained at the right temperature to enable the metabolic processes within the developing embryo to occur at the correct rate.
• The egg must be frequently turned and carefully positioned so that the embryo passes through fresh nutrients in the white of the egg, while forming in the correct position for hatching.
• The egg loses water through pores in the shell. The humidity of the air around it must be controlled to ensure the right amount of water is lost over the incubation period.
• The egg “breathes” so there must be a supply of fresh air to provide oxygen and to remove waste carbon dioxide. Eggs are susceptible to infection so the incubator must provide a clean, disinfected environment.
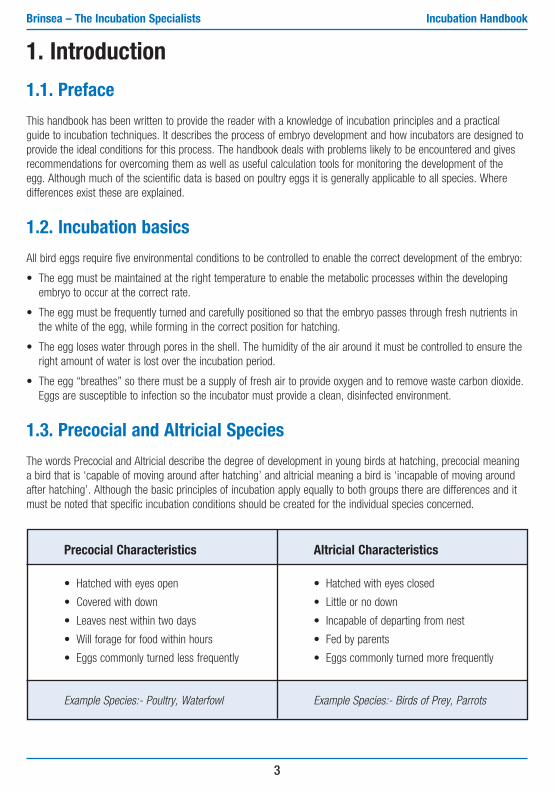
1.3. Precocial and Altricial Species
The words Precocial and Altricial describe the degree of development in young birds at hatching, precocial meaning a bird that is ‘capable of moving around after hatching’ and altricial meaning a bird is ‘incapable of moving around after hatching’. Although the basic principles of incubation apply equally to both groups there are differences and it must be noted that specific incubation conditions should be created for the individual species concerned.
Precocial Characteristics Altricial Characteristics
• Hatched with eyes open • Hatched with eyes closed
• Covered with down • Little or no down
• Leaves nest within two days • Incapable of departing from nest
• Will forage for food within hours • Fed by parents
• Eggs commonly turned less frequently • Eggs commonly turned more frequently
Example Species:- Poultry, Waterfowl Example Species:- Birds of Prey, Parrots
3
Brinsea – The Incubation Specialists Incubation Handbook

2. The Egg
2.1. Embryo Development (based on hen egg)
The yolk is dropped from the ovary into the unfundibilum where it is fertilised by the male sperm if present.
The embryo commences development while the yolk travels down the egg canal. Here it receives coatings of white.
The egg progresses to the shell gland where it receives membranes and forms the shell itself.
This process takes approximately 20 hours, in which time the embryo grows to about 4mm in diameter. The egg is laid.
After the egg is laid it cools and growth slows or stops. Many birds (but not all) accumulate a ‘clutch’ of eggs before commencing incubation. During this ‘storage’ time temperature is preferably between 0 and 20°C but some species tolerate more extreme temperatures. However, embryonic death is a risk if extremes are maintained.
In the first day of incubation a line called the primitive streak appears. This allows the formation of a third layer of cells. From these new cells the organs of the body will form. The cells are made up in three layers called ectoderm, mesoderm and endoderm.
Ectoderm forms the skin, feathers, beak, nervous system, claws eyes and mouth. Mesoderm forms the skeleton, muscle, blood and reproductive organs. Endoderm forms the respiratory organs, secretary system and digestive system.
By the end of the first day’s incubation, the head, eyes, nervous system and blood island have started to form. The heart is formed on the second day and is functioning by 44 hours.
On the fourth day the heart changes from its simple form and becomes a fully formed beating heart.
During this time extra membranes are formed to produce the amniotic sack. The embryo will now float in the amniotic fluid for the rest of incubation.
The amniotic fluid and turning of the egg ensure the embryo orients itself correctly for hatching.
By the fourth day, legs and wing buds begin to form and the heart is still positioned outside the body.
4
2 DAYS
FERTILISATIONAND FIRST 24 HOURS
INFERTILE
FERTILEEMBRYO4mm DIAON YOLK
AIR CELL EMBRYO
YOLK
4 DAYS
BLOOD VEINS
Brinsea – The Incubation Specialists Incubation Handbook
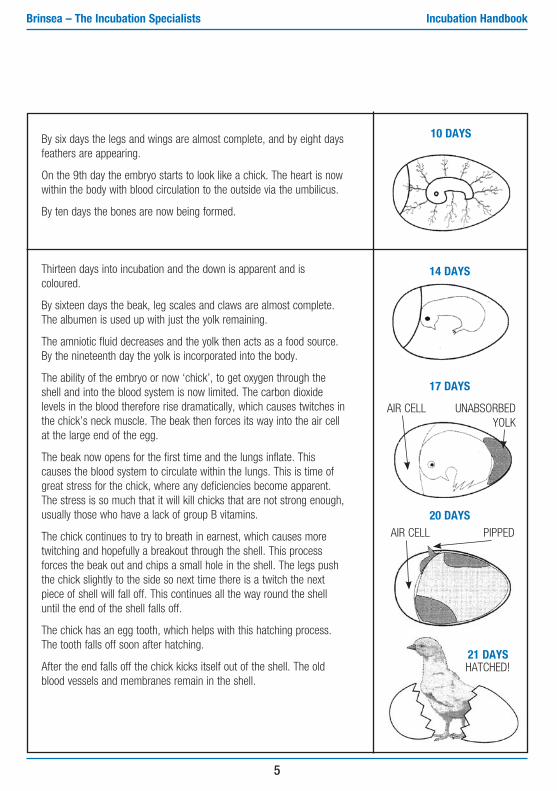
By six days the legs and wings are almost complete, and by eight days feathers are appearing.
On the 9th day the embryo starts to look like a chick. The heart is now within the body with blood circulation to the outside via the umbilicus.
By ten days the bones are now being formed.
Thirteen days into incubation and the down is apparent and is coloured.
By sixteen days the beak, leg scales and claws are almost complete. The albumen is used up with just the yolk remaining.
The amniotic fluid decreases and the yolk then acts as a food source. By the nineteenth day the yolk is incorporated into the body.
The ability of the embryo or now ‘chick’, to get oxygen through the shell and into the blood system is now limited. The carbon dioxide levels in the blood therefore rise dramatically, which causes twitches in the chick’s neck muscle. The beak then forces its way into the air cell at the large end of the egg.
The beak now opens for the first time and the lungs inflate. This causes the blood system to circulate within the lungs. This is time of great stress for the chick, where any deficiencies become apparent. The stress is so much that it will kill chicks that are not strong enough, usually those who have a lack of group B vitamins.
The chick continues to try to breath in earnest, which causes more twitching and hopefully a breakout through the shell. This process forces the beak out and chips a small hole in the shell. The legs push the chick slightly to the side so next time there is a twitch the next piece of shell will fall off. This continues all the way round the shell until the end of the shell falls off.
The chick has an egg tooth, which helps with this hatching process. The tooth falls off soon after hatching.
After the end falls off the chick kicks itself out of the shell. The old blood vessels and membranes remain in the shell.
5
14 DAYS
17 DAYS
20 DAYS
10 DAYS
AIR CELL
AIR CELL PIPPED
HATCHED!
UNABSORBED YOLK
21 DAYS
Brinsea – The Incubation Specialists Incubation Handbook

2.2. Nutrition of the Egg
The egg is composed of many nutrients that come from the parent so, to ensure a healthy hatched chick, the parent needs plenty of nutrients at least two weeks prior to laying. The most important vitamins and minerals are as follows:-
• Vitamin A – Sources of this vitamin are in green feeds, yellow vegetables, maize and synthetic compounds. The vitamin can be easily destroyed by light and heat. A lack of this vitamin is a common cause of poor hatchability, weak chicks and poor disease resistance.
• Vitamin D – The raw source of this vitamin is in sunlight. Chicks kept indoors will need supplements. A lack of it causes week bones that will bend and deform. Also eggshells may become deformed, resulting in complications of the chick’s use of shell calcium that in turn makes control of moisture loss difficult.
• Vitamin E – The source of this is in seed germs – i.e. wheat. A deficiency results in poor hatches of chicks that are weak and do not thrive. Most deaths occur due to circulatory failure in which the walls of the blood vessels are ruptured.
• Vitamin K – This can be found in most green feed. A gross deficiency will cause haemorrhages over the body of the chicks. In eggs, deaths may occur in turning due to severe bumping or sudden jarring.
2.3. Storage and Handling of Eggs
The quality of the chick all depends on the quality of the egg. It is essential that care is taken in the storage and handling of the eggs. It must be emphasised that the eggs cannot be improved once laid, and will only deteriorate with poor storage and handling. The following factors will help to ensure an egg is of best possible quality:-
NOTE:- Eggs should be stored with pointed end down.
• Temperature Ideal storage temperature is between 12ºC and 15ºC (50 – 69ºF). Too high a storage temperature and some
incubation can commence but at the wrong rate. This will decrease the chances of the embryo developing normally. If storage temperature is below freezing the cell structure of the egg can break down and prevent the embryo developing.
6
• Vitamins in the B Group – Vitamin B1 – Thiamine – Vitamin B2 – Riboflavin
• Nicotinic Acid or Niacin
• Vitamin B6 Pyridoxine
• Pantothenic Acid
• Biotin
• Folic Acid
• Vitamin B12
• Minerals
• Calcium
• Phosphorous
• Manganese
• Magnesium
• Zinc
Brinsea – The Incubation Specialists Incubation Handbook

2.3. Storage and Handling of Eggs (continued)
• Humidity The best humidity level at which to store eggs is between 75 to 85% RH to avoid significant drying out of the egg
before incubation.
• Time in Storage Depending on species, it is preferable that eggs should not be kept for more than 7 days prior to incubation.
Between 7 and 14 days hatchability begins to decrease considerably. Vitamins decay and membranes breakdown in time and so the embryo can often suffer early mortality.
• Cleanliness Cracked, mis-shaped and heavily soiled eggs should be discarded (if possible). Soiled eggs may be cleaned using
a brand egg wash solution such as Brinsea Incubation Disinfectant Concentrate following the manufacturers instructions. It is essential to wash eggs in solution that is significantly warmer than the egg so that expansion in the egg causes flow out through the pores rather than dirty water flowing inwards. Bear in mind that all solutions will remove the outer cuticle from the egg as well as the dirt and may leave the egg at greater risk from bacterial contamination in the future.
• Turning During Storage Eggs should be turned once a day, 45 degrees each way, back and forth through 90º during the storage period.
Insufficient turning can cause the yolk to float and touch membranes near the shell. If the embryo touches then it may stick and prevent growth once inside the incubator.
• Handle Eggs Carefully Eggs should be handled with care as severe bumping may rupture the yolk membranes, even if the shell remains
undamaged. Reasonable care should also be taken during incubation also. A bump can rupture blood vessels causing the chick to bleed to death.
• Collection of Eggs Generally the best time to collect eggs is before 9am, and to check again at lunchtime. Eggs left in the nest for
much longer than 24 hours tend to be poor hatchers.
• Egg Shape, Shell Texture and Quality Some naturally misshaped eggs have lower than expected hatch rates. Undersize eggs often have a large yolk in
proportion to the albumen. Large eggs can sometimes be ‘double yolkers’ which will not hatch. Misshaped eggs usually have faults in the shell.
It is important to remember that in natural circumstances eggs warm up quite slowly. Incubators often
warm up quickly, and so if placed in the incubator immediately the egg may suffer some thermal shock.
If possible, the eggs should be brought up to temperature slowly.
7
Brinsea – The Incubation Specialists Incubation Handbook
3. Incubator Construction and Function
3.1. Introduction
Incubators are machines, which artificially provide the egg with the correct, controlled environment for the developing chick. Depending on complexity, an incubator will give varying degrees of control over temperature, humidity, egg turning, fresh air flow and hygiene, while providing a secure place for the eggs.
Incubators may be classed as Still Air, Forced Draft and Contact types according to how air is circulated. Contact incubators are a new generation of machines designed to mimic natural incubation much more closely.
3.2. Still Air Incubators
Still air incubators are the most basic form of incubator. A still air incubator is basically an insulated box consisting of:-
• A Heating element• A Thermostat or temperature controller to control temperature• Egg tray• A thermometer to measure the air temperature• A tray for water• Some machines may have an hygrometer for humidity measurement• Some machines may have turning mechanism for automatic turning of eggs
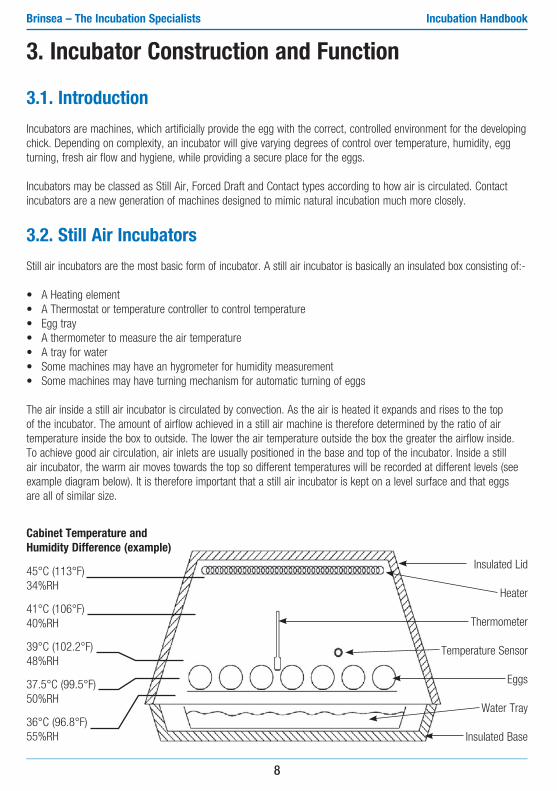
The air inside a still air incubator is circulated by convection. As the air is heated it expands and rises to the top of the incubator. The amount of airflow achieved in a still air machine is therefore determined by the ratio of air temperature inside the box to outside. The lower the air temperature outside the box the greater the airflow inside. To achieve good air circulation, air inlets are usually positioned in the base and top of the incubator. Inside a still air incubator, the warm air moves towards the top so different temperatures will be recorded at different levels (see example diagram below). It is therefore important that a still air incubator is kept on a level surface and that eggs are all of similar size.
8
Insulated Lid
Heater
Thermometer
Temperature Sensor
Eggs
Water Tray
Insulated Base
45°C (113°F) 34%RH
41°C (106°F) 40%RH
39°C (102.2°F) 48%RH
37.5°C (99.5°F) 50%RH
36°C (96.8°F) 55%RH
Cabinet Temperature andHumidity Difference (example)
Brinsea – The Incubation Specialists Incubation Handbook

3.3. Forced Draft Incubator
The forced draft machine was developed to overcome temperature gradient problems throughout the incubator. In a forced draft incubator a fan is used to circulate the air, which gives a uniform temperature throughout the machine. The air temperature surrounding the egg is therefore constant and positioning of the thermometer and temperature sensor are less critical. Eggs, too, can be of differing size and set in trays at different levels.
Using a forced draft incubator also allows the accurate measurement and control of humidity (explained in more detail later).
3.4. Contact IncubatorsContact Incubation mimics the natural incubation process that occurs in the nest.
The most striking difference between natural and artificial incubation is the fact that the natural parent provides warmth by contact rather than surrounding the egg with warm air. This may not at first sight seem significant but important research studies carried out by J. Scott Turner at New York State University and the University of Cape Town has revealed major unsuspected differences in thermal behaviour of eggs incubated by contact rather than convection. Crucially, eggs in a forced draft incubator have near uniform temperature throughout incubation; there will be some increase in embryonic temperature towards the end of incubation as a result of increased metabolism but otherwise the whole egg will remain near incubator air temperature. By contrast, eggs incubated naturally or by contact, have significant temperature differences. Heat is entering the egg over a relatively small brood patch, which is therefore warmer than other regions of the egg and is being lost from most of the
9
Brinsea – The Incubation Specialists Incubation Handbook
Brinsea Ovation 28 Advance forced draft incubator.
Unique Induced Dual Airflow in Brinsea’s Ovation forced
draft incubators.
remaining shell area, which is cooler.In contact incubation, the embryo temperature tends to fall at later stages of incubation as a result of the embryo’s own blood circulation which becomes significantly more important than embryonic metabolism in determining temperature distribution and heat flow within the egg, quite contrary to previous understanding which assumed metabolism to be dominant and cause egg temperature to rise. The inevitable fact that the embryo grows larger and must move from its original position on top of the yolk sack downwards in the egg to cooler regions also tends to reduce embryonic temperature as incubation progresses. These important findings emphasise surprising differences between natural and artificial incubation, but there are others.
Eggs in nature are certainly subjected to a cycle of warming and cooling coupled with ventilation as the parent bird leaves the nest to feed and defend territory, etc.
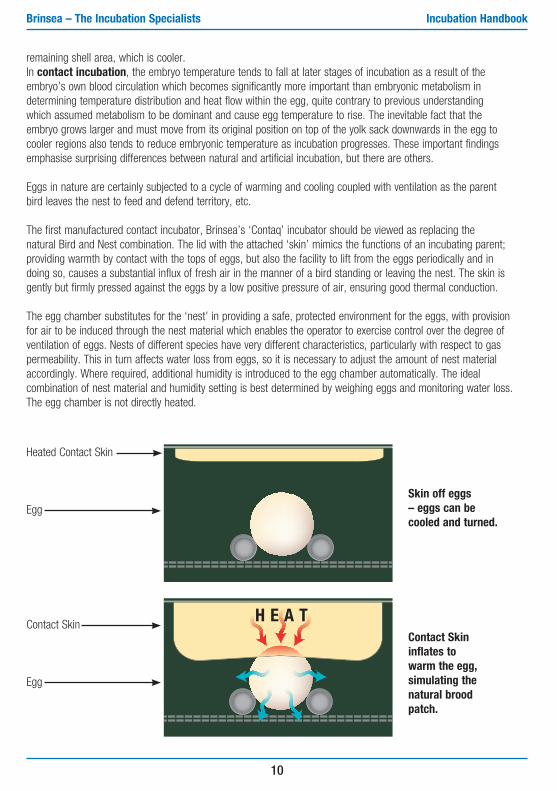
The first manufactured contact incubator, Brinsea’s ‘Contaq’ incubator should be viewed as replacing the natural Bird and Nest combination. The lid with the attached ‘skin’ mimics the functions of an incubating parent; providing warmth by contact with the tops of eggs, but also the facility to lift from the eggs periodically and in doing so, causes a substantial influx of fresh air in the manner of a bird standing or leaving the nest. The skin is gently but firmly pressed against the eggs by a low positive pressure of air, ensuring good thermal conduction.
The egg chamber substitutes for the ‘nest’ in providing a safe, protected environment for the eggs, with provision for air to be induced through the nest material which enables the operator to exercise control over the degree of ventilation of eggs. Nests of different species have very different characteristics, particularly with respect to gas permeability. This in turn affects water loss from eggs, so it is necessary to adjust the amount of nest material accordingly. Where required, additional humidity is introduced to the egg chamber automatically. The ideal combination of nest material and humidity setting is best determined by weighing eggs and monitoring water loss. The egg chamber is not directly heated.
10
Skin off eggs – eggs can be cooled and turned.
Contact Skin inflates to warm the egg, simulating the natural brood patch.
Heated Contact Skin
Egg
Contact Skin
Egg
H E A T
Brinsea – The Incubation Specialists Incubation Handbook

The Contaq egg chamber also provides sophisticated provision for automatic turning of eggs of different sizes. Egg turning coincides with lifting of the skin and enables programmable fixed or random turns.
3.5. Design Requirements for Successful Hatching
TemperatureAccurate incubation temperature is by far the most important requirement for successful hatching of chicks. Even marginal temperature differences can affect hatch rates, although these differences seem to have less effect on eggs in contact incubators. The growth processes in the development of the embryo are very temperature sensitive and small deviation can cause development to progress out of sequence resulting in losses or deformities. The design basis for Brinsea incubators is a maximum ±0.25C across the egg tray and ±0.25C over a period of time.
It is the egg centre or embryo temperature, that is most critical. To ensure this is correct it is of highest importance that the incubator is set up correctly, particularly for still air machines. Still air incubators have temperature variations from top to bottom, therefore the sensor of the temperature controller and the thermometer bulb need to be positioned as close as possible to the top of the eggs. Here the temperature needs to be slightly higher than the mean temperature used in forced draft incubators and accounts for the important difference found in the instructions. It is therefore vital to follow the manufacturer’s recommendations for the incubator used.
11
Brinsea – The Incubation Specialists Incubation Handbook
Brinsea Contaq Z7 Raptor contact incubator

HumidityConstant accuracy of humidity is less critical than that of temperature. Ideally, the egg needs to lose 13 – 15% of its weight between the time of laying and pipping, (more for some altricial species). Fairly wide tolerances in humidity are bearable although not ideal, as long as the chick ends up having lost the correct amount of weight by the time of hatching. Correction can be made in later stages for errors earlier.
Experience has shown Contact Incubation to be less critical of exact humidity control, perhaps due to the egg being in a more natural air-flow environment. Highly accurate digital humidity control is available for all Brinsea incubators.
The weight loss rate will vary according the type of egg, the amount of ventilation, the handling of the egg, the breeder diet and the time in the season in which it was hatched. There are two guides that help indicate correct humidity.
Firstly, the air cell. The air cell increases as the incubation proceeds. In order to see this at first sight, the eggs need to be candled (Chapter 4).
The other indicator is weight loss. If you weigh eggs before setting and weigh them as incubation progresses, the weight loss can be plotted on a graph (example below) to determine if the average weight loss has been correct.
Humidity can be adjusted during the incubation period according to the graph reading at that particular time in the incubation process. As a general rule, if actual weights are lower than ideal, then humidity needs to be increased. If actual weights are higher than ideal, then humidity needs to be decreased.
All incubators should have the facility to adjust humidity levels. There are two controllable factors that influence humidity levels. These are the amount of water surface area, and the amount of fresh air that the incubator draws in. The greater the water surface area, and the less fresh air being drawn in, the higher the humidity levels inside the incubator will be. One method to increase water surface area is to use evaporating pads or blotting paper. Finally, the environment in which the incubator is set up in can have an effect on accurate humidity control. If the ambient humidity in the air outside the incubator is very dry, then incubation humidity levels will be lower than if the air is very humid (wet). Also, cold air cannot retain much water vapour, so when cold winter air is warmed the RH level will be very low. This happens in heated houses in winter, and also inside incubators. The result of this in general is that humidity levels tend to be lower in the winter than in summer and so humidity levels should be adjusted with this in mind.
12
Brinsea – The Incubation Specialists Incubation Handbook

Some breeders go to great lengths to control the incubation room environment and overcome seasonal variations in ambient humidity. In extreme cases, sections of the egg’s shell are removed to allow extra water loss, or covered with tape to reduce water loss. This should be regarded as strictly for the experts though and a high risk method.
The humidity levels required when a chick is hatching need to be higher than previously in the incubation period. For the last day or so, high humidity levels are required to prevent the membranes of the egg drying too fast as the chick hatches and becoming tough and difficult to tear. The humidity level when hatching should therefore be at least 60%RH.
TurningAs the embryo develops on the yolk, it causes that part of the yolk to become lighter and float upwards. If, after the egg is moved, the embryo is downwards it will cause the yolk to rotate in the inner thin white until it is uppermost again.
The yolk is held in position by a structure called the chalaza and by membranes. It still tends to float upwards, deforming the inner membranes and eventually the yolk will touch the shell membranes. If this happens with the embryo uppermost the embryo will stick to the shell and die. For this reason, turning is essential for survival of a healthy chick.
As the egg is turned the embryo is swept into fresh nutrients, allowing the embryo to develop. This is critical for the first week when the embryo has no circulation system. After the first week, eggs still need to be turned but not as often. The turning regime is often different between species and altricial birds tend to need more frequent turning than precocial birds. Whereas fowl are turned through 80 degrees every hour or so, parrots are often turned through 180 degrees many times an hour in the early stage.
In incubators today there are four types of turning mechanisms:-
i) Tilting TraysMost commercial incubators are provided with plastic egg trays that hold the egg vertically, with the small end down. The tray is then tilted through an angle of about 40º either side of horizontal (an overall angle of 80º) at predetermined intervals, perhaps every hour for example. This method works well with poultry for which it was developed, and is very efficient to operate on a commercial scale. However this is very different from the natural process adopted by birds. So, this technique is fine for poultry but not so good for wild or altricial birds.
13
EGGS
EGG TRAY
Brinsea – The Incubation Specialists Incubation Handbook
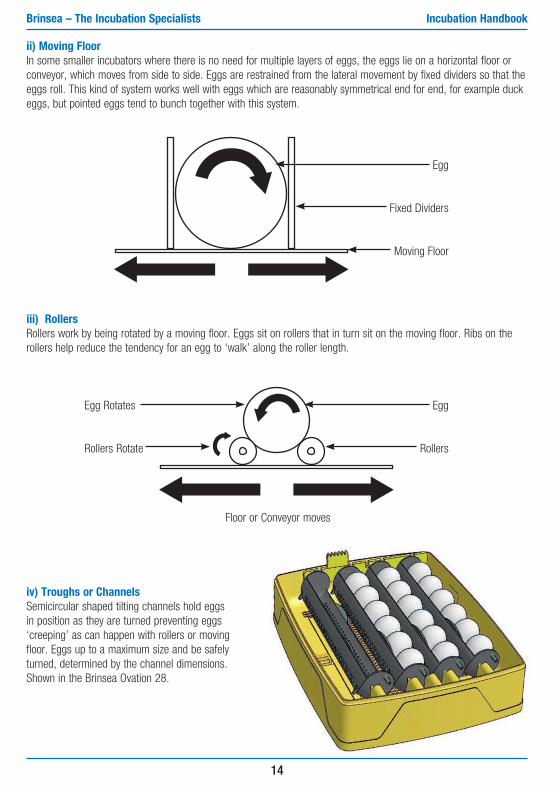
ii) Moving FloorIn some smaller incubators where there is no need for multiple layers of eggs, the eggs lie on a horizontal floor or conveyor, which moves from side to side. Eggs are restrained from the lateral movement by fixed dividers so that the eggs roll. This kind of system works well with eggs which are reasonably symmetrical end for end, for example duck eggs, but pointed eggs tend to bunch together with this system.
iii) RollersRollers work by being rotated by a moving floor. Eggs sit on rollers that in turn sit on the moving floor. Ribs on the rollers help reduce the tendency for an egg to ‘walk’ along the roller length.
iv) Troughs or ChannelsSemicircular shaped tilting channels hold eggs in position as they are turned preventing eggs ‘creeping’ as can happen with rollers or moving floor. Eggs up to a maximum size and be safely turned, determined by the channel dimensions.Shown in the Brinsea Ovation 28.
14
EGGS
EGG TRAY
EGGS
EGG TRAY
Egg
Fixed Dividers
Moving Floor
Egg
Rollers
Egg Rotates
Rollers Rotate
Floor or Conveyor moves
Brinsea – The Incubation Specialists Incubation Handbook

4. Monitoring of Eggs and the IncubatorEggs need to be monitored during incubation to determine embryo progress and where incubation adjustment may be necessary.
4.1. CandlingCandling lamps are lights with a concentrated beam that may be shone through the shell of the egg to illuminate the egg contents. This allows the size of the airspace to be determined which offers a guide to the weight loss rate. If the air space is larger than expected too much water is being lost and the humidity in the incubator should be increased to reduce the rate of water loss. If the air space is smaller than expected then the opposite applies.
Embryos can be damaged by the heat from conventional candling lamps which is why Brinsea’s OvaView candling lamps use high power yet cool LEDs to prevent this problem and still be highly effective. The matching OvaScope shrouds the candled egg making visibility of the embryo even better and means that the user doesn’t need to dim the room light which is deal for classrooms
Diagram shows extent of airspace development throughout incubation (in days)
Candling also allows the development to be observed so that eggs that are infertile or have died may be safely removed from the incubator.
15
1. Clear when candled – probably infertile (or very early death) when candled at 1/3 of the incubation period.
2. Fertile with red blood vessels – after 1/3 of the incubation period.
3. Red or black staining – early death when candled after 1/3 of the incubation period.
4. Embryo with red blood ‘ring’ – early death when candled after 1/3 of the incubation period.
5. Dark outline with ill defined detail – late death (1/2 or 2/3 through incubation period).
6. Live embryo with bill in air sack – due to hatch in 24-48 hours.
Brinsea – The Incubation Specialists Incubation Handbook

4.2. Measuring Humidity and Weight Loss
Modern sensor technology allows direct measurement of humidity although accuracy of these devices varies, with much higher accuracy sensor adding to incubator cost. Avoid mechanical dial hygrometers as these are often inaccurate. Brinsea only use high accuracy humidity measuring systems as we believe an inaccurate measurement is worse than no measurement at all.
Weight Loss Calculations
If the weight of an egg was not measured when it was laid it may be estimated using the formula:
Fresh Laid Weight (g) = Length (cm) x Breadth (cm) x Breadth (cm) x 0.548
Using the fresh laid weight and the weight loss percentage recommended for the species the daily weight loss may be calculated:
Daily Weight Loss = Fresh Laid Weight x Desired % Loss to pip
Number of Days to Pip
Some breeders prefer to use change of Egg Density as the measure of water loss from the egg:
Egg Volume = Length (cm) x Breadth (cm) x Breadth (cm) x 0.51
Egg Density (g/cm3) = Egg Weight (g)
Egg Volume (cm3)
Estimated Daily Change in Egg Density:
Daily Change = Egg Density at Time (T1) – Egg Density at Time (T2)
Time (T2) – Time (T1)
16
Brinsea – The Incubation Specialists Incubation Handbook
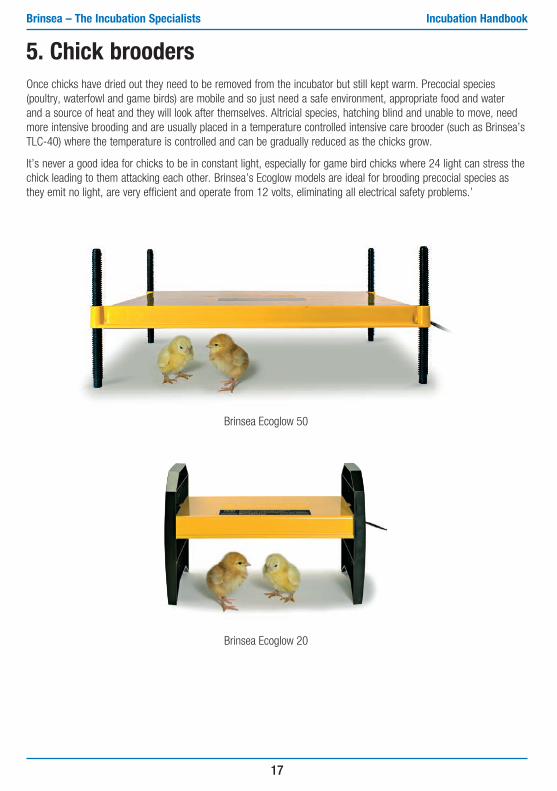
5. Chick broodersOnce chicks have dried out they need to be removed from the incubator but still kept warm. Precocial species (poultry, waterfowl and game birds) are mobile and so just need a safe environment, appropriate food and water and a source of heat and they will look after themselves. Altricial species, hatching blind and unable to move, need more intensive brooding and are usually placed in a temperature controlled intensive care brooder (such as Brinsea’s TLC-40) where the temperature is controlled and can be gradually reduced as the chicks grow.
It’s never a good idea for chicks to be in constant light, especially for game bird chicks where 24 light can stress the chick leading to them attacking each other. Brinsea’s Ecoglow models are ideal for brooding precocial species as they emit no light, are very efficient and operate from 12 volts, eliminating all electrical safety problems.’
17
Brinsea – The Incubation Specialists Incubation Handbook
Brinsea Ecoglow 50
Brinsea Ecoglow 20

6. Troubleshooting
Problem Possible Causes
Chicks hatch late • Large eggs • Old breeders • Eggs stored for too long • Incubator temperature too low • Weak embryos • Inbreeding • Incubator humidity too high
Slow (drawn-out) hatch • Mix of eggs (different sizes, different aged breeders, storage times)
• Poor egg handling • Hot or cold spots in incubator • Incubator or Hatcher temperature too high or low
Sticky Chicks, smeared with albumen • Low incubation temperature • High incubation humidity • Poor turning • Old eggs • Very large eggs
Chicks stuck in shell, dry, • Low humidity in storageshell fragment stuck to feathers • Poor egg turning • Cracked shell or Poor shell quality
Premature hatching, bloody navels • Temperature too high
Small chicks • Small eggs • Low humidity • High temperature • High altitude • Thin, porous shells
18
Brinsea – The Incubation Specialists Incubation Handbook

Problem Possible Causes
Unhealed naval, dry, • High incubator temperature, or temperature fluctuationsrough down feathers • Humidity too high when hatching • Inadequate nutrition
Weak Chicks • High hatching temperature • Poor Hatcher ventilation • Contamination
Chicks malpositioned • Eggs sat small end up position • Inadequate turning • Excessive turning at late stages • Too high or too low temperature • High humidity • Old breeders • Round shaped eggs • Nutritional deficiencies • Retarded development • Poor egg handling or storage conditions
Malformations • Poor storage conditions • Jarring of eggs • Nutritional deficiencies • Inadequate turning • High or low temperature • Inadequate ventilation
Crooked toes, bent legs • High or low temperature • Poor nutrition
Short down, wiry down • Nutritional deficiencies (especially riboflavin) • High incubation temperature
19
Brinsea – The Incubation Specialists Incubation Handbook

6. Troubleshooting (continued)
Problem Possible Causes
Eyes closed, down stuck to eyes • Temperature too high in Hatcher • Chicks remain in Hatcher too long after hatching • Excessive air movement in Hatcher
Exploding eggs • Dirty eggs from nest • Eggs not washed properly
(eggs wiped or cleaned with contaminated cloth) • Water condensation on eggs • Water sprayed on eggs • Contamination from earlier exploders • Contaminations from handling with dirty hands
Dwarf embryos, runts in • Egg contaminationsgrowing chicks • Breeder diseases • Nutritional deficiencies
Haemorrhage • Incubator or Hatcher temperature too high • Rough handling at transfer • Nutritional deficiencies (vitamin K or vitamin E) • Contamination
Swollen head and back of neck • Nutritional deficiencies
Small air cell, egg weight loss under 10% • High humidity • Very thick shells • Low temperature
Exposed brain • High incubation temperature • Low oxygen levels
20
Brinsea – The Incubation Specialists Incubation Handbook

Incubation Reference Table Species Incubation Still / Forced Air Contact
of Egg Period Incubation Incubation
(Days) Temperature Humidity Temperature Humidity ºC (ºF) RH% ºC (ºF) RH%
Hens 21 37.5 (99.5) 40 – 50 39.5 (103.1) 40 – 50
Pheasant 23 – 27 37.3 (99.1) 40 – 50 39.7 (103.5) 40 – 50
Partridge 23 – 24 37.5 (99.5) 40 – 50 39.5 (103.1) 40 – 50
Quail 16 – 23 37.3 (99.1) 40 – 50 39.7 (103.5) 40 – 50
Ducks 28 37.5 (99.5) 45 – 55 39.5 (103.1) 45 – 55
Geese 28 – 32 37.3 (99.5) 45 – 55 39.5 (103.1) 45 – 55
Falcons 31 – 33 37.0 (98.6) 40 – 45 39.0 (102.2) 40 – 45
Merlins 28 – 32 37.5 (99.5) 50 39.5 (103.1) 50
Kestrels 27 – 29 50 50
Barn Owl 30 50 50
Tawny Owl 29 50 50
Snowy Owl 33 50 50
Amazons (Parrots) 24 – 29 37.3 (99.1) 35 – 45 39.0 (102.2) 35 – 45
Macaws (Parrots) 28 – 30 37.3 (99.1) 35 – 45 39.0 (102.2) 35 – 45
Love Birds (Parrots) 22 – 24 37.3 (99.1) 35 – 45 39.0 (102.2) 35 – 45
African Grey (Parrots) 26 – 28 37.3 (99.1) 35 – 45 39.0 (102.2) 35 – 45
Sulphur Cockatoo (Parrots) 29 – 31 37.3 (99.1) 35 – 45 39.0 (102.2) 35 – 45
Electus (Parrots) 28 37.3 (99.1) 35 – 45 39.0 (102.2) 35 – 45
Rhea 35 – 40 36.0 (96.8) 20 – 25 38.0 (100.4) 20 – 25
Emu 49 – 52 37.0 (98.6) 20 – 25 39.0 (102.2) 20 – 25
Ostrich 40 – 43 36.4 (97.5) 20 – 40 38.4 (101.0) 20 – 40
IMPORTANT:- Temperatures for Still Air incubators MUST be adjusted in accordance with the Manufacturer’s instructions to take account of the difference in temperature at different levels in the machine.
While great effort is taken to ensure the accuracy of data, no responsibility can be accepted for any loss or injury incurred due to error or omission.
Figures given are guidelines only and some variation may be experienced in practice.
21
Brinsea – The Incubation Specialists Incubation Handbook

NOTES
22
Brinsea – The Incubation Specialists Incubation Handbook

NOTES
23
Brinsea – The Incubation Specialists Incubation Handbook

Incubation Specialists
Brinsea – The Incubation Specialists Incubation Handbook
Brinsea Products Ltd 32-33 Buckingham Road, Weston Industrial Estate,
Weston-super-Mare, BS24 9BGTel: +44 (0) 845 226 0120 Fax: +44 (0) 1934 708177
www.brinsea.co.uk e-mail: [email protected]
Brinsea Products Inc 704 N. Dixie Avenue, Titusville, FL 32796, USA
Tel: 1-888-667-7009 or (321) 267 7009 Fax: (321) 267 6090
www.brinsea.com e-mail: [email protected]