the great war in the east: 1914-1918 - victory point … 2nd edition session, i can't wait to...
TRANSCRIPT

ChurchillEnver Pasha
T.E. LawrenceMustafa Kemal
The Great War inthe East: 1914-1918
By Darin Leviloff

Now Available!
2nd Edition
session, I can't wait to play again. On top of that, I am also nervous over playing it again.
(Board Game Geek)
SolitaireGameplay!
1 Ottoman Sunset 2.0 Game Rules
Ottoman Sunset
The Great War in the Near East 1914-1918
Table of Contents [1.0] INTRODUCTION .................. 1 [2.0] GAME EQUIPMENT ............ 2 [3.0] SET UP ................................ 3 [4.0] SEQUENCE OF PLAY .......... 4 [5.0] EVENT CARDS .................... 4 [6.0] EVENT RESOLUTION ......... 4 [7.0] ARMY MOVEMENT ............ 6 [8.0] PLAYER ACTIONS .............. 7 [9.0] KAISERSCHLACHT ............. 9 [10.0] NATIONAL WILL............ 10 [11.0] VICTORY & DEFEAT ..... 10 [12.0] OPTIONAL RULES .......... 13 [13.0] EXAMPLE OF PLAY ........ 18
[14.0] DESIGNER’S NOTES ....... 20
[0.0] USING THESE RULES New gaming terms, when they are initially defined, appear in dark red lettering for quick referencing.
The instructions for this game are organized into major “Rules” sections as shown in large green CAPS font, and represented by the number to the left of the decimal point (e.g., Rule 4.0 is the fourth Rule). These Rules generally explain the game’s components, procedures for play, the game’s core systems and mechanics, how to set it up, and how to win.
With each Rule, there can be “Cases” that further explain a Rule’s general concept or basic procedure. Cases might also restrict the application of a Rule by denoting exceptions to it. Cases (and Subcases) are an extension of a Rule shown in the way that they are numbered. For example, Rule 4.1 is the first Case of
the fourth Rule; and Rule 4.1.2 is the second Subcase of the first Case of the fourth Rule.
Important information is in red text.
References to examples of a Rule or Case are in blue text and this font.
Text in shaded boxes, like this, provides the voice of the game’s designer, who is addressing you to explain an idea or concept that is not, itself, a Rule or a Case.
[1.0] INTRODUCTION Ottoman Sunset is a stand-alone solitaire States of SiegeTM game on World War One in the Near East from 1914-1918. The player controls the Young Turks (CUP or Committee of Union and Progress) as they try to keep the Ottoman Empire alive amidst the struggles of the Great War.
After many years of being the “Sick man of Europe,” by the late 19th century the Ottoman Empire attempted to reform and modernize itself. Ironically, such attempts convinced restive nationalities such as the Greeks, Romanians, Bulgarians, etc., to assert their independence and/or seek to expand their territory.
This weakness caused other Imperial Powers to seize Ottoman territory, both formally and informally. By the outbreak of World War One, the Ottoman Empire was reduced to a core of territory in Asia Minor, the Levant, the Hejaz, Mesopotamia, and a sliver of European territory. This collapse led the military-political leadership in Turkey to take over under the guise of the Young Turks.
When war in Europe broke out in 1914, the Ottoman Empire, pursuant to secret protocols, agreed to provide shelter to the fleeing German Battleship Goeben, which was renamed Yavuz after joining the Ottoman Navy. After Britain refused to deliver newly ordered Turkish battleships, the Turko-German fleet bombarded Russian

Ottoman Sunset 2.0 Game Rules 2
forts, signaling the Ottoman Empire’s entrance into World War One.
The Ottoman Empire began with lofty strategic goals, but soon faced a hard slog, defending its core empire against far-flung British-led forces, Russian armies, and a Hashemite Arab revolt. Furthermore, ongoing campaigns on other fronts, such as those with Austria against Romania in the East, against Italy on the Isonzo, and of course the draining stalemate of the Western Front had a direct impact on events in this theater. Like Austria-Hungary, the Ottoman Empire needed direct German aid to keep it in the conflict.
Despite victories at Kut and Gallipoli, by October 1918, the Turks had about all they could take and surrendered. Can you lead the Ottomans in the Great War and achieve victory where your historical counterparts failed?
COMBINED GAME: Ottoman Sunset has a sister game titled Hapsburg Eclipse, depicting the struggle of their Central Powers ally, Austria-Hungary. If in possession of both games, a Combined Game is playable, either as a two player co-op game or as a large two-front solitaire game. The rules for the Combined Game are included with Hapsburg Eclipse and modify the rules for each individual game.
[2.0] GAME EQUIPMENT Parts Inventory
● 1 11” x 17” map ● 57 game pieces (when assembled) ● 13 Morning Event cards ● 21 Mid-Day Event cards ● 15 Dusk Event cards ● 1 Setup Card ● 1 Rules booklet ● 1 6-sided die
[2.1] The Game Map: The game map depicts the Near East as it existed at the time of the First World War. Constantinople is the central hub of the game’s activity and six tracks emanate
outward from it like spokes (Salonika, Gallipoli, Caucasus, Mesopotamia, Arab, and Sinai). The map also includes inset maps of Gallipoli and The Narrows of the Dardanelles, various holding boxes, tables, and data tracks to facilitate play.
There is a half-box located in the Northwest corner of the map (“Baghdad Railway”). You’ll find the remaining half of the marker box on the Southeastern corner of the Hapsburg Eclipse map. This box is used to hold a marker indicating the Berlin-Baghdad Railway is open, allowing for transfers of reserves and other military assets in the Combined Game. The rules governing its use are included with Hapsburg Eclipse. This box is not used when playing Ottoman Sunset alone.
[2.2] Event Cards: These cards regulate the activity in the game, pronouncing headlines, providing history, listing advancing Fronts and the Actions you have available each turn. In addition, special effects or occurrences appear on some cards and must be taken into account during play.
The full deck of cards enters play in three “Epochs:” Morning (with the blue headline background color, prior to the declaration of Jihad), Mid-Day
Headline
(bac
kgro
und
shad
ing in
dicat
es
the
card
’s Ep
och)
Whi
ch F
ront
s m
ove
(Adv
ance
or R
etre
at)
Historical flavor text (explains the context)
Car
d #
Play
er A
ctio
ns
allo
tted
for t
hat t
urn
Event instructions
Action modifiers for that card (only)
Associated piece

3 Ottoman Sunset 2.0 Game Rules
(with the yellow headline background color, ending with the construction of the Sinai pipeline) and Dusk (with the gray background color, the period up to the end of World War 1), with the player trying to survive each card.
[2.2.1] Iron Cross Symbol: This symbol indicates that the card is handled differently when playing the Combined Game using Hapsburg Eclipse. The rules for that card in the Combined Game are separately described in the Combined rules booklet (included with Hapsburg Eclipse) and take priority over the individual games’ rules.
[2.3] The Playing Pieces: The square playing pieces come in two basic flavors: “Front” units and information markers.
Front units (“Fronts”) represent the military forces arrayed against the Ottoman Empire: some are coalitions of Allied nations (e.g., the Sinai Front, the Mesopotamia Front, the Salonika Front, and the Gallipoli Front) while others represent homogenous forces operating against the Turks, such as the Russian Army and the Hashemite Arab Revolt.
The various information markers (shown below) indicate the status, possession or effect of an important game activity or situation. Also included are markers that are used to keep quantitative information on tracks, such as net level of victory/defeat and British Fortitude.
[3.0] SET UP Follow these steps to set up the game:
1. Place the Mesopotamia Army marker on space 5 of the Mesopotamia track. The Army should be on its Townshend side (Battle Value of 3).
2. Place the Sinai Army marker on space 6 of the Sinai track. The Army should be on the Murray side (Battle Value of 3).
3. Place the Russian Caucasus Army marker on the 5 space of the Caucasus track. Use the Dashkov unit (Battle Value of 2 side up).
4. Set aside the Salonika, Gallipoli, Arab and other Caucasus Front units. These enter play later.
5. Place the National Will marker in the 0 space on the Turkish National Will track; keep the individual Battle markers nearby, just off the map.
6. Keep the Minefield, Gun Emplacement, British Fortitude, and
Front Back
Battle Value
Fron
t Nam
e Leader name
Symbol
Off-Map Battles and National Will markers
Sample Markers
markers for defending / forcing The Narrows
other assorted track and map markers

Ottoman Sunset 2.0 Game Rules 4
U-boats markers near The Narrows inset section of the map. Set aside the Intelligence Bureau for the East, Resources/German Staff and other markers off-map in a convenient location.
7. Sort out the Morning (blue title bar) Epoch Cards, shuffle them together, and place them face down next to the map to form the Draw Pile. Sort out the other two Epoch’s cards (Mid-Day / yellow and Dusk / gray) and set them aside; they may enter play later.
[4.0] SEQUENCE OF PLAY Each turn conduct the following Phases in this exact order:
1. Headline Phase: Reveal the top card in the Draw Pile and place it, face up, in the Event Pile (a.k.a., the Discard Pile). That card becomes the new Current Event card that you resolve that turn.
2. Event Resolution Phase: If an Event is listed on the Current Event card (other than the Kaiserschlacht), it is resolved during this Phase.
3. Army Movement Phase: Move all active Allied armies as indicated on the Current Event card. If any Advance into the Constantinople (0) space, you immediately lose the game (see 7.6).
4. Action Phase: The Current Event card usually confers upon you a number of Actions. These are used to: 1) launch Offensives against Army units and push them back; 2) allocate Resources to other, Off-Map Theaters; 3) deploy the Intelligence Bureau for the East, if it has been created; or 4) place additional Turkish Defenses in The Narrows.
Players may also spend previously allocated Resources as additional
Actions in the form of German Staff Operations during this Phase (see 8.7).
5. Kaiserschlacht Phase: Only after the Kaiserschlacht occurs, roll a Western Front Off-Map Battle during this Phase each turn (see 9.0).
6. National Will Phase: Determine the Turkish National Will and place the National Will marker in the corresponding box of the Turkish National Will track.
A complete game continues until all the cards have been revealed and played or victory / defeat occurs (11.0).
[5.0] EVENT CARDS The use of the Event cards is largely self-evident. The notations on each card are presented in the strict order that they are applied during the Sequence of Play and can easily be performed from top to bottom and left to right.
Adding Event Cards: Twice per game, at crucial junctures of the Great War, new cards are shuffled into the Draw Pile.
When a red-circled Event (i.e., #3 or #23) instructs you to add the Mid-Day or Dusk cards to the deck, take that stack of cards (set aside during set up) and shuffle them together with whatever remains of the Draw Pile to form a new (larger) Draw Pile.
[6.0] EVENT RESOLUTION Events occur first when listed on a card. Many are self-explanatory, some are explained here:
[6.1] Activating Fronts: When placing a Front unit on the map, it is placed in the highest-numbered box on its track. That Front then becomes

5 Ottoman Sunset 2.0 Game Rules
“Active,” and its unit moves normally via Event cards.
[6.2] Coups: Cards #5, 6, and 21 indicate a coup in India, Persia, and Afghanistan, respectively.
Procedure
To resolve a coup, roll a die; add two (+2) if the Intelligence Bureau for the East marker is in the box corresponding to the country undergoing a coup. If the result is greater than (>) 5, the coup succeeds: place its Coup marker in the Victories box (see 10.0). Any other result has no effect: remove that Coup marker from play.
During the course of the War, the Central Powers spent considerable resources attempting to subvert the British Empire.
[6.3] Off-Map Battles: Several cards call for conducting a Western Theater, Eastern Theater or Naval battle.
Procedure
To resolve an Off-Map Battle, roll a die and modify the result as follows:
+1 for each Resources marker in that Theater’s box (up to a maximum of +2)
-1 if War Weariness (card #41) is in effect
These modifiers are cumulative, but see 8.1.
Compare the modified result with the Battle Value on that Off-Map Battle’s marker.
If it is less than (<) its Battle Value, the result is a Defeat: place that Battle’s marker in the Defeats box.
If it equals (=) its Battle Value, the result is a Stalemate: place that Battle’s marker in the Stalemate box.
If it is greater than (>) its Battle Value, the result is a Victory: place that Battle’s marker in the Victories box.
The Near East was only a minor theater in the war and the successes and failures of operations in the other, more significant theaters of the war greatly influenced it.
Example: The Current Event, Brusilov Offensive, means you must conduct this Eastern Theater battle. War Weariness is not in effect, and you sagaciously have two Resources markers in the Eastern Front box.
The die roll is a #, and with a net +2 DRM (from the Resources markers), the modified result is ‘5,’ resulting in a Victory. Thus, you take the Brusilov Offensive marker and place it in the Victories box.
[6.4] Forcing the Narrows: When this Event occurs, check to see if the U-boats marker (card #14) is in The Narrows (the insert map of the Dardanelles Strait). If it is, German submarines have preempted a naval attempt to break through to Constantinople and made this operation impossible to perform, so this Event is skipped without effect. If the U-boats are not there, then when the Forcing the Narrows Event (card #8) occurs, the Royal Navy attempts to run past all of the Turkish defenses and take Constantinople by sea!
Procedure
Place the British Fortitude marker in box 4 of its track. To sail the British Fleet up The Narrows, roll one die at a time for each active Turkish Defense (gun emplacement or minefield printed on the map or markers placed there, see 8.6), starting
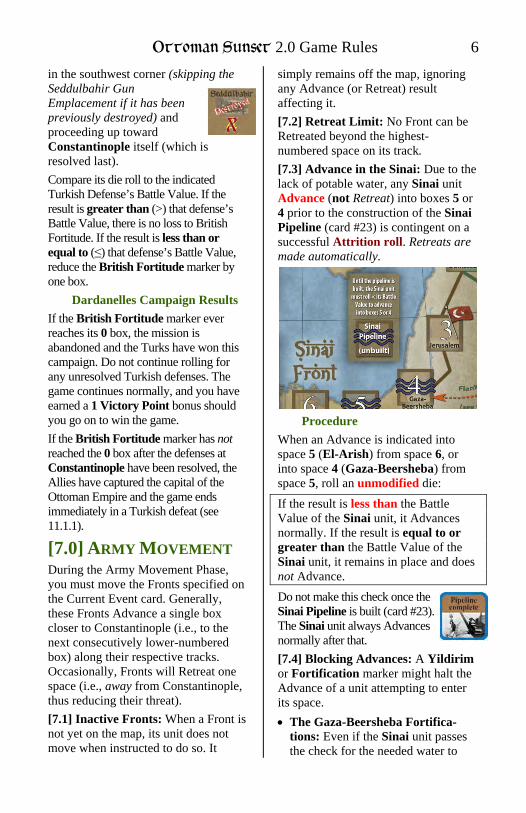
Ottoman Sunset 2.0 Game Rules 6
in the southwest corner (skipping the Seddulbahir Gun Emplacement if it has been previously destroyed) and proceeding up toward Constantinople itself (which is resolved last).
Compare its die roll to the indicated Turkish Defense’s Battle Value. If the result is greater than (>) that defense’s Battle Value, there is no loss to British Fortitude. If the result is less than or equal to (≤) that defense’s Battle Value, reduce the British Fortitude marker by one box.
Dardanelles Campaign Results
If the British Fortitude marker ever reaches its 0 box, the mission is abandoned and the Turks have won this campaign. Do not continue rolling for any unresolved Turkish defenses. The game continues normally, and you have earned a 1 Victory Point bonus should you go on to win the game.
If the British Fortitude marker has not reached the 0 box after the defenses at Constantinople have been resolved, the Allies have captured the capital of the Ottoman Empire and the game ends immediately in a Turkish defeat (see 11.1.1).
[7.0] ARMY MOVEMENT During the Army Movement Phase, you must move the Fronts specified on the Current Event card. Generally, these Fronts Advance a single box closer to Constantinople (i.e., to the next consecutively lower-numbered box) along their respective tracks. Occasionally, Fronts will Retreat one space (i.e., away from Constantinople, thus reducing their threat).
[7.1] Inactive Fronts: When a Front is not yet on the map, its unit does not move when instructed to do so. It
simply remains off the map, ignoring any Advance (or Retreat) result affecting it.
[7.2] Retreat Limit: No Front can be Retreated beyond the highest-numbered space on its track.
[7.3] Advance in the Sinai: Due to the lack of potable water, any Sinai unit Advance (not Retreat) into boxes 5 or 4 prior to the construction of the Sinai Pipeline (card #23) is contingent on a successful Attrition roll. Retreats are made automatically.
Procedure
When an Advance is indicated into space 5 (El-Arish) from space 6, or into space 4 (Gaza-Beersheba) from space 5, roll an unmodified die:
If the result is less than the Battle Value of the Sinai unit, it Advances normally. If the result is equal to or greater than the Battle Value of the Sinai unit, it remains in place and does not Advance.
Do not make this check once the Sinai Pipeline is built (card #23). The Sinai unit always Advances normally after that.
[7.4] Blocking Advances: A Yildirim or Fortification marker might halt the Advance of a unit attempting to enter its space.
The Gaza-Beersheba Fortifica-tions: Even if the Sinai unit passes the check for the needed water to

7 Ottoman Sunset 2.0 Game Rules
Advance (7.3), it might still be prohibited from entering space 4 (Gaza-Beersheba) due to the placement of the Fortification Gaza-Beersheba unit in that space (card #22).
Akin to moving across the Sinai without a water pipeline, so too must the Advancing Sinai unit make an(other) Attrition Roll before entering the Gaza-Beersheba space (4) while it is fortified.
If unsuccessful, nothing happens. No Advance is made by the Sinai unit and it remains in El-Arish (space 5).
After the first successful Advance (i.e., the Attrition Roll was passed) against the Fortification, the Sinai unit is halted (i.e., it remains in El-Arish) and the Fortification marker is flipped to its “Weakened” side. After the second successful Advance (against the now weakened forts), remove the Fortification marker from play and the Sinai unit Advances normally.
Yildirim: With the Yildirim event (card #34), you receive three Yildirim markers. You can spend these during a subsequent Army Movement Phase to negate the Advance of the Sinai or Mesopotamia units (only). Negating one Advance (i.e., keeping that Advancing unit in its box instead of Advancing it) requires the expenditure of one Yildirim unit (i.e., that marker is removed from play).
Note that you can wait to see if the Sinai unit actually Advances because of water or fortifications before opting to commit a Yildirim marker to stop it. Fortifications are not affected (e.g., damaged) if a Yildirim marker is used.
[7.5] Strategic Sites: Spaces with Ottoman flags in them are Strategic Sites (e.g., Mosul). If, during the National Will Phase, an Allied unit controls a Strategic Site, count it along with other Defeats when determining the Turkish National Will (see 10.0).
An Allied unit controls the space it occupies, plus all higher-numbered spaces behind it along its track. All other spaces are Turkish controlled.
Damascus: The capture of Damascus counts as only one enemy-controlled Strategic Site, even if both the Sinai and Arab armies control it. If you push either back beyond Damascus, but the other remains, it is still counted once.
[7.6] Constantinople Falls: When a Front enters the last space on its track (Constantinople), the game immediately ends in Defeat (see 11.1.2).
[8.0] PLAYER ACTIONS Each Event card specifies a number of Actions conferred to you, the Turkish player. You may “spend” Actions to: 1) launch Offensives against enemy Fronts; 2) allocate Resources to other theaters; 3) deploy the Intelligence Bureau for the East marker once available; or 4) place Turkish Defense units in The Narrows.
After using the Actions granted by the Current Event card, you may expend additional Actions through German

Ottoman Sunset 2.0 Game Rules 8
Staff Operations (see 8.7). Actions are spent one at a time; you can see the effects of one Action before deciding how to allocate any remaining Actions.
[8.1] Die Roll Modifiers (DRMs): Certain cards or conditions can impose a die roll modifier (abbreviated “DRM”). DRMs are cumulative, so in all such cases use the modified result of a die roll after applying all applicable DRMs.
For Example: Modifying a die roll is both a +2 DRM and -1 DRM. These are cumulative, so their net effect is to apply a +1 DRM to that die roll.
Thus, modified die roll results may end up being less than 1 or more than 6; such results cause failure or success as any other natural die roll result would.
Important: Regardless of the die roll modifiers, when conducting an Offensive (8.2) or Off-Map Battle (6.3) a natural (unmodified) roll of ! always results in failure, while a natural roll of ^ always results in success.
Thus, even these modified die rolls are never certain or impossible!
Note that you apply DRMs exclusively as indicated. That is, Offensive DRMs do not affect Off-Map Battle die rolls or Coups, and vice versa.
[8.2] Conducting Offensives: You use a military Offensive to try to Retreat a Front (move it back one box away from Constantinople to its next-higher numbered box). It costs one Action to conduct an Offensive.
Procedure
When conducting an Offensive, designate which Front you are attacking and roll the die, applying all DRMs as appropriate.
If the result is less than or equal to (≤) the target Front’s Battle Value, that Offensive is unsuccessful: there is no
effect; that enemy Front remains in its current box.
If the result is greater than (>) the target Front’s Battle Value, that Offensive is successful: move the targeted Front back on its track by one box. It cannot be ‘pushed off the map’ in this manner; instead, it simply remains in its track’s highest numbered box.
Damascus and Adana: In the event that an Offensive is directed against Damascus or Adana and both the Sinai and Arab Front units occupy that box, you must specify which one is targeted by that Offensive; its results are applied only to that specific Front unit.
[8.3] Multiple Efforts: There is no limit as to how many Offensives may be directed against a specific Front per turn (save the number of Actions available to do so), nor how many boxes it might be Retreated in a single turn (up to and including reaching the highest-numbered box on its track). Failure or success on prior attempts does not limit future attempts.
Similarly, you may make multiple efforts per turn to allocate Resources markers, or place Turkish Defenses.
[8.4] Allocating Resources to Other Theaters: There are three Off-Map Theater boxes: the Western, Eastern, and Naval Fronts. You must use two Actions to place one unallocated Resources marker in any Theater box, but no more than two may be in any Theater at the same time. You cannot shift previously allocated Resources markers between Theater boxes!
You may later “spend” (permanently remove from play) these Resources markers if and when reclaimed as
9 Ottoman Sunset 2.0 Game Rules
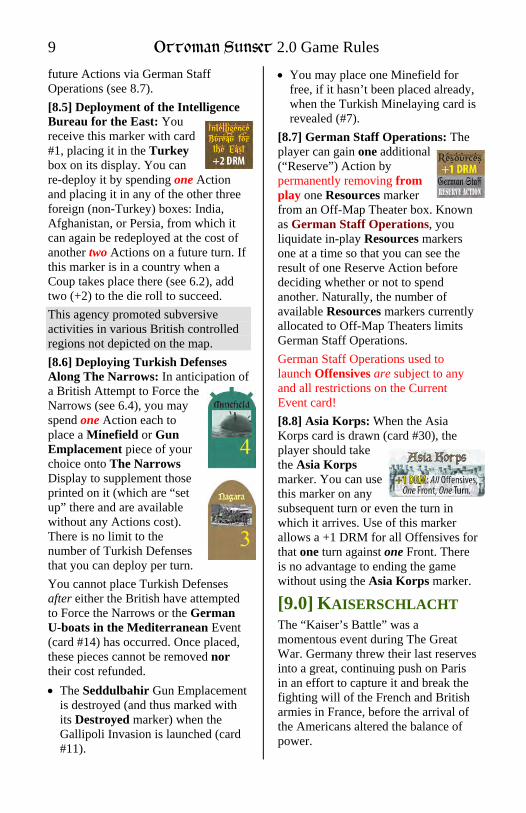
future Actions via German Staff Operations (see 8.7). [8.5] Deployment of the Intelligence Bureau for the East: You receive this marker with card #1, placing it in the Turkey box on its display. You can re-deploy it by spending one Action and placing it in any of the other three foreign (non-Turkey) boxes: India, Afghanistan, or Persia, from which it can again be redeployed at the cost of another two Actions on a future turn. If this marker is in a country when a Coup takes place there (see 6.2), add two (+2) to the die roll to succeed.
This agency promoted subversive activities in various British controlled regions not depicted on the map.
[8.6] Deploying Turkish Defenses Along The Narrows: In anticipation of a British Attempt to Force the Narrows (see 6.4), you may spend one Action each to place a Minefield or Gun Emplacement piece of your choice onto The Narrows Display to supplement those printed on it (which are “set up” there and are available without any Actions cost). There is no limit to the number of Turkish Defenses that you can deploy per turn.
You cannot place Turkish Defenses after either the British have attempted to Force the Narrows or the German U-boats in the Mediterranean Event (card #14) has occurred. Once placed, these pieces cannot be removed nor their cost refunded.
The Seddulbahir Gun Emplacement is destroyed (and thus marked with its Destroyed marker) when the Gallipoli Invasion is launched (card #11).
You may place one Minefield for free, if it hasn’t been placed already, when the Turkish Minelaying card is revealed (#7).
[8.7] German Staff Operations: The player can gain one additional (“Reserve”) Action by permanently removing from play one Resources marker from an Off-Map Theater box. Known as German Staff Operations, you liquidate in-play Resources markers one at a time so that you can see the result of one Reserve Action before deciding whether or not to spend another. Naturally, the number of available Resources markers currently allocated to Off-Map Theaters limits German Staff Operations.
German Staff Operations used to launch Offensives are subject to any and all restrictions on the Current Event card!
[8.8] Asia Korps: When the Asia Korps card is drawn (card #30), the player should take the Asia Korps marker. You can use this marker on any subsequent turn or even the turn in which it arrives. Use of this marker allows a +1 DRM for all Offensives for that one turn against one Front. There is no advantage to ending the game without using the Asia Korps marker.
[9.0] KAISERSCHLACHT The “Kaiser’s Battle” was a momentous event during The Great War. Germany threw their last reserves into a great, continuing push on Paris in an effort to capture it and break the fighting will of the French and British armies in France, before the arrival of the Americans altered the balance of power.

Ottoman Sunset 2.0 Game Rules 10
Initiation
Skip this Phase each turn until the Kaiserschlacht Event occurs (card #46). When it does, place the Kaiserschlacht marker in its holding box on the Sequence of Play near the bottom of the map as a reminder that you must conduct this Phase every turn for the rest of the game.
Procedure
After the Kaiserschlacht has commenced, each turn during the Kaiserschlacht Phase conduct an Off-Map Battle (see 6.3) on the Western Front against the lowest-numbered unfought Kaiserschlacht Battle marker (they are numbered ! to ^, so fight ! first, @ the next turn, etc.). Use all applicable modifiers for Resources markers committed to the Western Front (+1 DRM each) and War Weariness (-1 DRM). After fighting all six battles and placing them in the various outcome boxes, then during this Phase, first roll a die to determine which Kaiser-schlacht Battle marker is re-fought anew that turn, moving it to its new outcome box, if necessary, after refighting it.
Example: You have, over the past six turns, fought all of the Kaiserschlacht Battles and their markers now reside in the
Victories, Defeats and Stalemate outcome boxes. Now during this Phase, you roll a die to determine which of these battles is re-fought. A die roll of # means the marker with the French flag and a Battle Value of ‘4’ (currently in the Victories box) must be re-fought. With War Weariness in effect (-1 DRM) and no Resources committed, the roll to re-fight this battle is a %, which is reduced to a ‘4.’ This is a Stalemate, so this
marker is repositioned from the Victories to the Stalemate box.
Ending the Kaiserschlacht
The Kaiserschlacht Phase ceases to be conducted, and the Kaiserschlacht marker is removed from play, when the game ends OR every Kaiserschlacht Battle marker is in the same Victories or Defeats box (i.e., they are all in the Victories or all in the Defeats box).
At that point, this great campaign has permanently ended – one way or the other.
[10.0] NATIONAL WILL During this Phase, you must calculate the current Turkish National Will and adjust the National Will marker to reflect its current value.
Procedure
Add the number of markers in the Victories box. From that value, subtract the number of markers in the Defeats box and the number of Strategic Sites controlled by the Allies (see 7.5) at that moment. Ignore markers in the Stalemate box. Place the National Will marker in the corresponding box on the Turkish National Will track (or the 5+ if it is any value of +5 or greater). If that value is less than (<) -3, the game ends immediately in a Turkish defeat (see 11.1.3).
[11.0] VICTORY & DEFEAT Defeat can occur in three ways at any time. You achieve a Victory by surviving the play of every card in the game and then measuring your final position on the board.
[11.1] Instant Defeat: There are three ways to lose the game instantly:
1. The British succeed in Forcing the Narrows (see 6.4)
2. A Front unit Advances into Constantinople (see 7.6)

11 Ottoman Sunset 2.0 Game Rules
3. Turkish National Will collapses (10.0)
[11.1.1] Forcing the Narrows: As described in Case 6.4, if this attempt to capture Constantinople by sea is made, and the British Fortitude marker survives the gauntlet of Turkish Defenses, ending in its 1 box (or higher), the game instantly ends in a Crushing Defeat.
[11.1.2] Capture of Constantinople: If an Allied Front Advances into Constantinople (effectively reaching the 0 space on its track), the Ottomans drop out of the war and seek terms.
Determine the Level of Defeat by adding together all of the still-unrevealed cards (even those not yet added to the deck), and then subtracting the current Turkish National Will (i.e., the box number where the National Will marker resides, remembering to add a negative number in this case, pursuant to the rules of math). Finally, compare that sum to the table below to determine the result:
1 or less Pyrrhic Victory 2 to 10 Strategic Stalemate 11 to 25 Marginal Defeat 26 to 35 Strategic Defeat 36 or more Crushing Defeat
[11.1.3] Collapse of National Will: A collapse of Turkish National Will is automatically a Crushing Defeat. Note that this was historically the fate of the Ottoman Empire.
[11.2] Winning the Game: There is only one way to win the game, and that is to survive all of the Event cards without losing. After completing the last Current Event card, determine the level of your victory by scoring Victory Points (VPs).
Begin by adding the numbers of the boxes occupied by Allied Fronts and scoring that many VPs.
Example: At the end of the game, the Arab Front is in Aquaba, its 4 box. That would add +4 Victory Points. Score each on-map Front separately and add them together.
You score 0 points for the Gallipoli Front being inactive; we have already factored this in.
To that sum, add the final value of the Turkish National Will (see 10.0; note that this can exceed +5; use the actual value) which, in this case, means subtracting that amount if it is a negative value.
You are also awarded Bonus Victory Points as listed below:
+2 VPs if the Caucasus Front is not on the map (due to the Russian Revolution)
+1 VP if an attempt to Force the Narrows was made and defeated (see 6.4)
Compare that sum to the table below:
10 or less Tactical Victory 11 to 19 Marginal Victory 20 to 24 Operational Victory 25 to 28 Strategic Victory 29 or more International Victory
[11.3] Outcome hypotheticals: To give more of a sense of what a game result would equate to in the real world, the game designer has included his speculation of what each result would mean to world history.
International Victory: As a result of their setbacks in the Middle East, France and Britain sue for peace. The Sultan becomes ruler of all Muslim lands, stretching far into Asia and covering the entire coastline of North Africa. Germany takes over the rest of the British and French Empires. The Ottomans and Germany together invade the Soviet Union and partition much of the remaining Russian state.

Ottoman Sunset 2.0 Game Rules 12
Strategic Victory: The resurgent Ottoman Empire stands amidst the victorious Central Powers. Under the Peace of Berlin, the Ottoman Empire is awarded control of Egypt, Crete, Cyprus and much of the Caucasus and central Asia. A period of increased tension with the British Empire ensues as the Ottomans promote Pan-Islamism, with the tacit support of Kaiser Wilhelm of Germany, the foremost leader in Europe.
Operational Victory: The Ottoman Empire survives the First World War by reaching a negotiated peace between the warring powers under the auspices of the Pope in Rome. Compensating the Ottomans for their losses is substantial territory in Russia and they are able to fund their efforts to suspend Arab nationalism with increasing oil revenues, especially from the German-Turkish co-dominion of Azerbaijan. The British concede to joint administration of Egypt. The Ottoman Empire survives until well after the outbreak of the Second World War.
Marginal Victory: Despite the defeat of Germany in the West, the Ottoman Empire survives the war with its sovereignty intact. It works on rebuilding its society and continues to modernize using new revenues from the formerly Russian oil port of Baku. Enver Pasha, however, overplays his hand; he is killed in battle intervening on the side of the Russian Whites in the Russian Civil War in an attempt to seize Central Asia. Lenin demands the return of Russian territory to the Soviet Union in the Peace of Kars.
Tactical Victory: In the aftermath of the First World War, the Ottoman Empire becomes the new Turkish Republic. Enver Pasha wins the election as the first President of the new state, but spends his time in office trying to rebuild his shattered society. Some years later, the Arab
lands receive their independence in the form of a unified Arabian state after the Turks refuse to counter the uprising of the House of Sa’ud, which was heavily funded by the resentful Western Allies.
Pyrrhic Victory: After the defeat of Germany, the Western Allies look to launch further offensives against the undefeated Ottoman Empire. However, due to war weariness, all sides agree to a peace that leaves the Ottoman Empire intact as it was before the war. Allied mandates are set up as buffer states between the Ottomans and the new Soviet Union. Internal tensions lead to a Civil War that restores the Sultan to complete authority when the Young Turk leadership is defeated by Mustafa Kemal’s forces at the Sultan’s dispatch.
Strategic Stalemate: The Ottoman and Allied forces reach an armistice on November 11, 1918, basing the borders of the new state of Turkey on the battle lines as they stand. The transition to Democracy for Turkey is difficult. Deprived compensation for their assistance, Greece aligns with Hitler during World War 2, seeking to claim territory in Asia Minor.
Marginal Defeat: The Western Allies make a separate peace with the Ottomans, reducing the Ottoman Empire to a rump state of Turkey as a result. Allied mandates are set up to govern the former Arab territories. Within a couple of years, Mustafa Kemal launches a bloodless coup, removing the CUP from power and forcing the Sultan to abdicate. Turkey becomes an Axis power in World War 2, making Hitler’s defeat much more difficult.
Strategic Defeat: The Ottoman Empire surrenders in November, 1918, but still manages to avoid Allied occupation. Reduced to its core territories in Asia Minor, the Sultanate removes the Young Turk leadership

13 Ottoman Sunset 2.0 Game Rules
and Mustafa Kemal (Ataturk) is executed after an abortive uprising.
Crushing Defeat (Historical Result): The Ottoman Empire surrenders in October, 1918, with the rest of the Central Powers following thereafter. The League of Nations sets up mandates in the Middle East, governed by the victorious Allied powers. Those same Allied powers attempt to partition the Anatolian heartland of Turkey, with the acquiescence of the Sultanate, but a Nationalist uprising led by Mustafa Kemal (Ataturk) defeats them.
[12.0] OPTIONAL RULES You can add the following Optional Rules to vary the experience of playing Ottoman Sunset. Each Rule states whether it works to the Player’s Advantage (making the game easier), Handicap (making the game harder), or is Neutral (may make the game harder or easier depending on how it plays out). The “Designer’s Choice” Optional Rules are marked with an asterisk.
[12.1] Flanking the Gaza-Beersheba Line (Handicap): If the Sinai unit is attempting to Advance against the Fortification Gaza-Beersheba marker and the Allies control Tafilah (space 3 on the Arab track, but it cannot have been just captured during the current Army Movement Phase), then the Sinai unit automatically passes its Attrition Roll to Advance against the fortifications (see 7.4).
If the Allies lose control of Tafilah then this flank attack possibility is lost and the Fortification marker functions normally.
If this Flank Attack does take place, and the player goes on to win the game, score one additional (+1) Victory Point (see 11.2).
[12.2] The Historical Game (Neutral): Players desiring to encounter the events of the Great War in their historical sequence can simply play all of the cards in numerical order, #1 to #49.
[12.3] Military Intelligence* (Advantage; thanks to Mark Giordano): While the Intelligence Bureau for the East marker is in the Turkey box on its display, all Offensives versus enemy Fronts in their ‘1’ boxes (i.e., adjacent to Constantinople) receive a +1 DRM (not +2; flip this marker over as a reminder if you are using this Rule).
This marker could have been moved from the Turkey box and returned or it may have simply remained there since being received.
[12.4] Arab Feints* (Handicap): If the Arab unit is at Tafilah (box 3) or a lower-numbered box, you cannot conduct an Offensive versus the Sinai Front unless an Offensive is first taken against the Arab Army (whether it is successful or not).
German Staff Operations are not limited in this manner.
During the Palestine campaign, the British frequently deployed Arab forces on their eastern flank to distract Turkish reserves away from the main British thrust. This was particularly apparent during the Arab attack on Deraa, tying up Central Power forces before Allenby made a sweeping advance on the coastal plain, leading to the climactic Battle of Megiddo.

Ottoman Sunset 2.0 Game Rules 14
[12.5] Lenin (Neutral): To take the Russian Revolutions out of the card draw realm, use this rule:
The Provisional Government (#35) and Bolshevik Revolution (#43) cards have their Event text ignored. The Advances and Actions conferred by the card remain unchanged, so perform those.
The Caucasus Front is reduced to its Provisional side (i.e., flipped to its one-Battle-Value-lower side) if:
o The Mid-Day cards have been added to the deck; and
o Two German Staff Operations are spent (one of which must be from the Eastern Front); and
o At least two Eastern Front Off-Map Battle markers are in the Victory box.
Once, on any turn after the Caucasus Front is at its Provisional strength, it can be removed from the map if:
o The Dusk cards have been added to the deck; and
o One German Staff Operations from the Eastern Front is spent; and
o At least three Eastern Front OR two Kaiserschlacht Off-Map Battle markers are in the Victory box. A combination of the two types is not acceptable.
The game has the revolutions in Russia as events beyond the player’s control. To some degree, this is accurate, but actions of the Central Powers, in fact, played key roles in both revolutions, both indirectly through Russian defeats, and directly through the shipping of Vladimir Lenin to the Finland Station in 1917.
This rule may provide the player with great control over the Caucasus Front and hence may make the game easier, but it also carries the effect of making the Revolutions non-automatic and costly, which may not inure to the player’s advantage.
[12.6] Additional German Assistance (Advantage; it is recommended that this Rule be in effect if the Lenin Rule, above, is also in effect): When the first card of a new deck (Mid-Day and Dusk) is revealed, the player receives one free Resources marker (if it has remained unpurchased and is thus still available) which is immediately allocated to a Theater as per Case 8.4 (and can affect an Off-Map Battle that turn). The degree of German assistance to their Central Power allies was vast and increased dramatically as the war progressed. To some degree, the cards reflect this, but this Optional Rule simulates this further, while reducing the game’s difficulty.
[12.7] Persian Intervention (Advantage): You may also allocate Resources (see 8.4) to the Persia Coup box (indicating the entry of Turkish forces into that theater). No more than one Resources marker can exist in that Theater at a time and its presence in the Persia box has no effect on any Coup determination there.
While a Resources marker is in the Persia Coup box, before conducting any Advances by the Caucasus or Mesopotamia Fronts, a Persian Intervention roll is triggered on the table below. If Persian Intervention is in effect and both of these Front units Advance on the same card, roll for the Caucasus Front first.

15 Ottoman Sunset 2.0 Game Rules
Persian Intervention Table
Result Outcome
≤1 That Front Advances normally and that Resources marker is spent (removed from play)
2 or 3 That Front Advances normally
≥4 That Front does not Advance and remains in its present space
Die Roll Modifiers for the Persian Intervention Table are as follows:
+1 If the Persian Coup marker is in the Victories box
+1 If the Russian Provisional Government is in effect (Caucasus Front roll only)
-1 If the Dusk deck has been introduced
-1 If the Gallipoli Front has been evacuated (Mesopotamia Front roll only)
Once a 1 or less is rolled, no subsequent Persian Intervention rolls are made until and unless another Resources marker is allocated to the Persia box.
While not simulated directly in the game, Turkish, Russian, and British forces and their proxies engaged in direct conflict in Persia (Iran) at various points during the Great War.
To simulate the effect this “sideshow” theater had on the Russian and British commands in the Near East (and, to a lesser extent, to the Turks), you may add these Persian Intervention rules.
[12.8] Mustafa Kemal (Advantage): Mustafa Kemal was the best Turkish military leader in the conflict. Three times per game (maximum) the player
can commit him to join an Offensive for a +1 DRM (cumulative with any other DRMs) prior to rolling the die.
He cannot be used to launch his own Offensive (i.e., the player must still spend an Action), and can only be used once during an Offensive for a single +1 DRM.
Historical Restrictions: The Mustafa Kemal DRM can only be used on the Gallipoli Front until Gallipoli is evacuated, if ever. Only after an evacuation from Gallipoli can the Mustafa Kemal DRMs be applied to the Sinai or Arab Fronts (only). You cannot apply the Mustafa Kemal DRM against the Caucasus, Salonika, or the Mesopotamia Front.
[12.9] Capital Resilience (Advantage; thanks to Steve Carey): Instead of losing automatically, if the Constantinople space is entered by an enemy unit (not the Allied Fleet from Forcing of the Narrows), resolve this calamity thus instead:
Place that enemy unit back on its 1 space.
Move any one marker in the Victories box over to the Defeats box. This will cause a two-point swing in the National Will value when calculated each turn.
If there are no markers in the Victories box, then the player does lose automatically.
[12.10] Forcing the Narrows Redux (Handicap): When playing with this Optional Rule, remove (i.e., eliminated due to engagement with the Allied navy) any non-permanent gun or minefield that conducted its attack during the first attempt to force the Narrows. You can rebuild these pieces between Allied attempts to Force the Narrows.

Ottoman Sunset 2.0 Game Rules 16
To simulate the possibility of a second attack on The Narrows (or a first attack after the arrival of German U-boats), these rules apply:
Early German U-Boat Arrival
If the Forcing the Narrows card (#8) is drawn before the Dusk cards have been added to the deck and the U-Boats marker is in The Narrows area (i.e., card #14 has been previously drawn), then the Forcing the Narrows card is not played at this time. Instead, add this card to the Dusk deck (i.e., the Fleet tries again later when those cards enter play) and move the U-boats marker to the 4 box of the British Fortitude Track.
When redrawn, the Forcing the Narrows Event (6.4) does occur, but the British Fortitude marker starts in its 3 box (rather than its 4 box) due to the presence of German U-boats.
A Second Attempt
If the Forcing the Narrows Event (6.4) occurs and fails before the Dusk cards have been added to the deck, the Fleet will make a second attempt. Instead of continuing with that card’s Advances and Actions, immediately end that turn and add this card to the Dusk deck (i.e., the Fleet tries again later when those cards enter play).
When redrawn, the Forcing the Narrows Event (6.4) does occur, but the British Fortitude marker starts in its 3 box (rather than its 4 box) if the German U-boats marker is in The Narrows (i.e., card #14 has been previously drawn).
Rebuilding the Sedulbahir Guns
You can rebuild the on-map Sedulbahir gun emplacement after its destruction (via card #11) and after Gallipoli’s
evacuation (via card #24). It costs 1 Action to remove the destroyed marker from play, making that gun site operational again.
The British considered Forcing the Narrows a second time, particularly after the failure of the Suvla Landing.
It is unclear whether a second attempt would have fared better than the first, especially considering the withdrawal of most of the more modern warships after the arrival of German U-boats in the Mediterranean.
[12.11] British Submarines (Handicap): When the Armenian Volunteer Units card (#9) is drawn (there is no causal connection, but this card is as good a trigger as any), place the British Submarines unit (on the reverse side of the Kaiserschlacht marker) in the Kaiserschlacht marker’s holding box on the Sequence of Play chart near the bottom of the map.
At the end of each turn, during the Kaiserschlacht Phase, you must roll the die to conduct one free “attack” against this British Submarines unit.
A result of @ or higher is a “success” and has no effect.
A result of ! is a “failure” and, if any Resources markers are currently placed on the map, you must choose one of them to remove from play. If none of these markers are on the map (in an Off-Map Front box or the Persia Coup box), then there is no effect.
You must suffer the British Submarines every turn in this manner until one of the following events occurs:
Card # 14 (German U-Boats in the Mediterranean), #24 (Gallipoli Evacuation), or #46

17 Ottoman Sunset 2.0 Game Rules
(Kaiserschlacht) is subsequently drawn (in the latter case, flip the British Submarines marker over); OR
You spend two Actions to place submarine nets in The Narrows.
When any one of the above occurs, remove the British Submarines marker from play for the rest of the game and ignore this Rule.
At the time of the Gallipoli campaign, the Allies launched many submarines into the Turkish Straits, eventually deploying 13 submarines, of which 8 were ultimately destroyed. They penetrated The Narrows on 27 separate occasions and Turkish losses included 1 Battleship, 1 Destroyer, and several small war and transport vessels. Eventually the placing of a submarine net in The Narrows put an end to this threat.
[12.12] Basra Landing (Advantage): Due to Allied delays in launching their campaign, the Mesopotamia unit sets up off-map and is placed on the Basra space the first time a card calls for it to Advance.
At the start of the war, British-aligned forces were not based in Basra. As a prerequisite to converting that city into a base of operations for further advance, British forces landed at the Fao Peninsula and, from there, moved on to Basra.
[12.13] Cannibalizing Narrows Artillery (Advantage): During any Action Phase before the die is rolled for a declared Offensive, you may permanently remove from play one previously placed Gun Emplacement marker (only) from The Narrows Display to gain a +1 DRM (cumulative with any other DRMs) for that Offensive.
This option applies only to previously placed Gun Emplacement markers, not permanently placed guns (e.g., Seddülbahir or Constantinople) or Minefield markers.
GAME CREDITS Game Design: Darin A. Leviloff Development: Josh Neiman Documentation: Alan Emrich Map Art: Tim Allen Cover Art: Vinh Ha Graphic Design: Barry Pike III Playtesting: Geert van der Burgt, Steve Carey, Terry Coleman, Tom Decker, Dave Ells, Mark Giordano, Hans von Stockhausen
Proofreading: Simon King, Rick Partin, Leigh Toms, Ian Wakeham, Karen Wolterman

Ottoman Sunset 2.0 Game Rules 18
[13.0] Ottoman Sunset EXAMPLE OF PLAY War Clouds gather in the East and the Ottoman Empire has entered the Great War. With a Russian Army under Dashkov poised to invade at Kars, an Indian-British force under Townshend in Basra on the Persian Gulf, and General Murray in the Suez, the Player draws from the shuffled Morning Deck.
The first card drawn is the Second Battle of Ypres (#10). First, the event is resolved as an Off-Map Battle. The marker reveals a 4, meaning that a roll of % or ^ (higher than that value) will result in a victory, a roll of $ (equal to that value) will result in a Stalemate, and a roll of ! to # (less than that value) will result in a defeat. Applying no modifications because no Resources markers are yet placed in the Western Theater nor has “War Weariness” been drawn, the player rolls a
! and the Germans are repulsed in their Western Front attack; the marker is placed in the Defeats box.
Now that the Event Resolution Phase is done, Army Movement is conducted. The card indicates an Advance by the Caucasus Army and the Sinai Army. Dashkov is moved to Sarikamish (Space 4), but Murray fails to Advance because a # is rolled which does not allow an Advance into the Sinai due to water concerns (see 7.3). In the Action Phase, the player can decide what to do with the “1 Action” awarded. The Turks decide to use it to garrison the Turkish Straits, purchasing a Minefield marker and placing it in either space on The Narrows Display. Skipping the Kaiserschlacht Phase because that card has not been drawn (nor could it be at this stage of the game), the National Will is now adjusted to “-1” because of the defeat at Second Ypres.
The next turn begins. The Intelligence Bureau for the East is established (#1). The Intelligence Bureau marker is placed in Turkey on the Intelligence Display. Next, the Mesopotamia Army Advances to Ctesiphon (Space 4). The one Action is spent re-deploying the Intelligence Bureau to India, in case a coup opportunity presents itself. National Will remains at “-1.”
Turkish Minelaying (#7) is the next card drawn. A second Minefield marker is placed for free on the Narrows Display. The Arab Army would Advance, but it is not yet activated, so that Advance is ignored. The Caucasus Army Advances to Van. The Young Turks decide to use their Actions in military Offensives. Taking advantage of the +1 DRM vs. Mesopotamia conferred by the card, Townshend is attacked and, with a roll of %, is sent back to Basra. It can be pushed back no further, so the Turks re-direct their remaining attack to the Caucasus Front. With another %, Dashkov is sent Retreating to Sarikamish (Space 4). No change to National Will, which remains at “-1.”
The Gallipoli Landings occur (#11) and the Hamilton counter is placed on the track at Battle Value of 2 on Space 4 (Cape Helles) and the Seddulbahir guns are marked “Destroyed” on The Narrows Display. Since the Arab Revolt hasn’t been triggered, only General
19 Ottoman Sunset 2.0 Game Rules
Dashkov Advances, returning to Van. Both available Actions are invested in a Resources marker that is immediately placed in the Western Theater.
The next event is the Ghadar Conspiracy (#5), a Coup card associated with India. Normally, a ^ is required for a coup to be successful, but because the Intelligence Bureau for the East has been placed in that box, a DRM of +2 is applied, making a $ or higher successful. A # is rolled and failure results. It is not placed in the Defeats box, however, as the Coup marker is simply removed from the game (6.2). Hamilton Advances to Anzac Cove (space 3) on the Gallipoli Front, while Dashkov seizes Erzurum (Space 2), a Strategic Site (7.5). Both Actions are Offensives directed at Dashkov and he is forced back to Sarikamish by rolls of % and #, respectively (higher than its Battle Value of 2). National Will remains unchanged because the Russian forces were ejected from Erzerum and a failed coup cannot count against National Will.
Jihad is declared (#3). The Mid-Day cards are shuffled into the Draw Pile. Dashkov Advances to Van, Townshend re-emerges in Ctestiphon, and (despite the water situation) Murray Advances to El-Arish on a roll of @. The first Ottoman Action is spent on building a gun emplacement for the Narrows at Yildiz, since there is now a possibility that the Allies will attempt to Force the Straits. An Offensive is directed at Hamilton on the Gallipoli Front, and a $ sends him back to Cape Helles. With the final Offensive, Murray is sent back to the Suez with a ^. The +1 DRM conferred by the card was unnecessary.
The next card is Mesopotamian Siege (#27). The Mesopotamia Front is Retreated one space to Basra and flipped over from the Townshend side to the Maude side (Battle Value of 4). The Mesopotamian Siege counter is placed in the Victories box, raising National Will to “0” at the end of the turn. This is actually a rough card to draw so early in the game as it makes the Mesopotamia Front much more formidable. Dashkov Advances to Erzurum, but the Salonika Advance cannot take place (that Front is not active). The one Action sends Dashkov back to Van via a successful Offensive.
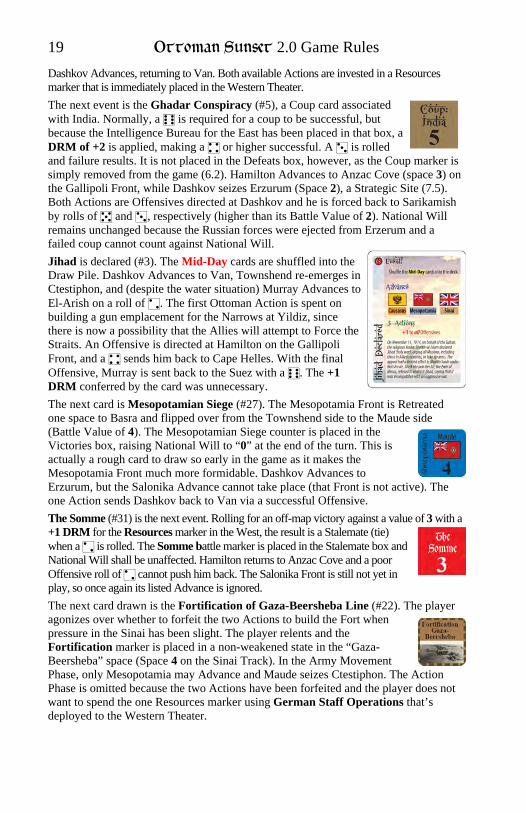
The Somme (#31) is the next event. Rolling for an off-map victory against a value of 3 with a +1 DRM for the Resources marker in the West, the result is a Stalemate (tie) when a @ is rolled. The Somme battle marker is placed in the Stalemate box and National Will shall be unaffected. Hamilton returns to Anzac Cove and a poor Offensive roll of @ cannot push him back. The Salonika Front is still not yet in play, so once again its listed Advance is ignored. The next card drawn is the Fortification of Gaza-Beersheba Line (#22). The player agonizes over whether to forfeit the two Actions to build the Fort when pressure in the Sinai has been slight. The player relents and the Fortification marker is placed in a non-weakened state in the “Gaza-Beersheba” space (Space 4 on the Sinai Track). In the Army Movement Phase, only Mesopotamia may Advance and Maude seizes Ctestiphon. The Action Phase is omitted because the two Actions have been forfeited and the player does not want to spend the one Resources marker using German Staff Operations that’s deployed to the Western Theater.
Ottoman Sunset 2.0 Game Rules 20
[14.0] DESIGNER’S NOTES By Darin Leviloff
You hold in your hands the re-release of Ottoman Sunset. It does seem strange to re-release the last game I designed before re-releasing others with a longer pedigree. Rest assured, the folks at Victory Point Games (hereafter VPG) never stop working and those are in the works. But for now, one thing at a time…
The reason that this re-release jumped the queue is that we’ve got something unique planned. What is that? It would be the upcoming release of Hapsburg Eclipse – our first foray into combined gaming in the States of SiegeTM series. With Ottoman Sunset and Hapsburg Eclipse combined, you can play two fronts and two games at the same time. But, get this – you can also play them co-operatively with another player! They are still very much solitaire and stand-alone games, but they have this one additional aspect. Soon, you will be able to simultaneously lead the Austro-Hungarian and the Ottoman Empires on their path to dissolution (or victory, if you are clever and fortunate enough) in the First World War.
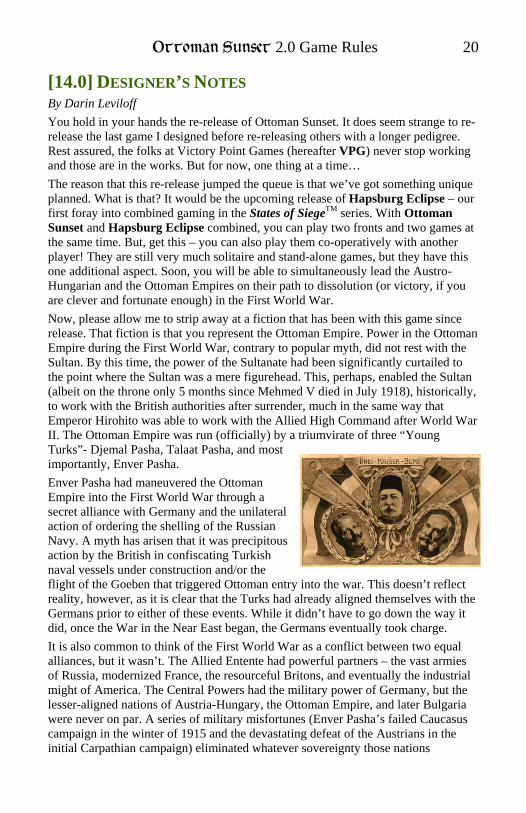
Now, please allow me to strip away at a fiction that has been with this game since release. That fiction is that you represent the Ottoman Empire. Power in the Ottoman Empire during the First World War, contrary to popular myth, did not rest with the Sultan. By this time, the power of the Sultanate had been significantly curtailed to the point where the Sultan was a mere figurehead. This, perhaps, enabled the Sultan (albeit on the throne only 5 months since Mehmed V died in July 1918), historically, to work with the British authorities after surrender, much in the same way that Emperor Hirohito was able to work with the Allied High Command after World War II. The Ottoman Empire was run (officially) by a triumvirate of three “Young Turks”- Djemal Pasha, Talaat Pasha, and most importantly, Enver Pasha.
Enver Pasha had maneuvered the Ottoman Empire into the First World War through a secret alliance with Germany and the unilateral action of ordering the shelling of the Russian Navy. A myth has arisen that it was precipitous action by the British in confiscating Turkish naval vessels under construction and/or the flight of the Goeben that triggered Ottoman entry into the war. This doesn’t reflect reality, however, as it is clear that the Turks had already aligned themselves with the Germans prior to either of these events. While it didn’t have to go down the way it did, once the War in the Near East began, the Germans eventually took charge.
It is also common to think of the First World War as a conflict between two equal alliances, but it wasn’t. The Allied Entente had powerful partners – the vast armies of Russia, modernized France, the resourceful Britons, and eventually the industrial might of America. The Central Powers had the military power of Germany, but the lesser-aligned nations of Austria-Hungary, the Ottoman Empire, and later Bulgaria were never on par. A series of military misfortunes (Enver Pasha’s failed Caucasus campaign in the winter of 1915 and the devastating defeat of the Austrians in the initial Carpathian campaign) eliminated whatever sovereignty those nations

21 Ottoman Sunset 2.0 Game Rules
maintained from their German overlords. From that point forward, Germany was running the Central Powers’ war and the others were along for the ride.
I don’t know if I originally had this conception of the war when I designed Ottoman Sunset; it came together as the components of the game took form. At the end of the day, I had emerged with a design where it seemed very clear that the power being simulated was not the power depicted on the map. Whether it is in the form of the Intelligence Bureau for the East, the Asia Korps, the Yilderim, or the German Staff Operations/Resources… the invisible hand of the Kaiser is always apparent. Once I understood that, then the path to linking the game with the other “sister” power, Austria-Hungary, came to the forefront, but more on that in the Designer’s Notes for the other game. Let’s talk about this Gold Banner upgrade for this game.
When I started working with VPG, they were little more than Alan and Vinnie, working out of Alan’s attic, with the desire to make small playable games from designers new and old. Their mission hasn’t changed. What has changed is not the scope of the enterprise, but the ability of the company to produce game components at a state-of-the-art level. The Little Game Company That Could has become The Not-So-Little Game Company That Has. But, part of the transition from brave upstart to established entity has involved upgrading its earlier catalog so that the quality of components matches the quality of the designs. The Gold Banner edition of Ottoman Sunset that you hold is not the first to fit this pattern, but it is the latest.
What we’ve done here is taken a good game and made it even better. What we haven’t done is alter what made the game a great and challenging experience in the first place. The rules in this edition are nigh identical to the prior incarnation, with only the exception that we’ve added some language to accommodate the future expansion of the combined game if, and when, you are ready to take that next step. Furthermore, the optional rules which were freely given on the VPG website are now included in the body of this manual, and the components are more designed to accommodate them. Additionally, we’ve also upgraded the components to provide a more enjoyable game experience and even added a new event and a set-up card. We’ve also fleshed out some counterfactuals for you.
What you are left with is a great game that creates its own narrative. You get the educational value of history as it was with the twists and turns of history as it could have been. Each game tells a story—similar, but never the same. Will the Allied Fleet’s force the Dardanelles, seizing Constantinople? Or will General Allenby break the will of the Turkish nation by capturing Damascus? Or will Turkey emerge victorious after Germany prevails on the Western Front? Sit down and find out!
Acknowledgements
While I used many historical resources in the design of this game, Brad and Brian Stock’s Pursuit of Glory from GMT, Joe Miranda’s Twilight of the Ottomans from Strategy & Tactics magazine, and Keith Poulter and Roger Nord’s Lawrence of Arabia games must be singled out, and the books Gallipoli: The End of the Myth by Robin Prior, Crowns in the Gutter by Ted Raicer, and Gallipoli by Alan Moorehead.
