the graphics pipeline and opengl iv · anaglyph rendering with opengl & glsl! 1. activate fbo1!...
TRANSCRIPT

The Graphics Pipeline and OpenGL IV: Stereo Rendering, Depth of Field Rendering, Multi-pass Rendering!
Gordon Wetzstein!Stanford University!
!
EE 267 Virtual Reality!Lecture 6!
stanford.edu/class/ee267/!!

Lecture Overview!
• overview of glasses-based stereo!• stereo rendering with OpenGL!
• projection matrix!• view matrix!
• offscreen frame buffers and multi-render passes!• anaglyph stereo rendering with GLSL!• depth of field rendering!
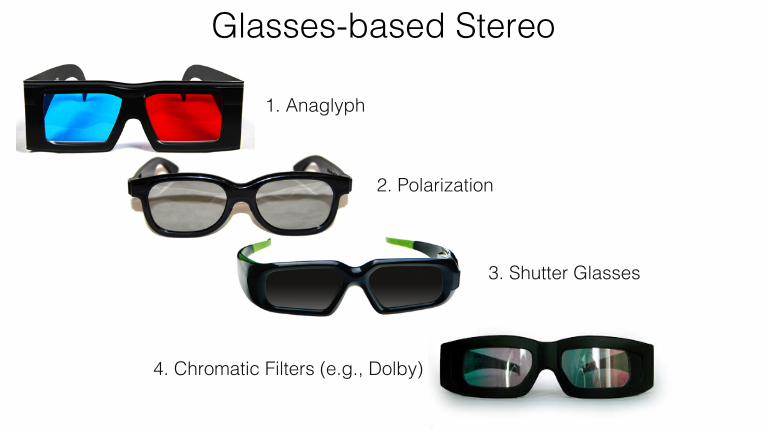
Glasses-based Stereo!
1. Anaglyph!
2. Polarization!
3. Shutter Glasses!
4. Chromatic Filters (e.g., Dolby)!

Glasses-based Stereo!
1. Anaglyph!
2. Polarization!
3. Shutter Glasses!
4. Chromatic Filters (Dolby)!
Glasses-based Stereo!
1. Anaglyph!
2. Polarization!
3. Shutter Glasses!
4. Chromatic Filters (Dolby)!
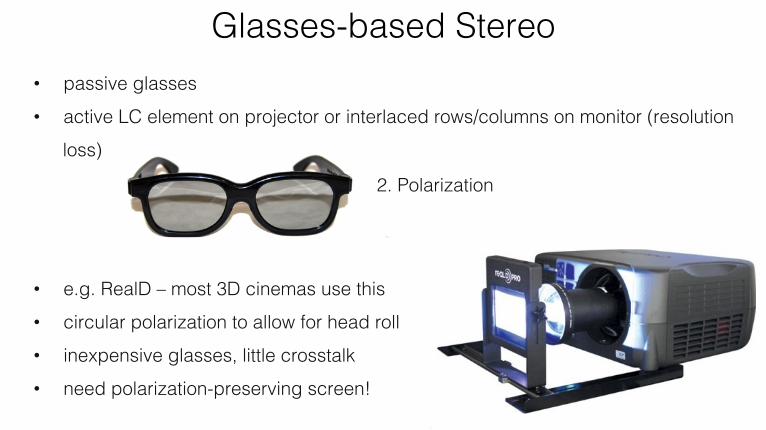
• passive glasses!• active LC element on projector or interlaced rows/columns on monitor (resolution
loss)!
• e.g. RealD – most 3D cinemas use this!• circular polarization to allow for head roll!• inexpensive glasses, little crosstalk!• need polarization-preserving screen!!

Glasses-based Stereo!
1. Anaglyph!
2. Polarization!
3. Shutter Glasses!
4. Chromatic Filters (Dolby)!
Glasses-based Stereo!
1. Anaglyph!
2. Polarization!
3. Shutter Glasses!
4. Chromatic Filters (Dolby)!
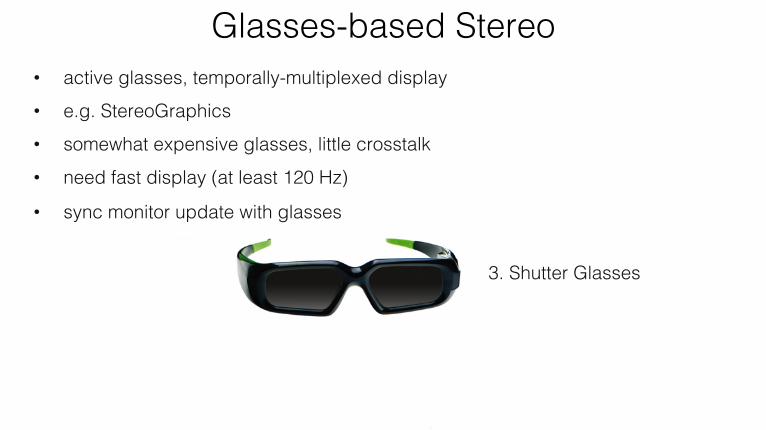
• active glasses, temporally-multiplexed display!• e.g. StereoGraphics !• somewhat expensive glasses, little crosstalk!• need fast display (at least 120 Hz)!
• sync monitor update with glasses!
Glasses-based Stereo!
4. Chromatic Filters (e.g., Dolby)!
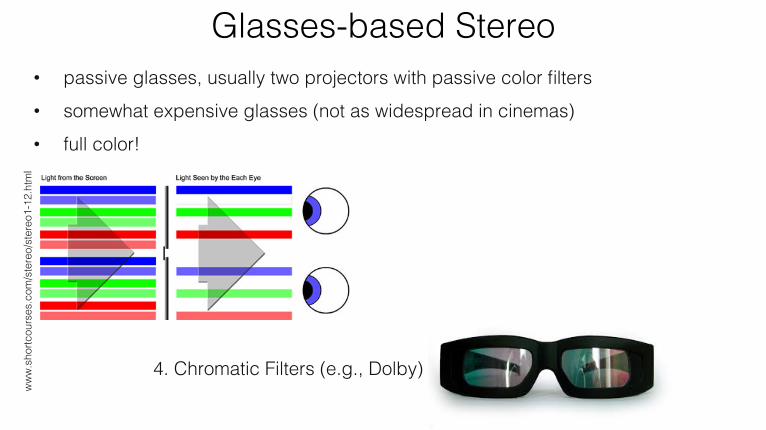
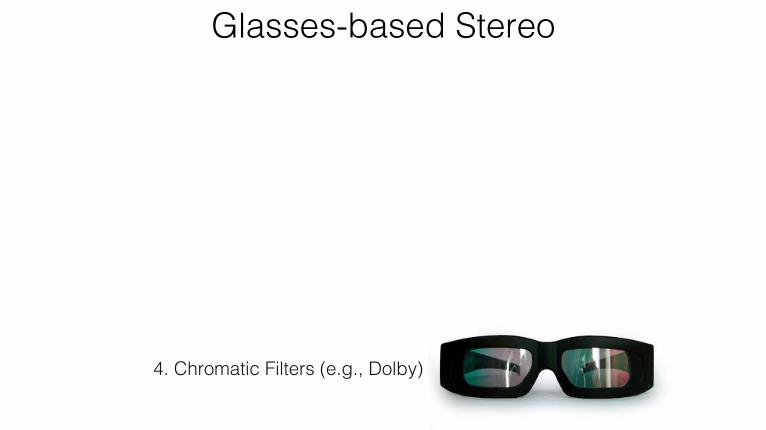
Glasses-based Stereo!• passive glasses, usually two projectors with passive color filters!• somewhat expensive glasses (not as widespread in cinemas)!• full color! !
ww
w.s
hortc
ours
es.c
om/s
tere
o/st
ereo
1-12
.htm
l!
4. Chromatic Filters (e.g., Dolby)!
Glasses-based Stereo!
1. Anaglyph!
2. Polarization!
3. Shutter Glasses!
4. Chromatic Filters (Dolby)!
Glasses-based Stereo!
1. Anaglyph!
2. Polarization!
3. Shutter Glasses!
4. Chromatic Filters (Dolby)!
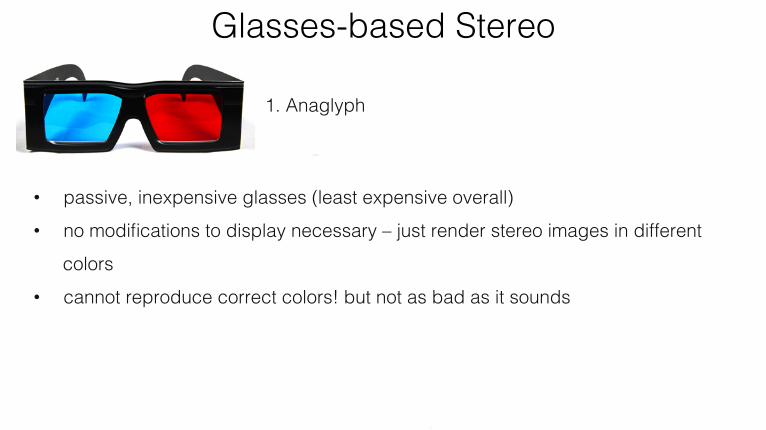
• passive, inexpensive glasses (least expensive overall)!• no modifications to display necessary – just render stereo images in different
colors!• cannot reproduce correct colors! but not as bad as it sounds!

2. Polarization!
3. Shutter Glasses!
4. Chromatic Filters (Dolby)!
Put on Your 3D Glasses Now!!
Glasses-based Stereo!pi
ntre
st.c
om!
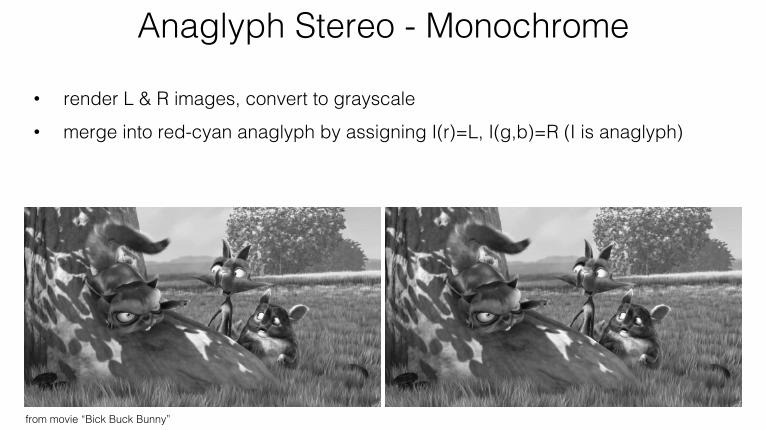
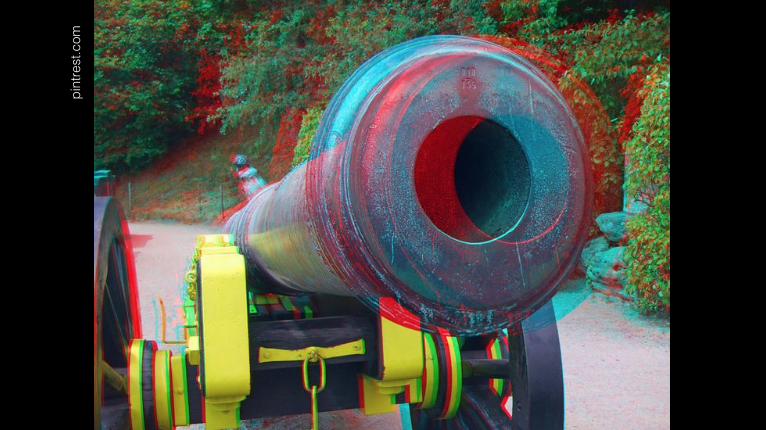
Anaglyph Stereo - Monochrome!
• render L & R images, convert to grayscale !• merge into red-cyan anaglyph by assigning I(r)=L, I(g,b)=R (I is anaglyph)!
from movie “Bick Buck Bunny”!


Anaglyph Stereo – Full Color!
• render L & R images, do not convert to grayscale !• merge into red-cyan anaglyph by assigning I(r)=L(r), I(g,b)=R(g,b) (I is
anaglyph)!
from movie “Bick Buck Bunny”!


Anaglyph Stereo - Dubois!
• paper: Eric Dubois “A Projection Method to Generate Anaglyph Stereo Images”, ICASSP 2001!
• optimize color management in CIE XYZ space !
• requires spectral transmission of glasses & spectral emission curves of display primaries!
• great course project - see previous course projects …!
http://bbb3d.renderfarming.net/download.html!
Open Source Movie: Big Buck Bunny!!
Rendered with Blender (Open Source 3D Modeling Program)!

Glasses-based Stereo!

Glasses-based Stereo!Anaglyph Comparison!!
!… show video clips …!
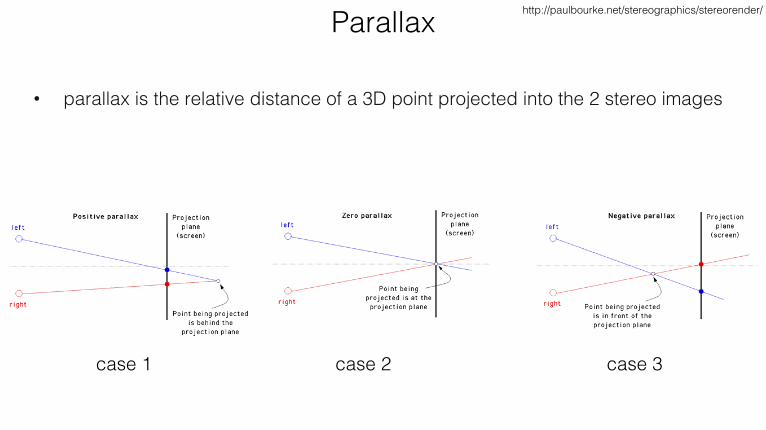
Parallax!
• parallax is the relative distance of a 3D point projected into the 2 stereo images!
case 1! case 2! case 3!
http://paulbourke.net/stereographics/stereorender/!

Parallax!
• visual system only uses horizontal parallax, no vertical parallax!!• naïve toe-in method creates vertical parallax à visual discomfort!
Toe-in = incorrect!! Off-axis = correct!!
http://paulbourke.net/stereographics/stereorender/!

Parallax – well done!

Parallax – well done!
1862!“Tending wounded Union soldiers at Savage's Station, Virginia, during the
Peninsular Campaign”,!Library of Congress Prints and
Photographs Division!!
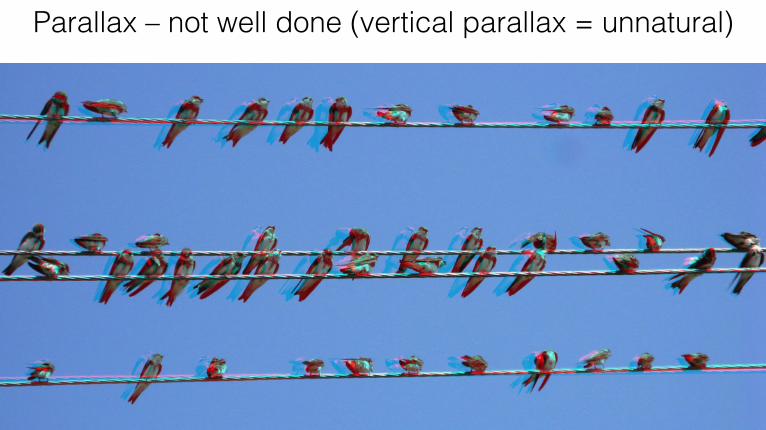
Parallax – not well done (vertical parallax = unnatural)!

2. Polarization!
3. Shutter Glasses!
4. Chromatic Filters (Dolby)!
Take Off Your 3D Glasses Now!!
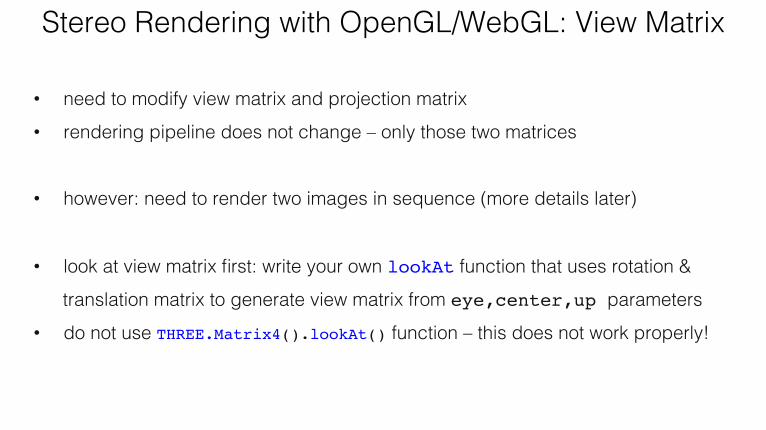
Stereo Rendering with OpenGL/WebGL: View Matrix!
• need to modify view matrix and projection matrix!• rendering pipeline does not change – only those two matrices!
• however: need to render two images in sequence (more details later)!
• look at view matrix first: write your own lookAt function that uses rotation & translation matrix to generate view matrix from eye,center,up parameters!
• do not use THREE.Matrix4().lookAt() function – this does not work properly!!

Important Numbers!m
onito
r wid
th &
hei
ght
IPD!
d
IPD!
dinterpupillary distance!
distance to monitor!
z
xworld origin is in the center of the physical monitor!!
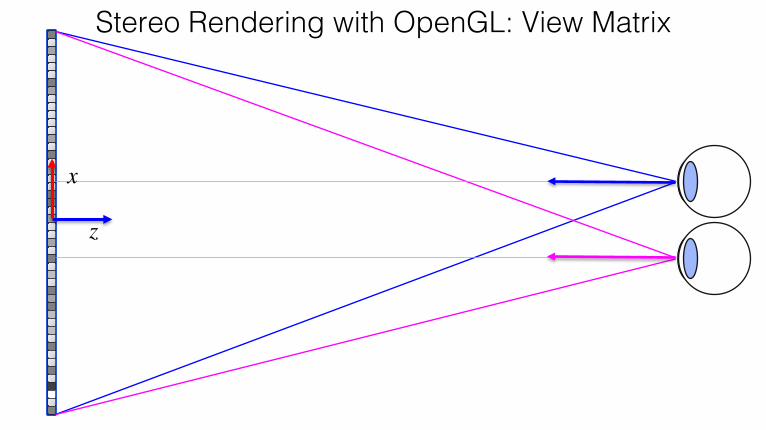
Stereo Rendering with OpenGL: View Matrix!
z
x

center points for lookat!!
Stereo Rendering with OpenGL: View Matrix!

lookAt( vec3(ipd/2,0,d),!vec3(ipd/2,0,0),vec3(0,1,0) );!
Stereo Rendering with OpenGL: View Matrix!
lookAt( vec3(-ipd/2,0,d),!vec3(-ipd/2,0,0),vec3(0,1,0) );!

Stereo Rendering with OpenGL: Projection Matrix!
• perspective projection we have discussed so far is on-axis=symmetric!• we need a different way to set up the asymmetric, off-axis frustum!• use THREE.Matrix4().makePerspective(left,right,top,bottom,znear,zfar)!
http
://pa
ulbo
urke
.net
/ste
reog
raph
ics/
ster
eore
nder
/!

On-axis Frustum!monitor!
Side View!
d
h
view frustum symmetric!
z
y

Side View!
d
h
view frustum symmetric! near
clipping plane!
On-axis Frustum!monitor!
znear
z
y
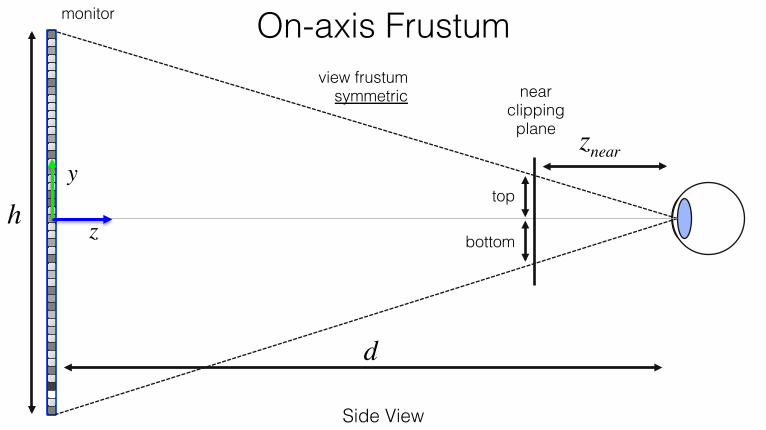
Side View!
d
h
view frustum symmetric! near
clipping plane!
On-axis Frustum!monitor!
top!
bottom!
znear
z
y

Side View!
d
h
view frustum symmetric! near
clipping plane!
On-axis Frustum!monitor!
top!
bottom!
similar triangles:!
top = znearh2d
bottom = −znearh2d
znear

Top View!
d
w
view frustum asymmetric!
ipd/2!
near clipping plane!
Off-axis Frustum!monitor!
znear
z
x

virtual image!
Top View!
d
view frustum asymmetric!
znear
right!
left!
ipd/2!
near clipping plane!
w
Off-axis Frustum!
z
x

virtual image!
Top View!
d
view frustum asymmetric!
znear
right!
left!
similar triangles:!
right = znearw + ipd2d
left = −znearw − ipd2d
ipd/2!
near clipping plane!
w
Off-axis Frustum!

virtual image!
Top View!
d
view frustum asymmetric!
znearright!
left!
similar triangles:!
right = znearw − ipd2d
left = −znearw + ipd2d
w
Off-axis Frustum!
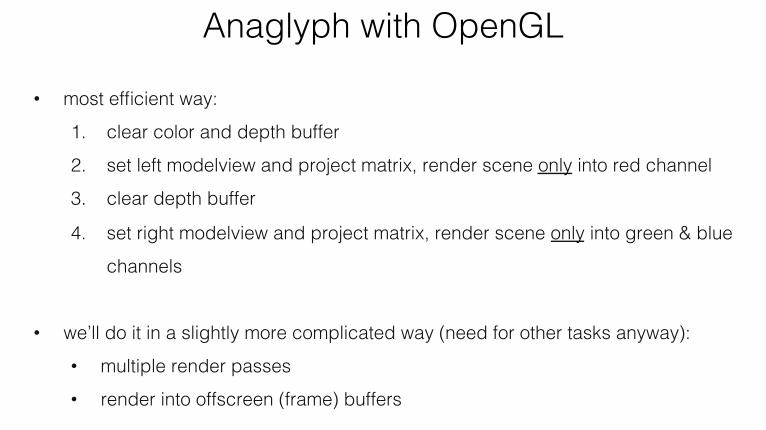
Anaglyph with OpenGL!
• most efficient way: !1. clear color and depth buffer!2. set left modelview and project matrix, render scene only into red channel !3. clear depth buffer!
4. set right modelview and project matrix, render scene only into green & blue channels !
• we’ll do it in a slightly more complicated way (need for other tasks anyway):!• multiple render passes!• render into offscreen (frame) buffers!

OpenGL Frame Buffers!
• usually (frame) buffers are provided by the window manager (i.e., your browser)!
• for most mono applications, two (double) buffers: back buffer and front buffer! à render into back buffer; swap buffers when done (WebGL does this for you!)!
• advantage: rendering takes time, you don’t want the user to see how triangles get drawn onto the screen; only show final image!
• in many stereo applications, 4 (quad) buffers: front/back left and right buffer !• render left and right images into back buffers, then swap both together!
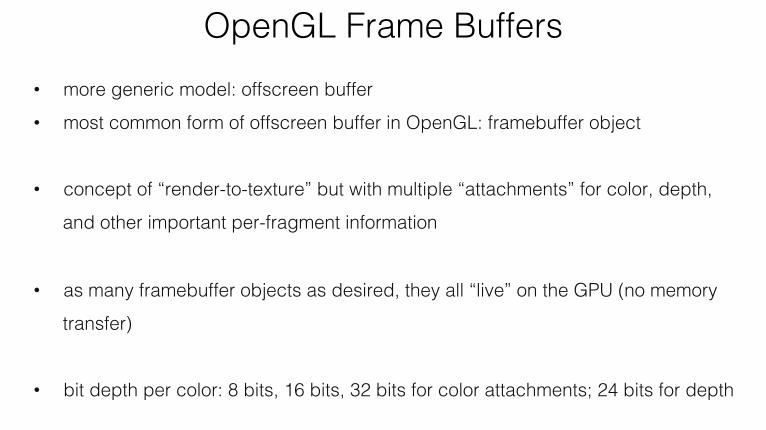
OpenGL Frame Buffers!• more generic model: offscreen buffer!• most common form of offscreen buffer in OpenGL: framebuffer object!
• concept of “render-to-texture” but with multiple “attachments” for color, depth, and other important per-fragment information!
• as many framebuffer objects as desired, they all “live” on the GPU (no memory transfer)!
• bit depth per color: 8 bits, 16 bits, 32 bits for color attachments; 24 bits for depth!

OpenGL Frame Buffers!FrameBuffer Object (FBO)!
…!
color attachment 0!
color attachment 1!
color attachment n!
depth attachment!
stencil attachment!
texture!
texture!
texture!
texture!
texture!
render!
• render into FBO as usual, just enable/disable the FBO!
• access content by
texture ID (e.g. in GLSL shader)!

OpenGL Frame Buffers!• FBOs are crucial for multiple render passes!!
• 1st pass: render color and depth into FBO!• 2nd pass: render textured rectangle – access FBO in fragment shader!
• we’ll provide a simple-to-use interface that shields you from the details of FBOs!
• in JavaScript FBOs are wrapped by WebGLRenderTarget in Three.js!
• more details in lab / homework starter code on Friday … !

Anaglyph Rendering with OpenGL & GLSL!
1. activate FBO1!2. set left modelview & projection matrix!3. render scene!4. deactivate FBO1!
5. activate FBO2!6. set right modelview & projection matrix!7. render scene!8. deactivate FBO2!9. render rectangle, pass FBO1 and FBO2 into fragment shader as textures!10. merge stereo images in fragment shader!
render pass 1!
render pass 2!
render pass 3!
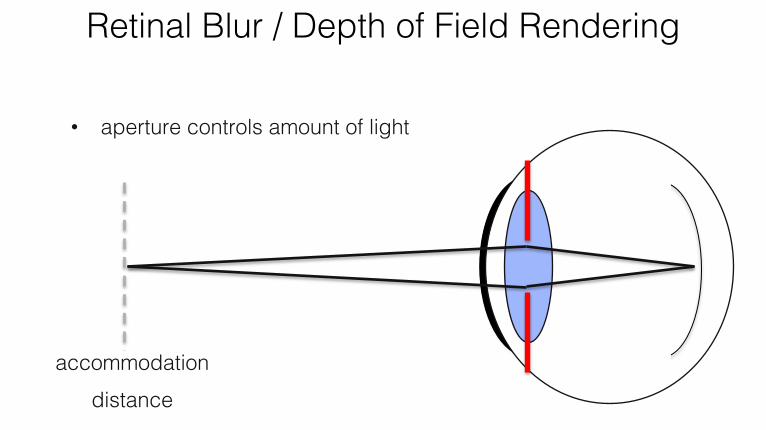
Retinal Blur / Depth of Field Rendering!
• aperture controls amount of light!
accommodation distance!

• aperture controls amount of light!
Retinal Blur / Depth of Field Rendering!
accommodation distance!

• out of focus blur!
retin
al b
lur!
Retinal Blur / Depth of Field Rendering!
accommodation distance!

• out of focus blur!
Retinal Blur / Depth of Field Rendering!
accommodation distance!
retin
al b
lur!

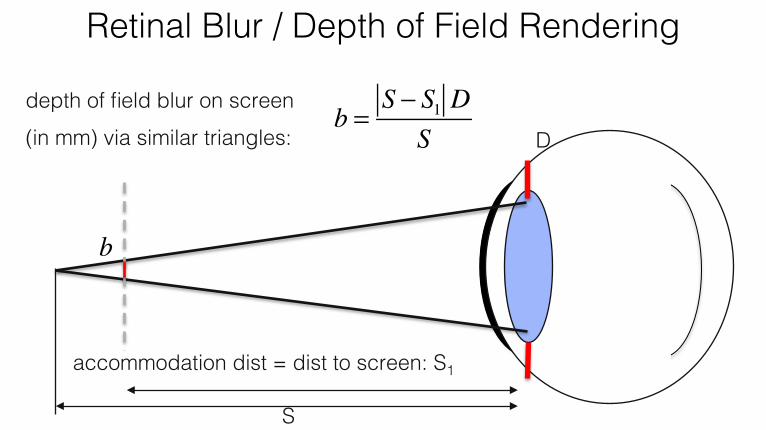
accommodation distance: S1!
D!
S!
c = M ⋅D ⋅S − S1S
M = fS1 − f
Retinal Blur / Depth of Field Rendering!
f = 17mm
retin
al b
lur d
iam
eter
c!
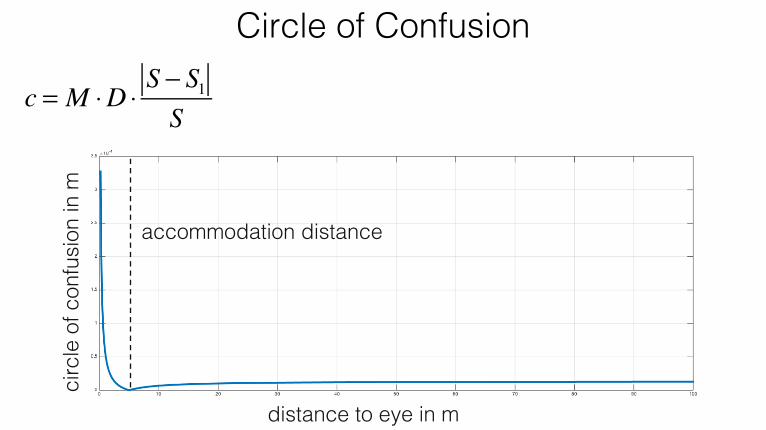
Circle of Confusion!
accommodation distance!
distance to eye in m!
circ
le o
f con
fusi
on in
m!
c = M ⋅D ⋅S − S1S
accommodation dist = dist to screen: S1!
D!
S!
Retinal Blur / Depth of Field Rendering!
b =S − S1 D
Sdepth of field blur on screen (in mm) via similar triangles:!
b

Depth of Field with OpenGL/GLSL!
• two rendering passes: !1. render image and depth map into FBO!2. render quad textured with image + depth!
• vertex shader is pass-through (just transforms, pass on texture
coordinates, no lighting)!• in fragment shader:!
• calculate depth for each fragment in mm (given in clip coords)!• calculate retinal blur size in pixels given depth & pupil diameter!• apply blur via convolution with double for loop over neighboring
color values in the texture!

Depth of Field with OpenGL/GLSL!
• how to get metric depth of a fragment?!
• in fragment shader we provide depth map z as uniform texture in window coordinates (range [0,1]) along with x,y fragment position in window coordinates!
• need to convert x,y,zwindow to view/camera coordinates x,y,zview and then calculate distance as !
dist = xview2 + yview
2 + zview2

How to get Metric Depth of Fragment!
M proj =
2nr − l
0 r + lr − l
0
0 2nt − b
t + bt − b
0
0 0 − f + nf − n
−2 ⋅ f ⋅nf − n
0 0 −1 0
⎛
⎝
⎜⎜⎜⎜⎜⎜⎜⎜
⎞
⎠
⎟⎟⎟⎟⎟⎟⎟⎟
xNDCyNDCzNDC1
⎛
⎝
⎜⎜⎜⎜
⎞
⎠
⎟⎟⎟⎟
vNDC! "# $#
=
xclip /wclip
yclip /wclip
zclip /wclip
1
⎛
⎝
⎜⎜⎜⎜⎜
⎞
⎠
⎟⎟⎟⎟⎟
zclip = − f + nf − n
zview −2 fnf − n
wclip = −zview
zview = 2 fnf − n
⋅ 1
zNDC − f + nf − n
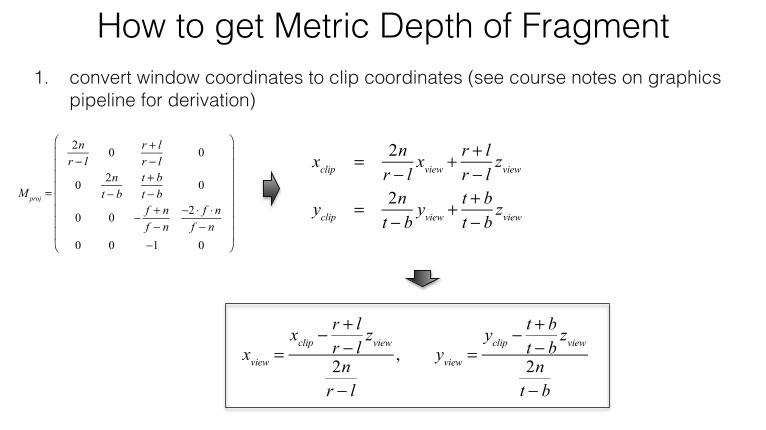
1. convert window coordinates to clip coordinates (see course notes on graphics pipeline for derivation)!
xclipyclipzclipwclip
⎛
⎝
⎜⎜⎜⎜⎜
⎞
⎠
⎟⎟⎟⎟⎟
vclip! "# $#
= Mproj ⋅Mview ⋅Mmodel ⋅
xyz1
⎛
⎝
⎜⎜⎜⎜
⎞
⎠
⎟⎟⎟⎟
v!"$
= Mproj ⋅
xviewyviewzview1
⎛
⎝
⎜⎜⎜⎜
⎞
⎠
⎟⎟⎟⎟
vview! "# $#
How to get Metric Depth of Fragment!
M proj =
2nr − l
0 r + lr − l
0
0 2nt − b
t + bt − b
0
0 0 − f + nf − n
−2 ⋅ f ⋅nf − n
0 0 −1 0
⎛
⎝
⎜⎜⎜⎜⎜⎜⎜⎜
⎞
⎠
⎟⎟⎟⎟⎟⎟⎟⎟
xclip = 2nr − l
xview +r + lr − l
zview
yclip = 2nt − b
yview +t + bt − b
zview
1. convert window coordinates to clip coordinates (see course notes on graphics pipeline for derivation)!
xview =xclip −
r + lr − l
zview
2nr − l
, yview =yclip −
t + bt − b
zview
2nt − b
How to get Metric Depth of Fragment!
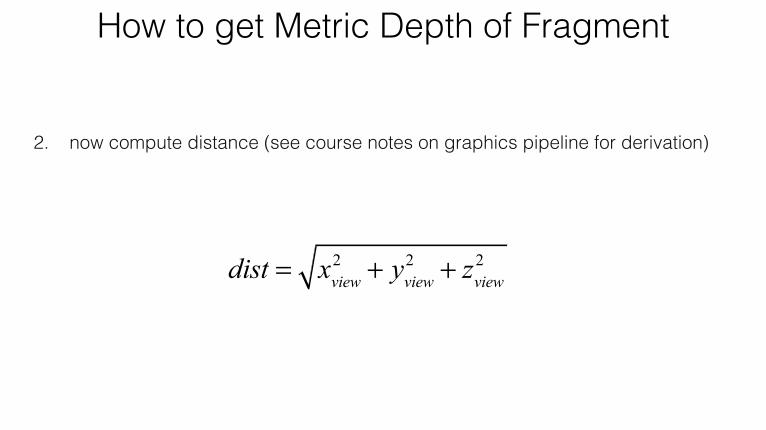
2. now compute distance (see course notes on graphics pipeline for derivation)!
dist = xview2 + yview
2 + zview2
Depth of Field with OpenGL/GLSL!
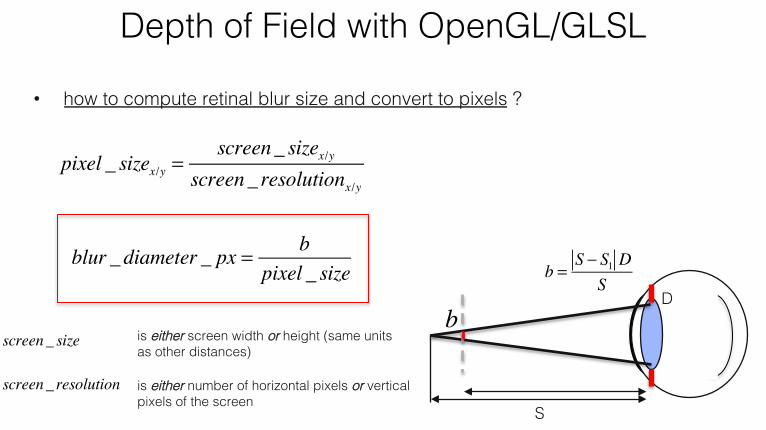
• how to compute retinal blur size and convert to pixels ?!
D!
S!
b =S − S1 D
S
bD!
pixel _ sizex/y =screen_ sizex/y
screen_ resolutionx/y
blur _diameter _ px = bpixel _ size
screen_ size
screen_ resolution
is either screen width or height (same units as other distances)!
is either number of horizontal pixels or vertical pixels of the screen!

1. activate FBO!2. set modelview & projection matrix!3. render 3D scene!4. deactivate FBO!
5. render rectangle, pass FBO with image & depth map into fragment shader as textures!
6. execute depth of field fragment shader!
render pass 1!
render pass 2!
Depth of Field with OpenGL/GLSL!

Depth of Field with OpenGL/GLSL!• putting it all together – this is just a general overview, do not use this exact code!
uniform sampler2D image; // RGB image was written in the first rendering passuniform sampler2D depthMap; // depth map was written in the first rendering passuniform float znear;uniform float zfar;uniform float pupilDiameter;varying vec2 textureCoords;
void main () // fragment shader{ // get fragment z in NDC float zNDC = 2*sampler2D( depthMap, textureCoords ).r – 1;
// get z in view coordinates (metric depth of current fragment) float distanceToFragement = …
// compute retinal blur radius in pixels float blurRadius = … int blurRadiusInt = round(blurRadius);
// set output color by averaging neighboring pixels in the color image (i.e., convolution) gl_FragColor.rgb = 0; for (int i=-blurRadiusInt; i<blurRadiusInt; i++) for (int j=-blurRadiusInt; j<blurRadiusInt; j++) if (float(i*i+j*j) <= blurRadius*blurRadius) gl_FragColor.rgb += … texture lookup in neighboring pixels
// normalize color …}
Summary!
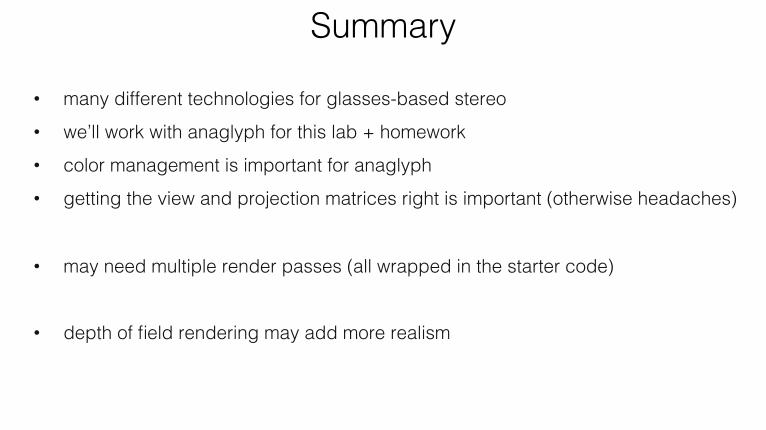
• many different technologies for glasses-based stereo!• we’ll work with anaglyph for this lab + homework!• color management is important for anaglyph!• getting the view and projection matrices right is important (otherwise headaches)!
• may need multiple render passes (all wrapped in the starter code)!
• depth of field rendering may add more realism!

Next Lecture: HMD Optics and Microdisplays !
• magnifiers!• VR & AR optics!• microdisplays!• stereo rendering for HMDs!
• lens distortion / undistortion!
drawing from Google Glass patent!

Further Reading!
• http://paulbourke.net/stereographics/stereorender/!
• Eric Dubois, “A Projection Method to Generate Anaglyph Stereo Images”, ICASSP 2001!
• Library of Congress, Stereoscopic Cards: !http://www.loc.gov/pictures/search/?st=grid&co=stereo!