the future we want a workbook on “learning to...
TRANSCRIPT

1m² of Forest – The Future We Want A Workbook on “Learning to See”

Forest spirit maskName

Contents
01CONTENTS
ONE SQUARE METRE OF FOREST 02 – What is a forest? – An introduction 03 – I spy with my little eye04 / 05 – Forest inhabitants 06 / 07 – Trees and their leaves 08 – How much forest is there on our planet? 09 – What is a forest for you?
LEARNING TO SEE
10 / 11 – Learning to see – An introduction12 / 13 – Colours 14 / 15 – Structures, patterns and ornaments16 / 17 – Shapes 18 / 19 – Geometry20 / 21 – Strategies and functions
THE VALUE OF FORESTS 22 / 23 – Preparing for the forest visit24 / 25 – Visiting the forest 26 – How valuable is the forest? 27 – The forest as a home
EXHIBITION AND WORKSHOPS
28 – Exhibition 29 – Zoom focus30 / 31 – Forest spirits
32 – Imprint
1m² of Forest – The Future We Want A Workbook on “Learning to See”

02 WHAT IS A FOREST?
One Square Metre of Forest
1. What is a forest?
In the first part of this workbook, you will learn all about forests. There are lots of different types of forests. These are home to countless different spe-cies of trees and are spread all across our planet. What’s more, there is far more to discover in these forests than just trees.
2. Take a closer look!
The second part of the workbook contains a number of practical exercises to help hone your senses. We will consider countless fascinating aspects of the question of beauty in nature and take a closer look at the many different colours, shapes, structures and patterns that can be found in the forest.
3. The value of forests
Now that you are fully prepared and know what to look out for, the third part of the project will involve a trip to a forest. We have created a handy toolkit for your exploration tour. Because you will need to examine items in the forest very closely, the kit also contains a special magnifying lens for your smartphone.
Select a forest find to take with you to examine in greater detail.
After gaining countless new impressions in the for-est, we will consider the question of how valuable the forest is to us.
4. Countless impressions – one exhibition
During this final practical part of the project, you will make an exhibition box to display your favour-ite forest find. You will then also be able to upload your favourite picture to an online photo gallery. During the “Zoom focus” workshop, you can recre-ate one specific feature of your favourite find, and in the “Spirit Mask” workshop, you will have the opportunity to reflect on what impressed you the most during the project.
You will then be able to present all that you have experienced, learned, found and created in a group exhibition.
Rediscover the forest and its beauty. Experience the diversity of living creatures and observe the minutest of details. This workbook will accompany you on this exploration tour.
Let us begin with a little guessing game:
What is pictured below?
Can you guess what is shown in the three circles? Do they remind you of anything? Make a note of what you notice!

I spywith my little eye
“Write what you can’t
see in these circles.”

Forest inhabitants
04 WHAT IS A FOREST?
What happens when trees are cut down?Take a look through the red sheet to see what you could not see in the forest at fi rst glance.
Forest inhabitants
04 WHAT IS A FOREST?
What happens when trees are cut down?Take a look through the red sheet to see what you could not see in the forest at fi rst glance.

05WHAT IS A FOREST? 05WHAT IS A FOREST?

06 WHAT IS A FOREST?
Trees and their leaves
Explore the many different leaf shapes!
Countless different leaf shapes exist in nature. Can you work out which trees these leaves are from? Copy their outlines into the boxes.
Now use www.leaf-id.com to identify the different leaves and write the names of the trees in the spaces provided.
What types of trees do you know?
1
3
2
6
3
5
4
Explore the many different leaf shapes!
Countless different leaf shapes exist in nature. Can you work out which trees these leaves are from?
Now use www.leaf-id.com to identify the different
6

Diversity of species
Planet Earth
70%water
21%land
6% forests
3%tropical rainforests
on land and in forest10%
in the tropical rainforests

How much forest is there on our planet?
08 WHAT IS A FOREST?
9
11
10
1011
9
8
8
7
7
5
5
6
6
4
4
3
3
2
2
1 1
Colour in the seas in blue. Which continents can you make out? Fold along the dotted lines to create a globe.Can you spot the tropi-cal rainforest vegetation belt?
Where do you live? Use a felt-tip pen to mark where you live on the globe.
Where would you like to go in the world?
Tropical rainforest
Coniferous forest
Savannah/desert
Grasslands/mixed woodland/green spaces
Tundra
High mountain ranges
Ice
Cut
Fold

What is a forest for you?
09WHAT IS A FOREST?
What can you see here? Describe the differences between the forest pictured here and those pictured on pages 3 and 7.

Learning to see – An introduction

11LEARNING TO SEE
What is beauty?
There really is absolutely no right or wrong answer to this question. It is entirely up to you what you find beautiful. Every person on our planet has their very own perception – and this can even change over time. When people live together, they often develop common notions of beauty. The result is clothing fashions and traditional dress, unique building and city construction styles, and endless different styles in painting, music and other arts. Shared values can be spoken of when a consensus is reached within the group on what is beautiful. It is interesting to learn why something is consid-ered beautiful. Art, philosophy and science all seek to identify possible formulas for beauty. This search essentially involves observing what individual people find beautiful. It helps to consider different aspects here such as colours, patterns, shapes and functions. It is particularly important to take a close look and to describe exactly what can be seen. There is no right or wrong, but rather only a subjective percep-tion – and this can be trained. The following pages contain a series of exercises to help you train your sense of perception.

REFRESHING SUNNY
MUDDY SOFT
PALE FROSTY
SPARKLING
VIBRANT BLUE
SHINY IRIDESCENT
POISONOUS RED
CLOUDY YELLOW
GOLD
Colour descriptions Colour shades

13LEARNING TO SEE
Colours
...a short time laterWild garlic...
Imagine you visit an imaginary forest. You see many fascinating things there – and then suddenly, you set eyes on an absolutely beautiful fl ower.
Describe the colours of this imaginary fl ower. Use the words on page 12 for ideas. You can also add some descriptions and colours for yourself in the empty boxes. Cut out the boxes and put them together to create combinations of words corresponding with your ideas. You can also exchange boxes for different ones.
Write your favourite combinations of words above your imaginary fl ower. Each of you will undoubtedly have created an entirely unique fl ower!
1
4
2
3
Colours in the rainforest
Unlike the animals that live in European forests, those that dwell in the rainforests (such as birds) are often particularly brightly coloured.
Colours of forest fi nds
Page 12 also features different colour samples. Once you have found an interesting item in the forest, use these samples to compare the colours and work out which appear in your fi nd. Stick three of these colours in the space provided on your presentation board (inside the back cover).
Colours change over time
If you have collected any plants (e.g. leaves, fl ow-ers, stalks, grass), you will be able to observe how the colours change over time.
1
2
3
4

14 LEARNING TO SEE
Surface structures
Patterns in nature
Endless different surface structures can be found in nature. Some may seem chaotic or disorganised at first glance while others resemble a pattern or ornament. Though it may seem it, patterns in nature are in fact by no means random. They all have a very specific purpose:
Unique
Unlike patterns created by a machine, patterns found in nature are never the same. Similar to fingerprints, they are always entirely unique.
Rub chalk on one of your fingertips, then press your finger onto the sticky surface of a piece of trans-parent adhesive tape. Stick this in the black space on the left here.
Compare your fingerprint with those of the other children.
They serve as camouflage
They help to attract
They deter
They stabilise
Creating rubbings
Take an A4 sheet of paper and a pencil and go find some interest-ing surface structures. These can be found in your school, at home, outside in nature and on the way to school. Take rubbings of these.
Cut out your favourite three patterns and stick them in your workbook here. Provide details of your finds.
Where found
What is it?
Where found
What is it?
Where found
What is it?

15LEARNING TO SEE
Structures, patterns and ornaments
Some examples of different structures and patterns you will find in nature are pictured here.
Which elements de-termine the structure? Copy one element of each pattern into the fields below.
Then use these to cre-ate your own ornament. Arrange the patterns you have copied in the grid.
You can then cut out the ornament you have created and include it in your exhibition.
1
4
2 3
5 6 – A
dhesive flap –
Patterns
1
4
2
5
6
3

16 LEARNING TO SEE
Shapes
Form and function
Generally speaking, every shape in nature has a function that has developed over the course of evolution.
In 1852, the American sculptor Horatio Greenough was the first to discuss how “form follows func-tion” in nature. The American architect Louis Sulli-van also considered this concept:
“Whether it be the sweeping eagle in his flight, or the open apple-blossom, the toiling workhorse, the blithe swan, the branching oak, the winding stream at its base, the drifting clouds, over all the coursing sun, form ever follows function, and this is the law. Where function does not change, form does not change.”
Sullivan, Louis H. (1896). “The Tall Office Building Artistically Considered”. Lippincott’s Magazine (March 1896): 403–409.
Mushrooms
Imagine it is raining. What do you have with you? Wellies, a raincoat – perhaps even an umbrella? Large raindrops roll off these and drip onto the ground.
Do you recognise the umbrella shape? Have you maybe seen something that looks similar in the forest? How about a mushroom? Lots of types of mushrooms look like little umbrel-las. The “hat” protects the spores concealed under-neath that are needed to scatter and propagate the mushrooms. Mushrooms also put out a mass of very fine underground roots known as myceli-um. These thread-like filaments wrap themselves around plant roots and help them to absorb water and nutrients.

17LEARNING TO SEE
Nature as inspiration
Humans copy and use shapes found in nature. Natural phenomena are pictured below alongside origami models and architectural structures that resemble them.
Search for the keywords on YouTube to recreate the origami figures.
Snail
Physalis
Rock crystal
Naval shell origami
Eiffel Tower origami
Tetrahedron origami
Stairway
Eiffel Tower
European Central Bank

18 LEARNING TO SEE
Geometry
Fibonacci
The Fibonacci sequence is a never-ending series of numbers that begins with the numbers 0, 1, 1, 2, 3, 5, 8, 13... The principle is simple: the next number in the sequence is obtained by adding together the two previous ones. Fibonacci numbers occur in nature surprisingly often. They can be found in the spiral structure of many different plants, including sunflowers, pine-apples and pine cones. If you count the number of spirals, it will (almost!) always be a Fibonacci number. There are generally two spiral systems at the same time. One goes in a clockwise direction and the other in an anticlockwise direction.Why not try this out for yourself: join all of the blue dots and all of the pink dots to create shapes that spiral around one another from the inside to the outside. Draw around the edges of the shapes you have created that look just like flower petals and colour them in.
Pine cone8 and 13
Sunflower34 and 55
Clockwise 8 spirals
Anticlockwise 5 spirals
5 and 8
11
2
2
3
3
4 4
5
5
67
8
1
2
3
4
5
6
7
8
12
3
4
5
0 + 1 = 1
1 + 1 = 2
1 + 2 =
+ =
+ =
+ =
+ =
+ =

Enter the keywordsSpirals, Fibonacci, and Being a plantin YouTube to watch an interesting video about Fibonacci.
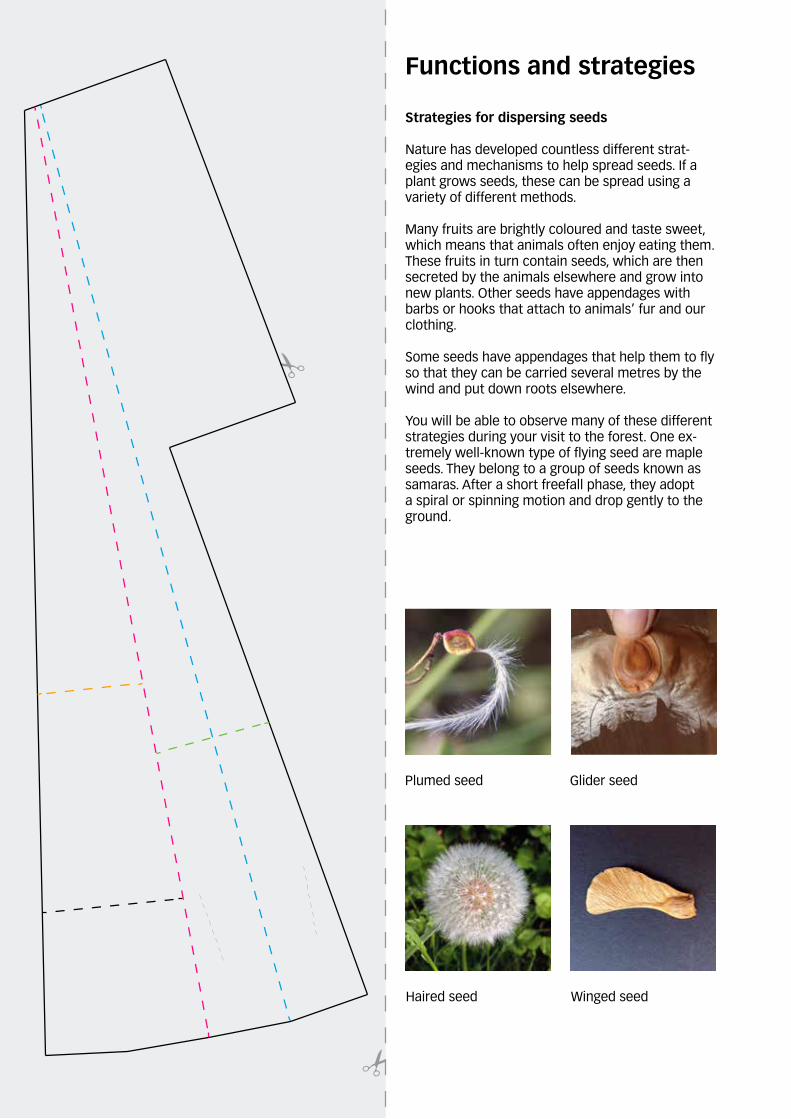
Functions and strategies
Strategies for dispersing seeds
Nature has developed countless different strat-egies and mechanisms to help spread seeds. If a plant grows seeds, these can be spread using a variety of different methods.
Many fruits are brightly coloured and taste sweet, which means that animals often enjoy eating them. These fruits in turn contain seeds, which are then secreted by the animals elsewhere and grow into new plants. Other seeds have appendages with barbs or hooks that attach to animals’ fur and our clothing.
Some seeds have appendages that help them to fly so that they can be carried several metres by the wind and put down roots elsewhere.
You will be able to observe many of these different strategies during your visit to the forest. One ex-tremely well-known type of flying seed are maple seeds. They belong to a group of seeds known as samaras. After a short freefall phase, they adopt a spiral or spinning motion and drop gently to the ground.
Plumed seed Glider seed
Winged seedHaired seed

21LEARNING TO SEE
Make a flying seed
On the left here is a template for a maple seed. Cut this out and follow the instructions below to fold it up. Use adhesive tape to stick the lower edge together. Have a think what the best shape might be for the wing. How should this look to ensure it stays in the air for as long as possible and can be carried as far as possible by the wind? You can then test out how well your seed model flies. Which wing shape stayed in the air the longest?
Nature has essentially developed over several million years what you have been able to work out in just a short time by experimenting! Countless different types of seeds with optimal flight and dispersal proper-ties have developed. This is how evolution works.
Can you remember what the shape of a maple seed wing looks like? Cut a wing shape that you think will help your model remain airborne the longest.
Throw your maple seed model up into the air at the same time as the other children. Which model floats through the air the longest?
A good throwing tech-nique is shown below.
Instructions
Cut out the template on page 20, then follow these instructions to fold it up:
01 07 13 19
1806 12
02 08 14
03 09 15
04 10 16
05 11 17

22 THE VALUE OF FORESTS
The Butterfly Catcher
Painted by Carl Spitzweg in 1840
The Butterfly Catcher
Once upon a time a long, long time ago, the butterfly catcher wandered through an enchanted forest.
Today, more than 175 years later, you no longer have a net to take with you but rather a magnifying lens for your smartphone. This is included in the toolkit.
1 Magnifying lens with 5 x magnification2 Magnifying lens with 9 x magnification
1 2
Preparing for the forest visit
The value of forests

Practice focusing
Try to make out the secret message on the back of the beetle pictured here! You will need to take a photo for this – hold the mag-nifying lens and cam-era very close to the picture!
1
Avoid making any loud noises. This may startle the animals.
2
Wherever possible, stick to the paths.
3
Take care to not disturb any animals during your visit.
4
Do not pick any plants needlessly. If you do pick anything,
then pick as few as possible.
5
Do not collect any endangered species.
6
Handle any creatures you catch (e.g. insects, spiders, worms, etc.)
with care. They should only be kept in the insect trap or Petri dish
for a short time for observation. You should then set them free again
where you found them.
7
If you turn over any stones or dead wood to search for small creatures,
be sure to turn them back over again.
Forest rules
Instructions
Use the elastic band to attach the magnifying lens over your smartphone, exactly in front of the camera lens.

Visiting the forest
Before you set off for the forest, cut out the exhibition notes on the left of this page.
Find a suitable place with a tree. Stand in a semicircle with the others for fi ve minutes. Keep quiet and observe the site. What do you notice? What can you hear? What can you smell? What do you feel? What else can you observe?
Jot down a few preliminary observations about the exploration site in your exhibition notes.
Collect sticks to mark out the area.
Attach the string to the tree trunk and set up the sticks around the tree like in the picture on page 25.
After marking out the exploration site, begin having a careful look around you. What can you fi nd there? Pay close attention to the smallest of details. It is often possible to discover a whole wealth of details by taking a closer look.
Select two items that particularly interest you. They should be no bigger than half a walnut. Please return larger fi nds or creatures once you have taken a picture.
Complete the exhibition notes.
Back in school
Take a picture of the items you have found.Upload your favourite picture to the follow-ing website:
Your teacher will then print the picture out for you.
Stick the picture in the space provided on the exhibition notes.
Need help uploading your picture? Instructions are available on http://1qmwald01.u-x.de
1
2
3
4
5
6
7
8
12
3
4
http://1qm-wald.klimabuendnis.eu/upload
Yo
ur favo
urite p
icture
Ob
serving th
e exp
loratio
n site
What do you notice? W
hat can you hear? What can
you smell? W
hat do you feel? What else can you
observe?
Describe your exploration site.
My favo
urite fi n
d
What have you found?
How
big is your fi nd? m
m
Date/season
Time
Weather
Temperature
Location

In the forest
25THE VALUE OF FORESTS
Mark out the exploration site
Attach the string to the tree trunk and use the end of the string to mark a circle around the tree.
Put a stick in the ground approx. every 30 cm around this circle. This will create a spiral with an “en-trance”.
Start
End
Each group will be pro-vided with the following materials:
TOOLKIT
The groups will need to share the following mate-rials:
1 x 5 magnifying lens (5 x magnification)
1 x 9 magnifying lens (9 x magnification)
2 x metal collection pots
2 x wooden tweezers
1 x Snapy insect trap6 m string 1 x glass Petri dish
2 x collection trays
2 x exploration sticks

How valuable is the forest?
26 THE VALUE OF FORESTS
What did you like best about your visit to the forest? What do you like about forests?
Think of some reasons why forests are valuable.
What might this sen-tence mean?
What does it look like where you live?
What is “home” for you?
Why do so many people live in the city?
Where would you prefer to live and why?
Could you imagine living in the forest? What would you like to ask the girls pictured here?
Here’s where we live!

The forest as a home
Nancy, Hilda, Brita and Lucia are doing each other’s hair here. They are using a plant called achiote to colour it red. They live in the rainforest in a village called Masaramu, which is in Ecuador.

28 EXHIBITION AND WORKSHOPS
Exhibition
This page shows how to make an exhibition box and set up your exhibi-tion.
There is space for your find here!
Case
Finished box
Glue
Glue
Name label– see page 28
Forest spirit mask– see inside the front cover
Ornament– see page 15
Your favourite picture
Box
Exhibition board– see inside the back cover
Colour samples– see page 12
Word combinations– see page 12
Your exhibition notes– see page 24
Fold up exhibition strip to store
Model label– see page 29
Your model
1
2
3 4
5
What is it?
Name

29EXHIBITION AND WORKSHOPS
Zoom focus
We will now explain how you can build a large-scale model. You should not recreate the whole object you have found but rather just one interesting detail.
At the bottom of this page are two templates. Cut these out and stick them together to create three viewing windows of different sizes. When you now hold this over your fi nd, you will see sections of different sizes. The smaller the viewing window, the larger the zoom factor.
Take a close look at your fi nd through the individu-al viewing windows and decide which detail looks particularly interesting.
Use newspaper, masking tape and coloured trans-parent paper to make a model.
Ideally, crumple up some newspaper to create a rough shape and fi x the structure with masking tape. You can then add several layers of transpar-ent paper and decorate the surface as appropriate.
For a detailed description of how to make a model, please watch this video:
http://1qmWald03.u-x.de
+
ModelWhat is your model of?
Size mm
Scale : 1


31EXHIBITION AND WORKSHOPS
Forest spirits
Masks How would you like to design your mask? Should it perhaps be enchanting and attract others, or should it be frightening and scare them away? Use the colours, shapes and patterns you explored in the “Learning to see” section and observed in nature.
A variety of different masks are pictured here. What effect do each of them have? Instructions Have a think what impact different colours, shapes and ornaments have and decorate your mask accordingly.
Create your very own forest spirit.
Forests are shrouded in myths. They are often the setting of fairy tales and legends that tell of forest spirits both good and bad, such as elves, hobgoblins and pixies. They are said to be associated with different elements, such as plants, streams or rocks.
You now have the opportunity to make up your very own forest spirit and to create a mask to represent them. You will find a template for your forest spirit mask on the inside of the front cover.

32
Imprint
IMPRINT
This publication was created as part of the project “EYD 2015: The Future We Want – Local Authorities for Sustainable Development” supported by the European Union. Its contents are the sole responsibility of Climate Alliance and can under no circumstances be regarded as reflecting the position of the European Union.
Climate Alliancewww.climatealliance.org
A good life is simplewww.overdeveloped.eu
Print run3,000
AuthorsJan CaspersSarah CunzeJasmin BaierRolf DegelTill Hergenhahn
English Translation Denise Dewey-Muno Graphic DesignTanita Sauerhöfer
Film / Cut / SoundLuis Degel
IllustrationsRolf DegelLucia DegelTanita Sauerhöfer
Homepage Rocco Georgi
Idea / Concept / Product DesignRolf DegelTill Hergenhahn
Photo credits
Page 02 / ImagesRolf Degel
Page 03 / Forest, SwedenTanita Sauerhöfer
Page 05 / Eucalyptus plantation in Uruguay, Teresa Perez, wrm.org.uy
Page 08 / LeavesManfred Ruckszio, naturbildagentur-ruckszio.de
Page 09 / Rainforest, GuadeloupeTanita Sauerhöfer
Page 10/11 / Indigenous women from Brazil, Filipe Frazao, de.fotolia.com
Page 13 / Rainforest, parrotTanita Sauerhöfer
Page 13 / Wild garlicRolf Degel
Page 14 / ImagesRolf Degel
Page 15 / Image 1Robert_C, pixabay.com/de
Page 15 / Image 2Unsplash, pixabay.com/de
Page 15 / Image 4Tanita Sauerhöfer
Page 15 / Image 3, 5, 6Rolf Degel
Page 16 / Mushroomsponkie, pixabay.com/de
Page 17 / Origami ImageTill Hergenhahn
Page 17 / Snail and physalisRolf Degel
Page 17 / Rock crystalLicenced to Didier Descouens
Page 17 / Stairwaystokpic, pixabay.com/de
Page 17 / Eiffel Towerskeeze, pixabay.com/de
Page 17 / ECBmoritz320, pixabay.com/de
Page 18 / ImageRolf Degel
Page 19 / SunflowerRolf Degel
Page 20 / Plumed seedRüdiger Kratz, St. IngbertWikimedia Commons 3.0
Page 20 / Glider seedRolf Degel
Page 20 / Haired seedRolf Degel
Page 20 / Winged seedRolf Degel
Page 21 / Pictorial instructionsTill Hergenhahn
Page 22 / The Butterfly CatcherCarl Spitzweg
Page 23 / Golden ground beetleBärbel Schulz
Page 26 / FrankfurtTill Hergenhahn
Page 27 / Sápara girls from Masaramu Silke Lunnebach
Page 29 / Oak leafManfred Ruckszio, naturbildagentur-ruckszio.de
Page 29 / ImageRolf Degel
Page 30 / Masks from GuatemalaDEZALB, pixabay.com/de
Page 31 / Batman mask lcr3cr, pixabay.com/de
Page 31 / Feathered mask skeeze, pixabay.com/de
Page 31 / Krampus mask edgarwinkler, pixabay.com/de
Page 31 / Wooden mask Till Hergenhahn
Page 31 / Locust maskTill Hergenhahn
© 2017 Umwelt-Exploratorium e. V. on behalf of Climate Alliance / Klima-Bündnis e. V.Silke Lunnebach
Climate Alliance / Klima-Bündnis e. V.European SecretariatGalvanistr. 2860486 Frankfurt am Main / [email protected]
www.climatealliance.org

Space for your exhibition box
Space for your model
Colour sample 01
Colour sample 02
Colour sample 03
Description
Colour
Nam
e
Model label
Description
Colour
Description
Colour

© 2017 Umwelt-Exploratorium e. V. on behalf of Climate Alliance / Klima-Bündnis e. V.