the flexible endoscope reprocessing cycle: from ... · leak testing – an important step for...
TRANSCRIPT
1
Pam Boulet RN, BSN, CGRN
Medivators Senior Clinical Specialist
[email protected] 504-390-4668
The Flexible Endoscope Reprocessing Cycle: From Contamination to Decontamination
.
.
.
• Guidelines for reprocessing flexible endoscopes are published by federal regulatory agencies such as the CDC:
Guideline for Disinfection and Sterilization in Healthcare Facilities, 2008 http://www.cdc.gov/hicpac/pdf/guidelines/disinfection_nov_2008.pdf
• Professional organizations have established guidelines for flexible endoscopes.
• Some are: – Society of Gastroenterology Nurses and Associates (SGNA) - www.sgna.org
Standards of Infection Control in Reprocessing of Flexible Gastrointestinal Endoscopes (2012)
– Association for Practitioners in Infection Control and Epidemiology (APIC) Guideline for infection prevention and control in flexible endoscopy, 2000
Alvarado CJ, Reichelderfer M, and the 1997, 1998, 1999 APIC Guidelines Committees. Am J Infect Control 2000;28:138-155.
– Association of Peri-Operative Registered Nurses (AORN) - www.aorn.org
– American Society for Gastrointestinal Endoscopy (ASGE) (Also known as SHEA paper)
Multisociety guideline on reprocessing flexible gastrointestinal endoscopes: 2011
• Endoscope manufacturer reprocessing guidelines for each endoscope (i.e. Olympus, Pentax, Fujinon, Karl Storz, etc.).
Reprocessing Guidelines
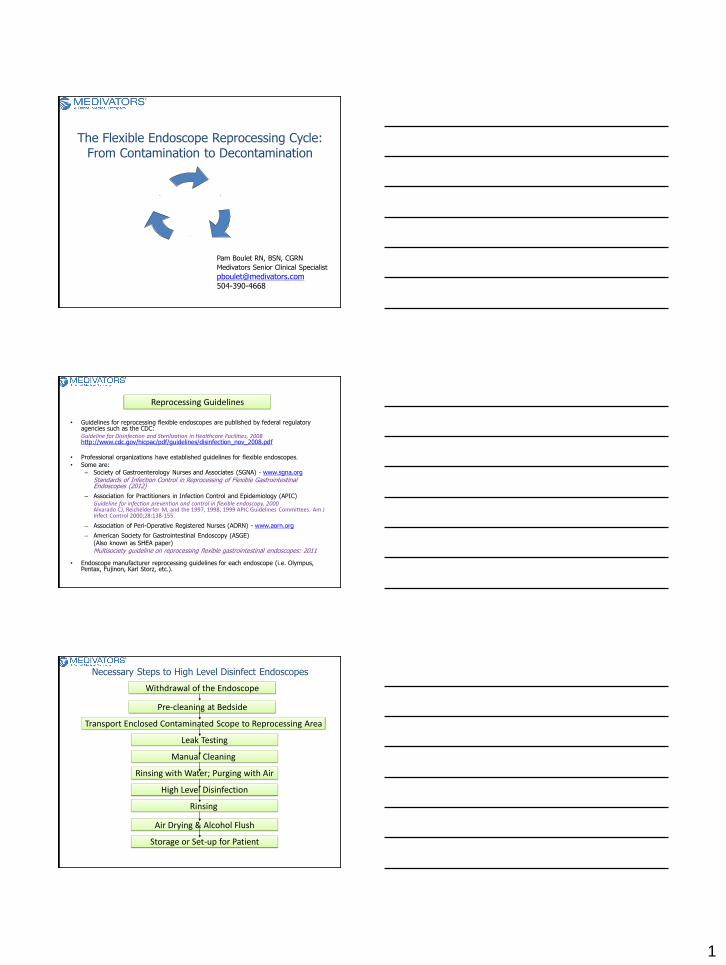
Necessary Steps to High Level Disinfect Endoscopes
Withdrawal of the Endoscope
Pre-cleaning at Bedside
Transport Enclosed Contaminated Scope to Reprocessing Area
Leak Testing
Manual Cleaning
Rinsing with Water; Purging with Air
High Level Disinfection
Rinsing
Air Drying & Alcohol Flush
Storage or Set-up for Patient

2
Manual Cleaning…Is it really that important?
SGNA states, “Manual cleaning of endoscopes is necessary prior to
automated or manual disinfection. This is the most important step in removing the microbial burden from an endoscope.” (SGNA, Standards of Infection Control in Reprocessing of Flexible Gastrointestinal Endoscopes , 2012., 14)
Manual cleaning: -Reduces the number of microorganisms and organic load on an endoscope (bioburden).
• Reduces the potential of biofilm growth. • Biofilms consist of colonies of organisms that form
structures with potential to have maximum growth. • Biofilms adhere to the internal channels of endoscopes. • This growth potential is an important factor because they
interfere with disinfection.
-Reduces the burden on the high-level disinfectant. (i.e. Rapicide or Rapicide PA) - Starts at the bedside, immediately after withdrawal.
1) Immediately – Wipe down scope’s
exterior with a detergent-soaked cloth like Intercept or with an Intercept Wipe.
**Detergent solution should be diluted
per manufacturer’s label. **
Step 1 – Pre-cleaning at Bedside
Intercept Solution Dilution 1 oz = 1 full pump per 3 gallons of water
2) Suction detergent through the
scope, then air. Alternate suctioning of air and detergent to create agitation.
3) If applicable, install the air/water
cleaning adapter. Flush with water, then air, through air/water channel.
4) Clear the air and water channels
according to the manufacturer’s instructions.
Step 1 – Pre-cleaning at Bedside continued…

3
5) Flush detergent, then air
through ANY SPECIAL FEATURE CHANNELS, such as auxiliary water inlet , elevator wire
channel, etc.
6) Detach all removable parts
and cleaning equipment and place in accessory bag.
Step 1 – Pre-cleaning at Bedside continued…
Step 1 – Pre-cleaning at Bedside continued…
7) Ensure water-resistant cap (soaking cap) is attached, if applicable.
Contain the scope and transport to reprocessing area.
Step 2 Transport Enclosed Contaminated Scope to Reprocessing Area

4
Step 3 – Leak Testing
Purpose: To detect a hole or leak in an endoscope.
Why leak test?
1) To prevent cross contamination of patient matter or chemicals. 2) To prevent fluid invasion.
3) To prevent very costly & lengthy repair. Always:
- Leak test after EVERY procedure and PRIOR to immersing the endoscope in any fluid. - Test for leaks according to the endoscope manufacturers’ instructions.
Step 3 – Leak Testing continued…
Leak test methods can be WET, DRY or AUTOMATIC
DRY LEAK TEST
•Attach leak tester to scope.
•Squeeze bulb to level of desired pressurization.
•Confirm bending section has inflated slightly.
•Observe the gauge continuously for 90 seconds.
•While observing the gauge, angulate the scope fully in each direction
at least once.
•A steady drop in pressure on the gauge indicates a leak.
•If this fails, check integrity of water resistant cap connection and re-
connect, if necessary.

5
Step 3 – Leak Testing continued…
•Remove all valves and/or buttons from the endoscope.
•Turn on air supply (i.e. maintenance unit or light source). •Depress pin in leak tester connector to ensure all is flowing through tubing.
•Attach the leak tester connection to the scope. •Confirm bending section has inflated slightly.
•Carefully place the scope in a basin of water full enough to completely cover the scope, ensuring the knobs are covered.
•Observe the scope for at least 90 seconds. •Angulate the scope fully in each direction at least once during the observation period.
•Depress each of the switches to observe for leaks. •If testing a duodenoscope, activate the elevator wire both up and down as well. •A steady stream of bubbles indicates a leak. If a leak is found, keep scope on leak tester
and finish manual cleaning. •Bubbles escaping at an irregular rate usually indicates trapped air.
•If no leak found, remove the scope from the basin. •Turn off the air supply.
•Unplug the leak tester from the air supply, and release all of the air pressure in the scope. •Remove the leak test connector from the scope.
WET LEAK TEST
Step 3 – Leak Testing continued…
VERISCAN LT AUTOMATIC LEAK TEST The Veriscan LT features:
•Detect leaks with 99% accuracy.
•Lowers cross-contamination risk due to undetected leaks.
•Detects endoscope leaks early when repairs are minor and
less costly.
•Unsurpassed leak detection compared to visual observation
methods.
•Dry endoscope leak test – no fluid submersion required.
•Utilizes highly sensitive, innovative leak sensing technology.
•Compatible will all flexible endoscopes.
•Simple to operate.
•Ensures compliance with endoscope leak test protocols.
•Provides consistent, repeatable endoscope leak testing.
•Printed confirmation of leak test results.
•Computerized endoscope leak test records and reports.
- If a leak is found, the endoscope needs to be taken out of service and
sent for repairs. Follow the manufacturer’s instructions for decontamination to avoid further damage.
- For smaller leaks, the Medivators Advantage and DSD-LT reprocessors can be used to reprocess the endoscope prior to being sent for repair by
keeping the scope pressurized with air for the entire reprocessing cycle to avoid fluid invasion.
- Contaminated scopes should never be placed in a suitcase and sent off for repair.
Step 3 – Leak Testing continued…

6
BRUSH…
- Scrub, brush, and soak scope and all removable parts.
- Ensure the correct brush size is being used.
- Do not reuse single-use brushes.
- Valves also should be depressed and the exposed areas brushed.
- Immerse scope in freshly prepared detergent solution like Intercept.
- Thoroughly clean exterior of endoscope.
- Brush distal tip and elevator, if applicable.
- Brush the entire suction/biopsy channel system.
- Clean brush each time it exits distal tip
and umbilical cord.
- Brushing should be repeated until
no debris is visible on the brush.
Step 4 – Manual Cleaning
BRUSH then FLUSH
FLUSH…either manually or with SCOPE BUDDY,
an Endoscope Flushing Aid.
Flush:
1st) with detergent
2nd) purge with air
3rd) with clean water
4th) purge with air
Step 4 – Manual Cleaning
BRUSH then FLUSH
Step 4 – Manual Cleaning
Flush all channels with Detergent, followed by an air purge:
1. Attach cleaning adapters or Scope Buddy connectors and
channel plugs to endoscope.
2. For manual flushing, push the required amount of Intercept
Detergent solution through all channels (suction, air/water,
accessory water, elevator wire).
3. For Scope Buddy flushing, push the START button.
4. Remove filter from detergent solution and flush air
through all channels to purge detergent from channels.

7
Step 5 – Rinsing with Water; Purging with Air
FLUSH…all channels with clean water; then purge with air.
-The scope’s exterior and removable parts need to be rinsed thoroughly
under water to remove residual detergent.
- All internal channels need to be flushed with water.
- This can be accomplished with SCOPE BUDDY by placing the intake filter
in clean water and pressing START.
- If no SCOPE BUDDY, then manual flushing
of all channels with clean water needs to be done
(including auxiliary-water/elevator-wire, if applicable).
-Remove water from all channels by purging with air.
-Use a soft, lint-free cloth to remove excess moisture
from the exterior of endoscope and cleaning accessories
in reparation for disinfection.
Step 6 – High Level Disinfection
Can be accomplished by:
Placing endoscope in a Medivators Endoscope Reprocessor
--------------- OR --------------- Manually Disinfect

8
Medivators Automated Endoscope Reprocessors
• For AERs using aldehyde-based high level disinfectants, test disinfectant
concentration (MEC or MRC) using a test strip and document result.
• Place endoscope in the reprocessor and attach all channel hookups.
• If applicable, verify disinfectant temperature is within required range.
• Place valves and other removable parts into the accessory bag. Tuck accessory bag under scope in basin to prevent floating.
• Enter in AER or log all ID data.
• Start endoscope reprocessor.
Step 6 – High Level Disinfection
Medivators Automated Endoscope Reprocessors
• For AERs using Rapicide PA, test high level disinfectant potency (MEC or
MRC) with test strip at the end of cycle and document.
Step 6 – High Level Disinfection continued…
Steps to Manually Disinfect Endoscopes:
• Completely immerse the clean, rinsed, and water-purged endoscope and all removable parts in a FDA-approved room temperature HDL.
• Ensure channel plug and irrigation tube are attached to the
endoscope.
• Use syringe to completely fill air, water, and suction channels with disinfectant solution until no bubbles are seen.
• If applicable, flush disinfectant solution into elevator-wire channel and accessory water channel.
• While the endoscope is immersed, disconnect cleaning accessories.
• Soak all equipment according to the disinfectant manufacturer’s
required time and temperature.
• Use a timer to measure exact contact time.
• Manually document all ID data.
Step 6 – High Level Disinfection continued…

9
• Reconnect channel plug and irrigation tube.
• Use syringe to inject air in order to remove disinfectant from air, water, and suction channel and, if applicable, from elevator-wire
channel and auxiliary water channel.
• Remove endoscope from disinfectant.
• Immerse endoscope and detached parts in water.
• Thoroughly rinse all external surfaces and removable parts with
water to remove all traces of the disinfectant.
• Use a syringe to inject water to rinse disinfectant from all internal channels.
• Rinse with fresh water for the required amount of times needed for
HLD used, per manufacturer’s DFU.
Steps to Manually Rinse Endoscopes
Step 7 – Rinsing with Water
1) Remove endoscope from rinse water.
2) Use syringe and irrigation tube to inject AIR through air, water, and suction
channels, and from elevator-wire channel and/or auxiliary-water channel, expelling the rinse water.
3) Use syringe and irrigation tube to flush 70% ALCOHOL through air, water,
and suction channels, and from elevator-wire channel and/or auxiliary-water channel to facilitate drying.
4) Purge all channels with air.
5) Disconnect all accessories from the endoscope.
6) Dry endoscope and accessories with a
soft, lint-free cloth.
7) Ensure equipment is completely dry prior to storage.
Step 8 – Air Drying and Alcohol Flush
Manual High Level Disinfection
Manual Rinsing
Manual Air Drying & Alcohol Flush
Note: When using a
Medivators Automated Endoscope Reprocessor (AER)
You can eliminate the following manual labor-intensive and time-
consuming steps because they are done automatically:
This provides:
Safety to Staff and Consistency for Our Patients!

10
For Storage:
• Remove all removable parts, including
water-resistant cap.
• Hang endoscopes vertically in a ventilated area.
• Do not replace removable parts until immediately prior to scope use.
Step 9 – Storage or Set-Up for Patient
The Flexible Endoscope Reprocessing Cycle: From Contamination to Decontamination
The Endoscope Cycle is complete…
It has moved from Contamination to Decontamination
.
.
.

11
Medivators Products www.medivators.com
Medivators products provide solutions for your
endoscope reprocessing needs—the way it should be.
Bedside pre-cleaning – Medivators detergents and wipes are
specifically designed for endoscopes, offering the most technologically
advanced detergent called Intercept.
Leak testing – an important step for eliminating cross-contamination
and reducing endoscope leak-related repair costs, the Veriscan is an
automated leak tester with 99% detection of endoscope leaks.
Supplemental leak testing is performed in certain Medivators
reprocessors.
Medivators Products www.medivators.com
Manual cleaning – Brush with Medivators PULL THRU™ & Stubby
Brush Combo •Disposable.
•Effective on lumens 2.8mm - 5mm in size.
•Significantly improves efficiency over traditional brushes.
•Smooth, non-abrasive, non-damaging, and time-saving method
to pre-clean the endoscope in a single pass.
•Patented design provides a complete circumferential seal in the
lumen tube.
Medivators Products www.medivators.com

12
Manual cleaning – Flush with Medivators detergents for superior
removal of biological and organic soils. Eliminate manual flushing with
the Scope Buddy automated flushing aid.
Medivators Products www.medivators.com
High-level Disinfection – whether you need a counter-top style to
reprocess one or two endoscopes at a time, or a free-standing, dual
basin version capable of reprocessing multiple endoscopes, the
Medivators line of Automated Endoscope Reprocessors provide
unsurpassed infection control and the lowest cost of ownership.
Medivators
CER OPTIMA
Medivators Products www.medivators.com
High-level Disinfection
Medivators
DSD EDGE
Medivators
DSD-201LT
Medivators Products www.medivators.com

13
High-level Disinfection
Medivators
Advantage Plus
Medivators Products www.medivators.com
High-level Disinfectants
Rapicide & Rapicide Test Strips
•Disinfects in 5 minutes at 35°C (95°F).
•Effectively kills TB, hepatitis viruses, and
Clostridium difficile.
•Up to 28-day reuse life.
•Only 2 rinses required.
•Easy to read Rapicide Test Strips accurately
measure the Rapicide solution for the minimum
recommended concentration (MRC).
Medivators Products www.medivators.com
Rapicide PA & Rapicide PA Test Strips
High-level Disinfectants
•Disinfects in 5 minutes at 30°C.
•Effectively kills TB, hepatitis viruses,
Clostridium difficile, VRE, and MRSA.
•Single-use, non-aldehyde chemistry base.
•Easy to read Rapicide PA Test Strips
accurately measure the minimum
recommended concentration (MRC) of
Rapicide PA.
Medivators Products www.medivators.com

14
Hookups for Medivators AERs
Hookups provide the critical connection between the endoscope
and the automated endoscope reprocessor (AER).
•Largest array of endoscope hookups, more than any other manufacturer.
•Examples include: gastroscopes, colonoscopes, EUS scopes, cystoscopes,
bronchoscopes, twin channel, dilators, and TEE probes.
Interactive Hookup Guide can be found at
http://www.minntech.com/medivators/HookupLookup/
Medivators Products www.medivators.com
Procedure Room Products
Medivators Products www.medivators.com
Endo SmartCap®
•1st completely disposable, 24-hour use alternative to the reusable water bottle in GI
Endoscopy. •Design minimizes infection control risks
that are associated with manual cleaning and sterilization.
EndoGator Irrigation Tubing
•1st cost-effective, completely disposable irrigation alternative to reusable irrigation tubing for GI
Endoscopy. •Universally compatible with any GI Endoscope or
sterile water bottle.
•Sterile 24-hour disposable tubing.
•Eliminates manual cleaning and reprocessing of reusable tubing.
Procedure Room Products
Medivators Products www.medivators.com
DEFENDO®
Sterile Single Use Valves
•Eliminates manual cleaning and reprocessing of reusable valves.
•Helps create consistent practices.
•Reduces the potential for errors.
•10-second protein detection time (blood, mucous, saliva, serum,
skin/tissue fragments). •1 microgram sensitivity.
•Visual color change indicator. •Minimal training needed.
Verifind™ Protein Detection Kit

15
The Flexible Endoscope Reprocessing Cycle: From Contamination to Decontamination
ALWAYS REMEMBER:
To get your colonoscopy with a scope that has gone
from Contamination to Decontamination.
---------------
If you’re not sure that the scope has been properly decontaminated, then you might need to check for
yourself…that is…
YOU MIGHT NEED TO…
THE END!!
THANK YOU!!!
QUESTIONS ??? Pam Boulet RN, BSN, CGRN
Medivators Senior Clinical Specialist
[email protected] 504-390-4668