the educator’s guide to sound system … · the educator’s guide to sound system application...
TRANSCRIPT
THE EDUCATOR’S GUIDE TO
SOUND SYSTEM APPLICATION
FEATURING THE
JBL PROFESSIONAL
EON SYSTEMS
▼

What Makes an EON Sound System Unique
What Makes up a Sound System
Sources
Mixers
Amplifiers
Speakers
Reference
Setting EQ
Cables and Connectors
System Examples
Single Speaker PA
Stereo System with Mixer
Adding Stage Monitors to the Basic System
Adding Effects to the Basic System
Adding Subwoofers to the Basic System
Covering a Larger Area
TABLE OF CONTENTS
2
2
2
3
4
4
4
4
5
6
6
8
11
13
14
15

FEATURING THE JBL PROFESSIONAL EON SYSTEMS
Communication is a fundamental part of education and a quality audio system is vital to communicating through speech, music,and audio/visual presentation.The advent of top quality audio systems in the home and high-quality sound in cinema, concerts,and houses of worship has raised expectations for audio quality in education as well. Students who are used to high-fidelityhome theater systems are not going to be engaged by presentations given through an inferior system. Until recently, highquality live sound required complex systems and experienced operators.The JBL EON line changes all that by integrating thesignal processing, amplification, and speakers into an easy to use package that sounds great every time without the need for aprofessional sound system operator.
This guide will give you instructions, background information and tips to help you get the most from your JBL ProfessionalEON speaker systems, mixers, and peripheral items.This guide will provide clear diagrams and step by step “quick start”instructions for each EON system application.We will do our best to keep this guide as jargon-free as possible.Whenever it’snecessary to resort to “audio geek” terminology, an explanation of the term will be offered.We’ll begin by providing anoverview of the elements that make a sound system.
WHAT MAKES AN EON SOUND SYSTEM UNIQUE
At the heart of your EON system is the EON powered speaker system. A conventional sound system includes microphones,mixers, signal processors (devices for manipulating tone and level of a sound), amplifiers, and speakers - not to mention all the cables and racks. JBL has combined the functions of a system and built-in the skill of an expert system operator to createEON. EON is so simple that a complete, working system can consist of just one EON speaker, a microphone, and themicrophone cable or the system may be expanded for more demanding applications.
WHAT MAKES UP A SOUND SYSTEM
SOURCES“Sources” is the generic term for all the things that provide an input to the sound system.MicrophonesMicrophones (mikes or mics) convert sound into an audio signal that can be amplified by a sound system.There are hundredsof types of microphones with an almost infinite blend of characteristics and functions. Here are the types likely to be found inan educational setting.
Handheld - This is the most common type of microphone and may be used on a stand or hand held.These are mostly general purpose mics that will do a good job on speech, voice, and musical instruments.Lavaliere - The “lav” microphone is a miniature device that can be clipped to a tie or collar for speech uses. Most lavaliere mics are connected to a small “belt pack” preamplifier that is clipped to a belt.These mics are unobtrusive and are commonly used in television and theater.Headset - The headset mic is similar to the lavaliere but is mounted on a small boom that is worn on the head.These are not as unobtrusive as lavaliere mics but since they are positioned nearer to the mouth they do a better job of picking up speech. Some headset mics work very well for vocals and have become more common with performers who wish to move around and keep their hands free.Wireless - All of the above types of microphones are available in wireless “RF” (radio frequency) versions.Wireless mics offer greater freedom of movement. Compared to wired microphones they are more expensive, more troublesome, and don’t perform as well. Before investing in a wireless microphone system, be certain that you really need the freedom of movement it provides.A wireless microphone consists of three parts; the microphone, the transmitter (which may be built into a handheld), and the receiver.Dynamic - refers to the way in which a microphone converts sound to an electrical signal.A dynamic mic is rugged and simple. Most handheld mics are dynamic.
▲2
THE EDUCATOR’S GUIDE TO SOUND SYSTEM APPLICATION

continued
continued
Condenser - A condenser mic is more complex than a dynamic. Condenser mics can offer extremely high performance. Some handheld mics and nearly all lavaliere and headset mics are condensers. Condenser micro-phones require a source of electrical power to operate.This source can be an internal battery or in the case of the lavaliere and headset microphones, a battery in the belt pack. Most condenser mics also can operate on “phantom power” - a voltage supplied back down the cable from the mixer.
Playback SourcesAny device that plays pre-recorded audio fits into this category.
Audio Tape - Cassette tape is the most common format.
CD
Mini-Disc
MP-3 Players
Computer audio outputs
Video Cassette Recorders (VCRs), DVD players, Laser Disc players
Turntables (note that turntables require a special pre-amplifier and will not work properly when connected directly
to a mixer input.)
Musical InstrumentsTechnology has brought us an array of musical instruments that rely on digital electronics to produce their sound. In addition,many traditional acoustic instruments may have special pick-ups installed so they can be amplified without the use ofmicrophones. Musical instrument sources include:
Digital pianos and synthesizers.
Digital drums and drum machines.
Electrified acoustic guitars (acoustic guitars that have had a special pick-up installed in them that allows them
to be amplified and retain their acoustic sound character)
Regarding electric guitars (as opposed to electrified acoustic guitars) - the tonal and distortion characteristics of the guitar amp and speaker are part of the sound of the instrument. Plugging an electric guitar directly into a sound system will usually not yield satisfactory results.
MIXERSAs the name implies, an audio mixer takes multiple audio input signals and blends them together.An audio mixer may appearvery complicated at first glance. Once you understand a few basics, mixers become less intimidating.
Mixer FunctionsThe controls on a mixer do one of the following:
Adjust the level (volume) of an audio signal.
Route an audio signal. For example the PAN control routes a signal to the left or right speaker.
Adjusts tone of the signal. The EQ section has the capability to cut or boost bass (lows) or treble (highs).
▲3
continued
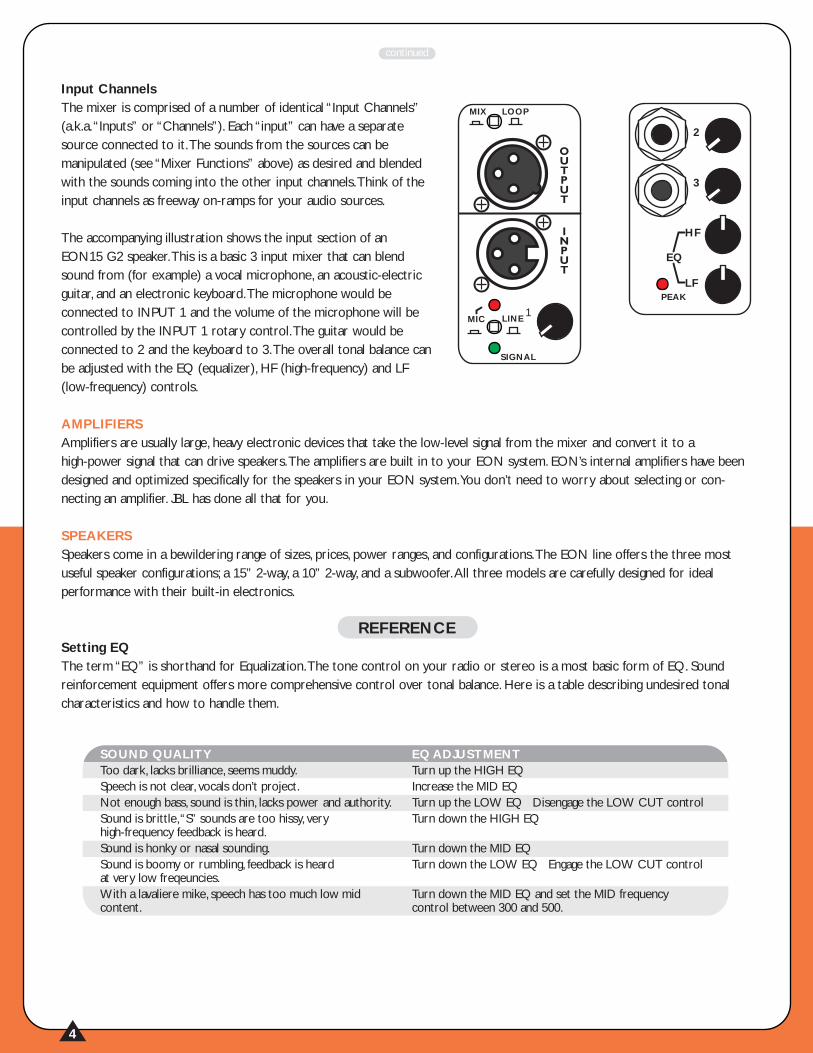
Input ChannelsThe mixer is comprised of a number of identical “Input Channels”(a.k.a.“Inputs” or “Channels”). Each “input” can have a separatesource connected to it.The sounds from the sources can bemanipulated (see “Mixer Functions” above) as desired and blendedwith the sounds coming into the other input channels.Think of theinput channels as freeway on-ramps for your audio sources.
The accompanying illustration shows the input section of anEON15 G2 speaker.This is a basic 3 input mixer that can blendsound from (for example) a vocal microphone, an acoustic-electricguitar, and an electronic keyboard.The microphone would beconnected to INPUT 1 and the volume of the microphone will becontrolled by the INPUT 1 rotary control.The guitar would beconnected to 2 and the keyboard to 3.The overall tonal balance canbe adjusted with the EQ (equalizer), HF (high-frequency) and LF(low-frequency) controls.
AMPLIFIERS Amplifiers are usually large, heavy electronic devices that take the low-level signal from the mixer and convert it to a high-power signal that can drive speakers.The amplifiers are built in to your EON system. EON’s internal amplifiers have beendesigned and optimized specifically for the speakers in your EON system.You don’t need to worry about selecting or con-necting an amplifier. JBL has done all that for you.
SPEAKERSSpeakers come in a bewildering range of sizes, prices, power ranges, and configurations.The EON line offers the three mostuseful speaker configurations; a 15” 2-way, a 10” 2-way, and a subwoofer.All three models are carefully designed for idealperformance with their built-in electronics.
REFERENCESetting EQThe term “EQ” is shorthand for Equalization.The tone control on your radio or stereo is a most basic form of EQ. Soundreinforcement equipment offers more comprehensive control over tonal balance. Here is a table describing undesired tonalcharacteristics and how to handle them.
▲4
LINEMIC
SIGNAL
1
LOOPMIX
PEAK
2
EQ
3
HF
LF
SOUND QUALITY EQ ADJUSTMENTToo dark, lacks brilliance, seems muddy. Turn up the HIGH EQSpeech is not clear, vocals don’t project. Increase the MID EQNot enough bass, sound is thin, lacks power and authority. Turn up the LOW EQ Disengage the LOW CUT controlSound is brittle, “S” sounds are too hissy, very Turn down the HIGH EQhigh-frequency feedback is heard. Sound is honky or nasal sounding. Turn down the MID EQSound is boomy or rumbling, feedback is heard Turn down the LOW EQ Engage the LOW CUT control at very low freqeuncies. With a lavaliere mike, speech has too much low mid Turn down the MID EQ and set the MID frequency content. control between 300 and 500.

Cables and Connectors
▲5
XLR/F to XLR/M Microphone Cable The standard cable for interconnection of microphone and line level signals in professional audio systems.
Microphone to mixer Microphone to EON15 G2 INPUT 1Professional audio mixer to EON15 G2 INPUT 1“Daisy chaining” EON15 G2 speaker systems
TRS (Balanced) 1/4” Phone to XLR/M Connects sources with 1/4” balanced outputs (some mixes and signal processors) to amps, processors, and powered speakers with balanced XLR/F inputs.
TRS (Unbalanced)1/4” Phone to XLR/M For connection of instruments with unbalanced outputs to a balanced XLR input. Sources (signal processors, electronic instruments) with 1/4” unbalanced outputs to amps, processors, and powered speakers with balanced XLR/F inputs.
TS (Unbalanced) 1/4” Phone to XLR/M This cable is electrically identical to “TRS (Unbalanced) 1/4” Phone to XLR/M” above and may be used interchangeably.
XLR/M to RCA (phono) cable Connects consumer audio products and some DJ mixer outputs to professional audio equipment inputs.
1/4” Phone to RCA (phono) cable Connects outputs of consumer audio equipment to unbalanced line inputs of EON15 G2 and many mixers.Connects unbalanced line outputs of many mixers to the inputs of consumer audio recorders.
TRS 1/4” Phone to dual 1/4” Phone Splits a stereo output into separate left / right signals. Connects stereo electric guitar to two unbalanced audio inputs.Connects a headphone output to two unbalanced audio inputs.Change to a TRS mini-phone to connect to the output of portable CD players and computer sound cards to a mixer or powered speakers.
Also used to connect signal processors to the “insert” of many mixing consoles.1/8” Mini-Phone to dual 1/4” Phone Connects the output of portable CD players, portable tape players, and
computer audio outputs to the inputs of EON15 G2 speakers and EON MusicMix 16 stereo channels.
1/4” Phone to RCA (phono) adapter Adapts standard RCA cables used on most consumer electronics to the inputs of EON15 G2 speakers and EON MusicMix 16 stereo channels.
1 (shield)23
123
XLR/F to XLR/M Microphone Cable
TRS (Unbalanced) 1/4” Phone to XLR/M CableTip
RingSleeve
1 (shield)23
TS (Unbalanced) 1/4” Phone to XLR/M CableTip
Sleeve
1 (shield)23
TRS 1/4” Phone to dual TS 1/4” Phone
TipRing
Sleeve
TipSleeve (shield)
TipSleeve (shield)
TRS 1/8” Mini-Phone to dual TS 1/4” Phone
TipRing
Sleeve
TipSleeve (shield)
TipSleeve (shield)
XLR/M to RCA (phono) Cable123
Center
Shield
TRS (Balanced) 1/4” Phone to XLR/M CableTip
RingSleeve
1 (shield)23
TipSleeve
TipSleeve (shield)
TS (Unbalanced) 1/4” Phone to RCA (phono) Cable
TipSleeve
TipSleeve (shield)
1/4” Phone to RCA (phono) Adapter
12
34
56
78
R1
R2
R3
R4
11
22
33
44
5 6 7 8
Fan-Out
Sends Returns
Stage Box
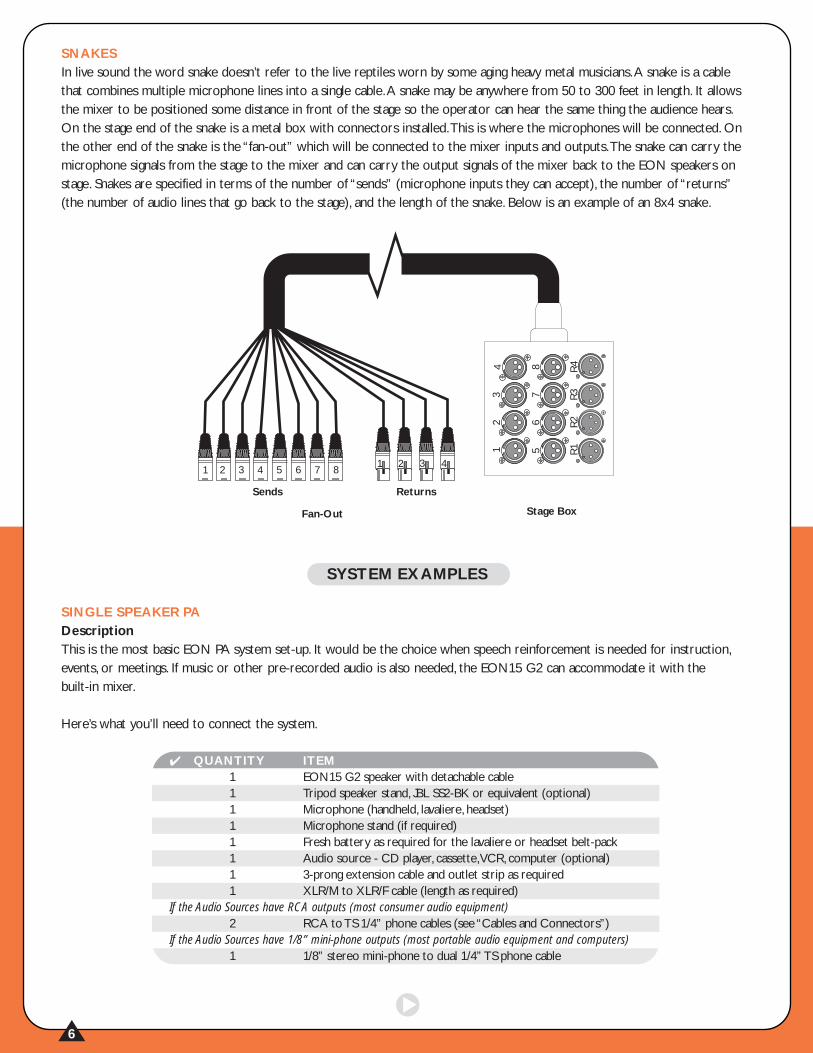
SNAKESIn live sound the word snake doesn’t refer to the live reptiles worn by some aging heavy metal musicians.A snake is a cablethat combines multiple microphone lines into a single cable.A snake may be anywhere from 50 to 300 feet in length. It allowsthe mixer to be positioned some distance in front of the stage so the operator can hear the same thing the audience hears.On the stage end of the snake is a metal box with connectors installed.This is where the microphones will be connected. Onthe other end of the snake is the “fan-out” which will be connected to the mixer inputs and outputs.The snake can carry themicrophone signals from the stage to the mixer and can carry the output signals of the mixer back to the EON speakers onstage. Snakes are specified in terms of the number of “sends” (microphone inputs they can accept), the number of “returns”(the number of audio lines that go back to the stage), and the length of the snake. Below is an example of an 8x4 snake.
SYSTEM EXAMPLES
SINGLE SPEAKER PADescriptionThis is the most basic EON PA system set-up. It would be the choice when speech reinforcement is needed for instruction,events, or meetings. If music or other pre-recorded audio is also needed, the EON15 G2 can accommodate it with the built-in mixer.
Here’s what you’ll need to connect the system.
▲6
✔ QUANTITY ITEM1 EON15 G2 speaker with detachable cable1 Tripod speaker stand, JBL SS2-BK or equivalent (optional)1 Microphone (handheld, lavaliere, headset)1 Microphone stand (if required)1 Fresh battery as required for the lavaliere or headset belt-pack1 Audio source - CD player, cassette, VCR, computer (optional)1 3-prong extension cable and outlet strip as required1 XLR/M to XLR/F cable (length as required)
If the Audio Sources have RCA outputs (most consumer audio equipment)2 RCA to TS 1/4” phone cables (see “Cables and Connectors”)
If the Audio Sources have 1/8” mini-phone outputs (most portable audio equipment and computers)1 1/8” stereo mini-phone to dual 1/4” TS phone cable
▲7
continued
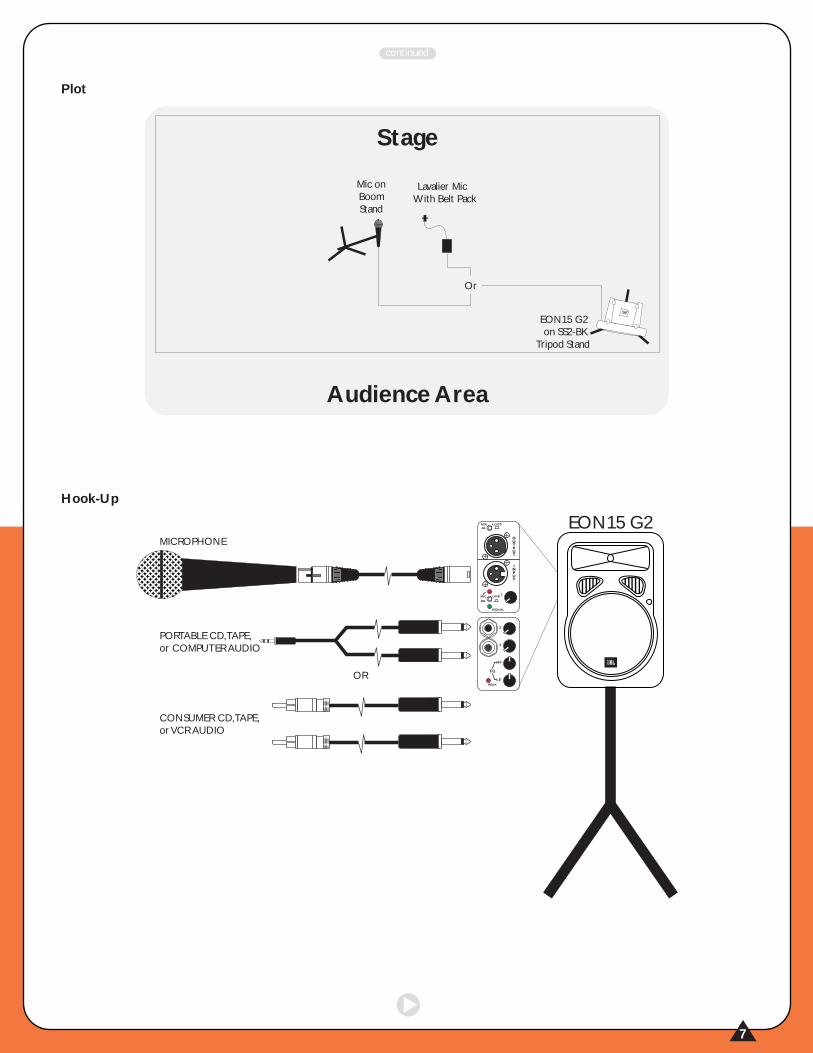
Plot
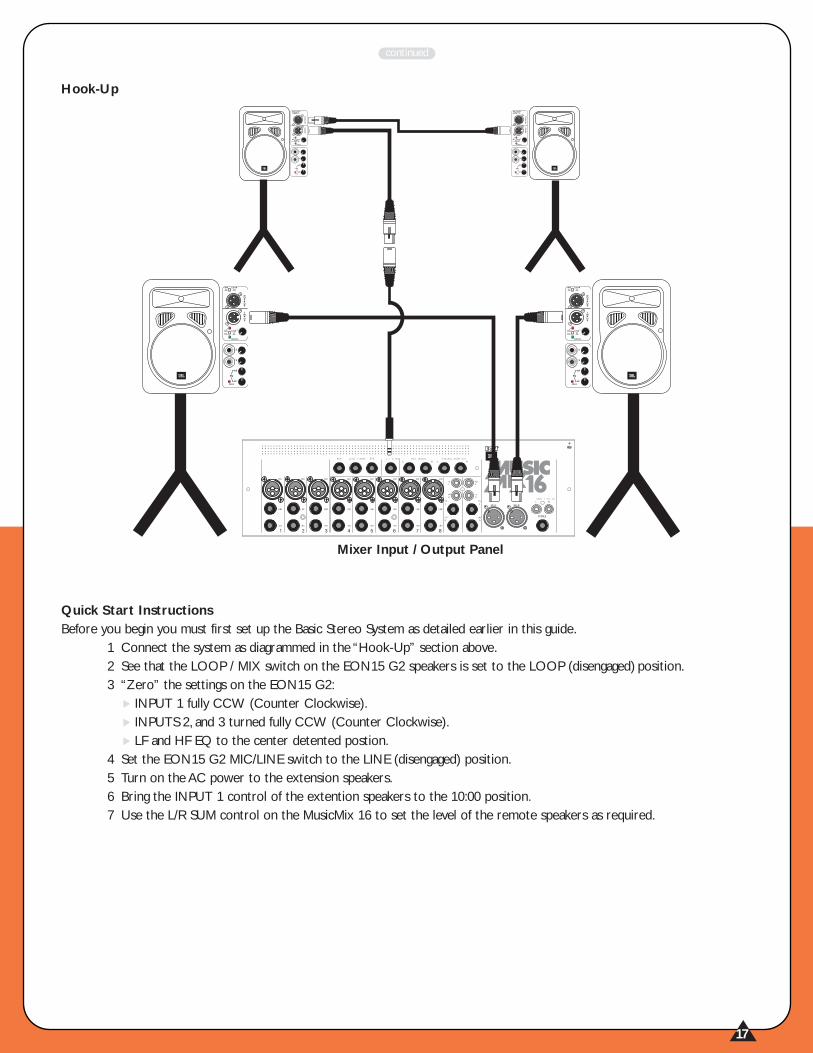
Hook-Upcontinued
Stage
Audience Area
Mic onBoomStand
Lavalier MicWith Belt Pack
Or
EON15 G2on SS2-BK
Tripod Stand
EON15 G2
OR
MICROPHONE
PORTABLE CD, TAPE, or COMPUTER AUDIO
CONSUMER CD, TAPE, or VCR AUDIO
LINEMIC
SIGNAL
1
LOOPMIX
PEAK
2
EQ
3
HF
LF

✔ QUANTITY ITEM2 EON15 G2 speaker with detachable cable2 Tripod speaker stand, JBL SS2-BK or equivalent (optional)1 EON MusicMix 16 mixer with power adapter1-8 Assorted microphones (handheld, lavaliere, headset) 1-8 Microphone stands (as required)
Fresh battery as required for the lavaliere or headset belt-pack1 or 2 Audio source - CD player, cassette, VCR, computer (optional)1 3-prong extension cable and outlet strip as required3-10 XLR/M to XLR/F cable (length as required)
If the Audio Sources have RCA outputs (most consumer audio equipment)2 RCA to 1/4” TS phone cables
If the Audio Sources have 1/8" mini-phone outputs (most portable audio equipment and computers)2 1/8” stereo mini-phone to dual RCA cable 4 RCA (female) to 1/4” TS phone (male) adapters
continued
Quick Start Instructions1 Before making any connections, verify that the power switch of the EON15 G2 is OFF.2 Connect the equipment as illustrated in “Hook-Up”.3 Connect the equipment to AC power.4 “Zero” the settings on the EON15 G2:
INPUT 1 turned fully CCW (Counter Clockwise)INPUTS 2 and 3 turned fully CCW (Counter Clockwise)LF and HF EQ to the center detented postion.Set the EON15 G2 MIC/LINE switch to the MIC (engaged) position. (see that the “Mic” LED lights)
5 Switch on the AC power.6 While speaking into the microphone, slowly rotate the INPUT 1 control CW (Clockwise) until the desired volume
is reached.7 While playing back audio from the CD,Tape, Computer, or VCR slowly rotate the INPUT 2 and 3 controls
CW (Clockwise) until the desired volume is reached.8 Adjust HF and LF EQ until the desired tonal balance is reached. (see “Setting EQ”)
STEREO SYSTEM WITH MIXERDescriptionThis system could be used in a wide range of applications including small ensemble musical performance and soundreinforcement for theatrical performance, rallies, assemblies, and other events.
Here’s what you’ll need to connect the system.
▲8

continued
Plot
Hook-Up
▲9
LOWCUT
MON MON MON MON MON MON MON MON MON MON MON
CONTROLROOM&
PHONES
LISTENON
LISTEN
TAPECD
EFX
LISTEN LISTEN LISTEN LISTEN LISTEN LISTEN LISTEN LISTEN LISTEN LISTEN
EFX EFX EFX EFX EFX EFX EFX EFX EFX EFX
EFX2/
MON2
EFX2/
MON2
EFX2/
MON2
EFX2/
MON2
EFX2/
MON2
EFX2/
MON2
EFX2/
MON2
EFX2/
MON2
EFX2/
MON2
EFX2/
MON2MON2
EFX2
TAPE / CD IN
CONTROL ROOM OUTL / R SUM MIX INSERTMON EFX2 / MON2 EFX
LISTEN
L / RSUM
48VPHANTOMPOWER
LISTEN
LISTEN
TAPE / CD LEVEL
TAPE / CDTOMIX
LOWCUT
LOWCUT
LOWCUT
LOWCUT
LOWCUT
LOWCUT
LOWCUT
MIX L MIX R
PortableCD Player,
DAT, orMini-Disc Player
LINEMIC
SIGNALSIGNAL
TPUT
UO
PUT
NI
1
LOOPMIX
PEAK
2
EQ
3
HF
LF
LINEMIC
SIGNALSIGNAL
TPUT
UO
PUT
NI
1
LOOPMIX
PEAK
2
EQ
3
HF
LF
Stage
Audience Area
Mic onBoomStand
Mic onBoomStand
Mic onBoomStand
EON15 G2on SS2-BK
Tripod Stand
EON15 G2on SS2-BK
Tripod Stand
Mixer

▲10
continued
Quick Start Instructions1 Before making any connections, verify that the power switch of the EON15 G2 is OFF.2 Connect the equipment as illustrated in “Hook-Up”.3 Connect the equipment to AC power.4 “Zero” the settings on the EON15 G2:
INPUT 1 to 10:00INPUTS 2, and 3 turned fully CCW (Counter Clockwise)LF and HF EQ to the center detented postion.
5 Set the EON15 G2 MIC/LINE switch to the LINE (disengaged) position. (The “mic” LED should be off)6 “Zero” the settings on your EON MusicMix 16 mixer
All SENS controls fully CCW (Counter Clockwise)All LOW CUT controls disengagedAll HF, MID, and LOW EQ controls centeredAll MON, EFX2 /MON2, EFX controls fully CCWAll PAN and BAL controls centeredFor Channels 9 through 16 all LEVEL and GAIN controls fully CCWAll Channel ON buttons to the OFF (disengaged) positionAll LISTEN buttons to the OFF (disengaged) positionAll FADERS down
7 Turn on the power.The EON15 G2 speakers are last on, first off.8 Turn up the sources - Bring the output level (volume) control of any electronic source to its “nominal” position.
This will usually be marked. If it isn’t, bring the control to about 2/3 of its maximum position. Make sure that any foot pedals or other volume controls are at the position they will be during the performance.
9 At the mixer, take the LEFT and RIGHT MIX FADERS to “10”.10 On input channel 1 of the mixer engage the ON switch.11 On input channel 1 of the mixer engage the LISTEN switch.This will allow you to observe the signal level on the
mixer’s meters. Note the LISTEN ON LED illuminates.12 Speak or sing into the microphone connected to channel 1 (or ask the performer to do so). Make sure that the
performer holds the microphone and speaks or sings as they will during the actual performance.13 Slowly rotate the channel 1 SENS control CW (clockwise) until you see the following indications on the meter...
When the performer is at their ”normal“ performance level, the meter should indicate ”0“.When the performer is at their loudest you should see the meter reaching to ”10“.An occasional flickering of the top LED on the meter during the loudest passages is OK, if this light illuminates steadily, reduce the SENS control setting by turning it CCW.
14 Listen carefully for the characteristic sound of ‘feedback’. If you cannot achieve satisfactory level settings without encountering feedback, check the loudspeaker positions relative to microphone positions. See that there is minimal chance for the sound leaving the speaker to feed back into the microphone. Make sure that the microphone and the speaker are pointing away from each other.Also see that the speaker is not facing a hard surface which is reflecting sound back into the front of the microphone. Finally, reduce the Left and Right mix controls and/or channel fader setting.
15 Move to the next input channel and repeat steps 10-14 until all inputs have been adjusted.16 If this is a performance by a group, ask them to perform. Performance level can vary from soundcheck level. During
performance, repeat steps 11-14 for each channel. Using the channel FADERS, adjust the balance between the performers. Use the Left and Right mix control to adjust overall volume. As you listen to how the individual instruments and voices “sit in the mix” you may also want to adjust EQ using what you’ve learned from the section “Setting EQ”.
17 Once you have made the adjustments, get out in front of the speakers, listen again and repeat the previous step as needed.
continued
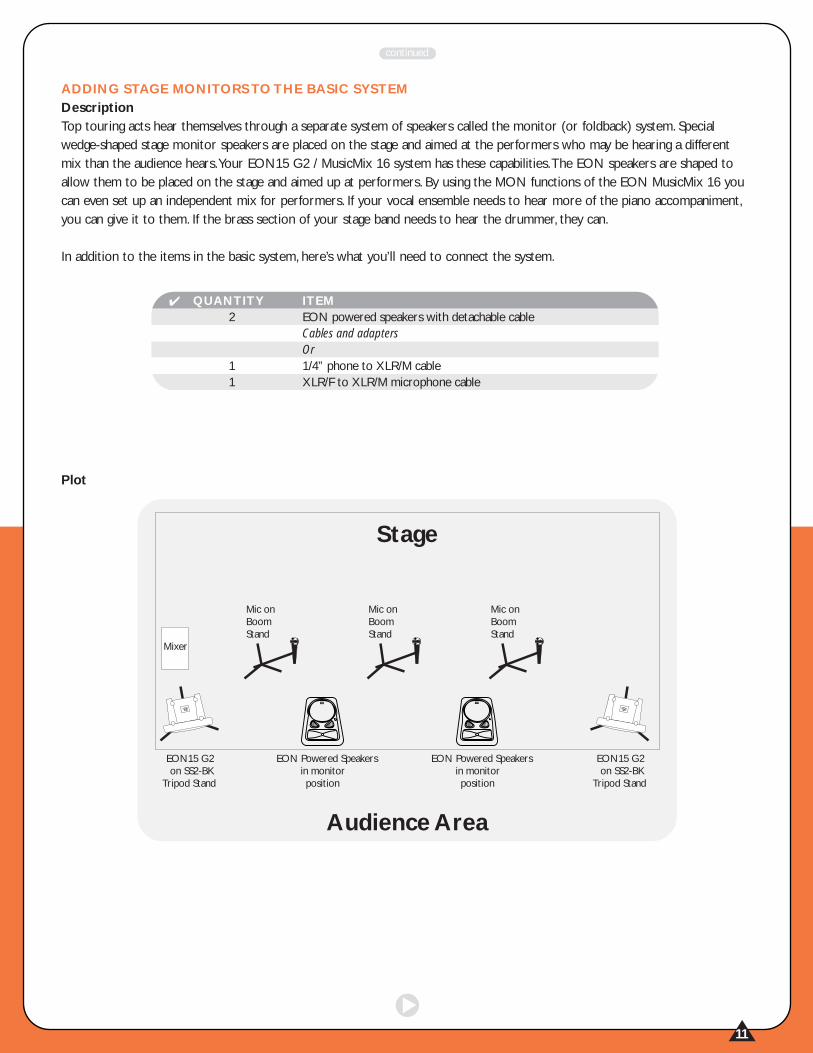
ADDING STAGE MONITORS TO THE BASIC SYSTEMDescriptionTop touring acts hear themselves through a separate system of speakers called the monitor (or foldback) system. Specialwedge-shaped stage monitor speakers are placed on the stage and aimed at the performers who may be hearing a differentmix than the audience hears.Your EON15 G2 / MusicMix 16 system has these capabilities.The EON speakers are shaped toallow them to be placed on the stage and aimed up at performers. By using the MON functions of the EON MusicMix 16 youcan even set up an independent mix for performers. If your vocal ensemble needs to hear more of the piano accompaniment,you can give it to them. If the brass section of your stage band needs to hear the drummer, they can.
In addition to the items in the basic system, here’s what you’ll need to connect the system.
Plot
▲11
Stage
Audience Area
Mic onBoomStand
Mic onBoomStand
Mic onBoomStand
EON15 G2on SS2-BK
Tripod Stand
EON Powered Speakersin monitorposition
EON Powered Speakersin monitorposition
EON15 G2on SS2-BK
Tripod Stand
Mixer
✔ QUANTITY ITEM2 EON powered speakers with detachable cable
Cables and adaptersOr
1 1/4” phone to XLR/M cable1 XLR/F to XLR/M microphone cable

continued
Hook-Up
Quick Start InstructionsBefore you begin, set up the Basic Stereo System as detailed earlier in this guide. For this example we will use EON15 G2 speakers.The procedure applies to all EON Powered Speakers.1 Before making any connections, verify that the power switch of the EON15 G2 speakers is OFF.2 Connect the system as diagrammed in the “Hook-Up” section above.3 Set the controls on the EON15 G2 speakers you are using as monitors.
INPUT 1 to 10:00.INPUTS 2 and 3 turned fully CCW (Counter Clockwise).LF and HF EQ to the center detented postion.Set the EON15 G2 MIC/LINE switch to the LINE (disengaged) position.
4 On the EON MusicMix 16 mixer set the MON Master control to the 3:00 position. Zero all channel MON controls.5 Switch on the power to the monitor EON15 G2 speakers.6 Note that the addition of a monitor system does increase susceptibility to feedback. Here are some tips to
minimize feedback:To the greatest extent possible, point the speakers at the back side of the microphones.A hard, reflective stage rear wall can increase feedback.A heavily draped rear wall will permit higher monitorgain before feedback.Use as few microphones as possible. Use more directional mics (cardioids instead of omnis).Unless a microphone source needs to be in the monitor mix, don’t add it.Cupping hands over a mic actually makes it more likely to feedback. Make sure that performers know not to do this.Ask the performers to keep the stage volume as low as possible. Be sure they know not to point handheld micsinto monitors.Adjust channel EQ to reduce the frequencies at which feedback is occurring.
7 Slowly bring up the MON control on the channels you wish to hear in the monitors.
▲12
LINEMIC
SIGNAL
1
LOOPMIX
PEAK
2
EQ
3
HF
LF
LINEMIC
SIGNAL
1
LOOPMIX
PEAK
2
EQ
3
HF
LF
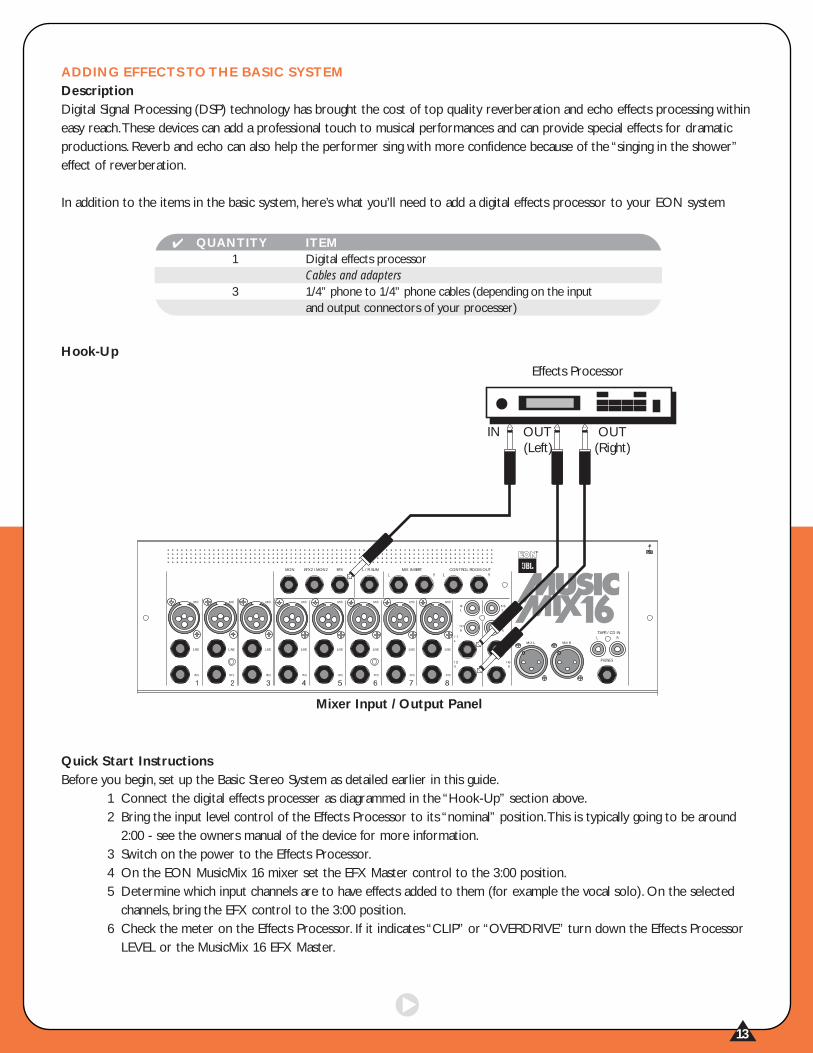
ADDING EFFECTS TO THE BASIC SYSTEMDescriptionDigital Signal Processing (DSP) technology has brought the cost of top quality reverberation and echo effects processing withineasy reach.These devices can add a professional touch to musical performances and can provide special effects for dramaticproductions. Reverb and echo can also help the performer sing with more confidence because of the “singing in the shower”effect of reverberation.
In addition to the items in the basic system, here’s what you’ll need to add a digital effects processor to your EON system
Hook-Up
Quick Start InstructionsBefore you begin, set up the Basic Stereo System as detailed earlier in this guide.
1 Connect the digital effects processer as diagrammed in the “Hook-Up” section above.2 Bring the input level control of the Effects Processor to its “nominal” position.This is typically going to be around
2:00 - see the owners manual of the device for more information.3 Switch on the power to the Effects Processor.4 On the EON MusicMix 16 mixer set the EFX Master control to the 3:00 position.5 Determine which input channels are to have effects added to them (for example the vocal solo). On the selected
channels, bring the EFX control to the 3:00 position.6 Check the meter on the Effects Processor. If it indicates “CLIP” or “OVERDRIVE” turn down the Effects Processor
LEVEL or the MusicMix 16 EFX Master.
▲13
TAPE / CD IN
CONTROL ROOM OUTL / R SUM MIX INSERTMON EFX2 / MON2 EFX
Effects Processor
IN OUT(Left)
OUT(Right)
Mixer Input / Output Panel
✔ QUANTITY ITEM1 Digital effects processor
Cables and adapters3 1/4” phone to 1/4” phone cables (depending on the input
and output connectors of your processer)
continued
7 Select the desired echo / reverb program on your Effects Processor.8 Bring the CHANNEL 15/16 fader to 0.9 With the performer(s) singing into the microphone(s), slowly bring the CHANNEL 15/16 GAIN control up until
the desired amount of echo / reverb is heard.10 Listen to the overall effect. Is there too much reverb on one voice? Not enough on another? Adjust the Channel
EFX controls as needed.11 If the performers want to hear the reverb in their stage monitors, bring up the CHANNEL 15/16 MON control
until the desired amount of reverb is heard.12 Caution - Be absolutely certain to keep the CHANNEL 15/16 EFX Control fully CCW. Failure to do so will result
in feedback that may damage equipment and annoy the performers.
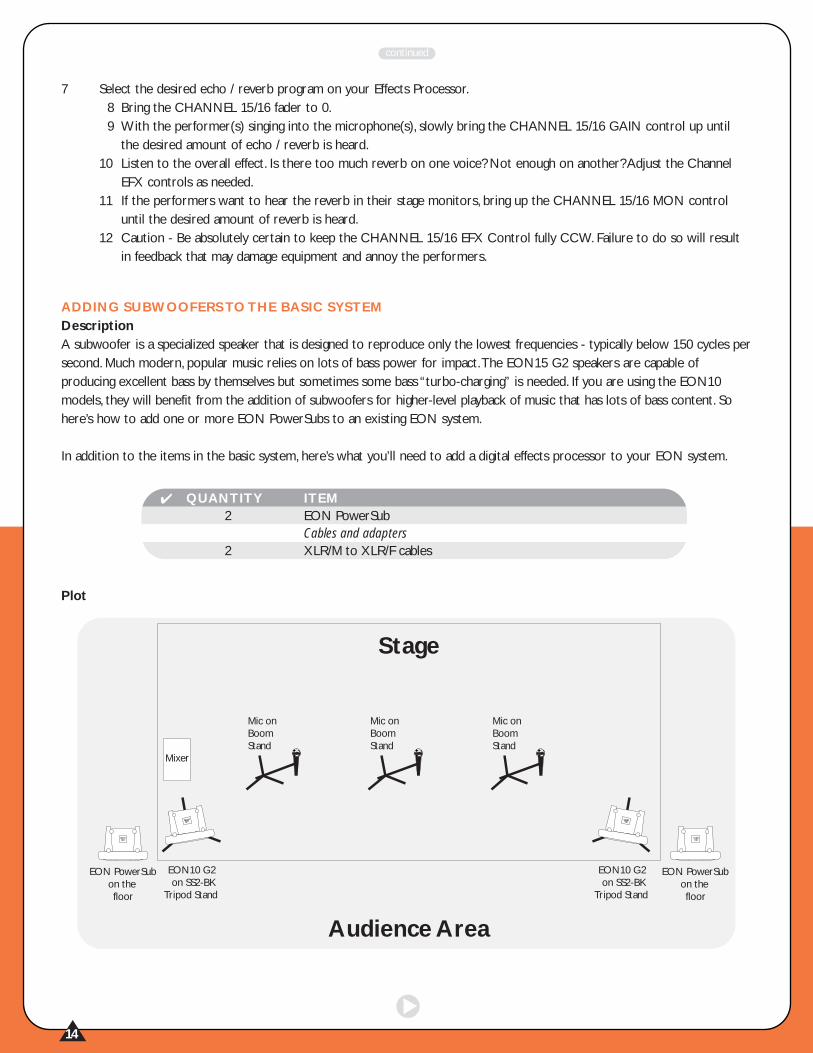
ADDING SUBWOOFERS TO THE BASIC SYSTEMDescriptionA subwoofer is a specialized speaker that is designed to reproduce only the lowest frequencies - typically below 150 cycles persecond. Much modern, popular music relies on lots of bass power for impact.The EON15 G2 speakers are capable ofproducing excellent bass by themselves but sometimes some bass “turbo-charging” is needed. If you are using the EON10models, they will benefit from the addition of subwoofers for higher-level playback of music that has lots of bass content. Sohere’s how to add one or more EON PowerSubs to an existing EON system.
In addition to the items in the basic system, here’s what you’ll need to add a digital effects processor to your EON system.
Plot
▲14
✔ QUANTITY ITEM2 EON PowerSub
Cables and adapters2 XLR/M to XLR/F cables
Stage
Audience Area
Mic onBoomStand
Mic onBoomStand
Mic onBoomStand
EON10 G2on SS2-BK
Tripod Stand
EON10 G2on SS2-BK
Tripod Stand
EON PowerSubon thefloor
EON PowerSubon thefloor
Mixer
continued
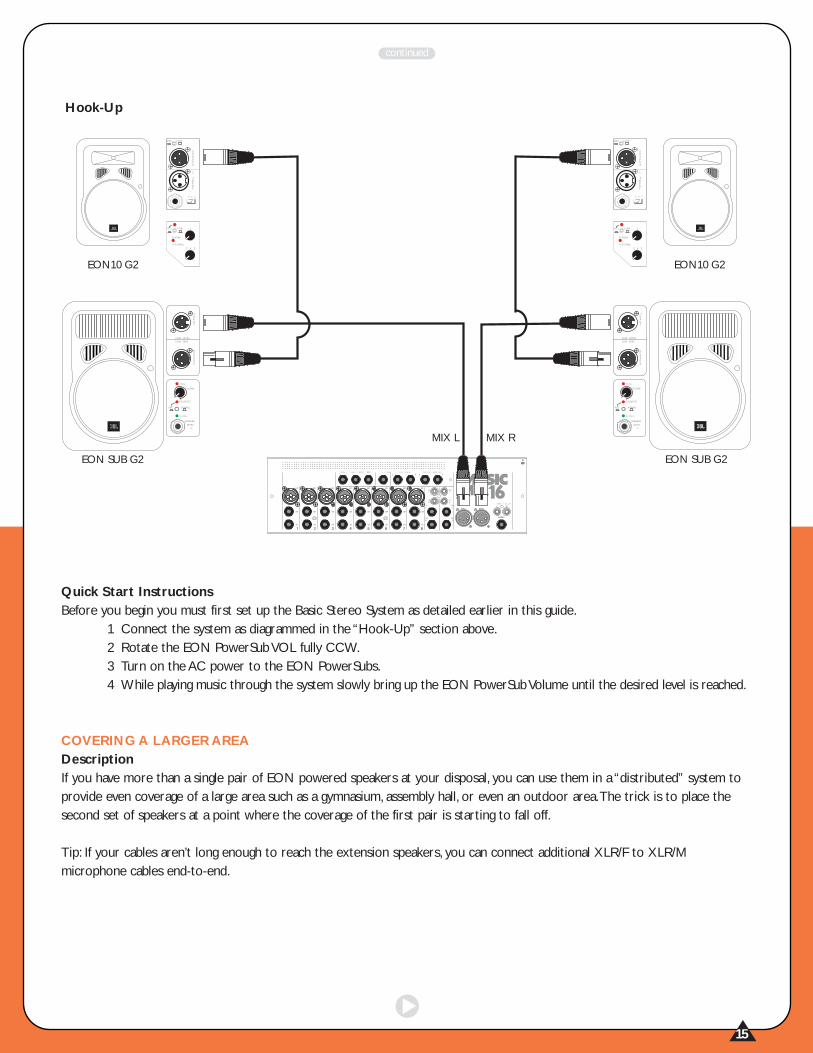
Hook-Up
Quick Start InstructionsBefore you begin you must first set up the Basic Stereo System as detailed earlier in this guide.
1 Connect the system as diagrammed in the “Hook-Up” section above.2 Rotate the EON PowerSub VOL fully CCW.3 Turn on the AC power to the EON PowerSubs.4 While playing music through the system slowly bring up the EON PowerSub Volume until the desired level is reached.
continued
COVERING A LARGER AREADescriptionIf you have more than a single pair of EON powered speakers at your disposal, you can use them in a “distributed” system toprovide even coverage of a large area such as a gymnasium, assembly hall, or even an outdoor area.The trick is to place thesecond set of speakers at a point where the coverage of the first pair is starting to fall off.
Tip: If your cables aren’t long enough to reach the extension speakers, you can connect additional XLR/F to XLR/Mmicrophone cables end-to-end.
▲15
EON SUB G2 EON SUB G2
TPUT
UO
PUT
NI
REV NORMAL
SIGNAL
SPEAKER
LEVEL
IN
PEAK
VOLUME
POLARITY
LINE LEVEL
LOOP THRU
TPUT
UO
PUT
NI
REV NORMAL
SIGNAL
SPEAKER
LEVEL
IN
PEAK
VOLUME
POLARITY
LINE LEVEL
LOOP THRU
EON10 G2 EON10 G2
LINEMIC
OUTPUT
1
INPUT
LOOPMIX
R-PEAK
G-SIGNAL
1
2 & 3
2 & 323
LINEMIC
OUTPUT
1
INPUT
LOOPMIX
R-PEAK
G-SIGNAL
1
2 & 3
2 & 323
TAPE / CD IN
CONTROL ROOM OUTL / R SUM MIX INSERTMON EFX2 / MON2 EFX
MIX L MIX R

In addition to the items in the basic system, here’s what you’ll need to cover a large area.
Plot
▲16
Stage
Audience Area
Audience Area
Mic onBoomStand
Mic onBoomStand
Mic onBoomStand
EON15 G2on SS2-BK
Tripod Stand
EON15 G2on SS2-BK
Tripod Stand
EON15 G2on SS2-BK
Tripod Stand
EON15 G2on SS2-BK
Tripod Stand
Mixer
50'or
more
✔ QUANTITY ITEM2 EON15 G2 or EON10 G22 Tripod speaker stand, JBL SS2-BK or equivalent (optional)
Cables and adapters2 (or more) XLR/M to XLR/F cables (sufficient length to reach the second set
of speakers)1 1/4" TRS Phone to XLR/M adapter
continued
Hook-Up
Quick Start InstructionsBefore you begin you must first set up the Basic Stereo System as detailed earlier in this guide.
1 Connect the system as diagrammed in the “Hook-Up” section above.2 See that the LOOP / MIX switch on the EON15 G2 speakers is set to the LOOP (disengaged) position.3 “Zero” the settings on the EON15 G2:
INPUT 1 fully CCW (Counter Clockwise).INPUTS 2, and 3 turned fully CCW (Counter Clockwise).LF and HF EQ to the center detented postion.
4 Set the EON15 G2 MIC/LINE switch to the LINE (disengaged) position.5 Turn on the AC power to the extension speakers.6 Bring the INPUT 1 control of the extention speakers to the 10:00 position.7 Use the L/R SUM control on the MusicMix 16 to set the level of the remote speakers as required.
▲17
TAPE / CD IN
CONTROL ROOM OUTL / R SUM MIX INSERTMON EFX2 / MON2 EFX
LINEMIC
SIGNAL
1
LOOPMIX
PEAK
2
EQ
3
HF
LF
LINEMIC
SIGNAL
1
LOOPMIX
PEAK
2
EQ
3
HF
LF
LINEMIC
SIGNAL
1
LOOPMIX
PEAK
2
EQ
3
HF
LF
LINEMIC
SIGNAL
1
LOOPMIX
PEAK
2
EQ
3
HF
LF
Mixer Input / Output Panel