the commentary
DESCRIPTION
BIAB BrewingTRANSCRIPT

[EDNOTE: Temporary Draft]
The Commentary
(Using Krispy Kolsch and a 70 L Gas-Fired Kettle as an Example Brew)
This commentary is extremely detailed as it has been written in a manner that will allow new brewers, with little all-grain
knowledge, to successfully brew a quality beer on their first attempt if they take the time to read and understand it fully.
Many sections can be skipped by more advanced brewers although they should read the Commentary to ensure advice they
hand on to new brewers is in line with The Master Guide.
It is recommended that new BIABrewers not only read and fully understand this commentary before brewing but also con-
tinue to use The Checklist and The Calculator for their first five brews at least. A planned brew day has less chance of er-
rors and thus becomes more enjoyable.
What Beer Should I Brew?
BIABrewer recommends you brew one of the following four recipes for your first beer…
Kolsch - LloydieP‟s Krispy Kolsch: A hybrid beer that will satisfy lager lovers without the complexities of lager fermenta-
tion and conditioning. Can also be fermented at higher temperatures to please those with fruity taste buds. The Master
Guide works from this original recipe.
American Pale Ale - NRB‟s All Amarillo APA: This beer is another crowd-pleaser. A simple beer to brew producing a well
-balanced, smooth yet flavoursome pale ale.
Schwartzbier—Doc‟s Schwartzbier: Schwartzbier is German for, “black beer.” This is a lager that is highly drinkable (does
not have the heaviness of a stout) yet full of complex flavours. This recipe can also be fermented as an ale without any drop
in quality.
The beautiful recipes are robust and will please the widest range of palates. They are all forgiving recipes - you can make
some major mistakes and usually get away with them. Lower alcohol (mid-strength) versions can easily be brewed as well.
[EDNOTE: Need to write article, The Basics of Low Alcohol Beers.]
The following instructions will use, as an example, the Krispy Kolsch recipe however can easily be applied to the American
Pale Ale, Schwartzbier and hundreds of other recipes.
THE CHECKLIST
The Checklist is split into various sections. The rest of this guide walks the brewer through these sections. The explanations
and accompanying pictures will provide detailed instructions on how to BIAB 23 L of Krispy Kolsch using a gas-fired 70 L
kettle. The principles of The Commentary, and The Master Guide generally, can be applied to Electric BIABs, Mini-
BIABs and a wide range of equipment and recipes.
Brew Summary
The first twenty lines of the BIAB Checklists comprises of main brew details, the recipe and important notes. Blank cells
should be filled out by the brewer at various stages of the brewing process. Most of this section is hopefully self-
explanatory and with your first beer, somewhat irrelevant. If you have any questions however, please ask them here. Here‟s
a picture and also a little explanation of parts of this section…
LET’S BREW THIS BEER!
The following principles and instructions apply to all BIAB methods—mini-BIABs, Electric Urn BIAB‟s, and larger elec-
tric or gas-fired BIABs. To illustrate these principles, we will use a 70lt (16 U.S. gal) kettle, an auto-siphon, a gas burner
and an immersion chiller to brew a kolsch. Brewers using other set-ups should read this guide as well as those written in the
Mini-BIABs and Electric BIABs sections of BIABrewer.info.
Prior
Before brew day, the brewer should finalise what beer they wish to brew (in our example, a Kolsch) and then scale the rec-
ipe to suit the brewlength they desire and the equipment they own using The Calculator.
The Checklist shows the Krispy Kolsch recipe scaled to suit a 70 L kettle of 45 cm diameter and an end of boil efficiency of
79%. brew equipment. Make sure this area is clean. Also ensure that you have a clean and sterile fermenter.
On brewday, mix up 5 L of no-rinse sanitizer in your fermenter. Put the lid on loosely and shake it. Place the equipment you
would like to keep sterile inside the fermenter. This will depend on your equipment but may include things like siphon
hoses, airlocks and fermenter rings. Generally anything that is going to come into contact with your wort after it has been
boiled. Fill a 500 ml spray bottle with no rinse sterilizer.
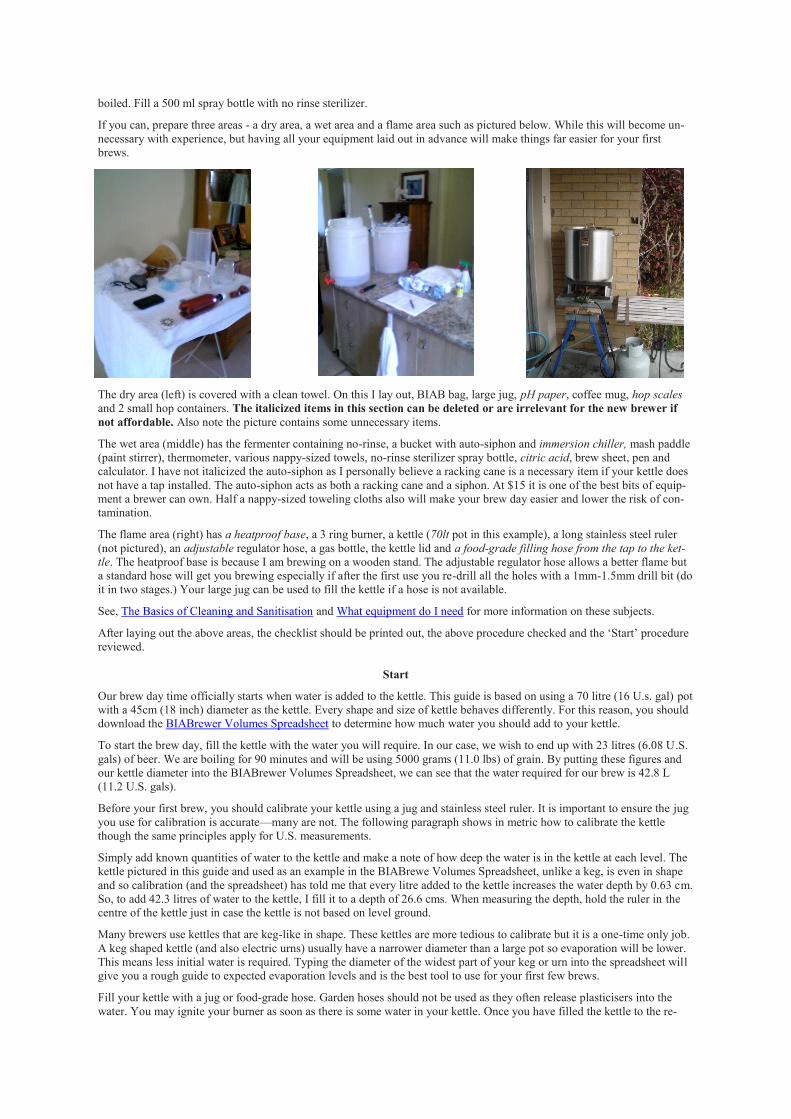
If you can, prepare three areas - a dry area, a wet area and a flame area such as pictured below. While this will become un-
necessary with experience, but having all your equipment laid out in advance will make things far easier for your first
brews.
The dry area (left) is covered with a clean towel. On this I lay out, BIAB bag, large jug, pH paper, coffee mug, hop scales
and 2 small hop containers. The italicized items in this section can be deleted or are irrelevant for the new brewer if
not affordable. Also note the picture contains some unnecessary items.
The wet area (middle) has the fermenter containing no-rinse, a bucket with auto-siphon and immersion chiller, mash paddle
(paint stirrer), thermometer, various nappy-sized towels, no-rinse sterilizer spray bottle, citric acid, brew sheet, pen and
calculator. I have not italicized the auto-siphon as I personally believe a racking cane is a necessary item if your kettle does
not have a tap installed. The auto-siphon acts as both a racking cane and a siphon. At $15 it is one of the best bits of equip-
ment a brewer can own. Half a nappy-sized toweling cloths also will make your brew day easier and lower the risk of con-
tamination.
The flame area (right) has a heatproof base, a 3 ring burner, a kettle (70lt pot in this example), a long stainless steel ruler
(not pictured), an adjustable regulator hose, a gas bottle, the kettle lid and a food-grade filling hose from the tap to the ket-
tle. The heatproof base is because I am brewing on a wooden stand. The adjustable regulator hose allows a better flame but
a standard hose will get you brewing especially if after the first use you re-drill all the holes with a 1mm-1.5mm drill bit (do
it in two stages.) Your large jug can be used to fill the kettle if a hose is not available.
See, The Basics of Cleaning and Sanitisation and What equipment do I need for more information on these subjects.
After laying out the above areas, the checklist should be printed out, the above procedure checked and the „Start‟ procedure
reviewed.
Start
Our brew day time officially starts when water is added to the kettle. This guide is based on using a 70 litre (16 U.s. gal) pot
with a 45cm (18 inch) diameter as the kettle. Every shape and size of kettle behaves differently. For this reason, you should
download the BIABrewer Volumes Spreadsheet to determine how much water you should add to your kettle.
To start the brew day, fill the kettle with the water you will require. In our case, we wish to end up with 23 litres (6.08 U.S.
gals) of beer. We are boiling for 90 minutes and will be using 5000 grams (11.0 lbs) of grain. By putting these figures and
our kettle diameter into the BIABrewer Volumes Spreadsheet, we can see that the water required for our brew is 42.8 L
(11.2 U.S. gals).
Before your first brew, you should calibrate your kettle using a jug and stainless steel ruler. It is important to ensure the jug
you use for calibration is accurate—many are not. The following paragraph shows in metric how to calibrate the kettle
though the same principles apply for U.S. measurements.
Simply add known quantities of water to the kettle and make a note of how deep the water is in the kettle at each level. The
kettle pictured in this guide and used as an example in the BIABrewe Volumes Spreadsheet, unlike a keg, is even in shape
and so calibration (and the spreadsheet) has told me that every litre added to the kettle increases the water depth by 0.63 cm.
So, to add 42.3 litres of water to the kettle, I fill it to a depth of 26.6 cms. When measuring the depth, hold the ruler in the
centre of the kettle just in case the kettle is not based on level ground.
Many brewers use kettles that are keg-like in shape. These kettles are more tedious to calibrate but it is a one-time only job.
A keg shaped kettle (and also electric urns) usually have a narrower diameter than a large pot so evaporation will be lower.
This means less initial water is required. Typing the diameter of the widest part of your keg or urn into the spreadsheet will
give you a rough guide to expected evaporation levels and is the best tool to use for your first few brews.
Fill your kettle with a jug or food-grade hose. Garden hoses should not be used as they often release plasticisers into the
water. You may ignite your burner as soon as there is some water in your kettle. Once you have filled the kettle to the re-
quired depth you should raise the temperature of the water to 1 to 2 degrees C (2 - 4
degrees F) above the mash temperature. This higher temperature is called the, “strike,”
temperature.
Our kolsch recipe requires mashing at 63 C (145.4 degrees F) so you should heat the
water to around 64-65 C (147 - 149 degrees F). When taking temperature readings, use
your mash paddle to agitate the water so as you gain an accurate reading. Also make
sure you are familiar with the importance of Thermometer Calibration.
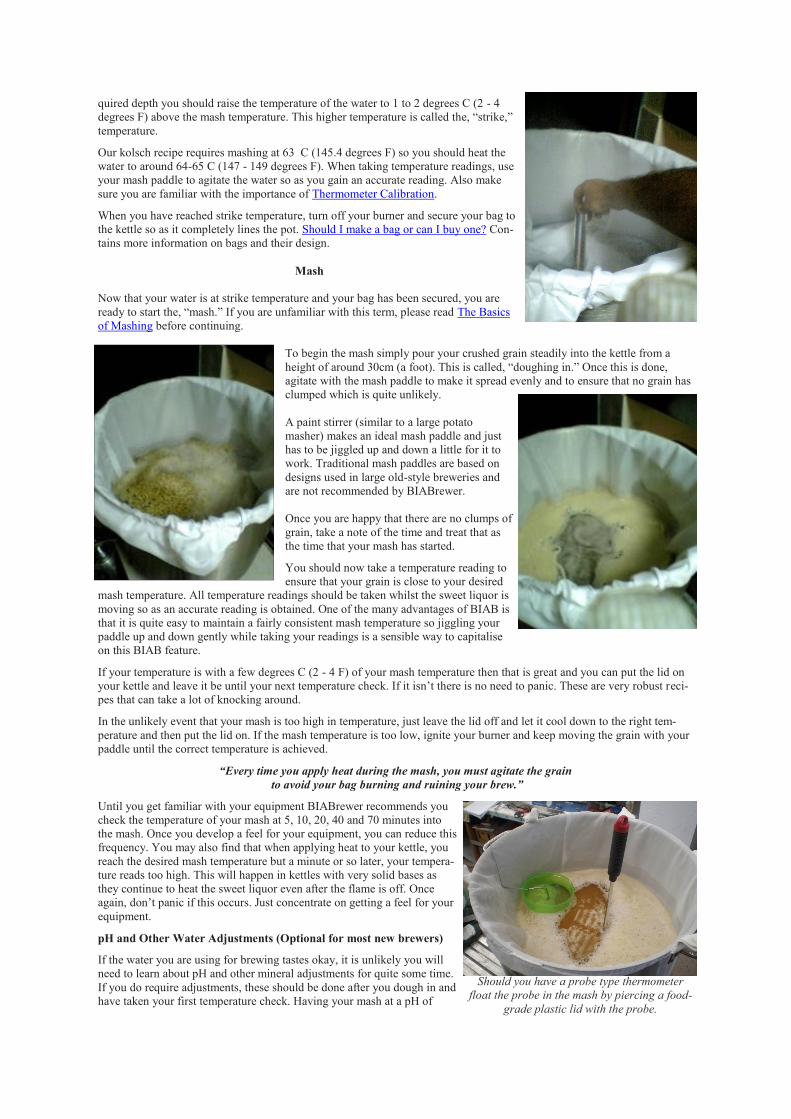
When you have reached strike temperature, turn off your burner and secure your bag to
the kettle so as it completely lines the pot. Should I make a bag or can I buy one? Con-
tains more information on bags and their design.
Mash
Now that your water is at strike temperature and your bag has been secured, you are
ready to start the, “mash.” If you are unfamiliar with this term, please read The Basics
of Mashing before continuing.
To begin the mash simply pour your crushed grain steadily into the kettle from a
height of around 30cm (a foot). This is called, “doughing in.” Once this is done,
agitate with the mash paddle to make it spread evenly and to ensure that no grain has
clumped which is quite unlikely.
A paint stirrer (similar to a large potato
masher) makes an ideal mash paddle and just
has to be jiggled up and down a little for it to
work. Traditional mash paddles are based on
designs used in large old-style breweries and
are not recommended by BIABrewer.
Once you are happy that there are no clumps of
grain, take a note of the time and treat that as
the time that your mash has started.
You should now take a temperature reading to
ensure that your grain is close to your desired
mash temperature. All temperature readings should be taken whilst the sweet liquor is
moving so as an accurate reading is obtained. One of the many advantages of BIAB is
that it is quite easy to maintain a fairly consistent mash temperature so jiggling your
paddle up and down gently while taking your readings is a sensible way to capitalise
on this BIAB feature.
If your temperature is with a few degrees C (2 - 4 F) of your mash temperature then that is great and you can put the lid on
your kettle and leave it be until your next temperature check. If it isn‟t there is no need to panic. These are very robust reci-
pes that can take a lot of knocking around.
In the unlikely event that your mash is too high in temperature, just leave the lid off and let it cool down to the right tem-
perature and then put the lid on. If the mash temperature is too low, ignite your burner and keep moving the grain with your
paddle until the correct temperature is achieved.
“Every time you apply heat during the mash, you must agitate the grain
to avoid your bag burning and ruining your brew.”
Until you get familiar with your equipment BIABrewer recommends you
check the temperature of your mash at 5, 10, 20, 40 and 70 minutes into
the mash. Once you develop a feel for your equipment, you can reduce this
frequency. You may also find that when applying heat to your kettle, you
reach the desired mash temperature but a minute or so later, your tempera-
ture reads too high. This will happen in kettles with very solid bases as
they continue to heat the sweet liquor even after the flame is off. Once
again, don‟t panic if this occurs. Just concentrate on getting a feel for your
equipment.
pH and Other Water Adjustments (Optional for most new brewers)
If the water you are using for brewing tastes okay, it is unlikely you will
need to learn about pH and other mineral adjustments for quite some time.
If you do require adjustments, these should be done after you dough in and
have taken your first temperature check. Having your mash at a pH of
Should you have a probe type thermometer
float the probe in the mash by piercing a food-
grade plastic lid with the probe.

around 5.3 is a good place to start with water adjustments. New brewers whose water does not taste great should feel free to
ask questions in the Advanced Brewing section of BIABrewer.info. Just let the guys there know that you are new and what
tastes bad about your water.
During the Mash
While waiting for the mash to complete and between temperature checks, you should take your time to review what has
happened so far. Did you miss anything on the checklist? Did you make any mistakes? Did you learn anything about your
equipment or how you can improve it?
Now is the time to write this down as
you will always forget these things no
matter how much they have stood out at
the time.
After doing this, look ahead on the
checklist so as you know what is coming
up. During this time you should make
sure that you have weighed out your
hops, whirfloc and yeast nutrient and
that they are sitting in containers marked
clearly with the time they should be
added during the boil. Make sure you are
familiar with The Basics of Hopping.
Mash End and Mashout
After the recommended 90 minutes, our mash ends. The brewer then has two options. They can remove the bag immedi-
ately and then raise the temperature of the sweet liquor to boiling point or they can leave the bag in and perform what is
known as a mashout.
A mashout involves raising the temperature of the mash to a little under 78 degrees C (172 degrees F). This increases effi-
ciency, (the amount of sugar we are able to leach from the grain), by a few percent and may help to make a more stable
wort although literature on the latter is often speculative rather than definitive. The disadvantages of doing a mashout is that
it requires heat application until the sweet liquor reaches the mashout temperature which takes time and means you are deal-
ing with sweet liquor that is above scalding temperature. BIABrewer recommends you do the following…
If you do not have a rope and pulley set-up, do not do a mashout. This will save you having to constantly agitate your mash
(to prevent your bag burning) whilst waiting for mashout temperature to be achieved. It will also prevent you from having
to pull the bag at scalding temperatures. If this is you then skip straight to, “Pulling the Bag by Hand,” below.
If you have a rope and pulley set-up along with industrial rubber gloves (which every all-grain brewer should buy) it is
recommended that you do a mashout because there is no reason why you shouldn‟t. If this is you then skip straight to,
“Lifting the Bag with Rope and Pulley,” below.
Pulling the Bag by Hand
The most basic method of finishing a mash is, “pulling the bag.” It is the most primitive version of BIAB but it has served
many people well. Pulling the bag means, at the end of the mash lifting the bag up and out of the kettle. Every method of all
-grain brewing has a side lacking elegance. Traditional brewers often hate emptying and cleaning out their mash tun.
BIABrewers often hate pulling the bag although it is easier and less time-consuming than the former.
New brewers who are pulling the bag by hand may worry about its weight. A 5kg (11 lb) grain bill in BIAB translates to
lifting about 8 kgs (17.6 lb) on average at the worst point so it can be fairly easily done. Even double batches can be done
this way and BIABrewer has done many in
situations where a rope and pulley were un-
available. Doing doubles this way is not com-
fortable and is not recommended.
To pull the bag by hand, raise the bag from the
sweet liquor so that you start to feel the weight.
Now twist and squeeze the bag as much as pos-
sible without tiring yourself out. Industrial rub-
ber gloves will help you out here. You can
squeeze as much as you like. There are only
positives to doing this (more beer) and abso-
lutely no negatives. For example, it is impossi-
ble to extract tannins from grain at this tem-
perature.
When you have squeezed the bag without tiring
yourself lift it up and out of the kettle. Having a

bucket to dump the bag into is an obvious advantage for cleanliness reasons. Those who have a food-grade bucket also
might like to suspend the bag using cord/rope and a door knob or something similar as seen in the accompanying picture to
gain some additional sweet liquor. This can then be transferred back to the kettle at the beginning of the boil.
Lifting the Bag with Rope and Skyhook
This method is certainly best and allows several advantages but you must have a
place directly above your kettle where you can install a skyhook (a hook that will
hold a rope and preferably pulley.)
At the end of your mash, place your paddle into the bag and then, using the rope
and pulley, suspend the bag so that it floats in the mash. In other words, ensure the
bag is as far off the bottom of the kettle without lifting the grain beyond the surface
of your sweet liquor.
Now, ignite your burner and raise the temperature of your sweet liquor to 78 de-
grees Celsius (172 degrees Farenheit). At 78 / 172 degrees, turn your burner off,
drop the bag back into the kettle so it is loose and then jiggle your mash paddle up
and down a little so that all the sweet liquor permeates through the grain. Leave it
for 5 minutes then agitate again so as you can take a temperature reading. Re-apply
heat if necessary remembering to stir as your bag at this stage will be touching the
bottom of the kettle. Once ten minutes is up you can consider your mashout as be-
ing completed.
Give another jiggle with your
paddle and then raise the bag so
that you start to feel weight. Keep
raising it up over the few minutes until just the bottom of the bag touches
the liquor. This prevents the liquor dripping into the kettle and being
overly-exposed to oxygen which may cause HSA (Hot Side Aeration.)
Use your rubber gloves to now give the bag a good twist and squeeze and
then raise it up with your rope and then swing it out of the kettle.
Having a bucket to dump the bag into is an obvious advantage for cleanli-
ness reasons. Those who have a food-grade bucket also might like to sus-
pend the bag using cord/rope and a door knob or something similar as
seen in the accompanying picture to gain some additional sweet liquor.
This can then be transferred back to the kettle at the beginning of the boil.
Pulley set-ups can be as simple or complex as is desired.
The Boil
Once you have removed your bag from the kettle, you should re-ignite your flame and bring your sweet liquor to the boil.
The time it takes to reach the boil will depend on your burner and whether you did a mashout. It is important that the new
brewer keeps a close eye on the kettle at this stage as wort can act like milk when it reaches boiling point. In other words it
can boil up and over the edges of the kettle. Like boiled over milk, cleaning up boiled over wort is not much fun at all! Af-
ter a few brews, you will get a good feel for how your equipment behaves and for how long you can leave it safely.
“Boilovers,” are most likely to occur as you reach boiling point but can also occur at other times during the boil so do not
let your flame get out of control.
Up until now, we have used the term, “sweet liquor,” to describe the sweet water we have gained from the mash. Now that
our sweet liquor has reached boiling point, we will call it wort (pronounced wert.) Some people also call the sweet liquor
wort so don‟t get confused on this as it is very common.
While waiting for the liquor to start boiling you can also check that you are on track and review the boil checklist.
When your wort reaches the boil then, if you have collected some sweet liquor in a food-grade bucket as mentioned above,
add it to the kettle now and then turn your flame off.
Boil Start (incl., “Into Boiler,” or, “Pre-Boil,” Efficiency Reading
Now is the time to take your pre-boil volume and gravity readings which result in an, “into boiler,” or, “pre-boil,” effi-
ciency figure. Whilst any single efficiency figure can be misleading and quite inaccurate, the new brewer is advised to take
and record the readings mentioned in this guide. This will give the new brewers some helpful figures once they have done 5
to 10 brews. New brewers should read [this section] and more specifically these articles [] [] [] (links needed) before doing
their first brew.
Once you have taken your volume and gravity readings, re-ignite your flame and return the wort to the boil. When it
reaches the boil, make a note of the time and record this as hops, finings and yeast nutrient are added at distinct times dur-
ing the boil. The time at which they are added is referred to in minutes and are based on the boil end not the boil start as
explained below.

Lloydies Krispy Kolsch recipe requires two hop additions -
40 grams at sixty minutes and 20 grams at ten minutes. As
the minutes mean from the end of the boil, you will actually
be adding these hops thirty minutes and eighty minutes after
the boil begins.
The First Half-Hour
Some recipes call for hop additions at 90 minutes. This
means that you should add your hops at the start of your 90
minute boil. BIABrewer recommends that new brewers be-
gin with recipes that are, “stickied,” in the BIAB Recipes
section such as Lloydie‟s Krispy Kolsch as all these recipes
are based on a 90 minute boil and have their first hop addi-
tion at 60 minutes (half an hour after your boil starts.) If a
new brewer really wants to brew a recipe that is not stickied,
they should post it in Getting Ready for My First BIAB and
someone will adjust the recipe to suit this guide.
This guide is based on a 90 minute boil with the bittering hop addition at 60 minutes. This is a very safe and sensible prac-
tice that also gives the brewer half an hour to relax and do the following…
1. Manage and observe the boil - Play around with your heat source to maintain what is best described as a, “good
rolling boil.” A simmer is inappropriate as is having your wort jumping wildly about. During the first part of the
boil, you will notice a creamy scum on the surface of your boil. This subsides quite quickly and your wort will ap-
pear as in the picture below.
2. Clean out your bag - Once the scum has settled and your boil is rolling nicely, empty the spent grain (pictured)
from your bag and run it under a tap to clean most of the grain away. This gets one cleaning job out of the way and
also gives you the option of using your bag as a, “hop sock,” as pictured in the next section.
3. Review what time your hops, finings, nutrient and chiller should be added to the kettle. Use a sheet of paper to work
out when your boil ends and then write these key times down. [Tad more info should be added here.]
4. If you have some time up your sleeve, reflect and write notes on anything you feel as though you could improve on
with your next brew.
1 Hour through to 20 Minutes (Bittering Hops and Boil Maintenance)
Thirty minutes into our ninety minute boil, it is time for our first 60 minute hop addition where 40 grams of Hallertau hops
are added to the boil. Hops can either be added directly to the wort or thrown inside your BIAB bag. If you have a rope and
pulley as well as a tap on your kettle, BIABrewer recommends you use the BIAB bag as a hop sock to help avoid trub man-
agement problems. Let it hang loosely in the wort as pictured. It will not burn.
New brewers without either a rope and pulley set-up or a tap on their kettle should avoid using their BIAB bag and simply
throw their hops straight into the boil.
Using a hop sock is neither right or wrong. All new brewers should try both methods at some stage to determine whether
using a hopsock makes their trub management (separating the solids from your boiled wort) more or less convenient.
Throw your 40 grams of Hallertau in now.
Occasionally, adding hops to the boil increases the chances of a boilover so keep your eye on the boil for a few minutes
after you add your hops.
The hops you have added at this stage of the boil are referred to as, “bittering,” hops as they impart bitterness to the brew.
Hops that add flavor but little bitterness to the beer (flavouring hops) are added to our wort at around 15 before the end of
the boil. Hops that add mainly aroma and very little flavor or bitterness are called, “aroma hops,” and are added right at the
boil end or a few minutes before. These, “bittering”, “flavor” and “aroma” hop additions are general terms but the new
brewer needs to understand that they are just general terms. Our Krispy Kolsh recipe for example, asks for a ten minute
addition. This will add a bit of bitterness but not much. It adds a fair bit of flavor and a tad of aroma.
Now that you have added your bittering hops, you can relax. Use this time to keep an eye on what is happening in the boil.
Occasionally you might have to add or reduce heat to maintain your good rolling boil . Boiling wort has a mind of its own.
It may stop boiling or boil excessively at any time for no apparent reason :). Like a 3 year old, boiling wort seems to know
what you are doing at any given time and uses the times when you are not watching to cause mischief. As your brewing
skills increase along with your equipment knowledge, you will develop what is best described as a, „feel,‟ for boiling wort
and can pay far less attention. Until you develop these, “eyes in the back of your head,” monitor the boil regularly.
Also take this time to review how the brew day has gone and check ahead on your checklist to make sure you have every-
thing ready to go for the last 20 minutes of the boil.
20 Minutes through to Flame Out (Flavour Hop, Equipment, Nutrient, Finings and Aroma Hop Additions)

Towards the end of the boil, several ingredient additions are usually made. Flavour and aroma hop additions are almost
always added during this time and it is a sensible practice (though not critical) for new brewers to add kettle finings and
yeast nutrient here as well. The example equipment we are using in our Master Guide also requires the addition of an im-
mersion chiller and our mash paddle which is not required for other chilling methods—see The Basics of Chillling for more
details.
To finish off our kolsch, twenty minutes before the end of our boil we need to add 20 grams of our Hallertau hops. Throw
these into your BIAB bag if you are using it as a hopsock or directly into the boil if not.
Now, if you are using an immersion chiller as we are in our kolsch example, spray it, your clean mash paddle and kettle lid
with no-rinse steriliser. At fifteen minutes before the end of the boil, drop the chiller into the wort and then your paddle.
Stand away from the outlets of your chiller as any water in the chiller will boil and then spit at you. Now, regardless of
chilling method, loosely cover the kettle with your lid. Do not cover it completely as this could well result in a boilover.
Allow your mash paddle to protrude from the kettle.
You will notice after you add the chiller that your wort stops boiling. Increase the flame to return the wort to the boil and
make a note of how long this takes. You should, “stop your clock,” during this time. In our example we are using a 90 min-
ute boil. If it took four minutes to return the wort to the boil, we would actually finish our boil 94 minutes after it started. If
you had a 15 minute hop addition, you would add this as soon as the wort returns to the boil.
The purpose of spraying the chiller and paddle and adding them to the boil is to help with sterilization. This equipment
will later be, “touching,” cool wort which is ideal food for many bacteria and wild yeasts that the brewer needs to avoid -
see The Basics of Identifying Faults for more details.
Whilst our kolsch recipe does not require it, most recipes will ask that you add aroma hops usually anywhere from 5 min-
utes before the boil ends right up until you turn your flame out.
In our example, “flame out,” will occur 94 minutes after our boil began. At this time your boil has finished and your chill
begins.
Now, take a 10 minute break to review and consider your checklist.
Chilling
When we turn off our heat source to end the boil, there are many ways of cooling (better known as, “chilling,”) our wort to
get it to the temperature at which yeast should be correctly pitched. All chilling methods have advantages and disadvan-
tages. For example, one method may require a very fussy brewer to make minor recipe adjustments but also allows the quite
amazing advantage of any brewer to delay pitching the yeast until many weeks after the boil. Mini BIAB brewers can sim-
ply put their kettle into a bath of cool water. Another often ignored and under-valued option is to simply cover the kettle
with foil and allow it to cool overnight.
Methods of chilling are numerous and often not well-defined. The Basics of Chilling defines, categorises and explains
numerous chilling methods in a format that is easy for all brewers to follow. Before brewing your first all-grain beer, you
should have read The Basics of Chilling and decided which chilling method you will use. The aim of all chilling methods is
to maintain the integrity of the wort until it is ready for yeast to be pitched.
In our example, we are using an immersion chiller so…
Once you have had your ten minute rest after flameout, cover the kettle as much as possible with the kettle lid. Also cover
the lid with a clean towel. This will help prevent bacteria or wild yeast dropping into your wort. The steam rising off the
just-boiled wort will help sanitise the towel.
Now connect the inlet and outlet hoses to your immersion chiller on. Be careful that your outlet hose will not lead to run-off
water touching any vegetation as it will be killed. Turn the tap supplying your inlet hose on—it only needs to be a tad more
than a trickle. Ensure that there are no leaks.
During the Chill
Agitating the wort from time to time speeds up the cooling process. To do this, simply lift the paddle handle up and down a
few times. This results in the wort, “washing,” over the chiller coils.
The example equipment we are using to brew our kolsch, uses a kettle with no tap. There are both advantages and disadvan-
tages to having a tap on a kettle so a brewer using a kettle without a tap should not feel that their set up is in any way infe-
rior. BIABrewer does suggest that those using an immersion chiller and a kettle without a tap, purchase an auto-siphon and
1m (3ft) of PVC hose that will fit to the siphon. As mentioned in [link needed] an auto-siphon is a combined self-priming
siphon and racking cane.
Whilst your wort is chilling you should ensure that your auto-siphon is sanitised. If you have followed this guide, your fer-
menter will still have no-rinse sanitiser in it. To sanitise your aut-syphon, simply unscrew the fermenter lid and dip the end
of your siphon into the sanitiser. Give a few pumps of the siphon to fill it with sanitiser. Spray any parts of the siphon so far
untouched by sanitiser such as the outside of the hose with your spray bottle of no-rinse.
If you‟re a new brewer you‟ll probably be tempted to crack a beer at this stage. Don‟t! Waiting a little longer will be well
worth it.
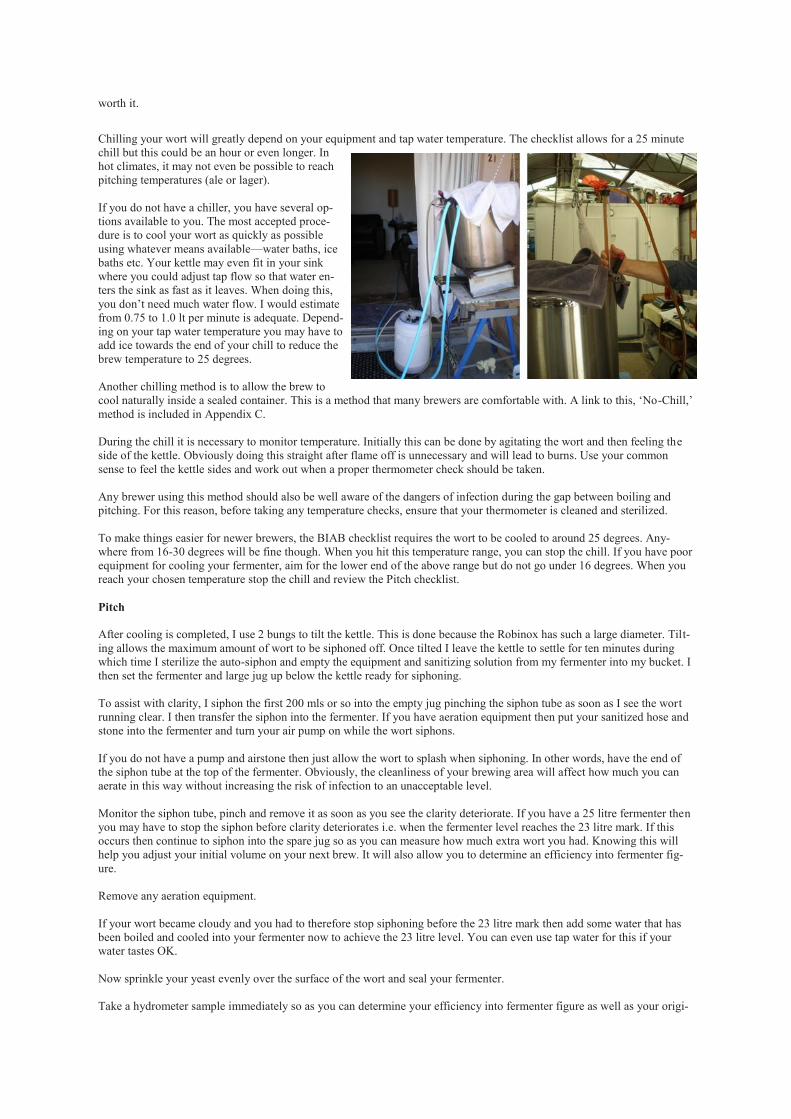
Chilling your wort will greatly depend on your equipment and tap water temperature. The checklist allows for a 25 minute
chill but this could be an hour or even longer. In
hot climates, it may not even be possible to reach
pitching temperatures (ale or lager).
If you do not have a chiller, you have several op-
tions available to you. The most accepted proce-
dure is to cool your wort as quickly as possible
using whatever means available—water baths, ice
baths etc. Your kettle may even fit in your sink
where you could adjust tap flow so that water en-
ters the sink as fast as it leaves. When doing this,
you don‟t need much water flow. I would estimate
from 0.75 to 1.0 lt per minute is adequate. Depend-
ing on your tap water temperature you may have to
add ice towards the end of your chill to reduce the
brew temperature to 25 degrees.
Another chilling method is to allow the brew to
cool naturally inside a sealed container. This is a method that many brewers are comfortable with. A link to this, „No-Chill,‟
method is included in Appendix C.
During the chill it is necessary to monitor temperature. Initially this can be done by agitating the wort and then feeling the
side of the kettle. Obviously doing this straight after flame off is unnecessary and will lead to burns. Use your common
sense to feel the kettle sides and work out when a proper thermometer check should be taken.
Any brewer using this method should also be well aware of the dangers of infection during the gap between boiling and
pitching. For this reason, before taking any temperature checks, ensure that your thermometer is cleaned and sterilized.
To make things easier for newer brewers, the BIAB checklist requires the wort to be cooled to around 25 degrees. Any-
where from 16-30 degrees will be fine though. When you hit this temperature range, you can stop the chill. If you have poor
equipment for cooling your fermenter, aim for the lower end of the above range but do not go under 16 degrees. When you
reach your chosen temperature stop the chill and review the Pitch checklist.
Pitch
After cooling is completed, I use 2 bungs to tilt the kettle. This is done because the Robinox has such a large diameter. Tilt-
ing allows the maximum amount of wort to be siphoned off. Once tilted I leave the kettle to settle for ten minutes during
which time I sterilize the auto-siphon and empty the equipment and sanitizing solution from my fermenter into my bucket. I
then set the fermenter and large jug up below the kettle ready for siphoning.
To assist with clarity, I siphon the first 200 mls or so into the empty jug pinching the siphon tube as soon as I see the wort
running clear. I then transfer the siphon into the fermenter. If you have aeration equipment then put your sanitized hose and
stone into the fermenter and turn your air pump on while the wort siphons.
If you do not have a pump and airstone then just allow the wort to splash when siphoning. In other words, have the end of
the siphon tube at the top of the fermenter. Obviously, the cleanliness of your brewing area will affect how much you can
aerate in this way without increasing the risk of infection to an unacceptable level.
Monitor the siphon tube, pinch and remove it as soon as you see the clarity deteriorate. If you have a 25 litre fermenter then
you may have to stop the siphon before clarity deteriorates i.e. when the fermenter level reaches the 23 litre mark. If this
occurs then continue to siphon into the spare jug so as you can measure how much extra wort you had. Knowing this will
help you adjust your initial volume on your next brew. It will also allow you to determine an efficiency into fermenter fig-
ure.
Remove any aeration equipment.
If your wort became cloudy and you had to therefore stop siphoning before the 23 litre mark then add some water that has
been boiled and cooled into your fermenter now to achieve the 23 litre level. You can even use tap water for this if your
water tastes OK.
Now sprinkle your yeast evenly over the surface of the wort and seal your fermenter.
Take a hydrometer sample immediately so as you can determine your efficiency into fermenter figure as well as your origi-