the catc automation api - teledyne lecroycdn.teledynelecroy.com/files/whitepapers/wpapi_0204.pdf ·...
TRANSCRIPT

The CATC Automation API By Matthew Dunn February 2004

CATC Automation API
TABLE OF CONTENTS
Introduction 1
Things to do with an API 2
API and COM/DCOM 3
What Does an API Look Like 4
Examples: 9
Test Control 9
Dual Recording 13
Data Extraction 17

CATC Automation API
INTRODUCTION CATC’s Automation Application Programming Interface (API) is a software application that allows sophisticated users to create scripts or programs of commands and run these scripts or programs locally or remotely over a network. The name Automation is derived from the goal of allowing engineers to automate test procedures. Automation API can take various forms but it simply offers the programmer, or his compiler, information on how to connect to an application. In this case the application is the CATC Trace™ expert analysis software that interfaces with the CATC analyzer hardware.
CATC’s Automation API is composed of a command set that duplicates most of the functionality of a specific CATC analyzer or exerciser Graphical User Interface. Automation is implemented through the use of scripts or programs that the user can write using late binding scripting languages such as VBScript and WSH or early binding languages such as C++. CATC provides examples of scripts written in WSH, VBScript and C++. Once an Automation script or program has been created, it can be run on the PC attached to the analyzer or transmitted to the PC over a network, from a remote location. Automation uses the Distributed Component Object Model (DCOM) protocol to transmit automation commands over a network. When run over a network, the Host Controller is configured as a DCOM server and the remote PC is configured as a DCOM client.

CATC Automation API
Page 2
THINGS TO DO WITH AN API: Interfacing to the Automation API allows the user to take complete control of the CATC analyzer/exerciser through his own application program. The subsections in this chapter suggest some possible applications.
Automatic Recording
Automatic recording. One would be to start two analyzers recording at as close to the same time as possible. You might want to do this so the internal timestamps of the analyzers are very close together. This would then make it much easier to correlate and measure latency across a bridge using two analyzers of different technology.
Another would be to start the recording based on a software trigger. In developing software for the target system it could be desirable to add a special call to the CATC analyzer to start the recording after some portion of the target program has been run.
Testing
Recording specific events or a trace synchronized to a portion of a series of tests in a customized testing suite. For example regression tests of firmware can be run a specific trace be made for each test. Such traces can then be compared with previous traces to determine if a software change has cause a change in the system output.
Similarly in production testing of devices an automatic recording of each test can be made and compared with a reference test recording. In this case the analyzer must have the recording setting loaded and the test case saved for each device automatically.
Post-processing
There are many situations where it can be of interest to further process the captured data to identify factors not currently in the standard product analysis capabilities or to add functionality not offered elsewhere in an automated method. Some examples of this would be to extract audio or picture information from a trace and pass it to another application that can then further process the data.
Similarly if the recorded trace needs to be compared with another trace it may be desirable to setup common display and filter parameters to then export from to allow like for like comparisons.
Multi analyzer set-up
USB USB

CATC Automation API
Page 3
API AND COM/DCOM: The Component Object Model (COM) is a way for software components to communicate with each other. It's a binary and network standard that allows any two components to communicate regardless of what machine they're running on (as long as the machines are connected), what operating systems the machines are running (as long as it supports COM), and what language the components are written in. COM further provides location transparency: it doesn't matter to you when you write your components whether the other components are in-process DLLs, local EXEs, or components located on some other machine. (There are performance implications, of course, but you don't have to rewrite a thing to change the other components' locations—that's key.)
Distributed COM (DCOM) extends the Component Object Model (COM) to support communication among objects on different computers—on a LAN, a WAN, or even the Internet. With DCOM, your application can be distributed at locations that make the most sense to your customer and to the application.
The Distributed Component Object Model (DCOM) is a protocol that enables software COM components to communicate directly over a network in a reliable, secure, and efficient manner. Microsoft previously called "Network OLE," DCOM is designed for use across multiple network transports, including Internet protocols such as HTTP. DCOM is based on the Open Software Foundation's DCE-RPC spec and will work with both Java applets and ActiveX components through its use of the Component Object Model (COM). Follow the links below to learn more about DCOM.
The CATC Application software API is COM and DCOM compliant, which means that you can choose to run the application locally, or remotely depending on the configuration to suit you.

CATC Automation API
Page 4
WHAT DOES AN API LOOK LIKE The API is typically supplied as a Microsoft type library. This allows you to call COM compliant function from your software allowing it access the CATC application associated with the particular type library.
Each application may have a dedicated type library allowing the user to selectively include that component in the project.
This should not be confused with an ‘Active-X’ control. It could be possible to encapsulate a type library in a control but this would add an unnecessary layer of abstraction while forcing some design elements on the end user.
Typically, CATC provides access to the primary menu functions available in a CATC application.
Depending on the programming system of choice, the way a call to the function might look will vary slightly but in general it will be similar. For example, to start the recording in the associated application would be by calling the method StartRecording(). In some cases it is also possible to define the recording options at the same time as a parameter is passed to the method
A Type Library in Object Browser

CATC Automation API
Page 5
Accessing the type Library (.tlb) file
In order to access the type library file and use it within your programming environment depends very much on the programming system you plan to use. It is also necessary to install the API client on each system from where it will be used. This will normally involve downloading the specific API client from the Automation API area of CATC Support pages http://www.catc .com/support/api/index.html. Alternatively, many of the CATC application installation systems have an option under the ‘Custom’ installation process, or by re-running the setup and selecting ‘Modify’.
You can verify that the file has been extracted by searching your file system for a ‘.tlb’ file with the prefix associated with the protocols automation.
It is also possible to register the type libraries manually using a type library registration utility of which there are many.
Once installed it will be necessary to reference the .tlb file from the compiler.

CATC Automation API
Page 6
Visual Basic 6.0
In Visual Basic 6.0 the type library is accessed by from the Project/References dialog. If the type library required is not already listed, selecting the browse option and browsing to the location of the required library can add it. For example C:\Program Files\CATC\USBTracer\UsbAutomation.tlb
VB6 Adding Project Reference

CATC Automation API
Page 7
Visual C++ 6.0
In Visual C++ 6.0 the type library is accessed from the Class Wizard. Select View/Class Wizard from the C++ workspace menu and on the Class Wizard Dialog select the Add Class button and From Type Library.
Visual C++ Adding Class from Type Library
CATC Automation API
Page 8
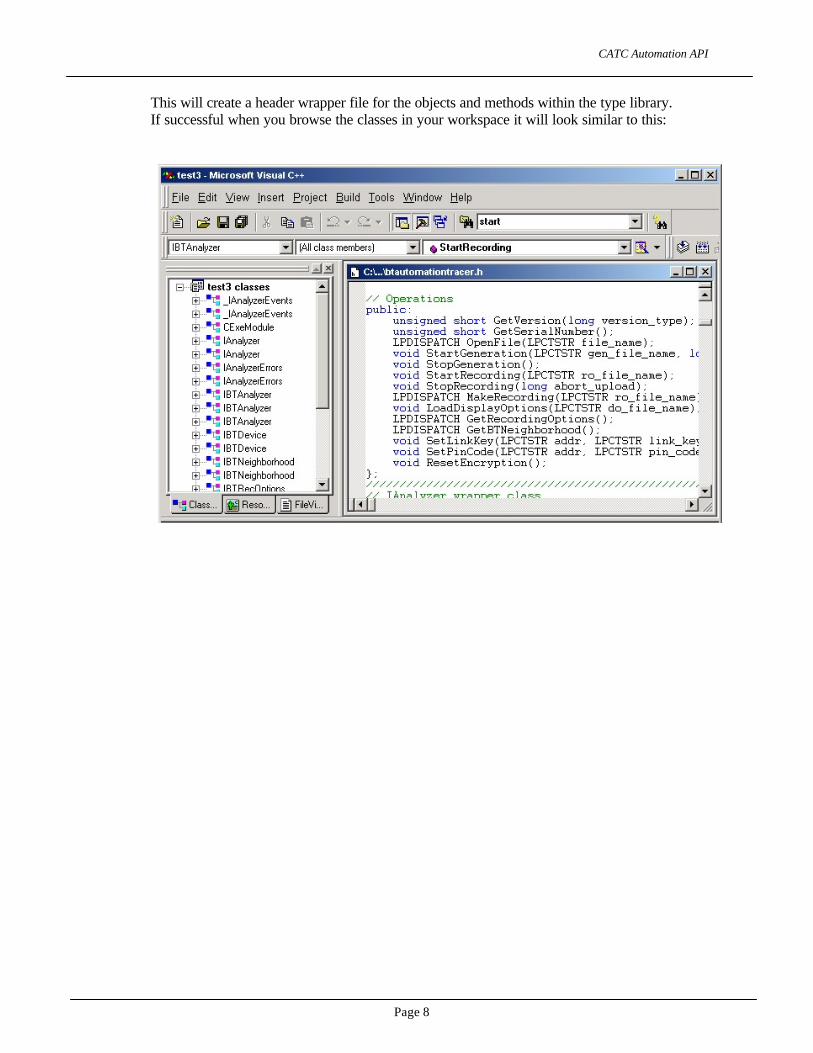
This will create a header wrapper file for the objects and methods within the type library. If successful when you browse the classes in your workspace it will look similar to this:

CATC Automation API
Page 9
EXAMPLES
• The API comes with CPP, HTML and WSH examples
• Examples show use of each API entry
(= read the code)
AUTOMATION EXAMPLE 1: TEST CONTROL In this section we will work through a typical example of API automation by creating a simple application that will load a configuration for a test setup and will then record the test and save the resulting trace. This first example will use Visual Basic to reduce the complexity of the code needed for the GUI and allow us to focus on the code specific to the API.
Step1:
The user interface will consist of a list of tests, the user will select a recording setup and press an execute button. Start a new VB6 standard exe project. Add a listbox control called list1, add items to the list called TEST1-TEST3. Add a button control called btnExecute with the caption ‘Execute’ and one called btnExit with the caption “Exit”. Finally add a label called Status1
CATC Automation API
Page 10
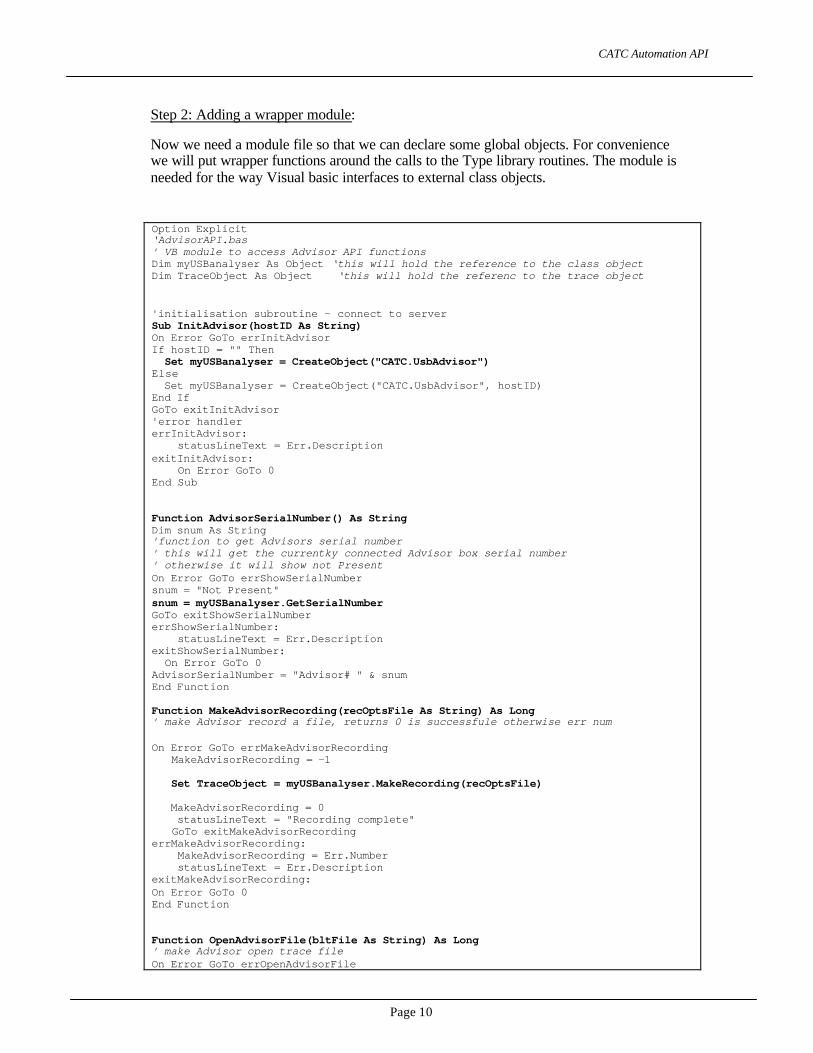
Step 2: Adding a wrapper module:
Now we need a module file so that we can declare some global objects. For convenience we will put wrapper functions around the calls to the Type library routines. The module is needed for the way Visual basic interfaces to external class objects.
Option Explicit ‘AdvisorAPI.bas ' VB module to access Advisor API functions Dim myUSBanalyser As Object ‘this will hold the reference to the class object Dim TraceObject As Object ‘this will hold the referenc to the trace object 'initialisation subroutine – connect to server Sub InitAdvisor(hostID As String) On Error GoTo errInitAdvisor If hostID = "" Then Set myUSBanalyser = CreateObject("CATC.UsbAdvisor") Else Set myUSBanalyser = CreateObject("CATC.UsbAdvisor", hostID) End If GoTo exitInitAdvisor 'error handler errInitAdvisor: statusLineText = Err.Description exitInitAdvisor: On Error GoTo 0 End Sub Function AdvisorSerialNumber() As String Dim snum As String 'function to get Advisors serial number ' this will get the currentky connected Advisor box serial number ' otherwise it will show not Present On Error GoTo errShowSerialNumber snum = "Not Present" snum = myUSBanalyser.GetSerialNumber GoTo exitShowSerialNumber errShowSerialNumber: statusLineText = Err.Description exitShowSerialNumber: On Error GoTo 0 AdvisorSerialNumber = "Advisor# " & snum End Function Function MakeAdvisorRecording(recOptsFile As String) As Long ' make Advisor record a file, returns 0 is successfule otherwise err num On Error GoTo errMakeAdvisorRecording MakeAdvisorRecording = -1 Set TraceObject = myUSBanalyser.MakeRecording(recOptsFile) MakeAdvisorRecording = 0 statusLineText = "Recording complete" GoTo exitMakeAdvisorRecording errMakeAdvisorRecording: MakeAdvisorRecording = Err.Number statusLineText = Err.Description exitMakeAdvisorRecording: On Error GoTo 0 End Function Function OpenAdvisorFile(bltFile As String) As Long ' make Advisor open trace file On Error GoTo errOpenAdvisorFile

CATC Automation API
Page 11
If bltFile <> "" Then Set TraceObject = myUSBanalyser.OpenFile(bltFile) OpenAdvisorFile = 0 statusLineText = "Trace File opened" Else OpenAdvisorFile = -1 statusLineText = "No Trace file!" End If GoTo exitOpenAdvisorFile errOpenAdvisorFile: OpenAdvisorFile = Err.Number MsgBox "Error#: " & Err.num & vbCrLf & Err.Description, vbOKOnly, "OpenAdvisorFile Error#: " & Err.num statusLineText = Err.Description Err.Clear exitOpenAdvisorFile: On Error GoTo 0 End Function
Step 3: Connect UI to module
First we need a form load procedure to initialize the link to the CATC Tracer Viewer and record software. Since we have already defined an initialization routine in the Analyzer wrapper module this is as simple as one call from the form:
Private Sub Form_Load() InitAdvisor "" End Sub
Should the SW be loaded on a remote machine and the DCOM setup is being used then it may be needed to change the “” reference to the text string for the remote machine identifier.
Next we can add some functionality to the UI buttons:
Private Sub btnExit_Click() End Unload Me End Sub Private Sub btnExecute_Click() Dim recOptsFileName As String Dim SerialNUm As String If (list1.Text <> "") Then SerialNUm = AdvisorSerialNumber 'check analyser connected status1.Caption = statusLineText recOptsFileName = App.Path & "\" & list1.Text & ".rec" MakeAdvisorRecording recOptsFileName 'start recording with appropriate recoding options status1.Caption = statusLineText Else MsgBox "Please select a test to run from the list first" End If End Sub

CATC Automation API
Page 12
The result is:
This full example is available at http://www.catc.com/support/whitepapers/apiExample1.zip

CATC Automation API
Page 13
AUTOMATION EXAMPLE 2- DUAL RECORDING Expanding on the first example we will use a second API interface to one of the other CATC Protocol analyzers to provide a recording based on a bridge solution. The second analyzer can either be connected on the same machine and have both applications hosted on the same platform, or one of the systems can be controlled remotely via the DCOM interface (see the setting up DCOM for API access whitepaper from CATC).
In this example we will create a system to record a Fibre Channel -> SATA bridge using a SATA1 analyzer in a UPAS2500H chassis and Fibre Channel Analyzer in a UPAS 10000. The principle can be applied to other busses and bridge examples supported by CATC. Again this is a Visual Basic example that will not focus on the UI.
Step 1: Create a new project.
Step 2: Add the references to the Fcautomation.tlb and the SATAAutomation.tlb
Step 3: The UI in this case is three buttons; called ‘btnExit’, ‘btnStartRec’ and ‘btnStop’. There is also a message/status textbox called ‘status1’
Step 4: Now we need a module file so that we can declare some global objects. For convenience we will put wrapper functions around the calls to the Typelibrary routines. For the FCTracer the FCTracer.bas module would look like this (error handling has been removed for clarity but is available in the download file):
Option Explicit ' VB module to access FCTracer API functions Dim myFCanalyser As Object ‘will hold the references to Analyser class Dim TraceObject_FCT As Object ‘will hold reference to trace when created 'initialisation subroutine Sub InitFCTracer(hostID As String) If hostID = "" Then Set myFCanalyser = CreateObject("CATC.FCAnalyzer") Else Set myFCanalyser = CreateObject("CATC.FCTracer", hostID) End If End Sub Sub CloseFCTracer() Set myFCanalyser = Nothing End Sub Function FCTracerSerialNumber() As String 'function to get FCTracers serial number Dim snum As String ' this will get the currentky connected FCTracer box serial number ' otherwise it will show not Present On Error GoTo errShowSerialNumber snum = "Not Present" snum = myFCanalyser.GetSerialNumber GoTo exitShowSerialNumber errShowSerialNumber:
MsgBox "Error#: " & Err.num & vbCrLf & Err.Description, vbOKOnly, "ShowSerialNumnber Error#: " & Err.num
statusLineText = Err.Description Err.Clear exitShowSerialNumber: On Error GoTo 0 FCTracerSerialNumber = "FCTracer# " & snum End Function

CATC Automation API
Page 14
Function StartFCTracerRecording(recOptsFile As String) As Long ' Start FCTracer record a file, returns 0 is successful otherwise err num On Error GoTo errStartFCTracerRecording StartFCTracerRecording = -1 myFCanalyser.StartRecording (recOptsFile) StartFCTracerRecording = 0 statusLineText = "FC Trace Recording Started " & Date GoTo exitStartFCTracerRecording errStartFCTracerRecording: StartFCTracerRecording = Err.Number exitStartFCTracerRecording: On Error GoTo 0 End Function Function StopFCTracerRecording() As Long ' Stop FCTracer record a file, returns 0 is successful otherwise err num On Error GoTo errStopFCTracerRecording StopFCTracerRecording = -1 myFCanalyser.StopRecording (False) StopFCTracerRecording = 0 statusLineText = "FC Trace Recording Stopped " & Date GoTo exitStopFCTracerRecording errStopFCTracerRecording: StopFCTracerRecording = Err.Number exitStopFCTracerRecording: On Error GoTo 0 End Function
And for the SATA Tracer this:
Option Explicit ' VB module to access SATracer API functions Dim mySATAanalyser As Object Dim TraceObject_SATA As Object 'initialisation subroutine Sub InitSATracer(hostID As String) If hostID = "" Then Set mySATAanalyser = CreateObject("CATC.SATAAnalyzer") Else Set mySATAanalyser = CreateObject("CATC.SATATRacer", hostID) End If End Sub Sub CloseSATracer() Set mySATAanalyser = Nothing End Sub Function SATracerSerialNumber() As String 'function to get SATracers serial number Dim snum As String ' this will get the currentky connected SATracer box serial number ' otherwise it will show not Present On Error GoTo errShowSerialNumber snum = "Not Present" snum = mySATAanalyser.GetSerialNumber GoTo exitShowSerialNumber errShowSerialNumber: MsgBox "Error#: " & Err.num & vbCrLf & Err.Description, / vbOKOnly, "ShowSerialNumnber Error#: " & Err.num statusLineText = Err.Description Err.Clear exitShowSerialNumber: On Error GoTo 0 SATracerSerialNumber = "SATracer# " & snum End Function

CATC Automation API
Page 15
Function StartSATracerRecording(recOptsFile As String) As Long ' Start SATracer record a file, returns 0 is successful otherwise err num On Error GoTo errStartSATracerRecording StartSATracerRecording = -1 mySATAanalyser.StartRecording recOptsFile StartSATracerRecording = 0 statusLineText = statusLineText & vbCrLf & "SATA Trace Recording started" / & Date GoTo exitStartSATracerRecording errStartSATracerRecording: StartSATracerRecording = Err.Number exitStartSATracerRecording: On Error GoTo 0 End Function Function StopSATracerRecording() As Long ' Stop SATracer record a file, returns 0 is successful otherwise err num On Error GoTo errStopSATracerRecording StopSATracerRecording = -1 mySATAanalyser.StopRecording (False) StopSATracerRecording = 0 statusLineText = statusLineText & vbCrLf & "SATA Trace Recording Stopped" / & Date GoTo exitStopSATracerRecording errStopSATracerRecording: StopSATracerRecording = Err.Number statusLineText = Err.Description exitStopSATracerRecording: On Error GoTo 0 End Function
Step 5: In the Form load section we will ask the UI to call the FCTracer and SATracer initialize routines. This will create an object reference and open the respective servers.
Private Sub Form_Load() InitFCTracer "" status1.Text = "Fibre Analyser=" & FCTracerSerialNumber InitSATracer "" status1.Text = status1.Text & vbCrLf & "SATA Analyser=" & SATracerSerialNumber End Sub
If the SW is on a remote machine and the DCOM interface has to be setup, the “” can be replaced with the remote machine identifier string.
CATC Automation API
Page 16
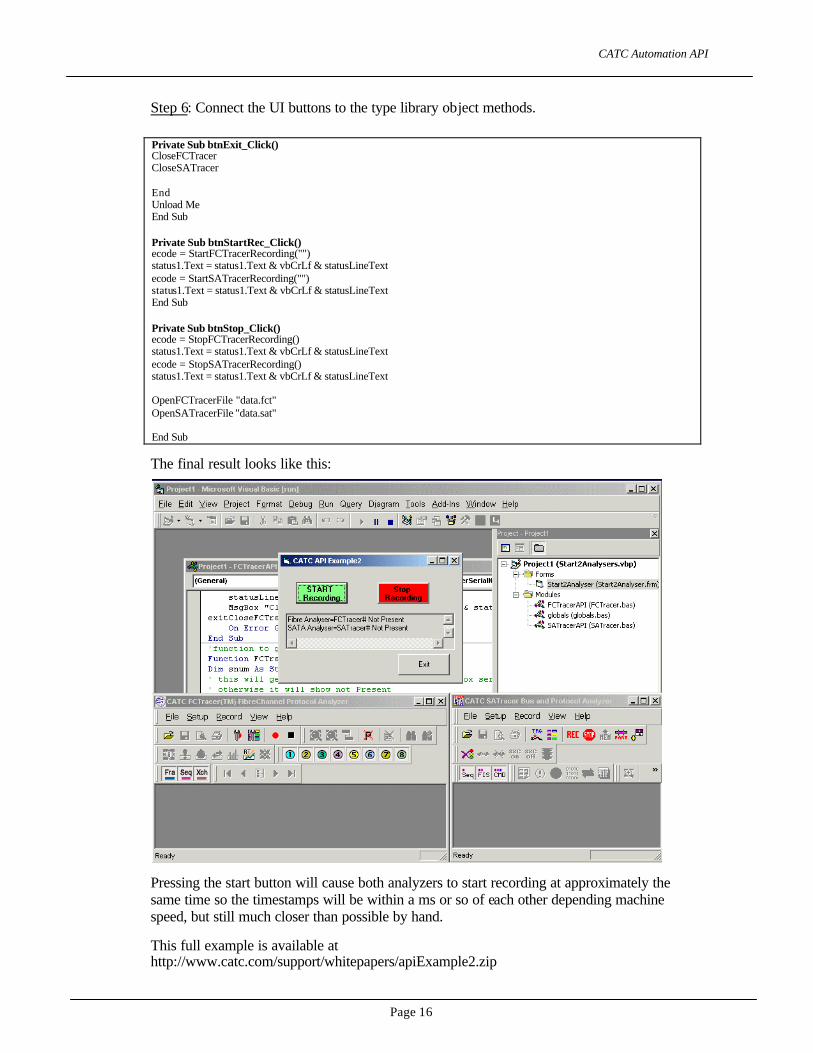
Step 6: Connect the UI buttons to the type library object methods.
Private Sub btnExit_Click() CloseFCTracer CloseSATracer End Unload Me End Sub Private Sub btnStartRec_Click() ecode = StartFCTracerRecording("") status1.Text = status1.Text & vbCrLf & statusLineText ecode = StartSATracerRecording("") status1.Text = status1.Text & vbCrLf & statusLineText End Sub Private Sub btnStop_Click() ecode = StopFCTracerRecording() status1.Text = status1.Text & vbCrLf & statusLineText ecode = StopSATracerRecording() status1.Text = status1.Text & vbCrLf & statusLineText OpenFCTracerFile "data.fct" OpenSATracerFile "data.sat" End Sub
The final result looks like this:
Pressing the start button will cause both analyzers to start recording at approximately the same time so the timestamps will be within a ms or so of each other depending machine speed, but still much closer than possible by hand.
This full example is available at http://www.catc.com/support/whitepapers/apiExample2.zip

CATC Automation API
Page 17
AUTOMATION EXAMPLE 3- DATA EXTRACTION In this example we will show part of the system for extracting and post processing data from a trace. This example is based around an example called MerlinsAudioCompanion. In this case we wish to extract specific information from a trace to then process externally. In this case to extract voice data from a trace and convert it into a wav file for playback.
The key API processes in this example are:
− load an already existing trace file
− Set the display options to show just the information we need
− export the file to an external file for post processing.
The key part of the program which calls the class library function in the wrapper module similar to the other examples is:
If (FileExists(cboSourceFile.Text)) Then lblSnum.Caption = "Opening Merlin Trace File" fhand = FileID(fileName(cboSourceFile.Text)) sDir = DirName(cboSourceFile.Text) rslt = OpenMerlinFile(cboSourceFile.Text) 'open .blt file in Merlin If rslt = 0 Then Show 'bring app back to the front ‘ if a displayoptions file is available use it, otherwise prompt user If frmOptions.AutoLoadSettings.Value = 1 Then rslt = ApplyMerlinDisplayOptions(App.Path + "\voiceext.opt") End If ' show manual dialog if needed If ((frmOptions.AutoLoadSettings.Value = 0) Or (rslt <> 0)) Then expandAudioDialog.Visible = True While expandAudioDialog.Visible = True ‘ wait while user adjust the display setting manually DoEvents Wend End If End If ‘set the output file name tbPacketFile.Text = FileID(cboSourceFile.Text) & ".txt" ‘extract the trace info as text ExtractMerlinFile tbPacketFile.Text, -1, -1 'extract to txt format ‘close the trace file display now we are finished CloseMerlinFile
This full example is available at:
http://www.catc.com/support/whitepapers/apiExample3.zip

Computer Access Technology Corporation
3385 Scott Boulevard
Santa Clara, CA 95054
408-727-6600
www.catc.com