“the black box” - welcome - roll-rite tarp systems and ... button black... · questions?...
TRANSCRIPT

Questions? Contact Customer Service @ 800-297-9905 Or
Parts Diagrams see “Parts and Diagrams” section on web at www.rollrite.com
Page 1 of 16
Roll Rite, LLC and its entire staff would like to not only Thank You but congratulate you on your purchase of one of what we feel to be the finest line of tarping systems in the industry.
“The Black Box” Push Button Control Box
RR Part # 101786

Questions? Contact Customer Service @ 800-297-9905 Or
Parts Diagrams see “Parts and Diagrams” section on web at www.rollrite.com
Page 2 of 16
In this booklet you will find:
INSTALLATION INSTRUCTIONS ......................................................................................................... 3
MOUNTING .................................................................................................................................................. 3 WIRING ....................................................................................................................................................... 3
Main Control Box and Motors ............................................................................................................ 3 Limit Switches ..................................................................................................................................... 5 Work Lights.......................................................................................................................................... 6
WIRING DIAGRAM ........................................................................................................................................ 7
OPERATING MANUAL ............................................................................................................................. 8
ON/OFF ..................................................................................................................................................... 8 WORK LIGHT ............................................................................................................................................... 8 PROGRAMMING MODES ................................................................................................................................ 8 CH1 AND CH2 ............................................................................................................................................ 8 CH3 AND CH4 ............................................................................................................................................ 9 CH5 AND CH6 ............................................................................................................................................ 9 LOCK OUT FEATURE: ................................................................................................................................... 9 PROGRAMMING ...........................................................................................................................................10
Limit Switch Programming ...............................................................................................................10 Application Programming .................................................................................................................11 Key fob Programming .......................................................................................................................11
ROLL-RITE “BLACK BOX” TROUBLESHOOTING ..............................................................................................12 LED Diagnostics, Unit @ Rest ..........................................................................................................12 LED Diagnostics, Unit in Operation .................................................................................................12 Fuse Replacement: ............................................................................................................................12
MAINTENANCE MANUAL ......................................................................................................................13
QUICK REFERENCE GUIDE - DETACH AND PUT IN TRUCK .....................................................15

Questions? Contact Customer Service @ 800-297-9905 Or
Parts Diagrams see “Parts and Diagrams” section on web at www.rollrite.com
Page 3 of 16
Installation Instructions
Mounting
1) Determination of wire size: measure from the power source to the desired control box location and from the control box to the motor furthest away from the control box.
If the total distance is 85’ or less, 6 gauge wire can be used. If so the control box must be mounted within 50’ of the power source.
If the total distance is greater than 85’, 4 gauge wire must be used. If so the control box must be mounted within 65’ of the battery.
2) Mount the control box.
Wiring
Main Control Box and Motors
1) Run 4 or 6 gauge wire (as determined above) from the power source to the control box.
2) Attach the wires to the positive/negative posts on the control box (see figure 1) using the supplied terminals and boots, DO NOT HOOK WIRE TO BATTERY AT THIS TIME.
Figure 1 - Connecting to Power

Questions? Contact Customer Service @ 800-297-9905 Or
Parts Diagrams see “Parts and Diagrams” section on web at www.rollrite.com
Page 4 of 16
3) Run 4 or 6 ga. wire (as determined before) from the first motor (usually the tarp motor) to circuit one on the control box (see figure 2). Attach both ends using provided terminals and protective boots.
Figure 2 - Connecting Output #1 to Motor
4) If applicable run 4 or 6 ga as determined above from the second device to be powered (usually the front hopper door motor or the valve to operate the tower in a detachable container application) to circuit 2 on the control box (see figure 3). Attach both ends using provided terminals and protective boots.
Figure 3 – Connecting Output #2 to 2nd Device

Questions? Contact Customer Service @ 800-297-9905 Or
Parts Diagrams see “Parts and Diagrams” section on web at www.rollrite.com
Page 5 of 16
5) If applicable run 4 or 6 ga as determined above from the third device to be powered (usually the rear hopper door motor or the valve to operate the sliding pivots in a detachable container application) to circuit 3 on the control box (see figure 4). Attach both ends using provided terminals and protective boots.
Figure 4 - Connecting Output #3 to 3rd Device
6) Fill all boots with Dielectric grease. This should be done monthly to maintain proper corrosion free connections.
7) Attach the positive and negative leads to the battery/power supply. Be sure to wire the 40A modified reset breaker as close to the battery as possible in the positive lead. Positive and Negative must be correct.
Limit Switches
If installing limit switches (typically only for the grain trailer hopper door application), see diagram on next page for basic detail – see the limit switch installation instructions that came with your kit for more details.

Questions? Contact Customer Service @ 800-297-9905 Or
Parts Diagrams see “Parts and Diagrams” section on web at www.rollrite.com
Page 6 of 16
Work Lights
This box is capable of powering LED work lights or up to two 60 watt Halogen lamps (15 amp circuit).
1) Using a ring terminal on the negative lead from the light and connect to the negative post on control box (see figure 5).
2) Remove the rubber cover from the spade terminal indicated in figure 5. Crimp the provided female spade to the positive switch lead from the light to and connect to the spade terminal.
3) Grease all connections! If the rubber spade terminal cover was removed from the additional spades, please reinstall the cover on the open spades.
Figure 5 - Connecting Work Lights
* Spade indicated by the dashed line arrow is only used in applications where the box is activating an electronic valve on a hydraulic pump.

Questions? Contact Customer Service @ 800-297-9905 Or
Parts Diagrams see “Parts and Diagrams” section on web at www.rollrite.com
Page 7 of 16
Wiring Diagram
CLOSE
OPENOPEN
CLOSE
NEG
PO
ST
NEG
PO
ST
NEG
PO
ST
NEG
PO
ST
TRAP DOOR (MOTOR 3)
CH 5
CH 6CH 4
CH 3
(FLIP DIP SWITCHES 9 & 10)
FOR TRAP DOOR (MOTOR 3)
LIMIT SWITCHES
(FLIP DIP SWITCHES 7 & 8)
FOR TRAP DOOR (MOTOR 2)
LIMIT SWITCHES
FOR UP TO 3 MOTORS
6 GA WIRE
6 GA WIRE
TRAP DOOR (MOTOR 2)
6 GA WIRE
6 GA WIRE
BLACK BOXWIRING DIAGRAM
BLACK BOX SIDE 2
40 AMP MODIFIED
6 G
A.
WIR
E
PART# 17941
+
12V BATTERY
RESET BREAKER
-
6 G
A.
WIR
E
BLACK BOX SIDE 1
TARP (MOTOR 1)

Questions? Contact Customer Service @ 800-297-9905 Or
Parts Diagrams see “Parts and Diagrams” section on web at www.rollrite.com
Page 8 of 16
Operating Manual
Figure 6 - Control Box Functions
Figure 7 - Remote
Functions
ON/OFF – To turn the control box on or off, press CH1 and CH2
simultaneously for 2 seconds. This can be done from the box itself (see figure 6) or from the key fob (see figure 7) by pressing buttons I & II simultaneously.
Work Light – If your system is equipped with work lights, press the Work
Light button or Buttons III & IV on the key fob at the same time to turn them on or off. THIS IS NOT THE ON/OFF BUTTON FOR THE CONTROL BOX!
Programming Modes – Your black control box and remotes come
preprogrammed! Do not attempt to enter the programming modes unless you are turning the limit switch features on or you have to reprogram the box to add or re-learn remote key fobs.
o Limit switch programming: press and release the work light button 6 times within 6 seconds to enter limit switch programming mode (see the Limit Switch Programming section below for details).
o Remote key fob programming: press and hold the work light button for 6 seconds to enter the remote learning mode (see the Key fob reprogramming section below for details).
CH1 and CH2 – control buttons for output #1 on the control box (typically
connected to the tarp motor). These two buttons correspond to buttons I and II respectively on the remote key fob. Pressing these two buttons at the same time and holding for 2 seconds will turn the control box on and off.
ON /
OFF
ON /
OFF

Questions? Contact Customer Service @ 800-297-9905 Or
Parts Diagrams see “Parts and Diagrams” section on web at www.rollrite.com
Page 9 of 16
CH3 and CH4 – control buttons for output #2 on the control box (typically
connected to hopper door or tower up/down). These two buttons correspond to buttons III and IV respectively on the remote key fob. Press and release these two buttons at the same time on the key fob to operate the work light from the remote.
CH5 and CH6 – control buttons for output #3 on the control box (typically
connected to hopper door or sliding pivots). These two buttons correspond to buttons V and VI respectively on the remote key fob.
Lock Out Feature:
The control box incorporates a safety feature to shut off automatically after 6 minutes* of inactivity. Press buttons 1 & 2 simultaneously on the box or remote for two seconds (as described above) to power the unit back up.
To lock the box down manually (shut off), press 1 & 2 simultaneously on the box or remote for two seconds as described above.
*Boxes produced after 8-10-09 may have programmable time out feature. To adjust the time delay before automatic shut off:
1) Turn the box on
2) Press and release the work light button 6 times, wait until the light stops
flashing press the work light button again, the LED will flash once, press the work light button a final time, LED will flash once – you are now in the program mode you need to be in to adjust the automatic shut down time.
3) Reference figure 8 below, # indicated on the button represents minutes until the box automatically shuts down. “0” means it will not shut down automatically.
4) After selecting shut down time wait for the LED to return to green. Programming complete.
Figure 8
2 6 10
0 4 8

Questions? Contact Customer Service @ 800-297-9905 Or
Parts Diagrams see “Parts and Diagrams” section on web at www.rollrite.com
Page 10 of 16
Programming
Limit Switch Programming – This section typically only applies to grain trailer hopper door power kit installations. In not using limit switches, all channels should be turned off (see steps below). The control box is capable of utilizing 6 limit switches, one to limit travel of the three motors in each direction. Once limit switches are installed (see limit switch installation instructions) you have to program the box so that it knows they are there. Please read the following steps and then proceed.
Figure 9 - Limit Switch Programming
1) Confirm that the box is turned on (the status LED should be green). 2) Press and release the work light button 6 times within 6 seconds (see fig.
9 above) – The green LED will flash 3 times and then change to Red. 3) Press and release the channel button corresponding to each limit switch
that needs to be activated (see table below). The red LED will flash once to confirm that the limit switch function is activated. Pressing it a second time will turn the limit switch function back off. The red LED will flash twice to indicate that the function is turned off.
4) Wait 8 seconds for the box to exit programming mode – the LED will turn green.
Table 1 – Limit Switch Programming
Output Button Function Spade Terminal / Corresponding Channel
Motor #1
CH1 Open
CH2 Close
Motor #2
CH3 Open
CH4 Close
Motor #3
CH5 Open
CH6 Close
CH1 CH3 CH5
CH2 CH4 CH6
Press &
Release 6
times
Questions? Contact Customer Service @ 800-297-9905 Or
Parts Diagrams see “Parts and Diagrams” section on web at www.rollrite.com
Page 11 of 16
Application Programming – This section is for reference only. All boxes
come preprogrammed for the application. See the application table below for channel settings.
Application CH 1 CH 2 CH 3 CH 4 CH 5 CH 6
Construction/Ag Off On Off Off Off Off
Waste Off On Off On Off Off
1) Confirm that the box is turned on (the status LED should be green).
2) Press and release the work light button 6 times within 6 seconds – The green LED will flash 3 times and then change to Red.
3) Press and release the work light button one additional time – The LED will flash red and change again to Solid Red.
4) Press and release each channel button to verify the correct setting for each (see table above for application specific channel settings). The LED will flash green once to confirm that the setting is turned on or it will flash green twice to indicate that the setting is turned off.
5) Wait 8 seconds for the box to exit programming mode – the LED will turn green.
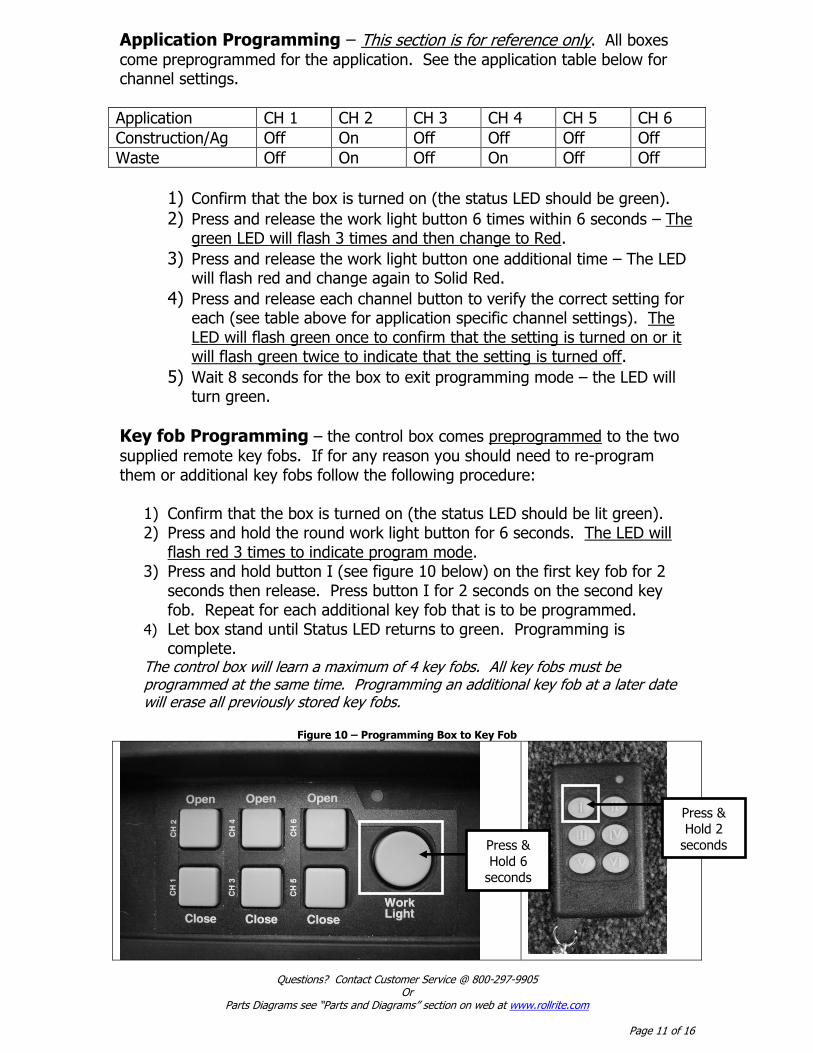
Key fob Programming – the control box comes preprogrammed to the two
supplied remote key fobs. If for any reason you should need to re-program them or additional key fobs follow the following procedure:
1) Confirm that the box is turned on (the status LED should be lit green). 2) Press and hold the round work light button for 6 seconds. The LED will
flash red 3 times to indicate program mode. 3) Press and hold button I (see figure 10 below) on the first key fob for 2
seconds then release. Press button I for 2 seconds on the second key fob. Repeat for each additional key fob that is to be programmed.
4) Let box stand until Status LED returns to green. Programming is complete.
The control box will learn a maximum of 4 key fobs. All key fobs must be programmed at the same time. Programming an additional key fob at a later date will erase all previously stored key fobs.
Figure 10 – Programming Box to Key Fob
Press & Hold 2
seconds Press &
Hold 6
seconds

Questions? Contact Customer Service @ 800-297-9905 Or
Parts Diagrams see “Parts and Diagrams” section on web at www.rollrite.com
Page 12 of 16
Roll-Rite “Black Box” Troubleshooting
LED Diagnostics, Unit @ Rest
No Light --------- No Power or box is locked out (see Lock out feature) Green Continuous Everything is OK
Green Single Blink Low Battery Warning. Recharge your Battery soon Green Double Blink Battery is nearly dead and must be recharged
before unit will operation
Yellow Continuous Fuse 1 (5 Amp – see fig. 10) is Blown Yellow Single Blink Fuse 2 (10 Amp – see fig. 10) is Blown
Yellow Double Blink Fuse 3 (15 Amp – see fig. 10) is Blown Yellow Triple Blink Fuse 4 (15 Amp – see fig 10) is Blown
Red Continuous Unit is in Program Mode
LED Diagnostics, Unit in Operation
Red Continuous Confirms it is in operation
Red Single Blink Low Battery warning. Recharge soon Red Double Blink Battery is nearly dead – unit will not operate until
charged
Fuse Replacement:
1) Using the codes above to diagnose which fuse is blown
2) Remove the 10 bolts that hold the lid in place 3) Carefully lift lid and unplug switch leads
4) Do not touch circuit board any more than necessary
5) Carefully locate (see Fig. 11) & remove the blown fuse and replace it with a fuse that is the same size
6) Replace the lid a. Plug switch leads in
b. Arrange so that they will not be pinched as lid is replaced
c. Insure that gasket is in place in groove in lid d. Press lid back into place and replace 10 lid bolts
e. Tighten lid bolts in a star pattern to insure lid tightens evenly
Figure 11 – Fuse Replacement
Fuse 1
Fuse 2
Fuse 3
Fuse 4

Questions? Contact Customer Service @ 800-297-9905 Or
Parts Diagrams see “Parts and Diagrams” section on web at www.rollrite.com
Page 13 of 16
Maintenance Manual
Roll Rite, LLC designs its tarping systems and power kits to be as maintenance free as possible, contributing to the overall value of the product. Maintenance intervals vary based on environmental conditions. Roll Rite, LLC recommends that:
- All electrical connections should be cleaned and greased regularly to prevent corrosion (fill all electrical boots, limit switch boots, etc. with dielectric grease). Electrical connections can be found at all motors, switches, contactors, limit switches, control boxes and batteries.
- All bearings with grease fittings and tower legs must be greased regularly.
- Check and tension all set screws. Set screws should be tightened until they touch and then torque them ¾ of a revolution beyond that.
- Check motor mounting bolts and torque to 70 in-lbs (5.8 ft-lbs). - All mounting hardware should be checked to insure all system
components are securely fastened. - Visually inspect all moving parts for abnormal or excessive
wear.

Questions? Contact Customer Service @ 800-297-9905 Or
Parts Diagrams see “Parts and Diagrams” section on web at www.rollrite.com
Page 14 of 16

Questions? Contact Customer Service @ 800-297-9905 Or
Parts Diagrams see “Parts and Diagrams” section on web at www.rollrite.com
Page 15 of 16
Quick Reference Guide - Detach and Put in truck Black Box Operation: ON/OFF – To turn the control box on or off, press CH1 and CH2
simultaneously for 2 seconds. This can be done from the box itself (see figure 6) or from the key fob (see figure 7) by pressing buttons I & II simultaneously.
Work Light – If your system is equipped with work lights, turn the control box on and then press the Work Light button or button III & IV at the same time to turn them on or off. THIS IS NOT THE ON/OFF BUTTON FOR THE CONTROL BOX!
CH1 and CH2 – control buttons for output #1 on the control box (typically connected to the tarp motor). These two buttons correspond to buttons I and II respectively on the remote key fob. Pressing these two buttons at the same time and holding for 2 seconds will turn the control box on and off.
CH3 and CH4 – control buttons for output #2 on the control box (typically connected to hopper door or tower up/down). These two buttons correspond to buttons III and IV respectively on the remote key fob. Press and release these two buttons at the same time on the key fob to operate the work light from the remote.
CH5 and CH6 – control buttons for output #3 on the control box (typically connected to hopper door or sliding pivots). These two buttons correspond to buttons V and VI respectively on the remote key fob.
Lock Out Feature:
The control box incorporates a safety feature to shut off automatically after 6 minutes of inactivity (this is programmable – see “Lock Out Feature” section in your operating instructions). Press buttons 1 & 2 simultaneously on the box or remote for two seconds (as described above) to power the unit back up.
To lock the box down manually (shut off), press 1 & 2 simultaneously on the box or remote for two seconds as described above.
If you have any issues please call Roll Rite – 800-297-9905

Questions? Contact Customer Service @ 800-297-9905 Or
Parts Diagrams see “Parts and Diagrams” section on web at www.rollrite.com
Page 16 of 16
Once Again Roll Rite, LLC would like to Thank You for your business and offer you not only the finest product in our industry, but the best customer service as well. We would like to invite you to visit our web site at www.rollrite.com , where you can find a complete set of parts diagrams. Additionally we would love to hear from you if you have any questions or issues: Phone - 800-297-9905 Fax – 888 TARP FAX (888-827-7329) E-mail – [email protected]