the big pig · 2020-03-11 · big pig you’ll love your pig big pig. the ozpig story the ozpig is...
TRANSCRIPT
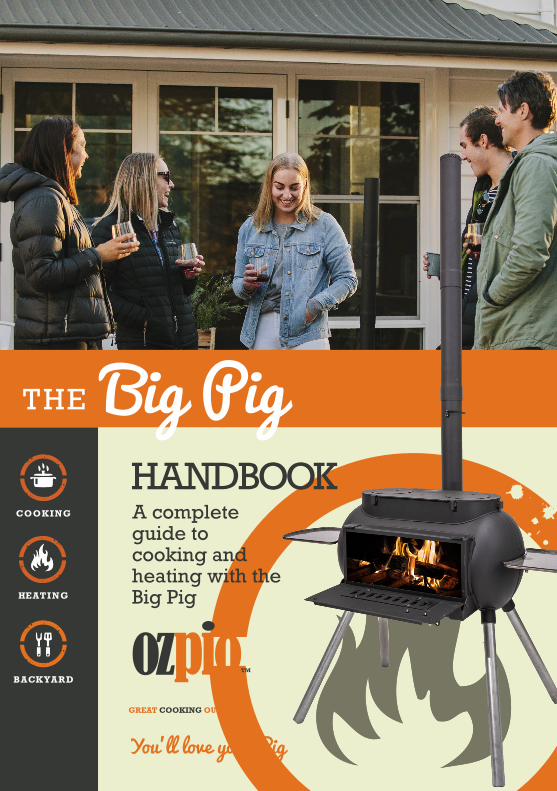
HANDBOOK
THE
A complete guide to cooking and heating with the Big Pig
You’ll love your Pig
Big Pig

The Ozpig StoryThe Ozpig is a true blue Aussie invention, created by the Shepherd family and their love for the great outdoors. Hearty appetites and a passion for travel led to the creation of the Ozpig. A portable, multipurpose cooker that boasts endless cooking options, as well as open-fire ambience and portable heating.
After listening to our customers, we’ve developed the ultimate Ozpig stove for home use. With three times the heat volume, a much larger fire door and dual zone cooking, the Big Pig is here to take on the backyard BBQ itself.
Named after its solid design and squat shape, the Big Pig is robust, ingenious and versatile. The raised, off-ground design means it can be used in a number of spaces, where you wouldn’t normally put an open fire or fire pit.
Mounted on strong, sturdy legs the Big Pig lets you cook up a storm without bending over a fire pit or grill, while the generous chimney directs smoke away from the action. The Big Pig is so much more flexible than your average backyard BBQ, capable of anything your indoor stove is. This allows you to enjoy baking, chargrilling, deep frying, wok cooking, rotisserie roasting and even camp oven cooking. The greatest part about any Ozpig stove, is the amazing wood fired flavour infused with everything you cook.
Fire up the fuel efficient Big Pig using your choice of fuel including timber, heat beads or volcanic rock. Thanks to its Australian heritage, the Big Pig has been built tough to withstand the harshest conditions with very little maintenance required. There’s a good chance your Ozpig will outlast you!
Ozpig remains a family-owned company proudly based in Queensland, Australia.
What’s In The Box? 3 Ozpig Components 4 Get Your Ozpig Firing 5-8 Receipes 9-20 Getting To Know Your Pig 22 Oven Smoker & Accesories 23 Caring For Your Pig 25 Warranty Information 27 Saftey & Maintenance 29
Contents

Your new Ozpig: What’s in the box. Setting up
your Ozpig1 x Steel Body
1 x Stove Plate
4 x Screw in Legs
2 x Fire Grates
3 x Chimney Sections
2 x Cooking Port Plates
2 x Warming Plates
1 x Lifting Tool(Wood poker & plate lift handle)
When you first take your Ozpig from its box, please ensure you have removed all items before discarding the packaging properly. Remove each item from the barrel of the Ozpig.
Simply start assembling your Ozpig from the bottom up, by screwing in the legs on the front. Lean the Ozpig over on those legs and repeat.
Next, place the 3 chimney pieces on top of the chimney stub at the back of the Ozpig. Remember to place the spark arrestor on top of the top chimney piece to contain embers. Ensure that you fit the chimney piece with baffle first.
Place the two Fire Grates into the belly of the Ozpig, so that they sit on the horizontal supports within.
Next, place your side plates on the left and right sockets of your Ozpig. Ensure the pins on the bottom are fully inserted.
Finally, place your stove plate and cooking port plates on top of the unit.
Please visit ozpig.com.au to see the full range of additional Ozpig
accessories available for purchase.
Ozpig Components
Spark Arrestor To prevent sparks and embers escaping
Chimney Sections 3x chimney pieces that fit together and into the stub at the back of the Ozpig. Note that the baffled chimney piece MUST be fitted at the base.
Steel Cooker Body Strong and durable 3mm pressed steel
Door Strong hinge enabling fully open or closed positions. (Leave your door open when in use)
Zinc Coated Legs 4 x standard legs screw in legs for exscellent stability
True Open Fire Stove With dual zone cooking surfaces
Mesh Floor Fire Grate
1 x Spark Arrestor(this fits to the top of the chimney when assembled)
6
04
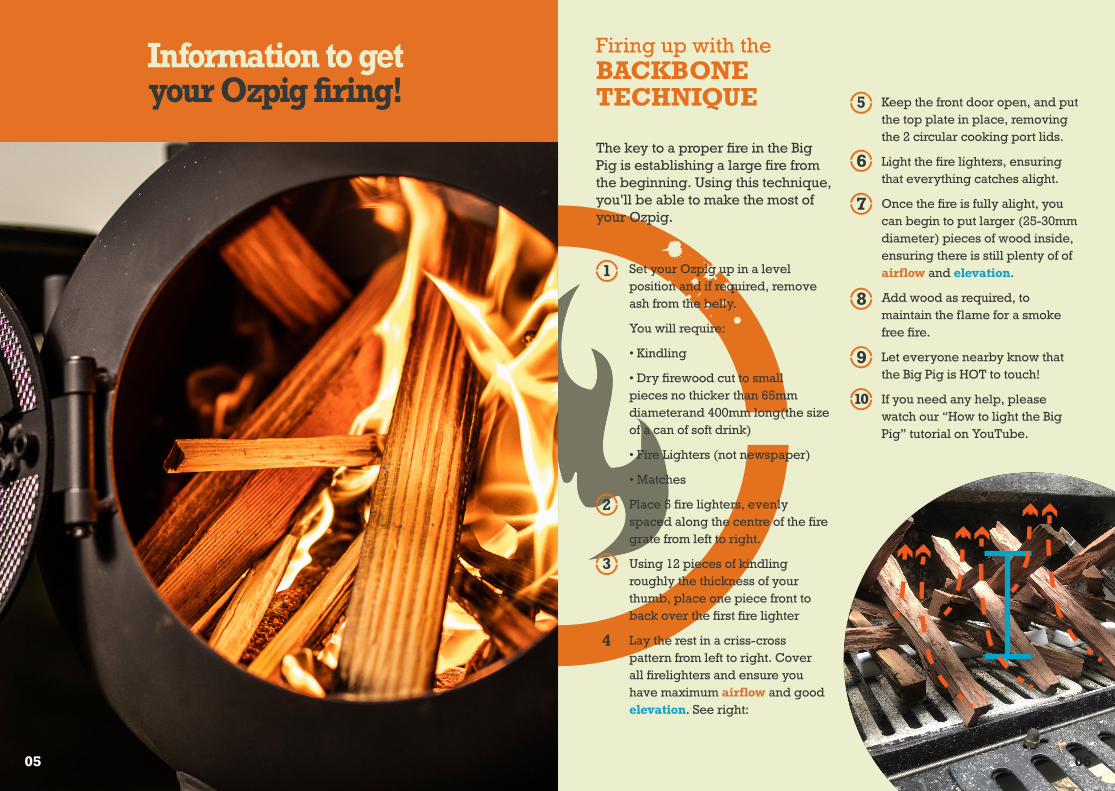
Information to getyour Ozpig firing!
Set your Ozpig up in a level position and if required, remove ash from the belly.
You will require:
• Kindling
• Dry firewood cut to small pieces no thicker than 65mm diameterand 400mm long(the size of a can of soft drink)
• Fire Lighters (not newspaper)
• Matches
Place 5 fire lighters, evenly spaced along the centre of the fire grate from left to right.
Using 12 pieces of kindling roughly the thickness of your thumb, place one piece front to back over the first fire lighter
Lay the rest in a criss-cross pattern from left to right. Cover all firelighters and ensure you have maximum airflow and good elevation. See right:
6
7
8
9
10
Keep the front door open, and put the top plate in place, removing the 2 circular cooking port lids.
Light the fire lighters, ensuring that everything catches alight.
Once the fire is fully alight, you can begin to put larger (25-30mm diameter) pieces of wood inside, ensuring there is still plenty of of airflow and elevation.
Add wood as required, to maintain the flame for a smoke free fire.
Let everyone nearby know that the Big Pig is HOT to touch!
If you need any help, please watch our “How to light the Big Pig” tutorial on YouTube.
Firing up with the BACKBONE TECHNIQUE
The key to a proper fire in the Big Pig is establishing a large fire from the beginning. Using this technique, you’ll be able to make the most of your Ozpig.
0605
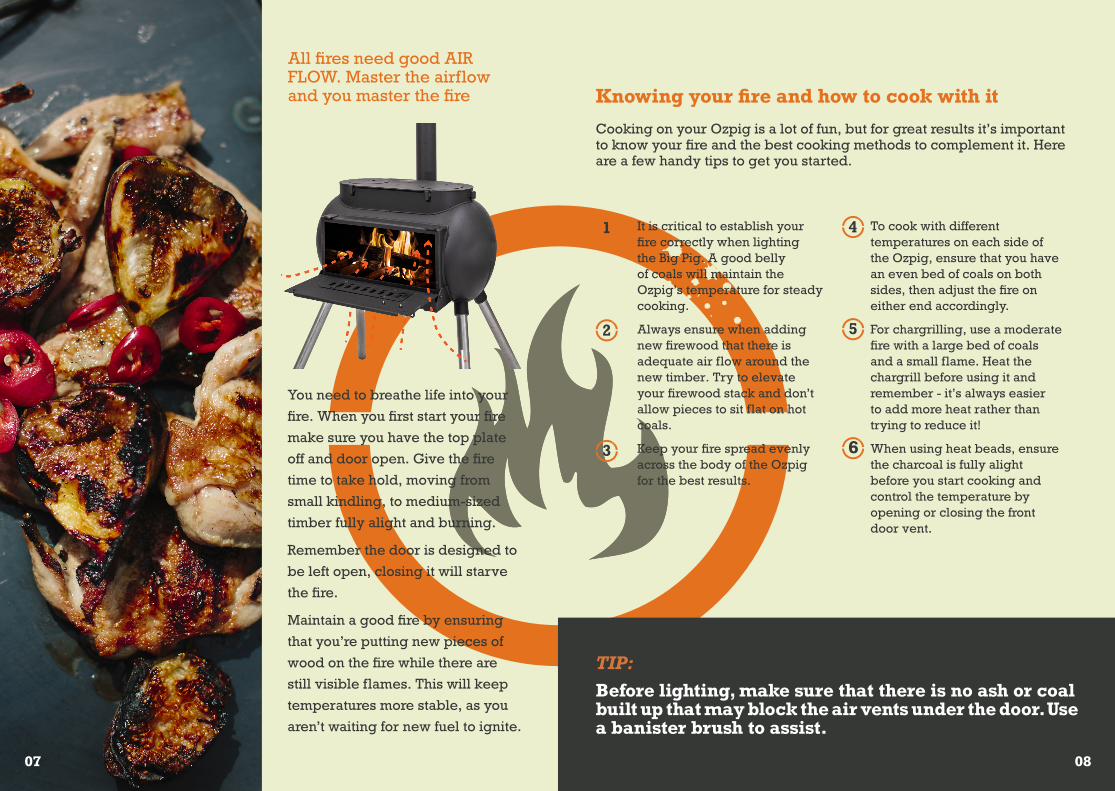
All fires need good AIR FLOW. Master the airflow and you master the fire
You need to breathe life into your
fire. When you first start your fire
make sure you have the top plate
off and door open. Give the fire
time to take hold, moving from
small kindling, to medium-sized
timber fully alight and burning.
Remember the door is designed to
be left open, closing it will starve
the fire.
Maintain a good fire by ensuring
that you’re putting new pieces of
wood on the fire while there are
still visible flames. This will keep
temperatures more stable, as you
aren’t waiting for new fuel to ignite.
6
Knowing your fire and how to cook with it
Cooking on your Ozpig is a lot of fun, but for great results it’s important to know your fire and the best cooking methods to complement it. Here are a few handy tips to get you started.
It is critical to establish your fire correctly when lighting the Big Pig. A good belly of coals will maintain the Ozpig’s temperature for steady cooking.
Always ensure when adding new firewood that there is adequate air flow around the new timber. Try to elevate your firewood stack and don’t allow pieces to sit flat on hot coals.
Keep your fire spread evenly across the body of the Ozpig for the best results.
TIP:
Before lighting, make sure that there is no ash or coal built up that may block the air vents under the door. Use a banister brush to assist.
To cook with different temperatures on each side of the Ozpig, ensure that you have an even bed of coals on both sides, then adjust the fire on either end accordingly.
For chargrilling, use a moderate fire with a large bed of coals and a small flame. Heat the chargrill before using it and remember - it’s always easier to add more heat rather than trying to reduce it!
When using heat beads, ensure the charcoal is fully alight before you start cooking and control the temperature by opening or closing the front door vent.
07 08

Wok Cooking
BUSH DOUGHNUTS
METHODTake a few slices of bread with crusts removed and spread with a generous amount of jam.
Cut each slice diagonally in half then fold each triangle over to create 2 smaller triangles.
Mix up a batter by combining egg, sugar, flour and milk in a bowl and mixing well.
Dip each doughnut into the batter and deep fry in boiling oil in the wok until golden brown.
Drain for a minute then roll in cinnamon and sugar.
INGREDIENTS:• 1 egg• ¼ cup Caster sugar• 1 cup S\R flour• ¾ cup milk• Bread• Strawberry jam• Cinnamon and sugar
Great quick and easy dessert that kids absolutely love. Perfect on their own or served with a scoop of ice cream, custard or some whipped cream.
TIPSThe wok is one of the most versatile pieces of Ozpig cooking gear you’ll own.
Not only is it great to place over the fire to reach sizzling hot temperatures perfect for creating a traditional Asian stir-fry but there are many other uses as well.
The wok flipped upside down over the grill or BBQ plate will trap in the heat creating a mini oven which can bake pizzas, biscuits, scones etc or just simply aid in cooking thicker cuts of meat. Just be sure to leave a slight gap between the top of the Ozpig and the BBQ plate to allow the heat to get in under the wok.
It can be used as a saucepan to cook pasta or boil veggies which means one less thing to carry in your camping kit.
Deep or shallow frying is a breeze with the wok, the thinner metal with a hot Ozpig fire brings oil to a simmer very quickly and holds it there extremely well.
Try placing a few inches of water in he wok and bringing it to a simmer before popping your bamboo steamer basket on to perfectly cook some delightful steamed Asian dim sims or dumplings.
Bush Doughnuts
Recipes
1
2
3
4
5
1009
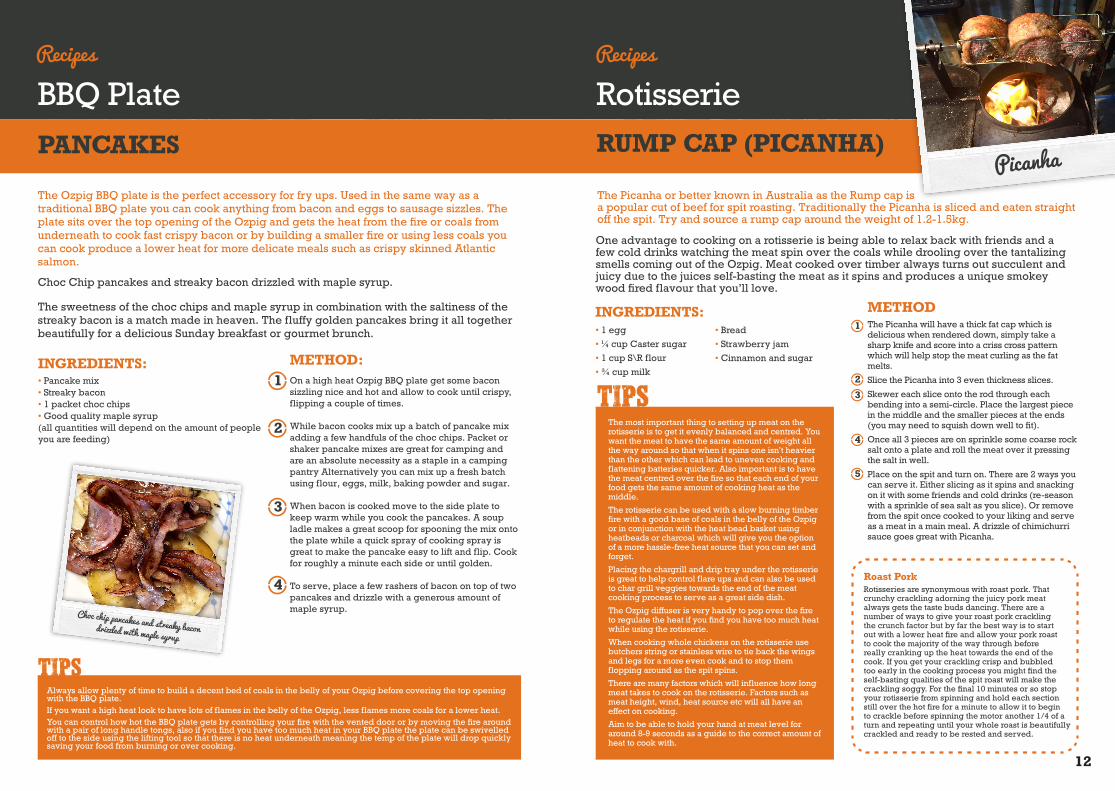
BBQ Plate RotisseriePANCAKES RUMP CAP (PICANHA)
METHODThe Picanha will have a thick fat cap which is delicious when rendered down, simply take a sharp knife and score into a criss cross pattern which will help stop the meat curling as the fat melts.
Slice the Picanha into 3 even thickness slices.
Skewer each slice onto the rod through each bending into a semi-circle. Place the largest piece in the middle and the smaller pieces at the ends (you may need to squish down well to fit).
Once all 3 pieces are on sprinkle some coarse rock salt onto a plate and roll the meat over it pressing the salt in well.
Place on the spit and turn on. There are 2 ways you can serve it. Either slicing as it spins and snacking on it with some friends and cold drinks (re-season with a sprinkle of sea salt as you slice). Or remove from the spit once cooked to your liking and serve as a meat in a main meal. A drizzle of chimichurri sauce goes great with Picanha.
INGREDIENTS:• 1 egg• ¼ cup Caster sugar• 1 cup S\R flour• ¾ cup milk
The Ozpig BBQ plate is the perfect accessory for fry ups. Used in the same way as a traditional BBQ plate you can cook anything from bacon and eggs to sausage sizzles. The plate sits over the top opening of the Ozpig and gets the heat from the fire or coals from underneath to cook fast crispy bacon or by building a smaller fire or using less coals you can cook produce a lower heat for more delicate meals such as crispy skinned Atlantic salmon.
The Picanha or better known in Australia as the Rump cap is a popular cut of beef for spit roasting. Traditionally the Picanha is sliced and eaten straight off the spit. Try and source a rump cap around the weight of 1.2-1.5kg.
Choc Chip pancakes and streaky bacon drizzled with maple syrup.
The sweetness of the choc chips and maple syrup in combination with the saltiness of the streaky bacon is a match made in heaven. The fluffy golden pancakes bring it all together beautifully for a delicious Sunday breakfast or gourmet brunch.
One advantage to cooking on a rotisserie is being able to relax back with friends and a few cold drinks watching the meat spin over the coals while drooling over the tantalizing smells coming out of the Ozpig. Meat cooked over timber always turns out succulent and juicy due to the juices self-basting the meat as it spins and produces a unique smokey wood fired flavour that you’ll love.
TIPS
TIPSThe most important thing to setting up meat on the rotisserie is to get it evenly balanced and centred. You want the meat to have the same amount of weight all the way around so that when it spins one isn’t heavier than the other which can lead to uneven cooking and flattening batteries quicker. Also important is to have the meat centred over the fire so that each end of your food gets the same amount of cooking heat as the middle.
The rotisserie can be used with a slow burning timber fire with a good base of coals in the belly of the Ozpig or in conjunction with the heat bead basket using heatbeads or charcoal which will give you the option of a more hassle-free heat source that you can set and forget.
Placing the chargrill and drip tray under the rotisserie is great to help control flare ups and can also be used to char grill veggies towards the end of the meat cooking process to serve as a great side dish.
The Ozpig diffuser is very handy to pop over the fire to regulate the heat if you find you have too much heat while using the rotisserie.
When cooking whole chickens on the rotisserie use butchers string or stainless wire to tie back the wings and legs for a more even cook and to stop them flopping around as the spit spins.
There are many factors which will influence how long meat takes to cook on the rotisserie. Factors such as meat height, wind, heat source etc will all have an effect on cooking.
Aim to be able to hold your hand at meat level for around 8-9 seconds as a guide to the correct amount of heat to cook with.
Recipes Recipes
1
2
3
4
5
INGREDIENTS:• Pancake mix• Streaky bacon• 1 packet choc chips• Good quality maple syrup(all quantities will depend on the amount of people you are feeding)
METHOD:On a high heat Ozpig BBQ plate get some bacon sizzling nice and hot and allow to cook until crispy, flipping a couple of times.
While bacon cooks mix up a batch of pancake mix adding a few handfuls of the choc chips. Packet or shaker pancake mixes are great for camping and are an absolute necessity as a staple in a camping pantry Alternatively you can mix up a fresh batch using flour, eggs, milk, baking powder and sugar.
When bacon is cooked move to the side plate to keep warm while you cook the pancakes. A soup ladle makes a great scoop for spooning the mix onto the plate while a quick spray of cooking spray is great to make the pancake easy to lift and flip. Cook for roughly a minute each side or until golden.
To serve, place a few rashers of bacon on top of two pancakes and drizzle with a generous amount of maple syrup.
Choc chip pancakes and streaky bacon drizzled with maple syrup
1
2
3
4
Always allow plenty of time to build a decent bed of coals in the belly of your Ozpig before covering the top opening with the BBQ plate.If you want a high heat look to have lots of flames in the belly of the Ozpig, less flames more coals for a lower heat.You can control how hot the BBQ plate gets by controlling your fire with the vented door or by moving the fire around with a pair of long handle tongs, also if you find you have too much heat in your BBQ plate the plate can be swivelled off to the side using the lifting tool so that there is no heat underneath meaning the temp of the plate will drop quickly saving your food from burning or over cooking.
Roast PorkRotisseries are synonymous with roast pork. That crunchy crackling adorning the juicy pork meat always gets the taste buds dancing. There are a number of ways to give your roast pork crackling the crunch factor but by far the best way is to start out with a lower heat fire and allow your pork roast to cook the majority of the way through before really cranking up the heat towards the end of the cook. If you get your crackling crisp and bubbled too early in the cooking process you might find the self-basting qualities of the spit roast will make the crackling soggy. For the final 10 minutes or so stop your rotisserie from spinning and hold each section still over the hot fire for a minute to allow it to begin to crackle before spinning the motor another 1/4 of a turn and repeating until your whole roast is beautifully crackled and ready to be rested and served.
• Bread• Strawberry jam• Cinnamon and sugar
Picanha
12
Camp OvenBEEF AND RED WINE CASSEROLE
The camp oven is a wonderful cooking apparatus, just as the name says it works just like an oven. In fact, anything you can cook in an oven at home in your kitchen you can cook in a camp oven. Some consider camp oven cooking a way of life and most agree that food cooked in a camp oven has a unique mouth-watering flavour and tastes better than anything cooked in a traditional oven. The biggest challenge with camp oven cooking as with all Ozpig cooking is heat control, once you master that the only limiting factor in what you can cook will be the size of your oven. Thankfully the Ozpig has several amazing features that help with heat control. The vented door, the side plates and heat diffuser all work together to make controlling your camp oven heat a breeze. Using a camp oven, you can Roast, bake, slow cook, fry, simmer, stew and lots more.
Recipes don’t get much easier than this stew. Perfect for a cold winters night. Brown the meat, throw everything else in the camp oven and let it all simmer. Stick it on the side plate all arvo while you play with the kids or catch some fish at camping. Very relaxing way to cook and it’s great to smell the fragrance of the casserole drift across your campsite. One important thing is to not leave out the soft vegetables such as pumpkin and sweet potato as it is what thickens up the stew from the long slow cooking which makes them break right down, so you don’t get the gluggy style sauce a lot of stews have if thickened with flour.
Recipes
INGREDIENTS:• 1.5kg diced beef• 2 diced onion• 2 chunky cut carrots• 1/4 diced pumpkin• 1 large diced sweet potato• 2 or 3 diced potatoes• Handful of fresh chopped parsley• 2 bay leaves• Half bottle red wine• 2 tablespoons tomato paste• Juice of half a lemon• 1 cup beef stock
METHOD:Brown the beef in some hot oil in a camp oven then add the onions and cook for a minute or two.
Throw in everything else except the potatoes and parsley then give a good stir to combine everything well.
Allow to simmer very slowly on the side plate giving it a bit of a stir every so often. Cook until the meat is extremely tender, and the sweet potato and pumpkin has broken down and thickened up the stew.
Throw in the diced potatoes 15-20 minutes before stew is done.
Stir in the parsley and serve in a bowl on its own or with rice or bread. Why not drag out the Rome industries bread stick maker and make some piping hot breadsticks?
Roast/BakeWith this method you will be able to make roast meats and roast vegetables, cakes, breads and dampers or anything else you would cook sitting on a baking tray in your kitchen oven. The main thing to remember is that to roast or bake you want to have an even heat all round the food. To achieve this you will use the heat from the Ozpig belly from below as well as heat from the top by placing coals or heatbeads on the lid of the camp oven. This will not only cook your food evenly, but it will achieve the desired browning on the top of bread and roasts. A great accessory to buy from your favourite camping shop is a trivet, which is basically a rack or stand that sits in the bottom of your camp oven to lift your food off the searing heat of the oven bottom. This will help preventing your food from burning.
Wet DishesWet dishes such as stews, curries, soups etc are probably the easiest cooking method in a camp oven. You will only require a gentle heat from the bottom to keep a simmer going. The heat diffuser is perfect to pop underneath the camp oven to cut the heat back to achieve that gentle simmer. There are times when you could put some heat on the top for example after adding dumplings to s stew. Camp ovens are great to take tough fatty cuts of meat such as chuck beef and turn them into tender melt in the mouth morsels in a curry or casserole. The trick to breaking down tough cuts is to cook for a longer period of time with extremely gentle heat. In this case this is where the side plates are worth their weight in gold. Once you get your stew simmering take your camp oven off the top of the Ozpig and place it on the side plate as close to the body of the Ozpig as possible preferably touching to transfer the heat into the oven. Keep the fire burning and rotate the oven and you will be able to slow cook your meal for hours until your meat is melting in the mouth tender.
Using these different heat placement methods and with a bit of practice and confidence you can create the perfect kind and level needed to cook absolutely anything in a camp oven.
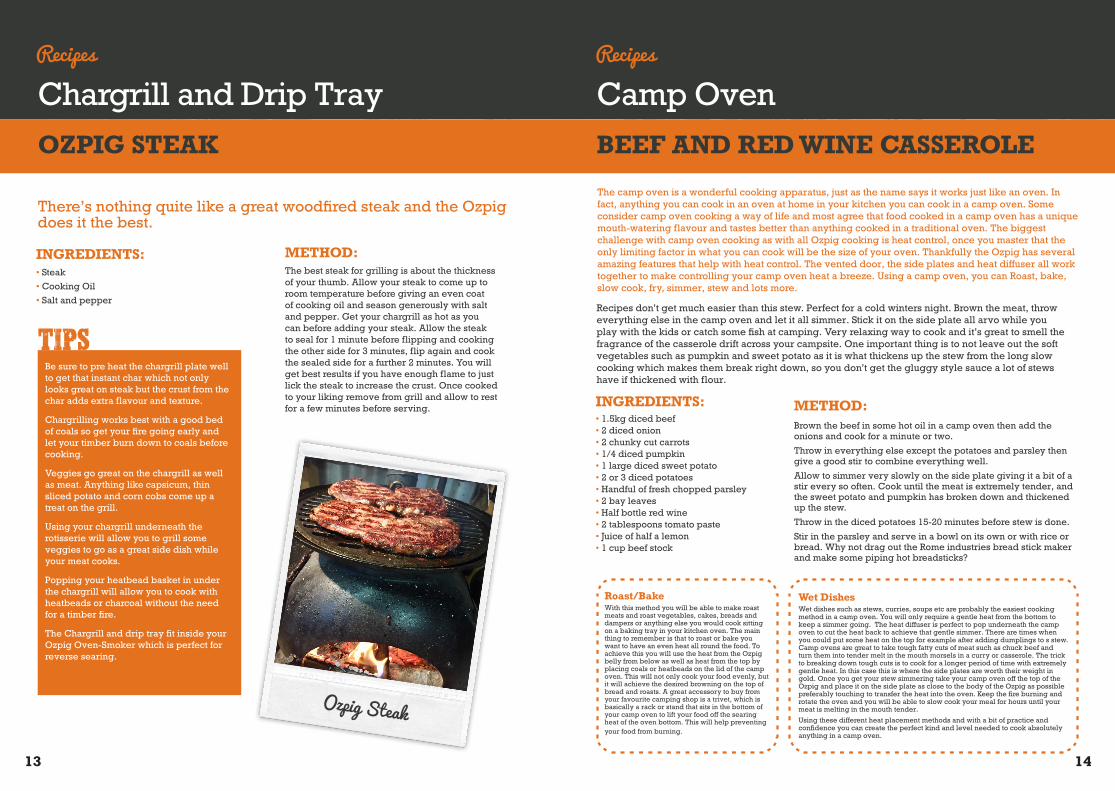
Chargrill and Drip TrayOZPIG STEAK
INGREDIENTS:• Steak• Cooking Oil• Salt and pepper
There’s nothing quite like a great woodfired steak and the Ozpig does it the best.
METHOD:The best steak for grilling is about the thickness of your thumb. Allow your steak to come up to room temperature before giving an even coat of cooking oil and season generously with salt and pepper. Get your chargrill as hot as you can before adding your steak. Allow the steak to seal for 1 minute before flipping and cooking the other side for 3 minutes, flip again and cook the sealed side for a further 2 minutes. You will get best results if you have enough flame to just lick the steak to increase the crust. Once cooked to your liking remove from grill and allow to rest for a few minutes before serving.
TIPSBe sure to pre heat the chargrill plate well to get that instant char which not only looks great on steak but the crust from the char adds extra flavour and texture.
Chargrilling works best with a good bed of coals so get your fire going early and let your timber burn down to coals before cooking.
Veggies go great on the chargrill as well as meat. Anything like capsicum, thin sliced potato and corn cobs come up a treat on the grill.
Using your chargrill underneath the rotisserie will allow you to grill some veggies to go as a great side dish while your meat cooks.
Popping your heatbead basket in under the chargrill will allow you to cook with heatbeads or charcoal without the need for a timber fire.
The Chargrill and drip tray fit inside your Ozpig Oven-Smoker which is perfect for reverse searing.
Recipes
Ozpig Steak
13 14
Pots and PansHUEVOS RANCHEROS WITH BEANS
INGREDIENTS:• 300g diced bacon• 1 diced onion• 2 minced garlic cloves• Minced chilli paste to taste• 1 teaspoon cumin• ½ tablespoon paprika• 2 cans diced tomatoes• 1 can kidney beans• 1/2 handful chopped basil• 1 tablespoon brown sugar• Squeeze lime juice• 4 eggs• Tortillas• Avocado• Olive oil
There are a lot of great camping pots and pans available out there that are invaluable for cooking with on top of the camp oven. Cast iron frypans, billies, kettles and saucepans all work great to help assist with meal prep. Whether it be boiling some water for coffee, heating water for washing up or even just boiling some eggs the correct choice of pan can make life easy around the camp site. A good quality cast iron frypan with deep sides makes a great one pot dinner or breakfast and saves on washing up. Like everything you can use frypans and saucepans with the large array of cooking options and styles the Ozpig has to offer. Sit your kettle on the side plate to keep water warm, pop the diffuser under your frypan to turn down the heat on your pan of beans, experimenting and thinking outside the box is the name of the game.
This is a bit of a twist on the Mexican tomato sauce and eggs dish. The beans add a great heartiness to this home cooked breakfast comfort food.
METHOD:In a cast iron frypan fry off bacon, garlic, chilli and onion in a little olive oil until bacon is browned.
Add cumin and paprika and coat well before stirring in the tomatoes.
Add kidney beans, basil, brown sugar and a good squeeze of lime juice.
Let simmer gently until some of the juices evaporate and the sauce thickens a little.
Crack in the eggs and cover with a lid or foil, remove and place on the side plate until the eggs are set.
While the eggs are setting throw your tortillas on the Ozpig char grill for a few seconds each side to colour them up and give a rustic char flavour to them.
Serve eggs and sauce mix on a tortilla with some sliced avocado.
Recipes
Heuvos Rancheros
1
2
3
4
5
6
7
Camp OvenTHE BEST ROAST POTATOES, EVER.
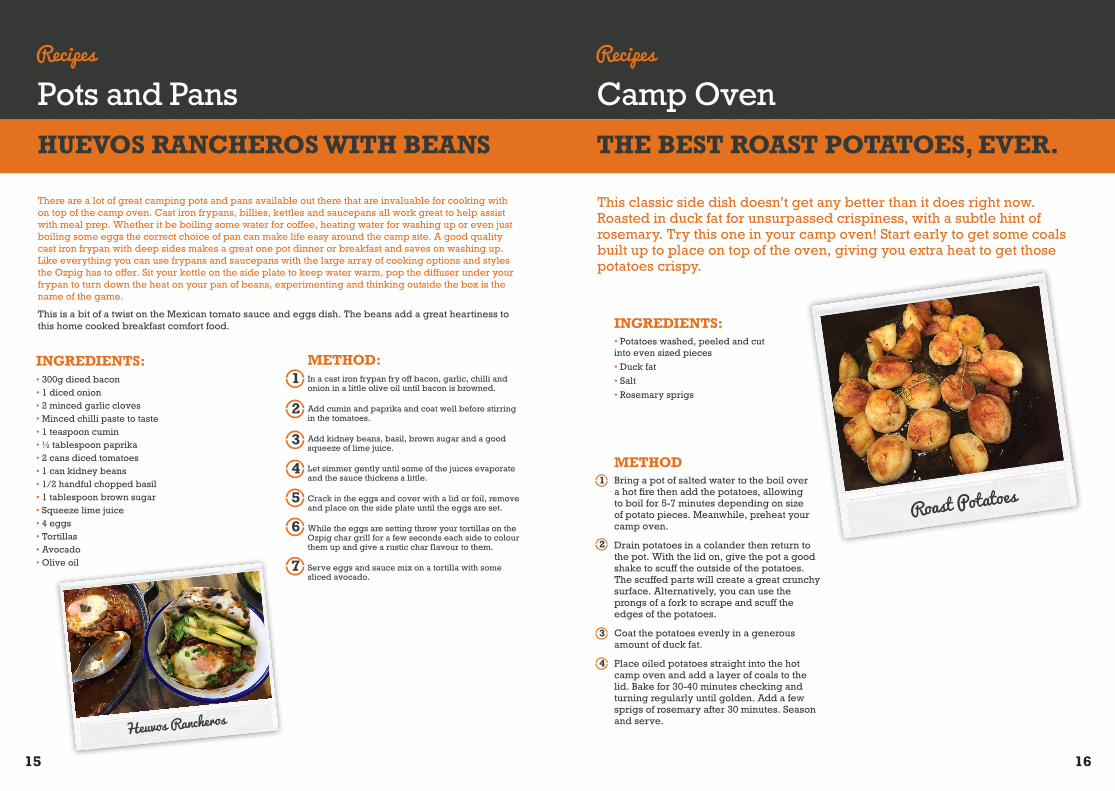
METHODBring a pot of salted water to the boil over a hot fire then add the potatoes, allowing to boil for 5-7 minutes depending on size of potato pieces. Meanwhile, preheat your camp oven.
Drain potatoes in a colander then return to the pot. With the lid on, give the pot a good shake to scuff the outside of the potatoes. The scuffed parts will create a great crunchy surface. Alternatively, you can use the prongs of a fork to scrape and scuff the edges of the potatoes.
Coat the potatoes evenly in a generous amount of duck fat.
Place oiled potatoes straight into the hot camp oven and add a layer of coals to the lid. Bake for 30-40 minutes checking and turning regularly until golden. Add a few sprigs of rosemary after 30 minutes. Season and serve.
INGREDIENTS:• Potatoes washed, peeled and cut into even sized pieces• Duck fat• Salt• Rosemary sprigs
This classic side dish doesn’t get any better than it does right now. Roasted in duck fat for unsurpassed crispiness, with a subtle hint of rosemary. Try this one in your camp oven! Start early to get some coals built up to place on top of the oven, giving you extra heat to get those potatoes crispy.
Roast Potatoes
Recipes
1
2
3
4
15 16
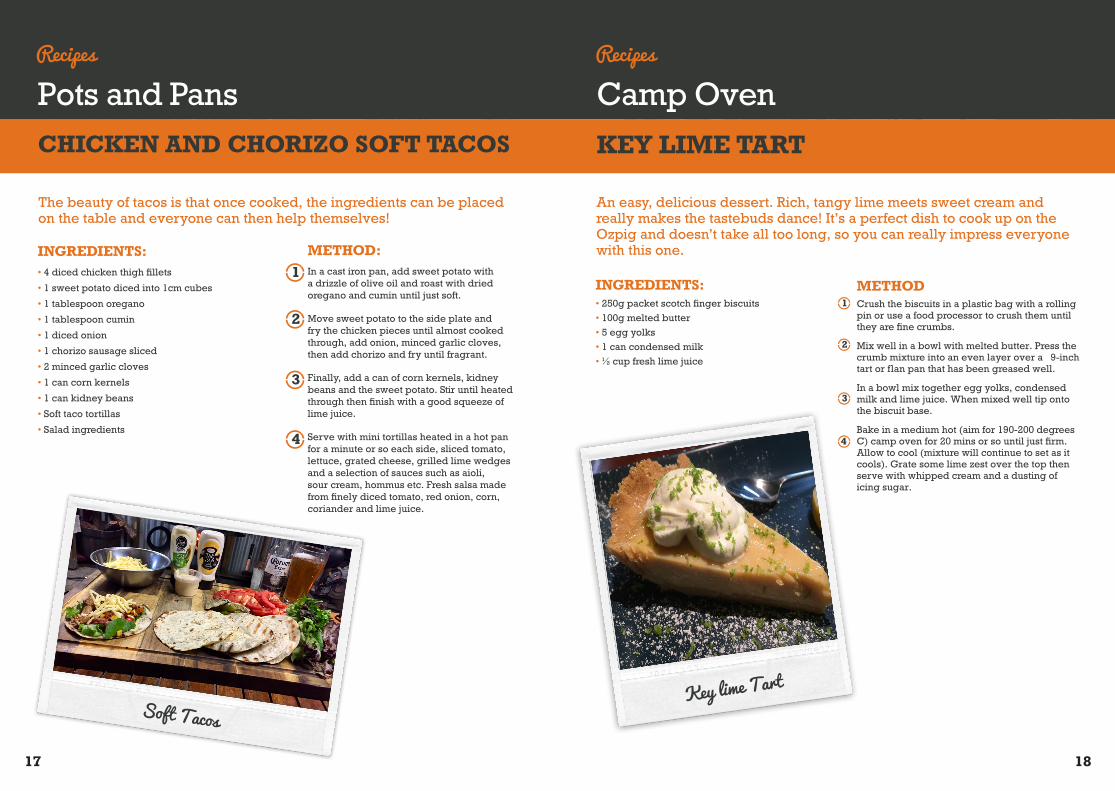
Pots and PansCHICKEN AND CHORIZO SOFT TACOS
INGREDIENTS:• 4 diced chicken thigh fillets
• 1 sweet potato diced into 1cm cubes
• 1 tablespoon oregano
• 1 tablespoon cumin
• 1 diced onion
• 1 chorizo sausage sliced
• 2 minced garlic cloves
• 1 can corn kernels
• 1 can kidney beans
• Soft taco tortillas
• Salad ingredients
METHOD:In a cast iron pan, add sweet potato with a drizzle of olive oil and roast with dried oregano and cumin until just soft.
Move sweet potato to the side plate and fry the chicken pieces until almost cooked through, add onion, minced garlic cloves, then add chorizo and fry until fragrant.
Finally, add a can of corn kernels, kidney beans and the sweet potato. Stir until heated through then finish with a good squeeze of lime juice.
Serve with mini tortillas heated in a hot pan for a minute or so each side, sliced tomato, lettuce, grated cheese, grilled lime wedges and a selection of sauces such as aioli, sour cream, hommus etc. Fresh salsa made from finely diced tomato, red onion, corn, coriander and lime juice.
Recipes
1
2
3
4
Camp OvenKEY LIME TART
The beauty of tacos is that once cooked, the ingredients can be placed on the table and everyone can then help themselves!
Recipes
Soft Tacos
METHODCrush the biscuits in a plastic bag with a rolling pin or use a food processor to crush them until they are fine crumbs.
Mix well in a bowl with melted butter. Press the crumb mixture into an even layer over a 9-inch tart or flan pan that has been greased well.
In a bowl mix together egg yolks, condensed milk and lime juice. When mixed well tip onto the biscuit base.
Bake in a medium hot (aim for 190-200 degrees C) camp oven for 20 mins or so until just firm. Allow to cool (mixture will continue to set as it cools). Grate some lime zest over the top then serve with whipped cream and a dusting of icing sugar.
INGREDIENTS:• 250g packet scotch finger biscuits• 100g melted butter• 5 egg yolks• 1 can condensed milk• ½ cup fresh lime juice
An easy, delicious dessert. Rich, tangy lime meets sweet cream and really makes the tastebuds dance! It’s a perfect dish to cook up on the Ozpig and doesn’t take all too long, so you can really impress everyone with this one.
1
2
3
4
Key lime Tart
17 18
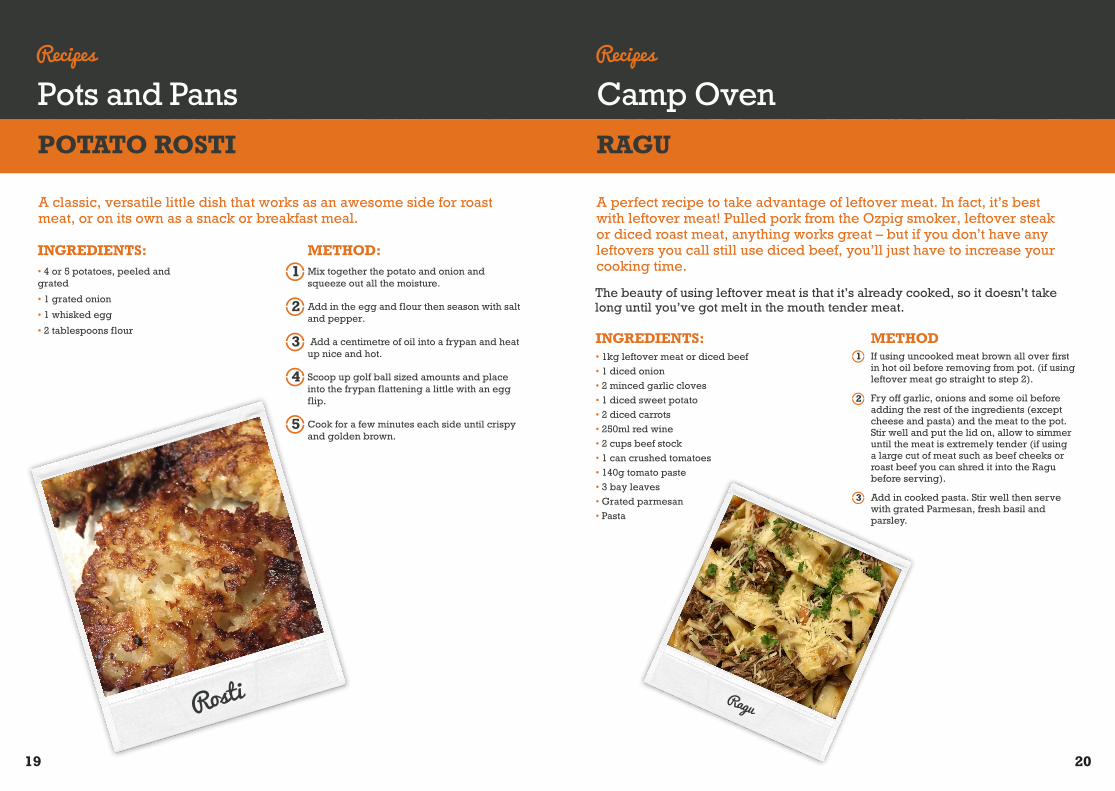
Pots and PansPOTATO ROSTI
INGREDIENTS:• 4 or 5 potatoes, peeled and grated
• 1 grated onion
• 1 whisked egg
• 2 tablespoons flour
METHOD:Mix together the potato and onion and squeeze out all the moisture.
Add in the egg and flour then season with salt and pepper.
Add a centimetre of oil into a frypan and heat up nice and hot.
Scoop up golf ball sized amounts and place into the frypan flattening a little with an egg flip.
Cook for a few minutes each side until crispy and golden brown.
Recipes
1
2
3
4
Camp OvenRAGU
METHODIf using uncooked meat brown all over first in hot oil before removing from pot. (if using leftover meat go straight to step 2).
Fry off garlic, onions and some oil before adding the rest of the ingredients (except cheese and pasta) and the meat to the pot. Stir well and put the lid on, allow to simmer until the meat is extremely tender (if using a large cut of meat such as beef cheeks or roast beef you can shred it into the Ragu before serving).
Add in cooked pasta. Stir well then serve with grated Parmesan, fresh basil and parsley.
INGREDIENTS:• 1kg leftover meat or diced beef• 1 diced onion• 2 minced garlic cloves• 1 diced sweet potato• 2 diced carrots• 250ml red wine• 2 cups beef stock• 1 can crushed tomatoes• 140g tomato paste• 3 bay leaves• Grated parmesan• Pasta
A classic, versatile little dish that works as an awesome side for roast meat, or on its own as a snack or breakfast meal.
A perfect recipe to take advantage of leftover meat. In fact, it’s best with leftover meat! Pulled pork from the Ozpig smoker, leftover steak or diced roast meat, anything works great – but if you don’t have any leftovers you call still use diced beef, you’ll just have to increase your cooking time.
Recipes
1
2
3
5
Rosti
The beauty of using leftover meat is that it’s already cooked, so it doesn’t take long until you’ve got melt in the mouth tender meat.
Ragu
19 20
The Big Pigyour best friend outdoors.
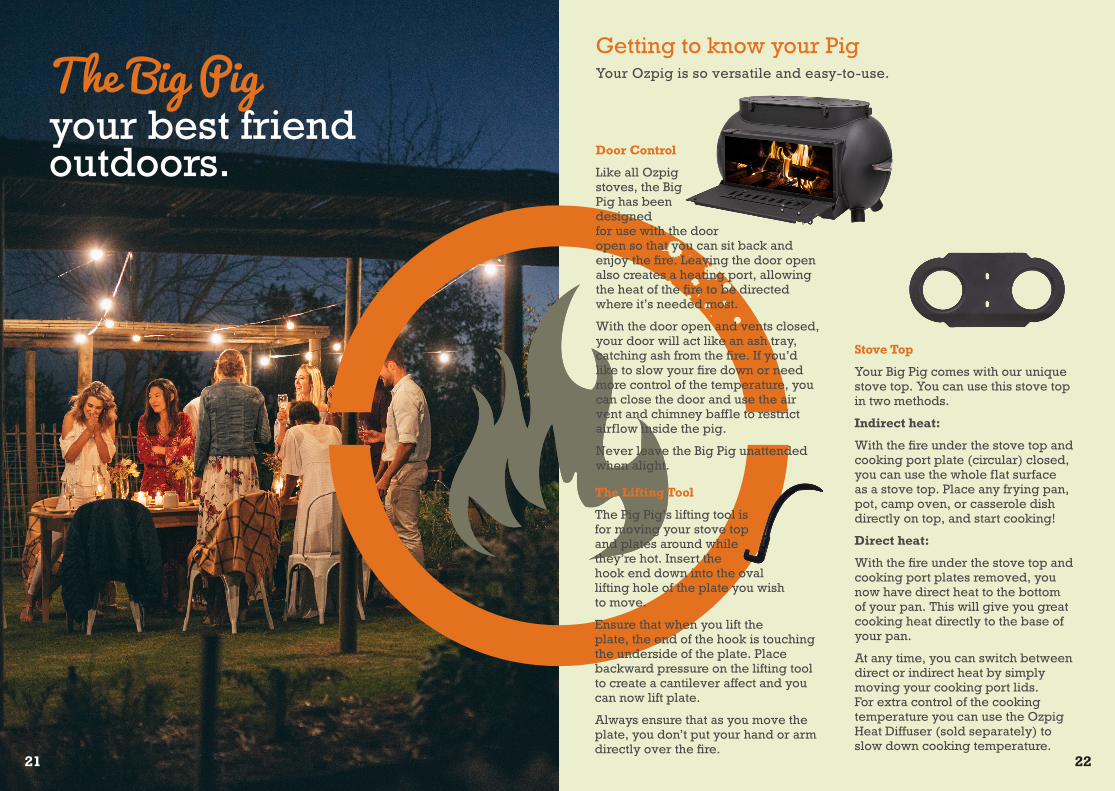
Getting to know your PigYour Ozpig is so versatile and easy-to-use.
Stove Top
Your Big Pig comes with our unique stove top. You can use this stove top in two methods.
Indirect heat:
With the fire under the stove top and cooking port plate (circular) closed, you can use the whole flat surface as a stove top. Place any frying pan, pot, camp oven, or casserole dish directly on top, and start cooking!
Direct heat:
With the fire under the stove top and cooking port plates removed, you now have direct heat to the bottom of your pan. This will give you great cooking heat directly to the base of your pan.
At any time, you can switch between direct or indirect heat by simply moving your cooking port lids. For extra control of the cooking temperature you can use the Ozpig Heat Diffuser (sold separately) to slow down cooking temperature.
The Lifting Tool
The Pig Pig’s lifting tool is for moving your stove top and plates around while they’re hot. Insert the hook end down into the oval lifting hole of the plate you wish to move.
Ensure that when you lift the plate, the end of the hook is touching the underside of the plate. Place backward pressure on the lifting tool to create a cantilever affect and you can now lift plate.
Always ensure that as you move the plate, you don’t put your hand or arm directly over the fire.
Door Control
Like all Ozpig stoves, the Big Pig has been designed for use with the door open so that you can sit back and enjoy the fire. Leaving the door open also creates a heating port, allowing the heat of the fire to be directed where it’s needed most.
With the door open and vents closed, your door will act like an ash tray, catching ash from the fire. If you’d like to slow your fire down or need more control of the temperature, you can close the door and use the air vent and chimney baffle to restrict airflow inside the pig.
Never leave the Big Pig unattended when alight.
2221
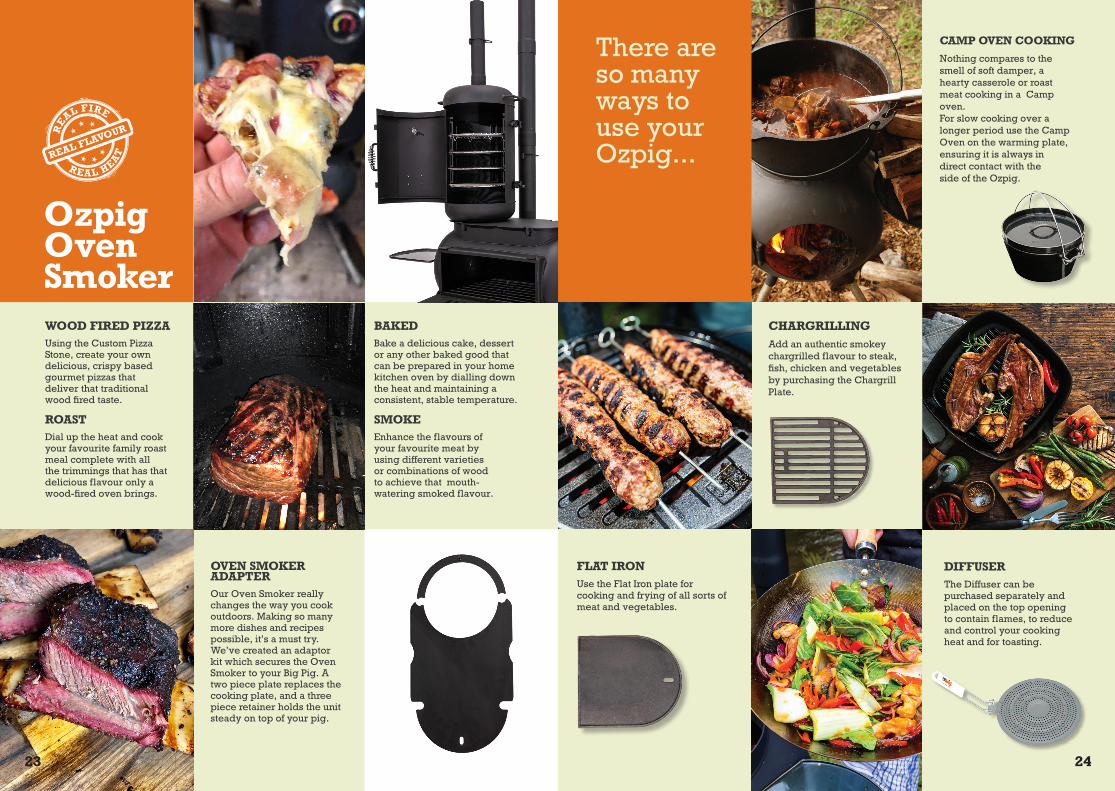
Ozpig Oven Smoker WOOD FIRED PIZZAUsing the Custom Pizza Stone, create your own delicious, crispy based gourmet pizzas that deliver that traditional wood fired taste.
ROASTDial up the heat and cook your favourite family roast meal complete with all the trimmings that has that delicious flavour only a wood-fired oven brings.
SMOKEEnhance the flavours of your favourite meat by using different varieties or combinations of wood to achieve that mouth-watering smoked flavour.
BAKEDBake a delicious cake, dessert or any other baked good that can be prepared in your home kitchen oven by dialling down the heat and maintaining a consistent, stable temperature.
OVEN SMOKER ADAPTEROur Oven Smoker really changes the way you cook outdoors. Making so many more dishes and recipes possible, it’s a must try. We’ve created an adaptor kit which secures the Oven Smoker to your Big Pig. A two piece plate replaces the cooking plate, and a three piece retainer holds the unit steady on top of your pig.
There are so many ways to use your Ozpig...
CAMP OVEN COOKING
Nothing compares to the smell of soft damper, a hearty casserole or roast meat cooking in a Camp oven. For slow cooking over a longer period use the Camp Oven on the warming plate, ensuring it is always in direct contact with the side of the Ozpig.
CHARGRILLINGAdd an authentic smokey chargrilled flavour to steak, fish, chicken and vegetables by purchasing the Chargrill Plate.
DIFFUSERThe Diffuser can be purchased separately and placed on the top opening to contain flames, to reduce and control your cooking heat and for toasting.
FLAT IRONUse the Flat Iron plate for cooking and frying of all sorts of meat and vegetables.
23 24
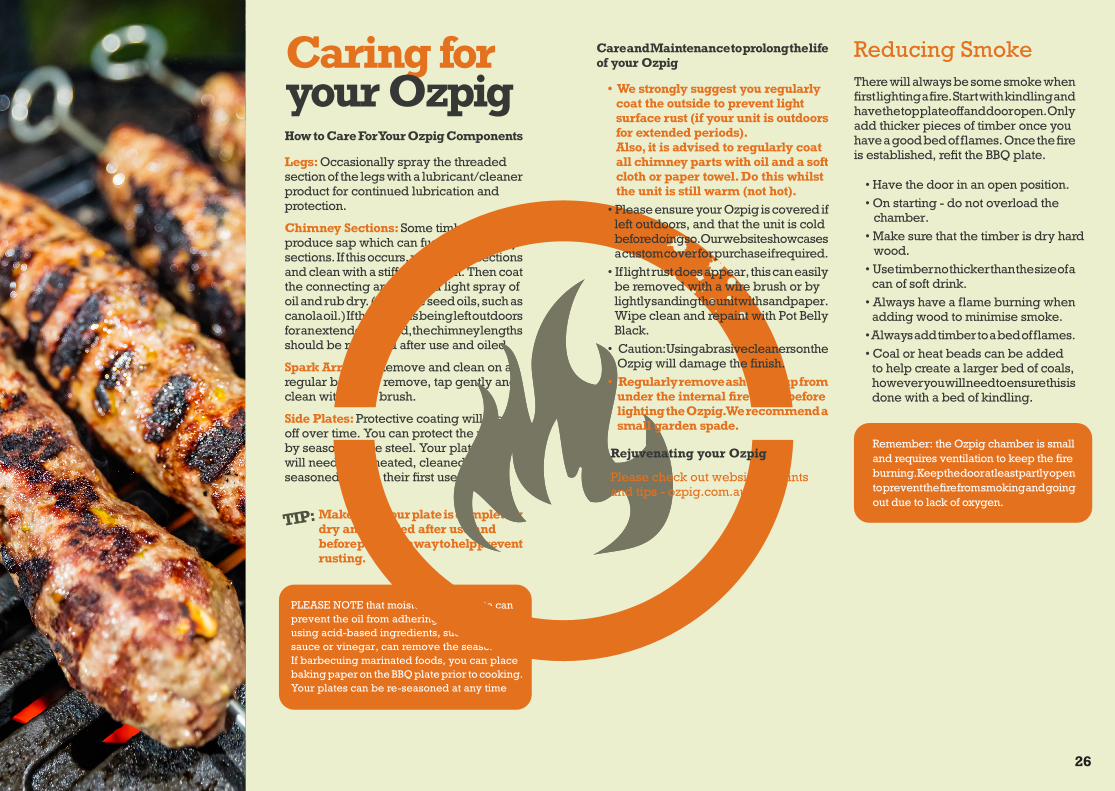
Caring foryour OzpigHow to Care For Your Ozpig Components
Legs: Occasionally spray the threaded section of the legs with a lubricant/cleaner product for continued lubrication and protection.
Chimney Sections: Some timbers will produce sap which can fuse the chimney sections. If this occurs, remove the sections and clean with a stiff wire brush. Then coat the connecting areas with a light spray of oil and rub dry. (Only use seed oils, such as canola oil.) If the Ozpig is being left outdoors for an extended period, the chimney lengths should be removed after use and oiled.
Spark Arrestor: Remove and clean on a regular basis. To remove, tap gently and clean with a stiff brush.
Side Plates: Protective coating will wear off over time. You can protect the plates by seasoning the steel. Your plates will need to be heated, cleaned and seasoned before their first use.
Make sure your plate is completely dry and re-oiled after use and before packing away to help prevent rusting.
PLEASE NOTE that moisture on the plate can prevent the oil from adhering and marinades using acid-based ingredients, such as tomato sauce or vinegar, can remove the seasoning. If barbecuing marinated foods, you can place baking paper on the BBQ plate prior to cooking. Your plates can be re-seasoned at any time
TIP:
There will always be some smoke when first lighting a fire. Start with kindling and have the top plate off and door open. Only add thicker pieces of timber once you have a good bed of flames. Once the fire is established, refit the BBQ plate.
• Have the door in an open position.• On starting - do not overload the
chamber.• Make sure that the timber is dry hard
wood.• Use timber no thicker than the size of a
can of soft drink.• Always have a flame burning when
adding wood to minimise smoke.• Always add timber to a bed of flames.• Coal or heat beads can be added
to help create a larger bed of coals, however you will need to ensure this is done with a bed of kindling.
Remember: the Ozpig chamber is small and requires ventilation to keep the fire burning. Keep the door at least partly open to prevent the fire from smoking and going out due to lack of oxygen.
Care and Maintenance to prolong the life of your Ozpig
• We strongly suggest you regularly coat the outside to prevent light surface rust (if your unit is outdoors for extended periods). Also, it is advised to regularly coat all chimney parts with oil and a soft cloth or paper towel. Do this whilst the unit is still warm (not hot).
• Please ensure your Ozpig is covered if left outdoors, and that the unit is cold before doing so. Our website showcases a custom cover for purchase if required.
• If light rust does appear, this can easily be removed with a wire brush or by lightly sanding the unit with sandpaper. Wipe clean and repaint with Pot Belly Black.
• Caution: Using abrasive cleaners on the Ozpig will damage the finish.
• Regularly remove ash build-up from under the internal fire grate before lighting the Ozpig. We recommend a small garden spade.
Please check out website for hints and tips - ozpig.com.au
Rejuvenating your Ozpig
Reducing Smoke
26
Warranty Information3 -Year Warranty on the steel structure of the Ozpig Body , Ozpig warrants that steel structure of the Ozpig Body is free of defects in material and workmanship for a period of 3 years.
3 -Year Warranty on the steel structure of the Ozpig Chimney , Ozpig warrants that steel structure of the Ozpig Chimney is free of defects in material and workmanship for a period of 3 years.
3 -Year Warranty on the steel structure of the Ozpig BBQ plate, Ozpig warrants that steel structure of the Ozpig cooking and warming plate is free of defects in material and workmanship for a period of 3 years.
3 -Year Warranty on the steel structure of the Ozpig Legs. Ozpig warrants that steel structure of the Ozpig legs are to be free of defects in material and workmanship for a period of 3 years.
What is Not Covered?This warranty does not apply to damage caused by abuse or use of the product for purposes other than that for which it is designed, damage caused by lack of proper use, assembly, maintenance or installation, damages caused by accidents or natural disasters, damage caused by unauthorized attachments or modifications, or damage during transport.
This warranty does not cover damage from normal wear and tear from use of the product (for example, scratches, dents, dings and chipping) or changes in the appearance of the grill that do not affect its performance.
This limited warranty is exclusive and in lieu of any other warranty, written or oral, express or implied, including but not limited to the warranty of merchantability or fitness for a particular purpose. The duration of any implied warranties, including any implied warranty of merchantability or fitness for a particular purpose is expressly limited to the duration of the warranty period for the applicable component.
The purchaser’s exclusive remedy for breach of this limited warranty or any implied warranty shall be limited as specified herein to replacement. In no case shall Ozpig Australia Pty Ltd be liable for any special, incidental or consequential damages.
FAQs For further information check out the FAQs and troubleshooting tips on our website.
Visit www.ozpig.com.au/troubleshooting or share your questions, concerns or tips with our large Facebook community of Ozpig lovers at www.facebook.com/ozpig
WARNING
• Keep the Ozpig in a level position at all times.
• Always use appropriate tools and cooking implements with long heat resistant handles.
• Never touch the surface of the Ozpig to test if hot.
• Never dump hot coals or ashes where someone may step OR where the hot coals or ash might start a fire - dispose of them appropriately.
2827
Safety & MaintenanceFor your safety:
• Do not store or use petrol or other flammable liquids in the vicinity of this or any other appliance.
• Do not store empty or full spare gas cylinders under or near this or any other appliance.
• Only use in well ventilated areas.
• CARBON MONOXIDE HAZARD - USING THIS APPLIANCE IN AN ENCLOSED SPACE MAY CAUSE DEATH. DO NOT USE IN CARAVANS, TENTS, MARINE CRAFT, CARS, MOBILE HOMES OR SIMILAR LOCATIONS.
• Keep children away from Ozpig during use and until Ozpig has cooled after you have finished. Do not allow children to operate Ozpig. Always ensure that no sporting or physical activities are carried out in close proximity to the Ozpig during use and while still hot.
• This appliance shall only be used in an above ground open-air situation with natural ventilation, without stagnant areas, where combustion products are rapidly dispersed by wind and natural convection.
• Operate the Ozpig only on a stable, level, non-flammable surface such as asphalt, concrete or solid ground. DO NOT operate the Ozpig on flammable materials
• Use caution when lifting and moving the Ozpig to avoid strains or back injury. Two people are recommended to lift or move the Ozpig.
• DO NOT move the Ozpig while it is in use.
• DO NOT leave the Ozpig unattended while in use. Operate the Ozpig with close supervision.
• DO NOT leave hot ashes unattended until the Ozpig cools completely.
• The Ozpig becomes extremely hot - allow it to cool completely before handling. If you must handle the Ozpig or its components while they are hot, ALWAYS wear protective oven mitts or heat resistant gloves. Allow the Oven to cool before removing and cleaning the grease pan.
CAUTION: All care and maintenance procedures are to be performed only while the Ozpig is turned off and cooled.
• Dispose of cold ashes by wrapping them in heavy duty aluminum foil and putting them in a non combustible container. Be sure there are no other combustible materials in or near the container.
• If you must dispose of the ashes in less time than it takes for them to completely cool, remove the ashes, keeping them in heavy duty foil, and soak them completely with water before disposing of them in a non combustible container.
• Frequently check and clean the chimney. A clogged tube can be obstructing the flow of combustion and ventilation air.
• If rust is present on the exterior surface of the, clean the area with steel wool or emery cloth and use heavy duty, heat resistant paint.
• To protect your Ozpig from weather, always keep your Ozpig covered while not in use.18 19
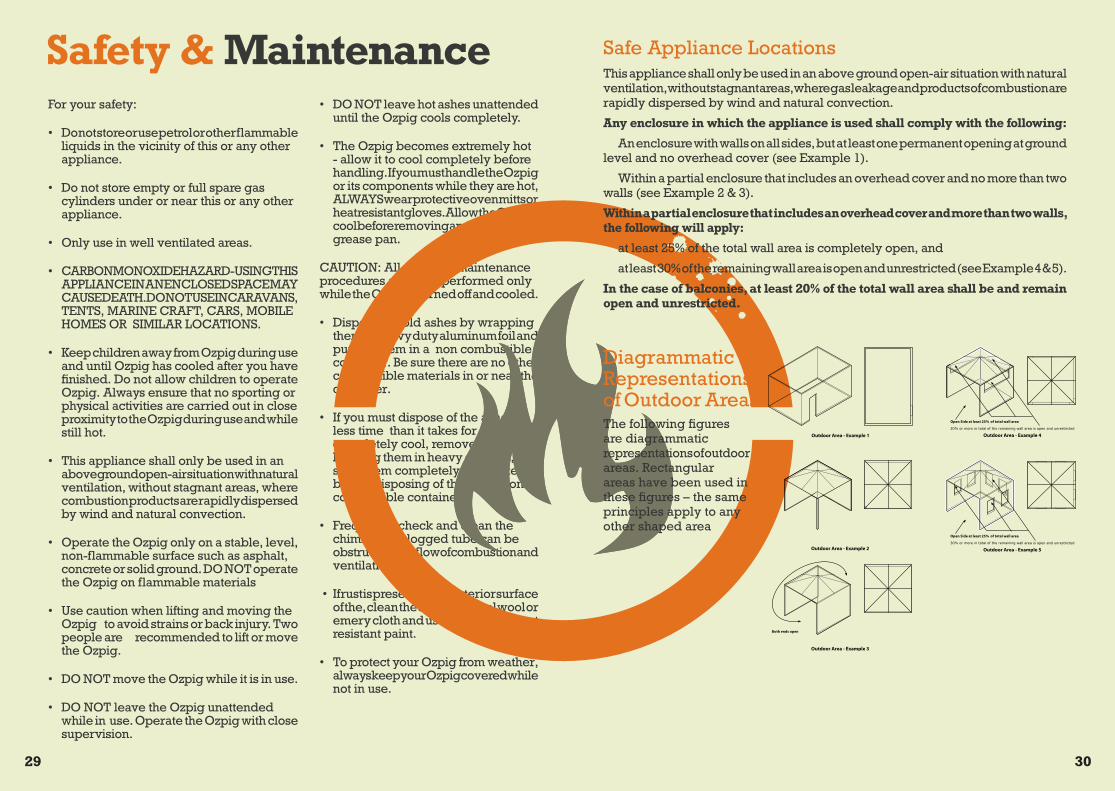
DIAGRAMMATIC REPRESENTATIONS OF OUTDOOR AREAS
The following figures are diagrammatic representations of outdoor areas. Rectangular areas have been used in these figures – the same principles apply to any other shaped area.
SAFE APPLIANCE LOCATIONS
This appliance shall only be used in an above ground open-air situation with natural ventilation, without stagnant areas, where gas leakage and products of combustion are rapidly dispersed by wind and natural convection.
Any enclosure in which the appliance is used shall comply with the following:An enclosure with walls on all sides, but at least one permanent opening at ground level and no overhead cover (see Example 1).Within a partial enclosure that includes an overhead cover and no more than two walls (see Example 2 & 3).
Within a partial enclosure that includes an overhead cover and more than two walls, the following will apply:
at least 25% of the total wall area is completely open, andat least 30% of the remaining wall area is open and unrestricted (see Example 4 & 5).
In the case of balconies, at least 20% of the total wall area shall be and remain open and unrestricted.
Gasmate® is a registered trademark of: Sitro Group Australia Pty Ltd www.gasmate.com.auAber, Hamilton, N.Z. www.gasmate.co.nz
Gasmate® is a registered trademark of: Sitro Group Australia Pty Ltd www.gasmate.com.au Aber, Hamilton, N.Z. www.gasmate.co.nz
SAFE APPLIANCE LOCATIONSThis appliance shall only be used in an above ground open-air situation with natural ventilation, without stagnant areas, where gas leakage and products of combustion are rapidly dispersed by wind and naturalconvection.
Any enclosure in which the appliance is used shall comply with one of the following:
An enclosure with walls on all sides, but at least one permanent opening at ground level and no overhead cover (see Example 1).
Within a partial enclosure that includes an overhead cover and no more than two walls (see Example 2 & 3).
Within a partial enclosure that includes an overhead cover and more than two walls, the following will apply:
at least 25% of the total wall area is completely open, and at least 30% of the remaining wall area is open and unrestricted (see Example 4 & 5).
In the case of balconies, at least 20% of the total wall area shall be and remain open and unrestricted.
The following figures are diagrammatic representations of outdoor areas. Rectangular areas have been used in these figures - the same principles apply to any other shaped area.
This appliance shall only be used in an above ground open-air situation with natural ventilation, without stagnant areas, where gas leakage and products of combustion are rapidly dispersed by wind and natural convection.
Any enclosure in which the appliance is used shall comply with the following:
An enclosure with walls on all sides, but at least one permanent opening at ground level and no overhead cover (see Example 1).
Within a partial enclosure that includes an overhead cover and no more than two walls (see Example 2 & 3).
Within a partial enclosure that includes an overhead cover and more than two walls, the following will apply:
at least 25% of the total wall area is completely open, and
at least 30% of the remaining wall area is open and unrestricted (see Example 4 & 5).
In the case of balconies, at least 20% of the total wall area shall be and remain open and unrestricted.
Safe Appliance Locations
The following figures are diagrammatic representations of outdoor areas. Rectangular areas have been used in these figures – the same principles apply to any other shaped area
Diagrammatic Representations of Outdoor Areas
29 30
You’ll love your PigFind us on Facebook. Join our Ozpig lovers group
Visit our website and subscribe to our Newsletter
1300 4 OZPIG(69744) | [email protected] | ozpig.com.au