the battle of the la fière causeway 6-9 june 1944 · both players, starting with the german...
TRANSCRIPT
The BaTTle of The la fière Causeway6-9 June 1944
82nd Airborne division
1057. GrenAdier reGiment & 100. PAnzer AbteilunG
utA
h beA
ch
14km
/8mi
n
Battle for the Causeway
The German attack on the thinly-held La Fière Causeway came from the west, spear-headed by the tanks of the 100. Panzer Ausbildungs und Ersatz Abteilung.
The American paratroopers were forced back to the western edge of the Merderet River, from which they launched several attacks to secure the bridge.
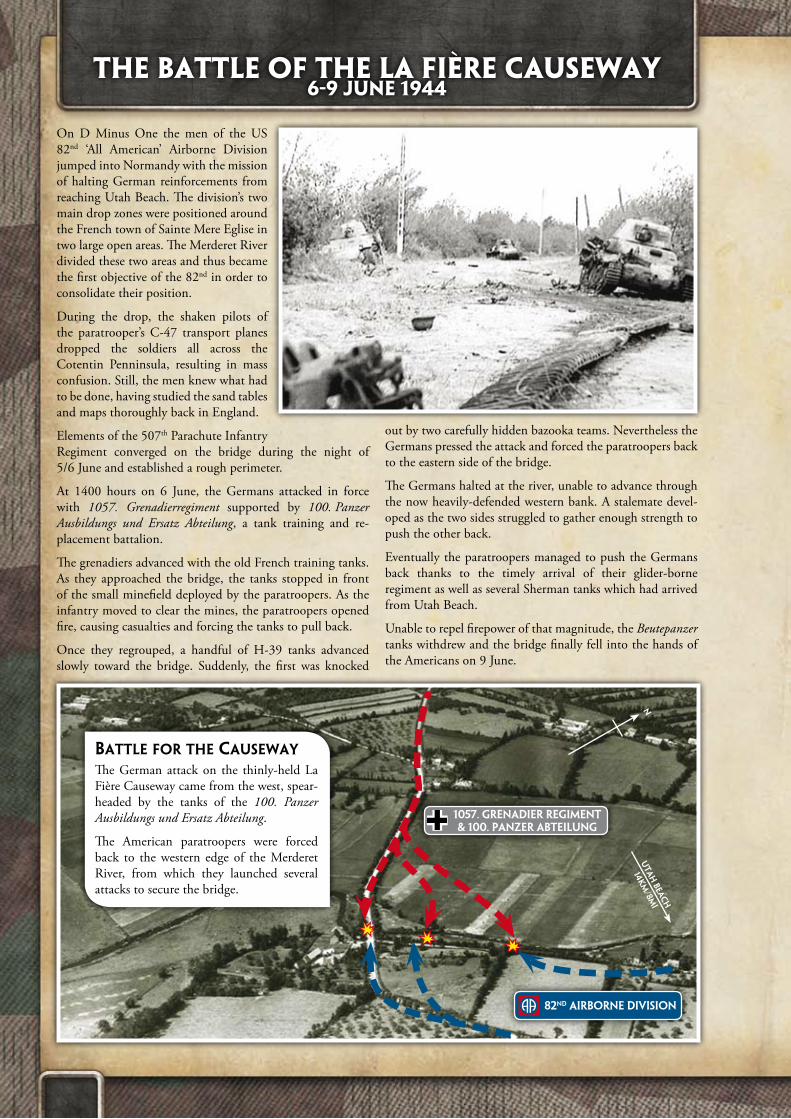
On D Minus One the men of the US 82nd ‘All American’ Airborne Division jumped into Normandy with the mission of halting German reinforcements from reaching Utah Beach. The division’s two main drop zones were positioned around the French town of Sainte Mere Eglise in two large open areas. The Merderet River divided these two areas and thus became the first objective of the 82nd in order to consolidate their position.
During the drop, the shaken pilots of the paratrooper’s C-47 transport planes dropped the soldiers all across the Cotentin Penninsula, resulting in mass confusion. Still, the men knew what had to be done, having studied the sand tables and maps thoroughly back in England.
Elements of the 507th Parachute Infantry Regiment converged on the bridge during the night of 5/6 June and established a rough perimeter.
At 1400 hours on 6 June, the Germans attacked in force with 1057. Grenadierregiment supported by 100. Panzer Ausbildungs und Ersatz Abteilung, a tank training and re-placement battalion.
The grenadiers advanced with the old French training tanks. As they approached the bridge, the tanks stopped in front of the small minefield deployed by the paratroopers. As the infantry moved to clear the mines, the paratroopers opened fire, causing casualties and forcing the tanks to pull back.
Once they regrouped, a handful of H-39 tanks advanced slowly toward the bridge. Suddenly, the first was knocked
out by two carefully hidden bazooka teams. Nevertheless the Germans pressed the attack and forced the paratroopers back to the eastern side of the bridge.
The Germans halted at the river, unable to advance through the now heavily-defended western bank. A stalemate devel-oped as the two sides struggled to gather enough strength to push the other back.
Eventually the paratroopers managed to push the Germans back thanks to the timely arrival of their glider-borne regiment as well as several Sherman tanks which had arrived from Utah Beach.
Unable to repel firepower of that magnitude, the Beutepanzer tanks withdrew and the bridge finally fell into the hands of the Americans on 9 June.
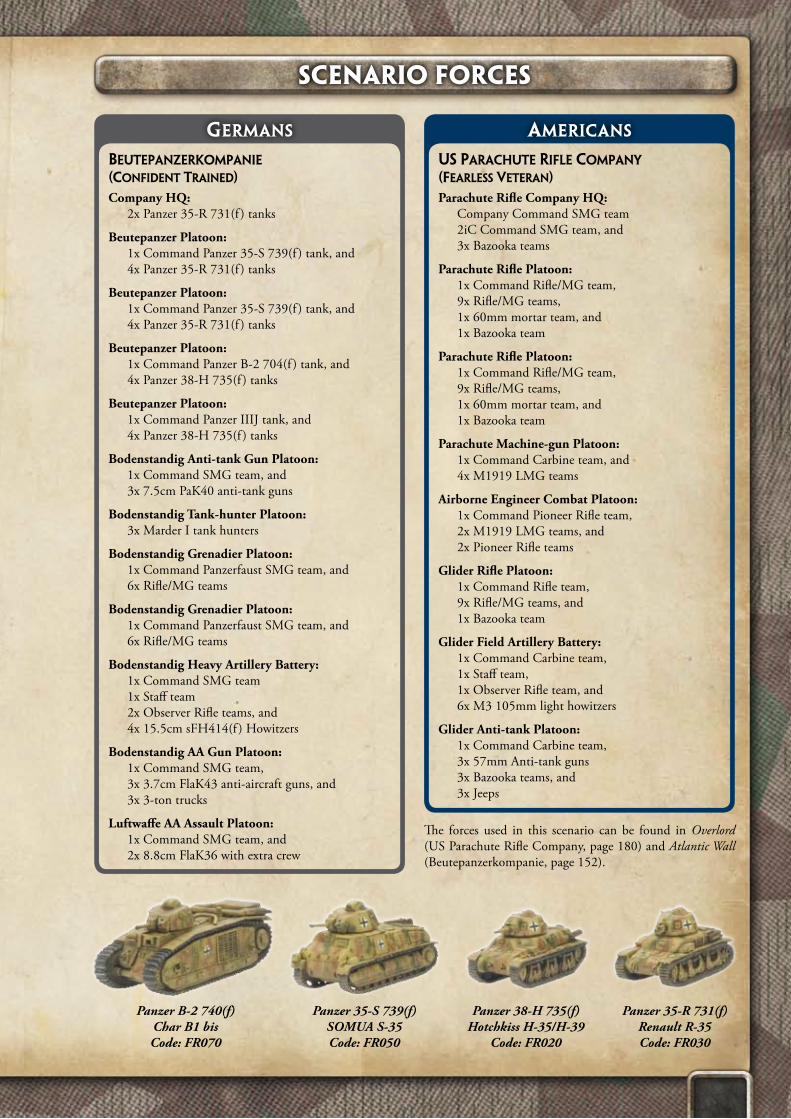
The forces used in this scenario can be found in Overlord (US Parachute Rifle Company, page 180) and Atlantic Wall (Beutepanzerkompanie, page 152).
Beutepanzerkompanie (Confident trained)
Company HQ: 2x Panzer 35-R 731(f ) tanks
Beutepanzer Platoon: 1x Command Panzer 35-S 739(f ) tank, and 4x Panzer 35-R 731(f ) tanks
Beutepanzer Platoon: 1x Command Panzer 35-S 739(f ) tank, and 4x Panzer 35-R 731(f ) tanks
Beutepanzer Platoon: 1x Command Panzer B-2 704(f ) tank, and 4x Panzer 38-H 735(f ) tanks
Beutepanzer Platoon: 1x Command Panzer IIIJ tank, and 4x Panzer 38-H 735(f ) tanks
Bodenstandig Anti-tank Gun Platoon: 1x Command SMG team, and 3x 7.5cm PaK40 anti-tank guns
Bodenstandig Tank-hunter Platoon: 3x Marder I tank hunters
Bodenstandig Grenadier Platoon: 1x Command Panzerfaust SMG team, and 6x Rifle/MG teams
Bodenstandig Grenadier Platoon: 1x Command Panzerfaust SMG team, and 6x Rifle/MG teams
Bodenstandig Heavy Artillery Battery: 1x Command SMG team 1x Staff team 2x Observer Rifle teams, and 4x 15.5cm sFH414(f ) Howitzers
Bodenstandig AA Gun Platoon: 1x Command SMG team, 3x 3.7cm FlaK43 anti-aircraft guns, and 3x 3-ton trucks
Luftwaffe AA Assault Platoon: 1x Command SMG team, and 2x 8.8cm FlaK36 with extra crew
Germans
us paraChute rifle Company (fearless Veteran)
Parachute Rifle Company HQ: Company Command SMG team 2iC Command SMG team, and 3x Bazooka teams
Parachute Rifle Platoon: 1x Command Rifle/MG team, 9x Rifle/MG teams, 1x 60mm mortar team, and 1x Bazooka team
Parachute Rifle Platoon: 1x Command Rifle/MG team, 9x Rifle/MG teams, 1x 60mm mortar team, and 1x Bazooka team
Parachute Machine-gun Platoon: 1x Command Carbine team, and 4x M1919 LMG teams
Airborne Engineer Combat Platoon: 1x Command Pioneer Rifle team, 2x M1919 LMG teams, and 2x Pioneer Rifle teams
Glider Rifle Platoon: 1x Command Rifle team, 9x Rifle/MG teams, and 1x Bazooka team
Glider Field Artillery Battery: 1x Command Carbine team, 1x Staff team, 1x Observer Rifle team, and 6x M3 105mm light howitzers
Glider Anti-tank Platoon: 1x Command Carbine team, 3x 57mm Anti-tank guns 3x Bazooka teams, and 3x Jeeps
americans
Panzer B-2 740(f) Char B1 bis Code: FR070
Panzer 35-S 739(f) SOMUA S-35 Code: FR050
Panzer 38-H 735(f) Hotchkiss H-35/H-39
Code: FR020
Panzer 35-R 731(f) Renault R-35 Code: FR030
sCenario forCes
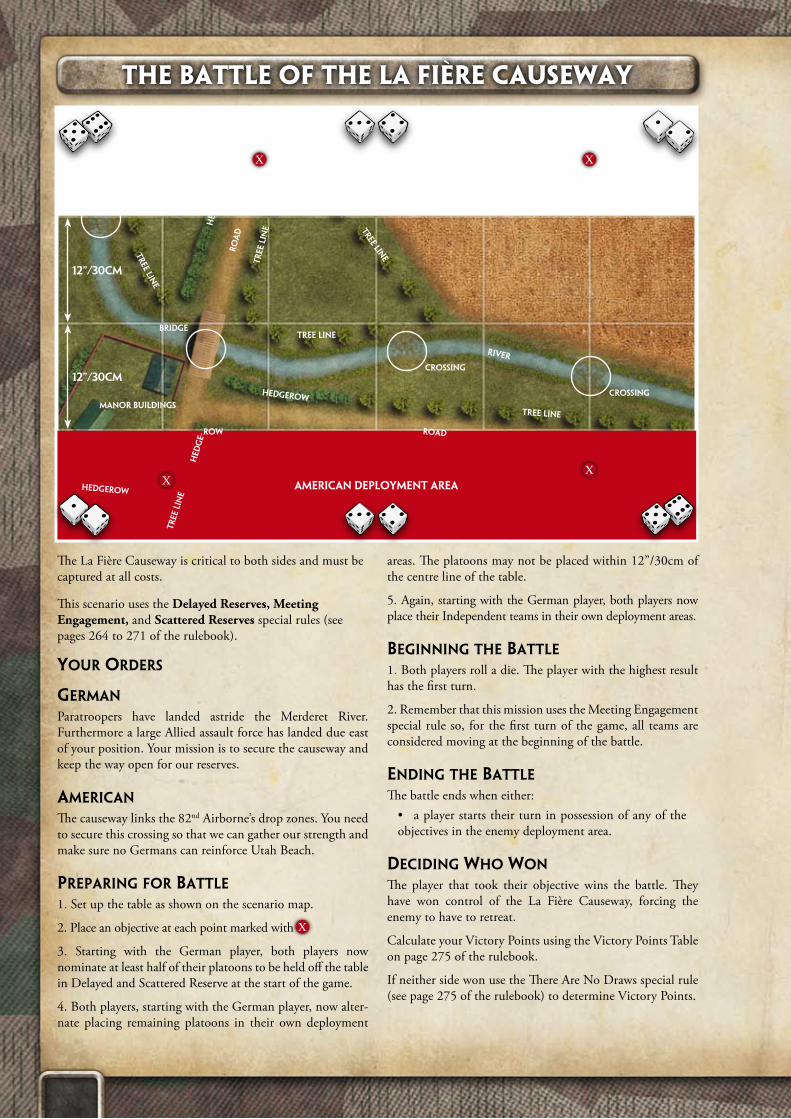
The La Fière Causeway is critical to both sides and must be captured at all costs.
This scenario uses the Delayed Reserves, Meeting Engagement, and Scattered Reserves special rules (see pages 264 to 271 of the rulebook).
your orders
German
Paratroopers have landed astride the Merderet River. Furthermore a large Allied assault force has landed due east of your position. Your mission is to secure the causeway and keep the way open for our reserves.
ameriCan
The causeway links the 82nd Airborne’s drop zones. You need to secure this crossing so that we can gather our strength and make sure no Germans can reinforce Utah Beach.
preparinG for Battle
1. Set up the table as shown on the scenario map.
2. Place an objective at each point marked with
3. Starting with the German player, both players now nominate at least half of their platoons to be held off the table in Delayed and Scattered Reserve at the start of the game.
4. Both players, starting with the German player, now alter-nate placing remaining platoons in their own deployment
areas. The platoons may not be placed within 12”/30cm of the centre line of the table.
5. Again, starting with the German player, both players now place their Independent teams in their own deployment areas.
BeGinninG the Battle
1. Both players roll a die. The player with the highest result has the first turn.
2. Remember that this mission uses the Meeting Engagement special rule so, for the first turn of the game, all teams are considered moving at the beginning of the battle.
endinG the Battle
The battle ends when either:a player starts their turn in possession of any of the
objectives in the enemy deployment area.
deCidinG who won
The player that took their objective wins the battle. They have won control of the La Fière Causeway, forcing the enemy to have to retreat.
Calculate your Victory Points using the Victory Points Table on page 275 of the rulebook.
If neither side won use the There Are No Draws special rule (see page 275 of the rulebook) to determine Victory Points.
•
GermAn dePloyment AreA
12”/30cm
AmericAn dePloyment AreA
12”/30cm
Hed
ger
ow
Hedgerow
Hed
ge-
Tree Line
Tr
ee L
ine
Tree Line
Tree Line
Hedgerow
RiveR
Crossing
Crossing
Crossing
Tree Line
Road
Ro
ad
Manor Buildings
Row
Tr
ee L
ine
Bridge
The BaTTle of The la fière Causeway
XX
XX
X

the merderet riVer
The main feature of the battlefield is the Merderet River which runs across the table. In this scenario the river is rated Very Difficult Going. The crossing points are rated Difficult Going. The bridge is rated as Cross-country
The banks of the river have a lot of low-lying vegetation allowing teams, taking cover behind it, Concealment.
In June 1944 the river was flooded by the Germans making it a mire of mud and water. For our scenario we ignored this as it would bog down the game. However, if you would like to represent this make all ground within 6”/15cm of the riverbank Difficult Going.
hedGerows
The hedgerows in this scenario have not grown large enough to be rated as bocage. Instead they are rated Very Difficult Going. They are tall enough and thick enough to block line of sight through them.
tree lines
The remainder of the tall vegetation are thin tree lines. These trees are not thick enough to block line of sight, but provide Concealment for teams on either side of them being shot at from the other side.
The Battle of the La Fière Causeway scenario includes rivers, bocage, tree lines, fields, roads and more. Here are some sug-gestions for how to define a few of the major pieces of terrain for this scenario.
While the operation was a success for the US paratroop-ers, how would they have fared if there happened to be a better equipped German force in the area? Try replacing the Beutepanzerkompanie with a 1500 point Panzerkompanie from page 52 of Atlantik Wall, or an SS-Panzerkompanie from page 184.
If you want to keep to the captured equiment theme, you could refight the battle over the river Orne, or Canal de Caen. Rather than US Paratroopers, use a 1500 point British Para force from page 22 of Overlord, trying to halt a counterattack against a Beute StuG Battery.
Terrain
oTher PlaCes, oTher Times