the 911 rescue cd user's guide -...
TRANSCRIPT

��������������������
������������������������
����������������
������

License Agreement I

License Agreement I
e Rescue CDE U L A
License and copyright noticee 911 Rescue CD is copyrighted property of the author, Ahmad Hisham.You are granted a limited license to use this material.Permission is hereby granted, free of charge, to any person obtaining a copy of this soware and associated documentation files (the “Soware”), to use, copy,publish and distribute, subject to the following conditions:
1. is license must be included with all copies of the Soware.
2. Selling or charging a fee for the Soware is prohibited, although a fee maybe charged for the act of transferring a copy or for the distribution media, but not for the Soware itself.
3. e Soware, in whole or in part, may not be included in any Commercialtitle intended to profit the offering company without written permissionfrom the Author(s) of this soware. e Author(s) reserves all rights re-garding charging a fee for the inclusion, in whole or in part, of this so-ware in any Commercial title.
4. e source code of the soware, which may be included in the sowareoriginal package can’t be modified without the written permission of theauthor(s), but the way of packaging or re-compiling this source can be changed, also the source may or may not be included in the new package.
5. Copies of the soware may be modified if created using the 911 Rescue CDBuilder™ only, and in the extents of the 911 Rescue CD Builder™ published and direct capabilities.

II 911 Rescue CD
6. e final package of the soware may contain soware that has its own EULA, the user shall use this soware only if he/she agreed on the originalcopyright holder license agreement, and the author is not responsible of the using of this soware without obtaining its legal license.
7. WARRANTY DISCLAIMER: e soware is provided “as is”, withoutwarranty of any kind, express or implied, including but not limited to the warranties of merchantability, fitness for a particular purpose andnon infringement.
In no event shall the authors or copyright holders be liable for any claim, damages or other liability, whether in an action of contract, tort or otherwise, arising from, out of or in connection with the so-ware or the use or other dealings in the soware.
Ahmad Hisham 2002-2004http://www.911cd.net/
II 911 Rescue CD
INTRODUCTION 1
Welcome 3
Loads of Maintenance Tools 3
Network Connectivity 5
More Advanced Tools 6
Install Windows with Ease 7
Easier and Simpler Building 8
Finding Information about the 911 Rescue CD 9
Learning the Basics 11
Booting from the CD-ROM drive 11
Starting the 911 Rescue CD Main Menu 14
Using the 911 Rescue CD Rescue Software 15
Using the 911 Network Access Software 17
Install Windows® 2000/XP/2003 on a new System 20
Install Windows® 98/98SE/Me on a new System 21
Contents

IV 911 Rescue CD
BUILDING THE 911 RESCUE CD 25
Installing the 911 CD Builder 27
System Requirements 27
Installation and Setup 28
If you need to uninstall the 911 CD Builder 33
Building your own CD 35
To Start the 911 CD Builder 35
Collecting the 911 Utilities 36
Creating your own copy of the 911 Rescue CD 37
Burning your 911 Rescue CD ISO file 51

IV 911 Rescue CD

PART

PART
I
A• Chapter 1
Welcome
• Chapter 2
Learning the Basics

Chapter

Chapter
1Welcome to the 911 Rescue CD, the Admin’s Swiss army knife.
Welcome
Welcome to the 911 Rescue CD world, the all-in-one rescue and maintenance CD, it is an integrated CD-ROM that contains many diagnostics and repair tools all easily accessed through the 911 Rescue CD menus, it allows you to access the CDROM drives, the USB storage devices, the network shares, or all of them at the same time, it can also include the Microso Windows 2000/XP/2003 Professional Setup files and the Microso Windows 98/MeSetup files.
Loads of Maintenance Tools
The 911 Rescue Software eases the diagnosis and fixing thesoware and hardware problems, scan the system for viruses,manage new and existing partitions using commercial tools and/or the 911 Auto Partitioner, perform system checkup to insure the reliability of various hardware and soware components oridentify the malfunctioning part in the system, create bootable CDs containing a complete backup of the system partitions, and much much more...

4 911 Rescue CD Welcome 5
The Best features
• Automatically partition new hard drives with a single mouse click.
• Access the USB mass storage devices (external CDROM drives and pen drives).
• Run the Hard Drives OEM Tools from IBM/Hitachi, Seagate, Maxtor / Quantum, Western Digital, Fujitsu, and Samsung.
• Run industry standard maintenance tools as OnTrack Easy Recovery, Norton Disk Doctor, Norton Ghost, Acronis utili-ties suite, Winternals Administrator’s Pak and PowerQuest Drive Image & Partition Magic when any of these tools are present on the CD.
• Make Emergency Recovery CDs for the C: drive that has the same 911 Rescue disk interface (if the Norton Ghost utility is available).
• Access NTFS partitions from DOS with the read/write capa-bility (if the NTFSDOS Pro utility is available).
• Read and write with long file names (normally only Windowsprovides this support), which enables the DOS commands to use the long file names.
• Maximize disk access performance by using Microso’sSMARTDrive high performance cache.
• Navigate through the menus and files using the mouse.• Support for 2 advanced File Managers with many features as
long file names support and mouse support.• Scan the System for viruses using the four leading Antivirus
engines (Norton Antivirus, McAfee Virus Scan, PCcillin and F-Prot AV) with a graphical front-end to set the options very
4 911 Rescue CD Welcome 5
easily and start the process with only mouse clicks.• Provide many details about the system’s hardware.• Fix the Windows NT/2000/XP/2003 bootsector, this is very
handy when Windows 98/Me Setup overwrite the Windows NT bootsector.
• Reset Windows NT/2000/XP/2003 accounts passwords even if the installation is inside NTFS partitions.
Network Connectivity
The Network Access Software provides access to Microsobased networks both the peer-to-peer and the domain based, with the ability to access the (Ethernet and Token Ring) net-works employing the TCP/IP, NetBEUI or NW Link protocols using a simple user interface for changing the various settings in the networking process as IP addresses, the usage of the DHCP protocol and mapping network shares to drive letters.
The Best features:
• PCI Network adapters’ auto-detection.• Very large driver plug-in support (100 drivers plug-ins cur-
rently available to select from when building the disk).• Multi protocol support (TCP/IP, NWLink and NetBEUI).• Very user friendly dialog boxes to select options or to enter
information.• e “CONFIG” utility provides a centralized console for user
settings management and viewing the current condition of

6 911 Rescue CD Welcome 7
your connection.• It has “PING” and “IPCONFIG” to check your connection.• Profile support, you can save your network settings to a pro-
file. When the soware is started, you can select what profileto use.
• Domain Name Resolver (DNS) support.• Support for packet driver interface is build-in.
More Advanced Tools
ERD Commander 2003, O&O BlueCon XXL, Acronis Utilities
Suite, Tomsrtbt Linux and MemTest x86 are all tools that are included in the 911 Rescue CD and can be run directly through the 911 CD main Menu.
ey provide additional functionality to the 911 Rescue CD andgive the user even more power to test and repair his dead system with ease.
The Best features
• ERD Commander 2003 gives a unique Windows-on-CD environment that gives the user access to the system through the familiar Windows Desktop and Start Menu interface, and gives access to the Windows 2000/XP registry and enables the administrator to reset lost passwords.
• BlueCon XXL gives the user access to the dead system through a recovery console-like interface with much added function-

6 911 Rescue CD Welcome 7
ality.• Acronis utilities suite is a great set of Hard disk maintenance
soware designed to provide a graphical Windows-like inter-face with mouse support and wizards to deal with many hard disk maintenance operations.
• Tomsrtbt Linux opens the gates of the Linux operating sys-tem; it provides access to Linux EXT2/EXT3/ReiserFS/FAT/NTFS file systems and many UNIX tools.
• MemTest x86 can test the memory modules that are present on the system, with through test patterns and fast algorithms to test as much RAM as possible in as little as possible.
Install Windows with Ease
e Microsoft Windows® 2000/XP/2003 Setup files providethe ability to setup the latest Microso operating systems withthe ability to slipstream the service packs and hotfixes into theoriginal setup files.e Microsoft Windows® 98/98SE/Me Setup files gives an easyway to partition new drives, format and setup the Windows 98/Me without even the need to enter the product key.
The Best features
• Setup the Windows 98 Second Edition or Windows Millennium Edition in unattended mode (hands free mode) or provide optimized defaults for attended setup with no need to provide the 25 character Product Key.

8 911 Rescue CD Welcome 9
• Setup the Windows 2000/XP directly from the CD using the original Windows CD boot loader; you can also specify an unattended setup script at design time to control the Win-dows Setup process and pre-define the decisions the Win-dows Setup uses when installing the Windows OS.
Easier and Simpler Building
The 911 CD Builder v2.0 automates the creation of the 911 Res-cue CD, it walks through the process with its wizard interface while automating most of the steps required to create the 911 CD, it creates a final ISO file that can be burned with any CDmastering tool (e.g. Nero Burning ROM).is is the Windows version of the 911 CD Builder, it has thesame functionality as version 1.0 but with the familiar Windows interface (it also runs correctly on the all the Windows versions 95/98/Me/NT4/2000/XP).
The Best features
• An easy and straightforward wizard driven interface greatly simplifies the process of assembling the final CD.
• Automatically slipstream the latest service packs and hotfixesinto the original Windows 2000/XP setup files.
• Include ERD Commander 2003 and O&O BlueCon XXL into the CD from their original CDs, without any manual editing for the binary files.

8 911 Rescue CD Welcome 9
Finding Information about the 911 Rescue CD
World Wide Web Website
e WWW website provides in-depth information about the 911Rescue CD and its various components, and provides the latest updates of the 911 CD builder and more.http://www.911cd.net/
Online Discussion Board
e CD Forum provides troubleshooting and general discus-sions about the 911 Rescue CD and Bootable CDs in general.http://www.911cd.net/forums/

Chapter

ChapterLearning the Basics
All you need to know about effectively work-ing inside the 911 Rescue CD environment. 2
is chapter walks you through the basics of the 911 Rescue CD,from booting up the system into using the most common (and useful) 911 Rescue CD functions and also steps for accessing your corporate network resources.
Booting from the CD-ROM drive
e 911 Rescue CD uses the industry standard “El-Torito”Bootable CDROM Specifications, any system that can boot fromthe Windows 2000/XP CDROM can boot from the 911 Rescue CD as they both use the same boot mode.In order to boot-up the system with the 911 Rescue CD, the sys-tem must be configured to boot from the CDROM as the firstboot device through the BIOS CMOS Setup Utility.
To configure systems equipped with the Award 4.51PG BIOS
1. Turn on or reboot the system, the following message will appear on the bottom of the screen “Press <DEL> to enter
setup”2. Press DEL quickly as the message appears for only a few sec-
onds.

12 911 Rescue CD Learning the Basics 13
3. e system should display the CMOS Setup Utility screen.4. Move to the second option “BIOS Features Setup” and press
ENTER.5. Move to the line that starts with “Boot Sequence”.6. While the “Boot Sequence” line is highlighted press PAGE-
UP several times until the current entry is “CDROM, C:, A:”.7. Press ESC then move to “Save & Exit Setup” and press
ENTER.8. Press Y then Press ENTER.
To configure systems equipped with the Award 6.00 BIOS
1. Turn on or reboot the system, the following message will appear on the bottom of the screen “Press <DEL> to enter
setup”.2. Press DEL quickly as the message appears for only a few sec-
onds.3. e system should display the CMOS Setup Utility screen.4. Move to the second option “Advanced BIOS Features” and
press ENTER.5. Move to the line that starts with “First Boot Device”.6. While the “First Boot Device” line is highlighted press PAGE-
UP several times until “CDROM” is the current entry.7. Move to the line that starts with “Second Boot Device”.8. While the “Second Boot Device” line is highlighted press
PAGE-UP several times until the “HDD0” is the current entry.9. Press ESC then “Save Settings and Exit” and press ENTER
then ENTER.
12 911 Rescue CD Learning the Basics 13
To configure systems equipped with other CMOS BIOS Programs
To configure other system’s settings, consult the Main Board’sUser Manual for specific instructions on how to boot from theCDROM, or if the CDROM drive is on a SCSI host adapter, check its User’s Manual.
If the Main Board or the SCSI host adapter manual is missing, try hitting ESC or F2 or F10 or F12 for the CMOS BIOS menu aerthe RAM counting.
en enter CMOS BIOS setup and change the boot order.If the option is apparently missing, maybe the Main Board doesn’t implement the El-Torito bootable CD standard.
14 911 Rescue CD Learning the Basics 15
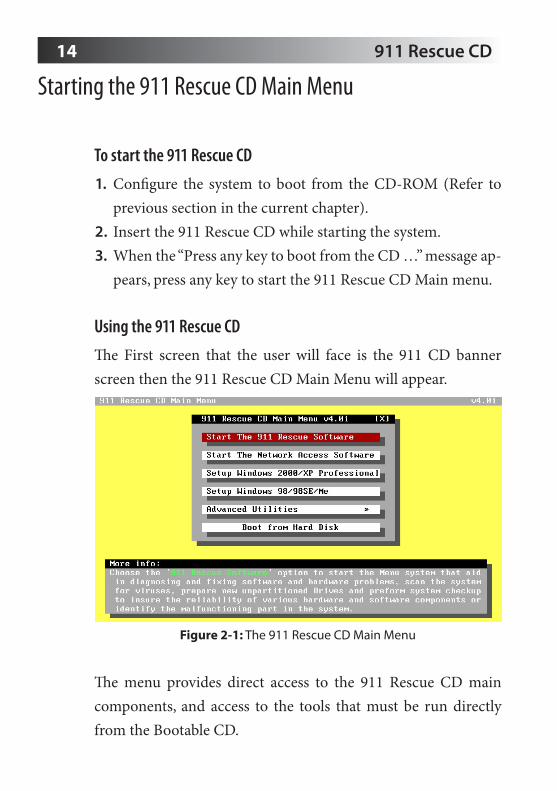
Starting the 911 Rescue CD Main Menu
To start the 911 Rescue CD
1. Configure the system to boot from the CD-ROM (Refer toprevious section in the current chapter).
2. Insert the 911 Rescue CD while starting the system.3. When the “Press any key to boot from the CD …” message ap-
pears, press any key to start the 911 Rescue CD Main menu.
Using the 911 Rescue CD
e First screen that the user will face is the 911 CD bannerscreen then the 911 Rescue CD Main Menu will appear.
Figure 2-1: The 911 Rescue CD Main Menu
e menu provides direct access to the 911 Rescue CD maincomponents, and access to the tools that must be run directly from the Bootable CD.

14 911 Rescue CD Learning the Basics 15
e keys that are available to control the menu are:• Arrow keys - Navigate through the menu with the UP/DOWN
keys.• ENTER or SPACE - Run the highlighted menu option.• ESC - Skip the booting from the CDROM and complete the
boot process from the system’s hard disk.• F10 - Exit to the CDShell console (the CDShell is a special
program that allows the 911 CD to become bootable).e More Info panel in the lower section of the screen showsmore detailed info about the highlighted menu option.
To quit the 911 Rescue CD
To quit the 911 Rescue CD at the CD main Menu point, just press the ESC key and the system will skip loading from the CD-ROM drive and will continue to load from the 1st Hard disk present.
Using the 911 Rescue CD Rescue Software
e 911 Rescue CD main part is the 911 Rescue Soware Menu,it provides access to most of the tools available on the 911 Res-cue CD through a mouse-driven menu and easy-to-use windows and configuration screens, while providing context-sensitive on-line help to aid the user.
To start the 911 Rescue Soware menu1. Boot from the 911 Rescue.2. Select “The 911 Rescue Software” from the main menu.

16 911 Rescue CD Learning the Basics 17
Using the 911 Rescue Software Menu
e 911 Rescue Soware Menu consists of:• Active menu options (White-selectable options): ese are
the available menu options that are present on the CD and can be used.
• Inactive menu options (Grayed-out options): ese are themenu options that are not present on the CD and thus can’t be used.
• More Info panel: shows context-sensitive info about the cur-rent menu screen.
• More Details button: Shows more detailed info about cur-rent menu options (the active and inactive ones).
Figure 2-2: The 911 Rescue Software Menu
To quit the 911 Rescue Software menu
To quit the 911 Rescue CD, press the “Exit” button or keep press-ing the ESC key until the Shut down dialog box appears.
16 911 Rescue CD Learning the Basics 17
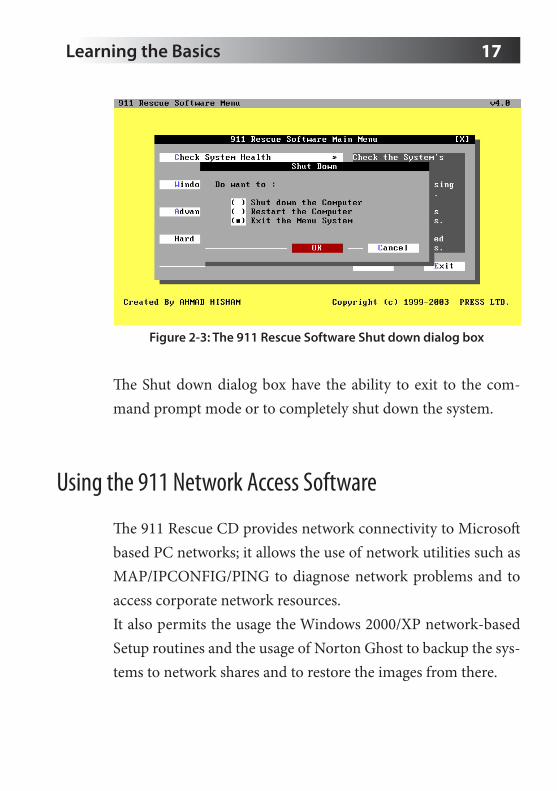
Figure 2-3: The 911 Rescue Software Shut down dialog box
e Shut down dialog box have the ability to exit to the com-mand prompt mode or to completely shut down the system.
Using the 911 Network Access Software
e 911 Rescue CD provides network connectivity to Microsobased PC networks; it allows the use of network utilities such as MAP/IPCONFIG/PING to diagnose network problems and to access corporate network resources.It also permits the usage the Windows 2000/XP network-based Setup routines and the usage of Norton Ghost to backup the sys-tems to network shares and to restore the images from there.

18 911 Rescue CD Learning the Basics 19
To Start the 911 Network Access Software
1. Boot from the 911 Rescue.2. Select “The 911 Network Access Software” from the main
menu.3. Select the protocol in which the network access (if you don’t
know the protocol used first try the TCP/IP protocol) fromthe “Select Protocol” window.
4. In the next windows, fill the User name and Password
fields.5. If you selected TCP/IP, then the “TCP/IP Settings” will ap-
pear, if you are using a static IP addressing (each machine has a static IP number) provide your system IP address and the network subnet mask, otherwise skip this step and accept the usage of the DHCP protocol to get the network information.
6. If you will join an NT domain controller, then enter its name in the Domain field, else keep this field empty.
Figure 2-4: The TCP/IP Settings window
18 911 Rescue CD Learning the Basics 19
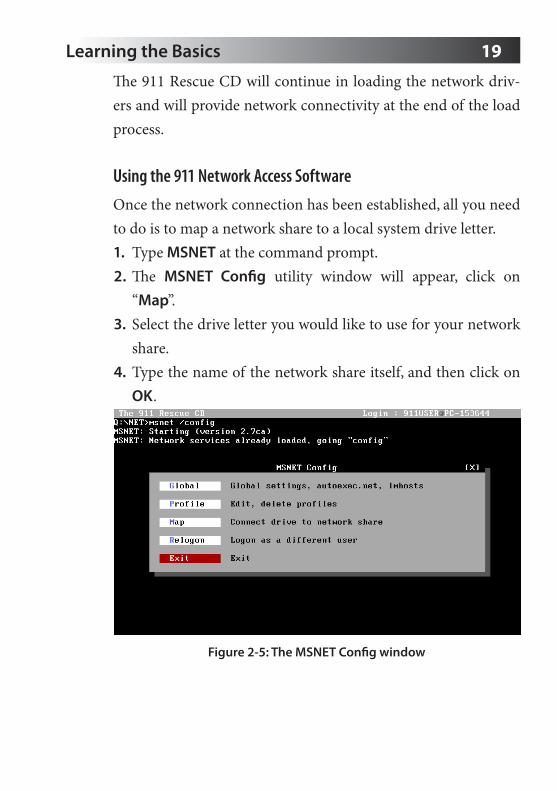
e 911 Rescue CD will continue in loading the network driv-ers and will provide network connectivity at the end of the load process.
Using the 911 Network Access Software
Once the network connection has been established, all you need to do is to map a network share to a local system drive letter.1. Type MSNET at the command prompt.2. e MSNET Config utility window will appear, click on
“Map”.3. Select the drive letter you would like to use for your network
share.4. Type the name of the network share itself, and then click on
OK.
Figure 2-5: The MSNET Config window

20 911 Rescue CD Learning the Basics 21
Install Windows® 2000/XP/2003 on a new System
e 911 Rescue CD can include Windows 2000/XP Setup files(depending on the Setup files supplied in the CD building pro-cess) to integrate the OS installation process inside the 911 Res-cue CD environment.
Starting the Setup routine
e Windows 2000/XP Setup routine can be run through a vari-ety of ways; one of them is the CD direct method.1. Boot from the 911 Rescue CD.2. Select “Setup Windows 2000/XP” from the main menu.3. e “Windows Product Key” window will appear contain-
ing the Windows Product Key which was supplied in the CD building process.
4. By pressing any key the “Windows Product Key” will be re-moved and the Windows 2000/XP Setup will begin.
Figure 2-6: The Windows xp Native Setup Program

20 911 Rescue CD Learning the Basics 21
Install Windows® 98/98SE/Me on a new System
In addition to the Windows 2000/XP Setup files that can be in-cluded in the 911 Rescue CD, Windows 98/Me Setup files canalso be included.
Starting the Setup routine
e Windows 98/Me Setup Assistant eases the Setup process andstreamlines it.1. Boot from the 911 Rescue CD.2. Select “Setup Windows 9x” from the main menu.3. e “Windows Setup Launcher” window will appear, it pro-
vides the ability to partition a newly installed hard disk or Format an existing partition before starting the actual Setup routine.
Figure 2-7: The 911 Windows Setup Launcher

22 911 Rescue CD
4. If you have a new (unpartitioned) hard disk, you can run the 911 Auto Partitioner by selecting the “I have a new hard
disk, Auto partition the drive” option.5. If your C: partition includes a previous data that you want
to clear before performing the installation, you can select “I
want to clean the C: partition, format it” option.6. Click on LAUNCH to start your selected actions.7. e “Windows Setup Assistant” window will appear.8. Select the Windows setup mode you want to use (using the
Hands-free mode is preferred).

22 911 Rescue CD

PART

PART
B 911 R CD
B• Chapter 3
Installing the 911 CD Builder
• Chapter 4
Building your own CD

Chapter

ChapterInstalling the911 CD Builder 3e 911 CD Builder is the tool you will use inorder to create your own customized copy of the 911 Rescue CD.
e 911 Rescue CD doesn’t come in a finalized form (such as a ready-made CD-ROM or a downloadable ISO file) because in itsfinal form it includes many non-redistributable files and manycommercial tools; so the only way to distribute it in a copyrights-respecting form is to publish only the building soware.
The 911 CD Builder v2.0 is the latest version of the 911 Rescue CD building soware, its wizard interface greatly simplifies thecreation process, and automates many of the manual steps previ-ously required to build a correct CD.
System Requirements
e 911 CD Builder has the following hardware and sowarerequirements:
Hardware requirements:
• Intel Pentium processor (or compatible) at 150 MHz for Windows 98/Me; and at 300 MHz for Windows 2000/XP.
• 32 MB of RAM (128 MB recommended).• 100 MB of available hard disk space for basic image creation

28 911 Rescue CD Installing the911 CD Builder 29
(Up to 50 MB ISO file can be created).• 1.5 GB of available hard disk space for full image creation(Up to 700 MB ISO File can be created).• CD-R/RW drive (for ISO image burning).
Software requirements:
• Microsoft Windows 98/Me/2000/XP/2003 (it should work on Microso Windows 95/NT, but it has not been tested).
• Nero Burning ROM 5.5 or later CD recording soware in-stalled (or any other CD mastering soware capable of burn-ing ISO file).
Installation and Setup
e 911 CD Builder is available as a download from the 911 Res-cue CD home page.
To install the 911 CD builder
1. Download the latest releases of the 911 CD Builder from the 911 Rescue CD home page (http://www.911cd.net/).
2. Double click on the downloaded EXE file.
3. e Setup welcome screen should appear, press Next.
4. Read the license agreement then click on “I accept the agree-
ment”, the click on Next.

28 911 Rescue CD Installing the911 CD Builder 29
If you don’t accept the License Agreement, you can’t continue the Setup; and you shouldn’t use the 911 Rescue CD.
5. Select where you want to install (keeping the default location is recommended), then click on Next.

30 911 Rescue CD Installing the911 CD Builder 31
6. Choose “Full Installation” then click on Next.
7. Select where to put the Start menu entries, and then click on Next.

30 911 Rescue CD Installing the911 CD Builder 31
8. Confirm your selected options, and then click on Install.
9. e Setup should perform the installation process.

32 911 Rescue CD Installing the911 CD Builder 33
10. Click on Finish to end the installation process.

32 911 Rescue CD Installing the911 CD Builder 33
If you need to uninstall the 911 CD Builder
If you need to remove the 911 CD Builder from your computer, use the Add/Remove Programs option from the Windows Con-trol Panel or the “Uninstall The 911 CD Builder” option from the Programs menu.
To uninstall the 911 CD Builder
1. On the Windows taskbar, click Start -> Settings -> Control
Panel. On the Windows XP taskbar, click Start -> Control Panel.2. In the Control Panel, double-click Add/Remove Programs.3. In the list of currently installed programs, click on “The 911
CD Builder” entry in the list.4. Click on “Change/Remove”.5. Click Yes to confirm that you want to uninstall the product.
6. e Uninstall operation should be completed aer your con-firmation.

Chapter

Chapter
4Building your own CD
By using the 911 CD Builder, you can create your own copy of the 911 Rescue CD, with just the tools you need.
One of the reasons that the 911 Rescue CD is so powerful, yet very easy to use is its ability to dynamically adapt to the tools available on the CD-ROM, you add the tools to the CD-ROM and it is recognized by the 911 Rescue CD menus and the menu entries depending on it will be activated.
With this feature you can create the CD with just the tools you want (or just the tools you already own); there is no need to pur-chase any unnecessary tools, in order to get a full ISO.
To Start the 911 CD Builder
1. On the Windows desktop, click Start-> Programs.On the Windows XP desktop, click Start -> All Programs.2. Click The 911 CD Builder -> The 911 CD Builder.
Figure 4-1: The 911 CD builder group in the Start menu

36 911 Rescue CD Building your own CD 37
Collecting the 911 Utilities
e 911 utilities are the utilities and tools that can integratedinside the 911 Rescue CD, they range from disk partitioning and maintenance tools to antivirus tools to hardware and sowarediagnostics tools to file management tools to low level file-sys-tems drivers files to disk imaging tools to many various tools thataid in any emergency situation.
By putting each tool you want to include inside the 911 Rescue CD into it located folder you’ll automatically integrate it func-tionality inside the 911 Rescue CD.
To collect the 911 Utilities
1. Browse to C:\Program Files\911 CD Builder\911_utilities
(replace C:\Program Files\911 CD Builder with wherever you installed the 911 CD Builder)
2. Enter the first folder inside the 911_utilities folder, you willfind inside it a file named _build.txt; open it with any stan-dard text editor (like Notepad).
3. e _build.txt file contains a step-by-step description on howwhich files to include inside the utility specific folder, by fol-lowing the updated steps inside the text file ensures that youhave collected the files correctly.
4. Repeat the steps 2 & 3 for all the folders inside the 911_utilities folder to collect the utilities that you want to
include inside the 911 Rescue CD.

36 911 Rescue CD Building your own CD 37
5. On the Windows desktop, click Start -> All Programs -> The
911 CD Builder -> Verify the 911 Utilities files.6. A Notepad window will appear containing a report showing
the 911 Utilities that was recognized as present and will ap-pear as active in the 911 Menu in the 911 Rescue Sowareoption.
Creating your own copy of the 911 Rescue CD
1. Start the 911 CD Builder from the Start menu.
2. e 911 CD Builder will start showing its welcome screenclick Next to skip it.

38 911 Rescue CD Building your own CD 39
3. Tis step shows the sections of the 911 Rescue CD that you want to include in your compilation.
It includes:a. 911 Boot Disks (911 Software - 911 Net) - is is a man-
datory option, its role is to generate the boot disks required in order to boot the 911 Rescue CD properly, this option generates the 911 Rescue Soware bootdisk and the 911Network Access bootdisk.i. Use CDNet Plus disk for Network Access - Instead of
building the 911 Network Access bootdisk to access the network with it, checking this option will generate the 911 CDNet Plus bootdisk image instead.

38 911 Rescue CD Building your own CD 39
Note: The 911 CDNet Plus bootdisk is a special bootdisk designed to
simultaneously access the network resources and the CDROM drive
in the same time, it provides access to both the 911 utilities, and the
network shares.
ii. Accept default list of Network drivers - is optionlets you use a generic (most widely used) list of network drivers, if you have a special network driver uncheck this option.
b. Microsoft Windows 2000/XP/2003 Setup Files - Check this option to include Windows 2000 or XP Setup files (a furtherstep will get more details about the Windows 2000/XP Setup files).c. Microsoft Windows 98/98SE/Me Setup Files - Check
this option to include Windows 98 or Millennium edition Setup files (a further step will get more details about theWindows 98/Me Setup files).
d. Advanced Tools - If you have copies of Winternals ERD Commander 2002/2003 and/or O&O BlueCon XXL Pro, check this option to include them in the 911 Rescue CD.
4. Aer specifying the components of the 911 Rescue CD youwant to include in your compilation, click Next.
5. is step shows the detailed options about including the Win-dows 2000/XP/2003 Setup files (if you selected not to includethe Windows 2000/XP/2003 Setup files in the 911 Rescue CDskip to step 9).

40 911 Rescue CD Building your own CD 41
It includes:a. Location of Windows Setup Files - Specify in this field
the location of the Windows setup files you want to includein the current CD compilation, you need to direct the 911 CD Builder to the I386 folder inside the Windows CD.
b. Integrate Service Pack - Check this option and specify the location of the service pack executable file in its belowfield in order to create a slipstreamed Windows installationfiles.
Note1: Slipstreaming means that the Windows Setup files are up-
dated with the service pack’s files, and that all the Windows installa-
tions done with the updated setup files are automatically using the
updated service pack files.

40 911 Rescue CD Building your own CD 41
Note2: The 911 CD Builder needs the Network version of the Service
pack executable file, you can’t slipstream Windows setup files with
the Express version, you can specify which version to get when you
downloading he desired service pack from
http://windowsupdate.microsoft.com.
6. Aer specifying the details of the Windows 2000/XP/2003 in-stallation files you want to include in your compilation, clickNext.
7. is step shows the extra options about the Windows 2000/XP/2003 Setup files you will include in your compilation.
42 911 Rescue CD Building your own CD 43
It includes:a. Customize installation info - By filling the Windows
setup info in this part ensures that your 911 Rescue CD includes the necessary information to run the Windows 2000/XP Setup in the fully automated hands-free mode.i. Store this info in the 911 Win2K Setup Assistant
- Store the Windows setup info in the 911 Windows 2000/XP Setup Assistant (which provides a front-end to the Windows Setup in the 911 Rescue Soware menu).
ii. Store this info in the Windows 2000/XP installation
- Store the Windows setup info in the installation folder directly (so that even without the 911 Setup Assistant) the info you provide here will automate the Windows Setup).
iii. Set Windows installation info - Click on this button to open the “Windows 2000/XP/2003 Installation Info” dialog box.
1. Unattended setup information file - is is thetemplate of the setup unattended script, you can use the pre-created script, or you can edit the script to provide a truly personal Windows installation.
2. Owner Name/Organization - Personal info that will be passed directly to the Windows Setup.
3. Product Key - the Windows setup product key. 4. Computer Name/Workgroup/Domain - Com-
puter-specific info to be passed directly to the Windowssetup.
b. Allow the installation to accept corporate product keys

42 911 Rescue CD Building your own CD 43
- If this option is checked and a Windows 2000 installation is to be included in the current compilation, it will prevent the installation from requesting the Windows product key entirely, but if a Windows XP installation is to be included, then it just accept the Product keys meant for the volume license (it has no advantage over the default option other than that).
c. Remove extra language files - Check this option to freeup around 90 MB of the Windows setup files total size, butcheck it only if you are not going to install a right-to-le orcomplex scripts languages (like the Arabic or Hebrew lan-guages), or an Asian language (like Traditional Chinese).
8. Click Next.
9. In this step you can specify the detailed options about the Windows 98/Me Setup files you want to include in the cur-rent compilation (if you selected not to include the Windows 98/Me Setup files in the 911 Rescue CD skip to step 11).
It includes:a. Location of Windows Setup Files - Specify in this field
the location of the Windows setup files you want to includein the current CD compilation, you need to direct the 911 CD Builder to the folder which contains the Windows Setup CAB files.
b. Customize installation info - By filling the Windowssetup info in this part ensures that your 911 Rescue CD

44 911 Rescue CD Building your own CD 45
includes the necessary information to run the Windows 98/Me Setup in the fully automated hands-free mode.
i. Store this info in the 911 Setup Assistant - Store the Windows setup info in the 911 Setup Assistant (which provides a front-end to the Windows Setup in the 911 Rescue Soware menu).
ii. Store this info in the Windows installation - Store the Windows setup info in the installation folder directly (so that even without the 911 Setup Assistant) the info you provide here will be automatically entered in the Windows Setup.
iii. Setup Windows installation info - Click on the this button to open the “Windows Installation Info” dialog box.

44 911 Rescue CD Building your own CD 45
1. Optimized For - Specifies the operating system that ac-cepts the below product key.
2. Owner Name/Organization - Personal info that will be passed directly to the Windows Setup.
3. Product Key - the Windows setup product key.4. Computer Name/Workgroup - Computer-specific
info to be passed directly to the Windows setup.
10.Click Next.
11. In this step you can specify the location of the ERD Com-mander and/or O&O BlueCon XXL CDs (if you selected not to include these tools in the 911 Rescue CD skip to step 13).a. ERD Commander 2002/2003 - Specify the location of

46 911 Rescue CD Building your own CD 47
the CD root where the ERD Commander 2002/2003 filesresides.
(e.g. If the ERD Commander 2002/2003 files are located inC:\ERDCD\I386, point the 911 CD Builder to C:\ERDCD).
b. Specify the location of your BlueCon CD - Specify the location of the root of the O&O BlueCon CD.
(e.g. If the O&O BlueCon files are located in C:\OOBCON\
I386, point the 911 CD Builder to C:\OOBCON).
Note: You can also create the tool’s ISO file, then extract it with ISO-
Buster or WinImage to a folder and point to it.
12.Click Next.
13.In the next step you can specify the location of the 911 Utili-ties collection and the Additional files folder.

46 911 Rescue CD Building your own CD 47
a. 911 Utilities - Specify the location of the 911 utilities col-lection that you have already collected in the previous sec-tion (normally it is stored in the 911_utilities folder in the folder where the 911 CD Builder was installed, but you can specify an alternate location).
b. Additional Files - Specify the location of the additional files (like an Autorun program or some extra programs)to be included in the 911 Rescue CD, these files will be in-cluded in the root of the CD.
14.Click Next.
15.In the last step you specify the ISO file details.
It includes:
48 911 Rescue CD Building your own CD 49
a. Specify the location to save the generated ISO file to
- Specify the name of the ISO file you want to save the cur-rent compilation, the generated ISO file can be written to aCD-R/RW using any standard CD recording soware.
b. Clean session’s temporary files after completing
- Check this option if you don’t need the temp files thatgenerated during the 911 Rescue CD ISO file generation.
c. Password Protect the created CD - Selects wether to password protect the generated compilation or not.
Important: The way of saving the password inside the current com-
pilation is considered very dangerous, as it saves the password in
clear text (by simply opening the right file, you can read the pass-
word directly), so keep the CD in a safe place.
16.Click Next.

48 911 Rescue CD Building your own CD 49
17.In this step you should review all the options you selected and the location of the files to include, take a moment in this stepto make sure you selected all the options you want.
18.Click Finish to start generating the ISO file of your own cus-tomized copy of the 911 Rescue CD.
19.If this your first time to run the 911 CD Builder, then youwill be prompted to insert the Windows 98 CD in order to get needed system files to actually boot the 911 Rescue CD.
18.Click on OK, then specify the location of the Windows Setup files, the 911 CD Builder will import the needed files thencontinue in its building process.
19. e building process should take some time (depends onthe speed of the machine used and the size of the files to beincluded in the generated ISO file).
50 911 Rescue CD Building your own CD 51
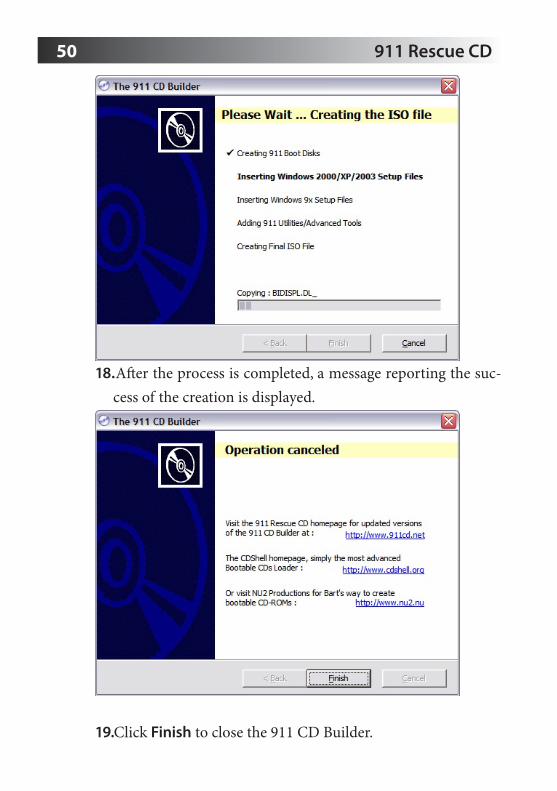
18.Aer the process is completed, a message reporting the suc-cess of the creation is displayed.
19.Click Finish to close the 911 CD Builder.

50 911 Rescue CD Building your own CD 51
Burning your 911 Rescue CD ISO file
Aer the previous section is completed, you should now have anISO file containing the just the contents you need in your 911Rescue CD.
In order to transfer the CD contents from the ISO file into a CD-R/RW you need CD recording soware.
In this section Nero Burning ROM 6.0 will be used, but you can use any other soware capable of burning ISO standard files(such as Roxio Easy CD Creator or CDR-Win).
1. Open Nero Burning ROM.2. Click Cancel on the “New CD compilation” dialog box that
appears.3. Choose Recorder -> Burn Image…
If you are using erlier versions of Nero select File -> Burn
Image…
4. Specify the ISO file location.5. Click on Burn.