the 6 critical steps to secure your servers - ssdnodes.com€¦ ·...
TRANSCRIPT

The 6
Critical
Steps to
Secure Your
Servers

Security is a lie. Well, that’s an exaggeration. Let’s try again. Security gives back exactly what you put into it. Let’s put the threat in perspective. If you’re a developer working on a side project, hosting a blog, or even running your small business from a virtual private server VPS , you’re unlikely to be targeted by the sophisticated attacks that cause the massive data breaches you might have heard about on the news. Unsurprisingly, the more popular you or your services are, the higher the risk. If you’re running a SaaS app with a hundred thousand users, your database is much more valuable to hackers. But no matter how big you are, or how valuable your data, you need to be vigilant. Attackers are continually probing the entire internet for servers that they can easily commandeer, whether that’s through misconfigured SSH, weak passwords, or security bugs in server-side software. Once an attacker has access to your server, they might use it to send spam, attack other services, mine cryptocurrencies, or spread malware with the computing power you pay for. Attackers look for easy targets, move quick, and leave a lot of damage in their wake. Aside from being an incredible inconvenience to you, having a compromised server puts everything you’ve built at risk. The goal of this guide is to give you easy-to-follow, high-value strategies for protecting your server. You should follow these steps when you first create an account with your VPS hosting provider and whenever you provision a new server. These tips will work on most VPS-hosted servers running one of the popular variants of Linux, such as Debian, Ubuntu, Fedora, or CentOS.

This guide isn’t the destination on server security—it’s the beginning. There is much more you can do to protect your server from attack. But, by following these steps, you’ll become anything but an easy target. And, when it comes to security, there is no better first step than that. And that’s the truth.

Contents
Implement strong, unique passwords What is a strong password? Why does uniqueness matter? How do I create strong, unique passwords?
Dashboard/administration area Server user accounts Databases
Two-factor authentication
Use SSH key authentication
Enable software firewalls iptables basics Firewall strategies
Explicit allow Explicit deny Basic setup for an explicit allow strategy
Protip Don’t get locked out! iptables persistence
Additional resources
Limit server-side application access to the internet Other applications
Update, update, update 9 Ubuntu/Debian Avoiding installations with deb/rpm Other software
Block intruders with fail ban Configuring fail ban

Additional resources
Beyond the steps to secure servers Guides/tutorials Other areas of interest

Implement strong, unique passwords Before we dive into VPS-specific strategies, we need to talk about cybersecurity at its most fundamental passwords. There are three ways for attackers to successfully acquire your password to any service they can make educated guesses based on what they learn about you as a person your birthday, your favorite hobby, the name of your child , they can use computer programs that use brute force by trying millions of passwords until one actually works, or they can download lists of common passwords in hope that you’re the kind of person who uses password on every website. It should come as no surprise then that the more complex your password is, the more difficult it will be to guess using any of two strategies. You want your passwords to be both strong and unique.
What is a strong password? Here at SSD Nodes, we have some general guidelines
➔ A minimum of characters ➔ No words you can find in a dictionary cat, password, tree

➔ No words or numbers that reference personal information, such as a birthday or the name of a child
➔ Both upper and lowercase letters ➔ At least one symbol # $ ! % &
Generally speaking, the more characters you use, and the more
Why does uniqueness matter? You want to use a different password for every website. That way, if an attacker manages to figure out one of your passwords, they can’t then use that same password to access all your other accounts. The same policy goes for your virtual private servers. If you use the same password to access multiple servers, an attacker who discovers your password has access to not just one server, but your entire infrastructure. And that’s really bad news.
How do I create strong, unique passwords? Fortunately, creating strong, unique passwords is relatively easy these days. The best solution for most people is a password manager, such as BitWarden, LastPass, or Password, among others. These programs store all of your passwords in an encrypted database that can be unlocked with a master password. Of course, this master password should be incredibly strong and unique, and one that you can remember. Once you have a password manager set up, they can generate entirely random passwords for each of your services, and will automatically fill them into log in forms on sites you visit. With a password manager, you only need to memorize your master password, and any others will also be both strong and unique. Many people also create their own pattern or mnemonic device to create unique passwords on-the-fly that don’t need to be memorized. But, how you do that is entirely up to you.
Now that you can create new, secure passwords regularly, where do you need to implement them?
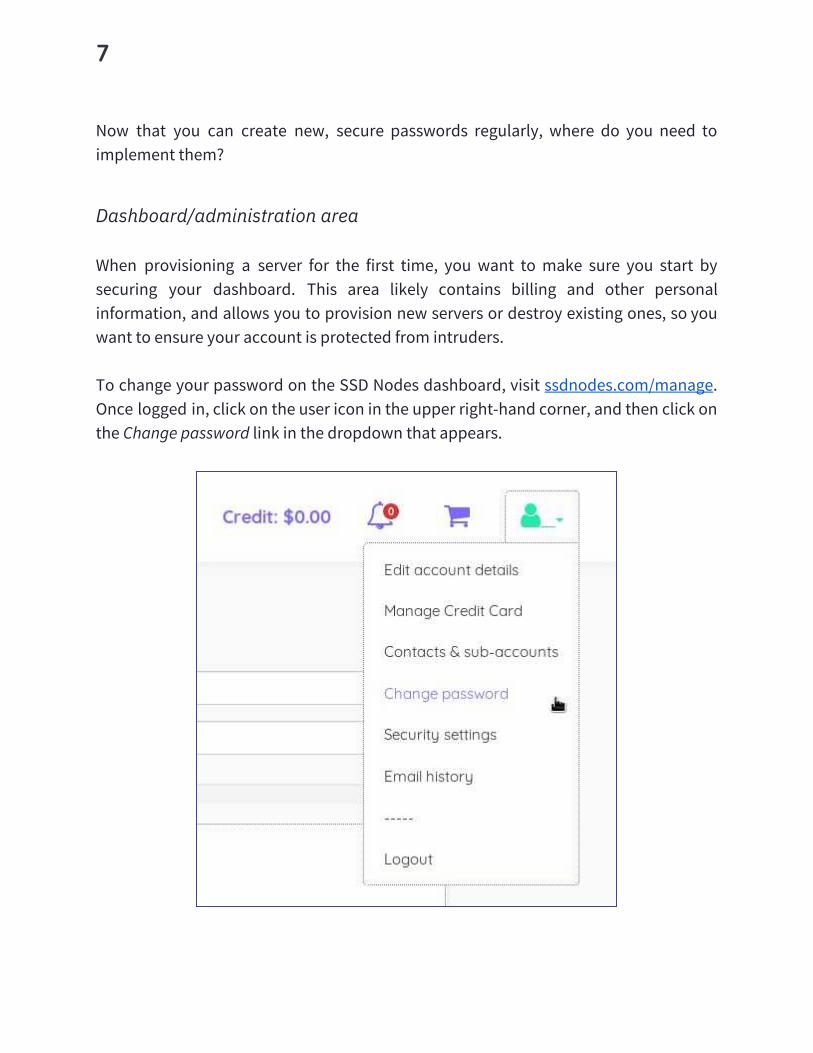
Dashboard/administration area When provisioning a server for the first time, you want to make sure you start by securing your dashboard. This area likely contains billing and other personal information, and allows you to provision new servers or destroy existing ones, so you want to ensure your account is protected from intruders. To change your password on the SSD Nodes dashboard, visit ssdnodes.com/manage. Once logged in, click on the user icon in the upper right-hand corner, and then click on the Change password link in the dropdown that appears.

Once the page loads, you can enter your existing password for security , followed by your new, strong, and unique password. We try to encourage the use of a good dashboard password with a progress bar that gives you a rough estimate of how effective your password will be at keeping attackers out.
Once finished, you can click on Save changes. Awesome—your dashboard will now be far more secure! Just remember to save this new password in your manager.
Server user accounts Just like a website, you connect to your VPS using usernames and passwords. Okay, not always, but more on that in a minute.

You want to ensure that any user account that you’ll use to connect to your server is protected with a strong password. Every time you create a new user, we strongly recommend using strong passwords. The first time you connect to a newly-provisioned VPS, we recommend changing the root password. This can be done easily with the pass d command—simply enter your current password followed by your new root password.
Databases Hackers will often probe for easy access to databases such as MySQL , which they can use as an access point for the entire server. The root password to the entire database should be strong and unique to that server. Later on, we’ll talk about limiting access to the port that MySQL runs on entirely for an additional layer of security. However, a strong database password might prevent someone who has already hacked into your server from quickly gaining access to your database.
Two-factor authentication Two-factor authentication FA is becoming increasingly common among services that retain sensitive personal information, such as bank accounts. When two-factor authentication is enabled for an account, you need to not only input your password, but also another piece of information that proves you’re the real account owner. You might have experienced FA on a service like Facebook. If you’re logging in from a new laptop, for example, they may ask you to look at your phone—viola!—they’ve sent you a text message with a -digit code. Once you enter that code, Facebook will let you into your account. This is FA in action—by supplying both your password and proving you’re able to receive messages on a device you own, Facebook now has more reason to believe you are who you say you are. With FA enabled, an attacker needs to not only figure out your password, but also take control of your physical device. And that’s a much bigger problem.

SSD Nodes supports FA, and strongly recommends you enable FA for your dashboard account. You can begin the setup process by clicking on your user icon in the upper right-hand corner, and then clicking on Security settings. To learn more, visit our blog post on this very topic Tutorial Enabling Two-Factor Authentication with SSD Nodes.
Use SSH key authentication Secure Shell SSH is the primary way people connect to their servers. SSH is a secure, encrypted protocol on its own, but there is a way to make it even stronger SSH authentication keys. Using authentication keys is similar to using FA on your SSD Nodes dashboard—instead of relying solely on passwords to log into your server, you’re using a secret key that only you have. You can even password-protect these keys for maximum security. On your Linux or OS X machine, you can create an SSH key pair using the ssh-key en tool. Follow the prompts to create your public/private key pair. On Windows machines, you can use PuTTY, our recommended tool for Windows users who want to connect to their VPS. For SSH keys that you’ll use to log into your VPS and make administrative changes, install programs, or edit files, we highly recommend password-protecting this file. You can also opt to leave the key unprotected, which is more useful for tasks that need to be completed without your intervention, such as automated backups. Once you create the key, you can copy the public key to your server. This will allow you to log into your server using the SSH key rather than your user password. It’s a far more secure method of connecting to your VPS, as someone would have to steal your SSH key to get in.

After you have SSH-based logins working, you can disable password-based logins for an additional layer of security against brute-force attacks. Before you do this, you want to be sure your SSH-based authentication is working, and that the user has sudo access. You will then want to edit the /etc/sshd_con i on your server so that both the Pe mitRootLo in and Pass o dAuthentication lines are followed by no, as in the following Pe mitRootLo in no Pass o dAuthentication no You’ll then want to restart the SSH server with the following command sudo systemctl
esta t ssh. For a more comprehensive look into SSH keys, how to set them up, and step-by-step directions of the entire process, visit our tutorial on the topic—Tutorial SSH authentication setup and improved security. Once these steps are complete, your server will be significantly more resilient to intrusion by brute-force attackers.
Enable software firewalls The core of the Linux firewall system is a suite of tools called iptables—it’s highly configurable, flexible, and remains the go-to solution for people wanting to protect their Linux servers from intrusion. iptables uses rules, which instruct the firewall on how to respond to different incoming and outgoing traffic. Rules are highly configurable, so covering all their options are beyond this guide, but we’ll cover the basics. iptables can be difficult for those new to Linux administration, so many distributions come with a tool that helps make configuration easier—these are called wrappers. For example, Ubuntu comes with u , which offers a more user-friendly method of creating firewall rules. In CentOS, the default wrapper is i e alld. You can choose to ignore the wrapper and use iptables directly or use the wrapper used by your particular distribution, but it’s not recommended to do both.
iptables basics iptables should be installed on your VPS by default. In order to see what rules might be applied already, type sudo iptables -L into your terminal to print out the list of current rules, if any. The word list is essential, because rules order matters. The first rules you create will take precedence over the following, so the order in which you create rules is critical. For example, let’s say your first rule denies all traffic, and your second rule opens port

for SSH traffic. When you try connecting to your VPS via SSH, you’ll be denied due to the first rule. If you reverse the order, first allowing SSH traffic on port and then denying all traffic, you will be able to connect via SSH while also restricting other ports.
Firewall strategies Unfortunately, there is no one firewall configuration that works for all needs. Instead, you should investigate what strategy might work best for you, and then reconfigure as needed. There are two common strategies explicit allow and explicit deny.
Explicit allow This is the most common strategy, and likely the most secure. With this strategy, the default rule is to deny all traffic to your VPS, and then explicitly allow access for certain programs/services. The negative of this strategy is that, if you’re new to firewalls, you’re much more likely to lock yourself out of your VPS due to incorrect rules, or incorrect ordering of rules. For a good strategy to prevent lock-outs, check out our pro tip on the next page.
Explicit deny Whereas the explicit allow strategy denies all traffic by default, the explicit deny strategy allows all traffic by default, and then locks down certain ports that are vulnerable to attack. Explicit deny prevents the risk of lock-outs, and can be easier for those who need
practice creating rules for the first time, but is inherently less secure.

Basic setup for an explicit allow strategy We won’t go into too many details about the syntax behind the following commands, but let’s set up a basic explicit allow firewall to allow SSH, HTTP, and HTTPS traffic—this will work for a majority of VPS uses. First, flush any existing rules sudo iptables -F Then, allow traffic on ports SSH , HTTP , and HTTPS sudo iptables -I INPUT -p tcp --dpo t -j ACCEPT sudo iptables -I INPUT -p tcp --dpo t -j ACCEPT sudo iptables -I INPUT -p tcp --dpo t -j ACCEPT
We now have three rules at the beginning of our order. We can now create the final rule to block all other traffic sudo iptables -P INPUT DROP
Protip: Don’t get locked out! Unfortunately, it’s common for firewall beginners to lock themselves out of their VPS when creating new rules. In the worst-case scenario, you would need to reinstall your operating system from the dashboard and begin again. To prevent a lockout, you can set up your VPS to restart iptables in a few minute’s time before setting any rules. This way, if you lock yourself out, you can wait a few minutes for iptables to restart, thereby giving you a clean slate to try again. echo "sudo se ice iptables esta t" | at no + minutes

iptables persistence By default, iptables rules are temporary. If you restart for VPS, for example, any rules you set up will disappear. In order to make rules stick around, you need to save them. In CentOS, this is as simple as running the following command sudo /etc/init.d/iptables sa e In Ubuntu/Debian, you need to install the iptables-pe sistent package sudo apt- et install iptables-pe sistent
Additional resources
● iptables Linux firewall rules for a basic Web Server ● A secure, standard iptables rule-set for a basic HTTP s webserver ● iptables rules to help secure your Linux box ● Linux Server Hardening Security Tips [ edition] ● Basic Guide on IPTables Linux Firewall Tips / Commands

Limit server-side application access to the internet If an application you’re running on your VPS doesn’t need to access the internet, you shouldn’t let it—that’s just smart security. Let’s use a MySQL database as an example. Let’s say you have a MySQL database connected to your Wordpress blog. When someone visits your website and scopes out a few posts, they’re not accessing your MySQL database directly—the Wordpress application running on your VPS is actually is doing the work to pull information from the database and display it on the user interface. In this setup, the MySQL database does not need to connect to the entire internet, only to Wordpress. You should ensure the database refuses connections coming from outside the VPS itself. A simple way to do this is to edit the MySQL configuration file, which is either located in the /etc/mys l/ directory, or the /etc/ directory. The file itself is called my.cn . You’ll want to ensure that the bind-address setting points to what’s called the loopback network device—essentially, the server itself.
bind-add ess = . . . Other users might want to take this a step further by uncommenting the option that reads skip-networking. Commented # skip-net o kin
Uncommented skip-net o kin This change will prevent MySQL from listening for any TCP/IP connections, meaning all interaction with the database will have to be done via Unix sockets. Unless you are using multiple servers that connect to each other a far more advanced configuration , this is the recommended option. Firewalls are also an effective method of preventing access to a MySQL installation via the port that it runs listens to for connections. It’s possible to restrict the port directly, or restrict access based on groups. If you use the recommended explicit allow firewall setup, port will be blocked by default—and you should keep it that way! Protip: Another excellent method of ensuring the overall security of your MySQL database is to use a program included in your installation called mys l_secu e_installation. This program will help improve your database’s security by ensuring that root accounts have passwords secure ones, hopefully , removes root accounts that are accessible from outside the server itself, removes anonymous users, and more. The example above is just a quick look into the philosophy behind limiting server-side applications from accessing the internet. There are too many other examples to possibly cover them here. But, keep in mind this rule of them If an application or service doesn’t need to directly access traffic from the internet, it shouldn’t be allowed to.

Update, update, update No matter what OS, software, and services you’re using on your new server, you want to ensure that they’re always up-to-date. The developers behind Linux distributions Ubuntu, Debian, CentOS, and so on are constantly updating software to patch and
mitigate security issues. Not upgrading regularly can leave your server vulnerable to known, exploitable flaws. Luckily, most Linux distributions and all those available through SSD Nodes come with a package manager that makes updates incredibly easy.
Ubuntu/Debian For Ubuntu/Debian, the updating process uses a tool called apt. sudo apt- et update sudo apt- et up ade
The first command updates the list of available software, and the second downloads and installs any new updates for software you currently have installed.
CentOS On recent versions of CentOS, you can use the yum tool instead. sudo yum update

After executing the command, you will need to agree to update the listed software packages.
Avoiding installations with deb/rpm It can be tempting to use the tools behind these package management systems—deb and pm, respectively—to install packages that might not be found within the system itself. At SSD Nodes, we recommend against this practice, namely because packages installed this way won’t be tracked or automatically updated. In addition, you can create dependency issues if you aren’t fully aware of the consequences of installing a certain package. As a rule of thumb, only install software with the appropriate package manager for your system apt or yum. If you’re in critical need of a certain piece of software that isn’t available in the package management system, but want to avoid using deb/ pm directly, you might be able to use a repository created by a developer. In Ubuntu, for example, these are called Personal Package Archives PPAs . Installing software from a PPA will ensure that it’s tracked in the package management system and updated when new versions become available, but Ubuntu developers warn that PPAs are a low-security alternative to the main repositories.
Other software If you’re using your server to host a web application built on a platform that has its own package manager—Node JS and npm, for example—you’ll want to make sure that you’re also keeping those packages up-to-date whenever possible. Each tool will have its own method of updating packages, whether individually or globally. For example, with npm, you can globally update all installed packages with one command. npm update -

A general rule is that the larger and more popular a platform is, the more critical it is to be timely with security updates. Wordpress, for example, has both a large codebase with lots of dependencies and is extremely popular, leading to frequent security patches that hackers can take advantage of if you don’t update regularly.

Block intruders with fail2ban As we’ve said before, hackers are regularly probing servers—even those that rely on SSH keys rather than passwords—in search of ways to get access. Obviously, strong passwords and SSH key-based logins while also disabling password-based logins can help mitigate those issues, but it’s also possible to prevent hackers from even trying a brute force attack to begin with. Enter ail ban, which blocks would-be intruders from gaining access to your server via a firewall. After a certain number of unsuccessful login attempts, that IP will automatically be added to a blocklist in the firewall, preventing any further access attempts. On Ubuntu or Debian, installing ail ban is quite easy. sudo apt- et install ail ban On CentOS, you need to install the EPEL repository before installing ail ban. sudo yum install epel- elease sudo yum install ail ban
Once installation completes, ail ban will be running, and your VPS will immediately be more secure from automated tools that are trying to sneak their way in.
Configuring fail2ban
You might want to want to edit the configuration file, which allows you to specify how many failed attempts will lead to a ban, how long the ban should last, and so on. To do that, copy the default configuration file to a new version that’s unique to your server, and then open it with your favorite editor, like nano. sudo cp /etc/ ail ban/jail.con /etc/ ail ban/jail.local sudo nano /etc/ ail ban/jail.local
Once you’ve dialed in your configuration, just restart the fail ban service. Ubuntu/Debian sudo se ice ail ban esta t
CentOS sudo systemctl esta t ail ban
Additional resources
● http //www.fail ban.org/wiki/index.php/HOWTOs ● https //fedoraproject.org/wiki/Fail ban_with_FirewallD ● https //help.ubuntu.com/community/Fail ban ● https //www.howtoforge.com/tutorial/how-to-install-fail ban-on-centos/

Beyond the 6 steps to secure servers This guide only covers six key steps for securing your new VPS—there are dozens, if not hundreds, more. Once you’re finished with this guide, your VPS will be far more resilient to attack, but you can still take your security to the next level with additional resources. Thanks so much for reading, and congratulations on your new VPS! Of course, if you haven’t invested in SSD Nodes yet,
Guides/tutorials
● My First Minutes On A Server Or, Essential Security for Linux Servers ● How To Make Your Linux Server More Secure ● Basic sshd hardening ● Linux Server Hardening Security Tips ● Hardening Security Tips for Linux Servers
For the very brave, Red Hat has a comprehensive guide to security that can be adopted for other Linux variants.

Other areas of interest
● Turn off or uninstall unneeded services. ● Create unique user accounts for web server processes that have read access to
only the relevant files/directories. ● Restrict write access for web server users to all directories except when
explicitly needed, such as for image uploads in Wordpress. ● Change your SSH port to something other than , and then block with your
firewall. ● Enable automatic updates. ● Set up automated backups, and then test that they work!

What are you
hosting for?SSD Nodes creates high-value cloud
computing for developers who want
make the web amazing.
Why you'll love us
Get way more for way less
Save at least $600/year by switching to SSD Nodes from high-priced competition, and extend your savings with new three-year plans.
Speed, price, quality — pick all three
Run e-commerce, web apps, high-traffic blogs, and so much more on a platform built Intel Gold processors, SSD drives, and 10Gbps networks.
An innovative dashboard
Forget inane, half-functional experiences—our newly-refreshed dashboard gives you power and puts in a pretty package to boot.
A real human touch
We're a small bunch and we love what we do, which is why we offer industry-leading guarantees, a 100% SLA, and customer service that works for you.
ssdnodes.com