thank you page (page 1) - meredith corporationimages.meredith.com/wood/pdf/dp-00158.pdfbrowse more...
TRANSCRIPT

Mission Furniture
Thank You!Thank you for ordering a WOOD® magazine download. We hope you enjoy being part of our online experience and that you have fun expanding your woodworking skills.
Please remember that this copyrighted material is for your use only. It is unlawful to share this file with someone else or to reprint it in any form.
Bill KrierEditor in Chief, WOOD magazine
Adobe Acrobat Reader Troubleshooting Guide
If you can read this page, your Acrobat Reader program is working correctly! But you may still have problems or specific issues, such as printing and saving your downloadable file.
My printer won’t print the text correctlyAlmost all printing problems are due to not enough free system resources memory. The files are very memory intensive because they include graphics, text, and photos. Close all other programs/applications and print directly out of the Acrobat Reader program, not your Web browser.
Patterns are not printing full-sizeMake sure your printer is set to print at 100 percent and that “print to fit” is not checked. These settings are selected in the printer setup or printer options.
I can’t save my file now that it’s downloadedYou must save the plan when you download the file. Download the file again, except this time try right-clicking on the red download button. A menu window will open. Select “Save target as” or “Save link as” to save the file to your hard drive. Once saved, you can open it up with Adobe Acrobat Reader.
For more details on using Adobe Acrobat Reader please visit our online help section at: http://www.woodstore.net/clicherforde.html
WOOD Store Customer Favorites
WOODStore.net Browse more than 1000 plans, projects, books, techniques, & more
Visit the WOOD Store at:
WOODStore.net
Shop Tools & Accessories
Indoor Furniture
Outdoor Furniture

http://www.woodonline.com
DOWNLOADABLE ONLINE WOODWORKING PLANS
®
Page 1 of 4DP-00158 ©Copyright Meredith Corporation 2001
Timeless Clockarts-and-crafts
Reminiscent of the Arts and Crafts style popular in the late 19th century, this easy-to-build oak clock will look right at home in any kind of decor.
fi"
stoc
k
‡"
stoc
k
›"
cham
fer
A
B
5fi"
3‡"
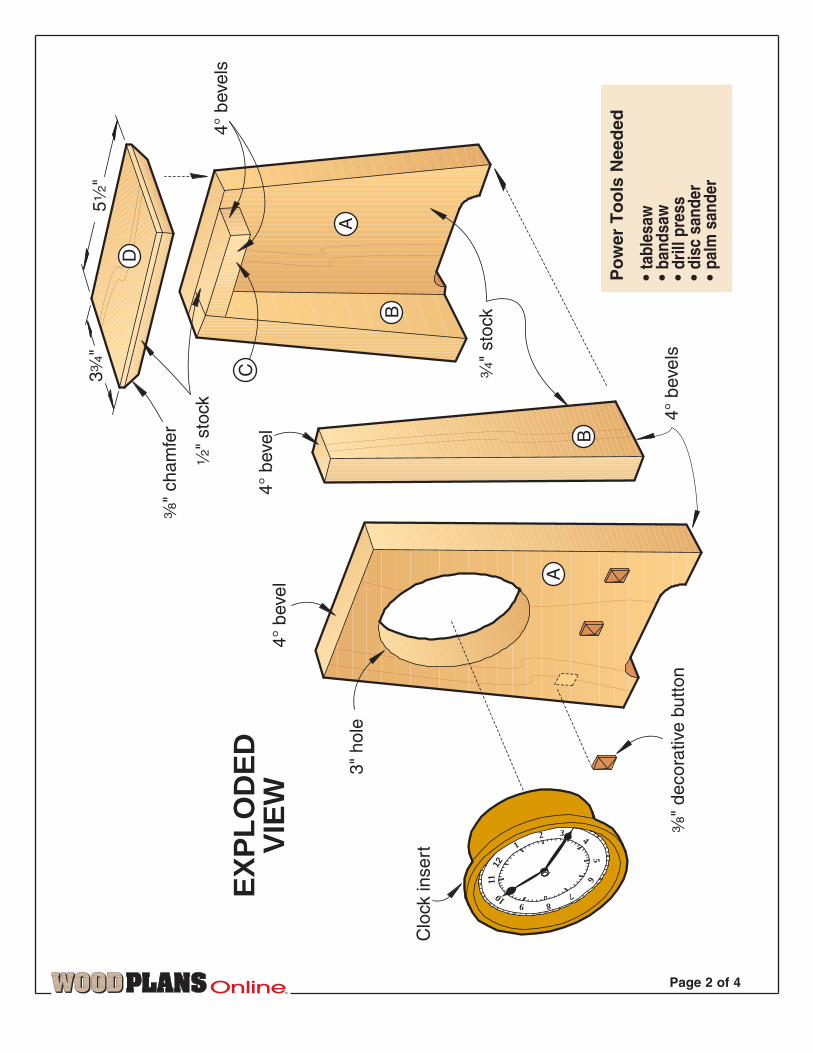
EX
PLO
DE
DV
IEW
Clo
ck in
sert
3" h
ole
›"
deco
rativ
e bu
tton
4° b
evel
A
1
3 4
5 6
78 9 10
12
11
2
C
B
4° b
evel
4° b
evel
s
D
4° b
evel
s
TM
Page 2 of 4
Po
wer
To
ols
Nee
ded
• ta
bles
aw
• ba
ndsa
w•
drill
pre
ss•
disc
san
der
• pa
lm s
ande
r

Add decorative buttons1 Cut a piece of ›" square stockabout 12" long. Choose a speciesthat contrasts with your clockbody. (We used walnut.) Theextra length allows more safetyand convenience when makingthe small buttons.2 Set the miter gauge on your discsander to 30°. On one end of thesquare stock, carefully sand abeveled face extending from oneedge to the middle of the piece. 3 Turn the stock to the next face,and sand another bevel on the sameend. Similarly, turn the stock toeach of the remaining faces andbevel the end. All four beveledfaces should meet in a point at thecenter of the end.4 You’ll end up with a pyramidalshape on one end of the squarestock. Using a dovetail saw orother fine-toothed handsaw, cut thepointed end off „" below the bot-tom edge of the bevels.5 Make two more buttons the sameway. Glue the three buttons to thefront of the clock, where shown onthe pattern. (A piece of maskingtape makes a great guideline tokeep them level.)
Complete the clock1 Apply a clear finish—we usedaerosol lacquer. If you want togive your clock an aged appear-ance, darken it with golden oakstain first.2 Install the battery in the clockinsert, and set the time. Finally, fitthe clock insert into the hole in thefront of the case.¿
TM
Page 3 of 4
Cut the case parts1 Cut parts A and B to the dimen-sions shown on the Bill ofMaterials. You could build theclock from any hardwood. But anauthentic, period look calls forquartersawn white oak, shown inthe photo. If you can’t find anylocally, see the Buying Guide.2 Tilt your tablesaw’s blade 4°from vertical, then bevel both endsof all four pieces. Saw the bevelsso they’re parallel; that is, saw oneend of each piece with one facedown, the other end with the otherface down.3 Refer to the full-size patterns onpage 4, and lay out the taperedsides on the front of each part Aand part B. (With the part standingupright, the front slants backtoward the top.)4 Bandsaw the tapered sides, withthe blade 90° to the table. Sawslightly outside the line, then sandor plane down to it. (If you have ataper-cutting jig for your tablesaw,you can use it to cut these parts.)5 Lay out the bottom profile oneach part A. Bandsaw the cutouts,using a ¤" blade. Sand.6 Cut the top filler (C) from fi"-thick stock. Rip an oversized pieceto width first, with the tablesaw
Buying GuideQuartersawn oak. Enough quartersawnwhite oak for one clock case, item ART-BR-Wood.Quartz clock insert. Style shown, itemno. 200220. Both from Schlabaugh andSons Woodworking, 720 14th St.,Kalona, IA 52247. Call 800/346-9663 toorder and current prices.
Part Finished Size
Bill of Materials
A front & back ‡" 5" 6›" O 2
B sides ‡" 1fl" 6›" O 2
C* filler fi" Œ" 2Ø" O 1
D top fi" 3‡" 5fi" O 1
*Cut this part oversize initially, then cut to finishedsize in accordance with how-to instructions.
Material Key: O–quartersawn white oakM
atl.
Qty
.
T W L
blade again tilted 4°. Then, cut thepiece to length, bevel-cutting theends. (The bevels converge, asshown on the Exploded Viewdrawing.)7 Using a holesaw or circle cutterand drill press, bore the 3" holein the clock front where shown.Be sure to back the workpiecewith scrapwood to preventchipout. Clamp both piecessecurely to the drill-press tablebefore you begin boring.
Assemble the case1 Lay the back (A) on your bench,the good side facing down. Gluethe sides (B) and filler (C) to theupturned face, flush with the edgesand top. Glue on the front piece.2 Holding the clock case togetherwhile the glue is still tacky, stand iton your workbench. Align thefront and back so the clock standsstraight and steady, then clampwith rubber bands.3 Cut the top (D) to size. Saw orrout a ›" chamfer around the bot-tom edges, and sand the top.4 After the glue dries, sand thebody. Glue the top (D) into posi-tion—note that the smaller facejoins to the clock body. Clampthe top.
TM
Page 4 of 4
The purchase of these plans does not transferany copyright or other ownership interest in theplans, the design, or the finished project to thebuyer. Buyer may neither reproduce the plansfor sale nor offer for sale any copies of the fin-ished project.
Produced by Marlen KemmetProject Design: ©Schlabaugh and SonsIllustrations: Roxanne LeMoine; Lorna JohnsonGraphic Design: Jamie DowningPhotographs: Hetherington Photography©Copyright Meredith Corporation 2001
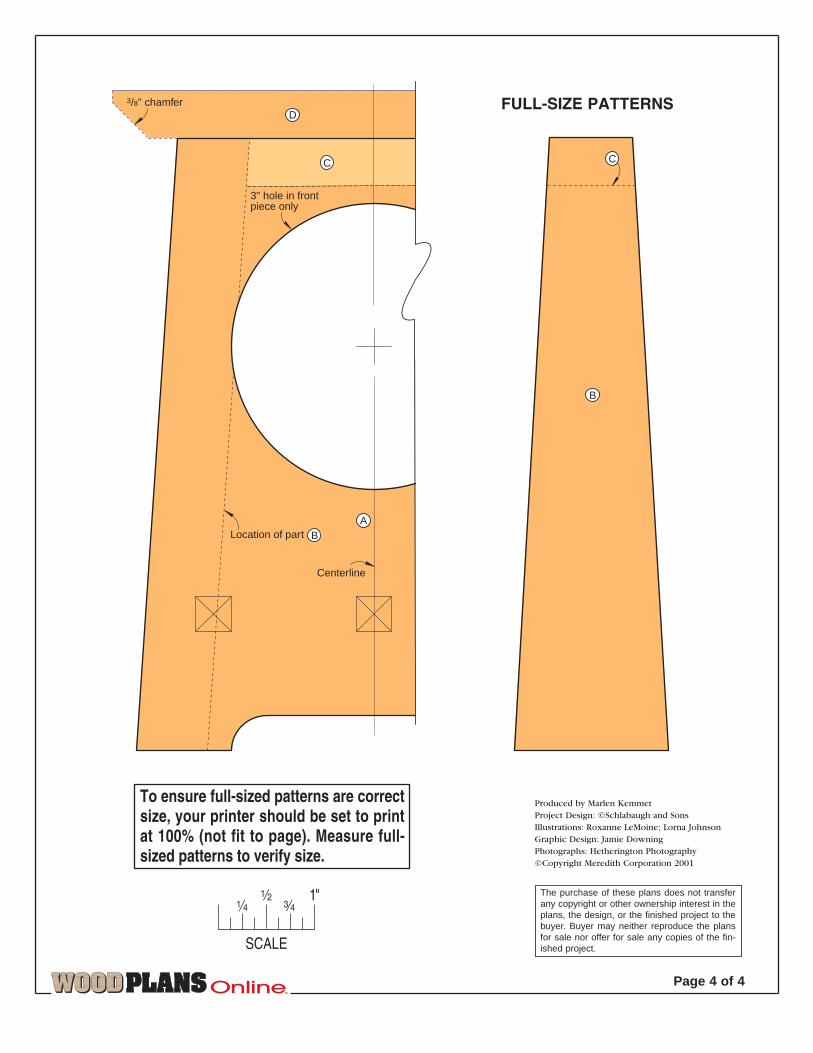
D
A
C
3" hole in frontpiece only
BLocation of part
3/8" chamfer
B
C
Centerline
fi‹ ‡
1"
SCALE
To ensure full-sized patterns are correctsize, your printer should be set to printat 100% (not fit to page). Measure full-sized patterns to verify size.
FULL-SIZE PATTERNS

All 26 Years of WOOD ® on one Disc!
The easy searchable index takes you instantly to
250 Shop Projects
920 Weekend Projects
Updated for 2011/
570 Tool Reviews
1,625Shop Tips
810 Skill-building Techniques
305 Furniture Projects
Order online at woodmagazine.com/DVDlibrary or by phone at 888-636-4478
AD#WD0511
New Woodworking Videos
50% OF F !When you buy two or more videos
Buy one at regular price ($19 95 each) or save by purchasing two or more for $9 95 each.
Limited time offer!Order today at
woodmagazine.com/videodvds
1,300+ Shop-tested Woodworking Planswoodmagazine.com/plans
➊
➋
➌
3Ways to better your woodworkingfrom the editors of WOOD ®
Magazine