thank you for being a creativeleeyours.com subscriber! i
TRANSCRIPT

Wendy Lee 336-671-1959 www.creativeleeyours.com [email protected]
By Wendy Lee Stampin’ Up!® Independent Demonstrator
Thank you for being a CreativeLeeYours.com subscriber! I hope that you enjoy the
fabulous projects that my fellow demonstrators and I have created for you this month.
I appreciate your support! Please remember that these special tutorials are for newsletter subscribers only and I do kindly ask that you not share them. Your
understanding is appreciated.
If I can answer any questions or help you with online ordering, please don’t hesitate to call me. I want to give my customers the BEST service I can!
Hope you enjoy your tutorials!
Scrapbooking, Greeting Cards & Invitations, Gifts and Home Décor... providing home parties, supplies, classes, design services, and business opportunities
See what I create, check out my events, shop my online store 24/7... https://creativeleeyours.com Dream with me on Pinterest... https://www.pinterest.com/SUwendylee Hang out with me on Facebook... https://www.facebook.com/SUWendyLee Watch me on YouTube...https://www.youtube.com/channel/UCHse93f0h9cQB5dogIoSWZw?view_as=subscriber Follow me on Instagram... https://www.instagram.com/suwendylee/

Wendy Lee 336-671-1959 www.creativeleeyours.com [email protected]
Art In Bloom Embossing
All images © 1990-2021 Stampin’ Up!®
SUPPLIES & MEASUREMENTS Stamps
155085 Art in Bloom Photopolymer Stamp Set (158368 bundle with Bloom Hybrid Embossing Folder (including dies) for 10% off)
Paper 159276 Basic White Cardstock: (4) 4-1/4” x 5” 155710 Polished Pink Cardstock: 4-1/4” x 11” folded in half for card base
Ink
102283 VersaMark Pad 155712 Polished Pink Classic Stampin’ Pad 153121 Just Jade Classic Stampin’ Pad 147087 Crushed Curry Classic Stampin’ Pad 131158 Crushed Curry Classic Ink Refill
Other 155554 Basics Stampin’ Emboss Powders 145645 Shimmery White finish Embossing Paste 127853 Silicone Craft Sheet 142808 Palette Knives 150697 Basic Patterns Decorative Masks 133773 Sponge Daubers 155989 Bloom Hybrid Embossing Folder (includes both dies and 3D embossing folder) 155475 Baker’s Twine Essentials Pack 102300 Bone Folder 110755 Multipurpose Liquid Glue 141825 Foam Adhesive Strips

Wendy Lee 336-671-1959 www.creativeleeyours.com [email protected]
INSTRUCTIONS
1. Mix a drop of Crushed Curry ink with a small amount of embossing paste. Place mask over Basic White cardstock. Apply colored embossing paste with Palette Knife in lower right corner. Wipe palette knife. Apply additional paste over the remainder of the cardstock. Set aside to set. Soak decorative mask in water asap to clean.
2. Stamp the detailed floral image with VersaMark ink on Basic White cardstock layer. Repeat. Stamp the two detailed leaf images with VersaMark ink on the third layer of Basic White cardstock. Repeat as desired. Apply White Stampin’ Emboss Powder over all images and heat set. With sponge daubers, apply Crushed Curry ink to the floral centers, Polished Pink ink to the floral petals, and Just Jade ink to the leaves. Apply with different pressures for a variation in shading. Die cut images with the coordinating dies.
3. Arrange the flowers and leaves as shown. Adhere with liquid glue onto the embossed background layer. Die cut the long sentiment label from Basic White cardstock. Stamp the sentiment with VersaMark Ink then Polished Pink on the die cut label. Leave as is or apply Clear Stampin’ Emboss Powder and apply heat. Wrap White Baker’s Twine around the embossed panel and tie off with a bow. Adhere sentiment panel with Foam Adhesive Strips over the twine. Adhere the embossed panel to the Polished Pink card base.
4. Inside: Select your favorite extra die cuts and arrange on the last Basic White card layer. Stamp the sentiment with Polished Pink ink. Adhere the die cuts. Adhere the card layer to the inside.
5. Enjoy!

Wendy Lee 336-671-1959 www.creativeleeyours.com [email protected]
Belated Birthday
All images © 1990-2021 Stampin’ Up!®
SUPPLIES & MEASUREMENTS Stamps
155356 Turtle Friends Photopolymer Stamp set (155819 bundle with Turtle Punch for 10% off) Paper
159229 Basic White Thick Cardstock: 5-1/2” x 8-1/2” folded in half for card base 153081 Misty Moonlight Cardstock: 5-1/4” x 4” for layer 159276 Basic White Cardstock: 3” x 3” for die-cutting, 3-1/2” x ½” for sentiment 122924 Pool Party Cardstock: 5” x 2” for punching 155426 Pattern Party Designer Series Paper (DSP): 5-1/8” x 3-7/8” for layer, 4-3/4” x ¾” for banner, 4-1/2” x 5/8” for banner, & scrap for party hat
Ink 153118 Misty Moonlight Classic Stampin’ Pad 147095 Granny Apple Green Classic Stampin’ Pad
Other 155567 Silver & Clear Epoxy Essentials 153585 Hippo & Friends Dies 144107 Take Your Pick 152392 Paper Trimmer 103579 Paper Snips 102300 Bone Folder 152813 Stampin’ Seal 104430 Stampin’ Dimensionals 144108 Mini Stampin’ Dimensionals
Wendy Lee 336-671-1959 www.creativeleeyours.com [email protected]
INSTRUCTIONS
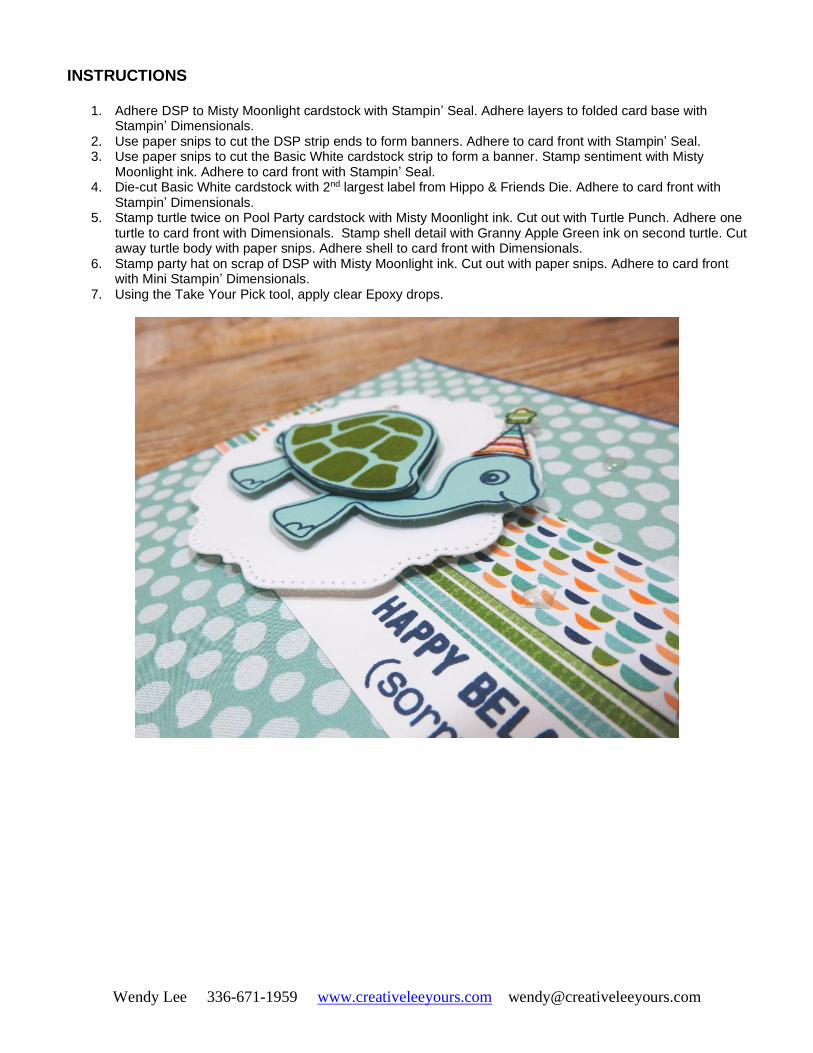
1. Adhere DSP to Misty Moonlight cardstock with Stampin’ Seal. Adhere layers to folded card base with Stampin’ Dimensionals.
2. Use paper snips to cut the DSP strip ends to form banners. Adhere to card front with Stampin’ Seal. 3. Use paper snips to cut the Basic White cardstock strip to form a banner. Stamp sentiment with Misty
Moonlight ink. Adhere to card front with Stampin’ Seal. 4. Die-cut Basic White cardstock with 2nd largest label from Hippo & Friends Die. Adhere to card front with
Stampin’ Dimensionals. 5. Stamp turtle twice on Pool Party cardstock with Misty Moonlight ink. Cut out with Turtle Punch. Adhere one
turtle to card front with Dimensionals. Stamp shell detail with Granny Apple Green ink on second turtle. Cut away turtle body with paper snips. Adhere shell to card front with Dimensionals.
6. Stamp party hat on scrap of DSP with Misty Moonlight ink. Cut out with paper snips. Adhere to card front with Mini Stampin’ Dimensionals.
7. Using the Take Your Pick tool, apply clear Epoxy drops.

Wendy Lee 336-671-1959 www.creativeleeyours.com [email protected]
Birthday Hugs
All images © 1990-2021 Stampin’ Up!®
SUPPLIES & MEASUREMENTS Stamps
155022 Sending Hugs Cling Stamp Set (155859 bundle with Layering Hugs Dies for10% off) Paper
102584 Garden Green Cardstock: 5-1/2” x 8-1/2" folded in half for card base & scrap for die-cutting 155426 Pattern Party Designer Series Paper (DSP) Host Reward: 5-1/2” x 4” (Granny Apple Green print), (2) 5-1/2” x 1/8” (stripe print), 3” x 1-1/2” (stripe print) for die-cutting letters & 5” x ¾” (stripe print) for inside 149612 Fluid 100 Watercolor Paper: 5-1/2” x 4-1/4” & scrap for stamping and die-cutting (inside) 159276 Basic White Cardstock: Scrap for sentiments & 5” x 3-3/4” for inside 155668 Pale Papaya Cardstock: Scrap for die-cutting (inside)
Ink 102283 Versamark Pad 147095 Granny Apple Green Classic Stampin’ Pad 147089 Garden Green Classic Stampin’ Pad 147050 Poppy Parade Classic Stampin’ Pad 147052 Flirty Flamingo Classic Stampin’ Pad 147101 Calypso Coral Classic Stampin’ Pad 155670 Pale Papaya Classic Stampin’ Pad 147087 Crushed Curry Classic Stampin’ Pad 147107 Pool Party Classic Stampin’ Pad
Other 155860 Layering Hugs Dies 151298 Water Painters 155554 Basics Stampin’ Emboss Powders (clear) 129053 Heat Tool 146276 Stamparatus
152477 Artistry Blooms Adhesive-Backed Sequins 152815 Foam Adhesive Sheets 110755 Multipurpose Liquid Glue 104430 Stampin' Dimensionals

Wendy Lee 336-671-1959 www.creativeleeyours.com [email protected]
INSTRUCTIONS
1. Fold Garden Green card base and burnish fold. 2. Use liquid glue to adhere Pattern Party layer (Granny Apple Green print) to card front 1/8” from the top. 3. Use liquid glue to adhere one Pattern Party strip (stripe print) to card front 1/8” from the bottom and another
1/8” above the first. 4. Place large floral HUGS stamp in Stamparatus (positioning the word straight and centering over 5-1/2” x 4-
1/4” layer of Fluid 100 Watercolor Paper. (Use scrap paper to test positioning prior to stamping on watercolor paper.) Secure watercolor paper with magnets and stamp with Granny Apple Green ink multiple times until image is clear. Keep stamp mounted. Clean stamp with a Shammy and stamp again with Versamark ink 2 or 3 times to ensure image is well covered. Remove paper from Stamparatus, cover with clear embossing powder, tap off excess and heat set.
5. Trim down watercolor paper to measure 5-1/4” x 3-3/8” being sure to center the image. 6. Watercolor image with small Water Painter. Squeeze ink pads to pool ink in the lids. Paint in small
sections and start with a thin wash. Then, add more saturated color to shadows while still wet. Squeeze Water Painter to clean brush in-between colors and use a paper towel to control the amount of water on the brush tip. Paint leaves with Granny Apple Green and Garden Green ink, wheat shaped leaves with Crushed Curry ink, berries with Poppy Parade ink, and flowers with Poppy Parade, Flirty Flamingo, Calypso Coral and Pale Papaya ink.
7. Use medium Water Painter to watercolor background with Pool Party ink. Squeeze pad to pool ink in the lid. Paint small sections starting with a thin wash, being careful to avoid previously painted areas. Then, add more saturated color around edges. Embossing will help protect previously painted areas. Let dry.
8. Using the same method as above, stamp and watercolor a single tulip and leaf for the inside. Cut out with coordinating die.
9. Adhere Foam Adhesive Sheet to the back of the 3” x 1-1/2” layer of Pattern Party DSP. Use the HUGS die to cut out the letters, being sure to align the letters straight with the strip pattern.
10. Adhere letters to watercolored layer. 11. Stamp two sentiments with Garden Green ink on Basic White Cardstock and cut out with coordinating dies. 12. Cut a narrow strip from the edge of a sheet of Dimensionals to adhere “Birthday” to the card front. 13. Cut two leaves from Garden Green Cardstock and adhere under “S” with liquid glue. 14. Add Artistry Blooms Sequins. 15. Inside: Adhere Basic White layer with liquid glue. Adhere Pattern Party DSP strip on top. Cut two detail
tulips from Pale Papaya Cardstock. Adhere die-cuts, along with single tulip, leaf and inside sentiment with liquid glue.

Wendy Lee 336-671-1959 www.creativeleeyours.com [email protected]
Congratulations
All images © 1990-2021 Stampin’ Up!®
SUPPLIES & MEASUREMENTS Stamps 155070 Hand-Penned Petals Photopolymer Stamp Set (155492 bundle with Penned Flowers Dies for 10% off) Paper 159229 Basic White Thick Cardstock: 4-1/4” x 11” folded in half for card base 159276 Basic White Cardstock: 3-5/8” x 4-7/8” 121045 Basic Black Cardstock: 4-1/4” x 1/2” for sentiment 101856 Vellum Cardstock: 4-1/4” x 5-1/2” for die-cutting Ink 147107 Pool Party Classic Stampin' Pad 154894 Pool Party Stampin' Blends Combo Pack 154843 Basic Black Stampin' Blends Combo Pack 102283 Versamark Pad

Wendy Lee 336-671-1959 www.creativeleeyours.com [email protected]
Other
155557 Penned Flowers Dies 153611 Blending Brushes 144220 Rhinestone Basic Jewels 155554 Basic Embossing Powders 129053 Heat Tool
149699 Stampin' Seal+ 104430 Stampin' Dimensionals 103683 Mini Glue Dots 152392 Paper Trimmer 149653 Stampin' Cut & Emboss Machine
INSTRUCTIONS
Fold Basic White cardstock in half at 5-1/2”.
Take the Basic White layer and use Blending Brushes and Pool Party ink to create an ombre look (darker color on the top and lighter color on the bottom.)
Use the Dark Pool Party & Basic Black Stampin’ Blends Markers to flick splatter over the blended layer.
Adhere the layer onto on the center of the card front with Seal+.
Die-cut two detailed bouquets of flowers from Vellum Cardstock.
Stamp a row of “congratulations” sentiments with Versamark ink on the strip of Basic Black Cardstock (using the Stamparatus hinge method) and then heat emboss with white embossing powder.
Adhere the sentiment strip on the card front using Dimensionals.
Using mini glue dots, adhere the vellum bouquets to the card front, one above the sentiment and one below.
Finish the card with clusters of rhinestones.

Wendy Lee 336-671-1959 www.creativeleeyours.com [email protected]
Flowers of Friendship Card
All images © 1990-2021 Stampin’ Up!®
SUPPLIES & MEASUREMENTS
Stamps
155358 Flowers of Friendship Cling Stamp Set (155590 bundle with Flowers & Leaves Punch for 10% off)
Paper
159276 Basic White Cardstock: 8-1/2” x 5-1/2" folded in half for card base 155668 Pale Papaya Cardstock: 1-1/2” x 11” strip for stamping flowers 155776 Soft Succulent Cardstock: 1” x 6” strip for stamping leaves 155641 2021-2023 In Color 6” x 6” Designer Series Paper Assortments: 1-1/2” x 5-1/2”
Ink
155670 Pale Papaya Classic Stampin’ Pad 155778 Soft Succulent Classic Stampin’ Pad 132708 Tuxedo Black Memento Ink Pad
Other
155373 Flowers & Leaves Punch 152718 Tasteful Textile 3D Embossing Folder 144220 Rhinestone Basic Jewels 104430 Stampin' Dimensionals 144108 Mini Stampin' Dimensionals 152813 Stampin’ Seal 103683 Mini Glue Dots

Wendy Lee 336-671-1959 www.creativeleeyours.com [email protected]
INSTRUCTIONS
1. Stamp sentiment with Tuxedo Black Memento Ink on Basic White card base.
2. Dry emboss the front of the Basic White card base with the Tasteful Textures Embossing
Folder.
3. Stamp and punch out three large flowers and three small flowers.
4. Stamp and punch out three large leaves and three small leaves.
5. Adhere In Color Designer Series Paper to left side of card Seal.
6. Use Mini Stampin’ Dimensionals to adhere flowers along the right side of the Designer
Series Paper.
7. Adhere leaves with mini glue dots.
8. Adhere rhinestones in the middle of the flowers and color with an orange sharpie.

Wendy Lee 336-671-1959 www.creativeleeyours.com [email protected]
Hand-Penned Hello Card
All images © 1990-2021 Stampin’ Up!®
SUPPLIES & MEASUREMENTS Stamps
155536 Inspired Thoughts Cling Stamp Set Paper
159229 Basic White Thick Cardstock: 5-1/2” x 8-1/2" folded in half for card base 155505 Hand-Penned Memories & More Card Pack Page cut in 5 pieces measuring 1” x 4” 159276 Basic White Cardstock 4-1/8” x 5-3/8” and scrap for die-cutting 155668 Pale Papaya Cardstock 2-¼” x 2-¼” square for die-cutting
Ink 132708 Tuxedo Black Memento Ink Pad
Other 151770 Layering Circles Dies 154422 Message Dies 155816 Pale Papaya & White Ribbon 155500 Genial Gems

Wendy Lee 336-671-1959 www.creativeleeyours.com [email protected]
INSTRUCTIONS
1. Cut the Memories and More card into 1” x 4” strips and adhere to the Basic White layer leaving a 1/16” border around each.
2. Adhere the strips layer to the card base. 3. Die Cut the Basic White scrap using the Messages die. 4. Stamp the Hello greeting from the Inspired Thoughts stamp set with Memento Tuxedo Black ink. 5. Adhere the sentiment die cut to the card. 6. Die cut the scalloped circle from Pale Papaya Cardstock. 7. Using a Memories and More card, die cut a pretty flower. 8. Adhere the two circles together and use Dimensional to adhere the circles to the card. 9. Tie a bow with the Pale Papaya & White ribbon and adhere to the card. 10. Adhere the Genial Gems around the sentiment. 11. Enjoy.

Wendy Lee 336-671-1959 www.creativeleeyours.com [email protected]
Hand Penned Thank You Card
All images © 1990-2021 Stampin’ Up!®
SUPPLIES & MEASUREMENTS Stamps
154999 Pansy Patch Photopolymer Stamp Set Paper
159229 Basic White Thick Cardstock: 5-1/2” x 8-1/2" folded in half for card base 146986 Highland Heather Cardstock: 4-1/8” x 5-3/8” 155505 Hand-Penned Memories & More Card Pack Page: 4” x 5-1/2 ”
Ink 132708 Tuxedo Black Memento Ink Pad
Other 154887 Highland Heather Blends Combo Pack 144219 Pearl Basic Jewels

Wendy Lee 336-671-1959 www.creativeleeyours.com [email protected]
INSTRUCTIONS
1. Using the Pansy Patch Thank You sentiment, stamp with Memento Black Ink on the Hand-Penned Memories and More Card.
2. Adhere the Hand-Penned Memories and More Card to the Highland Heather layer. 3. Adhere both layers to the Basic White card base. 4. Color five Pearl Basic Jewels with a Dark Highland Heather Blends Marker. 5. Adhere the Pearl Basic Jewels to the card. 6. Enjoy!

Wendy Lee 336-671-1959 www.creativeleeyours.com [email protected]
“Have a Peachy Day” Card
All images © 1990-2021 Stampin’ Up!®
SUPPLIES & MEASUREMENTS
Stamps
155050 Sweet As A Peach Stamp Set (155823 bundle with the Peach Dies for 10% off)
Paper 131201 Pear Pizzazz Cardstock: 8-1/2” x 5-1/2” folded in half for card base 159276 Basic White Cardstock: 4-1/8” x 5-3/8”, 4” x 5-1/4”, 3-1/2” x 5” for die-cutting & scrap for sentiment
155686 You’re A Peach Designer Series Paper (DSP): 1-3/4” x 5-1/4”, 2-1/2” x 5-1/4” & 5/8” x 5-1/4” Ink
147104 Pear Pizzazz Classic Stampin’ Pad 122925 Calypso Coral Classic Stampin’ Pad 153077 Bumblebee Classic Stampin’ Pad
Other
155829 Peach Dies 155560 Scalloped Contours 155475 Baker’s Twine Essentials Pack 155500 Genial Gems 153611 Blending Brushes 133773 Sponge Daubers 104430 Stampin' Dimensionals 103683 Mini Glue Dots 110755 Multipurpose Liquid Glue
Wendy Lee 336-671-1959 www.creativeleeyours.com [email protected]
INSTRUCTIONS
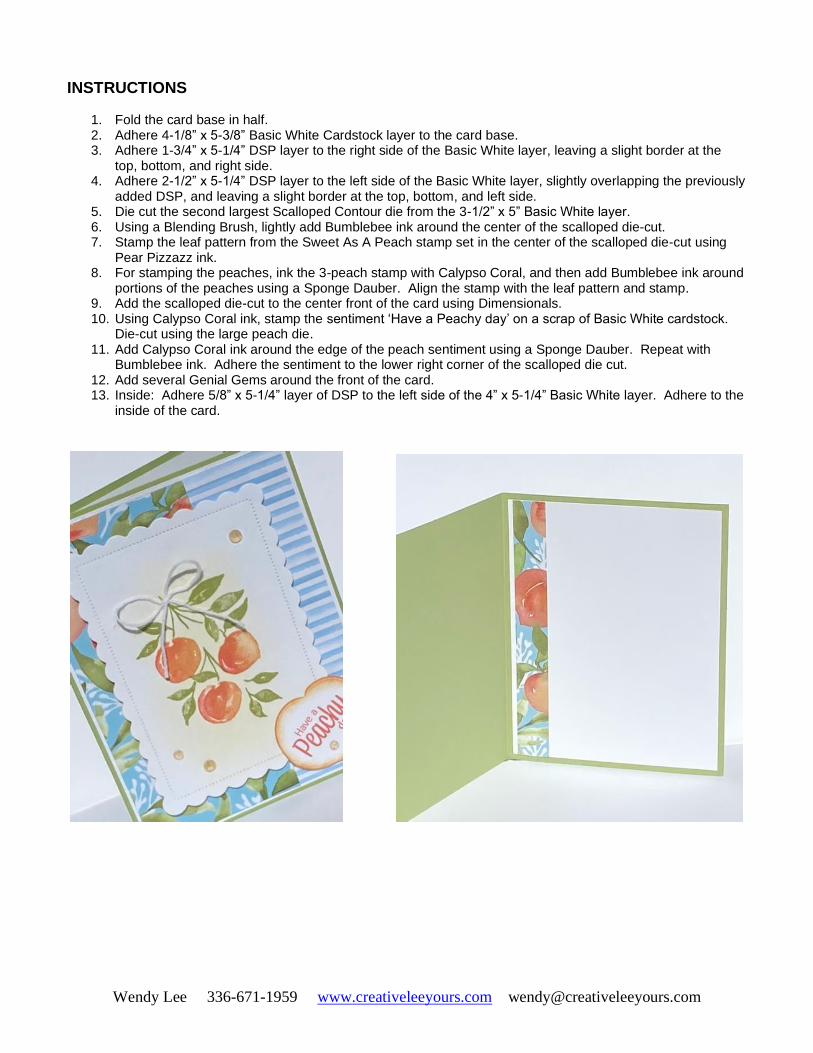
1. Fold the card base in half. 2. Adhere 4-1/8” x 5-3/8” Basic White Cardstock layer to the card base. 3. Adhere 1-3/4” x 5-1/4” DSP layer to the right side of the Basic White layer, leaving a slight border at the
top, bottom, and right side. 4. Adhere 2-1/2” x 5-1/4” DSP layer to the left side of the Basic White layer, slightly overlapping the previously
added DSP, and leaving a slight border at the top, bottom, and left side. 5. Die cut the second largest Scalloped Contour die from the 3-1/2” x 5” Basic White layer. 6. Using a Blending Brush, lightly add Bumblebee ink around the center of the scalloped die-cut. 7. Stamp the leaf pattern from the Sweet As A Peach stamp set in the center of the scalloped die-cut using
Pear Pizzazz ink. 8. For stamping the peaches, ink the 3-peach stamp with Calypso Coral, and then add Bumblebee ink around
portions of the peaches using a Sponge Dauber. Align the stamp with the leaf pattern and stamp. 9. Add the scalloped die-cut to the center front of the card using Dimensionals. 10. Using Calypso Coral ink, stamp the sentiment ‘Have a Peachy day’ on a scrap of Basic White cardstock.
Die-cut using the large peach die. 11. Add Calypso Coral ink around the edge of the peach sentiment using a Sponge Dauber. Repeat with
Bumblebee ink. Adhere the sentiment to the lower right corner of the scalloped die cut. 12. Add several Genial Gems around the front of the card. 13. Inside: Adhere 5/8” x 5-1/4” layer of DSP to the left side of the 4” x 5-1/4” Basic White layer. Adhere to the
inside of the card.

Wendy Lee 336-671-1959 www.creativeleeyours.com [email protected]
Party Puffins Birthday Card
All images © 1990-2021 Stampin’ Up!®
SUPPLIES & MEASUREMENTS Stamps
155054 Party Puffins Cling Stamp Set Paper
159229 Basic White Thick Cardstock: 5-1/2” x 8-1/2” folded in half for card base 141416 Flirty Flamingo Cardstock: 3-1/4” x 4-1/2” 155426 Pattern Party 12" X 12" (30.5 X 30.5 Cm) Host Designer Series Paper: 2-3/4” x 5” 121045 Basic Black Cardstock: 5/8” x 3-3/4” 159276 Basic White Cardstock: Scraps for stamping and die-cutting 111350 Pacific Point Cardstock: Scrap for die-cutting
Ink 102283 Versamark Pad 132708 Tuxedo Black Memento Ink Pad 147157 Brights Stampin' Write Markers Other
155554 Basics Embossing Powders 129053 Heat Tool 154284 Matte Black Dots 151770 Layering Circles Dies 149653 Stampin’ Cut & Emboss Machine 103579 Paper Snips Scissors 110755 Multipurpose Liquid Glue 144108 Mini Stampin' Dimensionals 152392 Paper Trimmer

Wendy Lee 336-671-1959 www.creativeleeyours.com [email protected]
INSTRUCTIONS
1. Fold Basic White Thick Cardstock card base and burnish score line. 2. Adhere Flirty Flamingo Cardstock layer to front of card base using Multipurpose Liquid Glue. 3. Adhere Pattern Party Designer Series Paper layer on top of Flirty Flamingo Cardstock layer using
Multipurpose Liquid Glue. 4. Take scraps of Pacific Point Cardstock and Basic White Cardstock and die-cut a scalloped circle (Pacific
Point) and a regular circle (Basic White) with Layering Circles Dies.
5. Adhere Basic White Cardstock circle to Pacific Point Cardstock scalloped circle with Multipurpose Liquid
Glue. 6. Adhere both circles to card base using Multipurpose Liquid Glue. 7. Stamp sentiment with Versamark Ink onto Basic Black Cardstock, heat set with White Embossing Powder
and Heat Tool. 8. Adhere sentiment to card base using Mini Stampin’ Dimensionals. 9. Stamp images (see sample card) from Party Puffins Stamp Set on scrap of Basic White Cardstock with
Tuxedo Black Memento Ink. 10. Color images with Brights Stampin’ Write Markers. Colors used on sample: Flirty Flamingo, Daffodil Delight,
Granny Apple Green, Pacific Point and Mango Melody. 11. Fussy cut images with Paper Snips. 12. Adhere images to card base using Mini Stampin’ Dimensionals and Multipurpose Liquid Glue. 13. Add three Matte Black Dots to Card Front.

Wendy Lee 336-671-1959 www.creativeleeyours.com [email protected]
Plentiful Plants Card
All images © 1990-2021 Stampin’ Up!®
SUPPLIES & MEASUREMENTS Stamps
155693 Plentiful Plants Photopolymer Stamp Set (155688 bundle with Perfect Plants dies for 10% off) Paper
155574 Evening Evergreen Cardstock: 4-1/4” x 11", folded in half for card base & scrap for die-cutting 155710 Polished Pink Cardstock: 4” x 5-1/4” 153078 Cinnamon Cider Cardstock: Scrap for die-cutting !55776 Soft Succulent Cardstock: Scrap for die-cutting 159276 Basic White Cardstock: 2-1/4” x 1/2” and scrap for stamping and die-cutting 155696 Bloom Where You are Planted Designer Series Paper (DSP): 3-7/8” x 5-1/8”
Ink 155576 Evening Evergreen Classic Stampin’ Pad 153114 Cinnamon Cider Classic Stampin’ Pad 155778 Soft Succulent Classic Stampin’ Pad 155520 Polished Pink Stampin’ Blends Combo Pack

Wendy Lee 336-671-1959 www.creativeleeyours.com [email protected]
Other
155562 Perfect Plants Dies 151820 Stitched Rectangle Dies 155697 Paper Lattice 104199 Linen Thread 144219 Pearl Basic Jewels
153611 Blending Brushes 110755 Multipurpose Liquid Glue 104430 Stampin' Dimensionals 103683 Mini Glue Dots
INSTRUCTIONS
1. Adhere the DSP to the Polished Pink Cardstock layer, then adhere to the Evening Evergreen card base. 2. Die-cut the third largest stitched rectangle from a scrap of Basic White Cardstock using the Stitched
Rectangle Dies. 3. Add some Soft Succulent ink to the stitched rectangle using a Blending Brush, focusing on the area behind
where the Paper Lattice will be placed. 4. Cut a piece of the Paper Lattice to 2-1/8” x 3-1/4” and adhere to the center of the stitched rectangle using
Mini Glue Dots on the top right and bottom left corners (the corners will be covered by the plant images). 5. On a scrap of Basic White Cardstock stamp the two vase images with Cinnamon Cider ink. Die-cut using
Perfect Plants Dies. 6. On a scrap of Basic White Cardstock, stamp the bamboo and two of the leafy plant images with Evening
Evergreen ink, then stamp the hanging plant image with Soft Succulent ink. Die cut using Perfect Plants Dies.
7. Die-cut the plant hanger and small planter from a scrap of Cinnamon Cider Cardstock using the Perfect Plants Dies.
8. Die-cut two of the leafy plant images, one from Soft Succulent Cardstock and one from Evening Evergreen Cardstock using the Perfect Plants Dies.
9. Assemble the plant pieces together as shown either with Mini Glue Dots or liquid glue and then adhere to the stitched rectangle using Stampin’ Dimensionals.
10. Attach the Basic White stitched rectangle to the card front using Stampin’ Dimensionals. 11. Stamp the sentiment on the strip of Basic White Cardstock with Evening Evergreen ink, snip both ends at
an angle and adhere to the card with Stampin’ Dimensionals. 12. Tie a double bow using two pieces of Linen Thread and attach to card with a Mini Glue Dot.

Wendy Lee 336-671-1959 www.creativeleeyours.com [email protected]
Wild Cats Split Front Card
All images © 1990-2021 Stampin’ Up!®
SUPPLIES & MEASUREMENTS Stamps
154992 Wild Cats (155507 bundle with Big Cats Dies for 10% off)
Paper 155776 Soft Succulent Cardstock: 7 ¼” x 5 ½” scored at 4 ¼” for card base, scrap for die-cutting 159276 Basic White Cardstock: scrap for di-cutting, tag, & 3” x 5 ¼” for inside 119684 Cajun Craze Cardstock: 3 ¼” x 2” for die-cutting 155817 In the Wild 12x12” Designer Series Paper (DSP): 4” x 5 ¼”, trim to 2 ¾” wide and keep strip
Ink 155576 Evening Evergreen Classic Stampin’ Pad 147085 Cajun Craze Classic Stampin’ Pad 132708 Tuxedo Black Memento Ink Pad Other
155513 Big Cats Dies 151820 Stitched Rectangle Dies 152392 Paper Trimmer 104430 Stampin' Dimensionals 149699 Stampin’ Seal

Wendy Lee 336-671-1959 www.creativeleeyours.com [email protected]
INSTRUCTIONS
1. To stamp tiger, begin by stamping head overlay with Tuxedo Black Memento Ink on Basic White cardstock. Ink body background with Cajun Craze ink and stamp off on scrap paper. Without re-inking, stamp body background overhead image, lining up image at ears and nose. Stamp stripes with Memento ink. Die cut.
2. Stamp two leafy bushes with Evening Evergreen ink and die cut. 3. Stamp greeting with Evening Evergreen ink and trim strip. 4. Die-cut Cajun Craze rectangle with Stitched Rectangles Die. 5. Die-cut extra vines from scrap of Soft Succulent cardstock. 6. Stamp plants as desired on Basic White panel for inside of card. 7. To assemble card, fold card base along 4-¼” score line. Adhere Basic White layer to inside, then add 1-¼”
x 5-¼” strip to inside along edge. Adhere larger DSP to card front. 8. Use Stampin’ Dimensionals to adhere rectangle to card front, avoiding area where rectangle overhangs. 9. Adhere plants to card front. Adhere tiger and greeting with Stampin’ Dimensionals. 10. Adhere vines with Multipurpose Liquid Glue to complete card.

Wendy Lee 336-671-1959 www.creativeleeyours.com [email protected]
You Are So Mermazing!
All images © 1990-2021 Stampin’ Up!®
SUPPLIES & MEASUREMENTS Stamps
155703 Pirates & Mermaids Cling Stamp Set 155009 Seascape Cling Stamp Set (158359 bundle with the Sea Life Dies for 10% off)
Paper
131297 Coastal Cabana Cardstock: 5-1/2” x 8-1/2" folded in half for card base 131197 Bermuda Bay Cardstock: 4” x 5-1/4” 159276 Basic White Cardstock: 3-1/2” x 5” and 4” x 4”
Ink
147052 Flirty Flamingo Classic Stampin’ Pad 147096 Bermuda Bay Classic Stampin’ Pad 147106 Mint Macaron Classic Stampin’ Pad 132708 Tuxedo Black Memento Ink Pad 154889 Mint Macaron Stampin’ Blends Combo Pack 154878 Bermuda Bay Stampin’ Blends Combo Pack 154958 Poppy Parade Stampin’ Blends Combo Pack 154922 Bronze & Ivory Stampin’ Blends Combo Pack 154884 Flirty Flamingo Stampin’ Blends Combo Pack
Other 149653 Stampin’ Cut & Emboss Machine 155560 Scalloped Contours 154242 Double Oval Punch 153611 Blending Brushes 155567 Silver & Clear Epoxy Essentials 103579 Paper Snips Scissors 144108 Mini Stampin' Dimensionals

Wendy Lee 336-671-1959 www.creativeleeyours.com [email protected]
INSTRUCTIONS
1. Use the scallop edge die from Scalloped Contours Dies to cut the top off the Basic White Cardstock. 2. Stamp the mermaid with Tuxedo Black Memento Ink onto the lower part of the Basic White card front. Use
Stampin’ Blends to color the mermaid as shown. 3. Use a Blending Brush to add Bermuda Bay Classic Ink to the Basic White Cardstock to create the water
effect. 4. Stamp the fish from the Seascape Stamp Set with Flirty Flamingo ink onto the card front. Re-ink and
stamp onto a scrap of Basic White Cardstock. Use the Paper Snips to cut out three fish and adhere over the stamped fish with Mini Stampin’ Dimensionals.
5. Stamp the seaweed from the Seascape Stamp Set with Mint Macaron ink onto the card base to create an ocean scene. Stamp the starfish with Bermuda Bay ink over the seaweed. Stamp the line drawn starfish with Mint Macaron ink over the seaweed. Stamp the seaweed again onto a scrap of Basic White Cardstock and cut it out with Paper Snips. Use Mini Stampin’ Dimensionals to adhere them over the stamped seaweed.
6. Use a Mint Macaron Dark Stampin’ Blend to splatter the card front by flicking the brush end of the marker against the cap.
7. Cut out the scalloped frame from Bermuda Bay Cardstock. Adhere stamped layer to scalloped frame. 8. Use Stampin’ Dimensionals to adhere all layers to the Coastal Cabana card base. 9. Embellish the card with seven Clear Epoxy Essentials.