textron warranty website claims & reports - … · textron warranty website . claims &...
TRANSCRIPT

Textron Warranty Website Claims & Reports
Warranty Claim Filing and Warranty Reports
1. Go to: www.parts.txtav.com
2. Enter user name and password then select Warranty. Here you can:
• View Warranty Overview • File an ARG/New Part Return • View Claim Status Report • View Core/Warranty Due In Report • View Aircraft Coverage Report • Create a Claim • Display or Change an existing Claim • View claims saves as a Draft • Link to Cforia to view Credits and Invoices
1
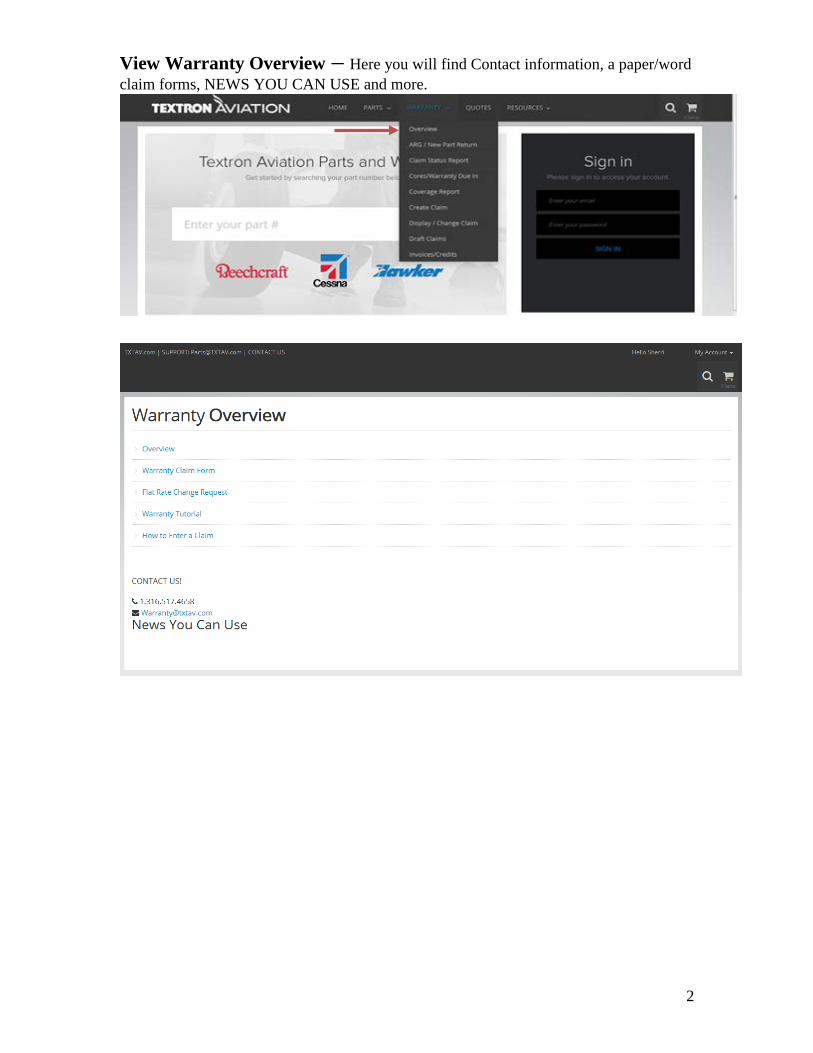
View Warranty Overview – Here you will find Contact information, a paper/word claim forms, NEWS YOU CAN USE and more.
2

File an ARG/New Part Return – Select ARG/New Part return from Warranty Dropdown list
Select the correct date range, then enter the Sales Order Number or Purchase Order Number or Part Number and a selection of available Sales Orders will be displayed
Select the desired Sales order and the parts on that specific sales order will be displayed.
3

Select the part you wish to return, change the quantity if needed and provide a reason for the return and submit.
A Return Authorized will be created. Please make a copy of this Authorization and return it with the part(s).
Correct Return address will be noted
4
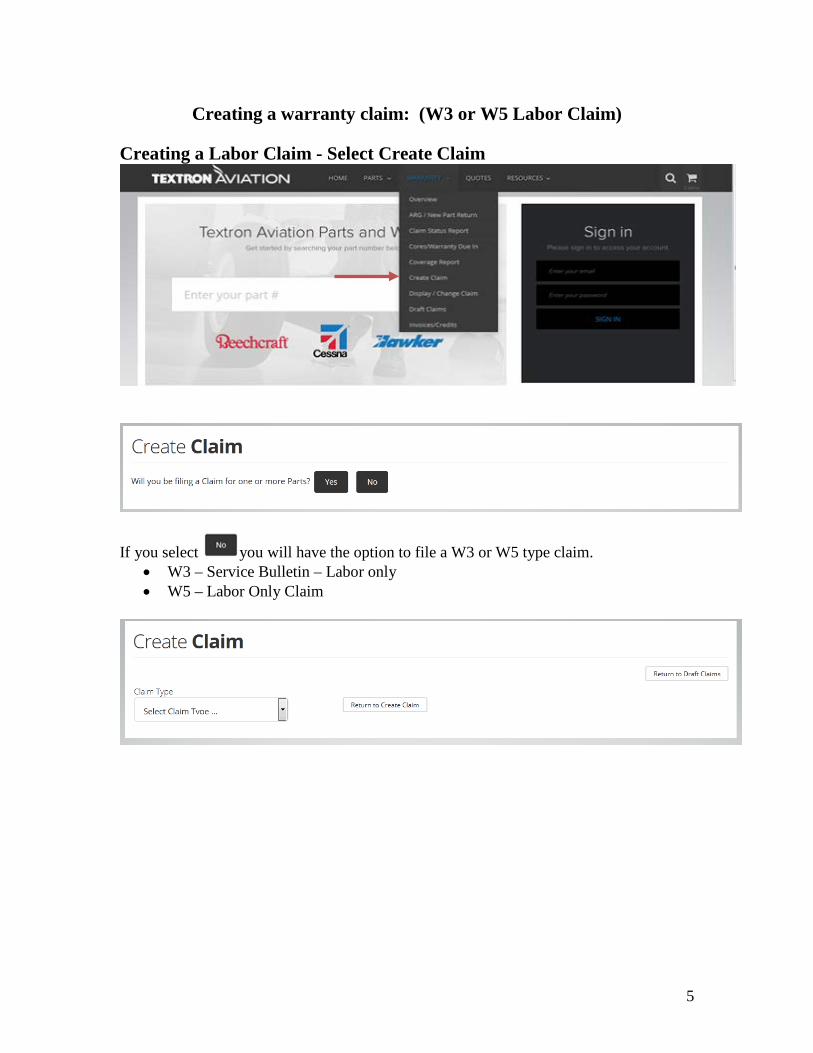
Creating a warranty claim: (W3 or W5 Labor Claim) Creating a Labor Claim - Select Create Claim
If you select you will have the option to file a W3 or W5 type claim. • W3 – Service Bulletin – Labor only • W5 – Labor Only Claim
5

Required data on the claim is maked by a red asterick . By hovering over the you will receive information on the required data for that field. Your name, e-mail and phone number will auto populate based on your log in data. Please fill in all required data.
Click on the following files to enter required information.
Aircraft Data
6

(If a W3 is selected, you will have an additional Field in the Aircraft Data Box to define
the Service Bulletin number. Engine Data – only required on Engine related claims
Labor Data:
Squawk/Corrective Action Data :
7

File Attachment: If you have related data to attach to the claim. (Invoices, pictures, etc.)
You can then submit the claim or save as a draft. Draft claims are saved in Draft Claim file on the Warranty Menu.
Once you have selected Submit claim you will receive the following message:
Select “Submit Warranty” If errors are detected you will receive a list of error to be corrected before the claim can process: Example
8

Once the claim has been submitted you will receive the following notification your claim has been successfully submitted:
Creating a warranty claim: (W1, W2 or W4 Part Claim) Creating a Part Claim - Select Create Claim
If you select you will be required to enter the Purchase Order, Web Order or Sales Order Number for the part.
Select claim applicable claim type: W1, W2 or W4
W1 – Out of Box Failure (Zero time part) W2 – Claim with Part W4 – Service Bulletin Claim with Part For a W2 or W4 type claim: Click on the following files to enter required information. You might note the addition of the Part Data field, since your claim is part related.
9

Required data is maked by a red asterick . By hovering over the you will receive information on the required data for that field. Your name, e-mail and phone number will auto populate based on your log in data. Please fill in all required data.
General Data:
Aircraft Data-
(If a W4 is selected, you will have an additional Field in the Aircraft Data Box to define
the Service Bulletin number.
10

Engine/APU Data – only required on Engine related claims
Part Data:
Select . Then select the correct part.
11

Fill in the requried data for the part removed and installed. If you have additional parts related to the same squawk/snag, you may add parts as needed.
Reminder, all parts related to a single sqauwk/snag can be filed on one claim. Squawk/Corrective Action Data:
12

File Attachment: If you have related data to attach to the claim. (Invoices, pictures, etc.)
You can then submit the claim or save as a draft. Draft claims are saved in Draft Claim file on Warranty Menu.
For a W1 type claim: You will notice the Aircraft Data and Engine Data fields are not required. W1 type claims are for out of box failures only (Zero Time Parts) that are not directly related to a specific aircraft or engine.
See instructions above for remaining File information.
13

Once you have selected Submit claim you will receive the following message:
Select Submit again or save as Draft. If errors are detected you will receive a list of error to be corrected before the claim can process:
Please make required corrections and re-submit. Once the claim is completed a Return Authorization will be created. If the Return Authorization data is correct, select Submit.
14

If the part is required to be returned on W1, W2 or W4 claims you will receive a message to return the part. Note: A copy of this Return Authorization must accompany the return part.
To enter another claim for the same aircraft, select and the aircraft data from the previous claim will back fill on to the next claim. Change /Display Claim
*The Change /Display Claim feature will allow you to: • Change - Edit information on the unsettled claim • Display - Display the claim entered so a copy can be made to return with
the part. Please note a copy of the warranty claim is your Return Authorization and must accompany the return part.
15

Reports: Core/Warranty Due In Report
Select the correct date range and Report Type, and then enter the Sales Order Number or Purchase Order Number or Part Number. A selection of available Sales Orders will be displayed. (This can also be run with dates and Report Type only for all Core and Warranty part due in.)
Results will be displayed. Data can be downloaded to a Spreadsheet if required.
16

Fill in all required data and click on submit. Required data is maked by a red asterick .
17

A Return Authorized will be created. Please make a copy of this Authorization and return it with the part(s).
Aircraft Coverage Report:
18

Enter the aircraft Model and Serial Number and select Search. All coverages will be display in order of active coverage. (Cessna Aircraft)
19

Beech Aircraft:
Claim Status Report
This report will display the current status of your claim (waiting for the part to be returned or waiting for claim settlement.) If the claim is accepted, the report will display the Warranty Administrator’s comments; the amount paid and credit memo number. If the claim is denied, the report will display the Warranty Administrator’s comments and reason for denial. 20

Enter the parameters of the warranty claims you would like to review and select submit.
Results will be displayed.
21

You can then click on each individual claim to view the status, settlement notes, amount paid, etc. Or if you would like to view all claims selected by clicking on View Detail of All Results . You may also download all data displayed to an Excel Spreadsheet. Each line will be color coded to disignate the status of the claim:
• Red – Denied • Green - Accepted • White – Not Settled/Open
By clicking on each individual claim your search results are displayed in detail for each claim. If the claim has not been settled, you can click on the claim number and it will take you back to the original claim so any edits can be completed. If the claim has been settled, you can click on the credit memo number to display a copy for your records.
Overview of Warranty Status Report. In the selection criteria screen, you can enter a range of values to help narrow down your list of warranty claims. To view all claims, leave the first date range field blank. The following User Status codes can be used on this screen: All Items Display all claims that meet entered criteria.
Accepted Display claims that have been settled/accepted,
and that meet the other specified search criteria.
22

Denied Display claims that have been settled and denied and that meet the other specified search criteria.
Awaiting Return Part Display all claims being held for the return of the
part removed and that meet the other specified search criteria. All Open Display all unsettled claims in review and that meet the other
specified search criteria. Draft Display all claims saved as Draft – not yet submitted for
warranty review. When selecting the credit memo you will be sent to Cforia. You will be required to log in and then enter the credit memo number desired. Go to: https://207.178.170.116/custportal/administrator.asp
Our ebilling site www.ebilling.cessna.com Your username is (your email address) Your temporary password is: cessna1 To view Invoices: On the left side of the screen click “Open Invoices” This should bring up a list of all the invoices open on your account. Next click the check boxes in the “invoice reprint” column for the invoices that you would like to view/ print and click the “Reprint Invoices” at the bottom of the page. On the next page click the “reprint invoices” button again and when the next page comes up it should show you the actual invoice copies. To Pay invoices. Enter your bank information on the Edit Payment Information link on the left side of the screen. Then on the open items page there will be check boxes next to the invoices and credits. Select the invoices you want to pay and the credits you would like to use. Scroll to the bottom of the screen and click the pay invoices button. This will take you to a confirmation screen with the total charge that will be processed. Click pay invoices button at the top of the screen and a receipt page will open – Print this page for your records.
23

Additional information: There are 5 different types of warranty claims, each with its own required set of data:
• W1 Out of Box Part, Zero Time Part • W2 Replaced Part with Hours and Labor • W3 Service Bulletin with Labor Only • W4 Service Bulletin with Parts and Labor • W5 Labor Only
Required fields All fields marked with *. Data must be entered in these fields
before you can proceed with processing the claim.
Information By hovering over the next to each field, information will be available on the required data
Glossary of Terms Customer Number TAPD customer number. Claim Type Type of claim filed. A range of claims can be entered (i.e.:
W1 – W5) W1 - Out of box part claim (zero time part) W2 –Replaced part with hours claim and Labor W3 –Service Bulletin with labor only claim W4 – Service Bulletin with parts and labor W5 – Labor only claims Customer Claim Number The unique customer reference number entered in the
original claim submittal. Purchase/Sales Order No Enter your TAPD purchase/sales order number. Your
purchase/sales order number was used/create at order entry. Date Range Refers to the date range of when the warranty claims were
submitted. Limit the date range whenever possible to improve response time and limit the number of records displayed.
Work Completed Enter the date the work on the aircraft was completed. Date Occurred Enter the date the discrepancy occurred.
Hourly Labor Rate If labor is approved, enter an hourly labor rate if different
from the approved rate. ATA Code Select from the drop down menu, if known. Example 25-
10, 32-40, etc. Owner Name Enter the name of the Aircraft owner/operator.
24

Aircraft Model/Serial The aircraft model/serial number of the aircraft. Cessna – select model, enter serial number Beech/Hawker – select model, enter full serial number
(Example, E-4000, BY-201, HA-167, etc.) AC Hours Enter the Aircraft hours. Please enter in whole numbers. Service Bulletin Number Select either a W3 or W4 type warranty claim. Once the
aircraft serial number has been enter a Service Bulletin box will appear. Use the drop down selection to view the Service Bulletins applicable for your aircraft.
Part Number Removed Enter the part number removed from the aircraft. Part Hours Enter the part hours. Spare Install Date If the part removed is not original equipment on the aircraft
and the part hours are less than the aircraft hours, enter the date the removed part was installed.
Quantity Removed Enter the quantity of part(s) removed Part Serial Number Enter the part serial number (removed and installed). Part Cycles Enter the part cycles. Part Landings Enter the part landings. Part Installed Enter the part number for the part installed.
Part numbers as required. Quantity Installed Enter the quantity installed. Person Reporting Enter the name of the person who reported the squawk Technical Representative If during the repair you were assisted by a Textron
Technical Engineer, either in person or via phone please note their name here.
Miscellaneous Amount Enter a miscellaneous amount for additional costs.
Explanation for part/service required must be defined.
Labor Hours Enter labor hours if part has been installed. Explain in Narrative field.
Narrative A narrative is required. What work was performed and why? What was the reason for the R&R of the part?
For assistance with web error messages, please send an e-mail to [email protected]
or call 316-517-4658 Updated 5/2015
25