term requirements for workmanship and materials in …
TRANSCRIPT

Section B_Term Requirements for Workmanship and Materials Part 2 Lot 1
Section B-Term Requirements for Workmanship and Materials
0
30/12/2013
TERM REQUIREMENTS FOR WORKMANSHIP AND MATERIALS in respect of the MAJOR HOUSING WORKS PROGRAMME for THE LONDON BOROUGH OF SOUTHWARK
Section B_Term Requirements for Workmanship and Materials Part 2 Lot 1
Section B-Term Requirements for Workmanship and Materials
1
30/12/2013
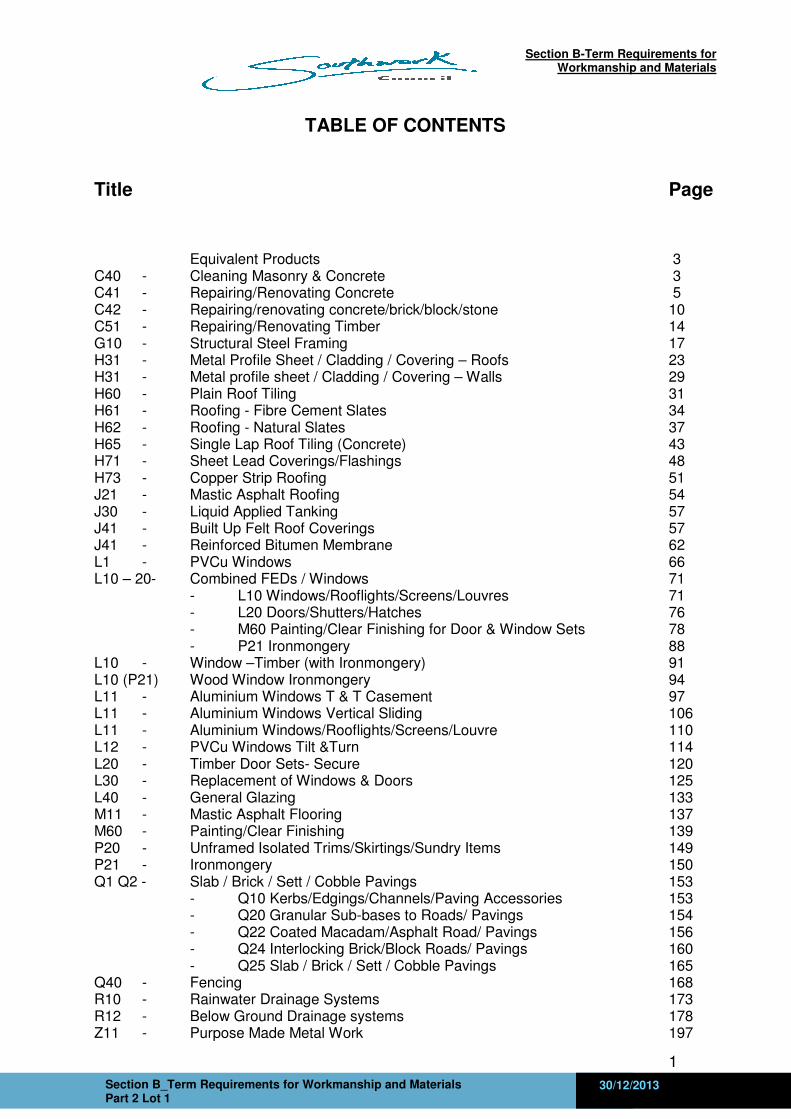
TABLE OF CONTENTS
Title Page
Equivalent Products 3 C40 - Cleaning Masonry & Concrete 3 C41 - Repairing/Renovating Concrete 5 C42 - Repairing/renovating concrete/brick/block/stone 10 C51 - Repairing/Renovating Timber 14 G10 - Structural Steel Framing 17 H31 - Metal Profile Sheet / Cladding / Covering – Roofs 23 H31 - Metal profile sheet / Cladding / Covering – Walls 29 H60 - Plain Roof Tiling 31 H61 - Roofing - Fibre Cement Slates 34 H62 - Roofing - Natural Slates 37 H65 - Single Lap Roof Tiling (Concrete) 43 H71 - Sheet Lead Coverings/Flashings 48 H73 - Copper Strip Roofing 51 J21 - Mastic Asphalt Roofing 54 J30 - Liquid Applied Tanking 57 J41 - Built Up Felt Roof Coverings 57 J41 - Reinforced Bitumen Membrane 62 L1 - PVCu Windows 66 L10 – 20- Combined FEDs / Windows 71 - L10 Windows/Rooflights/Screens/Louvres 71 - L20 Doors/Shutters/Hatches 76 - M60 Painting/Clear Finishing for Door & Window Sets 78 - P21 Ironmongery 88 L10 - Window –Timber (with Ironmongery) 91 L10 (P21) Wood Window Ironmongery 94 L11 - Aluminium Windows T & T Casement 97 L11 - Aluminium Windows Vertical Sliding 106 L11 - Aluminium Windows/Rooflights/Screens/Louvre 110 L12 - PVCu Windows Tilt &Turn 114 L20 - Timber Door Sets- Secure 120 L30 - Replacement of Windows & Doors 125 L40 - General Glazing 133 M11 - Mastic Asphalt Flooring 137 M60 - Painting/Clear Finishing 139 P20 - Unframed Isolated Trims/Skirtings/Sundry Items 149 P21 - Ironmongery 150 Q1 Q2 - Slab / Brick / Sett / Cobble Pavings 153
- Q10 Kerbs/Edgings/Channels/Paving Accessories 153 - Q20 Granular Sub-bases to Roads/ Pavings 154
- Q22 Coated Macadam/Asphalt Road/ Pavings 156 - Q24 Interlocking Brick/Block Roads/ Pavings 160
- Q25 Slab / Brick / Sett / Cobble Pavings 165 Q40 - Fencing 168 R10 - Rainwater Drainage Systems 173 R12 - Below Ground Drainage systems 178 Z11 - Purpose Made Metal Work 197

Section B_Term Requirements for Workmanship and Materials Part 2 Lot 1
Section B-Term Requirements for Workmanship and Materials
2
30/12/2013
Z21 - Mortars 200 Z31 - Powder coating 201
- Supplementary Items 203 - L10 Windows/-High Performance Timber H Type 206
See attached Mechanical and Electrical file Electrical AA - Access Control Specification BB - CCTV Radio Specification CC - Electrical Rewire Specification DD - General Power & Lighting Landlords EE - Lightning Protection Mechanical FF - Mechanical E Specification for Decent Homes GG - Ventilation Specification-Single Dwellings Appendix A - A - Bridge DH Approved List of Equipment Appendix B - Appliance Approved List Appendix C - Condition Survey Form+ Appendix D - Example Condition Survey Appendix E - Part 1- Example Appendix F - Commissioning Check Sheet Appendix G - ES Summary Warranty Notification Sheet Appendix H - Register of Competent Gas Personnel Procedure See attached Kitchen and Bathroom file HH - Bathroom Performance Specification II - Kitchen Performance Specification

Section B_Term Requirements for Workmanship and Materials Part 2 Lot 1
Section B-Term Requirements for Workmanship and Materials
3
30/12/2013
EQUIVALENT PRODUCTS 110 EQUAL AND APPROVED PRODUCTS:
Where particular products, proprietary names or manufacturers are specified herein the specification permits substitution of a product of different manufacture to that specified but these must be at least equal to the specification and approved. The Service Provider must price all works as detailed within the contract documents. Equal and approved products that have not been notified at tender stage may not be considered. All proposals for equal and approved products are subject to approval by the Client Representative and such sanctions granted by the Client Representative will be subject to the verification requirements of clause A31/200B.
C40 CLEANING MASONRY/CONCRETE To be read with Preliminaries/ General conditions: GENERAL/ PREPARATION: 110 SCOPE OF WORK:
All elements of external facades, brickwork and concrete columns, lintels, soffits etc Clean using DOFF steam system as clause 342A for removal of atmospheric soiling, biological growth, paint and vegetation. TORC low pressure system as clause 322A for the removal of any remaining lime scale and Cryptol-6 as clause 362 for any remaining graffiti, subject to CLIENT instruction. Restrictions: the building will remain occupied.
120 RELATED REPAIR AND REMEDIAL WORKS: Work to be carried out before cleaning work: Protect all openings fully, including windows, doors and existing redundant holes in brickwork, tape around and seal before work commences. Liaise with residents to ensure they are aware of extent and impact of work to be carried out.
142 REMOVAL OF FITTINGS: Timing: Before commencement of cleaning work. Disturbance to surfaces: Minimise items for disposal: redundant fittings. Items to be kept for reuse: any signage or other electrical fittings requiring protection. Bird protection. Satellite dishes. Possessions kept on private balconies to be returned to owner.
160 PROTECTION: Surfaces not designated for cleaning: Prevent damage, including marking and staining. Openings: Prevent ingress of water, cleaning agents and detritus. - Vents and grilles: Seek instructions before sealing up. Temporary mechanical fastenings: - In masonry: Locate in joints - In other surfaces: Seek instructions. Additional protection: flues, timber balcony rails. Inform residents to clear private balconies before work commences. Ensure all windows and doors are fully sealed before work commences, protect internal areas inside flats behind openings to protect furnishings and floor coverings. Inform residents of duration of work before commencing.
175 CONTROL AND DISPOSAL OF WASH WATER AND DETRITUS:

Section B_Term Requirements for Workmanship and Materials Part 2 Lot 1
Section B-Term Requirements for Workmanship and Materials
4
30/12/2013
Disposal: Safely. Obtain approvals from relevant Authority. Control of wash water: Collect and divert to prevent ingress and damage to building fabric and adjacent areas. Above and below ground drainage systems: Keep free from detritus and maintain normal operation.

Section B_Term Requirements for Workmanship and Materials Part 2 Lot 1
Section B-Term Requirements for Workmanship and Materials
5
30/12/2013
180 COLD WEATHER: Cleaning procedures using water: Do not use when air temperature is at or below 5°C. Protect damp surfaces from frost. Chemical cleaning agents: Do not use when surface temperatures are below those recommended by manufacturer.
190 CLEANING GENERALLY: Operatives: Appropriately trained and experienced for each type of cleaning work - Evidence of training: Submit on request. Control of cleaning: Confine cleaning processes and materials to designated areas. Prevent wind drift. Detritus: Remove regularly. Dispose of safely. Monitoring: Frequently check results of cleaning compared to approved trial samples. If results established by trials are not achieved, seek instructions. Modifications to cleaning methods and materials: Seek instructions.
230A TRIAL SAMPLES: Trial sample reference: before carrying out full cleaning works- Location/ Size: 3 separate areas of brickwork approx 1sq m each to be agreed by CLIENT - Type of soiling/ surface: biological growth / vegetation, lime scale, graffiti. - Cleaning methods: one area using DOFF system. Second area using DOFF and TORC system to remove lime scale still in place. Third area using DOFF and Cryptol-6 to remove any remaining graffiti. Records: Maintain written records for each trial area, including cleaning methods and conditions, to enable repetition of results elsewhere.
PRODUCTS/ EQUIPMENT: 300 COMPATIBILITY OF CHEMICAL PRODUCTS:
Products: Compatible and produced by the same manufacturer.
312 SURFACE BIOCIDES: Types: Registered by the Health and Safety Executive (HSE) and listed on the HSE website under non-agricultural pesticides. Compatibility with surface: Free from staining or other harmful effects.
322A ABRASIVE CLEANING EQUIPMENT: Manufacturer/ Supplier: Stonehealth Ltd Bowers Court, The Broadwell, Dursley, Gloucestershire GL11 4JE. Tel: 01453 540600 www.stonehealth.com .- Product reference: TORC. Low-pressure water and abrasive powder. Refer to relevant Appendix. Nozzle types: 9mm standard and 5mm parallel where necessary. Subject to site trials and as recommended by manufacturer. Abrasives: Refer to relevant Appendix and clause 452 below. Other requirements: Refer to manufacturer's specification and note that only operatives / subcontracting firms approved by the manufacturers will be allowed to carry out this work.
342A STEAM CLEANING EQUIPMENT: Manufacturer: Stonehealth Ltd Bowers Court, The Broadwell, Dursley, Gloucestershire GL11 4JE. Tel: 01453 540600 www.stonehealth.com. - Product reference: DOFF system high-pressure steam. Refer to relevant Appendix. Operational pressure: as recommended by manufacturer. Conduct sample to test minimum pressure necessary to avoid damage to surface. Nozzles: 9mm standard, or as manufacturer's recommendations. Other requirements: only operatives / subcontracting firms approved by the manufacturer will be allowed to carry out this work.
362 CHEMICAL AGENTS: FOR LIMESCALE AND GRAFITTI REMOVAL Manufacturer: Stonehealth Ltd.- Product reference: Cryptol-6.
APPLICATION: 412 REMOVAL OF LOOSELY ADHERED DEPOSITS:

Section B_Term Requirements for Workmanship and Materials Part 2 Lot 1
Section B-Term Requirements for Workmanship and Materials
6
30/12/2013
Timing: Before commencement of other cleaning methods. Surfaces: Prevent damage, including abrasion.
422 BIOCIDE APPLICATION: Preparation: Remove loose growths. Surfaces: Prevent damage, including abrasion. Biocide treatment: Appropriate solutions to kill growths and inhibit further growths.- Dead growths: Remove.
432 TOOLING: Tooling of surfaces: Not permitted.
452 ABRASIVES CLEANING:
Surfaces: Minimize abrasion.- Ingrained deposits: Seek instructions. Equipment settings (including nozzle type and distance from surface): Adjust regularly to achieve optimum cleaning performance for each surface. Detritus: Remove with clean water.
482 STEAM CLEANING: Surfaces: Prevent damage, including abrasion. Equipment settings (including nozzle type and distance from surface): Adjust regularly to achieve optimum cleaning performance for each surface.
500A CHEMICAL CLEANING: Surfaces: Prevent damage, including discolouration, bleaching and efflorescence. Product variables (including concentrations, dwell times and number of applications): Adjust for each surface to achieve optimum cleaning performance. Application: To wetted surfaces.- Drying out: Prevent unless recommended otherwise by cleaning product manufacturer. Removal of chemicals and neutralization: As recommended by product manufacturer, including rinsing with clean water. - Additional treatment: Where water rinsing is insufficient to neutralize surface, apply compatible neutralizing agent.- Surfaces and joints: Minimize absorption of chemicals. Prevent damage, including abrasion.
C41 REPAIRING/RENOVATING CONCRETE GENERAL 20 CONCRETE REPAIRS
Shall be carried out using one of the following proprietary systems with all materials in the repair being sourced from a single manufacturer:
• Sika Limited - Concrete repair system.
• SBD Limited - Concrete repair system.
• Fosroc Expandite Limited - Concrete repair system.
Or other equal and approved concrete repair system that has Agrément Certification covering both materials and workmanship.
21 THE REPAIR SYSTEM
Selected for this contract shall have a British Board of Agrément Certification for the materials and workmanship. Applicators shall be properly trained in the use of the materials and have the appropriate certification.
25 GUARANTEE Upon the expiration of the defects period the contractor shall provide, in addition to any contractual or statutory obligations that may exist under the agreement, a guarantee that the materials supplied and the works carried out in connection with the concrete

Section B_Term Requirements for Workmanship and Materials Part 2 Lot 1
Section B-Term Requirements for Workmanship and Materials
7
30/12/2013
repairs will perform their designed function in a satisfactory manner for a period of not less than 10 years.
26 INSURANCE BACKED GUARANTEE The contractor is to take out and maintain an insurance policy, which indemnifies the Employer against any direct or indirect costs arising from the failure of, or any part thereof, of the works, which are subject to a guarantee period. The contractor will become liable for the payment of all premiums and other charges payable in connection with this insurance and shall provide the Employer with reasonable proof of the discharge of the same.
27 TECHNICAL DETAILS Full technical details of the repair system selected shall be disclosed at the time of the tender and these shall be included in the tender documentation.
28 WORKS PROGRAMME Programme for the works will be set by the main contractor to ensure continuity to the work. Sub-contractors for the concrete repairs should not assume that all floors will be available for work at the same time.
60 REPAIRS TO RENDERED AREAS GENERALLY Render for repairs to general external areas shall be cement: lime: sand (1:1:5-6) for undercoats and finishes.
PREPARATION 80 CLEAN SURFACES
Clean all concrete surfaces to defective and suspect areas as directed by the CLIENT in order to enable an inspection to be carried out. Concrete surfaces coated with paint or other surface applied finish shall be prepared using mechanical means avoiding the generation of airborne particulates (e.g. water jet with included grit).
85 PREPARED CONCRETE SURFACES shall be suitable for the application of finishing coatings to the manufacturers requirements.
SURVEY AND TESTING
105 DEPTH OF CARBONATION AND CHLORIDE TEST There are no survey or test results available for these structures. The Bill of Quantities includes for a number of depth of carbonation and chloride tests which are for the use at the discretion of the CLIENT. The repairer should allow within the rates for any additional testing deemed necessary.
106 DEPTH OF CARBONATION TEST
Depth of carbonation testing should be carried out in accordance with BRE Information Paper IP6/81 and BRE Digest No. 264. Chloride content determination shall be carried out in accordance with BS 1881, Part 124.
110 CARBONATION SURVEY
The depth of carbonation survey shall be carried out prior to cover meter testing to ascertain the depth of carbonated concrete in a representative number of places.
111 COVER METER AND SURVEY RECORDING Shall be agreed with the CLIENT/Consultant Engineer prior to commencing work. The specialist shall include for recording the results of the cover meter survey on sketches, drawings and schedules as a permanent record.
115 COVER METER AND SURVEY RECORDING

Section B_Term Requirements for Workmanship and Materials Part 2 Lot 1
Section B-Term Requirements for Workmanship and Materials
8
30/12/2013
Shall be agreed with the CLIENT/Consultant Engineer prior to commencing work. The specialist shall include for recording the results of the cover meter survey on sketches, drawings and schedules as a permanent record.
116 INITIAL IMPLEMENTATION OF CONCRETE REPAIRS Shall be agreed with the CLIENT and be marked on and be fully referenced on a copy of the survey drawings, which is to be issued to the CLIENT prior to the commencement of any cutting out.
120 SURFACE CRACKS Which occur on the line of reinforcing bars shall be identified during the survey and shall be marked with an indelible marker.
121 HAMMER TEST Shall be carried out in the presence of the CLIENT or CoW. The specialist shall hammer test for hollow areas of concrete and shall mark these zones by locally breaking out a small area to expose corroding reinforcement for further investigation. These areas are to be recorded on the record drawings.
BREAKING OUT DEFECTIVE CONCRETE 142 EFFICACIOUS TOOLS
The specialist shall ensure that all cutting out is carried out using sharp tools avoiding featheredges or smooth cut square sides. The cut edges to the repair areas shall be undercut and left rough to give a good key for the repair mortar.
147 AGREEMENT TO CUTTING OUT Shall be sought from the CLIENT to identify the areas to be cut out from the surveys and drawings. The contractor should allow two weeks in his programme for the CLIENT to confirm the areas to be cut out. This time will commence once all relevant information has been received by the CLIENT.
152 MANAGEMENT OF CUTTING The specialist and/or main contractor shall ensure that the cutting out stage is properly managed and executed. Excess or unreasonable cutting out will not be tolerated and may be penalised during measurement by size reduction or in extreme case by disallowing the repair entirely. The right to properly test and repair shall not be diminished by this directive in any way.
155 EFFECTIVE CUTTING OUT
Ensure that cutting out is carried out safely without affecting the strength or stability of the building.
158 SAMPLES
Prepare samples of cutting out for approval of the CLIENT at the start of the work.
159 CORRODED REINFORCEMENT Concrete to corroded reinforcement shall be cut back to 50mm beyond the corroded length, exposing sound reinforcement.
162 REINFORCEMENT BARS
Those reinforcement bars indicated on the surface of the concrete shall be examined for corrosion by breaking out a small section of the bar indicated as having the least cover and testing for carbonation. Corroded reinforcement shall be broken out as required. Examine other bars with increasing amounts of cover until depth is established where no corrosion of reinforcement is occurring.

Section B_Term Requirements for Workmanship and Materials Part 2 Lot 1
Section B-Term Requirements for Workmanship and Materials
9
30/12/2013
165 PREPARATION OF STEEL REINFORCEMENT
All exposed steel shall be mechanically cleaned and all signs of corrosion, chlorides or other contaminates shall be removed.
168 REPAIRS TO CRACKS Cut out all cracks located on the line of reinforcing bars and repair as agreed by the CLIENT. Other cracks in the concrete structure shall be brought to the attention of the CLIENT and appropriate treatment agreed if necessary.
170 RECORD OF CUTTING OUT • Carefully record the location, width, length and depth of all cutting out on sketches and
schedules and agree this information with the CLIENT or CoW before treating the reinforcement and placing repair concrete.
• The contractor is to provide the CLIENT with a copy of each numbered concrete repair sheet within 7 days of the signing of the sheet by the CLIENT or CoW. The contractor is to maintain on site a logbook of signed concrete repair sheets.
172 PROGRESS AND MONITORING OF CUTTING OUT
At the agreement of the CLIENT the contractor shall: - • Once the provisional extent of concrete repairs is established, commence cutting out up
to 20% of the external surface area of the concrete. Unless otherwise expressly authorised by the CLIENT the contractor will not be permitted to continue cutting out until the signed repair sheets for at least 5% of the external surface area of the concrete have been delivered to the CLIENT.
• The contractor shall not be permitted to have cut out any more than 20% of the external surface area of the building at any one time. Although the areas specified need not be adjacent to each other, the contractor will be restricted to working on identified sections as agreed with the CLIENT.
175 INSPECTION OF CONCRETE REPAIRS
The contractor shall give two working days notice to the CLIENT of all completed cutting out. The contractor may not place any mortar until instructed to do so by the CLIENT.
GENERAL - REPAIR 188 REPAIR MATERIALS
Repair materials shall be employed strictly in accordance with manufacturers instructions and recommendations of the selected repair system.
189 DELIVERY OF MATERIALS
Materials shall be delivered in sealed containers clearly labelled with type of material, brand name, intended use and batch number.
192 STORAGE All materials supplied by the manufacturer of the specialist concrete repair system must be stored and handled strictly in accordance with the recommendations of the manufacturer. The contractor shall comply fully with the requirements of the COSHH Regulations.
REPAIR 205 BLAST CLEAN REINFORCEMENTS
By means of Pencil Vacuum Blast Cleaning (PVBC) to SA 2.5 standard.
210 STEEL PRIMER Immediately after blast cleaning, apply the recommended steel primer overlapping the

Section B_Term Requirements for Workmanship and Materials Part 2 Lot 1
Section B-Term Requirements for Workmanship and Materials
10
30/12/2013
concrete at the steel/concrete junction by not more than 10mm. Apply a second coat as required by the system manufacturers requirements.
213 BOND BRIDGE After the stipulated drying time for the primer apply a bond bridge as appropriate and place the repair concrete whilst the bond bridge is still active. Prior to the application the surfaces must be thoroughly cleaned and pre-dampened to a saturated surface dry standard.
215 REPAIR MORTAR • Shall be correctly mixed to the manufacturers requirement and applied using a placing
and compacting method rather than a rendering technique to ensure adequate compaction. Stale mortars shall be discarded and in no circumstances shall they be remixed.
• Shall be protected from rain, sun, wind, frost etc and cure in accordance with good practice and BS 8110, Part 1. No proprietary curing agent shall be used without the prior written agreement of the manufacturer and CLIENT.
218 EXISTING PROFILES
Whilst carrying out the repairs all existing profiles or features shall be maintained and the repairs shall match the existing unless previously agreed with the CLIENT.
RE-ALKILISATION AND CORROSION INHIBITORS 238 REPAIR TECHNIQUES
The use of re-alkalisation and corrosion inhibiting repair techniques are not precluded by this specification and they may be employed by the specialist repairer after carrying out repairs to existing visually apparent defects using the appropriate foregoing parts of the specification.
239 PROCESS TO EMPLOY INHIBITORS The process to be employed must have British Board of Agrément Certification for materials and workmanship, and carry with it a 10 or 15-year guarantee period. The period shall be clarified by the tenderer at the time of tendering.
243 CERTIFIED PERSONNEL All persons employed in using these products must be properly trained in the repair process and are in possession of relevant BBA certification, which should be produced on request from the CLIENT.
259 BUSH HAMMERED CONCRETE • Is to be pre-dampened and then levelled using cement based modified mortar, bulked
out with sharp sand in equal proportion to both, fill and level the surface. • Apply a finish to the same standard as clause 255. FINISHING 255 SMOOTH SURFACES • Prepare and pre-dampen al plain smooth concrete surfaces and apply a coating of
cement based fairing mortar to completely fill and level blowholes and other surface defects.
• Texture the finished surface as required to achieve a comparable finish to the adjacent concrete (i.e. smooth textured, board marked etc.).
258 EXISTING SURFACES
• Where the existing surface is particularly poor or uneven apply a levelling coat of fine mortar bulked out with sharp sand followed by a finishing fairing coat.

Section B_Term Requirements for Workmanship and Materials Part 2 Lot 1
Section B-Term Requirements for Workmanship and Materials
11
30/12/2013
269 APPLICATION OF SURFACE COATINGS • The coatings shall be fully compatible with the repair method used and all colours shall
be agreed by the CLIENT. • All areas to receive the surface coatings shall be cleaned down in accordance with the
manufacturers’ recommendations. The coating shall be mixed in accordance with the manufacturers’ instructions by using clean forced action mixers or clean electrically operated paddle.
• The coating product shall be applied in accordance with the manufacturers recommendations by using a spray, brush or trowel as appropriate, ensuring that air is not trapped in the coating system. All second or subsequent coats to be in alternate colours and should be applied when the undercoats are stable but not fully set.
• Protect the coatings from premature drying and leave undisturbed for a minimum of three days. Curing membranes are not to be used unless agreed by the CLIENT in advance.
C42 REPAIRING/RENOVATING CONCRETE REPAIRING AND RENOVATING CONCRETE 30 GENERAL
The following works clauses are written to show the complete sequence of expected operations for this part of the works. They are based upon pilot repairs carried out earlier this year.
40 CHECK DIMENSIONS. The contractor shall check all dimensions on site, and advise the CA of any discrepancies, particularly before ordering standard components.
50 MEASURED ALLOWANCES. Wherever the term "Allow" is used, the item of work described is to be re-measured before covering up. Items covered up with out being re-measured shall not be paid for.
60 ORDER OF WORK Investigations must be carried out at the beginning of the contract. Any new work, which is damaged by water penetration as a result of out of sequence working, shall not be paid for.
70 BUILDING CONTROL
Allow for putting in the required works notifications, complete with the required calculations and details, to Building Control for works that involve structural repairs.
SCOPE OF WORKS 90 WORK AREAS as scheduled later. All works are to be carried out within public access
stairwells.
100 TEMPORARY SUPPORTS. Re-use pre-fabricated steel beams installed at various locations.
• Beams to be bolted to sidewalls of stairwells and not to excessively encroach on headroom to stairs.
• Existing beams shall be moved after repairs have been affected and allowed to cure to full strength in accordance with the suppliers' code of practice.
110 ADDITIONAL TEMPORARY SUPPORT to be provided, including needling and props
down to ground level, to support beams while bottom section replaced with cast in-situ reinforced concrete.
• Allow for re-use of existing stringer supports stored on site.

Section B_Term Requirements for Workmanship and Materials Part 2 Lot 1
Section B-Term Requirements for Workmanship and Materials
12
30/12/2013
PREPARATIONS GUARDING OF WORK AREAS 140 MINIMUM PROTECTION • To staircases, circulation areas etc. Provide, install and maintain adequate signage,
barriers, temporary lighting, hoardings etc as laid down under the preliminaries. • These provisions are, to protect users of the staircases from the works, and to continue
with a full level of protection from accidental or malicious damage out of working hours. • This protection is to remain in place until the new works have dried out - allow 24 hours
after completion of each work stage. Allow for 72 hours before striking of shuttering to new concrete.
150 ADDITIONAL MEASURES
To areas where concrete to be hacked out, provide additional warnings to the residents, and provide, lay drape as required dustsheets or screens to catch debris. Debris shall be cleared up regularly, and ensure that stairs, landings and balconies are kept clean and safe at all times.
INVESTIGATIONS 170 PREPARATIONS
Clean all concrete surfaces to defective and suspect areas as directed by the CA in order to enable an inspection to be carried out.
180 HAMMER TEST all suspect and defective areas of concrete in the presence of the CA/Clerk of Works.
190 RECORDING
Clearly mark and record all areas that the CA/Clerk of Works designates as requiring repair. The position of each repair shall be recorded on a record sheet provided by the Contractor. A copy of this sheet is to be handed to the CA /Clerk of Works prior to any repairs being executed.
200 COVER METER TESTS
• Carry out a cover meter test to determine the position and concrete cover over the steel reinforcement in the defective or suspect areas. The cover meter shall comply with BS1881: pt 204 (1988).
• The testing shall be carried out in the presence of the CA/Clerk of Works and the position of all reinforcing steel having a cover less than that specified by the CA shall be clearly marked on the surface of the concrete and recorded on a record sheet provided by the Contractor. A copy of the record sheet will be handed to the CA/Clerk of Works.
TEMPORARY SUPPORTS 220 OVERALL • Install temporary steel supports to the locations shown on the schedule "Locations of
Works." • Allow for use of existing supports in place, and held in store. 230 BEAM SUPPORTS
• Supports under main beams to consist of 12mm x 300mm plates to the full width of the stairwell, and with a 550 x 300mm down turn at each end to take 6 No 12mm mounting bolts each. The main cross bearer to be supplemented with a 100 x 150mm hollow steel section.
• Supports under half landings to consist of 12mm x 150mm plates a.d.b. and with 550 x 150mm down turns to take 3 No 12mm mounting bolts each. A hollow steel section shall not be incorporated.

Section B_Term Requirements for Workmanship and Materials Part 2 Lot 1
Section B-Term Requirements for Workmanship and Materials
13
30/12/2013
240 STAIR STRING SUPPORTS
• In locations where main beams to be fully repaired, inclusive of new bottom reinforcement, provide prefabricated reinforcement to the outer string of the 2 flights which bear onto the beam. Reinforcement to be as indicated on the appended drawing. Allow for 150 x 150 x 6mm steel angle, with a timber packing and compressible foam to support the stair soffite.
• Extend angle at the top and bottom to run parallel to the landing / balcony beam & soffite to bearing / connection plates. At the staircase wall the plate to take 3 No 12mm bolts. At the main balcony extend under the profile of the down-stand beam as shown, and to bear across 2 No steels supporting the balcony.
•At the 2 No down stand beams, allow for 150mm working clearance between the beam face and edge support.
• In the 2 positions shown, install acrow or similar props, complete with head and base packing & spreaders to carry the load down to ground level.
250 COMPLETION
On completion of the works to the beam, strike the temporary supports and reuse at the next beam / store on site in the designated safe store.
REPAIRS TO BEAMS 280 STANDARDS
All works shall comply with the European Standard EN1504, or it recognized & approved equivalent.
290 REMOVAL OF DEFECTIVE • Remove all loose and defective concrete and mechanically clean all those areas
where the CA directs that concrete repairs shall be carried out. The concrete shall be taken back to a sound surface.
• Where steel reinforcement is encountered it shall be exposed around its circumference for the whole of the exposed length. A gap of 10mm minimum must be left around exposed steel.
300 EXPOSED REINFORCEMENT shall be mechanically cleaned and all signs of
corrosion, chlorides or other contaminates shall be removed.
310 CONCRETE REPAIR SYSTEM All concrete repairs and making good shall be carried out using one of the following proprietary fibre-reinforced polymer laminate and resin repair systems for concrete: -
• Sika Ltd. - Concrete Repair System. • Degussa (Thoro). - Concrete Repair System. • Concrete Repairs Ltd. - Concrete Repair System.
Or other equal and approved concrete repair system, which has Agrément Certificates covering both materials and workmanship.
• The Contractor shall advise the CA of which concrete repair system will be used at the time of submitting the tender.
320 NOTE • All concrete repairs shall be carried out strictly in accordance with the requirements and
recommendations of the manufacturer of the selected repair system. • Concrete repairs shall only be carried by a specialist company approved by the manufacturer of the selected repair system. The specialist company shall only use those operatives who are suitably qualified for the type of repair they are required to carry out.
• All materials supplied by the manufacturer of the specialist concrete repair system must be stored and handled strictly in accordance with the recommendations of the manufacturer. The Contractor shall comply fully with the requirements of the COSHH Regulations.
Section B_Term Requirements for Workmanship and Materials Part 2 Lot 1
Section B-Term Requirements for Workmanship and Materials
14
30/12/2013
• The Contractor shall prepare and submit prior to the commencement on site a detailed specification and method statement covering the selected concrete repair system.
330 NEW REINFORCEMENT Stainless steel reinforcement shall be incorporated as directed by the CA. 340 SURFACE FINISH
The surface finish of all concrete repairs shall match that of the adjacent concrete surfaces unless directed otherwise by the CA.
350 INSPECTION AND SAMPLING The Contractor shall permit the inspection and sampling of the materials, and inspection of the work in progress by representatives of the manufacturer of the repair system selected.
MAKING GOOD ONLY 370 TEST CONCRETE BEAMS
Test concrete beams for depth and condition of reinforcement, and condition of the concrete.
380 CORROSION INHIBITOR Apply a water-based corrosion inhibitor. Allow for 2 No separate applications. 390 THE REPAIR • Apply a cementations grout by injection and trowel, according to the manufacturer's
working codes and methodology, to prepared areas and cracks in the concrete surface. • Leave steel floated smooth and to follow existing profile of beam, including rounded
arrises to underside, ready for follow on decorations. • Allow for 4.0 l.m. per beam. REPLACEMENT OF DEFECTIVE CONCRETE 410 SCOPE • The following clauses are over and above those for making good only. • On completion of concrete replacement, allow for making good a.d.b. to bring forward
sound surface for decoration. 420 PREPARATIONS • Hack off top finishing render to concrete substrate to the underside and vertical faces of
the concrete beam. • Stair treads and risers SHALL NOT be hacked back, or included in these works. 430 REINFORCEMENT Make good exposed reinforcement 440 REPAIRS • Apply the concrete repair system, all in accordance with the manufacturer's codes and
instructions. • Allow for a primer coat, followed by an epoxy putty filler to bring forward a smooth
surface. • Apply resin, followed by Carbon Fibre sheet and then the second coat of resin. • To provide a finish ready for decorations, apply a protective coat over the whole area of
repair. GUARANTEES 460 SCOPE

Section B_Term Requirements for Workmanship and Materials Part 2 Lot 1
Section B-Term Requirements for Workmanship and Materials
15
30/12/2013
Upon the expiration of the defects liability period the contractor shall provide, in addition to any contractual or statutory obligations that may exist under the agreement, a guarantee that the materials supplied and the works carried out in connection with the concrete repairs will perform their designed function in a satisfactory manner for a period of not less than 10 years.
470 INSURANCE BACKED GUARANTEE • The contractor is to take out and maintain an insurance policy, which indemnifies the
Employer against any direct or indirect costs arising from the failure of, or any part thereof, of the works, which are subject to a guarantee period.
• The contractor will become liable for the payment of all premiums and other charges payable in connection with this insurance and shall provide the Employer with reasonable proof of the discharge of the same.
REPAIRING AND RENOVATING BRICKWORK OR BLOCKWORK 490 REMEDIAL BRICKWORK GENERALLY • All remedial brickwork, repointing and the like are to be straight, flush and level with the
existing work. Joint sizes, materials and finishes are to match existing. • Any replacement bricks are to be of the same size as the existing, be at least of an
equal crushing strength to the existing, be moderately resistant to frost and have a low soluble salt content.
495 TYPE OF BRICK • Metric bricks SHALL NOT be used. • All to be imperial. • Allow for the use of bull nose brown glazed and straight bricks. 500 SPALLING BRICKWORK
Spalling or cracked bricks are to be cut out and replaced with matching bricks bedded in group 4 mortar as Z21 of a colour to match existing and neatly pointed to a profile to match existing.
510 LAMINATING BRICKWORK Bricks, which are laminating, are to be brushed down to a smooth solid base, with a firm non-metallic brush, to remove all loose, flaking and soft material.
520 RE-POINTING OF BRICKWORK Carefully rake out existing joints, by hand, to form a neat and square recess 15-20mm deep, taking care not to damage existing bricks. Remove all dust and loose material with a stiff non-metallic brush, lightly wet existing joint and neatly point in group 4 mortar to Z21, in a colour and profile to match existing.
530 CRACKED JOINT IN EXISTING FACEWORK In areas, which are not to be re-pointed; joints with cracks in excess of 2mm wide are to be cut out and re- pointed in accordance with clause 213.
C51 REPAIRING/RENOVATING TIMBER 110A OVERHAUL DOOR Take off existing door(s) • Piece in redundant lock mortices, pockets, hinge positions, damaged areas and the like
to door and/or frame. • Make good damaged or missing mouldings and panels. • Cramp up, glue and re-wedge as necessary • Re-hang door(s) on new hinges. • Adjust oil, repair or renew ironmongery as necessary.
Section B_Term Requirements for Workmanship and Materials Part 2 Lot 1
Section B-Term Requirements for Workmanship and Materials
16
30/12/2013
• Apply mastic sealer to junction of doorframe and structure, including raking out old mastic where present.
• Ease and adjust door(s) generally and leave in working order. • Make good and touch up internal decorations where disturbed. 120A EASE AND ADJUST WINDOW OR DOOR • Easing a door or window shall be carried out in position and shall include for removing
existing paint layers and adjusting the timber meeting surfaces as required to allow proper operation and closure on completion of re-decoration.
• Adjust and oil hinges and ironmongery and leave in proper working order. • Exposed timber surfaces shall be knotted and primed as soon as is practicable
following easing. • Apply mastic sealer to junction of window/door frame and structure, including raking
out old mastic as required. REPAIRS 150A RENEW FACE OF WINDOW CILL
Cut away external face of existing cill, back to face of frame and remove all rotten timber. Prepare exposed face and plant on new hardwood face, glued screwed and filled. New cill to be throated, splayed and rebated generally to a profile to match existing cills.
150B RENEW COMPLETE THRESHOLD • Remove door(s) and carefully take out doorframe complete and remove existing
threshold together with all rotten timber. • Provide and fix new splayed, weathered, throated and grooved hardwood threshold to
match existing including splicing in a minimum 150mm length to bottom of frame. • All joints of frame should be checked and re-jointed and glued if necessary. • Refix door(s) and frame, which is to be bedded on mastic, and laid on a continuous
damp proof course. • Provide and fix appropriate section of architrave or fillet around perimeter of frame
internally and decorate to match existing finishes. • Bed and point perimeter of frame externally with cement and sand mortar and seal joint
with mastic sealant on completion. • Make good all works disturbed both internally and externally including re-decorations internally where required. 150C RENEW WEATHERBOARD • Carefully remove existing weatherboard. • Provide and fix new weatherboard profiled to match existing glued and screwed in
position on a mastic bed and rebated where required over weather bar. 150D RENEW COMPLETE WINDOW CILL • Carefully take out window complete and remove existing cill together with all rotten
timber. • Provide and fix new splayed, weathered and throated hardwood cill to match existing including splicing in a minimum 150mm length to bottom of frame/box frame. • All joints of window unit should be checked and re-jointed and glued if necessary. • Refix window, which is to be bedded on mastic, and laid on a continuous damp proof
course. • Provide and fix appropriate section of cover bead or fillet around perimeter of frame
internally and decorate to match existing finishes. • Bed and point perimeter of frame externally with cement and sand mortar and seal joint
with mastic sealant on completion. • Make good all works disturbed both internally and externally including re-decorations

Section B_Term Requirements for Workmanship and Materials Part 2 Lot 1
Section B-Term Requirements for Workmanship and Materials
17
30/12/2013
internally where required. 150E REPAIR DOOR FRAME • Remove door(s) and carefully remove section of rotten timber. • Provide and splice in new section, minimum 300mm long, of frame or threshold to
match existing. • Refix door(s). • Provide and fix or refix loose section of architrave or fillet around perimeter of frame internally and decorate to match existing finishes. • Bed and point perimeter of frame externally with cement and sand mortar and seal joint
with mastic sealant on completion. • Make good all works disturbed both internally and externally including re-decorations internally where required. 150F REPAIR WINDOW FRAME • Remove casement, sash or glazing and carefully remove section of rotten timber. • Provide and splice in new section, minimum 300mm long, of frame to match existing
profile. • Refix casement, sash or re-glaze as necessary. • Provide and fix or refix loose section of cover mould or fillet around perimeter of frame internally and decorate to match existing finishes. • Bed and point perimeter of frame externally with cement and sand mortar and seal joint
with mastic sealant on completion. • Make good all works disturbed both internally and externally including re-decorations internally where required. 150G REPAIR CORNER OF WINDOW FRAME • Works to be carried out as 150F except that new sections to be spliced for a minimum
of 300mm in both vertical and horizontal directions and securely jointed to maintain the integrity of the frame as a whole.
150L RENEW BOARDED CLADDING • Cut out and remove defective or rotten sections of match boarding or tongued and
grooved boarding as instructed. • Provide and fix new boarding to match existing size, type and profile, including providing additional battening and joints to existing as necessary. 150M RENEW BOARDED DUCT COVER • Cut out and remove defective or rotten sections of panelling as instructed. • Trim edged to neat profile and provide and fix new boarding to match existing size and
type, including providing additional battening, noggins and joints to existing as necessary.
150N RENEW TIMBER SECTION GENERALLY • Carefully cut out defective section, minimum 300mm long together with all rotten timber. • Provide and splice in new section to match existing type and profile. • Make good all works disturbed both internally and externally including re-decorations internally where required. 200 SPECIALIST REPAIRS Specialist repairs to small areas of decay to external joinery shall be carried out in 200A SPECIALIST REPAIRS Specialist repairs to small areas of decay to external joinery shall be carried out in accordance with the Windowcare System or other equal and approved.

Section B_Term Requirements for Workmanship and Materials Part 2 Lot 1
Section B-Term Requirements for Workmanship and Materials
18
30/12/2013
210 IN SITU RESIN REPAIRS TO EXISTING TIMBER WINDOWS • Product: 'Dry Flex' RP by Window Care Systems Ltd, tel. 01394 388 898 • Preparation: Remove all decayed wood with the Window Care Profi using the Round
Cutter back to sound wood. Lightly sand the surface using medium grade adhesive paper. Check that moisture content is below 18% using the Window Care Wood Condition Meter CS1. Apply hot air using a Hot Air Blower at 60 - 80 degrees Centigrade to ensure good adhesion of repair compound. Remove adjoining paint system up to 10mm from location of repair.
• Mix the required quantity of Dry Fix Wood Stabiliser in the correct ratio. Apply well into the surface using a small brush. Wipe off any excess. Leave for 25-30 minutes before applying Dry Flex RP.
• Mix the Dry Flex RP thoroughly to a homogenous mass. • Apply the Dry Flex using plastic modelling knife available from Window Care Systems.
For complex repairs, use Perspex shuttering. • Apply hot air to the surface of Dry Flex RP for a few minutes. • When the Dry Flex RP is completely dry (usually after 24 hours at 20 degrees
Centigrade), remove excess Dry Flex RP using the Window Care Scraper. • Sand the repaired areas lightly to achieve an even, smooth surface. • This item must be carried out only by operatives trained by Window Care Systems Ltd
in the use of this repair system. 220 SPLICED REPAIRS TO EXISTING TIMBER WINDOWS • Product: 'Dry Flex' RP by Window Care Systems Ltd, tel. 01394 388 898 • Preparation: Remove all decayed wood at an angle of 75 degrees using a saw, chisel
or the Window Care Profile. Lightly sand the surface using medium grade adhesive paper. Check that moisture content is below 18% using the Window Care Wood Condition Meter CS1. Apply hot air using a Hot Air Blower at 60 - 80 degrees Centigrade to reach correct moisture content and to ensure good adhesion of repair compound. Remove adjoining paint system up to 10mm from location of repair.
• Prepare the new timber splice in such a way that there is a gap of at least 4mm between the contact areas. The new timber splice should have moisture content of no more than 18 degrees Centigrade. The new timber splice should be unprimed.
• Mix the required quantity of Dry Fix Wood Stabiliser in the correct ratio. Apply to the end grain of the existing timber and the new timber using a small brush. Work well into surface. Leave for 25-30 minutes before applying Dry Flex RP.
• Mix the Dry Flex RP thoroughly to a homogenous mass. • Apply Dry Flex RP to all areas of contact. Use a 4mm 'space' at the joint and secure
the new timber splice in position using a Perspex fixing plate. Fill the space with Dry Flex RP and smooth the surface using a plastic knife.
• When the Dry Flex RP is completely dry (usually after 24 hours at 20 degrees Centigrade), remove excess Dry Flex RP using the Window Care Scraper and the fixing plate.
• Sand the Dry Flex lightly to achieve an even, smooth surface. • This item must be carried out only by operatives trained by Window Care Systems Ltd
in the use of this repair system. 300 CONTROL SAMPLES
After finalising all details, the contractor should prepare and complete a typical repair detailed below as control sample(s). The contractor should obtain the approval of the CA for each sample before proceeding with the remaining works.
• Doorframe repair • Dormer window framing at junction of cill and jamb.

Section B_Term Requirements for Workmanship and Materials Part 2 Lot 1
Section B-Term Requirements for Workmanship and Materials
19
30/12/2013
G10 STRUCTURAL STEEL FRAMING 110A DESIGN • Design standard: The structural steelwork has been designed to BS 5950 where
applicable. • Steel grades: S275. 125 SPECIFICATION STANDARD • Standard: Comply with latest edition of National Structural Steelwork Specification
(NSSS). - Document availability: Make available during the course of the Works at fabrication
shop and on site.
FABRICATION 180 NOTIFICATION OF COMMENCEMENT • Give notice: Before fabrication is due to start. -Period of notice (minimum): Five working days. 190 MARKING • Identifying and recording materials and components: Submit details of proposed
methods. • Location of marks: - Generally: Visible for checking after erection. - Weathering steel: On surfaces not exposed to open view in the completed work. • Steel to be blast cleaned, pickled, metal sprayed or galvanized: Marked so that
subsequent treatment cannot obliterate the marking. 195 HARD STAMPING • Usage: Not permitted except as indicated on drawings. 200 FAYING SURFACES FOR HIGH-STRENGTH FRICTION GRIP (HSFG) JOINTS
• Steel 25 mm thick or over: Check faying surfaces for deformities that may reduce slip factor to below design limit.
• Remedial measures: Submit proposals. 210 END CONNECTIONS • Angle cleats: Project beyond ends of simply supported members. 215 HOLLOW SECTIONS • Insides of sections: Debris and moisture removed before sealing ends and openings. WELDING 255 SITE WELDING • Usage: Permitted only where indicated on drawings. • Working conditions: Suitable and safe. Do not weld when surfaces are wet or when
ambient temperature is below 0°C. 270 ADDITIONAL WELDS • Welds (including tack welds) not indicated on drawings: Not permitted without approval. 290 FINISHED WELDS • Finished welds: Carefully dressed to remove slag without deforming surface of weld. BOLT ASSEMBLIES 335 SPRING WASHERS • Standard: To BS 4464.

Section B_Term Requirements for Workmanship and Materials Part 2 Lot 1
Section B-Term Requirements for Workmanship and Materials
20
30/12/2013
ERECTION 410 PRE-ERECTION CHECKS • Scope: At least 7 days before proposed erection start date, check the following: - Foundations and other structures to which steelwork will be attached: Accuracy
of setting out. - Holding down bolts: Position, protruding length, slackness and condition. • Inaccuracies and defects: Report without delay. • Permission to commence erection: Obtain. 425 MODIFICATIONS • Steelwork: Do not modify without approval. 440 COLUMN BASES • Levels: Adjust using steel shims or folding wedges no larger than necessary. • Location of shims/wedges: Position symmetrically around perimeter of base plate. Do
not use a single central pack. • Give notice: If space beneath any column base is less than, or over 25 mm greater
than, the specified dimension. • Accuracy of erection: Check, and correct errors before filling and bedding beneath
bases and carrying out other adjacent work. 443 PROPRIETARY FILLING/ BEDDING OF COLUMN BASES • Preparation: Concrete surfaces scarified to provide a good mechanical key. • Bolt pockets and spaces beneath base plates: Completely filled with Conbextra GP
cementitous epoxy grout by Fosroc or equivalent. Grout to be made up in accordance with manufacturers written instructions.
Manufacturer: Fosroc Limited, Coleshill Road, Tamworth, Staffordshire, B78 3TL. Tel: 01827 262222, Fax: 01827 262444,.
GENERAL REQUIREMENTS FOR PROTECTIVE COATING WORK 446 OPERATIVES Must be appropriately skilled and experienced in the use of specified materials and
methods of application.
520 COATING MATERIALS: Wherever possible, to be from one manufacturing batch. Where more than one batch is
to be used, keep separate, allocate to distinct parts or areas of the work, and inform the CA accordingly. Check that all coating materials to be used are recommended by their manufacturers for the particular surface and conditions of exposure, and that they are compatible with each other.
540 HANDLING AND STORING COATED STEELWORK: Use methods and equipment, which will minimise chafing, chipping and other damage to coated components. - Ensure an adequate drying/curing period for each coat before handling. Use
suitable packings, lashings, lifting harnesses, nylon slings, rubber protected chains and chocks, etc.
- Stack coated components clear of the ground, separated by timber chocks, and so that ponding does not occur.
550 REMEDIAL WORK: - Early degradation of coatings by blistering, peeling, flaking, cracking, lack of
adhesion, etc. must be made good by complete removal, preparation and reapplication of all coats, as instructed.
- Inadequate dry film thickness or surface defects due to adverse weather may, depending on the type of paint, be remedied by rubbing down and applying

Section B_Term Requirements for Workmanship and Materials Part 2 Lot 1
Section B-Term Requirements for Workmanship and Materials
21
30/12/2013
further coat(s), as instructed. - Mechanical damage to coatings must be made good by local cutting back of
coatings, preparation and reapplication of all coats to leave a neat, continuous and flat finish.
- Where damage to coatings or subsequent surface preparation has exposed bare metal, it must be thoroughly cleaned and primed within two hours.
640 SHOP PAINTING WITH ACRYLIC - Use/ location: Wind Break steel framing. - Paint manufacturer: ICI. - Shop preparation: Blast cleaning to BS EN ISO 8501-1, preparation grade 2.5. - Shop primer: ICI Epoxy Hi-Build 731 Zinc Phosphate Primer. - Dry film thickness: 100 microns. - Shop intermediate coat: ICI Epoxy Hi-Build 733 Micaceous Iron Oxide Two Pack. - Dry film thickness: 100 microns. - Shop topcoat: ICI Epoxy 716A Acrylic Finish Two Pack spray applied. - Dry film thickness: 50 microns. - Colour: Black. - Special requirements: Repair damaged paintwork on site. PREPARATION FOR PAINTING 710 OFFSITE PREPARATION AND PAINTING • Working area: Covered and properly lit, heated and ventilated. • Sequence of working: Select from the following and submit proposals: - Fabricate, blast clean, prime. - Blast clean, fabricate, and remove flash rust with a light overall sweep blast,
prime. - Blast clean, apply weld able prefabrication primer, fabricate, prime. • Prefabrication primer (option 3): Type recommended by manufacturer of post fabrication
primer. - Thickness of post fabrication primer coat: May be reduced if and as
recommended by manufacturer. • Surfaces inaccessible after assembly: Apply full treatment and coating system including,
if necessary, local application of site coatings.
725 MANUAL CLEANING OF NEW STEELWORK • Preparation: Remove fins, burrs, sharp edges, weld spatter, loose rust and loose scale. • Surface finish: Clean but unpolished to BS EN ISO 8501-1, grade St 2. • Finishing: Thoroughly degrease and clean down. Remove any consequent rusting back
to grade St 2. Prime without delay. 730 PREPARATION FOR SITE WELDING OF SHOP PAINTED STEELWORK • Method: Select from the following: - Mask weld areas immediately after blast cleaning and before coating steelwork. If
paint system comprises more than one coat, step each coat 30 mm back from edge of preceding coat and away from masked areas. Remove masking immediately before welding.
- Prepare and paint steelwork including weld areas. Grind off to bare steel around each weld area immediately before welding.
735 TREATMENT OF SITE WELDED JOINTS IN PAINTED STEELWORK • Preparation: After welding, and without delay, remove scale and weld spatter from weld
areas. Remove traces of rust. Wash with clean water and allow to dry. Prime without delay.
• Protective/Decorative coatings: Apply to weld areas to match surrounding painted areas.

Section B_Term Requirements for Workmanship and Materials Part 2 Lot 1
Section B-Term Requirements for Workmanship and Materials
22
30/12/2013
736 TREATMENT OF SITE WELDED JOINTS IN GALVANIZED STEELWORK • Preparation: After welding, and without delay, remove scale and weld spatter from weld
areas. Remove traces of rust. Wash with clean water and allow to dry. • Coating: Reinstate using one of the methods given in BS EN ISO 1461, clause 6.3. 740 BOLTED JOINTS (OTHER THAN FRICTION GRIP JOINTS) • Steelwork to be shop painted: Apply full shop specification to joint faces. • Steelwork to be erected with mill finish then site painted: Before erection, prepare and
prime joint faces and allow to dry. • Bolted joints in externally exposed steelwork: - Immediately before assembling, apply a further coat of primer and bring surfaces
together while still wet. - After assembling and before applying site coatings, seal crevices to bolts and joint
perimeters with a compatible sealant.
745 FAYING SURFACES OF FRICTION GRIP JOINTS • Protection: Immediately after blast cleaning and before coating surrounding areas, mask
faying surfaces to protect from contamination and deterioration. - Paint systems comprising more than one coat: Step each coat 30 mm back from
edge of preceding coat and away from masked areas. • Removal of protection: Immediately before bolting, remove masking. Check faying
surfaces are free from adhesive. Clean with solvent if necessary. 750 FRICTION GRIP JOINTS IN SHOP PAINTED STEELWORK • Post assembly treatment of bolts and surrounding areas: After final tightening of bolts
and inspection of joints: - Thoroughly degrease and clean uncoated areas including bolts. - Prime without delay. - Apply full shop coating specification. • Direct tension indicators: Seal measuring gap to prevent ingress of moisture. 755 UNCOATED FASTENERS • Treatment: After steelwork erection and before applying site coatings, thoroughly
degrease and clean. Without delay, coat to match adjacent shop painted areas. 760 GALVANIZED FASTENERS • Treatment: After steelwork erection and before applying site coatings, thoroughly
degrease and clean. Etch prime. 765 SITE PREPARATION OF SHOP PAINTED STEELWORK • Preparation: Before coating, abrade or wash down or both, as recommended by paint
manufacturer. 770 SITE PREPARATION OF GALVANIZED SURFACES FOR PAINTING • Preparation: Thoroughly degrease. Remove white corrosion products. Wash off and
allow to dry before applying etching wash or primer. PAINTING 810 ENVIRONMENTAL CONDITIONS • General requirements prior to starting coating work: - Surfaces: Unaffected by moisture or frost. - Steel temperature: At least 3°C above dew point, with conditions stable or
improving, and not high enough to cause blistering or wrinkling of the coating. - Relative humidity: Below 85%.

Section B_Term Requirements for Workmanship and Materials Part 2 Lot 1
Section B-Term Requirements for Workmanship and Materials
23
30/12/2013
815 COATINGS • Surfaces to be coated: Clean, dust free and suitably dry. Previous coats to be
adequately cured. • Multiple coats of same material: Use different tints to assist checking of complete
coverage. • Penultimate coat: Colour recommended by paint manufacturer to suit topcoat colour. • Finish required: Smooth and even, of uniform thickness and colour, free from defects. 820 FILM THICKNESS • Wet film thickness: During application, check thickness of each coat with a wheel or
comb gauge used in accordance with BS EN ISO 2808. • Accumulated dry film thickness: After each coat has dried, check total accumulated film
thickness. - Method: Magnetic or electromagnetic meter. - Number and position of measurements: As directed. - Validation: Measurements to be independently witnessed. - Meter calibration: Check against standard shims and recalibrate regularly against
a smooth steel reference plate. • Average dry film thickness: - At least specified thickness over any square metre. - No reading to be less than 75% of specified thickness. • Topcoat dry film thickness: Sufficient to give an even, solid, opaque appearance. 825 STRIPE COAT •External angles, nuts, bolt heads, rough weld seams, and areas difficult to coat: Apply
an additional stripe coat of primer, undercoat and finishing coat. 850 JUNCTIONS WITH CONCRETE • Exposed steelwork partially embedded or encased in concrete: Apply two coats of
bituminous coating locally to the steel/concrete junction. • Bituminous coating: RIW.

Section B_Term Requirements for Workmanship and Materials Part 2 Lot 1
Section B-Term Requirements for Workmanship and Materials
24
30/12/2013
H31 METAL PROFILE SHEET/CLADDING/COVERING-ROOFS TYPES OF CLADDING SYSTEM 120 METAL PROFILE CLADDING TO TIMBER CONSTRUCTION ROOF AREAS MAIN BUILDING. • Support structure: 24MM- 25MM THK. MARINE PLYWOOD DECK as section K11 ON
(assumed) 38X150 TIMBER JOISTS below, COUNTERSUNK SCREWED TO EXISTING JOISTS AT 400-600 CENTERS SPANNING BETWEEN CROSS WALLS .
- Bearing width (minimum): TOP HAT SECTIONS WITH MINIMUM SUPPORT BEARING WIDTH 65mm] .
- Pitch: 11.00 DEGREES approx. • External sheets: - Manufacturer: CORUS BUILDING SYSTEMS HAYDOCK LANE HAYDOCK, ST. HELENS MERSEYSIDE WA11 9TY Tel: 01942 295500 Fax: 01942 272136 .
Product reference: KALZIP 50/429 - ALUMINIUM SECRET FIXED STANDING SEAM .
- Material: ALUMINIUM ALLOY BS EN AW-3004 - AIMn1Mg1 ALUMINIUM ALLOY EN AW-7072 - AIMn1 ON BOTH WITH FACES. ULTIMATE TENSILE STRENGTH - MIN. 225 N/mm2. 0.2% PROOF STRESS - MIN. 200 N/mm2. MODULUS OF ELASTICITY - 70,000N/mm2 . - Thickness (nominal): 0.9mm WITH 50mm STANDING SEAM
Tolerance on thickness to be +0.05 mm and –0.25 mm. This is a Class 2 thickness tolerance as per BS EN 508-2:2000 .
- Finish side 1 (outer): PVF2 COATED FINISHES TO BS OR RAL STANDARD IN BEST QUALITY PAINT, APPLIED IN ACCORDANCE WITH BRITISH BOARD OF AGREMENT CERTIFICATION TO 3/2922 COMPLETE WITH PROTECTIVE FILM .
Colour: RAL 7012 to match adjoining block . - Finish side 2 (inner): TO MANUFACTURER'S RECOMMENDATIONS . Colour: same colour as finished side1 . • Additional requirements: • Kalzip Anti-drumming Membrane applied to underside of sheets • EXTERNAL SHEETS TO BE CONTINOUS FROM RIDGE TO EAVES. • Accessories: ALL AS PER CORUS BUILDING SYSTEMS KALZIP STANDARD DETAILS& RECOMMENDATIONS AND AS INDICATED ON INTENT DRAWINGS
NB. Kalzip sheets to be determined from Kalzip load/span tables and the specific loading for the project·
• Primary cladding/ covering sheet fasteners: STANDING SEAM CLOSURE MOULDING MECHANICALLY SEAMED OVERHEAD SUPPORT CLIPS (ST CLIPS). - Fastener profile location: TO MANUFACTURER'S RECOMMENDATIONS. - Number of fasteners per sheet width: - Eaves and end laps: TO MANUFACTURER'S RECOMMENDATIONS. - Intermediate supports: TO MANUFACTURER'S RECOMMENDATIONS. • End laps size (minimum): TO MANUFACTURER'S RECOMMENDATIONS. • Sealing laps: - End laps: TO MANUFACTURER'S RECOMMENDATIONS. - Side laps: TO BE MECHANICALLY SEAMED WITH A ZIPPING MACHINE. . • Stitching laps: - End laps: TO MANUFACTURER'S RECOMMENDATIONS.

Section B_Term Requirements for Workmanship and Materials Part 2 Lot 1
Section B-Term Requirements for Workmanship and Materials
25
30/12/2013
- Side laps: as above. • Spacers: Support clips (ST CLIPS)type L110 complete with TK 15 polyamide barrier
pads Fixed to top hat profile sub purlin spaced ata min 1600 mm c.c's to suit building loads confirmed by Project Engineer & CLIENT. ] Fasteners: 6.0 mm diameter stainless steel torque controlled fasteners, reference SDK3-S-377-6.0x30. Two fasteners per ST. Clip positioned diagonally opposite in the outside holes of the base of the clip. TO MANUFACTURER'S RECOMMENDATIONS
• ·Sub-Purlin:30 mm deep top-hat profile sub-purlin x 1.6 mm thick galvanised steel to BS EN 10147, grade S280GD+Z with designation 275 coating. Top hats to have a minimum 65mm bearing surface for the ST clips
• Fasteners: Dependant upon timber specification and fastener manufacturers requirement, in conjunction with project loadings. TBC by roofing contractor & project engineer and confirmed by CLIENT.
• Breather membrane: As clause 280. • Thermal insulation: AS CLAUSE 271]. • Vapour control layer: AS CLAUSE 26. • Acoustic insulation: as clause 271. • Lining sheets: PLYWOOD - BY OTHERS AS SECTION K11. • Additional requirements: • Kalzip Anti drumming Membrane applied to underside of sheets • Complete all details as clause 170 below and obtain CLIENT's approval including for replacement of RW goods • Installation by KALZIP approved subcontractors- refer to list in relevant Appendix • Special eaves profile • Kal-Safe Latchway Fall Arrest System as per item N25/210A Guarantee issued by CBS Kalzip on completion for maximum period (min 15 years). 121 METAL PROFILE CLADDING TO TIMBER CONSTRUCTION ROOFs - EXTERNAL STORES. • Support structure: 18- 19MM THK. EXT QUALITY PLYWOOD DECK as section K11
on existing TIMBER JOISTS below, COUNTERSUNK SCREWED TO EXISTING JOISTS AT 400-600 CENTERS SPANNING BETWEEN CROSS WALLS.
- Bearing width (minimum): n/a]. - Pitch: 11.00 DEGREES approx. • External sheets: - Manufacturer: CORUS BUILDING SYSTEMS HAYDOCK LANE HAYDOCK, ST. HELENS MERSEYSIDE WA11 9TY.
Product reference: KALZIP 50/429 - ALUMINIUM SECRET FIXED STANDING SEAM.
- Material: ALUMINIUM ALLOY EN AW-3004 - AIMn1Mg1 CLAD ALUMINIUM ALLOY EN AW-7072 - AIMn1 ON BOTH WITH FACES. ULTIMATE TENSILE STRENGTH - MIN. 225 N/mm2. 0.2% PROOF STRESS - MIN. 200 N/mm2. MODULUS OF ELASTICITY - 70,000N/mm2. - Thickness (nominal): 0.9mm WITH 50mm STANDING SEAM. - Finish side 1 (outer): PVF2 COATED FINISHES TO BS OR RAL STANDARD IN
BEST QUALITY PAINT APPLIED IN ACCORDANCE WITH BRITISH BOARD OF AGREMENT CERTIFICATION TO 3/2922 COMPLETE WITH PROTECTIVE FILM.
Colour: RAL 7012 to match adjoining blocks. - Finish side 2 (inner): TO MANUFACTURER'S RECOMMENDATIONS. Colour: TO MANUFACTURER'S RECOMMENDATIONS. - Additional requirements: SHEETS TO BE CONTINOUS LENGHT.

Section B_Term Requirements for Workmanship and Materials Part 2 Lot 1
Section B-Term Requirements for Workmanship and Materials
26
30/12/2013
• Accessories: ALL AS PER CORUS BUILDING SYSTEMS KALZIP STANDARD DETAILS & RECOMMENDATIONS AND AS INDICATED ON DRAWINGS NB. Kalzip sheets to be determined from Kalzip load/span tables and the specific loading for the project· .
• Primary cladding/ covering sheet fasteners: STANDING SEAM CLOSURE MOULDING MECHANICALLY SEAMED OVER HEAD SUPPORT CLIPS (ST CLIPS) - Fastener profile location: TO MANUFACTURER'S RECOMMENDATIONS. - Number of fasteners per sheet width: Eaves and end laps: TO MANUFACTURER'S RECOMMENDATIONS. Intermediate supports: TO MANUFACTURER'S RECOMMENDATIONS. • End laps size (minimum): TO MANUFACTURER'S RECOMMENDATIONS. • Sealing laps: - End laps: TO MANUFACTURER'S RECOMMENDATIONS. - Side laps: TO BE MECHANICALLY SEAMED WITH A ZIPPING MACHINE. . • Stitching laps: - End laps: No end laps – single length sheets. - Side laps: Kalzip sheets are mechanically seamed overhead of support clips
with a Kalzip _zipping_ machine. • Spacers: Support clips, extruded aluminium ST. Clips type L25, fixed to top-hat profile
sub-purlin spaced at a minimum 1600mm centres to suit building loads, confirmed by PE & CLIENT.]
- Fasteners: 6.0 mm diameter stainless steel torque controlled fasteners, reference SDK3-S-377-6.0x30. Two fasteners per ST. Clip positioned diagonally opposite in the outside holes of the base of the clip.
- Sub-Purlin: 30 mm deep top-hat profile sub-purlin x 1.6 mm thick galvanised steel to BS EN 10147, grade S280GD+Z with designation 275 coating. Top-hats to have a minimum 65mm bearing surface for the ST clips
- Fasteners: Dependant upon timber specification and fastener manufacturers requirement, in conjunction with project loadings. TBC by roofing contractor & project engineer. To be agreed with CLIENT.
• Thermal insulation: n/a]. • Vapour control layer: AS CLAUSE 261 . • Acoustic insulation: n/a. • Lining sheets: PLYWOOD AS SECTION K11 - BY OTHERS. • Additional requirements: • As per details and complete design as clause 170 below
(Note that an alternative solution to top hat sub purlin within these roofs such as a strap strip of 1.6 galvanised steel along the lines where clips would go might be required to keep the ridge of roofs as low as possible to a similar line below the parapet. It might be necessary to open up and all details will need to be agreed)
• Installation by KALZIP approved subcontractors Guarantee issued by CBS Kalzip on completion for maximum period ( min 15 years). 170 DESIGN ROOF COVERINGS GENERAL REQUIREMENTS KALZIP covering system: Complete detailed design and submit drawings for CLIENT's confirmation before commencement of fabrication. - Standard: To BS 5427-1. Related works: Coordinate in detailed design. 172 THERMAL PERFORMANCE/ BRIDGING
Requirement: Complete thermal design of the cladding/ covering system to avoid excessive thermal bridging.
- Standard: MCRMA Technical Paper No 14.

Section B_Term Requirements for Workmanship and Materials Part 2 Lot 1
Section B-Term Requirements for Workmanship and Materials
27
30/12/2013
175 PRODUCT SAMPLES General: Before commencing detailed design, submit labelled samples of the following: [EAVES & GABLE END SECTION INCLUDING GUTTER].
176 FASTENER SAMPLES General: During detailed design, submit labelled samples of each type of fastener. • DESIGN/ PERFORMANCE REQUIREMENTS 198 WATER PENETRATION
Requirement: Under site exposure conditions, moisture must not penetrate onto internal surfaces, or into cavities not designed to be wetted.
202 AVOIDANCE OF SURFACE CONDENSATION Requirement: Determine surface condensation risk of cladding/ covering system using the method described in BS EN ISO 13788. If necessary, revise thermal insulation to provide satisfactory temperature factor (fmin).ensure that damage and nuisance from surface condensation does not occur.
FIXING CLADDING/ COVERING 219 FASTENERS • Unspecified fasteners: Recommended for the purpose by the cladding/-covering
manufacturer. 221 FITTINGS AND ACCESSORIES • Unspecified fittings and accessories: Recommended for the purpose by the cladding/ covering manufacturer. 223 PREVENTION OF ELECTROLYTIC ACTION • Isolating tape: Type recommended by cladding/ covering manufacturer. Location: To contact surfaces of supports and sheets of dissimilar metals. 234 GUTTERS integral with roofing system- see also relevant clauses in section R10
Manufacturer: Corus Building Systems, Haydock Lane, Haydock, St Helens, Merseyside WA11 9TY. Tel: 01942 295500. Fax: 01942 272136. Email: [email protected]. Web address: http://www.Corus.co.uk.
- Product reference: Kalzip aluminium box gutter, Kal-Form Membrane or other Gutter System as recommended by manufacturer when referring to design intent drawing 8065/AR/T/300 and trying to match details of block B's system.
• Sizes: refer to design intent drawing 8065/AR/T/300. • Material: Aluminium: /liner. - Gauge/ Thickness: as clause R10/311. - External finish: as clause R10/311. • Insulation: -. • Internal liner sheet: refer to design intent drawing 8065/AR/T/300. • Jointing method: to manufacturer's recommendations. • Fixing method: [to manufacturer's recommendations. • Accessories: As per Corus Building Systems – Kalzip standard details and
recommendations. 261 VAPOUR CONTROL MEMBRANE • Material: CORUS BUILDING SYSTEMS. Product ref: KALZIP VCL CLEAR -REINFORCED VIRGIN POLYETHYLENE. SEALANT TAPE - BUTYL RUBBER SEALANT 15mm X 2mm THK. COLOUR: BLUE. - Vapour resistance (minimum): CLEAR - 530. • Continuity: No breaks and with the minimum of joints.

Section B_Term Requirements for Workmanship and Materials Part 2 Lot 1
Section B-Term Requirements for Workmanship and Materials
28
30/12/2013
- Penetrations and abutments: Seal to vapour control membrane with tape. Achieve full bond.
- Laps: Not less than 150 mm, seal with tape. Achieve full bond. • Tape: Double sided sealant with vapour resistivity not less than the vapour control membrane. - Size (width and thickness): TO MANUIFACTURER'S RECOMMENDATIONS].
• Repairs and punctures: Seal with lapped patch of vapour control membrane and continuous band of sealant tape along edges
271A MINERAL WOOL THERMAL INSULATION • Standard: To BS EN 13162. • Manufacturer: CORUS BUILDING SYSTEMS . - Product reference: KAL-THERM QUILT INSULATION PLUS- 37. • Thickness (minimum): 180mm COMPRESSED TO 165 to achieve U value of
0.25W/m2K Ensure that U-value is achieved with the frequency of Kalzip ST. Clips being no greater than 1.250 clips/m2 of roof area. Check with Kalzip as necessary. • Installation: Install & secure ensuring continuity and all edges are closed off and no
gaps left. Joints between layers of insulation to be staggered. Keep insulation dry at all times. Continuous and not compressed between outer and lining sheets. Secure to prevent future movement or dislodgement all to manufacturer's recommendations.
300 PROFILE FILLERS GENERALLY • Material: CLOSED CELL CROSS-LINKED POLYETHYLENE WITH A DENSITY OF 30 kg/m3. • Manufacturer: CORUS BUILDING SYSTEMS. - Product references: MANUFACTURER'S RECOMMENDATION. • Colour: black . • Thickness: 30 mm min . • Fixing method: to MANUFACTURER'S RECOMMENDATION. - Requirement: To close cavities/ regulate air paths within the external envelope.
Tight fit with no unintended gaps. 305 FIRE RESISTING PROFILE FILLERS • Types: To accurately match sheet profile. • Fixing method: Adhesive recommended by profile filler manufacturer. 310 PURPOSE MADE COLD FORMED METAL ACCESSORIES • Material: TO EXACTLY MATCH INTERNAL/EXTERNAL SHEETING MATERIAL. - Thickness/ gauge: 1.0 mm min FOR GENERAL FLASHINGS. - Finish/ Colour: PVF2 COATED FINISHES TO BS OR RAL STANDARD IN BEST QUALITY
ALUMINIUM ALLOY EN AW-3004 - AIMn1MG1 CLAD WITH ALUMINIUM ALLOY EN AW-7072 - AIZn1 ON BOTH FACES.
• Fasteners: - Type: PROPRIETRY SYSTEM. - Location: MANUFACTURER'S RECOMMENDATIONS.
- Fixing centres: MANUFACTURER'S RECOMMENDATIONS. -
410 FIXING SHEETS GENERALLY • Cut edges: Clean true lines. • Penetrations: Openings to minimum size necessary. - Edge reinforcement: MANUFACTURER'S RECOMMENDATIONS. • Sheet orientation: Exposed joints of side laps away from prevailing wind unless shown otherwise on drawings. • Sheet ends, laps and raking cut edges: Fully supported and with fixings at top of lap.

Section B_Term Requirements for Workmanship and Materials Part 2 Lot 1
Section B-Term Requirements for Workmanship and Materials
29
30/12/2013
• Fasteners: Drill holes. Position at regular intervals in straight lines, centred on support bearings. - Position of fasteners in oversized drilled holes: Central. - Fasteners torque: Sufficient to correctly compress washers. • Debris: Remove dust and other foreign matter before finally fixing sheets. • Completion: Check fixings to ensure water-tightness and that sheets are secure. • Cut edges: Paint to match face finish. 419 FIXING PLASTICS SHEETS • Crown fixing: For sheets with a profile depth greater than 20 mm, support crowns at primary fasteners with profile fillers. • Fastener holes: Sized in accordance with sheet manufacturer's recommendations. • End laps between plastics sheets: Use two strips of sealant tape, one along each edge
of lap. 460 ACCOMMODATION OF THERMAL MOVEMENT • Sheet type/ location: TO MANUFACTURER'S RECOMMENDATIONS. • Method: TO MANUFACTURER'S RECOMMENDATIONS. 480 FLASHINGS/ TRIMS GENERALLY • Lap joint treatment:
- Vertical and sloping flashings/ trims: End laps to be same as for adjacent sheeting.
- Horizontal flashings/ trims: End laps to be 150 mm, sealed and where possible arranged with laps away from prevailing wind.
• Method of fixing: To structure in conjunction with adjacent sheeting. Otherwise to sheeting.
Fasteners: TO MANUFACTURER'S RECOMMENDATIONS. 550 SEALING LAPS ON EXTERNAL SHEETS • Sealant tape: Types recommended by sheet manufacturer. - Position: Below fixing positions in straight unbroken lines, parallel to and slightly back
from edge of sheet. • Seal quality: Effective, continuous and not over compressed. • End laps: Sealant tape positions: - Single line tape: Immediately below line of fasteners. - Second line tape (where specified): Slightly set back from edge of external sheet. • Side laps: Sealant tape positions: - Single line tape: Outside line of fasteners. Second line tape (where specified): On other side of fasteners.
Section B_Term Requirements for Workmanship and Materials Part 2 Lot 1
Section B-Term Requirements for Workmanship and Materials
30
30/12/2013
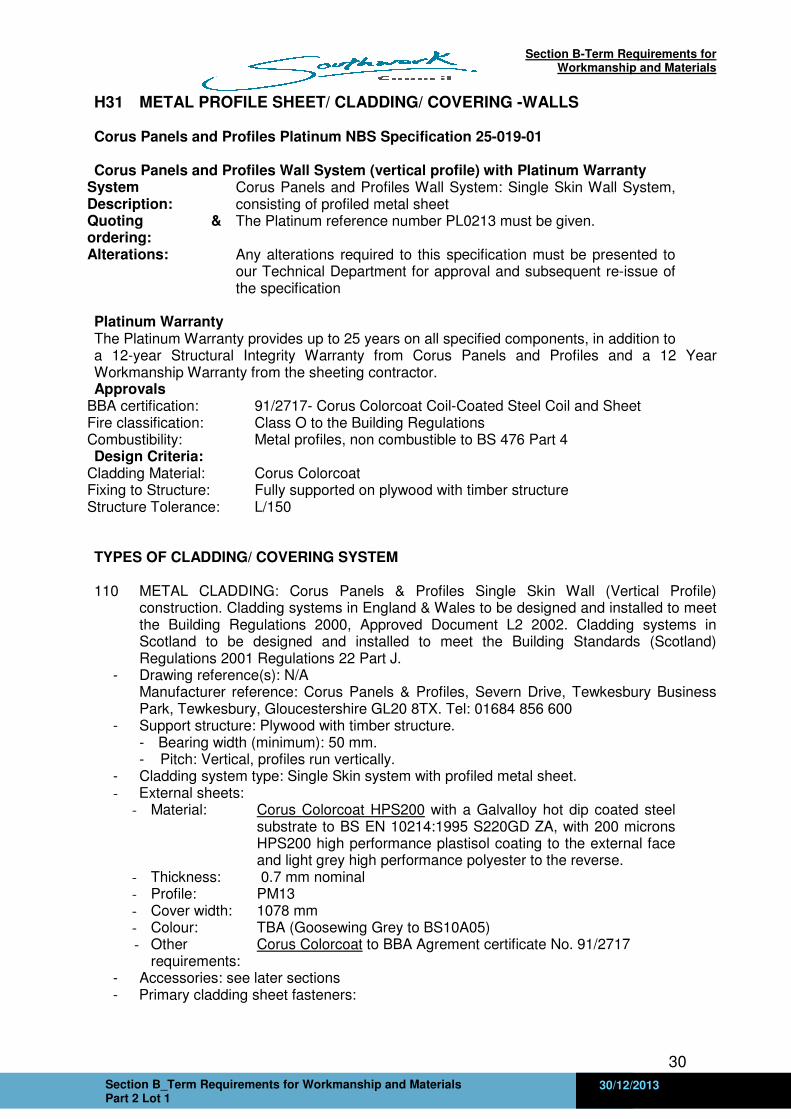
H31 METAL PROFILE SHEET/ CLADDING/ COVERING -WALLS Corus Panels and Profiles Platinum NBS Specification 25-019-01 Corus Panels and Profiles Wall System (vertical profile) with Platinum Warranty
System Description:
Corus Panels and Profiles Wall System: Single Skin Wall System, consisting of profiled metal sheet
Quoting & ordering:
The Platinum reference number PL0213 must be given.
Alterations: Any alterations required to this specification must be presented to our Technical Department for approval and subsequent re-issue of the specification
Platinum Warranty The Platinum Warranty provides up to 25 years on all specified components, in addition to a 12-year Structural Integrity Warranty from Corus Panels and Profiles and a 12 Year Workmanship Warranty from the sheeting contractor. Approvals
BBA certification: 91/2717- Corus Colorcoat Coil-Coated Steel Coil and Sheet Fire classification: Class O to the Building Regulations Combustibility: Metal profiles, non combustible to BS 476 Part 4 Design Criteria:
Cladding Material: Corus Colorcoat Fixing to Structure: Fully supported on plywood with timber structure Structure Tolerance: L/150 TYPES OF CLADDING/ COVERING SYSTEM 110 METAL CLADDING: Corus Panels & Profiles Single Skin Wall (Vertical Profile)
construction. Cladding systems in England & Wales to be designed and installed to meet the Building Regulations 2000, Approved Document L2 2002. Cladding systems in Scotland to be designed and installed to meet the Building Standards (Scotland) Regulations 2001 Regulations 22 Part J.
- Drawing reference(s): N/A Manufacturer reference: Corus Panels & Profiles, Severn Drive, Tewkesbury Business Park, Tewkesbury, Gloucestershire GL20 8TX. Tel: 01684 856 600
- Support structure: Plywood with timber structure. - Bearing width (minimum): 50 mm. - Pitch: Vertical, profiles run vertically. - Cladding system type: Single Skin system with profiled metal sheet.
- External sheets: - Material: Corus Colorcoat HPS200 with a Galvalloy hot dip coated steel
substrate to BS EN 10214:1995 S220GD ZA, with 200 microns HPS200 high performance plastisol coating to the external face and light grey high performance polyester to the reverse.
- Thickness: 0.7 mm nominal - Profile: PM13 - Cover width: 1078 mm - Colour: TBA (Goosewing Grey to BS10A05) - Other
requirements: Corus Colorcoat to BBA Agrement certificate No. 91/2717
- Accessories: see later sections - Primary cladding sheet fasteners:
Section B_Term Requirements for Workmanship and Materials Part 2 Lot 1
Section B-Term Requirements for Workmanship and Materials
31
30/12/2013
SX3/10-L12-S16-5.5xLmm irius colour headed austenitic stainless steel self-drilling fasteners with 16mm sealing washers from SFS intec. (SFS intec - Tel: 0113 208 5500).
- Fastener profile location:
Fix through profile trough
- Number and location of fasteners:
Fix through every trough at sheet ends and at every alternate trough at intermediate supports.
- End laps size (minimum): Not applicable, the profile cannot be end lapped. - Sealing laps: - End laps external sheets: not required to be sealed. - Side laps external sheets: not required to be sealed. - Stitching laps:
- End laps: Stitching not required. - Side laps to be
Stitched at 600mm centres:
Fix sheets together with irius colour headed SXL2-L12-A14-5.5x22 austenitic stainless steel self-drilling fasteners with 14mm sealing washers from SFS intec.
- Special features: - Platinum Warranty supplied, provided all components are as specified. - Panels to be fixed to plywood with timber support structure, screws to have 40 mm
minimum embedment into timber. 187 DEFLECTION OF METAL CLADDING:
- Maximum permitted roof cladding deflection under distributed loads as a multiple of span and due to: Dead and wind load: Span/120.
480 FLASHING & TRIM DETAILS
- Manufacturer: Corus Panels & Profiles (Tel 01684 856600). - System Type: Use Corus robust details to reduce thermal bridging. - Material and
finish: To match outer sheet
- Manufacturer: Corus Panels & Profiles (Tel 01684 856600) - Lap joint
treatment End joints to be lapped by 150mm and sealed, unless specified otherwise. Where possible arrange with laps away from the prevailing wind. Where butt joints are required. Butt join and seal flashings / trims on 300 mm wide butt straps made from sheet of the same material and finish.
- Method of fixing:
Fix to cladding with irius colour headed SXL2-L12-A14-5.5x22 austenitic stainless steel self drilling fasteners with 14mm sealing washers at 450 mm minimum centres from SFS intec
- Design: Maximum un-stiffened leg on flashing to be 250mm. Visible free edges to be finished with a stiffened edge or welt.
Section B_Term Requirements for Workmanship and Materials Part 2 Lot 1
Section B-Term Requirements for Workmanship and Materials
32
30/12/2013
H60 PLAIN ROOF TILING
110A CLAY ROOF TILING Base: Timber rafters at standard centres. Pitch: 42 Underlay: Monarfol 300 roof underlay or equal and approved. Lay as clause 240, directly over rafters Minimum horizontal lap: 100 mm. Battens: As clause 245, size 38 x 32 mm. Fixing: As clause 265, using 65mm x 3.35mm galvanized smooth round nails. Tiles: To BS EN 1304 and BS EN 538. Manufacturer and reference: as stated. Pattern: none Colour: as stated Size: 265 x 165mm. Minimum headlap: 65mm. Fixing: As clause 275: Fixing of general areas: 50mm x 11g aluminium alloy nail to each tile in every alternate course and all perimeter tiles
110B CLAY ROOF Base: Timbers rafters at standard centres. Pitch: 42 Underlay: Monarflex, Monarfol 300 roof underlay or equal and approved. Lay as clause 240, directly over rafters Minimum horizontal lap: 100mm. Battens: As clause 245, size 38 x 32mm. Fixing: As clause 265, using 38mm x 3.35mm galvanized smooth round nails.
1l0B CLAY ROOF (CONT’D) Tiles: To BS EN 1304: Part 1 and BS EN 538. Manufacturer and reference: as stated Pattern: none Colour: as stated Size: 384 x 267mm. Minimum headlap: 58 mm. Fixing: As clause 275: Fixing of general areas: 50mm x 11g aluminium alloy nail to each tile in every alternate course and all perimeter tiles
TILING GENERALLY 200G EQUIVALENT PRODUCTS:
Where the specification permits use of an equivalent roof tile of different manufacture to that specified, any proposal for use of an alternative type of tile must also include fixing calculations, proposals for substitution of compatible accessory products and variation of details as necessary, with evidence of equivalent durability, fitness for purpose and appearance of the roof as a whole. If such substitution is approved, and before ordering products, provide revised drawings, specification and manufacturer’s guarantees as required by Client Representative.
210 BASIC WORKMANSHIP:
Set out to give true lines and regular appearance, fitting neatly at all edges, junctions and features. Fix tile roofing to make the whole sound and weather tight at the earliest opportunity. Repair any defects as quickly as practicable to minimise damage and nuisance. Keep gutters and pipes free of debris and clean out at completion.

Section B_Term Requirements for Workmanship and Materials Part 2 Lot 1
Section B-Term Requirements for Workmanship and Materials
33
30/12/2013
220 EXISTING TILING:
Carefully remove tiles, battens, underlay, etc., the minimum necessary to carry out alterations, ensuring minimum disturbance of adjacent tiles. Set aside undamaged tiles for reuse.
225G SUITABILITY OF STRUCTURE/BASE:
Before commencement of tiling, survey supporting structure/base, checking line, level and fixing points. Report immediately to the Client Representative if the structure/base is unsuitable to receive tiling.
240 UNDERLAY:
Handle carefully to prevent tears and punctures, repair any which do occur with adhesive tape and cover with underlay patch tucked under the horizontal lap above. Lay parallel to eaves, maintaining consistent tautness. Vertical laps must be not less than 100 mm wide, coinciding with supports. Fix with galvanized steel, copper or aluminium extra large head felt nails. Where pipes and other components penetrate the underlay, use proprietary underlay seals or cut accurately and turn flanges up to give a tight, water shedding fit. Ensure that underlay does not obstruct roof ventilation.
245 BATTENS/COUNTER BATTENS:
Sawn softwood, species type A or B to BS 5534: Part 1, clause 2.12.1. Permissible characteristics and defects must not exceed the limits given in BS 5534: Part 1, annex E. Moisture content: Not more than 22% at time of fixing. Preservative treatment: CCA vacuum pressure or organic solvent double vacuum as section Z12 and British Wood Preserving and Damp-proofing Association Commodity Specification C8
265 BATTEN FIXING
In straight horizontal lines, aligned on adjacent areas, with no batten less than 1200 mm long. Joints to be square cut, butted centrally on supports and must not occur more than once in any group of four battens on any one support. Provide an additional batten where an unsupported lap in the underlay occurs between battens; Fix each batten to each support, with splay fixings at joints.
275 TILE FIXING:
Lay each course to a half lap bond with tails aligned and joints slightly open. Use tile and half tiles at ends of courses to maintain bond and ensure that cut tiles are as large as possible. Fix tiles as specified in the Type(s) of Tiling clause(s). In all cases fix perimeter tiles. At verges, abutments and each side of valleys and hips twice nail the end tile in every course. At eaves and top edges, twice nail two courses of tiles or clip as appropriate. Nail tiles where specified using tile manufacturer’s recommended nails or, if none, aluminium nails to BS 1202: Part 3, size as recommended by tile manufacturer.
290 MORTAR BEDDING/POINTING:
Mortar: As section Z21, 1:3 cement: sand, with plasticizing admixtures permitted. Bond strength providing resistance to uplift must be to BS 5534: Part 1. Do not use in wet or frosty weather or when imminent. Tiles to be bedded must be wetted and surface water allowed to drain before fixing. Finish neatly as work proceeds and remove any residue.

Section B_Term Requirements for Workmanship and Materials Part 2 Lot 1
Section B-Term Requirements for Workmanship and Materials
34
30/12/2013
ROOF TILING EDGES/JUNCTIONS/FEATURES 305 GENERALLY:
Form details using the specified and manufacturer’s recommended fittings and accessories; do not improvise without approval. Exposed fittings and accessories must match tile colour and finish unless specified otherwise. Cut tiles only where necessary, with an appropriate tool, to give straight, clean edges. Fix edge tiles and fittings securely to neat, true lines. Ensure that all flashings (specified in another section) are fixed with or immediately after the tiling, and are neatly dressed down.
325 FIRE SEPARATING WALLS:
Ensure that separating wall is cut on the rake 25 mm to 50mm below top of adjacent rafters. Fill space over top of wall with mineral fibre quilt so that, when overlaid, it is lightly compressed. Tuck edges of quilt between edges of wall and adjoining rafters. Lay 300mm wide pads of mineral fibre quilt thick enough to seal all gaps and cut to fit snugly between battens. Fix in position with continuous self-adhesive tape from ridge to eaves before tiling. At boxed eaves completely seal air paths in the plane of the separating wall with wire reinforced mineral fibre, 50 mm thick, nailed to rafter and carefully cut to shape.
355A VENTILATED EAVES:
Over fascia ventilators: 10mm ventilator strip. Ventilator trays: Rafter roll. Lay mineral fibre insulation over wallplate. Fix trays between each support to provide free passage of air over insulation. Continuous support for underlay at eaves to prevent water-retaining troughs: 12mm plywood, G20/312. Fix a strip of BS 747, type 5U felt, or comparable durable underlay, to underlap first full course of underlay. Dress underlay or underlay carrier down into gutter. Fix eaves under course and first course. Tiles with tails projecting 50 mm over gutter or to centre of gutter, whichever dimension is the lesser.
445 MORTAR BEDDED VERGE WITH BEDDED UNDERCLOAK:
Carry underlay 50 mm onto outer leaf of gable wall and bed in mortar. Bed undercloak of matching plain tiles projecting 50mm beyond face of wall, on mortar identical to that used in gable walling. Undercloak to be level with under of tiling battens. Carry tiling battens over undercloak and finish 100mm from verge edge. Bed edge of verge tiles flush with undercloak on 75mm wide bed of mortar as clause 290, ensuring that mortar is not displaced or cracked by mechanical fixing of tiles.
595 BONNET HIP:
Lay courses of underlay over hip with overlaps of not less than 150mm. Bonnet hip tiles: to match colour of tiles Bed in mortar as clause 290, coursing in with general tiling and fix to hip rafter or supplementary hip batten with nails recommended by tile manufacturer. Mortar to be neatly struck back about 13 mm from edge of tile. Fill end of first hip tile with mortar and tile slips finished flush. Cut adjacent tiles and tile and a half tiles to fit neatly.
660 SIDE ABUTMENT:
Turn underlay not less than 100mm up abutment. Cut tiles as necessary and interleave with metal soakers (specified in another section). Fix soakers by turning down over the head of each tile.

Section B_Term Requirements for Workmanship and Materials Part 2 Lot 1
Section B-Term Requirements for Workmanship and Materials
35
30/12/2013
Fix tiles close to abutment to Sable a weather tight junction to be formed by metal step flashing (specified in another section).
670 TOP EDGE ABUTMENT:
Turn underlay not less than 100 mm up abutment. Lay eaves/top tiles and clip or nail fix as recommended by tile manufacturer. Fix tiles close to abutment to enable a weather tight junction to be formed by metal apron flashing (specified in another section).
740A MORTAR BEDDED RIDGE: TO ROOFS
Lay top course of underlay from one side of ridge over apex to overlap top course of underlay at other side by not less than 150mm. Lay eaves/top tiles and clip or nail fix as recommended by manufacturer. Ridge tiles: to match tiles. Make weather tight with edges continuously bedded and joints solidly bedded in mortar as clause 290. Where rigid masonry walls support or abut ridge, all ridge tiles within 900 mm of such walls must be mechanically secured. Fix to supplementary ridge tile fixing batten with nails/wire ties recommended by tile manufacturer. Fill ends of ridges at gables with mortar and slips of tiles finished flush.
800 CHANGE OF ROOF PITCH:
Fix timber-tilting fillet to support flashing and course of tiles above change of pitch. Fix courses of tiles above and below change of pitch to form a weather tight junction in combination with metal flashing (specified in another section).
H61 FIBRE CEMENT SLATING
TYPE(S) OF SLATING 110A ROOF SLATING as identified • Base: Timber rafters at standard centres Pitch: to match existing • Underlay: Monarflex, Monoarfol 300 roof underlay (tel:0127 830116) or similar approved Lay as clause 240, directly over rafters Minimum horizontal lap: 100 mm. • Battens: As clause 245, size 38 x 25 mm. Fixing: As clause 265, using 65 x 3.35mm galvanized smooth round nails • Slates: To BS EN 492, Type NT (non-asbestos). Manufacturer and reference: Eternit 2000 Shape: Rectangular Colour: Blue/black Size: 600 x 300 mm. Minimum head lap: 100 mm. Fixing: As clause 275, using 2 copper nails and 1 disc rivet per slate. • Other requirements: three courses of tiles at eaves SLATING GENERALLY 210 BASIC WORKMANSHIP • Keep slates clean and dry until laid. Set out to give true lines and regular appearance, fitting neatly at all edges, junctions and features. • Fix slate roofing to make the whole sound and weather tight at the earliest opportunity. • Repair any defects as quickly as practicable to minimise damage and nuisance. • Keep gutters and pipes free of debris and clean out at completion.

Section B_Term Requirements for Workmanship and Materials Part 2 Lot 1
Section B-Term Requirements for Workmanship and Materials
36
30/12/2013
220A EXISTING SLATING Carefully remove slates, battens, underlay, etc., the minimum necessary to carry out alterations, ensuring minimum disturbance of adjacent slates.
225G SUITABILITY OF STRUCTURE/BASE
Before commencement of slating, survey supporting structure/ base, checking line, level and fixing points. Report immediately to the PM if the structure/base is unsuitable to receive tiling.
240 UNDERLAY • Handle carefully to prevent tears and punctures and repair with adhesive tape any
which do occur. • Lay parallel to eaves, maintaining consistent tautness. • Vertical laps not less than 100 mm wide, coinciding with supports. Horizontal laps of
the dimensions specified. Fix with galvanized steel, copper or aluminium extra large head felt nails.
• Where pipes and other components penetrate the underlay, use proprietary underlay seals or cross cut neatly and accurately and turn flanges up to give a tight, water shedding fit.
• Ensure that underlay does not obstruct roof ventilation.
245 BATTENS/COUNTERBATTENS • Sawn softwood, species type A or B to BS 5534:Part 1, clause 2.12.1.
Permissible characteristics and defects must not exceed the limits given in BS 5534:Part 1, annex E. Moisture content: Not more than 22% at time of fixing.
• Preservative treatment: CCA vacuum pressure or organic solvent double vacuum as section Z12 and British Wood Preserving and Damp-proofing Association Commodity Specification C8.
265 BATTEN FIXING • In straight horizontal lines, aligned on adjacent areas, with no batten less than 1200
mm long. • Joints to be square cut, butted centrally on supports and must not occur more than
once in any group of four battens on any one support. • Provide an additional batten where an unsupported lap in the underlay occurs between battens. • Fix each batten to each support, with splay fixing at joints.
275 SLATE FIXING Lay each course with tails aligned, to a half lap bond with not more than 5 mm gaps. • Use extra wide slates as necessary at ends of courses to maintain bond and ensure
that cut slates are as large as possible. Do not use half slates. • Fix slates as specified, in the Type(s) of Slating clause(s). Fix slates wider than slate
and a third with three nails and two disc rivets. Drill all additional holes on site before fixing.
• Nails: Copper to BS 1202:Part 2, 30 mm long for 25 mm thick battens, or slate manufacturer's recommended alternative nails. • Disc rivets: Copper, type and size recommended by slate manufacturer.
290 MORTAR BEDDING/POINTING • Mortar: As section Z21, 1:3 cement: sand with plasticising admixtures permitted. Bond S strength to provide resistance to uplift in accordance with BS 5534:Part 1. • Do not use in wet or frosty weather or when imminent. • Slates and accessories to be bedded or pointed must have relevant surfaces coated
with a suitable bonding agent.

Section B_Term Requirements for Workmanship and Materials Part 2 Lot 1
Section B-Term Requirements for Workmanship and Materials
37
30/12/2013
• Concrete and clay tile accessories to be bedded must be wetted and surface water allowed to drain before fixing.
• Finish neatly as work proceeds and remove any residue.
ROOF SLATING EDGES/JUNCTIONS/FEATURES 305 GENERALLY • Form details using the specified and manufacturer's recommended fittings and accessories; do not improvise without approval. • Exposed fittings and accessories must match slate colour and finish unless specified otherwise. • Cut slates only where necessary, with an appropriate tool, to give neat, close fitting
joints and straight, clean edges. • Fix edge slates and fittings securely to neat, true lines. • Ensure that all flashings (specified in another section) are fixed with or immediately after the slating, and are neatly dressed down.
325 FIRE SEPARATING WALLS • Ensure that separating wall is cut on the rake 25 mm to 50 mm below top of adjacent rafters. • Fill space over top of the wall with mineral fibre quilt so that, when overlaid, it is lightly compressed. Tuck edges of quilt between edges of wall and adjoining rafters. • Lay 300 mm wide pads of mineral fibre quilt thick enough to seal all gaps and cut to fit
snugly between battens. Fix in position with continuous self-adhesive tape from ridge to eaves before slating.
• At boxed eaves completely seal air paths in the plane of the separating wall with wire reinforced mineral fibre, 50 mm thick, nailed to rafter and carefully cut to shape.
355 VENTILATED EAVES • Fascia grilles: Glidevale FV100 fascia vent (Glidevale - Willan Building Services) Or similar approved. • Ventilator trays: Glidevale RV655 or RV635, depending on rafter spacing.
Or similar approved. Lay mineral fibre insulation over wallplate. Fix trays between each support to provide free passage of air over insulation. Continuous support for underlay at eaves to prevent water-retaining troughs: with timber inserts
• Fix a strip of BS 747, Type 5U felt, or comparable durable underlay, to underlap first full course of underlay.
• Dress underlay or underlay carrier down into gutter. • Fix eaves slates with tails projecting 50 mm over gutter or to centre of gutter, whichever dimension is the lesser.
555 MORTAR BEDDED TILE HIP • Lay courses of underlay over hip with overlaps of not less than 150 mm. • Cut and fix slates closely at junction. Hip irons: Galvanized steel to BS 5534:Part 1, clause 2.16.1, fixed to hip rafter or hip batten with galvanized steel screws. • Hip tiles: Clay angled hip, coloured to suit and to meet with approval.
Make weather tight with edges continuously bedded and joints solidly bedded in mortar at clause 290.
• Where rigid masonry walls support or abut hip, all hip tiles within 900 mm of such walls must be mechanically secured. Fix to hip rafter or supplementary hip batten with nails/wire ties or screws recommended by tile manufacturer.
• Shape first hip tile neatly to align with corner of eaves and fill end with mortar and slips of tile finished flush.
565 HIP IRONS

Section B_Term Requirements for Workmanship and Materials Part 2 Lot 1
Section B-Term Requirements for Workmanship and Materials
38
30/12/2013
Supplementary. Irons to be suitable sized to retain tiles and to prevent tiles slipping from roof.
615 METAL VALLEY • Ensure that valley boards, plywood valley sheathing and tilting fillets provide full
support for metal valley (specified in another section). • Cut underlay to rake and dress over tilting fillets to lap onto metal valley. Ensure that underlay is not laid under metal. • Cut double slates neatly and fix with a gap to match mm wide centred on valley.
740 MORTAR BEDDED TILE RIDGE • Lay top course of underlay from one side of ridge over apex overlapping top course of underlay at other side by not less than 150 mm. • Finish slating with head-nailed short course to maintain gauge. • Ridge tiles: Clay angled, coloured to suit and as approved.
Make weather tight with edges continuously bedded and joints solidly bedded in mortar as clause 290.
• Where rigid masonry walls support or abut ridge, all ridge tiles within 900 mm of such walls must be mechanically secured. Fix to supplementary ridge tile fixing batten with nails/wire ties or screws recommended by tile manufacturer.
• Ridge terminals: n/a • Fill ends of ridges at gables with mortar and slips of tile finished flush.
840 ROOF SLOPE VENTILATORS • Ventilator slates: Glidevale G1 (Willan Building Services) to pitched roof high level and Glidevale G5 low level to pitched roof. Or similar approved. • Fix with underlay seal (if any), to ventilate roof space, as follows: one vent at 1 m centres.
870 SUNDRY ACCESSORIES Pipe flashings, collars etc as described elsewhere in the relevant sections.
H62 NATURAL SLATING
TYPES OF SLATING 105 ROOF SLATING as identified • Substrate: Rafters at existing centres. • Pitch: to match existing. • Underlay: Submit proposals. - Direction: Parallel to eaves. - Head-lap (minimum): 100 mm. • Battens: - Size: 50 x 25 mm. - Fixing: 65 x 3.35 mm galvanized round plain shank nails. • Slates: - Supplier: Submit proposals. Product reference: Submit proposals. - Type: Spanish blue-black or equal approved. - Size: to match existing. - Head-lap (minimum): to match existing / and in accordance with codes of practice. • Fixing: Two nails each slate. • Other requirements: Insulation on lining trays..

Section B_Term Requirements for Workmanship and Materials Part 2 Lot 1
Section B-Term Requirements for Workmanship and Materials
39
30/12/2013
SLATING GENERALLY 210 BASIC WORKMANSHIP • General: Fix slating and accessories to make the whole sound and weather tight at
earliest opportunity. • Setting out: To true lines and regular appearance, with neat fit at edges, junctions and features. • Fixings for slating accessories: As recommended by manufacturer. • Gutters and pipes: Keep free of debris. Clean out at completion.
220 REMOVING EXISTING SLATING • General: Carefully remove slates, battens, underlay, etc. with minimum disturbance of adjacent retained slating. • Undamaged slates: Set aside for reuse.
225 SUITABILITY OF STRUCTURE / BASE Before commencement of slating, survey supporting structure/ base, checking line, level and fixing points. Report immediately to the PM if the structure/base is unsuitable to receive tiling.
240 UNDERLAY • Handling: Do not tear or puncture. • Laying: Maintain consistent tautness. • Vertical laps (minimum): 100 mm wide, coinciding with supports and securely fixed. • Fixing: Galvanized steel, copper or aluminium 20 x 3 mm extra large clout head nails. • Eaves: Where exposed, underlay must be BS 747/ BS 5534 Annex A, type 5U, or equivalent UV durable type. • Penetrations: Use proprietary underlay seals or cut underlay to give a watertight fit
around pipes and components. • Ventilation paths: Do not obstruct.
245 BATTENS/ COUNTERBATTENS - TREATED • Timber: Sawn softwood. - Standard: To BS 5534, clause 4.12.1.
- Permissible characteristics and defects: Not to exceed limits in BS 5534, annex C.
- Moisture content at time of fixing and covering (maximum): 22%. • Preservative treatment: As section Z12 and British Wood Preserving and Damp-
proofing Association Commodity Specification C8. Type: Organic solvent.
265 BATTEN FIXING • Setting out: Align parallel to ridge in straight horizontal lines to gauge of slates. Align on adjacent areas. • Batten length (minimum): Sufficient to span over three supports. • Joints in length: Square cut. Butt centrally on supports. Joints must not occur more than once in any group of four battens on one support. • Additional battens: Provide where unsupported laps in underlay occur between battens. • Fixing: Each batten to each support. Splay fix at joints in length.
270 BATTENS FIXED TO MASONRY • Setting out: In straight horizontal lines. Align on adjacent areas. • Batten length (minimum): 3 m. • Fixing centres (maximum): 400 mm.

Section B_Term Requirements for Workmanship and Materials Part 2 Lot 1
Section B-Term Requirements for Workmanship and Materials
40
30/12/2013
272 TIMBER FOR SLATING SUBSTRATE WORK • Timber: Sawn softwood, free from wane, pitch pockets, decay and insect attack
(ambrosia beetle excepted). - Moisture content at time of fixing and covering (maximum): 22%. • Preservative treatment: As section Z12 and British Wood Preserving and Damp-
proofing Association Commodity Specification C8. - Type: Organic solvent.
275 SLATE FIXING • Setting out: Lay slates with an even overall appearance with slightly open (maximum 5 mm) butt joints. Align tails. • Slate thickness: Consistent in any one course. Lay with thicker end as tail. • Ends of courses: Use extra wide slates to maintain bond and to ensure that cut slates
are as large as possible. Do not use slates less than 150 mm wide. • Top course: Head-nail short course to maintain gauge. • Fixing: Centre nail each slate twice through countersunk holes 20-25 mm from side
edges. - Nails: Copper clout to BS 1202-2 or aluminium clout to BS 1202-3. - Nail dimensions: Determine in accordance with BS 5534 to suit site exposure, withdrawal resistance and slate supplier's recommendations.
290 MORTAR BEDDING/ POINTING • Mortar: As section Z21, 1:3 cement: sand, with plasticizing admixtures permitted. - Bond strength providing resistance to uplift: To BS 5534. • Weather: Do not use in wet or frosty conditions or when imminent. • Preparation of concrete and clay tile accessories to be bedded: Wet and drain surface water before fixing. • Appearance: Finish neatly as work proceeds and remove residue. ROOF SLATING EDGES/ JUNCTIONS/ FEATURES 305 GENERALLY • Fittings and accessories: As recommended by slate supplier, do not improvise. - Exposed fittings and accessories: To match slate colour and finish. • Cut slates: Cut only where necessary, to give straight, clean edges. • Flashings: Fix with or immediately after slating. Form neatly.
325 FIRE SEPARATING WALLS • Separating walls: Completely fill space between top of wall and underside of slates with mineral wool quilt to provide fire stopping. • Boxed eaves: Completely seal air paths in plane of separating wall with wire reinforced mineral wool, not less than 50 mm thick, fixed to rafters and carefully cut to shape to provide fire stopping.
345 VENTILATED EAVES WITH INTEGRATED GRILLES TRAY • Fascia grilles and ventilator trays: - Manufacturer: Submit proposals. Product reference: Submit proposals. - Fix to carry underlay, form drip into gutter and provide free passage of air over insulation. • Undercourse and first course slates: Fix with tails projecting 50 mm over gutter or to
centre of gutter, whichever dimension is the lesser.
355 VENTILATED EAVES WITH SEPARATED GRILLES/ TRAYS • Fascia grilles: - Manufacturer: Submit proposals. Product reference: Submit proposals.

Section B_Term Requirements for Workmanship and Materials Part 2 Lot 1
Section B-Term Requirements for Workmanship and Materials
41
30/12/2013
• Ventilator trays: - Manufacturer: Submit proposals. Product reference: Submit proposals. - Fix to provide free passage of air over insulation. • Underlay support: Submit proposals. - Continuous to prevent water-retaining troughs. • Gutter: Dress underlay or underlay support tray to form drip into gutter. • Undercourse and first course slates: Fix with tails projecting 50 mm over gutter or to
centre of gutter, whichever dimension is the lesser.
365 UNVENTILATED EAVES • Underlay support: Submit proposals. - Continuous to prevent water-retaining troughs. • Gutter: Dress underlay or underlay support tray to form drip into gutter. • Undercourse and first course slates: Fix with tails projecting 50 mm over gutter or to
centre of gutter, whichever dimension is the lesser.
445 MORTAR BEDDED VERGES WITH BEDDED UNDERCLOAK • Underlay: Carry 50 mm onto outer leaf of gable wall and bed on mortar. • Undercloak: Slates. - Position: Over underlay, level with underside of slating battens, sloping towards verge. - Projection beyond face of wall: 38-50 mm. - Bedding: On mortar identical to that used in gable walling. • Slating battens: Carry onto undercloak and finish 100 mm from verge edge. • Verge slates: - Bedding: Flush with undercloak on 75 mm wide bed of mortar. - Pointing: Flush profile. Fixing: Do not displace or crack mortar.
455 MORTAR BEDDED VERGES WITH NAILED UNDERCLOAK • Underlay: Carry over full width of verge. • Undercloak: Slates. - Position: Over underlay, level with underside of slating battens, sloping towards
verge. - Projection: 38-50 mm beyond face of bargeboard / gable slating. - Fixing: Nails. • Slating battens: Carry onto undercloak and finish 100 mm from verge edge. • Verge slates: - Bedding: Flush with undercloak on 75 mm wide bed of mortar. - Pointing: Flush profile. Fixing: Do not displace or crack mortar.
525 MITRED HIPS • Underlay: Lay courses over hip. - Overlaps (minimum): 150 mm. • Hip slate fixing battens: to match existing. • Mitred slates: Cut extra wide slates and fix to form a straight, close mitred junction. • Soakers: Interleave with mitred slates. Fix by turning down overhead of mitred slates.
535 LEAD ROLL HIPS • Underlay: Lay courses over hip. - Overlaps (minimum): 150 mm. • Hip slates: Cut close to timber roll and fix to form a straight junction.
555 MORTAR BEDDED TILE HIPS

Section B_Term Requirements for Workmanship and Materials Part 2 Lot 1
Section B-Term Requirements for Workmanship and Materials
42
30/12/2013
• Underlay: Lay courses over hip. - Overlaps (minimum): 150 mm. • Roof slates: Cut and fix closely at hip. • Hip irons: Galvanized steel to BS 5534, clause 4.16.1. - Fixing: To hip rafter or hip batten with not less than two zinc coated steel screws. • Hip tiles: - Manufacturer: Submit proposals. Product reference: Submit proposals. - Bedding: On mortar, continuous to edges and solid to joints. - Fixing: Where rigid masonry walls support or abut hip, secure hip tiles within 900
mm of such walls to hip rafters or supplementary hip battens with nails/ wire ties or screws as recommended by hip tile manufacturer.
- Bottom hip tiles: Shape neatly to align with corner of eaves and fill ends with mortar and slips of tile finished flush.
605 GRP VALLEYS • Underlay: Lay as recommended by GRP valley manufacturer. • GRP valleys: - Manufacturer: Submit proposals. Product reference: Submit proposals. • Roof slates: Cut extra wide slates adjacent to valley to fit neatly. Valley width between
slates: to match existing.
615 METAL VALLEYS • Underlay: Cut to rake. Dress over tilting fillets to lap onto metal valley. Do not lay under metal. • Roof slates: Cut extra wide slates adjacent to valley to fit neatly. Valley width between
slates: to match existing. 635 MITRED VALLEYS • Underlay: Lay strips not less than 600 mm wide centred on valleys. Overlap with
general roof underlay. • Mitred slates: Cut extra wide slates and fix to form a straight, close mitred junction. • Soakers: Interleave with mitred slates. Fix by turning down overhead of mitred slates.
645 LACED VALLEYS • Preparatory work: Lay general roof underlay and slating battens into valleys. • Valley boarding: Timber 25 mm thick. - Centre board: Minimum 250 mm wide. - Side boards: 100 mm wide and feather edged. • Underlay: Lay strips not less than 600 mm wide centred on valleys. • Valley slates: Form intersections of slate courses by laying square slates diagonally on centre of valley boarding. Sweep roof slate courses neatly upwards to meet the square
slates at right angles, maintaining specified lap. Fix to battens or direct to valley boarding.
650 SWEPT VALLEYS • Preparatory work: Lay general roof underlay and slating battens into valleys. • Valley boarding: Timber 25 mm thick. - Centre board: Minimum 250 mm wide. - Side boards: 100 mm wide and feather edged. • Underlay: Lay strips not less than 600 mm wide centred on valleys. • Valley slates: Cut extra wide and/ or extra long slates to maintain bond and laps, and to give a smooth sweep through valleys. Fix to battens or direct to valley boarding.
660 SIDE ABUTMENTS

Section B_Term Requirements for Workmanship and Materials Part 2 Lot 1
Section B-Term Requirements for Workmanship and Materials
43
30/12/2013
• Underlay: Turn up not less than 100 mm at abutments. • Abutment slates: Cut as necessary. Fix close to abutments. • Soakers: Interleave with abutment slates. Fix by turning down overhead of abutment slates.
670 TOP EDGE ABUTMENTS • Underlay: Turn up not less than 100 mm at abutments. • Top slate courses: Fix close to abutments.
675 TOP EDGE VENTILATED ABUTMENTS • Underlay: Provide air gap at abutment as recommended by ventilator manufacturer. • Abutment ventilator: - Manufacturer: Submit proposals. Product reference: Submit proposals. - Fixing: As recommended by manufacturer.
690 ROOF WINDOWS • Underlay: Turn up not less than 100 mm at window surrounds under integral flashings/ soakers. • Roof slates: Cut as necessary and fix closely all round.
730 LEAD ROLL RIDGES • Underlay: Lay courses over ridge. - Overlap (minimum): 150 mm. • Top slate courses: Fit close to timber roll.
740 MORTAR BEDDED TILE RIDGES • Underlay: Lay courses over ridge. - Overlap (minimum): 150 mm. • Ridge tiles: - Manufacturer: Submit proposals. Product reference: Submit proposals. - Bedding: On mortar, continuous to edges and solid to joints. - Fixing: Where rigid masonry walls support or abut ridge, secure ridge tiles within
900 mm of such walls to ridge boards or supplementary ridge battens with nails/ wire ties or screws.
- Gable end ridge tiles: Fill ends with mortar and slips of tiles finished flush. • Ridge terminals: - Manufacturer: Submit proposals. Product reference: Submit proposals.
800 CHANGE OF ROOF PITCH • Slating substrate work: Fix timber-tilting fillet to support flashing and courses of slates above change of pitch. • Roof slates: Make weather tight with flashing. - Courses above change of pitch: Fix under-course and first course slates. - Courses below change of pitch: Cut top two courses as necessary to maintain
gauge. Head-nail top course.
840 VENTILATOR SLATES • Ventilator slates: - Manufacturer: Submit proposals. Product reference: Submit proposals. - Requirement: To ventilate above insulation, in each rafter space. - Positions: Top edge abutments, in second top slate course and at eaves.

Section B_Term Requirements for Workmanship and Materials Part 2 Lot 1
Section B-Term Requirements for Workmanship and Materials
44
30/12/2013
870 SUNDRY ACCESSORIES • To match existing.
950 ANGLES WITH SOAKERS • Angle slates: Cut extra wide slates and fix to form a straight, close mitred junction. • Soakers: Interleave with angle slates. Fix by nailing to battens at top edge.
960 JUNCTION WITH ROOF VERGES • Slating substrate work: Fix additional slating batten parallel to and below verges. • Course end slates: Splay cut slate and a half width slates to angle of verge rake. Fix to additional slating batten with cut edge parallel to and below verge.
H65 SINGLE LAP ROOF TILING 116A CONCRETE ROOF TILING RENEWALS • Substrate: Traditional at 400 ccs. Contractor to confirm on site. • Pitch: 30°. Insulation between horizontal ceiling joists may need extra upgrading • Underlay: Spirtech 250 (9077) Lay as clause 240 directly on to rafters. - minimum horizontal lap 150mm • Battens: As clause 245 - Size: new 50 x 25 mm .
Joists must not occur more than once in a group of four battens on any one support. An additional batten must be provided where an unsupported lap in underlay occurs between battens. Fix each batten to each support, splay nailing at ends,
- Fixing: 75 x 3.35 mm galvanized smooth round nails. • Tiles: To BS EN 490, interlocking. - Manufacturer: Redland . Product reference: Redland 50 , Double Roman (2201). - Colour: to be agreed with CLIENT. - Size: 330x 417 approx. - Head-lap: minimum 75mm, maximum 125mm. - Fixing:
Fixing of local areas: Clip every tile at the perimeter of the roof eaves, ridges, ends, valey gutters etc. Fixing of general areas: Remaining roof areas :Clip every tile in an alternative diagonal pattern. All to the manufacturer's fixmaster recommendations.
• Other requirements: A minimum of 20 years materials and workmanship guarantees will be required. Note that Redland provides 15-year design liability guarantee if all clauses of their specifications are followed and ensure this occurs.
100-year guarantee is also provided for concrete tiles by Redland as a standard. TILING GENERALLY 205A MANUFACTURERS INFORMATION • Check the existing supporting structure to be roofed and ensure is in a suitable state. It must be free from harmful conditions such as rot and must be structurally sound (Note time should be allowed for structural engineer's inspection). Redaland product codes in this section are given in parentheses

Section B_Term Requirements for Workmanship and Materials Part 2 Lot 1
Section B-Term Requirements for Workmanship and Materials
45
30/12/2013
Fixings for accessories: comply with Redland's fixing instructions for each product. Check that this is the current edition for the fixing instructions and consult with Redland Technical.
Solutions and draw to the attention of the CLIENT any relevant technical changes. 210 BASIC WORKMANSHIP • General: Fix tiling and accessories to make the whole sound and weather tight at
earliest opportunity. • Setting out: To true lines and regular appearance, with neat fit at edges, junctions and features. • Fixings for accessories: As recommended by tile manufacturer. • Gutters and pipes: Keep free of debris. Clean out at completion. 220 REMOVING EXISTING TILING • General: Carefully remove tiles, battens, underlay, etc. with minimum disturbance of adjacent retained tiling. • Undamaged tiles: Set aside for reuse. 240 UNDERLAY • Handling: Do not tear or puncture. • Laying: Maintain consistent tautness. • Vertical laps (minimum): 100 mm wide, coinciding with supports and securely fixed. • Fixing: Galvanized steel, copper or aluminium 20 x 3 mm clout head nails. • Eaves: Where exposed, underlay must be BS 747/ BS 5534, Annex A Type 5U, or an equivalent UV durable type. • Penetrations: Use proprietary underlay seals or cut underlay to give a tight, watertight
fit around pipes and components. • Ventilation paths: Do not obstruct. 245 BATTENS/ COUNTERBATTENS - TREATED • Timber: Sawn softwood. - Standard: BS 5534, clause 4.12.1. - Permissible characteristics and defects: Not to exceed limits in BS 5534, annex
C. - Moisture content at time of fixing and covering (maximum): 22%. • Preservative treatment: As section Z12 and British Wood Preserving and Damp-
proofing Association Commodity Specification C8. - Type: Organic solvent.
255 COUNTERBATTENS ON RIGID SARKING • Fixing: Through rigid sarking into rafters at not more than 300 mm centres. 257 COUNTERBATTENS ON STRUCTURAL METAL LINER TRAYS • Fixing: To each tray upstand at not more than 600 mm centres. 259 COUNTERBATTENS ON RAFTERS • Fixing: Into rafters at not more than 300 mm centres. 265 BATTEN FIXING • Setting out: Align parallel to ridge in straight horizontal lines to gauge of the tile. Align on adjacent areas. • Batten length (minimum): Sufficient to span over three supports. • Joints in length: Square cut. Butt centrally on supports. Joints must not occur more than once in any group of four battens on one support. • Additional battens: Provide where unsupported laps in underlay occur between battens.

Section B_Term Requirements for Workmanship and Materials Part 2 Lot 1
Section B-Term Requirements for Workmanship and Materials
46
30/12/2013
• Fixing: Each batten to each support. Splay fix at joints in length. 275 TILE FIXING • Setting out: Lay each course with tails aligned. • Ends of courses: Use special tiles to maintain bond and to ensure that cut tiles are as
large as possible. • Perimeter tiles: Fix tiles in eaves and top courses, and at verges, abutments and each
side of valleys and hips. • Nail fixed tiles: Use nails recommended by tile manufacturer. Fix through every hole. • Clip fixed tiles: Use clips recommended by tile manufacturer. 275A TILE FIXING • Setting out: Lay tiles straight bond in even courses with tails aligned. • Clip fixed tiles: Use clips (9288) recommended by tile manufacturer fixed to battens with
60 x 3.35mm aluminium alloy clout nails. 280 LOCAL AND GENERAL FIXING AREAS • Definitions: - Local areas: Bands of tiling around edges or obstructions of each plane of the
roof. Calculate extent of each band in accordance with BS 5534, section 5. - General areas: Remaining areas of roof tiling. -
290 MORTAR BEDDING/ POINTING • Mortar: As section Z21, 1:3 cement: sand, with plasticizing admixtures permitted. - Bond strength providing resistance to uplift: To BS 5534. • Weather: Do not use in wet or frosty conditions or when imminent. • Preparation of tiles and accessories to be bedded: Wet and drain surface water before fixing. • Appearance: Finish neatly as work proceeds and remove residue. 295 MORTAR BEDDED DENTIL COURSES • Dentil tile slips: Place in mortar edge bedding of hip and ridge tiles, one to each roof tile pan, projecting a consistent dimension. EDGES/ JUNCTIONS/ FEATURES 305 GENERALLY • Fittings and accessories: As recommended by tile manufacturer. Do not improvise. - Exposed fittings and accessories: To match tile colour and finish. • Cut tiles: Cut only where necessary, to give straight, clean edges. • Flashings: Fix with or immediately after tiling. Form neatly. 325 FIRE SEPARATING WALLS • Separating walls: Completely fill space between top of wall and underside of tiles with mineral wool quilt to provide fire stopping. • Boxed eaves: Completely seal air paths in plane of separating wall with wire reinforced mineral wool, not less than 50 mm thick, fixed to rafters and carefully cut to shape to provide fire stopping. 345 VENTILATED EAVES - INTEGRATED GRILLES/ TRAYS • Fascia grilles and ventilator trays: - Manufacturer: Redland. Product reference: RedVent Eaves ventilation pack (9189) RedVent eaves vent extension tray (9498). - Fix to carry underlay, form drip into gutter and provide free passage of air over insulation. • Eaves filler units for profiled tiles: Fix to close underside of first course tiles.
Section B_Term Requirements for Workmanship and Materials Part 2 Lot 1
Section B-Term Requirements for Workmanship and Materials
47
30/12/2013
• First course tiles: Fix with tails projecting 50 mm over gutter or to centre of gutter, whichever dimension is the lesser. 345A VENTILATED EAVES - REDVENT EAVES
Ensure that top of fascia board is fixed at the correct height to ensure all tiles are laid in an even and level plane
• Product reference: RedVent Eaves ventilation pack (9189) RedVent eaves vent extension tray (9498). • Fix continuously to ensure ventilation is not blocked. Before fixing ensure that mineral
fibre quilt is laid between rafters over and behind wallplate. • Fix all tiles in the eaves course with tails projecting 50mm from front of fascia • Fix all tiles in the eaves course with eaves clips (9287) and 80x3.75 aluminium alloy
clout nails. 450 MORTAR BEDDED VERGE • Underlay: Carry 50 mm onto outer leaf of gable wall and bed 6mm fibre cement
indercloak of approved colour on top of underlay projecting 38-50mm beyond face of wall on mortar identical to that used in gable walling and point neatly.
• Tiling battens: Carry over undercloak and finish 100mm from verge • Fix standard tiles with interlock removed to left hand verges. Fix standard tiles to right
hand verges • Bed edge of verge tiles on 75mm wide bed of mortar as clause 290 • Ensure mortar is not displaced or cracked by mechanical fixing of tiles • Fix tiles every course with verge clips (9297) left hand, (9121) light hand twice nailed to battens with 25x2.65mm galvanised clout nails . 530 RAPID HIPS • Overlap underlay courses at the hip line by no less than 150mm • Fix 50x50mm batten full length of hip on spacer blocks provided Cover with Rapid Hip Pack (9028) For plan angles at 135 degrees • Hip tiles: Third Round with Nail Holes (7411) • Colour to be agreed to match tile elsewhere • Block Ends (7784) • Hip Junctions (9521) 615 METAL VALLEYS • Underlay: Cut to rake. Dress over tilting fillets to lap onto metal valley. Do not lay under metal. Roof tiles: Cut adjacent tiles to fit neatly. - Bedding: On mortar on fibre cement undercloaks laid loose each side of valleys. - Valley width between tiles: to match existing. 615A LEAD VALLEYS • Ensure that on each side of valley, 19mm valley boards on noggins are cut between
and flush with top of rafters to provide full support for code 4 valley • Fix 38x25mm tilting fillets to valley boards on each side of valley • Cut undersaly to rake to abut lead valley. Ensure that underlay is not laid under lead • Fix 4mm WBP plywood sheathing over valley boards extending to abut tilting fillets • For plan angles at 90 degrees an areas draining up to 25m sq: Cut tiles neatly to form
125 mm gap centred on valley. Bed in mortar as caluse 290 on 6mm fibre cement underclock laid loose on each side of valley.
660 SIDE ABUTMENTS • Underlay: Turn up not less than 100 mm at abutments. • Abutment tiles: Cut as necessary. Fix close to abutments.

Section B_Term Requirements for Workmanship and Materials Part 2 Lot 1
Section B-Term Requirements for Workmanship and Materials
48
30/12/2013
660A LEAD SIDE ABUTMENTS • Underlay: Turn up not less than 50 mm at abutments. • Abutment tiles: Cut as necessary. Fix close to abutments.
Ensure that code 4 lead step and cover flashing is dressed closely over one complete roll and pan of tile.
675A TOP EDGE ABUTMENTS • Underlay: Turn up not less than 50 mm at abutments. • Top course tiles: Fix close to abutments. 690A ROOF/ ACCESS WINDOWS • Underlay: Turn up not less than 100 mm at window surrounds under integral flashings. • Roof tiles: Cut as necessary and fix closely all round.
Fix tiles both sides every course with verge clips (9297) left hand, (9121) right hand, twice nailed to battens with 25 x 2.65mm galvanised clout nails.
720A RAPID VENTED RIDGES • Finish underlay 30mm from apex on either side of roof to allow an air gap • Fix 38mm wide batten to top of ridge board with fixing straps provided. Height of batten should provide a wood screw penetration of no less than 15mm. • Ridge tiles: Half Round Ridge (8101). • Colour to match tile used elsewhere to be agreed. • Fix using Rapid Vented Ridge Pack (9304). • Half round ridge Vent Ridge (7241). • Rapid ange gas Flue Conversion Roll (9486). • Allow for purpose made Gas Flue ridge terminals installed to Redland's
recommendations to replace existing gas terminals in existing locations. 800 CHANGE OF ROOF PITCH • Tiling substrate work: Fix timber-tilting fillet to support flashing and course of tiles above change of pitch. • Roof tiles: Fix courses above and below changes of pitch and make weather tight with flashing. 810A JUNCTIONS • Fix code 5 lead saddle to provide weather tight detail at each: • Junction of ridge with one hip • Junction of ridge with valley • Junction of ridge with abutment 870 SUNDRY ACCESSORIES • Roof slope terminals Soil and Vent Pipe Terminals: Code 4 lead Slate.
Section B_Term Requirements for Workmanship and Materials Part 2 Lot 1
Section B-Term Requirements for Workmanship and Materials
49
30/12/2013
H71 SHEET LEAD COVERINGS/FLASHINGS
TYPE(S) OF LEADWORK 310 APRON FLASHINGS GABLE WALLS
Drawing reference(s): N/a Lead: Code 4in lengths not exceeding 1500mm End to end joints: Laps of not less than 100 mm. Dimensions: Upstand: Not less than 75 mm. Cover to abutment: Not less than 115 mm. Fixing: Lead wedges into bed joint, clips to bottom edge as clause 720 at laps and 500mm centres.
321 COVER FLASHINGS GENERAL Drawing reference(s): N/a Lead: Code 4 in lengths not exceeding 1500 mm. End to end joints: Laps of not less than 100 mm. Dimensions: Overlap to upstand: Not less than 50 mm. Cover to roof: Not less than 75 mm. Fixing: Lead wedges into bed joint, clips to lead upstand as clause 720 at laps and 500mm centres.
329 SOAKERS AND STEP FLASHINGS IN GENERAL Drawing reference(s): N/a Soakers: Lead: Code 3 cut and dressed to shape for fixing by roofer. Dimensions: Length: Slate/tile gauge + lap + 25 mm. Upstand: Not less than 75 mm. • Underlay: Not less than 100 mm Step flashings: Lead: Code 4 in lengths not exceeding 1500 mm. End to end joints: Laps of not less than 100 mm. Cover: Overlap to soaker upstands of not less than 65 mm. Fixing; Lead wedges at every course.
361 CHIMNEY FLASHINGS: Drawing reference(s): N/a Front apron: Lead: Code 4 Dimensions: Length: Width of chimney plus not less than 150mm underlap to each side flashing. Upstand: Not less than 75 mm. Cover to roof: Not less than 300 mm. Fixing: Lead wedges into bed joint. Side step and cover flashings: Lead: Code 4 in lengths not exceeding 1500 mm. End to end joints: Laps of not less than 100 mm. Dimensions: Upstand: Not less than 65 mm. Cover to roof: Not less than 150 mm. Fixing: Lead wedges at every course: and clips as clause 720 at not more than 500 mm centres along free edge.

Section B_Term Requirements for Workmanship and Materials Part 2 Lot 1
Section B-Term Requirements for Workmanship and Materials
50
30/12/2013
361 CHIMNEY FLASHINGS (CONT’D)
Back gutter: Lead: Code 5 Dimensions: Length: Width of chimney plus not less than 100mm overlap to each side flashing. Upstand: Not less than 100 mm. Gutter sole: Not less than 150 mm. Cover up roof not less than 225 mm. Back gutter cover flashing: Lead: Code 4 Dimensions: Length: Width of chimney plus not less than 100mm overlap to each side flashing. Cover: Overlap to back gutter upstand of not less than 75mm. Fixing: Lead wedges into bed joint. Saddle flashing Lead: Code 5 500mm x 500mm dressed over ridge tiles Fixing: Lead wedges into bed joint
370 LEAD SLATES: Lead: Code 4 cut and dressed to shape for fixing by roofer. Dimensions: Base: Not less than 400 x 400 mm. Upstand: Not less than 150 mm, to fit pipe and at angle to suit roof pitch.
GENERAL REQUIREMENTS/PREPARATORY WORK 510 WORKMANSHIP GENERALLY:
Cut, joint and dress lead neatly and accurately, to provide filly waterproof coverings/flashings, free from ripples, kinks, buckling and cracks. Comply with BS 6915 and current good practice as described in the latest editions of BS 6915 and ‘The Lead Sheet Manual’ published by the Lead Sheet Association, unless specified or agreed otherwise. Do no use scribers or other sharp instruments to mark out lead. Use solder only where specified. Ensure that finished lead work is fully supported, adequately fixed to resist wind uplift but also able to accommodate thermal movement without distortion or stress.
516 IN SITU LEAD WELDING: Is permitted, subject to completion of a “hot work permit” form and compliance with its requirements.
550 LEAD SHEET: Colour marked for thickness and weight and of the type and code specified: Milled, to BS 1178, or Machine cast, to BS EN 12588 in respect of general quality, chemical composition and tolerance on thickness, or Sand cast, from lead complying with BS EN 12588 and free from bitumen, solder, other impurities, inclusions, laminations, cracks, air, pinholes and blowholes. Thickness(es) as BS EN 12588 but with a tolerance of + 10%.
570 EXISTING LEAD TO BE REMOVED Will become the property of the Service Provider; The scrap value of such lead must be estimated by the Service Provider, itemised separately in the tender, and set against the tender sum - To discuss with David Lewis.
Section B_Term Requirements for Workmanship and Materials Part 2 Lot 1
Section B-Term Requirements for Workmanship and Materials
51
30/12/2013
610 SUITABILITY OF BASES: Bases to be dry and free of dust, debris, grease and other deleterious matter. Laying of lead will be taken as joint acceptance by the Service Provider and the Specialist of the suitability of bases.
620G PREPARATION OF EXISTING TIMBER BASES: Inform Client Representative of any defective boards and comply with instructions for replacement. Ensure that all boards are securely fixed. Punch in any protruding fastenings and plane or sand as necessary to achieve an even surface.
630 PLYWOOD UNDERLAYMENT: To the appropriate BS EN standard or other equal and approved national standard, WBP bonding, 6mm thick, sheet size 1200 x 1200 mm. Ensure that existing boards are securely fixed and acceptably level. Remove or fill any gross irregularities. Punch in any protruding fastenings. Lay sheets with cross-joints staggered and a 0.5 to 1 mm gap between boards. Fix with 24 mm annular ring shank copper or stainless steel nails, at 300 mm grid centres over the area of each sheet and at 150mm centres along edges, set in 10mm from perimeter edges. Ensure that fastenings are driven well in, with heads set flush with surface.
FIXING/JOINTING LEAD 710 HEAD FIXING LEAD SHEET:
Where not specified otherwise, secure top edge of lead sheets with two rows of fixings, 25mm and 50mm from top edge of sheet, at 75 mm centres in each row, evenly spaced and staggered. Sheets less than 500 in deep may be secured with one row of fixings, 25 mm from top edge of sheet and evenly spaced at 50 mm centres.
715 FIXINGS:
Where not specified otherwise, fix lead sheet to timber substrates with: Copper clout nails to 85 1202: Part 2, table 2, with annular ring, helical ring or serrated shank, length not less than 20mm, shank diameter not less than 3.35mm and head diameter not less than 8mm, or Stainless steel (austenitic) clout nails with annular ring, helical ring or serrated shank, length not less than 19 mm, shank diameter not less than 2.65 mm and head diameter not less than 8 mm. Where not specified otherwise, fix lead sheet to concrete or masonry substrates with: Brass or stainless steel screws to BS 1210, table 3, length not less than 19mm and diameter not less than 3 35 nun, with washers of the same material and plastics plugs of length and diameter to suit screws
720 CLIPS:
Generally 50 mm wide where not specified to be continuous, length to suit detail. Lead clips to be cut from sheets of same code as sheet being secured. Copper clips to be cut from 0.6 mm thick sheet to BS EN 1172,1652,1653 and 1654, temper grade 1/4H, dipped in solder if exposed to view. Stainless steel clips to be cut from 0.38 mm sheet to BS EN 10029,10048, 10051, 10095, 100258 and 10259, grade 304, terne coated if exposed to view. Unless specified otherwise fix each clip with two fastenings not more than 50mm from edge of lead sheet. Clips welted around edges of sheets to be turned over 25 mm.
770 WELTED JOINTS: Form with a 50 mm overlap, 25 mm underlap and copper or stainless steel clips as clause 720 at not more than 450mm centres. Welt overlap and clips around underlap, loosely turn over and lightly dress down

Section B_Term Requirements for Workmanship and Materials Part 2 Lot 1
Section B-Term Requirements for Workmanship and Materials
52
30/12/2013
820 WEDGE FIXING INTO JOINTS/CHASES:
Carefully rake out joint/chase to a depth of not less than 25mm. Dress lead into joint/chase and fix with lead wedges at not more than 450 mm centres, at every change of direction and with at least two for each piece of lead. Prepare joint/chase and apply sealant as section Z22. Sealant: one part polysulphide mastic to BS 5212
880 FINISHING: As soon as practical, apply a smear coating of patination oil, evenly in one direction and in dry conditions, to all lead work
H73 COPPER STRIP/SHEET COVERINGS/FLASHINGS
TYPE(S) OF COPPERWORK 275 RIDGE/HIP DOUBLE LOCK STANDING SEAMS TO COPPER ROOFS:
Form copper roofing strip/sheet from each side into a ridge/hip upstand. Fold down with a double lock welt to an upstand height of not less than 25 mm. Fold abutting roof double lock standing seams down flat and turn up into ridge double lock welt.
285 STANDING SEAM EAVES TERMINATIONS TO COPPER ROOFS: Copper underlap: Continuous clips as clause 760 Project underlap 20mm for forming into eaves welt. Form roofing sheets to project 20mm beyond underlap. Fold down standing seam joint ends in equal splays. Single welt-roofing sheets around underlap and fold down vertical into drip.
GENERAL REQUIREMENTS/PREPARATORY WORK 510G WORKMANSHIP GENERALLY:
Comply generally with CP 143-12 and current good practice as described in the latest editions of Copper Development Association publications and as recommended by copper manufacturers, unless specified or agreed otherwise. Fabricate and fix copper coverings/flashings to provide a secure, free draining and completely weatherproof installation. Operatives must be trained in the application of copper coverings/flashings. Submit records of their experience to the Client Representative on request. Measure, mark, cut and form copper prior to assembly wherever possible. Mark out copper with pencil, chalk or crayon. Do not use scribers or other sharp instruments without approval. Fold coverings/flashings with mechanical or manual presses to give straight, regular and tight bends, leaving panels free from ripples, kinks, buckling and. cracks. Use hand tools only for folding detail that cannot be pressed. Fold under or remove any sharp metal edges as work proceeds. Fold under all free edges of flashings aprons etc. by 10mm to provide additional stiffness. Do not use sealants in joints to attain waterproofing. Ensure that finished copper work is fully supported, adequately fixed to resist wind uplift, but also able to thermal movement without distortion or stress. Ensure that finished copper work is protected against staining or discolouration by subsequent work.
512A COPPER STRIP/SHEET: Rolled, to BS EN 1172, material designation Cu-DHP. Stamped or labelled with material condition designation, nominal thickness and finish as specified.

Section B_Term Requirements for Workmanship and Materials Part 2 Lot 1
Section B-Term Requirements for Workmanship and Materials
53
30/12/2013
515 INTEGRITY OF COPPER: Design copper coverings/flashings and methods of attachment to prevent loss of weatherproofing and permanent deformation due to wind pressure or suction. Calculate wind loads in accordance with BS 6399-2, Standard Method (and other related BS EN references): Basic wind speed (Vb): refer to Figure 6 Altitude factor (Sa): refer to Clause 2.2.2.2 and figure 7. Direction factor (Sd): refer to Clause 2.2.2.3 and table 3. Seasonal factor (Ss): 1 Probability factor (Sp): 1 Terrain and building factor (Sb): refer to clause 2.2.3.3 and table 4 Size effect factor (Ca): refer to clause 2.1.3.4 and table 4 External pressure coefficients (Cpe): refer to clause 2.5 Internal pressure coefficients (Cpi): refer to clause 2.6
525 IN SITU SOLDERING AND BRAZING Permitted, subject to completion of a ’hot work permit’ form and compliance with its requirements.
585 EXISTING COPPER TO BE REMOVED The value of salvaged copper from roofs will be shared between Service Provider and Client as laid out in the Term Brief. Give ample notice to the Client Representative of when the copper is to be stripped, so that arrangements can be made for supervision. Using a certified weighing machine, record the weight of all stripped copper and give copies of certificates to the Client Representative.
610 SUITABILITY OF BASES: Bases to be dry and free of dust, debris, grease and other deleterious matter. Laying of copper will be taken as acceptance by the copper work sub-contractor of the. suitability of bases.
620 PREPARATION OF EXISTING TIMBER BASES: Inform Client Representative of any defective boards and comply with instructions for replacement. Ensure that all boards are securely fixed. Punch in any protruding fastenings and plane or sand as necessary to achieve an even surface. Moisture content: Not more than 22% at time of covering.
640 TIMBER FOR USE WITH COPPER WORK: Planed, free from wane, pitch pockets, decay and insect attack except pinhole borers. Moisture content: Not more than 22% at time of covering: Preservative treatment: CCA as section Z12 and British Wood Preserving and Damp-proofing Association Commodity Specification C8.
650 UNDERLAY: Handle carefully to prevent tears and punctures. Lay butt or overlap jointed onto a dry base in strips across fall of roof and fix at edges and over the areas of each sheet with copper or stainless steel staples or clout nails. Wood batten rolls, where used, must be fitted over the underlay. Keep underlay dry and cover with copper strip/sheet at the earliest opportunity.
FIXING/JOINTING COPPER 710 FIXINGS FOR CLIPS:
Where not specified otherwise, fix copper clips to timber bases with copper clout nails to BS 1202-2, table 2, with annular ringed, helical threaded or serrated shank, length not less than 25 mm or equal to base thickness and shank diameter not less than 2.65 mm.

Section B_Term Requirements for Workmanship and Materials Part 2 Lot 1
Section B-Term Requirements for Workmanship and Materials
54
30/12/2013
Where not specified otherwise; fix copper clips to concrete- or masonry bases with brass screws to BS 1210, table-3, length not less than 25mm and diameter not less than 3.35 mm, with brass washers and plastics plugs of length and diameter to suit screws.
720 STANDING SEAM FIXED CLIPS: Material: Copper: Clips cut from strip/sheet of same temper and thickness as that being secured. Stainless steel (austenitic): Clips cut from the same thickness of metal as the copper being secured. Dimensions: Width: Not less than 38 mm Base length: Not less than 25 mm. Upstand: To suit standing seam profile. Unless specified otherwise, secure each clip with two fixings.
750 FIXED CLIPS FOR FLASHINGS/CROSS JOINTS: Copper cut from strip/sheet of same temper and thickness as that being secured. Dimensions: Width: Not less than 50mm. Length: To suit detail. Unless specified otherwise, secure each clip with two fixings not more than 50mm from edge of copper strip/sheet. Clips folded around edges of strip/sheet to be turned over 25 mm.
810 DOUBLE LOCK STANDING SEAM JOINTS: Form with 45 mm overlap, 35 mm underlap and not less than 3 mm gap for thermal movement. Position of clips: Fixed clips (clause 720) to comply with clause 515 Sliding clips (clause 725) not required Double welt overlap and clips around underlap to form a standing seam 25 mm high of consistent cross section.
860 SINGLE LOCK WELT JOINTS: Form with a 50 mm overlap and 25 mm underlap. Welt overlap around underlap and lightly dress down to allow freedom of movement.
910 FORMING DETAILS: Folding and welting must be carried out without thinning, cutting or otherwise splitting the copper strip/sheet. Soldering must only be used where there is no risk of thermal movement stresses at the joint. Seams must be neatly and consistently formed with a 10 mm overlap of bright copper. Use solder Sn Cu3 to BS EN ISO 9453, with a non-acid flux. Remove flux residues as work proceeds. Brazing must only be used where there is no risk of thermal movement stresses at the joint. Seams must be neatly and consistently formed with a 10mm overlap of copper. Use solder Cu P6 to BS EN 1044.
920 WEDGE FIXING INTO JOINTS/CHASES: Carefully rake out joint to a depth of not less than 25 mm. Fold copper 25 mm into joint/chase with a 2mm end upstand water stop. Fix with copper wedges at not more than 450 mm centres, at every change of direction and with at least two for each piece of copper. Prepare joint/chase and apply sealant as section Z22. Sealant: One part mastic.

Section B_Term Requirements for Workmanship and Materials Part 2 Lot 1
Section B-Term Requirements for Workmanship and Materials
55
30/12/2013
J21 MASTIC ASPHALT ROOFING
GENERAL REQUIREMENTS 210G ROOFING GENERALLY:
Lay roof covering to provide a secure, free draining and completely weather tight roof. Ancillary products and accessories, where not specified, to be types recommended for the purpose by the asphalt manufacturer. Use operatives certified after four years training in a course recognised by the Mastic Asphalt Council. Submit evidence of training to CR on request. Maintain a minimum of 50% fully trained operatives on site throughout the installation period.
220 ADVERSE WEATHER: Provide temporary covers and drainage as required to keep unfinished areas of the roof dry. Protect day work joints in warm deck roofs with a lapped and fully bonded strip of BS 747, Type 5B felt or equivalent. Protect edges of phased roofing with temporary asphalt kerbs, fully sealed to base. Suspend work in severe or continuously wet weather unless an effective temporary roof is provided over the working area. If unavoidable wetting of the construction does occur, take prompt action to minimise and make good any damage.
225G PROTECTION: Until completion, ensure that: - The roof is not used as a working platform unless fully protected to the
satisfaction of the CR. - No petroleum based solvents or other chemicals harmful to bitumen are allowed
to come into contact with the roof surface. - No building materials are stored on the roof. - Finished roof areas are adequately protected from damage by subsequent
building operations. 235 PROTECTION:
If boarding to gutter lining is taken off ensure that no damage occurs to ceiling below. Make good any damage that may occur. Provide temporary roof to renew asphalt gutter and tank room roof.
250 PRIMER(S): Type(s) recommended for the purpose by the manufacturer of the material to be bonded.
260 BONDING COMPOUND(S): Unless specified otherwise oxidised bitumen to BS 3690: Part 2, grade as recommended by the manufacturer of the material to be bonded for the conditions and type of surface. Heat and lay at a temperature sufficient to ensure bonding over the whole surface. Do not overheat. For bonding of and to heat sensitive insulation materials use cold bonding bituminous adhesive recommended by the insulation manufacturer.
270G USING BOILERS/CAULDRONS ON SITE: Comply with Information Sheet 18 ‘Code of practice for safe handling of hot bitumen for roofing purposes’, in the FRCAB Handbook, produced by the Flat Roofing Contractors’ Advisory Board and National Federation of Roofing Contractors. The boiler must be either thermostatically controlled or manually controlled using standard calibrated thermometers.

Section B_Term Requirements for Workmanship and Materials Part 2 Lot 1
Section B-Term Requirements for Workmanship and Materials
56
30/12/2013
Submit a ‘Hot Work Permit’ to the CR prior to commencing work, obtain agreement before proceeding and comply with its requirements.
BASES/VAPOUR CONTROL LAYERS/WARM DECK INSULATION 300 SUITABILITY OF BASE:
Before laying asphalt ensure that: - The base is to even falls with no areas which will pond. - Surfaces to be covered are firmly fixed, clean, dry, smooth, free from frost,
contaminants, voids and protrusions. - All preliminary work including formation of upstands, kerbs, box gutters, sumps, grooves,
chases, expansion joints, etc. and fixing of battens, fillets, anchoring plugs/strips, flashings, copings, roof outlets, pipe sleeves, ventilators, etc. is complete and satisfactory.
340 TIMBER FOR TRIMS, ETC. BY ROOFING SUB-CONTRACTOR:
Planed, free from wane, pitch pockets, decay and insect attack except pinhole borers. Moisture content: Not more than 22% at time of covering. Preservative treatment: CCA as section Z12 and British Wood Preserving and Damp-proofing Association. Commodity Specification C8. Fix with sheradized steel screws at not more than 600 mm centres.
360 KEYING TO BRICKWORK/BLOCKWORK: Apply a high-bond primer recommended for the purpose by the mastic asphalt manufacturer.
370 KEYING TO METAL: Apply keying primer to all metal pipes, pipe slates, roof trims, metal lathing, etc.
380 KEYING TO VERTICAL/SLOPING Loose lay black sheathing felt to BS 747 Type 4A with 50mm laps. Overlay with bitumen coated, plain expanded steel lathing, not less than 10mm short way of mesh, not less than 0.46mm thickness, with long side of diamond across slope, pitch of horizontal strands inclined upwards and butt jointed to continue mesh pattern. Fix with galvanized or stainless steel staples or large head nails at not more than 150 mm centres in both directions. Fix edges and stitch butt joints at 75mm centres.
450 LAYING THE VAPOUR CONTROL LAYER: Lay sheets with fully bonded 50mm side and 75mm end laps. Joints in second layer (if any) to be staggered by half a sheet. Carry up vertically at perimeter upstands and trim level with first layer of asphalt or turn back over the insulation and seal down before separating membrane is laid. Fully seal at penetrations using bonding or taping methods recommended by the manufacturer.
460 BONDING OF VAPOUR CONTROL LAYER: Lay torch-on sheets using equipment and methods recommended by the sheet manufacturer. Lay sheets other than torch-on type on a continuous even coating of hot bonding compound by the pour and roll method. Other methods will be permitted only where this is not practicable. Compound must still be fluid when sheets are laid. Ensure that there is a fill bond over the whole surface, with no air pockets.
ASPHALT/ACCESSORIES 630 SEPARATING LAYER:

Section B_Term Requirements for Workmanship and Materials Part 2 Lot 1
Section B-Term Requirements for Workmanship and Materials
57
30/12/2013
Black sheathing felt to BS 747, type 4A. Loose lay with 75 mm laps immediately prior to laying asphalt.
640 APPLICATION OF ASPHALT: Unless specified otherwise, lay roof covering in accordance with BS 8218 to provide a secure, free draining and completely weather tight roof. Remelt in mechanically agitated mixers and do not heat to more than 230 degrees Centigrade. Maintain strict temperature control while remelting. Apply each coat to even thickness using suitable gauges and float to a smooth surface free from imperfections and crazing. Apply successive coats without delay and within the same working period. Ensure complete fusion of asphalt at all joints to give a continuous watertight membrane. Clean and heat the edges of previously laid coats by poulticing with hot asphalt. Remove and discard poultice and cut away edge to remove sand rubbed material before jointing. Lay new asphalt whilst poulticed surface is still hot. Torching will not be permitted. Stagger junctions of bays in successive coats by not less than 150 mm. Pierce any blows and make good affected areas while the asphalt is still at working temperature. Form solid fillets in two layers at all internal angles, fully fused to asphalt coating and not less than 40 mm wide on face and at an angle of approximately 45 degrees to the horizontal. Maintain full thickness of asphalt around external angles. Turn asphalt into splayed chase at top edge of skirtings and vertical work. Finish top surface with a splay to shed water away from the wall, maintaining full thickness. Form watertight joints around pipes, gullies and other penetrations. Finish asphalt to a smooth fiat surface, free from lipping, pitting, scars and other imperfections. Sand rub all horizontal surfaces while asphalt is still warm, using clean, coarse sand from natural deposit, passing a 600 micrometer sieve and retained on a 210 micrometer sieve.
670 EDGE TRIMS:
Separating layer: To be terminated at trim. Do not carry under or over trim. Attachment: Lengths of trim to be not more than 3 m. Set 3 mm clear from wall or fascia and fix to base using 50mm countersunk wood screws to BS 1210 set 30mm from ends of trims and at not more than 300mm centres. Jointing: Fit jointing sleeves fixed one side only. Corners: Use corner pieces made for the purpose: do not improvise.
SURFACE PROTECTION/FINISHES 820 COMPLETION: Ensure that: - Roof areas are left clean with all outlets clear. - All work by others necessary to provide a weather tight finish is satisfactorily completed. - Defects are repaired without delay to minimise damage and nuisance.
Section B_Term Requirements for Workmanship and Materials Part 2 Lot 1
Section B-Term Requirements for Workmanship and Materials
58
30/12/2013
J30 LIQUID APPLIED TANKING/DAMP PROOF MEMBRANES 210 WORKMANSHIP GENERALLY:
Ensure that all holes, cracks, defective joints and other defects in surfaces to be coated have been made good. Remove dirt, laitance, grease, rust and loose material. Protect adjacent surfaces, which will be exposed to view in the finished work. Primer, if specified, to be brushed well in, ensuring complete coverage. Allow to dry thoroughly before applying coating. Apply coatings to clean, dry surfaces, in dry atmospheric conditions, to give a uniform, continuous film over all surfaces including angles, recesses, edges, joints and intersections. Do not allow to pool in hollows. The finished coating must firmly adhere to background and be free from pin holes, blisters, enbrittlement, foreign matter and other defects likely to permit the passage of water. Prevent damage to coating and apply final covering as soon as possible after coating has hardened.
220 COLD APPLIED COATINGS: Allow each coat to dry before applying the next. Apply each coat at right angles to the previous. Do not thin coatings unless recommended by manufacturer.
260 JUNCTIONS WITH DPCS Before applying coating, ensure that edges of dpcs to which coating must be joined are fully exposed and free from mortar, debris, dust and other contaminants. Ensure full contact of coating with dpc, applying liberally to adjacent surfaces and extending 50mm beyond, unless detailed otherwise.
270 BLIND coatings as specified whilst still tacky. Carefully brush away surplus material when coatings are completely dry.
280 PROTECTION OF EXTERNAL VERTICAL TANKING:
Cover tanking against which backfill material will be placed with hardboard or equivalent. Provide support as necessary to ensure protection remains fully in contact with tanking and does not move during backfilling operations.
J41 BUILT UP FELT ROOF COVERINGS 130G WARM DECK ROOF COVERING FLAT ROOF
Drawing reference(s); N/a Base: Timber Preparation: Remove existing roof coverings and timber base, remove nails etc Vapour control layer: Material: N/a (incorporated in board) Laying: As clause 410. Attachment: N/a Insulation: 75mm thick composite board to the approval of the Client Representative Overlay: N/a Waterproof covering: Manufacturer: Erisco Bauder ( Bauderflex System) or equal and approved. Laying: As clause 550. First layer: Bauder X4U underlay or equal and approved

Section B_Term Requirements for Workmanship and Materials Part 2 Lot 1
Section B-Term Requirements for Workmanship and Materials
59
30/12/2013
Attachment; as clause 605 Intermediate layer: N/a Attachment: Full bonding as clause N/a Top layer: Bauder X4E cap sheet or equal and approved Attachment: Full bonding as clause 605 Surface protection: in cap sheet - Accessories: Bauder EM-Trim GRP, edge trim F3 or other equal and approved.
GENERAL TECHNICAL REQUIREMENTS 210G ROOFING GENERALLY
Unless specified otherwise, lay roof covering in accordance with BS 8217 to provide a secure, free draining and completely weather tight roof. Ancillary products and accessories, where not specified, to be types recommended for the purpose by the felt manufacturer. Use operatives trained in the application of built-up felt roofing and who have attended a recognised training scheme. Submit evidence of training to CR on request. Maintain a minimum of 50 % fully trained operatives on site throughout the installation period.
220 ADVERSE WEATHER:
- Store rolls of felt indoors in reasonably warm conditions until immediately before use.
- Provide temporary covers and drainage as required to keep unfinished areas of the roof dry.
- Protect day work joints in warm deck roofs with a lapped and fully bonded strip of top layer felt.
- Suspend work in severe or continuously wet weather unless an effective temporary roof is provided over the working area.
- If unavoidable wetting of the construction does occur, take prompt action to minimise and make good any damage.
225G PROTECTION:
Ensure that from completion of the roof until Completion: - The roof is not used as a working platform unless fully protected to the satisfaction of the
CR. - No petroleum based solvents or other chemicals harmful to bitumen are allowed to come
into contact with the roof surface. - No building materials are stored on the roof. - Finished roof areas are adequately protected from damage by subsequent building
operations. 250 PRIMER(S):
Type(s) recommended for the purpose by the felt manufacturer. Apply by mopping, brushing or spraying to achieve an even and fill cover of the surface. Allow to dry thoroughly before covering.
260 BONDING COMPOUND(S): Unless specified otherwise oxidised bitumen to BS 3690: Part 2, grade as recommended by the sheet manufacturer for the conditions and type of surface. Heat and lay at a temperature sufficient to ensure bonding over the whole surface. Do not overheat.
270G HEATING BONDING COMPOUND: Comply with Information Sheet 18 ‘Code of practice for safe handling of hot bitumen for roofing purposes’, in the FRCAB Handbook, produced by the Flat Roofing Contractors’

Section B_Term Requirements for Workmanship and Materials Part 2 Lot 1
Section B-Term Requirements for Workmanship and Materials
60
30/12/2013
Advisory Board and National Federation of Roofing Contractors. The boiler must be either thermostatically controlled or manually controlled using standard calibrated thermometers. Submit a ‘Hot Work Permit’ to the CR prior to commencing work, obtain agreement before proceeding and comply with its requirements
BASES/VAPOUR CONTROL LAYERS/WARM DECK INSULATION 305 SUITABILITY OF BASE:
Before installing roof covering ensure that: - Surfaces to be covered are firmly fixed, clean, dry, smooth, free from frost,
contaminants, voids and protrusions. - All preliminary work including formation of upstands, kerbs, box gutters, sumps, grooves,
chases, expansion joints, etc. and fixing of battens, fillets, anchoring plugs/strips, etc. is complete and satisfactory.
310G RENEWING EXISTING COVERINGS
Agree with the CR the extent of the area(s) to be renewed. Remove, renew and waterproof each area on the same day, unless agreed otherwise with the CR. Adequately protect existing and new area(s) of roof against damage during the execution of the work. Where removal results in accidental damage to existing elements which are to remain, agree proposed repair or replacement with the CR.
320 MECHANICAL STRIPPING will not be permitted. 350 TIMBER FOR TRIMS, ETC BY ROOFING SPECIALIST/SUB-CONTRACTOR:
Planed, free from wane, pitch pockets, decay and insect attack except pinhole borers. Moisture content: Not more than 22% at time of covering. Preservative treatment: CCA as section Zl2 and British Wood Preserving and Damp-proofing Association Commodity Specification C8. Fix with sherardized steel screws at not more than 600 mm centres.
JOINTS IN RIGID SHEET BASES: Before laying vapour control layers or coverings lay a 150 mm wide strip of felt, BS 747 type: 5U, centrally over joints and adhere to base with bonding compound along edges only.
460A ATTACHMENT OF WARM DECK INSULATION:
Lay boards with long edges of the boards placed along the line of the joists, hilly support all edges of the boards with noggings. Apply mastic tape to top of joists and noggings. Boards should be laid onto mastic, lightly butted together with staggered end joints all boards to have minimum bearing of 20mm. Mechanical fixing: Round headed ring shank nails placed at 150mm centres down the line of each joist and nogging. Nails should be long enough to allow minimum of 35mm penetration of the supporting member. On completion of laying ensure that boards are in good condition, well fitting and with no springing, flexing or rocking.
WATERPROOF COVERINGS/ACCESSORIES 550 LAYING FELT GENERALLY:
Where practicable start at lowest point of roof and unroll felt up the slope with not less than 50mm side and 75 mm end laps, ensuring that water will drain over and not into laps.

Section B_Term Requirements for Workmanship and Materials Part 2 Lot 1
Section B-Term Requirements for Workmanship and Materials
61
30/12/2013
Break bond between layers with side laps staggered by one half sheet width in two layer coverings and one third sheet width in three layer coverings. Apply successive layers with minimum delay, ensuring that moisture is not trapped.#
570 MINERAL/METAL FACED CAP SHEETS: Comply with clause 550 and: Before laying obtain approval of appearance of lap positions and detailing of ridges, eaves, verges, hips, abutments, etc. Lay sheets neatly, with carefully formed junctions. Do not mark, crease or stain metal face. If the pour and roll method is used, avoid exudation of excess bonding compound at laps and carefully remove any excess when set.
590 PARTIAL BONDING: Loose lay venting base layer, but do not carry up angle fillets and vertical surfaces or through details.
600 POUR AND ROLL BONDING: Lay sheets on a continuous even coating of hot bonding compound by the pour and roll method. Compound must still be fluid when sheets are laid. Ensure that there is a. full bond over the whole surface, with no air pockets. Remove any excess compound at head and sidelaps of top layers.
605 TORCH-ON BONDING: Lay torch-on sheets using equipment and methods recommended by the sheet manufacturer. Ensure that there is a hill bond over the whole surface, with no air pockets. Leave a continuous bead of compound at head and side laps of top layers.
610 DETAILS GENERALLY:
Form details with adequate overlapping, staggering of laps and full bonding of successive layers so that they are waterproof. Strips of felt required for ‘linear’ details to be cut from the length of the roll rather than the width.
620 SKIRTINGS/UPSTANDS:
Angle fillets: Timber minimum 50x50mm Form upstands at ends of rolls by carrying felt up without using separate strip. Elsewhere use matching strips of felt, maintaining the specified laps. Carry all layers of felt in staggered formation up the upstand, fully bonding each layer. Where practicable carry top layer of felt over top of upstand. Secure felt to top of upstand with 30x6mm galvanised mild steel flat, screwed to background at 300mm centres with sheradized screws.
621 SKIRTINGS/UPSTANDS: Where venting base layer felt is specified, stop at angle fillet. Overlap onto upstand with strips of BS 747, type 3B felt fully bonded with 75 mm lap onto first layer, except where subsequent two layers are of high performance polyester based felt.
625 WELTED DRIPS: Form using maximum length strips of 100mm Nail tail of welt to face of drip batten, fold neatly and bond welt together. Carry not less than 100mm onto roof and overlap with top layer.
630 EDGE TRIMS:
Manufacturer and reference: Bauder EM-Trim F3 or equal and approved
Section B_Term Requirements for Workmanship and Materials Part 2 Lot 1
Section B-Term Requirements for Workmanship and Materials
62
30/12/2013
Felt underlay(s): Lay over upstand and leave free edge projecting 25 mm from wall or fascia. Attachment: Lengths of trim to be not more than 3 m. Set 3 mm clear from wall or fascia mid fix through underlay(s) using 50 mm stainless steel countersunk wood screws to BS 1210 set 30 mm from ends of trims and at not more than 300 mm centres. Jointing: Fit jointing sleeves fixed one side only and leave 3 mm gaps between ends of trim. Corners: Use purpose made corner pieces: do not improvise. Felt top layer: Prime contact surfaces of trim. Butt joint top layer of felt to rear edge of trim and bond 150 mm long pads of bitumen polymer felt over joints in trim. Cover strip: Top layer felt fully bonded to trim and top layer and carried down over angle fillet to lap 75 mm on to roof.
SURFACING/COMPLETION 790 COMPLETION
Ensure that: - Roof areas are left clean with all outlets clear. - All work by others necessary to provide a weather tight finish is satisfactorily completed. - Finished roof areas are adequately protected from damage by subsequent building
operations. - Defects are repaired without delay to minimise damage and nuisance.

Section B_Term Requirements for Workmanship and Materials Part 2 Lot 1
Section B-Term Requirements for Workmanship and Materials
63
30/12/2013
J41 REINORCED BITUMEN MEMBRANE TYPES OF COVERING: 110 BUILT-UP REINFORCED BITUMEN MEMBRANE WARM ROOF COVERING:
MAIN ROOF AREAS, ENTRANCES, GARAGE AND TANK ROOFS - REFER TO SWS SPECIFICATION PLUVITEC GOLD SHIELD QUANTUM SYSTEM 30 Substrate: Existing screed or woodwool slabs.- Preparation: Remove existing waterproof covering and debris. Vapour control layer: SWS Thermo Adhesive Metal Lined Vapour Barrier. Insulation: SWS Cut-to-falls polystyrene insulation panels over main roofs and tank roofs. Overlay to insulation: Not required. Waterproof covering:- System manufacturer: SWS (GB) Ltd, 37 Berwick Close, Walton, Chesterfield, Derbyshire, S40 3NY, tel 01621 774219, www.swswaterproofingmembranes.biz.- First layer: SWS Thermo Adhesive underlay. Attachment: self adhesive.- Intermediate layer: Not required. Attachment: N/A. Top layer/ Capsheet: SWS Tech 5000 PA5mm mineralised cap sheet. Attachment: Torch-on bonding.- Flashings and detail work: as SWS details. Surface protection: None. Accessories: SWS black GRP edge trims and SWS pipe collars.
PERFORMANCE: 210 ROOF PERFORMANCE:
General: Secure, free draining and weather tight.
PRODUCTS: 320 PRIMER:
Type:- As recommended by bitumen sheet manufacturer, or- Bitumen cut back with volatile solvent. Characteristics when tested to BS EN 13357: Volatile solvent content (minimum): 40% by mass. Viscosity (maximum) (STV at 25°C, 4 mm orifice): 10s.
325 BONDING COMPOUND: Type: As recommended by bitumen membrane manufacturer. Restriction: For heat sensitive insulation materials, use cold bonding compounds
330 TIMBER TRIMS, ETC:
Quality: Planed. Free from wane, pitch pockets, decay and insect attack (except ambrosia beetle damage).Moisture content at time of covering (maximum): 22%. Preservative treatment: As recommended for purpose by waterproof covering manufacturer.
335 ANGLE FILLETS: Material: Treated timber.- Size (minimum): 75 x 75 mm, triangular in section. Restriction: Fillets under torch-on bitumen sheets to be non-combustible.
345 PERIMETER TRIMS: Type: GRP. Manufacturer: SWS.- Product reference: N/A.Colour: Black.Size: to suit existing.- Lengths (maximum): 3 m.
355 NAILS FOR FIXING REINFORCED BITUMEN MEMBRANES: Type: as manufacturer's recommendations.
375 MINOR MOVEMENT JOINTS IN SUBSTRATES: Manufacturer: SWS .- Product reference: as manufacturer's recommendations .

Section B_Term Requirements for Workmanship and Materials Part 2 Lot 1
Section B-Term Requirements for Workmanship and Materials
64
30/12/2013
395 VAPOUR CONTROL LAYER:
Type: As recommended by membrane manufacturer. Manufacturer: SWS.- Product reference: Thermo Adhesive Metal Lined Vapour Barrier. Thickness: refer to SWS. Vapour resistance: refer to SWS.
410 EXPANDED POLYSTYRENE (EPS) WARM ROOF INSULATION: Standard: To BS EN 13163.Manufacturer: SWS.- Product reference: SWS polystyrene tapered insulation panels. Grade: As recommended by insulation manufacturer for the location. Thickness: 210 mm / 90mm tapering. Facing: as supplied.
480 PIPE COLLARS: Manufacturer: SWS.- Product reference: as manufacturer's recommendation. Size: to suit existing.
EXECUTION GENERALLY: 515 ADVERSE WEATHER:
General: Do not lay coverings in high winds, wet or damp conditions or in extremes of temperature unless effective temporary cover is provided over working area. Unfinished areas of roof: Keep dry.
520 INCOMPLETE WORK: End of working day: Provide temporary seal to prevent water infiltration. On resumption of work: Cut away tail of membrane from completed area and remove from roof.
530 APPLYING PRIMERS: Coverage per coat (minimum): as manufacturer's recommendations. Surface coverage: Even and full. Coats: Fully bond. Allow volatiles to dry off thoroughly between coats.
540 APPLYING BONDING COMPOUNDS: Roof sited boilers: Not permitted. Temperature of compound: Suitable to achieve bond over whole surface. Do not overheat. Heat sensitive insulation materials: Use cold bituminous adhesive or overlays recommended by the insulation manufacturer. Application: Using materials and method recommended by bitumen membrane manufacturer.
SUBSTRATES/ VAPOUR CONTROL LAYERS/ WARM ROOF INSULATION: 610 SUITABILITY OF SUBSTRATES:
Substrates generally: Secure, clean, dry, smooth, free from frost, contaminants, voids and protrusions. Preliminary work: Complete including: - Formation of upstands, kerbs, box gutters, sumps, grooves, chases and expansion joints.- Fixing of battens, fillets and anchoring plugs/ strips. Moisture content and stability of substrate: Must not impair roof integrity.
670 LAYING VAPOUR CONTROL LAYER: Attachment: Securely bond or nail to substrate. Side and end laps: 100mm side laps, 150mm head laps. Joints in second layer (if any): Stagger by half a sheet. Penetrations: Fully seal using bonding or taping methods recommended by manufacturer. Edges of insulation at roof edges, abutments, upstands, kerbs, penetrations and the like: Enclose, with vapour control layer:- Dressed up sufficiently, providing 50 mm (minimum) seal when overlapped by the roof covering; or- Turned back 150 mm (minimum) over the insulation and sealed down.
680 LAYING WARM ROOF INSULATION: Setting out:- Long edges: Fully support and run at right angles to structure.- End edges: Adequately support.- Joints: Butt together.- End joints: Stagger. Bedding: Full

Section B_Term Requirements for Workmanship and Materials Part 2 Lot 1
Section B-Term Requirements for Workmanship and Materials
65
30/12/2013
bed of bonding compound. Mechanical fixing: Not required. Protection to exposed edges of insulation: Reduced thickness treated timber batten, outer edge chamfered at changes in level. Completion: Boards must be in good condition, well fitting and stable.
WATERPROOF COVERINGS/ ACCESSORIES: 710 LAYING REINFORCED BITUMEN MEMBRANES GENERALLY:
Direction of laying: Unrolled up the slope.- Where practicable, install so that water drains over and not into laps. Side and end laps: 100mm side laps, 150mm head laps. Head and side laps: Offset. Intermediate and top layer/capsheet: Fully bond. Successive layers: Apply without delay. Do not trap moisture. Strips of bitumen membrane for 'linear' details: Cut from length of roll. Completed coverings: Firmly attached, fully sealed, smooth, weatherproof and free draining.
740 TORCH-ON BONDING OF REINFORCED BITUMEN MEMBRANE: Bond: Full over whole surface, with no air pockets. Excess compound at laps of top layer/capsheet: Leave as continuous bead.
775 SKIRTINGS AND UPSTANDS: Angle fillets: Fix by bitumen bonding or nailing. Venting first layer of bitumen membrane: Stop at angle fillet. Fully bond in bitumen for 300 mm strip around perimeters. Overlap onto upstand with strips of BS 747, type 3B bitumen membrane, fully bonded. Other layers of bitumen membrane: Carry in staggered formation up upstand, with each layer fully bonded. Where practicable, carry top layer over top of upstand. Upstands:- At ends of rolls: Form with bitumen membrane carried up without using separate strip.- Elsewhere: Form with matching strips of bitumen membrane, maintaining laps.- Additional fixing of bitumen membranes: Not required.
785 FIXING PERIMETER TRIMS: First/Intermediate layers bitumen membrane: Lay over roof edge upstand. Project free edge 25 mm from wall or fascia. Trim: - Setting out: 3 mm (minimum) clear from wall or fascia.- Fasteners: as manufacturer's recommendations.- Fixing: 30 mm from ends and at 300 mm (maximum) centres.- Jointing sleeves: Fix one side only. - Corner pieces: Purpose made. Completion:- Contact surfaces: Prime.- Joints: Cover with 150 mm long pads of bitumen membrane, bonded to trim. Completion of bitumen membrane:- Top layer/capsheet: Butt joint to rear edge of trim.- Cover strip: Fully bond to trim and top layer/capsheet of bitumen membrane. Carry over roof edge upstand and lap 75 mm onto roof. Cover strip material: As top layer/capsheet bitumen membrane.
SURFACING: 860A LAYING PAVING TILES:
Condition of substrate: Clean. Setting out: Minimize cutting. Manufacturer: Spartan Tiles Limited, Slough Lane, Ardleigh, Nr. Colchester, Essex CO7 7RU. Tel: 01206 230553 / 230886, fax: 01206 230516Tiles: Spartan Tiles 50mm recycled glass tiles, fully bedded in hot bitumen to cap sheet as recommended by manufacturer. Primer: Not required. Brush cap sheet to remove any loose chippings, debris etc. Bonding compound: Fully bed tiles in bitumen. Avoid excess compound being squeezed over tile face. Joints: 3 mm generally, 25 mm between bays. Bays:- Bay area (approximate): 9 m².- Bay joint locations: Submit proposals. Tiles at upstands and perimeters: Stop short of angle fillets by 25 mm minimum.
COMPLETION: 910 INSPECTION:
Interim and final roof inspections: Submit roof covering manufacturer's reports.
920 ELECTRONIC ROOF INTEGRITY TEST:

Section B_Term Requirements for Workmanship and Materials Part 2 Lot 1
Section B-Term Requirements for Workmanship and Materials
66
30/12/2013
Testing authority: The roofing contractor. Timing of test: Give notice. Condition of roof prior to testing: -Complete to a stage where integrity can be tested.- Surface: Clean. Test results and waterproof integrity certificate: Submit on completion of testing.
940 COMPLETION: Roof areas: Clean. Outlets: Clear. Work necessary to provide a weather tight finish: Complete. Storage of materials on finished surface: Not permitted. Completed membrane: Do not damage. Protect from chemicals, traffic and adjacent or high level working.

Section B_Term Requirements for Workmanship and Materials Part 2 Lot 1
Section B-Term Requirements for Workmanship and Materials
67
30/12/2013
L1 PVC-U WINDOWS
PRELIMINARY INFORMATION / REQUIREMENTS P1 EVIDENCE OF PERFORMANCE: Provide independently certified evidence that all
specified variants of components comply with specified performance requirements. P2 DRAWINGS: Provide a full set of working drawings for the entire contract for approval by
the Client Representative before commencing manufacture. The drawings are to include full details of jamb and head details, elevations, adjacent construction details, large scale section details, position of vents and ironmongery for each window type.
P3 Manufacture of windows shall not commence until approval of the drawings has been given by the Client Representative and the Service Provider should make provision for this in his programme.
P4 SITE DIMENSIONS must be taken and recorded on shop drawings before starting to make all windows and doors.
P5 PILOT FLAT: One the drawings have been agreed by the Client Representative prepare and install all the windows and doors to one dwelling as identified by the Client Representative, this is to agree all finishes and to ensure that the windows and doors are not fouled by the existing plaster lines.
MATERIALS AND FABRICATION 102C PVC-U WINDOWS:
Manufacturers: All manufacturers to be currently registered under a quality assurance scheme operated by a certification and inspection body accredited by the National Accreditation Council for Certification Bodies (NACCB). Windows are to be manufactured to BS 7412 from white PVC-u extruded hollow profiles of materials type A to BS EN 12608. All windows will also comply with the following standards: 1. “Trade Standard for PVC-U Windows” jointly published by the British Plastics
Federation and the Glass & Glazing Federation. 2. “Standard for PVC-U Windows and Doors” by the Plastic Windows Association Ltd. All windows shall be glazed as described in section L40.
105 DESIGN CRITERIA The window system shall be designed and tested for air infiltration to 300 Pa, water tightness to 300 Pa and wind resistance to 2000 Pa, in accordance with BS 6375 : part 1.
106 DESIGN CRITERIA The window system shall be designed and tested for air infiltration, to 600 Pa, water tightness to 600 Pa, and wind resistance to 2000 Pa, in accordance with BS 6375 : part 1.
108 GUARANTEE: The window manufacturer is to give written guarantee of 10 years for the PVC-u windows and 5 years for double-glazed sealed units. In addition a separate 10 year guarantee is required from the manufacturer of spiral balances and/or sliding gear.
110 SECTIONS:
• Composition: The system shall be constructed from white rigid multi-chamber fusion welded acrylic modified impact resistant PVC-u compound sections all frilly reinforced, with secret vertical drainage to outside.
• None of the sections shall contain any re-pulverised material (except for a maximum of 10% virgin reground material if necessary for extrusion purposes).
• Sashes: All sashes to be of a welded construction.
• Joints: Jamb and mullion joints to head are to be welded; jamb and mullion joint to cill to be mechanical.
• Reinforcement: All sashes, heads, jambs and mullions are to be fully reinforced.

Section B_Term Requirements for Workmanship and Materials Part 2 Lot 1
Section B-Term Requirements for Workmanship and Materials
68
30/12/2013
115a PROFILES:
• Materials: un-plasticised Polyvinyl Chloride (PVC-U). Sections — doors outward and inward opening — sash profile — F75-06-1472 - reinforcement with threshold — F75-40-9204 tilt-turn windows - frame profile — F75-01-1461
- reinforcement - F75-40-9199 - sash profile - F75-06-l464 - reinforcement - F75-40-9129 - mullion profile - F75-15-1469 / F75-84-9284 - reinforcement - F75-40-9 198
Additives: on those additives may be used that are essential in producing sound extrusions.
• Regrind: main profiles and beads shall not contain reworked material. Ancillary profiles may contain up to 10% regrind, the resulting profile shall conform to BS 7413: 1991. N.B: Regrind shall be the system suppliers own clean rework, generated in-house.
• Construction: the main PVC-U profiles shall be multi-chambered, with a minimum of three chambers front to back, the centre chamber for reinforcement shall be fully sealed at welded joints.
• Colour: profiles shall be white, or near white, the colour and finish shall be uniform when viewed by normal vision. The profile surfaces shall be free from cracks, sink marks, die lines, foreign bodies etc. The colour difference between any two profiles shall not exceed 1.0, when measured in accordance with BS 3900 D8, 11 D1O.
• The straightness of profiles along the longitudinal axis shall deviate from straight line to no more than lmm/m. The profile cross-section shall conform to the stated specification of the system supplier.
• Dimensions: overall dimensions (front to back) shall be a minimum of 58mm and shall be subject to tolerances of ±0.5 mm.
• Thickness: outer wall thickness shall be 3.00mm ±0.3mm.
• Surface flatness: shall not exceed 0.3mm i.e. the difference between the highest point and the lowest point.
• Weight: shall not vary from the specification by more than 5%.
• Reinforcement chamber: the central reinforcement chamber of the profile shall be hilly sealed when the main profiles are welded together. Drainage paths should not affect the integrity of this chamber.
• Testing: all profiles shall be tested on a regular basis for heat reversion — reference BS EN 12608.
• Main profiles — the mean maximum reversion should not exceed 2%, with no more than 4% variation between face sides.
• Glazing beads — the mean maximum reversion should not exceed 3%, with no more than 6% variation between face sides.
• All profiles shall be tested on a regular basis for heat ageing reference BS EN 12608.
• No sample shall exhibit bubbles, cracks or delamination. All main profiles shall be tested on a regular basis for low temperature impact resistance reference BS EN 12608.
• Ten samples per profile shall be tested (5 x each face). There shall be no evidence of the cracking through the entire wall thickness.
• Profiles shall be tested for colour fastness in accordance with BS 7413: 1991. The assessment of colour difference shall be in accordance with BS 1006 Method A03, and/or BS 3900: D8, D9 and D10.
• BS 1006 Max colour difference 3-4
• BS3900 Max colour difference 7.0
• No sample shall show surface erosion (chalking)
• Profiles shall be tested for weld factors in accordance with BS EN 12608.
• The weld factor shall not be less than 0.7 (i.e. 70% of original value).

Section B_Term Requirements for Workmanship and Materials Part 2 Lot 1
Section B-Term Requirements for Workmanship and Materials
69
30/12/2013
• Profiles shall be tested for corner strength in accordance with BS EN 12608. The 1 welded joint shall not fail below a stress level of 29MPa.
• Identification: all profiles shall be permanently marked at approximately one metre intervals with the name of the system supplier, the date of manufacture and the profile number. The marking should be put into an unobtrusive position but visible without removing the window. The mark is not to be visible when the opening light(s) are closed.
120 REINFORCEMENT:
• Generally: all profiles shall be filly reinforced.
• Supplier: reinforcement shall be supplied by the system supplier.
• Material: Mild steel sheet hot dip zinc coated of Grade Z2 G275 N in compliance with BS EN 10143, or extruded aluminium alloy Grade 6063 or 6082 in compliance with BS EN 515, BS EN 573, BS EN 755 and BS EN 12020.
• All mainframe profiles shall be designed to receive reinforcement.
• Each section shall be reinforced as per the system manual dependant upon the grade or category of exposure.
• For special constructions demanding high weather performance in respect of the calculated exposure the reinforcement required shall be adequate to provide the necessary rigidity, the maximum permissible defections on transoms and mullions shall be:-
1 / 175 for double-glazing 1/125 for single glazing as BS 6262: 1982.
This performance may be achieved by introducing additional reinforcement screw fixings or coupling sections.
• All profile reinforcement shall be held in position using the correct size screw. Screws shall be through fixed on the outer edge of the frame and the glazing rebate of the transoms, mullions and sashes. Screws used shall, be self tapping/drilling.
• Screws used for holding reinforcement within the profile shall be positioned as follows:-
• 1 number screw approximately 100mm from each end of the bar length. Additional screws shall then be positioned at a maximum of 200mm centres thereafter.
• On short lengths, e.g. 500mm mm. three fixings to be provided. No individual bar shall be provided with less than 2 fixings.
• Frames which are coupled together must be reinforced on connecting sides. 122A DRAINAGE
• All frames, transoms, mullions and sashes shall incorporate a method of internal drainage. Drainage holes or slots shall be offset and terminate externally on the face of the bottom rail of the outer frame.
• Drainage slots shall be 30mm wide x 5mm high. Drainage holes shall be 9mm diameter.
• No drainage slot shall enter or pass through the central reinforcement chamber.
• All drainage slots or holes are to be sited in accordance with the system manual.
• Windows which are installed in locations where they will be exposed to high wind forces shall be provided with pressure equalisation holes in the head of the frames and sashes.
l24A VENTILATION:
• Permanent/controllable ventilators shall be incorporated within all window frames. The ventilators shall be installed in accordance with the system manual. The ventilators shall be provided with fly screens.

Section B_Term Requirements for Workmanship and Materials Part 2 Lot 1
Section B-Term Requirements for Workmanship and Materials
70
30/12/2013
• Ventilation requirements shall be as set out in approved document F 1 of the Building regulations. •This calls for 8000 sq. mm free flow of air.
• Where windows are installed to rooms provided with gas appliances the ventilation shall also meet the requirements of all other statutory regulations.
• Where ventilators are fitted to the window frame a PVC-U sleeve shall be inserted through the frame and sealed to prevent moisture ingress into the reinforcement chamber.
• All ventilator controls will either be in easy reach of adults or be provided with cords set in guides and which terminate with a toggle. Toggles will be set within easy reach of adults.
125 FABRICATION
All corner joints on compatible profiles shall be achieved by automatic welding techniques incorporating a hot plate for fusion welding and sprue limiters, the welder shall be calibrated for the correct burn-off allowance. On internally beaded, outward opening casement systems all transoms and mullions shall be welded. On externally beaded outward opening casements or internally beaded inward opening systems, mullions and transoms may be either welded or mechanically coupled. Mechanical joints shall be achieved either by specially designed screw ported aluminium or via mechanical coupling blocks. Al windows and doors shall be manufactured in accordance with the approved system manual and all gearing, furniture and ironmongery shall be fined to the windows or doors in accordance with the manufacturer’s recommendations. Under no circumstances will adhesive bonding be permitted for corner mullion/transom joints. Upon completion of a welded joint the welding bead or sprue to the internal and external face shall be removed and finished, by shadow grooving to a maximum 4mm wide x 0.5mm deep. On systems with a single weather stripping gasket between the sash and outer frame the sash should not be shadow grooved. All welding shall be carried out under controlled conditions ensuring that: -
a) there are regular machine checks. b) welded surfaces are clean prior to welding. c) corner weld tests are to be carried out on a daily basis during normal fabrication
using suitably calibrated equiCRent. d) records of all tests are to be retained by the manufacturer.
Generally windows are to incorporate a weathered and throated cill to project a minimum 50mm beyond the face of the external skin of the building. Internally the existing window boards shall be over skinned with PVC-U ‘cap it’ boards.
125A HANDLING AND TRANSPORTATION: Windows or pre-fabricated units may be shrink wrapped prior to delivery. All windows or prefabricated units shall be transported to site in a vertical position and shall be securely anchored to prevent movement during transit. They shall be separated from each other using adequate packing pieces to prevent damage by or to adjacent units. All windows shall have an identification label or mark to indicate the exact location in which the window is to be installed. All windows shall be delivered to site with the protective tape as supplied by the extruder.

Section B_Term Requirements for Workmanship and Materials Part 2 Lot 1
Section B-Term Requirements for Workmanship and Materials
71
30/12/2013
Where windows are delivered to and stored on site with fixed frame extensions such as projecting cills they shall be provided with adequate support and stored in such a manner as to prevent damage to or deformation of the units. Windows shall be stored in the vertical position. If there are no secure suitable storage facilities on site then arrangements shall be made for windows to be delivered on a daily basis for fitting the same day. Where windows are to be installed on upper levels they shall be transported by lift or hoist. The use of ropes attached to windows for the purpose of hoisting will not be permitted. All windows shall be carried and offered to the structural opening in a vertical position. The window may not be carried flat or horizontal as this may cause damage to the welded joints. The windows or prefabricated units must not be dragged into position.
INSTALLATION 128B INSTALLATION: Generally
The installation shall be in accordance with the requirements in section L1. The method of fixing shall be in accordance with the system manual, and shall take account of the nature and condition of the structure in which it is to be installed, the position of DPCs, and the level of making good required. Where expansion couplings are incorporated, packers shall be positioned adjacent to fixing points. The windows shall be connected to the coupling via a 6mm diameter bright zinc coat threaded bar, with coupling nuts at each side. Whenever couplings are incorporated the outer frame shall be reinforced on connecting sides. Where small couplings are incorporated the windows shall be connected to the coupling via 4.8 to 5.5mm diameter screws passing through frame to flame reinforcement. Where flat bar steel couplings are incorporated windows shall be connected to the coupling via 6mm diameter bright zinc coated threaded. Steel bar with coupling nuts at each side.
128C FIXING Perimeter fixing shall be sited as follows:
• 1 number fixing 1 50-250mm vertically and horizontally from each corner.
• 1 number fixing 150-250mm at either side of a transom or mullion.
• Other fixings at maximum centres of 600mm between corner and transom and/or mullion fixings.
Where windows are coupled together, there shall be a through fixing 100mm from each end and at centres not exceeding 400mm. Where projecting cills are incorporated they shall not exceed 3 metres in any single length. Through frame fixings shall be either 10mm diameter or 8mm diameter integral sleeved anchors and each fixing shall penetrate the structure by a minimum of 60mm. Rendered surfaces shall not be regarded as structure for the purposes of fixing. Expanding foams shall not be regarded as a fixing. Foam shall only be used as a primary backing for sealants or renders. The bolt heads shall be capped with PVC-U domes and sealed against atmospheric corrosion.
128C FIXING

Section B_Term Requirements for Workmanship and Materials Part 2 Lot 1
Section B-Term Requirements for Workmanship and Materials
72
30/12/2013
Where fixing brackets are to be used all screws shall be 4.8 — 5.5mm diameter and shall penetrate a minimum 50mm into a nylon plug inserted into the structure. Where chemical fixings are used they shall be used strictly in accordance with the recommendations of the manufacturer. Care shall be taken so as not to over tighten the bolt or screw fixings. Additional fixings may be provided at the discretion of the Client Representative. Once a frame has been positioned in an opening packing shims shall be inserted at fixing positions around the perimeter. Packing shims shall be of the correct size prior to fully tightening the fixings to ensure that the frame is not distorted. Packing shims are to enable the window to move under thermal expansion without stressing the welded joints or causing overall distortion to the unit. Packing shims shall be of dense plastic. Glazing wedges or timber packers shall not be used.
128D JOINTS AND SEALANTS Self-adhering expanding tapes or backing rods may be used at the perimeter of window frames as a suitable surface for sealants. All external perimeters shall be sealed with a low modulus silicon sealant at the abutment of the frame and structure. The sealant used shall conform to section Z22 and shall be capable of adhering to both PVC-U and the materials, which make up the structure within which the unit is being installed. The sealant shall be applied by a specialist applicator. The silicon bead shall be clean and dry and be free from loose debris or dust.
L10-20 COMBINED FEDs/WINDOWS
L10 WINDOWS/ROOFLIGHTS/SCREENS/LOUVRES
PRELIMINARY INFORMATION/ REQUIREMENTS
110A EVIDENCE OF PERFORMANCE • Certification: Provide independently certified that all incorporated components comply
with specified performance requirements. Components are to meet with Secured by Design standards. Window and door assemblies must pass BS: PAS 23 General Performance Requirements (excluding annexes) and BS: PAS 24 Enhanced Security Requirements. Doors must also pass the end bolt test, which simulates an attack on the bolt. This is a specific requirement of SBD licensing. Testing must be carried out at an UKAS accredited test house.
115 DRAWINGS
Provide a full set of working drawings for the entire contract for approval by the CLIENT before commencing manufacture. The drawings are to include full details of jamb and head details, elevations, adjacent construction details, large scale section details, position of vents and ironmongery for each window type. Manufacture of windows shall not commence until approval of the drawings has been given by the CLIENT and the contractor should make provision for this in his programme.
120 SITE DIMENSIONS • Procedure: Before starting work on designated items take site dimensions, record on
shop drawings and use to ensure accurate fabrication. • Designated items: All windows and doors. Drawings to be approved by the CLIENT and to
include details of the position of ironmongery, vents and fixings the contractor should allow for this approval time in his programme.
Section B_Term Requirements for Workmanship and Materials Part 2 Lot 1
Section B-Term Requirements for Workmanship and Materials
73
30/12/2013
• Note windows in PVC-u frames to be supplied and fitted by others. Fixed transome lights are to be supplied by the door manufacturer for fitting neatly into the door frame. Door frame post(s) to incorporate mullion(s) ready to receive side panel / window assembly supplied and fitted by the window manufacturer. Replacements shall match appearance and alignment of existing combination door / window sets.
130 PILOT FLAT Once the drawings have been agreed by the CLIENT prepare and install all the windows and doors as required for the combination set to one dwelling as identified by the CLIENT. This is to agree all finishes and to ensure that the windows and doors are not fouled by the existing plaster lines.
COMPONENTS 351 PVC-U WINDOWS & DOORS· Drawing reference(s): Window Schedule with documentation Manufacturer and reference: From one of the following: 1. EuroWindows, Tel: 01375 641935 2. Marsland Limited, Tel: 01732 862501 3. Asset, Tel: 01842 763529 4. Nuglas Limited, Tel: 01273 517426 or equivalent. • Exposure category (Design wind pressure): 2000 (Pa), Air permeability 600 (Pa), Water permeability 300 (Pa). • Glazing details: See L40 double glazed units • Ironmongery/accessories: See clause 353 • Fixing: See clause 355
355 PVC-U WINDOW AND DOOR MANUFACTURE • Manufacturer, fabricator and installer of windows and doors to be agreed with the CLIENT. • Windows and doors generally to BS 7412 from white PVC-U extruded hollow profiles of materials type A to BS 7413. • All sections in windows and doors to be reinforced with either mild steel hot dip zinc
coated to Grade Z2 G275 N incompliance with BS 2989 or extruded aluminium alloy Grade 6063 or 6082 incompliance with BS 1474. All reinforcement to be held in place using the correct sized screws. All corner joints on compatible profiles shall be by automatic welding techniques incorporating a hot plate for fusion welding and sprue limiters. On internally beaded, outward opening casements systems all transoms and mullions shall be welded.
• Frames to be minimum dimensions required for structural stability, durability and security, and to impinge on area of light transmission as little as possible. Section sizes to be shown on drawings, outer wall thickness shall be 3.00mm + 0.3mm. Profiles to be checked for colour fastness as BS 7413. Generally windows are to incorporate a weathered and throated cill to project beyond the face of the building.
• Solid infill panels to be plastic coated steel internal and external with a rigid insulant (CFC free) bonded between, CLIENT to agree colour of panels. The panels should give a U value in accordance with the Building Regulations.
• Trickle ventilators to be fitted to the heads of the frame, where this passes through the reinforcement a PVC-u sleeve shall be inserted to prevent moisture ingress to the reinforcement. • Windows and doors to comply with requirements of BS 7950 - Secured by Design. • Potential areas of non-compliance to be notified by the contractor at tender stage. • Windows and doors to be individually manufactured to individually measured openings. Maximum tolerance to be 5mm on any one side as BS 8213. Any larger gaps are to be notified to CLIENT at time of measuring. • Windows and doors to be guaranteed by the fabricator backed up by the system

Section B_Term Requirements for Workmanship and Materials Part 2 Lot 1
Section B-Term Requirements for Workmanship and Materials
74
30/12/2013
manufacturer directly with Southwark Council to replace within a period of 10 years any defective parts including components, double-glazing units, ironmongery and gaskets. • Include glazing bars to give window/door similar scale to existing as necessary. • The colour of PVC-U components and glazing bars shall be RAL 9010. 420 TIMBER SUBFRAMES • Timber: To BS EN 942. - Wood species: To approval.. - Appearance class: Class J40. - Moisture content on delivery: 12 - 19%. • Assembly adhesive: Synthetic resin to BS 1204, type MR. • Joinery workmanship: As section Z10. • Preservative treatment: Organic Solvent as section Z12 and BWPDA Commodity Specification C5; Desired service life 60 years. • Finish as delivered: Prepared and primed M60/121.. • Fixing: Expanding anchor bolts at 600mm centres.
INSTALLATION 710A PROTECTION OF COMPONENTS • General: Do not deliver to site components that cannot be installed immediately or
placed in clean, dry floored and covered storage. • Stored components: Stack vertical or near vertical on level bearers, separated with
spacers to prevent damage by and to projecting ironmongery, beads, etc.
720 MOISTURE CONTENT OF TIMBER COMPONENTS During delivery, storage, fixing and thereafter to Completion maintain conditions of temperature and humidity to suit specified moisture content(s) of components. When instructed by PM, test components with an approved electrical moisture meter used in accordance with manufacturer's recommendations.
730 PRIMING/ SEALING • Timber surfaces inaccessible after installation: Prime or seal as specified before fixing components.
740 CORROSION PROTECTION • Surfaces to be protected: Lintol bars to window and door openings. • Protective coating: Two coats of bitumen solution to BS 6949 or an approved mastic impregnated type. - Timing of application: Before fixing components.
750 BUILDING IN • General: Not permitted unless indicated on drawings. - Brace and protect components to prevent distortion and damage during
construction of adjacent structure.
756A PVC-U REPLACEMENT WINDOW INSTALLATION • Standard: In accordance with clause 783, BS8213:Part 4, and British Plastics
Federation 'Code of practice for the survey and installation of replacement plastics windows and doorsets'.
765 WINDOW INSTALLATION GENERALLY • Installation: Into prepared openings. • Gap between frame edge and surrounding construction: - Minimum: 3 mm. - Maximum: 5 mm. • Distortion: Install windows without twist or diagonal racking.

Section B_Term Requirements for Workmanship and Materials Part 2 Lot 1
Section B-Term Requirements for Workmanship and Materials
75
30/12/2013
767 WORKING WITH THE DOOR MANUFACTURER • The window manufacturer is to allow for working with the door manufacturer in co-
ordination of manufacture and delivery of prepared assemblies, the design and detailing of components to be fully compatible.
• All new components are factory made and therefore to be designed and manufactured to work together and to be assembled to acceptable tolerances for fit and installation - all as specified elsewhere.
770 DAMP PROOF COURSES IN PREPARED OPENINGS • Location: Ensure correct positioning in relation to window frames. Do not displace
during fixing operations.
783 FIXING OF PVC-U FRAMES • Standard: As section Z20. • Fasteners: Fischer Limited type S10 RL 100 or similar approved.
- Spacing: When not predrilled or specified otherwise, position fasteners 150 - 250 mm from ends of each jamb, adjacent to each hanging point of opening lights, but no closer than 150 mm to a transom or mullion centre line, and at maximum 600 mm centres.
810G SEALANT JOINTS • Sealant:
- Manufacturer: Arbosil, to an approved type compatible with the surrounding structure [ ] or equivalent.
- Product reference: as approved or equivalent. - Colour: To match window frame - RAL 9010. - Application: As section Z22 to prepared joints. Finish triangular fillets to a flat or
slightly convex profile.
820G IRONMONGERY • Fixing: Assemble and fix carefully and accurately using fasteners with matching finish supplied by ironmongery manufacturer. Do not damage ironmongery and adjacent surfaces. • Checking/ adjusting/ lubricating: Carry out at Completion and ensure correct functioning.
822 IRONMONMGERY SUPPLIED WITH DOOR AND WINDOW SET Ironmongery shall meet with the Secured by Design Standards currently in force. Components for the door to include:- • 3 hook locking system as Yale Asgard or similar approved. • 7 lever mortice lock with lever handles to operate the locking system. • Snibbed internal lock operation. • Viewer incorporated in doorknocker. • Security chain • Letterbox and letter plarte assembly, complete with internal security shield. • Door numerals. Components for the openable windows to include:- • Opening stays and restrictors as required. • Trickle vents to all windows. 825 MEANS OF ESCAPE & USEAGE REQUIREMENTS • Ensure window installations meet with current means of escape requirements. • In each dwelling, at least 1 room with access onto a walkway, or at ground level is to
have easy egress fittings. This is to ensure there is an alternative means of escape from each dwelling.
• Handles and locks for operating the windows are to be within easy reach from finished floor level (n.m.t. 1500mm above finished floor level). Safety catches & limiters must be operated & held open easily while window locks / fastenings / lift handles are used.

Section B_Term Requirements for Workmanship and Materials Part 2 Lot 1
Section B-Term Requirements for Workmanship and Materials
76
30/12/2013
(This includes kitchens and bathrooms where the user has to reach across fittings / units to operate the window)
830 RESIDENTS INFORMATION • The contractor is to show each resident how to operate the windows and doors, special attention should be taken to explain how any locking mechanisms or restrictors work. • The contractor is to issue a booklet to each resident showing how to operate the
windows and doors and how to clean the windows and detail what products to clean the windows and frames with. This booklet is to be approved by the CLIENT before it is distributed to residents.
840 SIGNED OFF WORKS Notwithstanding the requirements of other clauses in this specification, the contractor shall maintain a paper system of recording the key operations from installation through to handing over of the windows to the occupants / a representative from the client department. This paperwork shall include space for a signature with date of handing over, and record that safety / instruction papers / booklet has been handed to the signee.

Section B_Term Requirements for Workmanship and Materials Part 2 Lot 1
Section B-Term Requirements for Workmanship and Materials
77
30/12/2013
L20 DOORS/SHUTTERS/HATCHES PRELIMINARY INFORMATION/REQUIREMENTS 110 EVIDENCE OF PERFORMANCE
Provide independently certified evidence that all specified variants of components comply with specified performance requirements.
150 SITE DIMENSIONS Must be taken and recorded on shop drawings before starting to make door sets 169 CONTROL SAMPLES
After finalisation of all details, prepare one of each of the following, as part of the quantity required for the project and obtain approval of appearance before proceeding with manufacture of the remaining quantity: Replacement front entrance door with a single diamond obsure glazed panel, and door furniture as scheduled.
COMPONENTS 250G EXTERNAL TIMBER PANELLED DOORS • Drawing reference(s): per elevations with tender documents • Manufacturer and reference: Allan Bros "Timedor Kenilworth" pattern. Tel: 01289 334613. Multisecure: door pattern to be approved. Tel: 01773 530 500. Soundcraft door with applied mouldings; pattern to be selected. Tel: 01959 533778 or equivalent. • Wood species: as supplied • Preservative treatment: as supplied • Moisture content on delivery: 13 to 19% • Glazing/panel details: pre-glazed to BS 6262 in obscure glass - pattern to be approved • Finish as delivered: Factory finished paint to colour schedule specified • Other requirements: None
335 EXTERNAL DOOR FRAMES Drawing reference(s): N/A Timber to BS EN 942. Wood species: Softwood as table NA1 Class: J40/50 Preservative treatment: Organic solvent as section Z12 and British Wood Preserving and Damp-proofing Association Commodity Specification C5. Desired service life: 30 years. Joinery workmanship: As section Z10. Adhesive: PVAC to BS EN 204, Class D4 Moisture content on delivery: 13 -19% Perimeter seals: To heads, jambs and threshold as draught proofing procedure.
Frames to accommodate window / panelled side lights where existing to be replaced.
Finish as delivered: primed Fixing: As described elsewhere using 10mm expanding bolts such as Fischer fixings. 337 HARDWOOD DOOR FRAMES One-hour fire resisting doorframe with intumescent strip. Size: To suit 54mm door (FD60) Timber to BS EN 942.
Wood species: A sustainable produced hardwood: Moderately durable as BS EN 350
Class 3; from a source accredited through the Forest Stewardship Council.

Section B_Term Requirements for Workmanship and Materials Part 2 Lot 1
Section B-Term Requirements for Workmanship and Materials
78
30/12/2013
Class: CSH Preservative treatment: Organic solvent as section Z12 and British Wood Preserving and Damp-proofing Association Commodity Specification C5. Desired service life: 30 years. Joinery workmanship: As section Z10. Adhesive: PVAC to BS EN 204 Class D4 Moisture content on delivery: 13-19% Finish as delivered: Smooth without blemish as M60/135 and protected
Fixing: Secure frame to existing roof structure and allow for new 100 x 50mm timber stud
work around the frame as bracing.
340 WORKING WITH THE WINDOW MANUFACTURER • Manufactured components are to be designed to be assembled and to fit within
acceptable tolerances, and in accordance with agreed delivery programmes. • Refer to Section L10, clause 767. INSTALLATION 710 PROTECTION OF COMPONENTS
Do not deliver to site components, which cannot be put immediately into suitable dry, floored and covered storage. Stack on bearers, separated with spacers to prevent damage by and to projecting ironmongery, beads, etc.
720G MOISTURE CONTENT
During delivery, storage, fixing and thereafter to Completion maintain conditions of temperature and humidity to suit specified moisture content(s) of timber components. When instructed by PM, test components with an approved electrical moisture meter used in accordance with manufacturer's recommendations.
730 PRIMING / SEALING Before fixing components ensure that surfaces of timber which will be inaccessible after installation are primed or sealed as specified.
760 BUILDING IN will not be permitted except where specifically stated. 780 PREPARED OPENINGS
Ensure that dpcs are positioned correctly in relation to frames and prevent displacement during fixing operations.
790 FIXING CENTRES FOR TIMBER FRAMES When not predrilled or specified otherwise, position fixings 150 mm from each end of jamb, adjacent to each hanging point and at 600 mm maximum centres.
800 LOOSE THRESHOLDS Fix 150 mm from each end and at 600 mm maximum centres.
820G SEALANT JOINTS •Sealant manufacturer and reference:
DOW CORNING 796 PVC-U Wood & Aluminium Glazing Silicone Sealant or equivalent. Colour: as door frame.
• Prepare joints and apply sealant as section Z22. Finish triangular fillets with a flat or slightly convex profile.
830 FIXING IRONMONGERY GENERALLY • Assemble and fix carefully and accurately using fasteners supplied by the ironmongery manufacturer, with matching finish and equivalent corrosion resistance. • Holes for components to be no larger than the minimum required for satisfactory fit/operation.

Section B_Term Requirements for Workmanship and Materials Part 2 Lot 1
Section B-Term Requirements for Workmanship and Materials
79
30/12/2013
• Protect ironmongery and adjacent surfaces as necessary to prevent damage. • At completion, check, adjust and lubricate as necessary to ensure correct functioning of
all moving parts.
840 IRONMONGERY SUPPLIED WITH DOOR Refer to Section L10, clause 822 for typical list of components required. Note allow for level / low access threshold to doorway.
850 LOCATION OF HINGES Where not specified otherwise, position hinges with centre lines 250 mm from top and bottom of door leaf. Position third hinge (where specified) in the centre
Position hinges for fire resisting doors in accordance with door leaf manufacturer's recommendations.
860 EMERGENCY EXIT DEVICES Unless specified otherwise, install panic bolts/latches in accordance with BS EN 1125.
M60 PAINTING/CLEAR FINISHING For door & window sets COATING SYSTEMS
12 IN GENERAL Door and window sets shall be supplied with a factory applied finish with protection to allow site handling, and building works by other trades without damaging the finishes. The following clauses cover site works which may be required to finish installation, and to allow for the redecoration of door sets which will not be changed.
100 ALKYD GLOSS ON WOOD, EXTERNAL: • Manufacturer: Dulux Weathershield or Johnstone Stormshield • Surface(s): Existing painted timber. Preparation: As clause 400, 401 and 402. • Initial coat(s): Where existing paint finish is removed, one coat exterior preservative
primer and one undercoat. • Finishing coats: One oil based undercoat and one gloss coat. • Colours: From BS 4800 range as directed by CA.
100A ALKYD GLOSS ON WOOD, EXTERNAL: • Manufacturer: As clause 210G • Surface(s): Existing painted timber windows. Preparation: As clause 400, 401, 403 and 530. • Initial coat(s): One coat exterior preservative primer. • Finishing coats: Two oil based undercoats and one gloss coat. • Colour: From BS 4800 range as directed by CA.
100B ALKYD GLOSS ON WOOD, EXTERNAL: • Manufacturer: As clause 210G • Surface(s): New timber. Preparation: As clause 400 and 402A. • Initial coat(s): One coat exterior preservative primer. • Finishing coats: Two oil based undercoats and one gloss coat. • Colour: From BS 4800 range as directed by CA.
105 ALKYD GLOSS ON METAL, EXTERNAL: • Manufacturer: As clause 210G • Surface(s): Existing painted metalwork. Preparation: As clause 400 and 485.

Section B_Term Requirements for Workmanship and Materials Part 2 Lot 1
Section B-Term Requirements for Workmanship and Materials
80
30/12/2013
• Initial coat(s): One coat lead-free metal primer to bare areas. • Finishing coats: Two oil based undercoats and one gloss coat. • Colour: From BS 4800 range as directed by CA.
105A ALKYD GLOSS ON METAL, EXTERNAL: • Manufacturer: As clause 210G • Surface(s): New metalwork and cast iron. Preparation: As clause 400, 480 and 490. • Initial coat(s): One coat lead-free metal primer. • Finishing coats: Two oil based undercoats and one gloss coat. • Colour: From BS 4800 range as directed by CA. 115 CLEAR GLOSS VARNISH, EXTERNAL: • Manufacturer: As clause 210G • Surface(s): Existing varnished or stained timber. Preparation: As clause 400 and 401. • Initial coat(s): None • Finishing coats: Two full coats.
115A CLEAR GLOSS VARNISH, EXTERNAL: • Manufacturer: As clause 210G • Surface(s): New varnished or stained timber. Preparation: As clause 400 and 402A. • Initial coat(s): None • Finishing coats: Two full coats.
120 PRESERVATIVE STAIN, EXTERNAL: • Manufacturer: Sadolin Extra • Surface(s): Existing stained timber. Preparation: As clause 400 and 401. • Initial coat(s): None • Finishing coats: Two full coats. • Colour: From BS 4800 range as directed by CA.
120A PRESERVATIVE STAIN, EXTERNAL: • Manufacturer: Sadolin Extra • Surface(s): New stained timber. Preparation: As clause 400 and 402A. • Initial coat(s): None • Finishing coats: Two full coats. • Colour: From BS 4800 range as directed by CA.
GENERALLY
215 UNDERCOATS • Where two or more coats of undercoat are specified, each coat shall be of a different
tint.
215G HANDLING AND STORAGE • Coating materials must be delivered in sealed containers, each clearly labelled with the brand name, type of material and manufacturer's batch number. • Wherever possible materials must be from one manufacturing batch. Inform the PM if
materials from more than one batch are to be used, store separately and allocate to distinct parts or areas of the work.
• Store materials in accordance with manufacturer's recommendations. Use in order of delivery and before expiry of any shelf life date.

Section B_Term Requirements for Workmanship and Materials Part 2 Lot 1
Section B-Term Requirements for Workmanship and Materials
81
30/12/2013
216 PRIMERS • The priming is to be specially selected for the purpose for which it is required in
accordance with the manufacturer's recommendations and must comply with BS 5082 or BS 5385.
• The primer for metal work shall be lead free, specified in accordance with the recommendations of BS 6150 "Code of Practice for Painting of Buildings". • The primer for external woodwork (including the internal surfaces of external doors, windows and their frames) shall be low lead or leadless. • The primer for new and existing galvanised areas shall be calcium plumbate primer with new galvanised surfaces being previously treated with mordant solution. 217 STOPPING/FILLER • Stopping for concrete, render or brickwork shall be a similar material to the background and shall be finished with a similar texture. • Stopping for external woodwork shall be approved external grade stopping. • Stopping for clear finished woodwork shall be stopping to match the surrounding woodwork. 218 KNOTTING Knotting shall be best quality "Shellac" to comply with BS 1336.
219 WHITE SPIRIT White spirit shall comply with BS 245.
220G COMPATIBILITY • Check that all materials to be used are recommended by their manufacturers for the particular surface and conditions of exposure, and that they are compatible with each other. • Where surfaces have been treated with preservatives or fire retardants, check with
treatment manufacturer that coating materials are compatible with the treatment and do not inhibit its performance.
• Inform the PM of any discrepancy in specification of coatings and obtain instructions before proceeding with application.
230 ANCILLARY SURFACES
The descriptions of areas to be coated given in schedules, etc. are of necessity simplified. All ancillary exposed surfaces and features are to be coated to
match similar or adjacent materials or areas except where a fair faced natural finish is required or items are completely prefinished. In cases of doubt obtain instructions before proceeding.
240 SURFACES NOT TO BE COATED Door and window ironmongery.
250 SURFACES TO BE CLEANED BUT NOT COATED Fair faced brickwork, Projecting brick courses, Decorative stonework Cills.
270 OFF SITE WORK • All off site preparation and coating to be carried out under cover in a suitable
environment with adequate lighting. • Store all items, both before and after coating, in a clean, dry area protected from the weather and mechanical damage, properly stacked with spaces to permit air circulation and prevent sticking of surfaces.
280 PROTECTION

Section B_Term Requirements for Workmanship and Materials Part 2 Lot 1
Section B-Term Requirements for Workmanship and Materials
82
30/12/2013
• Adequately protect internal and external surfaces, fixtures and fittings which are not to be coated, by covering with dust sheets, masking or other suitable materials.
• Exhibit 'Wet paint' signs and provide barriers where necessary to protect other operatives and the general public, and to prevent damage to freshly applied coatings.
290G TESTING OF VISCOSITY, ETC
The PM may, with discretion, take samples of materials from each manufacturing batch as follows:
• Unopened containers, or samples from previously unopened containers, for submission to manufacturer for comparison with manufacturer's own retained samples from the same batch.
• Unopened containers, or samples from previously unopened containers, as a control sample for assessment of samples taken from painters' kettles. • Samples from painters' kettles for submission with control sample to manufacturer
and/or independent testing laboratory for comparative testing.
310G SUPERVISED CONTROL SAMPLE(S) Prepare sample areas of the finished work, including preparation, in advance of the remainder as set out below. Make arrangements with the PM for full time supervision of the application of each coat. Obtain approval of appearance before proceeding.
Type(s) of coating Nature of sample M60/ 100 Alkyd gloss on timber M60/ 210G Aqualife Fire Upgrading Finish Supervised control samples may, at the PM's discretion, be used as the basis for comparative testing of dry film thickness of complete coating systems.
315A COLOURS • The finished paint colour is to match the colour of all previously painted work except
where colours are otherwise specified. The contractor is to note that the colour of the communal areas will be subject to residents choice. Colour choices for communal areas will be advised by the CA.
• The colour for front entrance doors has been selected. Note that front entrance doors will be to a different colour to each floor in accordance with the selected scheme which will be issued to the successful contractor.
• The Contractor shall allow for an additional finishing coat, in accordance with the manufacturer's instructions, for coverage of specific colours, where appropriate. The CA will select the standard colours for selection by residents and the Contractor must ensure that tenants sign written confirmation of their choice. This information should then be forwarded to the CA.
320 INSPECTION OF WORK Permit coating manufacturers to inspect the work in progress and take samples of their products from site if requested.
321G INSPECTION OF WORK
Inspection of the whole of the work at each of the stages set out below may be made, at the discretion of the PM. Agree with the PM a programme which will facilitate such inspections and notify him when each part and stage of the work is ready for inspection. Do not proceed with subsequent stages of the work until authorised.
Type(s) of coating Inspection at completion of M60/100 Priming, first undercoat, second
undercoat, gloss coat

Section B_Term Requirements for Workmanship and Materials Part 2 Lot 1
Section B-Term Requirements for Workmanship and Materials
83
30/12/2013
PREPARATION
400 PREPARATION GENERALLY • To BS 6150, Section 4. • Materials used in preparation must be types recommended by their manufacturers and
the coating manufacturer for the situation and surfaces being prepared. • Prevent or control exposure of operatives to dust, vapour and fumes exceeding occupational exposure standards set in the current Health and Safety Executive (HSE) document EH40. • Substrates must be sufficiently dry in depth to suit the coating to be applied. • Remove efflorescence salts from surfaces. Repeat removal if efflorescence recurs. • Clean off dirt, grease and oil from surfaces. If contamination of surfaces/substrates has occurred, obtain instructions before proceeding. • Smooth surface irregularities. Fill joints, cracks, holes and other depressions with
stoppers/fillers worked well in and finished off flush with surface. Abrade to a smooth finish.
• Apply oil based stoppers/fillers after priming. Apply water based stoppers/fillers before priming unless recommended otherwise by manufacturer. Patch prime water based stoppers/fillers when applied after priming. • Remove dust and particles from dry abrasive preparation of surfaces. • Remove residues from wet preparation of surfaces by rinsing with clean water, wiping
and allowing to dry. • Ensure that doors, opening windows, etc, are 'eased' as necessary before coating.
Prime any resulting bare areas.
400A FACE FILLING is not permitted.
401 EXISTING COATED SURFACES GENERALLY Unless coatings are specified to be removed or are galvanised. • Carefully remove all loose or defective areas of coating to firm edge. • Thoroughly clean by wiping down with white spirit or washing with water containing
detergent. Remove heavy deposits of oil, grease, etc. with a suitable proprietary cleaning solution.
• Sand down gloss surfaces while still wet to provide a key. • Rinse off and allow to dry. • Patch prime areas where coatings have been completely removed. • Fill joints, cracks, holes and other depressions with filler well worked in and finished off flush with surface. Sand smooth and remove dust. • Apply additional coats to area where paint has been removed to restore the original
coating thickness. Sand down junctions to give a flush surface.
401A BRING FORWARD coatings where existing coating has been partly removed with an additional coat of the decorating system. 402 EXISTING COATED TIMBER In addition to general preparation clauses 400 and 401 and at an appropriate stage:
• Remove any degraded surface timber by sanding down to clean timber. • Remove any resinous exudations by heat. Apply two coats of knotting to affected areas and any exposed knots and allow to dry.
402A UNCOATED TIMBER • Ensure that large and loose knots are removed and made good with sound timber of
the same species. Sand down flush. • Ensure that surfaces are clean and remove oil, grease and excessive natural oils with
Section B_Term Requirements for Workmanship and Materials Part 2 Lot 1
Section B-Term Requirements for Workmanship and Materials
84
30/12/2013
suitable solvents. • Sand to a smooth, even finish with arrises rounded or eased. • Remove resinous exudations by heat. Apply two coats of knotting to affected areas and any exposed knots and allow to dry. • Ensure heads of fastings are countersunk sufficiently to hold stopping/filling. Fill nail
and screw holes, joints, cracks, holes, depressions, open or coarse grain with stopper/filler worked well in and finished off flush with surface. Sand smooth and remove dust.
403 REMOVAL OF EXISTING COATINGS • Where directed in the Bills of Quantities or on site the Contractor shall allow for the removal of existing paint films by one or more of the following methods: Burning off, hot air, steam or chemical stripping, or sanding off. Use methods which will not damage substrate or adjacent surfaces or adversely affect subsequent coatings. • Where removal of coatings reveals rot, corrosion or other degradation of the substrate, obtain instructions from the CA before proceeding. • Burning off:
When the operation of burning off using a hot air stripper or naked flame is in progress, the Contractor must provide all necessary protection of the area to prevent the ignition of adjacent inflammable materials and components. The contractor must provide each "gang" with a suitable Fire Extinguisher to enable him
immediately to control the spread of fire accidentally ignited during this operation. All burning off operations must cease not less than 45 minutes before any cessation of the works on the site and all debris removed from the site. The foreman in charge must, as one of his primary duties, thoroughly inspect the areas where burning off has been carried out to ensure that no materials or components have been accidentally ignited. No burning off is to be carried out within 1 m of any roof lights, dormer windows, other roof features, or eaves level in which case the use of a chemical paint stripper or steam stripper is to be undertaken.
• Chemical stripping: Chemically stripping shall be carried using a proprietary stripper to BS 376 (water rinseable); surfaces taken back to sound bare timber or metal. Remove all traces of paint stripper with clean white spirit, neutralise, rinse and prepare.
• The existing paintwork may have a lead content. As precautions against contamination from lead or other substances when stripping or rubbing down previously painted surfaces, the Contractor shall observe the following:
Dust sheets or other suitable means shall be placed beneath the work area to catch all stripped materials, where removed by burning, paint remover, scraping, brushing or rubbing down. Plastic sheet must not be used when burning is carried out. Periodic cleaning up of debris from the areas beneath components being stripped shall
take place regularly during the day while work is in progress. All debris from stripping etc. shall be removed from site.
• Rubbing down of any paint known to have a lead content in the top coats shall wet rubbed and all debris shall be collected before it dries. Dust from the other rubbed down areas, both internally and externally shall be dampened down and removed at the end of each working day.
• The Contractor is to note special precautions will be required when removing paint from the staircase enclosure and these are detailed under clause 404.
403A Surfaces which have had their coatings removed are to have the initial coat of the decorations system applied on the same day. 410 SUITABILITY OF SURFACES AND CONDITIONS
Application of coatings will be taken as joint acceptance by the Main Contractor and the Painting Contractor of the suitability of surfaces and conditions within any given

Section B_Term Requirements for Workmanship and Materials Part 2 Lot 1
Section B-Term Requirements for Workmanship and Materials
85
30/12/2013
area to receive the specified coatings.
420 FIXTURES Before commencing work, remove the following fixtures and fittings, set aside and replace on completion: Cover plates, grilles, signs, and other surface mounted fixtures.
425 IRONMONGERY Remove from surfaces to be coated and refix on completion. Do not remove hinges unless instructed to do so.
430 IRONMONGERY Remove all old paint and varnish marks from existing ironmongery. Thoroughly clean and polish before refixing.
440 PREVIOUSLY COATED SURFACES GENERALLY • Prepare in accordance with BS 6150, Section 6. • When removing or partially removing coatings, use methods which will not damage the substrate or adjacent surfaces or adversely affect subsequent coatings. • Carefully remove all loose, flaking or otherwise defective areas to a firm edge. • Completely remove alkali affected coatings. • Where coatings are suspected of containing lead, obtain instructions before
proceeding. • Where substrates containing asbestos are revealed, obtain instructions before
proceeding. • Where significant rot, corrosion or other degradation of substrates is revealed, obtain instructions before proceeding. • Thoroughly clean retained coatings with appropriate detergent solutions or solvents to
remove all dirt, grease and contaminants. Abrade gloss coated surfaces when still wet to provide a key.
• Apply additional preparatory coats to areas of partial removal to restore original coating thicknesses. Abrade junctions to give a flush surface. • Where coatings are completely removed, prepare surfaces as specified for uncoated surfaces.
461 PREVIOUSLY COATED TIMBER • Remove any degraded or weathered surface timber by abrading. • Ensure that repairs to degraded substrate timber have been carried out with sound
timber of the same species. • Apply two coats of knotting to exposed resinous areas and knots and allow to dry.
471 PREPRIMED TIMBER Abrade chalking, powdery and other defective primer back to bare timber, remove dust and reprime resulting bare areas.
481 UNCOATED TIMBER • Abrade to a smooth, even finish with arrises and moulding edges lightly rounded or
eased. • Ensure that heads of fasteners are countersunk sufficiently to hold stoppers/fillers. • Apply two coats of knotting to resinous areas and knots and allow to dry.
485 EXISTING GALVANISED SURFACES to receive lead free primer • Spirit clean where there are particular oil or grease deposits. • Wash down all surfaces to be painted with soapy hot water using neutral detergent.
Scrub down with nylon or bristle pad or brush (e.g. 'Scotchbrite'). On no account use wire brushes or wire wool.
• Rinse thoroughly and allow to dry. • No finishes to be applied while there is any sign or possibility of condensation or
Section B_Term Requirements for Workmanship and Materials Part 2 Lot 1
Section B-Term Requirements for Workmanship and Materials
86
30/12/2013
dampness on the metalwork. • If metal or galvanising are defective obtain instructions before proceeding. 490A PREVIOUSLY COATED STEEL • Abrade corrosion and loose scale back to bare metal. • Treat any residual rust with a proprietary removal solution. Prime as soon as possible.
540G POINTING TO EXISTING FRAMES • Remove defective sealant pointing. • Thoroughly clean the joint recess, remove all dust and seal joint surfaces as
recommended by sealant manufacturer. • Check that depth of joint is approximately half its width, and adjust using recommended backing strip if necessary. • Repoint neatly using mastic gun during dry conditions when the ambient temperature is above 5 degrees Centigrade. • Sealant manufacturer and reference: to be selected or equivalent.
APPLICATION
605 PAINTING • Operatives must be appropriately skilled and experienced in the use of specified
materials and methods of applications. Do not use materials which show any bittines when applied. Do not thin or intermix unless specified or recommended otherwise. If materials are found to have been thinned without authorisation the CA may require the application of additional coats.
• Apply priming coats as soon as possible on the same day as preparation is completed. Ensure that they are of adequate thickness and suit surface porosity. • Apply coatings by brush or otherwise specified or approved. Keep all brushes, tools
and equipment in a clean condition. • Apply coatings to clean, dust free, suitable dry surfaces in dry atmospheric conditions
and after any previous coats have hardened. Lightly abrade between coats as necessary.
• Apply coatings evenly to give a smooth finish of uniform colour, free from brush marks, sags, runs and other defects. Cut in neatly and cleanly. Do not splash or mark adjacent surfaces.
• Keep all surfaces clean and free from dust during coating and drying. Adequate protect completed work from damage.
622 TREATMENT OF ORGANIC GROWTHS • Remove all loose growths and infected coatings/decorations. Apply appropriate biocidal solution to growth areas and surrounding surfaces. • Scrape or brush off all dead growth. Remove infected materials immediately to ensure
that no other areas become infected. • Apply appropriate residual effect biocidal solution to inhibit re-establishment of growths. • Biocides must be approved and registered by the Health and Safety Executive (HSE)
and listed in the current 'Reference Book 500', Part B, as surface biocides.
640G POINTING TO EXISTING FRAMES • Remove defective sealant pointing. • Thoroughly clean the joint recess, remove all dust and seal joint surfaces as
recommended by sealant manufacturer. • Check that depth of joint is approximately half its width, and adjust using recommended backing strip if necessary. • Repoint neatly using mastic gun during dry conditions when the ambient temperature is above 5 degrees Centigrade. • Sealant manufacturer and reference: to be selected or equivalent.

Section B_Term Requirements for Workmanship and Materials Part 2 Lot 1
Section B-Term Requirements for Workmanship and Materials
87
30/12/2013
700A UNSUITABLE CONDITIONS • Take all necessary precautions including restrictions on working hours, providing temporary protection and allowing extra drying time, to ensure that coatings are not adversely affected by climatic conditions during and after application
Prevent or control exposure of operatives to solvent vapour levels exceeding occupational exposure standards set in the current Health and Safety Executive (HSE) document EH40
• Unless it is specifically permitted by the coating manufacturer, do not apply coatings: • To surfaces affect by moisture, frost or airborne dust. • When the air or substrate temperature is below 5degC. • When the relative humidity is above 80%. • When heat is likely to cause blistering or wrinkling.
711 COATING GENERALLY • To BS 6150, Section 5. • Do not use materials which show any bittiness or other defects when applied. Do not
thin or intermix unless specified or recommended otherwise. • Apply priming coats as soon as possible on the same day as preparation is completed. They must be of adequate thickness and suit surface porosity. • Apply coatings by brush or roller unless otherwise specified or approved. • Keep brushes and equipment in a clean condition. Dispose safely of cleaning and
waste materials, do not pour into sanitary appliances or drains. Subsequent coats of the same pigmented material must be of a different tint to ensure that each coat provides complete coverage.
• Apply coatings to clean, dry surfaces in accordance with the manufacturer's recommended intervals between coats.
• Apply coatings evenly to give a smooth finish of uniform colour, free from brush marks, sags, runs and other defects. Cut in neatly and cleanly. Do not splash or mark adjacent surfaces. • Adequately protect drying and completed work from damage.
720 PRIMING JOINERY • Before priming preservative treated timber ensure that any cut surfaces have been retreated and that all preservatives are completely dry. • Liberally coat all end grain, allow to soak in and then recoat. 730 CONCEALED JOINERY SURFACES
Where one or more additional coats are specified to be applied in the factory, they must be applied to all surfaces, including those which will be concealed when components are fixed in place.
751 STAINING TIMBER • Apply primer where recommended by the stain manufacturer. • Apply stain in flowing coats. Brush out excess stain before set to produce uniform depth
of colour. 760 VARNISHING
Thin first coat with white spirit in accordance with manufacturer's recommendations. Brush well in avoiding aeration and lay off. Apply further coats of varnish, rubbing down lightly between coats along the grain.
770 EXTERNAL DOORS Prime and coat bottom edges before hanging.
780 BEAD GLAZING
Joinery which is to be stained must have the first two coats of the staining system

Section B_Term Requirements for Workmanship and Materials Part 2 Lot 1
Section B-Term Requirements for Workmanship and Materials
88
30/12/2013
applied to rebates and beads before glazing.
781 BEAD GLAZING Joinery which is to be varnished must have the first two coats of varnish applied to rebates and beads before glazing.
782 BEAD GLAZING Joinery which is to be painted must have the primer and one undercoat applied to rebates and beads before glazing.
790 PUTTY GLAZING Allow putty to set for 7 days then, within a further 14 days, seal with an oil based primer. Ensure that putty is fully protected by coating system as soon as it is sufficiently hard. Extend finishing coats on to glass up to sight line.
800 GLAZING Protect etched, sand blasted and ground glass from contamination by oily constituents of coating materials by:
• Treating or marking edges before coating. • Cleaning surfaces after coating. 810 WATER REPELLENT
Commence at top of wall, applying liberally to flood surface, ensuring complete coverage.
820 COMPLETION
Ensure that opening lights and other moving parts move freely. Remove all masking tape and temporary coverings.

Section B_Term Requirements for Workmanship and Materials Part 2 Lot 1
Section B-Term Requirements for Workmanship and Materials
89
30/12/2013
P21 IRONMONGERY
GENERALLY
110 GENERAL REQUIREMENTS Detailed requirements and locations of ironmongery are to be scheduled by the supplier, where the lists of minimal ironmongery for secured by design purposes do not meet the needs and configurations of like-for-like replacements on site.
Fixing is specified in section L1-. 150 IRONMONGERY FOR DOORSETS
Provide ironmongery required for each door-set in two separate packs (projecting and non-projecting items) clearly labelled to identify the door-set to which it belongs. Deliver the packs of non-projecting items to the door-set manufacturer for factory fitting and deliver the other packs to site.
160 IRONMONGERY FOR DOORS Provide ironmongery for each door in separate, clearly labelled packs. 170 IRONMONGERY FOR FIRE DOORS
Unless specified otherwise, select ironmongery to comply with the recommendations of the Association of Builders' Hardware Manufacturers Code of practice 'Hardware essential to the optimum performance of fire resisting doorsets'.
180 DURABILITY Unless specified otherwise, select ironmongery components to suit the following level(s) of use (as defined in BS 7352): Heavy duty:
HANGING DEVICES
310 HINGES • To BS 7352 and marked accordingly. Unless specified otherwise, select strength class
to suit door weight, duty, number of hinges and other factors as recommended in BS 7352, Appendix C.
• Corrosion protection: Unless specified otherwise: CP 24 for internal use CP 48 for damp internal and unpolluted external use CP 96 for polluted atmospheres.
330 NUMBER OF HINGES Provide three butt hinges to each leaf unless specified otherwise.
331 NUMBER OF HINGES
Provide three butt hinges to fire doors, external doors and doors with closers, unless specified otherwise.
OPERATING DEVICES
410G OVERHEAD CLOSERS GENERALLY • To BS 6459:Part 1, Class to be approved • Manufacturer and reference: Contractor's choice. or equivalent. Type: Face fixed. Finish: Stove enamel. • Closers must: - Be matched to the sizes and weights of doors

Section B_Term Requirements for Workmanship and Materials Part 2 Lot 1
Section B-Term Requirements for Workmanship and Materials
90
30/12/2013
- Override latches and/or door seals when fitted Hold unlatched doors shut under normal working conditions.
420 OVERHEAD CLOSERS FOR FIRE DOORS In addition to the general requirements for closers, overhead closers for fire resisting doors must: • Be types included in successful tests to BS 476:Part 22 of door assemblies similar to
those for which the closers are proposed. Submit evidence of testing by an approved laboratory.
• Be fixed on the opening face of the door unless specified otherwise. • Have no mechanical hold open facility. • Close positively against smoke seals where fitted. • Have arms of iron, steel or other metal with melting point not less than 800 degrees
Centigrade.
SECURING
515 LOCKS FOR ALL EXTERNAL DOORS: • To BS 5872. Category: for use in housing • Method of operation: Cylinder: Euro to BS EN 1303 classification 16-1-14.
550 LOCKS/LATCHES FOR FIRE RESISTING DOORS • Must not compromise the fire performance of the door and must be approved for the purpose by the door leaf manufacturer. • Components critical to the retention of the door in a closed position must not have a melting point lower than 800 degrees Centigrade. 560 ESCAPE LOCKS
Locks specified for security purposes on escape routes must be fitted with a means of withdrawing the bolt without use of a key.
585 BOLTS GENERALLY Unless specified otherwise, provide bolts: • To match door furniture and sized to suit height, weight and function of door. • To secure the first closing leaf on double doors.
590 HINGE BOLTS
To all Front Entrance Doors to residences at and above First Floor Level Install a pair of security bolts to the hanging side. Bolts to be to pattern of Chubb WS12 - white, or similar approved.
FURNITURE
610 LEVER HANDLES • To BS 4951. • Mounting: As approved from selection
620 DOOR KNOBS • To BS 4951. • Mounting: As approved from selection 630 KNOBSETS
To Method of Building Performance Specification MOB H3 PS, July 1989, 'Hardware for internal doorsets', Sections 2 and 3.
640 PULL HANDLES
Section B_Term Requirements for Workmanship and Materials Part 2 Lot 1
Section B-Term Requirements for Workmanship and Materials
91
30/12/2013
To Method of Building Performance Specification MOB H3 PS, July 1989, 'Hardware for internal doorsets'.
650 PULL HANDLES, Where required, to be fixed on the pull side only with a push plate on the opposite side.
710 ESCUTCHEONS Provide separate escutcheons to keyholes where not part of a back plate. 711 ESCUTCHEONS
Provide pull type escutcheons to cylinder locks where no other pull handle is specified to be fitted.
720 STOPS Unless specified otherwise, are required for doors opening against walls other than those fitted with closers with a back check facility.
Type: Wall mounted face fixed SAA finish 75 mm projection. Fixing height: 100mm above internal FFL
730G LETTER PLATE(S) • To BS 2911, Type outward opening flap closed by spring action • Manufacturer and reference: As approved from selection or equivalent. Material/Finish: To match set - NOT brass Features: Extended plate at one end for number.
735 INTERNAL LETTER FLAP(S) To match material, finish and size of letter plate.
850G THRESHOLD WEATHERSTRIP Manufacturer and reference: To be approved. & to comply with BSS 7386 & 7880 or equivalent.
855G WEATHERSTRIP to head and jambs Manufacturer and reference: To be approved. & to comply with BSS 7386 & 7880 or equivalent.
890 DOOR VIEWERS • Angle of vision: 130º deg • Material/Finish: Chrome • Diameter of body of viewer: Chubb model WS8 or as approved mm • Door thickness: Existing / new to fit mm

Section B_Term Requirements for Workmanship and Materials Part 2 Lot 1
Section B-Term Requirements for Workmanship and Materials
92
30/12/2013
L10 Windows - Timber (with ironmongery)
GENERAL
110 EVIDENCE OF PERFORMANCE • Certification: Provide independently certified evidence that all incorporated components comply with specified performance requirements.
120 SITE DIMENSIONS • Procedure: Before starting work on designated items take site dimensions, record on
shop drawings and use to ensure accurate fabrication. • Designated items: As scheduled to suit the project. Take account of filler panels and
make up pieces used to conceal partition walls and other internal features in existing configurations.
140 CONTROL SAMPLES • Procedure: - Finalise component details. - Fabricate one of each of the following designated items as part of the quantity
required for the project. - Obtain approval of appearance and quality before proceeding with manufacturer
of the remaining quantity. • Designated items: As scheduled to suit the project. PRODUCTS 210 WOOD WINDOWS • Manufacturer: Accredited by the British Woodworking Federation (BWF). Submit
proposals for approval. - Product reference: To be approved. • Species: To be approved. • Finish as delivered: Manufacturer's full paint or stain system. • Glazing details: Insulating glass units incorporating low emissivity glass (en = 0.05),
argon filled. • Ironmongery/ Accessories: To be approved. Include for Trickle ventilator, chid-proof
locks, secure locks, opening restrictors, hinges / stays / catches, etc. See Window Ironmongery section P21 immediately following.
• Fixing: Screwed to timber framing as clause 780.
250 WOOD WINDOWS • Standard: To BS 644. • Manufacturer: A firm currently registered under a third party quality assurance scheme. • Exposure category to BS 6375-1/ Design wind load: To suit site conditions / submitted proposals fro approval. • Operation and strength characteristics: To BS 6375-2. • Timber: Generally to BS EN 942. - Species: Softwood. - Appearance class: J10 for glazing beads, drip mouldings and the like. J40 or
better for all other members. - Moisture content on delivery: 12-19%. • Preservative treatment: Organic solvent as section Z12 and BWPDA Commodity Specification C5; Desired service life 60 years. • Finish as delivered: Full paint / stain / varnish system as section M60. • Glazing details: Insulating glass units incorporating low emissivity glass (en = 0.05),
argon filled .
Section B_Term Requirements for Workmanship and Materials Part 2 Lot 1
Section B-Term Requirements for Workmanship and Materials
93
30/12/2013
• Ironmongery/ Accessories: To be approved. Include for Trickle ventilator, chid-proof locks, secure locks, opening restrictors, hinges / stays / catches, etc. See Window Ironmongery section P21 immediately following.
• Fixing: Screwed to timber framing as clause 780.
420 WOOD SUBFRAMES • Timber: To BS EN 942. - Species: Hardwood as table NA.2. - Appearance class: J30. - Moisture content on delivery: 12-19%. • Assembly adhesive: PVAC to BS EN 204, class D4. • Joinery workmanship: As section Z10. • Preservative treatment: Organic Solvent as section Z12 and BWPDA Commodity Specification C5; Desired service life 60 years. • Finish as delivered: Full paint system / varnish as section M60. • Fixing: Bolted to masonry reveal as clause 780.
460 ROOFLIGHTS • Manufacturer: Submit proposals. - Product reference: To be approved. • Type: Flat. • Frame: Integral with roof light. - Finish: To be approved. - Colour: To be approved. • Kerb: Timber by main contractor. • Glazing details: Double skin . • Other requirements: Anti-burglar bars. • Fixing: To suit site conditions and to be approved.
480 ROOF WINDOWS • Manufacturer: Submit proposals. - Product reference: To be approved. • Glazing details: Insulating glass units incorporating low emissivity glass. • Flashings: By window manufacturer to suit Existing roof covering. • Accessories: Cord remote control. • Fixing: To suit site conditions and to be approved.
490 ROOF VENTILATORS • Manufacturer: Submit proposals. - Product reference: To be approved. • Type: To be approved / to match existing. • Controls: Manual. • Materials: To be approved. - Finish as delivered: Principal components polyester powder coated. • Seals: Required. • Guards: Security. • Accessories/ Special features: None. • Fixing: To suit site conditions and to be approved. EXECUTION 710 PROTECTION OF COMPONENTS • General: Do not deliver to site components that cannot be installed immediately or
placed in clean, dry floored and covered storage. • Stored components: Stack vertical or near vertical on level bearers, separated with
spacers to prevent damage by and to projecting ironmongery, beads, etc.

Section B_Term Requirements for Workmanship and Materials Part 2 Lot 1
Section B-Term Requirements for Workmanship and Materials
94
30/12/2013
730 PRIMING/ SEALING • Wood surfaces inaccessible after installation: Prime or seal as specified before fixing components.
740 CORROSION PROTECTION • Surfaces to be protected: Factory fitted ironmongery, cramps, connectors etc. • Protective coating: Two coats of bitumen solution to BS 6949 or an approved mastic impregnated tape. - Timing of application: Before fixing components.
750 BUILDING IN • General: Not permitted unless indicated on drawings. - Brace and protect components to prevent distortion and damage during
construction of adjacent structure.
760 REPLACEMENT WINDOW INSTALLATION • Standard: To BS 8213-4.
765 WINDOW INSTALLATION GENERALLY • Installation: Into prepared openings. • Gap between frame edge and surrounding construction: - Minimum: 4mm. - Maximum: 8mm. • Distortion: Install windows without twist or diagonal racking.
770 DAMP PROOF COURSES IN PREPARED OPENINGS • Location: Ensure correct positioning in relation to window frames. Do not displace
during fixing operations.
780 FIXING OF WOOD FRAMES • Standard: As section Z20. • Fasteners: 10 mm phosphor bronze expanding bolts. - Spacing: When not predrilled or specified otherwise, position fasteners not more
than150 mm from ends of each jamb, adjacent to each hanging point of opening lights, and at maximum 450 mm centres.
790 FIRE RESISTING FRAMES • Gap between back of frame and reveal: Completely fill with intumescent mastic or tape.
810 SEALANT JOINTS • Sealant: - Manufacturer: Submit proposals. Product reference: To be approved. - Colour: White. - Application: As section Z22 to prepared joints. Finish triangular fillets to a flat or
slightly convex profile.
820 IRONMONGERY • Fixing: Assemble and fix carefully and accurately using fasteners with matching finish supplied by ironmongery manufacturer. Do not damage ironmongery and adjacent surfaces. • Checking/ Adjusting/ Lubricating: Carry out at Completion and ensure correct
functioning.

Section B_Term Requirements for Workmanship and Materials Part 2 Lot 1
Section B-Term Requirements for Workmanship and Materials
95
30/12/2013
L10 (P21) WOOD WINDOW IRONMONGERY PRE-TENDER 10 QUANTITIES AND LOCATIONS • Quantities and locations of ironmongery are in the bills of quantities . • Fixing: As sections L10 and L20.
GENERAL 121 IRONMONGERY FROM SINGLE PROPRIETARY RANGE • Manufacturer: Submit proposals . - Product reference: To be approved . • Principal material/ finish: To match exiting . • Items unavailable within selected range: Submit proposals.
140 SAMPLES • General: Before placing orders with suppliers submit labelled samples of the following:
As scheduled / confirmed on site. - Conformity: Retain samples on site for the duration of the contract. Ensure
conformity of ironmongery as delivered with labelled samples.
141 SAMPLE BOARDS • General: Before placing orders with suppliers submit a sample board, containing
labelled samples of ironmongery and showing methods of fixing. • Range: Include All replacement items as agreed on site / per schedules . - Conformity: Retain board on site in an approved location for the duration of the
contract. Ensure conformity of ironmongery as delivered with labelled samples. WINDOW HANGING DEVICES 365 SINGLE AXIS WINDOW HINGES To match existing • Standard: To BS EN 1935. • Manufacturer: As before. - Product reference: As determined by the project. • Type: Double washered butt. • Size: As schedule . • Material/ finish: As schedule. • Hinge grade: Not less than 8. • Other requirements: None.
370 WINDOW HINGES To match existing • Manufacturer: As before . - Product reference: As determined by the project . • Type: Double washered butt . • Size: As schedule . • Material/ finish: As schedule .
380 SLIDING FRICTION STAY HINGES To match existing • Manufacturer: As before . - Product reference: As determined by the project . • Type: As schedule . • Size: As schedule . • Material/ finish: As schedule .
385 PIVOT HINGES To match existing • Manufacturer: As before . - Product reference: As determined by the project .

Section B_Term Requirements for Workmanship and Materials Part 2 Lot 1
Section B-Term Requirements for Workmanship and Materials
96
30/12/2013
• Type: As schedule . • Material/ finish: As schedule .
390 SPIRAL SASH BALANCES To match existing • Manufacturer: As before . - Product reference: Submit for approval . • Sash heights: As schedule . • Sash weight: As schedule . • Type: Spiral balance . • Material/ finish: White PVCU sleeve .
395 BOXED SASH HANGING FITTINGS To match existing • Manufacturer: As before . - Product reference: Submit for approval . • Axle pulleys: As schedule . • Cords/ Chains: Waxed cotton sash cord . • Weights: As schedule . - Matched to weights of glazed sashes. • Other requirements: None . WINDOW SECURING DEVICES 590 WINDOW ESPAGNOLETTE BOLTS To match existing • Manufacturer: As before. - Product reference: To be approved. • Type: As schedule. • Size: As schedule. • Backset: As schedule. • Material/ finish: Chromatized steel. • Additional requirements: None.
592 SASH FASTENERS To match existing • Manufacturer: As before. - Product reference: To be approved. • Type: As schedule. • Size: As schedule • Material/ finish: As schedule. • Additional requirements: None.
593 SASH SCREWS To match existing • Manufacturer: As before. - Product reference: To be approved. • Type: Thumbturn head. • Size: As schedule. • Material/ finish: To match window furniture. • Additional requirements: Style to match existing. 594 FANLIGHT CATCHES To match existing • Manufacturer: As before. - Product reference: To be approved. • Type: Rod pull operation. • Material/ finish: Satin anodised aluminium. • Additional requirements: Style to match existing.
596 CASEMENT/ SASH MORTICE BOLTS To match existing • Manufacturer: Submit proposals. - Product reference: To be approved. • Type: Key operated mortice bolt.

Section B_Term Requirements for Workmanship and Materials Part 2 Lot 1
Section B-Term Requirements for Workmanship and Materials
97
30/12/2013
• Size: As schedule. • Material/ finish: As schedule. • Additional requirements: None.
WINDOW FURNITURE
900 CASEMENT HANDLES To match existing • Manufacturer: As before. - Product reference: To be approved. • Type: As schedule. • Material/ finish: As schedule. • Features: Style to match existing
905 CASEMENT STAYS To match existing • Manufacturer: As before. - Product reference: To be approved. • Type: As schedule. • Size: As schedule. • Material/ finish: As schedule. • Features: Style to match existing
910 WINDOW LEVER HANDLES To match existing • Manufacturer: As before. - Product reference: To be approved. • Type: As schedule. • Material/ finish: As schedule. • Features: Style to match existing.
930 FRICTION RESTRICTOR CASEMENT STAYS To match existing • Manufacturer: As before. - Product reference: To be approved. • Type: As schedule. • Size: As schedule. • Material/ finish: As schedule. • Features: Style to match existing.
935 REMOTE WINDOW OPENERS To match existing • Manufacturer: As before. - Product reference: To be approved. • Type: Screwjack opener, manually operated cable. • Material/ finish: As schedule. • Features: None. 940 SASH LIFT HANDLES To match existing • Manufacturer: As before. - Product reference: To be approved. • Type: As schedule. • Size: As schedule. • Material/ finish As schedule.
950 SASH EYES To match existing • Manufacturer: As before. - Product reference: To be approved. • Type: As schedule. • Size: As schedule • Material/ finish: As schedule.

Section B_Term Requirements for Workmanship and Materials Part 2 Lot 1
Section B-Term Requirements for Workmanship and Materials
98
30/12/2013
960 WEATHERSTRIP TO WINDOWS To match existing • Manufacturer: As before. - Product reference: To be approved. • Type: As schedule. • Size: As schedule. • Material/ Finish: As schedule.

Section B_Term Requirements for Workmanship and Materials Part 2 Lot 1
Section B-Term Requirements for Workmanship and Materials
99
30/12/2013
L11 ALUMINIUM WINDOWS AND TILT & TURN CASEMENT POLYESTER POWDER COATED ALUMINIUM WINDOWS AND DOORS 1. INTRODUCTION This Performance Specification is for the supply and installation of aluminium windows
and doors to replace existing windows and doors, and is to include for all the fittings required to complete the installation, and to ensure the full, effective and safe operation of the windows/doors.
2. EXTENT/LOCATION OF WORK The units supplied will include all items and materials for their installation, making good,
and use, including: Fixed and opening lights; Ventilators; Glazing and gasketry; Ironmongery and furniture; Weather sealing; All necessary trims, internal and external mastics, foam fillers, and
other ancillary items required for an effective and neat finish to the works.
3. SURVEY, DIMENSIONS and DESIGN The units supplied are to be manufactured to suit existing openings. The Contractor is expected to make a pre tender visit to site and an inspection of all
relevant drawings and documents in order to ascertain all relevant conditions, structural details and site layout. No additional claim will be entertained for items that would be apparent during the pre tender site visit. The Contractor must allow in his tender for the replacement of all items specified and/or required.
The Contractor shall allow in his price for a survey visit to site in order to take the
dimensions and sizes of every opening in the property that is to be replaced. The Contractor is responsible for ensuring that all new windows and doors are square
and central in the opening, and that a perimeter gap shall be no more than that required for thermal expansion, assumed to be maximum 10mm; however the contractor shall be responsible for stating the gap required.
The Contractor is to allow for any anomalies and variations in the size of the openings,
and for out-of-square openings. This is to include for the manufacture of ‘specials’ as necessary. All framing including mullions, transoms and couplers shall be capable of withstanding the design wind loadings calculated in accordance with BS6399 Pt2: 1995, and the Contractor shall provide calculations to demonstrate this if requested by the Client Representative.
Transoms shall be positioned 1100mm from FFL, should this deviate by more than 50mm from the existing level, the Client Representative is to be informed prior to production.
4. STANDARDS
Section B_Term Requirements for Workmanship and Materials Part 2 Lot 1
Section B-Term Requirements for Workmanship and Materials
100
30/12/2013
The frames are to comply with any current British Standard Specification, Code of
Practice, and Statutory Requirements (including all revisions and amendments), as well as the guides and recommendations laid down by the relevant trade organisation relating to their performance, constituent materials, methods of assembly and use. Any exceptions to the above are to be confirmed in writing by the specifier.
The window extrusion systems manufacturer must hold British Standard Kitemark
licences for BS4873 “Specification for Aluminium Alloy Windows” and BS7950 “Enhanced Security of Casement and Tilt and Turn Windows for Domestic Applications”. Prior to commencement of work on site, the Window Installer shall forward copies of the Kitemark Certificates to the Client Representative.
The door extrusion system manufacturer shall hold test certificates to the following
standards. PAS023-1:1999 “General Performance Requirements for Door Assemblies” and PAS024-1:1999 “Doors of Enhanced Security”. Testing shall be carried out by a UKAS accredited test house. Prior to commencement of work on site, the Window Installer shall forward copies of the test certificates to the Client Representative. Aluminium window profiles to be manufactured by an approved systems company to BS EN ISO.9001/9002. The fabricated product to conform with BS 4873.
All materials and ancillary products are to be used and fitted entirely in accordance with
the instructions of the relevant manufacturer. 5. WINDOW & DOOR CONSTRUCTION Windows To be manufactured as Sapa Building Systems Ltd (Ashchurch, Tewkesbury,
Gloucestershire, GL20 8NB; Tel: 01684-853500) Dualframe 75mm Top and Side hung Casements and Dualframe 75 Si TBT Window System, to comply entirely with the requirements of BS4873.
All frames and other sections to be extruded to BS EN 755-9: 2001, Specification 6060/6063 T6. Frame sections to be:
Casements Outer frame DF310; Opening light DF800; Transom DF324; Mullion DF342; TBT’s Outer frame: DF1401; Opening light DF1430; Coupling (window to window) DF073; Coupling (window to door) DF073; Corner post DF131; Stairwell Outer frame CKF15; Mullion (span 2650mm) CKF15; (x2 + coupling) Coupling CKM20; Transom CKM21; Cill See Section 9 below: The sections forming the windows are to incorporate a thermal break, achieved using a
high strength, glass reinforced polyamide barrier. The thermal break is to be applicable to all profiles, including vents, couplers and cills.

Section B_Term Requirements for Workmanship and Materials Part 2 Lot 1
Section B-Term Requirements for Workmanship and Materials
101
30/12/2013
Window frame profiles are to be fabricated using 45o mitred joints. Corners to be reinforced with stainless steel corner ties and two extruded aluminium cleats, joined with two-part adhesive, and secured by mechanical crimping.
Joints to be sealed with sealants as specified by the aluminium systems company. Window outer frame sections to incorporate flexible “flipper” gasket, so as to provide
background for mastic jointing, and to accommodate structural opening tolerances.
All windows shall have a drip-trim fitted to the head of the frame. Doors (Residential)
To be Dualframe 75mm HP doors system with three-number hinges, and internally beaded construction.
Frame members to be mitre cut at 450. Corners to be reinforced with stainless steel corner ties and extruded aluminium cleats.
The sections forming the doors are to incorporate a thermal break, achieved using an
extruded 25% glass reinforced polyamide profile mechanically joined to the profiles. Ancillary profiles to incorporate a polyurethane resin thermal break. The thermal break is to be applicable to all fittings, including vents, couplers and cills.
A drained low threshold extrusion is to be included, compliant with Approved Document M of the Building Regulations.
All fabrication to be strictly in accordance with the system company’s Fabrication and
Specification Manuals and all current Technical Bulletins. 6. APPEARANCE Sightline dimensions and profile shapes shall be those as specified above (section 5) 7. FINISHING Aluminium sections to be polyester powder-coated to BS.6496: 1984, in full gloss Hipca
White 9910 other, by Sapa Building Systems Ltd, using Syntha Pulvin or Interpon D systems.
8. WEATHER PERFORMANCE Aluminium window system to have been tested in accordance with BS.5368, to meet
Exposure Category (2400 Special) of BS 6375: 1983, and to have achieved the following:
Windows DOORS Air permeability: 600 Pa Air permeability: 300 Pa Water penetration: 600 Pa Water penetration: 300 Pa Gust deflection: 2400 Pa* Gust deflection: 2400 Pa* * figures may vary from the design maximum wind loading which should be calculated in
accordance with BS6399: Part2: 1995

Section B_Term Requirements for Workmanship and Materials Part 2 Lot 1
Section B-Term Requirements for Workmanship and Materials
102
30/12/2013
DF Casements Silicone-treated, woven polypropylene pile to be fitted externally to ensure effective
weather sealing. Schlegel “Q-Lon” weatherseals to be fitted internally. All weatherseals are to be securely fixed in grooves within the extruded frame profiles such that they will not dislodge.
DF TBT’s Silicone bulb-type weatherseals to be fitted internally to ensure effective weather
sealing. Schlegel “Q-Lon” weatherseals to be fitted externally. All weatherseals are to be securely fixed in grooves within the extruded frame profiles such that they will not dislodge.
9. DRAINAGE The frames are to incorporate an adequate means of concealed self-drainage where
possible. This is to be achieved using a box section sub-cill or drainage tray, according to site
requirements, allowing drainage through frame of window and exiting via hidden drainage holes in the nose of the sub-cill or drainage tray.
Cill ends to be closed with plastic end caps, sealed with silicone seal. Cill profile to be selected according to the position of each frame within the structural
opening. 10. INSTALLATION Window framing to be securely fixed direct to the building structure, no further than
150mm from each corner and at centres not exceeding 300mm, as laid down in procedures issued by the systems company.
All installation shall be in accordance with BS8213 Part 4 1990. The removal of existing windows and doors must be programmed to ensure that units
are only removed if they are to be replaced within the same working day. Immediately on removal, the existing windows and doors, together with any debris associated with the removal of existing units, are to be cleared away to an approved tip or storage location. At the end of each working day, the contractor shall be responsible for the removal of any debris from the existing units and new materials from site, and shall thoroughly clean the working area in accordance with the requirements of the Schedule of Works.
On removal of the existing windows and doors and associated frames, sub frames, cills
etc. the reveal surfaces of the opening are to be cleaned to remove all existing frame sealant, mastic, beading mortar etc. ready for the installation of the new units.
DPC materials are to be repaired/renewed as necessary and tucked into the new
framing. The contractor is to make all due allowance to ensure that no damage is caused to the property internally or externally. The contractor’s attention is drawn specifically to the need to protect soft landscaping and external and internal fabric and finishes. Any

Section B_Term Requirements for Workmanship and Materials Part 2 Lot 1
Section B-Term Requirements for Workmanship and Materials
103
30/12/2013
damage caused as a result of the replacement of windows/doors will be the contractor’s liability.
The contractor shall allow for all necessary making good of all work disturbed. Frames are to be positioned to cover the cavity within the reveals, and level with the
existing external window/door line wherever possible. Any gap between the internal frame face and the existing plaster line is to be filled with
expanding foam void filler, knifed off flush with the plaster. The foam and a minimum of 15mm of plaster is to be covered with PVCue trims from a product range which carries BBA certification or Kitemarking to BS 7619: 1993. Trims to be fixed with acrylic caulking. The contractor is to allow for necessary measures to protect the occupants, fittings and finishes within the rooms for the duration of the works.
Seal all external joints between framing and structure with Adshead Ratcliffe Arbosil
1096 or equal approved silicone sealant. The contractor is also to allow for all making good work to window openings, both
internally and externally, including masonry, plaster, cladding, and decorative finishes to reveals. No additional allowance will be made for costs associated with making good which would be visible on a site inspection.
Allow to unclip all existing telephone cables, aerial cables and the like from existing window and door frames, and re-clip to surround in a suitable location using new cable clips of appropriate size and colour. Any cables passing through a frame/structure joint shall be routed through a plastic sleeve, the inner end of which is to be higher than the outer to prevent water penetration along or through the sleeve
Remove and re-fit existing net curtains and other soft furnishings as applicable.
Curtain rods to be screw fixed to window/door frame head. Main Contractor to replace curtain rods where necessary. Inform Client Representative of any soft furnishings not suitable for re-instatement.
Upon completion of the installation of each replacement window/door, all glazing,
window/door frames, handles and all other surfaces are to be cleaned with a mild detergent and polished to a perfect finish. All components are to be checked for security of fixings, adequacy of clearances, adjustment of hinges, locks etc. as may be necessary to leave the window units in a perfect working order.
11. GLAZING All glazing to windows to be secured by means of internal glazing beads. Glazing to be hermetically sealed double-glazed units, comprising inner pane of 4mm
“soft coat“ low emissivity glass and an outer pane of 4mm glass, with an argon filled cavity. The sealed units are to have a centre pane U value no greater than 1.2W/m2k. Interpane iplus, Solaglas Planitherm Futur N or equal approved.
Stairwell glazing to be single 6.4mm laminated glazing. All glazing in WCs and bathrooms shall have obscured glass to the inner pane.

Section B_Term Requirements for Workmanship and Materials Part 2 Lot 1
Section B-Term Requirements for Workmanship and Materials
104
30/12/2013
All glass within 800mm from FFL shall be toughened or laminated (Below 1500mm if
within a door or 300mm of a door). All glass and glazing shall conform to:
- EN12600: 2006 Specification for Impact Performance; - BS.6262: 1982: Code of Practice for Glazing Buildings; - BS. 952: 1978: Glass for Glazing; - BS.5713: 1979: Specification for Hermetically Sealed Flat Double Glazed Units - Valid Kitemark certification will be required.
Solid infill panels where required are to be 28mm insulated sandwich panels with facings
of polyester powder coated aluminium, finished to match framing.
Recommendations of the Glass and Glazing Federation shall be adhered to. 12. HARDWARE Casements Securistyle Sterling stainless steel friction stays (fanlights).
All side hung opening lights within habitable rooms up to 4.5m from ground level shall have Securistyle Egress / Easyclean hinges with a separate concealed over-ride able restrictor device to limit initial opening to 100mm. Hinges shall allow 90o/80o opening and incorporate a push button actuated sliding facility to allow internal cleaning of the opening light.
Securistyle Defender Restrictor stainless steel friction stays incorporating over-ride able 100mm restriction, accessible via a push button on the stay.
Ground floor windows, windows within 3m of flat roofs and access balconies to be fitted
with Securistyle excluder hinge security device. Maco Mk2 Eurogroove shootbolt espagnolette locking system comprising two rods,
moving in opposite directions from side of the sash frame into keeps securely fixed to perimeter frame, and with additional centre cam unit. All keeps to be profile related.
Handles to be equipped with a key-deadlocking, push button mechanism with ‘push to
unlock’ autolock operation. Securistyle Viscount Offset or equal and approved. Handle finished to match framing.
TBT’s
Siegenia Favorit tilt before turn multi point locking system with switch barrier preventing access to Turn mode from Tilt mode without first closing the window. All opening lights in excess of 1000mm in height to be fitted with additional switch barrier preventing access to Tilt mode from Turn mode without first closing the window. Winlock Stronghold Tilt before Turn handle, with key controlled access to turn mode.
Anti-slam device to be incorporated within Tilt before turn gearing. Residential Doors

Section B_Term Requirements for Workmanship and Materials Part 2 Lot 1
Section B-Term Requirements for Workmanship and Materials
105
30/12/2013
Lever/lever handle set (balcony), lever/pad handle set (garden level doors), polyester powder coated to match framing.
Locking to be by three-number hook locks, and central latch, engaging in fully adjustable stainless steel keeps, and actuated by the handle mechanism. Central dead bolt actuated by a 5 pin anti-drill cylinder complying with BS EN 1303.
Head and threshold shoot bolts, actuated by handle mechanism.
Head and threshold shootbolts to slave leaf of double doors, actuated by separate handle set.
Three-number to be fitted, adjustable in two planes. Stainless steel pins mechanically
pressed into extruded aluminium hinge bodies within nylon bushes. Colour-matched to doorframe.
Fully drained low threshold, to comply with the requirements of Building Regulation
Approved Document M. 13. VENTILATION Each window unit is to be fitted with colour-matched powder coated aluminium trickle
ventilators, to meet Building Regulations (Part F1, 1995). Ventilator to be secure and adjustable, complete with insect screen. Ventilator to be fitted through the head of the outer frame, with a sleeve between inner and outer units.
Where necessary, a frame extension profile, or extended leg framing, is to used to
ensure that trickle ventilators are clear of internal finishes. Frame extension sections to be of an identical material and finish to framing, and designed to locate in grooves within the frame extrusion.
Where the window is of insufficient width to accommodate the level of ventilation
required by Approved Document F1 the Contractor shall bring this to the attention of the Client Representative.
Trickle ventilation shall also comply with Approved Document J and BS5540 Part 2 with
respect to ventilation of gas burning appliances. This requirement shall take precedence over the requirements of Approved Document F1.
Footnotes: Information is given on an advisory basis only and specifiers are particularly recommended to contact suppliers of non-Sapa Building Systems Ltd products to ensure that such products are suitable. Sapa Building Systems Ltd recommends that a glazing thermal safety check be carried out by the glass or sealed unit supplier. Due to possible changes of design and usage after the compilation of this specification we recommend that the window fabricator/installer calculate framing requirements to comply with Approved Document K3 and BS6180 with regard to loading and barriers. Wind load calculations relating to framing and profile specifications have been carried out on a preliminary basis only using information available at the time, and a basic form of calculation to BS6399 Pt2 1995. The fabricator/installation contractor should provide detailed wind load

Section B_Term Requirements for Workmanship and Materials Part 2 Lot 1
Section B-Term Requirements for Workmanship and Materials
106
30/12/2013
calculations based on full and final information at the point of order, based on BS6399 Part 2 1995. Certain Window configurations may not meet the requirement of Approved Document B (2000) of the Building Regulations for a fire escape window. The requirement of BS8213 Pt 1for protection to openings at a minimum of 1100mm from FFL may not be met with the proposed designs. Windows may not comply with the safe internal cleaning requirements of BS 8213 Pt1 in terms of reach. Introducing new window configurations may result in a greater degree of compliance with BS8213 Pt1. Any Window and Door Schedules are issued by Sapa Building Systems Ltd for the principal purpose of defining window and door sizes and configurations. Sapa Building Systems Ltd will not be held liable for the accuracy of any quantities shown on the Schedule. The double glazed sealed units specified comply with the thermal insulation requirements revisions to Approved Document L1 (April 2002) of the Building Regulations, whereby a centre pane U value of 1.2W/M2k is required. Sapa Building Systems recommends that a pilot dwelling window installation is carried out prior to the manufacture and commencement of the rest of works.

Section B_Term Requirements for Workmanship and Materials Part 2 Lot 1
Section B-Term Requirements for Workmanship and Materials
107
30/12/2013
L11 ALUMINUM VERTICAL SLIDING ALUMINIUM WINDOWS/ROOFLIGHTS/SCREENS/LOUVRE 115 DRAWINGS: Provide a full set of working drawings for the entire contract for approval by
the Client Representative before commencing manufacture. The drawings are to include full details of jamb and head details, elevations, adjacent construction details, large scale section details, position of vents and iron for each window type. Manufacture of windows shall not commence until approval of the drawings has been given by the Client Representative and the constructor should make provision for this in his programme.
120A SITE DIMENSIONS must be taken and recorded on shop drawings before starting to make all windows and doors.
150 PILOT FLAT:
Once the drawings have been agreed by the Client Representative prepare and install all the windows and doors to one dwelling as identified by the Client Representative, this is to agree all finishes and to ensure that the windows and doors are not fouled by the existing plaster lines
COMPONENTS 330A ALUMINIUM WINDOWS & DOORS:
• Exposure category (Design wind pressure): (Pa).Air permeability (600) (Pa).
• Water Permeability (300) (Pa)
• Glazing details: L40
• Ironmongery/accessories: clause 333
• Finish: clause 334
• Fixing: clause 336 331 ALUMINIUM WINDOW AND DOOR MANUFACTURE:
Manufacturer, fabricator and installer of windows and doors to be agreed with the Client Representative. Windows and doors generally to BS 4873. All sections in windows and doors, including vents, couplers and cills are to be thermally broken with high strength polyurethane resin separators. All joints to be mechanically close mitred and crimped using stainless steel corner braces, all in accordance with component manufacturer’s quality control requirements. Frame, cill and opening light sections to be solidly constructed from minimum 1.6mm thick of aluminium. Frames to be minimum dimensions required for structural stability, durability and security, and to impinge on area of light transmission as little as possible. Maximum depth of frame with fixed light to be 53mm and for opening light to be 72mm, except at head where permanent ventilation hood is to clear internal reveal linings. Width of window frames to be 45mm or minimum necessary to replace existing W20 Steel frame. Any projecting opening light section are to be chamfered externally. Windows and doors to comply with requirements of BS 7950 -Secured by Design. Potential areas of non-compliance to be notified by the constructor at tender stage. Windows and doors to be individually manufactured to individually measured openings. Maximum tolerance to be 5mm on any one side as BS 8213. Any larger gaps are to be notified to Client Representative at time of measuring. Guarantee: Windows and doors to be guaranteed by the fabricator/manufacturer backed up by the system manufacturer directly with Southwark Council to replace within

Section B_Term Requirements for Workmanship and Materials Part 2 Lot 1
Section B-Term Requirements for Workmanship and Materials
108
30/12/2013
a period of 10 years any defective parts including components, double glazing units, ironmongery, gaskets and colour coating. Windows and doors to be handed as the existing layout to the buildings. Existing internally opening lights to be installed as existing.
333 IRONMONGERY AND ACCESSORIES FOR ALUMINIUM WINDOWS AND DOORS: Casement sliding friction stays to be strong, stainless steel, and cleanable from the inside as Securistyle Defender Egress. Ground floor, walkway and balcony windows also to be high security as Securistyle Vector Plus or equal and approved. Child proof restrictor to befitted to all windows above ground floor level. Casement multi-point locks to be key operated espagnolette bolts with mushroom headed pins and lockable ventilator positions in stainless steel as Cego Cadenza or equal and approved. Casement lock handles to be offset, sculptured, key operated and white powder coated as Securistyle Virage Espagnolette or equal and approved. Casement hinge bolts as Securistyle Vector Excluder to ground floor and balcony windows. Door hinges to be white powder coated stainless steel. Door(s) to open as existing to private balconies. Door fastenings to include a latch, two hook bolts, shoot bolts into head and cill and a S lever dead lock to BS 3621 with anti drill protection as Legge 5511 or equal and approved dead lock. Handle to be robust and white powder coated. Double doors to have pair of strong recessed flush bolts white powder coated. Cabin hooks to hold balcony doors open to be white powder coated stainless steel and be fixed through insulating render to existing wall; matching eyes to be fixed to outside of door. Cills to be approximately 95mm x 25mm, white powder coated stainless steel and to replace existing cill sections. Condensation channels to be approximately 15 x 15mm, white powder coated, fixed 6mm below top edge of bottom section and to have ends filled and sealed. Trickle ventilators to be secure, adjustable, complete with insect screen and conforming to Building Regulations Fl, two 4000mm2 vents in head of kitchen, living room and bedroom windows; one vent as wide as possible in head of WC and bathroom windows. Colour to match frames. Install permanently open vents to rooms containing gas burning appliances.
334 FINISH TO ALUMINIUM WINDOWS, DOORS AND ACCESSORIES: Full gloss powder coating in accordance with BS 6496 and the Syntha Pulvin, Interpon processes or equal and approved, in white (PAL 9910), 60 micron thick. Finish to be fully protected during installation
336 FIXING OF ALUMINIUM WINDOWS AND DOORS: See Preamble “Procedure for Window Replacement’. Balcony doors to include solid secured cill with asphalt adjusted to give waterproof junction to underside. All windows and doors to be firmly secured into openings as BS 8213 Part 4. Fixings to be stainless steel screws and plugged to walls at the jambs and heads at a maximum 600mm centres and no further than 250mm from each corner. Length of fixings to screw manufacturer’s recommendations.

Section B_Term Requirements for Workmanship and Materials Part 2 Lot 1
Section B-Term Requirements for Workmanship and Materials
109
30/12/2013
Windows and doors to be square and straight and not distorted by driving in packings or unsupported tightening of fixings. Ensure adequate clearance for opening parts; if necessary and only to approval by the CR adjust packing and fixings to eliminate binding. Windows and doors to be kept back a minimum of 30mm from the front edge of opening. All reveals to be cleaned of all old paint, mastic or filler etc and removed. External joints around windows and doors to be sealed with mastic compatible with finishes, as Arbosil 1090 silicone sealant and to be kept to an absolute minimum externally and internally. Hooks for net curtains to be pre-fixed into head of frame so that net cords avoid the trickle ventilators. Where curtain rails have previously been fixed to window/door frames or within reveals a timber batten (25mm x 50mm) is to be prepared, fixed and decorated and the existing rails refixed.
550A METAL GLAZED SCREENS: MAIN ENTRANCE TO BLOCKS To be approved by Client Representative. Panels: 9mm northern wired glass to upper panels & 2mm sheet metal clad panels to lower areas (as identified on drawings) to Jansen specification to be powder coated RAL. Colour agreed with Client Representative. Jointing: per manufacturers instructions/recommendations. Special features: for a conduit to be fixed within the frame for the connections to the door entry system. Allow for the cutting out and fixings for the door entry panel and the Fire Brigade Key Switch Accuracy: Permissible deviations:
• Height and width: +/- 1.5 mm.
• Difference in length of diagonals: 4mm. Glazing/infill details: Internally beaded with tamper proof fixings Finish as delivered: Polyester powder coating to RAL or equal and approved. Colour agreed by Client Representative. Fixing Fischer fixings
INSTALLATION 710 PROTECTION OF COMPONENTS: Do not deliver to site components which cannot be
put immediately into suitable clean, dry, floored and covered storage. Stack near vertical on level bearers, separated with spacers to prevent damage by and to projecting ironmongery, beads, etc.
740 CORROSION PROTECTION: Before fixing, apply two coats of bitumen solution to BS
6946 or an approved mastic impregnated tape, to surfaces of Windows and door frames components which will come into contact with structure.
765 WINDOW INSTALLATION:
Install windows into prepared openings, maintaining a maximum gap of 15mm between the frame edge and the surrounding construction. Install windows without twist or diagonal racking.
782 FIXING OF ALUMINIUM FRAMES: As section Z20 using approved fixings. When not predrilled or specified otherwise, position fixings not more than 250 mm from each end of jamb, adjacent to each hanging point of opening lights, and at maximum 609mm centres.

Section B_Term Requirements for Workmanship and Materials Part 2 Lot 1
Section B-Term Requirements for Workmanship and Materials
110
30/12/2013
810G SEALANT JOINTS: Sealant manufacturer and reference: An approved type compatible with the surrounding structure or equivalent. Colour: White. Prepare joints and apply sealant as section Z22. Finish triangular fillets with a flat or slightly convex profile.
820 IRONMONGERY: Assemble and fix carefully and accurately using fasteners with matching finish supplied by ironmongery manufacturer. Prevent damage to ironmongery and adjacent surfaces. At completion check, adjust and lubricate as necessary to ensure correct functioning.
830 RESIDENTS INFORMATION:
The Service Provider is to show each resident how to operate the windows and doors, special attention should be taken to explain how any locking mechanisms or restrictors work. The Service Provider is to issue a booklet to each resident showing how to operate the windows and doors and how to clean the windows and detail what products to clean the windows and frames with. This booklet is to be approved by the Client Representative before it is distributed to residents.

Section B_Term Requirements for Workmanship and Materials Part 2 Lot 1
Section B-Term Requirements for Workmanship and Materials
111
30/12/2013
L11 ALUMINIUM WINDOWS/ROOFLIGHTS/SCREENS/LOUVRE PRELIMINARY INFORMATION/REQUIREMENTS 110 EVIDENCE OF PERFORMANCE:
Provide independently certified evidence that all specified variants of components comply with specified performance requirements.
115 DRAWINGS: Provide a fill set of working drawings for the entire contract for approval by the Client Representative before commencing manufacture. The drawings are to include full details of jamb and head details, elevations, adjacent construction details, large scale section details, position of vents and iron for each window type. Manufacture of windows shall not commence until approval of the drawings has been given by the Client Representative and the constructor should make provision for this in his programme.
120A SITE DIMENSIONS Must be taken and recorded on shop drawings before starting to make all windows and doors.
150 PILOT FLAT Once the drawings have been agreed by the Client Representative prepare and install all the windows and doors to one dwelling as identified by the Client Representative, this is to agree all finishes and to ensure that the windows and doors are not fouled by the existing plaster lines
COMPONENTS 330A ALUMINIUM WINDOWS & DOORS:
• Exposure category (Design wind pressure): (Pa).Air permeability (600) (Pa).
• Water Permeability (300) (Pa)
• Glazing details: L40
• Ironmongery/accessories: clause 333
• Finish: clause 334
• Fixing: clause 336
331 ALUMINIUM WINDOW AND DOOR MANUFACTURE: Manufacturer, fabricator and installer of windows and doors to be agreed with the Client Representative. Windows and doors generally to BS 4873. All sections in windows and doors, including vents, couplers and cills are to be thermally broken with high strength polyurethane resin separators. All joints to be mechanically close mitred and crimped using stainless steel corner braces, all in accordance with component manufacturer’s quality control requirements. Frame, cill and opening light sections to be solidly constructed from minimum 1.6mm thick of aluminium. Frames to be minimum dimensions required for structural stability, durability and security, and to impinge on area of light transmission as little as possible. Maximum depth of frame with fixed light to be 53mm and for opening light to be 72mm, except at head where permanent ventilation hood is to clear internal reveal linings. Width of window frames to be 45mm or minimum necessary to replace existing W20 Steel frame. Any projecting opening light section are to be chamfered externally. Windows and doors to comply with requirements of BS 7950 -Secured by Design. Potential areas of non-compliance to be notified by the constructor at tender stage.

Section B_Term Requirements for Workmanship and Materials Part 2 Lot 1
Section B-Term Requirements for Workmanship and Materials
112
30/12/2013
Windows and doors to be individually manufactured to individually measured openings. Maximum tolerance to be 5mm on any one side as BS 8213. Any larger gaps are to be notified to Client Representative at time of measuring. Guarantee: Windows and doors to be guaranteed by the fabricator/manufacturer backed up by the system manufacturer directly with Southwark Council to replace within a period of 10 years any defective parts including components, double glazing units, ironmongery, gaskets and colour coating. Windows and doors to be handed as the existing layout to the buildings. Existing internally opening lights to be installed as existing.
333 IRONMONGERY AND ACCESSORIES FOR ALUMINIUM WINDOWS AND DOORS: Casement sliding friction stays to be strong, stainless steel, and cleanable from the inside as Securistyle Defender Egress. Ground floor, walkway and balcony windows also to be high security as Securistyle Vector Plus or equal and approved. Child proof restrictor to befitted to all windows above ground floor level. Casement multi-point locks to be key operated espagnolette bolts with mushroom headed pins and lockable ventilator positions in stainless steel as Cego Cadenza or equal and approved. Casement lock handles to be offset, sculptured, key operated and white powder coated as Securistyle Virage Espagnolette or equal and approved. Casement hinge bolts as Securistyle Vector Excluder to ground floor and balcony windows. Door hinges to be white powder coated stainless steel. Door(s) to open as existing to private balconies. Door fastenings to include a latch, two hook bolts, shoot bolts into head and cill and a S lever dead lock to BS 3621 with anti drill protection as Legge 5511 or equal and approved dead lock. Handle to be robust and white powder coated. Double doors to have pair of strong recessed flush bolts white powder coated. Cabin hooks to hold balcony doors open to be white powder coated stainless steel and be fixed through insulating render to existing wall; matching eyes to be fixed to outside of door. Cills to be approximately 95mm x 25mm, white powder coated stainless steel and to replace existing cill sections. Condensation channels to be approximately 15 x 15mm, white powder coated, fixed 6mm below top edge of bottom section and to have ends filled and sealed. Trickle ventilators to be secure, adjustable, complete with insect screen and conforming to Building Regulations Fl, two 4000mm2 vents in head of kitchen, living room and bedroom windows; one vent as wide as possible in head of WC and bathroom windows. Colour to match frames. Install permanently open vents to rooms containing gas burning appliances.
334 FINISH TO ALUMINIUM WINDOWS, DOORS AND ACCESSORIES: Full gloss powder coating in accordance with BS 6496 and the Syntha Pulvin, Interpon processes or equal and approved, in white (PAL 9910), 60 micron thick. Finish to be fully protected during installation
336 FIXING OF ALUMINIUM WINDOWS AND DOORS: See Preamble “Procedure for Window Replacement’. Balcony doors to include solid secured cill with asphalt adjusted to give waterproof junction to underside.

Section B_Term Requirements for Workmanship and Materials Part 2 Lot 1
Section B-Term Requirements for Workmanship and Materials
113
30/12/2013
All windows and doors to be firmly secured into openings as BS 8213 Part 4. Fixings to be stainless steel screws and plugged to walls at the jambs and heads at a maximum 600mm centres and no further than 250mm from each corner. Length of fixings to screw manufacturer’s recommendations. Windows and doors to be square and straight and not distorted by driving in packings or unsupported tightening of fixings. Ensure adequate clearance for opening parts; if necessary and only to approval by the CR adjust packing and fixings to eliminate binding. Windows and doors to be kept back a minimum of 30mm from the front edge of opening. All reveals to be cleaned of all old paint, mastic or filler etc and removed. External joints around windows and doors to be sealed with mastic compatible with finishes, as Arbosil 1090 silicone sealant and to be kept to an absolute minimum externally and internally. Hooks for net curtains to be pre-fixed into head of frame so that net cords avoid the trickle ventilators. Where curtain rails have previously been fixed to window/door frames or within reveals a timber batten (25mm x 50mm) is to be prepared, fixed and decorated and the existing rails refixed.
550A METAL GLAZED SCREENS: MAIN ENTRANCE TO BLOCKS To be approved by Client Representative. Panels: 9mm northern wired glass to upper panels & 2mm sheet metal clad panels to lower areas (as identified on drawings) to Jansen specification to be powder coated RAL. Colour agreed with Client Representative. Jointing: per manufacturers instructions/recommendations. Special features: for a conduit to be fixed within the frame for the connections to the door entry system. Allow for the cutting out and fixings for the door entry panel and the Fire Brigade Key Switch Accuracy: Permissible deviations:
• Height and width: +/- 1.5 mm.
• Difference in length of diagonals: 4mm. Glazing/infill details: Internally beaded with tamper proof fixings Finish as delivered: Polyester powder coating to RAL or equal and approved. Colour agreed by Client Representative. Fixing Fischer fixings
INSTALLATION 710 PROTECTION OF COMPONENTS:
Do not deliver to site components which cannot be put immediately into suitable clean, dry, floored and covered storage. Stack near vertical on level bearers, separated with spacers to prevent damage by and to projecting ironmongery, beads, etc.
740 CORROSION PROTECTION: Before fixing, apply two coats of bitumen solution to BS 6946 or an approved mastic impregnated tape, to surfaces of Windows and door frames components which will come into contact with structure.
765 WINDOW INSTALLATION: Install windows into prepared openings, maintaining a maximum gap of 15mm between the frame edge and the surrounding construction. Install windows without twist or diagonal racking.
782 FIXING OF ALUMINIUM FRAMES: As section Z20 using approved fixings.

Section B_Term Requirements for Workmanship and Materials Part 2 Lot 1
Section B-Term Requirements for Workmanship and Materials
114
30/12/2013
When not predrilled or specified otherwise, position fixings not more than 250 mm from each end of jamb, adjacent to each hanging point of opening lights, and at maximum 609mm centres.
810G SEALANT JOINTS: Sealant manufacturer and reference: An approved type compatible with the surrounding structure or equivalent. Colour: White. Prepare joints and apply sealant as section Z22. Finish triangular fillets with a flat or slightly convex profile.
820 IRONMONGERY: Assemble and fix carefully and accurately using fasteners with matching finish supplied by ironmongery manufacturer. Prevent damage to ironmongery and adjacent surfaces. At completion check, adjust and lubricate as necessary to ensure correct functioning.
830 RESIDENTS INFORMATION: The Service Provider is to show each resident how to operate the windows and doors, special attention should be taken to explain how any locking mechanisms or restrictors work. The Service Provider is to issue a booklet to each resident showing how to operate the windows and doors and how to clean the windows and detail what products to clean the windows and frames with. This booklet is to be approved by the Client Representative before it is distributed to residents.

Section B_Term Requirements for Workmanship and Materials Part 2 Lot 1
Section B-Term Requirements for Workmanship and Materials
115
30/12/2013
L12 PVCu WINDOWS TILT & TURN WINDOWS GENERAL 110 EVIDENCE OF PERFORMANCE • Certification: Provide independently certified evidence that all incorporated components comply with specified performance requirements. 110A DESIGN Design Intent Drawings: Drawings have been produced to assist the contractor and manufacturer in achieving the correct visual appearance of the assemblies. The design
intent drawings do not warrant the performance of the assemblies and the contractor is to ensure that all performance requirements of the specification are met. Shop Drawings: See clause 115 below. The CLIENT will comment on shop drawings and give a status A B or C as described below
A- no comment manufacture may proceed B - Manufacture may proceed subject to the incorporation of the attached
comments into the design C- Manufacture may not proceed. Re-submit drawings for comment taking
into account comments .The design team requires 15 working days from receipt of shop drawings for comments. Completion of design: Finalise details to meet structural and safety requirements.
115 MANUFACTURE DRAWINGS: SHOP DWGS & construction details Provide a full set of working drawings for the entire contract for approval by the CLIENT
before commencing manufacture. The drawings are to include full details of jamb and head details, elevations, adjacent construction details, large scale section details, type and position of vents and ironmongery for each window type. Manufacture of windows shall not commence until approval of the drawings has been given by the CLIENT and the contractor should make provision for this in his programme of works.
120A SITE DIMENSIONS • Procedure: Before starting work on designated items take site dimensions, record on
shop drawings and use to ensure accurate fabrication. • Contractor is to allow for variations in jamp, cill and head conditions. Gap around the new fitted windows should not exceed 5mm and this should be filled as noted. 140 CONTROL SAMPLES • Procedure: - Finalise component details. - Fabricate one of each of the following designated items as part of the quantity
required for the project. - Obtain approval of appearance and quality before proceeding with manufacturer
of the remaining quantity. • Designated items:
A complete pilot dwelling installation (see clause below) with min one each of l/rm, kitchen, bathroom, WC and patio doors complete with all associated fixings and ironmongery. Note that window /door and furniture and fixings design may vary as a result of these samples.
150A PILOT DWELLING • Once the window drawings have been agreed by the CLIENT prepare and install all the
windows and doors to one dwelling as identified by the CLIENT, this is to agree all finishes and to ensure that the windows and doors are not fouled by the existing plaster

Section B_Term Requirements for Workmanship and Materials Part 2 Lot 1
Section B-Term Requirements for Workmanship and Materials
116
30/12/2013
lines..
PRODUCTS 355 PVC-U REPLACEMENT WINDOWS, SCREENS & PATIO DOORS • Standard: Manufactured to BS 7412 from white PVC-U extruded profiles.
Manufacturer: A firm currently registered under a quality assurance scheme operated by a certification and inspection body accredited by the United Kingdom Accreditation Service (UKAS). Firm member of the BPF WINDOWS GROUP and agreed with CLIENT
Exposure category to BS 6375-1/ Design wind load: [2000pa. Air permeability 300 pa Water Penetration :300Pa
Type of windows: casement , tilt and turn and patio door assemblies as shown on relevant drawings. All by same manufacturer].
- Reinforcement: [all sections to be reinforced to manufacturer's specification to BS 7412. Frames and panels over 3m to be reinforced irrespective of size and to have continuous external reinforced subcills (to match windows), surrounds and jamb pressings/ covers at junctions of party walls and tenancy walls ].
- Finish: polyester powder coating, to be fully protected during installation Glazing details: [Insulating glass units incorporating low emissivity glass (en = 0.1), argon filled. Full specific requirements as clause L40/371A and clause L10/360 B below.
- Glazing to be internally beaded with security glazing tape for ease of future maintenance Operation and strength characteristics: To BS 6375:Part 2. Weather tightness: to BS 6375:Part 1.
- Draught stripping : each opening sash to have two rows of EPDM draught stripping Corners to be continuous not mitred.].
- Ironmongery/ Accessories: External PVC-u subcill throughout of adequate width to cover existing reveal (approximately 150mm), with end cappings.
- PVC-u frame surrounds as required by site conditions such as jamb extensions at junctions of tenancy / party walls and head extensions To maintain uniformed appearance PVC-u cover plates (solid panels or to conceal coupling) as appropriate (Refer to drawings.) Cover plates used to be insulated to avoid any cold bridging as necessary.
- Non glazed solid panels/screens to have 47mm thick core Styrofoam (or maximum allowed by new frame's width ) and to be in PVC-u finish to match window assemblies Internal cover moulds are to be fitted at the junction of the jambs with the plaster/ decorated reveals. Colour and finish PVCu white. Size of mould to be adequate to cover blemishes in the reveals where the windows and curtain casings have been removed.
- See clause 360C below and P20/170 - Replacement Window boards generally to match existing in width and thickness and to
be in white PVC u and to project in front of the plaster wall finish a minimum of 25mm. Trickle ventilators: through head of frame with PVCu sleeve to avoid passing through any reinforcement. Trickle ventilators to be airtight when close, secure, adjustable and fitted with insect mesh and in a way as to conceal entrance and avoid rain penetration (external hoods will not necessarily be acceptable by CLIENT).
- Minimum ventilation requirements to be as defined by the Building Regulations. Colour to match the window frames. Positions and types to be agreed by CLIENT Permanent Ventilators fitted as above and as required by building Regulations and Gas safety Regulations in specific locations - kitchens with boilers and bathrooms (Note: Background ventilation: minimum 5000mm2 in a habitable room, minimum 2500mm2 in wet room where rooms have external walls, total in accordance with Table 1.2A of Part L1B in Building Regulations. Floor areas and location of external walls and boilers to be ascertained during survey and findings incorporated into the sizing of vents.)
- Ironmongery/ Furniture: High Security / Austenitic Stainless Steel Fittings. All to comply with Secured by Design and requirements of BS 7950. Locking espagnolette handles,

Section B_Term Requirements for Workmanship and Materials Part 2 Lot 1
Section B-Term Requirements for Workmanship and Materials
117
30/12/2013
satin silver. Childproof restrictor to allow one fixed opening position and automatically re-engage on closing, push button type in same finish as window. Cabin hooks to hold balcony doors open, satin silver finish, fixed to brickwork, matching eyes fixed to door. Door swings to open giving maximum clear space onto balcony.].
- Fixing: [to manufacturer's specification. See also clauses 360C & 756A below].
356 PVC-U REPLACEMENT WINDOW & DOOR MANUFACTURE • Manufacturer, fabricator and installer of windows and doors to be agreed with the
CLIENT. All as clause 355, 756A and other relevant clauses. All framing including mullions, transoms and couplers shall be capable of withstanding the design wind loadings calculated in accordance with BS6399 Pt2: 1995, and the Specialist Contractor shall provide calculations to demonstrate this if requested by the Client Representative. All sections in windows and doors, including vents, couplers and cills are to be thermally broken with high strength polyurethane resin separators. Window frame profiles are to be fabricated using 45o mitred joints. Outer frames to be filled with closed cell foam insulant, plus hard p.v.c. extruded frame braces, to prevent frame distortion during fitting Frame, cill and opening light sections to be solidly constructed Frames to be minimum dimensions required for structural stability, durability and security, and to impinge on area of light transmission as little as possible. Maximum depth of frame with fixed light to be and for opening light to be agreed with CLIENT, Prior to commencement of work on site, the Specialist Contractor shall forward copies of the Kitemark Certificates to the Client Representative.
Testing must have been carried out at a UKAS accredited test facility as part of the BS7950 Kitemarking process. Windows and doors to be individually manufactured to individually measured openings. Maximum tolerance to be 5mm on any one side as BS 8213. Any larger gaps are to be notified to CLIENT at time of measuring. Windows and doors to be guaranteed by the fabricator backed up by the system manufacturer directly with Southwark Council to replace within a period of 10 years any defective parts including components, double glazing units, ironmongery, gaskets and colour coating. All fabrication to be strictly in accordance with the system company's Fabrication and Specification Manuals and all current Technical Bulletins. 360B GLAZING TO REPLACEMENT PVC-U WINDOWS & DOORS • Glazing to be hermetically sealed double-glazed units( 28mm), comprising generally of
inner pane of 4mm toughened _soft coat _low emissivity glass and an outer pane of 6.4mm laminated glass, self cleaning glass with an argon filled cavity.
The sealed units are to have a centre pane U value no greater than 1.2W/m2K, to meet Part L1B of Building Regulations For specific recommendations see L40/371/A and below All glass and glazing shall conform to: BS.6206 : 1994 : Specification for Impact Performance; BS.6262 : 1982 : Code of Practice for Glazing Buildings; BS. 952 : 1978 : Glass for Glazing;
BS.5713 : 1979 : Specification for Hermetically Sealed Flat Double Glazed Units. Valid Kitemark certification will be required.
Recommendations of the Glass and Glazing Federation shall be adhered to. Beads to be internally fitted and semi-chamfered 45 degrees to suit glazing unit. Security clip to glazing on ground floor. Hooded beads over drainage holes, opening or fixed lights as necessary.
The glazing must be wind and watertight under all conditions with full allowance made for deflections and other movements.
Panes/sheets to be accurately sized, with clean, un-disfigured surfaces and undamaged

Section B_Term Requirements for Workmanship and Materials Part 2 Lot 1
Section B-Term Requirements for Workmanship and Materials
118
30/12/2013
edges. Avoid contact between glazing panes/units and alkaline materials such as cement and lime.
Keep materials dry until fixed. Keep insulating glass units protected from the sun and away from heat sources. Low E glass to inner pane facing into cavity.
Double glazed units to have a minimum 12 - 16mm air gap and be argon filled. Outer pane of ground floor windows, and external and internal panes to all patio doors are to be glazed in Class A 6.8mm laminated glass, to BS 6206 and Kitemarked.
Bathrooms and WCs internal pane to be obscured glass Gaskets to be EPDM.
Recommendations of the Glass and Glazing Federation to be adhered to. Generally to BS 952 and the relevant part(s) of BS EN 572, free from scratches, bubbles, cracks, rippling, dimples and other defects.
360C FIXING OF REPLACEMENT PVC-U WINDOWS (GENERAL) • See Preamble "Procedure for Window/Door Replacement".
Sliding doors to include solid secured cill with asphalt adjusted to give waterproof junction to underside. All windows and doors to be firmly secured into openings to the standard as clause 756A below . Length of fixings and all fixings to manufacturer's recommendations. Windows and doors to be square and straight and not distorted by driving in packings or unsupported tightening of fixings. Ensure adequate clearance for opening parts; if necessary and only to approval by the CLIENT adjust packing and fixings to eliminate binding. Windows and doors to be kept back a minimum of 30mm from the front edge of openings.
All reveals to be cleaned of all old paint, mastic or filler etc and removed. External joints around windows and doors to be sealed with mastic compatible with finishes, as Arbosil 1096 One Part Low Modulus Silicone Sealant and to be kept to an absolute minimum externally and internally.
Hooks for net curtains to be pre-fixed into head of frame so that net cords avoid the trickle ventilators. Where curtain rails have previously been fixed to window/door frames or within reveals a timber batten is to be prepared, fixed and decorated and the existing rails refixed. Trims to be fitted to all internal window reveals and head, extruded white cellular uPVC with mitred welded corners, to suit existing window sizes and to cover whole depth of window cill and 75mm to reveal sides and head, including splayed or moulded finish to outer edge and cover bead to junction with frame. See also P20/170
440A PVC-U SUBFRAMES • Manufacturer: same as window manufacturer.
- Fixing: Use lugs and ties supplied by subframe/window manufacturer.
EXECUTION 710 PROTECTION OF COMPONENTS • General: Do not deliver to site components that cannot be installed immediately or
placed in clean, dry floored and covered storage. • Stored components: Stack vertical or near vertical on level bearers, separated with
spacers to prevent damage by and to projecting ironmongery, beads, etc. 740 CORROSION PROTECTION • Surfaces to be protected: where in contact with structure. • Protective coating: Two coats of bitumen solution to BS 6949 or an approved mastic impregnated tape. Timing of application: Before fixing components. 756A PVC-U REPLACEMENT WINDOW INSTALLATION

Section B_Term Requirements for Workmanship and Materials Part 2 Lot 1
Section B-Term Requirements for Workmanship and Materials
119
30/12/2013
• Standard: In accordance with clause 783 and British Plastics Federation 'Code of practice for the survey and installation of replacement plastics windows and doorsets'.
Installation to be carried out by an installer approved by the window manufacturer .
765A WINDOW INSTALLATION • Installation: Into prepared openings. • Gap between frame edge and surrounding construction: - Regular 3- 5mm. Where required extension on jamb surrounds to be fitted to achieve required layout. Distortion: Install windows without twist or diagonal racking. 770 DAMP PROOF COURSES IN PREPARED OPENINGS • Location: Ensure correct positioning in relation to window frames. Do not displace
during fixing operations. 780 FIXING OF WOOD FRAMES • Standard: As section Z20. • Fasteners: Stainless steel wood screws.
- Spacing: When not predrilled or specified otherwise, position fasteners not more than 150 mm from ends of each jamb, adjacent to each hanging point of opening lights, and at maximum 450 mm centres.
783 FIXING OF PVC-U FRAMES • Standard: As section Z20. • Fasteners: To be detailed by window manufacturer to be appropriate for location and to architect's approval. - Spacing: When not predrilled or specified otherwise, position fasteners 150-250 mm
from ends of each jamb, adjacent to each hanging point of opening lights, but no closer than 150 mm to a transom or mullion centre line, and at maximum 600 mm centres. 790 FIRE RESISTING FRAMES • Gap between back of frame and reveal: Completely fill with intumescent mastic or tape. 810 SEALANT JOINTS • Sealant:
- Manufacturer: Dow Corning ' 795' (or similar approved) one part silicone sealant which conforms to the requirements of BS 5889 Type A.
Product reference: as above. - Colour: to match window frame, (white to be confirmed).
- Application: As section Z22 to prepared joints. Finish triangular fillets to a flat or slightly convex profile.
- 820 IRONMONGERY • Fixing: Assemble and fix carefully and accurately using fasteners with matching finish supplied by ironmongery manufacturer. Do not damage ironmongery and adjacent surfaces. • Checking/ Adjusting/ Lubricating: Carry out at Completion and ensure correct
functioning. 830 RESIDENTS INFORMATION • The contractor is to show each resident how to operate the windows and doors, special attention should be taken to explain how any locking mechanisms or restrictors work.
The contractor is to issue a booklet to each resident showing how to operate the windows and doors and how to clean the windows and detail what products to clean

Section B_Term Requirements for Workmanship and Materials Part 2 Lot 1
Section B-Term Requirements for Workmanship and Materials
120
30/12/2013
the windows and frames with. This booklet is to be approved by the CLIENT before it is distributed to residents. Two keys per window to be left with resident.
840 INSULATED PANELS • Install cladding panels in spaces within existing timber frames behind kitchen and WC below windows in PVCu faced insulated panels, external facing 1.5mm to match new window finish, core Styrofoam lb, internal facing white polyester steel liner, thickness 24mm, U value 24mm = 1.006 W/msq K. Mounted on 25 x 25mm treated softwood battens on four sides. Maximum 5mm gaps on all sides, fix aluminium beads as clause 332B on all four sides to close gaps with timber frame, sealed with Arbosil 1096. Supplier Architectural Panels Ltd, 66 Bayton Road Bayton Road Ind Estate, Exhall,
Coventry CV7 9EJ, tel: 024 7636 6266, fax: 024 7664 4280, email: [email protected] or other approved.
850 GUARANTEE The window manufacturer is to supply the Client with a Certificate of Guarantee, valid for A MINIMUM OF TEN years covering the rectification of any defect DUE to faulty materials OR workmanship

Section B_Term Requirements for Workmanship and Materials Part 2 Lot 1
Section B-Term Requirements for Workmanship and Materials
121
30/12/2013
L20 TIMBER DOOR SETS-SECURE
PRELIMINARY INFORMATION/REQUIREMENTS
110 EVIDENCE OF PERFORMANCE Provide independently certified evidence that all specified variants of components comply with specified performance requirements.
150 SITE DIMENSIONS must be taken and recorded on shop drawings before starting to make door sets
170 CONTROL SAMPLES
After finalisation of all details, prepare one of each of the following, as part of the quantity required for the project and obtain approval of appearance before proceeding with manufacture of the remaining quantity: Replacement front entrance door with a single diamond obscure glazed panel, and door furniture as scheduled.
COMPONENTS 250G EXTERNAL TIMBER PANELLED DOORS • Drawing reference(s): per elevations with tender documents • Manufacturer and reference: Allan Bros "Timedor Kenilworth" pattern. Tel: 01289 334613. Multisecure: door pattern to be approved. Tel: 01773 530 500. Soundcraft door with applied mouldings; pattern to be selected. Tel: 01959 533778 or equivalent. • Wood species: as supplied • Preservative treatment: as supplied • Moisture content on delivery: 13 to 19% • Glazing/panel details: pre-glazed to BS 6262 in obscure glass - pattern to be approved • Finish as delivered: Factory finished paint to colour schedule specified • Other requirements: None
335 EXTERNAL DOOR FRAMES Drawing reference(s): N/A Timber to BS EN 942. Wood species: Softwood as table NA1 Class: J40/50 Preservative treatment: Organic solvent as section Z12 and British Wood Preserving and Damp-proofing Association Commodity Specification C5. Desired service life: 30 years. Joinery workmanship: As section Z10. Adhesive: PVAC to BS EN 204, Class D4 Moisture content on delivery: 13 -19% Perimeter seals: To heads, jambs and threshold as draught proofing procedure.
Frames to accommodate window / panelled side lights where existing to be replaced.
Finish as delivered: primed Fixing: As described elsewhere using 10mm expanding bolts such as Fischer fixings.
337 HARDWOOD DOOR FRAMES One hour fire resisting door frame with intumescent strip.

Section B_Term Requirements for Workmanship and Materials Part 2 Lot 1
Section B-Term Requirements for Workmanship and Materials
122
30/12/2013
Size: To suit 54mm door (FD60) Timber to BS EN 942.
Wood species: A sustainable produced hardwood: Moderately durable as BS EN 350
Class 3; from a source accredited through the Forest Stewardship Council. Class: CSH Preservative treatment: Organic solvent as section Z12 and British Wood Preserving and Damp-proofing Association Commodity Specification C5. Desired service life: 30 years. Joinery workmanship: As section Z10. Adhesive: PVAC to BS EN 204 Class D4 Moisture content on delivery: 13-19% Finish as delivered: Smooth without blemish as M60/135 and protected Fixing: Secure frame to existing roof structure and allow for new 100 x 50mm timber stud work around the frame as bracing.
340 WORKING WITH THE WINDOW MANUFACTURER • Manufactured components are to be designed to be assembled and to fit within
acceptable tolerances, and in accordance with agreed delivery programmes. • Refer to Section L10, clause 767.
INSTALLATION 710 PROTECTION OF COMPONENTS
Do not deliver to site components which cannot be put immediately into suitable dry, floored and covered storage. Stack on bearers, separated with spacers to prevent damage by and to projecting ironmongery, beads, etc.
720G MOISTURE CONTENT During delivery, storage, fixing and thereafter to Completion maintain conditions of temperature and humidity to suit specified moisture content(s) of
timber components. When instructed by PM, test components with an approved electrical moisture meter used in accordance with manufacturer's recommendations.
730 PRIMING / SEALING Before fixing components ensure that surfaces of timber which will be inaccessible after installation are primed or sealed as specified.
760 BUILDING IN will not be permitted except where specifically stated.
780 PREPARED OPENINGS
Ensure that DPCs are positioned correctly in relation to frames and prevent displacement during fixing operations.
790 FIXING CENTRES FOR TIMBER FRAMES When not predrilled or specified otherwise, position fixings 150 mm from each end of jamb, adjacent to each hanging point and at 600 mm maximum centres. 800 LOOSE THRESHOLDS Fix 150 mm from each end and at 600 mm maximum centres. 820G SEALANT JOINTS • Sealant manufacturer and reference: DOW CORNING 796 PVC-U Wood & Aluminium Glazing Silicone Sealant or equivalent. Colour: as door frame. • Prepare joints and apply sealant as section Z22. Finish triangular fillets with a flat or slightly convex profile.

Section B_Term Requirements for Workmanship and Materials Part 2 Lot 1
Section B-Term Requirements for Workmanship and Materials
123
30/12/2013
830 FIXING IRONMONGERY GENERALLY • Assemble and fix carefully and accurately using fasteners supplied by the ironmongery manufacturer, with matching finish and equivalent corrosion resistance. • Holes for components to be no larger than the minimum required for satisfactory fit/operation. • Protect ironmongery and adjacent surfaces as necessary to prevent damage. • At completion, check, adjust and lubricate as necessary to ensure correct functioning of
all moving parts.
840 IRONMONGERY SUPPLIED WITH DOOR Refer to Section L10, clause 822 for typical list of components required. Note allow for level / low access threshold to doorway.
850 LOCATION OF HINGES Where not specified otherwise, position hinges with centre lines 250 mm from top and bottom of door leaf. Position third hinge (where specified) in the centre
Position hinges for fire resisting doors in accordance with door leaf manufacturer's recommendations.
860 EMERGENCY EXIT DEVICES Unless specified otherwise, install panic bolts/latches in accordance with BS EN 1125.
COATING SYSTEMS
900 IN GENERAL Door sets shall be supplied with a factory applied finish with protection to allow site
handling, and building works by other trades without damaging the finishes.
Site works are covered by Section M60 – Painting / clear finishing. 910 SURFACES NOT TO BE COATED Door and window ironmongery.
920 SURFACES TO BE CLEANED BUT NOT COATED Fair faced brickwork, Projecting brick courses, Decorative stonework Cills.
930 PROTECTION • Adequately protect internal and external surfaces, fixtures and fittings which are not to
be coated, by covering with dust sheets, masking or other suitable materials. • Exhibit 'Wet paint' signs and provide barriers where necessary to protect other
operatives and the general public, and to prevent damage to freshly applied coatings.
940 COLOURS The finished paint colour is to match the colour of all previously painted work except
where colours are otherwise specified. The colour for front entrance doors has been selected. Note that front entrance doors
will be to a different colour to each floor in accordance with the selected scheme which will be issued to the successful contractor stoppers/fillers when applied after priming.

Section B_Term Requirements for Workmanship and Materials Part 2 Lot 1
Section B-Term Requirements for Workmanship and Materials
124
30/12/2013
IRONMONGERY
GENERALLY 1000 Ironmongery is covered by Section P21, and subject to the following requirements to
meet with “Secured by Design” standards.
1110 GENERAL REQUIREMENTS Detailed requirements and locations of ironmongery are to be scheduled by the supplier, where the lists of minimal ironmongery for secured by design purposes do not meet the needs and configurations of like-for-like replacements on site. Fixing is specified in section L1-.
1180 DURABILITY Unless specified otherwise, select ironmongery components to suit the following level(s) of use (as defined in BS 7352): Heavy duty:
1310 HINGES • To BS 7352 and marked accordingly. Unless specified otherwise, select strength class
to suit door weight, duty, number of hinges and other factors as recommended in BS 7352, Appendix C.
• Corrosion protection: Unless specified otherwise: CP 24 for internal use CP 48 for damp internal and unpolluted external use CP 96 for polluted atmospheres. 1330 NUMBER OF HINGES Provide three butt hinges to each leaf unless specified otherwise. 1331 NUMBER OF HINGES
Provide three butt hinges to fire doors, external doors and doors with closers, unless specified otherwise.
1515 LOCKS FOR ALL EXTERNAL DOORS: • To BS 5872. Category: for use in housing • Method of operation: Cylinder: Euro to BS EN 1303 classification 16-1-14 or equal and
approved to meet with Secured by Design standard.
1550 LOCKS/LATCHES FOR FIRE RESISTING DOORS • Must not compromise the fire performance of the door and must be approved for the purpose by the door leaf manufacturer. • Components critical to the retention of the door in a closed position must not have a melting point lower than 800 degrees Centigrade. 1560 ESCAPE LOCKS
Locks specified for security purposes on escape routes must be fitted with a means of withdrawing the bolt without use of a key.
1585 BOLTS GENERALLY Unless specified otherwise, provide bolts: • To match door furniture and sized to suit height, weight and function of door. • To secure the first closing leaf on double doors. 1590 HINGE BOLTS
To all Secured by Design Front Entrance Doors to residences, install a pair of security bolts to the hanging side. Bolts to be to pattern of Chubb WS12 - white, or similar approved.
Section B_Term Requirements for Workmanship and Materials Part 2 Lot 1
Section B-Term Requirements for Workmanship and Materials
125
30/12/2013
1610 LEVER HANDLES • To BS 4951. • Mounting: As approved from selection 1620 DOOR KNOBS • To BS 4951. • Mounting: As approved from selection 1710 ESCUTCHEONS Provide separate escutcheons to keyholes where not part of a back plate. 1711 ESCUTCHEONS
Provide pull type escutcheons to cylinder locks where no other pull handle is specified to be fitted.
1720 STOPS Unless specified otherwise, are required for doors opening against walls other than those fitted with closers with a back check facility.
Type: Wall mounted face fixed SAA finish 75 mm projection. Fixing height: 100mm above internal FFL 1730 LETTER PLATE(S) • To BS 2911, Type outward opening flap closed by spring action • Manufacturer and reference: As approved from selection or equivalent. Material/Finish: To match set Features: Extended plate at one end for number. Or allow for numerals to be fitted separately – All to be approved. 1735 INTERNAL LETTER BOX SHIELD To match material, finish and size of letter plate.
1850 THRESHOLD WEATHERSTRIP Manufacturer and reference: To be approved & to comply with BSS 7386 & 7880 or equivalent.
1855 WEATHERSTRIP to head and jambs Manufacturer and reference: To be approved & to comply with BSS 7386 & 7880 or equivalent.
1890 DOOR VIEWERS • Angle of vision: 130º deg • Material/Finish: Chrome • Diameter of body of viewer: Chubb model WS8 or as approved mm • Door thickness: Existing / new to fit mm

Section B_Term Requirements for Workmanship and Materials Part 2 Lot 1
Section B-Term Requirements for Workmanship and Materials
126
30/12/2013
L30 REPLACEMENT OF WINDOWS & DOORS SCOPE OF WORKS 110 To carry out Ml and partial replacement of existing doors and windows as described in
the Schedule of Works. 210 WINDOW REPLACEMENT The window and door replacement will be carried out whilst the premises are in
occupation; the Service Provider is to inform and agree the sequence and programme of the works with the Client Representative and to maintain constant liaison throughout the progress of the works with the Client Representative and representatives from the neighbourhood office and all tenants associations.
211 All works are to be carried out in accordance with the performance specification contained
in this section. The replacement of windows and doors is to be carried out by the Specialist Window fabricator and competent Window Installation contractors.
212 The Service Provider shall carry out a detailed survey of dwellings and external areas as
described in the preliminaries and in the Schedule of Works. 213 The Service Provider shall provide any necessary protection within the dwelling to protect
the occupants’ property against dust and damage and shall lay clean dust sheets. Under no circumstances should the tenants’ electricity be used.
214 Take down curtains or blinds complete with wires or rails, set aside and refix on
completion of works, to all dwellings. 215 Carefully take down from windows and doors any electrical fittings, telephone junction
boxes, cables and set aside and refix on completion of works. Allow for drilling frames (upwards from outside to inside) to receive any signal cables, feeding same through and sealing same on completion.
216 The Service Provider will ensure that property supply services (including any replacement
works involving gas, water, electricity, telephone and signal systems) and other like services works are carried out by the Service Provider or an approved Contractor during the removal and installation and complete the same day.
217 Carefully remove existing door and window frames and make good all disturbed works.
The Service Provider is to cause as little damage as possible to the internal finishing and the method of removal must minimise damage to decorations internally, e.g. score / cut around the perimeter of existing frame on the inside where plaster wall decoration directly abuts the window frame.
218 Remove all fixing wedges and make good holes and gaps where fixings have been
removed. If any damage results due to the Service Provider’s lack of care in removing the original window frames, he will make good any resulting damage at his own expense.
219 Supply the timber windows and doors and fix to existing openings all in accordance with
the specification and Schedule of Works. Sizes as stated are approximate and the Service Provider will be responsible for site measurement prior to manufacture. Each window is to be measured individually and to be delivered to site labelled for the aperture for which it is to be fitted.
220 The window and door units are to be double glazed with Super Low E energy glass
providing a minimum U Value of 1.8W/M2K and where appropriate, solar reflective glass,

Section B_Term Requirements for Workmanship and Materials Part 2 Lot 1
Section B-Term Requirements for Workmanship and Materials
127
30/12/2013
obscure glass, toughened or laminated safety glass and obscure and safety glass all as stated in this specification or in the Schedule of Works.
221 The Service Provider’s attention is particularly drawn to items in the performance
specification relating to ventilation, type of glazing and security devices, as well as the requirements of the Building Regulations, all relevant British Standards, Codes of Practice, BS ISO and BS EN ISO Publications, guidance notes etc all of which must be strictly adhered to.
222 The Service Provider is to include in his price for providing for acceptance, a fully glazed sample of the Client Representative’s choice including all specified ironmongery. The sample will be required for Residents’ consultation and prior to commencement of manufacture.
223 The Service Provider shall include for completing frilly one pilot installation to an agreed
accommodation unit for Resident consultation and approval of the Client Representative. The pilot installation should be allowed for in the Service Provider’s programme and must be carried out prior to manufacture. Any required modifications following the inspection of the pilot installation shall include the pilot flat installation.
224 No window unit is to be removed unless the new window can be fitted the same working
day. The Service Provider should also ensure that if any sealed glazing unit should be broken it should where possible be re-glazed from stock on site, or at the very worst be boarded that day and re-glazed as soon as a replacement can be manufactured and this should be given the highest priority.
225 Allow for unloading, storing, hoisting and distributing to positions adjacent to openings,
replacement doors and window frames of varying sizes and providing electric power. Allow for removing from scaffolding and site all door and window frames. NO frames or materials of any kind are to be stored on the scaffolding at any time.
226 Allow for making good plaster reveals internally. Following plastering allowance should be
made for wall tiling or decoration as required to match existing. 227 Gaps up to 10mm may be caulked. Otherwise provide timber mouldings as required for
making good reveals up to 150mm in order to provide a finish to the installation. The finish to these cover moulds will be to match the internal finish of the window. Covers
• 8144
• 6/1 to be affixed with adhesive to manufacturers recommendations. External cover moulds should be allowed for if required to complete the installation and matching the external finish.
228 The design of the system used for al window and door units shall comply with and have been tested for Weather tightness: To BS 6375: Part 11983, Performance of Windows Classification for Weather tightness and BS 6375: Part 2, Specification for Operation and Strength Characteristics
Air tightness: Minimum performance level acceptable is 2,800Pa Water tightness: Minimum performance level acceptable is 2,800Pa Wind loading: Minimum performance level acceptable is 2,800Pa
Tilt and Turn windows are to be certified BS 7950 Security Approved. Recent certified test reports must be provided to confirm compliance with the above standards.
229 The Service Provider shall provide insurance backed guarantees for the window installation complete for 10 years and for the double glazed sealed units for 10 years from

Section B_Term Requirements for Workmanship and Materials Part 2 Lot 1
Section B-Term Requirements for Workmanship and Materials
128
30/12/2013
the date of completion. The guarantees are to cover any defect or deficiency arising other than where directly caused by misuse, accidental damage or vandalism. The terms of the guarantees are to provide for any remedial works arising during the guarantee period to be carried out within the priority periods set out below: 1) Defects or deficiencies resulting in a risk to health and safety or security to be
attended to within 24 hours. 2) Defects or deficiencies requiring repair to the windows or sealed units but not
including the replacement of a complete window unit to be attended to within 7 days.
3) Defects or deficiencies requiring the complete replacement of a window unit to be completed within 28 days.
230 Should the Service Provider or the Insurer fail to fulfil the above obligations in any
individual occurrence the Council shall arrange for the works to be carried out in default and recharge the costs to the Service Provider.
231 The Service Provider shall submit a sample guarantee with details of the insurance
company for approval by the Client Representative prior to acceptance of the Tender. 232 DRAWINGS:
The Service Provider shall be responsible for preparation of drawings which must be submitted at least two weeks before starting any fabrication and showing:
• Elevations
• Large scale section of all profiles
• Proposed methods of fixing and edge waterproofing details of ironmongery fittings It is essential that these drawings are submitted for approval as soon as possible.
233 SUPPLIER: The system supplier shall also be the system manufacturer and the system designer.
234 The system supplier shall operate a Quality Management System in compliance with BS
EN ISO 9000 and 9001 with improvements to BS ISO EN All windows shall have an identification label or mark to illustrate the exact location of the window, i.e. front lounge window, 17 High Street. This may be a sticker on the glass or on the edge of the window. The fabricators mark or label may also be attached to the window in a non-visible position, i.e. in the rebate of a sash.
234 GUARANTEE: The window is to be guaranteed as described above for the following:
• Timber, workmanship finish and performance: 10 years.
• Sealed glazing units: 10 years All subject to manufacturer’s standard installation and maintenance procedures.
236 A sample of the window must have been submitted for test and certified as passed by BSI
Testing as complying with BS 7950 Improved Security Performance of Domestic Windows.
236 FIXING:
Installation to be carried out in accordance with the installation statement of the Window Manufacturer confirmed by the Service Provider.
237 DIMENSIONS: The window external frame is to be 92mm thick. The triple laminated sash thickness is to be 67mm, all as per standard sections.

Section B_Term Requirements for Workmanship and Materials Part 2 Lot 1
Section B-Term Requirements for Workmanship and Materials
129
30/12/2013
The windows are to be made to the fenestration design and size indicated on the elevation drawings and window schedule.
238 DELIVERY: Windows are to be placed onto pallets in the factory, with timber spacers between each window. Pallets are to be bound with steel binding straps, stretch-wrapped and suitable for forklift off loading on site.
240 All windows or pre-fabricated units shall be transported in vertical position and securely
anchored to the vehicle to prevent movement in transit. They shall be separated from each other using adequate packing pieces to prevent damage to adjacent windows and handles.
241 All windows shall have an identification label or mark to illustrate the exact location of the
window, i.e. front lounge window, 17 High Street; this may be a sticker on the glass or on the edge of the window. The fabricators mark or label may also be attached to the window in a non-visible position, i.e. in the rebate of a sash.
242 Windows delivered to site shall be stored in an upright position and separated from each other with packing pieces to prevent damage. Windows should be stored flat.
243 If there is no provision for storage on site then windows shall be delivered to site on a
daily basis and fitted the same day. Windows shall not be brought on site if it is envisaged that completion exceeds working hour limitation set by the employer unless special permission is sought.
244 Where windows are to be installed in multi storey flats or low rise buildings they shall be
taken to the correct level either by internal lift or external hoist. They shall not be hoisted with the use of rope attached to the window.
245 All windows shall be carried and offered to the structural opening in a vertical position and
not dragged. The window shall not be carried flat or horizontal as damage may occur to the welded joints. Larger windows may require more than one operative to position the window correctly.
FOR USE WITH PAINTED ALUMINIUM CLAD / TIMBER N992 WINDOWS 310 To BS644. 311 MATERIAL: Material for exterior frame, sash cladding and panels to be extruded
aluminium allow profiles to BS EN 515, BS EN 573, BS EN 755 and BS EN 12020. The cladding must be fixed in a way that allows full air circulation and drainage behind, the cladding must stand off the timber surface approximately 7mm. Cladding which is fixed or glued or the surface of the timber will not be accepted.
312 Timber species: Swedish (European) Redwood is to be used to manufacture the window. 313 Preservative treatment: The windows to be supplied double vacuum pressure
impregnated using the GORL solvent based process as section Z12 and British Wood preserving and Damp-proofing Association Commodity Specification CS. Depth of preservative penetration to be at least 150mm on the end grains and at least 5mm on the face and edge grain.
Desired service life: 30 years Moisture content on delivery: 12% ± 2%
314 PERFORMANCE:
Section B_Term Requirements for Workmanship and Materials Part 2 Lot 1
Section B-Term Requirements for Workmanship and Materials
130
30/12/2013
Weather tightness: to BS 7375: Part 1 1983, Performance of Windows Classification for Weather tightness, Specification for Operation and Strength Characteristics Air tightness: Minimum performance level acceptable is 2,800Pa (UK standard
is 600Pa) Water tightness: Minimum performance level acceptable is 2,800Pa (UK standard
is 300Pa) Wind loading: Minimum performance level acceptable is 2,800Pa
The above test values must also include the performance of the integral trickle ventilator. Recent certified test reports must be provided to confirm compliance with the above standards. Exposure category (Design wind pressure): To suit geographical location and position in building with particular reference to height above ground.
315 Security: when the window is closed, each locking point must withstand a force of 3Kn
within a maximum movement of 2mm. Independent testing documentation must be provided.
GLAZING 315 GLAZING:
The windows to be factory filled with 24mm thick sealed Super Low E double-glazing units with a minimum whole window performance U Value of 1 .6Wm2K. Where specified Security/Safety glass sealed units to incorporate 16.38mm Laminated glass on the outside made up as 4mm ES glass — 16mm cavity — 6.38mm Lam.
317 All tilt and turn side/bottom hung casements are to be externally glazed with the provision
of releasing the hinges and removing the casement into the property for the purpose of re-glazing.
318 Glass units are to be double sealed with i) Butyl mastic internally and ii) external Thiokol
mastic. A dry fully ventilated glazing system is to be used, where the glass is held in position by EPDM strips inlaid into the glazing beads and mechanically rolled into a continuous sash groove. The sealed units are to be fixed with polyester powder paint coated aluminium glazing beads on all 4 sides (top, sides and cill drip). The side beads are to be tongued into the sash frame and held in position by means of polyurethane glue. The glass unit is to be fixed to the sash by means of glue, so that removal of the glass from the outside is impossible without breaking the glass. The sealed unit must be replaceable from inside of the property as described above.
319 All double glazed units shall be manufactured in accordance with BS 5713. Hermetically
sealed flat double glazed units using Glaverbel Super Low E-mail or equal and approved thermal glass and suitably marked.
320 Safety glazing shall be fitted to windows where the internal glazing commences less than
800mm from internal floor level and or external ground level. Glazing in doors and side screen within 1500mm of the finished floor level and or finished ground level shall be safety glass meeting the requirements of Approved Document N of the current Building Regulations.
321 Obscure glazing is to be provided to bathroom and WC windows from a patterned and
textured range with an obscuration rating C (most obscuration), or equal and approved. Pattern is to be “Cotswold” or similar approved pattern.
322 Where patterned or obscure glazing is specified patterned or obscured the patterned,
etched or textured side shall face directly into the property to ensure that the sealing of the glazed unit is not comprised.

Section B_Term Requirements for Workmanship and Materials Part 2 Lot 1
Section B-Term Requirements for Workmanship and Materials
131
30/12/2013
IRONMONGERY 323 IRONMONGERY AND ACCESSORIES:
Ironmongery to be 3 handle system tilt and turn with three separate espagnolette providing a total of 7 point perimeter locking within each opening sash
324 Espagnolette to be Aluminium alloy to be seawater resistant. Guide fittings on sash: Zn5
zinc alloy, yellow chromatised bolts: Airing stay: Steel K50 DIN 1624 Guide plates on frame: Polyacetal (POM) with added molybdenum disulphide, Socket: Zn5 Handle housing: Zn5 Handles, restrictor stay: Zamak zinc alloy. Chrome plated.
325 Weather-strip to be Chloroprene strip with cast-in cord to prevent stretching. Weather strip
to be kept clean and free from finishing. All weather-strips, seals and grooves must be cleaned after completion
326 Ml aluminium glazing beads are to be powder paint coated using the Corro-Coat AS or
equal and approved system to match the cladding 327 All locks to be Association of British Insurers approved. 328 The operating handles shall be within easy reach by the frail and elderly, but generally
shall be within 1500mm of the finished floor level. To achieve this handles may have to be fitted off centre.
329 VENTILATOR:
All windows to be fitted with an adjustable draught proof ventilator as standard. The exception to this will be kitchens, bathrooms and WCs where the ventilator should be fixed open. Ventilators to be fitted through the head of the frame. When closed, the ventilator is to be airtight. The vent must be fitted in such a way as to conceal the entrance to resist rain penetration. Windows with external hood will not be accepted
330 Permanent ventilators to all kitchens of 4000mm ventilation opening and to all living rooms
of 8000mm De to allow the passage of air at all times and to be fitted with apertures which prevent the entry of a 10mm diameter ball, but allow the entry of a 5mm diameter ball The ventilator should be screened to avoid insects. No other gauze or screen is to be incorporated. The background ventilation requirements shall be as determined in the approved Building Regulation documentation, which calls for 8000mm free flow, permanent / controllable ventilation, located within the window so as to avoid draughts Care should be taken to ensure that the ventilator does not foul internal finishes
331 The Service Provider should ensure that ventilation is provided to comply with the
requirements of BS 5440, BS 5925, The Gas Safety (Installation and Use Regulations) Regulations 1984 (amended 1990 and Building Regulations Parts Fl and J).
332. A sample of the type of controllable ventilator to be used shall be offered up to the CR for
his approval. If cord operated, the cords should be set in guides to drop neatly along either jamb terminating with a toggle. The toggle shall be easy to grip by the elderly and set within easy reach
333 FINISH: All windows are to be pre-factory finished. The windows to be supplied factory
finished internally using Akzo Nobel micro porous finish or equal and approved. This finish is to be a two-coat treatment of two coats spray applied wet on wet. Finish to be applied

Section B_Term Requirements for Workmanship and Materials Part 2 Lot 1
Section B-Term Requirements for Workmanship and Materials
132
30/12/2013
by spray system to give a regimental, even and run-free finish. Windows will not be accepted with dipped or brushed finish Any damage to the factory finish on site will not be accepted and a factory finished replacement will be required. The making good of every minor damage will be to the Client Representative’s discretion and satisfaction. This will be at the Service Provider’s expense, prior to and/or after installation
334 Polyester powder paint coating to conform to BS 6496 and BS 6497. The colour will be
subject to tenant consultation and be confirmed by the Client Representative. Finish to a gloss level of 68 -72%.
335 OPERATION: Tilt and Turn to operate using the tilt and turn principle. Each opening
window to be fitted with a 3 handle operating system and 7 point locking espagnolette mechanism. The window is to incorporate a child proof safety lock which, until released, will not allow the window to open greater than 100mm. All opening sashes will be removable to facilitate future maintenance and other servicing. The release procedure and any release tools must not be revealed or provided to Residents
336 The window ironmongery shall be in the sequence closed tilt turn incorporating a separate
procedure and switch barrier to prevent the opening sash engaging in the tilt and turn modes at the same time and changing from the ventilation to the side hung cleaning position.
337 The gear shall incorporate an anti-mishandling device which will ensure that the window cannot be operated from tilt to turn without first closing the window.
338 Side / bottom-hung windows. The hinge mechanism is to incorporate a concealed locking
screw which, until released, will ensure that the casement cannot be removed, to facilitate the changing of the glazed unit. In the interests of safety, information regarding the function and location of this locking screw should not be divulged to residents. The window is to incorporate a childproof safety lock which, until released, will not allow the window to open greater than 100mm.
339 Doors to be outward opening and to incorporate a mid-rail. Doors to be glazed with safety
glass in all instances. 340 Below mid-rail allow for a choice of the lower panel to the door and frame to be glazed or
an insulated panel. The glazed panels are to be in safety glass. 341 Provide and fit a hook and eye to secure outward opening doors when opened. 342 Provide and fit a high security five point locking espagnolette incorporating a key operated
5 level mortise dead lock Three keys to be provided, all locks to each block to differ. Locking cylinder outside, blank plate outside.
343 The Service Provider shall ensure that windows incorporating an aluminium panel either
above and or below window casements shall include: 1) The frame to be manufactured in one piece 2) An external aluminium panel with a shiplap appearance to match as closely as
possible the design of the panel to be replaced. The panel should be finished in Polyester powder paint coating to conform to BS 6496 and BS 6497. The colour will be subject to tenant consultation and be confirmed by the CR. Finish to a gloss level of 68 — 72%.
3) Any required additional insulation to meet the relevant requirements of the current Building Regulations
Section B_Term Requirements for Workmanship and Materials Part 2 Lot 1
Section B-Term Requirements for Workmanship and Materials
133
30/12/2013
4) An internal panel capable of supporting a sink unit, hand basin or WC cistern. The panel should be finished on an individual basis to match the internal decorations.
344 The Service Provider will make allowance for the temporary removal and subsequent
reinstatement of sinks, hand basins, baths, WC’s and any domestic appliances or services associated with the installation of these windows. This will include any electrical work, plumbing, waste or overflow drainage. Residents shall not be left without services overnight.
345 INSTALLATION: It is important that the correct method of fixing is chosen and is
dependent upon: a) The cavity detail / solid wall b) The position of the DPC c) The level of making good required d) The quality of the structural material to be fixed into.
346 In certain cases alternative methods of fixing may need to be sourced dependent on the
type and design of individual structures, i.e. no finishes, portal framed structures, etc. 347 FDC Perimeter fixing shall be sited as follows:
1 Nr fixing 150 250mm from a corner both vertically and horizontally 1 Nr fixing 150 250mm at either side of a transom or mullion where it meets the outer frame Fixings shall occur no more than 600mm centres between fixings at corners, transoms and mullions.
348 Expanding foam is not to be used as a primary form of fixing. Its use is to fill voids or gaps
and act as a thermal blanket totally circumnavigating the frame without any gaps / holes whatsoever while also acting as a backing for sealants or renders. The Service Provider will ensure that the manufacturer’s installation recommendations are adhered to and will confirm to the manufacturer that installation have complied upon completion.
349 Care should be taken so as not to over tighten the bolt or screw fixing as this may result in
frame distortion and reduced performance of the window. 350 Additional fixings may be provided at the discretion of the CR dependent upon the quality
of the structure and building materials. 351 Once the frame has been positioned into the opening, packing shims shall be inserted at
fixing positions around the perimeter. Packing shims shall be of the correct size prior to fully tightening the fixtures, ensuring that the frame is not distorted. Packing shims are to enable the window to move under thermal expansion without stressing any welded joints or allowing the window to bow. Packing shims shall be of dense plastic and not be glazing wedges or cut timber.
352 Self adhering expanding tapes or hacking rods may be used at the perimeter of window
frames which frames will provide a suitable surface for sealants. Where the gap between the frame and structure exceeds 6mm, advice should be sought from the sealant manufacturer.
353 All external perimeters shall be sealed with a low modulus silicone sealant at the
(abutment between the window frame and the fabric of the structure. The sealant used shall be of a compatible formula to adhere to the window and the building materials i.e.

Section B_Term Requirements for Workmanship and Materials Part 2 Lot 1
Section B-Term Requirements for Workmanship and Materials
134
30/12/2013
sand I cement, plaster, brickwork, tiles etc. The sealant manufacturer shall be contacted for specific advice on joint width and type of sealant.
354 The sealant shall be applied by a specialist applicator as a final external operation
immediately before scaffold or other external access removal, The silicone bead shall be evenly applied and have sufficient contact with both the frame and structure. All surfaces shall be clean and dry and free from loose debris or dust.
355 Sealants shall also be applied between window frames and coupling as required by the window manufacturer.
356 Wherever possible, all windows shall be bedded on suitable compound i.e. sand cement
or silicone, including shims to prevent settlement until curing is complete. 357 Internal joint gaps will be made good by the application of caulking up to 10mm or timber
quadrant beading up to 20mm wide set in clear silicone sealant and neatly mitred at corners, or timber cover moulds up to 150mm wide suitably pinned and glued. All joint covers, quadrant or timber moulds to be finished the same colour as windows.
358 Windows are not designed to be load bearing unless there has been a provision made to
support any loads imposed which directly pass through the window. 359 The load should be calculated and the correct section incorporated ensuring that the
sections will not suffer from buckling or malformation as described in the relevant Trade Standard.
NB The section shall also be capable of withstanding any designed wind loads imposed. 360 Head and sole plates should be used and fixed back to the structure and support the lintel
/ wall plate. 361 Vertical supports may be a square or rectangular hollow section. In case of segmental or
splayed bay windows, a pole should be used with head and sole plate. 362 Upon completion, the frames shall be cleaned using a proprietary anti-static window
cleaner and the glass washed using mild detergent or glass cleaner. All dirt and debris shall be removed from the rebates and checks made to ensure that the drainage paths are clear.
363 The gearing shall be wiped down and a light oil applied as necessary in accordance with
the manufacturers instructions. L40 GENERAL GLAZING
110 PREGLAZING of components will not be permitted. 111 PREGLAZING of components will be permitted, but • Precautions to be taken to prevent displacement of glazing or compound. Submit details
and obtain approval. • Panes with any displaced glazing or compound or with defective seals to be re-glazed in
situ. 115A GLAZING IN CRITICAL LOCATIONS • A critical location shall be defined as any glazing part of which is within 800mm of the
adjacent floor or ground level or any part of which is either within a door or within 300mm measured horizontally off a door and which is 1500mm above the adjacent floor or ground level.
• All glazing in critical locations shall be laminated safety glass unless another form of
Section B_Term Requirements for Workmanship and Materials Part 2 Lot 1
Section B-Term Requirements for Workmanship and Materials
135
30/12/2013
safety glazing is specified. All safety glass in critical locations shall be properly marked by a visible etched symbol to indicate that it complies with the Glass and Glazing Regulations.
120B PREPARATION • All surfaces to receive glazing to be clean, dry, unobstructed and free from grease at
time of priming / sealing and glazing. To surfaces that are painted or stained finish, use non setting mastic only or load bearing butyl tape and perimeter non-setting mastic for double glazing with beads. Allow primer / sealer to dry between coats and before glazing and apply finish according to manufacturer’s' specification.
• Ensure that any specified priming / sealing by others has been carried out : if unsatisfactory report to SO.
131A RENEWING GLAZING GENERALLY • Existing sashes, casements, etc, where re-glazed are to have all old putties cut out, the rebates cleaned and primed and the sash weight adjusted to suit. 132A BROKEN GLASS • Any broken glass after fixing during the progress of the works shall be replaced by the Contractor at his/her own expense. 133A RATES INCLUDE • Rates for patterned and Georgian wired glass include for aligning the wires in adjacent panels in one or both directions where required., Rates for glazing or re-glazing with
beads include for removing the beads from the rebates and renewing with an appropriate size brass beading system as supplied by Newman Tonks or other similar approved. Rates for glazing to metal with beads include for sealing the space between the glass and the external bead with casement putty and renewing bead as necessary.
134A GLASS CLEANING • Clean and polish both sides of new glass on completion. 135A RENEW GLAZING TO WINDOWS AND DOORS • Hack out and clear away existing glazing. Remove beading or remove putties and
sprigs / clips and clear away. Provide and fix new glazing, all to match existing and renew beads or secure with new sprigs /clips and putty/metal glazing as appropriate.
136A RENEW FACE PUTTIES TO WINDOWS AND DOORS • Carefully remove and clear away defective face putties. Renew sprigs or refix clips and
re-run new putty/metal glazing compound as appropriate. 136B RENEW FACE PUTTIES TO HORIZONTAL MEMBERS OF WINDOWS AND DOORS USING WINDOW CARE DRY SEAL GLAZING SEALANT • Carefully remove and clear away face putties to horizontal members plus 50mm to
adjoining vertical members. Renew sprigs or refix clips and re-run new putty/metal Lightly sand the rebate using a fine / medium grade abrasive paper. Remove dust. Degrease the area using a cellulose thinner applied with a lint free cloth. Allow the surface to dry completely. Apply Window Care Systems Ltd Dry Seal with a sealant gun and remove any excess.
136C RENEW FACE PUTTIES COMPLETE WINDOWS AND DOORS USING WINDOW
CARE DRY SEAL GLAZING SEALANT • Carefully remove and clear away face putties to complete unit. Renew sprigs or refix
clips and re-run new putty/metal Lightly sand the rebate using a fine / medium grade abrasive paper. Remove dust. Degrease the area using a cellulose thinner applied with
Section B_Term Requirements for Workmanship and Materials Part 2 Lot 1
Section B-Term Requirements for Workmanship and Materials
136
30/12/2013
a lint free cloth. Allow the surface to dry completely. Apply Window Care Systems Ltd Dry Seal with a sealant gun and remove any excess.
137A PROVIDE NEW SEALANT TO WINDOWS AND DOOR FRAME • Prepare and prime as required and apply with gun, acrylic polymer sealant, to
perimeter of window or door frame, Colour to match. Finish as required to leave a smooth slightly convex profile, minimum 12mm across face of joint.
138A RENEW SEALANT TO WINDOWS AND DOOR FRAME • Where possible completely remove existing sealant and clear away, or cut 'V' in body of sealant as near to edges as practicable clear away. Clean and prime surfaces and apply with gun, acrylic polymer sealant to perimeter of
window or door frame, colour to match. Finish as required to leave a smooth slightly convex profile, minimum 12mm across face of joint.
140 SAMPLES of the following, not less than 150 mm square, to be submitted and approved before cutting panes. Plain, obscured, patterned, frosted and wired glass. 150 WORKMANSHIP GENERALLY • Glazing generally: To BS 6262. • The glazing must be wind and watertight under all conditions with full allowance made
for deflections and other movements. • Panes/sheets to be accurately sized, with clean, un-disfigured surfaces and undamaged edges. • Avoid contact between glazing panes/units and alkaline materials such as cement and
lime. • Keep materials dry until fixed. Keep insulating glass units and plastics glazing sheets protected from the sun and away from heat sources. • Ensure that glass/plastics, surround materials, sealers primers and paints/clear finishes
to be used together are compatible. Comply with glazing and sealant manufacturers' recommendations. 151A PUTTY • The linseed oil putty to be in accordance with BS 544, Type 1, must not be used in conjunction with stain finish and gold sized putty in accordance with BS 544, Type 11. 151B PREPARATION Ensure that preparation by others of surrounds rebates, grooves and beads is complete.
Clean surrounds, rebates, grooves and beads, and prepare as specified before installing glazing.
155 GLASS
Generally to BS 952 and the relevant part(s) of BS EN 572, free from scratches, bubbles, cracks, rippling, dimples and other defects.
155A GLAZING FIXING GENERALLY • Works are to comply with BS 6262: 1981, " Glazing for Buildings ", subject to any qualifications given within this document. The glass to be properly bedded, back puttied
sprigged for timber rebates (pegged for metal rebates) and neatly front puttied in woodwork and in metal window with "Ferromastic" or other approved proprietary brand of metal glazing putty. Where glass is fixed with beads, it is to be bedded in wash leather strips or proprietary foam strip.
160 DIRECTIONALLY PATTERNED/WIRED GLASS • Fix with pattern/wires parallel to surround.

Section B_Term Requirements for Workmanship and Materials Part 2 Lot 1
Section B-Term Requirements for Workmanship and Materials
137
30/12/2013
• Align in adjacent panes where seen together at close quarters. 180 BEAD FIXING WITH PINS
Space panel pins evenly at not more than 150 mm centres, and within 50 mm of each corner. Punch pins just below the timber surface.
181 BEAD FIXING WITH SCREWS
Space screws evenly at not more than 225 mm centres, and within 75 mm of each corner.
TYPES OF GLAZING 210 PUTTY FRONTED SINGLE GLAZING to windows • Drawing reference(s): N/A • Pane material: 6 mm clear float glass • Surround: Timber - into existing / replacement frames & glazing bars Sealer: To be approved • Type of putty: Linseed oil putty • Apply sufficient putty to produce not less than 1.5 mm finished thickness of back
bedding after inserting glazing. • Locate glazing centrally in surround using setting and location blocks, and secure with glazing sprigs/cleats/clips at 300 mm centres. • Apply front putty and finish to a neat triangular profile stopping 2 mm short of sight line. Lightly brush surface to seal putty to glass and leave smooth with no brush marks. • Seal putty as soon as sufficiently hard but not within 7 days of glazing. Within 28 days
apply either: - The full final finish, suitably protected until completion and cleaned down and made
good as necessary, or - Two coats of not required applied locally to the compound, to be followed nearer
Practical Completion with the full specified finish. • Keep opening lights in closed position until putty has set sufficiently to prevent
displacement of glazing. 230 BEAD FIXED SINGLE GLAZINGTO WINDOWS / SCREENS • Drawing reference(s): N/A • Pane material: 9.5 mm laminated glass to BS 6206, Class A and Kitemark certified. • Surround/bead: Softwood frame with hardwood beads. Preparation: As specified elsewhere Bead fixing: No. 6 x 25 mm countersunk brass screws. Beads fixed on inside. • Glazing compound: to be approved. • Apply glazing compound, using distance pieces to produce not less than 3 mm finished thickness of back bedding after inserting glazing. • Locate glazing centrally in the surround using setting and location blocks. • Apply front glazing compound, filling all voids, and insert distance pieces. Bed beads in compound and fix securely. • Finish visible edge of compound internally and externally with a smooth chamfer. 231A BEAD FIXED DOUBLE GLAZINGTO TRANSOME LIGHTS • Drawing reference(s): As elevation herewith - and to factory assembly drawings • Pane material: 9.5 mm laminated glass to BS 6206, Class A and Kitemark certified[.] • Surround/bead: Softwood frame with hardwood beads. Preparation: New works & as specified elsewhere Bead fixing: No. 6 x 25 mm countersunk brass screws. Beads fixed on inside • Glazing compound: as fitted in factory • Install as BS 8000:Part 7, clause 3.3.2.

Section B_Term Requirements for Workmanship and Materials Part 2 Lot 1
Section B-Term Requirements for Workmanship and Materials
138
30/12/2013
M11 MASTIC ASPHALT FLOORING/FLOOR UNDERLAYS TYPE(S) OF FLOORING/UNDERLAY 110A MASTIC ASPHALT FLOORING TO EXISTING WALKWAYS & BALCONIES.
Base: Existing concrete slab & screed. Preparation: Clean down and make good as necessary and apply high bond primer. Separating layer: glass fibre as clause 550 Undercoat: To ES 6925, Type R988, Kitemark certified. Asphaltic cement: T25 Nominal thickness: 12 mm Wearing coat: To BS 6925, Type F1076, Kitemark certified.
• Grade: III
• Asphaltic cement: T25
• Nominal thickness: 20 mm. Finish/treatment: Sand rubbed as clause 710 Skirtings: As clause 260 Fixtures/service penetrations: Rainwater outlets and pipes Other requirements: N/a
260 A MASTIC ASPHALT SKIRT TO EXISTING WALKWAYS & BALCONIES Background: Existing brickwork or block work (balconies) Preparation: Steel lathing as clause 500 as appropriate Material: BS 6925, type R988, Kitemark certified. Apply as clause 770. Overall thickness 20 mm applied m 2 coats Height above finished floor level: minimum 150mm Fillet profile angle
GENERAL REQUIREMENTS 310 ANCILLARY PRODUCTS:
Where not specified, these must be types recommended for the purpose by the asphalt manufacturer.
BASES AND BACKGROUNDS 410 REMOVAL OF EXISTING POLISH
Remove existing polish from appropriate areas before carrying out repairs to existing mastic asphalt. Wash or vacuum to remove loose dust. Apply a suitable stripping solution and remove slurry from surface, all in accordance with manufacturers recommendations.
420 REMOVAL OF EXIST MASTIC ASPHALT: All cutting into mastic asphalt is to be carried out by the asphalt sub-contractor. Place molten mastic asphalt along the line of shallow angle cuts, at edges and over general areas to be removed. Allow underlying material to soften sufficiently before carefully cutting away. Alternatively, remove material using a disc cutter. Do not use a hammer and chisel to cut cold material.
450 ACCEPTANCE OF BASES/BACKGROUNDS: Before applying mastic asphalt ensure that: - Bases are even textured, dry and free from dirt, oil, grease, frost and ice. Bases are within specified tolerances for level and surface regularity. Vertical surfaces have been correctly prepared.
Section B_Term Requirements for Workmanship and Materials Part 2 Lot 1
Section B-Term Requirements for Workmanship and Materials
139
30/12/2013
Service pipes, pipe ducts, fittings, mountings, plinths, etc., are in place and have been correctly prepared. Drainage outlets are installed and located at the correct height relative to the base. Cut and pre-formed chases are complete and not less than 25 x 25 mm in size. External angles in bases/backgrounds are chamfered as required to maintain specified mastic asphalt thickness. Movement joints have been correctly installed. Laying of mastic asphalt will be taken as joint acceptance by the Service Provider and asphalt sub-contractor of the suitability of bases and backgrounds.
480 KEYING TO EXISTING BRICKWORK: Lightly rake out all horizontal joints and remove all dust. Clean and prime surfaces using a proprietary high bond bitumen and rubber emulsion recommended for the purpose by the mastic asphalt manufacturer.
550 GLASS FIBRE SEPARATING LAYER:
Loose lay 50-70 g/sq m glass fibre tissue with 50 mm lapped joints immediately prior to over coating with mastic asphalt.
ASPHALTING 620 DELIVERY:
Deliver mastic asphalt to site hot-prepared in ‘hot charge transporters’. Alternatively, deliver mastic asphalt to site in blocks and re-melt using mechanically agitated mixers, temperature of material not to exceed 230 degrees Centigrade.
630 TRANSPORTING: Keep transport distances to a minimum to avoid excessive cooling of molten mastic asphalt. Line buckets, barrows or dumpers used for transporting mastic asphalt with the minimum quantity of fine inert dust, e.g. limestone dust. Use a silica or similar acid resisting dust where acid resisting mastic asphalt is being used.
640 BLOWLAMPS: The use of blowlamps is not permitted during laying, removal and repairing of mastic asphalt.
650 PREPARING EDGES OF EXISTING MASTIC ASPHALT: Soften cut edges using molten mastic asphalt. For two coat applications only, prepare edges by removing half the depth of softened material for a width of not less than 75 mm. Proceed immediately with new work. For two coat applications form a lapped joint between new and existing material at all prepared edges.
660 APPLICATION: Apply each coat in bays using suitable gauges to control thickness. Do not use re-heated asphalt. If blowing occurs pierce bubbles and make good the area affected whilst mastic asphalt is still hot. Warm and clean all contact edges of previously laid bays by applying, then removing hot mastic asphalt. Ensure complete fusion of asphalt at joints to give a continuous watertight coating. In multiple coat work avoid undue delay between applications and protect surface of undercoat against contamination whilst exposed. Offset joints between bays in consecutive coats not less than 75 mm. When laying grade I material avoid ‘pinning’ by placing timber battens on the base, set slightly away from door thresholds, internal/external angles of wails, and around

Section B_Term Requirements for Workmanship and Materials Part 2 Lot 1
Section B-Term Requirements for Workmanship and Materials
140
30/12/2013
stanchions, machine bases, and other vertical surfaces. Remove battens not more than 12 hours after laying the floor, sooner if cooling shrinkage has taken place, and complete remainder of the work. Do not lay large bays in grade I material next to others which are still cooling. Do not lay grade I or II material in open or unheated buildings nor grade I material when ambient temperature is below 10 degrees Centigrade. Do not lay material in conditions where it is likely to cool too rapidly, or where excessive blowing is likely to occur.
710 SAND RUBBED FINISH: Float mastic asphalt to an even surface, free from roughness and imperfections. During the final floating operation, whilst asphalt is still warm, apply sand to all horizontal surfaces and rub-in well using a wooden float. Use clean, coarse sand from natural deposits, free from loam, passing a 600micron sieve and retained on a 210micron sieve. Remove all surplus material after completion.
740 CRIMPING: Complete sand rubbing of mastic asphalt as clause 710 prior to crimping. Roll surfaces with a crimping roller, whilst mastic asphalt is still sufficiently plastic to take an impression, to produce regular and even indentations.
750 LEVEL OF FINISHED MASTIC ASPHALT Permissible deviation m level from datum +/- 10mm
770 SKIRTINGS
Ensure good adhesion of initial coat of mastic asphalt to background. On irregular brickwork or steel lathing apply initial coat as a dubbing out coat. Form base angle fillets at 45 degrees with a width on face not less than 40 mm. Form coved fillets to a 32 mm radius . Tuck top edge into chase or groove of not less than 25 x 25 mm and, maintaining full thickness asphalt, form splayed top to shed water away from wall, ready to receive mortar pointing. Ensure full thickness of mastic asphalt is maintained at all external angles.
COMPLETION 930 PROTECTION:
Protect finished mastic asphalt from damage by subsequent building operations including mechanical and impact damage, trafficking by following trades and contamination by oils, paints, solvents and fuel.
940 MAINTENANCE REQUIREMENTS:
On completion of mastic asphalt work provide the CR with: A list of recommended cleaning agents and polishes. Details of environmental, chemical and trafficking conditions which may result in damage to the flooring whilst in service. Details of other environmental constraints on the surfacing to balconies and walkways.

Section B_Term Requirements for Workmanship and Materials Part 2 Lot 1
Section B-Term Requirements for Workmanship and Materials
141
30/12/2013
M60 PAINTING/CLEAR FINISHING
COATING SYSTEMS 12 IN GENERAL
Door and window sets shall be supplied with a factory applied finish with protection to allow site handling, and building works by other trades without damaging the finishes. The following clauses cover site works which may be required to finish installation, and to allow for the redecoration of door sets which will not be changed.
100 ALKYD GLOSS ON WOOD, EXTERNAL: • Manufacturer: Dulux Weathershield or Johnstone Stormshield • Surface(s): Existing painted timber. Preparation: As clause 400, 401 and 402. • Initial coat(s): Where existing paint finish is removed, one coat exterior preservative
primer and one undercoat. • Finishing coats: One oil based undercoat and one gloss coat. • Colours: From BS 4800 range as directed by CR.
100A ALKYD GLOSS ON WOOD, EXTERNAL: • Manufacturer: As clause 210G • Surface(s): Existing painted timber windows. Preparation: As clause 400, 401, 403 and 530. • Initial coat(s): One coat exterior preservative primer. • Finishing coats: Two oil based undercoats and one gloss coat. • Colour: From BS 4800 range as directed by CR.
100B ALKYD GLOSS ON WOOD, EXTERNAL: • Manufacturer: As clause 210G • Surface(s): New timber. Preparation: As clause 400 and 402A. • Initial coat(s): One coat exterior preservative primer. • Finishing coats: Two oil based undercoats and one gloss coat. • Colour: From BS 4800 range as directed by CR.
105 ALKYD GLOSS ON METAL, EXTERNAL: • Manufacturer: As clause 210G • Surface(s): Existing painted metalwork. Preparation: As clause 400 and 485. • Initial coat(s): One coat lead-free metal primer to bare areas. • Finishing coats: Two oil based undercoats and one gloss coat. • Colour: From BS 4800 range as directed by CR.
105A ALKYD GLOSS ON METAL, EXTERNAL: • Manufacturer: As clause 210G • Surface(s): New metalwork and cast iron. Preparation: As clause 400, 480 and 490. • Initial coat(s): One coat lead-free metal primer. • Finishing coats: Two oil based undercoats and one gloss coat. • Colour: From BS 4800 range as directed by CR. 115 CLEAR GLOSS VARNISH, EXTERNAL: • Manufacturer: As clause 210G • Surface(s): Existing varnished or stained timber.

Section B_Term Requirements for Workmanship and Materials Part 2 Lot 1
Section B-Term Requirements for Workmanship and Materials
142
30/12/2013
Preparation: As clause 400 and 401. • Initial coat(s): None • Finishing coats: Two full coats.
115A CLEAR GLOSS VARNISH, EXTERNAL: • Manufacturer: As clause 210G • Surface(s): New varnished or stained timber. Preparation: As clause 400 and 402A. • Initial coat(s): None • Finishing coats: Two full coats.
120 PRESERVATIVE STAIN, EXTERNAL: • Manufacturer: Sadolins Extra • Surface(s): Existing stained timber. Preparation: As clause 400 and 401. • Initial coat(s): None • Finishing coats: Two full coats. • Colour: From BS 4800 range as directed by CR.
120A PRESERVATIVE STAIN, EXTERNAL: • Manufacturer: Sadolins Extra • Surface(s): New stained timber. Preparation: As clause 400 and 402A. • Initial coat(s): None • Finishing coats: Two full coats. • Colour: From BS 4800 range as directed by CR. GENERALLY 215 UNDERCOATS • Where two or more coats of undercoat are specified, each coat shall be of a different
tint.
215G HANDLING AND STORAGE • Coating materials must be delivered in sealed containers, each clearly labelled with the brand name, type of material and manufacturer's batch number. • Wherever possible materials must be from one manufacturing batch. Inform the PM if
materials from more than one batch are to be used, store separately and allocate to distinct parts or areas of the work.
• Store materials in accordance with manufacturer's recommendations. Use in order of delivery and before expiry of any shelf life date.
216 PRIMERS • The priming is to be specially selected for the purpose for which it is required in
accordance with the manufacturer's recommendations and must comply with BS 5082 or BS 5385.
• The primer for metal work shall be lead free, specified in accordance with the recommendations of BS 6150 "Code of Practice for Painting of Buildings". • The primer for external woodwork (including the internal surfaces of external doors, windows and their frames) shall be low lead or leadless. • The primer for new and existing galvanised areas shall be calcium plumbate primer with new galvanised surfaces being previously treated with mordant solution.
217 STOPPING/FILLER • Stopping for concrete, render or brickwork shall be a similar material to the background

Section B_Term Requirements for Workmanship and Materials Part 2 Lot 1
Section B-Term Requirements for Workmanship and Materials
143
30/12/2013
and shall be finished with a similar texture. • Stopping for external woodwork shall be approved external grade stopping. • Stopping for clear finished woodwork shall be stopping to match the surrounding woodwork.
218 KNOTTING Knotting shall be best quality "Shellac" to comply with BS 1336.
219 WHITE SPIRIT White spirit shall comply with BS 245.
220G COMPATIBILITY • Check that all materials to be used are recommended by their manufacturers for the particular surface and conditions of exposure, and that they are compatible with each other. • Where surfaces have been treated with preservatives or fire retardants, check with
treatment manufacturer that coating materials are compatible with the treatment and do not inhibit its performance.
• Inform the PM of any discrepancy in specification of coatings and obtain instructions before proceeding with application.
230 ANCILLARY SURFACES
The descriptions of areas to be coated given in schedules, etc. are of necessity simplified. All ancillary exposed surfaces and features are to be coated to match similar or adjacent materials or areas except where a fair faced natural finish is required or items are completely pre-finished. In cases of doubt obtain instructions before proceeding.
240 SURFACES NOT TO BE COATED Door and window ironmongery.
250 SURFACES TO BE CLEANED BUT NOT COATED Fair faced brickwork, Projecting brick courses, Decorative stonework cills.
270 OFF SITE WORK • All off site preparation and coating to be carried out under cover in a suitable
environment with adequate lighting. • Store all items, both before and after coating, in a clean, dry area protected from the weather and mechanical damage, properly stacked with spaces to permit air circulation and prevent sticking of surfaces.
280 PROTECTION • Adequately protect internal and external surfaces, fixtures and fittings which are not to
be coated, by covering with dust sheets, masking or other suitable materials. • Exhibit 'Wet paint' signs and provide barriers where necessary to protect other
operatives and the general public, and to prevent damage to freshly applied coatings. 290G TESTING OF VISCOSITY, ETC
The PM may, with discretion, take samples of materials from each manufacturing batch as follows:
• Unopened containers, or samples from previously unopened containers, for submission To manufacturer for comparison with manufacturer's own retained samples from the
same batch. • Unopened containers, or samples from previously unopened containers, as a control sample for assessment of samples taken from painters' kettles. • Samples from painters' kettles for submission with control sample to manufacturer
Section B_Term Requirements for Workmanship and Materials Part 2 Lot 1
Section B-Term Requirements for Workmanship and Materials
144
30/12/2013
and/or independent testing laboratory for comparative testing. 310G SUPERVISED CONTROL SAMPLE(S)
Prepare sample areas of the finished work, including preparation, in advance of the remainder as set out below. Make arrangements with the PM for full time supervision of the application of each coat. Obtain approval of appearance before proceeding.
Type(s) of coating Nature of sample M60/ 100 Alkyd gloss on timber M60/ 210G Aqualife Fire Upgrading Finish
Supervised control samples may, at the PM's discretion, be used as the basis for comparative testing of dry film thickness of complete coating systems.
315A COLOURS • The finished paint colour is to match the colour of all previously painted work except
where colours are otherwise specified. The contractor is to note that the colour of the communal areas will be subject to residents choice. Colour choices for communal areas will be advised by the CR.
• The colour for front entrance doors has been selected. Note that front entrance doors will be to a different colour to each floor in accordance with the selected scheme which will be issued to the successful contractor.
• The Contractor shall allow for an additional finishing coat, in accordance with the manufacturer's instructions, for coverage of specific colours, where appropriate. The CR will select the standard colours for selection by residents and the Contractor must ensure that tenants sign written confirmation of their choice. This information should then be forwarded to the CR.
320 INSPECTION OF WORK Permit coating manufacturers to inspect the work in progress and take samples of their products from site if requested.
321G INSPECTION OF WORK Inspection of the whole of the work at each of the stages set out below may be made, at
the discretion of the PM. Agree with the PM a programme which will facilitate such inspections and notify him when each part and stage of the work is ready for inspection. Do not proceed with subsequent stages of the work until authorised.
Type(s) of coating Inspection at completion of M60/ 100 Priming, first undercoat, second undercoat,
gloss coat
PREPARATION 400 PREPARATION GENERALLY • To BS 6150, Section 4. • Materials used in preparation must be types recommended by their manufacturers and
the coating manufacturer for the situation and surfaces being prepared. • Prevent or control exposure of operatives to dust, vapour and fumes exceeding occupational exposure standards set in the current Health and Safety Executive (HSE) document EH40. • Substrates must be sufficiently dry in depth to suit the coating to be applied. • Remove efflorescence salts from surfaces. Repeat removal if efflorescence recurs.

Section B_Term Requirements for Workmanship and Materials Part 2 Lot 1
Section B-Term Requirements for Workmanship and Materials
145
30/12/2013
• Clean off dirt, grease and oil from surfaces. If contamination of surfaces/substrates has occurred, obtain instructions before proceeding. • Smooth surface irregularities. Fill joints, cracks, holes and other depressions with
stoppers/fillers worked well in and finished off flush with surface. Abrade to a smooth finish.
• Apply oil based stoppers/fillers after priming. Apply water based stoppers/fillers before priming unless recommended otherwise by manufacturer. Patch prime water based stoppers/fillers when applied after priming. • Remove dust and particles from dry abrasive preparation of surfaces. • Remove residues from wet preparation of surfaces by rinsing with clean water, wiping
and allowing to dry. • Ensure that doors, opening windows, etc, are 'eased' as necessary before coating.
Prime any resulting bare areas.
400A FACE FILLING is not permitted.
401 EXISTING COATED SURFACES GENERALLY Unless coatings are specified to be removed or are galvanised. • Carefully remove all loose or defective areas of coating to firm edge. • Thoroughly clean by wiping down with white spirit or washing with water containing
detergent. Remove heavy deposits of oil, grease, etc. with a suitable proprietary cleaning solution.
• Sand down gloss surfaces while still wet to provide a key. • Rinse off and allow to dry. • Patch prime areas where coatings have been completely removed. • Fill joints, cracks, holes and other depressions with filler well worked in and finished off flush with surface. Sand smooth and remove dust. • Apply additional coats to area where paint has been removed to restore the original
coating thickness. Sand down junctions to give a flush surface.
401A BRING FORWARD coatings where existing coating has been partly removed with an additional coat of the decorating system.
402 EXISTING COATED TIMBER In addition to general preparation clauses 400 and 401 and at an appropriate stage:
• Remove any degraded surface timber by sanding down to clean timber. • Remove any resinous exudations by heat. Apply two coats of knotting to affected areas and any exposed knots and allow to dry.
402A UNCOATED TIMBER • Ensure that large and loose knots are removed and made good with sound timber of
the same species. Sand down flush. • Ensure that surfaces are clean and remove oil, grease and excessive natural oils with suitable solvents. • Sand to a smooth, even finish with arrises rounded or eased. • Remove resinous exudations by heat. Apply two coats of knotting to affected areas and any exposed knots and allow to dry. • Ensure heads of fastings are countersunk sufficiently to hold stopping/filling. Fill nail
and screw holes, joints, cracks, holes, depressions, open or coarse grain with stopper/filler worked well in and finished off flush with surface. Sand smooth and remove dust.
403 REMOVAL OF EXISTING COATINGS • Where directed in the documentation or on site the Contractor shall allow for the

Section B_Term Requirements for Workmanship and Materials Part 2 Lot 1
Section B-Term Requirements for Workmanship and Materials
146
30/12/2013
removal of existing paint films by one or more of the following methods: Burning off, hot air, steam or chemical stripping, or sanding off. Use methods which will not damage substrate or adjacent surfaces or adversely affect subsequent coatings. • Where removal of coatings reveals rot, corrosion or other degradation of the substrate, obtain instructions from the CR before proceeding. • Burning off:
When the operation of burning off using a hot air stripper or naked flame is in progress, the Contractor must provide all necessary protection of the area to prevent the ignition of adjacent inflammable materials and components. The contractor must provide each "gang" with a suitable Fire Extinguisher to enable him immediately to control the spread of fire accidentally ignited during this operation. All burning off operations must cease not less than 45 minutes before any cessation of the works on the site and all debris removed from the site. The foreman in charge must, as one of his primary duties, thoroughly inspect the areas where burning off has been carried out to ensure that no materials or components have been accidentally ignited. No burning off is to be carried out within 1 m of any roof lights, dormer windows, other roof features, or eaves level in which case the use of a chemical paint stripper or steam stripper is to be undertaken.
• Chemical stripping:
Chemically stripping shall be carried using a proprietary stripper to BS 376 (water rinsable); surfaces taken back to sound bare timber or metal. Remove all traces of paint stripper with clean white spirit, neutralise, rinse and prepare.
• The existing paintwork may have a lead content. As precautions against contamination from lead or other substances when stripping or rubbing down previously painted surfaces, the Contractor shall observe the following:
Dust sheets or other suitable means shall be placed beneath the work area to catch all stripped materials, where removed by burning, paint remover, scraping, brushing or rubbing down. Plastic sheet must not be used when burning is carried out. Periodic cleaning up of debris from the areas beneath components being stripped shall
take place regularly during the day while work is in progress. All debris from stripping etc. shall be removed from site.
• Rubbing down of any paint known to have a lead content in the top coats shall wet
rubbed and all debris shall be collected before it dries. Dust from the other rubbed down areas, both internally and externally shall be dampened down and removed at the end of each working day.
• The Contractor is to note special precautions will be required when removing paint from
the staircase enclosure and these are detailed under clause 404.
403A Surfaces which have had their coatings removed are to have the initial coat of the decorations system applied on the same day. 410 SUITABILITY OF SURFACES AND CONDITIONS
Application of coatings will be taken as joint acceptance by the Main Contractor and the Painting Contractor of the suitability of surfaces and conditions within any given area to receive the specified coatings.
420 FIXTURES Before commencing work, remove the following fixtures and fittings, set

Section B_Term Requirements for Workmanship and Materials Part 2 Lot 1
Section B-Term Requirements for Workmanship and Materials
147
30/12/2013
aside and replace on completion: Cover plates, grilles, signs, and other surface mounted fixtures.
425 IRONMONGERY Remove from surfaces to be coated and refix on completion. Do not remove hinges unless instructed to do so.
430 IRONMONGERY Remove all old paint and varnish marks from existing ironmongery. Thoroughly clean and polish before refixing.
440 PREVIOUSLY COATED SURFACES GENERALLY • Prepare in accordance with BS 6150, Section 6. • When removing or partially removing coatings, use methods which will not damage the substrate or adjacent surfaces or adversely affect subsequent coatings. • Carefully remove all loose, flaking or otherwise defective areas to a firm edge. • Completely remove alkali affected coatings. • Where coatings are suspected of containing lead, obtain instructions before
proceeding. • Where substrates containing asbestos are revealed, obtain instructions before
proceeding. • Where significant rot, corrosion or other degradation of substrates is revealed, obtain instructions before proceeding. • Thoroughly clean retained coatings with appropriate detergent solutions or solvents to
remove all dirt, grease and contaminants. Abrade gloss coated surfaces when still wet to provide a key.
• Apply additional preparatory coats to areas of partial removal to restore original coating thicknesses. Abrade junctions to give a flush surface. • Where coatings are completely removed, prepare surfaces as specified for uncoated surfaces.
461 PREVIOUSLY COATED TIMBER • Remove any degraded or weathered surface timber by abrading. • Ensure that repairs to degraded substrate timber have been carried out with sound
timber of the same species. • Apply two coats of knotting to exposed resinous areas and knots and allow to dry. 471 PREPRIMED TIMBER
Abrade chalking, powdery and other defective primer back to bare timber, remove dust and reprime resulting bare areas.
481 UNCOATED TIMBER • Abrade to a smooth, even finish with arrises and moulding edges lightly rounded or
eased. • Ensure that heads of fasteners are countersunk sufficiently to hold stoppers/fillers. • Apply two coats of knotting to resinous areas and knots and allow to dry.
485 EXISTING GALVANISED SURFACES to receive lead free primer • Spirit clean where there are particular oil or grease deposits. • Wash down all surfaces to be painted with soapy hot water using neutral detergent.
Scrub down with nylon or bristle pad or brush (e.g. 'Scotchbrite'). On no account use wire brushes or wire wool.
• Rinse thoroughly and allow to dry. • No finishes to be applied while there is any sign or possibility of condensation or
dampness on the metalwork. • If metal or galvanising are defective obtain instructions before proceeding.

Section B_Term Requirements for Workmanship and Materials Part 2 Lot 1
Section B-Term Requirements for Workmanship and Materials
148
30/12/2013
490A PREVIOUSLY COATED STEEL • Abrade corrosion and loose scale back to bare metal. • Treat any residual rust with a proprietary removal solution. Prime as soon as possible.
540G POINTING TO EXISTING FRAMES • Remove defective sealant pointing. • Thoroughly clean the joint recess, remove all dust and seal joint surfaces as
recommended by sealant manufacturer. • Check that depth of joint is approximately half its width, and adjust using recommended backing strip if necessary. • Repoint neatly using mastic gun during dry conditions when the ambient temperature is above 5 degrees Centigrade. • Sealant manufacturer and reference: to be selected or equivalent. APPLICATION 605 PAINTING • Operatives must be appropriately skilled and experienced in the use of specified
materials and methods of applications. Do not use materials which show any bittines when applied. Do not thin or intermix unless specified or recommended otherwise. If materials are found to have been thinned without authorisation the CR may require the application of additional coats.
• Apply priming coats as soon as possible on the same day as preparation is completed. Ensure that they are of adequate thickness and suit surface porosity. • Apply coatings by brush or otherwise specified or approved. Keep all brushes, tools
and equipment in a clean condition. • Apply coatings to clean, dust free, suitable dry surfaces in dry atmospheric conditions
and after any previous coats have hardened. Lightly abrade between coats as necessary.
• Apply coatings evenly to give a smooth finish of uniform colour, free from brush marks, sags, runs and other defects. Cut in neatly and cleanly. Do not splash or mark adjacent surfaces.
• Keep all surfaces clean and free from dust during coating and drying. Adequate protect completed work from damage.
622 TREATMENT OF ORGANIC GROWTHS • Remove all loose growths and infected coatings/decorations. Apply appropriate biocidal solution to growth areas and surrounding surfaces. • Scrape or brush off all dead growth. Remove infected materials immediately to ensure
that no other areas become infected. • Apply appropriate residual effect biocidal solution to inhibit re-establishment of growths. • Biocides must be approved and registered by the Health and Safety Executive (HSE)
and listed in the current 'Reference Book 500', Part B, as surface biocides.
640G POINTING TO EXISTING FRAMES • Remove defective sealant pointing. • Thoroughly clean the joint recess, remove all dust and seal joint surfaces as
recommended by sealant manufacturer. • Check that depth of joint is approximately half its width, and adjust using recommended backing strip if necessary. • Repoint neatly using mastic gun during dry conditions when the ambient temperature is above 5 degrees Centigrade. • Sealant manufacturer and reference: to be selected or equivalent.

Section B_Term Requirements for Workmanship and Materials Part 2 Lot 1
Section B-Term Requirements for Workmanship and Materials
149
30/12/2013
APPLICATION 700 SPECIALIST COATINGS • Work to some common areas necessitate the use of a sprayed or brush applied
system. • Background; All surfaces must be dry and free from all loose and flaking material, dirt
and grease. Remove nibs and fill surface cracks with plaster based filler. Carry out repairs to damaged arrises and areas of loose plaster. Feather to adjacent
surfaces apply one thinned coat of suitable priming, compatible with decorating system.
• System; Apply by brush or airless spray one coat of an appropriate undercoat in the correct colour.
Apply one coat of the appropriate top coat, compatible with the undercoat. Apply two coats of a high density glaze. Remove spills or over spraying to adjacent surfaces.
700A UNSUITABLE CONDITIONS • Take all necessary precautions including restrictions on working hours, providing temporary protection and allowing extra drying time, to ensure that coatings are not adversely affected by climatic conditions during and after application
Prevent or control exposure of operatives to solvent vapour levels exceeding occupational exposure standards set in the current Health and Safety Executive (HSE) document EH40
• Unless it is specifically permitted by the coating manufacturer, do not apply coatings: • To surfaces affect by moisture, frost or airborne dust. • When the air or substrate temperature is below 5degC. • When the relative humidity is above 80%. • When heat is likely to cause blistering or wrinkling.
711 COATING GENERALLY • To BS 6150, Section 5. • Do not use materials which show any bittiness or other defects when applied. Do not
thin or intermix unless specified or recommended otherwise. • ,Apply priming coats as soon as possible on the same day as preparation is completed. They must be of adequate thickness and suit surface porosity. • ,Apply coatings by brush or roller unless otherwise specified or approved. • Keep brushes and equipment in a clean condition. Dispose safely of cleaning and
waste materials, do not pour into sanitary appliances or drains. Subsequent coats of the same pigmented material must be of a different tint to ensure that each coat provides complete coverage.
• Apply coatings to clean, dry surfaces in accordance with the manufacturer's recommended intervals between coats.
• Apply coatings evenly to give a smooth finish of uniform colour, free from brush marks, sags, runs and other defects. Cut in neatly and cleanly. Do not splash or mark adjacent surfaces.
• Adequately protect drying and completed work from damage.
720 PRIMING JOINERY • Before priming preservative treated timber ensure that any cut surfaces have been retreated and that all preservatives are completely dry. • Liberally coat all end grain, allow to soak in and then recoat. 730 CONCEALED JOINERY SURFACES
Where one or more additional coats are specified to be applied in the factory, they must be applied to all surfaces, including those which will be concealed when

Section B_Term Requirements for Workmanship and Materials Part 2 Lot 1
Section B-Term Requirements for Workmanship and Materials
150
30/12/2013
components are fixed in place. 751 STAINING TIMBER • Apply primer where recommended by the stain manufacturer. • Apply stain in flowing coats. Brush out excess stain before set to produce uniform depth
of colour. 760 VARNISHING
Thin first coat with white spirit in accordance with manufacturer's recommendations. Brush well in avoiding aeration and lay off. Apply further coats of varnish, rubbing down lightly between coats along the grain.
770 EXTERNAL DOORS Prime and coat bottom edges before hanging. 780 BEAD GLAZING
Joinery which is to be stained must have the first two coats of the staining system applied to rebates and beads before glazing.
781 BEAD GLAZING Joinery which is to be varnished must have the first two coats of varnish applied to rebates and beads before glazing.
782 BEAD GLAZING Joinery which is to be painted must have the primer and one undercoat applied to rebates and beads before glazing.
790 PUTTY GLAZING Allow putty to set for 7 days then, within a further 14 days, seal with an oil based primer. Ensure that putty is fully protected by coating system as soon as it is sufficiently hard. Extend finishing coats on to glass up to sight line.
800 GLAZING Protect etched, sand blasted and ground glass from contamination by oily constituents of coating materials by:
• Treating or marking edges before coating. • Cleaning surfaces after coating. 810 WATER REPELLENT
Commence at top of wall, applying liberally to flood surface, ensuring complete coverage.
820 COMPLETION Ensure that opening lights and other moving parts move freely. Remove all masking tape and temporary coverings.

Section B_Term Requirements for Workmanship and Materials Part 2 Lot 1
Section B-Term Requirements for Workmanship and Materials
151
30/12/2013
P20 UNFRAMED ISOLATED TRIMS/SKIRTINGS/SUNDRY ITEMS TRIMS/CASINGS 110 SOFTWOOD SKIRTINGS for renewed kitchens if required • Quality of wood and fixing: To BS 1186-3. - Species: Contractor's choice.. - Class: 2. • Moisture content at time of fixing: 9-13% • Preservative treatment: Organic solvent as section Z12 and BWPDA Commodity Specification C5, service life 30 years. . • Profile: to match existing adjoining. - Finished size: to match existing adjoining. • Finish as delivered: Prepared and primed. • Fixing: Screwed at 450 mm centres and pelleted. 110B SOFTWOODARCHITRAVES, FRAMES, DOOR STOPS etc for renewed kitchens or bathroom doors adjustments if required • Quality of wood and fixing: To BS 1186-3. - Species: Contractor's choice.. - Class: 2. • Moisture content at time of fixing: 9-13% • Preservative treatment: Organic solvent as section Z12 and BWPDA Commodity Specification C5, service life 30 years. . • Profile: to match existing adjoining. - Finished size: to match existing adjoining. • Finish as delivered: Prepared and primed. • Fixing: Screwed at 450 mm centres and pelleted. 170 OTHER ITEMS NEW WINDOW AND DOOR REVEAL LINER • Manufacturer: Permacell Finesse Limited (tel. 01376 583241) . - Product reference: Permacell Cellular PVC-UE profiles. • Size: - Thickness: 6.5mm. • Finish/ Colour: White, smooth satin finish. All gaps to be sealed with white low modulus silicone sealant. • Accessories: Reveal liner to be constructed from Radiused Edge Coverboard profile
with mitred welded corners secured to the underlying substrate with a continuous bead of adhesive. Clean down all linings on completion and ensure that there are no scratches, dents or other defects to the lining..
• Fixing: All underlying substrate should be cleaned and levelled before fitting of any boards.
Linings are to be fixed using a fast curing neoprene rubber solvent adhesive or a good quality, clear, fast curing low modulus silicone sealant. Jointing: Other requirements. BOARD MATERIALS 370 OTHER BOARDS NEW WINDOW AND DOOR CILL BOARDS • Manufacturer: [Permacell Finesse Limited (tel. 01376 583241) - Product reference: Permacell Cellular PVC-UE profiles. • Standard: Window boards to be constructed from Bull Nose Standard profile secured to
the underlying substrate with a continuous bead of adhesive. The ends of the boards should be finished using purpose produced PVC endcaps.
- Type: as above. • Thickness: 10mm. • Finish: White, smooth satin finish. All gaps to be sealed with white low modulus silicone

Section B_Term Requirements for Workmanship and Materials Part 2 Lot 1
Section B-Term Requirements for Workmanship and Materials
152
30/12/2013
sealant] . • Support/ Fixing: All underlying substrate should be cleaned and levelled before fitting of
any boards. Boards are to be fixed using a fast curing neoprene rubber solvent adhesive or a good quality, clear, fast curing low modulus silicone sealant.
• Other requirements: Clean down all boards on completion and ensure that there are no scratches, dents or other defects to the board . INSTALLATION 510 INSTALLATION GENERALLY • Joinery workmanship: As section Z10. • Metal workmanship: As section Z11. • Methods of fixing and fasteners: Unless specified as section Z20. • Straight runs: To be in one piece, or in long lengths with as few joints as possible. • Running joints: Location and method of forming to be agreed where not detailed. • Joints at angles: Mitre unless shown otherwise. • Position and level: To be agreed where not detailed.
P21 IRONMONGERY GENERALLY 110 GENERAL REQUIREMENTS
Detailed requirements and locations of ironmongery are to be scheduled by the supplier, where the lists of minimal ironmongery for secured by design purposes do not meet the needs and configurations of like-for-like replacements on site.
Fixing is specified in section L1-.
150 IRONMONGERY FOR DOORSETS Provide ironmongery required for each doorset in two separate packs (projecting and non-projecting items) clearly labelled to identify the doorset to which it belongs. Deliver the packs of non-projecting items to the doorset manufacturer for factory fitting and deliver the other packs to site.
161 IRONMONGERY FOR DOORS
Provide ironmongery for each door in separate, clearly labelled packs.
171 IRONMONGERY FOR FIRE DOORS Unless specified otherwise, select ironmongery to comply with the recommendations of the Association of Builders' Hardware Manufacturers Code of practice 'Hardware essential to the optimum performance of fire resisting doorsets'.
180 DURABILITY Unless specified otherwise, select ironmongery components to suit the following level(s) of use (as defined in BS 7352): Heavy duty:
HANGING DEVICES 310 HINGES • To BS 7352 and marked accordingly. Unless specified otherwise, select strength class
to suit door weight, duty, number of hinges and other factors as recommended in BS 7352, Appendix C.
• Corrosion protection: Unless specified otherwise: CP 24 for internal use CP 48 for damp internal and unpolluted external use CP 96 for polluted atmospheres.

Section B_Term Requirements for Workmanship and Materials Part 2 Lot 1
Section B-Term Requirements for Workmanship and Materials
153
30/12/2013
330 NUMBER OF HINGES
Provide three butt hinges to each leaf unless specified otherwise.
331 NUMBER OF HINGES Provide three butt hinges to fire doors, external doors and doors with closers, unless specified otherwise. OPERATING DEVICES 410G OVERHEAD CLOSERS GENERALLY • To BS 6459:Part 1, Class to be approved • Manufacturer and reference: Contractor's choice or equivalent. Type: Face fixed. Finish: Stove enamel. • Closers must: - Be matched to the sizes and weights of doors - Override latches and/or door seals when fitted Hold unlatched doors shut under normal working conditions. 420 OVERHEAD CLOSERS FOR FIRE DOORS
In addition to the general requirements for closers, overhead closers for fire resisting doors must:
• Be types included in successful tests to BS 476:Part 22 of door assemblies similar to those for which the closers are proposed. Submit evidence of testing by an approved laboratory.
• Be fixed on the opening face of the door unless specified otherwise. • Have no mechanical hold open facility. • Close positively against smoke seals where fitted. • Have arms of iron, steel or other metal with melting point not less than 800 degrees
Centigrade. SECURING 515 LOCKSFOR ALL EXTERNAL DOORS: • To BS 5872. Category: for use in housing • Method of operation: Cylinder: Euro to BS EN 1303 classification 16-1-14.
550 LOCKS/LATCHES FOR FIRE RESISTING DOORS • Must not compromise the fire performance of the door and must be approved for the purpose by the door leaf manufacturer. • Components critical to the retention of the door in a closed position must not have a melting point lower than 800 degrees Centigrade. 560 ESCAPE LOCKS Locks specified for security purposes on escape routes must be fitted
with a means of withdrawing the bolt without use of a key. 585 BOLTS GENERALLY Unless specified otherwise, provide bolts:
• To match door furniture and sized to suit height, weight and function of door. • To secure the first closing leaf on double doors. 590 HINGE BOLTS To all Front Entrance Doors to residences at and above First Floor Level
Install a pair of security bolts to the hanging side. Bolts to be to pattern of Chubb WS12

Section B_Term Requirements for Workmanship and Materials Part 2 Lot 1
Section B-Term Requirements for Workmanship and Materials
154
30/12/2013
- white, or similar approved. FURNITURE 610 LEVER HANDLES • To BS 4951. • Mounting: As approved from selection
620 DOOR KNOBS • To BS 4951. • Mounting: As approved from selection. 630 KNOBSETS To Method of Building Performance Specification MOB H3 PS, July 1989, 'Hardware for internal doorsets', Sections 2 and 3. 640 PULL HANDLES
To Method of Building Performance Specification MOB H3 PS, July 1989, 'Hardware for internal doorsets'.
650 PULL HANDLES, where required to be fixed on the pull side only with a push plate on the opposite side.
710 ESCUTCHEONS
Provide separate escutcheons to keyholes where not part of a back plate. 711 ESCUTCHEONS
Provide pull type escutcheons to cylinder locks where no other pull handle is specified to be fitted.
720 STOPS Unless specified otherwise, are required for doors opening against walls other than those fitted with closers with a back check facility.
Type: Wall mounted face fixed SAA finish 75 mm projection. Fixing height: 100mm above internal FFL
730G LETTER PLATE(S) • To BS 2911, Type outward opening flap closed by spring action • Manufacturer and reference: As approved from selection or equivalent. Material/Finish: To match set - NOT brass Features: Extended plate at one end for number.
735 INTERNAL LETTER FLAP(S) To match material, finish and size of letter plate.
850G THRESHOLD WEATHERSTRIP Manufacturer and reference: To be approved & to comply with BSS 7386 & 7880or equivalent.
855G WEATHERSTRIP to head and jambs Manufacturer and reference: To be approved & to comply with BSS 7386 & 7880 or equivalent.
890 DOOR VIEWERS • Angle of vision: 130º deg • Material/Finish: Chrome • Diameter of body of viewer: Chubb model WS8 or as approved mm • Door thickness: Existing / new to fit mm

Section B_Term Requirements for Workmanship and Materials Part 2 Lot 1
Section B-Term Requirements for Workmanship and Materials
155
30/12/2013
Q1 Q2 SLAB/BRICK/SETT/COBBLE PAVINGS Q10 KERBS/EDGINGS/CHANNELS/PAVING ACCESSORIES TYPES OF KERBS/EDGINGS/CHANNELS 110 PRECAST CONCRETECHANNELS • Standard: To BS 7263-3. • Manufacturer: Contractor's choice. - Product reference: CD channel. • Type: CD Channel, dished. • Size (width x height x length): 255 x 125 x 915 mm. • Special shapes: None. • Finish: As cast. • Colour: Grey. • Joints: Narrow filled as clause 630. . • Other requirements: None. ROADS/PAVING ACCESSORIES/MARKING 395 ROAD MARKING (THERMOPLASTIC) • Standard: Road Safety Markings Association standard specification document for road marking and road studs (StanSpec). • Colour: Yellow. • Retroreflectivity: Class R2 to BS EN 1436. • Other requirements: markings to be to layout provided. LAYING 510 LAYING GENERALLY • Cutting: Neat, accurate and without spalling. Form neat junctions. • Bedding of units: Positioned true to line and levelled along top and front faces, in a
mortar bed on accurately cast foundations or, where clause 547 applies, on a race of fresh concrete.
• Securing of units: After bedding has set, secured with a continuous haunching of concrete or, where clause 547 applies, backing concrete cast monolithically with fresh concrete race.
520 ADVERSE WEATHER • Conditions: Do not construct if the temperature is below 3°C on a falling thermometer or
1°C on a rising thermometer. Adequately protect foundations, bedding and haunching against frost and rapid drying by sun and wind.
530 CONCRETE FOR FOUNDATIONS, RACES AND HAUNCHING • Standard: To BS 5328-1, 2, -3 and -4, or to BS 8500-1, -2, and BS EN 206-1. • Designated mix: Not less than GEN0 or Standard mix ST1. • Workability: Very low.
540 MORTAR BEDDING • General: To section Z21. • Mix: (Portland cement: sand): 1:3. • Bed thickness: 12-40 mm.
570 CHANNELS • Installation: To an even gradient, without ponding or backfall. • Lowest points of channels: 6 mm above drainage outlets.

Section B_Term Requirements for Workmanship and Materials Part 2 Lot 1
Section B-Term Requirements for Workmanship and Materials
156
30/12/2013
620 ACCURACY • Deviations (maximum): -Level: ± 6 mm. Horizontal and vertical alignment: 3 mm in 3 m.
630 NARROW MORTAR JOINTS • Jointing: Ends of units buttered with bedding mortar as laying proceeds. Joints
completely filled, tightly butted and surplus mortar removed immediately. Joint width:3 mm.
650 SEALANT MOVEMENT JOINTS • Joint filler: Compressible cellular rubber or plastics compatible with specified sealant. • Filler installation: Built in as work proceeds, extending through haunching and
foundation. Filler positioned accurately to fully support sealant at the recommended depth below exposed faces of units.
• Joint width 10 mm • Sealant: Silicone, brand to approval. -Colour: Colour match to kerbs. • Sealant application: As section Z22. Q20 GRANULAR SUB-BASES TO ROADS/PAVINGS 110 THICKNESSES OF SUB-BASE/SUBGRADE IMPROVEMENT LAYERS • Thicknesses: See sections: - Q22 Coated macadam/asphalt roads/pavings.
120 CHECKING CALIFORNIA BEARING RATIO (CBR) OF SUBGRADES • Subgrade variation: If material appears to vary from that stated in the site investigation
report, or if there are extensive soft spots, test subgrade CBR to BS 1377-4 or BS 1377-9. Submit results and obtain instructions before proceeding.
140 EXCAVATION OF SUBGRADES • Final excavation to formation/sub-formation level: Carry out immediately before
compaction of subgrade. • Soft spots and voids: Give notice. • Wet conditions: Do not excavate or compact when the subgrade may be damaged or destabilized.
145 PREPARATION/ COMPACTION OF SUBGRADES • Timing: Immediately before placing sub-base. • Compaction: Thoroughly, by roller or other suitable means, adequate to resist
subsidence or deformation of the subgrade during construction and of the completed roads/ pavings when in use. Take particular care to compact fully at intrusions, perimeters and where local excavation and backfilling has taken place.
150 SUBGRADES FOR VEHICULAR AREAS • Preparation and treatment: To Highways Agency 'Specification for highway works',
clauses 616 and 617.
200 SUBGRADE IMPROVEMENT LAYER (CAPPING) • Material: To Highways Agency 'Specification for highway works', table 6/1, Class 6F1,
6F2 or 6F3. • Standard: Placed and compacted to Highways Agency 'Specification for highway
works,' table 6/1, clauses 612 and 613.3, 613.8, 613.9, 613.10 and 613.13.

Section B_Term Requirements for Workmanship and Materials Part 2 Lot 1
Section B-Term Requirements for Workmanship and Materials
157
30/12/2013
210 HIGHWAYS AGENCY TYPE 1 GRANULAR MATERIAL • Material: Highways Agency 'Specification for highway works', clause 803 (Type 1) or approved equivalent. • Testing (if required): As clause 803.5.
225 SULFATE CONTENT • Slag and other granular materials placed within 500 mm of cement-bound materials, concrete pavements, structures or products: To Highways Agency 'Specification for highway works' clause 801.2.
230 PLACING GRANULAR MATERIAL GENERALLY • Preparation: Loose soil, rubbish and standing water removed. • Structures, membranes and buried services: Ensure stability and avoid damage.
240 LAYING GRANULAR SUB-BASES FOR VEHICULAR AREAS • General: Spread and levelled in layers. As soon as possible thereafter compact each
layer. • Standard: Highways Agency 'Specification for highway works' clause 801.3-801.15. • At drainage fittings, inspection covers, perimeters and where local excavation and backfilling has taken place: Take particular care to compact fully.
250 LAYING GRANULAR SUB-BASES FOR PEDESTRIAN AREAS • General: Spread and levelled. • Compaction: -Timing: As soon as possible after laying. -Method: By roller or other suitable means, adequate to resist subsidence or
deformation of the sub-base during construction and of the completed paving when in use. Take particular care to compact fully at intrusions, perimeters and where local excavation and backfilling has taken place.
310 ACCURACY • Permissible deviation (maximum) from required levels, falls and cambers: Roads Footways Parking areas Recreation areas Sub-grade + 20 mm ± 20 mm - 30 mm Sub-base ± 20 mm . ± 12 mm .
320 BLINDING • Locations: Surfaces to receive sand bedded interlocking brick or block paving to
sections Q24 and Q25. • Material: Sand, fine gravel, PFA or other approved. • Finish: Close, smooth, compacted surface.
330 COLD WEATHER WORKING • Frozen materials: Do not use. • Freezing conditions: Do not place fill on frozen surfaces. Remove material affected by frost. Replace and re-compact if not damaged after thawing.
340 PROTECTION • Sub-bases: As soon as practicable, cover with subsequent layers, specified elsewhere. • Sub-grades and sub-bases: Prevent damage from construction traffic, construction operations and inclement weather.
Section B_Term Requirements for Workmanship and Materials Part 2 Lot 1
Section B-Term Requirements for Workmanship and Materials
158
30/12/2013
Q22 COATED MACADAM/ASPHALT ROADS/PAVING TYPES OF PAVING 112 COATED MACADAM PAVING: TO ROADWAYS & CAR PARKING AREAS Materials and workmanship: To Highways Agency Manual of contract documents for highway works, Volume 1: Specification for highway works including all Amendments current at August 2001. Granular sub-base: As section Q20 clause 210G Thickness 200 mm Roadbase: 40mm size dense macadam Thickness 100 mm Basecourse: Dense macadam to clause 906, DoT specification for Highway Works. Thickness 70 mm Wearing course: dense macadam to clause 909, DoT specification for Highway works Thickness 30 mm Surface treatment: none
114 COATED MACADAM PAVING: PEDESTRIAN FOOTPATHS Materials and workmanship: To Highways Agency Manual of contract documents for highway works, Volume 1: Specification for highway works including all Amendments current at August 2001 Granular sub-base: As section Q20 clause 205G Thickness 200 mm.
Combined roadbase/basecourse: Dense macadam to clause 906, DoT specification for Highway Works
Thickness 50 mm Wearing course: Dense macadam to clause 909 specification for Highway Works Thickness 25 mm Surface treatment: none
122 COATED MACADAM PAVING: RED - PEDESTRAIN FOOTPATHS Materials and workmanship: To BS 4987. Granular sub-base: As section Q20 clause 205G Thickness 200 mm. Combined roadbase/basecourse: Dense macadam to clause 906, DoT specification for Highway Works. Thickness 50 mm
Wearing course: Dense macadam to clause 909, DoT specification for Highway Works. To be red-coated macadam to approval, aggregate to be Croft, Mount Sorrel or other
approved pink granite. Thickness 25 mm Surface treatment: none
124 COATED MACADAM PAVING: PEDESTRAIN FOOTPATHS Materials and workmanship: To BS 4987. Granular sub-base: As section Q20 clause 205G Thickness 200 mm.
Combined roadbase/basecourse: Dense macadam to clause 906, DoT specification for Highway Works.
Thickness 50 mm Wearing course: Dense macadam to clause 909, DoT specification for Highway
Section B_Term Requirements for Workmanship and Materials Part 2 Lot 1
Section B-Term Requirements for Workmanship and Materials
159
30/12/2013
Works. To be red-coated macadam to approval, aggregate to be Croft, Mount Sorrel or other approved pink granite.
Thickness 25 mm Surface treatment: none
225 MATERIALS GENERALLY Not less than 2 weeks before starting work submit to the PM the name(s) of all supplier(s) of bituminous material. At the time of delivery submit to the PM a test certificate for each manufacturing batch of bituminous material, certifying compliance with this specification and the relevant British Standard and giving complete information on the composition of each mix.
230 SAMPLES • Submit: Before placing orders submit representative sample(s) of red coated macadam including pink aggregate. Ensure that delivered materials match sample(s.
240 ACCEPTANCE OF SUB-BASE • Surface: Sound, clean and suitably close textured. • Levels and falls: To be within the specified tolerances: - Vehicular areas: +10 to -30 mm. - Pedestrian areas: ±12 mm. - Drainage outlets: 0 to -10 mm of the required finished level. • Kerbs and edgings: Complete, adequately bedded and haunched and to the required levels.
245 EXISTING TARMAC TO BE RESURFACED Remove all loose aggregate, dirt, mud from the surface by means of a stiff brush and pressure jet washing as appropriate. Remove all material arising and leave prepared surface in a clean and dry state.
250 ABUTMENTS • Edges of manholes, kerbs and other abutments: Clean and paint with a thin uniform coating of Bitumen or similar approved material. LAYING 310 LAYING GENERALLY • Preparation: Remove all loose material, rubbish and standing water. • Adjacent work: Form neat junctions. Do not damage. • Channels, kerbs, inspection covers etc: Keep clean. • New paving: - Keep traffic free until it has cooled to prevailing atmospheric temperature. - Do not allow rollers to stand at any time. - Prevent damage. - Lines and levels: With regular falls to prevent ponding. - Overall texture: Smooth, even and free from dragging, tearing or segregation. State on completion: Clean.
320 ADVERSE WEATHER • Frozen materials: Do not use. • Suspend laying: - During freezing conditions - If the air temperature reaches 0°C, or in calm dry conditions -3°C, on a falling thermometer. - Hot rolled asphalt: During periods of continuous or heavy rain.

Section B_Term Requirements for Workmanship and Materials Part 2 Lot 1
Section B-Term Requirements for Workmanship and Materials
160
30/12/2013
330 LEVELS • Permissible deviation from the required levels, falls and cambers (maximum): - Finished surface: ±6 mm. Adjacent to gullies and manholes: 0 to +3 mm.
340 FLATNESS/ SURFACE REGULARITY • Deviation of surface: Where appropriate in relation to the geometry of the surface, the
variation in gap under a 3 m straightedge placed anywhere on the surface to be not more than:
- Base: Hand laid, 25 mm. - Binder course: 10 mm. - Surface course: Hand laid, 10 mm. - Where a straightedge cannot be used the surface must be of a comparable standard of accuracy when judged by eye.
350 CONTRACTOR'S USE OF PAVEMENTS • Before use: Fill interstices of open-grained surface with coated grit to BS 4987-1, tables
34-36 with soluble bitument content for all aggregates in the range 1.5-3.5%. Remove surplus. Apply binder and chippings as clause 360.
• Final surfacing: -Timing: Defer laying until as late as practicable. -Immediately before laying final surfacing: Clean and make good the base/ binder
course. Allow to dry. Uniformly apply, without puddles, a tack coat of sprayed bitumen emulsion of a suitable grade to BS 434-1 at 1.5-2.0 kg/m². Allow emulsion to break completely before applying surfacing.
362 BITUMEN BINDER FOR RESURFACING AREAS Binder: Cutback bitumen to BS 3690:Part 1 or bitumen emulsion to BS 434:Part 1. Do not use modified binders without prior approval of PM. Application: Uniformly spray binder of a suitable grade at a rate in accordance with Transport Research Laboratory Road Note 39, Tables 8 and 9; adjust application rate for modified binders in accordance with manufacturer's instructions. Do not use cutback bitumen at temperatures below 15 °C. Protect adjoining areas by means of polythene or tarpaulin during application of tack coat.

Section B_Term Requirements for Workmanship and Materials Part 2 Lot 1
Section B-Term Requirements for Workmanship and Materials
161
30/12/2013
Q24 INTERLOCKING BRICK/BLOCK ROADS/PAVINGS TYPES OF PAVING 110 CONCRETE BLOCK PAVINGFOR ROAD TABLES • Granular sub-base: Granular material, as section Q20. - Thickness: 200 mm. • Bedding: Sand. - Compaction: Pre-compacted. - Nominal thickness after compaction: 50 mm. • Blocks: To BS 6717: - 1. - Manufacturer: Marshalls Mono Ltd or equal and equivalent approved. Product reference: Submit proposals. - Sizes: 200 x 100 x 80 mm. - Special blocks: None. - Colour/ Finish: To match others / TBA. • Jointing material: Sand. • Sealer/ Stabilizer: Not required. • Setting out: - Bond: 45° herringbone. - Features: Soldier course 200mm wide around perimeter of road table.
110A CONCRETE BLOCK PAVING: FOR ROAD TABLE RAMPS Granular sub-base: As section Q20 clause 210G thickness 200 mm. Bedding: 25mm (nominal) 1:3 cement sand bed - fully bedded Nominal thickness after compaction: 25 mm. Roadbase: 100mm as section Q22/110 Blocks: To BS 6717-1. Manufacturer and reference: Marshalls Mono Ltd or equivalent. Size(s): 200 x 100 x 80mm thick Special blocks: none Colour/finish: Buff & Red as drawings Setting out: Bond: 7No. courses stretcher bond per ramp Joint: nominal 10mm wide 1:3 mortar, flush finish.
110B CONCRETE BLOCK PAVING: FOR SHARED SURFACES/PARKING BAYS Granular sub-base: As section Q20 clause 210G thickness 200 mm. Bedding: As clause 280, compacted as clause 306 Nominal thickness after compaction: 50 mm. Blocks: To BS 6717-1. Manufacturer and reference: Marshalls Mono Ltd or equivalent. Size(s): 200 x 100 x 80mm thick Special blocks: none Colour/finish: BRINDLE Setting out: Bond: Herringbone Features: Soldier course 200mm wide around perimeter of block paved areas. 120 CLAY PAVER PAVINGTO PEDESTRIAN PAVED AREA • Granular sub-base: Granular material, as section Q20. - Thickness: 200 mm. • Bedding: Sand. - Compaction: as section Q20. - Nominal thickness after compaction: 50 mm. • Pavers: To BS EN 1344: classification PB.

Section B_Term Requirements for Workmanship and Materials Part 2 Lot 1
Section B-Term Requirements for Workmanship and Materials
162
30/12/2013
- Manufacturer: Submit proposals for approval. Product reference: Submit proposals for approval. - Sizes: 200 x 100 x 65 mm. - Special pavers: none. - Colour/ Finish: Blue to approval. • Jointing material: Sand. - Sealer/ Stabilizer: Not required. • Setting out: - Bond: 45° herringbone.
- Features: Single soldier course 200mm wide around areas of pedestrian slab paving (as drawings).
LAYING: 216 LAYING GENERALLY Ensure that sub-bases are suitably accurate and to specified gradients before laying
paving. - Cut blocks/pavers neatly and accurately without spalling to give neat junctions at
edge restraints and changes in bond. - Select blocks/pavers vertically from at least 3 separate packs in rotation, or as recommended by manufacturer, to avoid colour banding.
218 LAYING SAND BEDDED AND JOINTED PAVING Lay blocks/pavers on a well graded sand bed and vibrate to produce a thoroughly
interlocked paving of even overall appearance with regular sand filled joints and accurate to line, level and profile.
220 SAMPLES • General: Before ordering, submit samples of Concrete blocks (all colours) and clay
brick pavers blocks/ pavers/ setts that are representative of colour and appearance.
230 CONTROL SAMPLES • General: Carry out sample area of finished work: - Location: To be agreed on site. - Size (minimum): To be approved. - Features to be included: To match existing / suit site conditions. • Give notice: When ready for inspection. • Timing: Obtain approval of appearance before proceeding.
240 ADVERSE WEATHER • General: Do not use frozen materials or lay bedding on frozen or frost covered sub-
bases.
242 ADVERSE WEATHER (SAND BEDDED AND JOINTED PAVING) • Stockpiled bedding material: Protect from saturation. • Exposed areas of sand bedding and un-compacted areas of paving: Protect from heavy rainfall. • Sand bedding that becomes saturated before laying paving: Remove and replace, or
allow to dry before proceeding. • Damp conditions: Brush in as much jointing sand as possible. Minimize site traffic over paving. As soon as paving is dry, top up joints and complete compaction. PREPARATION/ LAYING 335 PLANING AND REPAIRS TO EXISTING BASES • Existing macadam/ asphalt surfaces: Plane to required levels. • Repairs: as Q22.

Section B_Term Requirements for Workmanship and Materials Part 2 Lot 1
Section B-Term Requirements for Workmanship and Materials
163
30/12/2013
• Building up to required levels: using basecourse material as per Q22.
360 CONDITION OF SUB-BASES AND BASES BEFORE LAYING SAND BEDDING COURSE
• Granular surfaces: - Sound, clean, smooth and close-textured enough to prevent migration of sand
bedding into the sub-base or overlay during compaction and use. - Free from movement under compaction plant and free from compaction ridges,
cracks and loose material. • Prepared existing and new bound bases (roadbases): Sound, clean, free from rutting or major cracking and cleared of sharp stones, projections or debris. • Bound base (roadbase) surface tolerance: +0 to -12 mm. • Levels and falls: Accurate and within specified tolerances. • Drainage outlets: Within +0 to -10 mm of required finished level. • Edge restraints, manhole covers, drainage outlets and the like: Complete, to required levels, and adequately bedded and haunched in mortar that has reached sufficient strength. • Haunching to gullies, manhole covers and inside face of edge restraints: Vertical, so
that pavings do not 'ride up' when compacted.
370 ACCEPTANCE OF PREPARED EXISTING BASES Existing roadbases are sound, clean, free from rutting or major cracking and cleared of sharp stones and debris that may rupture geotextiles. Drainage perforations are adequately prepared to receive geotextiles.
The surface of overlaid granular material, if any, is sound, clean, and close-textured enough to prevent loss of sand bedding into it during compaction and use.
Levels and falls are as detailed and within +0 to -12 mm of the required finished level. Drainage outlets are within +0 to -10 mm of the required finished level.
New edge restraints, raised manhole covers, drainage outlets and the like are complete, to the required levels, and adequately bedded and haunched in mortar that has reached sufficient strength. Haunching to gullies, manhole covers and the inside face of new edge restraints is vertical so that pavings do not 'ride up' when compacted.
395 SAND FOR BEDDING - GENERAL USE Naturally occurring clean sharp sand from the quaternary geological series or sea dredged, graded to BS 7533-3, Annex D, Category 2
Free from deleterious salts, contaminants and cement. Obtain from only one source and ensure that all sand supplied has consistent grading. Maintain at an even moisture content, which will give maximum compaction. Sand squeezed in the hand should show no free water and bind together when pressure is released.
400 SAND FOR BEDDING - LIGHT USE Naturally-occurring clean sharp sand or crushed rock fines, graded to BS 7533-3, Annex D, Category IV. Free from deleterious salts, contaminants and cement.
Obtain from only one source and ensure that all sand supplied has consistent grading. Maintain at an even moisture content which will give maximum compaction.
Sandsqueezed in the hand should show no free water and bind together when pressure is released.
410 SAND FOR JOINTING Clean free flowing dried silica sand graded to BS 7533-3, table D3.
Section B_Term Requirements for Workmanship and Materials Part 2 Lot 1
Section B-Term Requirements for Workmanship and Materials
164
30/12/2013
Do not use sand that will stain paving blocks. Free from deleterious salts, contaminants and cement.
465 LAYING BEDDING GENERALLY • Site trial: Determine by trial the depth of loose bedding material needed to ensure
specified bedding course thickness after final compaction of paving. • Bedding materials: Do not deliver to working area over un-compacted paving. • Bedding course prepared area: 1 m (minimum) to 3 m (maximum) in advance of laying face, and 1 m (maximum) at end of working period. • Saturated bedding: Not allowed. Remove and replace or allow to dry before laying
paving. • Protection of prepared bedding course: Do not allow traffic or leave exposed. Fill, re-
screed and re-compact areas disturbed by removal of screed rails or trafficking. Lay blocks/ pavers/ setts immediately.
470 LAYING BEDDING (PRECOMPACTED) • General: Spread bedding material in one loose layer. Compact with a plate compactor. Make allowance for a reduction in the thickness achieved during compaction. Level the surface by screeding.
475 LAYING BEDDING (PARTIALLY PRECOMPACTED) • General: Spread, in a loose un-compacted layer, approximately the required final
thickness of bedding material and compact with a plate compactor. Spread a further layer approximately 15 mm thick, and screed to create loose surface for paving blocks.
480 LAYING BEDDING (POSTCOMPACTED) • General: Spread bedding material in one loose uniform layer and screed to levels.
485 LAYING BLOCKS/ PAVERS/ SETTS • General: Commence from an edge restraint. Vibrate to produce thoroughly interlocked
paving of even overall appearance with regular joints and accurate to line, level and profile.
• Bedding of units: Firm, so that rocking or subsidence does not occur or develop. • Working face: Lay blocks/ pavers/ setts hand tight. Maintain open non-castellated
working face. Do not use mechanical force to obtain tight joints. • Joint width: 2-5 mm. • Placing: Squarely with minimum disturbance to bedding. • Supply to laying face: Deliver over newly laid paving but stack at least 1 m back from
laying face. Do not allow plant to traverse areas of un-compacted paving. • Alignment: Continually check with string lines as work proceeds to ensure maintenance
of accurate bond. • Infill at edge restraints: Complete as work proceeds. Cut units accurately and maintain
specified joint width. Avoid very small infill pieces at edges by breaking bond on the next course in from the edge, using cut blocks/ pavers/ setts not less than 1/3 full size.
• Cut edges: Turn inwards where possible; do not position against edge restraints or other features.
• In situ mortar infill: 1:3 cement: sand as section Z21, coloured to match pavers, in areas up to 65 cm2.
495 OBSTRUCTIONS • Cutting: After laying full paving units, trim blocks/ pavers/ setts neatly around drainage fittings and other obstructions. Cut units accurately and maintain joint width within specified range. Do not reduce thickness of blocks/ pavers/ setts.

Section B_Term Requirements for Workmanship and Materials Part 2 Lot 1
Section B-Term Requirements for Workmanship and Materials
165
30/12/2013
• In situ concrete surrounds: - Locations: Where agreed on site. - Standard: To BS 8500-2, C35 air entrained, maximum aggregate size 10 mm. - Shape and size: Rectangular, 100 mm (minimum) all round obstruction. - Thickness (minimum): Combined depth of blocks/ pavers/ setts and sand bedding. Colour: To match paving units as approved.
500 CUTTING BLOCKS/ PAVERS/ SETTS • General: Cleanly and accurately, without spalling. -Do not mark or damage visible surfaces. • Other requirements: Cut blocks only across the width, using a masonry saw to make a vertical cut.
520 COMPACTING AND JOINTING • Timing: - After edge restraint/ kerb haunchings have matured. - As laying proceeds, but after infilling at edges. Do not leave un-compacted areas of paving at end of working periods. • Compacting: - Standard: To BS 7533-3, Annex F, site category I and II.
- General: Thoroughly compact blocks/ pavers/ setts with vibrating plate compactor to achieve specified bedding course thickness. Apply same compacting effort throughout.
- Do not damage kerbs and adjacent work. - Neoprene sole plate: Use for clay pavers. • Areas not to be compacted: - Within 1 m of working face. - Within 1 m of unrestrained edges. • Surface levels: Check frequently. Lift and relay areas not at specified level. • Jointing: Where jointing material is specified, brush into joints, re-vibrate surface and
repeat as necessary to completely fill joints.
522 BEDDING LAYER TOLERANCES,: AFTER FINAL COMPACTION 50 mm nominal thickness: +15/-20 mm. 30 mm nominal thickness: +12/-0 mm
524 LEVELS OF PAVING Permissible deviation from specified levels to be ± 6 mm generally. Set paving 6-10 mm above gullies and 3-6 mm above surface drainage channels.
525 CLAY PAVERS • Timing: Brush sand into the joints and remove surplus before commencing any compaction. COMPLETION 611 REGULARITY Sudden irregularities not permitted.
Where appropriate in relation to the geometry of the surface, the variation in gap under 3 m straight edge placed anywhere on the surface to be not more than 10 mm. The difference in level between adjacent blocks/pavers to be not more than 2 mm.
615 COMPLETION OF PAVING WITH SAND FILLED JOINTS • Sand dressing: Leave a thin layer of dry jointing sand over the paving. • Vacuum cleaning machines: Not allowed.

Section B_Term Requirements for Workmanship and Materials Part 2 Lot 1
Section B-Term Requirements for Workmanship and Materials
166
30/12/2013
620 COMPLETION OF PERMEABLE PAVING • Cleaning: Immediately before handover, thoroughly clean paving with vacuum brush cleaning machine. Do not clean areas with sand filled joints.
630 REMEDIAL WORK During the Contract and Maintenance Period: - Any areas of paving which settle must be re-laid as specified.
- Where early trafficking leads to settlement of the jointing sand, refill the joints as specified.
Q25 SLAB/BRICK/SETT/COBBLE/PAVINGS GENERAL 105 MATERIAL SAMPLES • Samples representative of colour and appearance of designated materials: Submit
before placing orders. Designated materials: All pavings.
109 RECLAIMED STONE PAVINGS • Location/ Access: To be agreed on site. • Lifting/ Storage/ Protection: To be agreed on site. • Preparation: To be approved.
130 CEMENTITIOUS BASES AND SUB-BASES • General: Protect from moisture loss, if not covered by another pavement course within
2 hours of completion.
135 CONDITION OF SUB-BASES/ BASES BEFORE LAYING BEDDING COURSE • Trenches and excavation of soft or loose spots in subgrade: Filled and compacted as specified. • Granular surfaces: Sound, clean, smooth and close-textured enough to prevent
migration of bedding materials into the sub-base during compaction and use, free from movement under compaction plant and free from compaction ridges, cracks and loose material.
• Prepared existing and new bound bases (roadbases): Sound, clean, free from rutting or major cracking and cleared of sharp stones, projections or debris. • Sub-base/ Roadbase level tolerances: To BS 7533-7, Annex A. • Levels and falls: Accurate and within the specified tolerances. • Drainage outlets: Within 0 to -10mm of the required finished level. • Features in sand bedded paving (including mortar bedded restraints and drainage
ironwork): Completed, to required levels, and adequately bedded and haunched in mortar that has reached sufficient strength.
• Cementitious sub-bases: Cured for the minimum times specified in BS 7533-4, clause 4.5.3.
138 DRAINAGE HOLES IN EXISTING BASES • Location: Impervious layers of existing road/ paving. • Drainage: Form regular grid of holes, through base and any additional build up, down to sub-base: - Spacing in both directions: 750 mm. - Minimum clear opening: 40 mm. - Do not weaken or excessively disturb road/ paving. • Completion: Remove jagged or protruding edges. Fill voids with 2-8 mm pea gravel.
Ram down to form flush smooth surface.

Section B_Term Requirements for Workmanship and Materials Part 2 Lot 1
Section B-Term Requirements for Workmanship and Materials
167
30/12/2013
160 LIME FOR MORTAR BEDDING AND POINTING • General: Nonhydraulic to BS 890 or BS EN 459 or, if ready-mixed lime: sand, to BS
4721. 163 MORTAR BEDDED In areas specified • Foundation: Concrete, Mix E10/ to approved tested samples. - Size: To be approved. • Bedding: - Mortar: As section Z21, mix 1:3 Portland cement CEM1:sand, grading MP or FP with polymer admixture for rapid hardening, as section Z21 . -Thickness: 10 mm minimum to 40 mm maximum. • Laying: Bed units on foundation, and secure with continuous mortar haunching. - Keep exposed faces clean and free from mortar. • Jointing: Dry, closely butted. • Movement joints: As clause 174.
174 SEALANT MOVEMENT JOINTS IN MORTAR BEDDED UNITS • Spacing: 4.5 m. • Extent of joints: Through edge units and haunching. • Joint filler: Compressible cellular rubber or plastics compatible with specified sealant.
Build in as work proceeds. • Joint width 12 mm mm. • Barrier (joint breaker): As recommended by sealant manufacturer. Position filler and
barrier accurately to fully support sealant at recommended distance from exposed faces of units.
• Sealant: - Manufacturer: To be approved. Product reference: To be approved. - Colour: To be approved. - Application: As section Z22.
184 LAYING PAVINGS • Cutting: Cut units cleanly and accurately, without spalling, to give neat junctions with edgings and adjoining finishes. • Lines and levels of finished surface: Smooth and even, with falls to prevent ponding. • Bedding of units: Firm so that rocking or subsidence does not occur or develop. • Slopes: Lay paving units upwards from the bottom of slopes. • Appearance: Even and regular with even joint widths and free of mortar and sand
stains.
188 LEVELS OF PAVING • Permissible deviation from specified levels: -Generally: ± 6 mm. • Height of finished paving above features: -At gullies: +6 to +10 mm. -At drainage channels and kerbs: +3 to +6 mm.
192 REGULARITY • Maximum variation in gap under a 3 m straight edge placed anywhere on the surface (where appropriate in relation to the geometry of the surface): 10 mm. • Sudden irregularities: Not permitted. • Difference in level between adjacent blocks/ pavers/ setts (maximum): 2 mm.
196 PROTECTION • Cleanliness: Keep paving clean and free from mortar droppings, oil and other materials

Section B_Term Requirements for Workmanship and Materials Part 2 Lot 1
Section B-Term Requirements for Workmanship and Materials
168
30/12/2013
likely to cause staining. • Materials storage: Do not overload pavings with stacks of materials. • Handling: Do not damage paving unit corners, arrises, or previously laid paving. • Mortar bedded pavings: Keep free from traffic after laying: - Pedestrian traffic: For 2 days (minimum). - Vehicular traffic: For 8 days (minimum). • Access: Restrict access to paved areas to prevent damage from site traffic and plant.
SLAB/ FLAG PAVING 200 STONE SLAB PAVINGTO PAVEMENTS / AND RAMPS TO FRONT DOORS • Granular sub-base: As clause Q20/ To be approved. - Thickness: 120 mm mm. • Bedding: Compacted sand as clause 255. - Nominal thickness: 30 mm with a tolerance of -10 to +5 mm. Stone/ Finish: Reclaimed stone slabs. - Supplier: To be approved. - Sizes: Random rectangular - thickness 65 mm. • Jointing: Narrow joints for mortar bedded paving as clause 280. Bond: To match existing.
215 CONCRETE FLAG PAVINGTO PAVEMENTS / AND RAMPS TO FRONT DOORS • Granular sub-base: As clause Q20. To be approved. - Thickness: 120 mm mm. • Bedding: Compacted sand as clause 255. - Nominal thickness: 30 mm with a tolerance of -10 to +5 mm. • Flags: To BS 7263-1. - Manufacturer: To be approved. Product reference: To be approved. - Colour/ Finish: Natural/ textured. - Nominal sizes: 300 x 300 x 38 mm x 400 x 50 mm. • Jointing: Narrow, sand filled as clause 280. - Bond: To match existing.
235 CUTTING CONCRETE FLAGS • General: Cleanly and accurately, without spalling. - Visible surfaces: Do not mark or damage. • Notches cut from corner of flag exceeding 25% of flag area: Mitre cut remaining shape from internal corner of notch to opposite external corner. • Diagonal mitre cutting: Cut flags or portions of flags to form a mitre at abrupt changes
of level at the ends of ramped footpath crossings and the like.
245 SAND FOR BEDDING • Type: Naturally occurring clean sharp sand, graded as for laying course sand to BS
7533-4, table 4. • Purity: Free from deleterious salts, contaminants and cement. • Procurement: Obtain from one source and ensure consistent grading. • Moisture content: Maintain even moisture content that will give maximum compaction.
Sand squeezed in the hand should show no free water and start to exhibit cracking when pressure is released.
255 SAND BEDDING • Bedding sand: As clause 245. • Laying and compacting to specified final thickness: Vibrating plate as BS 7533-4, table
1. Loosen the top 10 mm using a rake; alternatively, screed out a further 10 mm of loose sand.

Section B_Term Requirements for Workmanship and Materials Part 2 Lot 1
Section B-Term Requirements for Workmanship and Materials
169
30/12/2013
• Bedding materials: Do not deliver to working area over un-compacted paving. • Bedding course prepared area: 1 m (minimum) to 3 m (maximum) in advance of laying face, and 1 m (maximum) at end of working period. • Protection of prepared bedding course: Do not allow traffic or leave exposed. Fill, re-
screed and re-compact areas disturbed by removal of screed rails or trafficking. Lay paving units immediately.
• Supply of slabs/ flags to laying face: Over newly laid paving but stack at least 1 m back from laying face.
280 NARROW SAND FILLED JOINTS FOR SAND BEDDED PAVING • Jointing sand: Clean dried sand, graded as for jointing sand to BS 7533-4, table 4 and
free from deleterious salts, contaminants and cement. • Placing slabs/ flags: Squarely with minimum disturbance to bedding. Lay away from previously laid slabs/ flags. • Joint width: 2-5 mm. Do not use mechanical force to obtain tight joints. • Jointing: - Timing: On the same day as laying and when rain is not expected. - Jointing: Brush clean dry sand over joints, then bed down slabs/ flags using plate vibrator to BS 7533-4, clause 6.9.4. - Completion: Refill joints with sand and re-vibrate until joints are completely filled.
Repeat if jointing sand settles during early trafficking. • Vacuum cleaning machines: Do not use.
305 RAPID STRENGTH MORTAR BEDDING • Bedding material: To be approved. • Spreading and levelling bedding material: To give specified average nominal thickness after bedding of slabs/ flags. • Laying slabs/ flags: On full solid bed. Bed down to line and level with a maul.
315 MORTAR SPOT BEDDING • Mortar: As section Z21. -Mix: 1:4-5 cement: sand. -Sand: To BS 882, grading limit M or F. • Bedding: Spread five spots of wet mortar to give specified average nominal thickness
after bedding of flags. • Laying: Bed slabs/ flags down to line and level with a maul, ensuring full contact at all
five spots.
335 MORTAR POINTED JOINTS • Jointing material: 1:3 lime: sand. • Timing: When the surface of the paving is dry and rain is not expected. • Jointing: Carefully and thoroughly fill joints. Tool to smooth bucket handle profile 2-3
mm below slab/ flag surface. Clean mortar from face of slabs/ flags before it sets. • Protection: Protect from rain.
350 NARROW JOINTS FOR MORTAR BEDDED PAVING • Jointing material: 1:3 lime: sand . • Jointing: Brush material into joints during the final stages of laying slabs/ flags. Knock
down by beating the slabs/ flags with a maul and repeatedly re-brushing until joints are filled solid and flush.
445 COLOUR BANDING • General: Select pavers vertically and diagonally from at least three separate packs in rotation to avoid colour banding.

Section B_Term Requirements for Workmanship and Materials Part 2 Lot 1
Section B-Term Requirements for Workmanship and Materials
170
30/12/2013
560 MORTAR BEDDING AND JOINTING • Mortar: As section Z21. • Bedding: Spread and level a bed of dry 1:3cement: sand mortar. • Laying: Individually lay and hammer down the setts so that tops are level, leaving joints open. • Mortar for jointing: 1:0.25:3 cement: lime: sand to BS 882, grading limit M, of a stiff
plastic consistency. • Jointing: Fill joints to within 3 mm of surface of setts and finish neatly. Clean any mortar from face of setts before it sets.
570 MORTAR BEDDING AND SEALANT JOINTING • Mortar: As section Z21. • Bedding: Spread and level a bed of dry 1:3cement: sand mortar. • Laying: Individually lay and hammer down the setts to the required level, with tops
level, leaving joints open. • Jointing: Brush dry 1:3 mortar into joints to within approximately 20 mm of surface of
setts. Pour hot sealant into joints to within 3-6 mm of surface of setts. Sealant: To be approved.
OTHER PAVINGS
800 PRECAST CONCRETE AND GRASS PAVINGTO CAR PARK • Granular sub-base: As clause Q20/ To be approved. - Thickness: 100 mm mm. • Bedding: Tamp down into a lightly compacted layer of BS 882 sand, grading limit M. - Nominal thickness of bed: 25 mm mm. • Precast units: - Manufacturer: To be approved. Product reference: To be approved. - Size: 600 x 400 x 120 mm. - Bond: Fully interconnected. • Soiling: Fill units with topsoil from the stockpiled material on site. Allow to settle fully
and refill level with surface. • Seeding: Included in general landscape work.
820 PLASTICS GRASS REINFORCING PAVERS • Locations: To be approved. • Granular sub-base: As section Q20 clause to be approved. - Thickness: 120 mm mm mm. • Bedding: Lightly compacted layer of sand. - Nominal thickness: 30 mm mm. • Paving units: - Manufacturer: To be approved. Product reference: To be approved. - Size: 500 x 500 x 25 mm mm. • Laying: Fully connect each paver to adjoining pavers using the locking tabs. - Bond: In accordance with manufacturer's recommendations. • Soiling: Fill units with Topsoil from the stockpiled material on site. • Completion: Seeding, as section Q30. • Other requirements: None.

Section B_Term Requirements for Workmanship and Materials Part 2 Lot 1
Section B-Term Requirements for Workmanship and Materials
171
30/12/2013
Q40 FENCING FENCING SYSTEMS
210 WOODEN POST AND RAIL FENCING • Standard: To BS 1722-7, type SPR 11/3. • Height: 1050 mm. • Wood: Softwood. - Treatment: To provide a 30 year service life. • Maximum centres of posts: 1.8 m. • Method of setting posts: 300 mm square or round holes, 700 mm deep filled to not less than half the depth with concrete. • Accessories: Additional mesh - litter proof netting. • Conformity: Submit manufacturer's and installer's certificates, to BS 1722-7.
250 PREFABRICATED WOOD PANEL FENCING • Standard: To BS 1722-11. • Type of infill: Waney edged horizontal boards, lapped. - Treatment: To provide a 30 year service life. • Height: 1830 mm. • Posts: Wood. - Treatment: To provide a 30 year service life. • Method of setting posts: - Hole depth: 300 mm square x 600 mm deep. - Concrete depth: Filled to not less than half the hole depth. • Accessories: None. • Conformity: Submit manufacturer's and installer's certificates, to BS 1722-11.
310 CLOSE BOARDED FENCING • Standard: To BS 1722-5, type BCM 180A. • Height: 1800 mm. • Wood: Softwood. - Treatment: To provide a 30 year service life·. • Boards/ rails: Softwood feather edged boards on arris rails. • Posts: Wood. • Centres of posts (maximum): 2.4 m. • Method of setting posts: 300 mm square or round holes, 750 mm deep filled to not less than half the depth with concrete . • Accessories: Concrete gravel board. • Conformity: Submit manufacturer's and installer's certificates, to BS 1722-5.
320 CLEFT CHESTNUT PALE FENCING • Standard: To BS 1722-4, type CW 105A. • Height: 1050 mm. • Posts and struts: Wood. - Treatment: To provide a 30 year service life·. • Centres of posts (maximum): - Straining posts: 70 m in straight runs and at all ends, corners, changes of
direction and acute variations in level. - Intermediate posts: 3.0 m. • Method of setting posts and struts: - Straining posts: 300 mm square or round holes, 750 mm deep filled to not less
than half the depth with concrete. - Struts: 300 x 450 mm holes, 450 mm deep filled with excavated material, well
rammed as filling proceeds.

Section B_Term Requirements for Workmanship and Materials Part 2 Lot 1
Section B-Term Requirements for Workmanship and Materials
172
30/12/2013
- Intermediate posts: Minimum 75 mm surround or 300 mm diameter holes, 600 mm deep filled to not less than half the depth with concrete.
• Accessories: Additional mesh - litter proof netting.
330 WOODEN PALISADE FENCING • Standard: To BS 1722-5, type WPC 105. • Height: 1050 mm. • Wood: Softwood. - Treatment: To provide a 30 year service life. • Palisades and rails: 75 x 22 mm softwood with pointed tops and arris rails. • Posts: Wood. • Centres of posts (maximum): 3 m. • Method of setting posts: 300 mm square or round holes, 600 mm deep filled to not less than half the depth with concrete. • Accessories: Single leaf gate at pedestrian entrance. • Conformity: Submit manufacturer's and installer's certificates, to BS 1722-5.
GATES, POSTS AND STILES
550 WOODGATES AND POSTS • Standard: To BS 5709. • Wood: Softwood. • Treatment: As section Z12 and British Wood Preserving and Damp-proofing Association Commodity Specification C3. - Type: To provide a 30 year service life. • Adhesive: Synthetic resin to BS EN 301, type 1. • Workmanship: As section Z10. • Fittings: 2 tee hinges, return spring and a thumb latch. • Method of fixing: Concrete foundation, 450 mm square x 750 mm deep. • Accessories: None.
560 STEEL GATES AND POSTS • Standard: To BS 4092. • Manufacturer: Submit proposals. - Product reference: Submit proposals. • Materials and workmanship: As section Z11. • Jointing: Welded. • Finish as delivered: Hot dip galvanized to BS EN ISO 1461 after fabrication. • Fittings: 2 self closing adjustable hinges and a thumb latch. • Method of fixing: Concrete foundation, 450 mm square x 750 mm deep. • Accessories: None.
580 WROUGHT IRON SINGLE GATE • Standard: Traditional blacksmith's methods. - Documentation: Submit certification of training and experience. - Membership: The Heritage Information Trust vetted register. • Samples: Submit on request an executed piece of work carried out by the proposed blacksmith. • Materials: Best quality true wrought iron. - Mild steel or other substitutes: Not permitted. - Consistency: Tough, ductile and fibrous in character and of even texture. - Submit: Invoices or certificate of authenticity to confirm provenance, on request. • Workmanship: - Ornamental work: Carefully forged, hand wrought and incised where required to
produce the design and effect desired.

Section B_Term Requirements for Workmanship and Materials Part 2 Lot 1
Section B-Term Requirements for Workmanship and Materials
173
30/12/2013
- Free ornament: Forged from substantial iron and forge welded where connected to other ironwork.
- Accuracy: Substantially framed together and closely fitted. - Cast parts: Not permitted other than as indicated on the approved design
drawings. • Electric welding: Not permitted. • Joints: Neatly tenoned and riveted or forge welded. - Heads of tenons and rivets: Countersunk. • Method of fixing: As blacksmith's recommendations. • Treatment: Undercoat, primed and painted as section M60. • Accessories: None. ACCESSORIES 625 ADDITIONAL MESH- LITTER PROOF NETTING • Manufacturer: Submit proposals. - Product reference: Submit proposals. • Type: Plastics coated hexagonal wire mesh. - Colour: Green. • Mesh size: 45 mm. • Height: 1830 mm. • Bottom of mesh: Turned out 150 mm and secured to the ground with wire pegs. • Fixings: Attached to top line wire with fencing rings. EXECUTION 710 INSTALLATION GENERALLY • Set out and erect: - Alignment: Straight lines or smoothly flowing curves. - Tops of posts: Following profile of the ground. - Setting posts: Rigid, plumb and to specified depth, or greater where necessary to
ensure adequate support. - Fixings: All components securely fixed.
715 COMPETENCE • Operatives: Contractors must employ competent operatives. • Qualifications: Submit certification of training. - Sector Scheme: 2A. Categories: 1 and 3. 720 SETTING POSTS IN CONCRETE • Standard: To BS 8500-2. • Mix: Designated concrete not less than GEN1 or Standard prescribed concrete not less than ST2. • Alternative mix for small quantities: 50 kg Portland cement to 150 kg fine aggregate to
250 kg 20 mm nominal maximum size coarse aggregate, medium workability. • Admixtures: Do not use. • Holes: Excavate neatly and with vertical sides. • Filling: Position post/ strut and fill hole with concrete to not less than the specified
depth, well rammed as filling proceeds and consolidated. • Backfilling of holes not completely filled with concrete: Excavated material, well rammed and consolidated.
730 EXPOSED CONCRETE FOUNDATIONS • Filling: Compact until air bubbles cease to appear on the upper surface. • Finishing: Weathered to shed water and trowelled smooth.
Section B_Term Requirements for Workmanship and Materials Part 2 Lot 1
Section B-Term Requirements for Workmanship and Materials
174
30/12/2013
740 SETTING POSTS IN EARTH • Holes: Excavated neatly, with vertical sides and as small as practicable to allow refilling. • Filling: Position posts/ struts and replace excavated material, well rammed as filling proceeds.
750 DRIVEN POSTS • Damage to heads: Minimize. - Repair: Neatly finish post tops after installation.
760 NAILED WOOD RAILS • Length (minimum): Two bays, with joints in adjacent rails staggered. • Fixing: Nail each length of rail to each post with two 100 mm galvanized nails. • Rails with split ends: Replace.
765 CLEFT WOOD RAILS • Length (maximum): 3.05 m. • Fixing: Rail end section shaped to adequately fill the post mortice. Nail each rail to each prick post with two galvanized nails. • Rails with split ends: Replace.
766 ARRIS RAILS • Fixing: - Rail end section: Shaped to adequately fill the post mortice or recess. - Recessed posts: Rails bolted to each post. - Top rails: Fixed at both ends using One 12 mm diameter wooden peg . • Rails with split ends: Replace.
770 SITE CUTTING OF WOOD • General: Kept to a minimum. • Below or near ground level: Cutting prohibited. • Treatment of surfaces exposed by minor cutting and drilling: Two flood coats of solution recommended for the purpose by main treatment solution manufacturer.
780 DAMAGE TO GALVANIZED SURFACES • Treatment of minor damage (including on fasteners and fittings): Low melting point zinc
alloy repair rods or powders made for this purpose, or at least two coats of zinc-rich paint to BS 4652.
• Thickness: Apply sufficient material to provide a zinc coating at least equal in thickness to the original layer.
790 SITE PAINTING • Timing: Prepare surfaces and apply finishes as soon as possible after fixing. COMPLETION 910 CLEANING • General: Leave the works in a clean, tidy condition. • Surfaces: Clean immediately before handover.
920 FIXINGS • All components: Tighten. Timing: Before handover.
930 GATES • Hinges, latches and closers: Adjust to provide smooth operation. Lubricate where necessary. Timing: Before handover.

Section B_Term Requirements for Workmanship and Materials Part 2 Lot 1
Section B-Term Requirements for Workmanship and Materials
175
30/12/2013
R10 RAINWATER DRAINAGE SYSTEMS
GENERAL 221 COLLECTION AND DISTRIBUTION OF RAINWATER • General: Complete, and without leakage or noise nuisance. PRODUCTS 315 CAST IRON GUTTERS • Standard: BS 460. • Manufacturer: Contractor's choice. - Product reference: Contractor's choice. • Profile: Half-round. • Jointing type: Jointing clips. • Nominal size: 150 mm. • Finish as supplied: Anti rust primer, to receive paint finish as section M60. • Brackets: Galvanized steel, ref ???. - Fixings: Stainless steel screws. Size: 40 x 5 mm. • Accessories: Stop ends.
351A PVC-U GUTTERS TO STAIR WELL FLAT ROOFS RENEW AS DIRECTED • Standard: To the relevant parts of BS 4576-1, BS EN 607 and BS EN 1462, Kitemark certified. • Manufacturer: Contractor's choice. - Product reference: Submit proposals. • Profile: Half round. • Nominal size: 100 mm. • Colour: Black. • Brackets: Plastic. - Fixings: Stainless steel screws. Size: 40 x 4 mm. • Accessories: Gutter stop ends.
360 SEALANT FOR GUTTERS • Type: As manufactures recommendations.
367 PROPRIETARY RAINWATER OUTLETS TO COMMUNAL BALCONIES Manufacturer: [Contractor's choice]. - Product reference: [Contractor's choice]. Construction: [asphalt flat balcony]. insulation thickness: [n/a]. - Type of grate/ Fittings: [flat grate]. - Outlet: Type and direction to suit pipe work with suitable adaptors and
connections. - Accessories: [n/a].
380 CAST IRON PIPEWORK - SPIGOT AND SOCKET • Standard: BS 460. • Manufacturer: Contractor's choice. - Product reference: Contractor's choice. • Type: Without ears. • Nominal size: 150 mm. • Finish as supplied: Water based primer, to receive paint finish as section M60. • Brackets: Cast iron holderbats.

Section B_Term Requirements for Workmanship and Materials Part 2 Lot 1
Section B-Term Requirements for Workmanship and Materials
176
30/12/2013
- Fixings: Stainless steel screws. Size: 50 x 5 mm. • Accessories: Plugged and screwed to masonry.
447 APPLY BITMEN PAINT TO INTERNAL FACES OF MAIN ROOF GUTTERS Apply proprietary bitumen paint Application method: Brush Coats: two Manufacture: CLIENT to approve Contractor's choice EXECUTION 600 PREPARATION • Work to be completed before commencing work specified in this section: - Below ground drainage. Alternatively, make temporary arrangements for
dispersal of rainwater without damage or disfigurement of the building fabric and surroundings.
- Painting of surfaces which will be concealed or inaccessible.
605 INSTALLATION GENERALLY • Electrolytic corrosion: Avoid contact between dissimilar metals where corrosion may
occur. • Plastics and galvanized steel pipes: Do not bend. • Allowance for thermal and building movement: Provide and maintain clearance as fixing
and jointing proceeds. • Protection: - Fit purpose made temporary caps to prevent ingress of debris. - Fit access covers, cleaning eyes and blanking plates as the work proceeds.
610 FIXING AND JOINTING GUTTERS • Joints: Watertight. • Brackets: Securely fixed. - Fixings: Screwed into softwood fascia board. Fixing centres: 450 mm. - Additional brackets: Where necessary to maintain support and stability, provide
at joints in gutters and near angles and outlets. • Roofing underlay: Dressed into gutter.
615 SETTING OUT EAVES GUTTERS - TO FALLS • Setting out: To true line and even gradient to prevent ponding or backfall. Position high
points of gutters as close as practical to the roof and low points not more than 50 mm below the roof.
• Outlets: Align with connections to below ground drainage.
635 FIXING PIPEWORK • Pipe work: Fix securely, plumb and/ or true to line. • Branches and low gradient sections: Fix with uniform and adequate falls to drain
efficiently. • Externally socketed pipes and fittings: Fix with sockets facing upstream. • Additional supports: Provide as necessary to support junctions and changes in direction. • Vertical pipes: - Provide a load bearing support at least at every storey level. - Tighten fixings as work proceeds so that every storey is self-supporting. - Wedge joints in unsealed metal pipes to prevent rattling. • Wall and floor penetrations: Isolate pipe work from structure. - Pipe sleeves: As section P31. - Masking plates: Fix at penetrations if visible in the finished work.

Section B_Term Requirements for Workmanship and Materials Part 2 Lot 1
Section B-Term Requirements for Workmanship and Materials
177
30/12/2013
• Expansion joint pipe sockets: Fix rigidly to buildings. Elsewhere, provide brackets and fixings that allow pipes to slide.
640 FIXING VERTICAL PIPEWORK • Bracket fixings: Plugged and screwed into masonry. • Distance between bracket fixing centres (maximum): 900 mm.
650 JOINTING PIPEWORK AND GUTTERS • General: Joint with materials and fittings that will make effective and durable
connections. • Jointing differing pipe work and gutter systems: Use adaptors intended for the purpose. • Cut ends of pipes and gutters: Clean and square. Remove burrs and swarf. Chamfer
pipe ends before inserting into ring seal sockets. • Jointing or mating surfaces: Clean and, where necessary, lubricate immediately before assembly. • Junctions: Form with fittings intended for the purpose. • Jointing material: Strike off flush. Do not allow it to project into bore of pipes and fittings. • Surplus flux, solvent jointing materials and cement: Remove.
690 ELECTRICAL CONTINUITY - PIPEWORK • Joints in metal pipes with flexible couplings: Clips (or suitable standard pipe couplings) supplied for earth bonding by pipe work manufacturer to ensure electrical continuity.
695 ELECTRICAL CONTINUITY - GUTTERS • Joints in metal gutters: Purpose made links supplied by the gutter manufacturer to
ensure electrical continuity.
700 LEAF GUARD Anodised steel leaf guard fitted to plastic gutter full length to ensure debris and leave are kept clear of guttering
COMPLETION 900 TESTING GENERALLY • Dates for testing: Give notice. - Period of notice (minimum): 1 week. • Preparation: - Pipe work: Complete, securely fixed, free from defects, obstruction and debris
before testing. • Testing: - Supply clean water, assistance and apparatus. - Do not use smoke to trace leaks. • Records: Submit a record of tests.
905 INTERNAL PIPEWORK TEST - ENGLAND, WALES, IRELAND AND NORTHERN IRELAND • Preparation: Temporarily seal open ends of pipe work with plugs. • Test apparatus: Connect a 'U' tube water gauge and air pump to pipe work via a plug. • Testing: Pump air into pipe work until gauge registers 38 mm. • Required performance: - Allow a period for temperature stabilization, after which the pressure of 38 mm is
to be maintained without loss for at least 3 minutes.
910 GUTTER TEST • Preparation: Temporarily block all outlets. • Testing: Fill gutters to overflow level and after 5 minutes closely inspect for leakage.
Section B_Term Requirements for Workmanship and Materials Part 2 Lot 1
Section B-Term Requirements for Workmanship and Materials
178
30/12/2013
915 MAINTENANCE INSTRUCTIONS • General: At completion, submit printed instructions recommending procedures for
maintenance of the rainwater installation, including full details of recommended inspection, cleaning and repair procedures.
920 IMMEDIATELY BEFORE HANDOVER • Construction rubbish, debris, swarf, temporary caps and fine dust which may enter the rainwater system: Remove. Do not sweep or flush into the rainwater system. • Access covers, rodding eyes, outlet gratings and the like: Secure complete with fixings.

Section B_Term Requirements for Workmanship and Materials Part 2 Lot 1
Section B-Term Requirements for Workmanship and Materials
179
30/12/2013
R12 BELOW GROUND DRAINAGE SYSTEMS
GENERAL 110 BELOW GROUND DRAINAGE SYSTEMS To be approved • Surface water and rainwater drainage sources: Submit proposals. • Foul drainage sources: Submit proposals. • Land drainage sources: None. • Pressure relief drainage sources: Submit proposals. • Pipes, bends and junctions: Submit proposals. - Accessories: Submit proposals. • Manholes, inspection chambers, traps, and separators: Submit proposals. - Accessories: Submit proposals. • Disposal: To sewers. • Accessories – general: Submit proposals. 120 SOAKAWAY SYSTEMS – PRECAST CONCRETE
To be approved • Rainwater drainage sources: Submit proposals. • Foul drainage sources: None. • Soakaway units: To be approved. - Accessories: To be approved. 124 SOAKAWAY SYSTEMS – GRANULAR FILL To be approved • Rainwater drainage sources: Submit proposals. • Foul drainage sources: None. • Soakaways: - Geotextile: To be approved. - Granular fill – rubble: To be approved. - Accessories: To be approved. • Pipes, bends and junctions: Submit proposals. SYSTEM PERFORMANCE 211 DESIGN – BELOW GROUND DRAINAGE SYSTEMS • Design: Complete the design of the below ground drainage system in accordance with
BS EN 752-1, -2, -3 and -4, BS EN 1295-1 and BS EN 1610. • Ground conditions: As advised - allow for London Clay. • Performance criteria: To be approved. • Proposals: Submit drawings, technical information, calculations and manufacturers' literature.
221 DESIGN - SOAKAWAY SYSTEMS • Design: Complete the design of the soak away system in accordance with BRE Digest
365. • Ground conditions: Per clause 211 above. • Required percolation rate: 100 L/s. • Design life of system: 40 years. • Proposals: Submit drawings, technical information, calculations and manufacturers' literature. • Maintenance requirements: Submit details. PRODUCTS 311 CONNECTORS to suit site requirements and configuration • Material and standard: Plastics to BS 4660 and Kitemark certified.
Section B_Term Requirements for Workmanship and Materials Part 2 Lot 1
Section B-Term Requirements for Workmanship and Materials
180
30/12/2013
• Type: To be approved. • Manufacturer: Submit proposals. - Product reference: Submit proposals.
313 ONE PIECE GULLIES to suit site requirements and configuration • Standards: - Cast iron: To BS 437 and Kitemark certified, or Agrément certified. - Clay: To BS EN 295-1 and Kitemark certified, or Agrément certified. - Concrete: To BS 5911-6 and Kitemark certified, or Agrément certified. - Plastics: To BS 4660 and Kitemark certified, or Agrément certified. - Polypropylene: To BS EN 1852-1. • Material: Cast iron. • Manufacturer: Submit proposals. - Product reference: Submit proposals. • Sizes: to suit site requirements and configuration. • Outlet sizes: to suit site requirements and configuration. • Silt buckets: Galvanized steel. Product reference: Submit proposals.
315 ONE PIECE GULLIES AND COVERS All types • Standards: - Cast iron: To BS 437 and Kitemark certified, or Agrément certified. - Clay: To BS EN 295-1 and Kitemark certified, or Agrément certified. - Concrete: To BS 5911-6 and Kitemark certified, or Agrément certified. - Plastics: To BS 4660 and Kitemark certified, or Agrément certified. - Polypropylene: To BS EN 1852-1. • Material: Cast iron. • Manufacturer: Submit proposals. - Product reference: Submit proposals. • Sizes: to suit site requirements and configuration. • Outlet sizes: to suit site requirements and configuration. • Covers: Cast iron or approved equivalent. - Product reference: Submit proposals. - Type: to be approved. - Material: Ductile cast iron or approved equivalent. - Sizes: to suit site requirements and configuration. - Loading grades to BS EN 124: Submit proposals. • Silt buckets: Galvanized steel. - Product reference: Submit proposals.
317 COMPOSITE GULLIES All types • Standards: - Cast iron: To BS 437 and Kitemark certified, or Agrément certified. - Clay: To BS EN 295-1 and Kitemark certified, or Agrément certified. - Plastics: To BS 4660 and Kitemark certified, or Agrément certified. - Polypropylene: To BS EN 1852-1. • Material: Cast iron. • Manufacturer: Submit proposals. • Traps: - Product reference: Submit proposals. • Raising pieces: - Product reference: Submit proposals. - Heights: to suit site requirements and configuration. • Hoppers: - Product reference: Submit proposals.

Section B_Term Requirements for Workmanship and Materials Part 2 Lot 1
Section B-Term Requirements for Workmanship and Materials
181
30/12/2013
• Covers: - Product reference: Submit proposals. - Type: To match existing layout. - Material: Ductile cast iron. - Sizes: to suit site requirements and configuration. - Loading grades to BS EN 124: to suit site requirements and configuration. • Silt buckets: Galvanized steel. - Product reference: Submit proposals.
327 RAINWATER FILTER AND COLLECTOR UNITS • Material: Aluminium. • Manufacturer: Submit proposals. - Product reference: Submit proposals.
329 PIPES, BENDS AND JUNCTIONS - SUPPLY • Pipes and fittings: From same manufacturer for each pipeline.
332 PIPES, BENDS AND JUNCTIONS - CAST IRON - DUCTILE Surface water and Foul Drainage • Standard: To BS EN 598, Kitemark certified. • Manufacturer: Submit proposals. - Product reference: Submit proposals. • Sizes: to suit site requirements and configuration. • Additional corrosion protection: None. • Jointing type: Push fit spigot and socket. 336 PIPES, BENDS AND JUNCTIONS - CLAY - FLEXIBLE JOINTS
To suit site requirements and configuration • Material and standard: Vitrified clay to BS EN 295-1, Kitemark certified. • Manufacturer: Submit proposals. - Product reference: Submit proposals. • Sizes: to suit site requirements and configuration. • Crushing strength (minimum): to suit site requirements and configuration. • Jointing type: Spigot and socket joints with sealing ring.
338 PIPES, BENDS AND JUNCTIONS - CLAY - RIGID JOINTS to suit site requirements and configuration • Material and standard: Vitrified clay to BS 65. • Type: Normal. • Manufacturer: Submit proposals. - Product reference: Submit proposals. • Sizes: to suit site requirements and configuration. • Strength class: Extra. • Jointing type: Spigot and socket with resin cement mortar joints.
355 ANTIFLOOD VALVES • Manufacturer: Submit proposals. Product reference: Submit proposals.
357 CONNECTORS - SADDLE • Standards: - Cast iron: To BS 437 and Kitemark certified, or Agrément certified. - Clay: To BS EN 295-1 and Kitemark certified, or Agrément certified. - Concrete: To BS 5911-6 and Kitemark certified, or Agrément certified. - Plastics: To BS 4660 and Kitemark certified, or Agrément certified.

Section B_Term Requirements for Workmanship and Materials Part 2 Lot 1
Section B-Term Requirements for Workmanship and Materials
182
30/12/2013
• Material: Cast iron. • Manufacturer: Submit proposals. - Product reference: Submit proposals. • Sizes: to suit site requirements and configuration.
359 FLEXIBLE COUPLINGS • Standard: To BS EN 295-4 or WIS 04-41-01 and Kitemark certified, or Agrément
certified. • Manufacturer: Submit proposals. - Product reference: Submit proposals.
361 FRESH AIR INLETS • Manufacturer: Submit proposals. - Product reference: Submit proposals.
371 RODDING POINTS to suit site requirements and configuration • Standards: - Cast iron: To BS 437 and Kitemark certified, or Agrément certified. - Clay: To BS EN 295-1 and Kitemark certified, or Agrément certified. - Concrete: To BS 5911-6 and Kitemark certified, or Agrément certified. - Plastics: To BS 4660 and Kitemark certified, or Agrément certified. • Material: Cast iron. • Manufacturer: Submit proposals. - Product reference: Submit proposals. • Sizes: to suit site requirements and configuration.
373 ROOT BARRIERS • Manufacturer: Submit proposals. Product reference: Submit proposals.
375 SEALED ACCESS FITTINGS to suit site requirements and configuration • Standards: - Cast iron: To BS 437 and Kitemark certified, or Agrément certified. - Clay: To BS EN 295-1 and Kitemark certified, or Agrément certified. - Plastics: To BS 4660 and Kitemark certified, or Agrément certified. - Polypropylene: To BS EN 1852-1. • Material: Cast iron. • Manufacturer: Submit proposals. • Bends: - Product reference: Submit proposals. • Branches: - Product reference: Submit proposals. • Straights: - Product reference: Submit proposals. • Raising pieces: - Product reference: Submit proposals. - Heights: to suit site requirements and configuration. • Covers: Product reference: Submit proposals.
401 INSPECTION CHAMBERS - PLASTICS to suit site requirements and configuration • Standard: To BS 7158 or BS EN 13598-1, or Agrément certified. • Diameter: to suit site requirements and configuration. • Manufacturer: Submit proposals. • Bases:

Section B_Term Requirements for Workmanship and Materials Part 2 Lot 1
Section B-Term Requirements for Workmanship and Materials
183
30/12/2013
- Product reference: Submit proposals. • Shaft units: - Product reference: Submit proposals. • Access covers and frames: - Product reference: Submit proposals. - Loading grades to BS EN 124: to suit site requirements and configuration.
407 MANHOLES AND INSPECTION CHAMBERS - CONCRETE to suit site requirements and configuration
• Standards: - To BS 5911-3 and BS EN 1917 and Kitemark certified; or - To BS 5911-4 and BS EN 1917. • Manufacturer: Submit proposals • Shape: to suit site requirements and configuration • Sizes: to suit site requirements and configuration. • Cement type and content: To BS 5911-1 and BS EN 1916. • Chamber sections: - Product reference: Submit proposals. - Jointing type: Proprietary sealant. • Cover slabs: - Product reference: Submit proposals. - Thickness: to suit site requirements and configuration. - Loading grades to BS EN 124: to suit site requirements and configuration. - Openings: To suit access covers. • Steps: Required in chambers over 1200 mm deep. 409 MANHOLES - CONCRETE - ADDITIONAL COMPONENTS FOR DEEP MANHOLES • Standards: - To BS 5911-3 and BS EN 1917 and Kitemark certified; or - To BS 5911-4 and BS EN 1917. • Manufacturer: Submit proposals. • Cement type and content: To BS 5911-3 and BS EN 1917 and Kitemark certified; or to
BS 5911-4 and BS EN 1917. • Landing slabs: - Product reference: Submit proposals. - Sizes: to suit site requirements and configuration. • Reducing slabs: - Product reference: Submit proposals. - Sizes: to suit site requirements and configuration. • Straight backed tapers: - Product reference: Submit proposals. - Nominal sizes: to suit site requirements and configuration. • Shaft sections:
- Product reference: Submit proposals. - Sizes: to suit site requirements and configuration.
421 OIL AND PETROL SEPARATOR UNITS - PLASTICS • Standards: To Environment Agency PPG 3 and BS EN 858-1, with oil level alarm. • Manufacturer: Submit proposals. - Product reference: Submit proposals. • Size: to suit site requirements and configuration. • Inlet pipe size: to suit site requirements and configuration. • Outlet pipe size: to suit site requirements and configuration. • Accessories: Access covers and frames.

Section B_Term Requirements for Workmanship and Materials Part 2 Lot 1
Section B-Term Requirements for Workmanship and Materials
184
30/12/2013
433 MANHOLE CHANNELS AND BRANCHES - CONVENTIONAL • Material: Clay. • Manufacturer: Submit proposals. - Product reference: Submit proposals.
435 MANHOLE CHANNELS AND BRANCHES - PREFORMED PLASTICS • Manufacturer: Submit proposals. - Product reference: Submit proposals.
439 MANHOLE STEPS to suit site requirements and configuration • Standard: To BS EN 13101. • Type: to suit site requirements and configuration. • Manufacturer: Submit proposals. - Product reference: Submit proposals. • Material: Galvanized steel.
444 SEALING FOR CONCRETE MANHOLES - BITUMINOUS STRIPS • Manufacturer: Submit proposals. Product reference: Submit proposals.
446 SEALING FOR CONCRETE MANHOLES - MORTAR • Manufacturer: Submit proposals. Product reference: Submit proposals.
448 SEALING FOR CONCRETE MANHOLES - SEALANT • Manufacturer: Submit proposals. Product reference: Submit proposals. 462 STORAGE TANKS - FOUL WATER
To suit site requirements and configuration • Standard: To BS EN 12566-1. • Material: GRP. • Manufacturer: Submit proposals. - Product reference: Submit proposals. • Capacity (minimum): 18 000 L. • Internal arrangements: Baffle plates. • Access shaft extension: Not required. • Access arrangements: Ladder. • Inlet pipes: to suit site requirements and configuration. - Size: to suit site requirements and configuration. - Invert depth below ground level: to suit site requirements and configuration. • Vent pipes: Galvanized steel. - Size: to suit site requirements and configuration. • Accessories: Access covers and frames.
471 ACCESS COVERS AND FRAMES FOUL MANHOLES • Standard: To BS EN 124. • Types: to suit site requirements and configuration. • Manufacturer: Submit proposals. - Product reference: Submit proposals. • Materials: Ductile cast iron. • Finishes: Hot-dip galvanized. • Sizes: to suit site requirements and configuration. • Loading grades to BS EN 124: to suit site requirements and configuration. • Edging trims: Not required. • Accessories: Independent sealing plates.

Section B_Term Requirements for Workmanship and Materials Part 2 Lot 1
Section B-Term Requirements for Workmanship and Materials
185
30/12/2013
473 ACCESS COVERS AND FRAMES - PRECAST CONCRETE SEATINGS To suit site requirements and configuration
• Standards: To BS 5911-3 and BS EN 1917 and Kitemark certified. • Manufacturer: Submit proposals. - Product reference: Submit proposals. • Opening sizes: To suit access covers.
475 ACCESS LADDERS to suit site requirements and configuration • Standard: To BS 4211, Class A. • Manufacturer: Submit proposals. - Product reference: Submit proposals. • Finish: Galvanized to BS EN ISO 1461. • Accessories: Safety chains and hoops.
481 CONCRETE (FOAMED) • Density (minimum): 1050 kg/m². • 28 day compressive strength (maximum): 10 N/mm². • Ground conditions to BS 8500-1: to suit site requirements and configuration.
483 CONCRETE (GENERAL) • Standards: To BS 8500-1, -2 and BS EN 206-1. • Concrete: GEN1 or ST2.
485 CONCRETE (STRUCTURAL) • Standards: To BS 8500-1, -2 and BS EN 206-1. • Concrete: GEN3 or ST4.
487 CONCRETE (ADOPTABLE MANHOLE BENCHINGS AND SURROUNDS) • Standard: - England and Wales, Northern Ireland: To WRc 'Sewers for Adoption'. - Scotland: To WRc 'Sewers for Scotland'. • Concrete: In situ.
489 CONCRETE (ADOPTABLE MANHOLE BENCHING TOPPING) • Standard: - England and Wales, Northern Ireland: To WRc 'Sewers for Adoption'. - Scotland: To WRc 'Sewers for Scotland'. • Concrete: High strength.
496 GRANULAR MATERIAL • Standard: To BS EN 12620. - Size: Dependent on location - see Execution clauses in this section, and in
sections R16, R17 and R18, if used.
498 GRANULAR SUB-BASE MATERIAL • Standard: To Highways Agency 'Specification for Highway Works', Type 1 Unbound mixtures for sub-base.
FABRICATION EXECUTION 610 STRIPPING OUT

Section B_Term Requirements for Workmanship and Materials Part 2 Lot 1
Section B-Term Requirements for Workmanship and Materials
186
30/12/2013
• Extent of stripping out: to suit site requirements and configuration. • Exposed ends of existing drainage to be abandoned: Seal with concrete (general).
611 EXISTING DRAINS • Setting out: Before starting work, check invert levels and positions of existing drains, sewers, inspection chambers and manholes against drawings. Report discrepancies. • Protection: Protect existing drains to be retained and maintain normal operation if in
use.
613 EXCAVATED MATERIAL • Turf, topsoil, hardcore, etc: Set aside for use in reinstatement.
616 SELECTED FILL FOR BACKFILLING • Selected fill: As-dug material, free from vegetable matter, rubbish, frozen soil and
material retained on a 40 mm sieve. - Compaction: By hand in 100 mm layers.
623 LOWER PART OF TRENCH – GENERAL • Trench up to 300 mm above crown of pipe: Vertical sides, width as small as practicable. Width (minimum): External diameter of pipe plus 300 mm.
625 LOWER PART OF TRENCH - TRANSITION DEPTH • Trench widths up to 300 mm above crown of pipe (maximum): - DN 100 pipelines more than 6.0 m deep: 600 mm. - DN 150 pipelines more than 5.4 m deep: 700 mm.
- DN 225 pipelines more than 4.0 m deep: 800 mm. - DN 300 pipelines more than 2.9 m deep: 900 mm.
631 TYPE OF SUBSOIL • General: Where type of subsoil at level of crown of pipe differs from that stated for the
type of bedding, surround or support, give notice.
635 FORMATION FOR BEDDINGS • Timing: Excavate to formation immediately before laying beddings or pipes. • Mud, rock projections, boulders and hard spots: Remove. Replace with consolidated bedding material. • Local soft spots: Harden by tamping in bedding material. • Inspection of excavated formations: Give notice.
641 PIPES AT DIFFERENT LEVELS IN COMMON TRENCH • Sub trench: Permissible provided soil of step is stable and unlikely to break away.
- Sub trench not permissible: Trench depth as required for lower pipe. Increase thickness of bedding to upper pipe as necessary.
• Lower pipe: Backfill with compacted granular material to at least half way up higher pipe.
• Clear horizontal distance between pipes (minimum): - Pipes up to DN 700: 350 mm. - Pipes exceeding DN 700: 500 mm.
651 CLASS A SUPPORT to suit site requirements and configuration • Type of subsoil: to suit site requirements and configuration. Allow for London Clay.. • Blinding: - Material: Concrete (general). - Thickness (minimum): 25 mm. - Width: Full width of trench.

Section B_Term Requirements for Workmanship and Materials Part 2 Lot 1
Section B-Term Requirements for Workmanship and Materials
187
30/12/2013
- Allow to set before proceeding. • Pipes:
- Temporary support: Two-layer pads of bituminous dpc or equivalent, on precast concrete cradles.
- Clearance under pipes (minimum): 100 mm. - Adjust pipes to line and gradient. • Bed:
- Material: Concrete (general). - Compact thoroughly.
- Thickness: From top of blinding to pipe invert. - Width (minimum): External diameter of pipe plus 200 mm. Shutter vertical sides
of concrete or extend concrete across full width of trench. • Initial testing before placing support: Required. • Support: - Material: Concrete (general). - Compact thoroughly. - Height: Halfway up each side of pipe. - Width: Full width of concrete bed or full width of trench. • Backfilling: - Material: Protective cushion of selected fill. - Depth: To 150 mm (250 mm for adoptable sewers) above crown of pipe. - Compaction: By hand in 100 mm layers.
653 CLASS B SUPPORT to suit site requirements and configuration • Type of subsoil: to suit site requirements and configuration. Allow for London clay. • Granular material: - Pipe sizes DN 100 and DN 150: Size 4/10. - Pipe sizes DN 225 and DN 300: Size 4/10, 10/20 or 4/20. - Pipe sizes DN 375-500: Size 10/20 or 4/20. - Pipe sizes DN 600 and above: Size 10/20, 20/40, 4/20 or 4/40. • Bedding: - Material: Granular, compacted over full width of trench. - Thickness (minimum): 50 mm for sleeve jointed pipes, 100 mm for socket jointed
pipes. If trench bottom is uneven, increase thickness by 100 mm. • Pipes: Dig slightly into bedding, rest uniformly on barrels and adjust to line and gradient. • Initial testing before placing support: Required. • Support: - Material: Granular. - Depth: Halfway up each side of pipe. - Compaction: By hand. • Backfilling: - Material: Protective cushion of selected fill. - Depth: To 150 mm (250 mm for adoptable sewers) above crown of pipe. Compaction: By hand in 100 mm layers. 655 CLASS D BED Requirements and configuration
• Type of subsoil: to suit site requirements and configuration. Allow for London clay. • Trench: Excavate slightly shallower than final levels. - Trimming: By hand to accurate gradients. Replace overdig with compacted spoil. • Pipes: Rest uniformly on barrels, adjust to line and gradient. Do not use hard packings under pipes. • Initial testing before backfilling: Required. • Backfilling:

Section B_Term Requirements for Workmanship and Materials Part 2 Lot 1
Section B-Term Requirements for Workmanship and Materials
188
30/12/2013
- Material: Protective cushion of selected fill. - Depth: 150 mm (250 mm for adoptable sewers) above crown of pipe. - Compaction: By hand in 100 mm layers.
657 CLASS F BEDDING to suit site requirements and configuration • Type of subsoil: to suit site requirements and configuration. Allow for London clay. • Granular material: - Pipe sizes DN 100 and DN 150: Size 4/10. - Pipe sizes DN 225 and DN 300: Size 4/10 or 10/20. - Pipe sizes DN 375-500: Size 10/20. - Pipe sizes DN 600 and above: Size 10/20 or 20/40. • Bedding: - Material: Granular, compacted over full width of trench. - Thickness (minimum): 50 mm for sleeve jointed pipes,
100 mm for socket jointed pipes. Where trench bottom is uneven, increase thickness by 100 mm.
• Pipes: Dig slightly into bedding, rest uniformly on barrels and adjust to line and gradient. • Initial testing before backfilling: Required. • Backfilling: - Material: Protective cushion of selected fill.
- Depth: 150 mm (250 mm for adoptable sewers) above crown of pipe. - Compaction: By hand in 100 mm layers.
659 CLASS N BEDDING to suit site requirements and configuration • Type of subsoil: to suit site requirements and configuration. Allow for London clay. • Granular material: Size 0/4 or 0/10. • Bedding: - Material: As-dug material with a compaction fraction of not more than 0.3. - Compaction: Over full width of trench.
- Thickness (minimum): 50 mm for sleeve jointed pipes, 100 mm for socket jointed pipes.
- Where trench bottom is uneven, increase thickness by 100 mm. • Pipes: Dig slightly into bedding, rest uniformly on barrels and adjust to line and gradient. • Initial testing before backfilling: Required. • Backfilling: - Material: Protective cushion of selected fill.
- Depth: 150 mm (250 mm for adoptable sewers) above crown of pipe. - Compaction: By hand in 100 mm layers.
661 CLASS O SUPPORT to suit site requirements and configuration • Type of subsoil: to suit site requirements and configuration. Allow for London clay. • Granular material: - Pipe sizes DN 100 and DN 150: Size 4/10. - Pipe sizes DN 225 and DN 300: Size 4/10 or 10/20. • Bedding: - Material: Granular, compacted over full width of trench. - Thickness (minimum): 100 mm. • Pipes: Dig slightly into bedding, rest uniformly on barrels and adjust to line and gradient. • Initial testing before placing support: Required. • Support: - Material: Granular. - Depth: To slightly above crown of pipe. - Compaction: By hand. • Backfilling: - Material and depth:
Section B_Term Requirements for Workmanship and Materials Part 2 Lot 1
Section B-Term Requirements for Workmanship and Materials
189
30/12/2013
Protective cushion of selected fill to 300 mm above crown of pipe; or Additional granular material to 100 mm above crown of pipe. - Compaction: By hand in 100 mm layers.
663 CLASS P SUPPORT to suit site requirements and configuration • Type of subsoil: to suit site requirements and configuration. Allow for London clay. • Granular material: - Pipe sizes DN 100 and DN 150: Size 4/10. - Pipe sizes DN 225 and DN 300: Size 4/10, 10/20 or 4/20. • Bedding: - Material: Granular, compacted over full width of trench. - Thickness (minimum): 100 mm. • Pipes: Dig slightly into bedding, rest uniformly on barrels and adjust to line and gradient. • Initial testing before placing support: Required. • Support: - Material: Granular. - Depth: To slightly above crown of pipe. - Compaction: By hand. • Backfilling: - Material and depth: Protective cushion of selected fill to 300 mm above crown of pipe; or Additional granular material, to 100 mm above crown of pipe. Compaction: By hand in 100 mm layers.
665 CLASS Q SURROUND to suit site requirements and configuration • Type of subsoil: to suit site requirements and configuration. Allow for London clay. • Granular material: - Pipe sizes DN 100 and DN 150: Size 4/10. - Pipe sizes DN 225 and DN 300: Size 4/10, 10/20 or 4/20. • Bedding: - Material: Granular, compacted over full width of trench. - Thickness (minimum): 100 mm. • Pipes: Dig slightly into bedding, rest uniformly on barrels and adjust to line and gradient. • Initial testing before placing support: Required. • Surround: - Material: Granular. - Depth (minimum): To 75 mm above crown of pipe. - Compaction: By hand. • Flexible filler: - Material: to suit site requirements and configuration. - Laying: Continuously over completed surround before laying protection slabs. • Protection slabs: - Material: Concrete (general). Type: Reinforced. - Thickness: 100 mm. - Reinforcement: Submit proposals. - Minimum bearing: 300 mm. • Backfilling: Soil or topsoil, as appropriate.
669 CLASS T SURROUND to suit site requirements and configuration • Type of subsoil: to suit site requirements and configuration. Allow for London clay. • Granular material: - Pipe sizes DN 100 and DN 150: Size 4/10. - Pipe sizes DN 225 and DN 300: Size 4/10, 10/20 or 4/20. • Bedding:

Section B_Term Requirements for Workmanship and Materials Part 2 Lot 1
Section B-Term Requirements for Workmanship and Materials
190
30/12/2013
- Material: Granular, compacted over full width of trench. - Thickness (minimum): 100 mm. • Pipes: Dig slightly into bedding, rest uniformly on barrels and adjust to line and gradient. • Initial testing before placing surround: Required. • Surround: - Material: Granular. - Depth: To 100 mm above crown of pipe. - Compaction: By hand.
673 CLASS W SURROUND to suit site requirements and configuration • Type of subsoil: to suit site requirements and configuration. Allow for London clay. • Timing: Excavate trench after hardcore has been laid and compacted. • Granular material: - Pipe sizes DN 100 and DN 150: Size 4/10. - Pipe sizes DN 225 and DN 300: Size 4/10 or 10/20. • Bedding: - Material: Granular, compacted over full width of trench. - Thickness (minimum): 100 mm. • Pipes: Dig slightly into bedding, rest uniformly on barrels and adjust to line and gradient. • Initial testing before placing surround: Required. • Surround: - Material: Granular. - Depth: To 100 mm above crown of pipe. - Compaction: By hand. • Backfilling: - Material: Hardcore as section D20, or granular. - Depth: Up to slab formation. Compaction: In 300 mm (maximum) thick layers.
676 CLASS Y SURROUND to suit site requirements and configuration • Type of subsoil: to suit site requirements and configuration. Allow for London clay /
sandy clay. • Timing: Excavate trench after hardcore has been laid and compacted. • Blinding: - Material: Concrete (general). - Thickness (minimum): 25 mm. - Width: Full width of trench. - Allow to set before proceeding. • Pipes: - Temporary support: Folding wedges of compressible board. Prevent flotation. - Clearance under pipes (minimum): 100 mm. - Adjust pipes to line and gradient. • Initial testing before placing surround: Required. • Surround, cast integrally with slab: - Material: Concrete of same mix as slab. - Width (minimum): External diameter of pipe plus 200 mm. • Extent of surround: To within 150 mm of nearest flexible joint.
678 CLASS Z SURROUND to suit site requirements and configuration • Type of subsoil: to suit site requirements and configuration. Allow for London clay. • Blinding: - Material: Concrete (general). - Thickness (minimum): 25 mm. - Width: Full width of trench. - Allow to set before proceeding.

Section B_Term Requirements for Workmanship and Materials Part 2 Lot 1
Section B-Term Requirements for Workmanship and Materials
191
30/12/2013
• Pipes: - Temporary support: Folding wedges of compressible board. Prevent flotation. - Clearance under pipes (minimum): 100 mm. - Adjust pipes to line and gradient. • Initial testing before placing surround: Required. • Surround: - Material: Concrete (general). - Depth: To 150 mm above crown of pipe. - Width: Full width of trench. • Vertical construction joints: - Location: At face of flexible pipe joints. - Material: 18 mm thick compressible board pre-cut to profile of pipe. - Socketed pipes: Fill gaps between spigots and sockets with resilient material to
prevent entry of concrete.
680 CONCRETE SURROUND FOR PIPE RUNS NEAR FOUNDATIONS • Class Z surround: Provide in locations where bottom of trench is lower than bottom of
foundation and as follows (horizontal clear distance between nearest edges of foundations and pipe trenches):
- Trenches less than 1 m from foundations: Top of concrete surround not lower than bottom of foundation.
- Trenches more than 1 m from foundations: Top of concrete surround not lower than D mm below bottom of foundation, where D mm is horizontal distance of trench from foundation, less 150 mm.
683 LAYING PIPELINES • Laying pipes: To true line and regular gradient on even bed for full length of barrel with sockets (if any) facing up the gradient. • Ingress of debris: Seal exposed ends during construction. • Timing: Minimize time between laying and testing.
685 JOINTING PIPELINES • Connections: Durable, effective and free from leakage. • Junctions, including to differing pipe work systems: With adaptors intended for the
purpose. • Cut ends of pipes: Clean and square. Remove burrs and swarf. Chamfer pipe ends
before inserting into ring seal sockets. • Jointing or mating surfaces: Clean and, where necessary, lubricate immediately before assembly. • Allowance for movement: Provide and maintain appropriate clearance at ends of spigots
as fixing and jointing proceeds. • Jointing material: Do not allow to project into bore of pipes and fittings.
687 CONCRETE SURROUND FOR CROSSOVERS • Class Z surround: Provide where two pipelines (other than plastics pipes) cross with
less than 300 mm separation. - Extent, on both pipes: 1 m centred on the crossing point, and beyond as
necessary to come within 150 mm of nearest flexible joints.
689 PIPELINES PASSING THROUGH STRUCTURES • Pipelines that must be cast in or fixed to structures (including manholes, catch pits and
inspection chambers): Provide 600 mm long rocker pipes adjacent to the external face of the structure (or both faces where appropriate, e.g. walls to footings), with flexible joints at both ends.
- Distance to rocker pipe from structure (maximum):150 mm.

Section B_Term Requirements for Workmanship and Materials Part 2 Lot 1
Section B-Term Requirements for Workmanship and Materials
192
30/12/2013
• Provision for movement for pipelines that need not be cast in or fixed to structures (e.g. walls to footings): - Rocker pipes as specified above; or
- Openings in the structures to give 50 mm minimum clearance around the pipeline.
- Closely fit a rigid sheet to each side of opening to prevent ingress of fill or vermin.
691 BENDS AT BASE OF SOIL STACKS • Type: to suit site requirements and configuration. - Radius to centreline of pipe (minimum): To be approved. • Height of invert of horizontal drain at base of stack below centreline of lowest branch
pipe (minimum): to suit site requirements and configuration. • Bedding: Do not impair flexibility of pipe couplings. - Material: Concrete (general).
693 DIRECT CONNECTION OF GROUND FLOOR WCS TO DRAINS • Drop from crown of WC trap to invert of drain (maximum): 1.3 m. • Horizontal distance from the drop to a ventilated drain (maximum): 6 m.
695 BACKDROP PIPES OUTSIDE MANHOLE WALLS • Excavation beneath backdrop pipe: Backfill. - Material: Concrete (general). • Pipe encasement:. - Material: Concrete (general). - Thickness (minimum): 150 mm.
697 INSTALLING FLEXIBLE COUPLINGS • Ends of pipes to be joined: Cut cleanly and square. • Outer surfaces of pipes to be joined: Clean and smooth. Where necessary, e.g. on concrete or iron pipes, smooth out mould lines and/ or apply a cement grout over the sealing area. • Clamping bands: Tighten carefully to make gastight and watertight seals.
699 CONNECTIONS TO SEWERS • General: Connect new pipe work to existing adopted sewers to the requirements of the adopting authority or its agent.
705 INITIAL TESTING OF PIPELINES • Before testing: - Cement mortar jointing: Leave 24 h. - Solvent welded pipelines: Leave 1 h. • Method: Block open ends of pipelines to be tested and pressurise. Air test short lengths
to BS EN 1610.
711 TRENCH SUPPORTS • Removal of trench supports and other obstacles: Sufficient to permit compacted filling of
all spaces.
713 INSTALLING ROOT BARRIERS
715 BACKFILLING TO PIPELINES • Backfilling above top of surround or protective cushion: Material excavated from trench, compacted in layers 300 mm (maximum) thick. • Heavy compactors: Do not use before there is 600 mm (total) of material over pipes.

Section B_Term Requirements for Workmanship and Materials Part 2 Lot 1
Section B-Term Requirements for Workmanship and Materials
193
30/12/2013
718 BACKFILLING OVER CONCRETE • Minimum times from placing concrete:
- Backfilling generally: 24 h. - Heavy compactors and traffic loads: 72 h.
720 BACKFILLING UNDER ROADS AND PAVINGS • Backfilling from top of surround or protective cushion up to formation level: Granular sub-
base material, laid and compacted in 150 mm layers.
722 PUBLIC ROADS AND PAVINGS – E&W, SCOT • Excavating and backfilling of trenches: To Department for Transport 'Specification for
the reinstatement of openings in highways'.
726 FOAMED CONCRETE BACKFILL • Preparation: Seal off openings in, and ends of, abandoned pipelines and ducts. Seal off cavities in or next to the excavation which are not to be filled. • Backfilling: To British Cement Association 'Foamed concrete - specification for use in
the reinstatement of openings in highways'.
728 LAYING WARNING MARKER TAPES • Installation: During backfilling, lay continuously over pipelines. • Depth: 300-400 mm. - Pipelines deeper than 2 m: Lay an additional tape 600 mm above the top of the
pipeline.
732 TEMPORARY BRIDGES • Trench bridges: As necessary to prevent construction traffic damaging pipes after backfilling.
734 INSTALLING ACCESS POINTS AND GULLIES • Bedding: - Material: Granular material, size 4/10. - Thickness (minimum): 100 mm. • Surround: - Material: Concrete (general). - Thickness (minimum): 100 mm. - Height: to suit site requirements and configuration. • Backfilling: to suit site requirements and configuration. - Material: Selected fill. - Compaction: By hand in 100 mm layers. • Setting out relative to adjacent construction features: Square and tightly jointed. • Permissible deviation in level of external covers and gratings: +0 to -6 mm. • Raising pieces (clay and concrete units): Joint with 1:3 cement: sand mortar. • Exposed openings: Fit purpose made temporary caps. Protect from traffic.
736 INSTALLING RODDING POINTS • Bedding and surround: - Material: Concrete (general). - Thickness (minimum): 100 mm. • Permissible deviation in level of external covers and gratings: +0 to -6 mm.
741 INSTALLING INSPECTION CHAMBERS - PLASTICS • Bedding: - Material: Concrete (general). - Thickness (minimum): 150 mm.
Section B_Term Requirements for Workmanship and Materials Part 2 Lot 1
Section B-Term Requirements for Workmanship and Materials
194
30/12/2013
• Surround: - Material: Concrete (general). - Thickness (minimum): 150 mm. • Backfilling: Granular material, size 4/10, to mm above crown of pipes, then selected fill. - Compaction: By hand in 100 mm layers. • Concrete collar: - Material: Concrete (structural). - Thickness (minimum): 200 mm. - Width (minimum): to suit site requirements and configuration. • Seating: Brickwork as section F10.
743 INSTALLING CONCRETE MANHOLES • Bases: - Material: Concrete (general). - Thickness (minimum): 225 mm. • Surround: - Material: Concrete (general). - Thickness (minimum): 150 mm. - Height: to suit site requirements and configuration. • Backfilling: - Material: Granular material, size 4/10, to mm above crown of pipes, then selected fill. - Compaction: By hand in 100 mm layers.
745 INSTALLING GREASE TRAPS AND CONVERTERS • Base: - Material: Concrete (general). - Thickness (minimum): 150 mm. • Surround: to suit site requirements and configuration. - Material: Concrete (general). - Thickness (minimum): 100 mm. • Backfilling: Granular material, size 4/10 to mm above crown of pipes, then selected fill. - Compaction: By hand in 100 mm layers.
753 FIXING MANHOLE STEPS • Fixing: Bed in joints. • Positioning: 300 mm vertical centres staggered 300 mm horizontally, with lowest step
300 mm (maximum) above benching and top step 450 mm (maximum) below top of cover.
755 JOINTING CONCRETE MANHOLE CHAMBER SECTIONS • Jointing and sealing: Submit proposals. • Inner joint surface: Trim surplus jointing material extruded into chamber and point
neatly.

Section B_Term Requirements for Workmanship and Materials Part 2 Lot 1
Section B-Term Requirements for Workmanship and Materials
195
30/12/2013
757 LAYING CONVENTIONAL CHANNELS, BRANCHES AND BENCHING • Main channel: Bed solid in 1:3 cement: sand mortar. - Branches: Connect to channel, preferably at half pipe level, so that discharge
flows smoothly in direction of main flow. - Branches greater than nominal size 150 mm: Connect the branch soffite level
with the main drain soffite. - Connecting angles more than 45° to direction of flow: Use three-quarter section
channel bends. • Benching: - Material: Concrete (general). - Profile: Rise vertically from top of main channel to a level not lower than soffite of
outlet pipe, then slope upwards at 10% to walls. - Topping: Material: 1:3 Cement: sand mortar. - Application: Before benching concrete has set, and with dense smooth uniform
finish.
759 LAYING PREFORMED PLASTICS CHANNELS, BRANCHES AND BENCHING • Main channel: Bed solid in 1:3 cement: sand mortar. - Branches: Connect to channel, preferably at half pipe level, so that discharge
flows smoothly in direction of main flow. - Connecting angles more than 45° to direction of flow: Use three-quarter section. • Bedding: 1:3 cement: sand mortar. Use clips or ensure adequate mechanical key. • Benching: - Material: Concrete (general). - Profile: Rise vertically from top of main channel to a level not lower than soffite of
outlet pipe, then slope upwards at 10% to walls. - Topping: Material: Concrete (structural). - Application: Before benching concrete has set, and with dense smooth uniform
finish.
761 LAYING SEALED ACCESS FITTINGS, BRANCHES AND BENCHING • Unused branches: Fit caps. • Bedding: 1:3 cement: sand mortar. • Benching: - Material: Concrete (general). Profile: 10% fall from manhole walls to component rim.
- Topping: Material: 1:3 Cement: sand mortar. - Application: Before benching concrete has set, and with dense smooth uniform
finish.
773 INSTALLING ACCESS COVERS AND FRAMES • Seating: Brickwork as section F10. • Bedding and haunching of frames: Continuously. - Material: 1:3 cement: sand mortar. - Top of haunching: 30 mm below surrounding surfaces. • Horizontal positioning of frames: - Centred over openings. - Square with joints in surrounding paving. • Vertical positioning of frames: - Level; or - Marry in with levels of surrounding paving. • Permissible deviation in level of external covers and frames: +0 to -6 mm.

Section B_Term Requirements for Workmanship and Materials Part 2 Lot 1
Section B-Term Requirements for Workmanship and Materials
196
30/12/2013
776 EXPOSED OPENINGS IN INSPECTION CHAMBERS, ACCESS POINTS, FITTINGS AND EQUIPMENT
• General: Fit purpose made temporary caps. Protect from site traffic. COMPLETION 901 REMOVAL OF DEBRIS AND CLEANING • Preparation: Lift covers to manholes, inspection chambers and access points. Remove mortar droppings, debris and loose wrappings. - Timing: Before cleaning, final testing, CCTV inspection if specified, and
immediately before handover. • Cleaning: Thoroughly flush pipelines with water to remove silt and check for blockages.
Rod pipelines between access points if there is any indication that they may be obstructed.
• Washings and detritus: Do not discharge into sewers or watercourses. • Covers: Securely replace after cleaning and testing.
903 TEMPORARY MEASURES • Water used to stabilize tanks and the like during installation: Drain.
911 TESTING AND INSPECTION • Dates for testing and inspection: Give notice. Period of notice: 48 hours.
921 FINAL TESTING OF PRIVATE GRAVITY DRAINS AND SEWERS UP TO DN 300 • Before testing: - Cement mortar jointing: Leave 24 h. - Solvent welded pipelines: Leave 1 h. • Standard: To Building Regulations. • Method: Water.
931 FINAL TESTING OF ADOPTABLE AND LARGE PRIVATE SEWERS • Standard (sewers up to and including size DN 750): - England, Wales and Northern Ireland: To WRc 'Sewers for adoption'. - Scotland: To WRc 'Sewers for Scotland'. • Method: Water.
941 WATER TESTING OF MANHOLES AND INSPECTION CHAMBERS • Timing: Before backfilling. • Standard: - Exfiltration: To BS EN 1610. - Method: Testing with water (method W). - Infiltration: No identifiable flow of water penetrating the chamber.
951 WATER TESTING OF ANCILLARY COMPONENTS • Components: to suit site requirements and configuration. • Standard: To BS EN 1610.
- Tests: infiltration. - Method: Testing with water (method W).
976 CCTV INSPECTION OF ADOPTABLE PIPELINES • General: Permit the Adopting Authority or its agent to carry out and record internal
CCTV inspection of pipelines and associated manholes after completion. - Locations to be inspected: to suit site requirements and configuration. • Pipelines under highways: Complete construction, except for laying of wearing course, before inspection.

Section B_Term Requirements for Workmanship and Materials Part 2 Lot 1
Section B-Term Requirements for Workmanship and Materials
197
30/12/2013
978 LIFTING KEYS • Lifting keys: Supply suitable keys for each type of access cover. Timing: At completion.
980 INSTRUCTIONS • Manufacturer's user instructions: provide for components with moving parts / machinery
and items which require periodic maintenance.

Section B_Term Requirements for Workmanship and Materials Part 2 Lot 1
Section B-Term Requirements for Workmanship and Materials
198
30/12/2013
Z11 PURPOSE MADE METAL WORK 310 METAL PRODUCTS:
Standards: Generally, as specified in the following clauses. Fasteners: Generally, same metal as component, with matching coating and finish.
320 STEEL LONG AND FLAT PRODUCTS: Hot rolled structural steels (excluding structural hollow sections and tubes): To BS EN 10025-1.Fine grain steels, including special steels: To BS EN 10025-3 and -4.Improved atmospheric corrosion resistance: To BS EN 10025-5.
330 STEEL PLATE, SHEET AND STRIP: Plates and wide flats, high yield strength steel: To BS EN 10025-6.
340 HOT ROLLED STEEL PLATE, SHEET AND STRIP:
Flat products, high yield strength for cold forming: To BS EN 10149-1, -2 and -3.Low carbon steel sheet and strip for cold forming: To BS EN 10111.Narrow strip, formable and general engineering purposes: To BS 1449-1.8 and BS 1449-1.14.
350 COLD ROLLED STEEL PLATE, SHEET AND STRIP:
- Steel sections: To BS EN 10162.Flat products, high yield strength micro-alloyed steels for cold forming: To BS EN 10268.
- Low carbon steel flat products for cold forming: To BS EN 10130 and BS EN 10131.
- Uncoated mild steel narrow strip for cold forming: To BS EN 10139 and BS EN 10140.
- Narrow strip, general engineering purposes: To BS EN 10132-1, -2, and -3.Low carbon steel flat products for vitreous enamelling: To BS EN 10209.
360 STEEL COATED FLAT PRODUCTS:
- Hot dip zinc coated low carbon steel sheet and strip for cold forming: To BS EN 10327 and BS EN 10143.
- Hot dip zinc coated structural steel sheet and strip: To BS EN 10143 and BS EN 10326.
- Hot dip zinc-aluminium (za) coated sheet and strip: To BS EN 10326 and 10327. - Hot dip aluminium-zinc (az) coated sheet and strip: To BS EN 10327.Organic
coated flat products: To BS EN 10169-1.
370 STEEL STRUCTURAL HOLLOW SECTIONS (SHS): Non-alloy and fine grain steels, hot finished: To BS EN 10210-1 and -2.Non-alloy and fine grain steels, cold formed welded: To BS EN 10219-2.Weather resistant steels, hot finished: To BS 7668.
380 OTHER STEEL SECTIONS:
Equal flange tees: To BS EN 10055.Equal and unequal angles: To BS EN 10056-1 and -2.Wire, mild steel for general engineering purposes: To BS 1052.Wire and wire products, general: To BS EN 10218-2.Tubes: - Cold finished electric resistance welded: To BS 6323-6.- Cold finished seamless: To BS 6323-4.- Seamless and welded generally: To BS 6323-1.- Seamless circular: To BS EN 10297-1.- Seamless cold drawn: To BS EN 10305-1.- Welded and cold sized square and rectangular: To BS EN 10305-5.- Welded circular: To BS EN 10296-1.- Welded cold drawn: To BS EN 10305-2.- Welded cold sized: To BS EN 10305-3.
400 STAINLESS STEEL PRODUCTS:

Section B_Term Requirements for Workmanship and Materials Part 2 Lot 1
Section B-Term Requirements for Workmanship and Materials
199
30/12/2013
Chemical composition and physical properties: To BS EN 10088-1.Sheet, strip and plate: To BS EN 10088-2.Semi-finished products bars, rods and sections: To BS EN 10088-3.Wire: To BS 1554.Tubes, welded: To BS 6323-8.
410 ALUMINIUM ALLOY PRODUCTS: Designations: - Designation system, chemical composition and forms: To BS EN 573-1 to -4.- Temper designations: To BS EN 515.Sheet, strip and plate: To BS EN 485-1 to -4.Cold drawn rods, bars and tubes: To BS EN 754-1 and -2.Extruded rods, bars, tubes and profiles: To BS EN 755-1 and -2.Drawn wire: To BS EN 1301-1, -2 and -3.Rivet, bolt and screw stock: To BS 1473.Structural sections: To BS 1161.
420 COPPER ALLOY PRODUCTS: Sheet, strip, plate and circles for general purposes: To BS EN 1652.Sheet and strip for building purposes: To BS EN 1172.Rods: To BS EN 12163.Profiles and rectangular bars: To BS EN 12167.Wire: To BS EN 12166.Tubes: To BS EN 12449.
510 PREPARATION FOR APPLICATION OF COATINGS:
General: Complete fabrication, and drill fixing holes before applying coatings. Paint, grease, flux, rust, burrs and sharp arrises: Remove.
515 FABRICATION GENERALLY:
Contact between dissimilar metals in components: Avoid. Finished components: Rigid and free from distortion, cracks, burrs and sharp arrises. - Moving parts: Free moving without binding. Corner junctions of identical sections: Mitre. Refinished metals: Do not damage or alter appearance of finish.
520 COLD FORMED WORK:
Profiles: Accurate, with straight arrises.
525 ADHESIVE BONDING: Preparation of surfaces of metals to receive adhesives: - Degrease- Abrade mechanically or chemically etch.- Prime: To suit adhesive. Adhesive bond: Form under pressure.
530 THERMAL CUTTING OF STAINLESS STEEL:
Carbonation in the heat affected zone: Remove, after cutting.
535 WELDING/ BRAZING GENERALLY: Surfaces to be joined: Clean thoroughly. jack welds: Use only for temporary attachment. Joints: Fully bond parent and filler metal throughout with no inclusions, holes, porosity or cracks. Surfaces of materials that will be self-finished and visible in completed work: Protect from weld spatter. Flux residue, slag and weld spatter: Remove.
540 WELDING OF STEEL: Method: Metal arc welding to BS EN 1011-1 and -2.
545 WELDING OF STAINLESS STEEL: Method: TIG welding to BS EN 1011-3.Butt welds: Double bevel.
550 WELDING OF ALUMINIUM ALLOYS: Method: TIG or MIG welding to BS EN 1011-4.
550 BRAZING: Standard: To BS EN 14324.
560 BRONZE WELDING: Standard: To BS 1724.

Section B_Term Requirements for Workmanship and Materials Part 2 Lot 1
Section B-Term Requirements for Workmanship and Materials
200
30/12/2013
565 FINISHING WELDED AND BRAZED JOINTS VISIBLE IN COMPLETE WORK: Butt joints: Smooth, and flush with adjacent surfaces. Fillet joints: Neat. Grinding: Grind smooth where indicated on drawings.
570 LIQUID ORGANIC COATING FOR ALUMINIUM ALLOY COMPONENTS:
Standard: To BS 4842.
575 ZINC AND CADMIUM PLATING OF IRON AND STEEL SURFACES: Zinc plating: To BS EN 12329.
Cadmium plating: To BS EN 12330.
580 CHROMIUM PLATING: Standard: To BS EN 12540.
585 GALVANIZING: Standard: To BS EN ISO 1461. - Vent and drain holes:- Location: As instructed on site. - Sealing after galvanizing: Required. Submit proposals.
590 VITREOUS ENAMELLING: Standard: To BS 3830. 600 PERFORATED PANELS
3mm mild steel perforated panels with round perforations galvanized prior to use. Panel to have 20% open area with 20mm edging strip welded to sheet. With diameter 5mm with a 10mm pitch panels to be powder coated as per clause Z31.

Section B_Term Requirements for Workmanship and Materials Part 2 Lot 1
Section B-Term Requirements for Workmanship and Materials
201
30/12/2013
Z21 MORTARS
CEMENT GAUGED MORTARS 110 MIX PROPORTIONS • Specification: Proportions and special requirements for mortar materials are specified elsewhere in relevant mortar mix items.
• Standard: To BS 1200. - Grades: Where the proportion of sand in a mortar mix is specified as a range
(e.g. 1:1: 5 - 6) use: Lower proportion with type G sands. Higher proportion with type S sands. • Sand for facework mortar: Obtain from one source. Mix different loads if necessary to maintain consistent colour and texture.
131 READY-MIXED LIME SAND FOR CEMENT GAUGED MORTARS • Standard: To BS 4721. • Pigments for coloured mortars: To BS EN 12878.
135 SITE PREPARED LIME SAND FOR CEMENT GAUGED MORTARS • Permitted use: Where a special colour is not required and in lieu of factory made ready- mixed material. • Lime: Hydrated non-hydraulic lime to BS 890. • Mixing: Thoroughly mix with sand, in the dry state. Add water and mix again. Allow to
stand, without drying out, for at least 16 hours before using.
160 CEMENTS FOR MORTARS • Cement: - Standard: To BS EN 197-1. - Types: Portland cement, CEM I. Portland slag cement, CEM II/ B-S. Portland fly ash cement, CEM II/ B-V. - Strength class: 42.5 or 52.5. • Sulfate resisting cement: - Standard: To BS 4027. - Strength class: 42.5 or 52.5. • Masonry cement: - Standard: To BS 5224. - Class: MC 12.5 (with air entraining agent). • Certification for all cements: BSI Kitemark scheme.
200 STORAGE OF CEMENT GAUGED MORTAR MATERIALS • Sands and aggregates: Keep different types/ grades in separate stockpiles on hard,
clean, free-draining bases. • Factory produced ready-mixed lime: sand/ ready to use retarded mortars: Keep in
covered containers to prevent drying out or wetting. • Bagged cement/ hydrated lime: Store raised off the ground in dry conditions.
210 MAKING CEMENT GAUGED MORTARS • Batching: By volume. Use clean and accurate gauge boxes or buckets. - Mix proportions: Based on dry sand. Allow for bulking of damp sand. • Mixing: Mix materials thoroughly to uniform consistency, free from lumps. - Mortars containing air entraining admixtures: Mix mechanically. Do not over mix. • Working time (maximum): Two hours at normal temperatures. • Contamination: Prevent intermixing with other materials. Keep plant and boards clean.

Section B_Term Requirements for Workmanship and Materials Part 2 Lot 1
Section B-Term Requirements for Workmanship and Materials
202
30/12/2013
LIME 310 MIX PROPORTIONS • Specification: Proportions and special requirements for mortar materials are specified elsewhere in relevant mortar mix items.
320 SAND FOR LIMES AND MORTARS • Type: Sharp, well graded. - Quality, sampling and testing: To BS 882 or BS 1200 as appropriate. Grading/ Source: As specified elsewhere in relevant mortar mix items.
335A READY PREPARED LIME PUTTY • Manufacturer: To be approved or equivalent. - Product reference: to be approved or equivalent. • Maturation period before use (minimum): 30 Days - as recommended by manufacturer.
350 STORAGE OF LIMES AND MORTAR MATERIALS • Sands and aggregates: Keep different types/ grades in separate stockpiles on hard,
clean, free-draining bases. • Ready prepared non-hydraulic lime putty: Prevent drying out and protect from frost. • Non-hydraulic lime: sand mortar: Store on clean bases or in clean containers that allow
free drainage. Prevent drying out or wetting and protect from frost. • Bagged hydrated hydraulic lime: Store raised off the ground in dry conditions.
360 MAKING LIMES AND MORTARS GENERALLY • Batching: By volume. Use clean and accurate gauge boxes or buckets. • Mixing: Mix materials thoroughly to uniform consistency, free from lumps. • Contamination: Prevent intermixing with other materials, including cement. Keep plant
and banker boards clean.
380G READY TO USE NONHYDRAULIC LIMES AND MORTARS • Manufacturer: to be approved or equivalent. - Product reference: to be approved. or equivalent. • Materials: select from: - Lime putty slaked directly from quicklime to BS 890 and mixed thoroughly with sand. - Quicklime to BS 890 slaked directly with sand. • Maturation period before use (maximum): 7 days.
390 KNOCKING UP NONHYDRAULIC LIMES AND MORTARS • Knocking up before and during use: Achieve and maintain a workable consistency by
compressing, beating and chopping. Do not add water. - Equipment: Roller pan mixer or submit proposals.
400 MAKING HYDRAULIC LIMES AND MORTARS • Mixing hydrated hydraulic lime: sand: Follow the lime manufacturer's recommendations
for each stage of the mix. - Water quantity: Only sufficient to produce a workable mix. • Working time: Within limits recommended by the lime manufacturer.

Section B_Term Requirements for Workmanship and Materials Part 2 Lot 1
Section B-Term Requirements for Workmanship and Materials
203
30/12/2013
Z31 POWDER COATING 120 POWDER COATING MATERIALS:
Manufacturer: Obtain from one only of the following: Contractor’s choice. Submit details before commencement of powder coating.
210 WORKING PROCEDURES: Requirement: Comply with:
• BS 6496 for aluminium alloy backgrounds.
• BS 6497 for galvanized steel backgrounds.
• British Coatings Federation: Code of safe practice - Application of thermosetting powder coatings by electrostatic spraying.
• Powder coating manufacturer’s guarantee.
220 POWDER COATING APPLICATORS: Applicator requirements:
• Approved by powder coating manufacturer. - Currently certified to BS EN ISO 9001.
• Comply with quality procedures, guarantee conditions, standards and tests required by powder coating manufacturer.
• Each applicator to use only one plant.
• Selected applicator: Submit details before commencement of powder coating.
225 GUARANTEES: Powder coating manufacturer and applicator guarantees: -
• Submit sample copies before commencement of powder coating.
• Submit signed project specific copies on completion of work.
230 CONTROL SAMPLES: Sequence: Prior to ordering materials for the works, obtain approval of appearance for: - Powder coated samples of various grades and forms of background metal to be used, showing any colour, texture and gloss variation. Fabrication samples: Showing joint assembly, how powder coating is affected and how any cut metal edges are protected. Samples to include the following information:
• Product reference.
• Colour: Reference number. Name. Gloss level.
235 INDEPENDENT INSPECTION AT PLANT: Requirement: Contractors/ suppliers of the following designated components must commission an approved Independent Inspection Authority to carry out acceptance inspections to confirm that powder coating application complies with this specification. Designated components: subject to approval. Acceptance inspections: Carry out for each variation of colour and finish of each component work package at applicator's plant prior to any fabrication of units, in accordance with the following: - Where three of more production runs are required for application of coatings, not less than three acceptance inspections must be carried out in accordance with BS 6001-1, general inspection level 2, with an acceptance quality limit of 1%.- Where less than three production runs are required for application of coatings, one acceptance inspection must be carried out in accordance with BS 6001-2, with a limiting quality of 5% where the probability of acceptance is 10%.Components failing inspection: Reprocess or replace and re-inspect. Inspection reports: Independent Inspection Authority must submit copies.
241 INDEPENDENT INSPECTION ON SITE:
Section B_Term Requirements for Workmanship and Materials Part 2 Lot 1
Section B-Term Requirements for Workmanship and Materials
204
30/12/2013
Requirement: Where coating specification compliance at plant is unresolved, contractors/suppliers must commission an approved Independent Inspection Authority to carry out site acceptance inspections. Acceptance inspections: Carry out in accordance with BS 6001-2 with a limiting quality of 5% where the probability of acceptance is 10%. Each component of a fabricated unit will be assessed as an individual part for sampling procedures. Components failing inspection: Remove and reprocess/replace.
250 COMPONENT DESIGN: Condition of components to be powder coated:- To comply with relevant recommendations of BS 4479-1, -3, and -4.- of suitable size to fit plant capacity.- Of suitable thickness to withstand oven curing.
310 PRETREATMENT: Condition of components to be powder coated: -
• Free from corrosion and damage.
• Free from impurities including soil, grease, oil. Suitable for and compatible with the pre-treatment and powder coating process.
Process: Clean, conversion coat, condition, rinse in demineralised water, drain and dry components in accordance with the powder coating manufacturer’s requirements and the pre-treatment supplier’s recommendations.
430 EXTENT OF POWDER COATINGS: Application: To visible component surfaces, and concealed surfaces requiring protection. Coated surfaces will be deemed 'significant surfaces' for relevant BS 6496/ BS 6497 performance requirements.
435 APPLICATION OF POWDER COATINGS: Surfaces to receive powder coatings: Free from dust or powder deposits. Completion of powder coatings: Within 48 hours of pre-treatment of components. Jig points: Not visible on coated components. Curing: Controlled to attain metal temperatures and hold periods recommended by powder coating manufacturer. Stripping and recoating of components: Only acceptable by prior agreement of powder coating manufacturer. Stripping, pre-treatment and powder coating are to be in accordance with manufacturer’s requirements. Over coating of components: Not acceptable.
440 PERFORMANCE AND APPEARANCE OF POWDER COATINGS: Standard: To BS 6496/ BS 6497.
450 ALUMINIUM ALLOY FABRICATIONS: Units may be assembled: -
• Before powder coating.
• From components powder coated after cutting to size.
• Where approved, from components powder coated before cutting to size. Exposure of uncoated background metal: Not acceptable. Assembly sealants: Compatible with powder coatings. Obtain approval of colour if sealants are visible after fabrication.
460 STEEL FABRICATIONS: Unit assembly: Wherever practical, before powder coating. Exposure of uncoated background metal: Not acceptable.

Section B_Term Requirements for Workmanship and Materials Part 2 Lot 1
Section B-Term Requirements for Workmanship and Materials
205
30/12/2013
Assembly sealants: Compatible with powder coatings. Obtain approval of colour if sealants are visible after fabrication.
470 FIXINGS: Exposed metal fixings: Powder coat together with components, or coat with matching repair paint system applied in accordance with the powder coating manufacturer’s recommendations.
480 FABRICATION DAMAGE REPAIR/ REPLACEMENT: Inspection: Check all components before delivery to site for damage to powder coatings. Submit proposals for repair or replacement.
510 PROTECTION: Powder coated surfaces of components: Protect from damage during handling and installation, or by subsequent site operations. Protective coverings: Must be: -
• Resistant to weather conditions
• Partially removable to suit building in and access to fixing points. Protective tapes in contact with powder coatings: Must be: -
• Low tack, self adhesive and light in colour
• Applied and removed in accordance with tape and powder coating manufacturers' recommendations.
Do not use solvents to remove residues, as these are detrimental to the coating. Inspection of protection: Carry out monthly. Promptly repair any deterioration or deficiency.
530 SITE DAMAGE REPAIR/ REPLACEMENT: Damage to powder coatings: Rectify immediately damage caused during handling and installation, or by subsequent site operations. Submit proposals for extensive repair or replacement.
531 DOCUMENTATION: Submit the following information for each batch of powder-coated components: Supplier.-
• Trade name
• Colour
• Type of powder
• Method of application
• Batch and reference number
• Statutory requirements.
540 COMPLETION: Cleaning and maintenance of powder coatings: Carry out in accordance with procedures detailed in powder coating manufacturer and applicator guarantees.

Section B_Term Requirements for Workmanship and Materials Part 2 Lot 1
Section B-Term Requirements for Workmanship and Materials
206
30/12/2013
SUPPLEMENTARY ITEMS
L10 Windows/ - High Performance Timber H Type
PRELIMINARY INFORMATION/ REQUIREMENTS
115B SCOPE OF WORKS FOR WINDOWS
Works shall consist of renewal of existing timber windows, pivot and side hung some with fixed panes and private doors including insulated panels to the kitchen window to receive kitchen fans. Replacement windows are to be softwood treated timber H style windows and private rear doors with Sikkens high performance coatings systems - fully finished from factory,
To Identified sites.
The buildings are to remain in occupation and the contractor must maintain proper liaison between tenants, Housing office and CLIENT during the installation.
The contractor shall visit site both at estimating stage and before manufacture taking all necessary measurements as appropriate and generally familiarise himself with access, working conditions, and all other matters relevant to the installation. No additional costs will be entertained due to inadequate inspection.
Supply and fit windows and doors to fit existing openings in accordance with specification and drawings. Sizes stated in Bills are approximate and are for general pricing purposes only. Overall opening sizes are identified in measured section, although window manufacturer may wish to break down frame sizes. (Subject to CLIENT approval).
ASBESTOS WORKS:
Works required where asbestos identified as follows: -
Various windows have an integral fixed panel underneath or to one side consisting of: -
• Foil backed plasterboard, asbestos board and GWR glass/plywood panel, or of similar construction.
• Plasterboard, asbestos board and timber panelling.
• Or similar.
This is to be removed as part of the works and replaced with an insulated panel, to meet latest U Values in accordance with Building Regulations. Panel is be finished with plywood panel to both sides.
Remove the fixed panel carefully to keep integrity of asbestos intact. Timber framing to panel should be sawn through and panel removed intact. Careful removal will ensure the effectiveness of the encapsulation provided by glass and plasterboard and should not normally require specialised operations.
The panel is protected on one side by plasterboard and T&G / reinforced glass / vertical tiled external panelling on the other.
Careful separation and removal of the existing windows will be required. The external timber panelling is to be over-clad with new timber.
Section B_Term Requirements for Workmanship and Materials Part 2 Lot 1
Section B-Term Requirements for Workmanship and Materials
207
30/12/2013
TIMBER WINDOWS
Type: H type fully reversible, fully factory finished softwood window as manufactured by:
• Wright Joinery 01482 221127
• Allan Bros Tel 01289 334600
• Bennet Tel 0116 239 5353
• Whitaker & Co. Tel 01274 833611
• Or equal and equivalent approved
INSULATED PANEL
Window and frame will incorporate insulated panel CFC free where appropriate to match existing sizes and this panel shall be installed during manufacture this is to also include the kitchen window side panel which is to incorporate the kitchen fan. The window & insulated panel manufacturer is to co-ordinate with the kitchen fan manufacturer: –
Ray Hudson Limited, Greys Road, Stuarts Lane, Henley-on-Thames, Oxon, RG9 1PB. Tel: 01491 410170, Fax: 01491 413180 or similar and approved.
Panel will be manufactured separately and installed together with main window. Panel will have rigid foam insulation and finished both sides with marine plywood, marine plywood to external and internal faces to have a service life 30 years.
Insulated panel is to be fitted once framing has been installed to allow proper access for fixing to cill.
For some bedrooms panel will span two bedrooms and act as coupling piece between two window frames.
KITCHEN FANS
Kitchen Fan is to be incorporated into the new insulated window side panel with cedar cladding to the external elevation. The window & insulated panel manufacturer is to co-ordinate with the kitchen fan manufacturer: –
Product Ref: AS2 with Autostat IV, Ray Hudson Limited, Greys Road, Stuarts Lane, Henley-on-Thames, Oxon, RG9 1PB. Tel: 01491 410170, Fax: 01491 413180 or similar and approved.
Note: Fan openings are required for all windows but only the tenanted flats(not leaseholder) are to have mechanical fans fitted. The other flats are still to have louvres baffle fixings to the front external elevation but on the internal elevation UPVC cover panels are to be manufactured and fitted over where the fans would have been fitted. Also refer to M&E spec for further information.
DOUBLE GLAZED PANEL WITH LOUVRES BAFFLE AND KITCHEN FAN FIXING
(Note: the following specification is the standard detail for the kitchen fan fixing. The window & insulated panel manufacturer is to coordinate with the kitchen fan manufacturer to ensure the correct fixing details are used.
Description

Section B_Term Requirements for Workmanship and Materials Part 2 Lot 1
Section B-Term Requirements for Workmanship and Materials
208
30/12/2013
This product is a composite panel to be fixed within a double glazed frame utilizing the same fixing methods as the double glazed windows. The purpose of this panel is to provide a mounting for the ventilation device as well as an exhaust port for the expelled air. The profile of the vent being such that it is aesthetically in harmony with the double glazing system as well as achieving a minimum window space for the ventilator.
Design Detail 1. External 6mm panel 10 single inset louvres @ 30 degree down angle
2. Middle 20mm section of 200mm reducing to 150mm (100mm for bathroom fan) with lowest louvre acting as condensate drain.
3. Internal 3mm panel with 100 or 150mm hole in centre
4. Distance between external louvre and internal finger guard = 120mm
5. Tape seal to external edges
6. Baffle Additional external louvre (6mm) fixed 8mm in front of panel by 8 spacers retained by nut and screws. The louvres of the front panel being off-set to face louvres.
Drawings Refer to M&E drawing 5747/MS/T/603 - RHL kitchen extract fan panel mounting detail, for standard detail.
Schedule of Works 1. Internal panel min. size 254 x 254 x 3 mm with 100 or 150mm hole in centre
2. Middle panel Expanded foam min. size 254 x 254 x 20 mm with internal detail
3. External panel min. size 254 x 254 x 6 mm with louvres
4. Retaining ring 100 or 150mm
5. 6 Screws Nylon
6. 6 Retaining nuts
7. 8 Nylon spacers
8. Edge sealing tape
9. 2 Stainless Steel Screws
10. 2 Stainless Steel retaining nuts
11. 2 white screw caps
SECURITY
Windows are to meet BS 7950 and Secure by Design requirement.
Windows are to include restrictor to 100mm for ventilation.
Windows shall have been tested for air filtration to 300 PA, water tighness to 300PA and water resistance to 600PA in accordance with BS 6375 Part 11989
All windows to be fitted with espagnolette locking system.

Section B_Term Requirements for Workmanship and Materials Part 2 Lot 1
Section B-Term Requirements for Workmanship and Materials
209
30/12/2013
INSTALLATION
PROTECTION OF COMPONENTS
The window replacement will be carried out in occupation. The contractor is to inform and agree with CLIENT the sequence and programme of works and to maintain proper and continuous liaison with CLIENT during installation; The contractors attention is specifically drawn to the clauses concerning tenant notification and possibility of compensation for missed appointments and damaged personal fittings.
The contractor shall carry out condition survey of each property and submit to CLIENT in a form approved by CLIENT beforehand.
The contractor shall provide all necessary protection, such as dust sheets to protect tenants and fittings against damage. Tenants electricity must not be used.
Contractor shall remove fittings/fixtures around window, e.g. blinds, curtain rails, including TV and telephone cables and reinstate on completion. Contractor is to allow for upwards drilling into frame when reinstating cable.
Carefully remove existing windows, including for careful removal of external timber panelling. Contractor is to make as little damage as possible to decorations, e.g. score around window perimeter. Contractor will make good damage at his own expense any damage caused through lack of proper care and attention, including for any specialist asbestos works that might be required.
Existing windows may be fixed with cramps or straps fitted internally. Due allowance must be given to removing window with the least disturbance to these fixings and any damage to internal decorations must be kept to a minimum.
The contractor shall provide drawings to the CLIENT for comment at least four weeks before any manufacture showing - elevations, large scale section of all profiles & proposed fixing details, ironmongery and waterproofing details.
Contractor is to inspect each flat and measure all window openings. Each window is to be measured individually and delivered to site labelled for the specific opening.
Measurements on drawings are to be used for pricing purposes only. The contractor is responsible for the accuracy of all measurements taken.
The contractor shall also provide elevation drawings to the CLIENT of all window layouts for each individual flat before installation - These drawings are for record purpose only in order that the residents will be aware of what windows are fitted within their flats.
All windows are to be double glazed with super Low E' glass manufactured by Pilkington.
All windows are to comply with Building Regulations, and Approved Document Part L in relation to safety glazing in critical areas, 'u' values1 security devices etc. All glazing on ground floor and all glazing fronting a public walkway are to have laminated glazing to outside pane. All 1st floor bedroom windows (above garages) to have laminated glazing to outside pane. All front elevation windows to and including 1st floor (i.e. floor above rear addition) to have laminated glass to outside pane. All other window glazing above first floor to have toughen glazing on both sides.
Where safety glass is required this shall be fitted to panes on both sides.
All glazing to be etched to confirm low e and laminated glass has been fitted.
The contractor shall allow for providing a full size sample of each window type. This sample may be incorporated during works if it is approved and undamaged.

Section B_Term Requirements for Workmanship and Materials Part 2 Lot 1
Section B-Term Requirements for Workmanship and Materials
210
30/12/2013
3 No. pilot flat installations will be required. 1 No. for each flat type. Any agreed modifications to the pilot flats will be incorporated into the complete installation. Mass manufacture of windows cannot be undertaken until Pilot Flats has been completed and approved by CLIENT The detail of sections sizes etc to the insulated panel and frame spanning rear bedrooms, for example, will need confirming prior to mass manufacture.
No window will be removed unless the replacement window can be installed that same day. The contractor should ensure that a full set of glazing is available should damage occur. Re-glazing to damaged units should be completed the same day.
Contractor should allow for unloading, storing, hoisting and distributing windows and to provide electricity to conduct this work. Allow for all removal works.
Allow for making good to internal reveals as required and provide timber quadrant cover mouldings to reveals using adhesive recommended by window manufacturer.
Clean all glazing and timber externally and internally in accordance with manufacturer’s recommendations.
DOORS TO PRIVATE GARDENS AND BALCONIES
Doors to be outward opening and to incorporate a mid rail. Door to be Wright Joinery or Allan Bros or Bennet or Whitaker & Co, or similar and approved, to match existing style. Doors to be double glazed units in accordance to Building Regulations. Hardwood doors are to be provided to ground and first floors and softwood doors to second and over floors.
Below mid rail allow for either insulated solid panel, comprising white plastic coated steel with rigid insulation to latest U values as set out in Building Regulations, or obscured safety glass.
Provide and fit 1 1/2 pairs 100mm stainless steel hinges with steel pin and nylon bushes incorporating a security holding screw.
Provide and fit high security 5 lever locking espagnolette incorporating a key operated 5 lever mortice deadlock, lockable inside and outside, with three keys. Handles to be stainless steel.
Clean all glazing and timber internally and externally in accordance with manufacturer’s recommendations.
The contractor is to show each resident the operation of the windows and doors. Contractor is to provide a leaflet for each resident outlining operation and cleaning methods.
The window manufacturer is to allow for working with the door manufacturer (if differing manufacturers) in co-ordination of manufacture and detailing of components to be fully compatible. All new components are factory made and therefore to be designed to work together and be assembled to acceptable tolerances for fit and installation.
PRIMING/ SEALING
Windows, doors and insulated panels to have Sikkens high performance coatings systems and be fully finished in manufacturer’s factory ready for installation. Any slight damage to frames may be made good according to manufactures recommendations and require acceptance by CLIENT. Badly damaged frames will not be accepted.
All external perimeters to windows and doors shall be sealed with a low modulus silicone sealant compatible with timber windows and adjacent surface.

Section B_Term Requirements for Workmanship and Materials Part 2 Lot 1
Section B-Term Requirements for Workmanship and Materials
211
30/12/2013
CORROSION PROTECTION
Surfaces to be protected: Aluminium alloy components in contact with preservative treated timber.
BUILDING IN
General: Not permitted unless indicated on drawings.
Brace and protect components to prevent distortion and damage during construction of adjacent structure.
SITE INVESTIGATION AND SURVEY
Before any measurements are undertaken, the following points should be noted:
• Access to site, visually checking working space and environment
• Site accommodation and position
• Storage compound facilities.
• Temporary protection to gardens, nearby buildings, roads etc
• Access for towers/scaffolding/ground conditions
Structural checks should be made ensuring that there are no defects such as:
• Settlement cracks
• Malformation/buckling of internal or external walls
• Cill or head details showing spalling or failure
• Type of lintel employed (timber windows are not designed to be load bearing)
• Cement pointing is powdery and subject to capillary attraction of water
• Quality of structure and finishes for making good purposes including internal finishes, e.g. tiles, plaster, window boards.
It may be necessary to remove certain sections from the window to ascertain the position of the DPC and assess the proposed method of fixing
Any defects should be notified to CLIENT and remedial action completed prior to window fixing
All structural openings shall be measured independently to ascertain the manufacturing size. Opening shall be measured to obtain smallest height and width measurement.
Where windows are fitted behind reveals the opening shall be measured for squareness and nominal allowance added to the structural opening measurement.
In some instances existing windows have been fitted with glazed in extract fans. The contractor shall allow for temporarily disconnecting electrical supplies, carefully taking out and setting aside fans for re-use and (following the installation of the new window unit) for cleaning and re-siting the fan in a fixed pane at high level where possible.
Where the window configuration does not provide a fixed pane the contractor shall allow for fitting the fan to a suitable external wall including core drilling and providing necessary adaptors and fittings as recommended by fan manufacturer.
Allow for the fitting of treated softwood battens to exposed end of partition wall between bedroom walls and for any making good required.

Section B_Term Requirements for Workmanship and Materials Part 2 Lot 1
Section B-Term Requirements for Workmanship and Materials
212
30/12/2013
WINDOW INSTALLATION GENERALLY
Installation: Into prepared openings.
Gap between frame edge and surrounding construction- Minimum: 5 mm. - Maximum: 10 mm. Distortion: Install windows without twist or diagonal racking.
FIXING TIMBER FRAMES
Fixing will be carried out in accordance with instructions laid down by BWF
and will generally follow guidelines set out below.
Fasteners: Allow for 10 mm phosphor bronze expanding bolts.
Spacing: When not predrilled or specified otherwise, position fasteners not more than 150 mm from ends of each jamb, adjacent to each hanging point of opening lights, and at maximum 450 mm centres and to all other requirements as required by manufacturer.
Allowance should be made for fixing frame to metal L section column.
Lower fixed glazed units are to be fitted after main frame has been installed to allow for fixing through cill section. Frames are not to be secured with straps unless agreed with CLIENT before installation.
Allowance should be given to weight and proper access for fixing of complete window and therefore glazing to larger windows may be glazed once the frame has been installed.
SEALANT JOINT
Sealant: Manufacturer:
DOW CORNING or equivalent. Product reference: 796 PVC-U Wood & Aluminium Glazing Silicone Sealant or equivalent.-
Colour: To match frame paintwork.
Application to prepared joints. Finish triangular fillets to a flat or slightly convex profile.
Sealant will be applied by specialist applicator and sample provided as part of Pilot Flat installation.
IRONMONGERY
All metal straps, clips, brackets, screws, nuts, bolts and the like shall be from the list of materials detailed in BS7412 199 L.
All ironmongery must be of the best quality and suitable for the windows installed.
Fixing: Assemble and fix carefully and accurately using fasteners with matching finish supplied by ironmongery manufacturer. Do not damage ironmongery and adjacent surfaces.
Checking/ adjusting/ lubricating:
Carry out at Completion and ensure correct functioning.
VENTILATION AND DRAINAGE
Windows shall incorporate permanent ventilation to comply with BS5440
Part 2 1989, BS5925, 1991, Gas Safety Regulations 1984 (amended 1990) and Building Regulations. Kitchens to have 4000 mm2 and living rooms 8000mm2

Section B_Term Requirements for Workmanship and Materials Part 2 Lot 1
Section B-Term Requirements for Workmanship and Materials
213
30/12/2013
The contractor shall offer up a sample of the ventilator for CLIENT approval prior to installation. Cord operated ventilators shall have a toggle that is easy to grip and shall fall within easy reach of the elderly.
All windows shall incorporate a method of internal drainage to terminate externally.
RECORD OF INSTALLATION
Notwithstanding the requirements of other clauses, the contractor shall maintain a paper system of recording the key operations from installation through to handing over the installation to client/CLIENT. Recording form to show, for example, but not limited to, dates of contractors inspection, date of CLIENT inspection, date of employers acceptance, confirmation of booklet and residents' acknowledgement of correct operation.
WARRANTIES
The contractor shall provide insurance backed guarantees for the installation complete for ten years and the double glazed units for five years. The guarantees are to cover any defect or deficiency arising other than where directly caused by misuse, accidental damage or vandalism. The terms of the guarantee is to provide that remedial work be carried out within the periods set out below:
• Defects or deficiencies resulting in a risk to health and safety or security to be attended to within 24 hours.
• Defects or deficiencies requiring repair to window or sealed unit but not the complete replacement of a window to be attended to within 7 days.
• Defects or deficiencies requiring the complete replacement of a window to be completed within 28 days.
Should the contractor or the insurer fail to fulfil the above obligations in any individual occurrence the Council shall arrange for the works to be carried out in default and recharge costs to the contractor.
The contractor shall submit sample guarantee with details of the insurance company for approval by the CLIENT prior to acceptance of the tender.
GLAZING
All glazing beads to be internal for security and to allow re-glazing from the inside.
All glass shall be the required thickness to meet wind load and safety requirements of BS6262 1982. All glazing shall comply with BS952 1978.
All double glazed units shall use Pilkington super low E glass to internal pane. Argon gas filled double glazed units. Glass units depending on location to be either 4mm toughen, 4mm toughen glazing with 16mm air space or 6.4mm laminated, 4mm toughen glazing with 16mm air space.
All glazing gaskets shall be manufactured from EPDM based material to comply with BS4255 Class A 1986.

Section B_Term Requirements for Workmanship and Materials Part 2 Lot 1
Section B-Term Requirements for Workmanship and Materials
214
30/12/2013
HANDLING & TRANSPORTATION
Window units must be properly protected during transit and during storage on site. Note manufacturer’s recommendations for protection and installation of fully finished frames.
Damaged units will not be approved for installation.
All windows must be transported in the vertical position and securely packed during transit and stored as manufacturer’s recommendations. Do not deliver components that cannot be immediately stored. Components are to be separated to prevent damage by and to projecting ironmongery etc.
All windows must carry an identification label indicating its destination, e.g. living room flat 35.
Window units must be carefully transported to property by external hoist. Windows are not to be lifted by means of rope attached to window.
Window units are heavy and proper attention given to manual handling procedures. Windows are to be carried, not dragged, to their opening.
INSTALLATION GENERALLY
The correct method of fixing must be used to take account of any cavity walls detail, DPC position, quality of material to be fixed into and making good afterwards.
Fixing to be as BWF and manufactures recommendations with generally one fixing 150 - 250mm from a corner both horizontally and vertically. One fixing 150 - 250mm at either side of transom or mullion where it meets the outer frame. Fixings shall occur at no more than 600mm centres between fixings at corners, transoms and mullions.
Bolt heads are to be sealed against atmosphere with plastic dome caps.
Through frame fixings shall be 10mm dia or 8mm dia integral sleeved anchors and shall penetrate structure a minimum of 59mm (render does not count as structure)
Where fixing brackets are used, screws shall be 4.8 - 5.5mm dia and a minimum penetration of 50mm into a nylon plug. The contractor shall obtain specialist advice from window manufacturer should chemical fixings be required.
Expanding foam is not to be used as a means of primary fixing. It is to fill voids and act as backing to perimeter seal.
Packing shims may be required to allow for thermal movement. Contractor is to obtain specialist advice from window manufacture.
PRICING
The contractor shall allow for all samples, pilot units, coupling pieces, trims, glass, ironmongery, ventilators, fixings etc. Contractor will provide copy of explanatory leaflet on window opening mechanism to all dwellings.
Contractor shall allow for internal quadrant in timber to match colour of frames. Quadrant to be neatly mitred at corners.
Contractor shall allow for supplying two sets of spare keys and one spare handle for each flat to Housing Office.
Contractor shall allow for proper removal of debris from scaffold.

Section B_Term Requirements for Workmanship and Materials Part 2 Lot 1
Section B-Term Requirements for Workmanship and Materials
215
30/12/2013
Waste materials from the window installation, i.e. frames, glass and external panelling have been included on the Salvo web page as available for re-use or recycling. Contractor shall allow for liaison with others if others wish to reuse materials. CLIENT will provide further details post contract.
Waste glass removed as part of the recycling works will be carefully set aside in a skip for the sole use of glass - no builders’ debris to be placed in skip.
Contractor is to liase with T Berryman & Son Tel 020 8709 0840, or similar approved contractor, for the removal of glass waste.