telstra business mail · pdf file033 telstra business mail administrator’s guide using...
TRANSCRIPT

101
TELSTRA BUSINESS MAILADMINISTRATOR’S GUIDE
INTRODUCTION
Business Online POP MailBusiness Online POP Mailboxes must not be selected unless the Business Online Extra or Standalone offer has been activated against the domain name (e.g. companyname.com.au) being used for Business Mail mailboxes.
Creating one of these mailboxes will activate a Business Online Account if you do not have one, and additional charges maybe incurred.
Use of Business Online POP Mailboxes is governed by the terms and conditions for Business Online as outlined in Telstra’s Our Customer Terms.
All Telstra Business Broadband faults should be directed to the Telstra Business Technical Helpdesk on 132 999. Do Not use the Mission Control Add a Job page for faults.
1.1 ABOUT THIS GUIDE
1.1.1 What is Mission Control
1.1.2 Who this Guide is For
1.1.3 What’s in This Guide
1.1.4 Terms used in This Guide
1.1.5 Syntax used in this Guide
1.1.1 What is Mission ControlMission Control is web interface for the administration of your Business Mail and Business Online account.
1.1.2 Who this Guide is ForThis guide is for those who are responsible for the administration of Business Mail accounts. It contains the information required to access Mission Control, how to create and manage user mailboxes, and how to configure your email client software.
The guide assumes the reader is familiar with Microsoft Windows and has a basic knowledge of email terms and concepts.
1.1.3 What’s in This GuideUsing Mission Control describes the requirements on how to login and how to navigate within Mission Control.
Creating and Editing Mailboxes describes how to create and manage user mailboxes within Mission Control, including:
Create user mailboxes, (see Creating and Editing Mailboxes).
Change mailbox details (name, password, email addresses, password etc). (see Creating and Editing Mailboxes).
1. INTRODUCTION 01
1.1 About this Guide 01
2. USING MISSION CONTROL 03
3. CREATING AND EDITING
MAILBOXES 05
4. DISTRIBUTION LISTS 21
5. PUBLIC FOLDERS 26
6. SPAM FILTERING 27
7. APPENDIX 30

202
TELSTRA BUSINESS MAILADMINISTRATOR’S GUIDE
INTRODUCTION
Delete (Purge) all mail from an unused mailbox (see Purging Mailboxes).
View Mailbox usage Records (see Reports for Business Mail Standard and Advanced).
Distribution Lists describes the creation of Distribution Lists.
Public Folders describes the creation and maintenance of Business Mail Public Folders.
Spam Filtering (Business Mail Standard and Business Mail Advanced Only) describes how to enable Business Mail’s the SPAM filtering feature.
Supported Protocols describes the email protocols supported by the Telstra Business Mailbox Types.
1.1.4 Terms used in This GuideOnce accounts have been created, users can change their passwords with DeskControl, which they can access from the same web page as Outlook Web Access.
The Global Address List (GAL) is the address list of all users and groups in your organisation that are represented on Business Mail Standard and Advanced.
Distribution Lists or Lists are groups of users and other groups with a common address. Messages sent to that address go to all members of the group.
Full functionality of Microsoft Outlook is available only when used as a MAPI (Messaging Application Programming Interface) client (only available with Business Mail Advanced service).
Your Business Mail Account Number identifies your account and is also used as the login User Name. The password to your Mission Control login is referred to as your Master Password. These details are provided in your Welcome to your new hosting service email for Business Mail/Online.
1.1.5 Syntax used in this GuideThroughout this guide, the following conventions are used:
Boldface type is used to
emphasise words or phrases as appropriate
describe the names of screens, windows, dialog boxes, and controls (menus, buttons, checkboxes etc) within the description of the procedures in this guide.
Italic type is used for cross references (other sections, figures, tables) in this guide.
1. INTRODUCTION 01
1.1 About this Guide 01
2. USING MISSION CONTROL 03
3. CREATING AND EDITING
MAILBOXES 05
4. DISTRIBUTION LISTS 21
5. PUBLIC FOLDERS 26
6. SPAM FILTERING 27
7. APPENDIX 30

303
TELSTRA BUSINESS MAILADMINISTRATOR’S GUIDE
USING MISSION CONTROL
2.1 ACCESSING THE USER MAILBOX SCREENS
2.1.1 Logging In to Mission Control
2.1.2 Selecting Business Mail
2.1.1 Logging In to Mission Control Type the URL https://missioncontrol.pm.telstra.com into
the address field of your browser:
Figure 1 Mission Control URL
When prompted, enter your account number and password.
Figure 2 Logging on to Mission Control
After authentication, Mission Control starts. By default, Mission Control opens at the Mission Control Screen.
1. INTRODUCTION 01
2. USING MISSION CONTROL 03
2.1 Accessing the User
Mailbox Screens 03
3. CREATING AND EDITING
MAILBOXES 05
4. DISTRIBUTION LISTS 21
5. PUBLIC FOLDERS 26
6. SPAM FILTERING 27
7. APPENDIX 30

404
TELSTRA BUSINESS MAILADMINISTRATOR’S GUIDE
USING MISSION CONTROL
2.1.2 Selecting Business Mail To go to the User Mailbox screens, select Business Mail from
the Mission Control screen. (Figure 3 Selecting Business Mail from the Mission Control Screen).
Figure 3 Selecting Business Mail from the Mission Control Screen
From the Business Mail screen, select Edit/Create (Figure 4 Selecting Edit/Create Mail from the Business Mail Screen
Figure 4 Selecting Edit/Create Mail from the Business Mail Screen
The Mission Control Edit/Create screen will open.
1. INTRODUCTION 01
2. USING MISSION CONTROL 03
2.1 Accessing the User
Mailbox Screens 03
3. CREATING AND EDITING
MAILBOXES 05
4. DISTRIBUTION LISTS 21
5. PUBLIC FOLDERS 26
6. SPAM FILTERING 27
7. APPENDIX 30

505
TELSTRA BUSINESS MAILADMINISTRATOR’S GUIDE
CREATING AND EDITING MAILBOXES
3.1 THE EDIT/CREATE MAILBOX SCREENS
3.1.1 Mailbox Functions
3.1.1 Mailbox FunctionsFrom the Edit/Create screens you will be able to create and maintain your user’s mailboxes. There are five Edit/Create screens, which can be selected from the tabs at the top of the page in the Business Mail section of Mission Control.
User Setup. From this screen you can create new mailboxes, modify mailbox details, and purge mailboxes. You can also search for users in your domain from this page.
Summary Report. This page shows a summary of your mailboxes. You can also search for users in your domain from this page.
Mailbox Storage Report. Your users’ storage details can be viewed from this page.
Exchange Distribution Lists. From this page you can create new Distribution Lists and assign ownership of these groups.
Figure 5 Use the tabs to select a Mailbox screen
3.2 USER SEARCHES
3.2.1 Searching for a User
3.2.2 Search Results
3.2.1 Searching for a User
If you are editing user mailboxes, the Mission Control search function allows you to quickly locate the individual mailboxes. To search for a mailbox, select the User Setup tab
The search options available are:
View all mailboxes – Click on the Show All button.
Search for a mailbox using a string of characters. Enter a string of characters from the Mailbox Full Name, Mailbox Number, Email Address, or one of the Extra Email addresses and click on Search.
Figure 6 Mailbox Search
1. INTRODUCTION 01
2. USING MISSION CONTROL 03
3. CREATING AND EDITING
MAILBOXES 05
3.1 The Edit/Create
Mailbox Screens 05
3.2 User Searches 05
3.3 Mailbox & User Attributes 07
3.4 Creating Users 10
3.5 Configuring Additional
Attributes 13
3.6 Purging Mailboxes
Business Mail Standard
and Advanced Mailboxes 16
3.7 Reports for Business Mail
Standard and Advanced 19
4. DISTRIBUTION LISTS 21
5. PUBLIC FOLDERS 26
6. SPAM FILTERING 27
7. APPENDIX 30

606
TELSTRA BUSINESS MAILADMINISTRATOR’S GUIDE
CREATING AND EDITING MAILBOXES
3.2.2 Search ResultsAfter a search, the results are displayed in a table. The Full Name, (Mailbox) Number, Mailbox Type and (Mailbox) Status are described in User Attributes
The Export Status field has two states, Operational and Pending Update. A mailbox which has been created or changed will have a Pending Update until the change becomes effective. Once a change or creation is effective, the status will change to Operational.
The search result can be sorted on any of the underlined columns by clicking on the heading of the column (e.g. Fullname, number, mailbox type etc)
Figure 7 Search Results
The Fullname is the name the administrator assigned to the user when creating the mailbox.
The Number is the user’s Mailbox Number automatically assigned by Business Mail mailbox creation.
The Mailbox Type describes the user’s mailbox:
POP Mailbox: Business Mail POP or Business Mail Online POP mailbox
Business Mail Standard: Business Mail Standard mailbox
Business Mail Advanced: Business Mail Advanced mailbox
The mailbox Status field indicates whether the mailbox is On or Off
1. INTRODUCTION 01
2. USING MISSION CONTROL 03
3. CREATING AND EDITING
MAILBOXES 05
3.1 The Edit/Create
Mailbox Screens 05
3.2 User Searches 05
3.3 Mailbox & User Attributes 07
3.4 Creating Users 10
3.5 Configuring Additional
Attributes 13
3.6 Purging Mailboxes
Business Mail Standard
and Advanced Mailboxes 16
3.7 Reports for Business Mail
Standard and Advanced 19
4. DISTRIBUTION LISTS 21
5. PUBLIC FOLDERS 26
6. SPAM FILTERING 27
7. APPENDIX 30

707
TELSTRA BUSINESS MAILADMINISTRATOR’S GUIDE
CREATING AND EDITING MAILBOXES
3.3 MAILBOX & USER ATTRIBUTES
3.3.1 Mailbox Types
3.3.2 Mailbox Storage
3.3.3 User Attributes
3.3.1 Mailbox TypesYou may select one of four mailbox types for users
Table 1 Mailbox Types
Business Mail Standard Web Mail (Outlook Web Access or OWA) access to Business Mail.
Collaborative features such as calendar free-busy information to schedule meetings etc.
Business Mail Advanced The same features as Business Mail Standard plus:
License to use Microsoft Outlook 2003 with Business Mail (Conditions apply)
MAPI access to Business Mail using Microsoft Outlook.
Business Mail POP Business Mail POP is a basic email system with POP 3 and WebMail access
Business Online POP
These mailboxes should only be used if you have a Business Online Account
Business Online POP is a basic email system with POP 3 and WebMail access
MAILBOX TYPES USE THESE MAILBOXES FOR …
Note: Each of these mailbox types is charged differently. You should ensure you select the required type to avoid unwanted charges.
1. INTRODUCTION 01
2. USING MISSION CONTROL 03
3. CREATING AND EDITING
MAILBOXES 05
3.1 The Edit/Create
Mailbox Screens 05
3.2 User Searches 05
3.3 Mailbox & User Attributes 07
3.4 Creating Users 10
3.5 Configuring Additional
Attributes 13
3.6 Purging Mailboxes
Business Mail Standard
and Advanced Mailboxes 16
3.7 Reports for Business Mail
Standard and Advanced 19
4. DISTRIBUTION LISTS 21
5. PUBLIC FOLDERS 26
6. SPAM FILTERING 27
7. APPENDIX 30

808
TELSTRA BUSINESS MAILADMINISTRATOR’S GUIDE
CREATING AND EDITING MAILBOXES
3.3.2 Mailbox StorageThe capacity of Telstra Business Mailboxes is unlimited, however the storage charges vary depending on the mailbox type chosen or hosting plan you have subscribed to.
The charges for the different mailbox types are outlined in Our Customer Terms.
3.3.3 User AttributesWhen you create new users, each one can have a number of unique attributes. These are:
Table 2 User Attributes
Mailbox Type or Managed Mail Type
You may create four types of mailboxes: See Table 1 Mailbox Types
Mailbox Status Mailboxes with an On status can be accessed by the user. Mailboxes with an Off status cannot be accessed by the user
Public Folder Access (Business Mail Advanced and Standard only)
This option changes a user’s public folder privileges. See Public Folders
Full Name The user’s full name. This name will appear in your Global Address List
Main Email Address The user’s email address. The user will also use this to log in to their email account.
Extra Email (up to four addresses)
The user can have up to four additional email addresses. Each email address is an alias for the Main Email address and mail addressed to these addresses goes to the user’s mailbox.
ATTRIBUTE DETAILS
1. INTRODUCTION 01
2. USING MISSION CONTROL 03
3. CREATING AND EDITING
MAILBOXES 05
3.1 The Edit/Create
Mailbox Screens 05
3.2 User Searches 05
3.3 Mailbox & User Attributes 07
3.4 Creating Users 10
3.5 Configuring Additional
Attributes 13
3.6 Purging Mailboxes
Business Mail Standard
and Advanced Mailboxes 16
3.7 Reports for Business Mail
Standard and Advanced 19
4. DISTRIBUTION LISTS 21
5. PUBLIC FOLDERS 26
6. SPAM FILTERING 27
7. APPENDIX 30

909
TELSTRA BUSINESS MAILADMINISTRATOR’S GUIDE
CREATING AND EDITING MAILBOXES
Mailbox Quotas (Business Mail Advanced and Standard only)
You can use the quotas to restrict the amount of email a user can store in their mailbox. They are set to a default value of no limit, indicated by a zero in this field.
Warning Quota (Business Mail Advanced and Standard only)
When a user’s mailbox reaches their Warning Quota they will get a message warning that their mail is approaching full.
Prohibit Send Quota (Business Mail Advanced and Standard only)
When the user’s mailbox reaches the level set as the Prohibit Send Quota, they will no longer be able to send messages until email is deleted from their mailbox.
Prohibit Send and Receive Quota (Business Mail Advanced and Standard only)
At the Prohibit Send Quota and Receive Quota, the user must delete email from their mailbox before they can send or receive any further email.
User Password The password must be at least eight characters long and cannot contain spaces or the characters @ # % ; ? | /.
ATTRIBUTE DETAILS
Stray Mail account One of the mailboxes in your domain can be set up as a Stray Mail account. This means any email addressed to a user who does not exist within your domain will go to that mailbox.
Auto-Responder The Auto-Responder automatically answers emails sent to the mailbox.
Auto-Forwarder (Business Mail POP mailboxes only)
The Auto-Forwarder will automatically forward incoming emails to another email address
ATTRIBUTE DETAILS
1. INTRODUCTION 01
2. USING MISSION CONTROL 03
3. CREATING AND EDITING
MAILBOXES 05
3.1 The Edit/Create
Mailbox Screens 05
3.2 User Searches 05
3.3 Mailbox & User Attributes 07
3.4 Creating Users 10
3.5 Configuring Additional
Attributes 13
3.6 Purging Mailboxes
Business Mail Standard
and Advanced Mailboxes 16
3.7 Reports for Business Mail
Standard and Advanced 19
4. DISTRIBUTION LISTS 21
5. PUBLIC FOLDERS 26
6. SPAM FILTERING 27
7. APPENDIX 30

1010
TELSTRA BUSINESS MAILADMINISTRATOR’S GUIDE
CREATING AND EDITING MAILBOXES
3.4 CREATING USERS
3.4.1 Mail Client Configuration Requirements
3.4.2 User Login Details
3.4.3 Mailbox Activation Time
3.4.4 Selecting a Mailbox Type
3.4.5 Configuring Mailbox Attributes
3.4.6 Mailbox Quotas (Business Mail Advanced and Standard only)
3.4.7 User Password
3.4.8 Saving User Details
3.4.9 How Long Do Changes Take?
3.4.1 Mail Client Configuration RequirementsTo configure an email client for Business Mail, a user’s mailbox must be created.
When you configure a user’s email client, you will need to know:
Table 3 Configuration Attributes
Mailbox Type The Mailbox type determines the type of access available to the user.
Login Username Main Email Address
Login Password User Password
Mailbox Name or User Name for Microsoft Outlook Configuration
Full Name or Mailbox Number
Business Mail Domain Name
me1
ATTRIBUTE NAME DESCRIPTION
Refer to Table 2 User Attributes for further details.
1. INTRODUCTION 01
2. USING MISSION CONTROL 03
3. CREATING AND EDITING
MAILBOXES 05
3.1 The Edit/Create
Mailbox Screens 05
3.2 User Searches 05
3.3 Mailbox & User Attributes 07
3.4 Creating Users 10
3.5 Configuring Additional
Attributes 13
3.6 Purging Mailboxes
Business Mail Standard
and Advanced Mailboxes 16
3.7 Reports for Business Mail
Standard and Advanced 19
4. DISTRIBUTION LISTS 21
5. PUBLIC FOLDERS 26
6. SPAM FILTERING 27
7. APPENDIX 30
1111
TELSTRA BUSINESS MAILADMINISTRATOR’S GUIDE
CREATING AND EDITING MAILBOXES
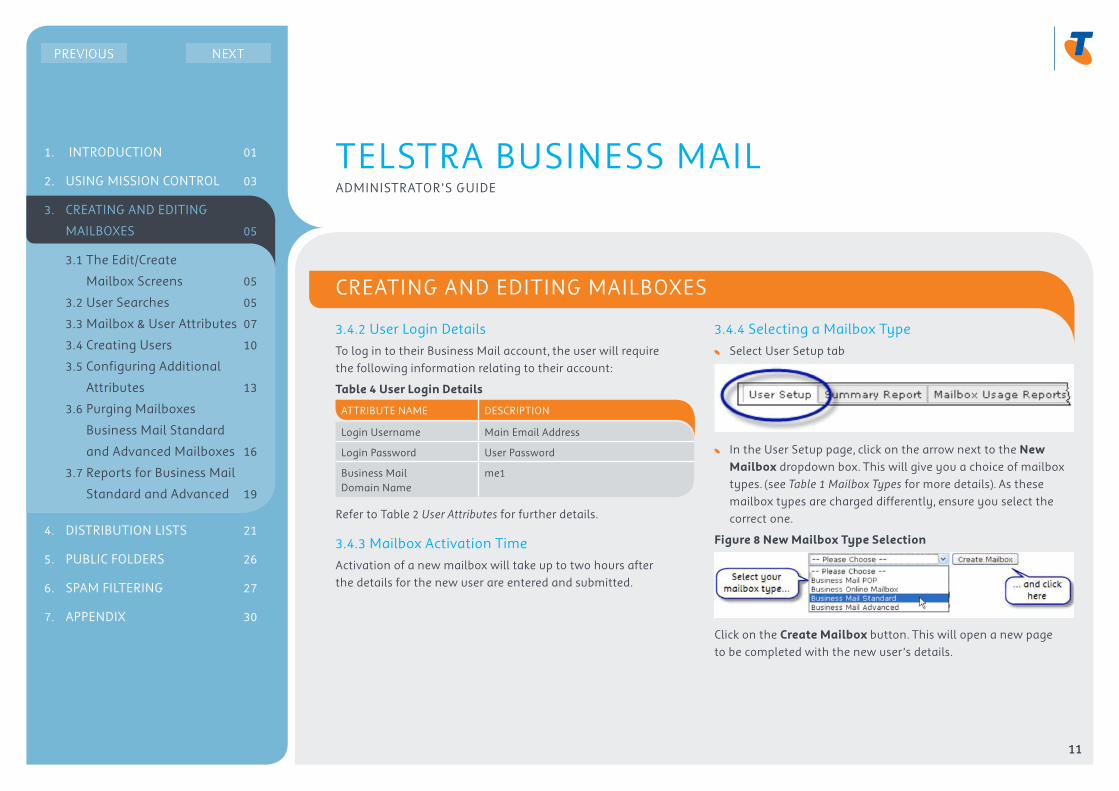
3.4.2 User Login DetailsTo log in to their Business Mail account, the user will require the following information relating to their account:
Table 4 User Login Details
Login Username Main Email Address
Login Password User Password
Business Mail Domain Name
me1
ATTRIBUTE NAME DESCRIPTION
Refer to Table 2 User Attributes for further details.
3.4.3 Mailbox Activation TimeActivation of a new mailbox will take up to two hours after the details for the new user are entered and submitted.
3.4.4 Selecting a Mailbox Type Select User Setup tab
In the User Setup page, click on the arrow next to the New Mailbox dropdown box. This will give you a choice of mailbox types. (see Table 1 Mailbox Types for more details). As these mailbox types are charged differently, ensure you select the correct one.
Figure 8 New Mailbox Type Selection
Click on the Create Mailbox button. This will open a new page to be completed with the new user’s details.
1. INTRODUCTION 01
2. USING MISSION CONTROL 03
3. CREATING AND EDITING
MAILBOXES 05
3.1 The Edit/Create
Mailbox Screens 05
3.2 User Searches 05
3.3 Mailbox & User Attributes 07
3.4 Creating Users 10
3.5 Configuring Additional
Attributes 13
3.6 Purging Mailboxes
Business Mail Standard
and Advanced Mailboxes 16
3.7 Reports for Business Mail
Standard and Advanced 19
4. DISTRIBUTION LISTS 21
5. PUBLIC FOLDERS 26
6. SPAM FILTERING 27
7. APPENDIX 30

1212
TELSTRA BUSINESS MAILADMINISTRATOR’S GUIDE
CREATING AND EDITING MAILBOXES
3.4.5 Configuring Mailbox Attributes Set the Mailbox Status to On.
The Mailbox Type will default to the value you chose on creating the mailbox. You may change it if you wish to use the Exchange Type control.
Select the Public Folder Access type for the user (see Working with Public Folders).
Enter the user’s Full Name
Enter the user’s Main Email Address and any required Extra Email addresses.
Figure 9 Mailbox Types and Name Information (Business Mail Standard and Advanced example)
3.4.6 Mailbox Quotas (Business Mail Advanced and Standard only)Configure the users mailbox quotas – Warning, Prohibit Send, Prohibit Send and Receive Quotas – as required
Figure 10 Mailbox Quotas
3.4.7 User PasswordEnter a password for the user in the New Password Field and the Confirm New Password Field – as per the section below (Figure 11)
Figure 11 Password fields
1. INTRODUCTION 01
2. USING MISSION CONTROL 03
3. CREATING AND EDITING
MAILBOXES 05
3.1 The Edit/Create
Mailbox Screens 05
3.2 User Searches 05
3.3 Mailbox & User Attributes 07
3.4 Creating Users 10
3.5 Configuring Additional
Attributes 13
3.6 Purging Mailboxes
Business Mail Standard
and Advanced Mailboxes 16
3.7 Reports for Business Mail
Standard and Advanced 19
4. DISTRIBUTION LISTS 21
5. PUBLIC FOLDERS 26
6. SPAM FILTERING 27
7. APPENDIX 30

1313
TELSTRA BUSINESS MAILADMINISTRATOR’S GUIDE
CREATING AND EDITING MAILBOXES
3.4.8 Saving User DetailsClick on Save to complete the user creation process.
Note: If you have made an error in creating or editing a mailbox, an error message is displayed. This is displayed at the top of the screen and you may have to scroll up to view it.
Figure 12 Password error warning
3.4.9 How Long Do Changes Take?Changes to user email addresses may take up to 2 hours to be effective. Changes to other user attributes, such as passwords and permissions, may take up to 20 minutes to take effect.
3.5 CONFIGURING ADDITIONAL ATTRIBUTES
3.5.1 Overview
3.5.2 Stray Mail
3.5.3 Auto-Responders
3.5.4 Auto-Forwarding
3.5.5 Editing a User
3.5.6 How long do Changes Take?
3.5.1 OverviewThese attributes can be configured either when the mailbox is created or at a later time when editing a user’s configuration.
1. INTRODUCTION 01
2. USING MISSION CONTROL 03
3. CREATING AND EDITING
MAILBOXES 05
3.1 The Edit/Create
Mailbox Screens 05
3.2 User Searches 05
3.3 Mailbox & User Attributes 07
3.4 Creating Users 10
3.5 Configuring Additional
Attributes 13
3.6 Purging Mailboxes
Business Mail Standard
and Advanced Mailboxes 16
3.7 Reports for Business Mail
Standard and Advanced 19
4. DISTRIBUTION LISTS 21
5. PUBLIC FOLDERS 26
6. SPAM FILTERING 27
7. APPENDIX 30

1414
TELSTRA BUSINESS MAILADMINISTRATOR’S GUIDE
CREATING AND EDITING MAILBOXES
3.5.2 Stray MailIf you select the Stray Mail option on a mailbox, any mail addressed to a user who does not exist in your domain will go to that mailbox. Only one mailbox can be configured for Stray Mail. To select the Stray Mail Option:
While creating or editing a mailbox
Select the Extra Settings tab for that mailbox
Select Stray Mail On radio button.
Click on the Save button to confirm your change.
3.5.3 Auto-RespondersAuto-Responders are used to automatically send replies to incoming messages. They are particularly useful as to reply to incoming email when the user is out of the office.
You may have a default reply and up to three additional reply messages which are dependent on the text in the Subject line of the received message.
To configure Auto-Responders:
Click on the Auto-Responder tab
Select the Auto-Responder On radio button
Enter your default reply message in the Default Reply field. This message will be sent as a reply to every message when the Auto-Responder is set to On.
1. INTRODUCTION 01
2. USING MISSION CONTROL 03
3. CREATING AND EDITING
MAILBOXES 05
3.1 The Edit/Create
Mailbox Screens 05
3.2 User Searches 05
3.3 Mailbox & User Attributes 07
3.4 Creating Users 10
3.5 Configuring Additional
Attributes 13
3.6 Purging Mailboxes
Business Mail Standard
and Advanced Mailboxes 16
3.7 Reports for Business Mail
Standard and Advanced 19
4. DISTRIBUTION LISTS 21
5. PUBLIC FOLDERS 26
6. SPAM FILTERING 27
7. APPENDIX 30

1515
TELSTRA BUSINESS MAILADMINISTRATOR’S GUIDE
CREATING AND EDITING MAILBOXES
Figure 13 Auto-Responder Enter any alternative replies you wish to use.
Click on the Save button.
3.5.4 Auto-Forwarding(Business Mail POP mailboxes only)
The Business Mail POP Auto-Forwarding feature allows you to automatically forward email addressed to your mailbox to another nominated mailbox.
To configure Auto-Forwarder:
Click on the Auto-Forwarder tab
Select the radio button for the Auto-Forwarder option you require.
In the Forward Mail to: field, enter the address you wish to have the email forwarded to.
Click on the Save button.
1. INTRODUCTION 01
2. USING MISSION CONTROL 03
3. CREATING AND EDITING
MAILBOXES 05
3.1 The Edit/Create
Mailbox Screens 05
3.2 User Searches 05
3.3 Mailbox & User Attributes 07
3.4 Creating Users 10
3.5 Configuring Additional
Attributes 13
3.6 Purging Mailboxes
Business Mail Standard
and Advanced Mailboxes 16
3.7 Reports for Business Mail
Standard and Advanced 19
4. DISTRIBUTION LISTS 21
5. PUBLIC FOLDERS 26
6. SPAM FILTERING 27
7. APPENDIX 30

1616
TELSTRA BUSINESS MAILADMINISTRATOR’S GUIDE
CREATING AND EDITING MAILBOXES
Figure 14 Auto-forwarding
3.5.5 Editing a User From the Maintain User Account Menu, Select User Setup.
Use the Mailbox Search to find the user you wish to modify.
Edit the user details as required.
3.5.6 How long do Changes Take?Changes to user email addresses may take up to 2 hours minutes to be effective. Changes to other user attributes, such as passwords and permissions, may take up to 20 minutes to take effect.
3.6 PURGING MAILBOXES BUSINESS MAIL STANDARD AND ADVANCED MAILBOXES
3.6.1 Introduction
3.6.2 Turning Off a Mailbox
3.6.3 Cooling Off Period
3.6.4 Purging a Mailbox
3.6.5 Cancelling a Purge Operation
3.6.1 IntroductionThe Purge function deletes all data from a mailbox. You should use the purge function to delete all messages from a mailbox before re-using it.
Purging a mailbox is a two step process. The first step is to switch the mail box off. In this state the mailbox is inactive, cannot be accessed by the user and cannot send or receive messages.
1. INTRODUCTION 01
2. USING MISSION CONTROL 03
3. CREATING AND EDITING
MAILBOXES 05
3.1 The Edit/Create
Mailbox Screens 05
3.2 User Searches 05
3.3 Mailbox & User Attributes 07
3.4 Creating Users 10
3.5 Configuring Additional
Attributes 13
3.6 Purging Mailboxes
Business Mail Standard
and Advanced Mailboxes 16
3.7 Reports for Business Mail
Standard and Advanced 19
4. DISTRIBUTION LISTS 21
5. PUBLIC FOLDERS 26
6. SPAM FILTERING 27
7. APPENDIX 30

1717
TELSTRA BUSINESS MAILADMINISTRATOR’S GUIDE
CREATING AND EDITING MAILBOXES
The second step is to invoke the Purge function.
As all data is removed from the mailbox, you do have the opportunity to reverse the process during a cooling off period (see Cooling Off Period, section 3.6.3)
3.6.2 Turning Off a MailboxTo turn off a mailbox:
From the Maintain User Account Menu, Select User Setup.
Use the Mailbox Search to find and the mailbox you wish to purge.
Click on the Off button.
At the bottom of the page, click on the Save button.
On the dialog box, click OK
The Mailbox is off and ready to be purged.
3.6.3 Cooling Off PeriodAfter commencing a purge operation you will have a cooling off period of 24 hours. If the purge is cancelled within this time the mailbox contents will not be deleted.
3.6.4 Purging a MailboxThe Purge function deletes all mail from a deactivated mailbox
From the Maintain User Account Menu, Select User Setup.
Use the Mailbox Search to find the mailbox you wish to purge.
Click on the Purge button.
Figure 15 Purging a Mailbox
You will receive a warning that the mailbox contents will be deleted after a cooling off period of 24 hours.
Click on Purge Mailbox to continue. The user’s mailbox details will now have a Cancel Purge in place of the Purge button. All mail in the mailbox will be deleted after the cooling off period.
1. INTRODUCTION 01
2. USING MISSION CONTROL 03
3. CREATING AND EDITING
MAILBOXES 05
3.1 The Edit/Create
Mailbox Screens 05
3.2 User Searches 05
3.3 Mailbox & User Attributes 07
3.4 Creating Users 10
3.5 Configuring Additional
Attributes 13
3.6 Purging Mailboxes
Business Mail Standard
and Advanced Mailboxes 16
3.7 Reports for Business Mail
Standard and Advanced 19
4. DISTRIBUTION LISTS 21
5. PUBLIC FOLDERS 26
6. SPAM FILTERING 27
7. APPENDIX 30

1818
TELSTRA BUSINESS MAILADMINISTRATOR’S GUIDE
CREATING AND EDITING MAILBOXES
Figure 16 Mailbox Purge Warning
3.6.5 Cancelling a Purge OperationIf you have commenced the mailbox purged process, you can cancel the purge within the cooling off period. To cancel a purged mailbox:
From the Maintain User Account Menu, Select User Setup.
Use the Mailbox Search to find the user you wish to modify.
Click on the Cancel Purge Button.
Figure 17 Cancelling a Purged Mailbox
You will be given the opportunity to cancel the mailbox purge. If you wish to cancel the purge, click on the Cancel Purge button.
Figure 18 Cancel a Purged Mailbox Confirmation
1. INTRODUCTION 01
2. USING MISSION CONTROL 03
3. CREATING AND EDITING
MAILBOXES 05
3.1 The Edit/Create
Mailbox Screens 05
3.2 User Searches 05
3.3 Mailbox & User Attributes 07
3.4 Creating Users 10
3.5 Configuring Additional
Attributes 13
3.6 Purging Mailboxes
Business Mail Standard
and Advanced Mailboxes 16
3.7 Reports for Business Mail
Standard and Advanced 19
4. DISTRIBUTION LISTS 21
5. PUBLIC FOLDERS 26
6. SPAM FILTERING 27
7. APPENDIX 30

1919
TELSTRA BUSINESS MAILADMINISTRATOR’S GUIDE
CREATING AND EDITING MAILBOXES
3.7 REPORTS FOR BUSINESS MAIL STANDARD AND ADVANCED
3.7.1 Mailbox Summary Reports
3.7.2 Mailbox Usage Reports
3.7.1 Mailbox Summary ReportsMailbox summary Reports give a brief report of the number of mailboxes you are using and their status. To view your mailbox report, select the Mailbox Summary Reports tab.
You receive a brief report of the mailboxes you are using.
Figure 19 Mailbox Summary Report
1. INTRODUCTION 01
2. USING MISSION CONTROL 03
3. CREATING AND EDITING
MAILBOXES 05
3.1 The Edit/Create
Mailbox Screens 05
3.2 User Searches 05
3.3 Mailbox & User Attributes 07
3.4 Creating Users 10
3.5 Configuring Additional
Attributes 13
3.6 Purging Mailboxes
Business Mail Standard
and Advanced Mailboxes 16
3.7 Reports for Business Mail
Standard and Advanced 19
4. DISTRIBUTION LISTS 21
5. PUBLIC FOLDERS 26
6. SPAM FILTERING 27
7. APPENDIX 30

2020
TELSTRA BUSINESS MAILADMINISTRATOR’S GUIDE
CREATING AND EDITING MAILBOXES
3.7.2 Mailbox Usage Reports(Business Mail Advanced and Standard only)
The mailbox usage report details the mail traffic and mailbox storage for each user. To view your mailbox usage report, select the Mailbox Usage Report tab.
Details for each user are displayed in the Usage Report:
Figure 20 Mailbox Storage Report
The fields displayed in the report are:
Table 5 Mailbox Usage Reports
Mailbox Number Mailbox Number
Fullname User’s full name
Mailbox Quota User’s quota in Mb
Mailbox Consumption User’s current storage in Mb
Mailbox Excess Storage in excess of user’s quota
Warning Quota User’s Warning Quota in percent
No Send Quota User’s No Send Quota in percent
No Send/Receive Quota User’s No Send/Receive Quota in percent
DISPLAYED DESCRIPTION
1. INTRODUCTION 01
2. USING MISSION CONTROL 03
3. CREATING AND EDITING
MAILBOXES 05
3.1 The Edit/Create
Mailbox Screens 05
3.2 User Searches 05
3.3 Mailbox & User Attributes 07
3.4 Creating Users 10
3.5 Configuring Additional
Attributes 13
3.6 Purging Mailboxes
Business Mail Standard
and Advanced Mailboxes 16
3.7 Reports for Business Mail
Standard and Advanced 19
4. DISTRIBUTION LISTS 21
5. PUBLIC FOLDERS 26
6. SPAM FILTERING 27
7. APPENDIX 30

2121
TELSTRA BUSINESS MAILADMINISTRATOR’S GUIDE
DISTRIBUTION LISTS
This section is only applicable to Business Mail Standard and Business Mail Advanced
4.1 ABOUT DISTRIBUTION LISTS
4.1.1 Introduction
4.1.2 The Distribution List Screen
4.1.3 Creating a Distribution List
4.1.4 Adding Administrators to a Distribution List
4.1.5 Editing Distribution List Names
4.1.6 Deleting Distribution Lists
4.1.1 IntroductionAs an administrator, you can create Distribution Lists and assign Administrators for the lists. You can also modify the Distribution List Names and Administrators. Users and other lists must be added using Microsoft Outlook.
After creation, the distribution lists appear in the users Global Address List.
When you are using Microsoft Outlook, they appear in a bold font in the Address Book (Figure 21).
Figure 21 Address Lists in the Outlook Address Book
1. INTRODUCTION 01
2. USING MISSION CONTROL 03
3. CREATING AND EDITING
MAILBOXES 05
4. DISTRIBUTION LISTS 21
4.1 About Distribution Lists 21
4.2 Mailing Lists 25
5. PUBLIC FOLDERS 26
6. SPAM FILTERING 27
7. APPENDIX 30
2222
TELSTRA BUSINESS MAILADMINISTRATOR’S GUIDE
DISTRIBUTION LISTS
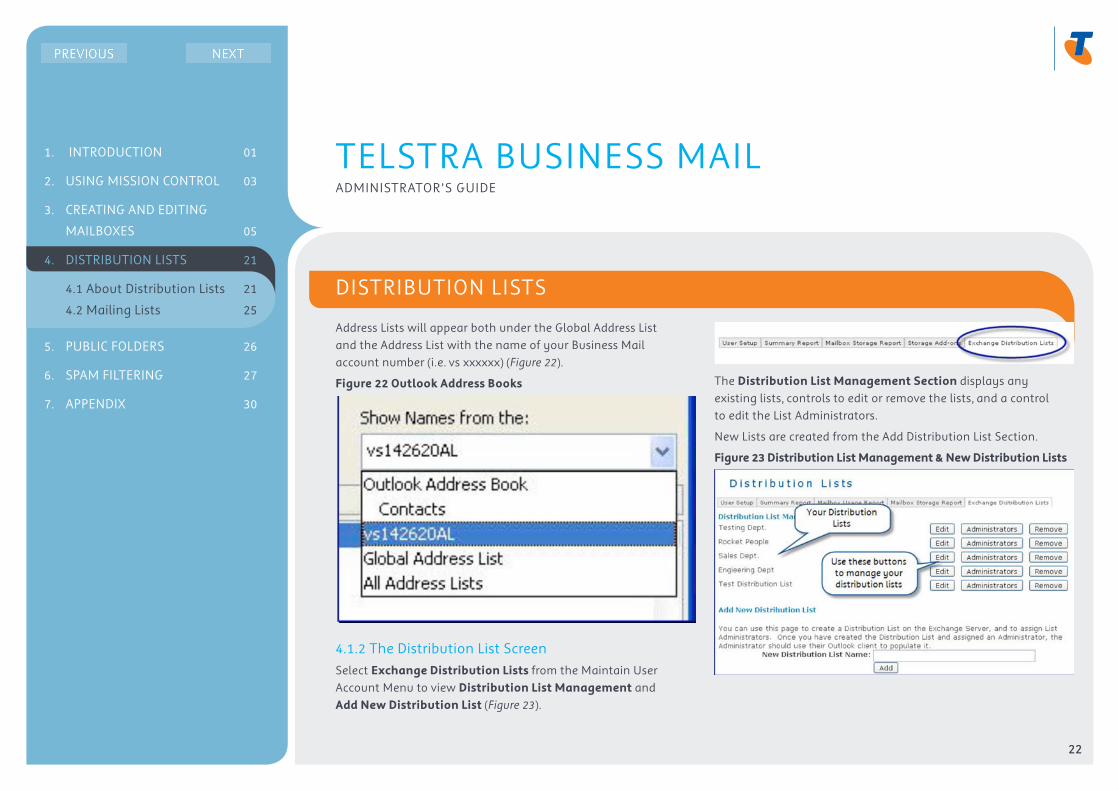
Address Lists will appear both under the Global Address List and the Address List with the name of your Business Mail account number (i.e. vs xxxxxx) (Figure 22).
Figure 22 Outlook Address Books
4.1.2 The Distribution List ScreenSelect Exchange Distribution Lists from the Maintain User Account Menu to view Distribution List Management and Add New Distribution List (Figure 23).
The Distribution List Management Section displays any existing lists, controls to edit or remove the lists, and a control to edit the List Administrators.
New Lists are created from the Add Distribution List Section.
Figure 23 Distribution List Management & New Distribution Lists
1. INTRODUCTION 01
2. USING MISSION CONTROL 03
3. CREATING AND EDITING
MAILBOXES 05
4. DISTRIBUTION LISTS 21
4.1 About Distribution Lists 21
4.2 Mailing Lists 25
5. PUBLIC FOLDERS 26
6. SPAM FILTERING 27
7. APPENDIX 30

2323
TELSTRA BUSINESS MAILADMINISTRATOR’S GUIDE
DISTRIBUTION LISTS
4.1.3 Creating a Distribution List To create a new distribution list, enter the name of the list in
the New Distribution List field and click on the Add button.
A Notice at the top of the page confirms the addition of the new list, and the list appears in the Distribution List Management Section (Figure 24).
Figure 24 New Distribution List management
4.1.4 Adding Administrators to a Distribution ListDistribution List members must be edited by Distribution List Administrators using Microsoft Outlook. Distribution Lists may have multiple Administrators. To add Distribution List Administrators:
Click on the Administrators button adjacent to the required list to open Manage Distribution List Administrators.
Select one or more mailbox names from the Existing Mailboxes list. Click on Add Selected to add the selected mailboxes as Administrators
Return to Distribution List Management by selecting Exchange Distribution Lists from the Maintain User Account Menu
Figure 25 Selecting Administrators
4.1.5 Editing Distribution List NamesYou can change the names of Distribution Lists you have created.
Click on the Edit button adjacent to the required list to open Manage Distribution Lists (Figure 25).
1. INTRODUCTION 01
2. USING MISSION CONTROL 03
3. CREATING AND EDITING
MAILBOXES 05
4. DISTRIBUTION LISTS 21
4.1 About Distribution Lists 21
4.2 Mailing Lists 25
5. PUBLIC FOLDERS 26
6. SPAM FILTERING 27
7. APPENDIX 30

2424
TELSTRA BUSINESS MAILADMINISTRATOR’S GUIDE
DISTRIBUTION LISTS
Figure 26 Edit Distribution List Details
Change the list name in the New Distribution List Name field.
Click on the Update button.
4.1.6 Deleting Distribution ListsYou can remove a Distribution List.
This deletes the list, but not the mailboxes in the list. After
a Distribution list has been deleted, it cannot be restored.
To delete a Distribution List:
Select Exchange Distribution Lists.
Click on the Remove button adjacent to the list you wish to delete. You will be asked to confirm that you wish to remove the list (Figure 27).
Click on OK to remove the list. After deletion the lists cannot be restored.
Figure 27 Confirming the Deletion of a Distribution List
A Notice at the top of the page confirms the deletion of the list (Figure 28), and the list is no longer displayed in the Distribution List Management Section.
Figure 28 Removal of Distribution List
1. INTRODUCTION 01
2. USING MISSION CONTROL 03
3. CREATING AND EDITING
MAILBOXES 05
4. DISTRIBUTION LISTS 21
4.1 About Distribution Lists 21
4.2 Mailing Lists 25
5. PUBLIC FOLDERS 26
6. SPAM FILTERING 27
7. APPENDIX 30

2525
TELSTRA BUSINESS MAILADMINISTRATOR’S GUIDE
DISTRIBUTION LISTS
4.2 MAILING LISTS
4.2.1 Overview of Mailing Lists
4.2.2 Further Information
4.2.1 Overview of Mailing ListsMailing lists can be created for use with Business Mail/Online POP mail boxes. There are a number of different types of mailing list available, namely:
Open – This is an open email discussion group; anyone can join the list and can then post a message to the list.
Closed – This is a closed email discussion group, the moderator must approve new members to the list and any member can post messages to the list.
Closed and Moderated – This is a moderated email discussion group. The moderator must approve new members and must approve any message which is posted to the list.
Newsletter – This is a Newsletter group, anyone can join, but only the moderator can post messages to the list.
Public – This is a public mailing list. Anyone can join the list, and anyone can post mail to the list, even without being a member of the list.
4.2.2 Further InformationThe Mailing Lists for Telstra Business POP Mail uses the EZMLM/IDX Mailing List. For instructions refer to:
http://www.ezmlm.org/manual/ and http://www.ezmlm.org/faq/
1. INTRODUCTION 01
2. USING MISSION CONTROL 03
3. CREATING AND EDITING
MAILBOXES 05
4. DISTRIBUTION LISTS 21
4.1 About Distribution Lists 21
4.2 Mailing Lists 25
5. PUBLIC FOLDERS 26
6. SPAM FILTERING 27
7. APPENDIX 30

2626
TELSTRA BUSINESS MAILADMINISTRATOR’S GUIDE
PUBLIC FOLDERS
This section is only applicable to Business Mail Standard and Business Mail Advanced
5.1 WORKING WITH PUBLIC FOLDERS
5.1.1 Introduction
5.1.2 Configuring Public Folders
5.1.3 Public Folders in Outlook 2003 and Outlook Web Access
5.1.1 IntroductionPublic Folders are folders that are visible to specific groups within your organisation, and can be used for storing items such as public email folders, contacts, etc. The users who have rights to read, write or edit items and folders within your organisation’s public folders is set using Mission Control and Outlook 2003.
5.1.2 Configuring Public FoldersA user’s public folder rights are configured using Mission Control. For a new user the public folder rights should be configured on creation of the mailbox (see Creating Users, section 3.4). For an existing user, edit the user’s details as described in Editing a User, section 3.5.5.
A user can be configured as either a Publishing Editor or an Author.
By default, all users are configured as Authors and have visibility of your organisations root level Public Folder. They can Create and Read, items in this folder. They can delete or edit any of the items they create.
A user designated as a Publishing Editor has the ability to assign privileges to other users and has read/write/create/delete privileges in all public folders. Once a user has been assigned as a publishing editor, Outlook 2003 is used to create Additional Public folders and assign rights for other users to access the folders.
Figure 29 Public Folder Access Rights
5.1.3 Public Folders in Outlook 2003 and Outlook Web Access
To access Public Folders from Outlook Web Access, Select Public Folders in the navigation pane. Your Public Folders will be displayed. Your root level Public Folder has the same name as the Business Mail Master Username, in the format vsxxxxxx.
To access Public Folders from Outlook 2003, Select Public Folders from the Folders List. Your Public Folders will be displayed. Your root level Public Folder has the same name as the Business Mail Master Username, in the format vsxxxxxx.
1. INTRODUCTION 01
2. USING MISSION CONTROL 03
3. CREATING AND EDITING
MAILBOXES 05
4. DISTRIBUTION LISTS 21
5. PUBLIC FOLDERS 26
5.1 Working with
Public Folders 26
6. SPAM FILTERING 27
7. APPENDIX 30
2727
TELSTRA BUSINESS MAILADMINISTRATOR’S GUIDE
SPAM FILTERING
This section is only applicable to Business Mail Standard and Business Mail Advanced
Business Mail uses Microsoft Intelligent Mail Filtering (IMF) to filter spam.
Outlook 2003 also incorporates spam filtering independent of IMF. See the section Outlook 2003 SPAM Filtering for more information.
Email designated as spam is automatically forwarded to your Junk Mail folder. You should check your Junk Mail folder periodically, to ensure real email has not been marked as spam
6.1 ENABLING SPAM FILTERING
6.1.1 Enabling Spam Filtering (Outlook 2003)
6.1.2 Enabling Spam Filtering (Outlook Web Access)
6.1.3 Configuring Junk Mail Settings
6.1.4 Outlook 2003 SPAM filtering
6.1.5 Configuring Outlook 2003 SPAM filtering
6.1.1 Enabling Spam Filtering (Outlook 2003)If you are using Outlook 2003, you should select “Cached Mode” during configuration to enable Spam Filtering.
6.1.2 Enabling Spam Filtering (Outlook Web Access)To enable Spam Filtering with Outlook Web Access (OWA):
Log into OWA
Select Options from the Navigation Bar
1. INTRODUCTION 01
2. USING MISSION CONTROL 03
3. CREATING AND EDITING
MAILBOXES 05
4. DISTRIBUTION LISTS 21
5. PUBLIC FOLDERS 26
6. SPAM FILTERING 27
6.1 Enabling Spam
Filtering 27
7. APPENDIX 30

2828
TELSTRA BUSINESS MAILADMINISTRATOR’S GUIDE
SPAM FILTERING
Figure 30 Outlook Web Access SPAM Filtering 6.1.3 Configuring Junk Mail Settings Scroll down the Options page to the Privacy and Junk E-mail
Prevention section
Figure 31 Outlook Web Access SPAM Filtering
Check the Select Filter Junk Email box.
Click on Save and Close at the top of the screen to save your setting.
6.1.4 Outlook 2003 SPAM filteringOutlook 2003 also incorporates spam filtering independent of IMF. To configure this:
From Outlook 2003 Actions Menu, select Junk E-mail and Junk E-mail Options.
1. INTRODUCTION 01
2. USING MISSION CONTROL 03
3. CREATING AND EDITING
MAILBOXES 05
4. DISTRIBUTION LISTS 21
5. PUBLIC FOLDERS 26
6. SPAM FILTERING 27
6.1 Enabling Spam
Filtering 27
7. APPENDIX 30

2929
TELSTRA BUSINESS MAILADMINISTRATOR’S GUIDE
SPAM FILTERING
Figure 32 Selecting SPAM Filtering
6.1.5 Configuring Outlook 2003 SPAM filteringIn The Junk E-mail Option dialog you can configure your Junk E-mail options.
To enable e-mail filtering, select one of the options under Choose the level of junk email protection you want:
Figure 33 Outlook 2003 SPAM Filtering
You may also choose other options from this dialog.
When you have completed, click on OK to close the Dialog box.
1. INTRODUCTION 01
2. USING MISSION CONTROL 03
3. CREATING AND EDITING
MAILBOXES 05
4. DISTRIBUTION LISTS 21
5. PUBLIC FOLDERS 26
6. SPAM FILTERING 27
6.1 Enabling Spam
Filtering 27
7. APPENDIX 30

3030
TELSTRA BUSINESS MAILADMINISTRATOR’S GUIDE
APPENDIX
7.1 SUPPORTED PROTOCOLS
7.1.1 Business Mail Standard
7.1.2 Business Mail Advanced
7.1.3 Business Mail POP
7.1.1 Business Mail StandardBusiness Mail Standard supports the following protocols:
Mail Retrieval
POP3 (Post Office Protocol 3)
IMAP4 (Internet Message Access Protocol)
These protocols are used by Microsoft Outlook Express. (Outlook Express) Microsoft Outlook 2003 (Outlook 2003) and Microsoft Outlook 2007 (Outlook 2007) can also be configured to use POP3and IMAP4
Mail Transmission
SMTP (Simple Mail Transmission Protocol)
Microsoft Outlook Express uses SMTP for mail transmission. Microsoft Outlook 2003 and Microsoft Outlook 2007 can also be configured to use SMTP.
Mail Retrieval & Transmission
HTTP Hypertext Transfer Protocol as Outlook Web Access.
The recommended application for OWA is Internet Explorer 5.01 or greater
For Windows based Portable Devices:
ActiveSync
Outlook Mobile Access
7.1.2 Business Mail AdvancedBusiness Mail Advanced supports all protocols supported by Business Mail Standard. In addition, Business Mail Advanced also supports MAPI (Microsoft Application Programming Interface) for Mail Retrieval & Transmission.
Microsoft Outlook 2003 or Microsoft Outlook 2007 are required for MAPI.
1. INTRODUCTION 01
2. USING MISSION CONTROL 03
3. CREATING AND EDITING
MAILBOXES 05
4. DISTRIBUTION LISTS 21
5. PUBLIC FOLDERS 26
6. SPAM FILTERING 27
7. APPENDIX 30
7.1 Supported Protocols 30

3131
TELSTRA BUSINESS MAILADMINISTRATOR’S GUIDE
APPENDIX
7.1.3 Business Mail POPMail Retrieval
POP3 (Post Office Protocol 3)
These protocols are used by Microsoft Outlook Express. (Outlook Express) Microsoft Outlook 2003 (Outlook 2003) and Microsoft Outlook 2007 (Outlook 2007) can also be configured to use POP3and IMAP4
Mail Transmission
SMTP (Simple Mail Transmission Protocol)
Microsoft Outlook Express uses SMTP for mail transmission. Microsoft Outlook 2003 and Microsoft Outlook 2007 can also be configured to use SMTP.
Two SMTP options are available:
Default SMTP – Restricted message volume, Maximum message size 20Mb
Mass Email SMTP – No volume limited, Maximum message size 20Mb
Mail Retrieval & Transmission
HTTP Hypertext Transfer Protocol as Outlook Web Access.
1. INTRODUCTION 01
2. USING MISSION CONTROL 03
3. CREATING AND EDITING
MAILBOXES 05
4. DISTRIBUTION LISTS 21
5. PUBLIC FOLDERS 26
6. SPAM FILTERING 27
7. APPENDIX 31
7.1 Supported Protocols 30

TELSTRA BUSINESS MAIL ADMINISTRATOR’S GUIDE
©Telstra Corporation Limited, Melbourne, 2010
All rights reserved. No part of this publication may be reprinted, reproduced, stored in a retrieval system or transmitted, in any form or by any means, without the prior permission in writing from the owners.
Unless otherwise expressly agreed in writing, the information contained in this manual is subject to change without notice and Telstra Corporation Limited assumes no responsibility for any alteration to, or any error or other deficiency in, this document.
Windows, Microsoft Exchange, Exchange 2000, Microsoft Outlook and Microsoft Outlook Express are trademarks of Microsoft Corporation.
Product or company names are trademarks or registered trademarks of their respective holders.
Published by Telstra Messaging, Level 24, 242 Exhibition St, Melbourne, Australia
TELSTRA CORPORATION LIMITED, MELBOURNE, ACN 051 775 556, ABN 33 051 775 556
C077
APR10
1. INTRODUCTION 01
2. USING MISSION CONTROL 03
3. CREATING AND EDITING
MAILBOXES 05
4. DISTRIBUTION LISTS 21
5. PUBLIC FOLDERS 26
6. SPAM FILTERING 27
7. APPENDIX 30