telephone operation guide for lip-9030 & lip-9040
TRANSCRIPT

Telephone Operation Guide For
LIP-9030 & LIP-9040
Version 87 March 20, 2019 © Presence Management4393-F Tuller Road Dublin, OH 43017 (614) 652-6500 Support.PresenceManagement.com


Telephone Operation Guide LIP-9030 & LIP-9040
ContentsMaking, Receiving, and Managing Calls...................................................................................................1
Making an external call....................................................................................................................1Calling another station......................................................................................................................1Calling another station using the directory.......................................................................................1Answering a call ringing your station...............................................................................................1Answering a second call ringing your station...................................................................................1Answering a call to another station without call coverage...............................................................1Switching between handset and hands-free......................................................................................2Group listening.................................................................................................................................2Muting your microphone..................................................................................................................2Silencing ringing while on a call......................................................................................................2Intercom calling with forced hands-free...........................................................................................2Placing a call on hold........................................................................................................................2Placing a call on exclusive hold........................................................................................................2Retrieving a call from hold...............................................................................................................3Transferring a call to another extension...........................................................................................3Transferring a call to a phone number..............................................................................................3Transferring a call directly to a voice mailbox.................................................................................3Transferring a call to a group............................................................................................................4Parking a call....................................................................................................................................4Retrieving a parked call....................................................................................................................4Making a page...................................................................................................................................4Instant Redial....................................................................................................................................4Reviewing the Call log.....................................................................................................................4
Conference Calling....................................................................................................................................5Personal conference calling...................................................................................................................5
Starting a personal conference with new calls..................................................................................5Conferencing a held call into your existing call...............................................................................5Managing the your personal conference call....................................................................................6
Conference rooms..................................................................................................................................6Create a conference room.................................................................................................................7Delete a conference room.................................................................................................................7Enter a conference room...................................................................................................................7
Flexible Button Programming....................................................................................................................8Viewing what a flexible button is currently programmed for...........................................................8Program a flexible button with an extension....................................................................................8Program a flexible button with a feature code..................................................................................8Program a flexible button with a phone number..............................................................................9Program a flexible button with a speed dial.....................................................................................9Deleting the programming of a flexible button................................................................................9
Speed Dials..............................................................................................................................................10Program a speed bin........................................................................................................................10Dial a speed bin by bin number......................................................................................................11
Page i

Telephone Operation Guide LIP-9030 & LIP-9040
Dial a station speed bin by name....................................................................................................11Program a flexible button with a speed dial...................................................................................11
Forwarding to a Cellular Phone with Mobile Extension..........................................................................12Mobile extension setup........................................................................................................................12
Program your cellular phone number.............................................................................................12Program the on/off button...............................................................................................................12Disabling mobile extension remotely.............................................................................................12Using mobile extension to make calls through the iPECS system.................................................13
Using mobile extension feature codes while on a call........................................................................13Transferring calls from mobile extension.......................................................................................13Parking calls from mobile extension..............................................................................................13Paging from mobile extension........................................................................................................13
Forwarding Calls without Mobile Extension...........................................................................................14Forwarding Types...........................................................................................................................14Forwarding your calls immediately to voice mail..........................................................................14Programming your station to forward calls to another extension...................................................14Canceling call forwarding...............................................................................................................14
Call coverage............................................................................................................................................15Allowing or disallowing call coverage...........................................................................................15Programming the covering station..................................................................................................15To stop covering another station.....................................................................................................15Call coverage ring delay.................................................................................................................16Silent call coverage.........................................................................................................................16
Additional Features..................................................................................................................................16Voice Mail.......................................................................................................................................16Volume buttons and their multiple functions..................................................................................16Intercom answering options............................................................................................................17Ring tones.......................................................................................................................................17Send Dialing (Enblock dialing)......................................................................................................17Headset management......................................................................................................................18
Character Entry........................................................................................................................................19Common Feature Code Reference...........................................................................................................20
Page ii

Telephone Operation Guide LIP-9030 & LIP-9040
Making, Receiving, and Managing Calls
Making an external call
1. Dial [9] to reach an outside line.
2. Dial your phone number.
Calling another station
1. Dial the extension of the station you wish to reach or, if programmed, press the flexible button labeled for the extension.
Calling another station using the directory
1. Press [Directory].
2. Press [3].
3. Use the directional buttons surrounding [OK] to browse the directory listing, or dial the first few characters of a name.
(a) A chart displaying how to dial letters can be found on page 18.
4. When you have highlighted your selection press [OK], your station will call that extension automatically.
Answering a call ringing your station
1. Lift the handset to answer normally or press [Speaker] to answer hands-free.
Answering a second call ringing your station
1. Press the blinking [Line] button to automatically place the first call on hold and answer the second.
2. Switch between calls by pressing the blinking [Line] button of the caller you wish to speak to.
Answering a call to another station without call coverage
Call coverage is detailed beginning on page 14.
1. If programmed, press the flashing flexible button that was pre-programmed with the extension that is ringing.
2. If no such button is programmed dial [*77] followed by the extension that is ringing.
Switching between handset and hands-free
1. Press [Speaker] and hang up the handset to switch to hands-free.
Page 1

Telephone Operation Guide LIP-9030 & LIP-9040
2. Lift the handset to switch from hands-free to handset, the speakerphone will automatically disable.
Group listening
1. While on the call and already using the handset, press [Speaker]
(a) The call will continue to use the handset as usual but the caller will also be heard over the speakerphone. This is useful if additional people need to monitor the call.
Muting your microphone
1. While on a call press [Mute], it will light red.
2. To disable mute press [Mute], it will no longer be lit.
Silencing ringing while on a call
1. If you find your phone ringing while you are on a call, press [DND] to silence the second ringing call.
(a) If the second call was routed directly to your station, the caller will be sent to voice mail.
(b) If the second call was ringing your station because it was routed to a station group of which you are a member, the call will continue ringing the other station group members.
Intercom calling with forced hands-free
This feature must be enabled for the calling station.
1. When calling from your station directly to another and the called station is ringing press [#]
(a) A tone will sound on both stations and the call will connect, the called station will automatically use speakerphone.
Placing a call on hold
1. Press [Hold] once, the call will hold for a short time before recalling.
(a) Your [Hold] button and a [Line] flexible button will both begin blinking.
(b) You may place one call on hold for each [Line] flexible button you have programmed.
Placing a call on exclusive hold
1. Press [Hold] twice, the call will hold for much longer (than if you had pressed [Hold] once) before recalling and cannot be retrieved by another station manually picking up that line.
(a) Your [Hold] button and a [Line] flexible button will both begin blinking.
(b) You may place one call on hold for each [Line] flexible button you have programmed.
Page 2

Telephone Operation Guide LIP-9030 & LIP-9040
Retrieving a call from hold
1. Press the flashing [Line] flexible button that is associated with the call you wish to pick up.
(a) If only one call was placed on hold, you may press the flashing [Line] or [Hold] button to retrieve the call.
Transferring a call to another extension
1. While on the call press [Trans/PGM] and your caller will automatically be put on transfer-hold.
2. Dial the extension of the party you wish to transfer the call to.
3. To transfer the call immediately, hang up. Otherwise wait for your call to be answered before announcing the transfer and hanging up to complete the transfer.
4. If unable to reach your party or you otherwise need to retrieve the party on transfer-hold press[Trans/PGM] to pick them back up.
Transferring a call to a phone number
1. While on the call press [Trans/PGM] and your caller will automatically be put on transfer-hold.
2. Dial [9] to reach an outside line.
3. Dial the phone number of the party you wish to transfer the call to.
4. To transfer the call immediately, hang up. Otherwise wait for your call to be answered before announcing the transfer and hanging up to complete the transfer.
5. If unable to reach your party or you otherwise need to retrieve the party on transfer-hold press[Trans/PGM] to pick them back up.
Transferring a call directly to a voice mailbox
1. While on the call press [Trans/PGM] and your caller will automatically be put on transfer-hold.
2. Press [Message]
3. Enter the extension of the voice mailbox to transfer the caller to or, if programmed, press the flexible button for that mailboxes extension.
4. Complete the transfer by hanging up.
Transferring a call to a group
1. While on the call press [Trans/PGM] and your caller will automatically be put on transfer-hold.
2. Dial the group number you wish to transfer to.
3. Hang up to complete the transfer.
Page 3

Telephone Operation Guide LIP-9030 & LIP-9040
Parking a call
1. While on the call press a park flexible button
Or
1. While on the call press [Trans/PGM]
2. Dial a park bin.
(a) Park bin numbers begin at [#601]. The total number of park bins depends on system model.
Retrieving a parked call
1. Press a flashing park flexible button, if programmed.
Or
1. Dial the park bin manually.
Making a page
If a user wishes to no longer receive pages from some or any page code please contact support.
1. Dial your page code
(a) [*301] pages all stations in zone 1.
(b) [*545] pages using overhead horns, if installed.
(c) [*549] pages all stations and overhead horns at the same time, if installed.
2. A tone will sound, make your announcement.
3. Hang up the handset to end your page.
Instant Redial
1. Dial [*552] to redial the most recently dialed external call.
Reviewing the Call log
1. Press your [Log] soft key.
2. The call log lists all calls involving this station and uses icons on the left side of each entry to differentiate between call types.
(a) An arrow pointing right is a call made by the station.
(b) An arrow pointing left is a call answered by the station.
(c) A bouncing arrow is a missed call.
3. The date and time that an entry is created can be viewed: highlight the line item and press the[Select] soft key.
Page 4

Telephone Operation Guide LIP-9030 & LIP-9040
4. Once an item is open, it can be deleted or saved as a speed dial by pressing the related soft key.
5. If the user wishes to call a line item found in the call log. Highlight the item and press [OK] to have the phone automatically dial.
Conference Calling
Personal conference callingEach station can create conference calls on their own without using a conference room. Follow these
instructions to do so.
Starting a personal conference with new calls
1. With your first party on the line press the [Conf] soft key under your screen.
(a) Your first party will be placed on conference-hold and you will hear intercom dial tone.
2. Dial the next party you wish to conference into the call.
(a) Dial as you would normally, [9] for outside call or extension for internal call.
3. Once you have your second party, press [Conference] once to place them on conference-hold, you will hear intercom dial tone again.
4. Repeat steps 2 and 3 for additional parties.
5. Once you wish to join the conference press [Conference] again while off-hook and listening to internal dial tone.
6. When completed, each user can exit the conference by hanging up or the station that begin the conference may disconnect all parties by pressing their [Conf] soft key while on-hook.
Conferencing a held call into your existing call.
This applies when you were already on the phone and another party calls your station. Follow these instructions to talk to both your existing call and the new caller at the same time.
1. This guide assumes you are speaking to one caller and have another caller on hold.
2. With your first party on the line press the [Conf] soft key under your screen.
(a) Your first party will be placed on conference-hold and you will hear intercom dial tone.
3. Press the blinking [Line] key to pickup your held party.
4. Press the [Conf] soft key once to place them on conference-hold, you will hear intercom dial tone again.
5. Press [Conference] again while off-hook and listening to internal dial tone, you will connect all parties and join the conference.
Page 5

Telephone Operation Guide LIP-9030 & LIP-9040
6. When completed, each user can exit the conference by hanging up or the station that begin the conference may disconnect all parties by pressing their [Conf] soft key while on-hook.
Managing the your personal conference call
1. The station that began the personal conference call may use the [View] soft key under their screen toreview, add, and delete members from the conference call.
2. With the view menu open, use the volume buttons to browse through the conference call member list.
(a) Press the [Delete] soft key to disconnect a member from the conference.
(b) Press [Add] soft key to receive internal dial tone, dial the party you wish to add to the conference.
i. Remember to dial [9] for an outside line if the party is not another extension.
ii. Once reached, press [Conference] to return to the conference and bring the new party into the conference with you.
A. If no party is reached hang up and the station will return to an idle state.
B. To rejoin the conference go off-hook and press the [Conf] soft key.
• If the [Conf] soft key is pressed while idle (not off-hook) the conference call will end andall parties will be disconnected.
Conference roomsNine conference rooms are available in the iPECS system at default. After each room is created the
following codes will enter the rooms and prompt for the password, if configured with a password.
Room Number Internal Access Code External Number Password
1 [*591]
2 [*592]
3 [*593]
4 [*594]
5 [*595]
6 [*596]
7 [*597]
8 [*598]
9 [*599]
Once accessed and password entered everyone in the conference room and the user joining it will hear a tone and be connected.
Please note there is a system-wide limited number of conference party resources. These resources are
Page 6

Telephone Operation Guide LIP-9030 & LIP-9040
shared between the conference rooms and all personal conference calls that are greater than 4 parties. This limit depends on installed hardware and licensing, your installation technician or support can identify the number of available conference resources.
Create a conference room
1. Dial [Trans/PGM] [53]
2. Press the room number: [1] through [9].
3. Enter any 5 digit password.
(a) To create the conference room without a password, skip step 3.
4. Press [Hold]
Delete a conference room
1. Dial [Trans/PGM] [54]
2. Press the room number: [1] through [9].
3. Enter the password, if programmed.
4. Press [Hold]
Enter a conference room
1. If dialing from your station:
(a) Dial [*59]
(b) Press the room number: [1] through [9].
(c) Enter the password, if programmed.
2. If not at your station: dial the phone number provided in the chart above, then enter your password when prompted.
Flexible Button ProgrammingThe LIP-9030 & LIP-9040 display their flexible buttons to the left and right of the LCD screen.
While only 8 or 12 physical buttons exist each button can save three functions by using the directional pad to scroll (up or down) through the three pages of stored flexible button functions.
Viewing what a flexible button is currently programmed for
Flexible buttons can be checked without making changes.
1. Press [Trans/PGM]
(a) Press the flexible button you wish to view the programming of.
Page 7

Telephone Operation Guide LIP-9030 & LIP-9040
(b) A tone will sound and the programming of the selected button will be displayed on the screen.
2. Continue pressing flexible buttons until you have checked all that you wish to.
3. Press [Speaker] to exit programming.
Program a flexible button with an extension
1. Press [Trans/PGM]
2. Press the flexible button you wish to program.
(a) A tone will sound and the programming of the selected button will be displayed on the screen.
3. Enter the extension number you want programmed on the selected flexible button.
4. Press [Hold]
5. Repeat steps 2 through 5 if additional flexible buttons require programming.
6. Press [Speaker] to exit programming.
Program a flexible button with a feature code
1. Press [Trans/PGM]
2. Press the flexible button you wish to program.
(a) A tone will sound and the programming of the selected button will be displayed on the screen.
3. Enter the feature code you want programmed on the selected button.
(a) Page 19 lists feature codes detailed in this document.
i. If any code shows a [Trans/PGM] in the feature code column it must be pressed along with theshown digits.
4. Press [Hold]
5. Repeat steps 2 through 5 if additional flexible buttons require programming.
6. Press [Speaker] to exit programming.
Program a flexible button with a phone number
1. Press [Trans/PGM]
2. Press the flexible button you wish to program.
(a) A tone will sound and the programming of the selected button will be displayed on the screen.
3. Dial [9] followed by your phone number.
4. Press [Hold]
5. Repeat steps 2 through 5 if any additional flexible buttons require programming.
6. Press [Speaker] to exit programming.
Page 8

Telephone Operation Guide LIP-9030 & LIP-9040
Program a flexible button with a speed dial
1. Press [Trans/PGM]
2. Press the flexible button you wish to program.
(a) A tone will sound and the programming of the selected button will be displayed on the screen.
3. Press [Speed].
4. Enter the speed bin number.
5. Press [Hold]
6. Repeat steps 2 through 5 if any additional flexible buttons require programming.
7. Press [Speaker] to exit programming.
Deleting the programming of a flexible button
A flexible button may be reprogrammed with a new feature without clearing the programming first.
1. Press [Trans/PGM]
2. Press the flexible button you wish to delete.
(a) A tone will sound and the programming of the selected button will be displayed on the screen.
3. Press [Hold]
4. Repeat steps 2 and 3 if any additional flexible buttons require deletion.
5. Press [Speaker] to exit programming.
Speed DialsNote: The Program a flexible button with a phone number section on page 8 could be better suited
for personal use instead of this Speed Dials section.
Note: Speed bin and speed dial are interchangeable terms.
Program a speed bin
1. Press [Trans/PGM].
2. Press [Speed].
3. Enter a bin number.
(a) The screen will display “Enter Speed Bin No (XXX)”, XXX being the first empty station speed bin.
i. The complete range of station speed bins is 000-099, every station has its own set.
ii. System-wide speed bin numbers range from 20000 to 31999 but can only be programmed from the system attendant station.
Page 9

Telephone Operation Guide LIP-9030 & LIP-9040
(b) To edit an existing speed bin enter that bin number.
(c) Station speed bins can only be accessed from the station that programmed them.
4. Dial [9] as you normally would to reach an outside line.
(a) Optional: Add [*] before your dialed number. This will enable “Display Security” and hide the dialed number from anyone using the speed bin number. If your speed dial requires [*] at the beginning of its number, such as *72, lead your dialed number with two [*].
5. Dial your phone number.
(a) Optional: Add [#] at the end of your dialed number. This will skip an internal timer and make the call complete sooner.
6. Press [Hold]
7. Enter the name for the speed bin.
(a) Type up to 16 characters for the speed bin name.
i. There is a chart on page 18 showing each character that can be entered, how to toggle lowercase characters, numeric characters, and how to enter a space.
8. Press [Hold]
9. Repeat steps 4 through 8 if additional speed bins require programming.
10. Press [Speaker] to exit programming.
Dial a speed bin by bin number
1. Press [Speed].
2. Dial the bin number. The station will automatically choose the programmed line and dial the stored number.
Dial a station speed bin by name
1. Press [Speed] twice.
2. Press 1 to choose to dial by station speed name.
3. Dial the first few digits of the speed bin name.
(a) For example “Greg” would be [4] [7] [3] [4]
(b) The list of speed bins can also be browsed manually without dialing by using the up/down buttons.
4. Press [Hold] or the [Send] soft key. The station will automatically choose the programmed line and dial the stored number.
Page 10

Telephone Operation Guide LIP-9030 & LIP-9040
Program a flexible button with a speed dial
The speed bin must be created first, see section “Using Speed Dials” for more details.
1. Press [Trans/PGM]
2. Press the flexible button you wish to program.
(a) A tone will sound and the programming of the selected button will be displayed on the screen.
3. Press [Speed]
4. Enter the bin number containing the phone number you want programmed on the selected flexible button.
5. Press [Hold]
6. Repeat steps 2 through 5 if any additional flexible buttons require programming.
7. Press [Speaker] to exit programming.
Forwarding to a Cellular Phone with MobileExtension
Mobile Extension rings the programmed phone number very soon after the station begins ringing. This feature also provides advanced call control by allowing feature codes to be dialed, such as transfer, park, and page.
This feature is not compatible with analog phone lines.
Mobile extension setup
Program your cellular phone number
1. Press [Trans/PGM] [37]
2. Enter the phone number you wish to forward your calls to.
(a) Do not dial [9] first.
3. Press [Hold]
Program the on/off button
This button enables or disables ringing the number programmed in the previous section.
1. Press [Trans/PGM]
2. Press the flexible button you wish to program.
(a) A tone will sound and the programming of the selected button will be displayed on the screen.
3. Enter [Trans/PGM] [38]
Page 11

Telephone Operation Guide LIP-9030 & LIP-9040
4. Press [Hold]
5. Press [Speaker] to exit programming.
Disabling mobile extension remotely
Note mobile extension cannot be disabled remotely over the phone without a personal DID number that routes directly to your station.
Mobile extension cannot be enabled remotely over the phone at all.
1. Dial your personal DID without restricting your cellular caller ID (if applicable).
2. Once the call connects, the system will recognize your caller ID as the number registered for mobileextension and provide internal dial tone. The same as if you were sitting at your desk and pressed[Speaker] on your station.
3. Dial [*580]
4. End the call.
(a) Enabling mobile extension must be done from the station using [Trans/PGM] [38] or a button programmed with it as detailed in the previous section.
Using mobile extension to make calls through the iPECS system
1. Dial your personal DID without restricting your cellular caller ID (if applicable).
2. Once the call connects, the system will recognize your caller ID as the number registered for mobileextension and provide internal dial tone. The same as if you were sitting at your desk and pressed[Speaker] on your station.
3. Dial the extension or phone number you wish to call as if you were sitting at your desk.
Using mobile extension feature codes while on a call
Transferring calls from mobile extension
1. Dial [*] to receive internal dial tone.
2. Dial the destination you wish to transfer to as if you were sitting at your station.
3. Once the destination rings once you may end the call to complete the transfer or stay on the line to announce the caller then hang up to complete the transfer.
(a) If the destination party cannot be reached press [#] to end the call out and pickup your original party.
Parking calls from mobile extension
1. Dial [*] to receive internal dial tone.
Page 12

Telephone Operation Guide LIP-9030 & LIP-9040
2. Dial the park location you wish to use: [#601] and up.
3. Once parked, the system will provide internal dial tone again, convenient for immediately dialing a page code and announcing where the call is parked and whom it is for.
Paging from mobile extension
1. Dial [*] to receive internal dial tone.
2. Dial the page code of the zone you wish to page.
(a) Refer to the Making a page section on page 4 to determine which page code best suits your need.
Forwarding Calls without Mobile Extension
Forwarding Types
1. The forwarding program is reached by selecting the [Forward] soft key. Press right once (next to the[OK] button to reveal the [Forward] soft key while not on a call.
2. The forward types presented are 0 through 5 and #. These are their definitions.
(a) Forward type [0] is not used in your iPECS implementation.
(b) [1] forwards all calls immediately and unconditionally.
(c) [2] forwards all calls when the forwarded station is busy.
(d) [3] forwards all calls when the forwarded station does not answer.
(e) [4] forwards all calls when the forwarded station is busy or does not answer.
(f) Forward type [5] is not used in your iPECS implementation.
(g) [#] cancels forwarding.
Forwarding your calls immediately to voice mail
Please note that all end user stations are already configured to forward to voice mail when not answered, DND, or an internal call reaches a busy station. Using the forwarding feature to manually forward such calls to voice mail is not required.
1. While on-hook press [DND]
2. The [DND] button will now be lit and the station screen will indicate the do not disturb state.
3. To disable, press [DND] again.
Programming your station to forward calls to another extension
1. Press the [Forward] soft key.
2. Dial a forwarding type, each type is defined in the “Forwarding Types” section.
Page 13

Telephone Operation Guide LIP-9030 & LIP-9040
3. Dial the extension you wish to forward your calls to.
4. If accepted the station will sound a confirmation tone.
5. Hang up.
6. The station screen will now indicate the current call forwarding state.
Canceling call forwarding
1. Press the [Forward] soft key.
2. Press [#]
3. The station will sound a confirmation tone.
4. Hang up.
5. The station screen will no longer indicate the station is forwarded.
Call coverageCall coverage is not traditional call forwarding. Instead it causes the configured station to ring
when another station receives a call and show on the screen “Call for” the other station.
Call coverage requires a flexible button be committed to the feature for every extension the station intends to cover.
Call coverage will not ring through mobile extension at default. Contact support to enable this ifrequired.
Allowing or disallowing call coverage
By default, a station may not be call covered. Follow these directions to allow or stop others from call covering your station.
1. Press [Trans/PGM] [141]
(a) The screen will show an on/off option for call coverage mode.
2. Dial [1] to enable or [0] to disable.
3. Press [Hold] to save your selection.
Programming the covering station
At the station meant to cover another, complete the following to enable call coverage.
1. Press [Trans/PGM]
2. Press the flexible button you wish to program.
(a) A tone will sound and the programming of the selected button will be displayed on the screen.
Page 14

Telephone Operation Guide LIP-9030 & LIP-9040
3. Dial [*76] followed by the extension you wish to cover.
4. Press [Hold]
5. Press [Speaker] to exit programming.
To stop covering another station
To disable call coverage, delete the flexible button programmed with the call coverage feature.
1. Press [Trans/PGM]
2. Press the flexible button programmed with the call coverage feature.
(a) A tone will sound and the programming of the selected button will be displayed on the screen.
(b) If the specific button is not known, browse the flexible buttons by continuing to press each flexible button until the screen reads “Call for sta”
3. Press [Hold]
4. Press [Speaker] to exit programming.
Call coverage ring delay
1. Dial [Trans/PGM] [142]
(a) The screen will show options for a delay ring cycle.
(b) The chosen number reflects the number of rings at the covered station before the covering stationbegins ringing.
2. Dial your selection, [0] through [9].
3. Press [Hold] to save your selection.
Silent call coverage
A station may use call coverage without ringing the covering station.
The flexible button programmed with the call coverage feature code would flashes instead of ringing. This button must be pressed to pickup the call, simply going off-hook or lifting the handset would not answer the call.
Please contact support if this feature is required. It cannot be configured from the station.
Additional Features
Voice Mail
Please refer to the Voice Mail add on packet that should accompany this document.
Page 15

Telephone Operation Guide LIP-9030 & LIP-9040
Volume buttons and their multiple functions
The volume buttons perform multiple operations depending on the state of the station.
1. When the station is idle the volume buttons control the contrast of the screen.
2. When on a call or ringing the volume buttons raise or lower the volume of the station feature currently being used.
(a) Handset, speakerphone, ringing, and paging all have their own volume levels and can be altered individually.
3. When a menu is shown on the screen, the volume buttons are used to scroll or otherwise navigate upand down through said menu.
Intercom answering options
The iPECS system offers three answering modes for intercom calls.
1. Press [Trans/PGM] [13] then choose one of the following.
(a) [1] Hands-free: Intercom calls will automatically connect using the speakerphone allowing both parties to hear and speak to each other without additional button presses.
(b) [2] Tone: Intercom calls will ring the station. This mode is selected by default.
(c) [3] Privacy: Intercom calls will automatically connect using the speakerphone however the calledstation will also be muted. The [Speak] soft key in the screen must be pressed to communicate tothe caller using the speakerphone unless the called party lifts their handset to continue the call.
2. Press [Hold] to confirm your selection.
3. (H) (T) or (P) will display in the screen next to the extension number to indicate the current intercom answering mode.
Ring tones
16 ring tones are built into the LIP-9030 & LIP-9040 stations.
1. Dial [Trans/PGM] [11] to alter your standard ring tone.
(a) To alter your DID/external call ring tone dial [Trans/PGM] [12]
2. Select a ring tone by dialing [0] [1] through [1] [6], once dialed your selection will begin to play a preview.
3. Press [Hold] to save your selection or [Speaker] to exit.
Send Dialing (Enblock dialing)
This feature is most simply described as making the station dial like a cellular phone. Once enabled you may take as much time as you wish to dial, after you have finished you must press the[Send] soft key on the screen.
Page 16

Telephone Operation Guide LIP-9030 & LIP-9040
1. To toggle enblock dialing on or off press [Trans/PGM] [10]
2. Press [1] to enable or [0] to disable.
3. Press [Hold]
Headset management
1. Multiple different headset manufacturers and models can be connected to your station.
(a) Headsets or their associated base must use an RJ10 handset style connector.
2. The station offers a headset port on the back of the station to which the headset may be connected. Otherwise follow the directions for wiring your headset and base that came packaged with your headset.
(a) Using the headset port will enable the headset but disable the speakerphone.
i. The benefit to using the headset port is the station can control headset volume and present ringing to the headset if configured.
(b) To enable or disable the headset port:
i. Press the [Headset] button. It will light red.
(c) To control whether your station or headset rings for new calls
i. Dial [Trans/PGM] [62]
ii. The screen will display options for headset ring type
A. Dial [1] for normal ringing at the station.
B. Dial [2] to ring only your headset.
C. Dial [3] to ring both your station and headset.
iii. Press [Hold] to save your selection.
Page 17
Telephone Operation Guide LIP-9030 & LIP-9040
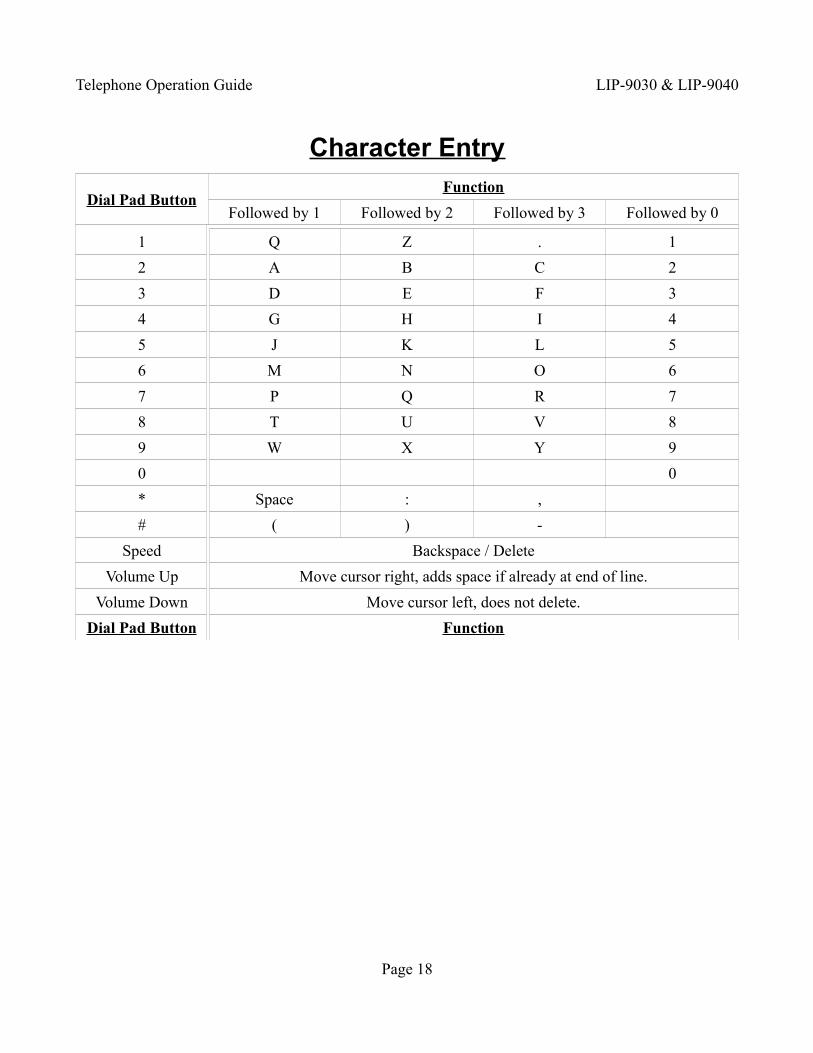
Character Entry
Dial Pad ButtonFunction
Followed by 1 Followed by 2 Followed by 3 Followed by 0
1 Q Z . 1
2 A B C 2
3 D E F 3
4 G H I 4
5 J K L 5
6 M N O 6
7 P Q R 7
8 T U V 8
9 W X Y 9
0 0
* Space : ,
# ( ) -
Speed Backspace / Delete
Volume Up Move cursor right, adds space if already at end of line.
Volume Down Move cursor left, does not delete.
Dial Pad Button Function
Page 18

Telephone Operation Guide LIP-9030 & LIP-9040
Common Feature Code ReferenceName Feature Code(s) Page Explaining Feature
Call Coverage Ring [*76] 14
Call Coverage Ring Delay [Trans/PGM] [142] 15
Call Coverage Toggle [Trans/PGM] [141] 14
Call Park [#601] and up 4
Conference Rooms [*591] - [*599] 6
Direct Call Pickup [*77] 1
Headset Mode Toggle [Trans/PGM] [61] 17
Headset Ring Mode Selection [Trans/PGM] [62] 17
Intercom Answer Mode [Trans/PGM] [13] 16
Mobile Ext. Registration [Trans/PGM] [37] 11
Mobile Ext. Remote Disable [*580] 12
Mobile Ext. Toggle [Trans/PGM] [38] 11
Outside Line [9] 1
Paging: Through desk phones [*301] and up 4
Paging: External page horns [*545] 4
Paging: Phones and external [*549] 4
Redial, Instant [*552] 4
Ring Tone Selection: Ext Call [Trans/PGM] [12] 16
Ring Tone Selection: Intercom [Trans/PGM] [11] 16
Send Dialing (Enblock Dialing) [Trans/PGM] [10] 16
Page 19