ted’s sacd ripping guide - version 4.0 feb 25, 2014 · pdf fileted’s sacd ripping...
TRANSCRIPT
Ted’s SACD Ripping Guide - Version 4.0 Feb 25, 2014
As we approach two and a half years of this ripping project life cycle, and one year from the last update on this guide, I realized it needed major updating. There are now over 100 DSD-capable DACs, almost a dozen DSD download sites, and over 8000 users of this guide (that I know of) So here is Version 4. First off, this primer is intended to help folks who, like myself, who want to rip their personal SACD collection for archiving and personal hi-end DAC (PCM or DSD) use. I am NOT intending this for use in pirating, selling or trading copyrighted content, or ripping content that you don’t already own. Here is hopefully everything you need for PS3 ripping, Windows or Mac extraction, or the server-mode capability of the SACD ripper (rip directly to LAN), and any necessary PCM conversion (native DSD playback is MUCH preferred but, of course, requires a DSD-capable DAC). And thanks to Jesus Rodriguez, a partner and friend (and owner of Simple Designs, which manufacturers Sonore gear and is the North American distributor for SOtM gear) I can now attest to 100 DSD-capable DACS that Jesus and I keep track of (I need to update at least 10 more DACs) over on the Google Docs DSD Database. https://docs.google.com/spreadsheet/ccc?key=0AgVhKcl_3lHfdFVyenBBNjNpQ2lieG81WGpqQTNfVUE#gid=0 However, the most important and valuable assistance that Jesus has given us is his new free ISO2DSD GUI app (in all three flavors; Windows, MAC OSX and Linux) that, among other things, deletes about a full page of this Guide . If one had an ISO image of an SACD (produced by the SACD Ripper on eligible PS3 machines) then there was a fairly painful and set of instructions to make sure one could set up an Extraction folder and run the necessary sacd_extract.exe and bat or script files to create album folders of DSD (DSF or DFF) tracks that would then be fed to a DSD-capable software music player and eventually to a DSD-capable DAC. Well, no more manual labor. Jesus’s GUI does all the work for you. Simply go the link below, download the correct files for your operating system, then run the app. http://www.sonore.us/apps2.html I have put this link first because some of you may already be ripping with a PS3 and simply need this Guide to educate you on how to extract ISOs to DSD formats. There are two very similar DSD formats out there, DSDIFF (Philips) and DSF (Sony). I much prefer DSF due to its full ID3V2 tagging (metadata) capabilities but either format plays music just fine, and for PCM conversion they seem equivalent. I may reference one but the other is equally relevant. The ripper and SACD-extract tools (Jesus’s GUI) can extract to either one. Both can be played with the current Windows, MAC and Linux MPD software players (JRiver, Foobar, HQplayer, Pure Music, Audirvana Plus, etc..or MPD clients on a Linux platform like the Auraliti PK90USB) or any streamer or hardware player out there that is DSD-capable (Sony’s new players, Sonore Rendu, Lumin streamer, Auralic’s announced Aries wireless DSD128 streamer, etc). Overview This guide is broken up into several sections:
1. Requirements to get started 2. PS3 Operating System Hack instructions
3. Installing SACD-ripper.pkg on the PS3 4. Using SACD-ripper.pkg on the PS3 to generate ISO files 5. Running server mode on SACD-ripper and your desktop 6. Extracting DSF or DFF files from you newly ripped ISOs 7. Installing and using Audiogate for PCM conversion (optional) 8. DSD file tagging using J River (Win/Mac player) as tool. nOte: players like JRiver now support
DSD-to-PCM conversion so Audiogate is purely optional for PCM-only playback of DSD files. Section 1 – Requirements to Get Started.
PS3 Capable of SACD Playback – Only 4 models can play back SACDs, and they have to be at firmware 3.55 or earlier. Otherwise they cannot be hacked. Details are here - http://www.ps3sacd.com/faq.html#_Toc180147566
OtherOS 3.55 firmware – available here https://dl.dropbox.com/u/3487125/CFW355-OTHEROS%2B%2B.zip
SACD-ripper.pkg – available here https://dl.dropboxusercontent.com/u/3487125/sacd-ripper_v0.37.zip
PS3 keys – available here https://dl.dropbox.com/u/3487125/ps3free-ps3keys.zip
Section 2 – Hacking the PS3 Operating System 1. Unzip OtherOs from above 2. After unzipping, rename it to PS3UPDAT.PUP 3. Plug in a USB Thumb Drive to your PC 4. Create a folder called PS3 on your thumb drive (see screen shot in Appendix) 5. Go into the PS3 folder 6. Create a subfolder called UPDATE inside the PS3 folder. 7. The full path will read PS3/UPDATE on your thumb drive. 8. Move the PS3UPDAT.PUP file into the PS3/UPDATE folder 9. Unplug the USB drive from your PCPlug it into the PS3 10. Use your PS3 remote and navigate to “System Update” 11. Choose Update via Storage Media 12. It will say it found Version 3.55 13. Choose OK 14. Accept Conditions and Follow the instructions. 15. Once the system restarts, your new OS will be installed! 16. If this did not work, you are likely already on stock version 3.55 NOTE: if you are already on
stock version 3.55 follow these instructions (starting at line 43, to line 60) http://code.google.com/p/sacd-ripper/source/browse/trunk/readme
Section 3 – Installing SACD-ripper.pkg on your PS3 Now that your new OS installed on your PS3, you are ready to install the SACD ripping program.
1. Unzip the SACD-ripper.pkg file from the dropbox link. 2. Move it to the root folder of your USB thumb drive (see screenshot in Appendix) 3. Unzip the PS3 Keys from their dropbox link 4. Move the PS3 Keys to the root folder of the USB Thumb Drive (see screenshot in Appendix) 5. Plug the USB Thumb drive into your PS3 6. Navigate (on your PS3) to the “Games” section 7. Click on the “Install pkg file” option
8. Congrats, you now have SACD ripping capability installed on your PS3!
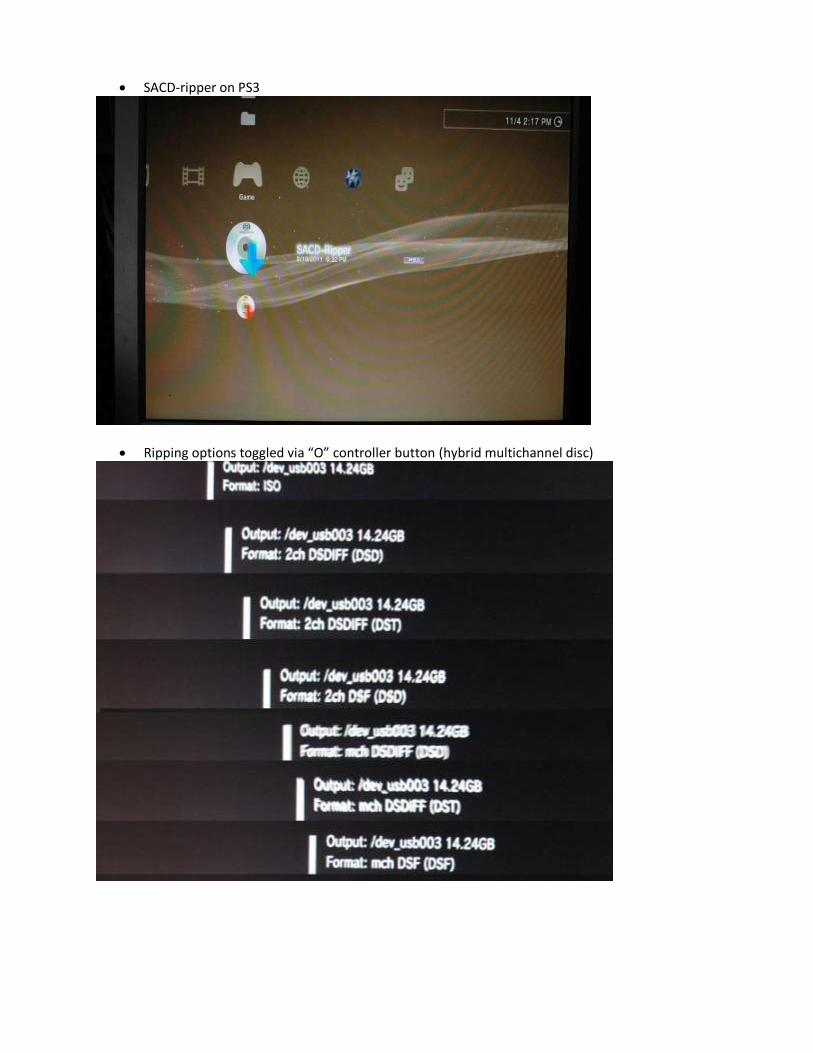
Section 4 - Using SACD-ripper on your PS3 1. You are now ready to rip your first SACD! 2. Navigate to the “Games” section of your PS3 3. Select “Unknown” 4. Select “ SACD-Ripper” (UPDATE choose “yes” and go to Section 4A if you have a PS3 connected
to your LAN and want to run server mode, i.e ripping direct to LAN rather than to local USB thumbdrive. Choose “no” if normal use with USB thumbdrive. If “no”, proceed to step 5)
5. Insert your SACD disc into your PS3 (if using network server mode, go to Section 4A) 6. Insert an empty thumb drive into one of the PS3's USB slots 7. If the SACD is recognized, it will show you the information for the disc. 8. Note: Although the modern V37 SACD-Ripper is intended to simply rip to a full disc image ISO,
older versions can rip and extract any level of DSD files from the disc. For older ripper versions than v.36 these options are available by cycling through them using the “0” button on the far right side of your PS3 controller. They are (example being a hybrid stereo/multichannel disc) ISO -> stereo DSDIFF -> stereo DSF -> multichannel DSDIFF -> etc, back to ISO. My recommendation (and the direction of Mr Wicked’s ripper from v.036 onward), for those of you with access to a Windows pc or MAC, is to simply rip to ISO. Why? Three reasons:
I. the current GUI extraction app (link above) program is more powerful and faster than the ripper for extracting the individual DSD files from the ISO; AND
II. just doing ISO’s reduces the wear and tear on the PS3 disc drive and internals (older PS3’s are notorious for having poor soldering connections internally, and the excess heat of long ripping sessions can cause problems with these solder connections resulting in a yellow indicator light, known as the yellow light of death (YLOD). This may make your PS3 unusable.
III. Mr Wicked has stated that additional features like his latest single diff extraction (for classical albums, gapless concept rock albums, etc), better metadata, etc will all go into the newer versions of sacd-extract.exe (used by Jesus’s GUI), not the PS3 ripper software, which is basically done. And in fact with ripper v.36 and onward ISO ripping is the sole intent. For these reasons the remainder of the instructions will assume ISO ripping only.
9. Once you find the option you want, click “OK” (“X” button) 10. Ripping commences. Usually is pretty slow. It might look like it is only copying one track, but it
is actually copying the whole disc (depending on option picked in step 8). 11. If ISO file is the output of this ripping process, then you will have one large file and a text file
that logs internal information for debugging purposes. NOTE: If you are ripping any of your SACDs that have multiple discs make sure the ISO is named uniquely or the ripper will overwrite the first one. Solution: I recommend you rip disc one, move on with other rips, fill up your thumb drive and then rename the disc 1 ISO with something like (disc 1) at the end of the name, whether before or after you move the ISOs to your hdd. Then go back and rip disc 2 on a fresh clean thumb drive and do the same.
12. Caveat – if the size of your SACD is under 4GB, then it will rip everything to a single ISO file. If your SACD is over 4GB, it will rip it to 2 ISO files (this is a limitation of the PS3 Fat file system). Just use http://www.hjsplit.org/ later on, on your hdd, to combine them so you can extract them as one ISO.
13. The ISO files will be stored on your USB thumb drive. 14. When ripping is completed, unplug the thumb drive from the PS3 and plug it in to your PC 15. Copy the ISO file to a directory of your choice. Some software players like JRiver allow direct ISO
playback, while most others allow for DSF and DFF playback. In either case, simply remember where you stored the ISOs.
16. You are done ripping! I'd recommend keeping the ISO file around for archiving purposes (scratched discs, etc). The next step I suggest is extracting the DSD files from the ISO so that a hi-rez capable DAC can play them. An alternative is to burn the ISO to a DVD-R for playback on a number of SACD players that will read copied SACD’s (aka SACD-R’s). http://code.google.com/p/sacd-ripper/wiki/SACDRCompatiblePlayers
Section 5 – Running server mode on SACD-ripper and desktop (optional)
1. Installation on the PC:
Chose a directory where you would like your ISO files to be stored (or use same as above)
copy sacd_extract.exe to this directory if it’s not already there. The ISOs will go wherever
sacd_extract.exe was launched from.
copy "Extract ISO via Network.bat" to this directory (if not already there)
start SACD ripper on the PS3 in server mode (at the server question screen answer yes)
The screen on the PS3 should read something like this:
SACD Daemon 0.36 Status: active IP Address: 192.168.1.XX (port 2002) Client: none Disc: empty
Make sure to edit the "Extract ISO via Network.bat" with YOUR IP address that the PS3 screen
shows (right click, edit, then save), so that sacd_extract.exe on the PC can find the PS3. The port
number after the colon (usually 2002) must be included.
2. To rip, do the following On the PS3:
Start SACD Ripper in server mode
Insert an SACD
PS3 screen should now read "Disc: inserted"
On the PC
navigate to the ISO target directory with windows explorer
double click "Extract ISO via Network.bat"
a command prompt window should open and show the progress of the rip
PS3 screen should now read "Client: connected"
To rip additional SACDs
eject SACD from PS3 with eject button
insert new SACD
double click "Extract ISO via Network.bat" on the PC
For ripping, the TV/monitor/projector of the PS3 does not have to be turned on. You can follow
ripping progress on the PC in the command prompt window
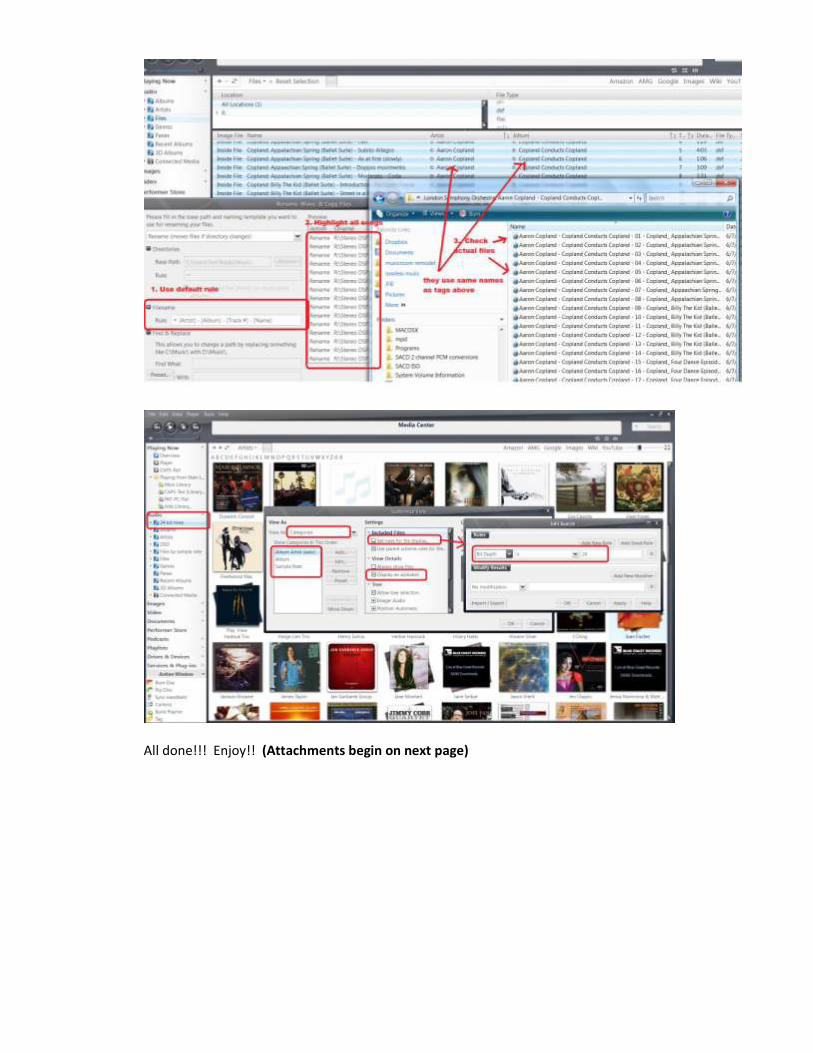
Section 6 – Extracting DSF or DFF files from your ISOs As I’ve mentioned numerous times, this section has been completely revamped with the introduction of the ISO2DSD GUI app (link above on page one). The app will allow you to choose any ISO (or multiple ISOs, hold down appropriate cntrl or shift keys to pick multiple entries) and automatically generate DSD album folders with DSD track files. There are a few options in the GUI app:
- You can choose between dual (stereo) and multichannel extraction. With the onset of multichannel DSD DACs hitting the market, this is a great option for those of us who love surround sound.
- You can choose any of several DSD formats (DSF, DFF, edit master..which is a DFF album-sized file that some may like if their player doesn’t support gapless playback, etc)
o My recommendation is DSF due to its great tagging capabilities - Cue sheet (needed if you are going to do edit master, as it records the track times, etc) - DST (a compressed DSD that is present on many multichannel hybrid SACDs to save space in
order to pack all content on one disc) o Due to DST’s incompatibility with most players, and the fact that storage is cheap, I
recommend ALWAYS having this checkbox checked. - Print (will show table of contents info at the beginning of the rip; nice if you copy and print off
the text generated by the rip process)
You now have 2 major options 1. DSD. If you own a DSD-capable DAC (see the DSD database) you can play DIFF or DSF files
natively. See section 6A below 2. OR PCM…if you use J River, Foobar, or some other software based playback, you can install a
plugin (nopw most versions include said plugin as standard) for that program to convert the DSD file to PCM “on the fly”, and you can play the DSD files directly in Foobar or JRiver (or whatever). An alternative option is to simply convert the DSD file to FLAC (or whatever audio codec you want) format and store them on your computer. Most players will recognize and play FLAC or WAV files. For this 2nd option, either use JRiver’s DSD-to-PCM convert function or proceed to Section 6B below to sue a 3rd party free conversion tool called Audiogate. NOTE: I am a huge fan of JRiver and believe it can do all these functions just fine…BUT…I am not a big fan of DSD-to-PCM conversion, as I believe it creates a sound that has timing/phase anomalies due to the 1 bit downsample to PCM. I do not have enough empirical evidence to support this, however; plus, it is our only alternative for PCM DACs where this hirez SACD music doesn’t also exist in native hirez PCM somewhere. As I always say, if it’s recorded in PCM, choose PCM (i.e DVD-Audio).
Section 6A –Native DSD Playback
The onset of true native DSD DACs has proven, to this writer at least, to be an amazing musical experience. True DSD playback (of pure DSD recordings) on many DSD-capable DACS (especially Meitner, Playback Designs and many SABRE-based chipsets) is as close as I have come to the promise of “perfect sound forever” since the arrival of digital music. The tonality, ease and overall realism of playback has what I have been waiting for when the promise of “hearing the master tapes” was first proposed in the hirez music world. However, the extraction of DSF and/or DFF files has not created a perfect computer-based platform. Why? Unlike FLAC or other PCM-based formats, the DFF DSD format, especially, is woefully lacking in tagging
(metadata) and 1 bit DSD is a technology that does not easily allow for any digital sound processing (i.e EQ, room correction, etc). I will spend a few bullets summarizing what is available. 1) The DSF format has better metadata support out of the box, and is precisely why some DSD
download sites like Cookie Marenco’s BlueCoast Records (an our own NAtiveDSD.com…I am a partner) has chosen DSF as its main DSD format. Album art, etc is easily attached. Software players like JRiver easily edit these tags and make browsing DSF as easy as browsing MP3 (I have JRiver tagging tutoprial links later on)
2) The DIFF format is a mixed blessing. Out of the box the metadata is poor, often missing such necessities as track numbers. However, tools like Foobar (Windows) have plugins such as Foo-input_SACD.dll (co-created by Mr Wicked) that allow DIFF fields to be tagged, but often only for that program.
3) DSD-capable software music players are now available on all platforms. They use either direct DSD playback via ASIO drivers (custom built, usually) or the now-ubiqutous DSD over PCM encoding (aka DoP, a clever vehicle for sending NATIVE unconverted DSD to a DAC via standard 24/176+ PCM paths…the DAC simply sees a flag that tells it whether it is true DSD or PCM). Either method is native pure DSD playback (specific recording and mastering history notwithstanding, of course).
4) There are now several websites that allow for downloading in DSD format. My own partnership with Jared and Jonas Sacks, along with Tom Caulfield, has produced a label co-op, started by Jared and Channel Classics, called NativeDSD.com, a website dedicated to native format in both stereo and multichannel. And, of course, the great Cookie Marenco has her BlueCoast Records delivering DSD content as well. Just recently Acoustic Sounds has added DSD downloads to their catalog, which includes Analogue Productions, Sony and others. Opus3 (dsd file.com; direct analog-toDSD transfers) and Premonition Records (PCM sourced) joined the DSD download list lately, as well.
Section 7– Another option of converting to PCM: Installing Audiogate on your PC 1. Go to http://www.korguser.net/audiogate/en/download.html 2. Download the Audiogate application and install it on your PC 3. For those without Korg recording hardware, Korg has made Audiogate free..but you need to
advertise for them! Audiogate will ask you to set up an automatic Twitter feature where you will tweet each time you convert files. It’s harmless but I realize may be a showstopper for those of you who take tweeting seriously.
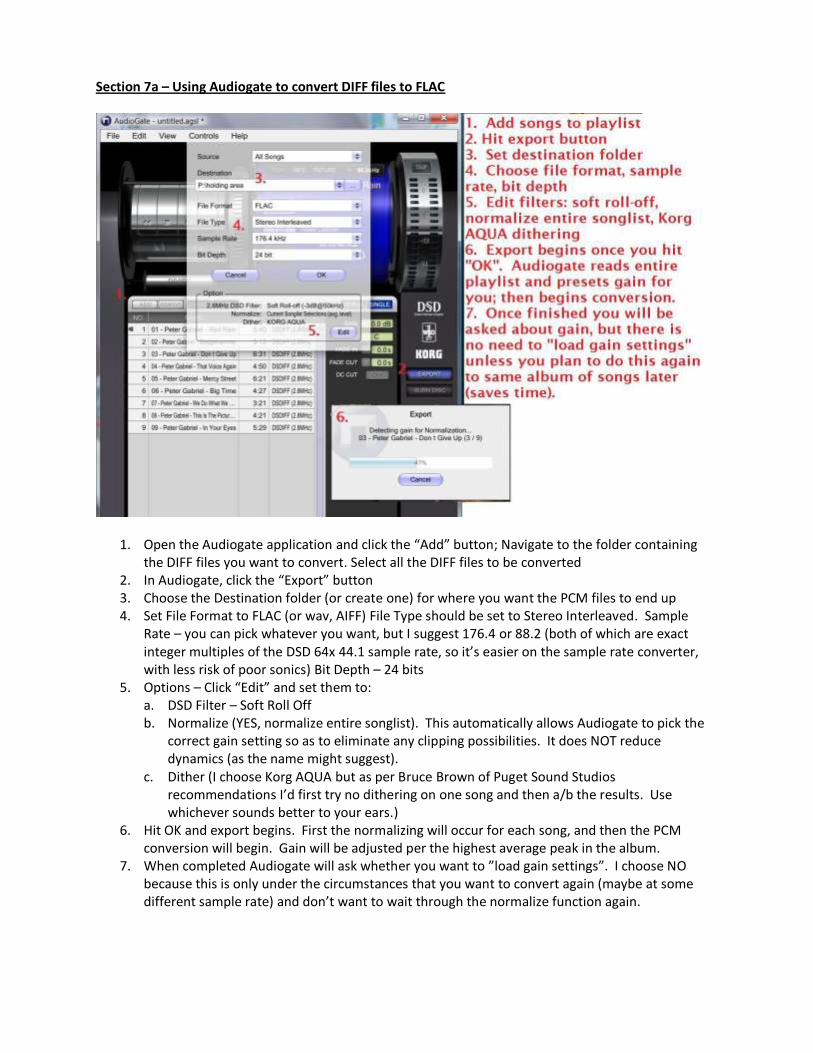
Section 7a – Using Audiogate to convert DIFF files to FLAC
1. Open the Audiogate application and click the “Add” button; Navigate to the folder containing the DIFF files you want to convert. Select all the DIFF files to be converted
2. In Audiogate, click the “Export” button 3. Choose the Destination folder (or create one) for where you want the PCM files to end up 4. Set File Format to FLAC (or wav, AIFF) File Type should be set to Stereo Interleaved. Sample
Rate – you can pick whatever you want, but I suggest 176.4 or 88.2 (both of which are exact integer multiples of the DSD 64x 44.1 sample rate, so it’s easier on the sample rate converter, with less risk of poor sonics) Bit Depth – 24 bits
5. Options – Click “Edit” and set them to: a. DSD Filter – Soft Roll Off b. Normalize (YES, normalize entire songlist). This automatically allows Audiogate to pick the
correct gain setting so as to eliminate any clipping possibilities. It does NOT reduce dynamics (as the name might suggest).
c. Dither (I choose Korg AQUA but as per Bruce Brown of Puget Sound Studios recommendations I’d first try no dithering on one song and then a/b the results. Use whichever sounds better to your ears.)
6. Hit OK and export begins. First the normalizing will occur for each song, and then the PCM conversion will begin. Gain will be adjusted per the highest average peak in the album.
7. When completed Audiogate will ask whether you want to ”load gain settings”. I choose NO because this is only under the circumstances that you want to convert again (maybe at some different sample rate) and don’t want to wait through the normalize function again.
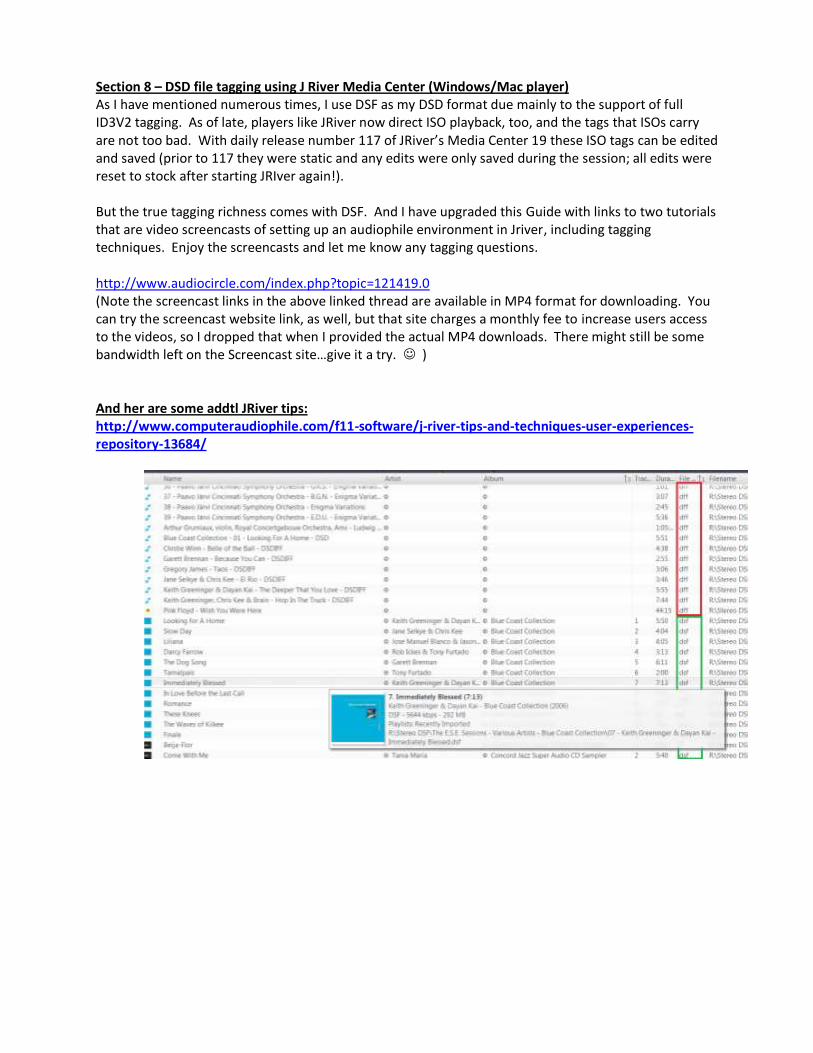
Section 8 – DSD file tagging using J River Media Center (Windows/Mac player) As I have mentioned numerous times, I use DSF as my DSD format due mainly to the support of full ID3V2 tagging. As of late, players like JRiver now direct ISO playback, too, and the tags that ISOs carry are not too bad. With daily release number 117 of JRiver’s Media Center 19 these ISO tags can be edited and saved (prior to 117 they were static and any edits were only saved during the session; all edits were reset to stock after starting JRIver again!). But the true tagging richness comes with DSF. And I have upgraded this Guide with links to two tutorials that are video screencasts of setting up an audiophile environment in Jriver, including tagging techniques. Enjoy the screencasts and let me know any tagging questions. http://www.audiocircle.com/index.php?topic=121419.0 (Note the screencast links in the above linked thread are available in MP4 format for downloading. You can try the screencast website link, as well, but that site charges a monthly fee to increase users access to the videos, so I dropped that when I provided the actual MP4 downloads. There might still be some bandwidth left on the Screencast site…give it a try. ) And her are some addtl JRiver tips: http://www.computeraudiophile.com/f11-software/j-river-tips-and-techniques-user-experiences-repository-13684/
All done!!! Enjoy!! (Attachments begin on next page)

Appendix (screen shots and misc)
What the pre-install USB thumb drive should look like
What the SACD-extract folder should include, once completed
SACD-ripper on PS3
Ripping options toggled via “O” controller button (hybrid multichannel disc)

ISO screen
ISO ripping in action (13% completed)
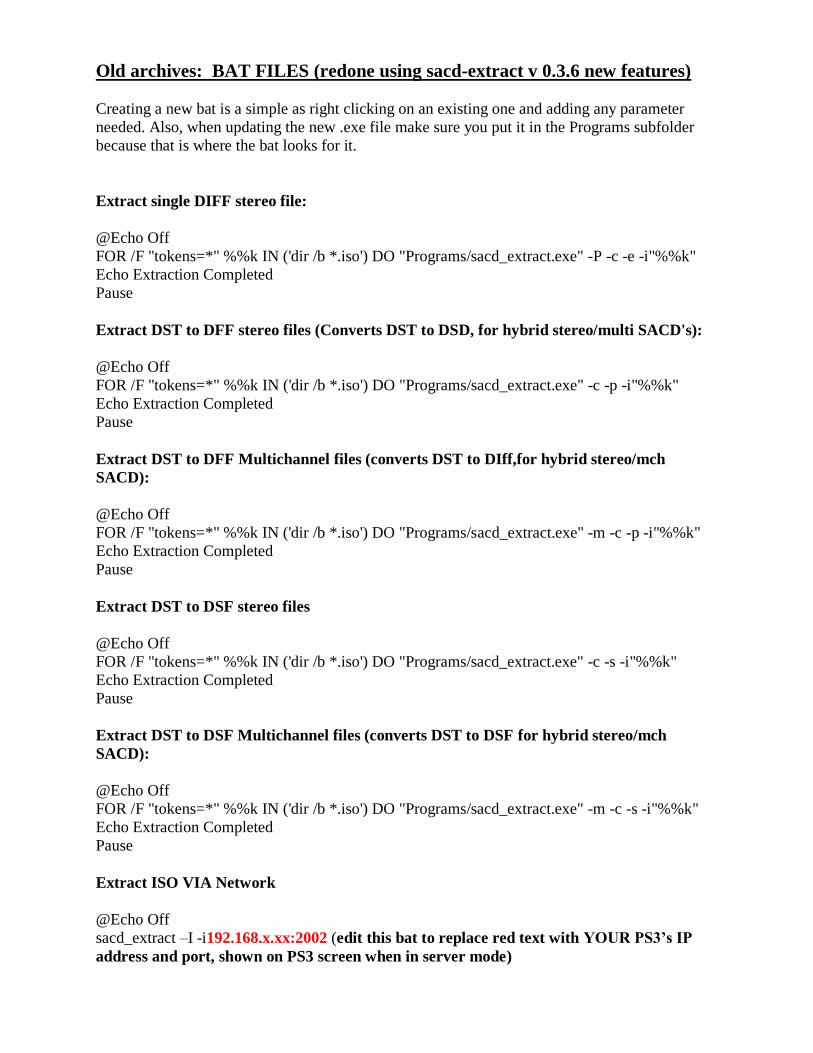
Old archives: BAT FILES (redone using sacd-extract v 0.3.6 new features)
Creating a new bat is a simple as right clicking on an existing one and adding any parameter
needed. Also, when updating the new .exe file make sure you put it in the Programs subfolder
because that is where the bat looks for it.
Extract single DIFF stereo file:
@Echo Off
FOR /F "tokens=*" %%k IN ('dir /b *.iso') DO "Programs/sacd_extract.exe" -P -c -e -i"%%k"
Echo Extraction Completed
Pause
Extract DST to DFF stereo files (Converts DST to DSD, for hybrid stereo/multi SACD's):
@Echo Off
FOR /F "tokens=*" %%k IN ('dir /b *.iso') DO "Programs/sacd_extract.exe" -c -p -i"%%k"
Echo Extraction Completed
Pause
Extract DST to DFF Multichannel files (converts DST to DIff,for hybrid stereo/mch
SACD):
@Echo Off
FOR /F "tokens=*" %%k IN ('dir /b *.iso') DO "Programs/sacd_extract.exe" -m -c -p -i"%%k"
Echo Extraction Completed
Pause
Extract DST to DSF stereo files
@Echo Off
FOR /F "tokens=*" %%k IN ('dir /b *.iso') DO "Programs/sacd_extract.exe" -c -s -i"%%k"
Echo Extraction Completed
Pause
Extract DST to DSF Multichannel files (converts DST to DSF for hybrid stereo/mch
SACD):
@Echo Off
FOR /F "tokens=*" %%k IN ('dir /b *.iso') DO "Programs/sacd_extract.exe" -m -c -s -i"%%k"
Echo Extraction Completed
Pause
Extract ISO VIA Network
@Echo Off
sacd_extract –I -i192.168.x.xx:2002 (edit this bat to replace red text with YOUR PS3’s IP
address and port, shown on PS3 screen when in server mode)
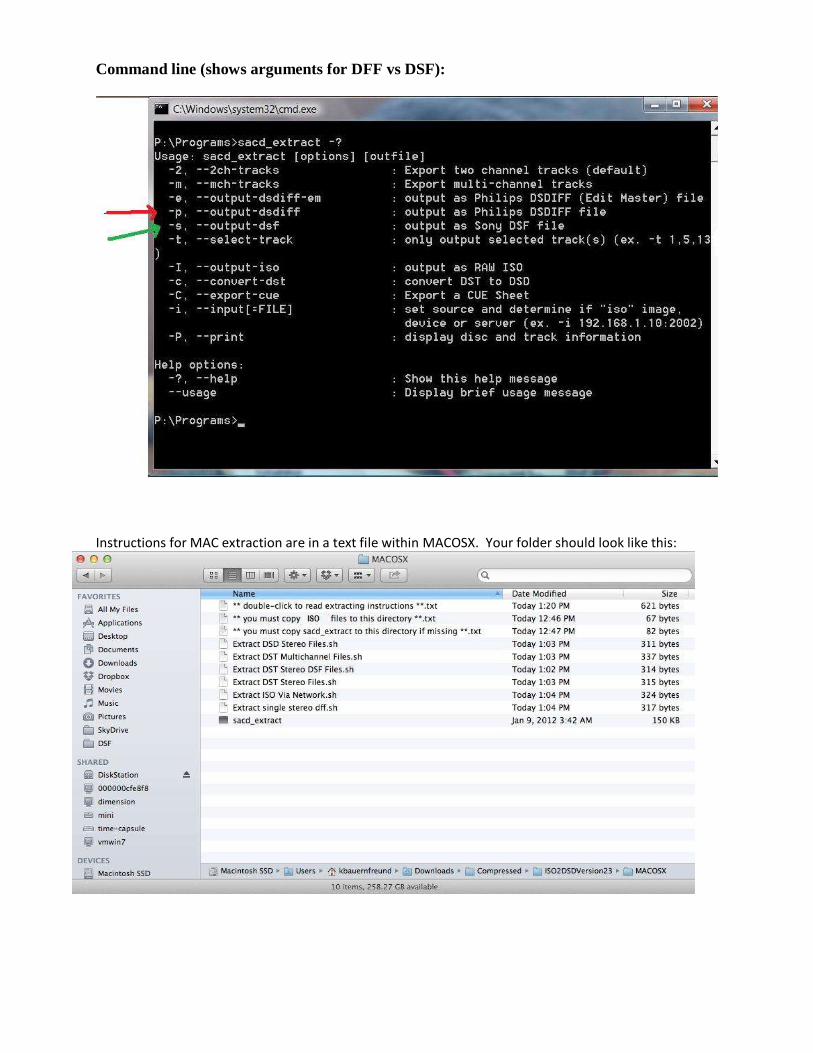
Command line (shows arguments for DFF vs DSF):
Instructions for MAC extraction are in a text file within MACOSX. Your folder should look like this:
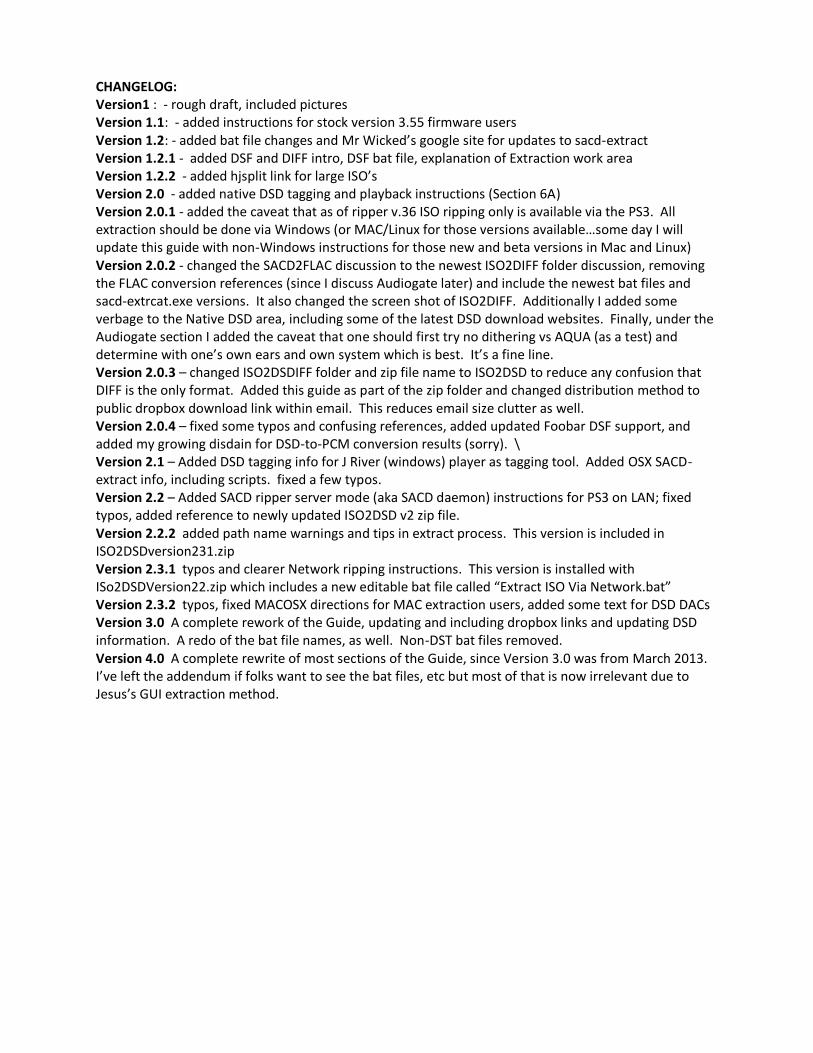
CHANGELOG: Version1 : - rough draft, included pictures Version 1.1: - added instructions for stock version 3.55 firmware users Version 1.2: - added bat file changes and Mr Wicked’s google site for updates to sacd-extract Version 1.2.1 - added DSF and DIFF intro, DSF bat file, explanation of Extraction work area Version 1.2.2 - added hjsplit link for large ISO’s Version 2.0 - added native DSD tagging and playback instructions (Section 6A) Version 2.0.1 - added the caveat that as of ripper v.36 ISO ripping only is available via the PS3. All extraction should be done via Windows (or MAC/Linux for those versions available…some day I will update this guide with non-Windows instructions for those new and beta versions in Mac and Linux) Version 2.0.2 - changed the SACD2FLAC discussion to the newest ISO2DIFF folder discussion, removing the FLAC conversion references (since I discuss Audiogate later) and include the newest bat files and sacd-extrcat.exe versions. It also changed the screen shot of ISO2DIFF. Additionally I added some verbage to the Native DSD area, including some of the latest DSD download websites. Finally, under the Audiogate section I added the caveat that one should first try no dithering vs AQUA (as a test) and determine with one’s own ears and own system which is best. It’s a fine line. Version 2.0.3 – changed ISO2DSDIFF folder and zip file name to ISO2DSD to reduce any confusion that DIFF is the only format. Added this guide as part of the zip folder and changed distribution method to public dropbox download link within email. This reduces email size clutter as well. Version 2.0.4 – fixed some typos and confusing references, added updated Foobar DSF support, and added my growing disdain for DSD-to-PCM conversion results (sorry). \ Version 2.1 – Added DSD tagging info for J River (windows) player as tagging tool. Added OSX SACD-extract info, including scripts. fixed a few typos. Version 2.2 – Added SACD ripper server mode (aka SACD daemon) instructions for PS3 on LAN; fixed typos, added reference to newly updated ISO2DSD v2 zip file. Version 2.2.2 added path name warnings and tips in extract process. This version is included in ISO2DSDversion231.zip Version 2.3.1 typos and clearer Network ripping instructions. This version is installed with ISo2DSDVersion22.zip which includes a new editable bat file called “Extract ISO Via Network.bat” Version 2.3.2 typos, fixed MACOSX directions for MAC extraction users, added some text for DSD DACs Version 3.0 A complete rework of the Guide, updating and including dropbox links and updating DSD information. A redo of the bat file names, as well. Non-DST bat files removed. Version 4.0 A complete rewrite of most sections of the Guide, since Version 3.0 was from March 2013. I’ve left the addendum if folks want to see the bat files, etc but most of that is now irrelevant due to Jesus’s GUI extraction method.