technology reference guide - hondatechinfo.honda.com/rjanisis/pubs/qs/p61010qs.pdftechnology...
TRANSCRIPT

T E C H N O L O G Y
R E F E R E N C E
G U I D E
2 0 1 0 A C C O R D C R O S S T O U R
w w w . o w n e r s . h o n d a . c o m1 2 3 4 5
3 1 T P 6 Q 0 0 2010 Honda Accord Crosstour Techno logy Reference Gu ide 1 2 3 4 . 5 6 7 8 . 9 1 . 00 0 X 3 1 - T P 6 - Q 0 0 1 ©2009 American Honda Motor Co., Inc. — All Rights Reserved P r i n t e d i n U . S . A .
FPO
10 Crosstour TRG_wbg 2:ATG_NEW STYLE 10/28/2009 3:37 PM Page 1

Navigation (if equipped) ........................................................................................16
Bluetooth® HandsFreeLink® (HFL) (if equipped) ...............................................18
Fuel Fill Door...........................................................................................................20
Hidden Removable Utility Box............................................................................21
Compact Spare Tire ...............................................................................................22
Owner Link..............................................................................................................24
Safety Reminder......................................................................................................25
Fuel Recommendation...........................................................................................25
Instrument Panel Indicators ...................................................................................2
Information Display ..................................................................................................4
Tire Pressure Monitoring System (TPMS)...........................................................5
Auto Door Locks .....................................................................................................6
Driving Position Memory System (DPMS) (if equipped) ..................................8
Rearview Camera (if equipped).............................................................................9
Playing an iPod or USB Flash Memory Device ...................................................9
Voice Recognition (if equipped) ..........................................................................10
BLUETOOTH®
HANDSFREELINK® p. 18
VOICE RECOGNITION p. 10
INSTRUMENT PANEL p. 2
NAVIGATION p. 16
AUDIO p. 15
T E C H N O L O G Y R E F E R E N C E G U I D EThe Technology Reference Guide is designed to help you
get acquainted with your new Honda and provide reference
instructions on driving controls and convenience items.
This guide is not intended as a substitute for the Owner’s
Manual. For complete information on vehicle controls and
operation, please refer to the respective sections in the
Owner’s Manual.
As with the Owner’s Manual, this guide covers all models
of the Accord Crosstour. Therefore, you may find
descriptions of equipment and features that are not on your
particular model.
10 Crosstour TRG_wbg 2:ATG_NEW STYLE 11/11/2009 11:32 AM Page 2

Malfunction IndicatorsIf an indicator remains on, there may be a problem; see your dealer On/Off Indicators
Condition IndicatorsAction is needed by driver
PASSENGER
AIRBAG
OFF
PASSENGER AIRBAG OFF(above Hazard Warning button)
SIDE AIRBAG OFF
VSA: off
CRUISE CONTROL on
ECO ECO on
Fog lights on
Headlights on
Turn signals/hazards on
CRUISE MAIN on High beams on
Charging system
Low brake fluid
Low oil pressure
ABS (anti-lock brake system)
DRL (daytime running lights)
Malfunction lamp (check engine light)
TPMS (tire pressure monitoring system)
VSA (vehicle stability assist)
SRS (supplemental restraint system)
Parking brake on: Release
Door/Trunk open:Close door(s) / tailgate
Seat belt reminder:Fasten seat belt(s)
Low fuel:Refill
Low tire pressure:Add air
Maintenance minder:Make appointment
INSTRUMENT PANEL INDICATORS
Immobilizer Flashes: improperly coded key;use correct key
Briefly appear with each engine start. Red and amber indicators are most critical. Blue
and green indicators are used for general information.
2 3
10 Crosstour TRG_wbg 2:ATG_NEW STYLE 10/28/2009 3:38 PM Page 3
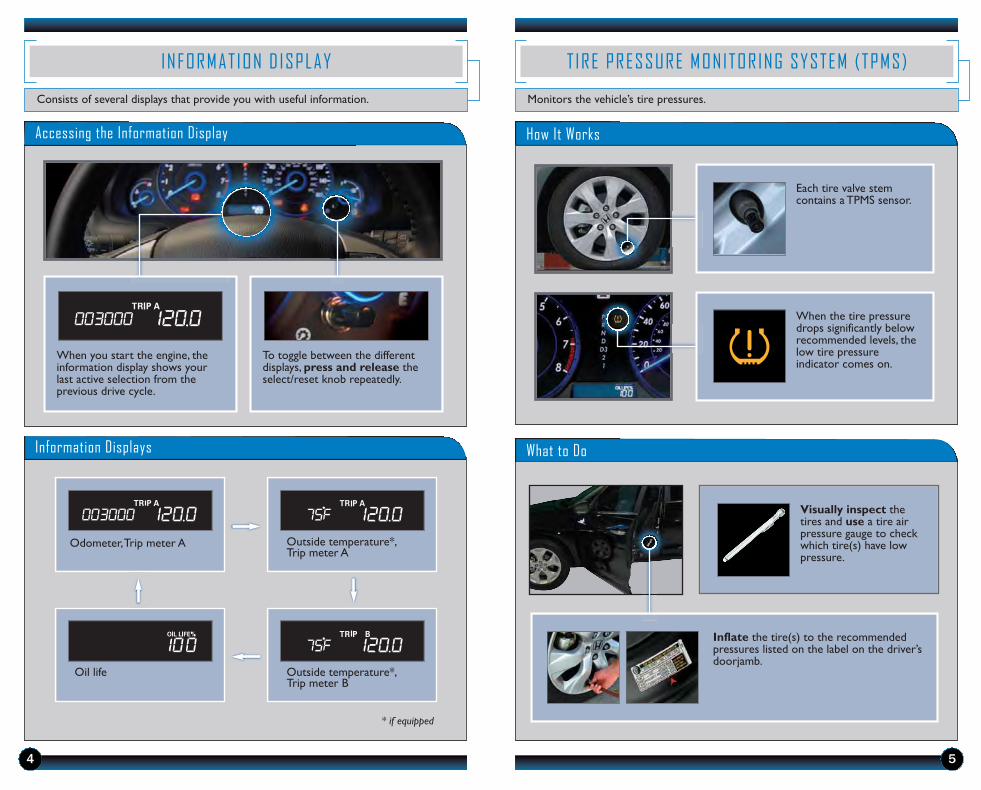
What to Do
Visually inspect thetires and use a tire airpressure gauge to checkwhich tire(s) have lowpressure.
Accessing the Information Display How It Works
Odometer, Trip meter A Outside temperature*, Trip meter A
Oil life Outside temperature*, Trip meter B
Information Displays
* if equipped
INFORMATION D ISPLAY
Consists of several displays that provide you with useful information.
T IRE PRESSURE MONITORING SYSTEM (TPMS)
Monitors the vehicle’s tire pressures.
To toggle between the differentdisplays, press and release theselect/reset knob repeatedly.
When you start the engine, theinformation display shows yourlast active selection from theprevious drive cycle.
Each tire valve stemcontains a TPMS sensor.
When the tire pressuredrops significantly belowrecommended levels, thelow tire pressureindicator comes on.
Inflate the tire(s) to the recommendedpressures listed on the label on the driver’sdoorjamb.
4 5
10 Crosstour TRG_wbg 2:ATG_NEW STYLE 10/28/2009 3:39 PM Page 4

AUTO DOOR LOCKS Allows you to program how and when the vehicle doors automatically lock and unlock.
Default Lock Setting Modifying the Auto Door Unlock Setting
The doors are preset tolock when your vehiclereaches about 9 mph.
Default Unlock Setting
Only the driver’s door ispreset to unlock whenyou shift into Park (P).
Programmable Auto Door Lock/Unlock SettingsBelow are the different programmable options you can choose. See Auto DoorLocking/Unlocking in your owner’s manual for instructions on programming these settings.
AUTO DOOR UNLOCK
Auto Unlock(all doors)
When you turnthe ignition OFF
When you shiftinto Park
Auto Unlock(only driver’s
door)When you turnthe ignition OFF
When you shiftinto Park
Turn off Auto Unlock
Operate manually
AUTO DOOR LOCK
Auto Lock
When youreach 9 mph
When you shiftout of Park
Turn off Auto Lock
Operate manually
1. Close the driver’s door. Shift intoPark.
2. Turn the ignition to the ON (II)position.
4. Within 20 seconds, turn the ignitionto the LOCK (0) position.
3. Press and hold the unlock side ofthe master lock switch for about 10seconds. In that time, you will hearthree clicks
6 7
To program all doors to unlock when you shift to Park:
10 Crosstour TRG_wbg 2:ATG_NEW STYLE 10/28/2009 3:39 PM Page 5

REARVIEW CAMERA (mode ls w i th nav igat ion)
How It Works
• When you shift into Reverse, a real-time image ofthe area behind your vehicle is shown in thenavigation display, along with helpful parking guidelines.
• Turn the guide lines off by pressing and holdingCANCEL for about 3 seconds.
• The display turns off when you shift out of Reverse.
For added convenience, the area behind your vehicle is displayed to help you navigatewhile backing up.
DRIVING POSITION MEMORY SYSTEM (DPMS) (if equipped)
Store a driver's seat and mirror position into memory for each remote transmitter.
Programming DPMS
IPOD ® OR USB FLASH MEMORY
Plays audio files from your compatible iPod or USB flash memory device through yourvehicle’s audio system.
Connecting Devices and Playing Audio Files
1. Open the center console, and pullout the USB adapter cable.
3. Press CD/AUX or AUX to beginplaying.
2. Connect the USB connector to youriPod dock connector or flash drive.
iPod is a registered trademark of Apple Computer, Inc.,registered in the U.S. and other countries. iPod not included.
Note: Each group of settings is activated by the corresponding remote transmitter(1 or 2) when it’s used to unlock the driver’s door. When activated, each item beginsto adjust before you enter the vehicle.
1. Turn the vehicle on. Shift intoPark (P).
2. Adjust your preferred seat andoutside mirror settings.
3. Press and hold the SET buttonuntil you hear a beep, then release.
4. Press and hold the memorybutton # corresponding to theremote (1 or 2) you are usinguntil you hear two beeps.
8 9
10 Crosstour TRG_wbg 2:ATG_NEW STYLE 10/28/2009 3:40 PM Page 6
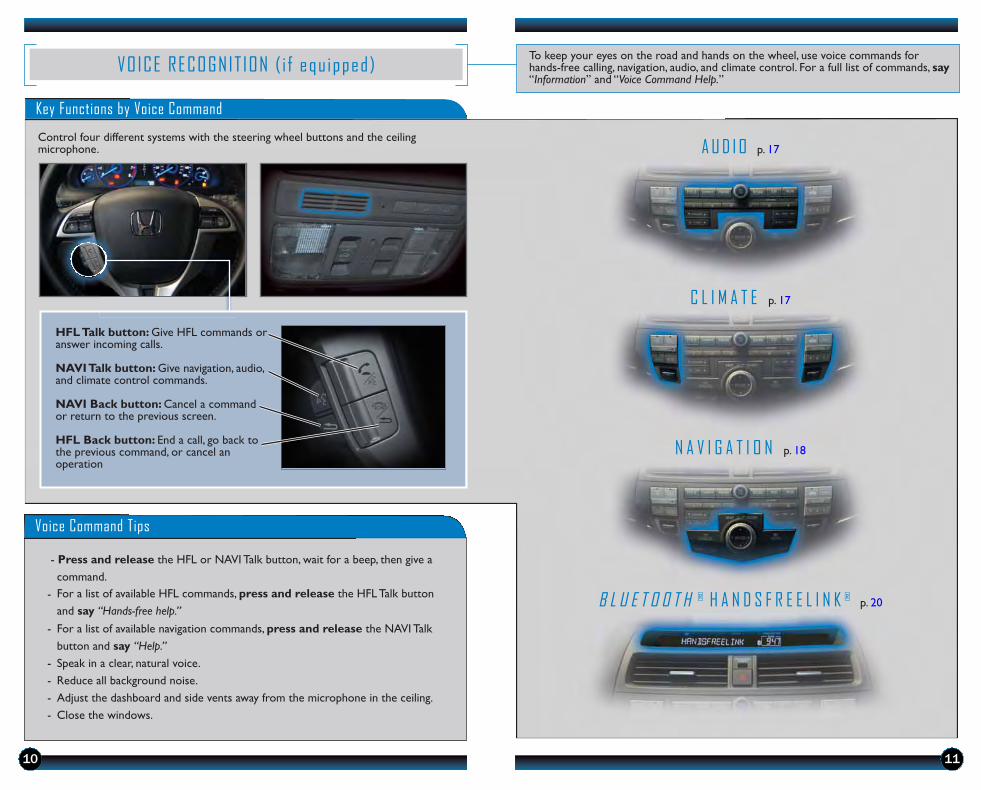
VOICE RECOGNIT ION ( i f equ ipped)To keep your eyes on the road and hands on the wheel, use voice commands forhands-free calling, navigation, audio, and climate control. For a full list of commands, say“Information” and “Voice Command Help.”
Key Functions by Voice Command
C L I M A T E p. 17
N A V I G A T I O N p. 18
B L U E T O O T H ® H A N D S F R E E L I N K ®p. 20
A U D I O p. 17Control four different systems with the steering wheel buttons and the ceilingmicrophone.
Voice Command Tips
- Press and release the HFL or NAVI Talk button, wait for a beep, then give a
command.
- For a list of available HFL commands, press and release the HFL Talk button
and say “Hands-free help.”- For a list of available navigation commands, press and release the NAVI Talk
button and say “Help.”- Speak in a clear, natural voice.
- Reduce all background noise.
- Adjust the dashboard and side vents away from the microphone in the ceiling.
- Close the windows.
HFL Talk button: Give HFL commands oranswer incoming calls.
NAVI Talk button: Give navigation, audio,and climate control commands.
NAVI Back button: Cancel a commandor return to the previous screen.
HFL Back button: End a call, go back tothe previous command, or cancel anoperation
10 11
10 Crosstour TRG_wbg 2:ATG_NEW STYLE 10/28/2009 3:41 PM Page 7

Press and release the NAVI Talk button before you give a command. Press and release the NAVI Talk button before you give a command.
Commonly Used Voice Commands
Here are some examples of commonly used voice commands. Try some of these tofamiliarize yourself with the voice command system.
Press and release the NAVI Talk button before you give a command.
Locate Points of Interest Say a command like “Displayrestaurant” to see restauranticons appear on the map.
Say a command like “Display gasstations” to see gas station iconsappear on the map.
Get Navigation RouteInformationAfter a destination is entered,say “How far to destination?” tohear the remaining distance.
Say “Display entire route” to seethe routing method the systemmapped for your destination.
Press and release the NAVI Talk button before you give a command.
Make Audio SelectionsSay a command like “Radio 97.1FM” to select that station.
Say a command like “CD playtrack 1” to hear that song on acurrently inserted CD.
Adjust the Vehicle’sClimate Setting Say a command like “Airconditioner on” to start theair conditioning system.
Say a command like “Fan speed4” to adjust the fan speed.
12 13
10 Crosstour TRG_wbg 2:ATG_NEW STYLE 10/28/2009 3:41 PM Page 8

Commonly Used Voice Commands (Continued)
Here are some examples of commonly used voice commands. Try some of theseto familiarize yourself with the voice command system.
Press and release the Navi Talk button before you give a command.
G e n e r a l C o m m a n d s(Accepted on most screens to change
displays)
• Display map• Display menu• Information• Display audio screen• What time is it?
F i n d P l a c e C o m m a n d s(Accepted on Map screen)
• Find nearest:- ATM - Honda dealer- gas station - airport- Mexican - hospitalrestaurant - bank
- post office
N a v i g a t i o n C o m m a n d s(Accepted on Map screen)
• How long/far to destination?• Display destination• Display entire route
D i s p l a y C o m m a n d s(Accepted on Map screen)
• Display (or hide):- ATM- gas station- restaurant- post office
• Display north up/heading up• Zoom in/out• Go home• Display current location
Press and release the Navi Talk button before you give a command.
A u d i o C o m m a n d s(Accepted on most screens)
• Radio on• Radio # FM/AM• Radio preset 1/2/3/4/5/6• XM channel #• XM preset 1/2/3/4/5/6• CD play• CD play track/disc #• CD skip forward/back• Auxiliary (AUX) play
S e t u p C o m m a n d s(Accepted on Setup screen)
• Brightness up/down• Volume up/down/min/max/off• Interface dial feedback on/off• Guidance prompts min/max/normal
Climate Control Commands(Accepted on most screens)
• Air conditioner on/off• Rear defrost on/off• Climate control recirculate/
fresh air• Fan speed up/down• Temperature # degrees(# = 57–87)
• Temperature max hot/cold
H e l p C o m m a n d s(Accepted on most screens)
• Help (list of available commands for current screen)
• Voice command help - from INFO screen (list of all available navigation, audio, and climate control commands)
14 15
10 Crosstour TRG_wbg 2:ATG_NEW STYLE 10/28/2009 3:41 PM Page 9

NAVIGAT ION ( i f equ ipped) Real-time navigation system uses GPS and a map database to show your currentlocation and help guide you to a desired destination.
Entering a Destination
Using Voice ControlPress and release the Navi Talk button before you give a command.
Using Find Nearest CommandTry these simple steps to find a nearby point of interest, such as a gas station,movie theater, restaurant, etc.
Press and release the Navi Talk button before you give a command.1. Say “Display menu” and “Address.”
2. Say “Street” followed by thestreet name. Do not include thedirection (N, S, E, W) or type(St., Ave., Blvd., etc.).
3. A list of street names appears.Say the number next to thestreet you want.
4. Say the entire street addressnumber. For example, “1-2-3-4.”
5. If the street address is in morethan one city, a list of city namesappears. Say the number next tothe city you want.
6. The system calculates the routeand displays the “Calculate routeto” screen. Say “OK” to set theroute.
1. Say “Find nearest ATM.”
2. A list of the nearest ATMs inyour area is displayed byshortest distance to destination.
3. Say the number you want toselect.
4. The system calculates theroute and displays the“Calculate route to” screen.Say “OK” to set the route.
Direction of destination
Calculated route
Distance to go
Time to go
Current vehiclelocation
Map ScreenLegend
16 17
10 Crosstour TRG_wbg 2:ATG_NEW STYLE 10/28/2009 3:41 PM Page 10

BLUETOOTH ® HANDSFREEL INK ® ( i f equ ipped) Allows you to place and receive phone calls through your vehicle's audio system. Visithandsfreelink.honda.com to check if your phone is Bluetooth-compatible.
Pairing Your Phone
Say “Pair.”
HFL asks you to name the phone. For example, say “Mary’s phone.”
YESNO
Enable “Discovery” or “Search” mode on your Bluetooth-compatible phone.
1
Say “Phone setup.”
2
3
HFL searches for your phone, and you must search for a Bluetooth device from yourphone. When HFL finds your phone, your phone prompts you to connect to HFL.
Your phone is now paired to HFL.The system exits out of the HFLmenu.
Enter the code from step 4 on your phone.
4
5
6
For more information or troubleshooting, call HFL consumer support at (888) 528-7876, visit handsfreelink.honda.com, or see your owner’s manual for details.
NO YESRepeat step 5.
HFL gives you a four-digit pairing code. This code also appears on the audiodisplay.
Was connection successful?
Was pairing successful?
Has a phone been paired to the system before?
YESNO
The system gives you information about pairing a phone forthe first time.
Press and release the HFL Talk button before you give a command.
Press and release the HFL Talk button before you give a command.
Making a Call
1. Press the HFL Talk button.
2. Say “Call” or “Dial”and thedesired phone number.
3. Press the HFL Talk button, andsay “Call” or “Dial” to continue.
Receiving a Call
2. Press the HFL Talk button toaccept the call.
3. Press the HFL Back button toend or decline the call.
4. The call is connected and heardthrough the vehicle’s speakers.
1. A notification is heard andthe incoming phone numberappears on the audio display.
HFL Talk button: Give HFLcommands or answer incoming calls.
HFL Back button: End a call, go backto the previous command, or cancel anoperation.
18 19
10 Crosstour TRG_wbg 2:ATG_NEW STYLE 10/28/2009 3:42 PM Page 11

HIDDEN REMOVABLE UT IL ITY BOX
Removable and washable utility box provides extra storage and access to tool kit and jack.
Removing the Utility Box
FUEL F ILL DOOR
Opening the Fuel Fill Door
When you unlock the driver’s door,the fuel door unlocks.
To open, push and release the fueldoor in the area shown until it popsopen.
Closing the Fuel Fill Door
Push the fuel door flush to thebody.
Easy-to-use locking fuel door keeps your fuel cap secure.
When you lock the driver’s door, thefuel door locks.
NOTE: If you lock the doors whilethe fuel door is open, you mustunlock the doors to close the fueldoor.
NOTE: The utility box also includestwo removable dividers for addedstorage options, located behind eachhandle.
1. Lift the removable tray usingthe handle.
3. Secure the anchors to thedesignated hooks located on theside panels.
2. Remove the side anchors attachedto the tray.
4. Lift the utility box out from itscompartment using the side handles.
20 21
10 Crosstour TRG_wbg 2:ATG_NEW STYLE 10/28/2009 3:42 PM Page 12
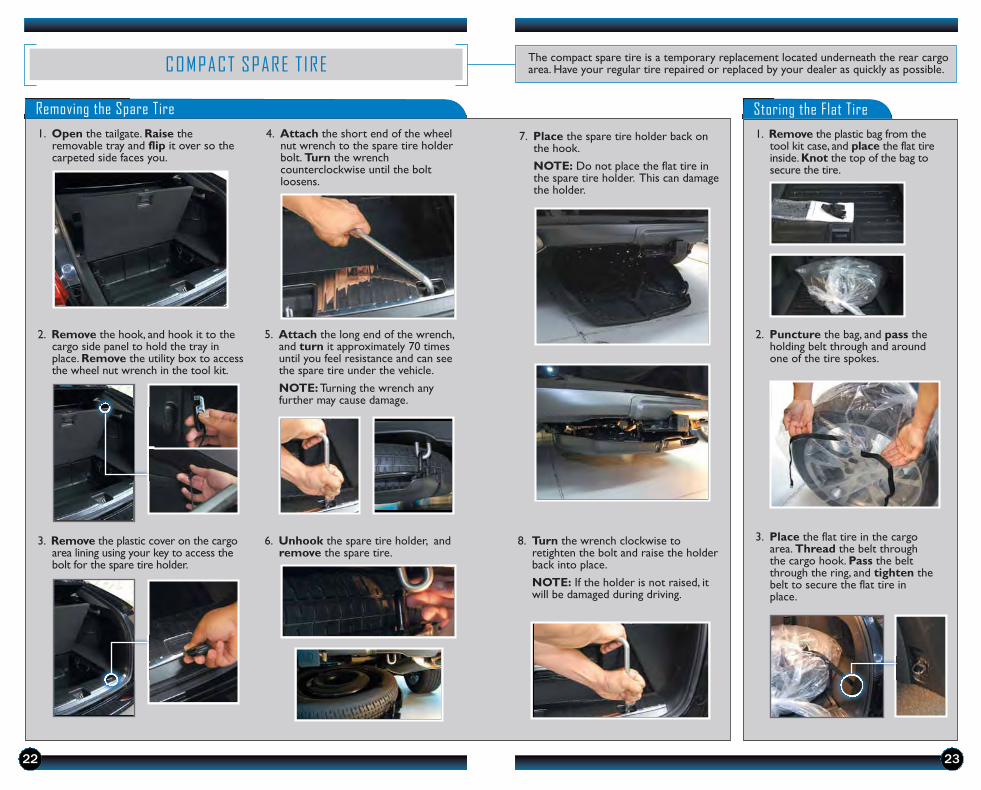
Removing the Spare Tire Storing the Flat Tire1. Open the tailgate. Raise the
removable tray and flip it over so thecarpeted side faces you.
3. Remove the plastic cover on the cargoarea lining using your key to access thebolt for the spare tire holder.
4. Attach the short end of the wheelnut wrench to the spare tire holderbolt. Turn the wrenchcounterclockwise until the boltloosens.
5. Attach the long end of the wrench,and turn it approximately 70 timesuntil you feel resistance and can seethe spare tire under the vehicle.
NOTE: Turning the wrench anyfurther may cause damage.
6. Unhook the spare tire holder, andremove the spare tire.
8. Turn the wrench clockwise toretighten the bolt and raise the holderback into place.
NOTE: If the holder is not raised, itwill be damaged during driving.
1. Remove the plastic bag from thetool kit case, and place the flat tireinside. Knot the top of the bag tosecure the tire.
2. Puncture the bag, and pass theholding belt through and aroundone of the tire spokes.
3. Place the flat tire in the cargoarea. Thread the belt throughthe cargo hook. Pass the beltthrough the ring, and tighten thebelt to secure the flat tire inplace.
COMPACT SPARE T IRE The compact spare tire is a temporary replacement located underneath the rear cargoarea. Have your regular tire repaired or replaced by your dealer as quickly as possible.
2. Remove the hook, and hook it to thecargo side panel to hold the tray inplace. Remove the utility box to accessthe wheel nut wrench in the tool kit.
7. Place the spare tire holder back onthe hook.
NOTE: Do not place the flat tire inthe spare tire holder. This can damagethe holder.
22 23
10 Crosstour TRG_wbg 2:ATG_NEW STYLE 10/28/2009 3:43 PM Page 13

OWNER L INK
Owner Link allows you to explore features and technologies specific to your vehicle,schedule service appointments, obtain and update maintenance and service records,manage your financial services account, and access other useful information. Registerat www.owners.honda.com to assure that you continue to enjoy the experience ofowning a Honda.
SAFETY REMINDER
Your vehicle is equipped with airbags. Airbags do not replace seat belts; they add tothe protection offered by seat belts. Airbags can help protect you in some types ofcollisions, but they do not provide protection in all collisions.
Always make sure you and your passengers wear seat belts, and that young childrenare properly secured in a child seat or booster in the rear seat. Never place an infantseat in the front passenger’s seat as the force of a deploying airbag can seriouslyinjure an infant.
FUEL RECOMMENDAT ION
• Only use unleaded gasoline of 87 octane or higher.
• Some gasoline in North America contains MMT, a manganese-based fuel additive.Prolonged and consistent use of gasoline containing MMT can deteriorate yourvehicle’s performance, fuel economy, and the emissions control system. Always useMMT-free gasoline if available. Failures caused by use of gasoline containing MMT maynot be covered under warranty.
• For further important information on fuel and lubricants for your car and informationon gasoline that does not contain MMT, contact your dealer or visit Owner Link atwww.owners.honda.com.
24 25
10 Crosstour TRG_wbg 2:ATG_NEW STYLE 10/28/2009 3:43 PM Page 14