technical training from - · pdf filetechnical training from ... • inline and...
TRANSCRIPT

2nd Is
sue
Dec 20
11

Members of eXponentia
Technical Training from
Electronic Diesel Control-1 - Course Content:
The course will provide the technician with the knowledge of diesel fuel and electroniccircuits required to understand and repair these systems. At the end of this course thetechnician should be able to demonstrate knowledge of how these systems work andhow to use oscilloscopes and meters for the performance of a correct diagnostic.Diesel fuelled Compression IgnitionEngines
• Direct / Indirect InjectionAutomotive diesel fuel systems
• Inline and distributor type pumps • Unit injector• Common Rail injectionEmissions
• EGR Petrol versus EGR Diesel • EGR Developments• Further developments• Particulate filtration (PAF)
EDC components
• MAF – Mass Air Flow • MAP – Man Abs Pressure Sensors• Crank & Cam shaft sensors• Fuel pressure sensors & control• Throttle pedal sensors & pedal switches• Throttle valve• LP & HP pumps• Turbos, fixed & variable geometryTools and Equipment
• Multi-meters • Oscilloscopes • Code Reader
Where: Europa Academy
When: Friday 24th February or
Saturday 25th February
9am - 5pm
Cost: €200
Book: Call Autobiz on 091-523 292
Ideal for: • Workshop Owners
• Mechanics
Book Now to avoid disappointment
091-523 292
New Technology - Course Content:
The perfect introductory course for further modules or to get caught up onrecent technology. A one day training seminar consisting of a centralpresentation, discussions and practical information on:Diesel engines
• Intake throttle • DPF filter • Piëzo injectorsPetrol engines
• Direct injection • Variable valve timing • Variable valve lift • Secondary air injectionDual Mass Flywheels
• Function & Design • Diagnosing & ServicingEngine general
• EGR • Dual stage turbo & turbo/supercharger • Electric water pump • Water cooled
intercooler integrated in intake manifold
Suspension Geometry
• Camber / Caster • KPI/SAI • Included angleHybrids
• Serial/parallel/combination systems • Available hybrids• Motor/generator: Operation and control • Combustion engine: Atkinson principle • Safety systemsComfort
• Electric park brake • Electrically powered steering (EPS)Safety
• Electronic stability control (ESC) • Dual stage airbags• Pedestrian protection
Where: Clayton Hotel, Galway
When: Thursday 23rd February
9am - 5pm
Cost: €160
Book: Call Autobiz on 091-523 292
Ideal for: • Mechanics
• Factor employees
• Workshop Owners
• After Sales Managers
• Parts Employees
• Customer Advisors
Course 1 - New Technology
Course 2 - Electronic Diesel Control-1
Clayton Hotel, Galway
Europa Academy, Swords, Co. Dublin
Instructor - Steve Carter
G A L W AY
Feb 23rdGalway
Feb 24th & 25thDublin
New Technology
Electronic Diesel Control

Autobiz Tech Tips December 2011 >> 3
Our contributors inthis issue are >>
Tech Tips
JOBS
JOBS
Tech Tips is published by:
Shangort, Knocknacarra, GalwayPhone (091) 523292Fax (091) 584411Web www.autobiz.ieEmail [email protected]
Average Net Circulation for
the period Jul 10 to Jun 11
is 5,197 copies of each issue.
Welcome to the second edition of the Autobiz Tech Tips Supplement
On my travels around thecountry visiting variousgarages, I noticed that lots ofgarages were keeping the firstedition of the Autobiz TechTips supplement stored in aplace that was handy for futurereference; in tool box drawers,or on shelves alongside othertechnical service manuals.
So here at Autobiz, we thoughit would be a good idea toserialise all the Tech Tips intothese booklets, so mechanicscan keep it for reference. Thissecond edition has all the TechTips published in Autobiz sinceour last supplement.
There is no doubt that the technical knowledge required to diagnose problems in cars, is something no serioustechnician can be without. Autobiz, with Tech Tips and through facilitating technical training in conjunction witheXponentia, are going some way towards helping motor mechanics all over Ireland, gain the technical knowledgenow essential for the survival of Independent garages.
The next 10 years will see our industry change enormously, as you will see on page 7, a simple battery changewill no longer be possible. Start Stop technology will bein 70% of new cars by 2015, which means that theadvancement of knowledge is now a priority fortechnicians.
I look forward to any feedback you may have on thissupplement, and also let me know if there are anyspecific technical issues you would liked to see coveredin future issues of Autobiz.
John O’Callaghan, Technical Editor
Diagnosticswith eXponentiaA trio of puzzling cars 4
Diagnosing wheel speed sensorswith DITSpinning your wheels 5
Timing belt installation with GatesTensioner problems 6
Battery managementwith BoschThe ever cleaner winds of change 7
Engine Cooling / Belt Tensioningwith Continental-CONTITECHVW 2.0l belt replacement guide 8
Diagnostics with eXponentiaSimilar, but not the same 10
Diagnosticswith eXponentiaHow training will save you money 11
Diagnosticswith eXponentiaTrouble codes - lost in translation 12
Diagnosticswith A.D.SNot a fun Carnival 13
Diagnosticswith eXponentiaAn incomplete installation 14
Diagnosticswith eXponentiaNothing is as good as good information 15
T: 01-402-3782E: [email protected]: www.DIT.ie
W: www.contitech.co.uk
E: www.gates.com/europe/contactW: www.gates.com/europe/technical
T: 0044 844 879 34 64E: [email protected]: www.exponentia.org.uk
E: [email protected]: www.boschautoparts.co.uk/
E: [email protected]: www.ADSRyan.???
Dublin Institute of Technology
Tech Tips is published by Autobiz Ltd and is sent free of charge to all readers of Autobiz. While every care is taken to provideaccurate information, the publisher cannot accept responsibility for any errors or omissions, no matter how caused.

4 >> Autobiz Tech Tips December 2011
A trio of Puzzling carsThree cars put eXponentia’s Steve Carter through his diagnostic paces, butall is not as it seems. Sometimes the real problem is beyond the ability ofthe ECU to understand, other than to say that something is wrong. That’swere knowledge comes in.
In this troubleshooting guide we will be looking
at three vehicles from different manufacturers, all
with their own unique problems.
A Sluggish VolvoThe first vehicle was a 2000 Volvo S40 1.6L 16
valve. The particular problem with this vehicle
was it’s frequent, but random, inability to pull
away from a standstill. This was not a
transmission or clutch problem, but appeared to
be the inability of the engine to develop
sufficient torque from idle speed. Even applying
a significant amount of throttle still made pulling
away problematic, and as I stated previously, this
problem was not continuous.
This particular engine is equipped with the EMS
2000 engine management system and does not
incorporate fly-by-wire, so no throttle body
adaption was available. Any idle adjustment is by
means of a small grub screw. However, the idle
speed, most of the time, appeared to be within
specification. As you can see in the photograph,
this engine is equipped with continuous variable
valve timing. The camshaft actuator receives its
instructions from the engine ECM which causes
the actuator to channel engine oil, under
pressure, to alter the camshaft's position,
creating continuous variable valve timing.
On closer inspection of the actuator, significant
amounts of solidified engine oil deposits could be
seen in the galleries within the actuator. These
deposits were cleaned out with a degreasing
agent, and the problem was resolved.
A Polo with Intermittent ABSThe next vehicle, a 2004 VW Polo 1.4, was
brought in for it’s annual service and pre-NCT
inspection. During the service, it was noted that
the ABS warning lamp was on. Reading the fault
code from the ABS ECM, it merely stated that
the ABS pump had failed. This is a very expensive
component to replace, and pointless if not
necessary.
While obtaining the necessary pin data
information, we checked the earth and battery
positive supply to the ABS module. While
carrying out these checks it was possible on one
or two occasions to regain one of the positive
battery supplies, which had been lost. This
coincided with leaning across the vehicle battery.
You probably remember that some of this
vehicle’s fuses are housed within the plastic
battery cover and these fuses are just thin metal
strips between two bolt fixings. A blown fuse can
be seen very clearly, but in our case, the fuse had
actually cracked and looked more like a scratch
than a defective fuse. The fuse was replaced and
the ABS was completely functional again.
A congested Citroen FAPThe next dilemma was a Citroen C8 2.2HDi FAP.
The car had been bought at auction and was
being prepared for resale when an anti-pollution
fault flagged up on the dash. Unfortunately, the
EOBD reader would not reveal sufficient
information about this fault, or where to go next
in fixing the vehicle.
With the appropriate level of diagnostics, it was
possible to view the fault codes in more detail.
The first fault related to the overloading of the
particulate filter, the second being that the
pressure differential sensor was too high on
engine start-up. The first fault code is fairly
straightforward- the vehicle had covered 58,000
miles and had a counter reading of 98g of soot
residue within the DPF, meaning it had reached
its design limits and needed replacing. As a
consequence of this, the Eolys tank must be
nearly empty and required refilling with the
appropriate Eolys (remember that there are two
types).
The second fault was more interesting, as it
indicated excessive backpressure within the now
clogged particulate trap before the engine was
even running. Viewing the serial live data, it
showed a backpressure differential of 993mb
with the engine off.
The pressure differential sensors were located
close to the DPF itself and with a heavily clogged
filter it is possible for soot particles to become
lodged within the sensor and cause incorrect
pressure differential readings. Naturally, the
engine's ECM has to reduce engine performance
in order not to generate high levels of
backpressure, which would damage the turbo.
However, its plausibility routine had determined
we had excessive backpressure without the
engine running.
Tech TipsJOBS
JOBS
A crack in a strip fuse, circled, can cause anintermittent fault. An observant eye will alsosuspect that the other strip fuse in thisexample needs to be replaced as well.
A build-up of oil deposits had intermittentlyinterfered with the variable valve timing
A Citroen FAP

Autobiz Tech Tips December 2011 >> 5
Joe Clarke, D.I.T.
Spinning your wheelsWheel speed sensors are the eyes and ears of the systems that controlABS and ESP. Joe Clarke, of the Dublin Institute of Technology, explainshow to diagnose a problem caused by a fault in the wheel speedsensor’s input to the ECU.
In the last decade, active vehicle safety has
progressed significantly due to the
technological advancements in anti-lock
braking systems (ABS) and electronic stability
control (ESP). The majority of motor vehicle
manufacturers, tend to use the active type
wheel speed sensor as opposed to the
previous inductive type. These sensors are
smaller in size, more accurate at lower speeds,
can measure direction and produce a digital
signal, which is interpreted directly by the
vehicle’s electronic control unit (ECU).
OperationThe active wheel speed sensor is typically
mounted directly in the hub carrier opposite
the wheel bearing. The wheel bearing
contains a ring of magnets, commonly known
as a phonic wheel, which rotates along with
the wheel bearing as the road wheel turns.
Hall-effect active wheel speed sensors consist
of two wires: a battery voltage power supply
from the ABS/ESP ECU and a return signal
wire. In order for this sensor to function, it
must receive it’s power supply from the ECU.
When the road wheel is rotated, the magnets
pass by the sensor, resulting in the production
of a square wave signal. The signal voltage
and current, switches from a high state to a
low state. The more times the signal goes
from high to low, the faster the wheel is
spinning. The voltage of the signal may vary in
amplitude according to manufacturer.
TestingIn the event of a wheel speed sensor fault, the
customer will be notified by the illumination
of a malfunction indicator lamp (MIL) on the
dash panel, along with a message on the
multi-function display (MFD). To identify the
fault, the technician’s first step is to
interrogate the ECU’s fault log or memory
bank using a diagnostic or scan tool. A fault
description, manufacturer’s fault code or a
generic OBD C-code may be provided,
according to the tool used. Another option is
the observation of the vehicle’s four wheel
speeds in the live data or parameter
measurement option while driving. All four
wheel speed sensors should be indicating the
same speed at all times.
Following fault area location, it is necessary to
determine the actual faulty component i.e.
sensor, ECU, phonic wheel or related wiring.
The hall-effect active sensor must remain
connected during all measurements. If the
active sensor is disconnected, the ECU will
interrupt the power supply to protect the
system, which could lead to a faulty diagnosis.
Measurements are therefore obtained by back
probing or using a suitable break out
box/connector.
When the ignition is switched on or the
engine is running, battery voltage should be
present on the supply line to the sensor. This
may be measured using a DC voltmeter, or an
oscilloscope as shown in Figure 1.
Although a DC voltmeter may be used to
determine the sensor’s signal high and low
state as the road wheel is rotated, true signal
verification is only possible with the
oscilloscope. Connect the positive oscilloscope
probe to the signal wire, while the negative
probe is connected to a good chassis earth.
Figure 2 shows the signal produced when the
road wheel is rotated slowly at constant
speed.
As the distance between the magnets remains
constant the duty cycle remains at 50%.
Figure 3 illustrates how the signal varies as the
road wheel is accelerated from stand still. The
50% duty cycle remains, the amplitude is
constant but the frequency of the waveform
increases which is directly proportional to the
wheel speed.
ConclusionIf the sensor produces no signal following
verification of the wiring, the ECU, sensor or
phonic wheel could be at fault. To eliminate
the sensor or phonic wheel as the source of
the fault, the sensor could be swapped with
another location on the vehicle and re-
checked. If the fault follows the sensor to it’s
new location, then the sensor is faulty.
A sticking phonic wheel can cause the signal
to be interrupted (faulty) intermittently,
causing the ECU to believe that a wheel is
rolling at a different speed to
the others. This may
cause an involuntary
ABS or ESP activation
as the ECU might
think that the vehicle is
out of control
i.e. in a yaw.
Tech TipsJOBS
JOBS
Figure 1: Oscilloscope trace of the supplyvoltage to the wheel speed sensor
Figure 2: Oscilloscope trace of the signalvoltage of the wheel speed sensor as thewheel rotates at constant speed
Figure 3: Oscilloscope trace of the signalvoltage of the wheel speed sensor as thewheel accelerates from a stop position

6 >> Autobiz Tech Tips December 2011
Tensioner problems A VW Golf 16 Valve engine met a premature end when one of the timingbelts broke. Gates Technical Support’s Andrew Vaux takes us step-by-step,as he examines all of the evidence to determine why the belt failed.
When Gates technical support received a
call about a problem with the drive system
on a VW Golf (97-06 1.4 16V), it was a
familiar story. The Golf range features a
variety of engines with different drive
system layouts, but one of the most
intriguing is associated with 1.4L 16V
engines.
Some of these twin cam engines feature
two separate drive belts in two different
sizes. One main camshaft belt provides the
timing. A smaller cam belt drives the second
cam.
Apparently, the main drive had failed
prematurely and the engine was beyond
repair. Technical assistance was required.
EvidenceEvidence from the broken belt is often the
key to the correct diagnosis. Whenever a
camshaft stops turning - as this one had -
the usual suspect is the timing belt. Closer
inspection showed that it was not a
problem with the main drive. The smaller
secondary belt had failed. Careful
examination of the pieces showed that the
belt had been significantly reduced in
width.
It had been 'worn away' on the edge
closest to the engine block, with the result
that the narrower belt had been unable to
sustain the load. The belt had snapped,
allowing piston-valve contact that destroyed
the engine.
A likely cause of reduced width is regular
contact with the engine block. This would
be clear from a scoured or polished surface
on either the drive system cover or the
engine block. While no evidence of any
such contact could be found, debris from
the worn away belt was found inside the
drive system cover.
The mystery grew when careful examination
of the backplate on the automatic tensioner
revealed the kind of damage that had been
sought. This would not normally be within
the operating plane of the belt.
It was now clear that the reduction in width
had been caused by contact with the belt
tensioner and not the engine. This failure
was a symptom of a very different problem.
Diagnostic procedureThrough careful reassembly and regular
inspection of the engine components in
situ, the pieces of the puzzle quickly came
together. With the automatic tensioner in
the correct position, contact with the small
secondary belt was impossible.
However, it is possible to install this
automatic tensioner upside down.
When the Gates inspector placed the
automatic tensioner in this position, contact
with the belt was shown to be inevitable.
The evidence supported the view that the
automatic tensioner had been fitted
incorrectly.
Sequence of eventsAs part of good engineering practice, the
VW Golf had had a drive system overhaul,
which involves replacement of belts and
tensioners. In replacing the automatic
tensioner however, a mechanic had installed
it upside down, initiating the following
sequence of events:
• small drive belt makes contact with
backplate of tensioner
• contact begins to 'pare away' the edge
of the belt
• width of the belt gradually reduced
• stress increases until the belt snaps
• piston to valve contact
• destruction of the engine
ConclusionInstalling a tensioner upside down is a basic
error that any mechanic can make,
regardless of the number of times the
procedure may have been carried out on a
particular model. It's always worth making a
note of the position and aspect of a
tensioner before it is removed.
While independent technical information
sources are often very specific about the
way the belt must be installed, information
about the installation of tensioners is
limited. For those drives where installation
of the belt drive may be more complex,
Gates belt kits include all the information
necessary to install belts and tensioners
correctly.
Gates also runs a
series of free
technical seminars
for mechanics in
association with
local motor factors
to make them
aware of possible
installation
problems.
Tech TipsJOBS
JOBS
Debris from the worn belt was abundantinside the drive system cover
The upside down tensioner left noclearance room for the timing belt, as canbe seen by the scoring in this picture
Andrew Vaux, Gates

Autobiz Tech Tips December 2011 >> 7
Tech TipsJOBS
JOBS
The ever cleaner winds of change
A new European directive to reduce CO2 emissions comes into force in 2012.Bosch looks at measures manufacturers are taking to reduce emissions, and someof the emerging technology that you can expect to see soon.Starting in 2012, the average CO2
emissions for 65% of all cars registered in
the EU, across a manufacturer’s entire range
of cars sold, can not exceed 130g of CO2
per km, without incurring what could be a
substantial financial penalty. The total fleet
emissions limits become more restrictive
over the following 3 years, while the
penalties start high, and go higher every
year.
The limits will be introduced with the
following schedule: in 2012 65% of each
manufacturer's newly EU registered cars
must comply with the regulation, rising to
75% in 2013, 80% in 2014 and 100% by
2015.
Manufacturers whose fleet average exceeds
the limit from 2012 will have to pay a
penalty for each and every car registered,
and the penalty will increase over time. The
penalty will be €5 for the first g/km in
excess of 130, €15 for the second g/km,
€25 for the third g/km, and €95 for each
subsequent g/km. From 2019, every g/km
over the limit will cost €95. The penalty will
be made for all of the cars registered, not
just the cars that exceeded the emissions
limit. For example, if a manufacturer fails to
register at least 65% of their car sales with
CO2 emissions less than 130g/km, and their
average is a respectively low 140g/km, the
total penalty would be €710 for each and
every car registered that year.
To reduce the vehicle emissions,
manufacturers are taking a variety of steps
including petrol downsizing, diesel
downsizing, start/stop systems, hybrid &
electric vehicles.
Typically, the additional cost of adding
technology to a standard internal
combustion vehicle is €350 for a start/stop
system, €4,000 for a hybrid vehicle
(combustion engine with electric motor)
and €10,000 for a plug in electric vehicle.
With these new systems, new battery and
vehicle technology is required.
The Battery Management System (BMS) has
to coordinate the electrical system with the
engine management. Its tasks include:
Engine start/stop
Managing generator and
recuperation/regeneration
Avoiding power peaks
Prioritisation of electrical consumers
Switching off idling consumers
When changing the battery of a start/stop
vehicle, exact ‘like for like’ replacement is
required.
Choosing the right battery (e.g. using Bosch
ESI, Tecdoc or a battery catalogue) is
essential.
The battery has to be replaced by a
qualified workshop – DIY battery change is
not recommended.
If the wrong battery is fitted or is fitted
incorrectly, the start/stop function may not
work or will work with lower efficiency and
fuel consumption will increase with higher
CO2 emissions.
After the installation of the battery, the
Battery Management System needs to know
a new battery has been installed. The
technical data of the newly installed battery
e.g. Ah, A and product number (depends
on electronic control unit) needs to be
programmed into the vehicle. Without this
information, the vehicle may refuse to start
or may even break down hours or days
later.
All Bosch KTS diagnostic tools have the
functionality to reprogram the battery
management system and also diagnose
hybrid and electric vehicles. Bosch also
offers training courses for working on high
voltage vehicles and also testers specifically
designed to work on electric vehicles and
carry out 1000v insulation tests on the
vehicle wiring (essential after working on
these vehicles).1 Engine Control Unit (ECU) with software option Start/Stop2 DC/DC convertor 12V3 AGM batter with integral Electronic battery sensor 4 Start/Stop starter
Power Supply 12VCommunicationHydraulic
5 Neutral gear sensor6 Wheel speed sensor7 Crankshaft sensor8 Efficiency Line Generator
1
23
4
5
6
7
8

8 >> Autobiz Tech Tips December 2011
VW belt replacement guideLarge numbers of the VW 2.0L common rail engines (engine code CBDB) are installed invarious models. When the timing belt is changed, serious mistakes are often made. To ensurethat changing belts goes smoothly, ContiTech Power Transmission Group provides a step bystep, detailed installation guide to help prevent problems along the way.These are detailed instructions for replacing the
timing belt on the 2.0 litre common rail engine
in the VW Scirocco, Golf V, Golf VI, Golf Plus and
Jetta III. These timing belts are found from model
year 2008 onwards, and are found on engines
that bear the code CBDB.
Volkswagen recommends that the timing belt
and tension pulley be replaced as follows:
Scirocco: 2009 and older: every 180,000 km
2010 on: timing belt, tension pulley
every 210,000 km
Golf Plus: Timing belt every 180,000 km
Golf V: Timing belt every 180,000 km
Golf VI: Timing belt and tension pulley
every 210,000 km
Jetta III: 2009 and older: Timing belt every
180,000 km, tension roller every
360,000 km
2010 on: timing belt and tension
pulley every 210,000 km
The working time is 2.2 hours for all engines.
Tip: When the timing belt is changed, the
tension pulley, the idler pulley and the water
pump should be replaced, too.
Fitters require the following special toolsfor belt changing:1. Locking pin for camshaft (OE 3359)
2. Locking pin for high-pressure pump
gear (OE 3359)
3. Arrester (OE T 10172, OE T 10172/4)
4. Lock ring tool for crankshaft (OE T 10050)
5. Cap wrench (OE T 10264)
6. Locking tool (OE T 10265)
Safety notes:Turn the engine in the direction of engine
rotation ONLY on the crankshaft gear. The
crankshaft sprocket and camshaft sprocket must
never be rotated after the timing belt has been
removed.
Do not use camshaft locking tool(s) as an
arrester when loosening or tightening the
camshaft gear.
When turning the camshaft, the crankshaft may
not be positioned at top dead center (OT).
The timing belt may not come in contact with oil
or cooling water.
Tech TipsJOBS
JOBS
Fig. 1 Fig. 2
Fig. 3
Fig. 4

Autobiz Tech Tips December 2011 >> 9
Adjustment work on the timing belt may be carried
out only when the engine is cold.
Make a note of the radio code. Disconnect the
battery's negative terminal.
We recommend that, once the timing belt has been
removed, it always be replaced and never reused.
Tightening torques:Note: Self-locking nuts and bolts should always be
replaced, even if not always specified by the
manufacturer.
According to VW, the following nuts and bolts are
to be replaced:
Bolt(s) on the camshaft gear (tightening torque
central bolt: 100 Nm, gear level 1: 20 Nm,
gear level 2: 90°)
Bolt(s) on the high-pressure pump gear
(level 1: 20 Nm, level 2: 90°)
Nut(s) of the tension pulley (level 1: 20 Nm,
level 2: 45°)
Center timing belt guard (10 Nm)
Lower timing belt guard (10 Nm)
Bolt(s) on the vibration damper (level 1: 10 Nm,
level 2: 90°)
Idler pulley (50 Nm and turn an additional 90°).
Removal:Remove engine cover.
Dismantle fuel filter.
Disconnect plug on the coolant temperature sensor.
Open clip(s). Remove the upper timing belt guard.
Remove front right wheel-house liner.
Remove drive unit belt.
Remove vibration damper.
Remove the lower timing belt guard.
Remove the center timing belt guard.
Remove coolant pipe(s).
Position the engine at top dead center cylinder 1.
Note the marking(s) (Fig. 1, No. 1 and Fig. 2, Nos. 2
and 3). The geared segment on the timing belt gear
of the camshaft must be at the top (Fig. 1, No. 1).
Use lock ring tool for crankshaft (OE T 10050) (Fig.
2, No. 1).
Markings of the crankshaft and the lock ring tool for
crankshaft must align (Fig. 2, Nos. 2 and 3).
Lock ring tool for crankshaft: Pins must be
positioned flush in the bore hole.
Use locking pins on the high-pressure pump gear
and on the camshaft (Fig. 3, No. 1 and Fig. 4, No.
1).
Loosen the bolts on the high-pressure pump gear
(Fig. 3, No. 2)
Loosen the bolts on the camshaft gear (Fig. 4, No. 2)
Use arrester.
Loosen the nut of the tension pulley (Fig. 5, No. 1
and Fig. 6, No. 1).
Using the hex key, turn the eccentric of the tension
roller (Fig. 5, No. 3 and Fig. 6, No. 2)
counterclockwise, until the tension roller can be
disconnected with the special tool (Fig. 5, No. 2).
Cap wrench (OE T 10264).
Locking tool (OE T 10265)
Using the hex key, turn the tension pulley clockwise
(max. load stop, Fig. 6, No. 2).
Tighten the nut of the tension pulley slightly (Fig. 5,
No. 1 and Fig. 6, No. 1).
Remove the timing belt from the idler pulley first
and then from the gear wheels.
Installation:Adjustment work on the timing belt may be carried
out only when the engine is cold.
Tension pulley: The nose of the base plate must be
in the recess (Fig. 7, No. 1).
Check the top dead center marking and readjust as
required.
The tension pulley must be locked using the locking
tool and fixed to the stop on the right
(Fig. 6, No. 2).
Turn the camshaft gear clockwise to the stop.
Turn the injection pump gear clockwise to the stop.
Position the timing belt onto the crankshaft, tension
pulley, camshaft gear, coolant pump, and high-
pressure pump, in that order.
Loosen the nut of the tension pulley.
Remove special tool (locking tool).
Ensure that the tension roller is positioned correctly.
Using the hex key, turn the tension pulley clockwise
(in the direction of the arrow).
The pointer of the tension pulley must be flush with
the recess in the base plate (Fig. 8, No. 1).
The nut of the tension pulley may not turn while
this is being done (Fig. 8, No. 2).
Tighten the nut of the tension pulley (Fig. 8, No. 2).
Hold the camshaft gear to maintain pretension
counterclockwise (use the arrester).
Tighten bolt(s) on the camshaft gear (Fig. 4, No. 2)
Tighten the bolt(s) on the high-pressure pump gear
(Fig. 3, No. 2)
Remove locking pins on the high-pressure pump
gear and on the camshaft pulley (Fig. 3, No. 1 and
Fig. 4, No. 1).
Remove crankshaft lock ring tool (Fig. 2, No. 1)
Rotate the crankshaft twice in the direction of
engine rotation.
Position the crankshaft right before the TDC of the
first cylinder (Fig. 6).
Use lock ring tool for crankshaft (OE T 10050) (Fig.
6, No. 1).
Turn crankshaft until the lock ring tool can be used.
The pin on the crankshaft lock ring tool must be
directly in front of the bore hole of the sealing
flange (Fig. 6, No. 1).
Turn crankshaft until the lock ring tool can be used
(Fig. 6).
Check whether the camshaft can be locked with the
lock ring tool.
The pointer of the tension pulley must be flush with
the recess in the base plate.
Tighten bolt(s) on the camshaft gear.
Tighten bolt(s) on the injection pump gear.
The rest of the installation procedure takes place as
for the disassembly procedure, in the reverse order.
Mount the drive unit belt.
Decode the radio, program the volatile memory.
Start the engine and check for proper function.
Read error memory.
Carry out a test drive.
Document timing belt change.
Fig. 8
Fig. 5
Fig. 6
Fig. 7
10 >> Autobiz Tech Tips December 2011
Similar, but not the sameeXponentia’s Steve Carter tackles a Fiat that refused to start a replacementengine, thought to be identical to the failed engine. But sometimes things arenot as they appear to be, and only knowledge and good diagnostics will getyou to a happy ending.
Common rail diesel engines have been in
production for several years now, and many
independent garages are probably seeing more
and more of these vehicles, as the owners pull
away from dealer servicing. This case study
involves a Fiat Ducato, but could have also
occurred to any common rail diesel powered
vehicle.
This particular vehicle had, unfortunately, been
driven through a flooded road when the
inevitable catastrophic engine failure occurred:
the number two con-rod had gone straight
through the block.
The garage, who had been tasked with
replacing the engine, obtained an identical
second-hand engine to replace the failed one.
However, when the vehicle refused to start, they
had some basic vehicle diagnostics which
appeared to interrogate the vehicles engine
management system. However, unknown to
them, it was in fact using an EOBD protocol to
do so, and the scan suggested that there were
no fault codes present. The actual system on
this vehicle was a Bosch EDC 15c2. They
attempted to measure the high-pressure pump
output using a sealed rail kit to confirm they
had sufficient rail pressure to trigger the
injectors. During cranking, they had over 300
bar, more than sufficient pressure to start the
engine.
At this point, they were beginning to run out of
ideas and I became involved with the vehicle.
My first thoughts was to attempt to interrogate
the vehicle’s engine management system using
the Bosch EDC specific programme, where upon
a fault code was retrieved-“crankshaft position
sensor; signal improbable”. Note that this is not
a P code, so is non-compliant under the EOBD
protocol and, for your reference, diesel powered
vehicles did not have to conform to EOBD
protocol before 2005. Remember EOBD is just
for faults which affect emissions of the vehicle.
We proceeded to evaluate the serial live data
while cranking the vehicle. I was particularly
interested in the engine speed and the high-
pressure rail value. Although the garage had
confirmed there were sufficient pressure at the
pump, it was still worthwhile to confirm that
this was being seen by the engine EDC as well.
The rail pressure was in line with their previous
test figures, confirming that the high-pressure
pump, rail sensor and associated wiring to the
EDC were in good order. As for the engine
speed, this was a different matter; although we
had a very stable engine cranking, the actual
RPM indicated by the serial diagnostics ranged
anywhere from 50 to 200 RPMs, thus
confirming the crankshaft sensor as the
potential problem.
At that point the garage was ready to order a
replacement crankshaft sensor. However, I
wasn't so sure and asked for a few more
minutes with the vehicle. A quick scoping of the
crankshaft sensor provided some useful
information.
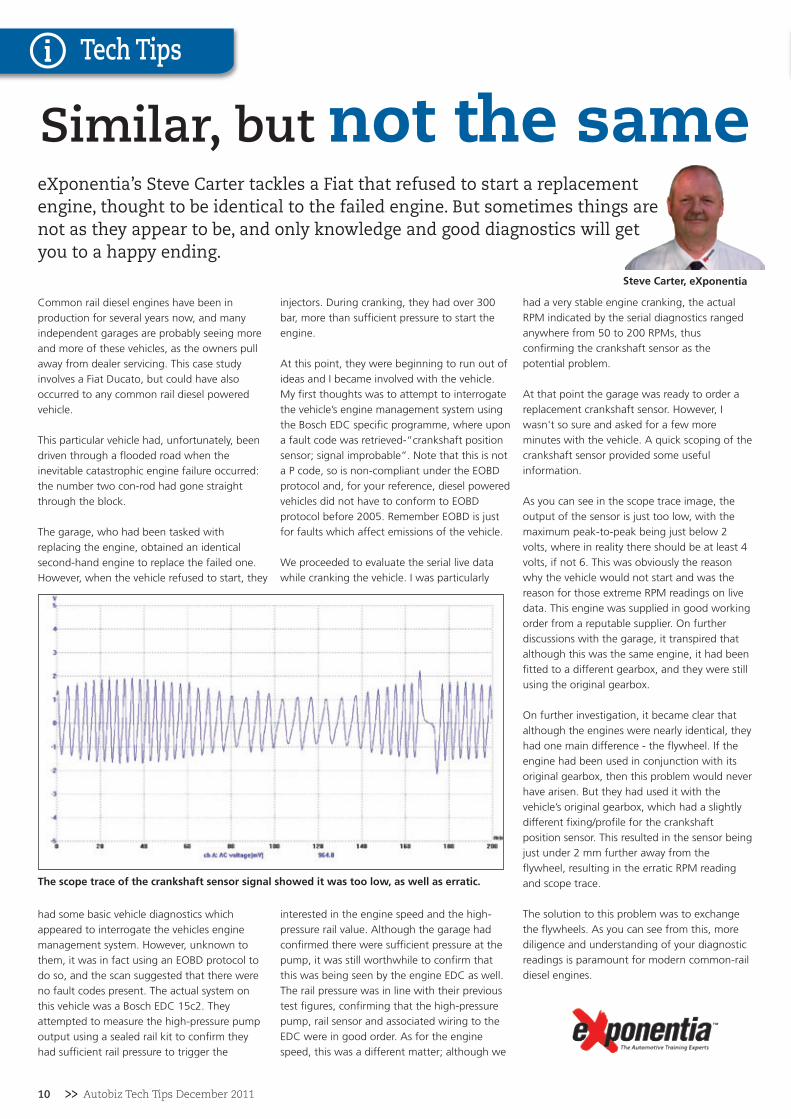
As you can see in the scope trace image, the
output of the sensor is just too low, with the
maximum peak-to-peak being just below 2
volts, where in reality there should be at least 4
volts, if not 6. This was obviously the reason
why the vehicle would not start and was the
reason for those extreme RPM readings on live
data. This engine was supplied in good working
order from a reputable supplier. On further
discussions with the garage, it transpired that
although this was the same engine, it had been
fitted to a different gearbox, and they were still
using the original gearbox.
On further investigation, it became clear that
although the engines were nearly identical, they
had one main difference - the flywheel. If the
engine had been used in conjunction with its
original gearbox, then this problem would never
have arisen. But they had used it with the
vehicle’s original gearbox, which had a slightly
different fixing/profile for the crankshaft
position sensor. This resulted in the sensor being
just under 2 mm further away from the
flywheel, resulting in the erratic RPM reading
and scope trace.
The solution to this problem was to exchange
the flywheels. As you can see from this, more
diligence and understanding of your diagnostic
readings is paramount for modern common-rail
diesel engines.
Tech TipsJOBS
JOBS
The scope trace of the crankshaft sensor signal showed it was too low, as well as erratic.
Steve Carter, eXponentia

Autobiz Tech Tips December 2011 >> 11
How training will save you money
Steve Carter from eXponentia, gives an example highlightinghow too little knowledge will cost you a lot more than payingfor training, by keeping your technicians’ skills up-to-date.
When discussing training requirements for
garages, it is often stated that the garage
can either not afford the cost of training or,
as is more often the case, cannot afford the
cost of the lost time when a technician is
away from the workshop.
I would argue that a well-trained technician,
who is kept up-to-date with modern
systems, will be far more efficient and will
make the garage owner more money than
it will ever cost to maintain this level of
knowledge.
An example of just this scenario occurred
when I returned from my holiday. A well-
respected large workshop with class 4 MOT
and seven ramps was having a severe
problem with a Saab 9 3 1.9TDi, and asked
for my help.
The vehicle had come in for a routine cam
belt replacement some eight weeks earlier.
This was duly completed and the vehicle left
the workshop. Five weeks later the car
broke down, the garage recovered the
vehicle and interrogated the on-board
systems, and found it had a crank sensor
fault. This component was replaced, but the
vehicle still refused to start and the crank
sensor fault was still there.
The garage contacted a local Saab dealer,
who informed them that this vehicle
apparently suffers from the cam belt
jumping a tooth or two. All covers were
removed and the timing checked, this
revealed that the cam belt had not jumped
any teeth at all and everything was perfectly
timed. At this point an auto electrician was
asked to look at the vehicle and after his
various checks, he concluded they should
try a manufacturer’s crankshaft sensor. This
was done and still the vehicle did not start
and it still had a crankshaft sensor fault. The
auto electrician then suggested the ECU be
sent away for testing. The ECU was
returned three days later, with no faults
having been found.
I started this article talking about training
costs and time away from the workshop.
Let's just look at the cost incurred to date
by this garage for all the work on this Saab:
2 crankshaft sensors £169
1 ECU testing £ 65
2 Days investigation work £300
½ Day engine timing check £ 75
1 Day Auto electrician £125
4 weeks of loan car to customer £550
Total cost £1,284
The engine still won’t start, and everyone is
out of ideas.
When I arrived at the workshop, I double-
checked the fault code, which was accurate
- crankshaft sensor no output. Looking next
at the 2 spare crankshaft sensors, it was
obvious that this was an inductive type
sensor, and as such, generated its own
signal from the exciter that would be
spinning in front of its magnetic tip. I
connected my oscilloscope to the two
output wires of the sensor and asked the
technician to attempt to start the vehicle,
instantly it was obvious that there was
no output at all from the sensor,
but this of course doesn't mean
the sensor was defective. If the
exciter has moved or broken,
then you would get the same
fault. Most exciters are usually
some part of the flywheel or
ring gear, but on this particular
engine it didn't appear that
the crankshaft sensor could
get close enough to pick up a
signal. On checking our data
information, it was obviously
not getting any signal.
This engine uses an exciter fixed to be
crankshaft, one journal in from the flywheel
end, by three bolts. Clearly if these bolts
come undone, then the exciter will not
rotate with the engine.
I removed the crankshaft sensor and by
using a boroscope, I peered into the hole
and could clearly see that this is exactly
what had happened. All three bolts had
come undone and the exciter was no longer
attached to the crankshaft. Without the
bolts, the exciter was not rotating along
with the crankshaft, and the sensor could
not pick up a signal from the now
permanently stationary exciter. The end
result was no signal to the ECU that the
crankshaft was turning, so no spark at all.
eXponentia, in conjunction with Autobiz,
are running two courses at the Europa
Academy this November: The highly popular
New Technology Seminar and the CAN-BUS
& Multiplex-1 course. More details on
facing page.
Tech TipsJOBS
JOBS
Steve Carter, eXponentia

12 >> Autobiz Tech Tips December 2011
Trouble codes - lost in translation
An older model Mercedes that ran well failed the NCT onexcessive emissions. The trouble code was less than straightforward in it’s attempt to explain the cause of the fault. A bit ofgood diagnostics and testing found the problem.
A 1996 Mercedes E36 AMG was brought
into the workshop after it failed the NCT
test. Apart from a few minor niggles, its
main failure was that the emissions, both
CO and HC, were just a bit too high. As a
result of these two readings being high,
obviously the lambda was wrong as well.
The car appeared to drive well and was not
suffering any major misfire, a 10 minute
inspection of the engine bay did not reveal
anything untoward. It was now time to see
if there were any fault codes stored in the
vehicle’s engine management ECM. The
system fitted to the vehicle was a Bosch
Motronic M 3.4.2, and although this vehicle
is over 14 years old, the on-board
diagnostic system seemed quite advanced
for its years. The fault code retrieved was
somewhat convoluted “ dwell angle end of
control stop reached”. This is a prime
example of an engine management system
trying to describe the fault in just a few
words. My favourite example of this is on
many VW models “Multplicative mixture
correction at end of control stop.” Just try
explaining that to the young man, when his
VW Golf has failed it’s NCT.
Back to our Mercedes, having established
our fault code, it was now necessary to drill
down further to understand the code
definition. The engine management system
on this particular vehicle, given its age,
controls both fuelling and ignition in one.
So the dwell angle, or the amount of time
the coils are being charged under the
control of the engine ECM, had reached its
limits and the engine ECM could not
increase this time any further. This engine
management system utilises three double
ended coils which are mounted directly
between the camshafts, leaving very limited
access for testing the secondary side of the
coils, so instead we focused on the primary
side of the coils
As you can see in figure 1, there was a
textbook primary wave pattern on two of
the coils. Just prior to the firing line you can
see the current limiting hump, indicating
that the coil had become fully charged, and
that the engine ECM had in fact stopped
charging this particular coil.
In figure 2, circumstances are much
different. You can see straight away that
there is no current limiting hump. In fact, 2
ms into the coil charging time, the engine
ECM stopped charging this coil, or what
was more likely happening was that the
insulation on this coil was breaking down.
The breakdown of the coil insulation
created an earth path, and prevented this
one coil from charging properly. Also note
that the burn time was only half the time of
the other two coils, and that there are no
coil oscillations indicating a very discharged
coil. The faulty coil was replaced, the code
was cleared and the emissions returned to
normal.
Although this particular fault was on a 15
year old Mercedes, I’m sure many other
vehicles will be suffering similar faults.
However, we expect the engine
management system can recognize these
faults and then give a text description that
we can actually comprehend and then work
with. I'm sure that as cars get ever more
complicated, the text description of the
fault code will follow the same pattern.
Tech TipsJOBS
JOBS
Two of the coils in the Mercedes were perfect, as can be seen inthis textbook coil primary trace.
Figure 2. One of the coils in the Mercedes was obviously faulty,the result of a short to earth through the coil insulation.
Steve Carter, eXponentia

Autobiz Tech Tips December 2011 >> 13
When a Kia Carnival’s Antilock Brake System (ABS) light came on at speedsgreater than 110kph, the problem seemed easy to fix. It was, but only when theproper tools were used to diagnose the problem. A.D.S explains the proper stepsneeded to find and fix this fault.
The ABS warning light and the trouble codes in
the Kia Carnival indicated that there was a fault
with the left wheel sensor, so the fault appeared
to be easy to solve. The sensor was replaced, but
the ABS warning light still went on when the car
went above 110 kilometers per hour. The newly
installed sensor was itself replaced, thinking that
the new sensor was also defective. This did not fix
the problem. The car was then brought to A.D.S
for investigation because the garage had ran out
of ideas, knowledge and diagnostic gear.
Wheel Speed Sensor FunctionMost wheel speed sensors work similar to
crankshaft and camshaft sensors. The rotating
part, in this case the wheel, has a disc with metal
teeth firmly attached to it. The sensor is equipped
with a coil and a permanent magnet. The coil and
magnet react with the teeth on the rotating disk
by creating a positive current pulse when a tooth is
passing the sensor, and a negative pulse when a
gap between teeth passes the sensor. When the
wheel is stopped, the voltage drops to a set value.
A rotating wheel produces a continuous change in
voltage that indicates exactly how fast the wheel is
rotating. Shorter times between peaks means that
the wheel is rotating faster. The distance between
the sensor and the metal teeth is very important,
because a larger distance between those two parts
produces a smaller magnetic change and a lower
signal voltage. In this case the margin was
between 0.1 and 1.5 millimeters.
ADS delves deeperIn this case, A.D.S quickly affirmed the fault and
saw that a new wheel speed sensor had been
installed properly. A multimeter was used to
measure the generated voltage (always set the
meter to AC) and to check the wiring using the
ohm meter setting. Both measurements showed
normal results. A multimeter alone did not provide
enough information to determine the fault, it was
time for something more.
In situations like this, A.D.S specialists always
use the ATS 5004D automotive oscilloscope for
measuring signals. The scope was used to
continuously measures the wheel speed sensor
signal in action, but only captured the signal and
transfered them to the computer when the
mechanic set the trigger. The large internal
memory on the scope allowed a long
measurement that contained lots of information.
Picture 1 shows the signal of the ABS wheel
sensor at 30 kph, and all appears to be normal.
The 'peak to peak' value of this alternating current
is approximately 3 volts. Typical for this signal is an
offset. The signal is not alternating around 0 volts,
but at about 0.8 volts. An offset voltage is used so
that the Electronic Control Module (ECM) can
better recognize a short-circuit fault in the sensor
wiring.The offset can be measured with a
multimeter when the wheel is not rotating.
At higher speeds, the problem became very
apparent, as shown in picture 2.
Examining the evidenceThe oscilloscope trace showed two strange
anomalies in the signal. Since these anomalies
appear in a fixed pattern, it could not have been
an electronic fault, so it was mechanical. The
repetition was caused by particular teeth on the
ABS disk teeth when they passed in front of the
sensor. The signal also showed a slight amplitude
variation. This is not uncommon, and is caused by
the fact that the ABS disk is not perfectly round.
When the disk was examined the problem was
obvious, some of the teeth on the sensor wheel
were physically damaged.
The finer detailsThe only question that remained was why the
fault was only reported by the ECU at speeds
above 110 kph. The scope trace of the wheel
speed sensor signal at 110kph showed that the
signal amplitude dropped when the broken teeth
passed the sensor was even greater than at low
speeds. At low speed, the peak to peak amplitude
when the broken teeth passed the sensor was 1.5
Volts. At 110 kph the voltage dropped to below
1.0 volt and was great enough for the ECU to
recognise the fault. The ABS ECM sets a limit on
the voltage of the signal coming from the ABS
wheel sensors. This can be a fixed value, where
the signal always must be above or under a
defined value, but it is also possible that a limit is
set dynamically and depends on the speed of the
car. So it can be that at a lower speeds, the limits
are less strict then at a high speed.
ConclusionThe ATS 5004D oscilloscope showed more
information about the wheel speed sensor signal
than could be seen with a multimeter. The
irregularities in the sensor signal as shown by the
scope were very apparent. The irregularities were
rhythmic, not random, leaving only a mechanical
fault as the problem. The damaged wheel speed
disk was replaced and the ABS system was
returned to a fully functional state. Without an
oscilloscope, the cause of the fault would have
been much harder to determine.
Tech TipsJOBS
JOBS
Figure 1: The ABS wheel sensor signal at 30Kph looked to be perfectly normal
Figure 2: The sensor signal at higher speedsshowed an obvious fault, at arrows
Figure 3: Defective teeth on the ABS diskwere good enough for lower speeds
Not a fun Carnival
AUTOMOTIVE DIAGNOSTIC SERVICES

Some problems that your customers come to you for
help with are very easy to diagnose and the proper
solution is easy to carry out. Let’s say a customer
brings in their late model Citroen/Peugeot,
complaining that the engine seems to turn over more
slowly in the morning lately, but seems to be fine at
any other time. You recall that the nights have been
getting colder, and you know they are going to get
colder still. Even though you might expect a battery
to last longer than this original factory battery
apparently has, you suspect that the battery is
nearing the end of it’s life and needs to be replaced.
A quick load test confirms your suspicions, the
battery has lost a good portion of it’s original power
and will not last long with the coming cold weather.
You very appropriately tell your customer that their
battery is nearly spent and needs to be replaced. You
install a proper sized replacement battery, start up
the engine and all seems well. Your customer is
happy to pay for the battery and thinks that that is
the last they will have to worry about the car starting
in the morning. Off they go and everybody is happy,
for now.
But the customer and the car will be back in a few
days, and your once happy customer will not be
happy then. The car will be turning over slowly, or
maybe it won’t even start at all. These are the worst
times for both you and your customer. Each may
suspect that the other has done something wrong.
The customer might think that either they were sold
a poor quality battery, or that the weak battery was
only a symptom, not the cause, of the problem with
their car. You might think that they left their lights on
and that is why the battery is dead again.
Not wanting to offend, you say nothing and
recharge the battery. After it has been charged, you
load test it and all appears to be well.
At this point you might send them back on their way,
but you think that just maybe
their is another problem with the car, so you use your
trusty multi-meter and quickly
discover that at idle, the battery voltage is 12.7V.
Even at 2500 rpm the battery voltage
is still 12.7V.
You come to the conclusion that there is something
wrong with the alternator, so you replace it. But
replacing the alternator will not solve this problem.
From the moment you replaced the battery, you were
sliding down a slope to certain failure.
The original battery was worn out. You correctly
diagnosed that, and it was the only problem with the
car when it was first brought to
you. When the car left your garage the
first time, the battery was in good working order, but
the alternator was never going to charge it. There
was nothing wrong with the alternator.
The problem was that you did not properly install the
battery. After you fastened the cables, it is a vital step
to attach a scan tool
to the car and inform the Engine Control
Unit (ECU) that a new battery has been installed.
Until that has been done, the charging system will
not put any current
back into the battery, assuring that the
battery will soon be discharged and will not start the
car.
Smart ChargingThis Citroen/Peugeot, and many more models on the
road, are equipped with a ‘smart charging’ system. In
the coming years, most cars will have this technology.
Just as many other system and components have
been improved and redesigned to increase reliability
and reduce emissions, the battery has also been
redesigned for modern requirements.
In the battery of a ‘smart charging’ system, there is a
chip that collects data about the current condition of
the battery, such as temperature, state of charge,
current flow, date of manufacture, etc. The
information monitored by the chip is communicated
to the ECU. The ECU makes decisions about when to
recharge the battery and how quickly to do it. The
system is smart enough to turn on and off the
alternator to varying degrees, to put back in just
what is needed to bring the battery to it’s optimum
state with the aim of extending the battery life as
much as possible, nothing more and nothing less.
Providing any more than what is precisely needed
would only overheat the battery and take power
away from the engine, resulting in a shorter battery
life and higher fuel consumption and emissions.
When a new battery is installed, the ECU needs to be
told it’s new. If not, the new chip and it’s data will be
ignored because it has abruptly changed. The system
sees that the data has changed, it can’t reconcile the
change with what it expects to see and will err on
the side of caution, by not charging the battery at all.
The solution to this problem is simple once you know
about this new technology. Technology will effect
everything on a car given enough time. We will have
more about diagnosing smart charging systems and
provide greater detail in a future issue
And that 12.7V at idle or even at 2500 rpm?
Perfectly normal.
14 >> Autobiz Tech Tips December 2011
An incomplete installation Replacing a worn out battery in a car, would probably be ranked asone of the easiest repair jobs any mechanic would be asked to do. Butin some cases, you would be wrong. New technology has come tomost parts of a car, and now it has taken battery replacement to ahigher level. eXponentia’s Steve Carter gives you all the details, foryou to successfully adapt to the new technology.
Tech TipsJOBS
JOBS
Steve Carter, eXponentia

Autobiz Tech Tips December 2011 >> 15
Tech TipsJOBS
JOBS
Nothing is as good asgood information
eXponentia’s Steve Carter recounts troubleshooting faults on three verydifferent cars with one common key to a succesful repair; the availabiltyof vehicle specific information.
Boomerang BMWOur first vehicle was a 2003 BMW X5 4.4L
V8. This particular garage had quite a busy
prestige used car sales area, along with its
four ramps and MOT testing bay. The car in
question had been sold by them some eight
weeks before, but within a few weeks of the
sale, the engine management lamp had come
on. The customer, having spent a considerable
sum of money on this vehicle, went back to
the garage straight away, complaining of the
appearance of the engine management light,
although the car was driving perfectly well.
The garage read the fault codes 26 and 27,
“multi-adaptive fuel correction at end of
control stop”. Not truly understanding the
definition of this fault code, they cleared the
code and sent the customer on her way.
Two weeks later, the customer returned to the
garage with the engine management light
shining brightly. The garage interrogated the
engines ECU, only to reveal exactly the same
fault code they had cleared two weeks
before. This process went on for another four
weeks, with the customer becoming ever
more disillusioned with her purchase. The
garage was reluctant to change any parts, as
they didn't really understand the fault code in
the first place. The fault code relates to
lambda control, and in particular, attempts to
achieve an optimum fuel/air mixture by
altering the opening time of the injector.
With this information, it was possible
to start evaluating some actual values,
which would have the possibility of
generating this particular fault code.
While evaluating the reading from
the air mass sensor, it became
apparent that this was operating
just over its prescribed range at
idle speed. On further
discussions with the
garage,
they confirmed that this part had been
changed recently, but not with a patterned
part. Replacing the air mass sensor brought
the air mass reading into the middle of the
prescribed range at idle, curing the fault.
As you can see from this example, technical
information, whether it is detailed
descriptions and explanations of complex fault
codes, or specific component values for
comparison with actual values, is going to
become ever more vital just to stay one step
behind the vehicle manufacturers.
Just the thing you need to knowThe next two examples show how
information plays a vital part in diagnosing
and correcting faults. These examples do not
require any diagnostic equipment or technical
information, just the exchange of information
between garages.
Making the right connectionThe first was a VW Golf Mk4. When the
ignition was switched on, the driver
information display showed a warning of low
oil level; however this level was satisfactory on
starting the vehicle. The oil warning light
would stay on when the engine was running,
but only as an orange glow rather than red.
Having received several of these puzzling
problems, eventually a solution was found
whereby the car’s ignition is switched off, the
battery is disconnected completely and the
battery’s harnesses are removed from the
battery and bridged together.
Putting out a fickering lightThe second vehicle in question was a Fiat
Punto Marea, and possibly the Stilo (although
I have never encountered the latter
personally). The common factor here is that
they both share the same Marelli engine ECU.
The problem is that the engine management
light flashes rapidly, but does not present any
serial fault codes and the car drives normally.
A rapidly flashing engine management light is
somewhat disconcerting for the driver of the
vehicle.
The solution to this problem is incredibly
simple but without this information, a garage
could spend many hours trying to correct the
fault. The solution? With the engine running
and at operating temperature, the engine
must be revved past 4000 RPM before
allowing to return rapidly to idle RPM. This
process must be conducted four times in
order for the light to be put out. Why does
this simple procedure work? It resets the
crankshaft sensor.
As you can see on all of these examples, the
one common factor shared is information.
Whether this information is gained from
technical publications or from real- life
experiences, it is imperative that the
independent automotive community shares
their information in order to help one another
but more importantly, to remain one step
behind the vehicle manufacturers.
Steve Carter, eXponentia
