technical notebook waterproofing baths and swimming pools€¦ · 01 page 02 1. introduction page...
TRANSCRIPT

Technical Notebook
WATERPROOFING BATHS AND SWIMMING POOLS
ADHESIVES • SEALANTS • CHEMICAL PRODUCTS FOR BUILDING
Technical Notebook
WATERPROOFING BATHS AND SWIMMING POOLS

01
page 02 1. INTRODUCTION
page 02 2. THE HISTORY OF SPA BATHS AND SWIMMING POOLS
page 03 3. DESIGNING AND WATERPROOFING NEW HYDRAULIC STRUCTURES
page 04 3.1 REINFORCED CONCRETE BATHS AND POOLS: SPECIFICATIONS FOR CONCRETE
page 07 3.2 PROTECTING AND WATERPROOFING STRUCTURES
page 10 3.3 SEALING SECOND POURS, STRUCTURAL JOINTS, COMPONENTS FOR WATER CIRCULATION AND FILTRATION UNITS AND LIGHT FITTINGS
page 13 3.4 SUBSTRATE PREPARATION
page 14 3.5 WATERPROOFING THE INSIDE OF BATHS AND SWIMMING POOLS
page 16 4. WATERPROOFING EXISTING STRUCTURES
page 16 4.1 PRELIMINARY ASSESSMENT
page 17 4.2 SUBSTRATE PREPARATION
page 18 4.3 SEALING LIGHT FITTINGS AND COMPONENTS FOR WATER CIRCULATION AND FILTRATION UNITS
page 20 4.4 LEVELLING AND WATERPROOFING SURFACES IN BATHS AND SWIMMING POOLS
page 21 5. INSTALLING CERAMIC, STONE AND MOSAIC
page 21 5.1 INTERACTION BETWEEN LININGS AND REINFORCED CONCRETE
page 21 5.2 ADHESIVES FOR INSTALLING LININGS
page 21 5.2.1 RAPID REPAIR SYSTEM FOR SWIMMING POOLS
page 21 5.3 GROUTING JOINTS
page 21 5.3.1 HOW TO CHOOSE THE CORRECT GROUTING PRODUCT
page 21 5.3.2 CEMENTITIOUS GROUTS
page 21 5.3.2 EPOXY GROUTS
page 21 5.4 SEALING JOINTS
page 29 6. FINISHING THE INSIDE OF BATHS AND SWIMMING POOLS WITH ACRYLIC PAINT

Technical Notebook
WATERPROOFING BATHS AND SWIMMING POOLS
02
1. INTRODUCTIONReinforced concrete structures are often used in the construction of baths
and swimming pools. Since they are often in permanent contact with the
water contained in the bath or pool, as well as with water in the ground,
they must be waterproofed and protected from aggressive agents that
could potentially compromise their durability over the years.
The guidelines proposed in this manual present measures to be taken
during the design phase of hydraulic structures and methods to be
adopted to waterproof both new baths and swimming pools and existing
structures in need of repair.
The aim of this document is to reduce problems caused by incorrect
technical specifications during the design phase or due to errors or a lack
of attention to detail during installation work.
2. THE HISTORY OF SPA BATHS AND SWIMMING POOLS
Since ancient times baths and swimming pools, that is, closed areas of
water in general, have been used for various purposes (swimming pools,
tanks for keeping or breeding fish, storage tanks for water, pools for
medical purposes, etc.). We just have to remember that, as far back as
prehistoric times, people were already immersing themselves in baths of
hot water to reap the benefits of their curative and healing properties.
The practice of bathing in hot water and the construction of special bathing
centres first became common in Ancient Greece thanks to the followers
of Asclepius, the God of medicine and healing, who theorised the health
benefits of water. The first known bath, however, the remains of which may
still be visited today, is the Great Bath built around the III Millennium BC in
Mohenjo-daro in what is today known as Pakistan.
The remains of the Siloam and Bethesda Baths discovered near
Jerusalem, on the other hand, which were mentioned in the Gospel of St.

03
John, date back to the VII Century and III Century BC respectively. These
baths were located near the Temple and historians believe they were used
by worshippers to cleanse themselves before entering the Temple, as
required by religious law at the time.
It was the Romans; however, who came up with the idea of “Thermal”
baths (from the Greek word termòs, which means hot, boiling) as places
with bathing areas where people could enjoy the therapeutic and hygienic
benefits of the water.
These thermal baths or spas, were places where people would meet
and socialise. In fact, apart from having baths, changing rooms and
gymnasiums, the most beautiful spas often had their own theatres and
libraries. Small spas were also part of the more elegant homes.
Amongst the most well known spa structures still visible today are those in
Caracalla (212-217 AD) and Diocletian (298-306 AD).
The fall of the Roman Empire, and the spread of Christianity, led to a
decline in the use of spas, and it wasn’t until Medieval times that spa baths
became fashionable again, although only for therapeutic and hygienic
purposes.
Since the 1800’s until today, pools for swimming have also been
constructed next to spa centres. These structures may now be found
within sports complexes or even as a feature in private homes.
3. DESIGNING AND WATERPROOFING NEW HYDRAULIC STRUCTURES
As far as the construction of swimming pools is concerned, the most
important aspect is normally the aesthetics of the pool such as its
shape, size, the material used to line it, etc. When deciding to build a
hydraulic structure, however, the most important and delicate aspect to
take into consideration is the design of the structure itself. Unfortunately,
errors and omissions during the design phase often lead to unpleasant

Technical Notebook
WATERPROOFING BATHS AND SWIMMING POOLS
04
consequences in terms of watertightness and durability of the structure
over the years. If we were to summarise the most important points to take
into consideration when designing a hydraulic structure they would be as
follows:
• correct mix design;
• protection and waterproofing of the external parts of the structure;
• sealing second pours and components for water circulation and filtration units and light fittings;
• preparation and waterproofing of the internal surfaces of the pool;
• choosing the right materials to finish off the surfaces.
3.1 REINFORCED CONCRETE BATHS AND POOLS: SPECIFICATIONS FOR CONCRETE
As mentioned previously, one of the aspects to take into consideration
when designing structures for swimming pools is the definition of the
correct mix design of the poured concrete. In fact, as far as durability
is concerned, concrete must be designed in accordance with EN 206-
1:2006 standards, which takes into consideration the exposure class of
the surroundings where the structure is located (Table 1). Then, depending
Exposure classes
CLASS DENOMINATION TYPE OF CONDITIONS AND SURROUNDINGS EXAMPLES OF CONDITIONS AND SURROUNDINGS TO WHICH
THE EXPOSURE CLASSES MAY BE APPLIED
1 No risk of corrosion or attack
X0 Concrete with no metallic reinforcement or inserts: exposure to all types of conditions except freeze/thaw cycles, abrasion or chemical attack.Concrete with metallic reinforcement or inserts: very dry.
Concrete in buildings with very low humidity in the surrounding air
2 Corrosion induced by carbonation
For concrete containing metallic reinforcement or inserts exposed to the air and humidity, exposure is classified as follows:Note: the levels of humidity refer to those present in the concrete or material used to cover the steel reinforcement or metal inserts, although in most cases such conditions may be considered as the same as the surrounding environment. In such cases, the classification of the surroundings may be considered sufficient. This may not necessarily apply if there is a barrier between the concrete and its surroundings.
XC1 Dry or permanently wet Concrete in buildings with low relative humidityConcrete permanently immersed in water
XC2 Wet, rarely dry Concrete surfaces in contact with water for long periods of timeMost foundations
XC3 Moderately damp Concrete in buildings with a moderate or high level of relative humidity in the surrounding airExposed concrete outdoors protected from rain
XC4 Cyclically wet and dry Concrete surfaces subjected to contact with water not in exposure class XC2

05
3 Corrosion induced by chlorides except chlorides from seawater
If concrete with metallic reinforcement or inserts is in contact with water containing chlorides not from seawater, including anti-freeze agents, exposure is classified as follows:Note: refer to section 2 of this table for humidity conditions.
XD1 Moderately damp Concrete surfaces exposed to saline mist
XD2 Wet, rarely dry Swimming poolsConcrete exposed to industrial water containing chlorides
XD3 Cyclically wet and dry Parts of bridges exposed to spray containing chloridesFlooringRoad surfaces in car parks
4 Corrosion induced by chlorides present in seawater
If concrete containing metallic reinforcement or inserts is in contact with chlorides present in seawater, or with air carrying salts from seawater, exposure is classified as follows:
XS1 Exposed to saline mist but not in direct contact with sea water Structures on or close to the coast
XS2 Permanently submerged Parts of marine structures
XS3 Zones exposed to waves or high tides Parts of marine structures
5 Attack from freeze/thaw cycles with or without de-icing salts
If wet concrete is exposed to significant attack due to freeze/thaw cycles, exposure is classified as follows:
XF1 Modest saturation of water without anti-freeze agents Vertical concrete surfaces exposed to rain and frost
XF2 Modest saturation of water with anti-freeze agents Vertical concrete surfaces of road structures exposed to frost and mist with anti-freeze agents
XF3 High saturation of water without anti-freeze agents Horizontal concrete surfaces exposed to rain and frost
XF4 High saturation of water with anti-freeze agents or with seawater Bridge joists and road surfaces exposed to anti-freeze agentsConcrete surfaces directly exposed to mist containing anti-freeze agents and frost
6 Chemical attack
If concrete is exposed to attack from chemicals contained naturally in the ground or in the water in the ground with the characteristics defined in table 2, exposure is classified as follows. The classification of seawater depends on its geographical location. Apply the classification valid for the area where the concrete is used.Note: a special study of the area may be required in the following cases to establish the exposure conditions to be applied:– if the limits are not within those defined in table 2;– if there are other aggressive chemicals present;– if the ground or water are polluted by chemicals;– if there is a combination of fast flowing water and chemical substances contained in table 2.
XA1 Chemically weak aggressive surroundings according to table 2
XA2 Chemically weak aggressive surroundings according to table 2
XA3 Chemically weak aggressive surroundings according to table 2
Table 1 - Taken from EN 206-1:2006 with indication of environmental exposure classes
Technical Notebook
WATERPROOFING BATHS AND SWIMMING POOLS
06
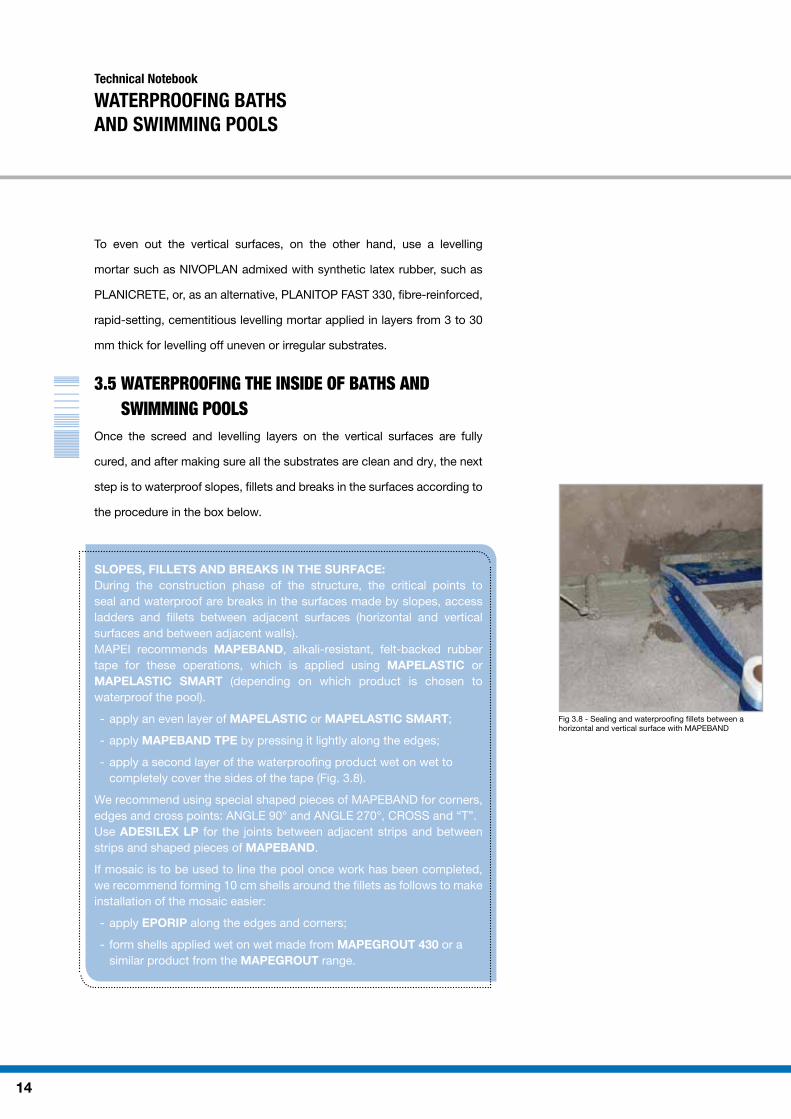
on the exposure class, the limit values for the composition and properties
of the concrete are specified (maximum water/cement ratio, minimum
strength class and minimum cement content) (Table 2).
Also, a good concrete mix with a coefficient of permeability (k) lower or
equal to 1x10-11 m/s, and resistance to the penetration of water of up to
50 mm and an average of up to 20 mm (in compliance with EN 12390-8
standards), may be considered theoretically impermeable. However, under
real conditions, it is very difficult to mix concrete with a perfect structure
throughout its entire mass, in that shrinkage during the curing phase,
settling of the foundations and small irregularities generate cracks that
form a preferential passage for water.
To overcome this problem, MAPEI recommends using a super-plasticising
Recommended limit values for the composition and properties of concrete
EXPOSURE CLASSES
No risk of corrosion and/or attack
Corrosion due to carbonation Corrosion due to chlorides Attack by freeze/thaw cycles Aggressive chemical environments
Sea water Other chlorides (not from sea water)
X0 XC1 XC2 XC3 XC4 XS1 XS2 XS3 XD1 XD2 XD3 XF1 XF2 XF3 XF4 XA1 XA2 XA3
MAXIMUM WATER/CEMENT RATIO
- 0.65 0.60 0.55 0.50 0.50 0.45 0.45 0.55 0.55 0.45 0.55 0.55 0.50 0.45 0.55 0.50 0.45
MINIMUM STRENGTH CLASS
C12/15 C20/25 C25/30 C30/37 C30/37 C30/37 C35/45 C35/45 C30/37 C30/37 C35/45 C30/37 C25/30 C30/37 C30/37 C30/37 C30/37 C35/45
MINIMUM CEMENT CONTENT (KG/M³)
- 260 280 280 300 300 320 340 300 300 320 300 300 320 340 300 320 360
MINIMUM AIR CONTENT (%)
- - - - - - - - - - - - 4.0A) 4.0A) 4.0A) - - -
OTHER REQUIREMENTS
Aggregates in compliance with EN 12620 with sufficient resistance to freeze/thaw cycles
Cement resistant to sulphatesb)
a) When the concrete does not contain added air, its performance must be verified by means of a standard test method compared with a type of concrete with proven resistance to freeze/thaw cycles for the relative exposure class.
b) If the presence of SO2 puts it in exposure classes XA2 and XA3, it is essential to use a type of cement resistant to sulphates. If the cement is classified as having moderate or high resistance to sulphates, it must be used in exposure class XA2 (and in exposure class XA1 if applicable) and cement with high resistance to sulphates must be used in exposure class XA3.
Table 2 - From EN 206-1: 2006 with indications of limit values for the composition and properties of concrete

07
admixture from the DYNAMON range. The DYNAMON system is based on
DPP (Designed Performance Polymer) technology, a new chemical process
which, through total monomer design (know-how exclusive to MAPEI),
allows the characteristics of the admixture to be modulated according to
the specific performance requirements of the concrete employed. Concrete
made with products from the DYNAMON range is easy to apply while fresh
and offers very high mechanical performance when hardened.
3.2 PROTECTING AND WATERPROOFING STRUCTURESEven if concrete is well made it will still need to be protected from
“aggressive agents” that would otherwise accelerate deterioration of the
element or structure and so reduce its durability over the years. Water
from the ground, as with the water in a bath or pool, is naturally aggressive
and, if it penetrates into the concrete, will weaken the structure. During the
design phase, therefore, another very important aspect to be taken into
consideration is the height of the water table (constant or temporary) in the
area in which the structure is built. Once this evaluation has been carried
out, it will be possible to define both the most suitable type of foundation
and the most appropriate waterproofing system.
MAPEI has a wide range of waterproofing products available to guarantee
protection of the structure, as well as being waterproof.
When building hydraulic structures below ground level, where there is ground
water, we recommend waterproofing the structure using MAPEPROOF or
MAPEPROOF LW bentonite sheets. These sheets are composed of two
layers of polypropylene geo-textile fabric needle-punched together with
a uniform layer of natural sodium bentonite sandwiched between the two
layers. One of the properties of bentonite is that it expands upon contact
with damp and moisture to form a seamless, impermeable, protective layer
that completely adheres to the structure. MAPEPROOF bentonite sheets
may be used to waterproof horizontal surfaces before pouring concrete
and vertical walls after pouring.
Below is a brief description of how to apply these products.

Technical Notebook
WATERPROOFING BATHS AND SWIMMING POOLS
08
• Waterproofingbelowfoundationslabspriortopouring
After fastening the formwork around the perimeter, roll out sheets of
MAPEPROOF with the lower geo-textile fabric (dark side) against the
inner edges and the regulating layer of concrete used to level off the
surface of the ground underneath. When rolling out the sheets, overlap
the edges of each sheet by 10 cm and fasten them in place with
MAPEPROOF CD nails and polyethylene washers approximately every
30 cm (Fig. 3.1).
Position the reinforcement for the concrete and cast the foundation
slab. Once the foundation slab is fully cured, pour the concrete for the
side walls making sure that second pours are sealed with beads of
hydro-expansive material, as described in the next section.
• Waterproofingsidewallsafterpouring
Once the concrete for the side walls has been poured and has fully
cured, level off any uneven or irregular areas in the substrate with
products from the MAPEGROUT or PLANITOP range by MAPEI.
The top of the walls must be treated with a 50 cm wide band of
MAPELASTIC FOUNDATION.
Then roll out the MAPEPROOF sheets with the upper side of the geo-
textile fabric (white non-woven fabric) against the reinforced concrete
wall and fasten the sheets in place with MAPEPROOF CD every 50 cm
(Fig. 3.2).
In order to ensure a continuous, perfect waterproofing layer, the sheets
must be overlapped at the foot of the structure with the waterproofing
layer underneath the foundation slab (Fig. 3.3).
Once the vertical walls have been waterproofed, apply a layer of
250 g/m² non-woven fabric to protect the waterproofing system when
back filling.
Fig. 3.1 - Waterproofing system under a foundation slab before pouring the concrete

09
Fig. 3.3 - Waterproofing treatment along the base of the structure
The walls may also be waterproofed after pouring with MAPELASTIC
FOUNDATION, two-component, elastic cementitious mortar specific
for waterproofing concrete subjected to negative and positive hydraulic
lift (up to 1.5 atm. or a 15 metre head of water). Before applying
MAPELASTIC FOUNDATION we recommend cleaning the surfaces
thoroughly, taking particular care to remove all traces of form-release
oils, dirt and any material or substance that could affect adhesion of
the waterproofing product. The ribs from the formwork must be broken
off and grouted with ADESILEX PG4 two-component, thixotropic epoxy
adhesive. While the adhesive is still wet, dust the surface with quartz
sand to create a surface that is rough enough to guarantee a good grip
for the next waterproofing system. Also, any peaks must be removed
and then smoothed over by applying a product from the MAPEGROUT
or PLANITOP range. Once this layer is fully cured, and before applying
MAPELASTIC FOUNDATION, prime the surface with PRIMER 3296
acrylic, dust-repellent consolidating primer in water dispersion to
Fig. 3.2 - MAPELASTIC FOUNDATION and MAPEPROOF overlapped and hemmed to waterproof a vertical wall after pouring concrete
➀ Concrete wall
➁ PRIMER 3296
➂ MAPELASTIC FOUNDATION
➃ MAPEPROOF MASTIC
➄ MAPEPROOF CD
➅ MAPEPROOF
➆ Ground
1
2
34
5
67

Technical Notebook
WATERPROOFING BATHS AND SWIMMING POOLS
10
improve its adhesion to the substrate. Dilute the primer 1:1 with water
and apply with a brush or roller.
After preparing the substrates as specified, apply a layer of MAPELASTIC
FOUNDATION minimum 2 mm thick with a brush, roller or by spray.
3.3 SEALING SECOND POURS, STRUCTURAL JOINTS, COMPONENTS FOR WATER CIRCULATION AND FILTRATION UNITS AND LIGHT FITTINGS
Another important aspect to take into consideration during the design
phase of a swimming pool is how to seal any breaks in the surfaces that
could potentially provide a preferential passage for water, such as:
• second pours;
• structural joints;
• pipe work;
• components for water recirculation units;
• light fittings.
MAPEI has a series of products available that have been specifically
developed to overcome this type of problem, such as IDROSTOP,
IDROSTOP B25 and IDROSTOP SOFT, pre-formed hydro-expansive tape,
which is used to seal second pours and the interface between through
elements and concrete.
IDROSTOP is an acrylic polymer-based hydro-expanding jointing product,
used preferably in the presence of salt water. For fresh water, on the other
hand, it is better to use IDROSTOP B25 and IDROSTOP SOFT. These are
also hydro-expansive products, the first made from a mixture of natural
sodium bentonite and polymers and the latter from a mixture of natural
sodium bentonite and butyl rubber.
When these jointing materials come into contact with water they expand
and, thanks to this special characteristic, are able to form a seal in second
pours, small localised gravel clusters and gaps that form between a
through penetration element and the poured concrete. Below are typical
application examples for IDROSTOP SOFT and IDROSTOP B25.

11
Fig. 3.4 - An example of how to seal a through pipe with a ring of IDROSTOP SOFT bonded with ULTRABOND MS RAPID and MAPEPROOF bentonite sheet trimmed to the shape of the pipe
Fig. 3.5 - An example of how to seal a second pour by fastening a bead of IDROSTOP B25 with nails at the mid-point of the poured concrete
1
23
4
5
6
7
9
8 11
10
3
12
➀ Reinforced concrete foundation slab
➁ Protective concrete layer with the same Rck as the foundation slab concrete
➂ MAPEPROOF
➃ Regulating layer of lean concrete
➄ Ground
➅ Reinforced concrete wall
➆ IDROSTOP 25
➇ MAPEPROOF MASTIC
➈ MAPELASTIC FOUNDATION
➉ Protective drainage layer
�11 Fixing rods
�12 PRIMER 3296
➀ Reinforced concrete structure
➁ IDROSTOP SOFT
➂ MAPEPROOF
➃ Through pipe
➄ MAPEPROOF MASTIC
EXTERNAL INTERNAL

Technical Notebook
WATERPROOFING BATHS AND SWIMMING POOLS
12
If structural joints need to be included during the design phase, they may
be waterproofed by following the procedure in the box below.
STRUCTURAL JOINTS:Waterproof the joints by placing MAPEBAND TPE tape (an acronym for Thermo-Plastic Elastomer) along the joints. The tape is 1 mm thick with edges reinforced with polyester fabric and must be bonded in place as follows:
- apply an even layer of ADESILEX PG4;
- apply MAPEBAND TPE by pressing it lightly along the edges;
- apply a second layer of ADESILEX PG4 wet on wet to completely cover the strip of fabric and dust the surface of the product while still wet with 0.5 mm spheroid quartz sand;
- once ADESILEX PG4 has fully hardened, remove any loose quartz and apply MAPELASTIC FOUNDATION or MAPELASTIC SMART.
Fig. 3.6 - An example of how to seal a second pour by fastening a bead of IDROSTOP B25 in place with nails at the mid-point of the poured concrete
6
4
2
5
3
1
7 8
➀ Ground
➁ Regulating layer of lean concrete
➂ MAPEPROOF
➃ Protective concrete layer with the same Rck as the foundation slab concrete
➄ Reinforced concrete wall
➅ Adjacent reinforced concrete wall
➆ IDROSTOP 25
➇ Fixing rods

13
Particular attention must also be paid during the design phase to
light fittings and components used for water circulation units, such as
skimmers.
These components must be placed in position before pouring the
concrete.
To make sure the interface between the components and the poured
concrete is completely sealed, MAPEI recommends applying EPORIP
two-component, solvent-free epoxy adhesive on the components and
then dusting them with quartz sand to make sure there is a good grip
between the component and the next pour of concrete (Fig 3.7).
3.4 SUBSTRATE PREPARATIONOnce the structure of the swimming pool has been completed and the
external surfaces have been waterproofed, the next phase is to prepare
and even out the internal horizontal and vertical substrates.
Before carrying out any further operation, the first thing to do is clean all
the surfaces by high pressure hydro-blasting to remove surface bleeding
and traces of form-release compounds. It is important that the substrates
are clean and have no loose parts, traces of dust, residues from previous
operations or any other product or substance that could impede good
adhesion of the next products to be applied. Once the substrates have
been prepared, level off the bottom of the pool by installing a compact,
bonded screed sufficiently strong for the waterproofing system and lining
material for the pool.
Apply a layer of bonding slurry on the bottom of the pool made from
PLANICRETE mixed with water and the same binder used to make the
screed in the following proportions: PLANICRETE 250 g, water 250 g and
TOPCEM 3 kg. Using the wet on wet technique, apply the screed made
from TOPCEM, cementitious binder for normal-setting, quick-drying,
controlled-shrinkage screeds or TOPCEM PRONTO, ready-mixed mortar
for normal-setting, quick-drying (4 hours), controlled-shrinkage screeds,
class CT-C30-F6-A1fl according to EN 13813.
Fig. 3.7 - Applying a coat of EPORIP on components for a water recirculation unit
Technical Notebook
WATERPROOFING BATHS AND SWIMMING POOLS
14
To even out the vertical surfaces, on the other hand, use a levelling
mortar such as NIVOPLAN admixed with synthetic latex rubber, such as
PLANICRETE, or, as an alternative, PLANITOP FAST 330, fibre-reinforced,
rapid-setting, cementitious levelling mortar applied in layers from 3 to 30
mm thick for levelling off uneven or irregular substrates.
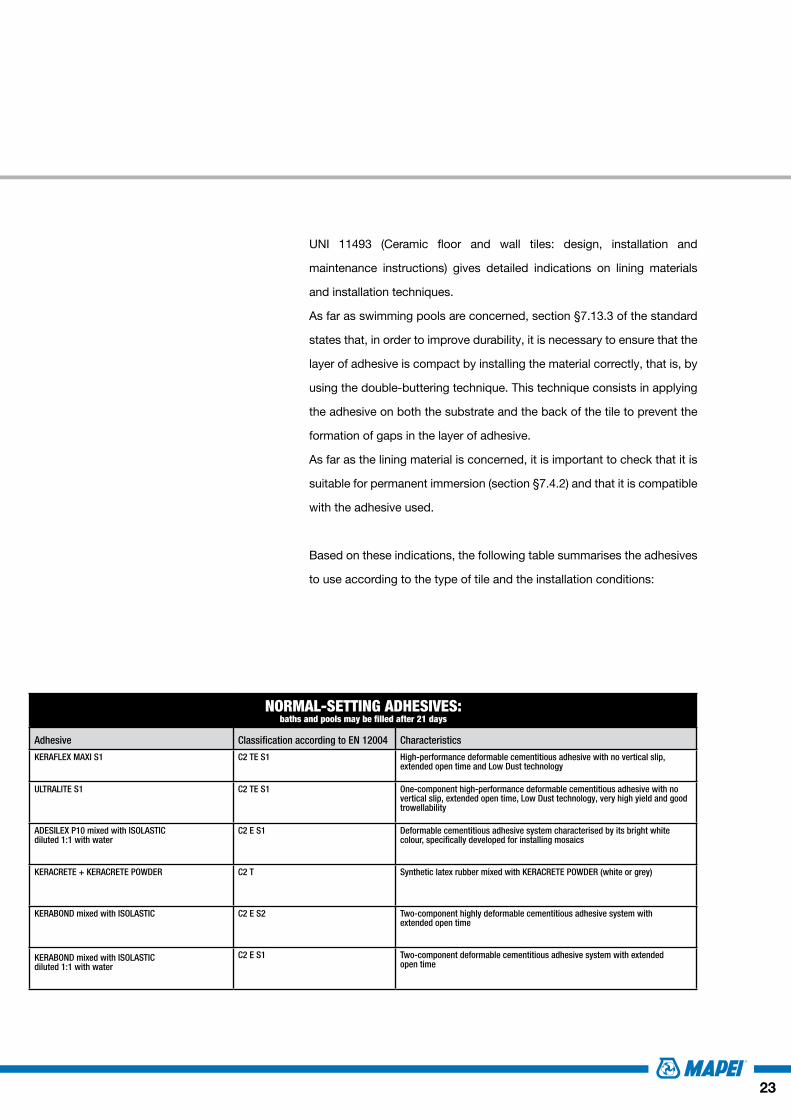
3.5 WATERPROOFING THE INSIDE OF BATHS AND SWIMMING POOLS
Once the screed and levelling layers on the vertical surfaces are fully
cured, and after making sure all the substrates are clean and dry, the next
step is to waterproof slopes, fillets and breaks in the surfaces according to
the procedure in the box below.
SLOPES, FILLETS AND BREAKS IN THE SURFACE:During the construction phase of the structure, the critical points to seal and waterproof are breaks in the surfaces made by slopes, access ladders and fillets between adjacent surfaces (horizontal and vertical surfaces and between adjacent walls).MAPEI recommends MAPEBAND, alkali-resistant, felt-backed rubber tape for these operations, which is applied using MAPELASTIC or MAPELASTIC SMART (depending on which product is chosen to waterproof the pool).
- apply an even layer of MAPELASTIC or MAPELASTIC SMART;
- apply MAPEBAND TPE by pressing it lightly along the edges;
- apply a second layer of the waterproofing product wet on wet to completely cover the sides of the tape (Fig. 3.8).
We recommend using special shaped pieces of MAPEBAND for corners, edges and cross points: ANGLE 90° and ANGLE 270°, CROSS and “T”.Use ADESILEX LP for the joints between adjacent strips and between strips and shaped pieces of MAPEBAND.
If mosaic is to be used to line the pool once work has been completed, we recommend forming 10 cm shells around the fillets as follows to make installation of the mosaic easier:
- apply EPORIP along the edges and corners;
- form shells applied wet on wet made from MAPEGROUT 430 or a similar product from the MAPEGROUT range.
Fig 3.8 - Sealing and waterproofing fillets between a horizontal and vertical surface with MAPEBAND

15
The waterproofing product must only be applied once all the breaks in the
surface have been waterproofed.
MAPEI recommends two-component, elastic cementitious mortar for
waterproofing hydraulic structures, such as: MAPELASTIC or MAPELASTIC
SMART.
The main characteristics of these two products are:
• excellent adhesion;
• high elasticity which is maintained over the years;
• excellent crack-bridging capacity;
• good workability;
• easy to apply.
The choice of whether to use MAPELASTIC rather than MAPELASTIC
SMART depends on where the bath or pool is constructed. We recommend
using MAPELASTIC for waterproofing pools with the structure below
ground level. If the structure is built above ground, on the other hand (such
as covered or indoor pools), in order to withstand any movements in the
whole structure, we recommend using MAPELASTIC SMART.
Substrates must be clean and dry before applying MAPELASTIC. Spread
two layers of the product with a smooth or notched trowel to form a layer
with a total thickness of at least 2 mm, with MAPENET 150 alkali-resistant
glass fibre mesh embedded between the layers to increase its flexibility
and guarantee its crack-bridging capacity for cracks up to 1.5 mm wide.
If a more fluid product that is easier to apply with a roller or brush is
preferred, we recommend using MAPELASTIC SMART. This must also be
applied to form a layer at least 2 mm thick, but in this case place MAPETEX
SEL perforated non-woven polypropylene fabric in the product and press
it down with a flat trowel to make sure it is completely embedded. When
MAPELASTIC SMART is used in combination with MAPETEX SEL, it
follows the movements of structures and has a crack-bridging capacity of
more than 3 mm.
Apply the second coat of MAPELASTIC or MAPELASTIC SMART around
Fig. 3.9 - Waterproofing treatment with MAPELASTIC SMART and MAPETEX SEL
Fig. 3.10 - Waterproofing treatment with MAPELASTIC SMART and MAPETEX SEL

Technical Notebook
WATERPROOFING BATHS AND SWIMMING POOLS
16
6 hours after the first one, and in all cases only when the first coat has
completely dried.
Once the waterproofing layer is completely dry (4-5 days), the tiling
material may be installed.
Depending on which type of material is used to tile the bath or pool
(ceramic, stone or mosaic), MAPEI has a suitable product available for
bonding and grouting the material.
To choose the most suitable product, refer to sections 5 and 6 of this
technical notebook.
4. WATERPROOFING EXISTING STRUCTURESUp to this point of the manual we have only taken into consideration how
to protect and waterproof new structures. Very often, however, problems
are encountered with the impermeability of existing structures for which,
during the design phase, a waterproofing system had not been included.
In other cases, on the other hand, repair work must be carried out on
a waterproofing system that has already been applied but is no longer
watertight.
For repair work, as with new builds, there are certain fundamental points to
be taken into consideration, such as:
• a preliminary assessment of the substrates;
• preparation of the surfaces;
• sealing light fittings and components for water circulation and filtration units;
• levelling and waterproofing baths and pools;
• choosing the right materials to finish off the surfaces.
4.1 PRELIMINARY ASSESSMENTBefore installing onto existing structures a thorough, preliminary
assessment must be carried out to identify the condition and strength
of the structure and the flatness of the substrates on which work is to

17
be executed. This operation is extremely important in that it enables the
surveyor to define the most suitable method to restore the soundness of
the substrates and to identify the most suitable operations and products
to waterproof the structure.
4.2 SUBSTRATE PREPARATIONAs with new builds, the first operation is to prepare the substrates correctly.
Before carrying out this operation the existing lining material, whether it is
ceramic, PVC or another type of material, must be completely removed.
Once the lining has been completely removed it will then be possible to
check the condition of the substrates and, as a result, restore them to a
monolithic state. If there are cracks in the screed, for example, they must
be sealed. Open the cracks (with a hand-grinder for example) and, after
removing all traces of dust, seal them by filling them with EPORIP dusted
with quartz sand while still wet to create a surface with a good grip.
If reinforcing bars are exposed on the vertical surfaces, we recommend
following the procedure in the box below.
EXPOSED REINFORCING BARS:After removing the existing lining material from inside the pool and hydro-blasting the substrates, it will probably be necessary to coat exposed reinforcing bars.
- demolish the layer of deteriorated concrete to fully expose the reinforcing bars;
- clean the rust from the reinforcing bars;
- apply a coat of MAPEFER 1K, one-component, anti-corrosion cementitious mortar;
- reinstate the areas where the concrete has been removed with MAPEGROUT 430, medium-strength, fibre-reinforced, compensated-shrinkage, fine-grained cementitious mortar mixed with 0.25% of MAPECURE SRA curing agent with the capacity to reduce hydraulic shrinkage and the formation of hair-line cracks.
Fig. 4.1 - Applying a coat of MAPEFER 1K on reinforcing bars

Technical Notebook
WATERPROOFING BATHS AND SWIMMING POOLS
18
Another operation that needs to be carried out before applying the
waterproofing system is to seal the second pours and fillet joints between
horizontal and vertical surfaces and between adjacent walls. To carry
out this operation follow the procedure in section 4.3 for sealing through
pipes.
All the surfaces must then be thoroughly cleaned as described in section
3.4, which discusses the preparation of substrates in new builds.
4.3 SEALING LIGHT FITTINGS AND COMPONENTS FOR WATER CIRCULATION AND FILTRATION UNITS
The risk of an element or component passing through the structure of a
swimming pool forming a preferential passage for water is just as high in
new builds as in pools under repair. That is why it is very important that
any breaks between these elements or components and the reinforced
concrete are sealed.
The following drawings illustrate how to seal components for water
circulation and filtration units and light fittings correctly.
• make a groove around the through element (6 cm deep);
• remove all traces of dust from the groove;
• extrude a bead of MAPEPROOF SWELL, one-component hydro-expanding paste for waterproof seals in the bottom of the groove (Fig. 4.2);
• apply a coat of EPORIP, two-component, solvent-free epoxy adhesive on the surface of the groove;
• reinstate the substrate with MAPEGROUT 430, fine-grained, fibre-reinforced, compensated-shrinkage thixotropic mortar (Fig. 4.3).
Fig. 4.3 - Reintegrating a substrate with MAPEGROUT 430
Fig. 4.2 - Forming a seal with MAPEPROOF SWELL

19
Another critical point to take into consideration before applying the
waterproofing product is the anchor points for ladders and handrails.
To ensure a continuous waterproofing layer, we recommend drilling the
holes and inserting the clamps for the ladders and handrails and then using
MAPEFIX VE SF styrene-free, polyester resin-based chemical anchor for
heavy loads.
Once all the anchor points are in place, sand all the metallic fittings
to remove traces of loose material or material which is not well bonded
and apply a coat of EPORIP, two-component, solvent-free epoxy
adhesive.
While the resin is still wet, dust the surface with quartz sand to create a
surface that is rough enough to help adhesion of the elastic, cementitious
waterproofing mortar to be applied later.
Fig 4.4 - An example of how to seal a water recirculation outlet on the bottom of a swimming pool
123 456 78
➀ Reinforced concrete structure
➁ MAPEPROOF SWELL
➂ MAPEGROUT 430
➃ MAPELASTIC SMART + MAPETEX SEL
➄ KERAFLEX MAXI S1
➅ Lining
➆ MAPESIL AC
➇ Drain

Technical Notebook
WATERPROOFING BATHS AND SWIMMING POOLS
20
4.4 LEVELLING AND WATERPROOFING SURFACES IN BATHS AND SWIMMING POOLS
Once all the critical points have been sealed, level off all the horizontal
and vertical surfaces so they are flat and ready for the waterproofing
product.
The operations to carry out are as follows:
1. level off the bottom of the bath or pool and install a screed bonded to the structure;
2. level off the vertical walls;
3. seal and waterproof the fillet joints between breaks in the surface and slopes;
4. waterproof all the surfaces.
To carry out all these operations correctly follow the procedure described
in sections 3.4 and 3.5.
Fig. 4.6 - An example of how to seal a light fitting on the side of a swimming pool
Fig. 4.5 - Styrene-free, vinylester resin-based chemical anchor for heavy loads
1
2
3
4
5
6
7
8
➀ Reinforced concrete foundation slab
➁ MAPEPROOF SWELL
➂ MAPEGROUT 430
➃ MAPELASTIC + MAPENET 150
➄ KERAFLEX MAXI S1
➅ Lining
➆ MAPESIL AC
➇ Light fitting

21
5. INSTALLING CERAMIC, STONE AND MOSAIC
To ensure the durability over the years of structures permanently in
contact with water, such as baths and swimming pools, or structures that
are exposed to moist or damp surroundings such as in spa centres, we
recommend tiling them with ceramic, stone or mosaic once they have
been waterproofed with MAPELASTIC or MAPELASTIC SMART.
When choosing which type of material to use, it is very important to take
into consideration that it must be able to resist the chemical and mechanical
stresses to which structures permanently immersed in water are exposed.
MAPEI has a wide range of adhesives available to bond tiles in place.
These products, together with their application techniques, are described
below.
5.1 INTERACTION BETWEEN LININGS AND REINFORCED CONCRETE
The load-bearing structure of a swimming pool and the material used to
line the pool form an integrated system that is subjected to various types
of stress, such as hydrostatic pressure (which is amplified when the pool
is emptied), temperature variations, shrinkage of the reinforced concrete
structure, settling of the ground, etc.
Variations in the interaction between the lining and the structure of the bath
or pool are the main cause of their deterioration (Fig. 5.1).
The installation system, therefore, plays a fundamental role in absorbing
the differential strains and stresses that are generated between the various
layers.
It is important, therefore, that the right material is chosen to ensure the
lining to guarantee its durability and reduce the frequency of maintenance
or repairs.Fig. 5.1 - Tiles detached from a substrate due to
compressive stresses

Technical Notebook
WATERPROOFING BATHS AND SWIMMING POOLS
22
We recommend using a deformable or highly deformable adhesive over
the waterproofing layer, depending on the format of tile used (see section
5.2). A certain amount of deformability is required because the adhesive
must be able to absorb the deformations that the lining material has to
withstand.
5.2 ADHESIVES FOR INSTALLING LININGSBefore installing the lining, we suggest checking that the waterproofed
bath or pool is watertight. Once MAPELASTIC or MAPELASTIC SMART
is fully cured, fill the bath or pool with water.
Once the watertightness and, therefore, the correct application of the
waterproofing material have been checked, drain off all the water and
install the lining material.
MAPEI has a wide range of products available to install lining material in
baths and pools, and the choice of which product to use depends on
various factors, such as:
• the format and type of material to be installed;
• the weather conditions when the material is installed;
• the schedule before the bath or pool is put into service.
• the chemical and mechanical stresses when the bath or pool are in service.
Adhesives used to install linings in baths and pools must meet the
following requirements (in compliance with EN 12004) (Figs. 5.2 - 5.3 -
5.4):
• class C2 to guarantee high adhesion strength to non-absorbent substrates, including when immersed permanently in water;
• class S1 or S2, which means deformable or highly deformable respectively, so that it matches the deformability characteristics of the waterproofed substrate and withstands the mechanical or thermal stresses to which the bath or pool is subjected.
Fig. 5.3 - Installing the lining on the bottom of a swimming pool
Fig. 5.2 - Bonding tiles to a wall with KERABOND mixed with ISOLASTIC
Fig. 5.4 - Installing a mosaic lining
23
UNI 11493 (Ceramic floor and wall tiles: design, installation and
maintenance instructions) gives detailed indications on lining materials
and installation techniques.
As far as swimming pools are concerned, section §7.13.3 of the standard
states that, in order to improve durability, it is necessary to ensure that the
layer of adhesive is compact by installing the material correctly, that is, by
using the double-buttering technique. This technique consists in applying
the adhesive on both the substrate and the back of the tile to prevent the
formation of gaps in the layer of adhesive.
As far as the lining material is concerned, it is important to check that it is
suitable for permanent immersion (section §7.4.2) and that it is compatible
with the adhesive used.
Based on these indications, the following table summarises the adhesives
to use according to the type of tile and the installation conditions:
NORMAL-SETTING ADHESIVES:baths and pools may be filled after 21 days
Adhesive Classification according to EN 12004 Characteristics
KERAFLEX MAXI S1 C2 TE S1 High-performance deformable cementitious adhesive with no vertical slip, extended open time and Low Dust technology
ULTRALITE S1 C2 TE S1 One-component high-performance deformable cementitious adhesive with no vertical slip, extended open time, Low Dust technology, very high yield and good trowellability
ADESILEX P10 mixed with ISOLASTICdiluted 1:1 with water
C2 E S1 Deformable cementitious adhesive system characterised by its bright white colour, specifically developed for installing mosaics
KERACRETE + KERACRETE POWDER C2 T Synthetic latex rubber mixed with KERACRETE POWDER (white or grey)
KERABOND mixed with ISOLASTIC C2 E S2 Two-component highly deformable cementitious adhesive system with extended open time
KERABOND mixed with ISOLASTICdiluted 1:1 with water
C2 E S1 Two-component deformable cementitious adhesive system with extended open time

Technical Notebook
WATERPROOFING BATHS AND SWIMMING POOLS
24
5.2.1 RAPID REPAIR SYSTEM FOR SWIMMING POOLS
Thanks to MAPEI’s long experience in building swimming pools, a
complete installation system has been developed so that swimming pools
can be put into service quickly.
The system includes a complete line of products to level, even
out and create substrates, waterproofing mortars to guarantee the
watertightness of structures, adhesives to install ceramic and glass
mosaic tiling, special mortars to grout linings and sealants to seal
expansion joints.
The following products in particular are worth a mention:
• PLANITOP FAST 330 rapid-setting, fibre-reinforced cementitious
mortar for levelling off surfaces in layers from 3 to 30 mm thick.
MAPELASTIC or MAPELASTIC SMART can then be applied over
PLANITOP FAST 330 after just 24 hours;
• TOPCEM PRONTO and MAPECEM PRONTO, normal-setting and
rapid-setting cementitious mortars respectively, used to make
screeds for the bottom of swimming pools;
• MAPELASTIC and MAPELASTIC SMART, flexible cementitious
waterproofing systems for perfect waterproofing work;
• GRANIRAPID and ELASTORAPID for rapid installation of ceramic
tiles and glass mosaics;
• ULTRACOLOR PLUS rapid grouting mortar (available In
30 different colours);
• MAPESIL AC acetic silicone sealant for sealing expansion joints
available in the same range of colours as ULTRACOLOR PLUS.
Linings for swimming pools installed using the products above may be
filled with water, and so be ready for use, within as little as 48 hours
of applying ULTRACOLOR PLUS and within just 3 days of installing
the tiling.

25
To install and grout linings in environments subjected to aggressive
chemical agents and to protect the waterproofing system and, as
a result, the concrete itself, we recommend using reactive epoxy
adhesives classified R2 according to EN 12004, such as KERAPOXY or
KERAPOXY DESIGN. These products may also be used where the lining
is fibreglass.
5.3 GROUTING JOINTSWhen installing the tiling the joint between each tile must be the right size,
as indicated in UNI 11493 (butted tiles are not permitted). Joints are not
just for decorative purposes; they are required to reduce the rigidity of the
lining and make it more resistant to deformations.
It is important to state that, no matter what material a grouting product
is made from, it cannot be considered a substitute for a complete,
continuous substrate waterproofing system made from MAPELASTIC or
MAPELASTIC SMART.
In fact, in a swimming pool, since cementitious grout is porous, a certain
amount of water will always tend to penetrate through it, and even
epoxy grout, albeit completely non-absorbent and impermeable, cannot
guarantee that a lining is completely leak-proof when it is subjected to the
stresses it has to withstand under normal conditions.
RAPID-SETTING ADHESIVES:baths and pools may be filled after 3 days
Adhesive Classification according to EN 12004 Characteristics
GRANIRAPID C2 F S1 Two-component high-performance deformable rapid-setting and hydrating cementitious adhesive
ELASTORAPID C2 FTE S2 Two-component high-performance highly-deformable rapid-setting and hydrating cementitious adhesive with extended open time and no vertical slip
ULTRALITE S1 QUICK C2 FT S1 One-component high-performance deformable rapid-setting and hydrating deformable lightweight cementitious adhesive with no vertical slip, high wetting capacity, very high yield and good trowellability

Technical Notebook
WATERPROOFING BATHS AND SWIMMING POOLS
26
5.3.1 HOW TO CHOOSE THE CORRECT GROUTING PRODUCT
Grouting materials are divided into two main categories according to
EN 13888, depending on their chemical nature; CG stands for cementitious
grouts while RG stands for reactive grouts.
The most suitable product must be chosen on the basis of the following:
• the type of water in the bath or pool;
• the schedule before the bath or pool is put into service;
• the type and frequency of sanitation treatments; certain treatments may have an influence on the durability of the grout.
5.3.2 CEMENTITIOUS GROUTS
Cementitious products are the type most commonly used to grout joints.
In compliance with the classification of grouts defined in EN 13888, we
recommend using products from class CG2 (improved cementitious grouts)
and class WA, that is, reduced water absorption and high resistance to
abrasion (Fig. 5.5).
MAPEI products in these categories are shown in the following table:
Fig. 5.6 - Grouting the lining with KERAPOXY CQ
CEMENTITIOUS GROUTS:Product Classification according to EN 13888 CharacteristicsULTRACOLOR PLUS CG2 WA High-performance polymer-modified mortar for grouting joints from 2 to
20 mm wide
With BioBlock® technology (resistant to the formation of mould) to impede the formation and proliferation of various types of mould on the surface of grout in damp conditions to safeguard the hygiene of the environment and, obviously, its final appearance and finish
Anti-efflorescence
With DropEffect® technology (high water repellence capacity) to guarantee high colour stability and excellent cleanability
Rapid-setting; baths and pools may be filled 48 hours after grouting
Available in 30 colours
KERACOLOR GG FUGOLASTIC CG2 WA Cementitious mortar mixed with FUGOLASTIC to increase strength and resistance to abrasion and reduce porosity and water absorptionWith DropEffect® technology (high water repellence capacity) to guarantee high colour stability and excellent cleanabilityAvailable in 17 colours
KERACOLOR FF
Fig. 5.5 - Grouting the lining with ULTRACOLOR PLUS

27
5.3.3 EPOXY GROUTS
Thanks to their high strength and high resistance to chemicals, epoxy
grouts, classified RG according to EN 13888, are generally more durable
compared with traditional cementitious grouts.
That is why they are to be preferred in the following cases:
• swimming pools where sanitation treatments are carried out frequently with chlorinated water, pH regulators, anti-mildew treatments, etc.;
• thermal spa baths and baths or pools with salt water;
• applications that require high resistance to chemical products that could be potentially aggressive to cementitious products;
• total impermeability of joints to help protect substrates;
• high strength or high adhesion.
Thanks to these characteristics, epoxy products reduce the frequency
of regular and unplanned maintenance operations compared with
cementitious products (Figs. 5.6 - 5.7 - 5.8).
The epoxy grouting products proposed by MAPEI are summarised in the
following table:
Fig. 5.8 - Final cleaning operation with a clean sponge
Fig. 5.7 - Cleaning the surface of the lining with a Scotch-Brite® pad
EPOXY GROUTS:
Product Classification according to EN 12004 Characteristics
KERAPOXY CQ RGR2
Two-component anti-acid adhesive and fillerExcellent workabilityEasy to cleanAvailable in 21 colours
KERAPOXY DESIGN R2RG
Two-component anti-acid adhesive and fillerHighly attractive finish, ideal for glass mosaics with a translucent effectAvailable in 24 colours and translucent effectExcellent workability and easy to clean
KERAPOXY R2TRG
Two-component anti-acid adhesive and fillerAvailable in 23 colours
Technical Notebook
WATERPROOFING BATHS AND SWIMMING POOLS
28
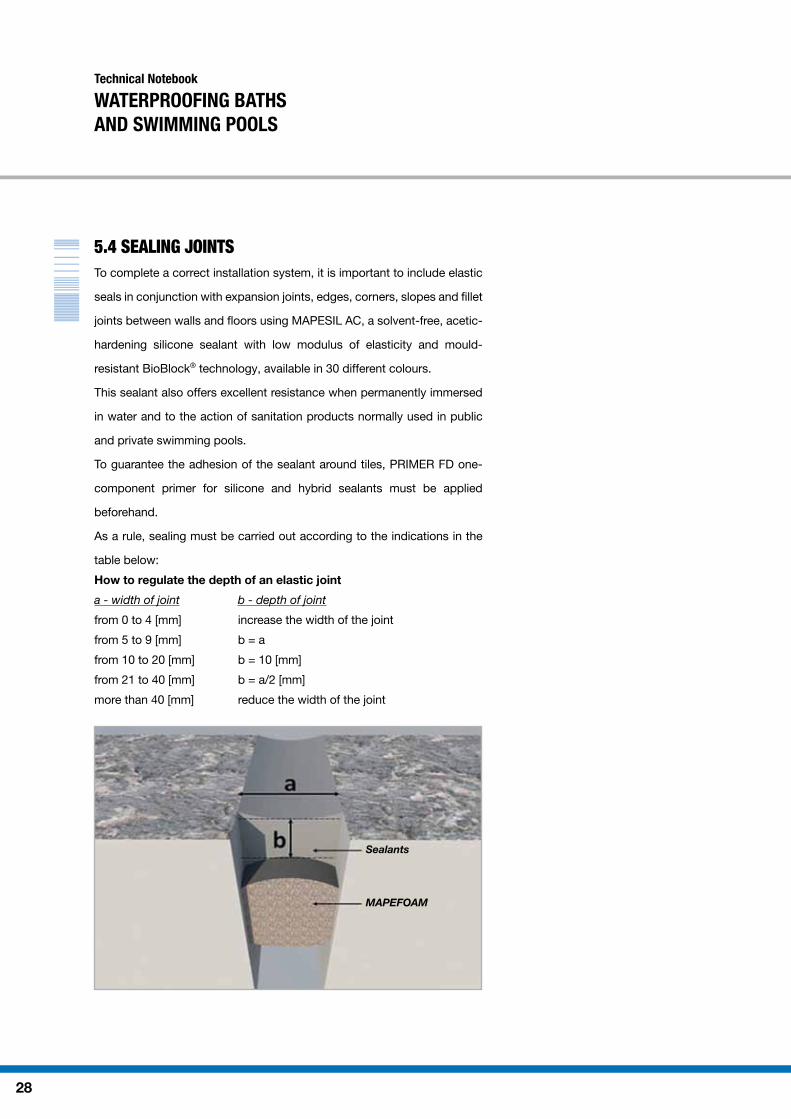
5.4 SEALING JOINTSTo complete a correct installation system, it is important to include elastic
seals in conjunction with expansion joints, edges, corners, slopes and fillet
joints between walls and floors using MAPESIL AC, a solvent-free, acetic-
hardening silicone sealant with low modulus of elasticity and mould-
resistant BioBlock® technology, available in 30 different colours.
This sealant also offers excellent resistance when permanently immersed
in water and to the action of sanitation products normally used in public
and private swimming pools.
To guarantee the adhesion of the sealant around tiles, PRIMER FD one-
component primer for silicone and hybrid sealants must be applied
beforehand.
As a rule, sealing must be carried out according to the indications in the
table below:
How to regulate the depth of an elastic joint
a - width of joint b - depth of joint
from 0 to 4 [mm] increase the width of the joint
from 5 to 9 [mm] b = a
from 10 to 20 [mm] b = 10 [mm]
from 21 to 40 [mm] b = a/2 [mm]
more than 40 [mm] reduce the width of the joint
Sealants
MAPEFOAM

29
The width of an elastic joint must be defined according to the compressive
and tensile stresses acting on the lining material.
To regulate the depth of the sealant (according to the indications in the table
above) and avoid it sticking to the bottom of the joint, insert MAPEFOAM
closed-cell polyethylene cord in the joint by pressing it lightly In place with
the tip of a trowel or a wooden slat.
If there are expansion joints, to prevent the sealant adhering to the
substrate, insert a non-adherent material between the waterproofed
substrate and the sealant.
GENERAL GUIDELINES FOR SWIMMING POOL MAINTENANCEIf a swimming pool is closed, the water should not be completely drained off, otherwise the structure could be directly exposed to frost (the water acts as a temperature regulator). If there is no hydrostatic pressure from the water, the lift from the ground pushes against the structure of the pool and the lining. Since the lining is the most rigid part of the structure, it could crack, be damaged, lift or even detach. When a pool is closed, we recommend emptying the pipework, lowering the level of the water by 10/15 cm and protecting the pool with sheets of plastic on the surface of the water. Ice-breakers (polystyrene blocks, inner tubes, etc) may also be placed in the pool to offer further protection.
6. FINISHING THE INSIDE OF BATHS AND POOLS WITH ACRYLIC PAINT
MAPEI proposes a specific treatment cycle for those who prefer a coloured
finish in a pool or bath containing water.
This cycle includes a layer on the bottom and side walls to even out the
substrate, as described in section 4.2, and the creation of coving in the
corners and around sharp edges.
Once the structure has been prepared as specified and the materials and
products are fully cured, the bath or pool must be tested to make sure it is

Technical Notebook
WATERPROOFING BATHS AND SWIMMING POOLS
30
watertight. Once the bath or pool has been successfully tested, apply the
finish as follows:
• Apply a coat of MAPECOAT I 600 W, two-component transparent primer in water dispersion diluted 1:1 with water;
• After 4-6 hours apply a waterproofing skim coat of TRIBLOCK FINISH, three-component thixotropic epoxy mortar for skimming damp substrates;
• Apply a second coat of MAPECOAT I 600 W diluted 1:1 with water 24 hours after applying TRIBLOCK FINISH;
• After 4-6 hours apply a first coat of ELASTOCOLOR WATERPROOF acrylic paint for permanent contact with water. This product is easy to clean and is resistant to all weather conditions, smog and direct sunlight;
• Apply a second coat of ELASTOCOLOR WATERPROOF the following day. A third coat will only be required (after a further 24 hours) if the colour chosen does not have good covering properties or if a thicker coat of finish is specified.
This system for coating internal surfaces, comprising the application of
ELASTOCOLOR WATERPROOF paint after waterproofing the substrates
with TRIBLOCK FINISH and MAPECOAT I 600 W, forms a compatible,
elastic finish resistant to permanent contact with water.
ELASTOCOLOR WATERPROOF provides good resistance to the most
commonly used chemical products for disinfecting water in swimming
pools (chlorine and quaternary ammonium compounds). In certain
cases, however, permanent contact with water may bleach the film of
ELASTOCOLOR WATERPROOF. Therefore, if a medium or dark colour is
used, annual maintenance must be scheduled to bring the finish back to
its original colour. If special disinfectants are used in the water, preliminary
tests must be carried out to verify the compatibility of ELASTOCOLOR
WATERPROOF.
Since ELASTOCOLOR WATERPROOF is applied in thin coats (200-300
μm) and is not particularly resistant to high mechanical abrasion, if it used
in baths or swimming pools it could be rubbed off by equipment normally
used to clean the surface (robots, brushing systems, etc.).
Fig. 6.1 - A swimming pool painted with ELASTOCOLOR WATERPROOF

31
After completing the application cycle, wait at least 20 days before filling
the bath or pool in normal weather conditions.
ELASTOCOLOR WATERPROOF is available in 6 standard colours,
although other colours may be created according to individual samples
using the ColorMap® automatic colouring system.
Fig. 6.2 - Applying ELASTOCOLOR WATERPROOF with a roller

Technical Notebook
WATERPROOFING BATHS AND SWIMMING POOLS
32
System for waterproofing and installing glass mosaic in swimming pools
7
8
9
10
1
345
6
2
11
1 Reinforced concrete structure
2 Skim/smoothing layer Planitop Fast 330
EN 998-1MALTA PER INTONACIINTERNI ED ESTERNI
CONFORME ALLA NORMA EUROPEA���
GP-CS IVEN 998-1
CONFORME ALLA NORMAEUROPEA
SISTEMI DI PROTEZIONE DELLA SUPERFICIE DI CALCESTRUZZO
MC-IREN 1504-2 (C)
PRINCIPI
EN 1504-2
3 Cementitious waterproofing product Mapelastic Smart
EN 1504-2 EN 1504-2 (C)
CONFORME ALLA NORMAEUROPEA
SISTEMI DI PROTEZIONE DELLA SUPERFICIE DI CALCESTRUZZO
PI-MC-IRPRINCIPI
EN 14891 IMPERMEABILIZZANTIAPPLICATI LIQUIDI
CONFORME ALLA NORMA EUROPEA
CMO1PEN 14891
4 Polypropylene TNT Mapetex Sel
5 Cementitious waterproofing product Mapelastic Smart
EN 1504-2 EN 1504-2 (C)
CONFORME ALLA NORMAEUROPEA
SISTEMI DI PROTEZIONE DELLA SUPERFICIE DI CALCESTRUZZO
PI-MC-IRPRINCIPI
EN 14891 IMPERMEABILIZZANTIAPPLICATI LIQUIDI
CONFORME ALLA NORMA EUROPEA
CMO1PEN 14891
6 Shell bonded monolithically to the substrate
Eporip + Mapegrout 430
EN 1504-4 INCOLLAGGIO STRUTTURALE
CONFORME ALLA NORMAEUROPEA
EN 1504-4
EN 1504-3 R3
CONFORME ALLA NORMA EUROPEA
MALTA DA RIPARAZIONE
EN 1504-3
7 Adhesive Adesilex P10 + Isolastic
EN 12004
CO
NFOR
ME ALLA NORMA EURO
PEA A
DESIVO CEMENTIZIO PER CER
AMIC
A
EN 12004
C2TE
8 Glass mosaic
9 Grout Kerapoxy Design
EN 12004
CO
NFOR
ME ALLA NORMA EUROPEA
AD
ESIVO REATTIVO PER CERAM
ICA
EN 12004
R2 EN 13888
CO
NFOR
ME ALLA NORMA EURO
PEA
MALTA REATTIVA PER FU
GHE
RG
10 Sealant Mapesil AC
11 Floor substrate bonded Topcem Pronto
EN 13813 MASSETTICEMENTIZI
CT
C30-F6A1 fl
CONFORME ALLA NORMA EUROPEA

33
1 Regulating layer of concrete
2 Waterproofing for the external part of the structure with Mapeproof sheets under the foundation bed and Mapelastic Foundation two-component elastic cementitious mortar on the walls after applying a coat of Primer 3296
EN 1504-2 EN 1504-2 (C)
CONFORME ALLA NORMAEUROPEA
SISTEMI DI PROTEZIONE DELLA SUPERFICIE DI CALCESTRUZZO
PI-MC-IRPRINCIPI
EN 14891 IMPERMEABILIZZANTIAPPLICATI LIQUIDI
CONFORME ALLA NORMA EUROPEA
CMO1PEN 14891
3 Reinforced concrete structure
4 Idrostop B25 hydro-expanding bentonite joint
5 Planicrete-based bonding slurry
6 Screed Topcem Pronto
EN 13813 MASSETTICEMENTIZI
CT
C30-F6A1 fl
CONFORME ALLA NORMA EUROPEA
7 Cementitious render Nivoplan + Planicrete
EN 998-1 MALTA PER INTONACIINTERNI ED ESTERNI
CONFORME ALLA NORMA EUROPEA���
GP-CS IVEN 998-1
8 Metallic mesh to hold the render
9 Precast overflow channel
10 Rubber-backed tape Mapeband 11 Waterproofing product (2 coats)
Mapelastic
EN 1504-2 EN 1504-2 (C)
CONFORME ALLA NORMAEUROPEA
SISTEMI DI PROTEZIONE DELLA SUPERFICIE DI CALCESTRUZZO
PI-MC-IRPRINCIPI
EN 14891 IMPERMEABILIZZANTIAPPLICATI LIQUIDI
CONFORME ALLA NORMA EUROPEA
CMO2PEN 14891
12 Glass fibre mesh Mapenet 150 13 Adhesive Keraflex Maxi S1
EN 12004
CO
NFOR
ME ALLA NORMA EUROPEA A
DESIVO CEMENTIZIO PER CER
AMIC
A
EN 12004
C2TE S1
14 Ceramic tiles
15 Grout Ultracolor Plus
CG2WA
CONF
OR
ME ALLA NORMA EURO
PEA
MALTA CEMENTIZIA PER FU
GHE
16 Sealant Mapesil AC
System for waterproofing and installing ceramic in new swimming pools
12
4
35
10
27
1
35
6
6
8
912
11
11
14
16
14
15
11 12
11
13

Technical Notebook
WATERPROOFING BATHS AND SWIMMING POOLS
34
SA AQUATIC & LEISURE & GP PLUS HEALTH CENTRE - ADELAIDE
Waterproofed with MAPELASTIC SMART, MAPETEX SEL and MAPEBAND
TOCCACIELO HOTEL AND TOURISM CENTRE - NOVA SIRI MARINA
Waterproofed with MAPELASTIC, MAPENET 150 and MAPEBAND

35
VILLA EOLO - FORTE DEI MARMI
Waterproofed with MAPELASTIC, MAPENET 150 and MAPEBAND
PUBLIC SPORTS COMPLEX AND SWIMMING POOL - MASSA
Waterproofed with MAPELASTIC FOUNDATION and MAPEBAND

Technical Notebook
WATERPROOFING BATHS AND SWIMMING POOLS
36
AQUAPARK - HRADEC
Waterproofed with MAPELASTIC, MAPENET 150 and MAPEBAND
LA NOSTRA FAMIGLIA SWIMMING POOL - SAN VITO AL TAGLIAMENTO
Waterproofed with MAPELASTIC, MAPENET 150 and MAPEBAND


HEADQUARTERSMAPEI Spa Via Cafiero, 22 - 20158 Milan (Italy)Tel. +39-02-37673.1 Fax +39-02-37673.214Internet: www.mapei.comE-mail: [email protected]
Technical Manual
WATERPROOFING BATHS AND SWIMMING POOLS C.
P. M
K 83
7830
- (G
B) 5
/14