technical manual - clearvue · technical manual clearvue roofing system. issue date: march 6, ......
TRANSCRIPT

Technical ManualClearVue Roofing System

Issue date: March 6, 2015 2
ClearVue Roofing System Components
CV-02
CLEARVUE RAFTER BRACKETS

Issue date: March 6, 2015 3
ClearVue Roofing System Components
CV-03
CLEARVUE EXTRUSIONS

Issue date: March 6, 2015 4
ClearVue Roofing System Components
CV-04
END PLATES - 6mm SHEET

Issue date: March 6, 2015 5
ClearVue Roofing System Components
CV-05
END PLATES - 8mm SHEET

Issue date: March 6, 2015 6
ClearVue Roofing System Components
CV-06
MECHANICAL FIXINGS

Issue date: March 6, 2015 7
ClearVue Roofing System Components
CV-07
MECHANICAL FIXINGS

Issue date: March 6, 2015 8
ClearVue Roofing System Exploded Views
Rafter Components
Span Bar Components
End Cap
F Profile
Bottom Glazing Bar
Glazing Rubber
ClearVue Panel
Middle Glazing Bar
Top Glazing Bar
End Cap
Saddle Bracket
F Profile
Span Bar
ClearVue Panel
Middle Glazing Bar
Top Glazing Bar
Glazing Rubber

Issue date: March 6, 2015 9
ClearVue Roofing System Installation Instructions for Rafters
Step 1:Insert rubber gaskets into the top glazing bars
Measure 100mm from one end of the bottom glazing bar and drill a 5mm hole using the narrow line in the centre of the bar as a guide. REPEAT AT OTHER END.
Step 2:IF YOU INTEND TO INSTALL A GUTTER ALLOW THE GLAZING BAR TO OVERHANG THE END OF YOUR ROOF BY AT LEAST 50MM.
Insert rubber gaskets into the bottom glazing bars.
Step 3:JOIN THE TOP AND BOTTOM GLAZING BARS TOGETHER WITH TAPE. MAKE SURE THE ENDS ARE ALIGNED PERFECTLY.
Step 1. Using a 2mm pilot, drill completely through the taped bars every 300mm along the full length.
DRILL THE FIRST HOLE 70MM FROM THE END OF THE BAR.
Step 2. Using these holes as a guide, drill a 5mm hole firstly through the top glazing bar, then turn over and repeat on the bottom glazing bar.
TIP: THIS IS EASIER THAN TRYING TO DRILL THE 5MM HOLES ALL THE WAY THROUGH THE ALUMINIUM IN ONE STEP.

Issue date: March 6, 2015 10
ClearVue Roofing System Installation Instructions for Rafters
Step 4:Untape the glazing bars to start installation on the roof.Using 50mm screws fix the bottom glazing bars to the rafters in the pre-drilled holes 100mm from each end.
Step 5:Fit the end cap to the end of the glazing bars at the gutter end, using the screw provided.
CHECK: That the bottom of end cap lines up with the bottom edge of the glazing bar.
Step 6:Peel 50mm of the protective masking away from the long sides of each panel (on both sides).
TIP: Leave the rest of the masking until the job is complete to avoid damage.
Place 2 ClearVue panels on the bottom glazing bar. Use the 2mm spacers provided to ensure that the panel is in the correct position.
Step 7:Position the top glazing bar in place ensuring that the panels are hard against the edge of the end cap.

Issue date: March 6, 2015 11
ClearVue Roofing System Installation Instructions for Rafters
Step 8:Fix with 50mm screws into pre-drilled holes at 300mm centers.
IMPORTANT: Do not over tighten the screws as this may cause the panels to bow.
Step 9:Clip on the top cover as you go (tap with rubber mallet until it clicks into place).
ONCE THE FIRST TWO PANELS ARE INSTALLED, SECURE AND COMPLETE ONE PANEL AT A TIME. ALWAYS START INSTALLATION AT THE CENTRE OF YOUR ROOF!
Step 10:OPTION: To install a gutter.
Install the ClearVue roof with a minimum of 50mm overhang from the end of the roof.Attach the gutter brackets as per the instructions supplied.
Step 11:Clip in gutter.

Issue date: March 6, 2015 12
ClearVue Roofing System Installation Instructions for Rafters
Step 12:Connect to downpipes as required.
Step 13:OPTION: To finish the end of the roof without a panel or against the building.
Remove the bottom rubber gasket only from the side where you will install an F Section.
Step 14:Place one panel and an F section into the bottom glazing bar, where the roof will finish.
Position Glazing Bar in place and secure using the 50mm screws as previously.
Step 15:Clip on the top cover (tap with rubber mallet until it clicks into place).
Step 16:Completely remove all remaining protective masking from the top and bottom of the ClearVue panels.

Issue date: March 6, 2015 13
ClearVue Roofing System Installation Instructions for Purlins
Step 1:Insert rubber gaskets into the top glazing barsPre drill 5mm holes in the top glazing bar every 150mm.
(Start the first hole at least 30mm from the end of bar)
Step 2:IF YOU INTEND TO INSTALL A GUTTER ALLOW THE GLAZING BAR TO OVERHANG THE END OF YOUR ROOF BY AT LEAST 50MM.
Step 3:Insert rubber gaskets into the bottom glazing bars.
Step 4:Using the narrow line in the centre of the glazing bar as a guide, fix the bottom glazing bar to the purlin with 2 x 8g 50mm screws.
IMPORTANT : Start fixing at the centre of your roof!
Issue date: March 6, 2015 14
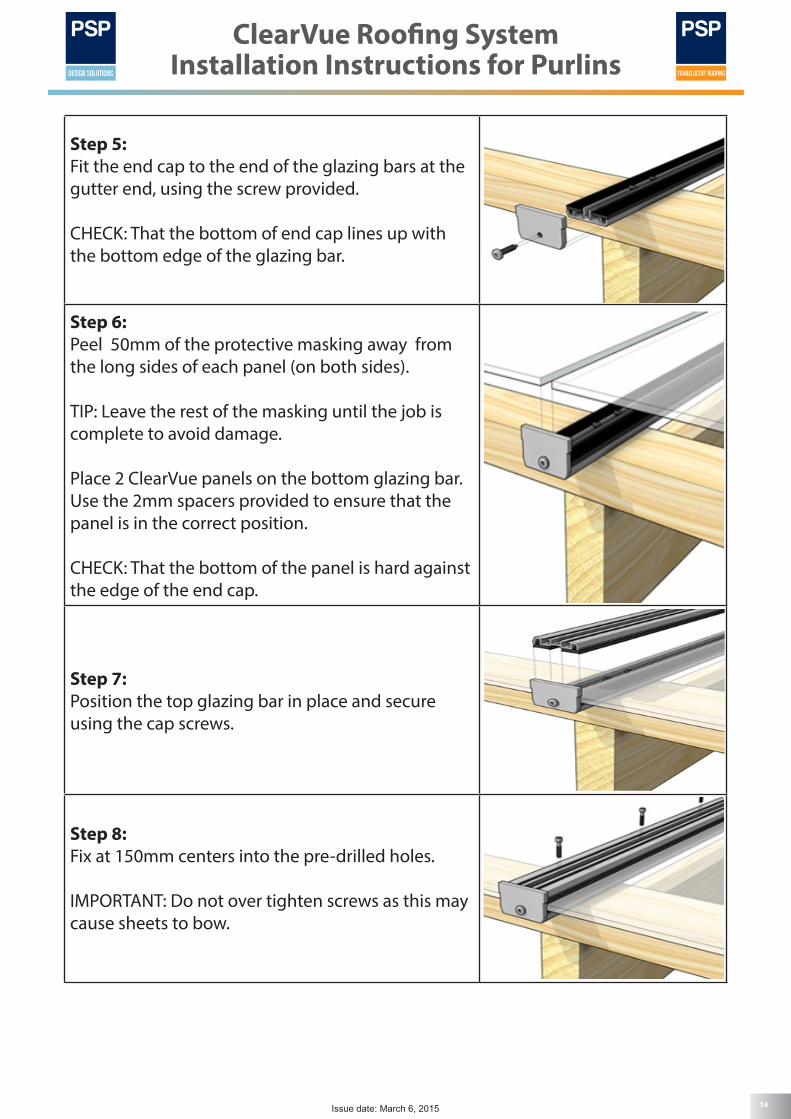
Step 5:Fit the end cap to the end of the glazing bars at the gutter end, using the screw provided.
CHECK: That the bottom of end cap lines up with the bottom edge of the glazing bar.
Step 6:Peel 50mm of the protective masking away from the long sides of each panel (on both sides).
TIP: Leave the rest of the masking until the job is complete to avoid damage.
Place 2 ClearVue panels on the bottom glazing bar. Use the 2mm spacers provided to ensure that the panel is in the correct position.
CHECK: That the bottom of the panel is hard against the edge of the end cap.
Step 7: Position the top glazing bar in place and secure using the cap screws.
Step 8:Fix at 150mm centers into the pre-drilled holes.
IMPORTANT: Do not over tighten screws as this may cause sheets to bow.
ClearVue Roofing System Installation Instructions for Purlins

Issue date: March 6, 2015 15
ClearVue Roofing System Installation Instructions for Purlins
Step 9:Clip on the top cover as you go (tap with rubber mallet until they click into place).
Step 10:OPTION: To install a gutter.
Install the CleaVue roof with a minimum of 50mm overhang from the end of the roof.Attach the gutter brackets as per the instructions supplied.
Step 11:Clip in gutter.
Step 12:Connect to downpipes as required.

Issue date: March 6, 2015 16
ClearVue Roofing System Installation Instructions for Purlins
Step 13:OPTION: To finish the end of the roof without a pan-el or against the building.
Remove the bottom rubber gasket only from the side where you will install an F Section.
Step 14:Place one panel and an F section into the bottom glazing bar, where the roof will finish.
Position Glazing Bar in place and secure using the cap screws as previously.
Step 15:Clip on the top cover (tap with rubber mallet until it clicks into place).
Step 16:Completely remove all remaining protective masking from the top and bottom of the ClearVue panels.

Issue date: March 6, 2015 17
ClearVue Roofing System Installation Instructions for Span Bar
Step 1:Insert rubber gaskets into the top glazing bars.Pre drill 5mm holes in the top glazing bar every 150mm.
(Drill the first hole a minimum of 70mm from the end to allow for gutter installation ).
Step 2:IF YOU INTEND TO INSTALL A GUTTER ALLOW THE TOP GLAZING BAR TO OVERHANG THE END OF YOUR SPANBAR BY AT LEAST 50MM.
PRE-DRILL EXTRA HOLES IN THE BOTTOM END CAP FOR FIXING THE GUTTER BRACKETS AS REQUIRED.
Step 3:Insert rubber gaskets into Span Bar.
Mark hole positions for the selected rafter brackets on the sides of the Span Bar and pre drill 6mm holes to suit.
Step 4:FIX THE SELECTED RAFTER BRACKETS TO THE ROOF STRUCTURE USING THE SCREWS PROVIDED.
Option 1: D Bracket (as pictured)Option 2: Two Piece Rafter Bracket (see Technical Details)

Issue date: March 6, 2015 18
ClearVue Roofing System Installation Instructions for Span Bar
Step 5:Fit the Span Bars into the Brackets at both ends.
Step 6:Screw through the sides of the brackets into the pre-drilled holes using the screws provided.
Step 7:Fix the Bottom Split End Cap in place using the screws provided.
Step 8:Peel 50mm of the protective masking away from the long sides of each ClearVue panel (on both sides).
TIP: Leave the rest of the masking until the job is complete to avoid damage.
Place 2 panels onto the Span Bar. Use the 2mm spacers provided to ensure that the panel is in the correct position.Position the panels so they line up with the edge of the Top Glazing Bar.

Issue date: March 6, 2015 19
ClearVue Roofing System Installation Instructions for Span Bar
Step 9:Position the top glazing bar in place and secure using the cap screw.Fix at 150mm centers into the pre-drilled holes.
ONCE THE FIRST TWO PANELS ARE INSTALLED, SECURE AND COMPLETE ONE PANEL AT A TIME. ALWAYS START INSTALLATION AT THE CENTRE OF YOUR ROOF!
Install Span Bar Top Split End Cap using screws provided.
Step 10:Clip on the top cover as you go. (tap with rubber mallet until it clicks into place)
Step 11:OPTION: To install a gutter.
Install the ClearVue roof with a minimum of 50mm overhang from the end of the roof.Attach the gutter brackets as per the instructions supplied.
Step 12:Clip in gutter.

Issue date: March 6, 2015 20
ClearVue Roofing System Installation Instructions for Span Bar
Step 13:Connect to downpipes as required.
Step 14:OPTION: to finish the end of the roof without a panel or against the building.
Remove the bottom rubber gasket only from the side where you will install an F Section.
Step 15:Place one panel and an F section into the bottom glazing bar, where the roof will finish.
Position Glazing Bar in place and secure using the cap screws as previously.
Step 16:Clip on the top cover. (tap with rubber mallet until it clicks into place)
Step 17:Completely remove all remaining protective masking from tthe top and bottom of the ClearVue panels.

Issue date: March 6, 2015 21
ClearVue Roofing System Handling/Storage & Cutting
HANDLING & STORAGEOnce delivered to site, it is important to handle and store the ClearVue panels with care until they are installed into position on the roof.The panel should be covered and not left exposed to the sunlight for prolonged periods. The Panels should be stored horizontally, on a flat surface with the largest panels on the bottom. Stacking the panels vertically is not recommended.
CUTTING INSTRUCTIONSIMPORTANT NOTE: When using machinery always read follow the instructions provided. Work safely and keep work areas clean and hazard free at all times.
CLEARVUE PANELSPSP recommend Irwin Marathon PVC cutting blades when using a skill saw to cut ClearVue Panels.
However, most circular saws are suitable for cutting ClearVue panels to size. Multi-tooth carbide blades are most suitable. The panels should be secured against flutter. It is best to work with a stop, such as a wooden bar, to prevent the saw from tilting and causing an accident or damaging the cut edge of the sheet.
CLEARVUE GLAZING BARS & SPAN BARSClearVue Roofing Bars can be cut using either a hacksaw with a metal blade or with a drop saw with a suitable aluminium blade inserted. Ensure that any swarf or sharp burrs are removed prior to installation.