technical implementation of assessment and authorization
TRANSCRIPT
Technical Implementation of A&A in the NISP – Student Guide Page 1 of 28
Technical Implementation of Assessment and Authorization (A&A) in the NISP
Student Guide
Lesson 1: Course Overview
Course Introduction and Information Welcome to the Technical Implementation of Assessment and Authorization (A&A) in the NISP
course.
The purpose of this course is to provide you with the knowledge needed to assess information
systems for authorization under the National Industrial Security Program (NISP).
Scenario
Meet Monique, an Information Systems Security Manager (ISSM) at Lockhardt, Inc. Lockhardt is
a new company that has recently won a new government contract. The company is
geographically dispersed with several different environments. Monique has been working on
preparing Lockhardt’s information system for authorization under the NISP.
She has guided Lockhardt through steps 1‐3 of the Assessment and Authorization process,
which are (1) categorize system, (2) select security controls, and (3) implement security
controls.
Now she will be using the Security Content Automation Protocol (SCAP) Compliance Checker
and Security Technical Implementation Guide (STIG) Viewer to self‐assess Lockhardt’s system
security controls so that Lockhardt will be prepared for authorization.
Course Objectives
Here are the course objectives.
Distinguish the steps to install and properly configure the SCAP Compliance Checker and
STIG Viewer
Perform the steps used to conduct a SCAP scan to assess risks to information systems
Identify mitigation strategies of a known vulnerability
Identify unmitigated vulnerabilities required to be included in a Plan of Actions &
Milestones (POA&M)
Technical Implementation of A&A in the NISP – Student Guide Page 2 of 28
Lesson 2: Obtaining the SCAP Compliance Checker and STIG Viewer Lesson Introduction
To begin a self‐assessment for Lockhardt, Inc., Monique must obtain two tools: a SCAP
Compliance Checker and a STIG viewer. This lesson will explain the purpose of these tools and
how to obtain them.
Here are the lesson objectives:
Identify the purpose of the SCAP Compliance Checker and how to obtain it
Identify the purpose of the STIG Viewer and how to obtain it
Introduction to the SCAP Compliance Checker
Monique begins the self‐assessment process by obtaining the SCAP Compliance Checker. The
SCAP Compliance Checker is an automated vulnerability scanning tool. It leverages the Defense
Information Systems Agency (DISA) Security Technical Implementation Guides (STIGS) and
Operating System‐specific baselines to analyze and report on the security configuration of an
information system.
The SCAP Compliance Checker is not the only method of scanning for vulnerabilities. Other
DoD‐approved tools authorized by your command may be available.
It is important to note that administrative privileges on the machine to be scanned are
required.
Installing the SCAP Compliance Checker: Method 1
The SCAP Compliance Checker may be obtained in two ways, depending on the possession of a
DoD PKI token.
If you are PKI enabled, go to DISA’s Information Assurance Support Environment (IASE).
Method 1
Open an internet browser.
Click in the address bar. Navigate to http://iase.disa.mil/stigs/scap/Pages/index.aspx
Scroll to the bottom section titled “SCAP Tools.”
o You will need to know the operating system of the machine you are scanning. In
this demonstration, we are using Windows 7.
Select the appropriate SCAP Compliance Checker for your operating system from the list
and provide your PKI credentials to start the download of the ZIP file.
Enter your PIN
Select the OK button
Select the Save button
Open the extracted files folder
Select by double‐clicking the setup application file
Technical Implementation of A&A in the NISP – Student Guide Page 3 of 28
Select the Run button
Select the “I accept the agreement” radio button
Select the Next button
Select the Next button
Select Components (or leave default), then select the Next button
Select the “Create a desktop shortcut” check box
Select the Next button
Select the Install button
Select the Finish button
Installing the SCAP Compliance Checker: Method 1
Method 2
If you are not PKI enabled, go to the DSS Office of the Designated Approving Authority, or
ODAA, Business Management System, or OBMS, through the NISP Central Access Information
Security System, or NCAISS.
https://ncaiss.dss.mil
After you log in, select OBMS Application
Select Accept
Select ODAA Bulletin Board
Scroll to Headquarters Section
Select “Headquarters Bulletin Board” in the Headquarters section
select the forum post corresponding to the operating system you are using. In this
demonstration, we are using Windows.
You are now ready to download the ZIP file, unarchive, and install the application.
Knowledge Check 2.1
Answer this question.
Which of the following do you need to know before installing the SCAP Compliance Checker?
a. The date your system was last scanned
b. Login credentials for accessing DISA tools
c. The operating system of the machine you’re scanning

Technical Implementation of A&A in the NISP – Student Guide Page 4 of 28
Downloading the Baseline
Next, Monique will need to download the appropriate baseline, also known as a benchmark.
The baseline is used to generate checklists used for vulnerability assessments. They are version‐
specific, unclassified, and non‐PKI controlled.
Monique returns to the IASE DISA page where she found the SCAP Compliance Checker.
She navigates to the Microsoft Windows 7 STIG Benchmark and downloads the baseline.
Open an internet browser
Click in the browser address bar
Navigate to DISA’s Information Assurance Support Environment (IASE) webpage:
http://iase.disa.mil/stigs/scap/Pages/index.aspx
Scroll to the applicable SCAP Content
In this example, we will be using the “Microsoft Windows 7 STIG Benchmark, Version 1,
Release 32,” which is the current baseline.
Select the Save as button
Save ZIP file to the C drive, Program Files, SCAP Compliance Checker 4.2, Resources
Select the Save button
Introduction to the STIG Viewer
Monique has successfully obtained the SCAP Compliance Checker and baseline, which she will
use to analyze and report on the security configuration of her information system. To view the
compliance of the system’s security settings, she needs another tool: the STIG Viewer.
The STIG Viewer is an unclassified, non‐PKI controlled tool. It can be downloaded from DISA’s
IASE website. It is a Java‐based application, requires no installation, and runs as a Java applet.
It is used in conjunction with the SCAP Compliance Checker scan results in order to view the
compliance status of the system’s security settings.
Other DoD‐approved tools are available.
Downloading the STIG Viewer
To download the STIG Viewer, go to DISA’s IASE webpage.
Open an internet browser
Click in the browser address bar
Enter the URL as shown: http://iase.disa.mil/stigs/Pages/stig‐viewing‐guaidance.aspx
Scroll to the section titled STIG Viewer
Select the most current version
Select the Save button
Extract the STIG Viewer from your Downloads folder to the Desktop

Technical Implementation of A&A in the NISP – Student Guide Page 5 of 28
Downloading the STIGs
Next, Monique will need to download the appropriate STIGs.
STIGS are Security Technical Implementation Guides – Configuration standards based on DoD
policy and security controls that contain technical guidance to “lock down” information systems
and software that might otherwise be vulnerable to a malicious computer attack.
Open an internet browser
Click in the browser address bar
Enter http://iase.disa.mil/stigs/os/Pages/index.aspx
Select the link for your applicable operating system to access the STIGs
In this example, we have chosen “Microsoft Windows 7 STIG – Version 1, Release 26”
Select the Save button
Extract the files from the Downloads folder to your Desktop
Your desktop is now equipped with the SCAP Compliance Checker, STIG Viewer, and STIGs.
Knowledge Check 2.2
True or False: STIG Viewers are non‐PKI controlled.
True
False
Technical Implementation of A&A in the NISP – Student Guide Page 6 of 28
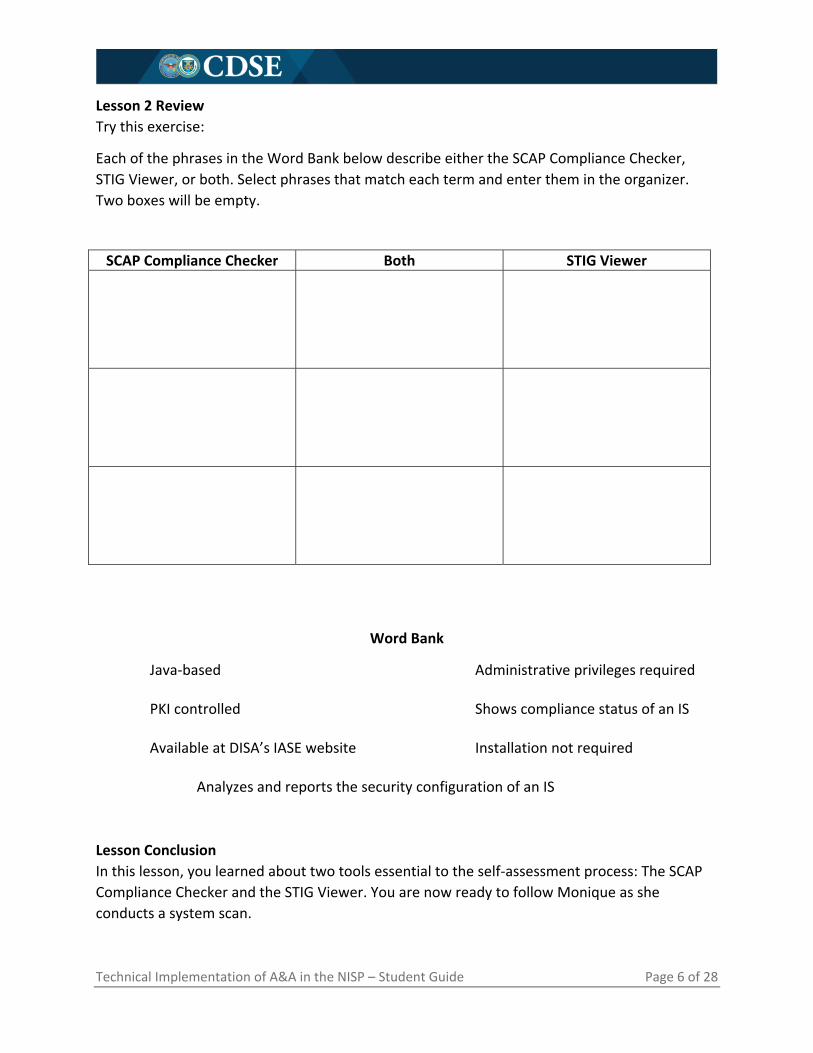
Lesson 2 Review
Try this exercise:
Each of the phrases in the Word Bank below describe either the SCAP Compliance Checker,
STIG Viewer, or both. Select phrases that match each term and enter them in the organizer.
Two boxes will be empty.
Word Bank
Java‐based
Administrative privileges required
PKI controlled Shows compliance status of an IS
Available at DISA’s IASE website
Installation not required
Analyzes and reports the security configuration of an IS
Lesson Conclusion
In this lesson, you learned about two tools essential to the self‐assessment process: The SCAP
Compliance Checker and the STIG Viewer. You are now ready to follow Monique as she
conducts a system scan.
SCAP Compliance Checker Both STIG Viewer
Technical Implementation of A&A in the NISP – Student Guide Page 7 of 28
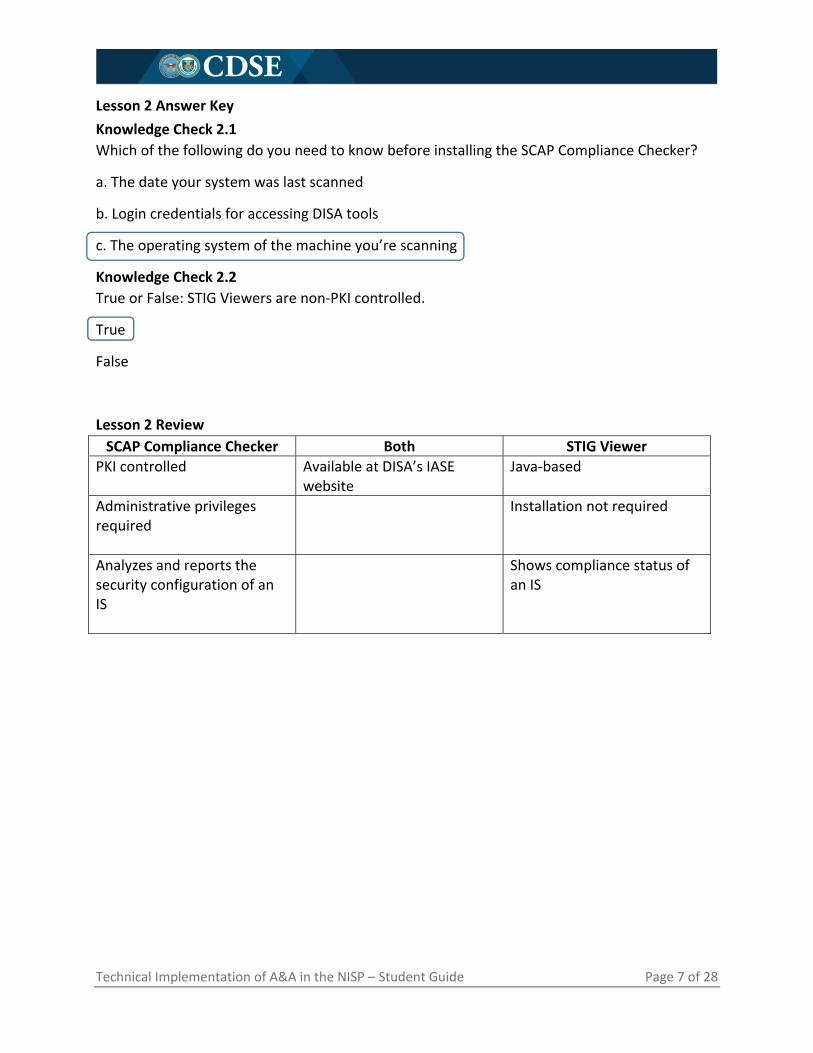
Lesson 2 Answer Key
Knowledge Check 2.1
Which of the following do you need to know before installing the SCAP Compliance Checker?
a. The date your system was last scanned
b. Login credentials for accessing DISA tools
c. The operating system of the machine you’re scanning
Knowledge Check 2.2
True or False: STIG Viewers are non‐PKI controlled.
True
False
Lesson 2 Review
SCAP Compliance Checker Both STIG Viewer
PKI controlled Available at DISA’s IASE website
Java‐based
Administrative privileges required
Installation not required
Analyzes and reports the security configuration of an IS
Shows compliance status of an IS

Technical Implementation of A&A in the NISP – Student Guide Page 8 of 28
Lesson 3: Running a SCAP Scan Lesson Introduction
Monique will now initiate a SCAP scan. Time will vary based on network speed, but it may take
about 3 minutes to run the scan. Before doing the scan, let’s see how to select and save
appropriate configuration settings.
Here are the lesson objectives.
Select and save appropriate configuration settings for the SCAP Compliance Checker
Describe the process used to run a SCAP scan and save results
Initiate a Scan
To initiate a scan, Monique opens the SCAP Compliance Checker Application.
During this lesson, you will be performing the same actions as Monique. Follow the audio cues
and use your mouse to find messages in blue boxes that will help you complete the process.
She’ll need to select the appropriate baseline. In her case, it is the Windows 7 Version 1 Release
32 STIG SCAP 1‐1 Benchmark. Generally this file is the last one listed and has the most recent
date. She will check the box to select the file, and then left click on the entry to select the
Mission Assurance Category, or MAC level. Generally an ISSM should select MAC‐3 Classified.
To initiate the scan, Monique selects “Analyze Selected Computer(s).” The “local computer”
radio button should be selected.
Double‐click the “SCAP Compliance Checker (SCC) 4.2” shortcut icon
Select Edit ˃ Content and Options
Select Install SCAP Content
In the window that appears, navigate to the benchmark that you previously
downloaded.
Select the Open button
Select the OK button
Scroll to select the latest benchmark version. You’ll need to select the appropriate
baseline. For this demonstration, it is the Windows 7 Version 1 Release 32 STIG SCAP 1‐1
Benchmark. Generally this file is the last one listed and has the most recent date. Check
the box to select the file.
Right click the Profile column to select the Mission Assurance Category, or MAC level.
Generally an ISSM should select MAC‐3 Classified. MAC‐3_Classified is the default
configuration setting for systems under the NISP.
Select MAC‐3_Classified
Technical Implementation of A&A in the NISP – Student Guide Page 9 of 28
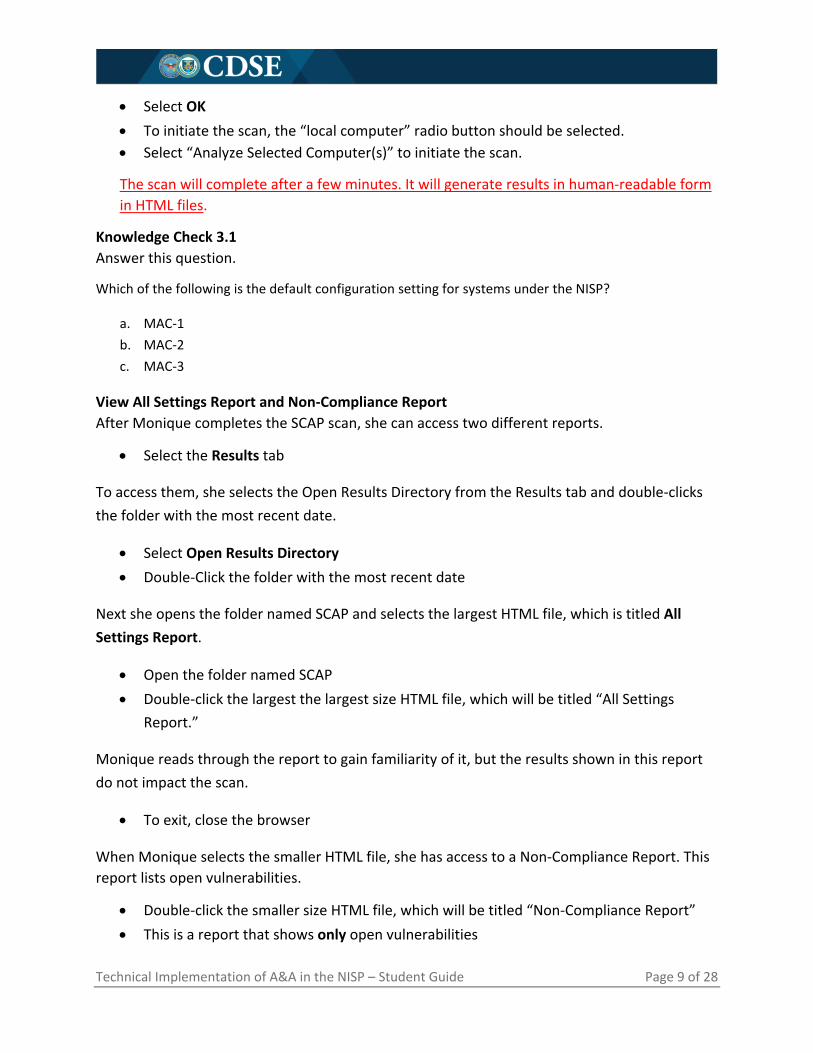
Select OK
To initiate the scan, the “local computer” radio button should be selected.
Select “Analyze Selected Computer(s)” to initiate the scan.
The scan will complete after a few minutes. It will generate results in human‐readable form
in HTML files.
Knowledge Check 3.1
Answer this question.
Which of the following is the default configuration setting for systems under the NISP?
a. MAC‐1
b. MAC‐2
c. MAC‐3
View All Settings Report and Non‐Compliance Report
After Monique completes the SCAP scan, she can access two different reports.
Select the Results tab
To access them, she selects the Open Results Directory from the Results tab and double‐clicks
the folder with the most recent date.
Select Open Results Directory
Double‐Click the folder with the most recent date
Next she opens the folder named SCAP and selects the largest HTML file, which is titled All
Settings Report.
Open the folder named SCAP
Double‐click the largest the largest size HTML file, which will be titled “All Settings
Report.”
Monique reads through the report to gain familiarity of it, but the results shown in this report
do not impact the scan.
To exit, close the browser
When Monique selects the smaller HTML file, she has access to a Non‐Compliance Report. This
report lists open vulnerabilities.
Double‐click the smaller size HTML file, which will be titled “Non‐Compliance Report”
This is a report that shows only open vulnerabilities
Technical Implementation of A&A in the NISP – Student Guide Page 10 of 28
Copy SCAP Results to Desktop
Next, we will copy SCAP results to the Desktop. In order to do this, we will copy the XCCDF file
to the Desktop.
Open the XML folder
Right‐click to open the context menu
Select Copy
Right‐click the Desktop tree view item
Select Paste
Close browser window
Close SCAP Compliance Checker window
The file is now copied to the desktop.
View Results in STIG Viewer
Next, Monique is ready to review the SCAP scan results in the STIG Viewer.
Open the STIG Viewer
She opens the STIG viewer on her desktop and then selects the File tab, and then Import STIG.
Select the File tab
Select Import STIG
She returns to her desktop, opens the STIG folder, and selects the XCCDF file, but this is not the
results she previously copied to the Desktop.
Open the STIG folder on your desktop and select the XCCDF file. Note this is not the
results file previously copied to the desktop.
Open the STIG folder
Select the XCCDF file
Select Open
After selecting Open, she selects the imported STIG profile from the menu appearing on the
left. She selects the Checklist tab and selects Create Checklist.
Select the imported STIG profile
Select the Checklist tab
Select Create Checklist
Next she selects Import, and then XCCDF Results File. She returns to her desktop one more time
and selects the Results file, and selects Open.
Select Import
Select XCCDF Results File
Select the Results File you copied to the desktop
Technical Implementation of A&A in the NISP – Student Guide Page 11 of 28
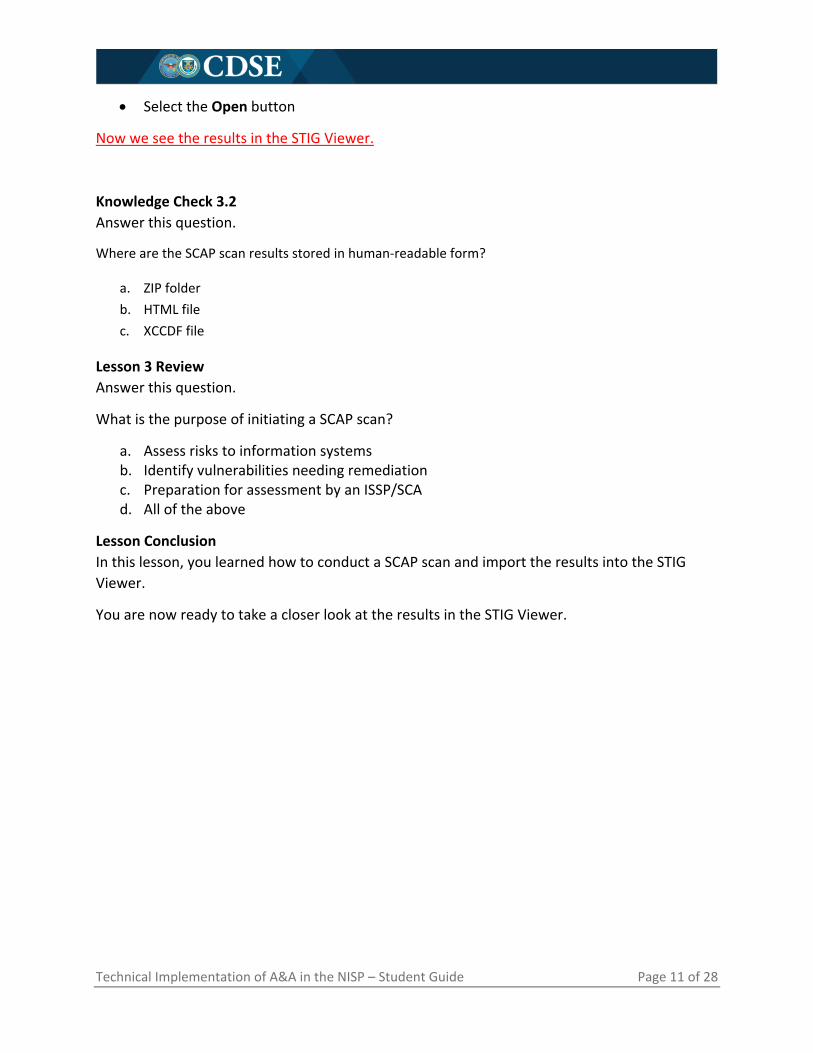
Select the Open button
Now we see the results in the STIG Viewer.
Knowledge Check 3.2
Answer this question.
Where are the SCAP scan results stored in human‐readable form?
a. ZIP folder
b. HTML file
c. XCCDF file
Lesson 3 Review
Answer this question.
What is the purpose of initiating a SCAP scan?
a. Assess risks to information systems b. Identify vulnerabilities needing remediation c. Preparation for assessment by an ISSP/SCA d. All of the above
Lesson Conclusion
In this lesson, you learned how to conduct a SCAP scan and import the results into the STIG
Viewer.
You are now ready to take a closer look at the results in the STIG Viewer.

Technical Implementation of A&A in the NISP – Student Guide Page 12 of 28
Lesson 3 Answer Key
Knowledge Check 3.1 Which of the following is the default configuration setting for systems under the NISP?
a. MAC‐1
b. MAC‐2
c. MAC‐3
Knowledge Check 3.2 Where are the SCAP scan results stored?
a. ZIP folder
b. HTML file
c. XCCDF file
Lesson 3 Review
What is the purpose of initiating a SCAP scan?
a. Assess risks to information systems b. Identify vulnerabilities needing remediation c. Preparation for assessment by an ISSP/SCA d. All of the above

Technical Implementation of A&A in the NISP – Student Guide Page 13 of 28
Lesson 4: Assessing and Remediating Vulnerabilities Lesson Introduction
Narrator: Franklin, the Facility Security Officer, or FSO, at Lockhardt, Inc., has stopped by to
discuss the SCAP scan with Monique.
Franklin: How are you doing, Monique? Are you having success with the SCAP Compliance
Checker?
Monique: Yes, I’ve gotten it to run two reports, and now I’m ready to have a look at the results
in the STIG Viewer.
Franklin: The STIG Viewer?
Monique: Yes, as part of the automated approach we now have in the Risk Management
Framework, or RMF, I imported the STIGs, or Security Technical Implementation Guides,
specific to our system into this STIG Viewer in the form of a checklist. The STIG Viewer will now
compare our settings with the checklist and identify any vulnerabilities we may need to
address.
Franklin: I’d like to see the results. Could I have a look?
Monique: Sure, please join me. I’ll walk you through the results in the STIG Viewer.
Narrator: The STIG Viewer will provide Lockhardt, Inc. not only with a list of vulnerabilities, but
also suggestions for fixing them.
Here are the lesson objectives.
Identify categories of vulnerabilities
Compare scan results to the System Security Plan (SSP) to identify vulnerabilities
Results Overview
Monique: Here are the results in the STIG Viewer. We can see from looking at the pie graph
and caption that there are 94 open findings, 163 findings that were closed, or not
vulnerabilities, and 46 that were not reviewed.
Franklin: That looks like a lot of open findings!
Monique: Yes, but some of them may actually not be vulnerabilities. The STIG Viewer assists us
in sorting through them and identifying any that need remediation. You’ll also see that 46
findings were not reviewed. These are manual checks. They can’t be assessed automatically and
must be reviewed manually. The STIGS also cover managerial and administrative checks as well.
Franklin: What are the CAT tabs?
Monique: These are different levels of severity. Level 1 is the most severe and Level 3 is the
least severe. The NISP does not require corrective actions for each of these levels, but best
Technical Implementation of A&A in the NISP – Student Guide Page 14 of 28
industry practices recommend we mitigate CAT 1 findings first. I’ll select CAT 1 and have a look
at the results.
Interpreting the Results
Monique: Besides seeing the results in the pie chart, we can also see them color coded in the
center column. A red O indicates Open, a green NF is Not a Finding, and a black NR is Not
Reviewed. I’ll select one of the open findings. It is V‐3347, Internet Information Services, which
means that a workstation has Internet Information Services enabled. In this case, this means
that someone from outside the network may be able to access information they shouldn’t.
These tabs provide valuable details related to the findings. There is a Discussion tab that helps
us understand the potential vulnerability exploit. In this case, it is telling us that having IIS
enabled on a system may allow unauthorized services to be hosted on a workstation, instead of
authorized services on a properly configured server.
Select the Check Content tab
Next there is a Check Content tab to show us if the system is properly configured. The
description here will tell us if we may need to change the registry, add a registry key, or modify
the registry hive. In this case, we’ll need to review the installed services or registry settings.
Select the Fix Text tab
And here is likely the most valuable tab, the Fix Text tab. It provides guidance in how to resolve
the issue. As you can see, we’ll need to remove Internet Information Services to close the
vulnerability.
Select the CCI tab
In addition, the CCI tab identifies Control Correlation Identifiers in the NIST SP 800‐53, and the
Misc. tab (not shown in this example) lists Information Assurance controls.
Knowledge Check 4.1
Answer this question.
Which findings are most severe?
a. CAT 1 b. CAT 2 c. CAT 3
Analyzing Open Findings
Franklin: It’s great to see there are fixes for our open findings. Looks like you will be working on
mitigating these for the next few days.

Technical Implementation of A&A in the NISP – Student Guide Page 15 of 28
Monique: Yes, I may have some work to do, but some of the findings that are categorized as
open may be false positives. For example, this finding, V‐26359, requiring a warning banner
when logging in, is categorized as open. However, because the specialized system doesn’t have
user interface, as cited in our System Security Plan, or SSP, I know this finding does not require
a control.
Franklin: I see. The SCAP Compliance Checker is a powerful tool, but your knowledge as an
ISSM is needed to truly determine the criticality of these findings.
Knowledge Check 4.2
True or False?
The SCAP Compliance Checker is the best determiner of the criticality of an open finding.
True
False
Lesson 4 Review
Answer this question.
Do all open results from the SCAP scan require controls?
a. Yes, and these are listed in the “Fix Text” tab of the STIG Viewer b. No, and the ISSM can reference the SSP for guidance on findings requiring controls
Lesson 4 Conclusion
In this lesson, you learned how to interpret the results provided in the STIG Viewer by
identifying categories of vulnerabilities and comparing the results to the System Security Plan.
In the next lesson, we will discuss how to document vulnerabilities that need corrective actions
before they can be resolved.
Technical Implementation of A&A in the NISP – Student Guide Page 16 of 28
Answer Key
Knowledge Check 4.1
Which findings are most severe?
a. CAT 1 b. CAT 2 c. CAT 3
Knowledge Check 4.2
The SCAP Compliance Checker is the best determiner of the criticality of an open finding.
a. True
b. False
The ISSM is the best determiner of the criticality of an open finding.
Lesson 4 Review
Do all open results from the SCAP scan require controls?
a. Yes, and these are listed in the “Fix Text” tab of the STIG Viewer
b. No, and the ISSM can reference the SSP for guidance on findings requiring controls
Not all open results require controls. Some open results may be false positives or require
manual checks.
Technical Implementation of A&A in the NISP – Student Guide Page 17 of 28
Lesson 5: Documenting Vulnerabilities Lesson Introduction
During Monique’s evaluation of the SCAP Compliance Checker results, she identified some
vulnerabilities needing corrective actions. As part a of the self‐inspection process, she is
required to document these vulnerabilities in a Plan of Action and Milestones, or POA&M. This
lesson will further explain the purpose of the POA&M and how to use it.
Here are the lesson objectives.
Identify the purpose of a POA&M
Describe details expected to be included in a POA&M
Explain the procedure for using a POA&M, including who creates the plan, compiles results in a
SSP, and who monitors the plan
Pretest your Knowledge
How much do you already know about POA&Ms? Answer this question to test your knowledge.
Which of the following describe the purpose of the POA&M? Select ALL correct choices.
a. The POA&M is a report prioritizing corrective actions. b. POA&Ms are submitted early in the RMF process to inform the Authorizing Official (AO)
of vulnerabilities. c. The POA&M is used to monitor progress on mitigating vulnerabilities d. The POA&M is maintained as part of the Security Authorization Package e. POA&Ms are updated approximately once per year.
Technical Implementation of A&A in the NISP – Student Guide Page 18 of 28
Pretest Answer
Which of the following describe the purpose of the POA&M? Select ALL correct choices.
a. The POA&M is a report prioritizing corrective actions. b. POA&Ms are submitted early in the RMF process to inform the Authorizing Official (AO)
of vulnerabilities. c. The POA&M is used to monitor progress on mitigating vulnerabilities d. The POA&M is maintained as part of the Security Authorization Package e. POA&Ms are updated approximately once per year.
Feedback: POA&Ms are not submitted early in the RMF process to inform the Authorizing
Official (AO) of vulnerabilities. Instead they are used by the AO to monitor progress in
correcting weaknesses. POA&Ms are living documents that are maintained throughout the
system lifecycle.
Purpose of the POA&M
How did you do? As you may have already known or just learned, one of the most important
purposes of a POA&M is to monitor the progress of correcting security vulnerabilities. To
achieve this purpose, the POA&M is a living document that is maintained throughout the
system life cycle. It is used by the ISSM to monitor progress in correcting weaknesses and is
maintained as a part of the Security Authorization Package, which is formerly known as the
Certification and Accreditation, or C&A, package. POA&Ms are required for a system
undergoing recertification, third party inspection, or self‐inspection.
Unmitigated Vulnerabilities to be Included in the POA&M
Listings in the POA&M should be unmitigated vulnerabilities. Examples include an outdated
patch, an incorrect version of Java, or a misconfigured security setting. Until these listings are
mitigated, their status is recorded in the open findings section of the POA&M and continuously
monitored.
Technical Implementation of A&A in the NISP – Student Guide Page 19 of 28
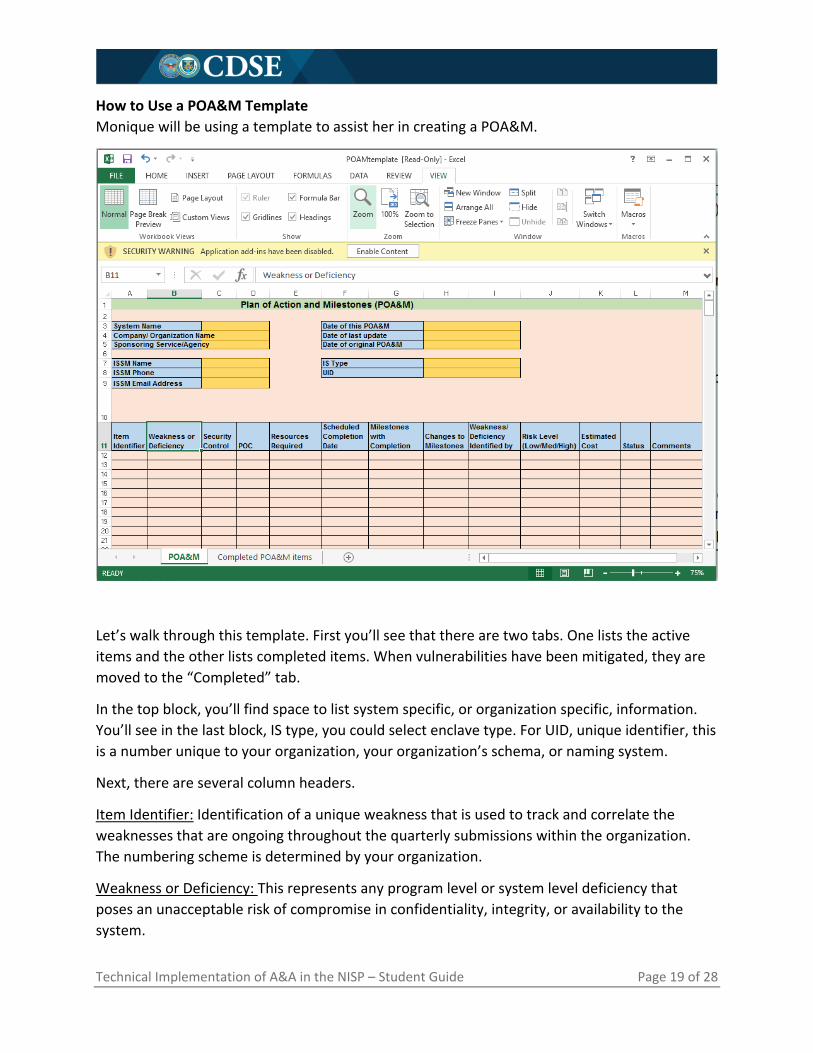
How to Use a POA&M Template
Monique will be using a template to assist her in creating a POA&M.
Let’s walk through this template. First you’ll see that there are two tabs. One lists the active
items and the other lists completed items. When vulnerabilities have been mitigated, they are
moved to the “Completed” tab.
In the top block, you’ll find space to list system specific, or organization specific, information.
You’ll see in the last block, IS type, you could select enclave type. For UID, unique identifier, this
is a number unique to your organization, your organization’s schema, or naming system.
Next, there are several column headers.
Item Identifier: Identification of a unique weakness that is used to track and correlate the
weaknesses that are ongoing throughout the quarterly submissions within the organization.
The numbering scheme is determined by your organization.
Weakness or Deficiency: This represents any program level or system level deficiency that
poses an unacceptable risk of compromise in confidentiality, integrity, or availability to the
system.
Technical Implementation of A&A in the NISP – Student Guide Page 20 of 28
Security Control: Here you can list the security control from NIST Special Publication 800‐53 and
directly relate to the weakness identified in the weakness or deficiency column. Enter the
security control that correlates with the weakness or deficiency.
POC: Enter the title of a position within the organization that is responsible for mitigating the
weakness.
Resources Required: Include the total funding requirements of the security solution. Also note if
the resources are current, new, or re‐allocated.
Scheduled Completion Date: Enter a date based on a realistic estimate of the amount of time
needed to procure and allocate the resources required for corrective action. Enter either the
estimated completion date or NA if the risk is going to be accepted. Never change this date. If
the security weakness is resolved before or after the scheduled completion date, enter the
actual completion date in the status field.
Milestones with Completion Dates: Enter specific high level steps to be executed in mitigating
the weaknesses and the estimated completion date for each step.
Changes to Milestones: Enter new estimated completion dates for milestones and the reason
for the change. Indicate the new estimated date for the milestone completion if the original
date is not met, and indicate the reason for the change.
Weakness/Deficiency Identified by: List the source of the weakness plus the reviewing agency,
the organization, and the date that the weakness was identified.
Risk Level (Low/Med/High): List risk level by high, medium, or low. High risk means that there is
risk of a catastrophic effect on the system or operations. Medium means there is a severe
adverse risk to system or operations, and low means that there is risk of limited adverse effect
to the system or operations.
Estimated Cost: Enter the total estimated cost, which may include man hours, by adding up the
individual estimated costs of correcting each weakness or deficiency.
Status: Note the state of the weakness: completed, ongoing, delayed, planned, or accepted.
Comments: Enter explanations for a delay or change in a milestone or a scheduled completion
date, or identify obstacles or challenges that are non‐funding related, such as lack of personnel
or expertise related to that personnel.
Technical Implementation of A&A in the NISP – Student Guide Page 21 of 28
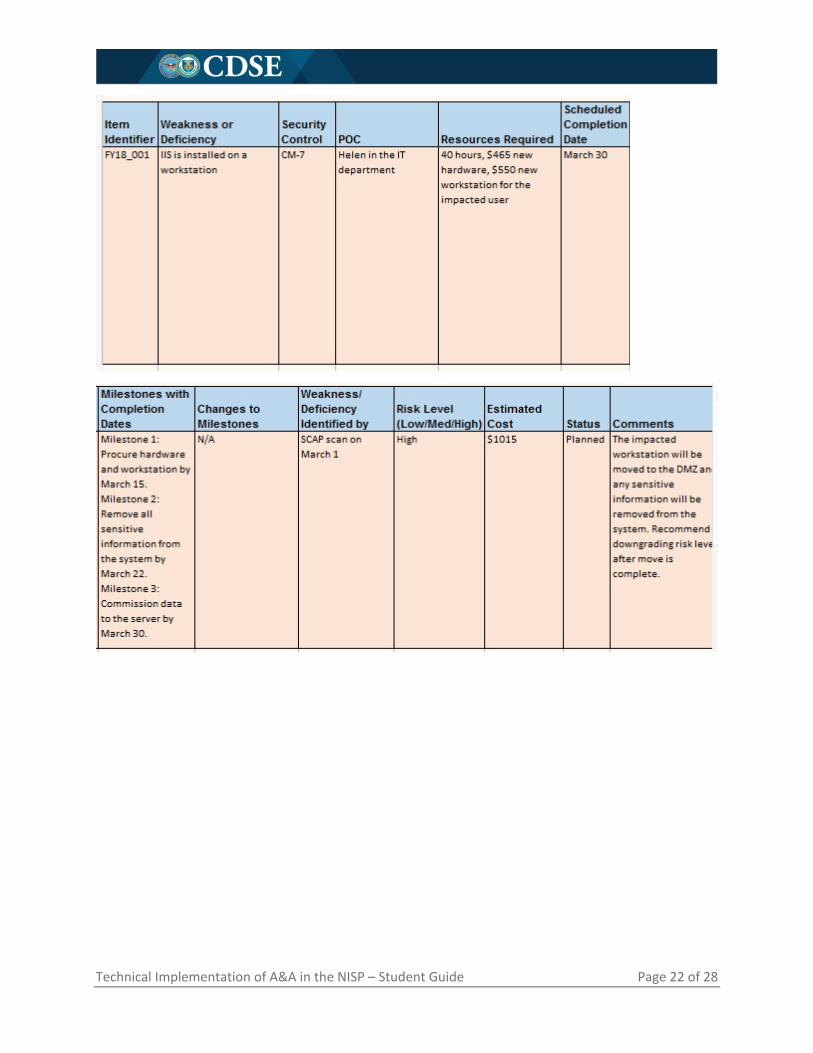
Using a POA&M Template
As an example, let’s look at the open finding V‐3347, Internet Information System, or IIS.
The Discussion tab states that IIS may allow unauthorized internet services to be hosted, which
would be a significant risk.
This has appeared as an open finding because Lockhardt, Inc. is using a workstation to host
some web content, but because of the criticality of the web‐accessible information, the data
must be transferred to a dedicated server prior to removing the service.
This is how Monique can enter her mitigation plan into the POA&M:
Monique will enter FY18_001 as an item identifier, which is consistent with the schema defined
by the organization. This will allow the organization to track and correlate weaknesses
consistently.
The weakness or deficiency in this case is that IIS is installed on a workstation as cited in the
Discussions tab.
The Relevant security control is CM‐7, which is the security control defined in NIST SP 800‐53 that is impacted by this vulnerability. The POC is an IT staff member. Monique estimates 40 hours are needed for the fix and $465 in new hardware costs. Monique estimates the work will be completed in 30 days. Today is March first, so she enters March 30. Monique estimates three milestones. She expects to procure the hardware by March 15, remove all sensitive information from the system by March 22, and commission data to the server by March 30. At this stage, there aren’t any changes to milestones, so Monique enters N/A for Not Applicable. The weakness was identified during Monique’s SCAP scan on March 1, and it is a high risk. The estimated cost for the new hardware and new workstation is $1,015. The status is planned. Monique adds in the comments that the impacted workstation will be moved to the
Demilitarized Zone (DMZ) and any sensitive information will be removed from the system.
Recommend downgrading risk level after move is complete.
Technical Implementation of A&A in the NISP – Student Guide Page 22 of 28
Technical Implementation of A&A in the NISP – Student Guide Page 23 of 28
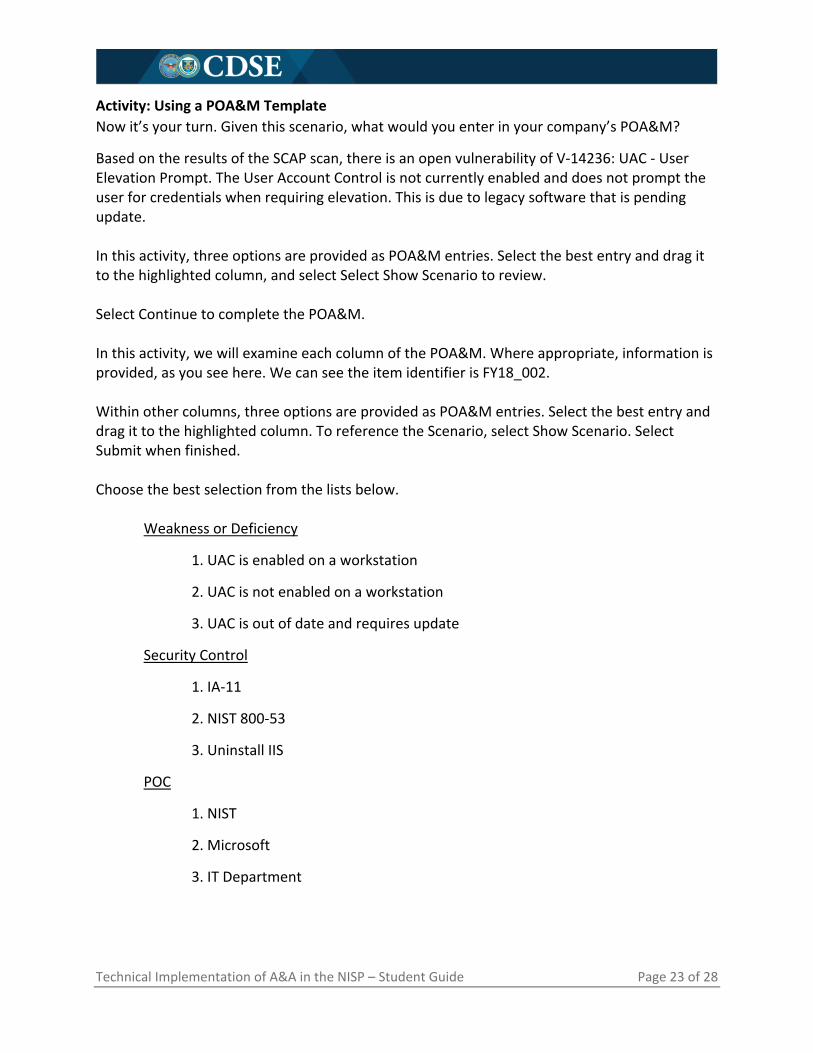
Activity: Using a POA&M Template
Now it’s your turn. Given this scenario, what would you enter in your company’s POA&M?
Based on the results of the SCAP scan, there is an open vulnerability of V‐14236: UAC ‐ User Elevation Prompt. The User Account Control is not currently enabled and does not prompt the user for credentials when requiring elevation. This is due to legacy software that is pending update. In this activity, three options are provided as POA&M entries. Select the best entry and drag it to the highlighted column, and select Select Show Scenario to review. Select Continue to complete the POA&M. In this activity, we will examine each column of the POA&M. Where appropriate, information is provided, as you see here. We can see the item identifier is FY18_002. Within other columns, three options are provided as POA&M entries. Select the best entry and drag it to the highlighted column. To reference the Scenario, select Show Scenario. Select Submit when finished. Choose the best selection from the lists below.
Weakness or Deficiency
1. UAC is enabled on a workstation
2. UAC is not enabled on a workstation
3. UAC is out of date and requires update
Security Control
1. IA‐11
2. NIST 800‐53
3. Uninstall IIS
POC
1. NIST
2. Microsoft
3. IT Department
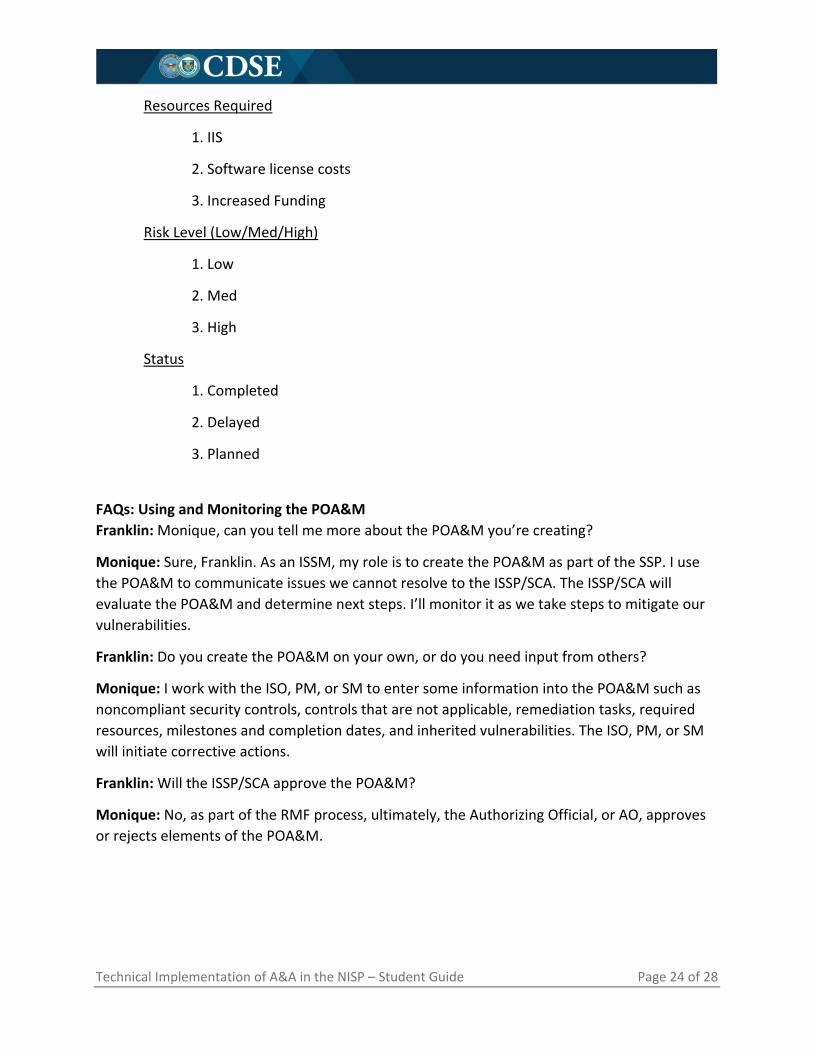
Technical Implementation of A&A in the NISP – Student Guide Page 24 of 28
Resources Required
1. IIS
2. Software license costs
3. Increased Funding
Risk Level (Low/Med/High)
1. Low
2. Med
3. High
Status
1. Completed
2. Delayed
3. Planned
FAQs: Using and Monitoring the POA&M
Franklin: Monique, can you tell me more about the POA&M you’re creating?
Monique: Sure, Franklin. As an ISSM, my role is to create the POA&M as part of the SSP. I use
the POA&M to communicate issues we cannot resolve to the ISSP/SCA. The ISSP/SCA will
evaluate the POA&M and determine next steps. I’ll monitor it as we take steps to mitigate our
vulnerabilities.
Franklin: Do you create the POA&M on your own, or do you need input from others?
Monique: I work with the ISO, PM, or SM to enter some information into the POA&M such as
noncompliant security controls, controls that are not applicable, remediation tasks, required
resources, milestones and completion dates, and inherited vulnerabilities. The ISO, PM, or SM
will initiate corrective actions.
Franklin: Will the ISSP/SCA approve the POA&M?
Monique: No, as part of the RMF process, ultimately, the Authorizing Official, or AO, approves
or rejects elements of the POA&M.
Technical Implementation of A&A in the NISP – Student Guide Page 25 of 28
Franklin: Thank you, Monique. This is much clearer to me now.
Knowledge Check 5.1
In the table below, each position is not aligned with the correct POA&M responsibility. Draw a
line from each position to the correct POA&M responsibility.
Position POA&M Responsibility
ISSM Approves or rejects
ISSP/SCA Initiates corrective actions
AO Evaluates vulnerabilities
ISO or PM/SM Monitors progress
Knowledge Check 5.2
Answer this question.
What is the purpose of a POA&M?
a. Document the RMF process b. Monitor progress in mitigating vulnerabilities
c. Communicate vulnerabilities to the FSO
Lesson Conclusion
In this lesson, you learned the ISSM’s responsibilities for creating and monitoring a POA&M, the
end product of the SCAP scan and STIG comparison. This living document will aid you in
mitigating your vulnerabilities and documenting them for the AO.
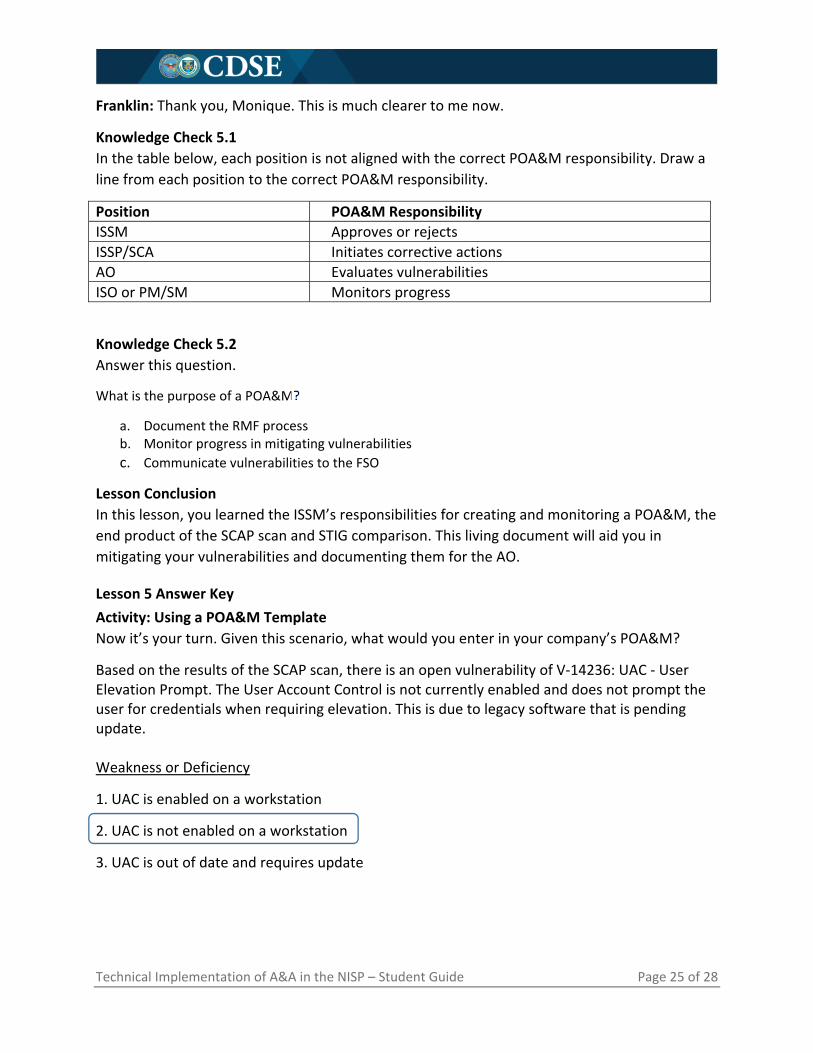
Lesson 5 Answer Key
Activity: Using a POA&M Template
Now it’s your turn. Given this scenario, what would you enter in your company’s POA&M?
Based on the results of the SCAP scan, there is an open vulnerability of V‐14236: UAC ‐ User Elevation Prompt. The User Account Control is not currently enabled and does not prompt the user for credentials when requiring elevation. This is due to legacy software that is pending update. Weakness or Deficiency
1. UAC is enabled on a workstation
2. UAC is not enabled on a workstation
3. UAC is out of date and requires update

Technical Implementation of A&A in the NISP – Student Guide Page 26 of 28
Security Control
1. IA‐11
2. NIST 800‐53
3. Uninstall IIS
POC
1. NIST
2. Microsoft
3. IT Department
Resources Required
1. IIS
2. Software license costs
3. Increased Funding
Risk Level (Low/Med/High)
1. Low
2. Med
3. High
Any answer is correct
Status
1. Completed
2. Delayed
3. Planned
Technical Implementation of A&A in the NISP – Student Guide Page 27 of 28
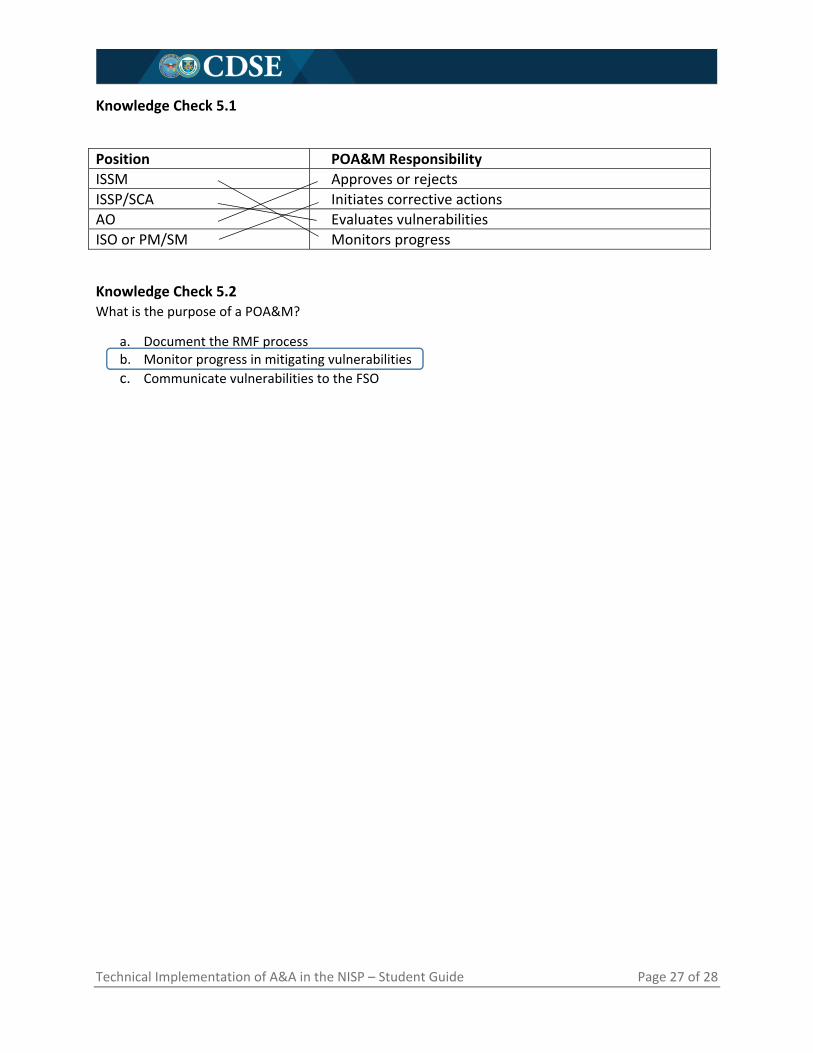
Knowledge Check 5.1
Position POA&M Responsibility
ISSM Approves or rejects
ISSP/SCA Initiates corrective actions
AO Evaluates vulnerabilities
ISO or PM/SM Monitors progress
Knowledge Check 5.2 What is the purpose of a POA&M?
a. Document the RMF process b. Monitor progress in mitigating vulnerabilities
c. Communicate vulnerabilities to the FSO
Technical Implementation of A&A in the NISP – Student Guide Page 28 of 28
Course Review This course provided you with instruction needed to use the SCAP Compliance Checker and
STIG Viewer to identify vulnerabilities and document unmitigated vulnerabilities on a POA&M.
If you are an ISSM like Monique, you now have more tools to prepare for authorization.
Here are the course objectives.
Distinguish the steps to install and properly configure the SCAP Compliance Checker and
STIG Viewer
Perform the steps used to conduct a SCAP scan to assess risks to information systems
Identify mitigation strategies of a known vulnerability
Identify unmitigated vulnerabilities required to be included in a Plan of Actions &
Milestones (POA&M)
Ready to test your knowledge? Start the exam by selecting the exam link.