technical guide -...
TRANSCRIPT
Page 1 of 63
Technical Guide Updated June 20, 2018

Page 2 of 63
How to use VRMark ........................................................................................................ 4
Choose a performance level ........................................................................................... 5
Choose an evaluation mode ........................................................................................... 6
Choose a platform ............................................................................................................ 7
Target frame rate .............................................................................................................. 8
Judge with your own eyes ................................................................................................ 9
Setup and settings ........................................................................................................ 10
Editions ............................................................................................................................. 10
System requirements for VR HMDs ............................................................................. 12
How to benchmark performance ................................................................................. 14
Options ............................................................................................................................. 15
VRMark Orange Room .................................................................................................. 18
Orange Room benchmark ............................................................................................. 18
Orange Room experience .............................................................................................. 20
Controls for Experience mode ...................................................................................... 21
Custom runs .................................................................................................................... 22
System requirements ..................................................................................................... 24
Default settings ............................................................................................................... 25
VRMark Cyan Room ...................................................................................................... 27
Cyan Room benchmark ................................................................................................. 27
Cyan Room experience .................................................................................................. 29
Controls for Experience mode ...................................................................................... 30
Custom runs .................................................................................................................... 32
System requirements ..................................................................................................... 34
Default settings ............................................................................................................... 35
VRMark Blue Room ....................................................................................................... 37
Blue Room benchmark .................................................................................................. 37
Blue Room experience ................................................................................................... 39
Controls for Experience mode ...................................................................................... 40
Custom runs .................................................................................................................... 41
System requirements ..................................................................................................... 43
Default settings ............................................................................................................... 44
VRMark engines ............................................................................................................ 45
Orange Room and Blue Room engine ......................................................................... 45
Cyan Room engine .......................................................................................................... 48
Page 3 of 63
Benchmark results ........................................................................................................ 53
Benchmark score ............................................................................................................ 53
Result details ................................................................................................................... 55
How does your score compare? ................................................................................... 56
System information ........................................................................................................ 57
Monitoring ....................................................................................................................... 58
How to report scores ...................................................................................................... 60
Release notes ................................................................................................................ 61
About UL ........................................................................................................................ 63

Page 4 of 63
HOW TO USE VRMARK
VRMark is a benchmarking application for measuring VR performance. It is
built around performance levels, which we call Rooms. A Room is a piece of
VR content carefully designed to require a specific level of VR performance.
There are three Rooms in the latest version of VRMark. The Orange Room is
based on the recommended hardware requirements for the HTC Vive and
Oculus Rift. The Cyan Room is heavier test that also uses DirectX 12. The
Blue Room is a very demanding test that sets a high bar for future hardware
generations.
Each Room can be run as a Benchmark, which tests performance
objectively, or as a free-roaming Experience, which lets you judge the quality
of the rendering with your own eyes.
In addition, each Benchmark and Experience can be run on your monitor in
Desktop mode, no headset required, or on a connected headset in HMD
mode.
With three Rooms, two run modes, two platform modes, and custom
settings, VRMark provides a wide range of options for testing and evaluating
the VR performance of the latest PC hardware.
DESKTOP MODE HMD MODE
BENCHMARK
"Is my PC ready for VR?" – Test
your system before you buy a
headset.
See how a system performs
with actual VR hardware and
software.
EXPERIENCE
Enjoy exploring each scene in
your own time on your
monitor.
Judge the subjective quality of
the VR experience with your
own eyes.
Page 5 of 63
CHOOSE A PERFORMANCE LEVEL
VRMark measures your PC's ability to meet the performance requirements
for different types of virtual reality content. The latest release includes three
levels based on VR gaming content.
Orange Room
The Orange Room benchmark shows the impressive level of detail that can
be achieved on a PC that meets the recommended hardware requirements
for the HTC Vive and Oculus Rift. A PC that passes this test is ready for the
two most popular VR systems available today.
Cyan Room
Cyan Room is a DirectX 12 benchmark. Sitting between the Orange and Blue
Rooms, it features a large, complex scene and many eye-catching effects.
Cyan Room shows how using an API with less overhead can help developers
deliver impressive VR experiences even on modest PC systems.
Blue Room
The Blue Room is a much more demanding test. It's ideal for benchmarking
the latest graphics cards. With its massive 5K rendering resolution and
spectacular volumetric lighting effects, the Blue Room sets the bar for future
hardware generations.

Page 6 of 63
CHOOSE AN EVALUATION MODE
VRMark offers two modes that let you test and assess VR performance both
objectively and subjectively.
Benchmark mode
The purpose of the benchmark is to measure a PC's ability to meet the
performance requirements for a specific level of virtual reality content. The
benchmark workload runs on a fixed path, which makes it easy to repeat
the test on other systems.
In desktop mode, the benchmark runs on your monitor. A headset is not
required. At the end of the test, you'll see whether your PC is VR-ready for
that level of content, and if not, how far it falls short. See the Results section
later in this guide for more details.
In HMD mode, you can run the benchmark on a connected headset to test
performance with actual VR hardware and runtime libraries. Note that VR
software limits the frame rate to the refresh rate of the headset, which is
90 Hz for both HTC Vive and Oculus Rift. This means that the frame rate will
be capped at 90 FPS even when the system is capable of rendering at a
higher frame rate.
⚠ For your own comfort, you should not wear the headset while
running the benchmark in HMD mode.
Experience mode
In Experience mode, you can freely explore each test scene in your own
time.
With a connected HMD, Experience mode is a great way to see the quality of
the VR experience on the system with your own eyes. VR headsets use
clever techniques to compensate for missed frames and low frame rates.
Even when the benchmark shows that the average frame rate is below the
target, you may be surprised by the quality of the experience in Experience
mode.
In desktop mode, Experience mode runs on your monitor. Take your time
and enjoy getting up close to the scenes.
Experience mode does not produce a score or other results.
Page 7 of 63
CHOOSE A PLATFORM
You can choose to run VRMark on your desktop monitor or on a connected
VR HMD. The test content is identical whichever platform you choose.
Desktop mode
Desktop mode runs on your monitor, no headset required. It's the ideal way
to answer the question, "Is my PC ready for VR?" before buying a headset.
Desktop mode is the default in VRMark. The workload is exactly the same as
when an HMD is connected. It has the same resolution and a view is
rendered for each eye.
HMD mode
When a supported HMD1 is attached to the system, choosing HMD mode
will render the workload on the headset. Note that the frame rate will be
capped at 90 FPS when running on an HTC Vive or Oculus Rift as these
HMDs are limited by vertical sync at 90 Hz.
To use HMD mode, go to the OPTIONS screen and set "Allow content to run
on an HMD" to Yes.
1 VRMark currently supports HTC Vive and Oculus Rift.
Page 8 of 63
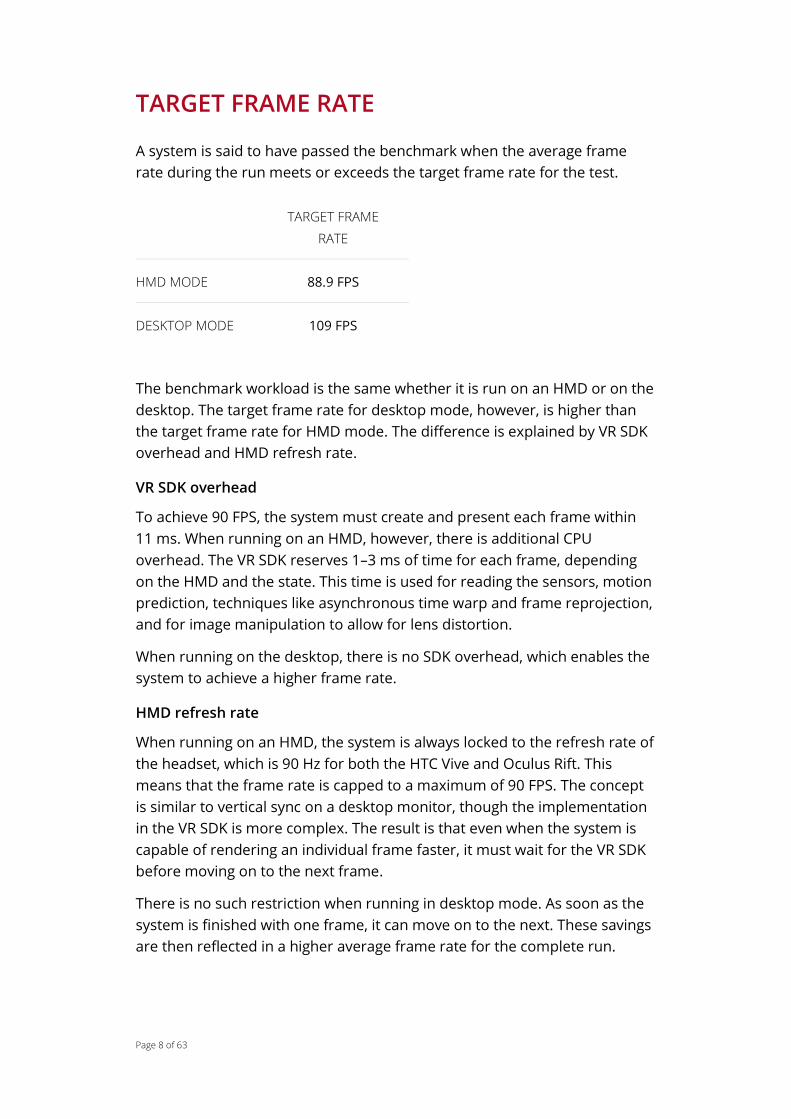
TARGET FRAME RATE
A system is said to have passed the benchmark when the average frame
rate during the run meets or exceeds the target frame rate for the test.
TARGET FRAME
RATE
HMD MODE 88.9 FPS
DESKTOP MODE 109 FPS
The benchmark workload is the same whether it is run on an HMD or on the
desktop. The target frame rate for desktop mode, however, is higher than
the target frame rate for HMD mode. The difference is explained by VR SDK
overhead and HMD refresh rate.
VR SDK overhead
To achieve 90 FPS, the system must create and present each frame within
11 ms. When running on an HMD, however, there is additional CPU
overhead. The VR SDK reserves 1–3 ms of time for each frame, depending
on the HMD and the state. This time is used for reading the sensors, motion
prediction, techniques like asynchronous time warp and frame reprojection,
and for image manipulation to allow for lens distortion.
When running on the desktop, there is no SDK overhead, which enables the
system to achieve a higher frame rate.
HMD refresh rate
When running on an HMD, the system is always locked to the refresh rate of
the headset, which is 90 Hz for both the HTC Vive and Oculus Rift. This
means that the frame rate is capped to a maximum of 90 FPS. The concept
is similar to vertical sync on a desktop monitor, though the implementation
in the VR SDK is more complex. The result is that even when the system is
capable of rendering an individual frame faster, it must wait for the VR SDK
before moving on to the next frame.
There is no such restriction when running in desktop mode. As soon as the
system is finished with one frame, it can move on to the next. These savings
are then reflected in a higher average frame rate for the complete run.

Page 9 of 63
JUDGE WITH YOUR OWN EYES
One of the hurdles for VR becoming mainstream is that the performance
requirements are far higher than for a typical game.
When a system's average frame rate is below the target frame rate for the
test, it means the system is not strictly VR-ready for that level of VR content.
However, VR headsets will use clever techniques to compensate for the
missed frames. In many cases, these techniques are very effective at
providing a good-quality VR experience for the user by covering up missed
frames.
When a system falls short of the benchmark's target frame rate, we highly
recommend trying Experience mode with an HMD for yourself. You may
find that, even though the rendering frame rate is below the target, the
actual experience with a headset is still comfortable and enjoyable.
This is especially the case for systems with the recently announced, lower
minimum hardware requirements for the Oculus Rift. These systems cannot
render the Orange Room benchmark at 90 FPS on an HMD. Instead, they
rely on a technique called Asynchronous SpaceWarp (ASW) in the Oculus
Runtime.
"The Rift operates at 90 Hz. When an application fails to submit frames at 90 Hz, the
Rift runtime drops the application down to 45 Hz with ASW providing each
intermediate frame. ASW applies animation detection, camera translation, and head
translation to previous frames in order to predict the next frame. As a result, motion
is smoothed and applications can run on lower performance hardware."
Page 10 of 63
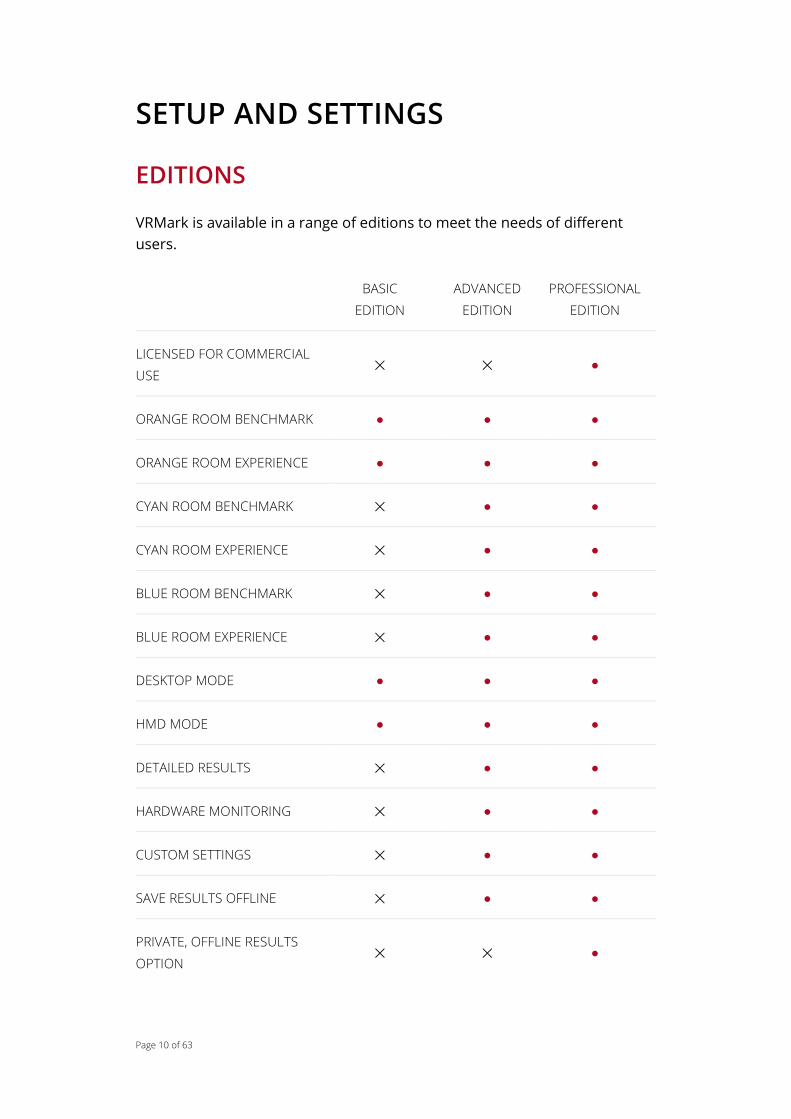
SETUP AND SETTINGS
EDITIONS
VRMark is available in a range of editions to meet the needs of different
users.
BASIC
EDITION
ADVANCED
EDITION
PROFESSIONAL
EDITION
LICENSED FOR COMMERCIAL
USE ✕ ✕ ●
ORANGE ROOM BENCHMARK ● ● ●
ORANGE ROOM EXPERIENCE ● ● ●
CYAN ROOM BENCHMARK ✕ ● ●
CYAN ROOM EXPERIENCE ✕ ● ●
BLUE ROOM BENCHMARK ✕ ● ●
BLUE ROOM EXPERIENCE ✕ ● ●
DESKTOP MODE ● ● ●
HMD MODE ● ● ●
DETAILED RESULTS ✕ ● ●
HARDWARE MONITORING ✕ ● ●
CUSTOM SETTINGS ✕ ● ●
SAVE RESULTS OFFLINE ✕ ● ●
PRIVATE, OFFLINE RESULTS
OPTION ✕ ✕ ●

Page 11 of 63
BASIC
EDITION
ADVANCED
EDITION
PROFESSIONAL
EDITION
COMMAND LINE
AUTOMATION ✕ ✕ ●
SUPPORT Online Online Email & phone
PRICE Free $19.99 From $995
p.a.

Page 12 of 63
SYSTEM REQUIREMENTS FOR VR HMDS
HTC Vive
RECOMMENDED
OS Windows 7 with SP1
64-bit
PROCESSOR Intel Core i5-4590
or AMD FX 8350
RAM 4 GB
GPU NVIDIA GeForce GTX 1060
or AMD Radeon RX 480
VIDEO
OUTPUT
HDMI 1.4
or DisplayPort 1.2
USB PORTS 1×USB 2.0
Oculus Rift
RECOMMENDED MINIMUM2
OS Windows 7 with SP1, 64-bit Windows 8, 64-bit
PROCESSOR Intel Core i5-4590 Intel Core i3-6100
or AMD FX 4350
RAM 8 GB 8 GB
GPU NVIDIA GeForce GTX 970
or AMD R9 290 NVIDIA GeForce GTX 960
VIDEO
OUTPUT HDMI 1.3 HDMI 1.3
2 Announced at Oculus Connect on October 6, 2016. The minimum spec relies on Asynchronous SpaceWarp.

Page 13 of 63
RECOMMENDED MINIMUM2
USB PORTS 3×USB 3.0
1×USB 2.0
1×USB 3.0
2×USB 2.0

Page 14 of 63
HOW TO BENCHMARK PERFORMANCE
To get accurate, consistent benchmark results you should test clean systems
without third party software installed. If this is not possible, you should
close as many background tasks as possible, especially automatic updates
or tasks that feature pop-up alerts such as email and messaging programs.
⚠ When running in desktop mode, ensure that HMD processes,
such as the SteamVR empty world scene and the Oculus Rift
home scene, are closed as they can negatively affect your
results.
Vertical sync, FreeSync, and G-SYNC can also negatively affect
your results. They should be disabled before running the
benchmark.
Recommended process
1. Install all critical updates to ensure your operating system is up to date.
2. Install the latest drivers for your hardware.
3. Close other programs.
4. Run the benchmark.
Expert process
1. Install all critical updates to ensure your operating system is up to date.
2. Install the latest drivers for your hardware.
3. Restart the computer or device.
4. Wait 2 minutes for startup to complete.
5. Close other programs, including those running in the background.
6. Wait for 15 minutes.
7. Run the benchmark.
8. Repeat from step 3 at least three times to verify your results.

Page 15 of 63
OPTIONS
License
If you have a VRMark Advanced Edition or Professional Edition upgrade key,
copy it into the box and press the Register button. To unregister your key, to
move your license to a different PC for example, press the Unregister
button.
Version details
Here you see the current version number of the VRMark application and the
different Rooms. If a newer version is available, you will be able to update
from this screen.
Language
Use this drop down to change the display language. Your choices are:
English
German
Simplified Chinese
Russian
Experience mode audio
Use this setting to turn the sound effects in Experience mode on or off. The
option is provided as a preference. It has no effect on performance.
Validate result online
This option is only available in VRMark Professional Edition where it is
disabled by default. In VRMark Basic and Advanced Editions, all results are
validated online automatically.
Automatically hide results online
Check this box if you would prefer to keep your VRMark scores private.
Hidden results are not visible to other users and do not appear in search
results.
VRMark Basic Edition, disabled by default and cannot be selected.
VRMark Advanced Edition, disabled by default.
VRMark Professional Edition, selected by default.
Scan SystemInfo
SystemInfo is a component used in UL benchmarks to identify the hardware
in your system or device. It does not collect any personally identifiable
Page 16 of 63
information. This option is selected by default and is required in order to get
a valid benchmark test score.
SystemInfo hardware monitoring
This option controls whether SystemInfo monitors your GPU frequency,
load, and temperature, and other hardware information during the
benchmark run. This option is selected by default.
Allow content to run on an HMD
Selecting this option lets you use your VR headset as the output device
instead of your desktop monitor. When you run a Benchmark or Experience
on a VR headset, the frame rate will be capped at 90 frames per second. You
will not get full result details.
⚠ The benchmarks use an animated camera. For your own
comfort, you should not wear the headset while the test is
running. Some headsets, such as the Oculus Rift, detect
whether the headset is being worn. You will need to cover the
proximity sensor with your finger or tape. Or you can place the
headset on your forehead rather than over your eyes.
Page 17 of 63
Page 18 of 63
VRMARK ORANGE ROOM
ORANGE ROOM BENCHMARK
The VRMark Orange Room benchmark shows the impressive level of detail
that can be achieved on a PC that meets the recommended hardware
requirements for the HTC Vive and Oculus Rift. If your PC passes this test,
it's ready for the two most popular VR systems available today.
Target frame rate
The Orange Room benchmark has been carefully tuned so that a system
with the recommended hardware for HTC Vive and Oculus Rift will achieve a
consistent average frame rate of 90 FPS when running on an HMD. The
target frame rate is slightly lower, 88.9 FPS, to allow for occasional missed
frames.
On the desktop, the same workload running on the same hardware
achieves a consistent average frame rate of 109 FPS. The difference is
explained by VR SDK overhead and the HMD refresh rate, as explained
earlier in this guide.
Implementation
The Orange Room benchmark focuses on geometry processing, illumination
and GPU simulated particles. The test uses a deferred, tile-based lighting
method with seven shadow-casting spotlight. It features bloom effects and
uses FXAA as an anti-aliasing solution.
The benchmark features CPU simulated physics using the Bullet Open
Source Physics C++ Library. CPU simulated cloths are created using
RigidBodies, SoftBodies and DynamicsWorld.
The rendering resolution is 2264 × 1348, which is 1132 × 1348 per eye.
When a headset is connected, the rendered image is distorted to make it
look natural when seen through the headset's lens and then scaled to the
native display resolution, 1080 × 1200 per eye, used by both the HTC Vive
and the Oculus Rift.
Benchmarking on your desktop
By default, the benchmark runs on your monitor to show you whether your
PC is VR-ready before you purchase a VR headset. To pass the test, your PC
has to maintain a consistent frame rate of 109 FPS or above without
dropping frames.

Page 19 of 63
Benchmarking with an HMD connected
You can choose to run the test on a connected HMD from the OPTIONS
screen. Some VR headsets, such as the Oculus Rift, detect whether the
headset is being worn. You will need to cover the proximity sensor with your
finger or tape. Or you can place the headset on your forehead rather than
over your eyes. The target frame rate is 88.9 FPS when an HMD is
connected.
⚠ VRMark benchmark tests use an animated camera. For your
comfort, please take off your headset while the test is running.
Page 20 of 63
ORANGE ROOM EXPERIENCE
In Experience mode, you can freely explore the test scene in your own time.
With a connected HMD, Experience mode is a great way to see the quality of
the VR experience on the system with your own eyes. VR headsets use
clever techniques to compensate for missed frames and low frame rates.
Even when the benchmark shows that the average frame rate is below the
target, you may be surprised by the quality of the experience in Experience
mode.
On the Custom Run screen, you can change the rendering resolution and
other settings to make the scene more or less demanding. This is a great
way to see how performance affects your personal VR experience.
In desktop mode, Experience mode runs on your monitor. Take your time
and enjoy exploring the scene. Trying pressing the Space bar to toggle the
flashlight on and off.

Page 21 of 63
CONTROLS FOR EXPERIENCE MODE
HTC Vive
ACTION VIVE CONTROLLER
Flashlight on/off Touchpad button
Oculus Rift
ACTION KEYBOARD
OPTION 1
KEYBOARD
OPTION 2 GAMEPAD
Move WASD + QE Arrows +
PageUp/Dn Left stick
Flashlight on/off Space Return A button
Reset camera R R X button
Monitor
ACTION KEYBOARD
OPTION 1
KEYBOARD
OPTION 2 GAMEPAD
Look Mouse Mouse Right stick
Move WASD + QE Arrows +
PageUp/Dn Left stick
Flashlight on/off Space Return A button
Press the Esc key to end the Experience and return to the application.
Page 22 of 63
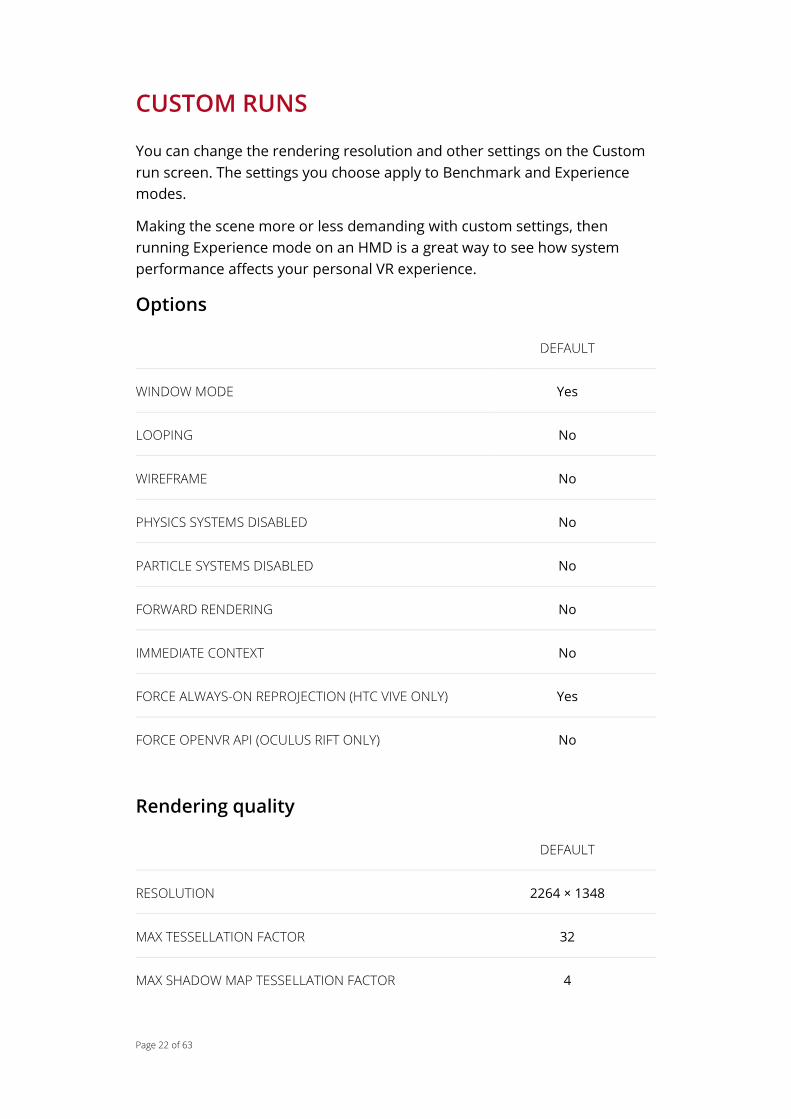
CUSTOM RUNS
You can change the rendering resolution and other settings on the Custom
run screen. The settings you choose apply to Benchmark and Experience
modes.
Making the scene more or less demanding with custom settings, then
running Experience mode on an HMD is a great way to see how system
performance affects your personal VR experience.
Options
DEFAULT
WINDOW MODE Yes
LOOPING No
WIREFRAME No
PHYSICS SYSTEMS DISABLED No
PARTICLE SYSTEMS DISABLED No
FORWARD RENDERING No
IMMEDIATE CONTEXT No
FORCE ALWAYS-ON REPROJECTION (HTC VIVE ONLY) Yes
FORCE OPENVR API (OCULUS RIFT ONLY) No
Rendering quality
DEFAULT
RESOLUTION 2264 × 1348
MAX TESSELLATION FACTOR 32
MAX SHADOW MAP TESSELLATION FACTOR 4

Page 23 of 63
DEFAULT
TEXTURE FILTERING MODE Trilinear
MAX AF ANISOTROPY 16
ANTIALIASING MODE FXAA
MSAA SAMPLE COUNT 2
TESSELLATION FACTOR SCALE 1

Page 24 of 63
SYSTEM REQUIREMENTS
OS Windows 7, 64-bit with SP1
PROCESSOR Dual core CPU with
SSE 4.1 support
RAM 2 GB
GPU DirectX 11
GPU MEMORY 1.5 GB

Page 25 of 63
DEFAULT SETTINGS
BENCHMARK MODE
RENDERING RESOLUTION 2264 × 1348
FRAME PRESENTATION Windowed split-screen
TARGET DESKTOP FRAME RATE 109 FPS
TARGET HMD FRAME RATE 88.9 FPS

Page 26 of 63
Page 27 of 63
VRMARK CYAN ROOM
CYAN ROOM BENCHMARK
Cyan Room is a DirectX 12 benchmark. Sitting between the Orange and Blue
Rooms, it features a large, complex scene and many eye-catching effects.
Cyan Room shows how using an API with less overhead can help developers
deliver impressive VR experiences even on modest PC systems.
Target frame rate
The target frame rate for the Cyan Room benchmark when running in HMD
mode is 88.9 FPS, slightly lower than the 90 Hz refresh rate of HTC Vive and
Oculus Rift to allow for occasional missed frames.
On the desktop, the same workload running on the same hardware
achieves a consistent average frame rate of 109 FPS. The difference is
explained by VR SDK overhead and HMD refresh rate, as explained earlier in
this guide.
Implementation
The Cyan Room benchmark uses a deferred renderer and focuses on
geometry processing, illumination, and GPU-simulated particles. The test
uses a deferred tile-based lighting method with several shadow casting spot
lights. The test utilizes high-quality SSAO, bloom effects, and CMAA anti-
aliasing.
The rendering resolution is 2264 × 1348, which is 1132 × 1348 per eye.
When a headset is connected, the rendered image is distorted to make it
look natural when seen through the headset's lens and then scaled to the
native display resolution, 1080 × 1200 per eye, used by both the HTC Vive
and the Oculus Rift.
Benchmarking on your desktop
By default, the benchmark runs on your monitor. To pass the test, your PC
must maintain a frame rate of 109 FPS or above without dropping frames.
Benchmarking with an HMD connected
You can choose to run the test on a connected HMD from the OPTIONS
screen. Some VR headsets, such as the Oculus Rift, detect whether the
headset is being worn. You will need to cover the proximity sensor with your
finger or tape. Or you can place the headset on your forehead rather than

Page 28 of 63
over your eyes. The target frame rate is 88.9 FPS when an HMD is
connected.
⚠ VRMark benchmark tests use an animated camera. For your
comfort, please take off your headset while the test is running.
Page 29 of 63
CYAN ROOM EXPERIENCE
In Experience mode, you can freely explore the test scene in your own time.
With a connected HMD, Experience mode is a great way to see the quality of
the VR experience on the system with your own eyes. VR headsets use
clever techniques to compensate for missed frames and low frame rates.
Even when the benchmark shows that the average frame rate is below the
target, you may be surprised by the quality of the experience in Experience
mode.
You can press the Space bar or gamepad button to toggle a flashlight on
and off. The flashlight effect cannot be compensated for by asynchronous
time warp or other techniques, making it a good tool for judging
performance.
On the Custom Run screen, you can change the rendering resolution and
other settings to make the scene more or less demanding. This is a great
way to see how performance affects your personal VR experience.
In desktop mode, Experience mode runs on your monitor. Take your time
and enjoy exploring the scene.
Page 30 of 63
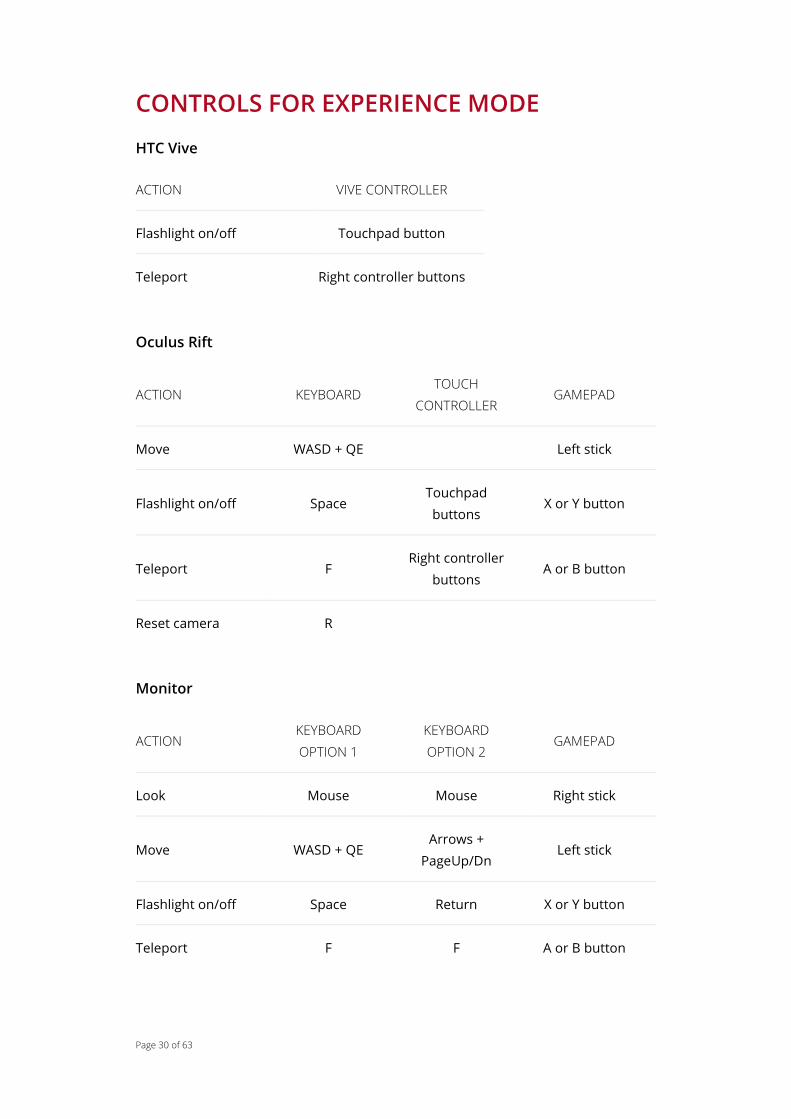
CONTROLS FOR EXPERIENCE MODE
HTC Vive
ACTION VIVE CONTROLLER
Flashlight on/off Touchpad button
Teleport Right controller buttons
Oculus Rift
ACTION KEYBOARD TOUCH
CONTROLLER GAMEPAD
Move WASD + QE Left stick
Flashlight on/off Space Touchpad
buttons X or Y button
Teleport F Right controller
buttons A or B button
Reset camera R
Monitor
ACTION KEYBOARD
OPTION 1
KEYBOARD
OPTION 2 GAMEPAD
Look Mouse Mouse Right stick
Move WASD + QE Arrows +
PageUp/Dn Left stick
Flashlight on/off Space Return X or Y button
Teleport F F A or B button

Page 31 of 63
Press the Esc key to end the Experience and return to the application.
Page 32 of 63
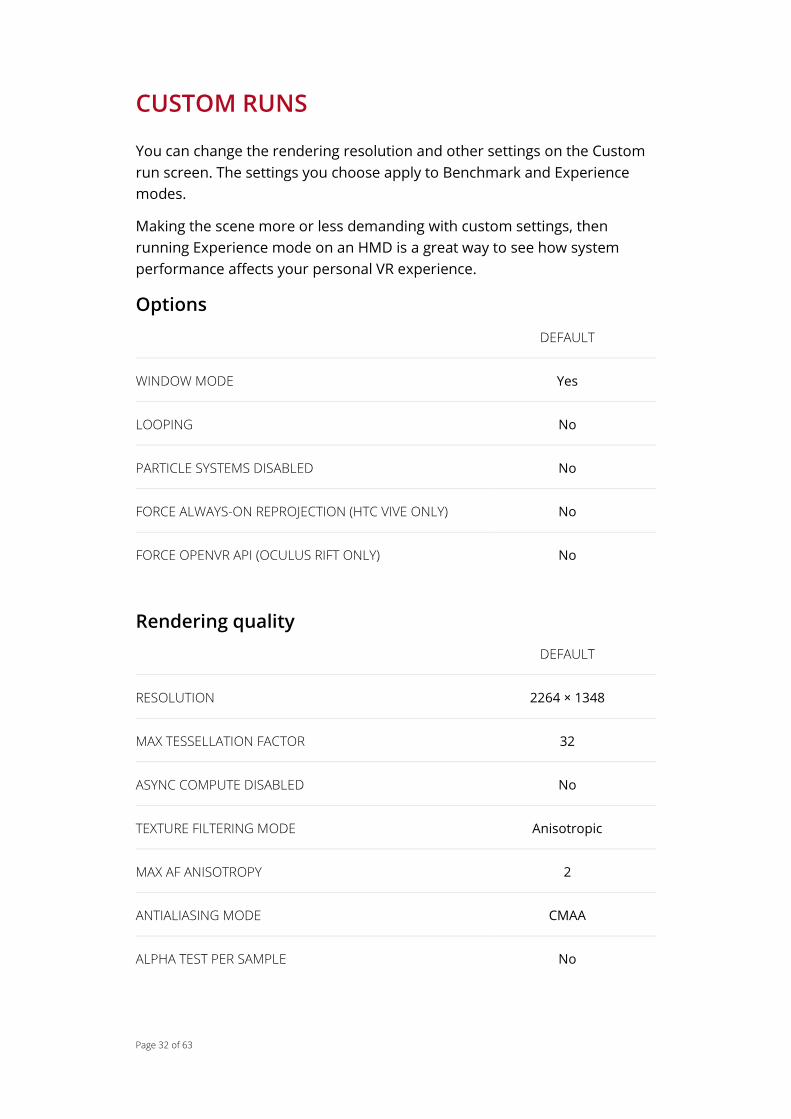
CUSTOM RUNS
You can change the rendering resolution and other settings on the Custom
run screen. The settings you choose apply to Benchmark and Experience
modes.
Making the scene more or less demanding with custom settings, then
running Experience mode on an HMD is a great way to see how system
performance affects your personal VR experience.
Options
DEFAULT
WINDOW MODE Yes
LOOPING No
PARTICLE SYSTEMS DISABLED No
FORCE ALWAYS-ON REPROJECTION (HTC VIVE ONLY) No
FORCE OPENVR API (OCULUS RIFT ONLY) No
Rendering quality
DEFAULT
RESOLUTION 2264 × 1348
MAX TESSELLATION FACTOR 32
ASYNC COMPUTE DISABLED No
TEXTURE FILTERING MODE Anisotropic
MAX AF ANISOTROPY 2
ANTIALIASING MODE CMAA
ALPHA TEST PER SAMPLE No

Page 33 of 63
DEFAULT
MSAA SAMPLE COUNT 1
TESSELLATION FACTOR SCALE 1

Page 34 of 63
SYSTEM REQUIREMENTS
OS Windows 10, 64-bit
PROCESSOR Dual core CPU with
SSE 4.1 support
RAM 3 GB
GPU DirectX 12 feature level 11_0
GPU MEMORY 2 GB
Page 35 of 63
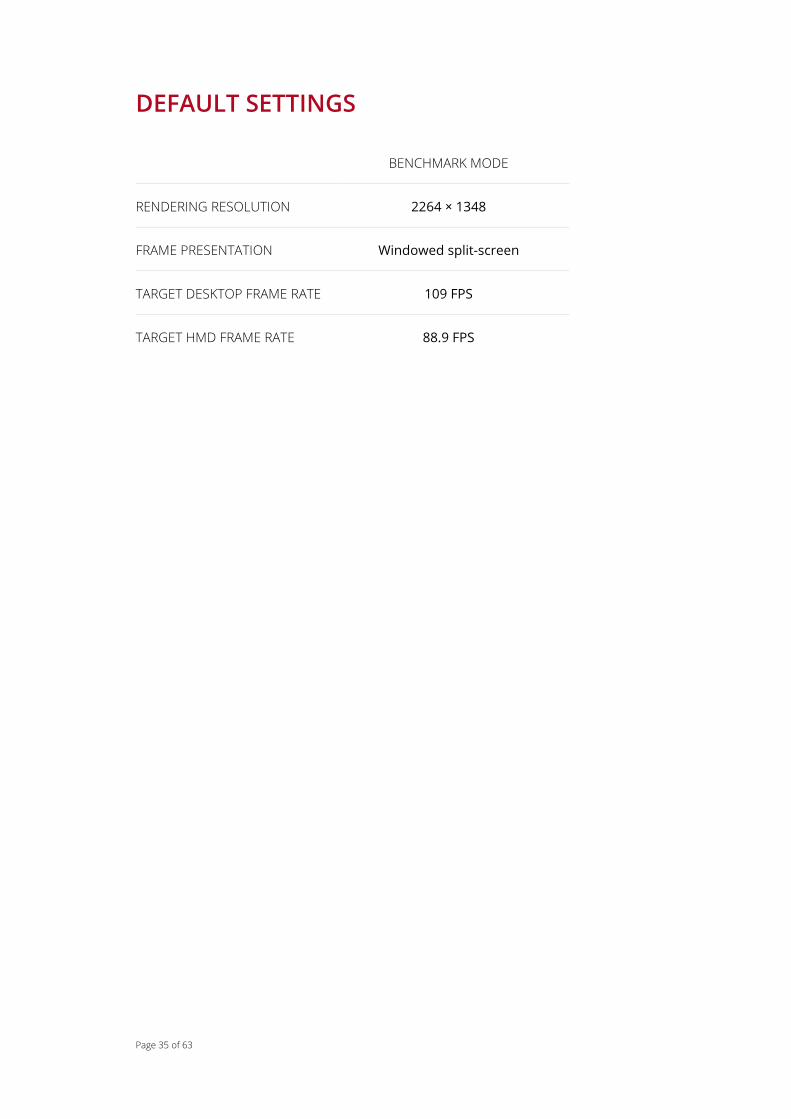
DEFAULT SETTINGS
BENCHMARK MODE
RENDERING RESOLUTION 2264 × 1348
FRAME PRESENTATION Windowed split-screen
TARGET DESKTOP FRAME RATE 109 FPS
TARGET HMD FRAME RATE 88.9 FPS

Page 36 of 63

Page 37 of 63
VRMARK BLUE ROOM
BLUE ROOM BENCHMARK
The Blue Room benchmark is a more demanding test with a greater level of
detail that requires more powerful hardware. In fact, as of October 2016, no
publicly available system running as sold is able to pass this test. This makes
it the ideal benchmark for comparing high-end systems that are limited to
90 FPS when running the Orange Room benchmark in HMD mode.
The Blue Room shows the amount of detail that may be common in future
VR games. A PC that passes this test will be able to run the latest VR games
on the HTC Vive and Oculus Rift at the highest settings, and may even be VR-
ready for the next generation of VR headsets.
Target frame rate
The target frame rate for the Blue Room benchmark when running in HMD
mode is 88.9 FPS, slightly lower than the 90 Hz refresh rate of HTC Vive and
Oculus Rift to allow for occasional missed frames.
On the desktop, the same workload running on the same hardware
achieves a consistent average frame rate of 109 FPS. The difference is
explained by VR SDK overhead and HMD refresh rate, as explained earlier in
this guide.
Implementation
The Blue Room test is a more intense test in terms of GPU load. It draws in a
higher resolution and has more geometry. This results in a higher CPU load
for preparing the scene and D3D calls. As a result, there is no CPU physics
load in the Blue Room.
Rendering work focuses on surface and volumetric illumination. The test
uses deferred tile-based lighting method with one volumetric shadow-
casting spotlight. The test features bloom effects and 2×MSAA as the anti-
aliasing solution with 16×Anisotropic filtering.
The rendering resolution is 5012 × 2880 (5K). When a headset is connected,
the rendered image is then distorted so that it looks natural when seen
through the headset's lens and scaled to the native 1080 × 1200 per eye
display resolution used by both the HTC Vive and the Oculus Rift.
Page 38 of 63
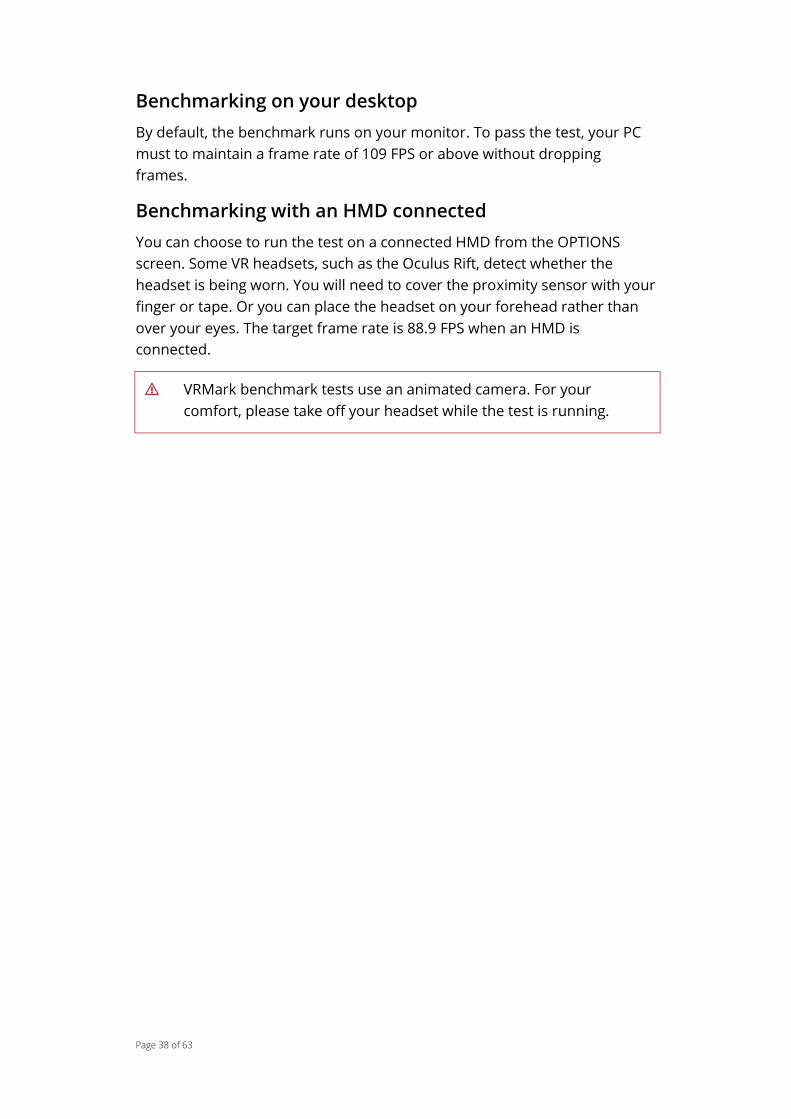
Benchmarking on your desktop
By default, the benchmark runs on your monitor. To pass the test, your PC
must to maintain a frame rate of 109 FPS or above without dropping
frames.
Benchmarking with an HMD connected
You can choose to run the test on a connected HMD from the OPTIONS
screen. Some VR headsets, such as the Oculus Rift, detect whether the
headset is being worn. You will need to cover the proximity sensor with your
finger or tape. Or you can place the headset on your forehead rather than
over your eyes. The target frame rate is 88.9 FPS when an HMD is
connected.
⚠ VRMark benchmark tests use an animated camera. For your
comfort, please take off your headset while the test is running.

Page 39 of 63
BLUE ROOM EXPERIENCE
In Experience mode, you can freely explore the test scene in your own time.
With a connected HMD, Experience mode is a great way to see the quality of
the VR experience on the system with your own eyes. VR headsets use
clever techniques to compensate for missed frames and low frame rates.
Even when the benchmark shows that the average frame rate is below the
target, you may be surprised by the quality of the experience in Experience
mode.
You can press the Space bar or gamepad button to toggle a flashlight on
and off. The flashlight effect cannot be compensated for by asynchronous
time warp or other techniques, making it a good tool for judging
performance.
On the Custom Run screen, you can change the rendering resolution and
other settings to make the scene more or less demanding. This is a great
way to see how performance affects your personal VR experience.
In desktop mode, Experience mode runs on your monitor. Take your time
and enjoy exploring the scene.
Page 40 of 63
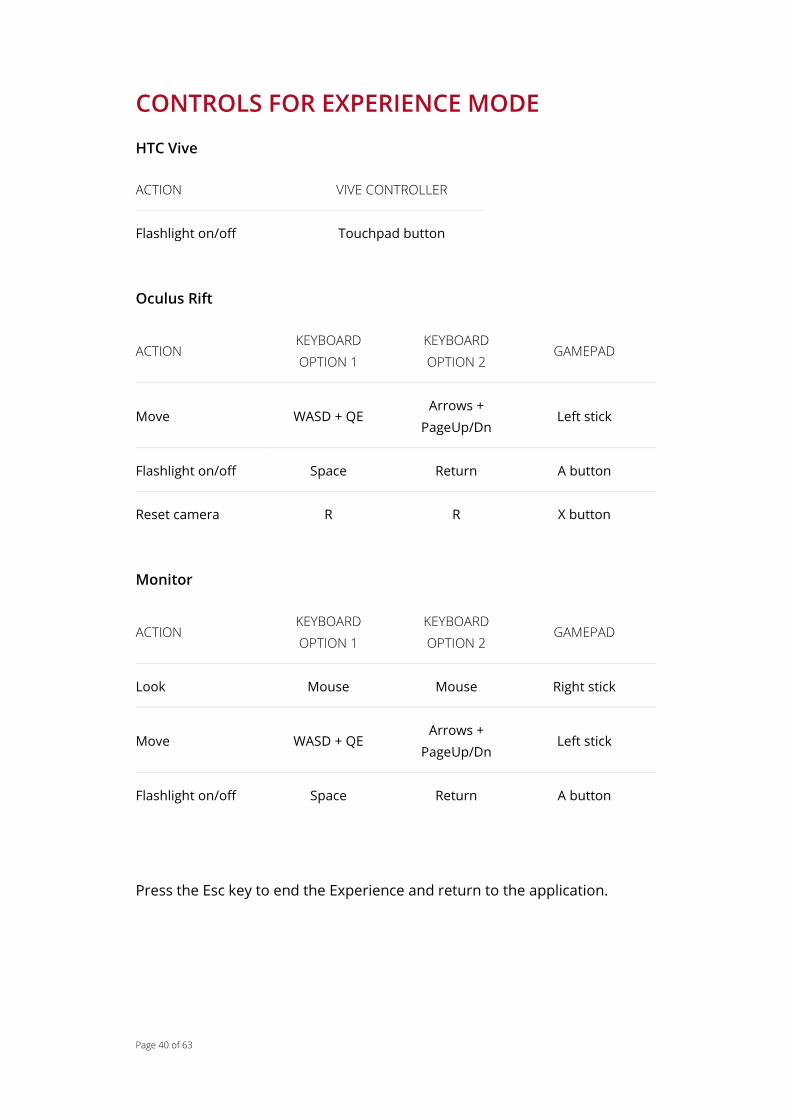
CONTROLS FOR EXPERIENCE MODE
HTC Vive
ACTION VIVE CONTROLLER
Flashlight on/off Touchpad button
Oculus Rift
ACTION KEYBOARD
OPTION 1
KEYBOARD
OPTION 2 GAMEPAD
Move WASD + QE Arrows +
PageUp/Dn Left stick
Flashlight on/off Space Return A button
Reset camera R R X button
Monitor
ACTION KEYBOARD
OPTION 1
KEYBOARD
OPTION 2 GAMEPAD
Look Mouse Mouse Right stick
Move WASD + QE Arrows +
PageUp/Dn Left stick
Flashlight on/off Space Return A button
Press the Esc key to end the Experience and return to the application.

Page 41 of 63
CUSTOM RUNS
You can change the rendering resolution and other settings on the Custom
run screen. The settings you choose apply to Benchmark and Experience
modes.
Making the scene more or less demanding with custom settings, then
running Experience mode on an HMD is a great way to see how system
performance affects your personal VR experience.
Options
DEFAULT
WINDOW MODE Yes
LOOPING No
WIREFRAME No
PHYSICS SYSTEMS DISABLED No
PARTICLE SYSTEMS DISABLED No
FORWARD RENDERING No
IMMEDIATE CONTEXT No
FORCE ALWAYS-ON REPROJECTION (HTC VIVE ONLY) Yes
FORCE OPENVR API (OCULUS RIFT ONLY) No
Rendering quality
DEFAULT
RESOLUTION 5120 × 2880
MAX TESSELLATION FACTOR 32
MAX SHADOW MAP TESSELLATION FACTOR 4
Page 42 of 63
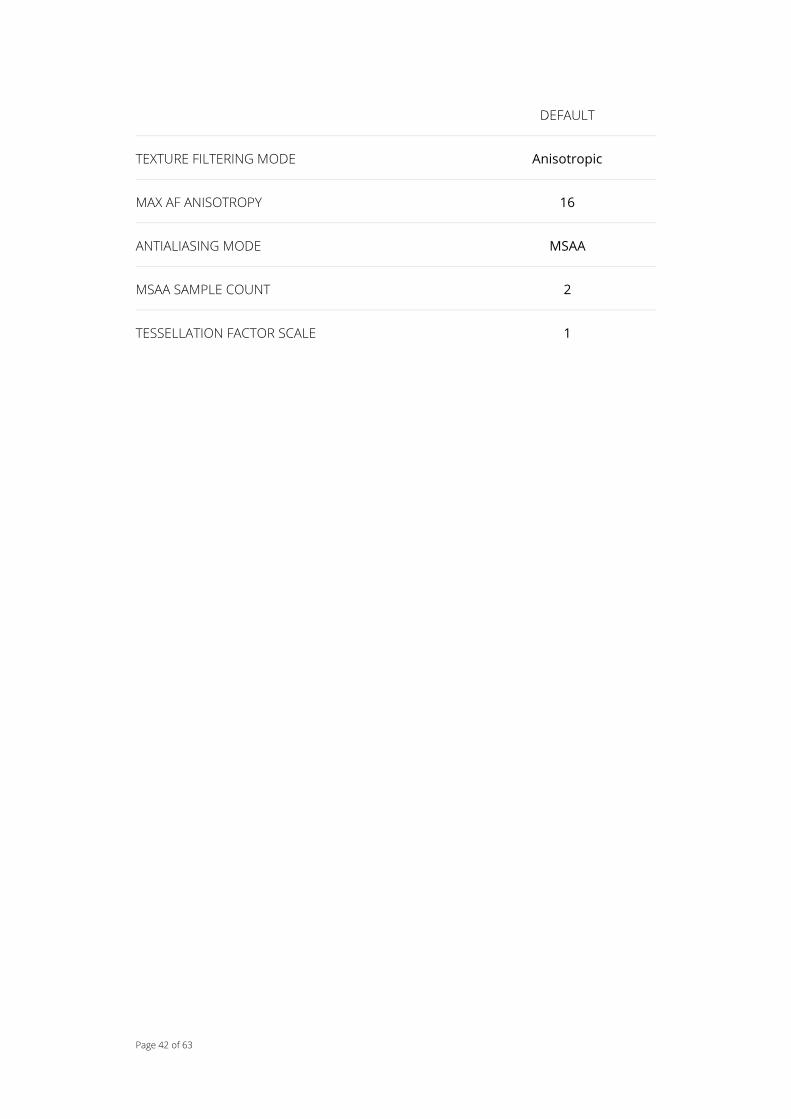
DEFAULT
TEXTURE FILTERING MODE Anisotropic
MAX AF ANISOTROPY 16
ANTIALIASING MODE MSAA
MSAA SAMPLE COUNT 2
TESSELLATION FACTOR SCALE 1
Page 43 of 63
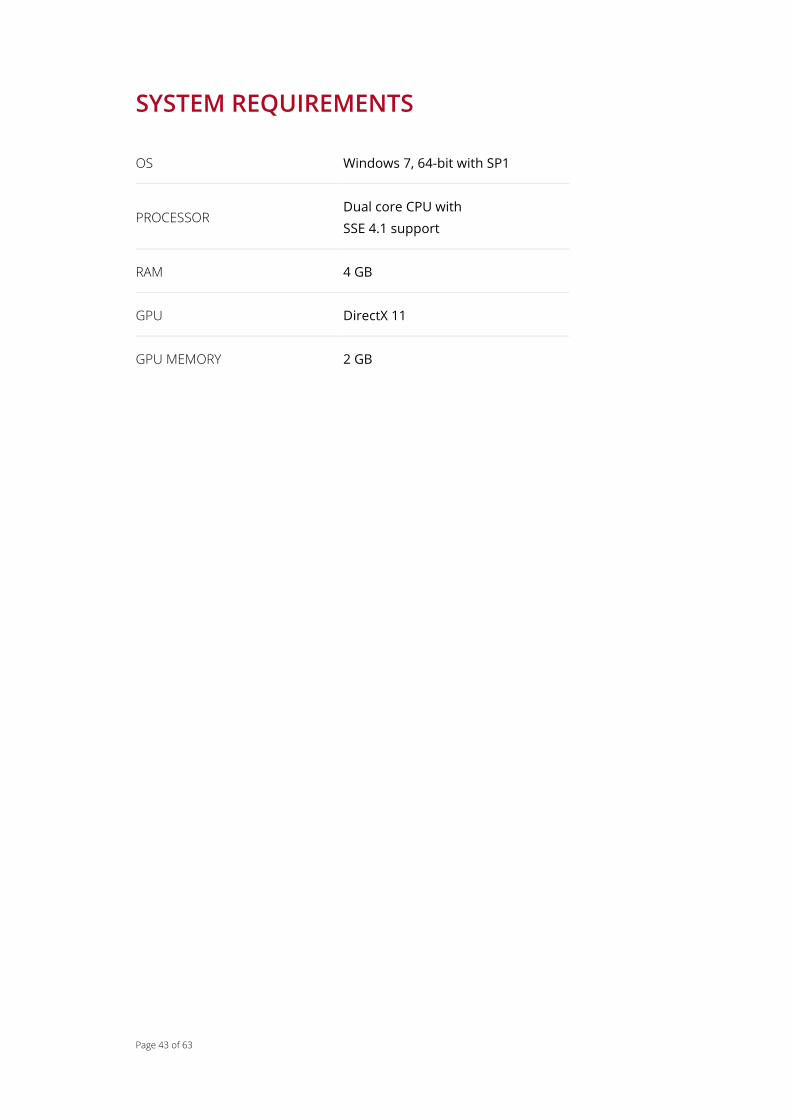
SYSTEM REQUIREMENTS
OS Windows 7, 64-bit with SP1
PROCESSOR Dual core CPU with
SSE 4.1 support
RAM 4 GB
GPU DirectX 11
GPU MEMORY 2 GB
Page 44 of 63
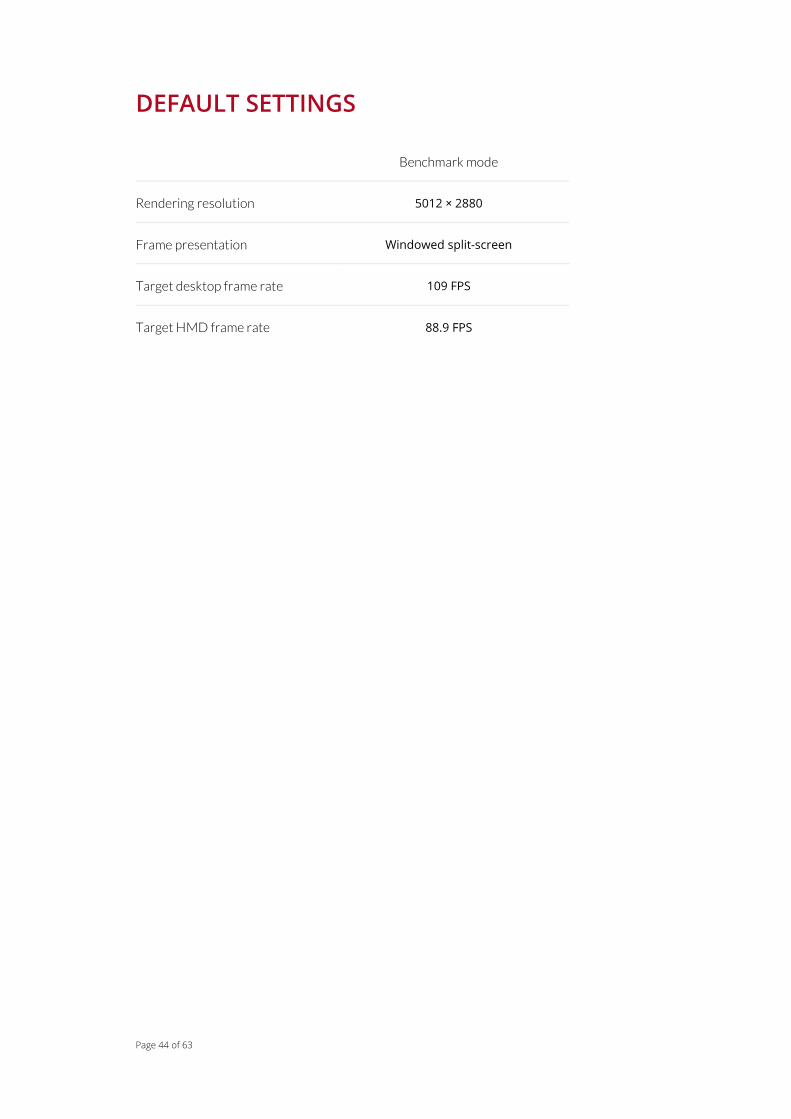
DEFAULT SETTINGS
Benchmark mode
Rendering resolution 5012 × 2880
Frame presentation Windowed split-screen
Target desktop frame rate 109 FPS
Target HMD frame rate 88.9 FPS

Page 45 of 63
VRMARK ENGINES
VRMark uses custom graphics engines developed in-house to ensure there
is no bias towards a particular vendor. It also ensures that results are not
skewed by the vendor-specific optimizations sometimes found in game
engines.
Source code access is available to members of our Benchmark Development
Program. Contact [email protected] for details.
ORANGE ROOM AND BLUE ROOM ENGINE
The Orange Room and Blue Room both use a DirectX 11 engine.
Pipeline
The engine pipeline is optimized for VR. Scene update, shadow map draw,
particle simulations, physics simulation, and geometry visibility solving and
culling are executed only once per frame, and the results are shared for
both eye views. All other rendering passes are executed per eye view.
Multithreading
The scene update is multithreaded using all available CPU cores less one,
which is left free for the display driver. On a four core CPU, for example,
three cores are used for scene update, and one core is for the display driver.
Draw calls are issued through deferred device contexts in a multithreaded
fashion. A small number of draw calls are made directly on the immediate
context.
On the Custom run screen, there is an option to always use immediate
context.
Tessellation
The engine supports Phong tessellation and displacement-map-based detail
tessellation. Tessellation factors are adjusted to give a sensible edge length
for the output geometry on the render target. Back-facing patches and
those outside of the view frustum are culled by setting the tessellation
factor to zero. When the size of an object's bounding box on the render
target drops below a threshold, tessellation is turned off by disabling hull
and domain shaders.
Page 46 of 63
Lighting
The engine supports two lighting methods.
Deferred lighting
The compute-shader-based tiled deferred lighting method supports point
lights, spotlights, and cube-map-based ambient illumination.
The geometry is first rendered to the G-buffer that contains depth, normal,
and surface illumination parameters stored in three textures. The lighting is
then evaluated in two compute shader passes:
1. The surface illumination pass splits the screen into tiles and culls scene
lights by evaluating illumination for visible lights on each tile. The
lighting is rendered to a texture.
2. The volume illumination pass uses ray marching to solve volumetric
illumination for one spotlight.
Forward+ lighting
The forward+ lighting method supports up to 32 shadow-casting spotlights,
a limited number of unshadowed point lights, and cube-map-based ambient
illumination. It uses a pre-depth pass to solve the depth of the scene, which
is then used in tiled light culling before traditional forward-style lighting. All
lights are rendered in one pass to a texture.
Particles
Particles are simulated on the GPU. Particle effects are rendered on top of
opaque surface illumination with additive or alpha blending. Particles are
simply self-illuminated.
Post-processing
Bloom
Bloom is based on a compute shader FFT that evaluates several effects with
one filter kernel. The filter combines blur, streak, lenticular halo, and
anamorphic flare effects.
Fast approximate anti-aliasing (FXAA)
FXAA is implemented in the post-processing chain using the techniques
described in this whitepaper.
Multi-sample anti-aliasing (MSAA)
Forward+ and deferred renderers can use traditional MSAA for solving
aliasing. MSAA is implemented as follows:
Page 47 of 63
Multi-sampled G-buff er is drawn.
Edges are solved and a single sample luminance and depth is outputted.
Illumination is multi-sampled on the edges.
Rest of the pipeline uses single sampled resources.
In the beginning of every frame, a multi-sampled G-buffer is created with a
selected sample count. Supported sample counts are 2, 4 and 8. Multi-
sampled textures are drawn in geometry draw tasks.
After geometry draw tasks, geometry complex pixels are detected. Complex
pixels are detected using depth, normals, reflectance, and luminance
texture. This method produces significantly less complex pixels than using
SV_Coverage. Detection is made in a separate edge renderer shader pass,
which takes the multi-sampled G-buffer as shader resource views and finds
the geometry edges. Edges are searched first by comparing samples in the
normals texture, then from depth, reflectance, and luminance textures.
The illumination pass takes the G-buffer and edge texture as a resource. If
the current shaded position is on the edge, illumination is calculated with
contribution from each MSAA sample.
Multi-GPU
VRMark implements multi-GPU rendering by using VRSLI from VRWorks and
Affinity multiGPU from LiquidVR.
Audio
The engine uses the OpenAL Soft library. Spatial effects for the scene audio
are based on distance and location relative to the camera. Audio occlusion
and acoustics are not simulated.
Page 48 of 63
CYAN ROOM ENGINE
Cyan Room runs on a DirectX 12 engine that uses a multithreaded pipeline
optimized for VR rendering.
Pipeline
The engine pipeline is optimized for VR. Scene update, shadow map draw,
particle simulations, physics simulation, and geometry visibility solving and
culling are executed only once per frame, and the results are shared for
both eye views. All other rendering passes are executed per eye view.
Multithreading
The rendering, including scene update, visibility evaluation and command
list building, is done with multiple CPU threads using one thread per are
available logical CPU core. The aim is to reduce the CPU load by using
multiple cores.
Multi-GPU support
Cyan Room implements explicit multi-GPU rendering for systems with
2×GPUs. The engine implements multi-GPU support using linked-node
configuration. Heterogeneous adapters are not supported.
Visibility Solution
The Umbra occlusion library is used to accelerate and optimize object
visibility evaluation for all cameras, including the main camera and light
views. Culling only runs on the CPU and does not consume GPU resources.
Descriptor Heaps
One descriptor heap for each descriptor type is created when the scene is
loaded and then used during the tests. Hardware Tier 1 is sufficient for
containing all the required descriptors in the heaps. Root signature
constants and descriptors are used when suitable.
Resource Heaps
Implicit resource heaps are used for most resources.
Asynchronous compute
Asynchronous compute is used extensively to overlap multiple rendering
passes and achieve maximum utilization of the GPU.
The following rendering passes/features for the left eye are run
asynchronously:

Page 49 of 63
Particle simulation
Light culling
Lighting
MSAA edge detection
Post processing
Tessellation
The engine supports Phong tessellation and displacement-map-based detail
tessellation. Tessellation factors are adjusted to give a sensible edge length
for the output geometry on the render target. For shadow maps, the edge
length is also calculated from the main camera to reduce aliasing due to
different tessellation factors between the main camera and shadow map
camera. Back-facing patches and those outside of the view frustum are
culled by setting the tessellation factor to zero. When the size of an object's
bounding box on the render target drops below a threshold, tessellation is
turned off by disabling hull and domain shaders. If an object has several
geometry LODs, tessellation is used on the most detailed LOD.
Geometry rendering
Objects are rendered in two steps; first, all opaque objects are drawn into G-
buffer. In the second step, transparent objects are rendered using an order-
independent transparency algorithm to another target, which is then
resolved on top of surface illumination later on.
Geometry rendering uses LOD system to reduce the number of vertices and
triangles for far away objects. This also results in bigger on-screen triangle
size.
The material system uses physically-based materials. The system supports
textures for albedo, metallicity, normal, roughness, displacement,
luminance, blend, opacity, detail normal, and cavity. A material need not use
all textures.
Opaque objects
Opaque objects are directly rendered to the G-buffer.
The G-buffer is composed of following textures. All target textures are not
enabled with all materials. For example, luminance texture is only written
into when drawing geometries with luminous materials.

Page 50 of 63
Transparent objects
Transparent objects are rendered using a technique called Weighted Order-
independent Transparency.3 The technique only requires two render targets
and the special blending settings to achieve good approximation of real
transparency in the scene.
There are also additively blended objects, which to do not require special
treatment.
Lighting
Lighting of opaque surfaces is evaluated using a tiled method in multiple
separate passes.
Before main illumination passes, compute shaders are used to cull lights
and mark the tiles that are to be illuminated for shadowed and unshadowed
lights.
Every lighting pass has its own result texture. All illumination passes are
executed on 8x8 tiles.
Prebaked global diffuse illumination and prebaked environment reflections
are evaluated for all tiles.
Unshadowed lights contribution is evaluated by using light culling data per
tile.
Shadowed lights are evaluated similarly, but with their own light culling data
and shadow maps.
Shadowed and unshadowed passes are executed indirectly only on tiles that
contain appropriate light data.
The combined result is fed to the post-processing stages.
Shadows are sampled in surface illumination shaders. For shadow casting
lights, following textures can be rendered.
Particles
Particles are simulated on the GPU using the asynchronous compute queue.
Simulation work is submitted to the asynchronous queue. G-buff er and
shadow map rendering commands are submitted to the main command
queue.
3 McGuire and Bavoild http://jcgt.org/published/0002/02/09/
Page 51 of 63
Particle illumination
Particles can be illuminated with scene lights or they can be self-illuminated.
The output buffers of the GPU light culling pass are used as inputs for
illuminated particles. The illuminated particles are drawn without
tessellation and they are illuminated in pixel shader. Particles are blended
together with the same order-independent technique as transparent
geometries.
Post-processing
Bloom
Bloom is based on a compute shader FFT that evaluates several effects with
one filter kernel. The filter combines blur, streak, lenticular halo, and
anamorphic flare effects.
Deferred multi-sample anti-aliasing (MSAA)
MSAA is implemented in the following fashion:
Multi-sampled G-buff er is drawn
Edges are detected, optimal sample mask is generated, and a single
sample luminance and depth is outputted
Illumination is multi-sampled with the sample mask on the edges
Single sampled pixels use resolved G-buffer surfaces
Rest of the pipeline (GI, post-processing) uses single sampled resources
In the beginning of every frame a multi-sampled G-buff er is created with a
selected sample count. Supported sample counts are 2, 4 and 8. Multi-
sampled textures are drawn in geometry draw tasks.
After geometry draw tasks are done edge pixels are detected. Edge
detection is done based on depth, normals, and fog density. This method
produces significantly less complex pixels than using SV Coverage. Detection
is done in a separate edge renderer shader pass, which takes the multi-
sampled G-buffer as shader resource views and finds the geometry edges.
In addition, the edge detector identifies how many samples in multi-
sampled fragment contain unique data and computes a weighting factor for
each unique sample (for example, if a texel is fully covered by rasterized
fragment, this would correspond to single unique sample with weight 4 in
case of MSAAx4). These data (edge bitmask and the weighting factors) are
packed into 16-bit unsigned normalized edge texture.
The illumination pass takes the G-buffer and edge texture as resource. If the
current shaded position is on the edge, illumination is calculated with
contribution from each unique MSAA sample weighted by the
Page 52 of 63
corresponding weighting factor extracted from the edge texture, this
calculation is distributed for the whole thread group.
Fast approximate anti-aliasing (FXAA)
FXAA is implemented in the post-processing chain. Implementation
described in this whitepaper.
Conservative Morphological Anti-Aliasing (CMAA)
CMAA is implemented in the post-processing chain using this
implementation.
Audio
The engine uses OpenAL Soft library to produce spatial effects for the scene
audio based on distance and location relative to the camera. Audio
occlusion and acoustics are not simulated in audio effects.

Page 53 of 63
BENCHMARK RESULTS
The Result screen in divided into sections.
1. Benchmark score
2. Result details
3. How does your score compare?
4. System information
5. Monitoring
BENCHMARK SCORE
VRMark benchmarks produce an overall score when run on the desktop.
You can use this score to compare the performance of different systems.
The higher the score, the better the performance.
The ring graphic is a visual indication of VR-readiness. It shows how the
system's average frame rate during the benchmark run compares with the
target frame rate for the test. The ring is fully orange when the system's
average frame rate meets or exceeds the target frame rate.
The text below the score explains what the result means in terms of the
quality of the VR experience you are likely to have with your system. You can
qualify this further by running Experience mode on an HMD and using your
own judgement to assess the quality of the VR experience.
The score validation box is either green, showing 'Valid score' if the result
passes our checks; or red, showing details of any errors or problems with
the run. You can click on the [?] icon in both cases for more information.
Benchmark score
𝐵𝑒𝑛𝑐ℎ𝑚𝑎𝑟𝑘 𝑠𝑐𝑜𝑟𝑒 = 𝑎𝑣𝑒𝑟𝑎𝑔𝑒𝐹𝑃𝑆 × 𝑠𝑐𝑜𝑟𝑒𝑀𝑢𝑙𝑡𝑖𝑝𝑙𝑖𝑒𝑟

Page 54 of 63
Where:
𝑎𝑣𝑒𝑟𝑎𝑔𝑒𝐹𝑃𝑆 = The average frame rate
𝑠𝑐𝑜𝑟𝑒𝑀𝑢𝑙𝑡𝑖𝑝𝑙𝑖𝑒𝑟 = A scaling constant set to 5000/109
The 𝑠𝑐𝑜𝑟𝑒𝑀𝑢𝑙𝑡𝑖𝑝𝑙𝑖𝑒𝑟 scaling constant is used to bring the score in line with
traditional UL benchmark score levels. In the case of VRMark Orange Room
benchmark, a PC with the recommended hardware requirements for HTC
Vive and Oculus Rift will score around 5,000.
⚠ Scores from Orange Room and Blue Room benchmarks should
not be compared with each other. Orange Room and Blue
Room are separate tests. Each produces its own score.
VR-readiness
VRMark answers the question, "Is my PC ready for this level of VR content?"
by providing a visual graphic and a score context statement with the result.
To fully pass the test, the system's average frame rate must meet or exceed
the target frame rate.
𝐵𝑒𝑛𝑐ℎ𝑚𝑎𝑟𝑘 𝑝𝑎𝑠𝑠𝑒𝑑 = 𝑎𝑣𝑒𝑟𝑎𝑔𝑒𝐹𝑃𝑆 > 𝑡𝑎𝑟𝑔𝑒𝑡𝐹𝑃𝑆
Where,
𝑎𝑣𝑒𝑟𝑎𝑔𝑒𝐹𝑃𝑆 = Average frame rate 𝑡𝑎𝑟𝑔𝑒𝑡𝐹𝑃𝑆 = 109 FPS on desktop or 88.9 FPS on HMD
When a system falls short of the benchmark's target frame rate, we highly
recommend trying Experience mode with an HMD for yourself. You may
find that, even though the frame rate is below the target, the actual
experience with a headset is still comfortable and enjoyable.
Page 55 of 63
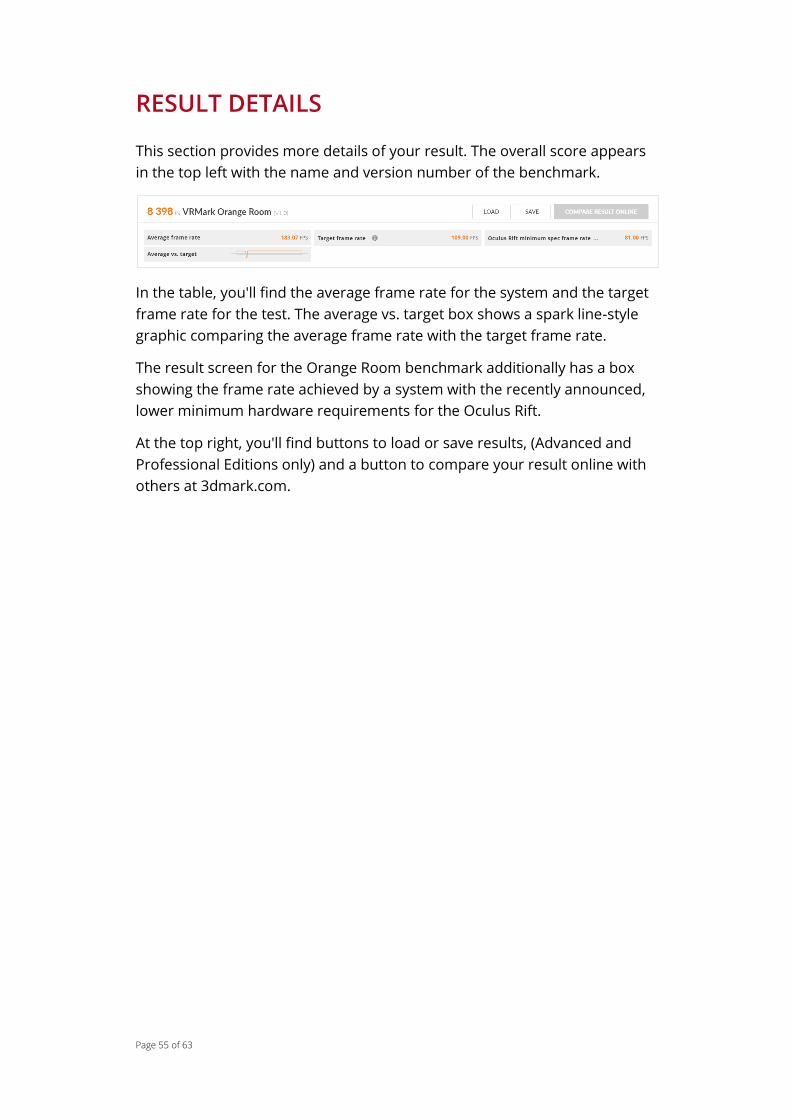
RESULT DETAILS
This section provides more details of your result. The overall score appears
in the top left with the name and version number of the benchmark.
In the table, you'll find the average frame rate for the system and the target
frame rate for the test. The average vs. target box shows a spark line-style
graphic comparing the average frame rate with the target frame rate.
The result screen for the Orange Room benchmark additionally has a box
showing the frame rate achieved by a system with the recently announced,
lower minimum hardware requirements for the Oculus Rift.
At the top right, you'll find buttons to load or save results, (Advanced and
Professional Editions only) and a button to compare your result online with
others at 3dmark.com.
Page 56 of 63
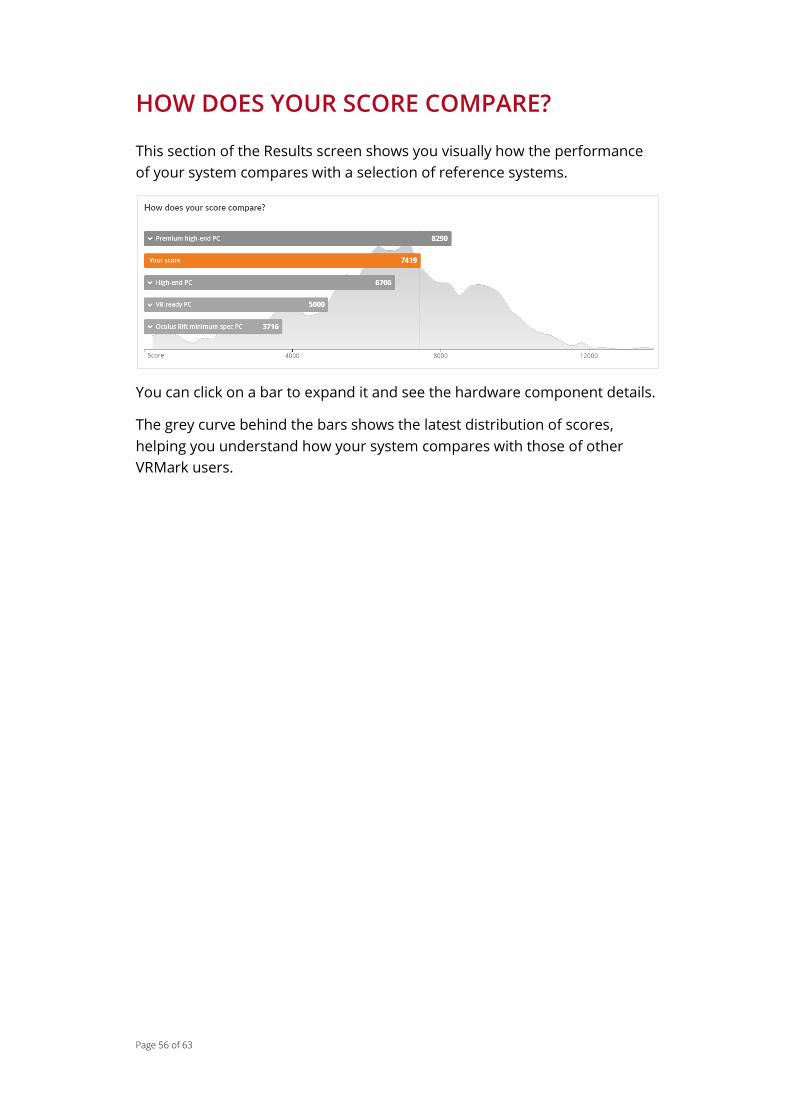
HOW DOES YOUR SCORE COMPARE?
This section of the Results screen shows you visually how the performance
of your system compares with a selection of reference systems.
You can click on a bar to expand it and see the hardware component details.
The grey curve behind the bars shows the latest distribution of scores,
helping you understand how your system compares with those of other
VRMark users.
Page 57 of 63
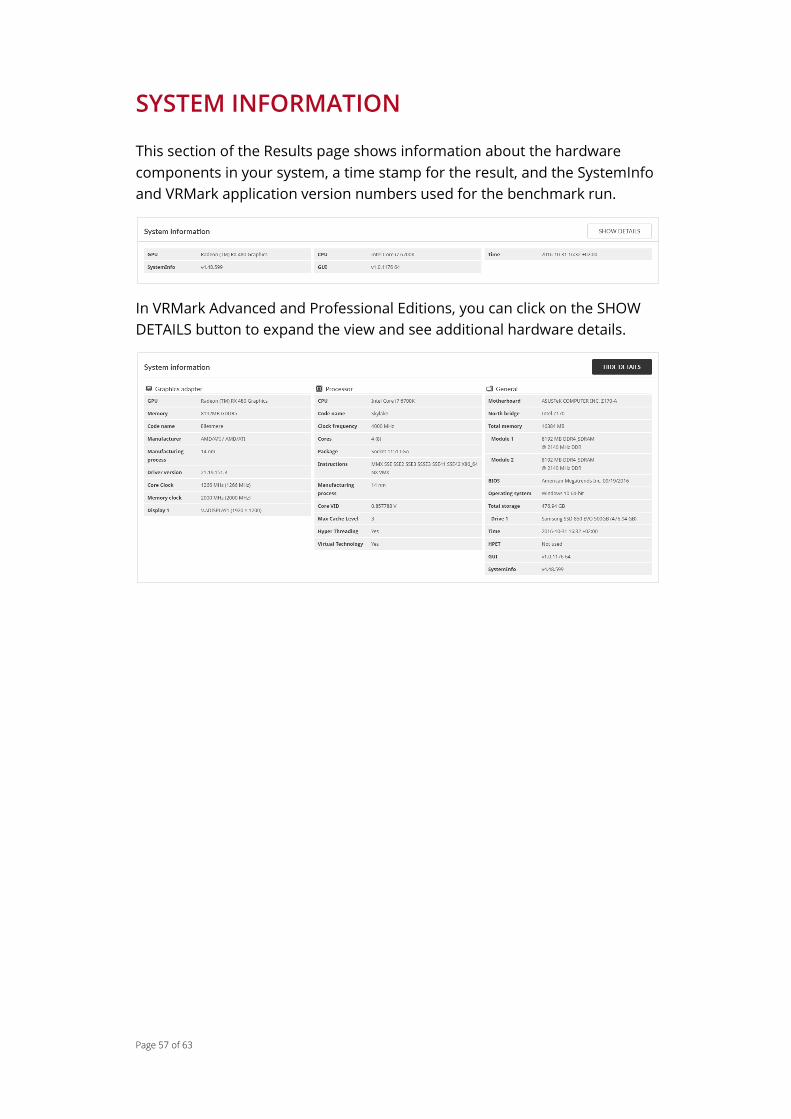
SYSTEM INFORMATION
This section of the Results page shows information about the hardware
components in your system, a time stamp for the result, and the SystemInfo
and VRMark application version numbers used for the benchmark run.
In VRMark Advanced and Professional Editions, you can click on the SHOW
DETAILS button to expand the view and see additional hardware details.

Page 58 of 63
MONITORING
In VRMark Advanced and Professional Editions, the benchmark result comes
with hardware monitoring charts. Use these charts to see how various
performance and hardware metrics changed during the test.
In the default view, the chart will automatically cycle through the different
metrics. You can click on a legend bar to see a metric without waiting.
Click the SHOW DETAILS button on the right of the screen to expand the
view and see all the charts at once.
Move your mouse pointer over the chart to see the values for each metric at
that point in time. This helps you quantify any peaks and dips in
performance.
Frame rate
The frame rate chart shows the actual frame rate in orange and the target
frame rate in grey. The Orange Room benchmark chart also shows a grey
line for the Oculus Rift minimum spec frame rate target.
When you run the benchmark on a headset in HMD mode, you will
additionally see chart lines for application misses and compositor misses.
Page 59 of 63
Application misses
An application miss occurs when the rendering application cannot produce
a frame within the target frame time. For example, with the 90 Hz display
used by the HTV Vive and Oculus Rift, the target frame time is 11ms. When
an application miss occurs, techniques like asynchronous time warp can
warp the previous frame and submit that to HMD in place of the missed
frame.
Compositor misses
A compositor miss happens when the application could not render a frame
in desired time and the fall back techniques, such as asynchronous time
warp, fail to provide an alternative frame to the HMD.
Temperature
The chart shows how GPU temperature changed during the benchmark run.
Frequency
The chart shows how GPU core clock and GPU memory clock changed
during the benchmark run.
Load
The chart shows how GPU load changed during the benchmark run.
Page 60 of 63
HOW TO REPORT SCORES
VRMark includes two VR performance benchmarks, each representing a
different quality level of VR content. The scores from VRMark Orange Room
and VRMark Blue Room benchmarks are not comparable. Use the full name
of the test when reporting your benchmark scores. Please do not use
VRMark as a unit of measurement. For example:
“PC scored 5000 in the VRMark Orange Room benchmark”
“PC scored 5000 in VRMark”
“PC scored 5000 VRMarks”
Always include details of the hardware setup you used to obtain the score.
Be sure to include the operating system, system hardware and version
numbers for relevant drivers and VR SDKs.
Using VRMark scores in reviews
We provide complimentary Professional Edition benchmarks to members of
the press working for established and reputable publications. Contact us at
[email protected] to request a VRMark key for your publication.
You may monetize video reviews that include VRMark video and
screenshots. But please do not use YouTube's ContentID system, or other
similar systems, to claim copyright ownership of videos that include UL
material.
We kindly ask you to include a link to https://benchmarks.ul.com/vrmark
whenever you use our benchmarks in a review, feature or news story.
Using VRMark scores in marketing material
Please contact [email protected] if you would like to use VRMark
scores in marketing material.
On the first mention of VRMark in marketing text, such as an advertisement
or product brochure, please write “VRMark® benchmark” in order to protect
our brand trademark. For example:
“We recommend VRMark® benchmarks from UL.”
Please include our legal text in your small print.
“VRMark® is a trademark of Futuremark Corporation.”

Page 61 of 63
RELEASE NOTES
VRMark v1.3.2020 – June 20, 2018
This is a minor update. Benchmark scores are not affected.
Improved
Improved presentation of AMD Ryzen specifications on the Results
screen.
Improved update notification system.
Text, logos, links, and file paths updated to reflect new company
branding. See https://benchmarks.ul.com/welcome.
Fixed
Fixed an issue that could result in visual artifacts in the Cyan Room.
Fixed an issue with logging that could cause a benchmark run to fail.
VRMark v1.2.1701 – December 18, 2017
This is a minor update. Benchmark scores are not affected.
Fixed
Fixed an issue that could cause VRMark to hang on the splash screen.
The frame counter now correctly resets when looping the Orange or
Blue Room.
The resolution setting for Custom Runs again includes the
recommended values for the HTC Vive and Oculus Rift.
VRMark v1.2.1678 - November 29, 2017
This is a minor update. Benchmark scores are not affected.
Fixed
Restored the ability to use custom run settings with Experience Mode.
Restored the result descriptions to the Orange and Blue Room result
screens.
Fixed a rare issue with the Steam version where Cyan Room could fail to
write shader cache files to disk.
Professional Edition
Fixed in-app updates for VRMark Professional Edition.
Page 62 of 63
VRMark v1.2.1664 - November 22, 2017
This major update adds Cyan Room, a new DirectX 12 benchmark. Cyan
Room shows how using an API with less overhead can help developers
deliver impressive VR experiences even on modest PC systems. Measure
performance with the Cyan Room benchmark or try Experience mode with a
VR headset to judge a system's rendering quality with your own eyes.
New
Cyan Room - a new DirectX 12 benchmark for VR
Improved
Enhanced compatibility with the latest multicore processors. Orange
Room benchmark scores will improve on systems with eight or more
cores.
VRMark v1.1.1272 – November 11, 2016
New
Added CPU performance data to hardware monitoring charts.
Fixed
Fixed a hardware monitoring issue on systems with the Intel X99 chipset.
Autosaving results when My Documents is not accessible or is mapped
to a network drive no longer causes a crash.
The vsync warning no longer appears when vsync is set to "disabled, but
allow if application requests."
Compatibility
VRMark now shows a warning if your CPU does not support SSE 4.1.
VRMark v1.0.1227 – November 3, 2016
Launch version

Page 63 of 63
ABOUT UL
UL is an independent, global company that offers a wide range of testing,
inspection, auditing, and certification services. With 10,000 people in 40
countries, UL helps customers, purchasers, and policymakers navigate
market risk and complexity. UL builds trust in the safety, security, and
sustainability of products, organizations and supply chains – enabling
smarter choices and better lives. Visit https://www.ul.com/ to find out more.
UL benchmarking software is developed by the Product Supply Chain
Intelligence division. We enable global product compliance, innovation and
promotion throughout the supply chain with our intelligent software and
services backed by world-class scientific and technical expertise. Please visit
https://psi.ul.com/ to find out more.
UL benchmarks help people measure, understand and manage computer
hardware performance. Our talented team creates the industry's most
trusted and widely used performance tests for desktop computers,
notebooks, tablets, smartphones, and VR systems.
We work in cooperation with leading technology companies to develop
industry-standard benchmarks that are relevant, accurate, and impartial. As
a result, our benchmarks are widely used by the press. UL maintains the
world's largest and most comprehensive hardware performance database,
using the results submitted by millions of users to drive innovative online
solutions designed to help people make informed purchasing decisions.
Our benchmarks are developed in Finland just outside the capital Helsinki.
We also have a performance lab and sales office in Silicon Valley and sales
representatives in Taiwan.
Press [email protected]
Sales [email protected]
Support [email protected]
© 2018 Futuremark® Corporation. VRMark® trademarks, logos, character names, and distinctive likenesses are the exclusive
property of Futuremark Corporation. UL and the UL logo are trademarks of UL LLC. Microsoft, Windows , DirectX, and Direct3D
are either registered trademarks or trademarks of Microsoft Corporation in the United States and/or other countries. HTC and
Vive are trademarks of HTC Corporation. Oculus and Rift are trademarks of Oculus VR, LLC. All other names of companies and
products mentioned herein may be trademarks of their respective owners.