tech shop safety -...
TRANSCRIPT

1
Tech Shop Safety - FN000258
Tech Shop / Tool Safety Operations

2
Table of Contents
Tech Shop / Tool Safety Operations 3
General Rules of Safety 4
Additional Safety Rules 5
Machine Hazards 6
Hydraulic Presses 8
Hand Shears 10
Foot Shear 11
Notcher 12
Rotex Punch 15
Press Brake Safety 16
Hand Brakes 17
Metal Rollers 20
Gasket Cutter 21
Pistorius Saw 22
Sand Blaster 25
Insulation Cutter 26
Vertical Milling Machine 27
Lathe 30
Drill Press 35
Vertical Band Saw 38
Horizontal Band Saw 41
Pedestal Grinders / Buffers 43

3
Tech Shop / Tool Safety Operations
1. All personnel that use the machine tools covered in this booklet must review the material
herein and have permission from their supervisor to operate the tools based on either prior
work experience or on-the-job training at Fermilab.
2. The area directly surrounding the Machines must be posted “Eye Protection Required”.
3. All personnel in the shop area must wear eye protection at all times.
4. Hearing protection (ear plugs) should be readily available to shop users.
5. Injuries must be reported to the employee’s supervisor.
6. Oil spills should be cleaned up immediately.
7. A fire extinguisher must be readily available.
8. Basic Safety rules must be followed at all times. Among these are:
(a) Long hair must be tied back at all times.
(b) No sandals or opened toed shoes are permitted in the work area.
(c) If lifting heavy objects you are required to wear safety toe shoes.
(d) Loose fitting clothing must be tucked in or tied up.
(e) Neckties must be removed.
(f) Bracelets and other loose jewelry must be removed prior to using the shop.
(g) No horseplay around the machines is permitted. Machine tools can be dangerous.
9. The shop area must be kept clean. Sweep up cuttings and other debris when you are
finished with the job.
10. Most shop accidents are a result of lack of knowledge, not carelessness. If you have any
doubt, ask your supervisor.
11. Know the limitations of the machine (i.e., consult users’ manual). Do not attempt to cut or
bend stock that is too thick for the equipment.
12. Please report any problems with the machine (e.g., missing guards) to the Division/Section
ES&H Department or TD Machine Repair Group.

4
General Rules of Safety
1. Always wear safety glasses, goggles, or safety shields designed for the type of work being
done when you or anyone is operating a machine.
2. Get first aid immediately for ANY injury. Report all accidents and injuries to your supervisor
immediately.
3. Be sure that all machines have effective and proper working guards.
4. Replace guards immediately after any repair.
5. Do not attempt to oil, clean, adjust or repair any machine while it is running.
6. Do not leave a machine while it is running. Someone else may not notice it is still running,
and be injured.
7. Do not try and stop the machine with your hands or body.
8. Always see that work and cutting tools on any machine are clamped securely before
starting.
9. Keep the floor clear of metal chips and waste pieces. Put them in the container provided
for scrap.
10. Get help when handling long or heavy pieces of material.
11. When working with another person, only one should operate the machine or switches.
12. Do not lean against the machines.
13. Concentrate on the work and the machine at all times, it only takes a moment for an
accident to occur. Do not talk unnecessarily while operating a machine.
14. Do not talk to others while they are operating a machine.
15. Be sure you have sufficient light to see clearly when doing any job.
16. Never use compressed air for cleaning machinery.
17. Never use compressed air to clean your clothes or any part of your body.

5
Rules Concerning Clothes and Safety Equipment
1. Wear clothes suited for the job.
2. Wear short sleeves, or sleeves rolled up above the elbow.
3. Do not wear rings, watches, bracelets or other jewelry that could get caught in moving
machinery.
4. Wear gloves when handling sharp pieces, but never while machining.
5. Wearing of shorts or cut off pants is not allowed in the shop. Hot chips can cause cuts and
burns.
6. Open toe shoes are not allowed in the shop. Shoes must cover the entire foot to be
acceptable. Leather is preferred.
7. Long hair must be kept up at all times. It is easy for long hair to get caught in moving
machinery.
Rules Concerning Housekeeping
1. Keep floors free of oil, grease or any other liquid. Clean up spilled liquids immediately; they
are slipping hazards.
2. Aisles must be kept clear at all times to avoid tripping or other accidents.
3. Store materials in such a way that they cannot become tripping hazards. Return all excess
material to its proper storage place.
4. Put tools away when not in use.
5. Place all scrap in scrap containers.

6
Machine Hazards
Each machine used in a machine shop presents a special set of hazards to anyone working on or
near it. However, most hazards can be classified into three categories: mechanical, electrical,
and chemical.
Mechanical
For the most part, mechanical hazards are present at four areas on a machine:
Points of Operation
Points of operation are areas where cutting tools, drill bits or saw blades
come into contact with the work piece. The hazards at points of operation
can include flying chips; sharp edges on chips, cutting tools or work pieces;
and heat created by the friction of the tool with the work piece. Objects
coming into contact with points of operation can be pulled into or thrust
away from the point of contact with great force.
Shear Points
A shear point is an area where a moving surface passes over a stationary
surface, such as a carriage moving along the ways on a lathe. Since one of
the surfaces that creates a shear point moves, the shear point itself also
moves. Before beginning any machining operation, it is important to be
aware of any shear points on the machine you are using and take care to
avoid them.
Nip Points
A nip point is created when two surfaces are in contact and at least one of
them rotates. These areas are also referred to as pinch points.
In-running nip points (also called in-going pinch points) include points of
operation on drills, lathes and mills; the point of contact of a belt and
pulley; and meshed gears. Objects brought into contact with in-running nip
points can be pulled into the point of contact.
The out-running side of a nip point may also be dangerous. Flying chips or
shavings are usually present at the out-running side of a cutting tool or drill

7
bit. Tools or other objects that come into contact with an out-running nip
point may be thrown out with great force.
Power Transmission Points
Power transmission points are areas where the power from the machine’s
motor is transferred to the point of operation. These include areas with
moving gears, belts, pulleys, shafts, chucks, or spindles.

8
Hydraulic Hand Presses
Inspect the press and press attachments before each use to ensure proper
working condition.
Make sure the press table is locked in the proper position before operating the
press. Avoid running the ram screw out to its limit of travel.
Make sure the work piece is firmly seated and the pull-down guard is in position
before operating the press.
Do not hold the work piece with your hand while applying the press.
Hydraulic Press
Machine Hazards
Flying debris
Pinch points
Safety Precautions
Safety eyewear
9
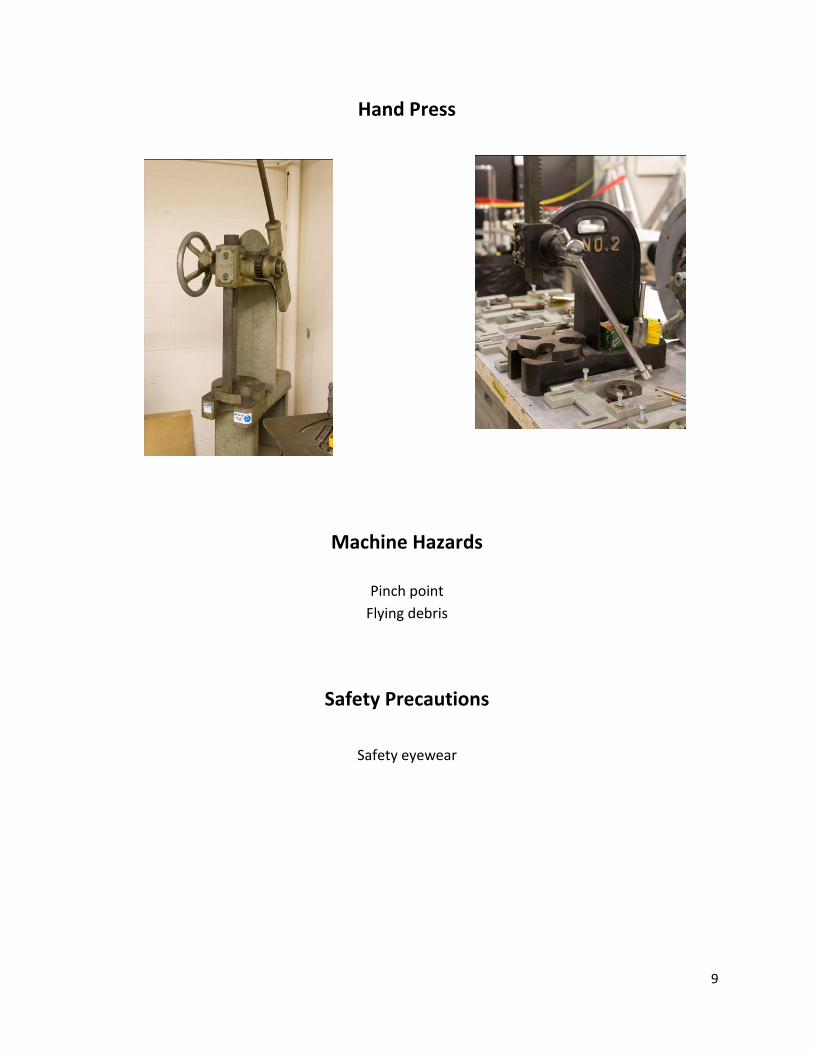
Hand Press
Machine Hazards
Pinch point
Flying debris
Safety Precautions
Safety eyewear
10
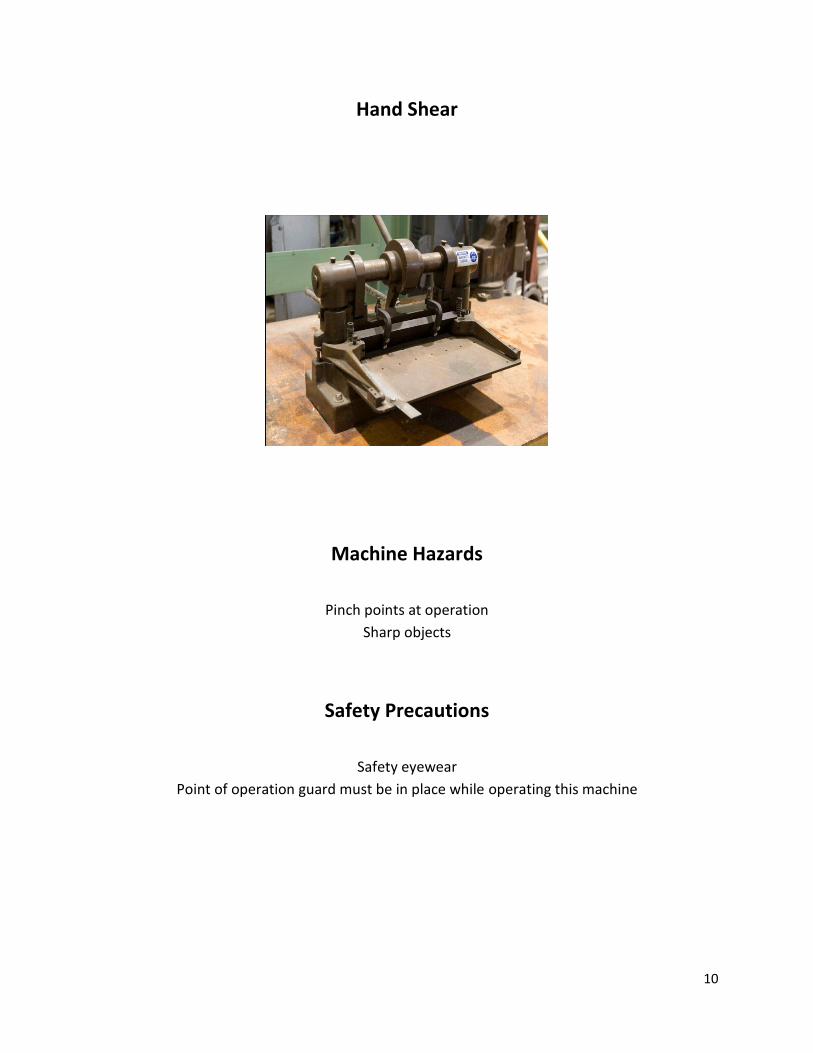
Hand Shear
Machine Hazards
Pinch points at operation
Sharp objects
Safety Precautions
Safety eyewear
Point of operation guard must be in place while operating this machine

11
Foot Shear
Machine Hazards
Pinch point at operation
Sharp objects
Safety Precautions
Safety eyewear
Leather gloves
Point of operation plastic guard must be in place while operating this machine

12
Hand Notcher
The hand notcher is designed and intended for use by properly trained and experienced
personnel only. If you are not familiar with the proper and safe operation of the hand notcher,
do not use until proper training and knowledge has been obtained.
1. KEEP GUARDS IN PLACE and in working order.
2. KEEP ALL BODY PARTS AWAY FROM MOVING PARTS. Avoid placing any part of your body
near belts, cutters, gears, etc.
3. DO NOT EXCEED RATED GAUGE CAPACITY on this hand notcher.
4. KEEP THE WORK AREA CLEAN. Cluttered areas and work benches invite accidents.
5. KEEP CHILDREN AWAY. All visitors should be kept a safe distance from the work area.
6. MAKE THE WORKSHOP KID PROOF with padlocks, master switches, or by removing starter
keys.
7. DON’T FORCE THE MACHINE. It will do the job better and safer at the rate for which it was
designed.
8. USE THE RIGHT MACHINE. Don’t force a machine or attachment to do a job for which it was
not designed.
9. WEAR PROPER APPAREL. Do not wear loose clothing, gloves, neckties, rings, bracelets, or
other jewelry which may get caught in other parts. Non-slip footwear is recommended.
Wear protective hair covering to contain long hair.
10. ALWAYS USE SAFETY GLASSES. Also use face or dust masks if the cutting operation is dusty.
Everyday glasses only have impact resistant lenses; they are not safety glasses.
11. DON’T OVERREACH. Keep proper footing and balance at all times.
12. MAINTAIN TOOLS WITH CARE. Keep tools sharp and clean for the best and safest
performance. Follow instructions for lubricating and changing accessories.
13. NEVER STAND ON A MACHINE. Serious injury could occur if the machine tipped.
14. CHECK DAMAGED PARTS. Before further use of the machine, a guard or other part that is
damaged should be carefully checked to determine that it will operate properly and
perform its intended function – check for alignment of moving parts, binding of moving
parts, breakage of parts, mounting, and any other conditions that may affect its operation.
A guard or other part that is damaged should be properly repaired or replaced.
15. SHEET METAL STOCK HAS SHARP EDGES. To prevent cuts, use caution when handling.
16. KEEP HANDS AND FINGERS clear of the area in front and rear of the hand notcher.
17. DO NOT USE THE MACHINE for any purpose other than for which it was designed.
18. FAILURE TO COMPLY with all of these warnings may cause serious injury.
19. SOME DUST CREATED BY power sanding, sawing, grinding, drilling and other construction

13
activities contains chemicals known to cause cancer, birth defects or other reproductive
harm. Some examples of these chemicals are:
Lead from lead based paint
Crystalline silica from bricks and cement and other masonry products, and
Arsenic and chromium from chemically-treated lumber.
20. YOUR RISK FROM THOSE EXPOSURES varies, depending on how often you do this type of
work. To reduce your exposure to these chemicals: work in a well-ventilated area, and
work with approved safety equipment. Such as those dusk masks that are specifically
designed to filter out microscopic particles.
21. DO NOT OPERATE TOOL while under the influence of drugs, alcohols or any medication.

14
Corner Notcher
Machine Hazards
Sharp objects
Safety Precautions
Safety eyewear
Protective guard at point of operation must be in place at all times

15
Rotex Punch
Machine Hazards
Sharp objects
Pinch points
Safety Precautions
Safety eyewear
16
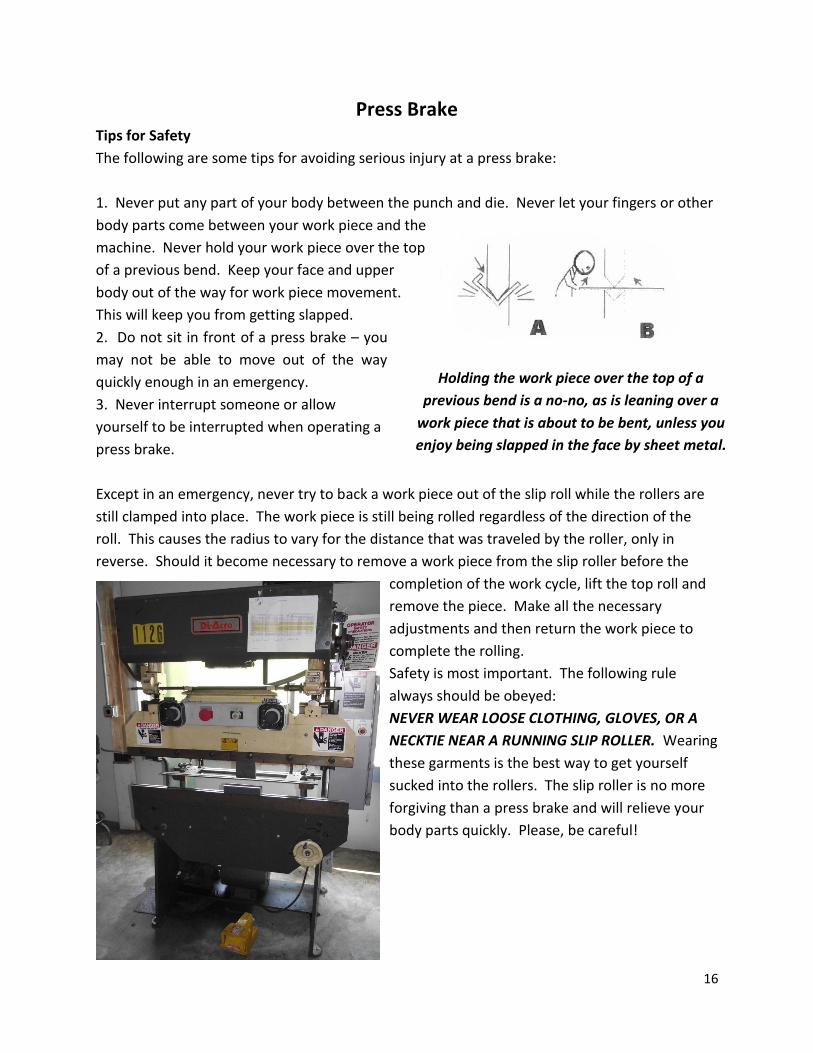
Holding the work piece over the top of a
previous bend is a no-no, as is leaning over a
work piece that is about to be bent, unless you
enjoy being slapped in the face by sheet metal.
Press Brake Tips for Safety
The following are some tips for avoiding serious injury at a press brake:
1. Never put any part of your body between the punch and die. Never let your fingers or other
body parts come between your work piece and the
machine. Never hold your work piece over the top
of a previous bend. Keep your face and upper
body out of the way for work piece movement.
This will keep you from getting slapped.
2. Do not sit in front of a press brake – you
may not be able to move out of the way
quickly enough in an emergency.
3. Never interrupt someone or allow
yourself to be interrupted when operating a
press brake.
Except in an emergency, never try to back a work piece out of the slip roll while the rollers are
still clamped into place. The work piece is still being rolled regardless of the direction of the
roll. This causes the radius to vary for the distance that was traveled by the roller, only in
reverse. Should it become necessary to remove a work piece from the slip roller before the
completion of the work cycle, lift the top roll and
remove the piece. Make all the necessary
adjustments and then return the work piece to
complete the rolling.
Safety is most important. The following rule
always should be obeyed:
NEVER WEAR LOOSE CLOTHING, GLOVES, OR A
NECKTIE NEAR A RUNNING SLIP ROLLER. Wearing
these garments is the best way to get yourself
sucked into the rollers. The slip roller is no more
forgiving than a press brake and will relieve your
body parts quickly. Please, be careful!

17
Box Brake
Machine Hazards
Pinch points at operation
Safety Precautions
Safety eyewear
Keep hands clear of work area

18
Kick Brake
Machine Hazards Pinch points
Sharp objects
Flying debris
Safety Precautions Safety eyewear
Keep hands clear of work area

19
Box Brake
Machine Hazards
Pinch points at operation
Sharp objects
Safety Precautions
Safety eyewear
Keep hands clear of work area

20
Metal Roller
Machine Hazards
Pinch points
Sharp edges on metal stock
Safety Precautions
Leather gloves (if handling sharp stock)

21
Gasket Cutter
Machine hazards associated with operation
Sharp cutting blade
Pinch point hazard near lever
Safety Precautions
Safety eyewear
Keep finger away from blade

22
Pistorius Saw
Machine Hazards
Blade shattering
Water spray
Flying particles
Safety Precautions
Safety glasses with side shields
Face shield
Apron
Tool rest must be in place
Blade guard must be in place
Provide water to cool blade

23
SAFETY OPERATING PROCEDURES
Abrasive Cut-Off Saw
PRE-OPERATIONAL SAFETY CHECKS
1. Ensure the saw is properly secured to a worktable by bolts / clamps at approximately
hip height.
2. Ensure the saw is operated on an RCD protected circuit.
3. Use abrasive cut off wheels with the correct size arbor hole.
4. Use abrasive cut off wheels which have a maximum safe operating speed greater than
the “no load RPM” marked on the machine’s nameplate.
5. Before each use inspect the cut off wheel for chips and cracks.
6. Check workspaces and walkways to ensure no slip / trip hazards are present.
7. Ensure all guards are in place, in working order, and in proper adjustment and
alignment.
8. Ensure the depth stop is properly adjusted.
9. Ensure you are familiar with the operation of the ON / OFF starter.
10. Keep table and work area clear of all tools and off-cut material.
11. Faulty equipment must not be used. Immediately report suspect equipment.
OPERATIONAL SAFETY CHECKS
1. Ensure all adjustments to machine are secure before making a cut.
2. Allow the machine to reach full speed before contacting the work piece.
3. Ease the abrasive disc against the work piece when starting to cut. Do not force tool.
4. Keep hands away from cutting area. Do not attempt to remove cut material while
wheel is moving.
5. After finishing the cut, release the switch, hold the saw arm down and wait for the disc
to stop before removing work or off-cut piece.
6. Disconnect the plug from the power source and bring the machine to a complete
standstill before making any adjustments.
HOUSEKEEPING
1. Ensure ventilation openings and switch levers are kept clean and free of foreign matter.
2. Leave the machine in a safe, clean and tidy state.

24
POTENTIAL HAZARDS
Metal sparks Noise Sharp metal burrs Contact with rotating
disc Eye injuries Burns from work
piece
FORBIDDEN
Do not grind on the side of abrasive cut off-wheels

25
Sand Blaster
Machine Hazards
Dust hazard
High noise
Gloves leaking or cracked
Hand hazard
Static electricity
Safety Precautions
Safety glasses
Clean Plexi-glass for viewing operation
Ensure seals are not leaking
Vacuum should be operating while using this machine
Hearing protection
Inspect gloves before use, proper seal
Ground part / operator

26
Insulation Cutter
Machine Hazards associated with operation
Moving blade
Flying debris / particulate
Safety Precautions
Safety glasses with side shields
Keep fingers away from blade
27
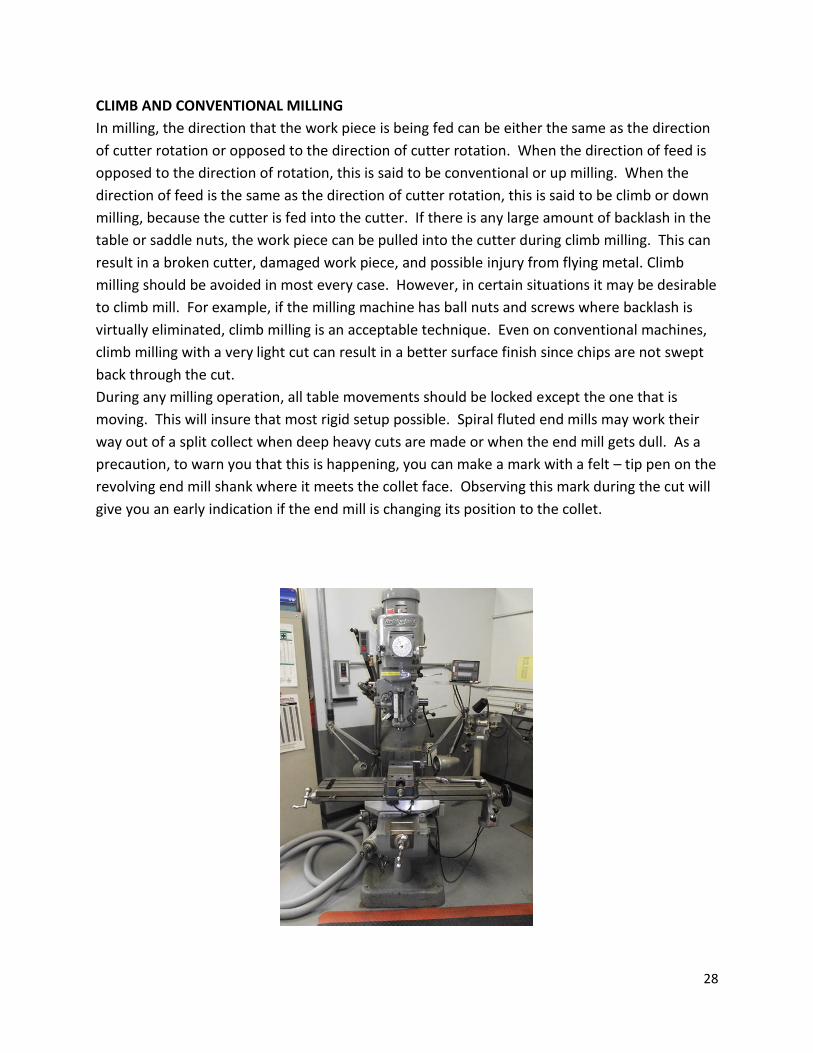
Vertical Milling Machine
The vertical milling machine is capable of performing milling, drilling, boring, and
reaming operations.
If a vise is utilized to mount the work, wipe the vise base and work table clean. Inspect
for burrs and nicks. They prevent the vise from seating properly on the table. Bolt it firmly to
the machine.
Mounting directly to the table is an excellent work – holding method. Be careful not to
distort the work piece when applying clamping pressure.
In any case, the work piece must be aligned with the table or saddle axis to insure
parallel or perpendicular cuts.
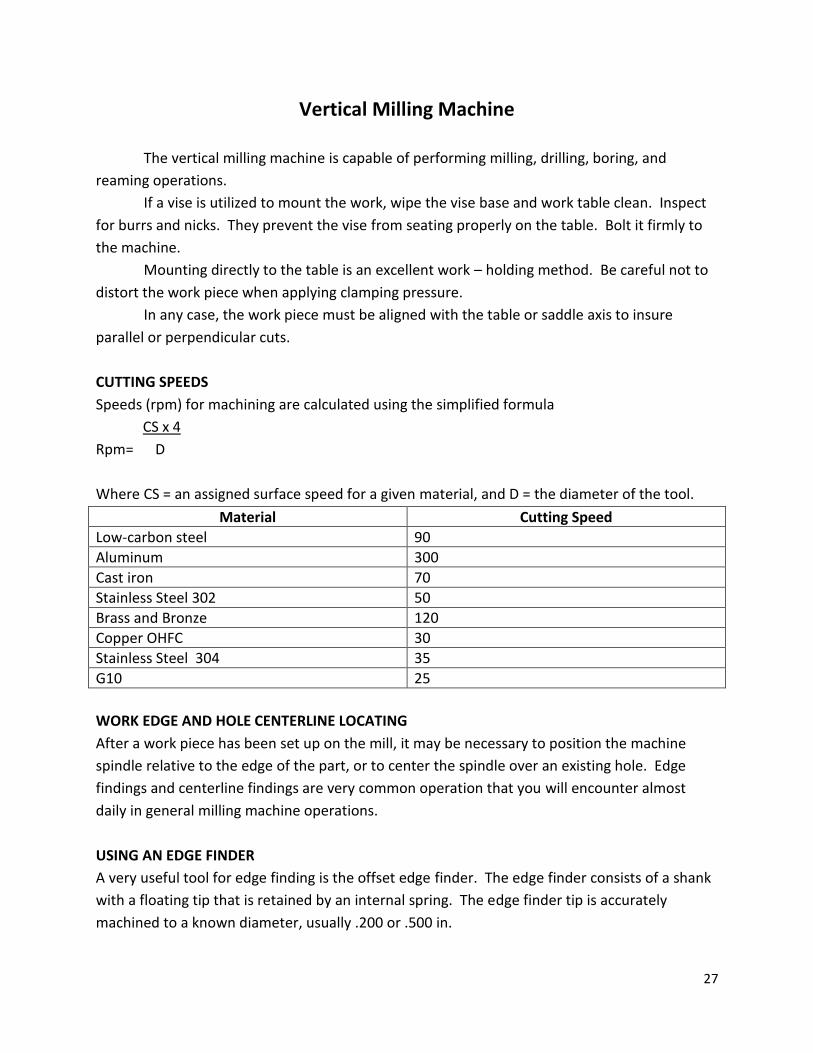
CUTTING SPEEDS
Speeds (rpm) for machining are calculated using the simplified formula
CS x 4
Rpm= D
Where CS = an assigned surface speed for a given material, and D = the diameter of the tool.
Material Cutting Speed
Low-carbon steel 90
Aluminum 300
Cast iron 70
Stainless Steel 302 50
Brass and Bronze 120
Copper OHFC 30
Stainless Steel 304 35
G10 25
WORK EDGE AND HOLE CENTERLINE LOCATING
After a work piece has been set up on the mill, it may be necessary to position the machine
spindle relative to the edge of the part, or to center the spindle over an existing hole. Edge
findings and centerline findings are very common operation that you will encounter almost
daily in general milling machine operations.
USING AN EDGE FINDER
A very useful tool for edge finding is the offset edge finder. The edge finder consists of a shank
with a floating tip that is retained by an internal spring. The edge finder tip is accurately
machined to a known diameter, usually .200 or .500 in.
28
CLIMB AND CONVENTIONAL MILLING
In milling, the direction that the work piece is being fed can be either the same as the direction
of cutter rotation or opposed to the direction of cutter rotation. When the direction of feed is
opposed to the direction of rotation, this is said to be conventional or up milling. When the
direction of feed is the same as the direction of cutter rotation, this is said to be climb or down
milling, because the cutter is fed into the cutter. If there is any large amount of backlash in the
table or saddle nuts, the work piece can be pulled into the cutter during climb milling. This can
result in a broken cutter, damaged work piece, and possible injury from flying metal. Climb
milling should be avoided in most every case. However, in certain situations it may be desirable
to climb mill. For example, if the milling machine has ball nuts and screws where backlash is
virtually eliminated, climb milling is an acceptable technique. Even on conventional machines,
climb milling with a very light cut can result in a better surface finish since chips are not swept
back through the cut.
During any milling operation, all table movements should be locked except the one that is
moving. This will insure that most rigid setup possible. Spiral fluted end mills may work their
way out of a split collect when deep heavy cuts are made or when the end mill gets dull. As a
precaution, to warn you that this is happening, you can make a mark with a felt – tip pen on the
revolving end mill shank where it meets the collet face. Observing this mark during the cut will
give you an early indication if the end mill is changing its position to the collet.

29
Milling Safety Practices
Chips are razor sharp; do not use your hand to remove them. Never remove chips with
compressed air. The flying chips may injure you or a nearby person.
If cutting oil was used, the oily mist produced by the compressed air is highly flammable. If
ignited by an open flame, it can produce explosive results. Finish by wiping down the machine
with a soft cloth.
The following procedures are suggested for the safe operation of a milling machine.
1. Become thoroughly familiar with the milling machine before attempting to operate it.
When in doubt, obtain additional instructions.
2. Wear appropriate clothing and approved safety glasses.
3. Stop the machine before attempting to make adjustments or measurements!
4. Get help to move any heavy machine attachment, such as a vise, dividing head, rotary
table, or large work.
5. Stop the machine before trying to remove accumulated chips.
6. Never reach over or near a rotating cutter!
7. Be sure the work holding device is mounted solidly to the table and the work is held
firmly. Spring or vibration in the work can cause thin cutters to jam and shatter!
8. Avoid talking with anyone while operating a machine tool, nor allow anyone to turn
your machine on for you.
9. Keep the floor around, your machine clear of chips and wipe up spilled cutting fluid
immediately! Place sawdust or special oil absorbing compounds on slippery floors.
10. Be thoroughly familiar with the placement of the machine’s STOP switch or lever.
11. Treat any small cuts and skin punctures as potential infections! Clean them thoroughly.
Apply antiseptic and cover injury with a bandage. Report any injury, no matter how
minor, to your instructor or supervisor.
12. Have work clothes laundered frequently. Greasy clothing is a fire hazard.
13. Put all oily rags, used to wipe down machines, in an approved metal container that can
be closed tightly.
14. Never “fool around” when operating a milling machine. Keep your mind on the job and
be ready for any emergency!
15. Be sure all power to the machine is turned off before opening or removing guards and
covers.
16. Take care to prevent running the saddle or work into the column.
17. Use a section of heavy cloth or gloves for protection when handling milling cutters.
Avoid using your bare hands!

30
The Lathe
The Lathe operates on the principle of the work being rotated against the edge of a cutting tool.
Preparing Lathe for operation
1. Start with clean machine.
2. Be sure all guards are in position and locked in place.
3. Turn the spindle over by hand to be sure it is NOT locked nor engaged in back gear
(unless you intend to use back gear).
4. Move the carriage along the ways, there should be no binding.
5. Check cross slide movement.
6. Mount the desired work holding attachment.
7. Adjust the drive mechanism for the desired speed and feed.
8. If the tailstock is used, check it for alignment.
9. Clamp the cutter bit into an appropriate tool holder and mount it in the tool post. Do
NOT permit excessive compound rest overhang as this often causes tool “chatter” and
results in a poorly machined surface.
10. Mount the work. Check for adequate clearance between the work and the various
machine parts.
In addition to the above procedures, the operator must take some precautions. Sleeves should
be rolled up and rings, jewelry, and necktie or necklace removed.
A lathe board will aid in organizing and holding the tolls and measuring instruments needed for
the job. They must NOT be placed on the lathe ways or carriage.
Cleaning the Lathe
To maintain the accuracy built into a lathe, it must be cleaned after each work period. Use a 2
in. paint brush, NOT a dust brush, to remove the accumulated chips.
WARNING: Lathe chips are sharp; do NOT remove them with your hands.
DANGER: An air hose should NEVER be used to remove chips. The flying particles might injure
you or a nearby person.
Cutting Speeds and feeds
The matter of cutting speed and feed is most important since they govern the length of time
required to machine the work and the quality of the surface finish.

31
Cutting speed indicates the distance in feet or meters per minute the work moves past the
cutting tool. Measuring is done on the circumference of the work.
Feed is the distance the cutter moves LENGTHWISE along the lathe bed during ONE revolution
of the work.
Several factors that must be considered when determining the correct cutting speed and
amount of feed are:
1. Cutting tool material
2. Kind of material being machined
3. Finish desired
4. Condition of lathe
5. Rigidity of work
6. Kind of coolant, if any, being used
7. Shape of material being machined
8. Depth of cut
Calculating Cutting Speeds
RPM = CS x 4
D
Where RPM = Revolutions per minute. CS = Cutting speed recommended for the particular
material being machined (steel, aluminum, etc.) in feet per minute. D = diameter of work in
inches. Convert all fractions to decimals.
Depth of Cut
The depth of the cut refers to the distance the cutter has been fed into the work surface. The
depth of cut, like feed, varies greatly with lathe condition, material hardness, speed, feed, and
amount of material to be removed, and whether it is to be a roughing or finishing cut.
Work Holding Attachments
Most work is machined while supported by one of the following methods:
1. Between centers using a faceplate and dog.
2. Held in a chuck
a. 3-jaw universal chuck
b. 4-jaw universal chuck
c. Jacobs type chuck
3. Held in a collet
4. Bolted to the faceplate

32
Drilling and Reaming on a Lathe
The lathe can perform many operations other than turning. It can sometimes be needed to drill
or ream holes.
Drilling
When a hole is cut in solid stock, the usual practice is to hold it in a suitable chuck and mount
the drill in the tailstock.
Greater accuracy requires a centered starting point for the drill. A starting point made with a
combination drill and countersink is adequate for most jobs.
Filing on a lathe
When filing on a lathe, avoid holding the tool stationary against the work. Keep it moving
across the area being filed. If held in one position, the file will “load” and score the surface of
the work.
An ordinary mill file will produce satisfactory results. However, a long angle lathe file produces
superior results.
Operate the lathe at high spindle speed and apply long, even strokes. Release pressure on the
return stroke. Out-of-round work will result when uneven pressure is applied. Clean the file
often.
As simple as filing on a lathe may appear, it can be DANGEROUS if a few precautions are not
observed.
1. Move the carriage out of the way and remove the tool post.
2. Use the left-hand method of filing. It involves holding the file handle in the left hand.
The right hand is then well clear of the revolving chuck of faceplate. AVOID the right-
hand method. This technique places your left arm over the chuck or faceplate.
Polishing on a Lathe
Polishing is sometimes done on a lathe. A strip of abrasive cloth, suitable for the material to be
polished, is cut to length. It is then grasped between your fingers and held across the work. If
more pressure is required, mount the abrasive cloth on a strip of wood or on a file. Use a high
spindle speed for polishing.

33
Lathe Safety
1. No attempt should be made to operate a lathe until you know the proper procedures
and have been checked out on its safe operation by your instructor.
2. Dress appropriately! Remove necktie, necklace, wrist watch, rings, and other jewelry,
and loose fitting sweater. Wear an apron or a properly fitted shop coat. Safety glasses
are a must!
3. Clamp all work solidly! Use the correct size tool and work holding device for the job.
Get help when handling large sections of metal and heavy chucks and attachments.
4. Check work frequently when it is being machined between centers. The work expands
as it heats up and could damage the tailstock center.
5. Be sure all guards are in place before attempting to operate the machine.
6. Turn the faceplate or chuck by hand to be sure there is NO binding or danger of the
work striking and part of the lathe.
7. Keep the machine clear of tools.
8. Stop the machine before making measurements and adjustments.
9. Remember – chips are sharp! Do NOT try to remove them with your hands when they
become “stringy” and build up on the tool post. Stop the machine and remove them
with pliers.
10. Do NOT permit small diameter work to project too far from the chuck without support
from the tailstock. Without support, the work will be tapered or worse, spring up over
the cutting tool and/or break.
11. Be careful NOT to run the cutting tool into the chuck or dog. Check any readjustment or
work or tool for ample clearance when the cutter has been moved left to the farthest
point that will be machined.
12. Stop the machine before attempting to wipe down a machine surface. Keep the coolant
brush clear of the work when knurling.
13. Before repositioning or removing work from the lathe, move the cutting tool clear of the
work area. This will prevent accidental cuts from the cutter bit.
14. Avoid talking to anyone while running a lathe! Do NOT permit anyone to fool around
with the machine while you are operating it. You are the only one who should turn the
machine on or off, or make adjustments to the lathe.
15. If the lathe has a threaded spindle nose, never attempt to run the chuck on or off the
spindle using power. It is also dangerous practice to stop such a lathe by reversing the
direction of rotation. The chuck could spin off and cause serious injury to you. There is
also the danger of damaging your machine.
16. You should always be aware of the direction of travel and speed of the carriage before
engaging the half-nuts or automatic feed.

34
17. Always remove the key from the chuck. Make it a habit NEVER to let go of the key until
it is out of the chuck and clear of the work area.
18. Tools must NOT be placed on the lathe ways. Use a tool board or place them on the
lathe tray.
19. When filing on the lathe, be sure the file has a securely fitting handle.
20. Stop the machine immediately if some off sounding noise or vibration develops during
operation. If you cannot locate the trouble, get help from the instructor. Under no
condition should the machine be operated until the trouble has been corrected.
21. Remove sharp edges and burrs from work before removing it from the machine.
22. Plan your work thoroughly before starting. Have all needed tools on hand.
23. Use care when cleaning the lathe. Chips sometimes stick in recesses. Remove them
with a brush or short stick. NEVER clean a machine tool with compressed air, or a floor
dust brush.

35
Operating Drill Press
CUTTING SPEEDS
Speeds (rpm) for drilling are calculated using the simplified formula
CS x 4
Rpm = D
Where CS = an assigned surface speed for a given material, and D = the diameter of the drill.
Material Cutting Speed
Low – Carbon Steel 90
Aluminum 300
Cast Iron 70
Stainless Steel 302 50
Brass and Bronze 120
Copper OFHC 30
Stainless Steel 304 35
G 10 25
WORK HOLDING
Drill press vises are very frequently used for holding small workpieces of regular shape and size
with parallel sides. Vises provided the quickest and most efficient setup method for parallel
work, but should not be used if the work does not have parallel sides. The groove in the vise
jaws is used to hold small cylindrical parts while large cylindrical parts can rest on the bottom
surface of the vise. The workpiece must be supported so the drill will not go into the vise. If
precision parallels are used for support, they and the drill can be easily damaged since they are
both hardened. For rough drilling, however, cold-finished keystock would be sufficient for
supporting the workpiece. Angular vises can pivot a workpiece to a given angle so that angular
holes can be drilled. Another method of drilling angular holes is by tilting the drill press table.
If there is no angular scale on the vise or table, a protractor head with a level may be used to
set up the correct angle for drilling. Of course, this method will not be accurate if the drill press
is not level. A better way is to measure the angle between the side of the quill and the table.
Angle plates are also sometimes used for drilling angular holes. The drill press table must be
level.
LOCATING HOLE POSITION
The wiggler is clamped into a drill chuck and the machine is turned on. Push on the knob near
the end of the pointer with a 6-in. rule or other piece of metal until it runs with no wobble.
With the machine still running, bring the pointer down into the punch mark. If the pointer
begins to wobble again, the mark is not centered under the spindle and the workpiece will have

36
to be shifted. When the wiggler enters the punch mark without wobbling, the workpiece is
centered.
After the work is centered, use a spotting or center drill to start the hole. Then, for larger holes,
use a pilot drill, which is always a little larger than the dead center. In some industrial
application, a split-point is needed because the split-point drills have no dead center. Use the
correct cutting speed and set the rpm on the machine. Chamfer both sides of the finished hole
with a countersink or chamfering tool.

37
Drill Press Safety
1. Remove neckties and tuck in loose clothing so there is no chance of them becoming
entangled in the rotating drill.
2. Check out the machine. Are all the guards in place? Do the switches work? Does the
machine operate properly? Are the tools sharpened for the material being worked?
3. Clamp the work solidly. Do NOT hold work with your hands. A “merry-go-round” can
inflict serious and painful injuries.
4. Wear goggles!
5. Place a piece of wood under drills being removed from the machine. Small drills can be
damaged when dropped and the larger tools can injure you if they are dropped.
6. Use sharp tools.
7. Clean chips from the work with a brush, NOT your hands.
8. Treat cuts and scratches immediately.
9. Always remove the key from the chuck BEFORE turning on the power.
10. Let the drill spindle stop on its own after turning off the power. Do NOT attempt to stop
it with your hand!
11. Keep the work area clear of chips. Place them in an appropriate container and NOT
brush them onto the floor.
12. Wipe up all cutting fluid that spills on the floor right away.
13. Avoid trying to clean the tapered opening in the spindle while it is rotating.
14. After using a drill, wipe it clean of chips and cutting fluid. Replace the tool to proper
storage.

38
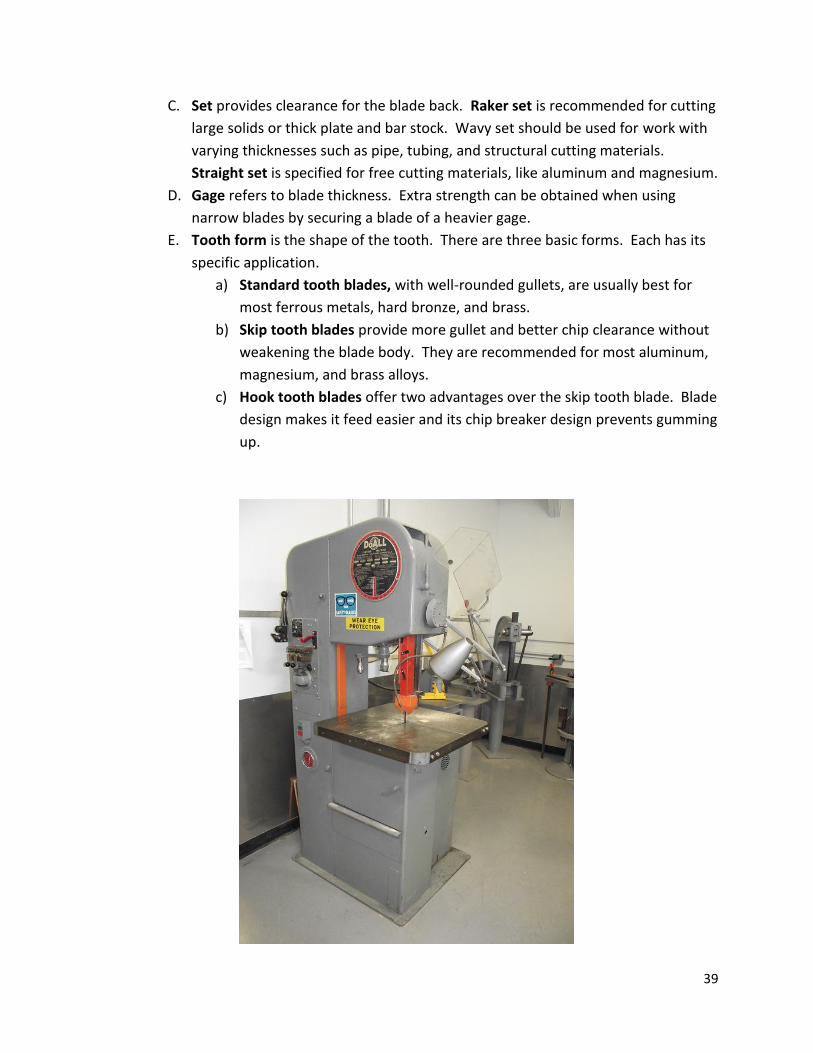
Vertical Band Saw
BAND SAW OPERATIONS
1. Band saws maintain sharpness. Wear is distributed over many teeth. Chip load is
uniform and constant on each tooth, minimizing tool wear.
2. Band saws provide unrestricted cutting geometry. Cutting can be done at any angle, in
any direction, and the length of the cut is unlimited.
3. Band saws are efficient. Excess chip production wastes power. Band saws produce the
desired shape with a minimum of chips.
4. Band saws provide a built-in tool holder. Cutting action is downward and cutting forces
hold the work to the table. In most situations, work need not be clamped.
5. Band saws have little waste. Band saws cut directly to shape. Unwanted material is
removed in solid sections rather than in chips.
BAND BLADE SELECTION
Some blade manufacturers list more than 500 different band saw blades. Points that
must be considered by the machinist when selecting the correct blade for a specific job
are:
1. Blade type – There are six basic kinds of band saw blades.
A. Tungsten carbide
B. Bimetal (high speed cutting edge with flexible carbon steel back)
C. High – speed steel
D. Shock resistant
E. Hard edge with spring tempered back
F. Carbon steel flexible back
2. Blade characteristics include width, pitch, set, gage, and tooth form.
A. Width of the blade is important – the wider the blade, the greater its strength
and the more accurate it will cut. Use the widest blade the machine will
accommodate when making straight cuts. Contour cutting should utilize the
widest blade that will cut the required radii. Widths from 1/16 to 2 inches are
available.
B. Pitch refers to the number of teeth per inch or the distance between each tooth
measured in millimeters. The thickness of the material to be cut determines the
pitch. At least three teeth should be in contact with the work for best
performance. Pitches from 2 to 32 per inch are manufactured.
39
C. Set provides clearance for the blade back. Raker set is recommended for cutting
large solids or thick plate and bar stock. Wavy set should be used for work with
varying thicknesses such as pipe, tubing, and structural cutting materials.
Straight set is specified for free cutting materials, like aluminum and magnesium.
D. Gage refers to blade thickness. Extra strength can be obtained when using
narrow blades by securing a blade of a heavier gage.
E. Tooth form is the shape of the tooth. There are three basic forms. Each has its
specific application.
a) Standard tooth blades, with well-rounded gullets, are usually best for
most ferrous metals, hard bronze, and brass.
b) Skip tooth blades provide more gullet and better chip clearance without
weakening the blade body. They are recommended for most aluminum,
magnesium, and brass alloys.
c) Hook tooth blades offer two advantages over the skip tooth blade. Blade
design makes it feed easier and its chip breaker design prevents gumming
up.

40
Band Saw Safety
1. Wear eye protection and leather gloves when handling band blades or blade material!
2. Get help when handling heavy material.
3. Have cuts and bruises treated immediately! Report all injuries!
4. Remove burrs and sharp edges from the work as soon as possible. They can cause
serious cuts!
5. Do not clean chips from the machine with your hands! Use a brush. Stop the machine
before attempting to clean it!
6. Keep your hands away from the moving blades! Use a push stick or section of metal for
additional safety. Never have your hands in line with the cutting edge of the band.
7. Other than changing blade speeds (some machines require band to be running when
speed changes are made), make no adjustments until the blade has come to a complete
stop!
8. Be sure all guards are in place before starting to operate a band saw.
9. Do not start a cut until the guides have been set properly! Guides should be positioned
as close to the work as the job will permit.
10. Do NOT attempt to operate the machine until you have received instructions on its safe
operation!

41
Horizontal Band Saw
Machine Hazards
Flying debris
Exposure to cutting blade
Safety Precautions
Safety glasses with side shields
Do not wear gloves, jewelry or ties
Roll sleeves up above elbow
Point of operation guards should be in place while operating this machine
Keeps hands away from blade while running

42
Band Saw Safety
1. Wear eye protection and leather gloves when handling band blades or blade material!
2. Get help when handling heavy material.
3. Have cuts and bruises treated immediately! Report all injuries!
4. Remove burrs and sharp edges from the work as soon as possible. They can cause
serious cuts!
5. Do not clean chips from the machine with your hands! Use a brush. Stop the machine
before attempting to clean it!
6. Keep your hands away from the moving blade! Use a push stick or section of metal for
additional safety. Never have your hands in line with the cutting edge of the band.
7. Other than changing blade speeds (some machines require band to be running when
speed changes are made), make no adjustments until the blade has come to a complete
stop!
8. Be sure all guards are in place before starting to operate a band saw.
9. Do not start a cut until the guides have been set properly! Guides should be positioned
as close to the work as the job will permit.
10. Do NOT attempt to operate the machine until you have received instructions on its safe
operation!

43
Abrasive Belt / Pedestal Grinder
Grinding Rules
To obtain maximum efficiency from a grinder, the following recommendations should be
observed.
1. Use the face of a wheel, not the sides.
2. Move the work back and forth across the wheel face. Even wear will result and it will
prevent grooves from forming on the face of the wheel.
3. Keep the wheel dressed and the tool rests properly adjusted.
4. Soft metals, like aluminum, brass and copper, tend to clog grinding wheels. When
possible, these metals should be ground on an abrasive belt grinder. If such a machine
tool is NOT available, and the grinder is to be used primarily for tool grinding, it is
suggested that another grinder be secured for this type of work.
USING DRY TYPE GRINDER
After examining the grinder and making the necessary adjustments, turn on the machine. It is
assumed that you wear safety glasses whenever you are in the shop. Remember to stand to
one side until the grinder has reached operating speed.
Place the work on the tool rest and slowly push it against the grinding wheel. If too much
pressure is applied, the work will begin to “burn” or discolor. Dipping the work into the water
container from time to time can minimize overheating. Care must be taken when grinding edge
tools because excessive heat will “draw” or remote the temper (hardness) and ruin the tool.
Keep the work moving across the wheel face to prevent the formation of grooves or ridges.
Dress and re-true the wheel as needed for maximum efficiency.
ABRASIVE BELT AND GRINDER SAFETY
1. Always wear goggles or a face shield when performing grinding operations even though
the machines are fitted with eye shields.
2. Always check a grinding wheel for soundness before putting it on the grinder.
3. Allow the wheels or belt to stop completely before attempting to make machine
adjustments.
4. Because it is NOT possible to check grinding wheels each time the machine is used, it is
considered good practice to stand to one side of the machine during operation. This will
keep you clear of flying fragments if the wheel shatters.
5. Be sure all wheel guards and safety devices are in place before attempting to use a
grinder or abrasive belt machine.

44
6. If the grinding operation is to be performed dry, do NOT forget to hook up any exhaust
attachments before starting.
7. Check the machine thoroughly before using it. Lubricate the machine only as
recommended by the manufacturer.
8. Keep your hands clear of the rotating wheels. It is a cutting tool and can cause serious
injuries!
9. Injuries caused by rotating grinding wheels are especially prone to infection. Have
them, no matter how small, treated immediately.
10. Under no condition should work be held with a cloth to protect your hands from the
heat generated by the grinding operation. Hold the work in a clamp or hand vise.
11. Make sure the tool rest is properly adjusted.
12. Avoid work pressure on the side of the wheel and do NOT use a wheel that is glazed or
loaded with metal.
13. NEVER operate a grinding wheel at speeds higher than that recommended by the
manufacturer!

45
Buffing Wheels
Machine Hazards
Flying debris
Dust hazard
Safety Precautions
Safety goggles or glasses with side
shields
Tongue guard must be in place
before operating, adjusted no
greater than one fourth inch above
wheel
Guard around moving wheels must
be in place before operating
Vacuum must be operating to
remove dust and debris
Wheels must be dressed to protect
cloth wheel from wearing
Stand slightly to side in case debris
kicks back toward operator

46
For operational, repair or machine guarding questions please
Call 630-840-3711
Additional Questions or Concerns:
Accelerator Division Personnel call 630-840-4446
Computing Division Personnel call 630-840-5424
Particle Physics Division Personnel call 630-840-8261
Technical Division Personnel call 630-840-5424