tech bulletin - waysmart uninstall instructions all of the antenna connections and the waysmart...
TRANSCRIPT

Technical Bulletin waySmart Uninstall Instructions
© 2012 inthinc Confidential Page 1 of 5
Document Properties Document/Part Number Document Type Products Affected Internal Technical Bulletin waySmart
Revision History
Revision No. Revisions Made Author Date 1.0 Initial Draft Scott Vecchiarelli 4-26-2012
Table of Contents Document Properties.............................................................................................................. 1
Revision History...................................................................................................................... 1
1 Overview.......................................................................................................................... 2
2 Summary .......................................................................................................................... 2
3 Uninstall Instructions & Guidelines ................................................................................... 2
4 Additional Information ..................................................................................................... 5

Technical Bulletin waySmart Uninstall Instructions
© 2012 inthinc Confidential Page 2 of 5
1 Overview The purpose of this document is to provide guidance and basic instructions on how to remove the waySmart system from a vehicle.
2 Summary In the event a waySmart system needs to be removed from a vehicle, perhaps the vehicle is going to be sold or retired; it is not necessary to remove the entire waySmart system, including all cables and wiring. Most of the cables and wiring (i.e. power, ground) will remain installed in the old vehicle. Only the waySmart hardware components, identified in this document, need to be removed so they can be reused in another vehicle. When re-installing the hardware in another vehicle, all of the cables/wiring needed will be included in a new Installation Kit that can be purchased.
3 Uninstall Instructions & Guidelines WARNING: Disconnect system power from the vehicle and remove system main fuses prior to removing any hardware components or you may damage the waySmart unit.
waySmart™ Unit
Locating and removing the waySmart unit first is the best place to start. After removing the waySmart unit, you can trace the cable routing to the other hardware components that need to be removed.
The waySmart unit is typically mounted in the following locations:
Under/behind the driver or passenger seat
On the rear wall of the cab
Mounted directly to the driver/passenger seat
Note: Installation locations will vary depending on vehicle type. The above mentioned installation locations are typical in light-duty vehicles.
Uninstall Instructions:
1. To access the waySmart mounting screws, you will first need to remove the tampershield lockbox.
2. Disconnect all of the antenna connections and the waySmart System Cable.
3. The waySmart is mounted to the vehicle using 4 mounting screws, located in each of the four corners of the unit. Remove these mounting screws to remove the hardware.
Tri-Band Antenna (Optional)
The Tri-Band antenna hardware is typically mounted in the following locations:
On the exterior roof of the vehicle
On an exterior accessory or headache rack
On a custom-fabricated mounting bracket on the exterior of the vehicle
Uninstall Instructions:
1. Locate the Tri-Band antenna hardware and disconnect the antenna cable connections
2. Remove the Tri-Band antenna by unscrewing the bolt securing the antenna to the mounting surface
3. If needed, plug and seal the hole where the Tri-Band antenna was secured to the vehicle

Technical Bulletin waySmart Uninstall Instructions
© 2012 inthinc Confidential Page 3 of 5
Touchscreen or Handheld Driver Interface
The Touchscreen or Handheld driver interface is typically installed in the following locations:
On the vehicle dashboard
On the floor of the vehicle, between the driver and passenger seats
On the center console of the vehicle, between the driver and passenger seats
Uninstall Instructions:
1. Locate the driver interface and trace the cable routing to underneath the dashboard where the cable is connected to the waySmart system cable. Disconnect this cable from the waySmart system cable.
2. The driver interface hardware is typically installed using a RAM mount, remove this mount by removing the screws securing the mount to the vehicle.
3. Keep the RAM mount and set aside to use in a future installation
Cellular (GPRS) Antenna & Modem
The Cellular (GPRS) Antenna is typically mounted in the following location:
Under/behind the vehicle dashboard, usually to the left of the steering column
Uninstall Instructions:
1. Locate the System Cable bundle that is tucked away under the dash below the steering column
2. Disconnect the Cell Modem from the snap-lock power connection that is part of the System Cable bundle
3. Trace the power cable back to where the cell modem is installed under/behind the dashboard
4. In some cases, the cell antenna is adhered to the inside of the vehicle dash using two-sided adhesive tape. If this is the case, you will need to detach the antenna from the vehicle dash.
5. Disconnect the antenna and power cables on the cell modem and keep the power & antenna connections, and the modem hardware for a future installation.
CAN/OBD Adapter Cable
The CAN or OBD adapter cable is typically mounted in the following location:
CAN/OBD connection is plugged in to the vehicle’s DLC port. This port is typically just underneath the steering column. In some cases, the port is underneath and to the left or right of the steering column.
CAN/OBD is connected to the waySmart system cable that is typically tucked away underneath the dash under the steering column.
Uninstall Instructions:
1. Locate the vehicle’s DLC port, where the OBD/CAN connection is plugged in and disconnect the cable
2. Trace the cable back to where is it bundled with the waySmart System cable under the dash of the vehicle.
3. Disconnect the CAN/OBD cable roll-lock connection on the waySmart System cable.
4. Keep this OBD/CAN adapter cable for a possible future installation.
Technical Bulletin waySmart Uninstall Instructions
© 2012 inthinc Confidential Page 4 of 5
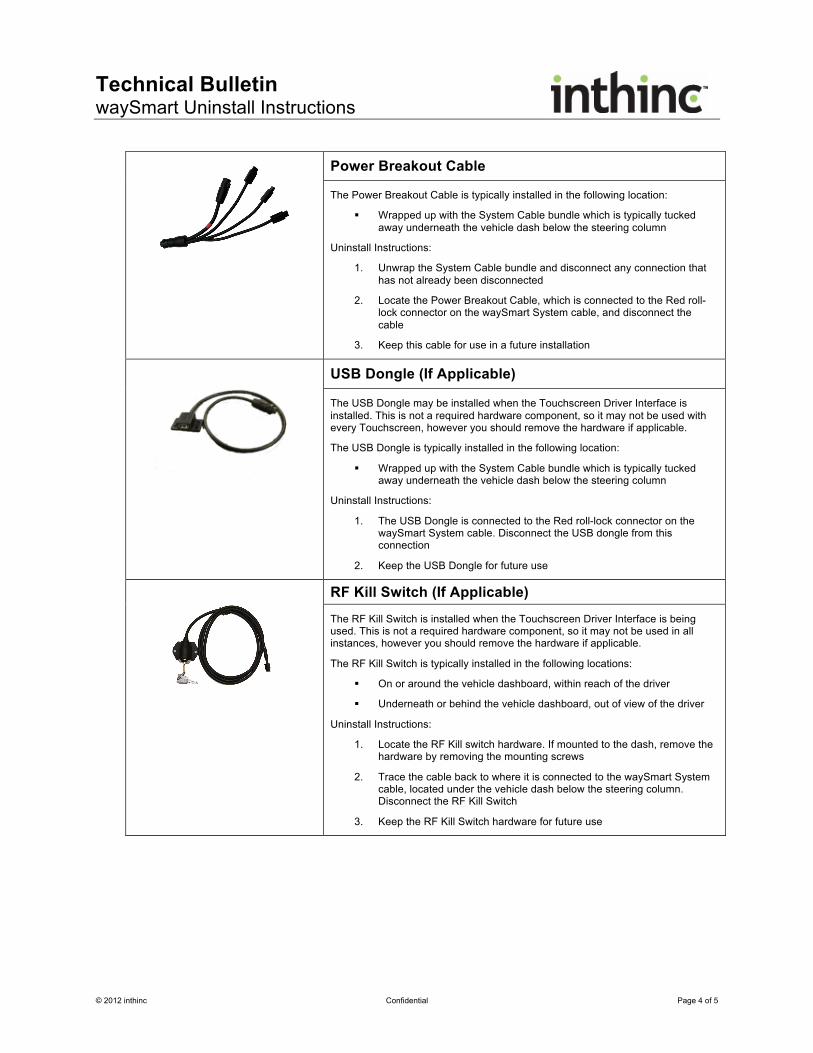
Power Breakout Cable
The Power Breakout Cable is typically installed in the following location:
Wrapped up with the System Cable bundle which is typically tucked away underneath the vehicle dash below the steering column
Uninstall Instructions:
1. Unwrap the System Cable bundle and disconnect any connection that has not already been disconnected
2. Locate the Power Breakout Cable, which is connected to the Red roll-lock connector on the waySmart System cable, and disconnect the cable
3. Keep this cable for use in a future installation
USB Dongle (If Applicable)
The USB Dongle may be installed when the Touchscreen Driver Interface is installed. This is not a required hardware component, so it may not be used with every Touchscreen, however you should remove the hardware if applicable.
The USB Dongle is typically installed in the following location:
Wrapped up with the System Cable bundle which is typically tucked away underneath the vehicle dash below the steering column
Uninstall Instructions:
1. The USB Dongle is connected to the Red roll-lock connector on the waySmart System cable. Disconnect the USB dongle from this connection
2. Keep the USB Dongle for future use
RF Kill Switch (If Applicable)
The RF Kill Switch is installed when the Touchscreen Driver Interface is being used. This is not a required hardware component, so it may not be used in all instances, however you should remove the hardware if applicable.
The RF Kill Switch is typically installed in the following locations:
On or around the vehicle dashboard, within reach of the driver
Underneath or behind the vehicle dashboard, out of view of the driver
Uninstall Instructions:
1. Locate the RF Kill switch hardware. If mounted to the dash, remove the hardware by removing the mounting screws
2. Trace the cable back to where it is connected to the waySmart System cable, located under the vehicle dash below the steering column. Disconnect the RF Kill Switch
3. Keep the RF Kill Switch hardware for future use

Technical Bulletin waySmart Uninstall Instructions
© 2012 inthinc Confidential Page 5 of 5
4 Additional Information Some customers will require that all cables and wires should to be removed from the vehicle. However, in most cases, it is okay to leave behind any cables/wires, when uninstalling the waySmart hardware components. Any needed cables and wiring needed to reinstall the waySmart hardware components is included in a waySmart Installation Kit that is available through inthinc. After removing all of the necessary hardware components and cables, secure and tuck away any remaining cables and wiring.