team approach to effective laboratory...
TRANSCRIPT

The Team Approach to Effective Laboratory Communication
– We are equal partners
– Our goal is to please the patient (aka the Real Boss)
– Win-Win
Respect• Treat me as a partner, not an underling
Respect• Treat me as a partner, not an underling
• Stop by my lab to meet my team
Respect• Treat me as a partner, not an underling
• Stop by my lab to meet my team
• Don’t insult me by telling me I am too expensive *
Respect• Treat me as a partner, not an underling
• Stop by my lab to meet my team
• Don’t insult me by telling me I am too expensive
• When something does not work, do your part to help remedy the situation
Respect• Treat me as a partner, not an underling
• Stop by my lab to meet my team
• Don’t insult me by telling me I am too expensive
• When something does not work, do your part to help remedy the situation
• Don’t degrade me to your patients *

I Need to Send It Back to the Lab ‘cause the Lab Screwed Up AGAIN
• If lab screws up why are you sending it back to THEM?
Tell Me What You Want
And I’ll Give You What You Need
Everything the Lab would Love to tell you, but is Afraid to Ask For!
• Give me a readable impression
It has been reported that 89% of impressions
surveyed had 1 or more observable errors
J Prosthet Dent 2005;94:112‐7.
You Want Me to do What?
You Want Me to do What? You Want Me to do What?

Cord plain or impregnated
Hemostasis/Retraction Hemostasis/Retraction
•Dry, no liquids to affect bonding
•Easy to dispense without tangles
Cord plain or impregnated
Comprecap
Comprecap w hemostatic agent
Hemostasis/Retraction Retraction Manufacturer
HemostaticAgent
Comments
Expasyl KerrAluminum Chloride
Clay-based. Gray-green color. Place material into sulcus for 1-2 minutes, 30 seconds after rotary curettage. Remove material by rinsing with water. Dispensed in cartridges using Expasyl gun
dispenser. Comes in Original and Strawberry flavor.
Traxodent PremierAluminum Chloride
Clay-based. White color. Place in sulcus for 2 minutes, compress with cotton cap, and remove material by rinsing with water.
Syringe dispensed.
Retraction Capsule
3M ESPEAluminum Chloride
Blue color. Extrude material into the sulcus with extra fine tip, let dwell for 2 minutes, remove by rinsing with water. Uses standard
composite compule dispenser.
Magic Foam Cord
Coltene None
Expanding vinyl polysiloxane material extruded from 50mL impression gun. Blue color. Place around prepared tooth,
compress with cotton cap, remove from mouth in minimum 5 minutes, maximum 10 minutes.
Access Edge CentrixAluminum Chloride
Clay-based. Light green color. Place in sulcus for 2 minutes, apply 2 minutes of compression using cotton caps, rinse with
water to remove. Uses standard composite compule dispenser
GingiTrac CentrixAluminum
Sulfate
Vinyl polysiloxane material extruded from 50mL impression gun. Light green color. Intraoral setting time is 2 minutes. Apply pressure while setting with cotton compression cap. Also
available in unit-dose MiniMix syringe without the need for 50mL impression gun.
Dryz ParkellAluminum Chloride
Clay-based. Light green color. Place in sulcus for 2 minutes, apply 2 minutes of compression using cotton caps, and rinse with
water to remove. Syringe dispensed.
Gingival Retraction System
Gingi-Trac
Taking Perfect First Impressions
• Preparation to marginal gingiva
• Pack cord and re-prepare apically to cord
• Remove cord and place Gingi-Trac

Taking Perfect First Impressions
• Remove after 5 minutes and evaluate
• Repeat until no bleeding (1-5 times)
Cord plain or impregnated
Comprecap
Comprecap w hemostatic agent
Electrosurgery
Diode Laser
Hemostasis/Retraction
Diode Laser
Picasso Lite Odyssey
Impression Materials
• Panasil
• Imprint 4
• Splash• Aquasil Ultra Cordless
Panasil Panasil
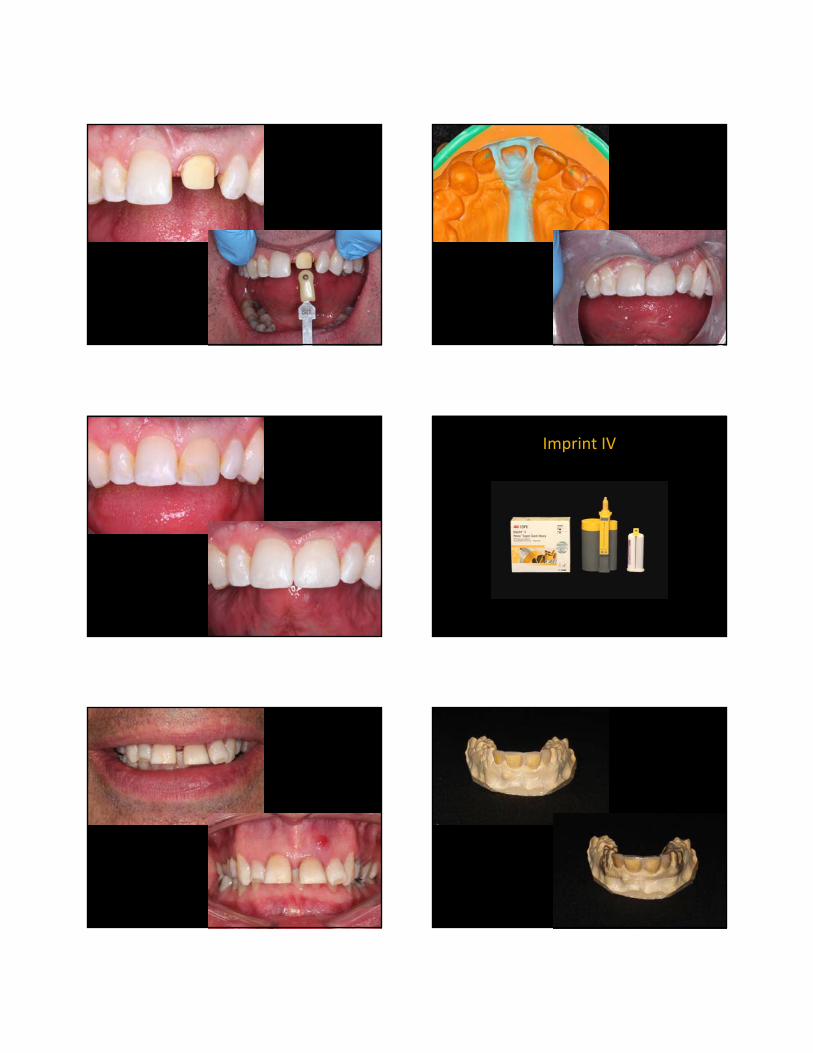
Panasil Imprint IV

Splash
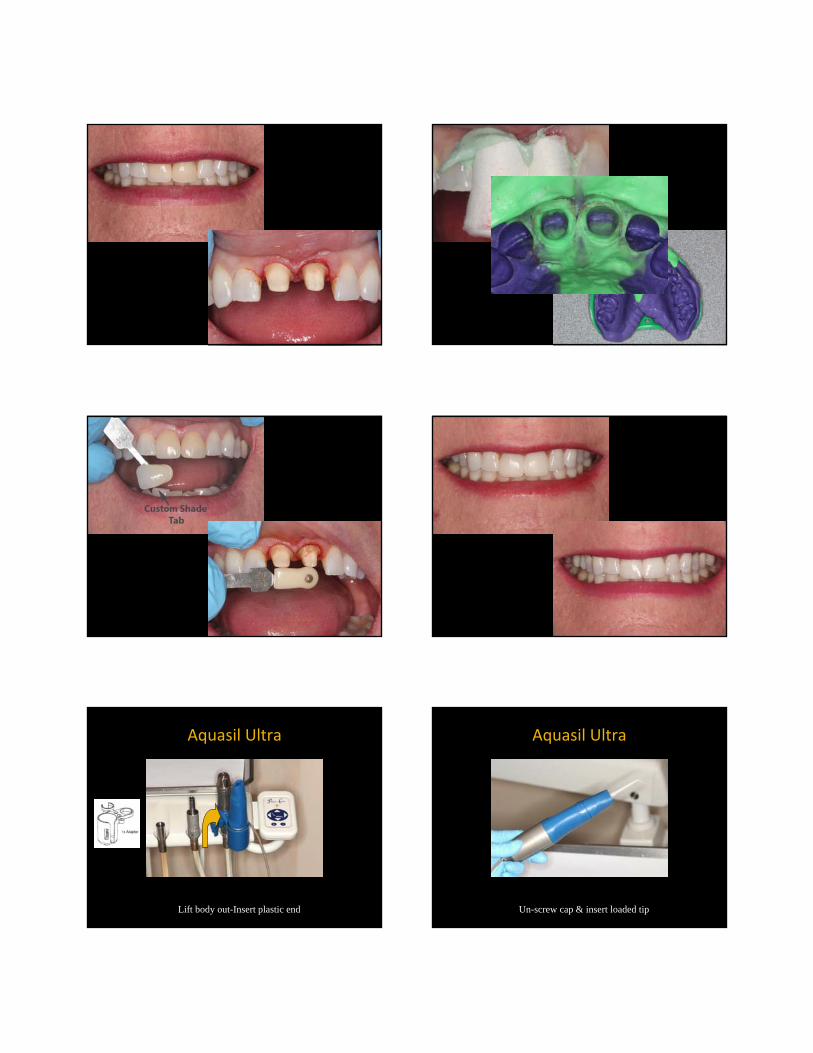
Aquasil Ultra
Lift body out-Insert plastic end
Aquasil Ultra
Un-screw cap & insert loaded tip

Aquasil Ultra Aquasil UltraInfection Control
Barriers available
Grip & Cap Autoclavable
Aquasil Ultra
2 mm
3 mm
Aquasil Ultra
Size Color Work Time
Mouth Removal Time (MRT)
No. of Teeth
Fill Amount
Single Light Purple
35” 3’00” 1 ‐ 2 .7 mL
Multi Light Blue
1’00” 4’30” 3 ‐ 4 1.6 mL
Everything the Lab would Love to tell you, but is Afraid to Ask For!
• Give me a readable impression
• Give me enough room
Ain’t no way

Everything the Lab would Love to tell you, but is Afraid to Ask For!
• Give me a readable impression
• Give me enough room
• Give me the option of asking for a new impression or new preparation
Let’s start over
Let’s start overEverything the Lab would Love to tell you, but is Afraid to Ask For!
• Give me a readable impression
• Give me enough room
• Give me the option of asking for a new impression or new preparation
• Give me pictures of the prep, adjacent teeth and the desired shade
Uses of Dental Photography Laboratory Communication
““Singular SuccessSingular Success””
Uses of Dental Photography Laboratory Communication
Root fractureRoot fracture

Uses of Dental Photography Laboratory Communication
Paint tints onto shade tabPaint tints onto shade tab
Uses of Dental Photography Laboratory Communication
Take photos and send to labTake photos and send to lab
Print JPEG
Uses of Dental Photography Laboratory Communication
““Singular SuccessSingular Success””
Everything the Lab would Love to tell you, but is Afraid to Ask For!
• Give me a readable impression
• Give me enough room
• Give me the option of asking for a new impression or new preparation
• Give me pictures of the prep, adjacent teeth and the desired shade
• Give me a guide of desired incisal edge, midline, angulations, position of the anterior teeth & preferably impression of temps

Looks
Longevity
versus
Common Public Perception of a Crown
Sticks out like a headlightDoesn’t matchToo opaqueBlack line at gum
The All-Ceramic Restoration
• Increased translucency and vitality
• Supra-gingival margins possible
• Does not contain metal
• Potentially best esthetics
All-Ceramic RestorationAdvantages
PFM vs All-Ceramic Crown
PFM Crown
All-Ceramic Crowns

• More exacting and extensive preparation (except pure Zr)
• Often exacting cementation procedures
• Post-operative sensitivity
• More prone to fracture
• Often higher lab bill (not pure Zr)
All-Ceramic RestorationChallengesChallenges
• All Zirconia
• Porcelain fused to Zirconia
• Monolithic Lithium Disilicate
• Lithium Disilicate w/ cutback
• Pressed Ceramic
• Feldspathic
All-Ceramic Restoration Materials-2015
• Esthetic expectations
• Specific tooth
• Occlusal habits and trauma
• Amount of tooth preparation
• Color of underlying tooth structure
• Periodontium biotype
• Type of core or post
• Bonding vs conventional cementation
• Cost
• Patient cooperation
All-Ceramic Selection Factors
Cardoso JA, Almeida PJ, Fischer A, Phaxay SL. Clinical decisions for anterior restorations: the concept of restorative volume. J Esthet Restor Dent. 2012; 24:367-83
Feldspathic Porcelain
• Potential for best esthetic results
• Primary use-Laminate Veneers
• 60-70 MPa flexural strength
• Must be meticulously bonded
I want an extreme makeover
Retracted View
Lateral Views

8 Teeth Prepared for Feldspathic Porcelain Laminate Veneers
Select desired shade before beginning preparation
Bonding Porcelain Laminate Veneers
DO NOT USE:
Self-Cured Cements (Contain elevated levels of Tertiary Amines which may yellow)
Self Curable Cements which you can add a dual-cured catalyst (May yellow)
Dual-Cured Cements (May Yellow)
Cement Do’s and Don’ts
Dr Nasser BarghiUTHSCSA
Delta “E” Values for Veneer CementsStored at 500 C
Bonding Porcelain Laminate Veneers
DO NOT USE:
Self-Adhesive “Cem” Cements-lower bond strength-(12-15 MPA vs 24-36 MPA) Rely X Unicem
Smart Cem
Bis Cem
G Cem
Mono Cem
Cement Do’s and Don’ts
Bonding Porcelain Laminate Veneers
DO NOT USE:
Self-Etching Primer (Poor enamel bonding) MUST ACID ETCH ENAMEL
Cement Do’s and Don’tsBonding Porcelain Laminate Veneers
DO USE:
Fourth Generation Total Etch multi-bottle
Fourth Generation Total Etch 2 component
Fifth Generation Total Etch
Universal Bond Total Etch Mode
Cement Do’s and Don’ts
All-Bond Universal Bond
All-Bond III (ACE TE)
All-Bond II One Step Bond

Bonding Porcelain Laminate Veneers
DO USE:
Light Cured Only Resin Cements
Cement Do’s and Don’ts
Choice 2 (delta E<1.2)
Bonding Porcelain Laminate VeneersTreatment of Porcelain Surface
Only glass beads should be applied under pressure to internal surface of laminate
If not etched apply 9% HF for 90 seconds
Bonding Porcelain Laminate VeneersTreatment of Porcelain Surface
Wash thoroughly
Ultrasonic in Et OH or apply 32-27% phosphoric acid to remove hexafluorosilicasalts on surface if over-etched
Over-etched
Bonding Porcelain Laminate VeneersTreatment of Porcelain Surface
If not silanated dry & apply silane-wait 90 seconds (BEST to silanate when received from lab
Silane to Porcelain
Condensation Reaction
Porcelain
-H2O
Bonding Porcelain Laminate VeneersTreatment of Porcelain Surface 2 Forms of Silane
Pre-Hydrolyzed Silane + Acid Non-Hydrolyzed
O
OSi
OH
HO
HO
Bonding Porcelain Laminate VeneersTreatment of Porcelain Surface Tryin with water soluble gels
Clean in ultrasonic or apply phosphoric acid wash and dry thoroughly

Bonding Porcelain Laminate VeneersTooth Surface Preparation
Place 32-37% Phosphoric Acid on enamel for 15 seconds then on dentin for 5 seconds
Wash thoroughly and dry enamel but leave dentin moist
Place GLUMA on exposed dentin
Bonding Porcelain Laminate VeneersTooth Surface Preparation
All Bond 2:Apply 3-5 coats A&B, gently air dry, light cure 10 sec, apply D/EBond do not light cure
All-Bond 3 (ACE TE): Apply 1-2 coats of mixed, gently air dry and light-cure 10 sec
One-Step Plus: Apply 1-2 coats, gently air dry and light cure for 10 sec
All-Bond Universal: Apply 1-2 coats, lightly air dry at an angle and light cure for 10 sec
Bonding Porcelain Laminate VeneersPlacement
Optional-w thick cements (Provi-Link) Apply a thin layer of Porcelain Bonding Resin (HEMA free) to internal surface of veneer, do NOT light-cure
Apply selected shade of CHOICE 2 to internal surface of veneer and guide into place
Tack cure for 3-5 seconds, then remove excess cement
Bonding Porcelain Laminate VeneersPlacement
Use rubber tip to remove excess
Wave cure (1:1,000, one inch away)
Use scaler to remove excess
Floss contacts
Place glycerin around margins and thoroughly cure for 1 minute from buccal and lingual
Bonding Porcelain Laminate VeneersFinal Adjustments
Check occlusion in Centric Occlusion
Carefully adjust protrusive and lateral excursions
Smooth lingual with fine diamond football, white stone, successive points
Have patient return in 2 weeks for photos and to check occlusion
Before
After
Porcelain Laminate Veneers Seated
Laboratory prostheses fabricated by Valley Dental Arts Stillwater MN
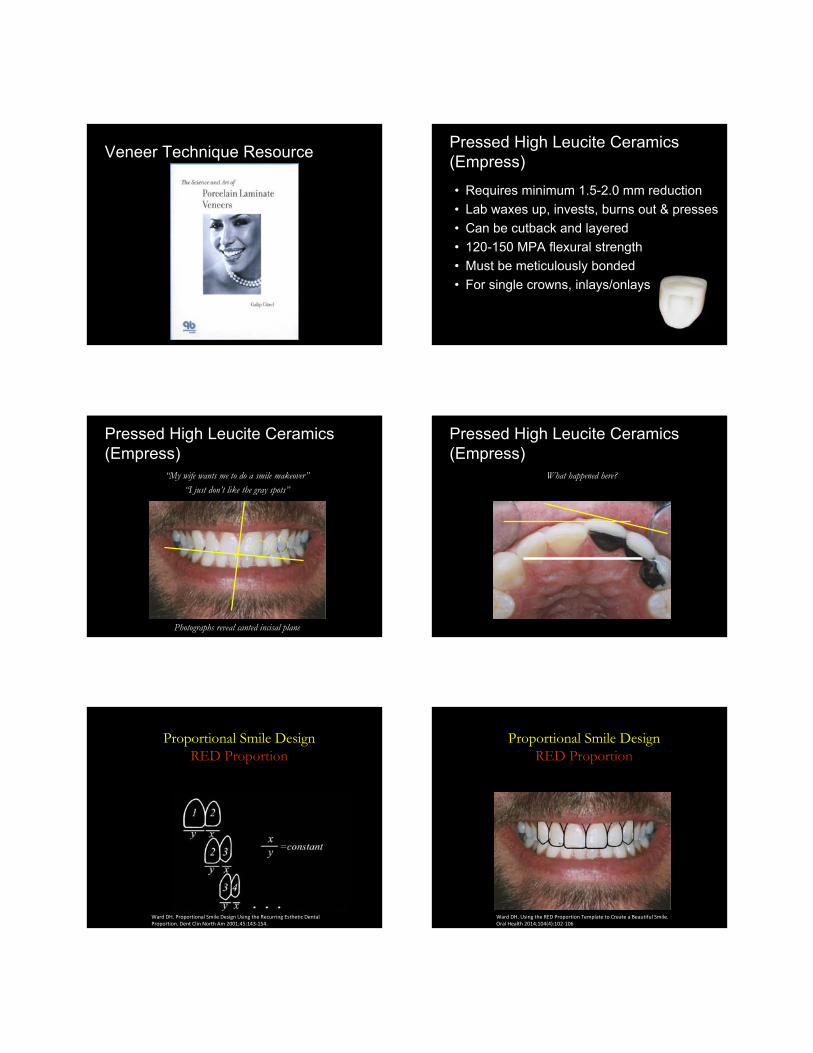
Veneer Technique ResourcePressed High Leucite Ceramics (Empress)
• Requires minimum 1.5-2.0 mm reduction
• Lab waxes up, invests, burns out & presses
• Can be cutback and layered
• 120-150 MPA flexural strength
• Must be meticulously bonded
• For single crowns, inlays/onlays
Pressed High Leucite Ceramics (Empress)
“My wife wants me to do a smile makeover”
“I just don’t like the gray spots”
Photographs reveal canted incisal plane
Pressed High Leucite Ceramics (Empress)
What happened here?
Proportional Smile DesignRED Proportion
Ward DH. Proportional Smile Design Using the Recurring Esthetic Dental Proportion. Dent Clin North Am 2001;45:143‐154.
Proportional Smile DesignRED Proportion
Ward DH. Using the RED Proportion Template to Create a Beautiful Smile. Oral Health 2014;104(4):102‐106.

Recommended Treatment•All-porcelain bridge #9-11•Porcelain laminate veneers #5-8, 12
Accepted Treatment•All-porcelain bridge #9-11•Porcelain laminate veneers #6-8
Apical Zenith distal to midline-electrosurgery (2003)
Retract gingiva with cord packer during margination
Completed preparations
Select stump shade
Bis-acryl temporary
Blend margins but avoid touching tooth
Blend margins but avoid touching tooth
Temps seated
Impressions taken at another appointment since
electrosurgery
Models
Restorations seated on model

Restorations on Soft-Tissue Model
Temps on Seating day
Scrub with pumiceWash and dryTry-in each laminate individuallyAdjust tooth if internalAdjust laminate if contactTry-in all laminates together
A1 tryin paste
Clear tryin paste
Milky White tryin paste
Immediate Smile
Bond Bridge first, then seat laminates
Before
After
Laboratory prostheses fabricated by Valley Dental Arts Stillwater MN
Lithium Disilicate (E-Max)
• Strength and translucency
• Posterior crowns-monolithic
• Pressed or CAD produced
• Anterior crowns-w/ layered porcelain
• 360-400 MPA flexural strength
• Better to be bonded unless >1.0mm thick
• Best esthetics

Single Central Incisor Crown•2-5 Appointments•Higher Fee
Lithium Disilicate (E-Max)Endodontically Treated
Old Bonding
Lingual View
Remove facial compositeRemove AO compositeRemove most stainUse perio probe to remove subgingivalBond bleach white compositePrepare toothPhoto w/stump shade
Make custom temp for lab
•Make quick bis-acryl
•Laminate prep on facial
•Add composite and custom stains
Send photo and temp to lab
OR Make custom shade tab for lab
•Core Shade
•Add tints
•Overlay with IncisalShade for value
Send photo and tab to lab
Pre Operative Smile
Post Operative Smile
Laboratory prosthesis fabricated by Valley Dental Arts Stillwater MN

Monolithic E Max CrownsLoad to Failure*
*Data from Ivoclar/Vivadent
Selecting Bonding Agent w Duo-Link
Bonding Agent Clinical situation
AllAll--Bond SE (light cure) + DuoBond SE (light cure) + Duo--Link (Light Cured)Link (Light Cured)
Vital tooth
AllAll--Bond TE (light cure) + Duo Bond TE (light cure) + Duo Link (Self Cured)Link (Self Cured)
Endo tooth, post & core
9%HF 60s
Li2Si2O5
Dentin______
CoreResin Cement
Sila
ne
Bonding to Lithium Disilicate(Retentive)
15 MPa
Li2Si2O5
Dentin______
CoreResin Cement
Sila
ne
Adhesive
Bonding to Lithium Disilicate-(Non Retentive)
35 MPa
DuoDuo--Link UniversalLink Universal
•Increased radiopacity
•2 shades‐milky white & translucent
•Dual curing
•Completely cures w/o light exposure
•Easier cleanup

DuoDuo--Link UniversalLink Universal
•Usable with Universal, total etch, self‐etch bonding agents
e Cemente Cement•All‐inclusive kit
•Dual and light cure
Temporary Crown
Bonding Technique
Place Divots with 330 bur
Anesthetize if vital
Seat Pointed Forceps-Easy back and forth
Be gentle: slight rock, then pull straight up
(Optional) Roughen surface w diamond for immediate dentin sealing
Sandblast bases/liners (place gingival protection)
Wash and remove excess moisture
Wipe off tooth with wet cotton roll
Check interproximal contacts with floss-avoid causing bleeding
Adjust contacts with white stone-re-polish areas
Check margins w/explorer
Adjust tooth not intaglio surface of crown
Re-acidify surface with Phosphoric Acid
Wash and dry thoroughly
Apply silane (if not previously applied)
Wait 90 seconds and air dry avoiding water contamination
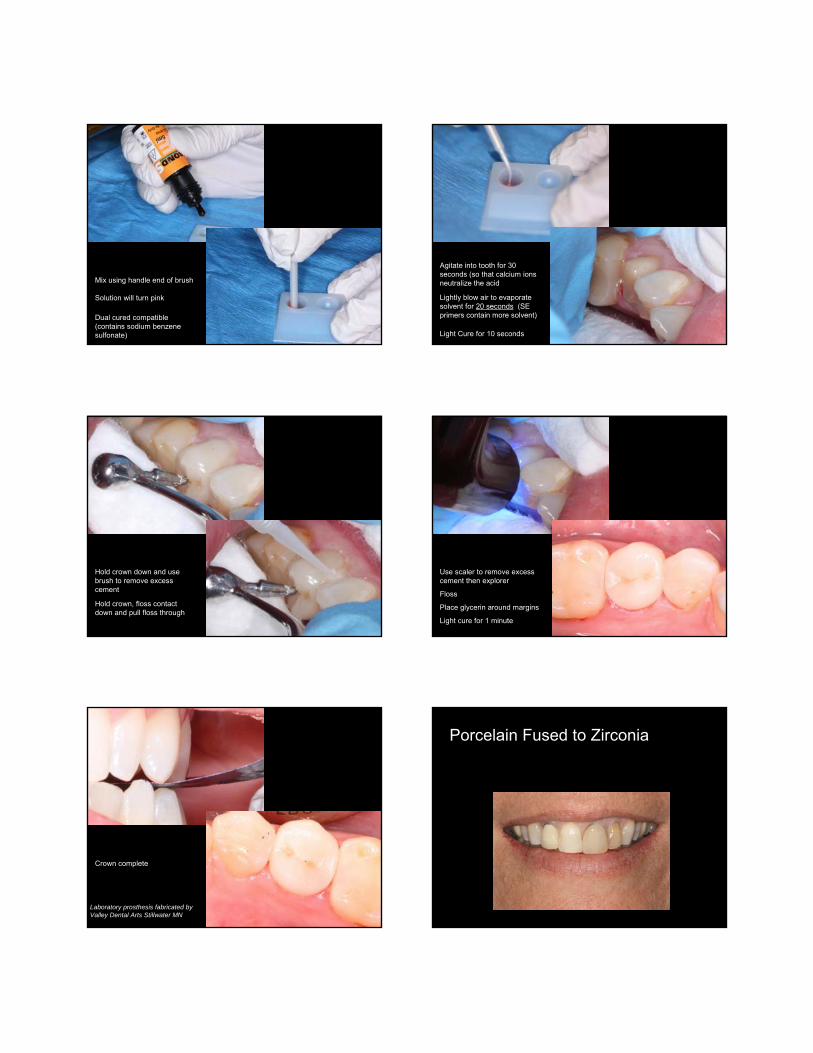
Dispense one drop each of Self-Etching Primer into well
Mix using handle end of brush
Solution will turn pink
Dual cured compatible (contains sodium benzene sulfonate)
Dip brush in well
Agitate into tooth for 30 seconds (so that calcium ions neutralize the acid
Lightly blow air to evaporate solvent for 20 seconds (SE primers contain more solvent)
Light Cure for 10 seconds
Mix Cement and place in tooth
Lightly coat to avoid overfilling (hydraulic pressure can impede seating)
Quickly seat crown and push down
Hold crown down and use brush to remove excess cement
Hold crown, floss contact down and pull floss through
Wave cure margin 1 second
Use scaler to remove excess cement then explorer
Floss
Place glycerin around margins
Light cure for 1 minute
Check Occlusion
Adjust with fine diamond
Then white stone and polish
Crown complete
Laboratory prosthesis fabricated by Valley Dental Arts Stillwater MN
Porcelain Fused to Zirconia

RED Proportion
Ward DH. Proportional smile design using the RED
proportion. Dent Clin North Am 2001;45:143-154.
“The proportion between the successive widths of the teeth as viewed from the frontal should remain
constant as you move distally”
RED Proportion
Ward DH. Proportional smile design using the RED
proportion. Dent Clin North Am 2001;45:143-154.
Without pre-existing constraints
Sample RED Proportions
x 0.8x 0.64x
x 0.7x 0.49x
x 0.62x 0.38x
Same size Central Incisors
Ward DH. Proportional smile design using the RED
proportion. Dent Clin North Am 2001;45:143-154.
“The majority chose central incisors that were as close to 0.75-0.78 width/height ratio as possible.”
Rosenstiel SF, Ward DH, Rashid RG. Dentists’ Preferences of Anterior
Tooth Proportion-A Web-based Study. J Prosthodont 2000;9:123-136.
Conclusions
Preferred RED Proportions
78% w/hratio
78% w/hratio
78% w/hratio
Very Short
Normal
Very Tall
Same Inter-canine tooth width
Relative Tooth heights
Rosenstiel SF, Ward DH, Rashid RG. Dentists’ Preferences of Anterior
Tooth Proportion-A Web-based Study. J Prosthodont 2000;9:123-136.
Effect of Crown Length & RED Proportion
Ward DH. Using the RED Proportion to Engineer the Perfect Smile.
Dent Today 2008;27(5):112-117.

Effect of Crown Length & RED Proportion
Ward DH. Using the RED Proportion to Engineer the Perfect Smile.
Dent Today 2008;27(5):112-117.
Using Inter-Canine Width & CI Height to Determine CI Width
ICW
CIH
Ward DH. Using the RED Proportion to Engineer the Perfect Smile.
Dent Today 2008;27(5):112-117.
Divide inter-canine width by central incisor length to give a quotient
ICW
CIH
ICW/CIH
Ward DH. Using the RED Proportion to Engineer the Perfect Smile.
Dent Today 2008;27(5):112-117.
LOOKUP QUOTIENT IN CHART FOR RED & TOOTH SIZES
ICW/CIH
Ward DH. Using the RED Proportion to Engineer the Perfect Smile.
Dent Today 2008;27(5):112-117.
Using RED Proportion Charts
36.2mm
10.9
mm
36.2/10.9=3.3
Calculating CI Width
36.2
------ =8.5mm CI
4.25
36.2mm

Calculating LI Width
36.2
------ =5.7mm LI
6.35
36.2mm
Calculating Cuspid Width
36.2
------ =3.8mm C
9.5
36.2mm
Teeth Preparations Laboratory Procedures
Mounted cast of temporaries
Matrix used for crown
fabrication
Crowns on Model from Lab
ZrDentin______
Core Resin ModifiedGlass Ionomer Cement
Z P
rime
Polyacrylc
Acid*
Cementing to Zirconia
Retentive Zr Crown cement with Resin-Modified Glass Ionomer Cement (*Pre-Treatment optional)
DO NOT TREAT WITH PHOSPHORIC ACID!
ZrDentin______
Core Resin ModifiedGlass Ionomer Cement
Z P
rime
Polyacrylc
Acid*
Cementing to Zirconia
Retentive Zr Crown cement with Resin-Modified Glass Ionomer Cement (*Pre-Treatment optional)
DO NOT TREAT WITH PHOSPHORIC ACID!

ZrDentin______
Core Calcium AluminateRMGI Cement
Cementing to Zirconia
Retentive Zr Crown cement with Resin-Modified Glass Ionomer Cement (*Pre-Treatment optional)
DO NOT TREAT WITH PHOSPHORIC ACID!
CeramirCeramir
ZrDentin______
CoreResin Cement
Z P
rime
Adhesive
Bonding to Zirconia
Short/Tapered, Non-retentive Zr Crown adhesively bond with Resin Cement
Z-Prime Plus (Surface Primer)
• Phosphate Monomer (MDP), BPDM, Et OH
• Indications– Zirconia (LAVA, Cercon, Implant)
– Alumina (Procera)
– Metal (Titanium, Non-Precious, Semi-precious, High Noble)
– Composite Indirect
– Endodontic Posts (Zirconia, Fiber, Metal)
– Intra-oral repairs
Bonding Zirconia CrownsTreatment of Zirconia Surface
MDP to Zirconia
Addition Reaction
Zirconia
Bond Strengths to Intaglio Surface*
*Data from Bisco

157
Phosphates contaminate Zr surface
• Saliva contains phosphates that tie up receptor sites
• DO NOT clean with Phosphoric Acid
158
Composition (wt%):Zirconium oxide 10 - 15Water 65 - 80Polyethylene glycol 8 - 10Sodium hydroxide ≤ 1 (pH = 13 -13.5)Pigments, additives 4 - 5
Ivoclean
Phosphates contaminate Zr surface
• Treat contaminated surface with Ivocleanthen apply Z Prime
P < 0.05 (ANOVA, T-Test)
Contamination Clean/Treat SBS, MPa (n = 8)
No contamination Z-Prime 31.5 (8.4)a
Saliva Water 20.6 (7.1)b
Saliva Ethanol 20.3 (4.2)b
Saliva Ivoclean 32.0 (6.2)a
Saliva Sandblast 30.3 (6.7)a
Pre Z-Prime-Saliva Ethanol 28.8 (7.7)a
AADR/IADR 2013 Abstract
Effects of Saliva ContaminationBefore
After
After (2 Years)
Laboratory prostheses fabricated by Valley Dental Arts Stillwater MN
Porcelain fused to Zirconia (Lava, Cercon, Procera Zr)
• Strong core, but reported interface chipping
• 900-1100 MPA flexural strength (Zr)
• 90-160 MPA veneered ceramic
Can be used for bridges
Can use conventional cementation
Opaqueness masks out metal posts
Full-mouth rehabilitation
All Zirconia
• Opaque but glazes added
• Able to use on second molars
• Perhaps on grinders
• Less preparation needed
• Hard to make adjustments
• Promoted as gold alternative
• Economical, results so far are excellent

All Zirconia DT Posts/XRO
• Quartz fiber post
• 825 MPa flexural strength
• Radiopaque
• Changing temperature changes color
• Excellent micro-mechanical retention
Four Sizes
1.25 1.5 1.8 2.2mm
1.2mm1.00.90.8
TAPER #2:
.04
.02 .02 .02 .02
.06 .08 1.0
TAPER #1:
Diameter
DT Posts/XRO Core Flow
• High Compressive Strength (266 MPa)
• High Flexural Strength (129 MPa)
• Low 2.5% Polymerization volumetric shrinkage (for a resin core)
• Used as a cement for the post as well as the buildup
• Non-slumping
• Cuts like dentin
Core Flow
• Three Shades
• White
• Blue
• Natural
All Bond TE
• Fourth Generation DBA
• Easy mixing dispenser
• Compatible with dual cure, light cure or self cure modes
• Only dual cured one drop adhesive!

Broken post removed
Post drill prepared 2/3’s length of root
Take radiographic to measure canal length
Try-in postClean post and dry
Apply Z Prime
Etch canal with Phosphoric Acid for 5 seconds
Irrigate thoroughly with waterUse paper points to dry canal
Click once and mix All Bond TE-ACE(All-Bond III)
Place 2 coats of bonding agent
Leave for 20 secondsUse paper point to remove excess liquids
Evaporate for 20 seconds
Coat post with Core Flow
Seat quickly
Light cure through post for 10 seconds

Express Core Flow and shape
Light cure thoroughlyBuilding Up Core
Core Buildup CompleteInitial Core Buildup
Diode laser used to crown lengthen and increase ferrule
Crown Seated
Thank You!