teachers college content management system (tc-cms) department
TRANSCRIPT

Teachers College Content Management System (TC-CMS) Department/Program/Center Module Guide Revised: 4.16.2007
1
Login to CMS
1. Type http://cms.tc.columbia.edu on the address bar of the Internet browser.
⇒ You will be redirected to the Columbia University login page.
2. Login with your Columbia University Network Id (UNI) and Password.
⇒ If you do not know your UNI, need to create/activate one or forgot your password, visit http://uni.columbia.edu/.
Accessing the Content of Your Website
Your menu will ONLY show the modules you have permission to modify.
Department Module Program Module Center Module (for centers of research, admin offices and all other
websites) Faculty Module
3. Click on the module that corresponds to the type of website content
you need to edit.
Teachers College Content Management System (TC-CMS) Department/Program/Center Website Content Management Guide
⇒ If you UNI and password are correct, you will be redirected to the TC-CMS main menu page.
Teachers College Content Management System (TC-CMS) Department/Program/Center Module Guide Revised: 4.16.2007
2
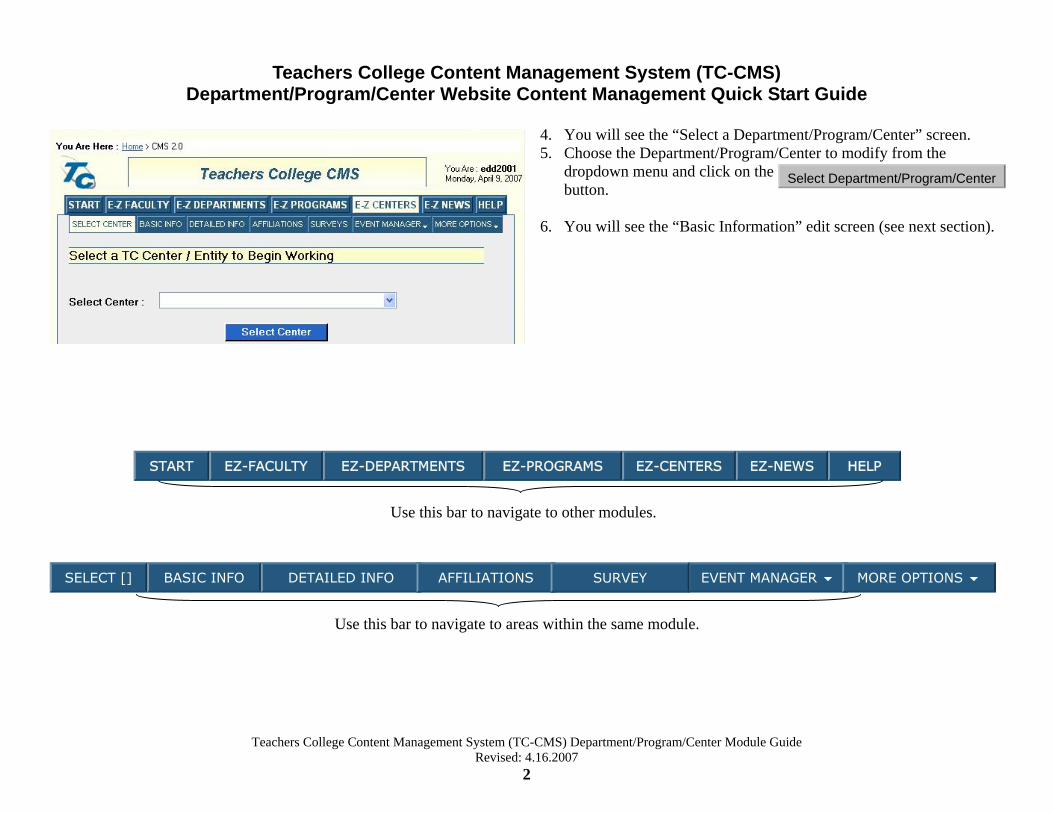
4. You will see the “Select a Department/Program/Center” screen. 5. Choose the Department/Program/Center to modify from the
dropdown menu and click on the button.
6. You will see the “Basic Information” edit screen (see next section).
Teachers College Content Management System (TC-CMS) Department/Program/Center Website Content Management Quick Start Guide
Select Department/Program/Center
Use this bar to navigate to other modules.
START EZ-FACULTY EZ-DEPARTMENTS EZ-PROGRAMS EZ-CENTERS EZ-NEWS HELP
Use this bar to navigate to areas within the same module.
SELECT [] BASIC INFO DETAILED INFO AFFILIATIONS EVENT MANAGER MORE OPTIONS SURVEY

Teachers College Content Management System (TC-CMS) Department/Program/Center Module Guide Revised: 4.16.2007
3
The Basic Information Screen
1. Modify the basic contact information as needed by highlighting existing text in the textboxes and typing the new information or by entering new text.
⇒ Keywords: words that users can type on the TC web search engine to find your department/program/center’s website. Type them separated by commas.
⇒ Short description: short overview of your department/program/center for listing in other parts of the TC website.
2. Click the Update Department/Program/Center button to save the changes to the basic contact information.
Department Program Center
You will need to contact the office of the TC website to update items that are not updatable on this form. !
SELECT [] BASIC INFO DETAILED INFO AFFILIATIONS EVENT MANAGER MORE OPTIONS SURVEYS

Teachers College Content Management System (TC-CMS) Department/Program/Center Module Guide Revised: 4.16.2007
4
Clicking on any “Save Changes” or “Update…” button in CMS updates the information in the database. However, the actual information on the website is updated every 2 hours (on the even hours). Therefore, you might have to wait in order to see the changes displayed on your website.
!
3. A confirmation message appears at the top of the Basic Information screen: • Successfully Updated Department/Program/Center!
⇒ The information on the “Basic Info” screen appears in several parts of the website, e.g. the footer, window title.
⇒ Different pieces of the basic information can be turned on/off on the website depending on your needs.
The Basic Information Screen (cont.)
SELECT [] BASIC INFO DETAILED INFO AFFILIATIONS EVENT MANAGER MORE OPTIONS SURVEYS

Teachers College Content Management System (TC-CMS) Department/Program/Center Module Guide Revised: 4.16.2007
5
The Detailed Information Screen
The “Detailed Info” Screen consists of two areas: 1. A form
⇒ The form is blank when you first click on the “Detailed Info” tab. ⇒ Add new items by typing the “Title”, “Rank” and “Description/
Test/HTML”, choosing the appropriate category and checking the “This item is a SubMenu” checkbox if necessary.
⇒ The form will show the content for you to edit when you click on an item from one of the content categories at the bottom of the page.
2. A listing of content categories ⇒ Content categories are represented by generic CMS names which
display as a link (e.g. Description) and are preceded by a + or - sign. ⇒ They represent collections of menu/submenus in your website. ⇒ The generic names do not appear on your website. What appears is the
“Menu Label”. ⇒ Content categories are not in the order in which the content appears on
the website. ⇒ Categories can hold content that does not appear on the menu of the
website (e.g. content that is not yet ready for public display or content that will be accessible from locations other than the menu).
(The following features will be activated soon. To achieve the same functionality at the moment, contact our office so we can program the website accordingly.) To edit the wording, order and/or display options of a main menu item on the website:
1. Click on the edit label & order link.
⇒ The following window appears:
2. Enter the wording for the menu in the “Label” text box.
SELECT [] BASIC INFO DETAILED INFO AFFILIATIONS EVENT MANAGER MORE OPTIONS SURVEYS

Teachers College Content Management System (TC-CMS) Department/Program/Center Module Guide Revised: 4.16.2007
6
The Detailed Information Screen (cont.)
SELECT [] BASIC INFO DETAILED INFO AFFILIATIONS EVENT MANAGER MORE OPTIONS SURVEYS
3. Choose a number from the “Rank” drop down menu to set the order in which the main menu item will appear on the website.
⇒ The lowest number will be the first main menu item. ⇒ The highest number will be the last main menu item.
4. Indicate whether the whole category should be included or excluded from the website.
⇒ No Exclusion: the content will appear as one of the options on the main menu of the website.
⇒ Exclude from Menu: the content will not appear as an option on the menu but can be made available through other areas of the website.
(Functionality from here on already IS available.) To edit the wording, order, content and/or display options of a submnu item on the website (or flyout in some templates):
⇒ Click the category link (e.g. Description) to display its contents. Its bullet changes from [+] to [-].
⇒ Click the title of the section you want to edit OR the Edit link to modify the information in the text editor.
⇒ Click View to see a sample Internet page displaying the information. (Keep in mind that the actual format displayed in your website will vary from this preview because of the style choices specified for the website.)
⇒ Click Delete to eliminate the information from the database. When you click on the title of a category item within a category or its Edit link, its content populates the form at the top of the “Detailed Info” Screen (see next section for info about the functionality of this form).

Teachers College Content Management System (TC-CMS) Department/Program/Center Module Guide Revised: 4.16.2007
7
1. Add / Edit the section Title.
2. Select an appropriate category. 3. Assign a rank number to specify the order in which you want this
item displayed in your website menu. This should be done beginning with number 5 and continuing in increments of 5. Doing it this way will facilitate inserting other menu items later.
⇒ The item ranked lowest will be the first submenu. ⇒ The item ranked highest will be the last submenu.
4. Click the “This item is a SubMenu” checkbox if you want the title of a particular section to be displayed as a link on your department/program/center website menu.
To eliminate an item from the menu: ⇒ Uncheck the “This Item is a Submenu” checkbox.
- OR - ⇒ Delete the item (if you know you won’t need it anymore). ⇒ Save your changes. To move an item between categories: ⇒ Open the item by clicking on the title or the “Edit” link (in the
content categories at the bottom of the “Detailed Info” screen. ⇒ Select a different category from the “Category” dropdown menu. ⇒ Save your changes.
Appropriate Titles The title you enter here will appear on your website as the submenu link (or flyout) if you identify it as a SubMenu item. ⇒ Use titles that are as succinct as possible but very
descriptive of the contents of the section.
!
The Detailed Information Screen (cont.)
SELECT [] BASIC INFO DETAILED INFO AFFILIATIONS EVENT MANAGER MORE OPTIONS SURVEYS

Teachers College Content Management System (TC-CMS) Department/Program/Center Module Guide Revised: 4.16.2007
8
Add / Edit the information using the various format options which work like most word processors.
Switch view buttons corresponds to the edit view. displays the HTML
programming code behind your content. This allows you to directly edit the HTML code.
Allows you to preview the content within the text
editor. You can test absolute links (links that include the full URL as opposed to links that are relative to your website). Click the “Save Changes” button
so that your changes are updated on the CMS database.
Click the “Delete Department/Program/Center” button to eliminate this section from your website.
The “View This Information” link allows you to see the whole section within the CMS page. Notice that the actual display on the website will vary because of particular style specifications that match your website’s color scheme, layout and formatting.
To cancel modifications just click on any other links on the page. Your changes will not be recorded unless you click on “Save Changes”. !
The Detailed Information Screen (cont.)
SELECT [] BASIC INFO DETAILED INFO AFFILIATIONS EVENT MANAGER MORE OPTIONS SURVEYS
Use to upload .jpg or .gif images to your department/
program/center CMS website. You will need, then, to insert the image(s) into the desired piece of content (See Appendix A for instructions on how to use the “Insert Image” dialog box).
Use to upload different kinds of documents (e.g. .pdf, .doc, ppt,
xls) to your department/program/center CMS website. You will need, then, to insert the file(s) into the desired piece of content (See Appendix B for instructions on how to use the “Insert Image” dialog box).
Teachers College Content Management System (TC-CMS) Department/Program/Center Module Guide Revised: 4.16.2007
9
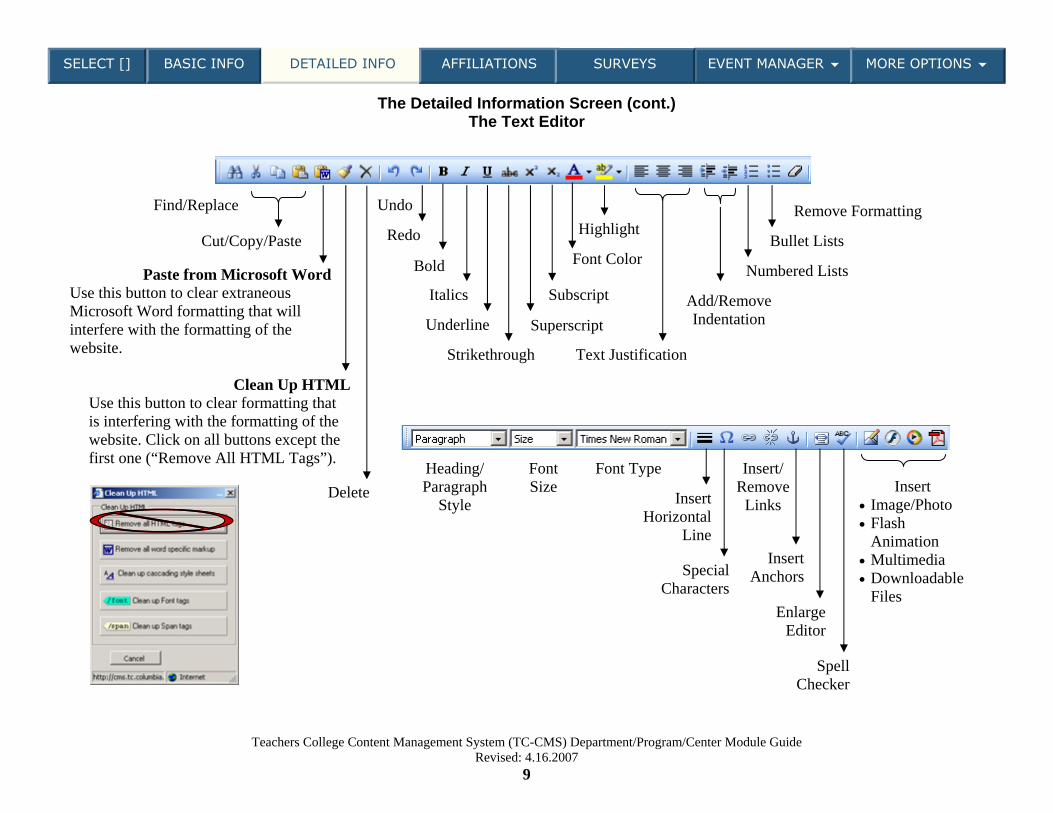
The Detailed Information Screen (cont.) The Text Editor
Find/Replace
Cut/Copy/Paste
Paste from Microsoft Word Use this button to clear extraneous Microsoft Word formatting that will interfere with the formatting of the website.
Clean Up HTML Use this button to clear formatting that is interfering with the formatting of the website. Click on all buttons except the first one (“Remove All HTML Tags”).
Delete
Undo
Redo
Bold
Italics
Underline
Strikethrough
Superscript
Subscript
Font Color
Highlight
Text Justification
Add/Remove Indentation
Numbered Lists
Bullet Lists
Remove Formatting
Heading/Paragraph
Style
Font Size
Font Type
Insert Horizontal
Line
Special Characters
Insert/Remove
Links
Insert Anchors
Enlarge Editor
Spell Checker
Insert • Image/Photo • Flash
Animation • Multimedia • Downloadable
Files
SELECT [] BASIC INFO DETAILED INFO AFFILIATIONS EVENT MANAGER MORE OPTIONS SURVEYS

Teachers College Content Management System (TC-CMS) Department/Program/Center Module Guide Revised: 4.16.2007
10
The Detailed Information Screen (cont.) The Text Editor
Insert Table
Modify Table
Insert Rows Before
After
Row/Cell Properties
Split Cells Horizontally Vertically (Only for cells that have been previously merged)
Merge Cells Right Down Delete Row
Insert • Image/Photo • Downloadable
Files Link to the old Asset Manager
Insert Column Before
After
Delete Column
SELECT [] BASIC INFO DETAILED INFO AFFILIATIONS EVENT MANAGER MORE OPTIONS SURVEYS

Teachers College Content Management System (TC-CMS) Department/Program/Center Module Guide Revised: 4.16.2007
11
The Detailed Information Screen (cont.) How We Display the Detailed Info on the Website
[Text in Bracket Becomes] ⇒ Label for the link item on the main menu. ⇒ Main heading for the page. ⇒ Main heading for menu on side bar (if requested)
Title of Item Becomes ⇒ Label for the link on the flyout submenu of
your website menu ⇒ Additional heading for the page. ⇒ Links on the menu on side bar (if requested)
SELECT [] BASIC INFO DETAILED INFO AFFILIATIONS EVENT MANAGER MORE OPTIONS SURVEYS

Teachers College Content Management System (TC-CMS) Department/Program/Center Module Guide Revised: 4.16.2007
12
The Detailed Information Screen (cont.) How We Display the Detailed Info on the Website
The Content on the Description/Text/HTML Text Editor Usually Becomes ⇒ The content on the page
Other pieces of content can be used in different ways depending on your needs. !
SELECT [] BASIC INFO DETAILED INFO AFFILIATIONS EVENT MANAGER MORE OPTIONS SURVEYS
Teachers College Content Management System (TC-CMS) Department/Program/Center Module Guide Revised: 4.16.2007
13
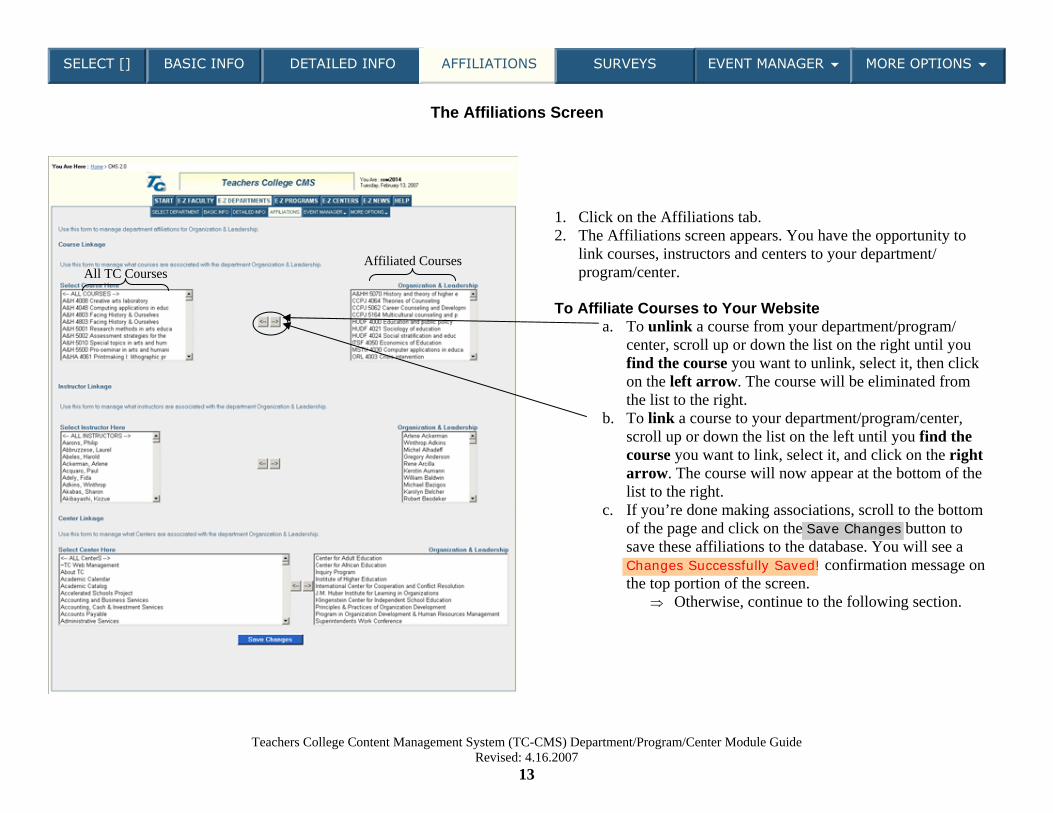
1. Click on the Affiliations tab. 2. The Affiliations screen appears. You have the opportunity to
link courses, instructors and centers to your department/program/center.
To Affiliate Courses to Your Website
a. To unlink a course from your department/program/center, scroll up or down the list on the right until you find the course you want to unlink, select it, then click on the left arrow. The course will be eliminated from the list to the right.
b. To link a course to your department/program/center, scroll up or down the list on the left until you find the course you want to link, select it, and click on the right arrow. The course will now appear at the bottom of the list to the right.
c. If you’re done making associations, scroll to the bottom of the page and click on the Save Changes button to save these affiliations to the database. You will see a Changes Successfully Saved! confirmation message on the top portion of the screen.
⇒ Otherwise, continue to the following section.
The Affiliations Screen
SELECT [] BASIC INFO DETAILED INFO AFFILIATIONS EVENT MANAGER MORE OPTIONS SURVEYS
All TC Courses Affiliated Courses

Teachers College Content Management System (TC-CMS) Department/Program/Center Module Guide Revised: 4.16.2007
14
The Affiliations Screen (cont.)
SELECT [] BASIC INFO DETAILED INFO AFFILIATIONS EVENT MANAGER MORE OPTIONS SURVEYS
To Affiliate Instructors to Your Website a. To unlink an instructor to your department/program/center,
scroll up or down the list on the right until you find the name of the instructor you want to unlink, select it, then click on the left arrow. The instructor name will be eliminated from the list to the right.
b. To link an instructor to your department/program/center, scroll up or down the list on the left until you find the name of the instructor you want to link, select it, then click on the right arrow. The instructor will now appear at the bottom of the list to the right.
c. If you’re done making associations, scroll to the bottom of the page and click on the Save Changes button to save these affiliations to the database. You will see a Changes Successfully Saved! confirmation message on the top portion of the screen.
⇒ Otherwise, continue to the following section. To Affiliate Courses to Your Website
a. To unlink a center to your department/program/center, scroll up or down the list on the right until you find the name of the center you want to unlink, select it, then click on the left arrow. The center name will be eliminated from the list to the right.
b. To link an center to your department/program/center, scroll up or down the list on the left until you find the name of the center you want to link, select it, then click on the right arrow. The center will now appear at the bottom of the list to the right.
c. If you’re done making associations, scroll to the bottom of the page and click on the Save Changes button to save these affiliations to the database. You will see a Changes Successfully Saved! confirmation message on the top portion of the screen.
For Center or Office websites, you can also affiliate departments in the same way.
All TC Instructors Affiliated Instructors
All TC Centers Affiliated Centers

Teachers College Content Management System (TC-CMS) Department/Program/Center Module Guide Revised: 4.16.2007
15
The Event Manager Screen The Event Manager has three options: Events: Browse by Month Use the “Browse by Month” option to browse to previous/current/future months to see events already entered for them
Navigate to previous months
SELECT [] BASIC INFO DETAILED INFO AFFILIATIONS EVENT MANAGER MORE OPTIONS SURVEYS
Add a new event
Navigate to future months
Edit an existing event

Teachers College Content Management System (TC-CMS) Department/Program/Center Module Guide Revised: 4.16.2007
16
Events: Add New Use the “Add New Events” screen to add events associated to your department/program/center. 1. Enter a title for the event. 2. Enter a description. 3. Select the type of event you are adding. 4. Enter the location of the event. 5. Choose the beginning and ending dates and times from the pull
down menus. 6. Enter a website associated with the event for more info as well as
contact information. 7. Click “Yes” or “No” depending on whether you want to publish this
event simultaneously to the school-wide calendar. 8. Click “Yes” or “No” depending on whether you want to display this
event on the left side of the eBoard (event listing). 9. Select RSVP options (and contact our office if you’d like this
enabled for the event). 10. Click the Add New Event button to add it to the database.
⇒ You will see a Successfully Added New Event! confirmation message at the top of the screen.
Editing Department/Program/Center Events
The bottom portion of the Events screen lists all the events that have been associated to your Department/Program/Center. The side bar also lists the events that have been recently added/updated. 1. To edit an event’s details, click on the event title or on its associated
“Edit” link.
The Event Manager Screen (cont.)
List of events that have been recently updated (for quick edit access)
Add events form
List of associated events
SELECT [] BASIC INFO DETAILED INFO AFFILIATIONS EVENT MANAGER MORE OPTIONS SURVEYS

Teachers College Content Management System (TC-CMS) Department/Program/Center Module Guide Revised: 4.16.2007
17
The Event Manager Screen (cont.)
SELECT [] BASIC INFO DETAILED INFO AFFILIATIONS EVENT MANAGER MORE OPTIONS SURVEYS
Editing Department/Program/Center Events (cont.)
⇒ You will see the same screen but this time the textboxes contain the information that was previously entered for the event.
2. Modify the necessary information and press the Update Event button. ⇒ A Successfully Updated Event! confirmation message displays at the top of the
screen.
Duplicating Department/Program/Center Events You can duplicate an event that repeats so you don’t have to enter all the info again. 1. Click on the event and click on the Copy Event button.
⇒ You will see a warning dialog box. 2. The duplicate event appears on the list at the top right of the
screen with the word “COPY” attached at the end of the event title (and link). It is visible only if the event title is not too long.
3. Click on the duplicated event title to update the info. 4. Modify the necessary info and click on the Update Event button.
⇒ A Successfully Updated Event! confirmation message displays at the top of the screen.
Deleting Department/Program/Center Events
1. To delete an event, click on the event’s “Delete” link.
⇒ If you are already on the Edit Event screen with an event’s details listed in the textboxes, you can also click on the Delete Event button.
⇒ You will see a warning dialog box. 2. Press OK to delete the event.
⇒ A Successfully Deleted Event! confirmation message appears at the top of the screen.

Teachers College Content Management System (TC-CMS) Department/Program/Center Module Guide Revised: 4.16.2007
18
Your website can be set up to automatically display a list of upcoming events in the page as you deem appropriate.
Clicking on any event will lead you to an events page that can provide detailed information about the event and a calendar view of the events.
Clicking on a highlighted day on the calendar will give you a list of the events for that day.
The Event Manager Screen & Your Website
SELECT [] BASIC INFO DETAILED INFO AFFILIATIONS EVENT MANAGER MORE OPTIONS SURVEYS
Teachers College Content Management System (TC-CMS) Department/Program/Center Module Guide Revised: 4.16.2007
19
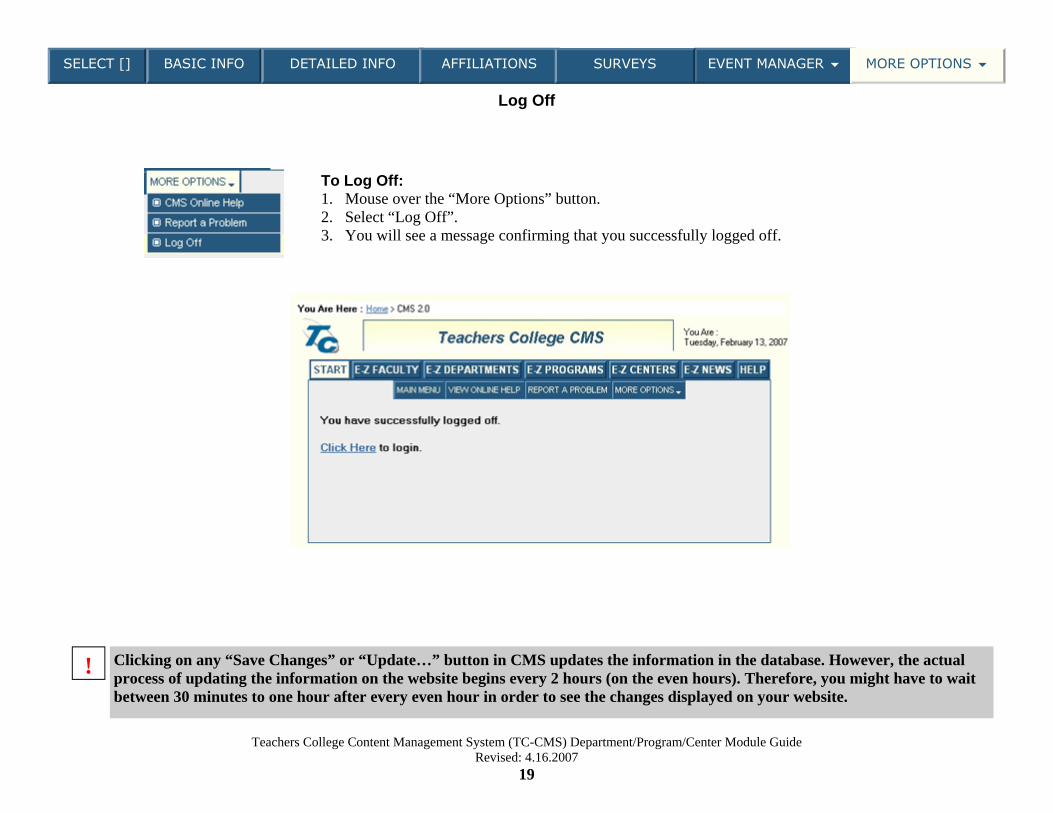
Log Off
Clicking on any “Save Changes” or “Update…” button in CMS updates the information in the database. However, the actual process of updating the information on the website begins every 2 hours (on the even hours). Therefore, you might have to wait between 30 minutes to one hour after every even hour in order to see the changes displayed on your website.
!
To Log Off: 1. Mouse over the “More Options” button. 2. Select “Log Off”. 3. You will see a message confirming that you successfully logged off.
SELECT [] BASIC INFO DETAILED INFO AFFILIATIONS EVENT MANAGER MORE OPTIONS SURVEYS

Teachers College Content Management System (TC-CMS) Department/Program/Center Module Guide Revised: 4.16.2007
20
Appendix A: Inserting Images
The “Insert Image” dialog box 1. Click on the button on the “Description/Text/HTML” text editor tool bar.
⇒ The “Insert Image” dialog box pops up.
Images must be resized using an image editing program such as Adobe Photoshop or Macromedia Fireworks BEFORE uploading to CMS. Contact our Office if you have questions regarding how much to resize depending on what you want to do with the image. !
List of images associated with your website Image preview area
Image properties area Image formatting/layout area
Image upload area
Enlarge/reduce to actual size Fit in preview window
Zoom in Zoom out
Image spacing area
Image delete button
Image file rename button
This new interface will not allow you to upload newer versions of images to replace old ones. You will have to remove all references to the image within the text. Then, you will have to delete the image from the list. Finally, you upload a new image and insert it on the text.
!

Teachers College Content Management System (TC-CMS) Department/Program/Center Module Guide Revised: 4.16.2007
21
Appendix A: Inserting Images (cont.)
To Upload an Image 1. Click on the button on the “Browse” button.
⇒ The “Choose File” dialog box pops up. 2. Use the “Look In” drop down menu to navigate to the location in
your computer where the image is stored. 3. Select the image and click “Open”
⇒ The image path appears in the textbox on the “Image Upload” area.
4. Click on the “Upload” button. 5. The “Upload” button changes to indicate that the image is being
uploaded. 6. When the image uploads, the text box disappears and a confirmation
message appears in its place. The image is also listed on the area with the list of images associated to your website.
To Insert an Image into the Text 1. Click on the place where you’d like to insert the image in the
“Description/Text/HTML” text editor. 2. Click on the image you would like to insert.
⇒ The image appears on the image preview area. ⇒ The image URL appears on the “Insert Image” —> URL
textbox. 3. Enter some short/long descriptive text on the “Alternative Text” and
“Long Description” textboxes for users with screen readers.
Teachers College Content Management System (TC-CMS) Department/Program/Center Module Guide Revised: 4.16.2007
22
Appendix A: Inserting Images (cont.)
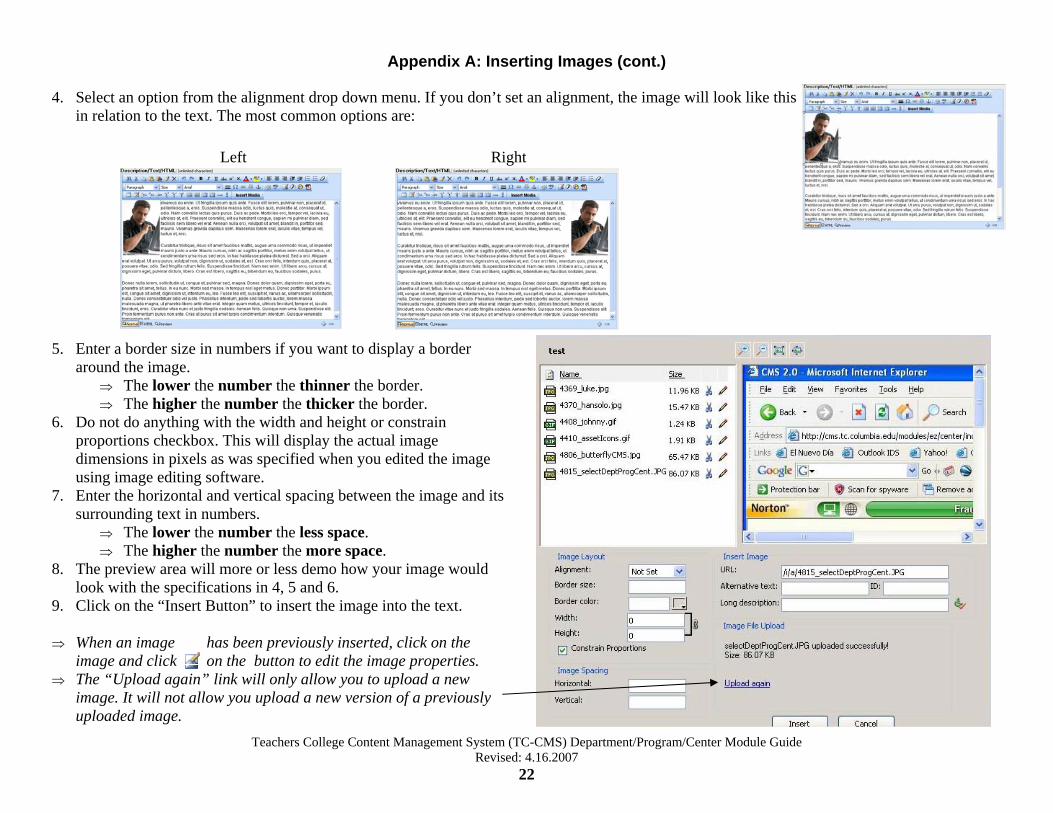
4. Select an option from the alignment drop down menu. If you don’t set an alignment, the image will look like this in relation to the text. The most common options are:
Right Left
5. Enter a border size in numbers if you want to display a border around the image.
⇒ The lower the number the thinner the border. ⇒ The higher the number the thicker the border.
6. Do not do anything with the width and height or constrain proportions checkbox. This will display the actual image dimensions in pixels as was specified when you edited the image using image editing software.
7. Enter the horizontal and vertical spacing between the image and its surrounding text in numbers.
⇒ The lower the number the less space. ⇒ The higher the number the more space.
8. The preview area will more or less demo how your image would look with the specifications in 4, 5 and 6.
9. Click on the “Insert Button” to insert the image into the text. ⇒ When an image has been previously inserted, click on the
image and click on the button to edit the image properties. ⇒ The “Upload again” link will only allow you to upload a new
image. It will not allow you upload a new version of a previously uploaded image.

Teachers College Content Management System (TC-CMS) Department/Program/Center Module Guide Revised: 4.16.2007
23
Appendix B: Inserting Downloadable Files Forthcoming