tcs color conversions: user guide inventory ... - gotcs.net guide 2.pdf · 1 tcs® color...
TRANSCRIPT

1
TCS® COLOR CONVERSIONS: USER GUIDEINVENTORY AND PRIORITY SEQUENCE
Home Page: www.colorconversions.com or www.gotcs.net
We provide this TCS User Guide as an overview document for our existing customers as well as persons who would liketo know more about the functionality before joining or becoming a member of the network.
We Value Satisfied Customers and “We Listen!”
Neal and Bobbie PearcyTCS / Tru-Color Systems64 E. Marion St. Danville, IN 46122
317-745-7535 Fax: 317-745-1886 E-mail: [email protected]

2
YOUR INVENTORY
From this menu you can:• Add to your inventory by brand
• View, edit or print your personal inventory by brand
• Delete from your existing inventory, once you have selected a brand to view
• View or print your entireinventory
Add to your Inventory by Brand
Select Add Colors by Brand when entering brands ofpaints not already in your personal inventory.
•Option 2: Manual EntryThis option provides a blank field and allows user to manually enter a quantity of 1 thru 9 for each color name intheir inventory. Put blinking cursor in Qty. field then type the Qty number. You can “tab” to the next field. Thisworks well for users with Windows 98 and earlier Operating Systems. If the Mouse Entry method does notfunction properly on your system, always choose the Manual Entry Option from this screen.
We offer two Quantity input options for adding to inventory.•Option 1: Mouse EntryThis default option allows user to select a quantity of 1 thru 9 foreach color name in their inventory from a drop down menu inQuantity field. Click on arrow in Qty field. This method workswell for users with Windows XP and most MAC OperatingSystems. If menus are grayed-out or display a zero in the Quantityfield (without the arrow) or does not allow you to change it, useGO BACK function and choose Option 2 for inventory entry.
After selecting Option One or Two, click the “Go” button to proceed to the Brand Selection list. Here you select one brandfrom which you want to add paint names into your personal inventory.
3
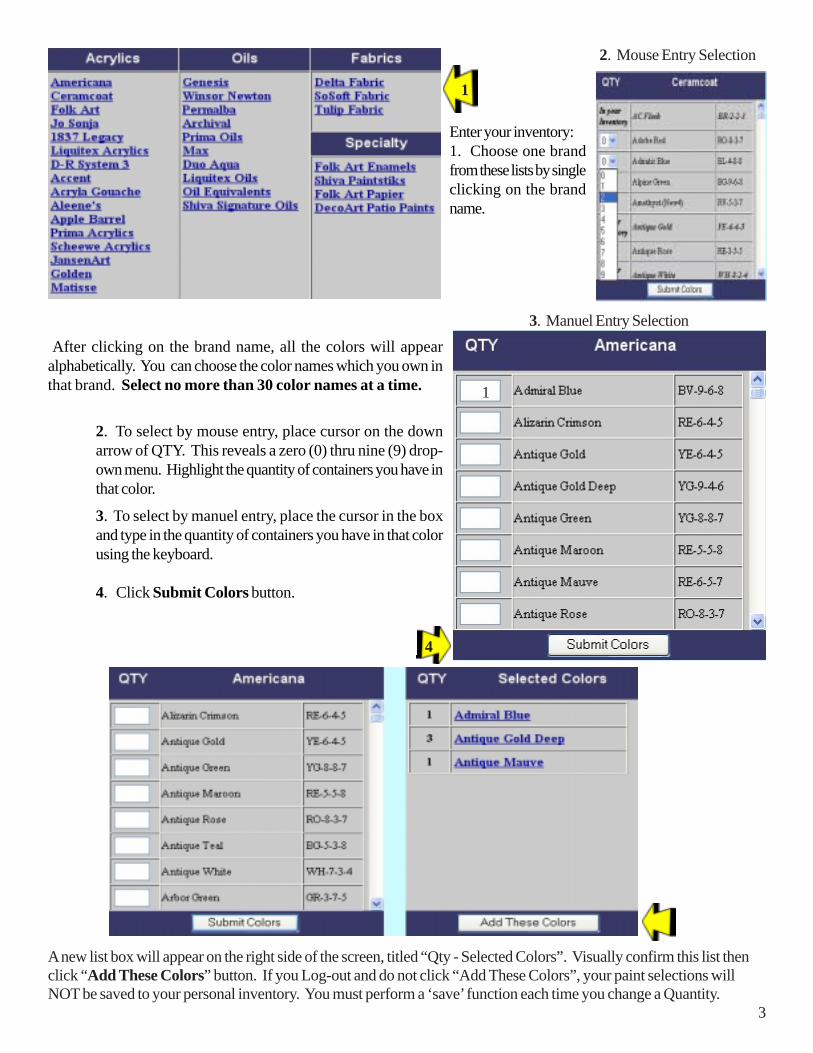
Enter your inventory:1. Choose one brandfrom these lists by singleclicking on the brandname.
3. Manuel Entry Selection After clicking on the brand name, all the colors will appearalphabetically. You can choose the color names which you own inthat brand. Select no more than 30 color names at a time.
2. To select by mouse entry, place cursor on the downarrow of QTY. This reveals a zero (0) thru nine (9) drop-own menu. Highlight the quantity of containers you have inthat color.
3. To select by manuel entry, place the cursor in the boxand type in the quantity of containers you have in that colorusing the keyboard.
4. Click Submit Colors button.
1
A new list box will appear on the right side of the screen, titled “Qty - Selected Colors”. Visually confirm this list thenclick “Add These Colors” button. If you Log-out and do not click “Add These Colors”, your paint selections willNOT be saved to your personal inventory. You must perform a ‘save’ function each time you change a Quantity.
2. Mouse Entry Selection
1
4

4
If you have an incorrect selection, double click on a color name and it will return to the Color Names list. Note that yoursetting may change. (Manual Entry returns to Drop Down Menu List). If so, choose Main and reset manual Entry Option.
View, edit or print your personal inventory by brand
Working With Your Personal Inventory. Locate the View / Edit Colors by Brand and select a brand name for which youalready have existing inventory. The only brand names that will appear on this list are ones you have at least one paint nameselected. For instance, if you purchased another bottle and want to change the quantity from one to two, select the brandname here and all of you inventory will be shown for that brand.
When one brand name is selected, a new list box will appear on right side of screen, titled ‘Inventory – (brand nameselected). Column headings are Color Name, TCS ID, MFG #, and Qty. All paint names in your personal inventory willappear in alphabetic color name order in this dialog box.
This screen allows several functions:
• You can change the Qty of any color name by highlighting the number and manually entering another Qty. Notethat it will change on the screen but it is NOT saved until you click ‘Update Inventory’ button.

5
• By clicking on column header ‘TCS ID’ all the colornames will be re-arranged in TCS sequence. Since manyusers store their paints in TCS Color order, this allows youto print your Personal Inventory in Color Family order. Byclicking on Print View link, you can open another windowwith all of you inventory for one brand, to view and or print.
Be Aware: If you change a Quantity while in TCS ID order, thenchoose the ‘Update Inventory’ button, the list automatically resets inColor Name order. To get TCS Color Family order again, clickTCS ID.
If you are using the Manual Entry option, the system returns to DropDown menu list. If so, choose ‘Main’ and reset manual Entry Optionto continue working with personal inventory. We recommend thatyou change Quantities while in Color Name order.
To Change Brands:To select another brands inventory, just click on different brand name in the dialog box at the left side of the screen and aother brands color names will appear with Quantities for each. This makes working with your personal inventory simplebecause you can switch to another brand, change Quantity for any color, and print your personal inventory inboth color name and TCS sequence.
View/Edit/Print By Brand
View/Edit1. Select a Brand
2. You may change the quantityof any color by putting the cursorin on the down arrow and selecting adifferent quantity. If using the manualentry option, highlight the existing quantitynumber and typing in a new quantitynumber.
3. When changes are complete, clickon the Update Inventory. Note that thiswill change on the screen but it is NOTsaved until you click ‘Update Inventory’button.
TCS Color Family OrderYE = YellowYO=Yellow-OrangeOR = Orange
RO= Red-OrangeRE = RedRV = Red-Violet
VI = VioletBV = Blue-VioletBL = Blue
BG = Blue-GreenGR = GreenYG=Yellow-Green
BR = BrownBK = BlackWH = White
2
3
1

6
1
2
Remove a Color1. Select a brand from theView/Edit section.
2. To remove a color, click theDelete Colors link.
3. Then checkmark all colors youwish to remove from yourinventory.
4. When changes are complete,click on the Delete Colors button.
If you delete all the colors from a brand, then the brand will bedeleted from your inventory list.
Print a Brand
1. Select a brand from the View/Edit section. (See 1 above)
2. Click the Print link above the table listing all of the colors inthe selected brand.
View/Print Only - All Brands
Click the View/Print Only -All Brands link andchoose the print function to print your entireinventory.
Tip: To see what you are going to print, includinghow many pages, choose the Print Previewfunction from the File pull-down menu on yourbrowser.
3
4
Print Preview shows number of pages.
7
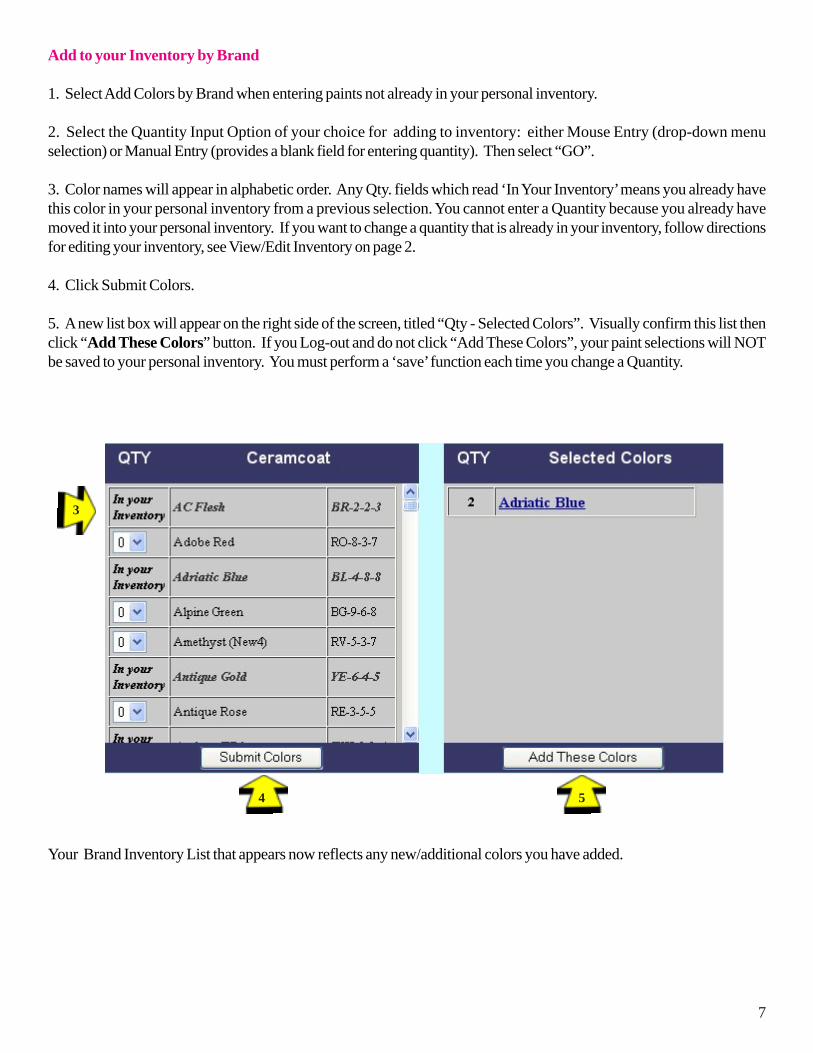
Add to your Inventory by Brand
1. Select Add Colors by Brand when entering paints not already in your personal inventory.
2. Select the Quantity Input Option of your choice for adding to inventory: either Mouse Entry (drop-down menuselection) or Manual Entry (provides a blank field for entering quantity). Then select “GO”.
3. Color names will appear in alphabetic order. Any Qty. fields which read ‘In Your Inventory’ means you already havethis color in your personal inventory from a previous selection. You cannot enter a Quantity because you already havemoved it into your personal inventory. If you want to change a quantity that is already in your inventory, follow directionsfor editing your inventory, see View/Edit Inventory on page 2.
4. Click Submit Colors.
5. A new list box will appear on the right side of the screen, titled “Qty - Selected Colors”. Visually confirm this list thenclick “Add These Colors” button. If you Log-out and do not click “Add These Colors”, your paint selections will NOTbe saved to your personal inventory. You must perform a ‘save’ function each time you change a Quantity.
3
4 5
Your Brand Inventory List that appears now reflects any new/additional colors you have added.

8
BRAND PRIORITY LIST
A Brand Priority list enables you to:
• Choose the brands of paints you wish to see first when viewing the full TCS Screen.This displays a list of brands which is your current priority list. This will display as many selections as youchoose. For instance, if you chose all brands, they will appear here in the order you selected them. If youonly chose six brands, those six will appear in this window.
• You may print your current priority list from this window.
• You may also rebuild your list by selecting the “Redo” function. This option forces you to make a completely newlist starting with position one.
Create a Brand Priority List
This program feature allows you to choose the order you wish the brands to display on the Full TCS Screen. On any listingwhere you see a TCS Number that appears as a link, double clicking on this TCS link will automatically take you to the FullTCS Color Match Screen.*
This is a listing of all brands that contain either a name or a mix in this TCS color. It includes a large example of theactual color, and suggested Shades and Highlights by brand.
1. Choose from the list of brands by clicking on each brand name in the order that you wish to view them. Starting with thefirst brand a second window will appear putting each brand in your priority preference.
For instance, if you are an acrylic painter, you would want to list your favorite acrylic brands in the top positions.Or if you paint with both oils and acrylics, you might want to list the brands at the top that have your inventory. Asan acrylic painter who prefers projects originally written in oils, you might wish to list the oil brands next.
2. Submit your Priority List.
2
1

9
You may print your currentpriority list from this window.
You may also rebuild your list byselecting the “Redo” function.This option forces you to makea completely new list startingwith position one.
Tip: Print your current list forreference before creating a newlist.
WHY IS LISTING MY INVENTORY IMPORTANT
In all functions of the TCS Color Match Network, you are offered the option of checking colors and brands against yourown inventory.
For instance, if your design calls for Rooster Red, you can Search By Color Name: Rooster Red, then check:Search against my inventory.

10
The results show one Color Name and that is a Ceramcoat acrylic. It also shows that you do NOT have the color in yourinventory.
To see if you have the color in another brand, click on the TCS identifier.
Note the Priority List places your Inventory colors first so you can see that, although you do not have Rooster Red, you dohave the color in Folk Art and in a Winsor/Newton oil. That means you have the color you need for the design you havechosen either in an oil or acrylic. This information saves you buying a color you already have, and the time it would take toshop and purchase the color.

11
UPDATING YOUR PERSONAL INFORMATION
This function allows you to maintain your membership information. Update this when you move or have a new mailingaddress, new e-mail address or telephone number etc.
PasswordYou can change your password if andwhen you choose. Allow 5 min. beforere-logging in with the new password.
User Name, Birth Date, Settings,Start Date and Renewal DateYou CANNOT change your username, birth date (Month / Day),Settings, Start date or Renewal Date.These are shown in yellow font.
Credit Card Type, Number andExpiration DateYou can change credit card type, creditcard number and expiration date. It ishelpful if you keep card informationcurrent so when we process yourrenewal information it is accurate.Credit Card numbers may not change,so you can update the expiration datewhen necessary and do it on-line.
Your Credit Card file: We have chosenNOT to leave your full credit cardnumber on-line. We are keeping it with
your personal information file off-line. We will show only 5 numbers from your card on this screen, just to tell us that wealready have your information. So when you see just 5 numbers in your credit card field, it tells you that we have chargedyour card for this year and we are storing it off-line and will not use it again until your renewal period arrives.

12
Save 20% with the Automatic Renewal Option:How? Select Auto Renew button on your personal profile page.We offer an Auto Renew Option which you can select from your Personal Information page. If you select Auto-Renewal,you will earn a 20% discount from the standard $25 annual renewal rate. That makes using the TCS Color SolutionsNetwork just five cents a day for all your color matching needs.
Automatic Renewal Savings: If we can save the cost of contacting you to get your approval for annual renewal charges toyour credit card, we will pass the savings along to you.
1. Question: Which Renewal Option was selected for me when I subscribed?When you enrolled, the Standard Option was automatically chosen for you. We will contact you via e-mail about60 days prior to your renewal date asking for approval to process $25 charge to your credit card. If you want touse a different credit card than the one we have on file, you can enter new information in the Card Number field onyour personal profile at anytime.
2. Question: If I choose, when can I select the Auto-Renewal option?You can select to save 20% of the standard renewal fee at anytime during the year by checking the Auto-Renewalbutton on the personal profile form. It must be done 60 days prior to your renewal date. This will eliminate anysurprises when your credit card statement arrives with a $20 charge.
3. Question: Once I choose Auto-Renewal, when will my credit card be charged?We will automatically process the charge 30 days before your renewal month. For instance, if your renewal dateis in November we will process during October. If your card is expired, we will have time to contact you beforethe November expiration date.
You must select the Auto Renewal Option 60 days before your listed Renewal date.Do It Now, so you do not forget.
After making any changes to your Personal Information, you MUST click the Make Changes button.