tactical flashlightssightmark.com/manuals/sm73001_inf_man2.pdfp4 and q5 triple duty tactical...
TRANSCRIPT

USER MANUAL
Triple Duty P4 & Triple Duty Q5
TACTICAL FLASHLIGHTS

Sightmark offers a wide range of products that include red dot scopes, reflex sights, rangefinders, riflescopes, laser sights, night vision and award-winning flashlights and boresights. Sightmark products are inspired by military and law enforcement applications. All products are designed to be the most effective weapon accessories possible.
Sightmark - MAKE YOUR MARK
ABOUT SIGHTMARK®
www.sightmark.com

P4 and Q5 Triple Duty Tactical Flashlights ....................... 1- 10
Lampes de Poche Triple Duty P4 et Q5 .......................... 11-20
Linternas Tacticas Triple Duty P4 y Q5 ............................ 21-30
P4 und Q5 Triple Duty Taktische Taschenlampe ......... 31-40
ENGLISH
FRANCAIS
ESPAÑOL
DEUTSCH

1
ENGLISH
FEATURES:• 160 lumen Cree® LED* • 280 lumen Cree® LED** • 2-stage push On/Off button (momentarily on/permanently on) • Pressure switch** (momentarily on) • Type II mil-spec anodizing • Aircraft grade aluminum construction • Multi-faceted reflector • 3-prong glass breaking head ring** • 3-prong glass breaking tail cap • Recoil resistant • Waterproof *P4 model
** Q5 model

2
TECHNICAL SPECIFICATIONS - P4
Material aluminum
Color matte black
Finish type II mil-spec anodizing
Head ring flat
Mount type belt clip
Circuit DC-DC regulated
Light beam smooth
Battery type (2) CR-123A
Battery life (hours) 1.5 (at max. output; approx. 1 amp)*
Bulb type (1) XR-E Cree® LED
Output power (lumens) 160 (at max. output)
Operating temperature (°F) 40 to 120
Dimensions (diameter, in) (length, in)
0.845.33
Weight (oz) 6.4
INCLUDES:• Push button cap • Lanyard • Belt/pocket clip • (2) CR-123A batteries • Limited Lifetime Warranty
*after 1.5 hours at max. output, continuous operation for 24 hours at reduced power

3
1. Smooth head cap 2. Bulb assembly 3. Flashlight body 4. Battery compartment 5. Battery cap/push button switch 6. Belt/pocket clip
DIAGRAM - P4
51
3 4
5
6
2
4
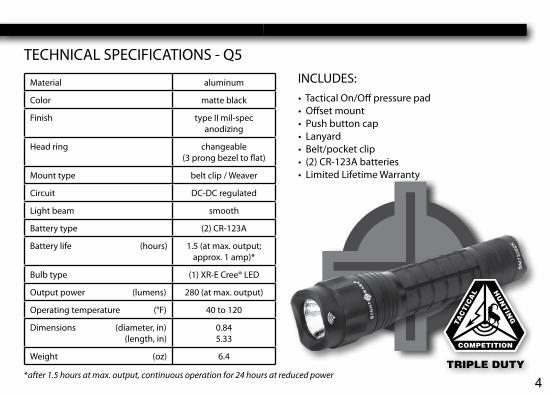
TECHNICAL SPECIFICATIONS - Q5 INCLUDES:• Tactical On/Off pressure pad • Offset mount • Push button cap • Lanyard • Belt/pocket clip • (2) CR-123A batteries • Limited Lifetime Warranty
Material aluminum
Color matte black
Finish type II mil-spec anodizing
Head ring changeable (3 prong bezel to flat)
Mount type belt clip / Weaver
Circuit DC-DC regulated
Light beam smooth
Battery type (2) CR-123A
Battery life (hours) 1.5 (at max. output; approx. 1 amp)*
Bulb type (1) XR-E Cree® LED
Output power (lumens) 280 (at max. output)
Operating temperature (°F) 40 to 120
Dimensions (diameter, in) (length, in)
0.845.33
Weight (oz) 6.4
*after 1.5 hours at max. output, continuous operation for 24 hours at reduced power

5
1. Bezel head cap 2. Bulb assembly 3. Flashlight body 4. Battery compartment 5. Battery cap/push button switch 6. Battery cap/pressure switch 7. Belt/pocket clip 8. Offset mount
DIAGRAM - Q5
56
8
3 4
7
5
21

6
ABOUT THE SIGHTMARK P4 & Q5 TRIPLE DUTY FLASHLIGHTS The Sightmark series of Triple Duty flashlights have high intensity light beams that illuminate the darkness with powerful, concentrated shafts of light precise enough to assist you with the most difficult shots in the most pre-carious situations. They are both durable and corrosion-resistant, making it a versatile tool for any well-stocked arsenal.
As with every Sightmark Triple Duty product, the P4 and Q5 tactical flashlights are quality shooting accessories for any tactical, hunting, or competition shooting function.
BATTERIESBoth the P4 and Q5 tactical flashlights are powered by (2) CR-123A batteries.
To insert or remove the battery: 1) Rotate the battery cap/switch (5, 6) counterclockwise until it separates from the flashlight body (3). 2) Insert both CR-123A batteries into the battery compartment (4), with the positive end first, as shown on the battery cap. 3) Replace the battery cap/switch (5, 6) onto the laser body (3). To tighten, rotate the cap/switch clockwise until fixed firmly. Do not over tighten.

7
SWITCH OPERATION
After inserting the batteries, install the desired battery cap/switch.
Push button switch: 1) For momentary operation, press lightly on the rubber button on the back of the switch. 2) For permanent operation, press the rubber button until you hear or feel a “click”, then release. 3) To turn the flashlight off, press the rubber button a second time until you hear or feel a “click”, then release.
Pressure switch: 1) For momentary operation, press firmly on the pressure pad. 2) To turn the laser off, release the pressure on the pressure pad.

MOUNTING The Q5 Triple Duty flashlight includes an offset mount. Before mounting the laser designator onto your firearm, be sure it is unloaded and safe to handle.
To mount: 1) Loosen the mounting bolt on the offset mount (8) using the provided Allen wrench. 2) Position the offset mount onto your firearm’s base. Align the offset mount’s mounting bolt between the grooves of the firearm’s base. 3) Tighten the mounting bolt. Do not over tighten. 4) Using the Allen wrench, loosen the two ring screws on the offset mount’s scope ring. 5) Remove the battery cap/switch (5,6) from the flashlight by following step 1 in the “BATTERIES” section. 6) Slide the flashlight, battery cap end first, through the loosened scope ring until in the desired position*. 7) Tighten the ring screws. Do not over tighten. 8) Replace the battery cap/switch by following step 3 in the “BATTERIES” section.
*The belt/pocket clip may remain on the flashlight during mounting. Pull the clip up and away from the flashlight’s body, and slide the offset mount underneath it. The belt/pocket clip can also be removed, if desired (see BELT/POCKET CLIP REMOVAL instructions).
8

WARNING Before handling the tactical flashlights, read and understand the contents of your firearm’s manual, and the Sight-mark tactical flashlight manual. Follow all standard safety precautions and procedures during firearm operation, even when the flashlight is not in use.
MAINTENANCE The flashlights may be cleaned using a soft cloth and water, or a gun cleaning solvent, when exposed to dirt, dust, or other residue. Clean the lens using a soft cloth dipped in water or alcohol. To clean residue from contacts, use a cotton swab dipped in alcohol. Maintain threads and O-rings by applying silicon-based grease to those areas.
STORAGE Make sure that your Sightmark tactical flashlight is securely attached to your firearm before storing, and be sure the unit is turned off. Remove the battery if the flashlight will be stored for an extended period of time.
9
BELT / POCKET CLIP REMOVAL 1) Firmly grip the bulb assembly (2) and rotate counterclockwise until it detaches from the flashlight body (3). 2) Slide off the belt/pocket clip (7). 3) Replace the bulb assembly (2) onto the flashlight’s body (3). To tighten, rotate the bulb assembly clockwise until fixed firmly. Do not over tighten.

SIGHTMARK LIMITED WARRANTY Please visit www.sightmark.com for warranty details and information.
10
• NEVER point the flashlight directly at, or into, an eye. This may cause damage to the eye, or blindness. The flash-lights produce enough light to identify an individual without direct illumination to the face. • Avoid looking directly into the flashlight’s beam. • Avoid shining the flashlight into mirrors or other reflective surfaces. • Avoid hitting or dropping the unit. • ALWAYS check that the chamber of your weapon is clear before mounting or dismounting the flashlight. • ALWAYS remove the flashlight when cleaning, or performing other maintenance, on your firearm. • The flashlight should be tested during periods of non-use to make sure it is still operating properly.• NEVER place the flashlight bulb side down on a surface while it is turned on. The bulb generates heat that can damage the unit or the surface it is on.
Failure to follow standard firearm safety precautions and procedures, as well as the above warnings, is dangerous and may result in serious injury, damage to property, or death.
*P4 model **Q5 model

www.sightmark.com