table of contents - xerox · table of contents general information ... the 510 hardware address or...
TRANSCRIPT

Kit Installation Instructions i
Table of Contents
General Information ........................................................................................................ 1
Introduction ............................................................................................................................................................ 1Helpful Hints ........................................................................................................................................................... 1Necessary Information ...................................................................................................................................... 1
Accxes Based Systems ..................................................................................................... 5
Redeem a Coupon for a Feature Key (Accxes versions 8.0 or greater) ....................................... 5Redeem a Coupon for a Feature Key (Accxes versions prior to version 8.0) ............................ 8Get a Single Replacement Key (Accxes versions 8.0 or greater) ................................................. 11Get a Single Replacement Key (Accxes versions prior to version 8.0) ...................................... 12Replace All Feature Keys After a Software Upgrade ........................................................................ 13Uninstall a Feature Key .................................................................................................................................. 14Moving a Feature Key to another Accxes System (Accxes versions 8.0 or greater) .......... 15Enabling a Feature Key ................................................................................................................................... 15
6204 with Embedded Controller .............................................................................. 19
Redeem a Coupon for a Feature Key ....................................................................................................... 19Alternate Feature Key Installation Method ............................................................................. 23
Get a Single Replacement Key .................................................................................................................... 26Get a Single Replacement Key .................................................................................................................... 26Uninstall a Feature Key .................................................................................................................................. 29Moving a Feature Key to another System ............................................................................................. 30
XEScan Systems .............................................................................................................. 31
Redeem a Coupon for a Feature Key (XEScan Software versions 1.1 or greater) .............. 31Alternate Feature Key Update Installation Method ............................................................ 33
Redeem a Coupon for a Feature Key (XEScan Software versions 1.0) .................................... 34Get a Single Replacement Key (XEScan Software versions 1.1 or greater) ........................... 36Get a Single Replacement Key (XEScan Software versions 1.0) ................................................. 37

Table of Contents
ii Kit Installation Instructions

Kit Installation Instructions 1
General Information
Introduction These instructions walk through the steps to redeem a Wide Format feature Coupon into a Feature key.
It is assumed that the person doing this installation has network access to the Xerox device and to the World Wide Web.
Helpful Hints When redeeming a coupon for an Accxes system or 6204, it may be helpful to open two browsers; one for the controller printer manager and one for the XES Coupon Exchange web site. With the two browsers open you may move between the two sites as required until the Feature Key download is complete.
When downloading multiple Feature Keys, download all the keys before rebooting the controller. This allows you to download all the keys using the same KIK number. If you reboot, a new KIK number will be created and you will have to obtain the new KIK number and use the Get a Single Replacement Key (Accxes Software Versions 8.0 or Greater) procedure to download the additional keys.
Necessary Information Features: Know what feature coupon you are trying to exchange and have the 16 digit coupon
ID from the certificate or CD label. Note: This coupon represents a proof of purchase and must be kept for the life of the equipment.
System: Feature keys are used on three different types of systems: Printers or Copiers that use an Accxes controller, 6204 with embedded controller, and standalone scanning using XEScan. You will need to know which system you have (and the version of Accxes or XEScan).
Additional Information: Table 1 lists the available features and the information you will need to download them from the Coupon Exchange web site. Have this information readily available when you log on to the web site.

General Information Wide Format Feature Keys
2 Kit Installation Instructions
Table 1. Available Features and the Required Download Information
Feature Plotter (Printer) Model
Advanced Network
Hardware Address AND
Controller Serial
Number
Scanner Hardware
Address AND Scanner
Serial Number
Printer (IOT) Hardware
Address AND Machine ID
(Printer Serial Number)
Scan To Net - Accxes X X
Job Accounting X X
PostScript – All X X
V8.0 Activation X X
6030/50 Print Activation
X X
Scan to Print X X
Versatec Raster Formats
X X
VCGL Format X X
CGM Format X X
Disk Overwrite X X
OS Enablement X X
AutoCAD X X
Raster X X
Other CAD X X
Color Enablement (Accxes, XEScan)
X
Speed Enhancement TurboII Scanner Key (Access, XEScan)
X
Speed Enhancement Turbo III Scanner Key – (Accxes, XEScan)
X
Speed Enhancement – 510; 5D to 7D/Minute
X X
Speed Enhancement – 510; 5D to 10D/Minute
X X
Speed Enhancement Upgrade- 510; 7D to 10D/Minute
X X
Drawer Enablement – 510; 2 Drawer
X X
Drawer Enablement – 510; 3 Drawer
X X

Wide Format Feature Keys General Information
Kit Installation Instructions 3
Feature Plotter (Printer) Model
Advanced Network
Hardware Address AND
Controller Serial
Number
Scanner Hardware
Address AND Scanner
Serial Number
Printer (IOT) Hardware
Address AND Machine ID
(Printer Serial Number)
Drawer Enablement Upgrade – 510; 1 to 3 Drawer
X X
6204 5D/minute X X
OS 6204 Copy Only X X
6204 Scan To Net X X
6050A 9D/minute X X
6279 Scan to Net X X
6279 Scan Speed X X
6279 Color Scanning X X
6279 9D/minute X
Accxes Generic Finishing Interface
X X
In other words, Color Enablement, Turbo II and Turbo III reside on the Scanner and MUST be redeemed using the Scanner hardware address or the feature key will not load.
IOT Speed and Drawer features reside on the 510 printer and MUST be redeemed using the 510 hardware address or the feature will not load.
All other features are redeemed using the Controller (also known as Print Server) hardware address.

General Information Wide Format Feature Keys
4 Kit Installation Instructions
This page has been intentionally left blank.
Kit Installation Instructions 5
Accxes Based Systems
Redeem a Coupon for a Feature Key (Accxes versions 8.0 or greater) For Accxes firmware versions less than 8.0 and XEScan Version 1.0, follow all the instructions beginning on page 7.
1. Locate the 16 character coupon ID on the label of the CD from the coupon kit. The coupon ID represents your Proof of Purchase of the Feature for your system and MUST NOT be misplaced.
Note: If required, reference the Web Printer Management Tool User Guide, Logging on to the Web Printer Management Tool, and Printer Defaults, Test Print Group sections for more information.
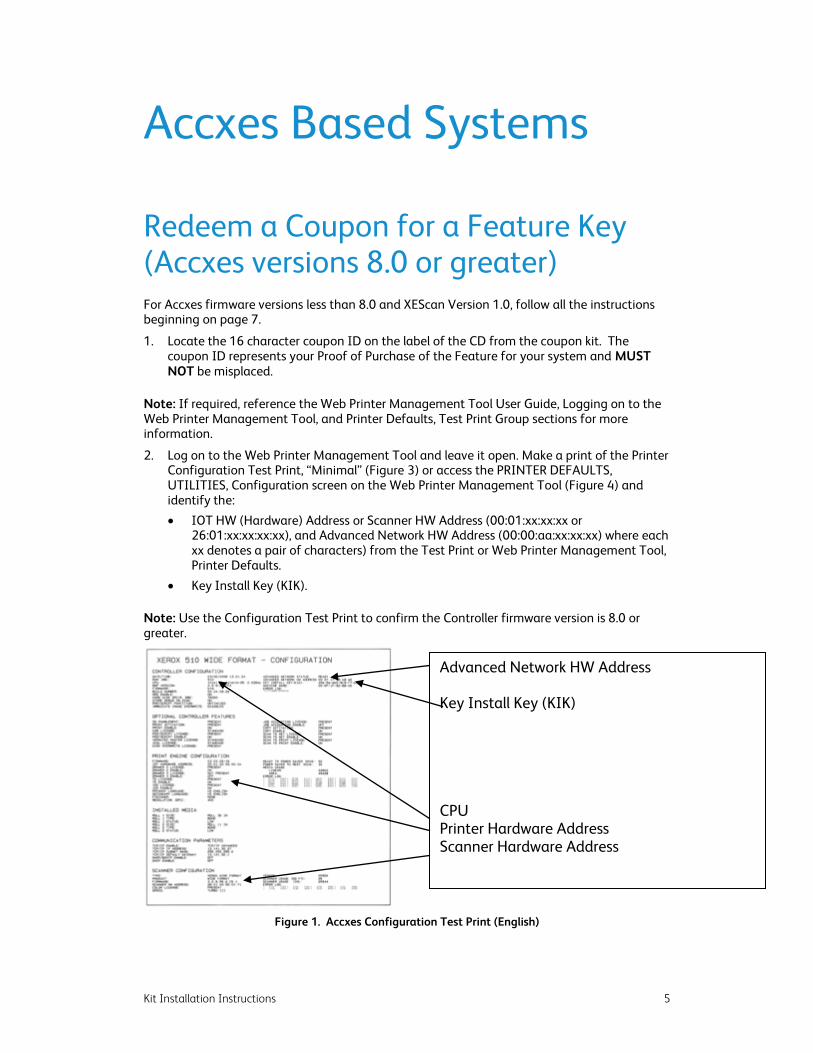
2. Log on to the Web Printer Management Tool and leave it open. Make a print of the Printer Configuration Test Print, “Minimal” (Figure 3) or access the PRINTER DEFAULTS, UTILITIES, Configuration screen on the Web Printer Management Tool (Figure 4) and identify the:
� IOT HW (Hardware) Address or Scanner HW Address (00:01:xx:xx:xx or 26:01:xx:xx:xx:xx), and Advanced Network HW Address (00:00:aa:xx:xx:xx) where each xx denotes a pair of characters) from the Test Print or Web Printer Management Tool, Printer Defaults.
� Key Install Key (KIK).
Note: Use the Configuration Test Print to confirm the Controller firmware version is 8.0 or greater.
Figure 1. Accxes Configuration Test Print (English)
Advanced Network HW Address Key Install Key (KIK) CPU Printer Hardware Address Scanner Hardware Address

Accxes Based Systems Wide Format Feature Keys
6 Kit Installation Instructions
Figure 2. Web Printer Management Tool, Defaults
3. Using your Internet browser access https://www.xeroxlicensing.xerox.com/coupon/.
4. Select a language (English, French, German, Italian, Spanish, or Portuguese).
5. Click on “Redeem a Coupon for a Feature Key (Accxes v8.0 or later or XEScan v1.1 or later)” and then click “Continue”.
6. Enter the following information then click “Continue”.
� Coupon ID (obtained from certificate or disk label in this kit)
� Key Install Key (KIK)
� Feature
Note: Refer to Table 1 to determine which address and serial number is required.
7. Enter the:
� Plotter (Printer) model.
� IOT HW (Hardware) HW Address or Scanner Hardware Address and Advanced Network HW Address.
� Machine ID (Printer Serial Number - located on the connector panel) or Scanner Serial Number (locate on the rear of the Scanner) or Controller Serial Number
8. Then click “Continue”.
9. Enter the IOT HW (Hardware) Address or Scanner Hardware Address and Advanced Network HW Address a second time and click “Confirm”.
10. Fill in the requested name and addressing information and click “Continue”.
11. After submitting the information, verify that all information on the Summary Page is correct.
a. Then click on the “Download Feature Key (file)” button.
b. A “File Download” dialog box will appear, click “Save”.
c. A “Save As” window will open. Choose the location (Save In:) to save the file, and change the file name if you desire.
d. Click “Save” to save the file to your hard drive location.
e. Close the “Download Complete” window.
Note: You may want to rename the file to a meaningful name, but do not change the file extension (.plt, .xky). Changing the file name will not affect the system’s ability to read the file.
12. Upload the key file(s) to the Controller using the Web PMT.
a. Open the Web Printer Management Tool on your workstation.

Wide Format Feature Keys Accxes Based Systems
Kit Installation Instructions 7
b. Navigate to Printer Defaults, Utilities, Upload File. If required, reference the Web Printer Management Tool User Guide, Printer Defaults, Upload File section for more information.
c. Click on the Browse button, Browse to where you saved the Feature Key file in Step 11, select the file name, and click on the Open button. Click on the Upload button to upload the file.
Note: The Accxes Client Tools, Document Submit Tool can also be used (Reference the Accxes Client Tools User Guide, Document Submit Tool). Send the key file(s) the same as you would send a print job. The Controller will recognize the file extension and load the key(s).
13. After waiting 60 seconds
Note: If required, reference the Xerox Wide Format Digital System User’s Guide, Powering Off the Digital Solution or the Colorgrafx X2 User Guide, for powering off instructions.
, reboot your entire system to enable the feature key. Wait for the system to complete the initialization. It will then be ready to accept prints.
14. Verify that the Optional License(s) is/are present.
a. Print a Printer Configuration Test Print (Minimal) (Figure 3) or on the Web Printer Management Tool click PRINTER DEFAULTS, UTILITIES, Feature Configuration to open the Configuration screen (Figure 4).
b. Verify that the feature is present:
Test Print
� Color license is located under the SCANNER CONFIGURATION.
� Check under the second column of the CONTROLLER CONFIGURATION for OPTIONAL LICENSES. “Present” should appear opposite the feature license that was installed.
Web Printer Management Tool
� PRINTER DEFAULTS UTILITIES, Configuration: Check License Configuration. “Present” should appear opposite the feature license that was installed.
15. Place the Test Print, along with a record of your Coupon ID, in the service logbook located in the door panel of your printer.
16. Store the coupon CD in a safe place, together with your other driver and firmware CDs.
17. Refer to Enabling a Feature Key (Optional Feature) in this document to enable the feature to be used.

Accxes Based Systems Wide Format Feature Keys
8 Kit Installation Instructions
Redeem a Coupon for a Feature Key (Accxes versions prior to version 8.0) 1. Locate the 16 character coupon ID on the label of the CD from the coupon kit. The
coupon ID represents your Proof of Purchase of the Feature for your system and MUST NOT be misplaced.
Note: If required, reference the Web Printer Management Tool User Guide, Logging on to the Web Printer Management Tool and Printer Defaults, Test Print Group.
2. Log on to the Web Printer Management Tool and leave it open. Make a print of the Printer Configuration Test Print, “Minimal” (Figure 3) or access the Printer Defaults screen on the Web Printer Management Tool (Figure 4) and identify the:
� Advanced Network HW Address or the Scanner HW Address (00:00:AA:xx:xx:xx or 26:01:xx:xx:xx:xx), where each xx denotes a pair of characters) from Test Print or Web Printer Management Tool, Printer Defaults.
Figure 3. Printer Configuration Test Print (English)
CPU IOT HW (Hardware) Hardware Address Scanner Hardware Address

Wide Format Feature Keys Accxes Based Systems
Kit Installation Instructions 9
Figure 4. Web Printer Management Tool, Printer Defaults
Note: Use the Configuration Test Print to confirm the Controller firmware version is less than 8.0.
3. Using your Internet browser access https://www.xeroxlicensing.xerox.com/coupon/.
4. Select a language (English, French, German, Italian, Spanish, or Portuguese).
5. Click on “Redeem a Coupon for a Feature Key (versions prior to Accxes v8.0 or XEScan v1.1)” and click “Continue”.
6. Enter the following information and click “Continue”.
� Coupon ID (obtained from certificate or disk label in this kit)
� Feature
Note: Refer to Table 1 to determine which address and serial number is required.
7. Enter the:
� Plotter model,
� IOT HW (Hardware) HW Address or Scanner Hardware Address from Test Print or Web Printer Management Tool, Printer Defaults..
� Machine ID (Printer Serial Number - located on the connector panel) or Scanner Serial Number (locate on the rear of the Scanner) or Controller Serial Number
Then click “Continue”.
8. Enter the IOT HW (Hardware) HW Address or Scanner Hardware Address a second time and click “Confirm”.
9. Fill in the requested name and addressing information and click “Continue”.
Advanced Network Hardware Address

Accxes Based Systems Wide Format Feature Keys
10 Kit Installation Instructions
10. After submitting the information, verify that all information on the Summary Page is correct.
a. Then click on the “Download Feature Key (file)” button.
b. A “File Download” dialog box will appear, click “Save”.
c. A “Save As” window will open. Choose the location (Save In:) to save the file, and change the file name if you desire.
d. Click “Save” to save the file to your hard drive location.
e. Close the “Download Complete” window.
Note: You may want to rename the file to a meaningful name, but do not change the file extension (.plt, .xky). Changing the file name will not affect the system’s ability to read the file.
11. Upload the key file(s) to the Controller using the Web PMT.
a. Open the Web Printer Management Tool on your workstation
b. Navigate to Printer Defaults, Utilities, Upload File. If required, reference in the Web Printer Management Tool User Guide, Printer Defaults, Upload File section for more information.
c. Click on the Browse button, Browse to where you saved the Feature Key file in Step 11, select the file name, and click on the Open button. Click on the Upload button to upload the file.
Note: The Accxes Client Tools, Document Submit Tool can also be used (Reference the Accxes Client Tools User Guide, Document Submit Tool). Send the key file(s) the same as you would send a print job. The Controller will recognize the file extension and load the key(s).
12. After waiting 60 seconds
Note: If required, reference the Xerox Wide Format Digital System User’s Guide, Powering Off the Digital Solution or Colorgrafx X2 User Guide, for reboot instructions.
, reboot your entire system to enable the feature key. Wait for the system to complete the reboot and is ready to accept prints.
13. Verify that the Optional License(s) is/are present.
a. Print a Printer Configuration Test Print (Minimal) (Figure 3) or on the Web Printer Management Tool click PRINTER DEFAULTS, UTILITIES, Feature Configuration to open the Configuration screen (Figure 4).
b. Verify that the feature is present:
Test Print
� Color license is located under the SCANNER CONFIGURATION.
� Check under the second column of the CONTROLLER CONFIGURATION for OPTIONAL LICENSES. “Present” should appear opposite the feature license that was installed.
Web Printer Management Tool
� PRINTER DEFAULTS UTILITIES, Configuration: Check License Configuration. “Present” should appear opposite the feature license that was installed.
14. Place the Test Print, along with a record of your Coupon ID, in the service logbook located in the door panel of your printer.
15. Store the coupon CD in a safe place, together with your other driver and firmware CDs.
16. Refer to Enabling a Feature Key (Optional Feature) in this document to enable the feature to be used.

Wide Format Feature Keys Accxes Based Systems
Kit Installation Instructions 11
Get a Single Replacement Key (Accxes versions 8.0 or greater) If you lose your feature key and need a replacement or have rebooted the Accxes System creating a new KIK number, perform the following steps:
Note: The steps below assume that your IOT HW (Hardware) Address or the Scanner HW Address and Advanced Network HW Address has NOT changed (as shown on the Printer Configuration Test Print or in the System Description Applications.
Note: If required, reference the Web Printer Management Tool User Guide, Logging on to the Web Printer Management Tool and Printer Defaults, Test Print Group.
1. Log on to the Web Printer Management Tool and make a print of the Printer Configuration Test Print, “Minimal” (Figure 1) or access the PRINTER DEFAULTS, UTILITIES, Configuration screen on the Web Printer Management Tool (Figure 2) and identify the:
� Key Install Key (KIK).
Note: Use the Configuration Test Print to confirm the Controller firmware version is 8.0 or greater.
2. Using your Internet browser access https://www.xeroxlicensing.xerox.com/coupon/.
3. Select a language (English, French, German, Italian, Spanish, or Portuguese).
4. Click on “Get a single replacement key (Accxes v8.0 or later or XEScan v1.1 or later)” and click “Continue”.
5. Enter the Coupon ID (obtained from the certificate or coupon kit CD label) and KIK number then click “Continue”.
6. A “File Download” dialog box will appear, click Save. A “Save As” window will open. Choose the location (Save In:) to save the file, and change the file name if you desire. Click Save to save the file to your hard drive location. Close the “Download Complete” window.
Note: You may want to rename the file to a meaningful name, but do not change the file extension (.plt, .xky). Changing the file name will not affect the system’s ability to read the file.
7. Repeat steps 11 - 16 of Redeem a Coupon for a Feature Key (Accxes versions prior to version 8.0) to complete this procedure.

Accxes Based Systems Wide Format Feature Keys
12 Kit Installation Instructions
Get a Single Replacement Key (Accxes versions prior to version 8.0) If you lose your feature key and need a replacement or have rebooted the Accxes System creating a new KIK number, perform the following steps:
Note: The steps below assume that your IOT HW (Hardware) Address or the Scanner HW Address and Advanced Network HW Address has NOT changed (as shown on the Printer Configuration Test Print or in the System Description Applications.
Note: If required reference the Web Printer Management Tool User Guide, Logging on to the Web Printer Management Tool and Printer Defaults, Test Print Group.
1. Log on to the Web Printer Management Tool and make a print of the Printer Configuration Test Print, “Minimal” (Figure 3) or access the Printer Defaults, Utilities, Configuration screen on the Web Printer Management Tool (Figure 4) and identify that the Controller firmware version is prior to 8.0.
2. Using your Internet browser access https://www.xeroxlicensing.xerox.com/coupon/.
3. Select a language (English, French, German, Italian, Spanish, or Portuguese).
4. Click on “Get a single replacement key (versions prior to Accxes v8.0 or XEScan v1.1)” and click “Continue”.
5. Enter the Coupon ID (obtained from the certificate or coupon kit CD label) then click “Continue”.
6. A “File Download” dialog box will appear, click Save. A “Save As” window will open. Choose the location (Save In:) to save the file, and change the file name if you desire. Click Save to save the file to your hard drive location. Close the “Download Complete” window.
Note: You may want to rename the file to a meaningful name, but do not change the file extension (.plt, .xky). Changing the file name will not affect the system’s ability to read the file.
7. Repeat steps 11 - 16 of Redeem a Coupon for a Feature Key (Versions 8.0 or greater) to complete this procedure.

Wide Format Feature Keys Accxes Based Systems
Kit Installation Instructions 13
Replace All Feature Keys After a Software Upgrade After upgrading the firmware all feature keys may or may not be disabled depending on the configuration of your Accxes System. To enable the keys, you must perform the following steps:
1. Using your Internet browser access https://www.xeroxlicensing.xerox.com/coupon/, then click the appropriate language button.
2. Click on “Replace all keys after software upgrade” and click “Continue.”
Note: Refer to Table 1 to determine which address and serial number is required.
3. Enter the:
� Scanner HW Address or IOT HW (Hardware) Address, Advanced Network HW Address and Key Install Key number from Test Print or Web Printer Management Tool, Printer Defaults.
� Key Install Key (KIK) then click “Continue”.
4. A “File Download” dialog box will appear, clicks Save. A “Save As” window will open. Choose the location (Save In:) to save the file, and change the file name if you desire. Click Save to save the “replacement.plt” file to your hard drive location. Close the “Download Complete” window.
5. Upload the “replacement.plt” to the Controller using the Web PMT.
a. Open the Web Printer Management Tool. Reference the Web Print Manager Tool User Guide, Logging on to the Web Printer Management Tool if required.
b. After opening the Web Printer Management Tool, navigate to Printer Defaults, Utilities Upload File. Reference in the Web Printer Management Tool User Guide, Printer Defaults, Upload File if required.
c. Browse to where you saved the “replacement.plt” file in Step 4 and upload the file.
Note: The Accxes Client Tools, Document Submit Tool can also be used (Reference the Accxes Client Tools User Guide, Document Submit Tool). Send the key file(s) the same as you would send a print job. The Controller will recognize the file extension and load the key(s).
6. After waiting 60 seconds
Note: If required, reference the Xerox Wide Format Digital System User’s Guide, Powering Off the Digital Solution or the Colorgrafx X2 User Guide, for reboot instructions.
, reboot your entire system to enable the feature key. Wait for the system to complete the reboot and is ready to accept prints.
7. Print another Printer Configuration Test Print “Minimal” to verify that the features are present (Figure 3).
8. Check under the second column of the CONTROLLER CONFIGURATION, for Feature licenses and Optional features. The color license is located under the SCANNER CONFIGURATION.
9. Place the Test Print, along with a record of your Coupon ID, in the service logbook located in the door panel of your printer.
10. Store the coupon CD in a safe place, together with your other driver and firmware CDs.
11. Refer to Enabling a Feature Key (Optional Feature) in this document to enable the feature to be used.
Accxes Based Systems Wide Format Feature Keys
14 Kit Installation Instructions
Uninstall a Feature Key To remove feature a key(s) or move a key to another Accxes System, you must perform the following steps:
1. Using your Internet browser access https://www.xeroxlicensing.xerox.com/coupon/, then click the appropriate language button.
2. Click on “Uninstall a Feature Key (step 1—get download file)” and click “Continue.”
Note: Refer to Table 1 to determine which address and serial number is required.
3. Enter the following information and click “Continue”
� Coupon ID (obtained from certificate or disk label in this kit)
� Scanner or IOT HW (Hardware) Address and Advanced Network HW Address from Test Print or Web Printer Management Tool, Printer Defaults.
� Key Install Key (KIK)
� Select feature
4. Click the “Download Feature Key (file)” button.
Note: The “Procedure to re-enable your coupon” button is only used if you have to temporarily discontinue the download after Step 1. To continue the download click this button to resume at Step 2.
5. A “File Download” dialog box will appear, click “Save”. A “Save As” window will open. Choose the location (Save In:) to save the file, and change the file name if you desire. Click “Save” to save the file to your hard drive location. Close the “Download Complete” window.
Multiple features can be removed using the same KIK. Repeat Steps 1 through 5 for each Feature to be removed before doing Step 6. A new KIK number is created each time the Accxes System is rebooted. If you reboot, the new KIK will have to be used in Step 3.
Note: You may want to rename the file to a meaningful name, but do not change the file extension (.plt, .xky). Changing the file name will not affect the system’s ability to read the file.
6. Upload the Uninstall Feature key file to the Controller using the Web PMT.
a. Open the Web Printer Management Tool on your workstation
b. Navigate to Printer Defaults, Utilities, Upload File. If required, reference in the Web Printer Management Tool User Guide, Printer Defaults, Upload File section for more
information.
c. Browse to where you saved the Feature Key file in Step 5 and click on the Upload button to upload the file.
Note: The Accxes Client Tools, Document Submit Tool can also be used (Reference the Accxes Client Tools User Guide, Document Submit Tool). Send the key file(s) the same as you would send a print job. The Controller will recognize the file extension and load the key(s).
7. After waiting 60 seconds
8. Locate the Key Uninstall Verification (KUV) on the Feature Receipt for the feature that was uninstalled.
, reboot your entire system to disable the feature key. Wait for the system to complete the reboot and automatically print out the FEATURE RECEIPT page.
Wide Format Feature Keys Accxes Based Systems
Kit Installation Instructions 15
Note: If required, reference the Xerox Wide Format Digital System User’s Guide, Powering Off the Digital Solution or Colorgrafx X2 User Guide, for reboot instructions.
9. Click the “Proceed to re-enable your coupon” button.
10. Enter the Key Uninstall Verification (KUV) number from the Printer Configuration Test Print and click the “Continue” button.
11. This will re-enable the Feature Coupon to be used again on another Accxes System. Refer to Moving a Feature Key to another Accxes System (Software Versions 8.0 or greater) to move the Feature to another Accxes System.
Moving a Feature Key to another Accxes System (Accxes versions 8.0 or greater) To move a Feature from one Accxes System to another, perform the following steps.
Note: This procedure cannot be done on Accxes System software versions prior to version 8.0.
1. On the Accxes System that is to have a Feature removed, perform the Uninstall a Feature
Key procedure to remove the Feature(s).
2. Perform the Redeem a Coupon for a Feature Key (Accxes versions 8.0 or greater) for each feature(s) that is to be uploaded on the new Accxes System.
Enabling a Feature Key To enable a Feature perform the following steps.
Note: You must enter a password on the Web Printer Management Tool Session Setup window to enable the features.
1. Verify that the Optional License(s) is/are present.
a. Print a Printer Configuration Test Print (Minimal) (Figure 5) or on the Web Printer Management Tool click PRINTER DEFAULTS, UTILITIES, Feature Configuration (Figure 6)
b. Verify that the feature is present:
Test Print
� Color license is located under the SCANNER CONFIGURATION.
� Check in the second column of the CONTROLLER CONFIGURATION, for OPTIONAL LICENSES. “Present” should appear opposite the feature license that was installed.
Web Printer Management Tool
� PRINTER DEFAULTS, UTILITIES, Feature Configuration: Check License Configuration. “Present” should appear opposite the feature license that was installed.
2. Enable the Features using the Web Printer Management Tool.
� Accounting Feature: Click Accounting, in the Accounting Mode box click Enable. For information on using Accounting, refer to the Accxes Account Manager Tool Administrator User Guide.

Accxes Based Systems Wide Format Feature Keys
16 Kit Installation Instructions
� Copy Enable and Scan To Net Enable: Click PRINTER DEFAULTS, PRINTER SETUP then click DDS enable. For information on using Copy and Scan To Net, refer to the Xerox Wide Format Digital System User’s Guide.
� Click on UTILITIES and click on Feature Configuration. Look in the State column to verify that the Feature is enabled.
Figure 5. Configuration Test Print
Color License
Optional Licenses

Wide Format Feature Keys Accxes Based Systems
Kit Installation Instructions 17
Figure 6. Web Printer Management Tool, Printer Defaults
Optional Licenses

Accxes Based Systems Wide Format Feature Keys
18 Kit Installation Instructions
This page has been intentionally left blank.

Kit Installation Instructions 19
6204 with Embedded Controller
Redeem a Coupon for a Feature Key The instructions in this section describe how to install a Feature Key option on a Xerox 6204 or a Xerox 6030/6050 Wide Format Printer or Copier/Printer. These instructions assume that network access to the printer and internet access are available to the installer.
1. Locate the 16 character coupon ID on the certificate or the CD included in the coupon kit. The coupon ID represents your Proof of Purchase of the Feature for your system and MUST NOT be misplaced.
Figure 7. Example Feature Certificate

6204 with Embedded Controller Wide Format Feature Keys
20 Kit Installation Instructions
2. Log on to the Print Services on Web webpage and locate the Key Install Key (KIK) and Ethernet Address (Hardware Address).
a. Open a web browser and enter the IP address of your printer.
b. Select the Administrator Page button.
c. Enter the Administrator user name and password when prompted.
User name: root
Password: root (default)
Figure 8. Print Services on Web
d. Two additional tabs will be displayed when the Administrator Page is accessed. Select the Properties tab.
Figure 9. Print Services on Web – Administrator page

Wide Format Feature Keys 6204 with Embedded Controller
Kit Installation Instructions 21
e. Under the Properties menu, select Software Option
f. Locate the Key Install Key (KIK) and Ethernet Address (Hardware Address).
Figure 10. Print Services on Web – Software Option page
3. Using your internet browser, access: https://www.xeroxlicensing.xerox.com/coupon/
4. Select a language (English, French, German, Italian, Spanish, or Portuguese).
5. Select “Redeem a Coupon for a Feature Key (Accxes v8.0 or later or XEScan v1.1 or later)” and click “Continue”.
6. Enter the following information:
� Coupon ID – From step 1
� Key Install Key (KIK) – From step 2-f
Note: Include the dashes (“-“) when the KIK from the Software Option page.
� Feature
7. Click “Continue”
8. Enter the following information:
� Plotter Model
� Advanced Network HW Address
Note: The Advanced Network HW Address is listed as the Ethernet Address on the Software Option page. Colons (“:”) will need to be inserted between each pair of characters.
� Controller Serial Number
Note: The controller serial number is the same as the printer serial number, and is listed as the SER # on the Software Option page.
9. Click “Continue”.
10. Enter the Advanced Network Address (Ethernet Address) a second time and click “Confirm”
11. Enter the requested name and addressing information and click “Continue”.
12. After submitting the information, verify that all information on the summary page is correct.
a. Then click on the “Download Feature Key (file)” button.

6204 with Embedded Controller Wide Format Feature Keys
22 Kit Installation Instructions
b. A “File Download” dialog box will appear, click “Save”.
c. A “Save As” window will open. Choose the location (“Save In:”) to save the file, and change the file name if you desire. Click “Save” to save the file to your hard drive location.
d. Close the “Download Complete” window.
e. Print the summary page. Please read the note on the web page regarding using the “Redeem Another Coupon” button.
Note: You may rename the file, but do not change the extension (.plt).
13. Repeat steps 1-10 to redeem additional feature coupons.
Note: For an alternate upload procedure using BT-PA, go to step 16.
14. Upload the feature keys to the printer using LPR (command line).
a. Open a Command Prompt window.
b. Change the current directory to the location of the feature key saved in step 10.
c. Type the following command:
Lpr –S IP address –P plt00 filename
Note: IP address is the IP address or DNS name of the printer and filename is the name of the feature key file saved in step 10.
15. After waiting 60 seconds, reboot the system to enable the feature key.
16. Log on to the Print Services on Web webpage and verify that the feature is installed.
a. Open a web browser and enter the IP address of your printer.
b. Select the Administrator Page button.
c. Enter the Administrator user name and password when prompted.
User name: root
Password: root (default)
d. Select the Properties tab.
e. Under the Properties menu, select Software Option

Wide Format Feature Keys 6204 with Embedded Controller
Kit Installation Instructions 23
f. Installed feature keys will be displayed below the Key Install Key with “Enabled” next to the key name.
Figure 11. Print Services on Web – Software Option page
17. Place the coupon certificate, CD, and printed summary page in the pocket inside the front door of the machine.
Alternate Feature Key Installation Method
1. Open BT-PlotAssistant.
2. If this is the first time BT-PlotAssistant has been opened, then the Printer Name field will be blank and the following steps must be performed to create a Printer Name Registration before the feature file can be submitted.
a. If Printer Name does not match the IP Address of the 6204 (Figure 8, Item 1), then proceed to step b.
b. Select Option button (Figure 12, Item 2).
c. Select Printer Name tab (Figure 12, Item 3).
d. Select New button (Figure 12, Item 4).
e. Printer Name New dialog appears (Figure 13). Enter the IP Address of the 6204 and Select OK.
f. Select OK to close the Option dialog.
g. Select the IP Address from Printer Name pull-down (Figure 12, Item 1).

6204 with Embedded Controller Wide Format Feature Keys
24 Kit Installation Instructions
Figure 12. BT-PlotAssistant – Printer Registration
Figure 13. BT-PlotAssistant – Printer Name New

Wide Format Feature Keys 6204 with Embedded Controller
Kit Installation Instructions 25
Figure 14. BT-PlotAssistant – Submit Feature File
3. Select File button from the Data File Selection area of BT-PlotAssistant (Figure 14, Item 1).
4. Browse to and select the Feature Key File redeemed in step 10 and Select OK. (Figure 14, Item 2). Item 2 is an example of the selected Feature Key File.
5. Select Print Button (Figure 14, Item 3). The feature file is submitted to the printer selected. A beep is sounded on the printer once the file is done processing. Successful submittal can also be confirmed by selecting the Job and Log button.
6. After waiting 60 seconds, reboot the system to enable the feature key.
7. Log on to the Print Services on Web webpage and verify that the feature is installed.
a. Open a web browser and enter the IP address of your printer.
b. Select the Administrator Page button.
c. Enter the Administrator user name and password when prompted.
User name: root
Password: root (default)
d. Select the Properties tab.
e. Under the Properties menu, select Software Option
f. Installed feature keys will be displayed below the Key Install Key with “Enabled” next to the key name (Figure 11: Print Services on Web – Software Option page).
8. Place the coupon certificate, CD, and printed summary page in the pocket inside the front door of the machine.

6204 with Embedded Controller Wide Format Feature Keys
26 Kit Installation Instructions
Get a Single Replacement Key If you lose your feature key and need a replacement or have rebooted the printer before the feature key was uploaded, perform the following steps:
Note: The steps below assume that your Advanced Network HW Address (Ethernet address) has not changed.
1. Locate the 16 character coupon ID on the label or the CD included in the coupon kit. The
coupon ID represents your Proof of Purchase of the Feature for your system and MUST NOT be misplaced.
Figure 15. Example Feature Certificate
2. Log on to the Print Services on Web webpage and locate .
a. Open a web browser and enter the IP address of your printer.
b. Select the Administrator Page button.
c. Enter the Administrator user name and password when prompted.
User name: root
Password: root (default)
d. Select the Properties tab.
e. Under the Properties menu, select Software Option
f. Locate the Key Install Key (KIK) and Ethernet Address (Hardware Address).

Wide Format Feature Keys 6204 with Embedded Controller
Kit Installation Instructions 27
Figure 16. Print Services on Web – Software Option page
3. Using your internet browser, access https://www.xeroxlicensing.xerox.com/coupon/.
4. Select a language (English, French, German, Italian, Spanish, or Portuguese).
5. Select “Get a single replacement key (Accxes v8.0 or later or XEScan v1.1 or later)” and click “Continue”.
6. Enter the following information:
� Coupon ID – See step 1
� Key Install Key (KIK) – See step 2-e
7. Click “Continue”
8. A “File Download” dialog box will appear. Click “Save”.
a. Choose the location to save the file, and change the file name if desired.
b. Click “Save” to save the file to the location specified on your hard drive.
c. Close the “Download Complete” window.
Note: You may rename the file, but do not change the extension (.plt).
9. Upload the feature keys to the printer using LPR (command line).
a. Open a Command Prompt window.
b. Change the current directory to the location of the feature key saved in step 10.
c. Type the following command:
Lpr –S IP address –P plt00 filename
Note: IP address is the IP address or DNS name of the printer and filename is the name of the feature key file saved in step 7.
10. After waiting 60 seconds, reboot the system to enable the feature key.
6204 with Embedded Controller Wide Format Feature Keys
28 Kit Installation Instructions
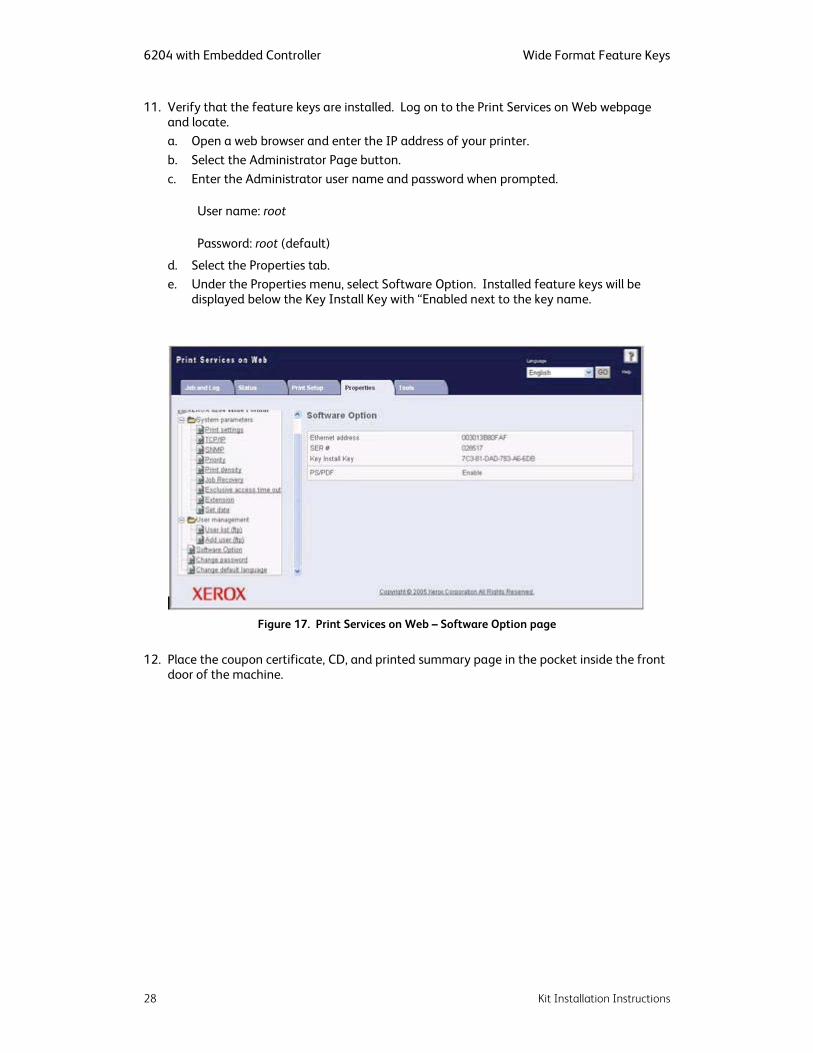
11. Verify that the feature keys are installed. Log on to the Print Services on Web webpage and locate.
a. Open a web browser and enter the IP address of your printer.
b. Select the Administrator Page button.
c. Enter the Administrator user name and password when prompted.
User name: root
Password: root (default)
d. Select the Properties tab.
e. Under the Properties menu, select Software Option. Installed feature keys will be displayed below the Key Install Key with “Enabled next to the key name.
Figure 17. Print Services on Web – Software Option page
12. Place the coupon certificate, CD, and printed summary page in the pocket inside the front door of the machine.

Wide Format Feature Keys 6204 with Embedded Controller
Kit Installation Instructions 29
Uninstall a Feature Key To remove Feature Key(s) or move a key to another system, you must perform the following steps:
1. Using your internet browser, access https://www.xeroxlicensing.xerox.com/coupon/
2. Select a language (English, French, German, Italian, Spanish, or Portuguese).
3. Select “Uninstall a Feature Key (step 1 – get download file)” and click “Continue”.
4. Enter the following information and click “Continue”.
� Coupon ID (obtained from certificate or CD label from the coupon kit).
� Advanced Network Address (Ethernet Address) – See Feature Key Installation Instructions, step 2.
� Key Install Key (KIK) – See Feature Key Installation Instructions, step 2.
� Feature
5. Click the “Download Feature Key (file)” button.
6. A “File Download” dialog box will appear, click “Save”. A “Save As” window will open. Choose the location (Save In:) to save the file to your hard drive location. Close the “Download Complete” window.
7. Upload the uninstall key(s) to the printer using LPR (command line).
a. Open a Command Prompt window.
b. Change the current directory to the location of the feature key saved in step 5.
c. Type the following command:
Lpr –S IP address –P plt00 filename
Note: IP address is the IP address or DNS name of the printer and filename is the name of the feature key file saved in step 10.
8. Wait for the system to automatically print out the FEATURE RECEIPT page.
9. IMPORTANT: Locate and write down the Key Uninstall Verification (KUV) on the Feature Receipt page that is automatically printed for the feature that was uninstalled.
10. Click the “Proceed to re-enable your coupon” button.
11. Enter the Key Uninstall Verification (KUV) number (step 8) from the Plotter Configuration Test Print and click the “Continue” button.
Note: The Key Install Verification number may be labeled as Key Uninstall Vec, depending on machine firmware.
Note: Dashes must be included when entering the Key Install Verification number.
12. After waiting 60 seconds, reboot the entire system to disable the feature key.
13. The coupon is now re-enabled for use on another system. (Refer to the section titled “Moving a Feature Key to Another System” for additional information.

6204 with Embedded Controller Wide Format Feature Keys
30 Kit Installation Instructions
Moving a Feature Key to another System To move a Feature from one system to another, perform the following steps:
1. On the system that is to have a Feature removed, perform the Uninstall a Feature Key procedure.
2. For each feature that is to be installed on the new system, follow the Install a Feature Key procedure using the coupon ID(s) that were removed in step 1.

Kit Installation Instructions 31
XEScan Systems
Redeem a Coupon for a Feature Key (XEScan Software versions 1.1 or greater) 1. Locate the 16 character coupon ID on the label of the CD from the coupon kit. The
coupon ID represents your Proof of Purchase of the Feature for your system and MUST NOT be misplaced.
2. Make sure the XEScan Application is not open. Open the Diagnostic Application and select System Description/Scanner and obtain the following:
� Scanner Hardware Address (26:01:xx:xx:xx:xx where each xx denotes a pair of characters).
� Key Install Key (KIK).
Figure 18. Diagnostic application-scanner description

Scan System Feature Keys Wide Format Feature Keys
32 Kit Installation Instructions
Figure 19. Scanner Information Dialog
3. Click “Done” to close the “Scanner” dialog box and then click “Done” to close the Diagnostic Application.
4. Obtain the Scanner Serial Number located on the left front of the scanner under the feed in shelf.
5. Using your Internet browser access https://www.xeroxlicensing.xerox.com/coupon/.
6. Select a language (English, French, German, Italian, Spanish, or Portuguese).
7. Click on “Redeem a Coupon for a Feature Key (Accxes v8.0 or later or XEScan v1.1 or later)” and then click “Continue”.
8. Enter the following information then click “Continue”.
� Coupon ID (obtained from certificate or disk label in this kit)
� Feature
� Key Install Key (KIK)
9. Enter the following information then click “Continue”.
� Scanner Hardware Address
� Scanner Serial Number
10. Enter the Scanner Hardware Address a second time and click “Confirm”.
11. Fill in the requested name and addressing information and click “Continue”.
12. After submitting the information, verify that all information on the Summary Page is correct.
a. Then click on the “Download Feature Key (file)” button.
b. A “File Download” dialog box will appear, click “Save”.
c. A “Save As” window will open. Choose the location (Save In:) to save the file, and change the file name if you desire.
d. Click “Save” to save the file to your hard drive location.
e. Close the “Download Complete” window.
Note: You may want to rename the file to a meaningful name, but do not change the file extension (.plt, .xky). Changing the file name will not affect the system’s ability to read the file.
13. Open “File Explorer” from the Windows desktop, and browse to the Feature Key file that was saved in Step 12.
Wide Format Feature Keys Scan System Feature Keys
Kit Installation Instructions 33
a. Double click on the file name. A “Feature Key Update” dialog box will be displayed indicating “Press start to Update”.
b. Click “Start” to begin the update.
c. If the “Feature Key Update” dialog box doesn’t appear after double clicking on the Feature Key file, try the Alternate Feature Key Update method (step 19).
14. When the update is complete a “Feature Key Update Complete” dialog box will be displayed indicating that a scanner power cycle should be performed. Power off the scanner and then power it back on. When the scanner has been powered up and a “P” is displayed on the rear of the scanner, click “OK” in the Feature Key Update Complete window.
15. An “Initializing” dialog box appears stating “waiting for the Scanner to initialize”.
16. When initialization is complete a “Feature Key Status” dialog box appears specifying the status of the Feature Keys. Verify the status of the recently installed Feature Key.
17. Open the XEScan Solution application and perform a scan to ensure that the new feature is now enabled.
18. Store the coupon CD in a safe place, together with your other driver and firmware CDs.
Alternate Feature Key Update Installation Method
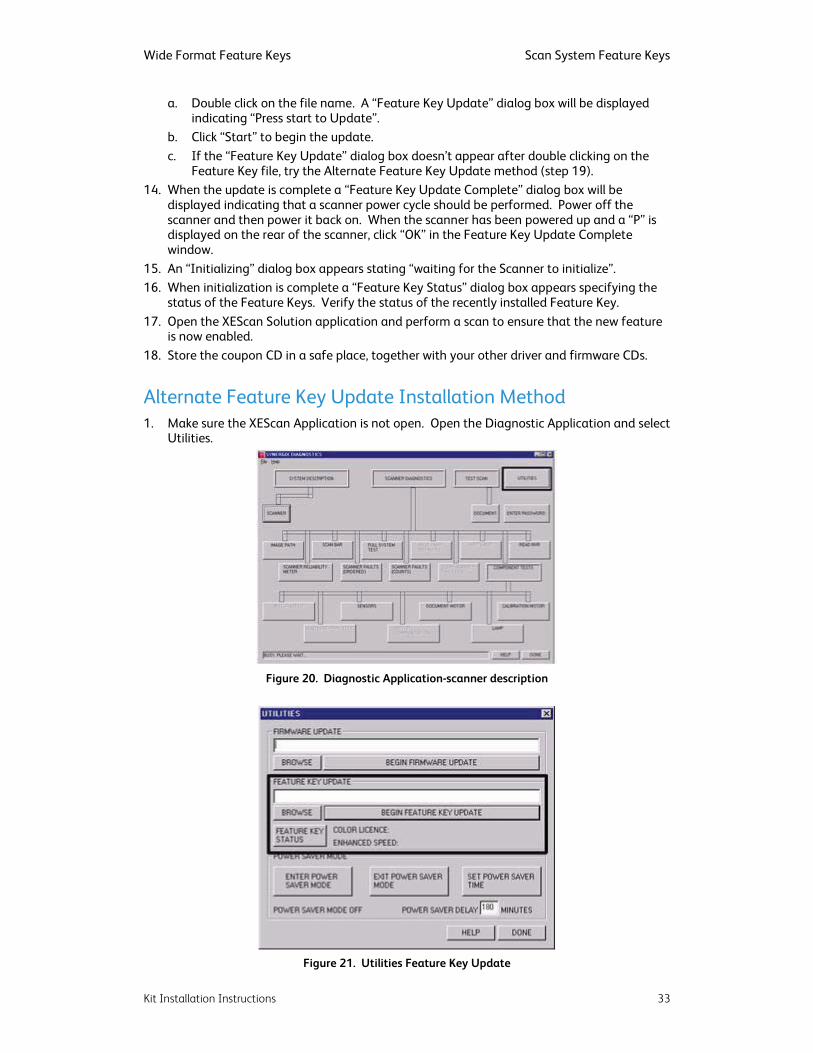
1. Make sure the XEScan Application is not open. Open the Diagnostic Application and select Utilities.
Figure 20. Diagnostic Application-scanner description
Figure 21. Utilities Feature Key Update

Scan System Feature Keys Wide Format Feature Keys
34 Kit Installation Instructions
2. Press the browse button and browse to and select the Feature Key File that was saved in Step 12.
3. Press the Begin Feature Key Update button. This brings up the “Feature Key Update” dialog box. Click “Start” to begin the update.
4. When the update is complete a “Feature Key Update Complete” dialog box will be displayed indicating that a scanner power cycle should be performed. Power off the scanner and then power it back on. When the scanner has been powered up and a “P” is displayed on the rear of the scanner, click “OK” in the Feature Key Update Complete window.
5. An “Initializing” dialog box appears stating “waiting for the Scanner to initialize”.
6. When initialization is complete a “Feature Key Status” dialog box appears specifying the status of the Feature Keys. Verify the status of the recently installed Feature Key.
7. Open the XEScan Solution application and perform a scan to ensure that the new feature is now enabled.
8. Store the coupon CD in a safe place, together with your other driver and firmware CDs.
Redeem a Coupon for a Feature Key (XEScan Software versions 1.0) For XEScan version 1.1 or greater, follow all the instructions beginning on page 31.
1. Locate the 16 character coupon ID on the label of the CD from the coupon kit. The coupon ID represents your Proof of Purchase of the Feature for your system and MUST NOT be misplaced.
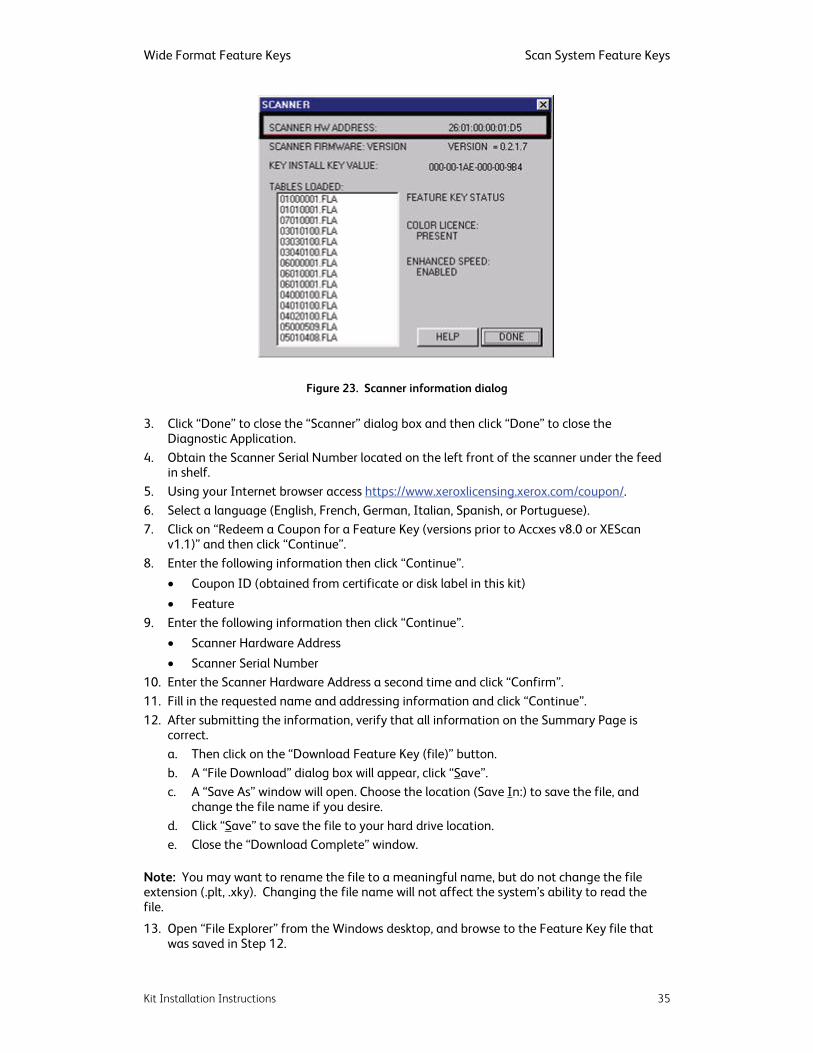
2. Make sure the XEScan Application is not open. Open the Diagnostic Application and select System Description/Scanner and obtain the following:
� Scanner Hardware Address (26:01:xx:xx:xx:xx where each xx denotes a pair of characters).
Figure 22. Diagnostic application- scanner description
Wide Format Feature Keys Scan System Feature Keys
Kit Installation Instructions 35
Figure 23. Scanner information dialog
3. Click “Done” to close the “Scanner” dialog box and then click “Done” to close the Diagnostic Application.
4. Obtain the Scanner Serial Number located on the left front of the scanner under the feed in shelf.
5. Using your Internet browser access https://www.xeroxlicensing.xerox.com/coupon/.
6. Select a language (English, French, German, Italian, Spanish, or Portuguese).
7. Click on “Redeem a Coupon for a Feature Key (versions prior to Accxes v8.0 or XEScan v1.1)” and then click “Continue”.
8. Enter the following information then click “Continue”.
� Coupon ID (obtained from certificate or disk label in this kit)
� Feature
9. Enter the following information then click “Continue”.
� Scanner Hardware Address
� Scanner Serial Number
10. Enter the Scanner Hardware Address a second time and click “Confirm”.
11. Fill in the requested name and addressing information and click “Continue”.
12. After submitting the information, verify that all information on the Summary Page is correct.
a. Then click on the “Download Feature Key (file)” button.
b. A “File Download” dialog box will appear, click “Save”.
c. A “Save As” window will open. Choose the location (Save In:) to save the file, and change the file name if you desire.
d. Click “Save” to save the file to your hard drive location.
e. Close the “Download Complete” window.
Note: You may want to rename the file to a meaningful name, but do not change the file extension (.plt, .xky). Changing the file name will not affect the system’s ability to read the file.
13. Open “File Explorer” from the Windows desktop, and browse to the Feature Key file that was saved in Step 12.
Scan System Feature Keys Wide Format Feature Keys
36 Kit Installation Instructions
a. Double click on the file name. A “Feature Key Update” dialog box will be displayed indicating “Press start to Update”.
b. Click “Start” to begin the update.
c. If the “Feature Key Update” dialog box doesn’t appear after double clicking on the Feature Key file, try the Alternate Feature Key Update Installation Method (Step 19).
14. When the update is complete a “Feature Key Update Complete” dialog box will be displayed indicating that a scanner power cycle should be performed. Power off the scanner and then power it back on. When the scanner has been powered up and a “P” is displayed on the rear of the scanner, click “OK” in the Feature Key Update Complete window.
15. An “Initializing” dialog box appears stating “waiting for the Scanner to initialize”.
16. When initialization is complete a “Feature Key Status” dialog box appears specifying the status of the Feature Keys. Verify the status of the recently installed Feature Key.
17. Open the XEScan Solution application and perform a scan to ensure that the new feature is now enabled.
18. Store the coupon CD in a safe place, together with your other driver and firmware CDs.
Get a Single Replacement Key (XEScan Software versions 1.1 or greater) 1. Make sure the XEScan Application is not open. Open the Diagnostic Application and select
System Description/Scanner and obtain the following:
� Key Install Key (KIK).
2. Using your Internet browser access https://www.xeroxlicensing.xerox.com/coupon/.
3. Select a language (English, French, German, Italian, Spanish, or Portuguese).
4. Click on “Get a single replacement key (Accxes v8.0 or later or XEScan v1.1 or later)” and click “Continue”.
5. Enter the following information then click “Continue”.
� Coupon ID (obtained from the certificate or CD included in the coupon kit)
� KIK number
6. A “File Download” dialog box will appear, click Save. A “Save As” window will open. Choose the location (Save In:) to save the file, and change the file name if you desire. Click Save to save the file to your hard drive location. Close the “Download Complete” window.
Note: You may want to rename the file to a meaningful name, but do not change the file extension (.plt, .xky). Changing the file name will not affect the system’s ability to read the file.
7. Repeat steps 13 - 18 of Redeem a Coupon for a Feature Key (Scan System Software Version 1.1 or greater) to complete this procedure.

Wide Format Feature Keys Scan System Feature Keys
Kit Installation Instructions 37
Get a Single Replacement Key (XEScan Software versions 1.0) 1. Ensure XEScan Software is version 1.0.
2. Using your Internet browser access https://www.xeroxlicensing.xerox.com/coupon/.
3. Select a language (English, French, German, Italian, Spanish, or Portuguese).
4. Click on “Get a single replacement key (versions prior to Accxes v8.0 or XEScan v1.1)” and click “Continue”.
5. Enter the Coupon ID (obtained from the certificate or CD included in the coupon kit) then click “Continue”.
6. A “File Download” dialog box will appear, click Save. A “Save As” window will open. Choose the location (Save In:) to save the file, and change the file name if you desire. Click Save to save the file to your hard drive location. Close the “Download Complete” window.
Note: You may want to rename the file to a meaningful name, but do not change the file extension (.plt, .xky). Changing the file name will not affect the system’s ability to read the file.
7. Repeat steps 13 - 18 of Redeem a Coupon for a Feature Key (Scan System Software Version 1.0) to complete this procedure.

Scan System Feature Keys Wide Format Feature Keys
38 Kit Installation Instructions
This page has been intentionally left blank.

