t6861 series large lcd digital thermostat 110/220 vac · pdf filet6861 series large lcd...
TRANSCRIPT

�
T6861 Series Large LCD Digital Thermostat 110/220 VAC2-pipe/4-pipe fan coil control
Data sheet
Features• Super modern appearance design, suitable for
office, hotel and residential building • Horizontal and vertical model available for variant
application• Slim design, direct installation on 86 size box• Stylish and elegant blue/green backlight with blue/
green colour ring• 2-pipe/4-pipe integrated into one unit with easy
configuration• Big LCD display with English and icons• Easy to install and set-up• Time on/off function• Selectable room temperature or setpoint display• Manual or automatic fan speed selection • Remote temperature sensor• Energy saving mode activation by button press or
dry contact (key card)• Cycle per Hour (CPH) function• Adjustment of display room temperature• Temperature unit either oC or oF• User setting can be kept when power off• Freezing protection function available• Lock or unlock keys or part of keys in Installer Set-
up • Heat and cool setpoint limitation for energy saving
Model summary
ApplicationT6861 digital thermostats are designed for application of 3-speed fan and valves in fan coil system. Including:
2-pipe cool only/heat only/manual changeover and 4-pipe manual or automatic changeover Ventilation mode Manual or automatic 3-speed fan control Water valve control
Fan speed can be selected to automatic or manual 3-speed control mode.In ventilation mode, fan only support manual speed control.
Model Horizontal/Vertical
Backlight/Color Ring
Time on/off
2-pipe/4-pipe
Power supply(V)
EnergySaving Ventilation
Manual/Automatic
Fan
Remote Sensor
T6861H2BB Horizontal Blue Y 2/4 220 Y Y Y YT6861V2BB Vertical Blue Y 2/4 220 Y Y Y YT6861H2GG Horizontal Green Y 2/4 220 Y Y Y YT6861V2GG Vertical Green Y 2/4 220 Y Y Y YT6861H1BB Horizontal Blue Y 2/4 110 Y Y Y YT6861V1BB Vertical Blue Y 2/4 110 Y Y Y YT6861H1GG Horizontal Green Y 2/4 110 Y Y Y YT6861V1GG Vertical Green Y 2/4 110 Y Y Y Y
APH07CH04 - R2001EN
Note: Horizontal models are taken as samples for display, operation and installation pictures shown in below parts.

�
Mechanical designThermostat appearnce
LCD display
FunctionValve controlThermostat acquires the room temperature via its integrated sensor or external temperature sensor and maintains the setpoint by delivering on/off valve control commands output.
Fan Operation
DIGITAL DISPLAY
FAN BUTTON
POWER BUTTON
MODE BUTTON
UP BUTTON
DOWN BUTTON
INDICATES ROOM TEMPERATURE
CURRENT FAN SETTING
INDICATES THERMOSTAT IS OFF
CURRENTMODE SETTING
INDICATES THERMOSTATIS SET TO TIME ON/OFF
INDICATES THE KEYPADIS ENTIRELY OR PARTLYLOCKED
INDICATES THERMOSTAT ISIN FREEZING PROTECTION MODE
INDICATES WHETHER THERMOSTAT IS IN OCCUPIED OR NOT
INDICATES THERMOSTAT IS"CALLING" FOR HEAT OR COOL
INDICATES THE LENGTHOF TIME ON/OFF
INDICATES THE HEAT/COOL SETPOINTINDICATES INSTALLER TEST
INDICATES INSTALLER SETUPINDICATES THE SETPOINT
PRESS THE MODE BUTTON TO SELECT HEAT, COOL, AUTO OR VENT
PRESS THE FAN BUTTON TO SELECT LOW, MED, HIGH OR AUTO
Fan can be selected as manual or automatic 3-speed operation. In Manual mode, the fan is switched to the selected speed via control output Gh, Gm, Gl. While in automatic mode, fan speed depends on the difference between room temperature and setpoint. When room temperature reaches setpoint , valve wi l l be closed and meanwhile, fan will be closed either.
Four-pipe applicationSystem will have a fixed deadband set in ISU between heating and cooling setpoints for Automatic Change Over (ACO) configured thermostats.While the heating and cooling set points determine the dead band.
If the difference between heating and cooling set points is less than the dead band set in ISU, then the dead band set in ISU is enforced. When adjusting the cooling set point, conflicts will be resolved by moving the heating set point out of the way of the cooling set point (heating set point=cooling set point –dead band set in ISU). When adjusting the heating setpoint, conflicts will be resolved by moving the cooling set point out of the way of the heating set point (cooling set point=heating set point +dead band set in ISU).Heating and Cooling range stops will determine the maximum heating setpoint setting and minimum cooling setpoint setting.
APH07CH04 - R2001EN
Fan speed ramping control algorithm
-4F
-2F
2F
4F
CO
OL
HE
AT
Fan speed is high or off
Fan speed is medium or off
Fan speed is low or offFan speed is low or off
Fan speed is medium or off
Fan speed is high or off
Setpoint
Diff
eren
ce b
etw
een
RT
and
SP
4 pipes auto change over setpoint algorithm
Dead band
-1/2 Deadband
+1/2 Deadband Cooling Setpoint
Heating Setpoint
The last system control mode used will determine the mode in ACO when in the deadband.

�
Cycle per hour (CPH)In order to get a more accurate temperature control, CPH function may enable the thermostat to open the valve for several times per hour even the temperature is close to setpoint (difference less than ½ P-band). The default value is 4 for heating and 3 for cooling and can be changed in Installer Set-Up process.
Time on/offIf the thermostat is off, hold power button for 3 seconds, system will be time on mode. If the thermostat is on, hold power button for 3 seconds, system will be time off mode.The setting range is from 0 to 12 hours. The step is 0.5 hour with the default time is 0.
Backlight Any key press will activate the backlight. Backlights will timeout 8 seconds after last key press. When in Installer Set-up and Installer test mode, the backlight will timeout 60 seconds after last key press.
Remote temperature sensor T6861 provides control either depending on the acquired room temperature or depends on the return air temperature. The model of remote temperature sensor is (NTC20K).
Keypad lock Keypad lock can be set in ISU with default status is all keys available. You may change into mode button locked out, Fan and mode buttons locked out and All buttons locked out by changing the ISU.
TEMPERATURESETTINGPRESS THIS BUTTON TORAISE THE TEMPERATURE SETTING
PRESS THIS BUTTON TOLOWER THE TEMPERATURESETTING
Ventilation modePress mode button to enter ventilation mode. In ventilation mode, no output for valve while the fan will operate according to selected fan speed.
Energy saving modeA potential-free dry contact (such as hotel key card) or button press (pressing mode button for continuous 3 seconds) can activate the energy saving mode with icon appearing on screen. The dry contact can be selected as normal open or normal close type in ISU.
If activated by dry contact, all buttons will be locked except the multi-key for ISU. If energy saving is activated by button press, then any following button press will stop energy saving mode.
For heating mode, if the energy saving function is enabled, the setpoint will change to remote setback heating setpoint. The range of remote setback heating setpoint is from 10oC to 21oC and default value is 18oC. The value may change in ISU with step of 0.5oC.
For cooling mode, if the energy saving function is enabled, the setpoint will change to remote setback cooling setpoint. The range of remote setback cooling setpoint is from 22oC to 32oC and default value is 26oC. The value may change in ISU with step of 0.5oC.
Operating modesThe following operating modes are available:
Comfort modeIn comfort mode, the setpoint can be changed by pressing up and down button. Different applications include cool only, heat only and manual heat/cool changeover.
INDICATES THERMOSTATHAS BEEN SET TIME OFF
APH07CH04 - R2001EN
Temperature displayThe displayed temperature can be set to acquired room temperature or setpoint. The setting can be made during Installer Set-Up process.Room temperature and scetornt can be displayed simultaneously.
�
Freezing protection modeFreezing protection can be selected as disabled (default) or enabled. In freezing protection mode (no such mode in cool only application), when thermostat is in OFF mode while the acquired temperature is below 6oC, the thermostat will start heat mode until the temperature rises to 8oC or the thermostat is turned on.
On/off modePressing power button can switch between on and off mode.
Technical specificationPower supply 110 (+/-10%) VAC, 220(+10%,
-15%)VAC Frequency 50/60HzControl algorithm PI, On/off outputAccuracy +/-1oC at 21oC Rating capacity For 220V power supply: 4(2)A for fan load, 2(1)A for zone
valve For 110V power supply: 4(2)A for fan load, 2(1)A for zone
valve Cycle times 100,000次Setpoint range 10~32oCDisplay range 0~37oCInstallation Installed on 86×86mm junction
box or US2×4 inch. Protection Class IP20 Environmental Operation temperature -18~49oC Conditions Shipping temperature -35~65oC Relative humidity 5~90%
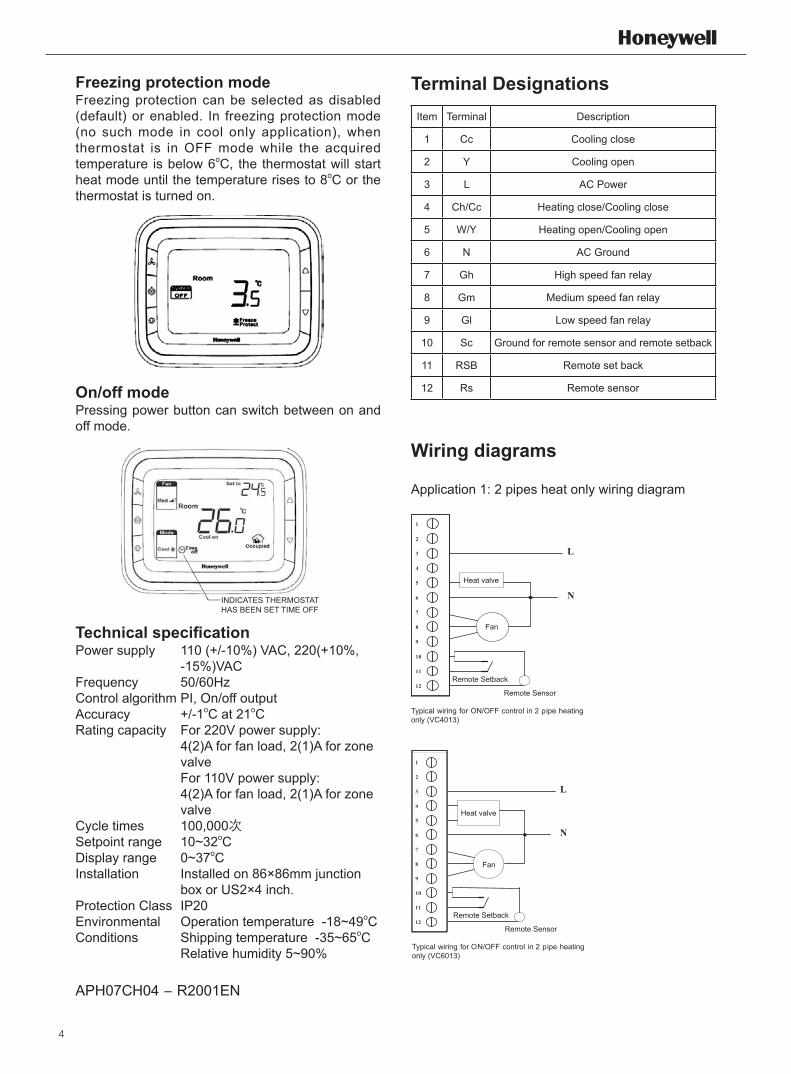
Terminal DesignationsItem Terminal Description
1 Cc Cooling close
2 Y Cooling open
3 L AC Power
4 Ch/Cc Heating close/Cooling close
5 W/Y Heating open/Cooling open
6 N AC Ground
7 Gh High speed fan relay
8 Gm Medium speed fan relay
9 Gl Low speed fan relay
10 Sc Ground for remote sensor and remote setback
11 RSB Remote set back
12 Rs Remote sensor
Wiring diagrams
Application 1: 2 pipes heat only wiring diagram
INDICATES THERMOSTATHAS BEEN SET TIME OFF
1
2
4
5
6
7
8
9
10
N
L
11
12
3
1
2
4
5
6
7
8
9
10
3
11
12
Heat valve
Fan
Remote Setback
Remote Sensor
Typical wiring for ON/OFF control in 2 pipe heatingonly (VC4013)
1
2
3
4
5
6
7
8
9
10
N
L
11
12
1
2
4
5
6
7
8
9
10
11
12
3
Heat valve
Fan
Remote Setback
Remote Sensor
Typical wiring for ON/OFF control in 2 pipe heatingonly (VC6013)
APH07CH04 - R2001EN

�
Application 3: 2 pipes 1 stage Heat or 1 stage Cool MCO wiring diagram
Application 4: 4 pipes 1stage Heat and 1 stage Cool MCO/ACO wiring diagram
Application 2: 2 pipes Cool only wiring diagram
Installation & Commissioning1 Pull wires through wire hole. Loosen screw terminals, insert wires into terminal
block, then retighten screws.
2 Push the Power box into the junction box.
N
L
1
2
3
4
5
6
7
8
9
10
11
12
1
2
4
5
6
7
8
9
10
11
12
3
Cool valve
Fan
Remote Setback
Remote SensorTypical w iring for ON/OFF c ontrol i n 2 p ipe c oolingonly (VC4013)
1
2
3
4
5
6
7
8
9
10
N
L
11
12
1
2
4
5
6
7
8
9
10
11
12
3
Cool valve
Fan
Remote Setback
Typical wiring f or O N/OFF control i n 2 p ipe c oolingonly (VC6013)
Remote Sensor
1
2
3
4
5
6
7
8
9
10
N
L
11
12
1
2
3
4
5
6
7
8
9
10
11
12
1
2
4
5
6
7
8
9
10
11
12
3
valve
Fan
Remote Setback
Remote SensorTypical wiring for ON/OFF control in 2 pipe heatingonly (VC4013)
1
2
3
4
5
6
7
8
9
10
N
L
11
12
1
2
3
4
5
6
7
8
9
10
11
12
1
2
4
5
6
7
8
9
10
11
12
3
valve
Fan
Remote Setback
Remote SensorTypical wiring for ON/OFF control in 2 pipe heatingonly (VC6013)
1
2
3
4
5
6
7
8
9
10
N
L
11
12
1
2
3
4
5
6
7
8
9
10
11
12
1
2
4
5
6
7
8
9
10
11
12
3
Fan
Remote Setback
Remote Sensor
Cool valve
Heat valve
Fig.2.7 Typical wiring for ON/OFF c
ontrol in 4 p ipe1H/1C Auto/ Manual Change over (VC4013)
1
2
3
4
5
6
7
8
9
10
N
L
11
12
1
2
3
4
5
6
7
8
9
10
11
12
1
2
4
5
6
7
8
9
10
11
12
3
Fan
Remote Setback
Remote Sensor
Cool valve
Heat valve
Typical wiring for 3 -wire control in 4 p ipe 1H/1CAuto/ Manual Change over (VC6013)
APH07CH04 - R2001EN
Typical wiring for ON/OFF control in 2 pipe 1H1C (VC4013)
Typical wiring for ON/OFF control in 2 pipe 1H1C (VC6013)

�
Back cover installation Install the thermostat about 5 feet (1.5m) above the floor in an area with good air circulation at average temperature.
Do not install in locations where the thermostat can be affected by:• Drafts or dead spots behind doors and in corners• Hot or cold air from ducts• Sunlight or radiant heat from appliances• Concealed pipes or chimneys• Unheated/uncooled areas such as an outside wall
behind the thermostat
1 Place Back cover over junction box, insert and tighten mounting screws.
2 Insert the cable into connector on circuit board of thermostat.
3 Align 4 tabs on the Back cover with corresponding slots on the back of the thermostat, and then push it until the thermostat snaps in place.
Installer Set-Up (ISU) settingPress and simultaneously for 3 seconds to enter ISU as below:
Number
Setting
Press or to change settingsPress to advance to next function
Press and hold and buttons 3 seconds to exit and save settings
Installer system testAfter completing the installer setup above, press the button again to begin a system test Follow the procedure below to test the heating and cooling and fan system.
System
System test No.
Press and hold and buttons 3 seconds to enter test mode.Press or button to change system status.Press button to advance to next test number.Press and button hold to terminate system test at any time.
System Test System Status10 Heat 0 Heat turn off. 1 Heat turns on. 30 Cool 0 Cool off. 1 Cool on.40 Fan 0 Fan off 1 Low speed Fan on 2 Medium speed Fan on 3 High speed Fan on70 Thermostat information(for reference only) 71 Software revision number (major) 72 Software revision number (minor) 73 Configuration identification code (major) 74 Configuration identification code (minor) 75 Production configuration date code (week) 76 Production configuration date code (year)
APH07CH04 - R2001EN

�
Troubleshooting Tips
Dimension
Horizontal model
Vertical model
If… Then…
Heating system does not turn on.
♦ Set the mode to Heat by pressing the Mode button.♦ Check that the heat temperature setting is set above
the room temperature and “Heat On” shows solidly in the display.
♦ Wait five minutes for the heating system to respond.
Cooling system does not turn on.
♦ Set the mode to Cool by pressing the Mode button.♦ Check that the cool temperature setting is set below
the room temperature and “Cool On” shows solidly in the display.
♦ Wait five minutes for the cooling system to respond.
The fan doesn’twork.
♦ Check whether the Fan mode is set to Auto♦ Check whether the heating or cooling system works.
The Mode button doesn’twork.
♦ Check whether the keypad is locked or not.♦ Check whether the system is working in Energy
saving mode.♦ Check whether the thermostat is off.
The Fan buttondoesn’t work.
♦ Check whether the keypad is locked or not.♦ Check whether the system is working in Energy
saving mode.♦ Check whether the thermostat is off.
The Up or Down button doesn’t work.
♦ Check whether the keypad is locked or not.♦ Check whether the system is working in Energy
saving mode.♦ Check whether the thermostat is off.
Setup Function Settings & OptionsNumber Description Possible Options
1 System type
0 Heat only1 Cool only2 two pipes 1H1C manual (Default)4 four pipes manual5 four pipes auto
5 Remote sensor0 Onboard Sensor (Default)1 Remote (NTC20K)
9 Temperature scale
0 ºF1 ºC(Default)
10 Fan control type
0 Cycle only 1 Constant only (3 speed: Low->Med->High-> Low)2 User can choose Cycle or Constant(3 speed: Low->Med->High->Auto-> Low) (Default)
12Sequence Dead band for four pipes
1 ºC (2 ºF)1.5 ºC (3 ºF)(Default)2 ºC (4 ºF)3 ºC (5 ºF)3.5 ºC (6 ºF)4 ºC (7 ºF)4.5 ºC (8 ºF)5 ºC (9 ºF)
13 CPH value For Heat
1234 (default)56789101112
14 CPH value For Cool
123(default)456
18Display Temperature adjustment
-2 ºC(-4 ºF)-1.5 ºC(-3 ºF)-1 ºC(-2 ºF)-0.5 ºC(-1 ºF)0 ºC(0 ºF) (default)0.5 ºC(1 ºF)1 ºC(2 ºF)1.5 ºC(3 ºF)2 ºC(4 ºF)
19 Temperature Display mode
0 display Room Temperature1 display Setpoint2 display both (default)
20 Heating Range Stops 10-32 ºC default 32 ºC (50-90 ºF default 90 ºF)
21 Cooling Range Stops 10-32 ºC default 10 ºC (50-90 ºF default 50 ºF)
22 Keypad Lockout
0 All keys available(default)1 System button Locked out2 Fan and System button Locked out3 All buttons locked out
23 Remote setback enable method
0 Hotel card NO1 Hotel Card NC2 Button (Default)
24 Remote setback heating setpoint
Range 10-21ºC Default : 18 ºC(Range 50-70ºF Default : 64)
25 Remote setback cooling setpoint
Range 22-32ºC Default : 26 ºC(Range 72-90 ºF Default : 79 ºF)
27 Freeze Protection0 Disabled (default)1 Enabled
APH07CH04 - R2001EN