t3 orbital english operator manualaz295482.vo.msecnd.net/globalassets/globalassets/all...t3 english...
TRANSCRIPT

T3
English EN
Operator Manual
9010337Rev. 00 (12-2012)
Automatic Scrubber
*9010337*
North America
Orbital
Hygenic Fully Cleanable TanksR
Model Part No:9009981 Conventional Scrubber9009980 ec-H2O Scrubber
To view, print or downloadthe latest manual, visit:
www.tennantco.com/manuals

OPERATION
2 Tennant T3 Orbital (12--2012)
INTRODUCTION
This manual is furnished with each new model.It provides necessary operation and maintenanceinstructions.
Read this manual completely andunderstand the machine beforeoperating or servicing it.
This machine will provide excellent service. However,the best results will be obtained at minimum costs if:
S The machine is operated with reasonable care.
S The machine is maintained regularly - per themachine maintenance instructions provided.
S The machine is maintained with manufacturersupplied or equivalent parts.
Parts and supplies may be ordered online, by phone,by fax or by mail.
PROTECT THE ENVIRONMENTPlease dispose of packaging materials,old machine components, and fluids inan environmentally safe way accordingto local waste disposal regulations.
Always remember to recycle.
INTENDED USE
This walk behind orbital scrubber is intended forcommercial use, for example in hotels, schools,hospitals, factories, shops, offices, and rentalbusinesses. It is designed to scrub floors in an indoorenvironment and is not constructed for any other use.Use only recommended pads and commerciallyavailable floor cleaners intended for machineapplication. Do not use flammable liquids with thismachine. This machine is not intended for cleaningcarpets or sanding wood floors.
TENNANT CompanyPO Box 1452Minneapolis, MN 55440Phone: (800) 553--8033 or (763) 513--2850
www.tennantco.com
Specifications and parts are subject to change without notice.
Original Instructions Copyright E 2012 TENNANT COMPANY, Printed in
U.S.A. All rights reserved.
MACHINE DATA
Please fill out at time of installationfor future reference.
Model No. --
Serial No. --
Machine Options --
Sales Rep. --
Sales Rep. phone no. --
Customer Number --
Installation Date --

OPERATION
Tennant T3 Orbital (12--2012) 3
TABLE OF CONTENTS
SAFETY PRECAUTIONS 4. . . . . . . . . . . . . . . . . . . .
SAFETY LABELS 5. . . . . . . . . . . . . . . . . . . . . . . . . . .
MACHINE COMPONENTS 6. . . . . . . . . . . . . . . . . . .
CONTROL PANEL SYMBOLS 7. . . . . . . . . . . . . . .
MACHINE INSTALLATION 7. . . . . . . . . . . . . . . . . . .UNCRATING MACHINE 7. . . . . . . . . . . . . . . . . .INSTALLING BATTERIES 7. . . . . . . . . . . . . . . .
HOW THE MACHINE WORKS 8. . . . . . . . . . . . . . .
PAD INFORMATION 9. . . . . . . . . . . . . . . . . . . . . . . .
MACHINE SETUP 9. . . . . . . . . . . . . . . . . . . . . . . . . .ATTACHING SQUEEGEE ASSEMBLY 9. . . . .INSTALLING BACKER PAD AND WORK PAD 10FILLING SOLUTION TANK 10. . . . . . . . . . . . . . .
MACHINE OPERATION 11. . . . . . . . . . . . . . . . . . . . .PRE--OPERATION CHECKS 11. . . . . . . . . . . . . .OPERATING THE MACHINE 11. . . . . . . . . . . . .WHILE OPERATING MACHINE 12. . . . . . . . . . .BATTERY METER 13. . . . . . . . . . . . . . . . . . . . . . .CIRCUIT BREAKER / FUSES 14. . . . . . . . . . . . .HOUR METER 14. . . . . . . . . . . . . . . . . . . . . . . . . .
DRAINING TANKS 14. . . . . . . . . . . . . . . . . . . . . . . . . .DRAINING RECOVERY TANK 14. . . . . . . . . . . .DRAINING SOLUTION TANK 15. . . . . . . . . . . . .
CHARGING BATTERIES 16. . . . . . . . . . . . . . . . . . . .BATTERY CHARGER SPECIFICATIONS: 16. .USING THE ON--BOARD BATTERYCHARGER 16. . . . . . . . . . . . . . . . . . . . . . . . . . . . .ON--BOARD BATTERY CHARGER FAULTCODES 18. . . . . . . . . . . . . . . . . . . . . . . . . . . . . . . .
MACHINE MAINTENANCE 19. . . . . . . . . . . . . . . . . .DAILY MAINTENANCE 19. . . . . . . . . . . . . . . . . . .MONTHLY MAINTENANCE 21. . . . . . . . . . . . . . .MOTOR MAINTENANCE 21. . . . . . . . . . . . . . . . .ec--H2O MODULE FLUSH PROCEDURE 21. . .SQUEEGEE BLADE REPLACEMENT 22. . . . . .SQUEEGEE BLADE ADJUSTMENT 23. . . . . . .BATTERY MAINTENANCE 23. . . . . . . . . . . . . . .
TRANSPORTING MACHINE 24. . . . . . . . . . . . . . . . .
STORING MACHINE 24. . . . . . . . . . . . . . . . . . . . . . . .FREEZE PROTECTION 24. . . . . . . . . . . . . . . . . .
TROUBLESHOOTING 26. . . . . . . . . . . . . . . . . . . . . . .
BATTERY METER LED FAULT CODES 28. . . . . . .
SPECIFICATIONS 29. . . . . . . . . . . . . . . . . . . . . . . . . .
MACHINE DIMENSIONS 30. . . . . . . . . . . . . . . . . . . .
OPERATION
4 Tennant T3 Orbital (12--2012)
IMPORTANT SAFETY INSTRUCTIONS -- SAVE THESE INSTRUCTIONS
The following warning alert symbol and the “FORSAFETY” heading are used throughout this manual asindicated in their description:
WARNING: To warn of hazards or unsafepractices which could result in severe personalinjury or death.
FOR SAFETY: To identify actions which must befollowed for safe operation of equipment.
The following safety precautions signalpotentially dangerous conditions to the operatoror equipment. All operators must read,understand and practice them.
WARNING: Fire Or Explosion Hazard:
-- Never Use Flammable Liquids Or OperateMachine in Or Near Flammable Liquids,Vapors Or Combustible Dusts.
This machine is not equipped with explosionproof motors. The electric motors will spark uponstart up and during operation which could cause aflash fire or explosion if machine is used in anarea where flammable vapors/liquids orcombustible dusts are present.
-- Do Not Pick Up Flammable Materials OrReactive Metals.
-- Batteries Emit Hydrogen Gas. Keep SparksAnd Open Flame Away. Keep BatteryCompartment Open When Charging.
WARNING: Electrical Hazard
-- Disconnect Battery Cables and Charger PlugBefore Servicing Machine.
-- Do Not Charge Batteries with Damaged PowerSupply Cord. Do Not Modify Plug.
If the charger supply cord is damaged or broken,it must be replaced by the manufacturer or itsservice agent or a similarly qualified person inorder to avoid a hazard.
FOR SAFETY:
1. Do not operate machine:-- With flammable liquids or near flammable
vapors as an explosion or flash fire mayoccur.
-- Unless trained and authorized.-- Unless operator manual is read and
understood.-- If not in proper operating condition.-- Unless mentally and physically capable of
following machine instructions.-- In areas that are too dark to safely see the
controls or operate the machine.
2. Before starting machine:-- Check machine for fluid leaks.-- Make sure all safety devices are in place
and operate properly.
3. When using machine:-- Use only as described in this manual.-- Go slow on inclines and slippery surfaces.-- Wear non--slip shoes.-- Reduce speed when turning.-- Report machine damage or faulty
operation immediately.-- Never allow children to play on or around.-- Do not operate on inclines that exceed 5%.-- Follow mixing, handling and disposal
instructions on chemical containers.-- Follow safety guidelines concerning wet
floors.
4. Before leaving or servicing machine:-- Stop on level surface.-- Turn off machine.-- Remove key.
5. When servicing machine:-- Avoid moving parts. Do not wear loose
clothing, jewelry and secure long hair.-- Disconnect battery connections before
working on machine.-- Wear protective gloves and eye protection
when handling batteries or battery cables.-- Avoid contact with battery acid.-- Wear protective gloves and eye protection
when handling white vinegar.-- Do not power spray or hose off machine.
Electrical malfunction may occur.

OPERATION
Tennant T3 Orbital (12--2012) 5
-- All work must be done with sufficientvisibility and lighting.
-- Wear personal protection equipment asneeded and where recommended in thismanual.
-- Wear a dust mask, protective glasses andgloves in dusty environments.
-- Keep work area well ventilated.-- Use manufacturer supplied or approved
replacement parts.-- All repairs must be performed by a
qualified service person.-- Do not modify the machine from its
original design.
6. When loading/unloading machine onto/offtruck or trailer:-- Drain tanks before loading.-- Use a ramp that can support the machine
weight and person loading it. Do notexceed a 15% ramp incline at a ramplength of 12 ft (3.7m).
-- Turn machine off.-- Put scrub head in the lowered position.-- Block machine wheels.-- Use tie--down straps to secure machine.-- Set parking brake, if equipped.
SAFETY LABELS
The safety labels appear on the machine in the locations indicated. Replace labels if they are missing or becomedamaged or illegible.
BATTERY CHARGE LABEL --Located near battery compartment.
WARNING: Fire Or ExplosionHazard. Batteries Emit HydrogenGas. Keep Sparks And Open FlameAway. Keep Battery CompartmentOpen When Charging.
WARNING LABEL -- Located on recovery tank cover.
OPERATION
6 Tennant T3 Orbital (12--2012)
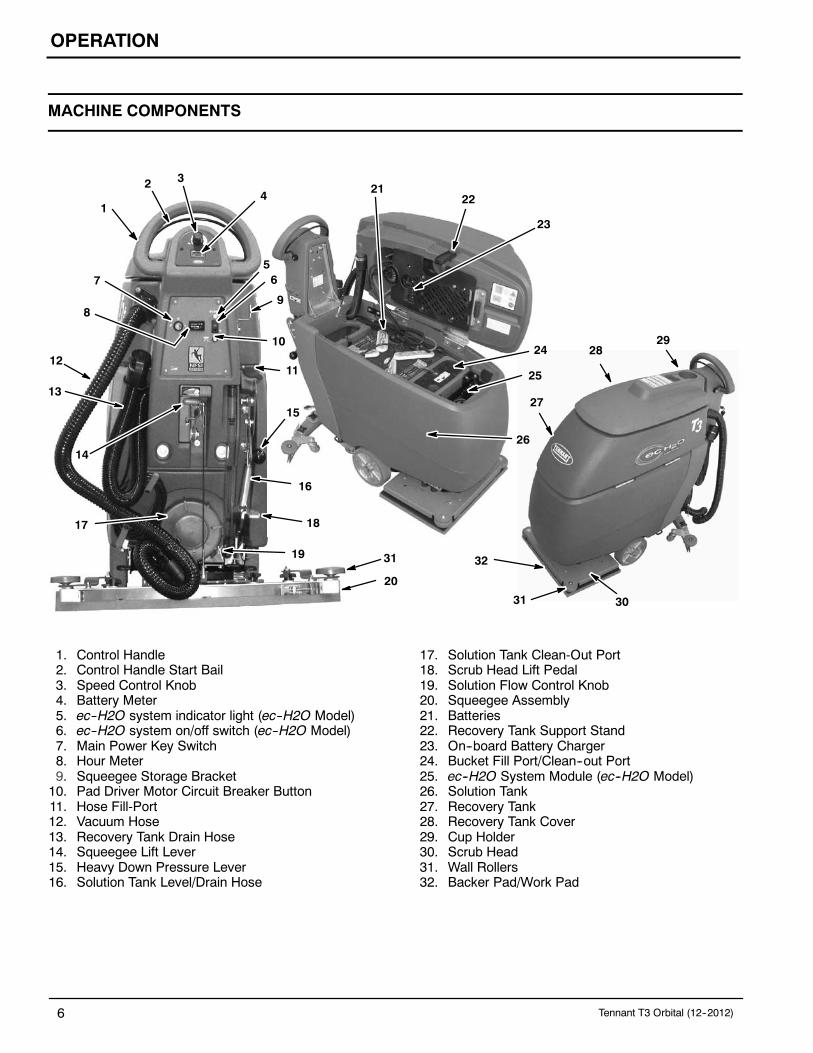
MACHINE COMPONENTS
2829
27
21
26
23
22
3031
1
2 3
4
56
8
7
14
18
15
17
20
1112
16
13
10
19
25
9
24
31 32
1. Control Handle2. Control Handle Start Bail3. Speed Control Knob4. Battery Meter5. ec--H2O system indicator light (ec--H2O Model)6. ec--H2O system on/off switch (ec--H2O Model)7. Main Power Key Switch8. Hour Meter9. Squeegee Storage Bracket10. Pad Driver Motor Circuit Breaker Button11. Hose Fill-Port12. Vacuum Hose13. Recovery Tank Drain Hose14. Squeegee Lift Lever15. Heavy Down Pressure Lever16. Solution Tank Level/Drain Hose
17. Solution Tank Clean-Out Port18. Scrub Head Lift Pedal19. Solution Flow Control Knob20. Squeegee Assembly21. Batteries22. Recovery Tank Support Stand23. On--board Battery Charger24. Bucket Fill Port/Clean--out Port25. ec--H2O System Module (ec--H2O Model)26. Solution Tank27. Recovery Tank28. Recovery Tank Cover29. Cup Holder30. Scrub Head31. Wall Rollers32. Backer Pad/Work Pad

OPERATION
Tennant T3 Orbital (12--2012) 7
CONTROL PANEL SYMBOLS
Main PowerI/O Key Switch
Solution FlowControlSlow Speed
Pad Motor CircuitBreaker
Fast Speed
5% MaximumMachine Climb
Bail DirectionHeavy Scrub PadDown Pressure
ec--H2O System I/O Switch(ec--H2O Model)
MACHINE INSTALLATION
UNCRATING MACHINE
1. Carefully check the shipping crate for signs ofdamage. Report damages at once to carrier.
2. Check the contents list. Contact distributor formissing items.Contents:S 2--12 V Batteries -- OptionalS 2--Foam Battery Spacers (#630375)S Battery Tray (#1012994)S 15 in / 38 cm Battery Cable (#130364)S 4--Battery Cable Rubber BootsS Squeegee Assembly (#9001178)
3. To uncrate your machine, remove the shippinghardware and straps that secure the machine tothe pallet. With assistance, carefully lift themachine off the pallet.
ATTENTION: Do not roll machine off pallet unlessa ramp is used, machine damage may occur.
ATTENTION: To prevent possible machinedamage, install batteries after removing machinefrom shipping pallet.
INSTALLING BATTERIES
WARNING: Fire Or Explosion Hazard.Batteries Emit Hydrogen Gas. Keep Sparks AndOpen Flame Away. Keep Battery Hood Open WhenCharging.
FOR SAFETY: When servicing machine, wearprotective gloves and eye protection whenhandling batteries and battery cables. Avoidcontact with battery acid.
Battery Specifications:Two 12 volt deep cycle lead acid batteries.
155 AH battery -- 20 in / 50cm
Maximum battery dimensions: 6.85 in / 174 mm W x15 in / 380 mm L x 11.18 in / 284 mm H.
1. Park the machine on a level surface and removethe key.
2. Lift the recovery tank to access the batterycompartment (Figure 1).
FIG. 1

OPERATION
8 Tennant T3 Orbital (12--2012)
3. Carefully install the batteries into the batterycompartment tray and arrange the battery postsas shown (Figure 2). Insert the two foam spacersalong side the batteries as shown.
ATTENTION: Do not drop the batteries into thecompartment, battery and machine housingdamage may result.
Machine
Front1
Foam Spacer
BLACK
RED2
Foam Spacer
FIG. 2
4. Using the supplied battery post boots, connect thecables to the battery posts in numerical order aslabeled (Figure 2), RED TO POSITIVE (+) &BLACK TO NEGATIVE (--).
IMPORTANT: Make sure that the charger isproperly set for your battery type before charging(See USING THE ON--BOARD CHARGER).
HOW THE MACHINE WORKS
Conventional Scrubbing:Water and detergent from the solution tank flow to thefloor through a manually controlled solution valve. Thepad uses the detergent and water solution to scrub thefloor clean. As the machine moves forward, thesqueegee wipes the dirty solution from the floor intothe recovery tank.
ec-H2O Scrubbing (ec-H2O Model):(ec--H2O--electrically converted water)Normal water passes through a module where it isoxygenated and charged with an electric current. Theelectrically converted water changes into a blendedacidic and alkaline solution forming a neutral pHcleaner. The converted water attacks the dirt, breaks itinto smaller particles, and pulls it off the floor surfaceallowing the machine to easily scrub away thesuspended soil. The converted water then returns tonormal water in the recovery tank.

OPERATION
Tennant T3 Orbital (12--2012) 9
PAD INFORMATION
BACKER PAD (With Retaining Strips)
For best cleaning performance and to avoid damagingthe pad driver plate or floor surface, always usebacker pad (p/n 9010674) with work pads (Figure 3).
Backer pad
Work pad
Scrub head
Pad driver plate
FIG. 3
WORK PADS
For best results, use the correct work pad type for thecleaning application. The following are recommendedwork pads.
Polishing Pad (White) -- Used to maintain highlypolished or burnished floors (p/n 1205512, 10 pack).
Buffing Pad (Red) -- Used for light duty scrubbingwithout removing floor finish (p/n 1205513, 10 pack).
Scrubbing Pad (Blue) -- Used for medium toheavy--duty scrubbing. Removes dirt, spills, and scuffs(p/n 1205514, 10 pack).
Surface Preparation Pad (Maroon) -- Used for veryaggressive chemical free removal of floor finish toprepare the floor for re--coating(p/n 1205515, 10 pack).
MACHINE SETUP
ATTACHING SQUEEGEE ASSEMBLY
1. Park the machine on a level surface and removethe key.
2. Lift the squeegee lift lever to the upward position(Figure 4).
FIG. 4
3. Mount the squeegee assembly to the squeegeepivot bracket as shown (Figure 5). Make sure theknobs are completely seated into the slots beforesecuring knobs.
FIG. 5
4. Connect the vacuum hose to the squeegeeassembly. Loop the hose as shown using the hoseclip provided (Figure 6).
FIG. 6
5. Check the squeegee blades for proper adjustment(See SQUEEGEE BLADE ADJUSTMENT).
OPERATION
10 Tennant T3 Orbital (12--2012)
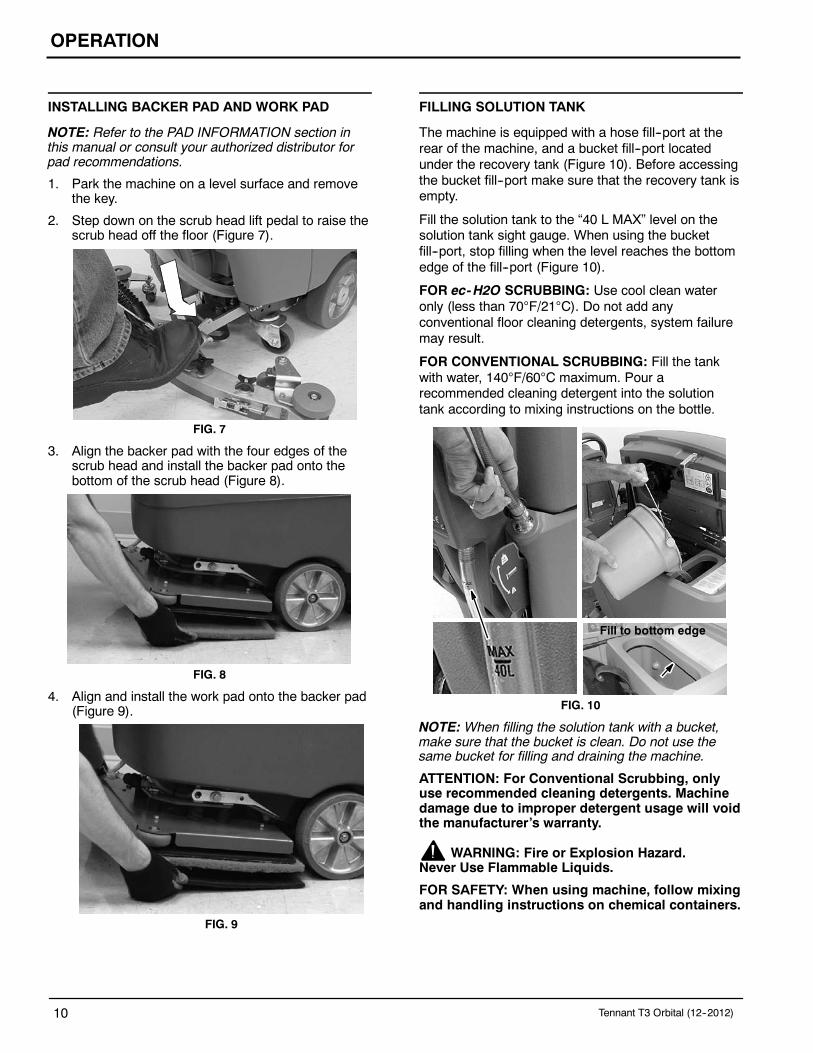
INSTALLING BACKER PAD AND WORK PAD
NOTE: Refer to the PAD INFORMATION section inthis manual or consult your authorized distributor forpad recommendations.
1. Park the machine on a level surface and removethe key.
2. Step down on the scrub head lift pedal to raise thescrub head off the floor (Figure 7).
FIG. 7
3. Align the backer pad with the four edges of thescrub head and install the backer pad onto thebottom of the scrub head (Figure 8).
FIG. 8
4. Align and install the work pad onto the backer pad(Figure 9).
FIG. 9
FILLING SOLUTION TANK
The machine is equipped with a hose fill--port at therear of the machine, and a bucket fill--port locatedunder the recovery tank (Figure 10). Before accessingthe bucket fill--port make sure that the recovery tank isempty.
Fill the solution tank to the “40 L MAX” level on thesolution tank sight gauge. When using the bucketfill--port, stop filling when the level reaches the bottomedge of the fill--port (Figure 10).
FOR ec-H2O SCRUBBING: Use cool clean wateronly (less than 70F/21C). Do not add anyconventional floor cleaning detergents, system failuremay result.
FOR CONVENTIONAL SCRUBBING: Fill the tankwith water, 140F/60C maximum. Pour arecommended cleaning detergent into the solutiontank according to mixing instructions on the bottle.
Fill to bottom edge
FIG. 10
NOTE: When filling the solution tank with a bucket,make sure that the bucket is clean. Do not use thesame bucket for filling and draining the machine.
ATTENTION: For Conventional Scrubbing, onlyuse recommended cleaning detergents. Machinedamage due to improper detergent usage will voidthe manufacturer’s warranty.
WARNING: Fire or Explosion Hazard.Never Use Flammable Liquids.
FOR SAFETY: When using machine, follow mixingand handling instructions on chemical containers.
OPERATION
Tennant T3 Orbital (12--2012) 11
MACHINE OPERATION
FOR SAFETY: Do not operate machine, unlessoperator manual is read and understood.
WARNING: Fire Or Explosion Hazard. NeverOperate Machine In Or Near Flammable Liquids,Vapors Or Combustible Dusts.
PRE--OPERATION CHECKS
- Sweep and dust-mop the floor.
- Check the battery meter charge level (SeeBATTERY METER).
- Check the pad for wear.
- Check the squeegee blades for wear and properadjustment.
- Make sure the recovery tank is empty and thefloat shut--off screen is installed and clean.
- For ec-H2O Scrubbing: Make sure the solutiontank is filled with cool clean water only.
- For ec-H2O Scrubbing: Ensure that allconventional cleaning agents are drained andrinsed from solution tank.
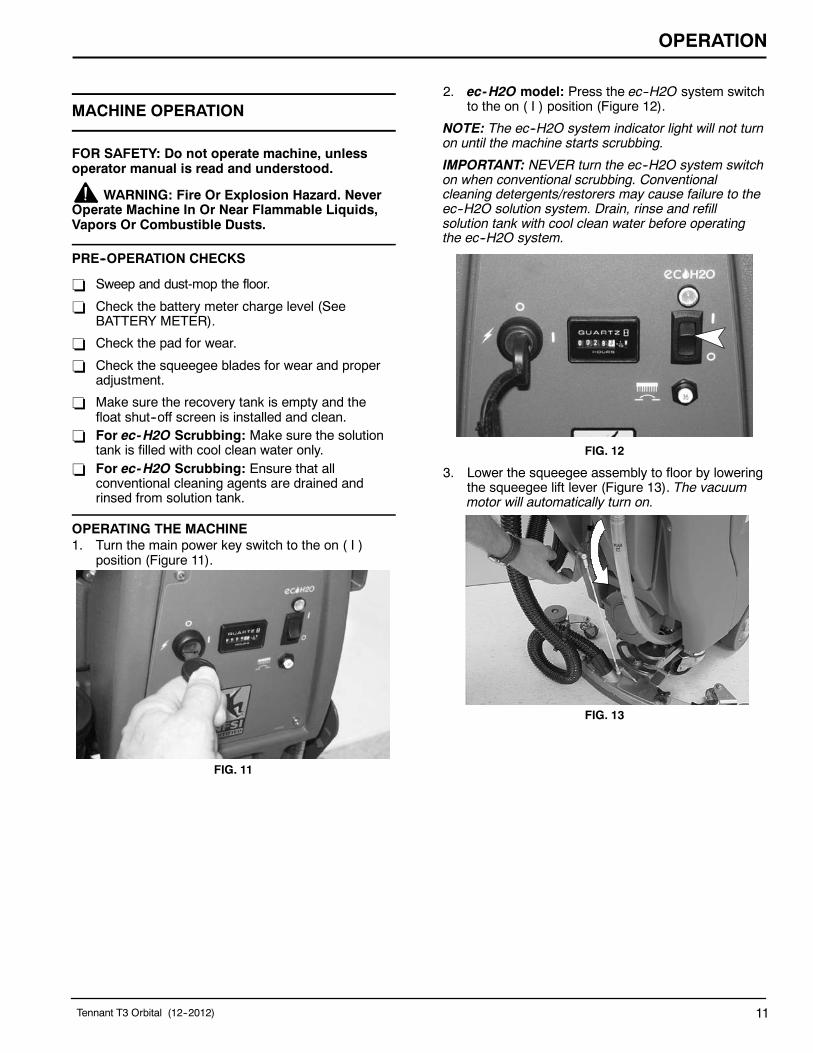
OPERATING THE MACHINE1. Turn the main power key switch to the on ( I )
position (Figure 11).
FIG. 11
2. ec-H2O model: Press the ec--H2O system switchto the on ( I ) position (Figure 12).
NOTE: The ec--H2O system indicator light will not turnon until the machine starts scrubbing.
IMPORTANT: NEVER turn the ec--H2O system switchon when conventional scrubbing. Conventionalcleaning detergents/restorers may cause failure to theec--H2O solution system. Drain, rinse and refillsolution tank with cool clean water before operatingthe ec--H2O system.
FIG. 12
3. Lower the squeegee assembly to floor by loweringthe squeegee lift lever (Figure 13). The vacuummotor will automatically turn on.
FIG. 13

OPERATION
12 Tennant T3 Orbital (12--2012)
4. Lower the scrub head to the floor by stepping onthe scrub head lift pedal as shown (Figure 14).
FIG. 14
5. Pull the control handle bail backwards to startscrubbing. The machine will propel forward. Pushthe control handle bail forward to move themachine in reverse (Figure 15).
ReverseForward
FIG. 15
6. Adjust the speed control knob to a desiredscrubbing speed (Figure 16).
NOTE: 45--60 meters (150--200 ft) per minute is therecommended scrubbing speed.
FIG. 16
7. For conventional scrubbing, turn the solution flowcontrol knob to a desired flow rate (Figure 17).
NOTE: For the ec--H2O models, the solution flow rateis fixed and requires no adjustment. The ec--H2Omodule has optional flow rate settings. If solution flowadjustments are required, contact an AuthorizedService Representative.
FIG. 17
8. When more pad pressure is needed for heavilysoiled areas simply lift the down pressure lever(Figure 18).
FIG. 18
9. To stop scrubbing, release the control handle bail,raise the scrub head and the squeegee.
WHILE OPERATING MACHINE
WARNING: Fire Or Explosion Hazard. Do NotPick Up Flammable Materials Or Reactive Metals.1. Overlap each scrubbing path by 5 cm (2 in).
2. Keep the machine moving to prevent damage tofloor finish.
3. Wipe the squeegee blades with a cloth if bladesleave streaks. Pre-sweep the area to preventstreaking.
4. Do not operate the machine on inclines thatexceed 5%.
FOR SAFETY: When using machine, go slow oninclines and slippery surfaces. Wear non--slipshoes.
5. Pour a recommended foam control solution intothe recovery tank if excessive foam appears.
ATTENTION: Do not allow foam to enter the floatshut-off screen, vacuum motor damage will result.Foam will not activate the float shut-off screen.

OPERATION
Tennant T3 Orbital (12--2012) 13
6. Use the double scrubbing method for heavilysoiled areas. First scrub the area with thesqueegee up, let solution set for 3--5 minutes, thenscrub the area a second time with the squeegeedown.
7. When leaving the machine unattended, park themachine on a level surface and remove the key.
8. ec-H2O Model: If an alarm sounds and theec--H2O system indicator light begins to blink red,the ec--H2O module must be flushed to resumeec--H2O operation (See ec--H2O MODULEFLUSH PROCEDURE) (Figure 19).
NOTE: When the alarm sounds and the light blinksred, the machine will bypass the ec--H2O system. Tocontinue scrubbing, turn the ec--H2O switch off andchange over to conventional scrubbing.
ATTENTION: (ec-H2O model) Do not allowsolution tank to run dry. ec-H2O module failuremay result if operated without water for anextended period.
FIG. 19
ec-H2O SYSTEMINDICATOR LIGHT CODE CONDITION
Solid green Normal operation
Blinking red Flush ec--H2O module
Solid red Contact Service Center
7. Use caution when working near the tile cove(Figure 20) and floor mounted fixtures such aspedestal sinks and other breakable items. Keepthe metal scrub head edge away to avoid possibledamage to the cove and other breakable items.
Tile Cove
FIG. 20
9. When transporting or storing machine, remove thesqueegee assembly and hang it on the storagebracket (Figure 21).
FIG. 21
10. Perform the Daily Maintenance procedures afterscrubbing (See MACHINE MAINTENANCE).
BATTERY METER
The battery meter displays the charge level of thebatteries. When the batteries are fully charged, allindicator lights are lit. As the batteries discharge, theindicator lights will begin to go out from right to left.To prolong the life of the batteries, do not allow theindicator lights to go beyond the discharge level asdescribed below.
NOTE: To prolong the life of the batteries ONLYrecharge the batteries when the machine is used for atotal of 30 minutes or more.
When the discharge level reaches the last red light(Figure 22), stop scrubbing and recharge the batteries.If the last red light begins to flash, the scrubbingfunction will shut off automatically. This protects thebatteries from total discharge. Drive the machine tothe charging area and recharge the batteriesimmediately.
NOTE: The battery meter also displays machine faultcodes. If a fault is detected, the LED bars will flashspecific fault codes (See BATTERY METER LEDFAULT CODES).
Stop scrubbing and rechargebatteries
FIG. 22

OPERATION
14 Tennant T3 Orbital (12--2012)
CIRCUIT BREAKER / FUSES
The machine is equipped with a resettable circuitbreaker to protect the pad motor from damage. Thecircuit breaker button is located on the control panel(Figure 23). If the circuit breaker should trip, determinethe cause, allow the motor to cool, and then manuallyreset the circuit breaker button.
The machine is also equipped with two fuses locatedinside the control console: 30A Main fuse and a 25Avacuum motor fuse. When replacing a fuse neversubstitute a higher Amp rated fuse than specified.
Contact an Authorized Service Center formachine repairs.
FIG. 23
HOUR METER
The hour meter records the number of total hours themotor has been powered on. Use the hour meter todetermine when to perform recommendedmaintenance procedures and to record service history(Figure 24).
FIG. 24
DRAINING TANKS
The recovery tank should be drained and cleaned outafter every use. The solution tank should be cleanedout periodically to remove any corrosion.
Transport the machine to a draining site, turn the keyoff and follow the draining instructions below:
FOR SAFETY: Before leaving or servicingmachine, stop on level surface, turn off machineand remove key.
DRAINING RECOVERY TANK
1. While holding the drain hose upward, remove thecap and lower hose to drain (Figure 25).
FIG. 25
NOTE: When using a bucket to drain the machine, donot use the same bucket to fill the solution tank.
2. Open the recovery tank cover and rinse out thetank. Use a rag to remove any excess dirt(Figure 26).
FIG. 26

OPERATION
Tennant T3 Orbital (12--2012) 15
3. Clean the float shut-off screen and debris traylocated in the recovery tank (Figure 27).
FIG. 27
DRAINING SOLUTION TANK
1. To drain any remaining water from the solutiontank, pull the solution tank level hose off the hosefitting as shown (Figure 28).
FIG. 28
2. To rinse out the solution tank, remove theclean--out cap at the rear of the machine andspray water, 60C (140F) maximum, directly intothe two fill--ports located under the recovery tank(Figure 29).
FIG. 29
3. Remove and clean the solution tank filter(Figure 30). Turn the filter counter--clockwise toremove.
FIG. 30
4. After rinsing out the tank, securely replace thesolution tank filter, clean--out cap, fill--port coversand hose.
OPERATION
16 Tennant T3 Orbital (12--2012)
CHARGING BATTERIES
ATTENTION: To prolong the life of the batteriesonly recharge the batteries if the machine wasused for a total of 30 minutes or more. Do notleave batteries discharged for lengthy periods.
WARNING: Fire Or Explosion Hazard.Batteries Emit Hydrogen Gas. Keep Sparks andOpen Flame Away. Keep Battery CompartmentPropped Open When Charging.
FOR SAFETY: When servicing batteries, wearprotective gloves and eye protection whenhandling batteries and battery cables. Avoidcontact with battery acid.The following charging instructions are intended forbattery chargers supplied with the machine. Only usea battery charger with the following specifications toprevent battery damage.
BATTERY CHARGER SPECIFICATIONS:S CHARGER TYPE:
-- FOR SEALED (Gel) BATTERIES-- FOR WET (Lead Acid) BATTERIES
S OUTPUT VOLTAGE - 24 VOLTS
S OUTPUT CURRENT - 11 AMPS
S AUTOMATIC SHUTOFF CIRCUIT
S FOR DEEP CYCLE BATTERY CHARGING
USING THE ON--BOARD BATTERY CHARGER
IMPORTANT: Make sure the on--board batterycharger profile is properly set for your batterytype before charging. Failure to properly set willresult in battery damage.
To determine your battery type, see battery label.Contact your battery supplier if not specified.
To verify the setting of the charger profile:Connect the charger cord into an electrical receptacle,open the battery compartment and view the on--boardbattery charger LED display.
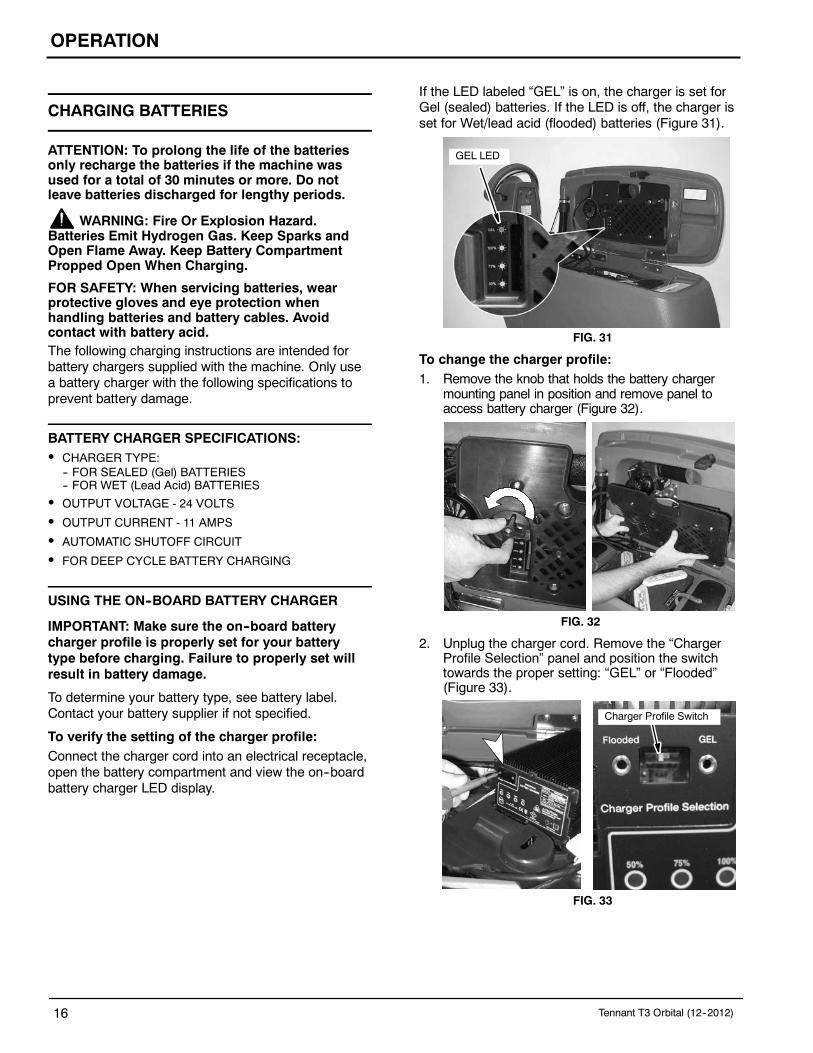
If the LED labeled “GEL” is on, the charger is set forGel (sealed) batteries. If the LED is off, the charger isset for Wet/lead acid (flooded) batteries (Figure 31).
GEL LED
FIG. 31
To change the charger profile:1. Remove the knob that holds the battery charger
mounting panel in position and remove panel toaccess battery charger (Figure 32).
FIG. 32
2. Unplug the charger cord. Remove the “ChargerProfile Selection” panel and position the switchtowards the proper setting: “GEL” or “Flooded”(Figure 33).
Charger Profile Switch
FIG. 33

OPERATION
Tennant T3 Orbital (12--2012) 17
To charge batteries:
1. Transport the machine to a well--ventilated areafor charging.
2. Park the machine on a level surface and turn thekey off.
3. If charging wet (lead acid) batteries check the fluidlevel before charging (See BATTERYMAINTENANCE on page 24).
4. Connect the charger cord into a properly groundedelectrical receptacle (Figure 34).
NOTE: The machine will not operate once the batterycharger is connected.
FIG. 34
5. The charger will start automatically within a fewseconds. The LEDs will display the charging stateas described in the following table (Figure 35).
CHARGING STATE LED DISPLAY
Charging State 50% LED 75% LED 100% LED
0--50% charged Blinking Off Off
50--75% charged On Blinking Off
75--100% charged On On Blinking
100% charged On On On
Abnormal Cycle * Off Off Blinking
Fault detected * Blinking Blinking Blinking
* See the On--board Battery Charger Fault Codes table. When afault occurs, the charger will also sound an alarm.
FIG. 35
6. Prop up the recovery tank for ventilation whencharging (Figure 36).
FIG. 36
7. Once the batteries are fully charged, the chargerwill stop suppling power, but will continue tomonitor the battery voltage. The charger willrestart if the batteries self--discharge.
NOTE: The charger may take up to 30 seconds to turnoff once the charger cord is disconnected. During thistime, the machine will not power up.
The charger cord must also be disconnected for 30seconds before the charger can be restarted.

OPERATION
18 Tennant T3 Orbital (12--2012)
ON--BOARD BATTERY CHARGER FAULT CODES
LED FAULT CODE FAULT SOLUTION
3 LEDs flash oncerepeatedly
Loose charger cable connection. Check charger cable connection.
Loose or damaged battery cable. Check battery cable connections.
Defective Battery. Replace battery.
3 LEDs flash twicerepeatedly
Input voltage is out of range. Try using a different wall outlet.
3 LEDs flash threetimes repeatedly
Safety thermostat exceeded maximum internaltemperature.
Open battery compartment to promote aircirculation or move machine to a coolerclimate.
3 LEDs flash fourtimes repeatedly
Output current exceeds a limit. Disconnect charger cord, wait 30 seconds,then plug back in. If fault continues replacecharger or Contact Service Center.
100% LED flasheswhile the 50% and75% LED’s are off.
Abnormal cycle. Safety timer exceeded the 18hour charging time.
Battery maintenance required or replacebattery.

MAINTENANCE
Tennant T3 Orbital (12--2012) 19
MACHINE MAINTENANCE
To keep the machine in good working condition, simplyfollow the daily, monthly and quarterly maintenanceprocedures.
WARNING: Electrical Hazard. DisconnectBattery Cables Before Servicing Machine.
FOR SAFETY: When servicing machine, wearpersonal protection equipment as needed andwhere recommended in this manual.
DAILY MAINTENANCE (After Every Use)
1. Drain and clean out the recovery tank (Figure 37).
FIG. 37
2. Remove the debris tray and empty (Figure 38)
FIG. 38
3. Remove and clean the float shut--off screenlocated in the recovery tank (Figure 39).
FIG. 39
4. Drain the solution tank and rinse out the insidewith hot water, 60C (140F) maximumtemperature, as needed (Figure 40)
FIG. 40
5. Remove and clean the solution tank filter(Figure 41). Turn the filter counter--clockwise toremove.
FIG. 41
MAINTENANCE
20 Tennant T3 Orbital (12--2012)
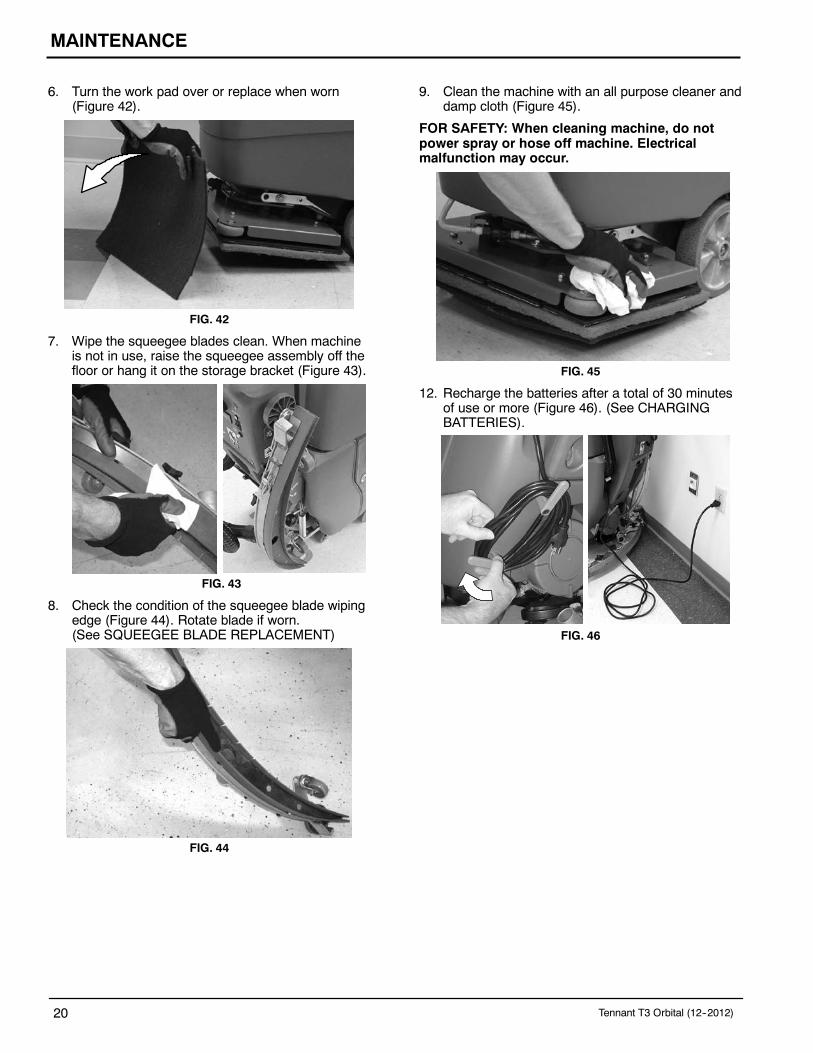
6. Turn the work pad over or replace when worn(Figure 42).
FIG. 42
7. Wipe the squeegee blades clean. When machineis not in use, raise the squeegee assembly off thefloor or hang it on the storage bracket (Figure 43).
FIG. 43
8. Check the condition of the squeegee blade wipingedge (Figure 44). Rotate blade if worn.(See SQUEEGEE BLADE REPLACEMENT)
FIG. 44
9. Clean the machine with an all purpose cleaner anddamp cloth (Figure 45).
FOR SAFETY: When cleaning machine, do notpower spray or hose off machine. Electricalmalfunction may occur.
FIG. 45
12. Recharge the batteries after a total of 30 minutesof use or more (Figure 46). (See CHARGINGBATTERIES).
FIG. 46

MAINTENANCE
Tennant T3 Orbital (12--2012) 21
MONTHLY MAINTENANCE (Every 80 hours of use)
1. Clean the battery tops to prevent corrosion (SeeBATTERY MAINTENANCE).
2. Check for loose battery cable connections.
3. Inspect and clean the recovery tank cover seal(Figure 47). Replace if damaged.
FIG. 47
4. Lubricate all pivot points and rollers with siliconespray then coat with a water resistant grease tomaintain smooth operation.
5. Check the machine for loose nuts and bolts.
6. Check the machine for leaks.
MOTOR MAINTENANCE
Contact an Authorized Tennant Service Center forcarbon brush replacement.
Carbon Brush Replacement Hours
Drive Transaxle Motor 750
Vacuum Motor 750
Pad Driver Motor 1200
WARNING: Electrical Hazard. DisconnectBattery Cables Before Servicing Machine.
ec-H2O MODULE FLUSH PROCEDURE
This procedure is only required when an alarm soundsand the ec--H2O system indicator light begins to blinkred.
1. Drain the solution tank and recovery tank of allwater.
2. Pour 1 gallon (4 liters) of white or rice vinegar intothe solution tank at full strength. Do not dilute.
NOTE: Use white or rice vinegar only. The aciditylevel should be between 4--8%. Do not use other acidsfor this procedure.
FOR SAFETY: When servicing machine, wearprotective gloves and eye protection whenhandling vinegar.
3. Disconnect the black connector fitting at the scrubhead and place the hose into a bucket (Figure 48).
FIG. 48
4. Turn the key to the on ( I ) position.

MAINTENANCE
22 Tennant T3 Orbital (12--2012)
5. Press and release the ec--H2O module flushswitch to start the flush cycle (Figure 49). Themodule is located under the recovery tank.
NOTE: The module will automatically shut off whenthe flush cycle is complete (approx. 7 minutes). Themodule must run the full 7 minute cycle in order toreset the system indicator light and alarm.
Repeat flush procedure if the ec--H2O moduledoes not reset. If module fails to reset, contact anAuthorized Service Center.
FIG. 49
SQUEEGEE BLADE REPLACEMENT
Each squeegee blade has four wiping edges. Whenthe blades become worn, simply rotate the bladesend-for-end or top-to-bottom for a new wiping edge.Replace blade if all four edges are worn.
1. Remove the squeegee assembly from the machine.
2. Loosen the band clamp and remove the band fromthe squeegee assembly (Figure 50).
FIG. 50
3. Rotate the rear blade to a new wiping edge andreinstall the band. Make sure the notched edge ofthe band is facing downward (Figure 51).
FIG. 51
4. To replace the front blade, remove the rear bandand fully loosen the four squeegee assemblyknobs, do not remove the knobs. Lift and tilt theretainer plate to access the front blade(Figure 52). Rotate the front blade to a new wipingedge and return the retainer plate. Make sure theretainer plate tabs engage the blade slots.Reinstall the band then retighten the knobs.
Retainer Plate
FIG. 52

MAINTENANCE
Tennant T3 Orbital (12--2012) 23
SQUEEGEE BLADE ADJUSTMENT
The squeegee blade adjustment is factory set, butmay require periodic adjustment.
For optimum squeegee blade performance, thesqueegee assembly casters must be adjusted to aspecified height as described below.
1. To check the squeegee assembly for properadjustment, remove the squeegee assembly fromthe machine and place it on a level surface.Measure the distance between the caster and thesurface. It should measure approximately 2 mm(1/16”) (Figure 53).
2. To adjust the caster height, loosen the top nut andremove the plastic bearing cover to access theadjustment nut. Turn the adjustment nut untilproperly adjusted (Figure 53). After adjusting,tighten the top nut and replace the plastic bearingcover. Repeat step for the other caster.
2 mm1/16”
FIG. 53
3. During machine operation, with the castersproperly adjusted, the squeegee blades shoulddeflect as shown (Figure 54).
FIG. 54
BATTERY MAINTENANCE (Wet/lead acid batteries)
1. Check battery fluid level frequently to preventbattery damage. The fluid should be at the levelshown (Figure 55). Add distilled water if low. DONOT OVERFILL, the fluid may expand andoverflow when charging.
Before Charging After Charging
CORRECT BATTERY FLUID LEVEL:
FIG. 55
WARNING: Fire Or Explosion Hazard.Batteries Emit Hydrogen Gas. Keep Sparks AndOpen Flame Away. Keep Battery CompartmentOpen When Charging.
2. Clean the batteries to prevent battery corrosion.Use a scrub brush with a mixture of baking sodaand water (Figure 56).
FOR SAFETY: When cleaning batteries, wearprotective gloves and eye protection. Avoidcontact with battery acid.
FIG. 56

MAINTENANCE
24 Tennant T3 Orbital (12--2012)
TRANSPORTING MACHINE
When transporting the machine by trailer or truck, becertain to follow the transporting procedure below:
1. Drain machine tanks.
2. Raise the scrub head and hang squeegee onsqueegee storage bracket.
3. Load the machine using a ramp that can supportthe machine weight and person loading it. Themaximum ramp incline should not exceed 15% ata ramp length of 12 ft (3.7m).
4. Position the front of machine up against the frontof the trailer or truck. Lower the scrub head.
5. Place a block behind each wheel to prevent themachine from rolling.
6. Secure with tie--down straps as shown (Figure57). It may be necessary to install tie-downbrackets to trailer or truck.
FOR SAFETY: When loading/unloading machineonto/off truck or trailer, use a ramp that cansupport the machine weight and person loading it,do not exceed a 15% ramp incline at a ramp lengthof 12 ft (3.7m), use tie--down straps to securemachine and block machine wheels.
FIG. 57
STORING MACHINE
1. Charge the batteries before storing. Never storethe machine with discharged batteries.
2. Drain and rinse the tanks thoroughly.
3. Store the machine in a dry area with the squeegeeand scrub head in the up position.
4. Open the recovery tank cover to promote aircirculation.
ATTENTION: Do not expose machine to rain, storeindoors.
5. If storing machine in freezing temperatures, followthe FREEZE PROTECTION instructions below.
FREEZE PROTECTION
1. Drain the solution tank and recovery tank of allwater.
2. Pour 1 gallon / 4 liters of recreational vehicle (RV)antifreeze into the solution tank at full strength.Do not dilute.
FOR SAFETY: Avoid eye contact with antifreeze.Wear safety glasses.
3. Turn the machine power on and operate thesolution flow system. Turn the machine off whenthe red RV antifreeze is visible.
Continue with the freeze protection procedure ifmachine is equipped with the ec--H2O system.
ec-H2O Model:
Press and release the flush switch on the ec--H2Omodule to cycle the antifreeze through ec--H2Osystem (Figure 58). When the antifreeze is visible,press the switch again to turn off the module.
FIG. 58
MAINTENANCE
Tennant T3 Orbital (12--2012) 25
IMPORTANT: Before operating machine, theantifreeze must be flushed from the module asdescribed below.
If the antifreeze is not properly flushed from theec--H2O system, the ec--H2O module may detect anerror and not function (ec--H2O switch indicator lightwill turn red). If this occurs, reset key and repeat theflush procedure as described below.
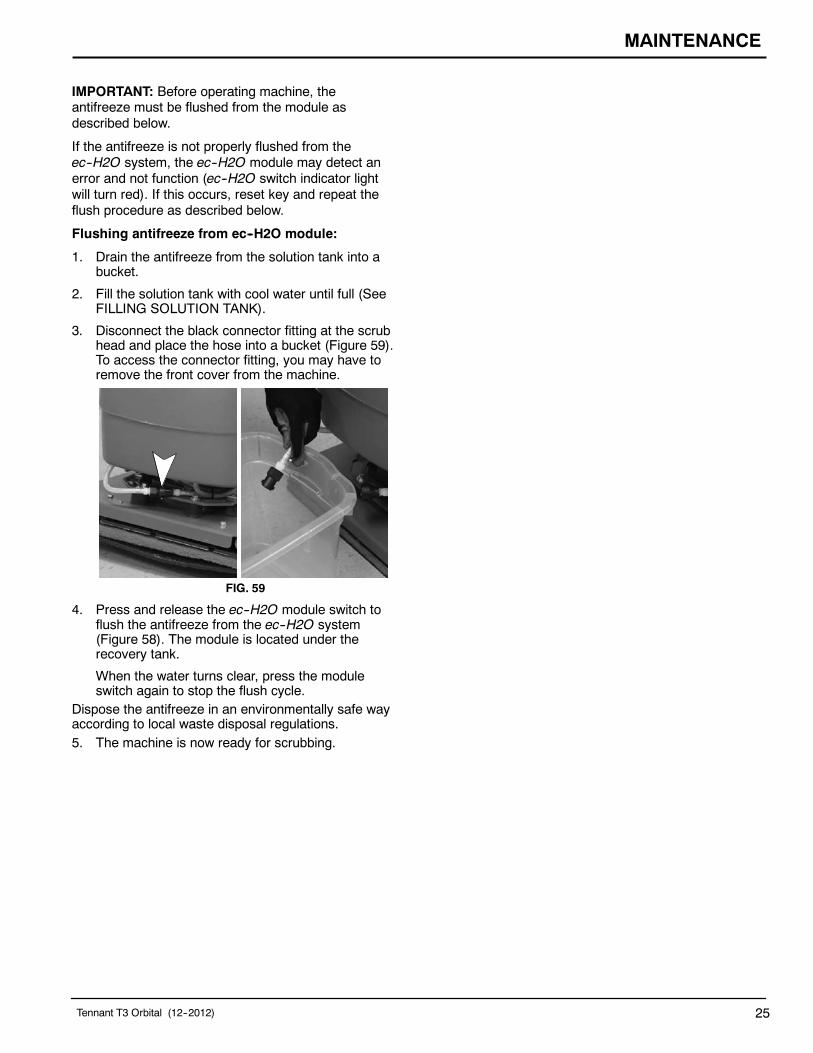
Flushing antifreeze from ec--H2O module:
1. Drain the antifreeze from the solution tank into abucket.
2. Fill the solution tank with cool water until full (SeeFILLING SOLUTION TANK).
3. Disconnect the black connector fitting at the scrubhead and place the hose into a bucket (Figure 59).To access the connector fitting, you may have toremove the front cover from the machine.
FIG. 59
4. Press and release the ec--H2O module switch toflush the antifreeze from the ec--H2O system(Figure 58). The module is located under therecovery tank.
When the water turns clear, press the moduleswitch again to stop the flush cycle.
Dispose the antifreeze in an environmentally safe wayaccording to local waste disposal regulations.5. The machine is now ready for scrubbing.
MAINTENANCE
26 Tennant T3 Orbital (12--2012)
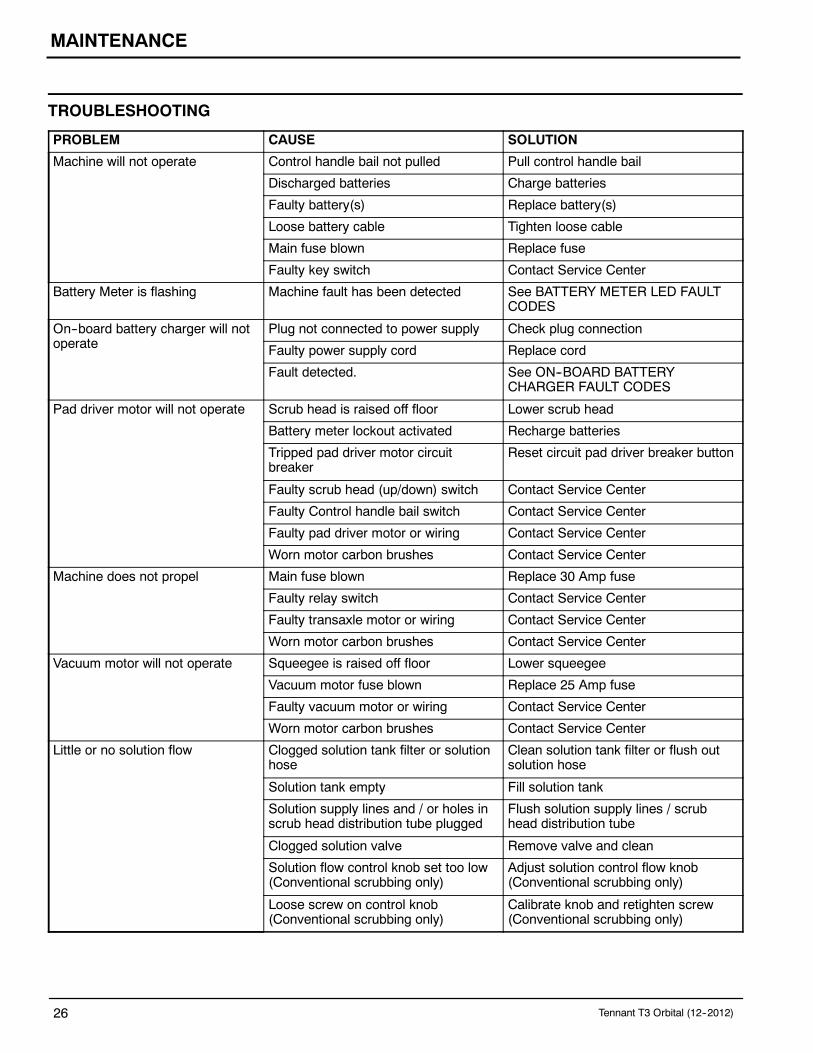
TROUBLESHOOTING
PROBLEM CAUSE SOLUTION
Machine will not operate Control handle bail not pulled Pull control handle bail
Discharged batteries Charge batteries
Faulty battery(s) Replace battery(s)
Loose battery cable Tighten loose cable
Main fuse blown Replace fuse
Faulty key switch Contact Service Center
Battery Meter is flashing Machine fault has been detected See BATTERY METER LED FAULTCODES
On--board battery charger will notoperate
Plug not connected to power supply Check plug connection
Faulty power supply cord Replace cord
Fault detected. See ON--BOARD BATTERYCHARGER FAULT CODES
Pad driver motor will not operate Scrub head is raised off floor Lower scrub head
Battery meter lockout activated Recharge batteries
Tripped pad driver motor circuitbreaker
Reset circuit pad driver breaker button
Faulty scrub head (up/down) switch Contact Service Center
Faulty Control handle bail switch Contact Service Center
Faulty pad driver motor or wiring Contact Service Center
Worn motor carbon brushes Contact Service Center
Machine does not propel Main fuse blown Replace 30 Amp fuse
Faulty relay switch Contact Service Center
Faulty transaxle motor or wiring Contact Service Center
Worn motor carbon brushes Contact Service Center
Vacuum motor will not operate Squeegee is raised off floor Lower squeegee
Vacuum motor fuse blown Replace 25 Amp fuse
Faulty vacuum motor or wiring Contact Service Center
Worn motor carbon brushes Contact Service Center
Little or no solution flow Clogged solution tank filter or solutionhose
Clean solution tank filter or flush outsolution hose
Solution tank empty Fill solution tank
Solution supply lines and / or holes inscrub head distribution tube plugged
Flush solution supply lines / scrubhead distribution tube
Clogged solution valve Remove valve and clean
Solution flow control knob set too low(Conventional scrubbing only)
Adjust solution control flow knob(Conventional scrubbing only)
Loose screw on control knob(Conventional scrubbing only)
Calibrate knob and retighten screw(Conventional scrubbing only)
MAINTENANCE
Tennant T3 Orbital (12--2012) 27
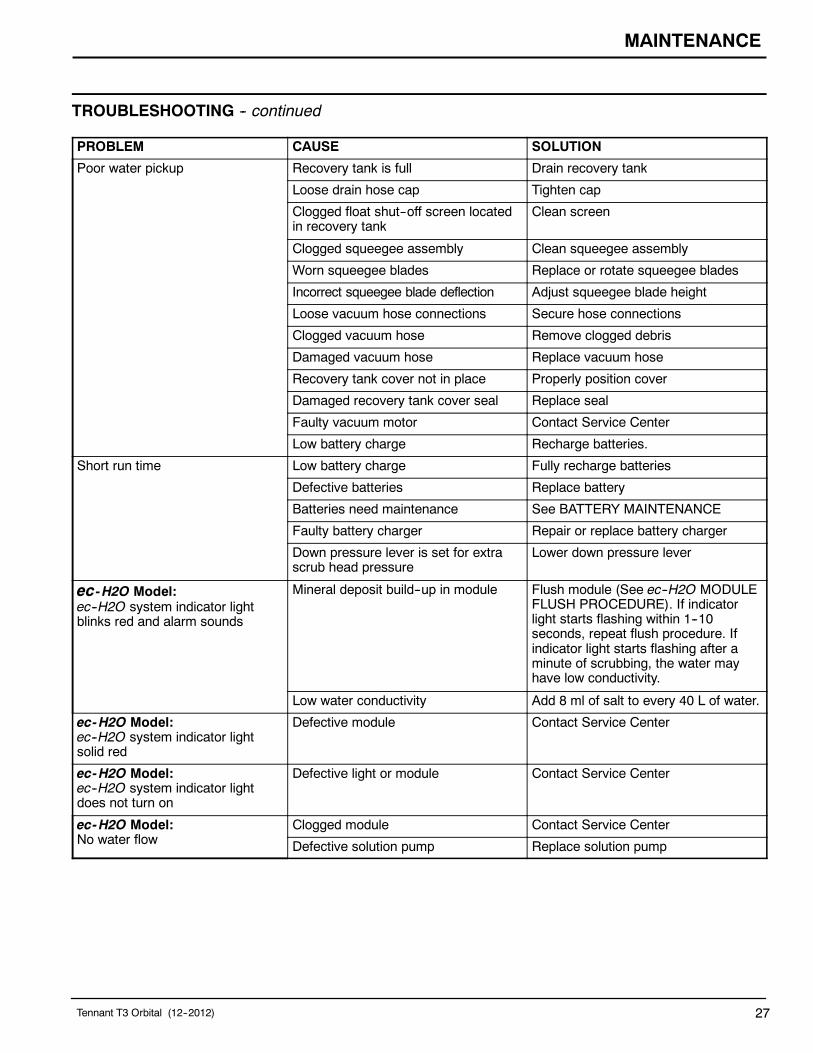
TROUBLESHOOTING -- continued
PROBLEM CAUSE SOLUTION
Poor water pickup Recovery tank is full Drain recovery tank
Loose drain hose cap Tighten cap
Clogged float shut--off screen locatedin recovery tank
Clean screen
Clogged squeegee assembly Clean squeegee assembly
Worn squeegee blades Replace or rotate squeegee blades
Incorrect squeegee blade deflection Adjust squeegee blade height
Loose vacuum hose connections Secure hose connections
Clogged vacuum hose Remove clogged debris
Damaged vacuum hose Replace vacuum hose
Recovery tank cover not in place Properly position cover
Damaged recovery tank cover seal Replace seal
Faulty vacuum motor Contact Service Center
Low battery charge Recharge batteries.
Short run time Low battery charge Fully recharge batteries
Defective batteries Replace battery
Batteries need maintenance See BATTERY MAINTENANCE
Faulty battery charger Repair or replace battery charger
Down pressure lever is set for extrascrub head pressure
Lower down pressure lever
ec-H2O Model:ec--H2O system indicator lightblinks red and alarm sounds
Mineral deposit build--up in module Flush module (See ec--H2O MODULEFLUSH PROCEDURE). If indicatorlight starts flashing within 1--10seconds, repeat flush procedure. Ifindicator light starts flashing after aminute of scrubbing, the water mayhave low conductivity.
Low water conductivity Add 8 ml of salt to every 40 L of water.
ec-H2O Model:ec--H2O system indicator lightsolid red
Defective module Contact Service Center
ec-H2O Model:ec--H2O system indicator lightdoes not turn on
Defective light or module Contact Service Center
ec-H2O Model:No water flow
Clogged module Contact Service Center
Defective solution pump Replace solution pump
MAINTENANCE
28 Tennant T3 Orbital (12--2012)
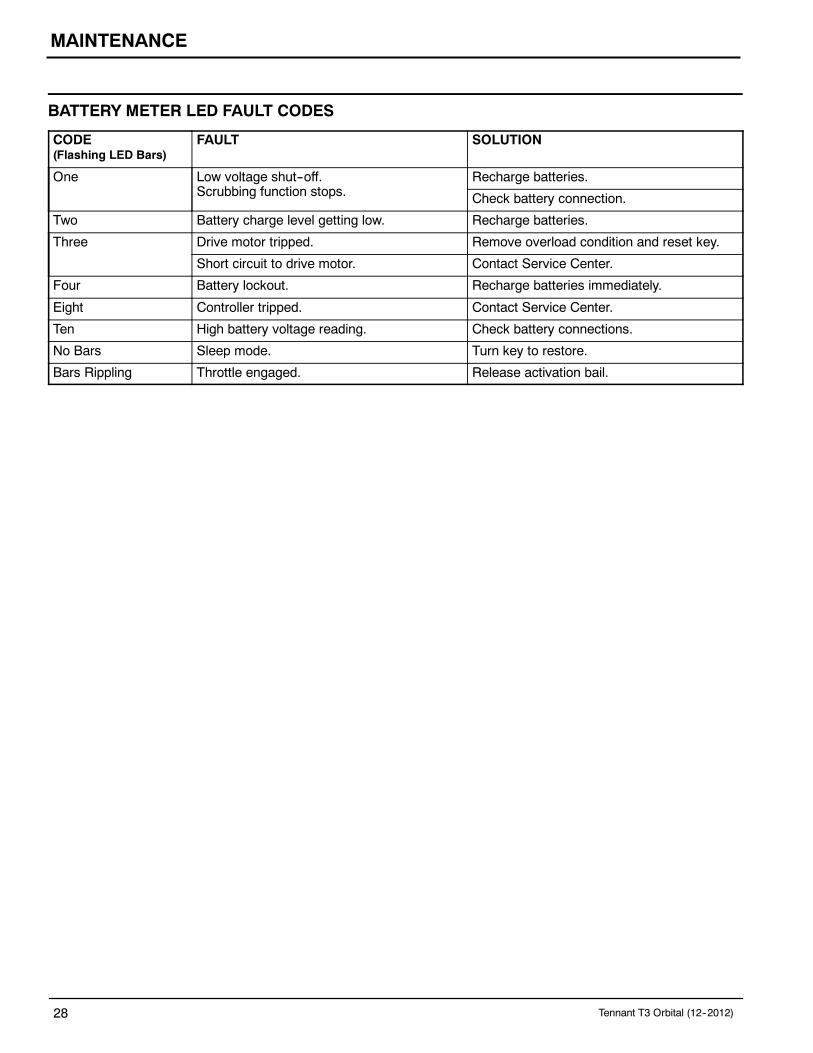
BATTERY METER LED FAULT CODES
CODE(Flashing LED Bars)
FAULT SOLUTION
One Low voltage shut--off.Scrubbing function stops.
Recharge batteries.
Check battery connection.
Two Battery charge level getting low. Recharge batteries.
Three Drive motor tripped. Remove overload condition and reset key.
Short circuit to drive motor. Contact Service Center.
Four Battery lockout. Recharge batteries immediately.
Eight Controller tripped. Contact Service Center.
Ten High battery voltage reading. Check battery connections.
No Bars Sleep mode. Turn key to restore.
Bars Rippling Throttle engaged. Release activation bail.
SPECIFICATIONS
Tennant T3 Orbital (12--2012) 29
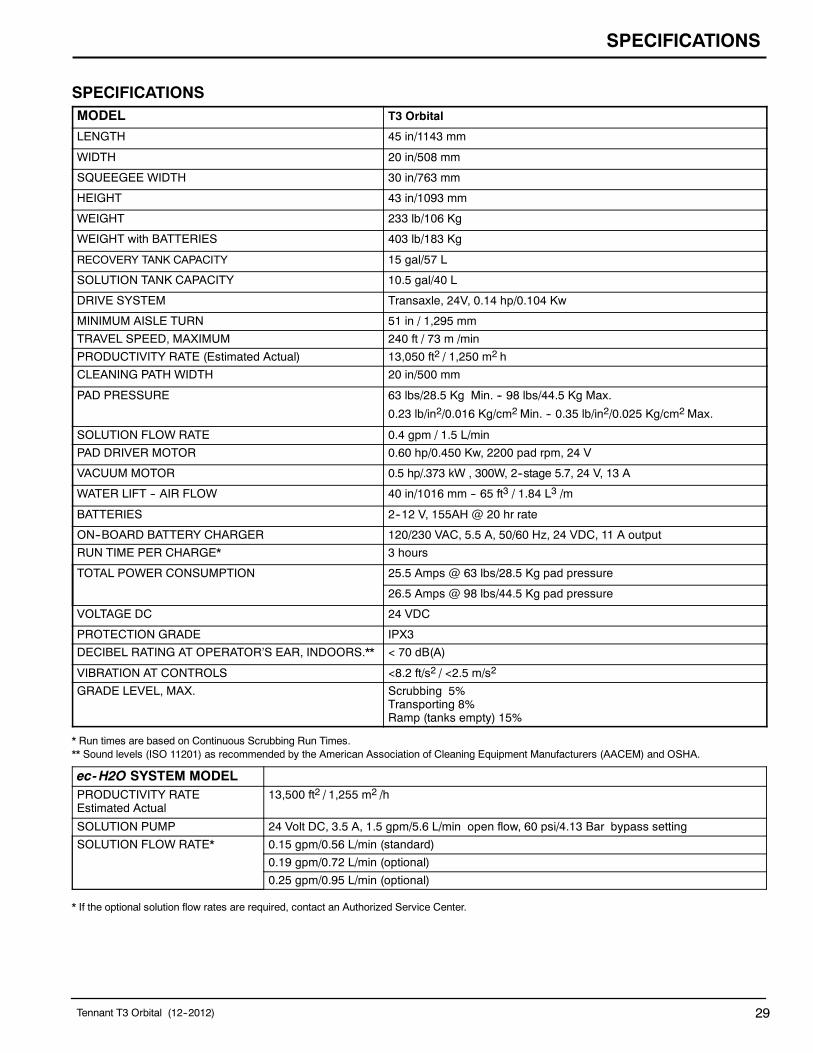
SPECIFICATIONSMODEL T3 Orbital
LENGTH 45 in/1143 mm
WIDTH 20 in/508 mm
SQUEEGEE WIDTH 30 in/763 mm
HEIGHT 43 in/1093 mm
WEIGHT 233 lb/106 Kg
WEIGHT with BATTERIES 403 lb/183 Kg
RECOVERY TANK CAPACITY 15 gal/57 L
SOLUTION TANK CAPACITY 10.5 gal/40 L
DRIVE SYSTEM Transaxle, 24V, 0.14 hp/0.104 Kw
MINIMUM AISLE TURN 51 in / 1,295 mm
TRAVEL SPEED, MAXIMUM 240 ft / 73 m /min
PRODUCTIVITY RATE (Estimated Actual) 13,050 ft2 / 1,250 m2 h
CLEANING PATH WIDTH 20 in/500 mm
PAD PRESSURE 63 lbs/28.5 Kg Min. -- 98 lbs/44.5 Kg Max.
0.23 lb/in2/0.016 Kg/cm2 Min. -- 0.35 lb/in2/0.025 Kg/cm2 Max.
SOLUTION FLOW RATE 0.4 gpm / 1.5 L/min
PAD DRIVER MOTOR 0.60 hp/0.450 Kw, 2200 pad rpm, 24 V
VACUUM MOTOR 0.5 hp/.373 kW , 300W, 2--stage 5.7, 24 V, 13 A
WATER LIFT -- AIR FLOW 40 in/1016 mm -- 65 ft3 / 1.84 L3 /m
BATTERIES 2--12 V, 155AH @ 20 hr rate
ON--BOARD BATTERY CHARGER 120/230 VAC, 5.5 A, 50/60 Hz, 24 VDC, 11 A output
RUN TIME PER CHARGE* 3 hours
TOTAL POWER CONSUMPTION 25.5 Amps @ 63 lbs/28.5 Kg pad pressure
26.5 Amps @ 98 lbs/44.5 Kg pad pressure
VOLTAGE DC 24 VDC
PROTECTION GRADE IPX3
DECIBEL RATING AT OPERATOR’S EAR, INDOORS.** < 70 dB(A)
VIBRATION AT CONTROLS <8.2 ft/s2 / <2.5 m/s2
GRADE LEVEL, MAX. Scrubbing 5%Transporting 8%Ramp (tanks empty) 15%
* Run times are based on Continuous Scrubbing Run Times.** Sound levels (ISO 11201) as recommended by the American Association of Cleaning Equipment Manufacturers (AACEM) and OSHA.
ec-H2O SYSTEM MODELPRODUCTIVITY RATEEstimated Actual
13,500 ft2 / 1,255 m2 /h
SOLUTION PUMP 24 Volt DC, 3.5 A, 1.5 gpm/5.6 L/min open flow, 60 psi/4.13 Bar bypass setting
SOLUTION FLOW RATE* 0.15 gpm/0.56 L/min (standard)
0.19 gpm/0.72 L/min (optional)
0.25 gpm/0.95 L/min (optional)
* If the optional solution flow rates are required, contact an Authorized Service Center.

SPECIFICATIONS
30 Tennant T3 Orbital (12--2012)
MACHINE DIMENSIONS
45 in/1,143 mm20 in/508mm
43 in1,093 mm
30 in/763 mm
356202