system administrative manual - software … start menu - go to control panel - double-click add or...
TRANSCRIPT

System Administrative Manual
CRCD Management System
Team 11
Muzzammil Imam - Project Manager/Implementer
Jason Loewy – Implementer
Fan Xu - Implementer/Trainer/Tester
Adarsh Khare- Implementer / Trainer/Tester
Kathleen Barrera - IIV&V / QFP
March 14, 2012

System Administrative Manual (AM) Version 1.0
AM_IOC2_S12_T11_V1.0 ii Version Date: 04/09/12

System Administrative Manual (AM) Version 1.0
AM_IOC2_S12_T11_V1.0 iii Version Date: 04/09/12
Table of Contents TABLE OF CONTENTS ......................................................................................................................... III
TABLE OF TABLES .............................................................................................................................. IV
TABLE OF FIGURES ..............................................................................................................................V
1. Introduction ................................................................................................................................................ 1
1.1 System Overview ................................................................................................................................ 1
1.2 System Requirements .......................................................................................................................... 1
2. Installation Procedures ................................................................................................................................ 2
2.1 Initialization procedures ...................................................................................................................... 2
2.1.1 MySQL 5.5 Installation……………………………………………………………………………………..2 2.1.1.1 MySQL Installation Layout on Microsoft Windows……………………………………………………..2 2.1.1.2 Installation Package………………………………………………………………………………………3 2.1.1.3 Installating MySQL on Microsoft Windows Using MySQL Installer……………………………………4
2.2 Re-installation ................................................................................................................................... 13
2.3 De-installation ................................................................................................................................... 13
2.3.1 Remove/Uninstall Timetrex Standard Edition Onsite……………………………………………………13 2.3.2 Removal For Inventory Management System……………………………………………………………14 2.3.3 Uninstalling MySQL 5.5…………………………………………………………………………………14
3. Procedure for Setting Up the System ......................................................................................................... 15
3.1 Install Timetrex………………………………………………………………………………………………….15 3.2 Inventory Management System…………………………………………………………………………………..18 3.3 Copy Other System Files…………………………………………………………………………………………19
4. Troubleshooting ........................................................................................................................................ 20
4.1 Frequently Asked questions ............................................................................................................... 20
4.2 Error Codes and Messages and Troubleshooting ................................................................................ 20
4.3 Note .................................................................................................................................................. 22

System Administrative Manual (AM) Version 1.0
UM_IOC2_S12_T11_V1.0 iv Version Date: 03/14/12
Table of Tables No table of figures entries found.

System Administrative Manual (AM) Version 1.0
UM_IOC2_S12_T11_V1.0 v Version Date: 03/14/12
Table of Figures No table of figures entries found.
System Administrative Manual (AM) Version 1.0
AM_IOC2_S12_T11_V1.0 1 Version Date: 04/09/12
1. Introduction
1.1 System Overview Time Trex : TimeTrex is a complete web-based payroll and time management suite which offers employee scheduling, time & attendance (timeclock, timesheet), job costing, invoicing and payroll all in tightly integrated package. The following features are taken care by Time Trex:
Time and attendance Job costing Payroll Scheduling Time clock Timesheet
Inventory Management System:
Inventory management is the process of efficiently overseeing the constant flow of units into and out of an existing inventory. Inventory management is not limited to documenting the delivery of raw materials and the movement of those materials into operational process. The movement of those materials as they go through the various stages of the operation is also important. Typically known as a goods or work in progress inventory, tracking materials as they are used to create finished goods also helps to identify the need to adjust ordering amounts before the raw materials inventory gets dangerously low or is inflated to an unfavorable level. Inventory management has to do with keeping accurate records of finished goods that are ready for shipment.
1.2 System Requirements The following are the major system requirements for Timetrex and Inventory Management Software:

System Administrative Manual (AM) Version 1.0
AM_IOC2_S12_T11_V1.0 2 Version Date: 04/09/12
1.2.1 Hardware Requirements Hard Disk Drive: Minimum 500 MB. Physical Memory(RAM): 1 GB (Recommended)
1.2.2 Software Requirements
Operating System: Windows XP/Vista or newer PHP v5.0 or higher. Servers: IIS or Apache Web Servers, MySQLv5.5 or PostgreSQL v8.0+
2. Installation Procedures
2.1 Initialization procedures
2.1.1 MySQL 5.5 Installation: A native Windows distribution of MySQL has been available since version 3.21 and represents a sizable percentage of the daily downloads of MySQL. This section describes the process for installing MySQL on Windows.
2.1.1.1 MySQL Installation Layout on Microsoft Windows
For MySQL 5.5 on Windows , the default installation directory is C:\Program Files\MySQL\MySQL Server 5.5. Some Windows users prefer to install in C:\mysql, the directory that formerly was used as the default. However, the layout of the subdirectories remains the same.
All of the files are located within this parent directory, using the structure shown in the following table.

System Administrative Manual (AM) Version 1.0
AM_IOC2_S12_T11_V1.0 3 Version Date: 04/09/12
Table 1. MySQL Installation Layout for Windows
Directory Contents of Directory bin Client programs and the mysqld server C:\Documents and Settings\All Users\Application Data\MySQL
Log files, databases (Windows XP, Windows Server 2003)
C:\ProgramData\MySQL Log files, databases (Windows 7, Windows Server 2008)
examples Example programs and scripts include Include (header) files lib Libraries scripts Utility scripts
share Miscellaneous support files, including error messages, character set files, sample configuration files, SQL for database installation
2.1.1.2 Installation Package The following package has been used for the installation of MySQL 5.5.
MySQL Installer:
It can be downloaded from the following location:
http://dev.mysql.com/downloads/installer/5.5.html
This package has a file name similar to mysql-installer-5.5.24.0.msi and utilizes MSI's to automatically install MySQL server and other products. It will download and apply updates to itself, and for each of the installed products. It also configures the additional non-server products, such as MySQL Workbench.
The installed products are configurable, and this includes: documentation with samples and examples, connectors (such as C, C++, J, NET, and ODBC), MySQL Workbench, and the MySQL Server with its components.
System Administrative Manual (AM) Version 1.0
AM_IOC2_S12_T11_V1.0 4 Version Date: 04/09/12
2.1.1.3 Installing MySQL on Microsoft Windows Using MySQL Installer
MySQL Installer is designed to simplify the installation and updating process for a wide range of MySQL products, and is managed from a single application. The MySQL Installer is only available for Microsoft Windows.
MySQL Installer is compatible with pre-existing installations; it simply adds these to its list of installed components. (Please note that the Installer is bound to the main server version.)
MySQL Installer handles the initial configuration of applications. For example:
1. It will create the initial MySQL Workbench connections, that allow immediate use of MySQL Workbench.
2. It creates the configuration file (my.ini) that is used to run the server. 3. It creates example tables that are available from the local server.
MySQL Installer can also check for updated components and download them automatically, should you choose to allow it to do so. The Installer has its own Start Menu item so that you can access it more easily.
To install MySQL Installer, open the application, and click Execute or Next when prompted.
After the installer itself has been installed and started, the following screen is displayed:

System Administrative Manual (AM) Version 1.0
AM_IOC2_S12_T11_V1.0 5 Version Date: 04/09/12
Figure 1. MySQL Installer - Welcome Screen
There are three main options:
1. Install MySQL Products - The Installation Wizard. 2. About MySQL - Learn about MySQL products and features. 3. Resources - Information to help install and configure MySQL.
When you click "Install MySQL Products," the Installer will find and install MySQL. But first, you'll need to accept the license agreement before proceeding. The license agreement is only displayed the initial time that MySQL Installer is executed:

System Administrative Manual (AM) Version 1.0
AM_IOC2_S12_T11_V1.0 6 Version Date: 04/09/12
Figure 2. MySQL Installer - License Agreement
If you are connected to the internet, then the program will search for the latest MySQL components, and add them to the installation bundle, ensuring the best functionality. Click Connect to the Internet to complete this step, or if you'd rather not, check the Skip checkbox and continue.
Figure 3 MySQL Installer - Find latest products

System Administrative Manual (AM) Version 1.0
AM_IOC2_S12_T11_V1.0 7 Version Date: 04/09/12
If you chose "Connect to the Internet," the next page will show the progress of MySQL Installer's search for available updates. When the search is complete (or if you opted to skip the search), you will be taken to the Choose Setup Type page:
Figure 4. MySQL Installer - Choose Setup Type
Each type contains a description, so read the Setup Type Description to determine which option will be most compatible with your preferences.
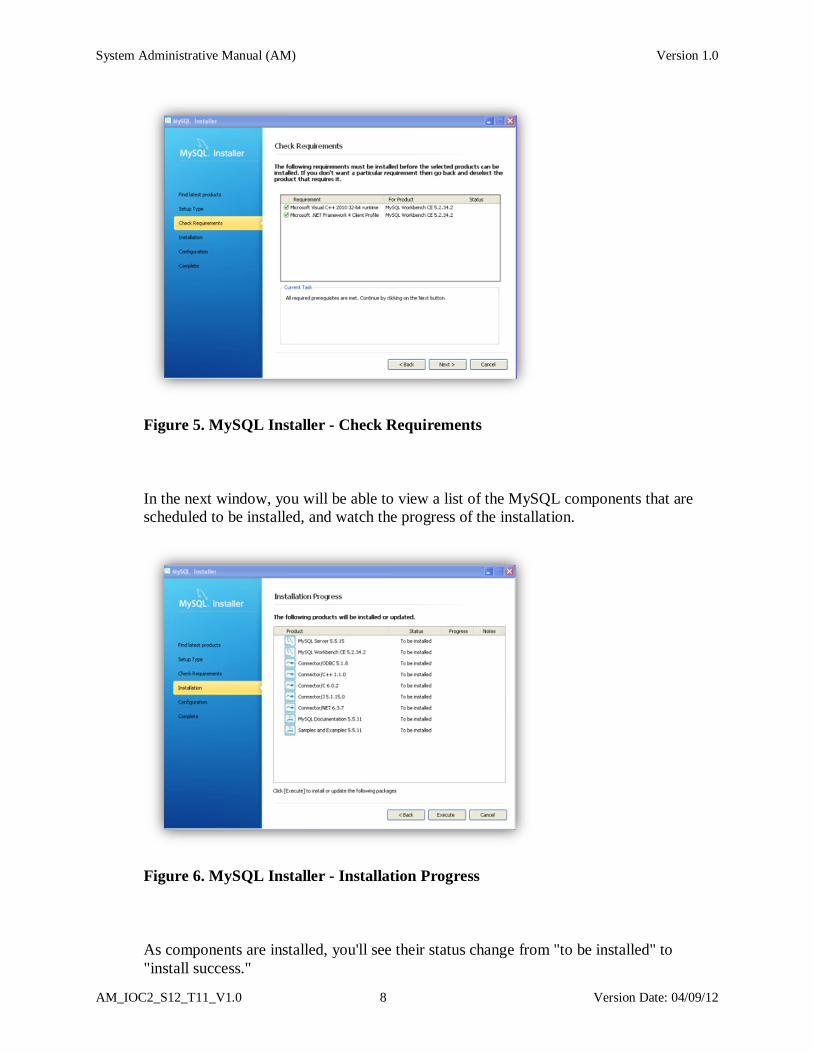
The Installation and Data paths are also defined here, and a caution flag will notify you if the data path you are trying to establish already exists.
Once you select a setup type, the MySQL Installer will check your system for the necessary external requirements, and download and install any missing pieces onto your system.
System Administrative Manual (AM) Version 1.0
AM_IOC2_S12_T11_V1.0 8 Version Date: 04/09/12
Figure 5. MySQL Installer - Check Requirements
In the next window, you will be able to view a list of the MySQL components that are scheduled to be installed, and watch the progress of the installation.
Figure 6. MySQL Installer - Installation Progress
As components are installed, you'll see their status change from "to be installed" to "install success."

System Administrative Manual (AM) Version 1.0
AM_IOC2_S12_T11_V1.0 9 Version Date: 04/09/12
Figure 7. MySQL Installer - Installation Progress status
Once all components are installed, the next step is configuration. You can watch the progress of this step in the Configuration Overview window:
Figure 8. MySQL Installer - Configuration Overview
The ideal MySQL Server configuration depends on your intended use, as explained in the next window. Choose the description that most closely applies to your machine:

System Administrative Manual (AM) Version 1.0
AM_IOC2_S12_T11_V1.0 10 Version Date: 04/09/12
Figure 9. MySQL Installer - MySQL Server Configuration: Choose a platform
Next, choose your basic Network, Windows, and Security Settings:

System Administrative Manual (AM) Version 1.0
AM_IOC2_S12_T11_V1.0 11 Version Date: 04/09/12
Figure 10. MySQL Installer - MySQL Server Configuration: Basic settings
When the MySQL Installer configuration is complete, you can save the log and by default, the "Start MySQL Workbench after Setup" option is checked:

System Administrative Manual (AM) Version 1.0
AM_IOC2_S12_T11_V1.0 12 Version Date: 04/09/12
Figure 11. MySQL Installer - Installation Complete
You can now open MySQL Installer from the Microsoft Windows Start menu, which will pull up the MySQL Installer Maintenance Screen. This will be used to add, update, and remove features.
Figure 12. MySQL Installer - Maintenance Screen

System Administrative Manual (AM) Version 1.0
AM_IOC2_S12_T11_V1.0 13 Version Date: 04/09/12
2.2 Re-installation If there are any corrupt files or errors encountered, de-installation steps mentioned in the Section 2.3 should be followed first and then the software should be installed from the start as explained
2.3 De-installation
2.3.1 Remove/Uninstall TimeTrex Standard Edition On Site: Click Start menu - go to Control Panel - double-click Add or Remove Programs. Highlight the program and select uninstall to remove it as shown in the figure below.
Click yes and confirm

System Administrative Manual (AM) Version 1.0
AM_IOC2_S12_T11_V1.0 14 Version Date: 04/09/12
To completely remove and uninstall TimeTrex Time and Attendance 2.2.20-1013 from your computer and totally eliminate any uninstall errors and other hassle along the way, you still need to delete the related registry entries and unneeded folders from your system.
Go to registry editor to get rid of its registry keys and values:
(HKEY_CURRENT_USER\Software\)
(HKEY_LOCAL_MACHINE\Software\)
(HKEY_LOCAL_MACHINE\Software\Microsoft\Windows\CurrentVersion\Run\eg ui)
Click on the START menu again and get in the Control Panel and then Folder Options then View and choose Show Hidden Files and Folders, delete the following folders:
C:\Program Files\
(C:\Document and Settings\All Users\Application Data\)
(C:\Documents and Settings\%USER%\Application Data\)
2.3.2 Removal For Inventory Management System: In order to completely remove the Inventory Management Software, make sure all the folders which include forms, images, library files and templates are deleted manually. Also, the php and sql files should be removed completely from the Inventory software folder. Since, the folder includes files only; it should be deleted and then copied again at the same location in order to see the proper functioning of the Inventory Management system.
2.3.3 Uninstalling MySQL 5.5 To uninstall a MySQL where you have used the MSI packages, you must use the Add/Remove Programs tool within Control Panel. To do this:
1. Right-click the start menu and choose Control Panel. 2. If the Control Panel is set to category mode (you will see Pick a category at the top of the
Control Panel window), double-click Add or Remove Programs. If the Control is set to classic mode, double-click the Add or Remove Programs icon.
3. Find MySQL in the list of installed software. MySQL Server is installed against major version numbers (MySQL 5.1, MySQL 5.5, etc.). Select the version that you want to remove and click Remove.
4. You will be prompted to confirm the removal. Click Yes to remove MySQL.
System Administrative Manual (AM) Version 1.0
AM_IOC2_S12_T11_V1.0 15 Version Date: 04/09/12
When MySQL is removed using this method, only the installed components are removed. Any database information (including the tables and data), import or export files, log files, and binary logs produced during execution are kept in their configured location.
If you try to install MySQL again the information will be retained and you will be prompted to enter the password configured with the original installation.
If you want to delete MySQL completely:
Delete the associated data directory. On Windows XP and Windows Server 2003, the default data directory is the configured AppData directory, which is C:\Documents and Settings\All Users\Application Data\MySQL by default.
On Windows 7 and Windows Server 2008, the default data directory location is C:\ProgramData\Mysql.
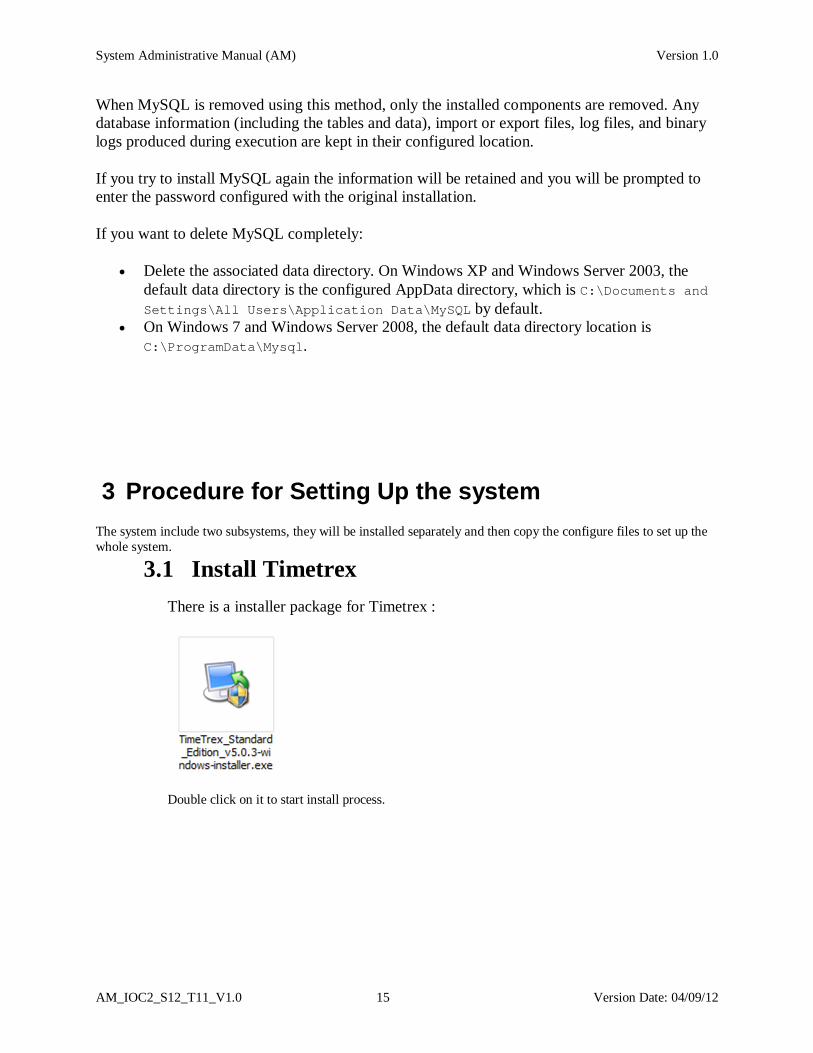
3 Procedure for Setting Up the system The system include two subsystems, they will be installed separately and then copy the configure files to set up the whole system.
3.1 Install Timetrex There is a installer package for Timetrex :
Double click on it to start install process.

System Administrative Manual (AM) Version 1.0
AM_IOC2_S12_T11_V1.0 16 Version Date: 04/09/12
Click next.
Choose accept then click on next.

System Administrative Manual (AM) Version 1.0
AM_IOC2_S12_T11_V1.0 17 Version Date: 04/09/12
Set the directory folder of Timetrex, and then click on next.
Click next.

System Administrative Manual (AM) Version 1.0
AM_IOC2_S12_T11_V1.0 18 Version Date: 04/09/12
Choose a port number which haven’t been used on your hardware, then click next, until the program start copy files. After the installation process is over, copy the configuration file under the direction where Timetrex is installed. Copy “UserList.php” and “EditUser.php” to X:\TimeTrex\timetrex\interface\users then the Timetrex subsystem is finish installation.
3.2 Inventory Management system The following steps must be followed in order to set up the files for the Inventory Management Software:
A. Get the inventory management software folder.
B. Find apache server document root, default direction is : Folder where Apache installed\Apache
Software Foundation\Apache2.2\htdocs
C. Copy the inventory software folder under document root.
D. Configure inventory system database as following:
System Administrative Manual (AM) Version 1.0
AM_IOC2_S12_T11_V1.0 19 Version Date: 04/09/12
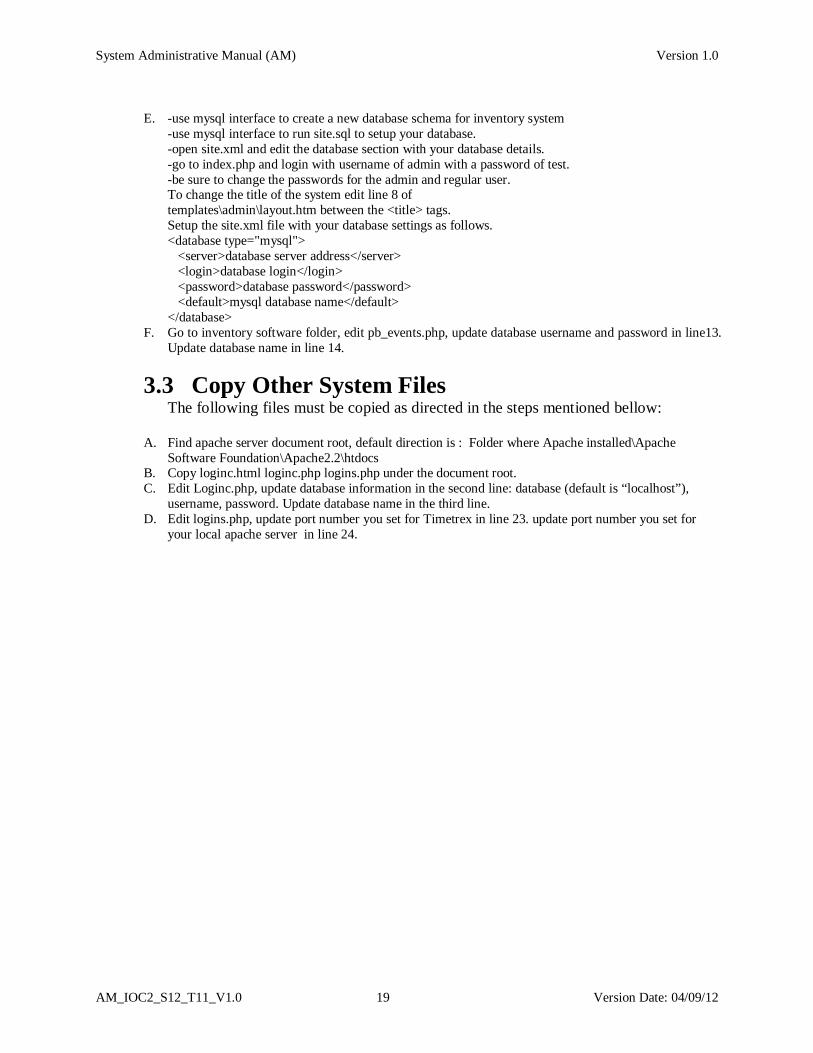
E. -use mysql interface to create a new database schema for inventory system
-use mysql interface to run site.sql to setup your database. -open site.xml and edit the database section with your database details. -go to index.php and login with username of admin with a password of test. -be sure to change the passwords for the admin and regular user. To change the title of the system edit line 8 of templates\admin\layout.htm between the <title> tags. Setup the site.xml file with your database settings as follows. <database type="mysql"> <server>database server address</server> <login>database login</login> <password>database password</password> <default>mysql database name</default> </database>
F. Go to inventory software folder, edit pb_events.php, update database username and password in line13. Update database name in line 14.
3.3 Copy Other System Files The following files must be copied as directed in the steps mentioned bellow:
A. Find apache server document root, default direction is : Folder where Apache installed\Apache Software Foundation\Apache2.2\htdocs
B. Copy loginc.html loginc.php logins.php under the document root. C. Edit Loginc.php, update database information in the second line: database (default is “localhost”),
username, password. Update database name in the third line. D. Edit logins.php, update port number you set for Timetrex in line 23. update port number you set for
your local apache server in line 24.

System Administrative Manual (AM) Version 1.0
AM_IOC2_S12_T11_V1.0 20 Version Date: 04/09/12
Notes:
4Troubleshooting
4.1Frequently Asked questions (FAQ’s) For (FAQ’s) regarding Timetrex System please refer to the following URL: http://forums.timetrex.com/faq.php
4.2 Error Codes and Messages and Troubleshooting The below mentioned error is the most common error encountered as far as MySQL is concerned:
Error: If the MySQL server cannot find the mysql privileges database or other critical files, you may see these messages: System error 1067 has occurred. Fatal error: Can't open privilege tables: Table 'mysql.host' doesn't exist Explanation: These messages often occur when the MySQL base or data directories are installed in different locations than the default locations (C:\Program Files\MySQL\MySQL Server 5.5 and C:\Program Files\MySQL\MySQL Server 5.5\data, respectively).
This situation may occur when MySQL is upgraded and installed to a new location, but the configuration file is not updated to reflect the new location. In addition, there may be old and new configuration files that conflict. Be sure to delete or rename any old configuration files when upgrading MySQL.
If you have installed MySQL to a directory other than C:\Program Files\MySQL\MySQL Server 5.5, you need to ensure that the MySQL server is aware of this through the use of a configuration (my.ini) file. The my.ini file needs to be located in your Windows directory, typically C:\WINDOWS. You can determine its exact location from the value of the WINDIR environment variable by issuing the following command from the command prompt:
C:\> echo %WINDIR%

System Administrative Manual (AM) Version 1.0
AM_IOC2_S12_T11_V1.0 21 Version Date: 04/09/12
An option file can be created and modified with any text editor, such as Notepad. For example, if MySQL is installed in E:\mysql and the data directory is D:\MySQLdata, you can create the option file and set up a [mysqld] section to specify values for the basedir and datadir options:
[mysqld] # set basedir to your installation path basedir=E:/mysql # set datadir to the location of your data directory datadir=D:/MySQLdata
Note that Windows path names are specified in option files using (forward) slashes rather than backslashes. If you do use backslashes, double them:
[mysqld] # set basedir to your installation path basedir=C:\\Program Files\\MySQL\\MySQL Server 5.5 # set datadir to the location of your data directory datadir=D:\\MySQLdata
If you change the datadir value in your MySQL configuration file, you must move the contents of the existing MySQL data directory before restarting the MySQL server.
If you reinstall or upgrade MySQL without first stopping and removing the existing MySQL service and install MySQL using the MySQL Configuration Wizard, you may see this error:
Error: Cannot create Windows service for MySql. Error: 0
This occurs when the Configuration Wizard tries to install the service and finds an existing service with the same name.
One solution to this problem is to choose a service name other than mysql when using the configuration wizard. This enables the new service to be installed correctly, but leaves the outdated service in place. Although this is harmless, it is best to remove old services that are no longer in use.
To permanently remove the old mysql service, execute the following command as a user with administrative privileges, on the command-line:
C:\> sc delete mysql [SC] DeleteService SUCCESS
If the sc utility is not available for your version of Windows, download the delsrv utility from http://www.microsoft.com/windows2000/techinfo/reskit/tools/existing/delsrv-o.asp and use the delsrv mysql syntax.

System Administrative Manual (AM) Version 1.0
AM_IOC2_S12_T11_V1.0 22 Version Date: 04/09/12
4.3Note 1) MySQL Installer and the "Complete Package" methods for installing MySQL are similar, but different. The MySQL Installer is the newer and more advanced option, and it includes all functionality found within the "Complete Package." 2) The Current Root Password, seen in the figure 10 above, is only required if existing data files were found. 3) If MySQL Installer is used on a machine with older products installed, an Update Screen is shown in Figure 12 instead of the Maintenance Screen. However, the functionality remains the same.