synology rack station - download center · synology rack station rs-406 15-060100060 quick...
TRANSCRIPT

Synology Rack Station
RS-406
15-060100060
Quick Installation Guide
Schnell-Installationsanleitung
Guide d’installation rapide
Guida di installazione rapida
Guía de instalación rápida
�
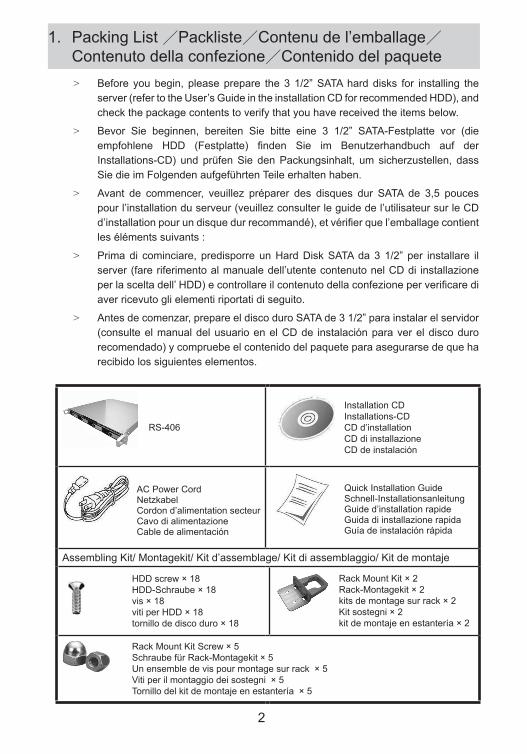
Packing List /Packliste/Contenu de l’emballage/ Contenuto della confezione/Contenido del paquete
1.
Before you begin, please prepare the 3 1/�” SATA hard disks for installing the server (refer to the User’s Guide in the installation CD for recommended HDD), and check the package contents to verify that you have received the items below.
Bevor Sie beginnen, bereiten Sie bitte eine 3 1/�” SATA-Festplatte vor (die empfohlene HDD (Festplatte) finden Sie im Benutzerhandbuch auf der Installations-CD) und prüfen Sie den Packungsinhalt, um sicherzustellen, dass Sie die im Folgenden aufgeführten Teile erhalten haben.
Avant de commencer, veuillez préparer des disques dur SATA de 3,5 pouces pour l’installation du serveur (veuillez consulter le guide de l’utilisateur sur le CD d’installation pour un disque dur recommandé), et vérifier que l’emballage contient les éléments suivants :
Prima di cominciare, predisporre un Hard Disk SATA da 3 1/�” per installare il server (fare riferimento al manuale dell’utente contenuto nel CD di installazione per la scelta dell’ HDD) e controllare il contenuto della confezione per verificare di aver ricevuto gli elementi riportati di seguito.
Antes de comenzar, prepare el disco duro SATA de 3 1/�” para instalar el servidor (consulte el manual del usuario en el CD de instalación para ver el disco duro recomendado) y compruebe el contenido del paquete para asegurarse de que ha recibido los siguientes elementos.
>
>
>
>
>
Assembling Kit/ Montagekit/ Kit d’assemblage/ Kit di assemblaggio/ Kit de montaje
RS-406
Rack Mount Kit Screw × 5 Schraube für Rack-Montagekit × 5Un ensemble de vis pour montage sur rack × 5Viti per il montaggio dei sostegni × 5Tornillo del kit de montaje en estantería × 5
Rack Mount Kit × �Rack-Montagekit × �kits de montage sur rack × �Kit sostegni × �kit de montaje en estantería × �
Installation CDInstallations-CDCD d’installationCD di installazioneCD de instalación
AC Power CordNetzkabelCordon d’alimentation secteurCavo di alimentazioneCable de alimentación
Quick Installation GuideSchnell-InstallationsanleitungGuide d’installation rapideGuida di installazione rapidaGuía de instalación rápida
HDD screw × 18HDD-Schraube × 18vis × 18viti per HDD × 18tornillo de disco duro × 18
3
NoteIt is recommended that you install hard disks with the same size to make the best use of hard disk capacity.
After you go through all the setup steps of the first time installation, system will reboot. While booting, system will choose a volume type for you according to the amount of hard disks you installed, and create a volume automatically. Refer to the User’s Guide in the installation CD for details.
>
>
ObservaciónIt is recommended that you install hard disks with the same size to make the best use of hard disk capacity.
After you go through all the setup steps of the first time installation, system will reboot. While booting, system will choose a volume type for you according to the amount of hard disks you installed, and create a volume automatically. Refer to the User’s Guide in the installation CD for details.
>
>
NotaSi raccomanda di installare hard disk delle stesse dimensioni per un utilizzo ottimale della loro capacità.
Dopo aver compiuto tutti i passaggi relativi alla prima installazione, il sistema si riavvierà. Durante il riavvio, il sistema sceglierà per voi un tipo di volume in relazione agli hard disk installati e creerà un volume automaticamente. Fare riferimento al manuale utente nel CD di installazione per maggiori dettagli.
>
>
RemarqueIl est recommandé d’utiliser des disques durs de la même capacité pour maximiser l’utilisation de cette capacité.
Lorsque vous avez terminé la première installation, le système redémarrera. Au démarrage, le système choisira un type de volume en fonction du nombre de disques installés et créera un volume automatiquement. Veuillez consulter le guide de l’utilisateur sur le CD d’installation pour de plus amples informations.
>
>
HinweisEs wird empfohlen, Festplatten der gleichen Größe zu installieren, um die Kapazität der Festplatten optimal auszunutzen.
Wenn Sie alle Schritte der Erstinstallation ausgeführt haben, führt das System einen Neustart durch. Während des Boot-Vorgangs wird anhand der installierten Anzahl an Volumes ein Volume-Typ gewählt, und das Volume wird automatisch erstellt. Nähere Einzelheiten finden Sie im Benutzerhandbuch auf der Installations-CD.
>
>

4
2
1
Install HDD/Festplatte installieren/Installation du disque dur/Installazione dell’HDD/Instalación del disco duro
�.
Pull the clip in the direction as indicated below to remove the hard disk tray.Die Klammer wie unten gezeigt öffnen und das Festplattenfach entfernen.Tirez le clip dans la direction indiquée ci-dessous pour enlever le tiroir du disque dur.Tirare la clip nella direzione indicata sotto per rimuovere il cassetto dell’hard disk.Tire de la pinza en la dirección que se indica a continuación para extraer la bandeja del disco duro.
>
>
>
>
>
Push the release button in the direction as indicated below.Die Verriegelungstaste in die gezeigte Richtung schieben.Appuyez sur le bouton de désengagement comme indiqué ci-dessous.Spingere il tasto di rilascio nella direzione indicata sotto.Pulse el botón de desbloqueo en la dirección que se indica a continuación.
>>>
>>

5
Replace the hard disk tray to the case.Das Festplattenfach wieder in das Gehäuse einsetzen.Replacez le tiroir dans le boîtier.Riporre il cassetto dell’hard disk nel case.Vuelva a colocar la bandeja del disco duro en la carcasa.
>>>>>
3
4
Attach the prepared SATA hard disk to the hard disk tray and use 4 screws to fix the hard disk. Refer to the picture below for the screw position.Die vorbereitete SATA-Festplatte in das Festplattenfach einsetzen und mit 4 Schrauben festschrauben. Die Anordnung der Schrauben ist unten gezeigt.Attachez le disque dur SATA préparé au tiroir à l’aide de 4 vis. L’image ci-dessous indique l’emplacement des vis.Mettere l’hard disk SATA nel cassetto e fissare l’hard disk mediante 4 viti. Fare riferimento all’immagine sotto per individuare la posizione delle viti.Fije el disco duro SATA preparado a la bandeja del disco duro mediante 4 tornillos. Consulte en la siguiente imagen las posiciones de los tornillos.
>
>
>
>
>
6
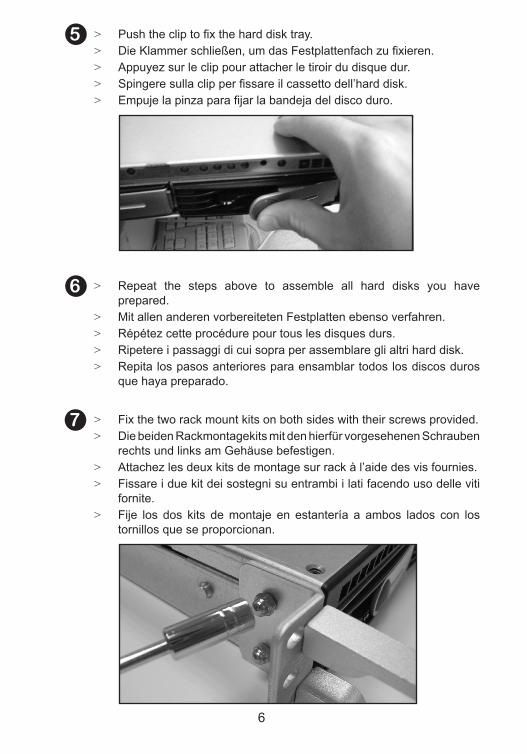
Fix the two rack mount kits on both sides with their screws provided.Die beiden Rackmontagekits mit den hierfür vorgesehenen Schrauben rechts und links am Gehäuse befestigen.Attachez les deux kits de montage sur rack à l’aide des vis fournies.Fissare i due kit dei sostegni su entrambi i lati facendo uso delle viti fornite.Fije los dos kits de montaje en estantería a ambos lados con los tornillos que se proporcionan.
>>
>>
>
5
6 Repeat the steps above to assemble all hard disks you have prepared.Mit allen anderen vorbereiteten Festplatten ebenso verfahren.Répétez cette procédure pour tous les disques durs.Ripetere i passaggi di cui sopra per assemblare gli altri hard disk.Repita los pasos anteriores para ensamblar todos los discos duros que haya preparado.
>
>>>>
7
Push the clip to fix the hard disk tray.Die Klammer schließen, um das Festplattenfach zu fixieren.Appuyez sur le clip pour attacher le tiroir du disque dur.Spingere sulla clip per fissare il cassetto dell’hard disk.Empuje la pinza para fijar la bandeja del disco duro.
>>>>>
�
1
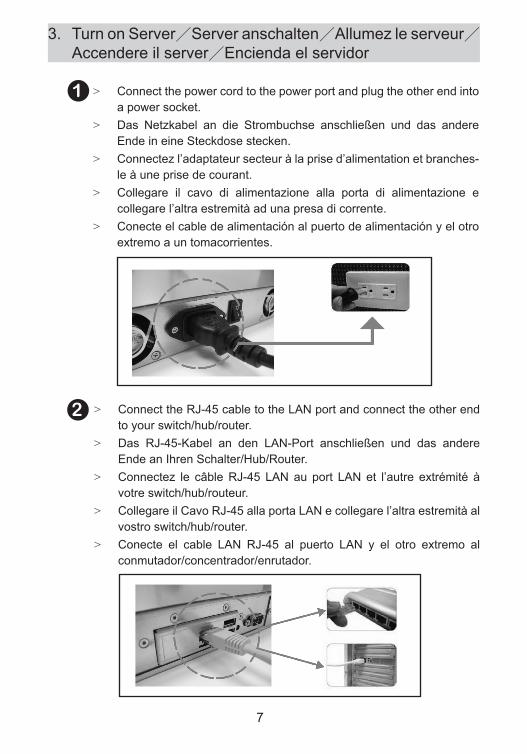
Connect the RJ-45 cable to the LAN port and connect the other end to your switch/hub/router.Das RJ-45-Kabel an den LAN-Port anschließen und das andere Ende an Ihren Schalter/Hub/Router.Connectez le câble RJ-45 LAN au port LAN et l’autre extrémité à votre switch/hub/routeur.Collegare il Cavo RJ-45 alla porta LAN e collegare l’altra estremità al vostro switch/hub/router.Conecte el cable LAN RJ-45 al puerto LAN y el otro extremo al conmutador/concentrador/enrutador.
>
>
>
>
>
2
Turn on Server/Server anschalten/Allumez le serveur/Accendere il server/Encienda el servidor
3.
Connect the power cord to the power port and plug the other end into a power socket.Das Netzkabel an die Strombuchse anschließen und das andere Ende in eine Steckdose stecken.Connectez l’adaptateur secteur à la prise d’alimentation et branches-le à une prise de courant.Collegare il cavo di alimentazione alla porta di alimentazione e collegare l’altra estremità ad una presa di corrente.Conecte el cable de alimentación al puerto de alimentación y el otro extremo a un tomacorrientes.
>
>
>
>
>
8
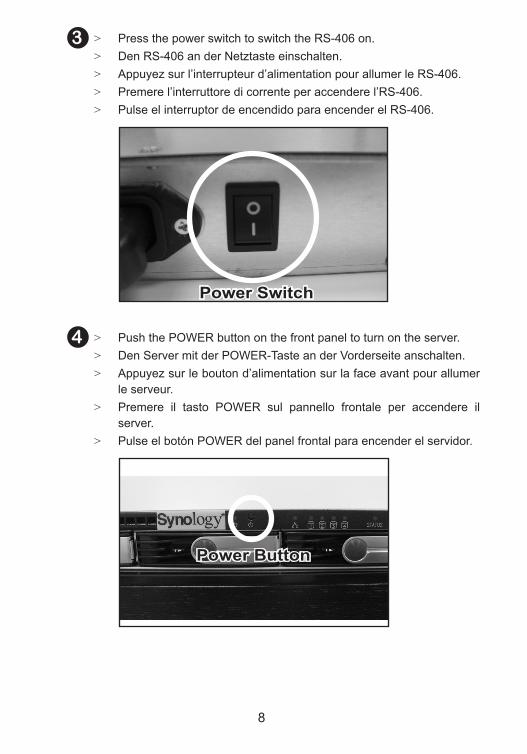
Press the power switch to switch the RS-406 on.Den RS-406 an der Netztaste einschalten.Appuyez sur l’interrupteur d’alimentation pour allumer le RS-406.Premere l’interruttore di corrente per accendere l’RS-406.Pulse el interruptor de encendido para encender el RS-406.
>>>>>
3
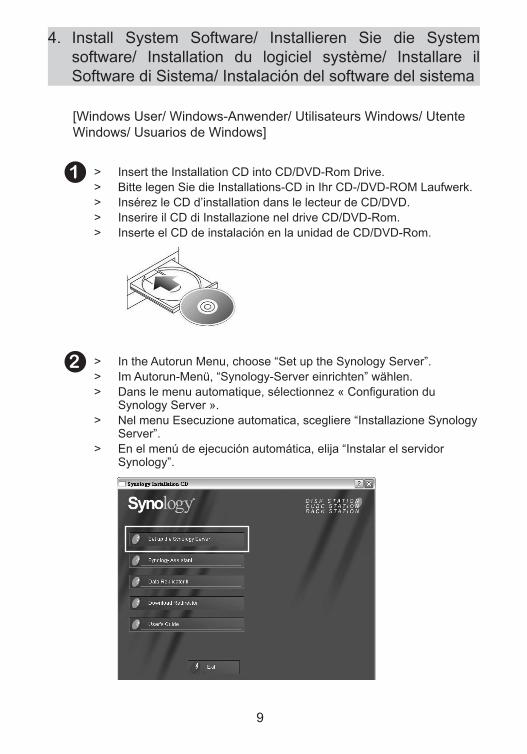
Push the POWER button on the front panel to turn on the server.Den Server mit der POWER-Taste an der Vorderseite anschalten.Appuyez sur le bouton d’alimentation sur la face avant pour allumer le serveur.Premere il tasto POWER sul pannello frontale per accendere il server.Pulse el botón POWER del panel frontal para encender el servidor.
>>>
>
>
4
Power Switch
Power Button
�
1
2
Install System Software/ Installieren Sie die System software/ Installation du logiciel système/ Installare il Software di Sistema/ Instalación del software del sistema
4.
[Windows User/ Windows-Anwender/ Utilisateurs Windows/ Utente Windows/ Usuarios de Windows]
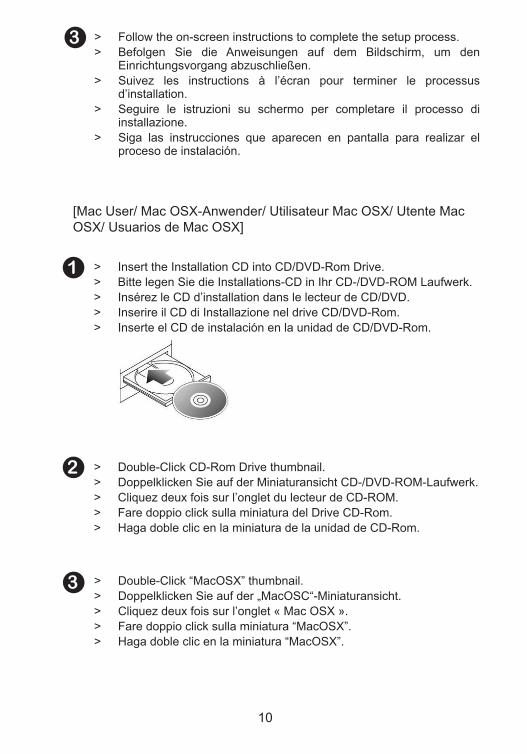
Insert the Installation CD into CD/DVD-Rom Drive.Bitte legen Sie die Installations-CD in Ihr CD-/DVD-ROM Laufwerk.Insérez le CD d’installation dans le lecteur de CD/DVD.Inserire il CD di Installazione nel drive CD/DVD-Rom.Inserte el CD de instalación en la unidad de CD/DVD-Rom.
>>>>>
In the Autorun Menu, choose “Set up the Synology Server”.Im Autorun-Menü, “Synology-Server einrichten” wählen.Dans le menu automatique, sélectionnez « Configuration du Synology Server ».Nel menu Esecuzione automatica, scegliere “Installazione Synology Server”.En el menú de ejecución automática, elija “Instalar el servidor Synology”.
>>>
>
>
10
3 Follow the on-screen instructions to complete the setup process.Befolgen Sie die Anweisungen auf dem Bildschirm, um den Einrichtungsvorgang abzuschließen.Suivez les instructions à l’écran pour terminer le processus d’installation.Seguire le istruzioni su schermo per completare il processo di installazione.Siga las instrucciones que aparecen en pantalla para realizar el proceso de instalación.
>>
>
>
>
1
2
Insert the Installation CD into CD/DVD-Rom Drive.Bitte legen Sie die Installations-CD in Ihr CD-/DVD-ROM Laufwerk.Insérez le CD d’installation dans le lecteur de CD/DVD.Inserire il CD di Installazione nel drive CD/DVD-Rom.Inserte el CD de instalación en la unidad de CD/DVD-Rom.
>>>>>
Double-Click CD-Rom Drive thumbnail.Doppelklicken Sie auf der Miniaturansicht CD-/DVD-ROM-Laufwerk.Cliquez deux fois sur l’onglet du lecteur de CD-ROM.Fare doppio click sulla miniatura del Drive CD-Rom.Haga doble clic en la miniatura de la unidad de CD-Rom.
>>>>>
[Mac User/ Mac OSX-Anwender/ Utilisateur Mac OSX/ Utente Mac OSX/ Usuarios de Mac OSX]
3 Double-Click “MacOSX” thumbnail.Doppelklicken Sie auf der „MacOSC“-Miniaturansicht.Cliquez deux fois sur l’onglet « Mac OSX ».Fare doppio click sulla miniatura “MacOSX”.Haga doble clic en la miniatura “MacOSX”.
>>>>>
11
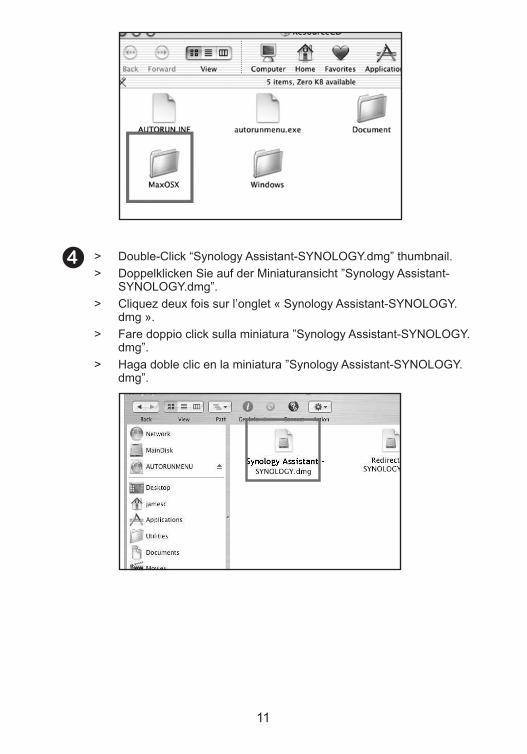
4 Double-Click “Synology Assistant-SYNOLOGY.dmg” thumbnail.Doppelklicken Sie auf der Miniaturansicht ”Synology Assistant-SYNOLOGY.dmg”.Cliquez deux fois sur l’onglet « Synology Assistant-SYNOLOGY.dmg ».Fare doppio click sulla miniatura ”Synology Assistant-SYNOLOGY.dmg”.Haga doble clic en la miniatura ”Synology Assistant-SYNOLOGY.dmg”.
>>
>
>
>
1�
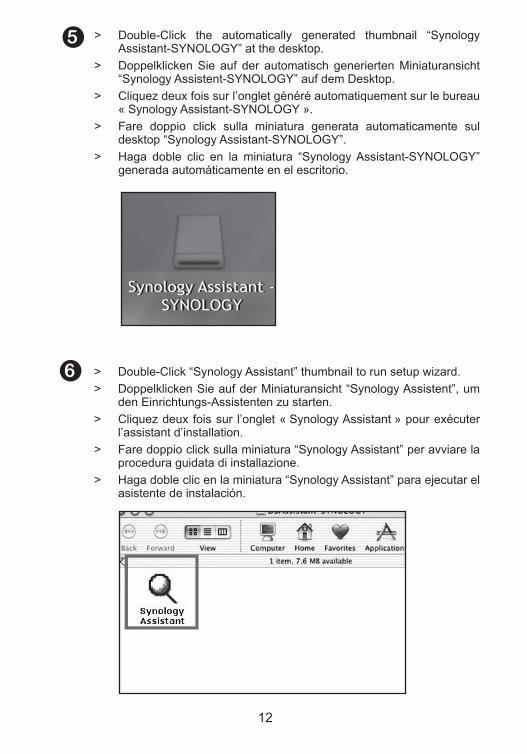
5 Double-Click the automatically generated thumbnail “Synology Assistant-SYNOLOGY” at the desktop.Doppelklicken Sie auf der automatisch generierten Miniaturansicht “Synology Assistent-SYNOLOGY” auf dem Desktop.Cliquez deux fois sur l’onglet généré automatiquement sur le bureau « Synology Assistant-SYNOLOGY ».Fare doppio click sulla miniatura generata automaticamente sul desktop “Synology Assistant-SYNOLOGY”.Haga doble clic en la miniatura “Synology Assistant-SYNOLOGY” generada automáticamente en el escritorio.
>
>
>
>
>
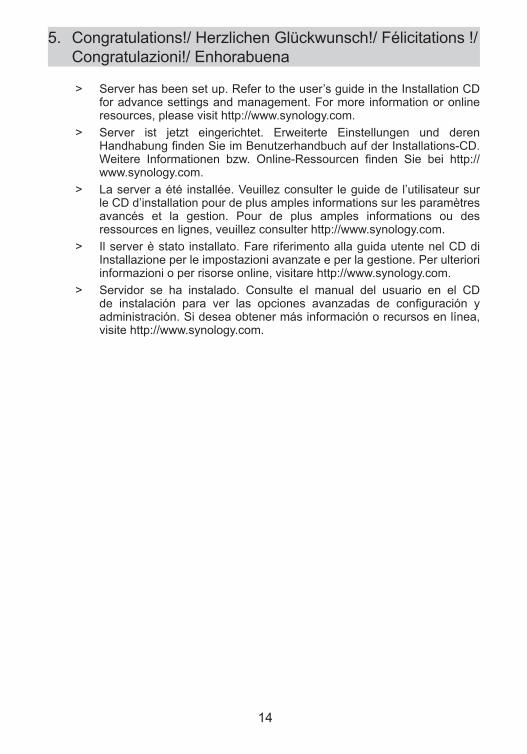
6 Double-Click “Synology Assistant” thumbnail to run setup wizard.Doppelklicken Sie auf der Miniaturansicht “Synology Assistent”, um den Einrichtungs-Assistenten zu starten.Cliquez deux fois sur l’onglet « Synology Assistant » pour exécuter l’assistant d’installation.Fare doppio click sulla miniatura “Synology Assistant” per avviare la procedura guidata di installazione.Haga doble clic en la miniatura “Synology Assistant” para ejecutar el asistente de instalación.
>>
>
>
>

13
7 Follow the on-screen instructions to complete the setup process.Befolgen Sie die Anweisungen auf dem Bildschirm, um den Einrichtungsvorgang abzuschließen.Suivez les instructions à l’écran pour terminer le processus d’installation.Seguire le istruzioni su schermo per completare il processo di installazione.Siga las instrucciones que aparecen en pantalla para realizar el proceso de instalación.
>>
>
>
>
14
Congratulations!/ Herzlichen Glückwunsch!/ Félicitations !/ Congratulazioni!/ Enhorabuena
5.
Server has been set up. Refer to the user’s guide in the Installation CD for advance settings and management. For more information or online resources, please visit http://www.synology.com. Server ist jetzt eingerichtet. Erweiterte Einstellungen und deren Handhabung finden Sie im Benutzerhandbuch auf der Installations-CD. Weitere Informationen bzw. Online-Ressourcen finden Sie bei http://www.synology.com.La server a été installée. Veuillez consulter le guide de l’utilisateur sur le CD d’installation pour de plus amples informations sur les paramètres avancés et la gestion. Pour de plus amples informations ou des ressources en lignes, veuillez consulter http://www.synology.com.Il server è stato installato. Fare riferimento alla guida utente nel CD di Installazione per le impostazioni avanzate e per la gestione. Per ulteriori informazioni o per risorse online, visitare http://www.synology.com.Servidor se ha instalado. Consulte el manual del usuario en el CD de instalación para ver las opciones avanzadas de configuración y administración. Si desea obtener más información o recursos en línea, visite http://www.synology.com.
>
>
>
>
>
15
Copyright © �004-�006 Synology Inc.; All rights reserved. Synology and other names of Synology products are trademarks or registered trademark of Synology Inc.Other products and company names mentioned herein are trademarks of their respective holders.
Copyright © �004-�006 Synology Inc.; Alle Rechte vorbehalten. Synology und Namen anderer Synology-Produkte sind Warenzeichen oder ein-getragene Warenzeichen von Synology Inc. Weitere hier genannte Produkte und Firmennamen sind Warenzeichen der entsprechenden Eigentümer.
Copyright © �004-�006 Synology Inc.; Tous droits réservés. Synology et les autres noms des produits Synology sont des marques com-merciales ou des marques commerciales déposées de Synology ; Inc. Les au-tres noms de produits et de sociétés mentionnés dans ce document sont des marques commerciales de leur propriétaire respectif.
Copyright © �004-�006 Synology Inc. Tutti i diritti riservati. Synology e altri nomi dei prodotti Synology sono marchi o marchi registrati della Synology Inc. Altri prodotti e nomi di aziende qui menzionati possono essere marchi appartenenti ai rispettivi titolari.
Copyright © �004-�006 Synology Inc.; todos los derechos reservados. Synology y otros nombres de productos de Synology son marcas comercia-les o marcas registradas de Synology Inc. Los demás nombres de productos y empresas aquí mencionados son marcas comerciales de sus respectivos propietarios.