synchronize! pro x manual · document a is initially the same as document b. while at work, you...
TRANSCRIPT

User Guide
2501 Skyblue CourtSt. Paul, MN 55110
(651) 779 – 0955http://www.qdea.com
[email protected]@qdea.com
Synchronize! and Qdea are trademarks of Qdea.Macintosh and the Mac OS logo are trademarks of Apple Computer, Inc.

Copyright Notice
Copyright © 2008 Qdea. All rights reserved.
Manual version 6.0Ninth edition.
Warranty
Qdea warrants that any original purchased disk on which this software isreceived is free from defects in material and workmanship, under normal use, for90 days after the date of original purchase. If a defect occurs during the 90-dayperiod, you may return the disk to Qdea for a free replacement.
The remedy for breach of this warranty shall be limited to replacement and shallnot encompass any other damages, including but not limited to loss of profit, andspecial, incidental, or other claims. The software is licensed and delivered on an“as is” basis. Except for the express warranty set forth above, Qdea makes noother warranties, either express or implied, by statute or otherwise, regarding theenclosed computer software product, or its fitness for any particular purpose.
Software License
Each copy of Synchronize! Pro X is licensed for installation on one and onlycomputer. The software license may be transferred from one computer to anotherby first uninstalling from one computer, then installing on another computer.
Installing Synchronize! Pro X on more than one computer requires the purchaseof one copy of Synchronize! Pro X for each computer.

Table of ContentsIntroduction. . . . . . . . . . . . . . . . . . . . . . . . . . . . . . . . . . . . . . . . . . . . . . . . . . . . . . . . . . . . . . . . . . 1
Synchronization vs. Backup..............................................1Copy files over the Internet...............................................1File Synchronization.........................................................1File Server Backup and Mirroring......................................1Selective Backup .............................................................2Keep Old Files.................................................................2File Distribution................................................................2Using Synchronize! Pro X with disks on the desktop...........2Synchronizing remotely with removable disks ....................3
Getting Started . . . . . . . . . . . . . . . . . . . . . . . . . . . . . . . . . . . . . . . . . . . . . . . . . . . . . . . . . . . . . . 4Installation ....................................................................................4
Try an example................................................................4Using Synchronize! Pro X. . . . . . . . . . . . . . . . . . . . . . . . . . . . . . . . . . . . . . . . . . . . . . . . . . 5
The problem....................................................................5The solution.....................................................................5Using Synchronize! Pro X with removable disks.................5Putting Synchronize! Pro X to work ...................................6Using Synchronize! Pro X with a direct connection.............7How Synchronize! Pro X works.........................................7Advanced Features..........................................................8
Making a bootable OS X Backup . . . . . . . . . . . . . . . . . . . . . . . . . . . . . . . . . . . . . . . . . . 10Make sure your Mac knows what time it is.......................................10Erase the backup disk....................................................................10Open Synchronize! Pro X...............................................................11Setting up the backup ....................................................................11Starting up from a bootable backup ................................................12
Six Ways To Use Synchronize! Pro X. . . . . . . . . . . . . . . . . . . . . . . . . . . . . . . . . . . . . 13Tips and Techniques . . . . . . . . . . . . . . . . . . . . . . . . . . . . . . . . . . . . . . . . . . . . . . . . . . . . . . . 15
Using Synchronize! Pro X automatically ............................15Starting syncs with AppleScript.........................................15Keeping old files in an archive ..........................................16Synchronizing with removable disks..................................17
Synchronize! Pro X Reference . . . . . . . . . . . . . . . . . . . . . . . . . . . . . . . . . . . . . . . . . . . . 18Synchronize! Pro X Windows .........................................................18
Document Windows.........................................................18Status Window ................................................................24Waiting List Window.........................................................25Auto Syncs Window.........................................................26Log Window ....................................................................27
Synchronize! Pro X Menus.............................................................28Synchronize! Pro X Menu.................................................28File Menu........................................................................40Edit Menu........................................................................41Options Menu..................................................................41Windows menu................................................................80

Table of Contents (continued)
Requirements . . . . . . . . . . . . . . . . . . . . . . . . . . . . . . . . . . . . . . . . . . . . . . . . . . . . . . . . . . . . . . . 81Feedback. . . . . . . . . . . . . . . . . . . . . . . . . . . . . . . . . . . . . . . . . . . . . . . . . . . . . . . . . . . . . . . . . . . . . 82Technical Support . . . . . . . . . . . . . . . . . . . . . . . . . . . . . . . . . . . . . . . . . . . . . . . . . . . . . . . . . . 82Upgrades. . . . . . . . . . . . . . . . . . . . . . . . . . . . . . . . . . . . . . . . . . . . . . . . . . . . . . . . . . . . . . . . . . . . . 82Index. . . . . . . . . . . . . . . . . . . . . . . . . . . . . . . . . . . . . . . . . . . . . . . . . . . . . . . . . . . . . . . . . . . . . . . . . . 83

Introduction 1
Introduction
Synchronize! Pro X is an enhanced version of Synchronize! X Plus. In addition tothe many features in Synchronize! X Plus, Qdea’s personal file synchronizationsoftware, it supports a number of advanced functions, including resolving aliasesand more flexible ways to include or exclude files and folders.
Synchronization vs. Backup
A “Synchronization” compares two files and copies the newer file to replace theolder file, while a “Backup” always copies files in one direction. In general, it’sbest to use a “Backup” if you want to make the destination look like the source,because there’s less room for error and a “Backup” takes less computerresources.
Synchronize! Pro X always copies only the files that have changed – there is nodifference in this respect between a “Synchronization” and a “Backup”. Becauseof this, updating a synchronization or a backup is as simple as running it again.
Copy files over the Internet
Synchronize! Pro X works with Mac OS X to copy files over the Internet.Synchronize! Pro X can compare and copy files on any disk which appears on theOS X desktop. Mac OS X can connect to AppleShare, File Sharing, NFS and SMB(Windows) servers.
File Synchronization
Synchronize! Pro X solves the problem of changing your documents on morethan one computer.
You’re familiar with the problem: you have a Mac at work and a PowerBook or aMac home, and you have some changes that you need to make in a few of yourdocuments. So you copy them onto your PowerBook or a removable disk, takethem with you, and change them. When you’re done with the changes, youreplace the older documents on your Mac at work with the newer ones.
Synchronize! Pro X automates the process of keeping the most recent version ofany number of documents on multiple Macs that you use, so that you don’t haveto worry about it.
Synchronize! Pro X will keep two folders on different Macs synchronized, andalways copy the newest document in a folder to the corresponding folder on aPowerBook, another Mac, or on a disk you take with you.
File Server Backup and Mirroring
Synchronize! Pro X makes backups much more efficient by copying only filesthat have changed. The first backup will still take a while, although it will be

Introduction 2
done as quickly as possible, due to the high-performance architecture ofSynchronize! Pro X. Subsequent backups take much less time, because only filesthat have changed are copied again. This can speed up a backup by 90% or more.
With Synchronize! Pro X, you can keep a second file server as a “hot backup”. Inthe event that the primary file server goes down, the second file server isimmediately available, with all files current as of the last scan.
Scans for differing files can be done as frequently as you desire, limited only bythe length of time required to complete a single scan.
A significant advantage of this approach over hardware-based disk mirroring isthat a failure of software on one server will often cause any disk access due tothat failure to be replicated on both mirror disks; a failure of any component ofthe primary file server which renders the server inaccessible prevents bad datafrom being written to the secondary server.
Selective Backup
Synchronize! Pro X will automatically keep the folders you choose (or your entirehard disk) backed up to a second hard disk, one or more floppy disks, or to a fileserver. If your main hard disk should ever fail, your most important documentsare safely backed up.
Keep Old Files
When files are replaced or deleted, they can be kept in an archive so thatprevious versions of those files are available should you need them. This featureis called “Archive Files” in the Options menu.
File Distribution
Files which need to be delivered to one or more remote sites can be kept up-to-date automatically.
Synchronize! Pro X can automatically connect to a remote server, copy thenewest files to the remote server, log off the server, and disconnect the modem,at a preset time.
Using Synchronize! Pro X with disks on the desktop
Synchronize! Pro X works with any disk that appears on the desktop, whether itis a removable disk, hard disk, or file server volume. The disk might be aPowerBook in “FireWire Target Mode”, an AppleShare file server or a Mac withFile Sharing, an NFS disk, or a WebDAV server.
Once the disk appears on your desktop, choose any two folders for thesynchronization. Once you set it up, Synchronize! Pro X will copy any newer filesbetween two folders on any disk, automatically.

Introduction 3
Synchronizing remotely with removable disks
Macs in two different locations can be synchronized by carrying a removabledisk between them. Firewire disks are well-suited to this purpose because theyare small, portable, and many don’t require external power.
The idea is to synchronize a folder on each Mac with a folder on the removabledisk. Synchronize! Pro X copies only the documents which are newer from thehard disk to the removable disk, so it takes less time.
As you move from one Mac to the other, use Synchronize! Pro X to copy anynewer documents to your portable disk. At the other Mac, use it again to copythose documents to the hard disk.
All you have to do to keep the newest versions of your documents on both Macsis to use Synchronize! Pro X when you leave one Mac, and when you arrive atthe other Mac. Your removable disk is also a backup of your most recent files.

Getting Started 4
Getting Started
Installation
Installing Synchronize! Pro X is done with drag and drop. Drag the“Synchronize! Pro X” folder, which contains the application and supportingdocuments, to your hard disk. The folder may be on a CD or it may be in acompressed archive which can be downloaded from the Qdea web site athttp://www.qdea.com .
You can put Synchronize! Pro X in any location on your hard disk, althoughmany people put it in the Applications folder.
Try an example
The best way to learn about Synchronize! Pro X is to try it out. Here’s a simpleexample:
1. Think of a folder that you’d like to backup or synchronize.2. Open Synchronize! Pro X.3. To set the folders to be synced, click on each folder, navigate to the
folder you want to sync and click Choose.4. Click the Sync… button. Synchronize! Pro X shows the documents
which will be copied.5. Click the Start button. Synchronize! Pro X copies the documents from
one folder to the other.
Note: Just like a word processor or a spreadsheet, Synchronize! Pro Xuses the contents of its setup documents to tell it what to do. In the caseof Synchronize! Pro X, its documents tell it what folders to synchronize,and what options have been set.
If you click the “Sync” button again, Synchronize! Pro X reports that “The twofolders are the same”. This is because Synchronize! Pro X has copied all fileswhich are different to the other folder, making the folders identical. BecauseSynchronize! Pro X copies files only when they are different, it has no more filesto copy.

Using Synchronize! Pro X 5
Using Synchronize! Pro XThis chapter discusses how Synchronize! Pro X works. It describes one waySynchronize! Pro X can work for you.
The problem
The primary purpose of Synchronize! Pro X is to keep the most recent versions ofyour documents on more than one disk.
This is best illustrated by two documents, A and B. For the purposes of thisexample, Document A is on your Mac at work, and Document B is on your Macat home.
Document A is initially the same as Document B. While at work, you make somechanges to Document A. At home, an inspiration hits you, and you make somechanges to Document B.
You put Document B on a floppy disk, intending to update your Mac at work.But wait! If you copy Document B onto your hard disk at work, the changes youmade to Document A will be lost!
Naturally, if you only worked with one document, you’d remember where youmade the last change. But it you hadn’t changed it in a while, it might be hard toremember which location has the most current version of a document.
The solution
Wouldn’t it be nice if there were a way to automatically keep both locations’documents up-to-date, so that any changes are always made to the most recentversion?
That’s what Synchronize! Pro X does for you, automatically.
Using Synchronize! Pro X with removable disks
To let Synchronize! Pro X solve this problem for you, create a folder on your Macat work. Call it “Working Documents”. This folder contains your workingdocuments, which are those documents you’re changing regularly.
Arrange the organization of your files so that your “Working Documents” foldercontains the files you’re working on. The contents of this folder should besmaller than the size of the removable disk.
It’s OK to create as many folders within your “Working Documents” folder asyou need to keep a manageable arrangement. You might have, for example, adifferent folder for each project you work on.

Using Synchronize! Pro X 6
Take out a new disk and label it “Travelling Disk”. This is the disk that you willuse to carry your updated files to your other Mac.
Create a folder on your new disk. Give it a name like “Travelling Documents”,which shows that it contains the files that travel from one Mac to the other.
Set up a Synchronize! Pro X document which identifies the folder on your harddisk and your “Travelling Disk” as “clones*”, or folders which are to be madeidentical.
Check the “Reopen at startup” box in the document. Save it on your hard disk.
* In biology, a clone is an exact biological duplicate. Two people who areclones have the same fingerprint. The idea here is that Synchronize! Pro Xwill always keep these two folders identical, so that when you make achange to a file in one folder, the newer file will replace the file in thecorresponding folder.
At home, create a similar “Working Documents” folder on your hard disk.Create a Synchronize! Pro X document which identifies the “WorkingDocuments” folder on your Mac at home, and the “Travelling Documents” folderon your removable disk. Check the “Reopen at startup” box in the document,and save it on your hard disk at home.
Important! Make sure that the clocks on all Macs on which you use Synchronize! ProX are set accurately!
It’s critical to Synchronize! Pro X’s proper operation that the time of the clock onyour Mac is set correctly, since it is used to stamp the time your files are changed.Use the “Date & Time” Control Panel to check the time of your Mac’s clock. Thetime does not need to be accurate to the second, since you won’t be changingfiles on more than one Mac at a time, but it should be accurate within fiveminutes.
Your setup is complete. Now you’re ready to put Synchronize! Pro X to work.
Putting Synchronize! Pro X to work
Since Synchronize! Pro X compares the files in your “Working Documents”folder with the files in your “Travelling Documents” folder and copies thenewest file to the other folder, run Synchronize! Pro X whenever you makechanges to any of your working documents.
It’s often easiest to run Synchronize! Pro X every day just before you go home, asa routine part of leaving for the day, so that any documents you may havechanged during the day are copied to your “Travelling Disk”.
When you’re ready to use your Mac at home, run Synchronize! Pro X before youstart working. Any documents which have been changed at work are on your

Using Synchronize! Pro X 7
“Travelling Disk”; Synchronize! Pro X copies them to your "WorkingDocuments" folder on your hard disk at home.
When you’re finished making changes at home, run Synchronize! Pro X againbefore you shut down your Mac, and run Synchronize! Pro X at work when youarrive. Synchronize! Pro X copies any documents you changed at home to your“Travelling Disk” and then to your Mac at work.
You’ve completed the cycle, always taking your working documents with you.You didn’t have to compare the dates of your documents and drag the newestones to a removable disk, or copy an entire folder from your Mac to a removabledisk.
Synchronize! Pro X copies the files for you, and since it copies only the newestones, you spend as little time as possible keeping your files with you!
An added benefit of using Synchronize! Pro X is that you also always have abackup of your most recently changes files, which are the ones least likely to bebacked up!
Using Synchronize! Pro X with a direct connection
If you have a way of connecting your Macs together so that the disks of bothMacs appear on your desktop, you can use Synchronize! Pro X without aremovable disk. There are several ways to do this, including using File Sharingand AppleTalk or Apple Remote Access, or using “SCSI Disk Mode” for a directconnection to the hard disk in some PowerBooks.
In this case, you need only one Synchronize! Pro X document. Choose a folder oneach Mac in the document, and save it. Whenever you make changes to yourdocuments, connect your Macs together and use Synchronize! Pro X tosynchronize your files.
If you use File Sharing and/or Apple Remote Access, Synchronize! Pro X canmake the connection to your remote Mac automatically. Please see thedescription of the “Auto-Connect” option in the “Synchronize! Pro X Reference”chapter.
How Synchronize! Pro X works
Synchronize! Pro X works by looking through the two folders identified in aSynchronize! Pro X setup document, creating pairs of files and folders whichcorrespond to each other.

Using Synchronize! Pro X 8
This is a diagram of corresponding folders:
Working Documents
Personal
Proposals
Projects
Traveling Documents
Personal
Proposals
ProjectsCorresponding Folders
Corresponding Folders
Corresponding folders
Each folder pair has the same name, except for the top-level folders, withoutregard to capitalization. Each pair is also nested within the same folders on bothsides; for example, the two “Projects” folders correspond, but neither of themcould correspond with a “Projects” folder within the “Personal” folder.
The files in each folder pair are compared by name, without regard tocapitalization, to find file pairs. Each file pair is compared to determine if theyare the same; if they were last changed at exactly the same time (to the second),they are considered to be identical.
If they are not the same, Synchronize! Pro X copies the newer file to replace theolder file.
Advanced Features
Synchronize! Pro X has a number of advanced features that make it more useful.These features appear under the Options menu.
For example, it is possible to set up synchronization to occur when disks areinserted, when a setup document is opened, at login, or periodically at aparticular time of day.
It is possible to connect to a file server or another Mac with File Sharing,automatically supplying the password even if you aren’t present.
Synchronize! Pro X can recognize when you make changes to two differentversions of a document, warn you, and take appropriate action.
Finally, it’s possible for Synchronize! Pro X to automatically unmount or eject thedisk, completely automating file synchronization. If your Mac has the capability,Synchronize! Pro X can shut down your Mac when it’s done.

Using Synchronize! Pro X 9
With these features, you can automatically synchronize in the middle of the nightwhen you aren’t using your Mac, and when telephone rates are at their lowest.
Or you can synchronize your files at the end of the day by inserting your backupfloppy or removable disk, making a backup of the day’s work while you gohome.
For more information on these features, please see the description of the Optionsmenu in the “Synchronize! Pro X Reference” chapter.

Making a bootable OS X Backup 10
Making a bootable OS X Backup
The following tutorial covers the steps needed to set up Synchronize! Pro X tomake a bootable backup of your OS X system. A bootable backup can be made toa local hard disk such as a FireWire or IDE disk, but not to a file server. Thisprocedure gives you a bootable copy of your system, so that if your main harddisk fails, you start up your computer from the backup disk and continueworking with your computer, just as it was as of the last backup.
Make sure your Mac knows what time it is
Make sure that the clock on your Mac is set correctly!
It’s critical to Synchronize! Pro X’s proper operation that the time on your Mac isset correctly, since it is used to stamp the time your files are changed. Use Dateand Time in the System Preferences to check the time of your Mac’s clock. Thetime does not need to be accurate to the second, but it should be accurate withinfive minutes.
Erase the backup disk
Please note: In order to be bootable, the backup destination must be a disk on the desktop,not a folder on a disk.
The first time you back up your OS X system, the destination disk needs to beerased.
1. Open Disk Utility.2. For Intel Macs, check the “Partition Map Scheme” for your backup disk. This
info is listed at the bottom of the window when the physical disk is selected.It’s important that it is “GUID Partition Method”. If it isn’t, we recommendthat you do this:
2a. Click the Partition tab.2b. Use the “Volume Scheme” popup menu to choose “1 Partition”. (You
can choose more than one partition if you wish.)2c. Click the Options button.2d. Click “GUID Partition Scheme”.2e. Click OK.2f. Click the “Apply” button.
3. Erase the destination disk for the backup using the “Mac OS Extended,Journaled” format.
4. Quit Disk Utility.
You don’t need to erase the disk again, once you’ve done a backup, but only thefirst time you set up the disk to be a bootable system disk.

Making a bootable OS X Backup 11
Open Synchronize! Pro X
Double-click the Synchronize! Pro X application icon to open the application.The icon looks like this:
Synchronize! Pro X application icon
Setting up the backup
Synchronize! Pro X setup documents describe two folders or disks which are tobe synchronized or backed up.
New document window
Note: To set up a system backup, the source and destination disks must be visibleon the desktop.
To set up a setup document for backing up your system, follow these steps:
1. Close any open Untitled window.2. Use the File menu to choose “New”.3. Click on “Bootable System Backup”.4. Click OK.

Making a bootable OS X Backup 12
5. Enter your administrator name and password and click OK.6. Click the icon for “Folder B”. Use the dialog to choose the destination
disk.
Tip: You can also drag the icon for the disk over the folder icon andrelease the mouse.
7. Uncheck the “Show files to copy” box. There is generally no need toshow the list of files to be copied, and this step takes some time. Pleasenote that this causes the backup to proceed without interruption, so it iscritical that you’ve chosen the correct destination.
8. Save the setup document for future use. You may want to check the “Re-open at startup” box. When this box is checked, the backup documentwill be automatically opened when you open Synchronize! Pro X.
Starting manually
Every time you click the “Sync…” button, Synchronize! Pro X checks the contentsof the two disks or folders shown in the document. When it encounters a filewhich is newer than the corresponding file, or which doesn’t have acorresponding file, it marks the newer document to be copied to the other folder.
To manually start the backup, click the “Sync…” button. The Status windowshows files as they are copied.
Any errors will be shown in a dialog and noted in the Log.
Starting up from a bootable backup
One way to start up from a backup disk is to choose the disk using “StartupDisk” in the System Preferences.
Sometimes the computer isn’t running. To start up from any bootable backupdisk, hold the Option key down when starting up the computer. After a period oftime, you’ll see a window which shows you the available disks. Click on the diskyou want to start up from, then click the right arrow.

Six Ways To Use Synchronize! Pro X 13
Six Ways To Use Synchronize! Pro X1. Backup the system disk to another hard disk.
Synchronize! Pro X will backup the contents of any Mac OS X system disk toanother hard disk, including the files’ owners, groups and permissions, such thatthe backup disk is bootable.
If your hard disk fails, the computer can be started up from the backup harddisk, immediately making it available.
To set it up, use the File menu to choose New. Click the “Bootable SystemBackup” button. Click OK. Click the folder icons to set the system disk as theMaster, and the destination as another hard disk.
In order for the backup disk to be bootable, Synchronize! Pro X must be run withthe “Setup type” popup menu set to “Bootable System Backup”.
2. Keep folders on two Macs the same.
This is called “file synchronization”. It is a common use for Synchronize! Pro X.To set up Synchronize! Pro X for file synchronization, use the File menu tochoose New. Click the “Synchronization” button, then click OK. To choose thefolders to be synchronized, click each folder icon.
Remember that more than one folder can be synchronized by using aSynchronize! Pro X setup document for each folder, or by using aliases to otherfolders. When using removable disks for large numbers of files, more than oneremovable disk can be used, as long as each removable disk can contain thecontents of the folder it is synchronized with.
3. Back up your hard disk to a file server or a removable disk.
Synchronize! Pro X will make a backup of all or part of your hard disk to any fileserver that you can see on your Mac OS X desktop. Synchronize! Pro X will alsobackup to a removable disk.
To make an exact backup, use the File menu to choose New. Click the Backupbutton, then click OK. Click the folder icons to set the folder to be backed up, andthe destination folder.
Use Start Options (in the Options menu) to “Start copying when document isopened”. When you’re ready to go home, open the backup document.
As an alternative, use Start Options to set up an automatic backup daily, at aparticular time. Synchronize! Pro X will be automatically opened at theappropriate time to perform the backup.

Six Ways To Use Synchronize! Pro X 14
4. Distribute files to one or more remote Macs or file servers.
This makes document distribution to other sites easy – just start thesynchronization, and the remote disk will be mounted automatically!
Since Synchronize! Pro X copies only the information which has changed, yourRemote Access connection need not be in use any longer than necessary, savingyou money in telephone bills.
Synchronize! Pro X will keep the files and the folder organization at the remotelocations identical to your master site if you: a) check the “Master” box for thefolder at the master site and b) check the “Delete files and folders not in themaster folder” box.
Use “Auto-Connect” in the Options menu to enter the passwords for the fileserver, so that the connection can be made automatically, when you are notpresent.
Check “Unmount disk when complete” in the Completion Options toautomatically disconnect when synchronization is complete.
Finally, to completely automate the activity, set a start time and how often thesynchronization should take place in the Start Options.
5. Move files automatically.
Synchronize! Pro X will automatically move files which are older than a presetnumber of days to a different disk, or a different Mac on the network.
Use this feature to move older files from an expensive disk array, freeing spacefor new files.
To set it up, use the Options menu to check “Move files”. Use “Copy onlyfiles…” in the Options menu to set how old files which are moved must be.
6. Keep multiple Macs running as Web servers up-to-date with the latest content.
Macintosh computers are often employed in a Web site as a RAIC, or RedundantArray of Independent Computers.
A RAIC has several advantages: redundancy, so that the failure of any onemachine doesn't bring down the Web site; the ability to serve very highbandwidths, because each Mac handles part of the load; and low cost.
Synchronize! Pro X is optimized to keep the Web content identical on the manyredundant computers in a RAIC, while the servers are being accessed, so thatchanges can be made transparently during normal server operation.
The army.mil web site and others use Synchronize! Pro X for this purpose.

Tips and Techniques 15
Tips and Techniques
This chapter describes ways to get more out of Synchronize! Pro X, and how tosimplify its day-to-day use.
Using Synchronize! Pro X automatically
Once you’re familiar with the operation of Synchronize! Pro X, you’ll probablywant to use it with a minimum of fuss. The following tips automate the use ofSynchronize! Pro X and its documents, so that it’s a simple part of your normalroutine.
• Put an alias to Synchronize! Pro X in your Favorites folder. Drag yourFavorites folder in the Dock. When you want to synchronize your files, justchoose Synchronize! Pro X from the folder – click and hold until a menuappears, find Synchronize! Pro X, and choose it.
• Use the Options menu to choose “Start Options.” Check the “Startsynchronization when document is opened” box to automatically start asynchronization. Save the setup document (or an alias to it) in your Favoritesfolder, and put your Favorites folder in the Dock, so that choosing the item inthe folder automatically starts the synchronization.
• Check the “Reopen at startup” box. When this box is checked, yourdocument will be automatically opened when Synchronize! Pro X is opened,and you won’t have to find and open the document manually.
• Don’t check the “Show files to copy” box. This eliminates the window thatallows you to examine the files and/or folders to be copied.
• Use the “Auto-Connect” feature. If you synchronize with an AppleShareserver or File Sharing, use the “Auto-Connect” option to enter yourpasswords so that a connection can be made without having to re-enterthem.
Starting syncs with AppleScript
Any sync setup document can be executed with AppleScript.
Here is an example script:
tell application "Synchronize! Pro X"-- Open a synchronization documentopen file "Sync Server"-- If the Start Option "Start synchronization when the-- document is opened" is checked,-- the synchronization will be automatically started.

Tips and Techniques 16
-- Start a synchronizationsync file "HardDisk:Sync My Documents"-- Synchronize! Pro will automatically open the-- specified document (if it's not already open)-- and start its synchronization
-- Quit Synchronize! Proquit
end tell
An AppleScript can also be executed when a sync completes. Please seeCompletion Options in the Reference section for more information.
Keeping old files in an archive
As you modify your files, Synchronize! Pro X copies the newer file to replace theolder file. You may want to keep the older files around. When you enablearchiving, replaced and deleted files are moved to an archive folder instead ofbeing deleted.
Given the large size of hard disks, all of your old files may fit in the free space onyour backup drive.
Use “Archive files…” in the Options menu to enable archiving. Create andchoose a folder that you want archived files to be saved in.
If you want to keep a certain amount of free space on the disk containing thearchive, check “Preserve free space” and enter the amount of space, inmegabytes, that you want to keep free.
You may want to write your old archived files to CD-R or DVD-R. To organizethe archive into groups which fit conveniently on your backup media, ccheck“Group archive folders” and set the size to 650 MB for CD-R or 4700 MB forDVD-R.
With “Group archive folders” active, each folder in the archive folder willoccupy no more than the designated space. A completed group folder will havea name like “3137568331 Wed, Jun 4, 2003 10-45-31 AM”, while the groupfolder that’s being filled has the name “Current Group”.
Once you save a group folder to CD-R, you can free the space it occupies bydragging it to the Trash and then emptying the Trash.
You may not care about archiving files that you didn’t create or modify, such asOS X system files. In this case, use “Archive files only in certain folders” toarchive files that are within your home folder.

Tips and Techniques 17
Synchronizing with removable disks
If you carry files between two Macs on removable disks, it’s more convenient tosynchronize automatically when you insert your removable disks.
AutoSync, a small background application, can automatically start asynchronization when you insert your removable disks. It is installedautomatically by Synchronize! Pro X, and can be installed manually from thePreferences.
• Use the Options menu to choose Start Options. Check the “When disksbecome available” box to start synchronization when you insert yourremovable disk. Click OK.
Synchronize! Pro X asks you if you would like a startup application installedwhich will automatically open Synchronize! Pro X at the appropriate times.Click Yes.
Synchronize! Pro X installs AutoSync in your Applications folder. AutoSyncis set to run at login in the Login pane of the System Preferences.
• Choose the “When copying is complete, Quit” option in the CompletionOptions. Then set Synchronize! Pro X to run in the background.
• You may want to check one or both of the “Start copying at Login” and “Start copying when disks are available” boxes. This causes the document tobe automatically started when you log in to your computer, and when youinsert the disk.
• Be sure to save your synchronization setup (it doesn’t matter where).
With these options set, Synchronize! Pro X will automatically synchronize yourfiles when you insert your removable disk. All you have to remember to do is totake the disk with you!

Synchronize! Pro X Reference 18
Synchronize! Pro X Reference
This chapter describes each of the features of Synchronize! Pro X and how to usethem.
You may find it most helpful to read a portion of this chapter when you have aparticular question, rather than read it all at once.
Synchronize! Pro X Windows
Document Windows
Synchronize! Pro X document windows describe two folders whose contents willbe made identical. You choose the folders that will be compared in a documentwindow. A document window looks like this:
Document window
Synchronize! Pro X document windows represent the contents of a setupdocument. Each setup document contains all the information on a singlesynchronization setup. The document window and the Options menu make iteasy to change the settings.
Choosing Folders
To change the folder to be synced, click on the folder icon. Navigate to the folderyou want and click Choose.

Synchronize! Pro X Reference 19
Folders can also be set by dragging them into a document window from theFinder.
Command-click a folder to see the location of that folder on the disk.
Setup type popup
Use the Setup type popup to conveniently set up a synchronization, a normalbackup, a bootable system backup, or a verify operation. Use the “Custom”option for the flexibility to choose any combination of settings. The mostcommon custom setup is a one-direction sync with no master; with this setup,files are copied in the direction of the arrow, but only those files which are newerare copied, and files which have been deleted from the source folder are notdeleted from the destination folder.
A “Synchronization” compares files and copies the newer file to replace the olderfile, while a “Backup” always copies files in one direction. In general, it’s best touse a “Backup” if you want to make the destination look like the source, becausethere’s less room for error and a “Backup” takes less computer resources.
Synchronize! Pro X always copies only the files that have changed – there is nodifference in this respect between a “Synchronization” and a “Backup”. Becauseof this, updating a synchronization or a backup is as simple as running it again.
Master check box
When the box titled Master is checked, the folder above it is considered a “masterfolder”. No files in that folder will be replaced, even by newer files. Any file inthe Master folder which is different from a corresponding file in the other folder,whether newer or older, will replace the file in the other folder.
This feature makes Synchronize! Pro X copy files in one direction only. This isuseful when you use Synchronize! Pro X to create a backup of your work.
When neither Master box is checked, only newer files will replace older files;older files will not replace newer files.
Copy Direction Arrow
The arrow between the two folders in a document indicates which direction filesand folders will be copied or moved.
When the arrow points in both directions, files will be copied in either direction,depending upon which file is newer. The file which is replaced will always bethe older or nonexistent file. This is the normal setting for file synchronization.
When the arrow points in one direction, files will be copied only in the directionof the arrow.

Synchronize! Pro X Reference 20
The Master check box below a folder identifies the folder as containing fileswhich are considered “master files”, regardless of age. When a Master box ischecked, files will be copied in the direction of the arrow only, replacing correspondingfiles which are newer or older.
When Move files in the Options menu is checked, the word “MOVE” will appearabove the arrow. This indicates that the files will be moved to the destinationfolder, not duplicated.
With a “Custom” sync setup, an alternate way of setting the direction of thearrow is to click on the arrow. Each time you click, the folder which is the masterwill change, and the arrow will change as well.
Delete files and folders not in the master folder
Check this box to delete any file or folder which is not in the Master folder.
The effect of checking this box is equivalent to using the Master folder to replacethe other folder. Synchronize! Pro X does this as efficiently as possible, however,by replacing only the files which are different.
Use this option to create a backup of a folder on your hard disk.
This option is active only when one of the Master boxes is checked, and “Movefiles” in the Options menu is not checked.
Show files to copy
When “Show files to copy” is checked, Synchronize! Pro X shows you what fileswill be copied. When it is not checked, Synchronize! Pro X starts copying withoutrequiring you to dismiss a dialog box.
Reopen at startup
To cause your synchronization setup document to be reopened every timeSynchronize! Pro X is opened, check this box.
Synchronize! Pro X saves information on whether a document is to be reopenedat startup only when the document is saved. This means that if you checked thebox and did not save the document, the document will not be reopened the nexttime you open Synchronize! Pro X.
The first time you run Synchronize! Pro X on a different Macintosh, you willhave to manually open any documents which have “Reopen at startup” checked,so that Synchronize! Pro X knows where they are.

Synchronize! Pro X Reference 21
Sync… button
The Sync… button initiates the synchronization of the two folders shown in thewindow. If the “Show files to copy” box is checked, a dialog shows the files andfolders which will be copied or deleted. If the box is not checked, copying startsimmediately.
When you click the Sync button of a document window and “Show files to copy”is checked, Synchronize! Pro X shows what files and folders need to be copiedand deleted in a window like this:
Files to copy windowThis dialog shows what actions Synchronize! Pro X must take, in what order, tomake the folders identical. Files and folders may need to be copied or deleted,depending upon the option settings.
To see how many files are to be copied in a particular folder, click on that folder.To open or close the folder and all folders below it, click on the triangle to the leftof the folder.
Icons are used to show the different actions to be taken during thesynchronization. The descriptions which follow refer to the actions in the “Filesto copy” dialog illustration above.
1. The folder “Personal” will be created in its appropriate place within thefolder “Travelling Documents”.

Synchronize! Pro X Reference 22
2. The file “Letter to Mom” will be copied to the folder named “Personal”.
3. The folder “Temporary Stuff” will be deleted.
4. The file “Proposal (DRAFT)” will be deleted.
5. The file “Flight Confirmation” will be copied to the folder named“Trips”.
Note that when a file is selected, the modification dates for the file and itscorresponding file, if one exists, will be shown below, as well as thedifference in time between the modification of the two files.
Left and right arrows indicate the direction that files will be copied. They aredifferent colors to make it easier to see a file that is being copied in the oppositedirection.
A red arrow pointing to the left or right indicates that the file will be copied suchthat the newer file will be replaced with an older file. This is often an occurrenceof special significance.
Shortcuts in the Files to Copy window
Use the up and down arrow keys to change the selected line. Hold down the shiftkey to add lines to the selection.
The number of files to be copied and deleted for the current selection isdisplayed at the bottom of the window.
Click the triangles to hide or reveal the contents of a folder. Double-click for thesame effect.
Command-click a triangle to close or open all folders at the level which are slsowithin the same parent folder.
Option-click a triangle to close or open all folders inside the folder which is beingclosed or opened.
Command-click the icon of a file or folder to see a menu showing the path of thatfolder. Choose “Show In Finder” to show the file or folder in a Finder window.
Option-click the icon of a file or folder to copy its path. Pasting the copied textinto Terminal or another path-oriented application will allow direct access to thefile or folder.
Double-click a file to change the direction that it will be copied. If a file has beenmarked to be deleted, double-click to restore its original state.

Synchronize! Pro X Reference 23
“Delete” button
The “Delete” button causes any selected files to be marked for deletion. Once thesynchronization is started, the files will be deleted with no further warning.
The effect of this button can be reversed by double-clicking the same files, or byremoving them from the list.
Remove from list
The “Remove from list” button removes any selected actions from the list. Use“Remove from list” to manually tell Synchronize! Pro X not to copy, move, ordelete a particular file or folder.
Sometimes removing an action from the list requires that other actions also mustbe removed. For example, removing a folder to be created from the list requiresthat any files to be copied into that folder must also be removed. When suchsituations arise, Synchronize! Pro X will warn you and ask whether you want toremove all affected items.
“Donʼt copy” button
The “Don’t copy” button removes any selected items from the list andremembers those items so that they are not copied in the future. Use “Removefrom list” to manually tell Synchronize! Pro X not to copy, move, or delete aparticular file or folder, and to not copy the file or folder in all future syncs orbackups.
This button adds specific files to the “Don’t copy files…” list, and folders to the“Don’t copy folders” list. Use the Options menu to see these lists.
To review or remove files or folders from the “don’t copy” lists, hold down theoption key and click the “Don’t copy” button. Remember that any changes youmake to the settings will only affect the files and folders that will be copied afteryou start a new sync or backup – they will not affect the sync or backupperformed when you click the “Start” button.
Reversing copying direction
Sometimes you may discover that a file which is to be copied should not replacean older version of the file. To reverse the direction the file will be copied,double-click the file.
When an older file will replace a newer file, the arrow will look like this: To reverse the direction again, double-click the file again.

Synchronize! Pro X Reference 24
Cancel
The Cancel button cancels the actions shown in the dialog. When you clickCancel, no files or folders are copied or deleted.
Start
The Start button initiates the copying actions shown. If no other copying is inprogress, copying will start immediately. If other copying is in progress, thesynchronization will be placed in the Waiting List until the other copying iscomplete.
Status Window
The Status window shows the status of the most recent copy operation. Whencopying is active, the Status window shows how far the copying has proceededtoward completion. This is what the Status window looks like:
Status Window
Stop
The Stop button stops copying. Normally, when copying is stopped, a file whichhas been partly copied will not be affected. However, if there is very little freespace on the disk, a partially-copied file may be deleted from its destinationwithout being replaced. Any deleted file is always the file to be replaced.
Pressing the command and period keys at the same time when the Statuswindow is active has the same effect as clicking the Stop button.

Synchronize! Pro X Reference 25
Continue
The Continue button resumes copying which has been paused. Pausing has nodetrimental effect on the completion of the synchronization.
Pause
The Pause button temporarily suspends copying. Use the Pause button when youwant access to your Mac without the background activity of copying.
Pause is useful when you’ve thought of one small thing you wanted to do beforeyou leave.
Waiting List Window
The Waiting List window shows a list of all documents whose synchronization iswaiting to be started. This is what the Waiting List window looks like:
Waiting List Window
Use the Waiting List window to monitor multiple synchronizations which arewaiting to be started. Double-click on a document name to bring that document’swindow to the front. Command-click a document to see the location of thatdocument on the disk.
If there are several syncs or backups waiting to be started, and you don’t want tostart them, hold down the Option key after canceling the operation. If the Optionkey is down, the waiting syncs or backups won’t be started.

Synchronize! Pro X Reference 26
Remove from list
Use the “Remove from list” button to cancel a waiting synchronizationoperation. Select the operation to be cancelled before clicking the button.
Up and Down Buttons
Use the Up and Down buttons to change the order of the list. The first item (theone at the top) will always be the next one to start.
The Waiting List is useful for starting several synchronizations when it will takesome time for them to complete. If the “Show files to copy” box is not checkedfor these synchronizations, they will proceed as soon as the currentsynchronization is complete.
Auto Syncs Window
The AutoSyncs window shows a list of the sync documents that are set to runautomatically.
Auto Syncs Window
Double-click on a document name to bring that document’s window to the front.Command-click a document to see the location of that document on the disk.
Use the Auto Syncs pane in the Preferences to install the AutoSync backgroundapplication and to affect how it operates.

Synchronize! Pro X Reference 27
Open button
Use the Open button to open a document and bring it to the front. Double-clicking a document in the list has the same effect.
Remove button
Use the Remove button to close a sync setup document and remove it from theAuto Syncs list. This prevents the document from being started automatically. Ifthe document is opened again, it will be automatically added to the Auto Syncslist.
Log Window
The Log window shows the contents of the log. The date, time, and results ofeach synchronization are normally stored in the log.
Position the Log window conveniently; its position will be remembered.
To select portions of the text in the Log window, click on the text and drag. Theselected text is highlighted. To copy the selected text, choose Copy from the Editmenu.
Selected text in the Log can be dragged directly to another application.
Use the Log pane in the Preferences to affect the way the log is displayed.

Synchronize! Pro X Reference 28
Synchronize! Pro X Menus
This section describes the menus in Synchronize! Pro X and how to use them.
Synchronize! Pro X Menu
Preferences
Choose Preferences to show the Preferences window.
The Preferences window has many panes. Choose a pane with the popup menuor with the right and left arrows.
Settings in the Preferences window apply to all Synchronize! Pro X documents.
General Preferences Pane
General Preferences Pane
Donʼt open an Untitled window at startup
Check this box to avoid opening a new Untitled window every time you openSynchronize! Pro X.

Synchronize! Pro X Reference 29
When copying is complete, play
Check this box to play a sound when copying completes. When this box is notchecked, no sound is played.
Use the popup menu to choose the sound that will be played. If the sound shownin the popup menu is gray, the chosen sound is not available, and you shouldchoose a different sound.
Donʼt show ʻno files to copyʼ dialog
Check this box to skip showing the dialog box that says, “There are no files tocopy”. This is a convenience for those who prefer not to have to dismiss theinformational dialog.
Ask Finder to eject disks
Check this box to cause Synchronize! Pro X to send Apple Events to the Finder toeject a disk, instead of using system calls. This may cause the Finder to clean upany open files prior to attempting to eject the disk.

Synchronize! Pro X Reference 30
Defaults Pane
Defaults Preferences pane
Settings in the Defaults Preferences pane affect which setup types are availablewhen “New” is chosen from the File menu.
To disable a particular setup type, click the “Disable” box for that type
To change the setup type which is initially shown, click the desired setup type.

Synchronize! Pro X Reference 31
Warnings Preferences Pane
Warnings Preferences pane
Settings in the Warnings Preferences pane establish criteria for warnings issuedabout potential problems, such as replacing all one’s files. Such a problem canoccur when a backup is done in the wrong direction, for example.
Warn me if more than 50 percent of the data will be deleted
Check this box to show a warning before deleting more than a certain fraction ofthe total data in the top-level folder.
Warn me if more than 50 percent of the files will be deleted
Check this box to show a warning before deleting more than a certain fraction ofall files in the top-level folder.
Warn me if more than 50 percent of the files will be replaced
Check this box to show a warning before replacing more than a certain fractionof the total data in the top-level folder.

Synchronize! Pro X Reference 32
Always warn for automatic syncsCancel automatic syncs after warning for 1 minuteDonʼt warn for automatic syncs
Use these settings to determine what happens when an automatic sync occurs.Automatic syncs occur on a scheduled basis, when a disk is made available, or atlogin. To set syncs to run automatically, use the Options menu to choose StartOptions.
Monitoring Pane
Monitoring Preferences pane

Synchronize! Pro X Reference 33
Settings in the Monitoring Preferences pane enable web-based monitoring ofyour backups. Using the Qdea Backup Monitor, you can receive emails whenyour backups run successfully, have errors, are missed, or don’t run tocompletion.
To enable or disable monitoring for the computer, click the “Enable monitoring”box.
When your backups are monitored, you may want to add more information onwhich computer is being monitored. You may optionally enter a description ofthe location of the computer.
Click “More Info” to be directed to a web page on the Internet that describesbackup monitoring in more detail.
Files To Copy Pane
Files To Copy Preferences pane
Settings in the Files To Copy Preferences pane affect formatting of the Files ToCopy window, which is shown after folders are scanned for a backup orsynchronization.

Synchronize! Pro X Reference 34
Set the desired font and type size using the popup menus.
When Always use generic icons is not checked, Synchronize! Pro X attempts toget specific icons for the files and folders that are shown. This can slow thedisplay of the contents of the Files To Copy window. When this box is checked,specific icons are not shown, and no additional disk access is made.
When Use generic icons for network volumes is checked, specific icons forfiles and folders that reside on shared disks are not shown. This can improvedisplay and scrolling speed of the contents of the Files To Copy window forshared disks that are connected over a slow network.
When Initially open all folders, including packages is checked, the contents ofall folders are shown when the Files To Copy window is opened. If you don’twant to see items which are inside packages, leave this box unchecked.
File Change Pane
File Change Preferences pane
Settings in the Defaults Preferences pane affect which setup types are availablewhen “New” is chosen from the File menu.
To disable a particular setup type, click the “Disable” box for that type

Synchronize! Pro X Reference 35
To change the setup type which is initially shown, click the desired setup type.
Disk Errors Pane
Disk Errors Preferences pane
Settings in the Disk Errors Preferences pane affect the handling of errors whichoccur while trying to find the disks for a synchronization.
Synchronize! Pro X normally uses an invisible file at the top level of each disk touniquely identify it. If you want a disk to be found by its name only, check Usename only to identify a volume.
This can be useful if you want the same backup to work for two different disks.Remember, however, that two disks with the same name (for example, a localdisk and a network disk with the same name) might be confused if this box ischecked.
To announce an error and wait for user interaction, click Wait forever.To continue with other synchronizations if a disk can't be found, click If a diskisn't available, Cancel. Set the number of minutes you want a dialog to announcethe error before being automatically dismissed.

Synchronize! Pro X Reference 36
File server disks that aren’t available when the sync is started can be mountedautomatically using the Auto-Connect options.
File Errors Pane
File Errors Preferences pane
Settings in the File Errors Preferences pane affect the handling of errors whichoccur while copying files.
Wait forever
Click this button to cause Synchronize! Pro X to show any errors in a dialog boxuntil it is dismissed.
Skip immediately and log the error
Click this button to cause Synchronize! Pro X skip the file for which the erroroccurred and proceed to copy the next file. Errors are always entered in the Log.
Retry, Skip, or Cancel
Click these buttons for the action you want performed after a particular time.

Synchronize! Pro X Reference 37
To cause a sync to be cancelled without showing an error dialog, set the numberof minutes to zero.Beep
Check this box to have Synchronize! Pro X beep when an error occurs. The beepsound is set with the “Sound” pane of the System Preferences.
AutoSync Preferences Pane
AutoSync Preferences pane
Settings in the AutoSync Preferences pane affect the installation and operation ofthe background application AutoSync
AutoSync is a faceless background application which normally runs wheneverthe user is logged in. It monitors the current time and the disks that are present.When a synchronization is supposed to start, AutoSync will launch Synchronize!Pro X and tell it to start the sync.
If AutoSync is not running, no automatic operations will occur in Synchronize!Pro X. These operations include starting a sync at a scheduled time, starting async when disks become available, and starting a sync when you log in.

Synchronize! Pro X Reference 38
Install AutoSync
Click this button to install AutoSync manually. AutoSync is not installed if theversion currently installed is newer or the same as the version distributed withSynchronize! Pro X.
To unconditionally re-install the version distributed with Synchronize! Pro X,click the button while holding down the option key.
Donʼt install AutoSync automatically
Check this box to prevent Synchronize! Pro X from asking to install thebackground application AutoSync. If this is checked, the only way to installAutoSync is to click the Install AutoSync button.
Donʼt add AutoSync to the login list
Check this box to prevent Synchronize! Pro X from modifying the login startuplist. This is a list of applications that are started when you log in. The applicationsare shown in the System Preferences Login pane.
Normally, when AutoSync is installed, AutoSync is added to the list of loginstartup applications, so that automatic operation will occur whenever you log in.Remember that if AutoSync is not running, automatic operations won’t occur.
Open Synchronize! Pro X in the background
Check this box to open Synchronize! Pro in the background when it is launchedautomatically. This setting will have no effect on Synchronize! Pro X if it isalready running.
Hide Synchronize! Pro X after launch
Check this box to hide Synchronize! Pro when it is launched automatically. Thiscauses all of its windows to be hidden, making its operation less intrusive.

Synchronize! Pro X Reference 39
Log Preferences Pane
Log Preferences pane
Settings in the Log Preferences dialog box affect how the Log is displayed andused.
Show Log window at startup
Check this box to show the Log window every time Synchronize! Pro X isstarted.
Font
Use the popup menu to choose a font for the text displayed in the Log window.
Size
Use the popup menu to choose the size of the text displayed in the Log window.
Limit Log file size

Synchronize! Pro X Reference 40
Enter the maximum number of lines allowed in the Log file. When the number oflines in the Log file exceeds this value, the oldest entries in the Log file areremoved.
The range for this number is 32 to 4096. The larger the log file, the longer it willtake to open the Log at startup.
Donʼt save anything in the log
Check this box to prevent any information from being saved in the Log.
Log the names of copied files
Check this box to enter the name of each copied file in the Log.
Include file path
Check this box to include the complete path of each copied file in the Log. Thismay slow down the copying operation due to the large amount of informationwritten to the Log.
File Menu
Use the File menu to create and save Synchronize! Pro X documents.
New
Use New to create a new setup document. A Synchronize! Pro X setup documentcontains the information describing two folders to be synchronized.
Open
Use Open to open an existing setup document. When a setup document isopened, a window appears to show the contents of the document.
Close
Use Close to close the active window. Windows generally show the contents of asetup document. Status, Waiting List, and Log are windows which are alwayspresent, although they are not always visible. Closing a window dismisses it andmakes it disappear.
Save
Use Save to store the contents of a window in its setup document. Synchronize!Pro X setup documents contain all the settings for synchronizing two folders.

Synchronize! Pro X Reference 41
Save As…
Use Save As… to store the contents of a window in a different document whichyou name.
Revert
Use Revert to discard any changes you have made to a document since you lastsaved it. Revert is useful when you try some different settings and decide thatyou liked it better the way it was.
Quit
Use Quit to exit the application. If copying is still underway when you quit, youwill be asked if you really want to quit. While the dialog is shown, copyingcontinues. If you leave your Mac alone until copying completes, Synchronize!Pro X will quit when it is done.
Edit Menu
Undo, Cut, Copy, Paste, and Clear
Undo, Cut, Copy, and Paste functions are available for editing text in dialogs andfor copying the selected contents of the Log.
Any changes made to a document since the last time it was opened or saved maybe undone by choosing Revert from the File menu.
Options Menu
The Options menu contains many ways of affecting how two folders aresynchronized. All items displayed in the Options menu apply to the activewindow. When the active window changes to a different document window, theOptions menu changes to reflect the options set for that setup document.
When options that affect the operation of the setup document are changed fromtheir initial settings, a diamond is displayed next to that menu item.
When the active window is not a document window, the Options menu isdisabled.
Wake up…
This wakes a sleeping computer if it’s connected to Ethernet.

Synchronize! Pro X Reference 42
Wake up settings
In order for this feature to work, the computer to be awakened must beconnected to Ethernet and it must have its “Wake for network administratoraccess” box checked in the Energy Saver panel in System Preferences.
Wake up computer A
Check this box to wake a sleeping computer prior to running the sync. Enter theEthernet Hardware Address for the computer to be awakened. This address isfound in the Network panel in System Preferences.
Wake up computer B
Check this box to wake a second sleeping computer prior to running the sync.Enter the Ethernet Hardware Address for the computer to be awakened. Thisaddress is found in the Network panel in System Preferences.
Auto-Connect…
Auto-Connect allows the user name and password for a file server to be set inadvance, so that the file server disk can be mounted automatically.

Synchronize! Pro X Reference 43
Auto-Connect settings
Automatically connect “G3 Powerbook”
Check this box to automatically mount a file server disk. Enter the user name andpassword needed for the file server.
This box is active only for folders which reside on an AppleShare file server, or aMacintosh running File Sharing.
Retry button
Use this button to set how many times to try connecting to a file server, or AppleRemote Access.

Synchronize! Pro X Reference 44
Retry settings
Ask for the password
Click this option to try connecting with an alias. This will require a password tobe entered.
Allow for a manual connection
Click this option to allow a manual connection. Synchronize! Pro X shows adialog box and waits for the connection to be made.
Quit trying
Click this option to abandon the synchronization attempt if the file server cannotbe found. When this option is chosen, other synchronizations proceed withoutdelay.

Synchronize! Pro X Reference 45
Start Options…
Choose Start Options… to set a sync to run automatically.
Start Options settings
Start synchronization at login

Synchronize! Pro X Reference 46
Check this box to start synchronization immediately when you log in. Thedocument will be opened and the sync started at login. The backgroundapplication AutoSync must be set to open at login for this option to be functional.
Start synchronization when this document is opened
Check this box to start synchronization immediately when the document isopened. This works the same as if you clicked the Sync button when you openthe document.
Use this option to automatically synchronize your files by double-clicking thedocument.
Start synchronization when disks become available
Check this box to start synchronization when both disks needed for asynchronization become available.
When both disks are available, the setup document will be opened, andsynchronization will begin.
A common use for this feature is to automatically start synchronization to afloppy disk when it is inserted.
To start synchronization with this feature, the background application AutoSyncmust be running before both disks become available. In order to take fulladvantage of this feature, it is recommended AutoSync be set to open at login.
Start synchronization before Quit
Check this box to have Synchronize! Pro X start a synchronization before theapplication quits. This can trigger a synchronization while the computer isshutting down. Another way to accomplish this is to start the synchronization forthis setup, and have Synchronize! Pro X shut down the computer when thesynchronization is completed.
Start synchronization when folder changes
Check this box to start a synchronization when the contents of a folder changes.You can choose to watch the contents of as many as two folders.
To prevent constant synchronizations, the minimum amount of time betweensynchronizations can be adjusted.
This feature is available only when running on OS X 10.5 and later.

Synchronize! Pro X Reference 47
Start synchronization at a preset time
Check the “On Sunday…” box to start synchronization at a particular time. Toset the time, click the time and use the up and down arrows, or type.
This option is effective only when Synchronize! Pro X is running before thesynchronization is set to start.
Start again every…
Check this box to start synchronization periodically. Enter the amount of timebetween synchronizations. Use the popup menu to set the time in minutes,hours, days, weeks, months or years.
Each time a synchronization is completed, the start time is reset.
Start only on...
Check this box to start synchronization only on certain days. Use the popupmenu to choose which days synchronization will be started.
Don't Start button
Click this button to set a period of time during which synchronizations will notbe started. This is often used to create a "window" of time during which a backupis not performed.
AutoSync
When you click the “OK” button with synchronization set to occur at login, at apreset time, or when disks are available, you are asked if you would likeAutoSync, a background application, to be installed.
AutoSync checks for conditions that you have set for starting synchronization,and automatically launches Synchronize! Pro X when those conditions are met.
Synchronize! Pro X Reference 48
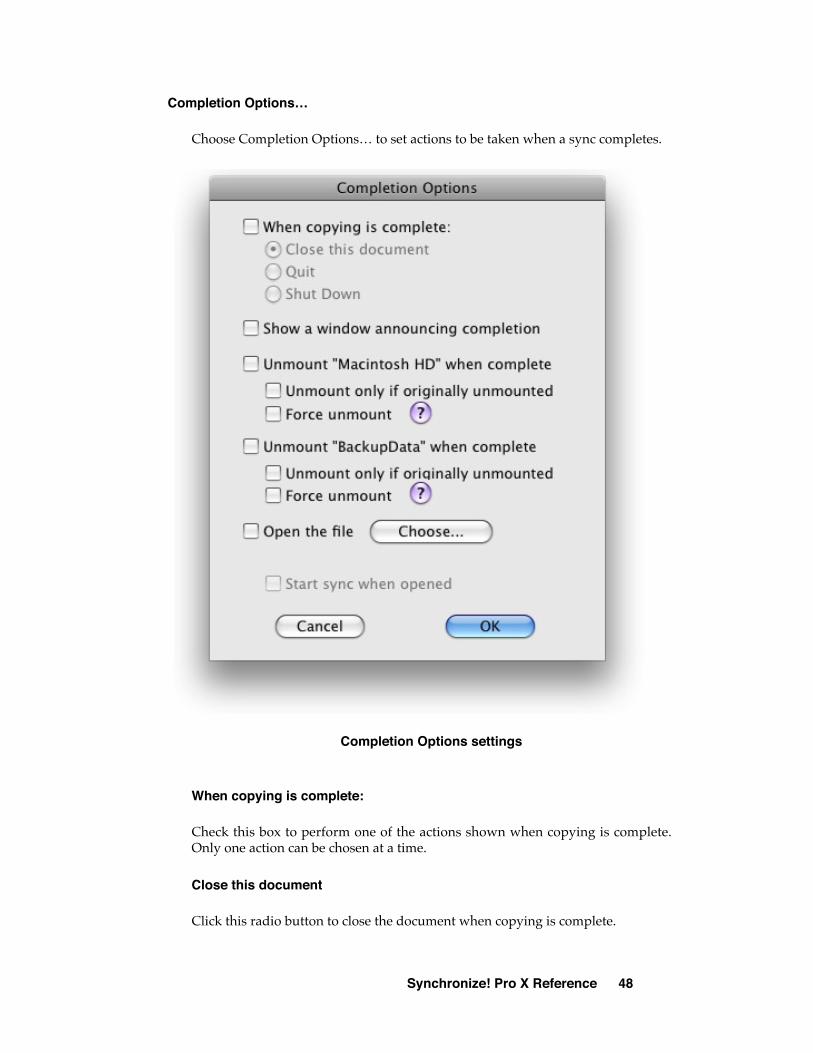
Completion Options…
Choose Completion Options… to set actions to be taken when a sync completes.
Completion Options settings
When copying is complete:
Check this box to perform one of the actions shown when copying is complete.Only one action can be chosen at a time.
Close this document
Click this radio button to close the document when copying is complete.

Synchronize! Pro X Reference 49
Quit
Click this radio button to quit when copying is complete. Note that Synchronize!Pro X will not quit until all copying is complete, even if the document containingthis option is the first one started.
Unmount “G3 Powerbook” when complete
Check these boxes to unmount or eject a disk when copying is complete. When adisk is ejected or unmounted, the action is equivalent to dragging the disk to thetrash.
The disk containing the active System cannot be unmounted.
A hard disk or removable disk containing one or more open files cannot beunmounted.
Force unmount
Check this box to cause a disk to be unmounted even if files on it are open. WhenAsk Finder to eject disks is checked on the General page of the Preferences, thissetting has no effect.
Open the file
Check this box to open a file when copying is complete. Click the Choose…button to choose the file to be opened. This is useful for causing some otheraction to occur after a synchronization, including the execution of anAppleScript.
The file which is opened can be any file on your Mac, including anothersynchronization setup document, any alias or an AppleScript saved as anapplication. This allows another synchronization to be started or an AppleScriptto be executed when a synchronization is complete.
Conflicts…
Use the Conflicts… option to set the handling of file conflicts. Conflicts settingsdo not apply to backups.
There are two types of file conflicts:
• Editing Conflict . Both files have been changed since the last synchronization.Overwriting the older file in this situation causes the changes made to it to belost.
An editing conflict is noted with this symbol:

Synchronize! Pro X Reference 50
• Name Conflict . Two files have the same name, but have different types. Anexample of such a situation might be two files called “Proposal”, one of whichwas created by a word processing application, and another which was created bya spreadsheet application. The two files are obviously different, and should notoverwrite each other.
A name conflict is noted with this symbol:
Conflicts… settings
Don't check for conflicts
Check this box to turn off conflict checking. When this box is checked, less diskspace and less memory is required. Synchronization will also take less time.
Alert Me
When this box is checked, a conflict will be announced with a dialog box.
Donʼt copy either file
Click this button to avoid copying conflicting files.

Synchronize! Pro X Reference 51
Overwrite the older file
Click this button to overwrite the older file. This is the same action taken whenconflict checking is turned off.
Move the older file to the Conflicts Folder
Click this button to move the older conflicting file to a special Conflicts Folder.This folder is located immediately within the top-level folder containing theconflicting file. If a Conflicts Folder does not exist, it will be created.
After the conflicting file is moved, the newer version of the file will be copied toreplace it.

Synchronize! Pro X Reference 52
Copy only files…
Copy only files… settings
“Copy only files” restricts the files which are copied. Only files which meet thecriteria will be copied. Other files which do not meet the criteria are ignored bySynchronize! Pro X.
If no boxes are checked in this dialog, all files in all folders are copied.

Synchronize! Pro X Reference 53
“Whose names” check box
Use this check box to copy files by matching their names. Click “Add…” to addan entry to the list. Double-click an entry to make changes. Click “Remove” toremove an entry from the list. Matches can be made with the first part of thename (starts with), the last part of the name (ends with), the whole name(matches), or a part of the name (contains).
Multiple partial names may be entered. When multiple entries are in the list, anyone entry that matches will cause the file to be included in the set of matching filenames.
“Which are in the list” check box
Use this check box to copy files by matching their name and specific location.Click “Add…” to add an entry to the list. Click “Change…” or double-click anentry to change it. Click “Remove” to remove an entry from the list.
To see the path of a particular file, hold the mouse over the file name for morethan two seconds.
“Which were modified” check box
This check box restricts files by how old they are, or by the time they were lastchanged. Use this check box to copy files which are older, or newer by a certaintime, or some particular date.
“Which are applications” check box
Use this check box to copy only those files which are applications, likeSynchronize! Pro X, a word processor, or a spreadsheet. Documents are notcopied if this is the only box checked.
“Which are aliases” check box
Use this check box to copy only those files which are aliases. This check box hasno effect when the “Resolve Aliases” option is checked, because the alias isresolved first.
“Which are invisible” check box
Use this check box to copy only those files which are invisible. The invisible filesfor virtual memory, and the Desktop files, are never copied, even when this boxis checked.
“Which are icon files” check box
Use this check box to copy only those files that are icon files. An icon file is theinvisible file inside a folder that contains the icon for a folder. This check box is

Synchronize! Pro X Reference 54
primarily useful to avoid copying icon files to servers which don’t supportcertain characters in file names. The name of an icon file is “Icon\r”, which willgenerate an error from some Windows file servers.
“Which have type and/or creator” check box
This check box restricts files to documents that have particular types and/orcreators. The most common types are TEXT and PICT, which refer to filescontaining text only and bitmap pictures, respectively. Use this check box to copyonly certain kinds of files.
A file’s creator is usually the application that saved the file. Set the creator forfiles saved by a particular application.
“Which are labelled” check box
This check box restricts files to documents that have a certain label. If a file oneither side of the backup or sync has a label which matches, the file will match.
Don't copy any files…
Choose “Don't copy any files…” to choose files which are not to be copied. Adialog box is presented which is identical to the “Copy only files…” dialog boxdescribed above. This dialog box, however, describes files which will not becopied.
Well, you ask, what happens if I tell it to copy a file, and also tell it not to copy afile? It won’t be copied.
Synchronize! Pro X first includes all files which meet the criteria in the “Copyonly files” dialog, then excludes those which meet the criteria in the “Don't copyfiles” dialog.
If no boxes are checked in this dialog, no files are ignored.

Synchronize! Pro X Reference 55
Copy only folders…
Use “Copy only folders…” to limit a synchronization to a subset of folders.
This option is useful for synchronizing only certain folders on a hard disk.Criteria for folders include full or partial folder name, inclusion in a list, andwhether the folder is invisible.
Copy only folders… settings
“Whose names” check box
Use this check box to copy the contents of folders by matching all or part of theirnames. Enter the portion of the name to be matched. Use the popup menu tochoose the kind of matching. Matches can be made with the first part of the name(starts with), the last part of the name (ends with), the whole name (matches), apart of the name (contains), or from a list of file names (are in the list).

Synchronize! Pro X Reference 56
“Which are in the list” check box
Use this check box to copy the contents of specific folders. Click Add… to add afolder to the list. Click Add Name to add a folder by name without having tofind it on disk.
To remove a folder from the list, click the folder and click the Remove button.
Any number of folders may be included in the list. Only those folders thatactually reside within the top-level folders shown in the sync setup will becopied.
To see the path of a particular folder, hold the mouse over the folder for morethan two seconds.
Donʼt copy folders…
Use “Don’t copy folders…” to exclude certain folders from a synchronization.
This option is useful for synchronizing several folders on a hard disk withoutsynchronizing them all. For example, you might want to synchronize all folderson your disk except the System folder and the Applications folder.
Use this option to identify folders whose contents are not to be synchronized, ina manner similar to that shown in “Copy only folders…” above.

Synchronize! Pro X Reference 57
Fast scan
This option enables a faster method of finding files that need to be copied. It isparticularly useful for large sets of files, because this method does not requireindividually examining every file and folder in the set.
An example of a great use for this is to speed up a Bootable System Backup.While running a Bootable System Backup the first time can’t take advantage ofthis feature, updating the backup (which is done by running a “Bootable SystemBackup” again) will be much faster when Fast scan is used.
Fast scan… settings
Synchronize! Pro X Reference 58
Enable fast scan
Check this box to enable fast scan of folders. When this box is checked, severalcriteria are used to determine whether a fast scan is allowed. A full folder scanmust have been performed previously, and the disk must be mounted locally,not remotely over a network.
Fast scan is available on on Mac OS X 10.5 or later.
If you think files in either folder may have been modified on a system that is notrunning Mac OS X 10.5 or later, you should disable fast scan and run a backup orsynchronization, to ensure that all files in both folders are the same.
Check backup disk for changes
Check this box if there is a possibility that changes may occur to the backup disk.When this box is not checked, the assumption is made that the backup disk is notchanged by any application. This box is normally not checked for a backup.
Checking this box will cause more folders to be scanned, so if you know that thebackup disk isn’t being modified, it is faster to leave it unchecked.

Synchronize! Pro X Reference 59
Comparing files
This option provides alternatives to the default method of comparing files forsynchronization or backup.
Comparing files… settings
Copy files if modification time is different
This is the normal setting. This setting compares the time that a file was modifiedand copies all files which have different modification times.
Copy files if modification time is not an exact multiple of one hour
Use this setting to synchronize or backup files whose modification dates mayhave been changed due to a change in Daylight Savings Time or time zone.
Copy files if modification time difference is > 5 seconds
Use this setting to cause files whose modification times are different by a certainnumber of seconds to be considered the same.
Normally, files whose modification times are different at all are copied bySynchronize! Pro X. This works well for file servers which store and reportmodification times in seconds.

Synchronize! Pro X Reference 60
Some file servers, however, either do not store file modification times to thesecond, or do not report the modification time precisely. This option allows theflexibility needed for these circumstances.
If files which were just copied are subsequently reported to be different, showthe files to be copied and click on a pair of files in the Files To Copy window. Thetime difference between the files is shown in at the bottom of the window. Set thenumber of seconds for this option to be a little greater than the maximumdifference observed.
One instance in which this option is needed is when connecting to someWindows file servers which store the file modification date to the nearest twoseconds. In this instance, the number of seconds should be 1.
Copy files if file size is different
Check this box to backup files whose modification dates may be the same, butthe file size is different. This option is only valid for a backup, when a Master boxis checked.
Copy files if 'ckid' resource is different
Check this box to backup files which are managed with the 'ckid' resource. Thissetting is usually used for backing up source code managed by such as Projectorand VOODOO. This option is only valid for a backup, when a Master box ischecked
Copy files if creator or type is different
Check this box to backup files whose modification dates may be the same, butthe file size is different. This option is only valid for a backup, when a Master boxis checked.
Adjust file times
Check this box to adjust file times on one or both disks.
This option corrects a potentially difficult situation which arises fromsynchronizing two disks which were witten with the same files but with adifferent time zone setting.
Change file times
This option allows the modification times of files on one or both disks to bechanged by a number of hours. This is useful primarily for synchronizing orbacking up a MacOS Standard Format disk that was written by a computer in adifferent time zone.

Synchronize! Pro X Reference 61
Use this button to show the following settings:
Change file times settings
The values entered are used to adjust the times of all files in the folders shown.This adjustment is handled internally by Synchronize! Pro X – it does not affectthe actual creation and modification times stored on the disk.
When files are moved to another folder on the same disk, they are moved veryquickly. When files are moved to another disk, they are copied completely, thenthe original file is deleted.
Run as ʻrootʼ
Check “Run sync with root privileges” to sync or back up files with rootprivileges. This is needed when copying files to which the logged-in user doesnot normally have access. If you are copying files between two directly-connected hard disks, and you are getting permission errors, it is probablyappropriate to check this box.
This option is not available when the source or the destination is on a remotedisk.

Synchronize! Pro X Reference 62
Skip files
Check “Skip files which can’t be copied due to insufficient privileges” to copyonly those files which should not cause permission errors. This may be usefulwhen a few files can’t be accessed due to their permissions.
Warning: using this feature may mask a problem that should be solved, ratherthan hidden. Usually, it is better to identify permission problems and correctthem, or exclude certain files from a backup or sync, rather than use this feature,because the files that are skipped may be ones you wanted backed up.
Copy existing files only
Check “Copy existing files only” to synchronize only those files which have anexisting corresponding file in the other folder. Any file which does not have acorresponding file already in existence will be ignored.
This option is not active when a Master box is checked.
Donʼt copy empty folders
When “Don’t copy empty folders” is checked, any folders which would normallybe created, and which will be empty when the synchronization is completed, willnot be copied.
This option is useful when copying or moving only certain files. With this optionchecked, only those folders which will contain files will be created.
Donʼt delete folders
Check “Don’t delete folders” to avoid deleting any folders during a sync orbackup. This is useful, for example, when a backup is set to “Copy only files thatend with ‘.txt’”. If the Setup Type is Backup, and the source folder is empty, and“Don’t delete folders” is checked, then all files that end in “.txt” that are in thedestination folder will be deleted, and all folders in the destination will be left asthey are.
Sync deleted files
When “Sync deleted files” is checked, any files which are deleted from one folderwill cause the corresponding file to be deleted at the next synchronization.
Check this option to make it easier to delete files from two synchronized folders;when this option is not checked, a file which is deleted from one folder, ordragged to the Trash, will be replaced by a copy of the file from the other folder.
With this option checked, when a file is no longer needed, just drag it to theTrash. Its corresponding file will be deleted during the next synchronization.

Synchronize! Pro X Reference 63
This option is not available if “Don’t check for conflicts” is checked in the“Conflicts…” settings.
Copy locked state
Use this option to copy the locked state of every file to the destination. When thisoption is checked, any file which is locked in the master folder will also be lockedin the destination folder, and any file which is not locked in the master folderwill not be locked in the destination folder. The contents of files whose lockedstate is different are copied only if the files have different modification dates.
This option is available only for backups. In a backup, files can be copied in onlyone direction.
PC Compatibility
This option provides a method of eliminating copying of resource forks to a PC-formatted disk. Resource forks appear on a PC as files whose names start with“._” (dot-underscore).
PC Compatibility settings
Donʼt copy resource forks
Check this box to prevent resource forks from being copied. PLEASE NOTE thatsome files have essential data in their resource forks, and not copying this datamay cause the files to be corrupt. In general, a good rule of thumb is that if thefile is created on a PC, and it can be correctly read on a Mac, you can copy the filewithout the resource fork without a problem.
Donʼt copy files that have a resource fork
Use this setting to ignore files in your sync or backup that have a resource fork.When this box is checked, files that have a resource fork won’t be copied.

Synchronize! Pro X Reference 64
Donʼt replace files that have a resource fork
Use this setting to ignore files in your sync or backup that have a resource fork.When this box is checked, files that have a resource fork won’t be copied.WARNING: Replacing a file that has a resource fork with one that doesn’t coulddamage the file so that it cannot be used, if that file needs a resource fork. Somedo, and some don’t.
If you’re unsure about whether to uncheck “Don’t copy files that have a resourcefork” or “Don’t replace files that have a resource fork”, you probably shouldn’t.Unchecking both boxes will corrupt any files that must retain their resourceforks.

Synchronize! Pro X Reference 65
Permissions
This option provides flexibility in copying and setting file and folderpermissions.
Permissions… settings
Permissions allow different users and groups “read-write-execute” privileges fora file or folder. These users and groups are called “Owner”, “Group”, and“Everyone”. If you’re not familiar with these terms, don’t worry, you probablydon’t need to use this option, and you should leave it with its “normal” settings,as shown above.

Synchronize! Pro X Reference 66
Keep in mind that the owner and group of a file or folder is copied only whenSynchronize! Pro X is performing an operation with root privileges.
Donʼt set permissions of copied files and folders
Check this box to use whatever default permissions will be assigned to files andfolders copied to another volume. This is useful when the destination doesn’tsupport OS X-style permissions, and errors result when checking that they wereset correctly. Some examples of such volumes are remotely-mounted Windowsvolumes and Mac OS 9 disks connected using File Sharing.
Using the permissions options
These options allow flexibility in setting the permissions of copied files andfolders.
For example, if you want everyone to have “Read & Write” access for all copiedfiles:
1. Click Set permissions of copied files to.2. Set the popup menus for Owner, Group and Everyone to “Read &
Write”.3. Click OK.
Normally, permissions are set only for files whose contents are copied. To ensurethat all files in the destination folder to have the same permissions, check Copypermissions to all destination files. This will cause all files to have theirpermissions set, even if their contents do not need to be copied.
To force all files in the destination folder to have the permissions of thecorresponding files in the source folder, make these settings:
1. Check Copy permissions to all destination files.2. Click Copy file permissions exactly.3. Click OK.
Folders have permissions, too. The settings for folders work the same way.
Copy permissions to all destination files
Check this box to copy permissions from the source files to the correspondingdestination files, even if the contents of the files have not been modified, and thefile contents won’t be copied. This option is available only for backups.
Copy file permissions exactly
Make this active to copy permissions from the source file to the destination file.This is done for both synchronization and backup.

Synchronize! Pro X Reference 67
Set permissions of copied files to
Make this active to force a set of permissions to be associated with copied files,regardless of the permissions associated with the source file.
Permissions popup menus
Use the Owner, Group and Everyone popup menus to set specific permissionsto be used for copied files.
Copy execute bit
Make this active to copy the execute bit for copied files. This is the normalsetting.
Clear execute bit
Make this active to clear the execute bit for copied files. If you’re not familiarwith the execute bit, make “Copy execute bit” active.
Copy permissions to all destination folders
Check this box to copy permissions from all source folders to the correspondingdestination folders, even if the folders don’t need to be copied. This option isavailable only for backups.
Copy folder permissions exactly
Make this active to copy permissions from any copied source folder to thedestination folder. This is done for both synchronization and backup.
Set permissions of copied folders to
Make this active to force a set of permissions to be associated with copied folders,regardless of the permissions associated with the source folder.
Permissions popup menus
Use the Owner, Group and Everyone popup menus to set specific permissionsto be used for copied folders.
Copy owner and group
Check this box to copy owner and group information for files and folders. Thisbox is automatically checked for Bootable System Backups. Normally, owner andgroup information cannot be copied unless the backup or sync is performed withroot privileges (that is, the “Run as root” option is checked in the Options menu).

Synchronize! Pro X Reference 68
Extended attributes
Use this option to control whether and how Extended Attributes are copied.Extended Attributes are small bits of information that can be attached to a filewithout modifying the actual contents of the files. For example, on some versionsof OS X, the time, date, and URL of a downloaded application are saved as anextended attribute attached to that application.
Extended Attributes are available on Mac OS X 10.4 and later.
This option has no effect when used on a disk that doesn’t support extendedattributes.
Extended Attributes settingsUsing the setting “Copy extended attributes when different” will cause the folderscan to be slower, because the extended attributes for all files must be readduring the scan. However, this setting has the advantage of copying extendedattributes when the only thing that was changed is the extended attributes.
By contrast, “Copy extended attributes only when file data is copied” is faster,because the extended attributes are read only for those files that are copied.

Synchronize! Pro X Reference 69
Copy ACLs
Use this option to control how ACLs (Access Control Lists) are copied. ACLs areavailable on OS X 10.4 Server and Mac OS X 10.5 and later. This option has noeffect when used on a disk that doesn’t support ACLs.
Copy ACLs settingsUsing the setting “Copy Access Control Lists when different” will cause thefolder scan to be slower, because the ACL for all files must be read during thescan. However, this setting has the advantage of copying ACLs when the onlything that was changed is the ACL.
By contrast, “Copy Access Control Lists only when file data is copied” is faster,because the ACL is read only for those files that are copied.
Move files
Use “Move files” to move files, rather than copy them. Use this feature to extractcertain files from a larger set. For example, all word processing documents lastmodified more than two months ago could be moved to a floppy disk forstorage.

Synchronize! Pro X Reference 70
Verify files…
Using this feature, files can be verified either after a backup or sync, orindependently.
To verify files after a backup or sync, use the Options menu to choose “Verifyfiles…”. To verify files independently, use the “Setup type” popup menu tochoose “Verify”, and set the options for the verify operation using “Verifyfiles…” in the Options menu.
Verify files… settings

Synchronize! Pro X Reference 71
Verify copied files and folders
Make this active to verify only files and folders that are copied during aparticular backup.
Verify all files and folders
Make this active to verify all files and folders contained in the selected sourceand destination folders. When this setting is active, all files and folders areverified after every sync or backup, whether they were copied as a part of thatsync or backup or not.
Compare all attributes
Make this active to compare all attributes for files and folders. This is the defaultsetting.
Compare selected attributes
Make this active to compare only certain attributes of the files and folders.
Compare owner and group
Check this box to compare owner and group information. This information ischecked for folders and files.
Compare permissions
Check this box to compare permissions of both folders and files. “Permissions”are Read & Write, Read Only, Write Only, and No Access, for owner, group, andeveryone.
Compare file creator and type
Check this box to compare the creator and type of files. For files which have nocreator and type, a comparison may cause the false generation of an error.
Compare file dates
Check this box to compare the creation and modification times of files.
Compare file data
Check this box to compare the contents of the files. Only certain forks or all forks(yes, there can be more than two) may be compared.

Synchronize! Pro X Reference 72
Log the first 32 bytes that are different
Check this box to log a portion of any files whose data does not match. The filedata is logged in hexadecimal and, where possible, ASCII.
Log all differences for each item
Make this active to log any number of differences found in a file or folder.
Log the first difference and skip further tests
Make this active to log only the first difference found in a file or folder. Whenthis is active and a mismatch is found, other attributes of the file or folder are notchecked.
Verify everything regardless of compare results
Make this active to verify all files and folders, even if one or more mismatchesoccur.
Stop verifying after the first mismatch
Make this active to stop the verification after the first mismatch.

Synchronize! Pro X Reference 73
Archive files…
This feature keeps a copy of replaced and deleted files in an archive, so that anold version of a file, or a deleted file, can be recovered.
This is an optional feature which must be enabled to be active. To enable thisfeature, choose a folder to be the archive folder. This folder can be on the samedisk as the backup, or it can be in another location.
Archive files… settings

Synchronize! Pro X Reference 74
Files are saved to the archive for a particular destination. For a backup, there isone archive. For a synchronization, there are two archives – one for files replacedor deleted in the left-hand folder, and a separate archive for files replaced anddeleted in the right-hand folder.
Archive folder organization
Archived files are saved in the same folder hierarchy used for the originalbackup. This means that any number of files that have the same name but are indifferent folders will be archived if they are replaced or deleted during a backupor synchronization.
Files are optionally grouped into chunks of a specified size. This is useful, forexample, to keep archived files in chunks that can be conveniently copied to aCD-R. Once a group of archived files is copied to the CD-R, it can be deleted,freeing space for more archived files.
Inside the archive folder, the group folder called “Current Group” alwayscontains the most recently archived files. When the size of the folder “CurrentGroup” reaches the maximum allowed size, it is given the name correspondingto the most recent archive operation.
Inside a group folder, a folder will exist for each sync or backup operation thatarchived one or more files. This folder will have a name which starts with asequence of numbers, followed by the date and time of the sync or backup.
Don’t change the name of the folders inside the group folder. If their names arechanged, the archive can’t be purged of its oldest files.
Finding previous versions of a file
The easiest way to find all the versions of a particular file is to use the “Find”function in the Finder. Here’s how:
1. In the Finder, navigate to the archive folder.2. Use the File menu to choose “Find…”.3. Use the popup menu to choose “Specific places”.4. Uncheck all items in the list.5. Drag and drop the icon for the archive folder on the list below the “Specific
places” popup.6. Set the criteria for the search (for example, “file name contains”).7. Click the Search button.8. Files matching the criteria will be shown in a “Search Results” window. Click
on the particular file to see its location. Double-click the folder containing thefile to open a Finder window containing that file.

Synchronize! Pro X Reference 75
Archive replaced and deleted files
Check this box to enable saving archive files. Choose the folder that will be thedestination for the archive.
Preserve free space
Check this box to keep a certain amount of space free on the disk containing thearchive. The oldest files in the archive will be deleted to keep the requiredamount of space available on the disk.
Group archive folders
Check this box to group files in the archive in chunks of a particular size. Enterthe size of the groups (650 MB, for example, to make it easy to save group foldersto CD-R) in the box.
It’s OK to manually delete any and all group folders inside the archive folder.You may want to delete a group folder after you’ve copied it to a permanentbackup medium like CD-R.
Archive only certain files…
Check this box to limit the files that are archived. Click the Choose button to setthe criteria.
Donʼt archive certain files…
Check this box to limit the files that are archived. Click the Choose button to setthe criteria. Files which meet the “Archive only certain files” criteria and alsomeet the “Don’t archive certain files” criteria will not be archived.
Archive files only in certain folders…
Check this box to limit the folders whose files are archived. Click the Choosebutton to set the criteria.
Donʼt archive files in certain folders…
Check this box to limit the files that are archived. Click the Choose button to setthe criteria. Files which meet the “Archive files only in certain folders” criteriaand also meet the “Don’t archive files in certain folders” criteria will not bearchived.
Remove archived files from backups
Check this box to automatically remove old archived files. Files archived morethan the specified number of days in the past are removed each time the backup

Synchronize! Pro X Reference 76
or sync is performed. The “Don’t remove files from backups” setting takesprecedence over this setting.
Donʼt remove files from backups
Check this box to prevent recently-archived files from being automaticallyremoved from the archive. If there is no space for new files to be copied to thedisk containing the archive, the oldest files are removed from the archive. Settingthis option prevents the removal of files archived from newer backups. Thissetting takes precedence over “Remove archived files from backups”.
Multiple Items
“Multiple Items” is used to include files and folders from different parts of adisk, or different disks, in a synchronization.
Any number of item pairs may be included.
Multiple Items settings
Add
Click this button to add an item pair.
Remove
Click this button to remove the selected item pair(s). At least one item pair mustbe in the list for “Multiple Items” to be active.

Synchronize! Pro X Reference 77
Choosing items in a pair
Click the item icon to choose the particular item to be synced. Two files or twofolders can be included in an item pair. When files are included in an item pair,the names of the files must be the same.
To choose invisible files or folders, hold down the Option key when you click theicon for the item.
Seeing the path of an item
To see the location of an item, hold down the Command key and click the iconfor the item.
Changing the order of item pairs
To move an item pair up or down in the list, click an item to select it and typecommand-up-arrow or command-down-arrow. The command key also has anapple outline on it.
Resolve aliases
When “Resolve aliases” is enabled, aliases may be used to include files andfolders in a synchronization, even if they actually reside elsewhere.
An alias is a file which contains information on the location of a file or folder. Itscontents “point” to the actual location of the file or folder. An alias is usefulbecause, in many cases, it can be used as the actual file or folder, while allowingthe actual file or folder to be located elsewhere.
To use an alias to include a file or folder in a synchronization, create an alias tothe file or folder in the Finder with Make Alias in the File menu. Drag the alias tothe folder to be synchronized. Check Resolve aliases in the Options menu in yourSynchronize! Pro X document.
When the folder is synchronized, the alias is “resolved”, which causes the alias tobe replaced with the file or folder itself, as if it were actually located where thealias is located.
Note: Changes were made to the way that aliases work starting with Panther(Mac OS X 10.3), and as a result, aliases may not work as you expect. Toavoid potential problems, we recommend that you use the “MultipleItems” feature rather than “Resolve aliases”.

Synchronize! Pro X Reference 78
Resolve aliases settings
Donʼt resolve aliases
Click this button to copy aliases as ordinary files.
Resolve top-level aliases only
Click this button to resolve only those aliases which are immediately within thefolder which appears in the setup document. Any alias in a folder which isnested inside the top-level folder will not be resolved.
Note: Remember that the name of the original file is used to find acorresponding file, not the name of the alias. It’s a good idea to give thealias a name similar to the name of the original it was created from, butit’s not necessary.

Synchronize! Pro X Reference 79
Monitoring
Use this option to monitor backups or synchronizations, and to receive emailwhen the backup or synchronization occurs, has errors, is missed, or doesn’tcomplete.
Monitoring settingsCheck “Report backup status” to enable monitoring of this backup orsynchronization.
When this box is checked, Synchronize! Pro X will report its status to the QdeaBackup Monitor, a specially-configured web server. The Qdea Backup Monitorwatches for the backup to occur, and sends emails based on settings you make.
Using this feature requires setting up an account on the Qdea Backup Monitor.Once you have an account, you can configure which notifications you want toreceive via email.
Once you have an account on the Qdea Backup Monitor, you can look at thestatus of your monitored backups using any web browser. You can see the recenthistory of backups, whether there were any errors, and you can examine the Logcontents for recent backups.

Synchronize! Pro X Reference 80
Enter a description of the purpose of the backup in Backup Description . Thisinformation will be visible when you look at the backup in the Qdea BackupMonitor.
Windows menu
The Windows menu shows all open windows. When you open sync setupdocuments, they are added to the Windows menu.
Use the Windows menu to show a particular window. Notice that the WaitingList, Status, Auto Syncs and Log windows are always present in the Windowsmenu. These windows are always available, although they may not be visible.
For more information about the Waiting List, Status, Log and Help windows, seethe section “Synchronize! Pro X Windows”, above.
The Windows menu is particularly useful when many Synchronize! Pro X setupdocuments are open at the same time. Use it to show the window for a particularsetup document.
The check mark in the Windows menu shows which window is active. If nowindows are active, no check mark will appear in the menu.

Requirements 81
RequirementsSynchronize! Pro X is designed to work effectively on all Macintosh computersrunning Mac OS X 10.3 or later.
Synchronize! Pro X supports AppleScript. For more information on AppleScriptsupport, see the Tips and Techniques section in this manual.
Synchronize! Pro X documents vary in their requirements for disk space. Whenlarge disks are synchronized with conflict checking turned on, disk spacerequirements can be substantial.

Feedback, Technical Support, and Upgrades 82
FeedbackSynchronize! Pro X can be what you’d like it to be. Makesuggestions and see them incorporated into the product.
Send us your suggestions and feedback via electronic or regularmail to:
U.S. MailQdeaTechnical Support2501 Skyblue CourtSt. Paul, MN 55110 USA
Technical SupportTechnical Support is available for Synchronize! Pro X via email,or by letter at the address above. Please allow 48 hours for aresponse to email.
Email [email protected]
Technical support is also available by telephone:+1 (651) 779-0640
Answers to common questions about Synchronize! Pro X areposted on the Qdea web site:
http://www.qdea.com
UpgradesNew versions of Synchronize! Pro X are published periodicallyon the Qdea web site.
For the latest version, check Qdea’s Web site:http://www.qdea.com
The latest version is available by visiting this direct URL:http://www.qdea.com/pages/downloads1.html

Index 83
Index
AAdd button – Multiple Items, 76Alert Me, 50Archive files only in certain folders, 75Archive folder organization, 74Archive only certain files, 75Archive replaced and deleted files, 75Arrow, 19Auto-Connect, 41, 42Auto-Connect dialog box, 43Automatically connect, 43AutoSync, 47AutoSync Preferences, 37AutoSyncs window, 26
BBeep, 37
CCancel, 24, 36Changing the order of item pairs, 77Choosing folders, 18Choosing items in a pair, 77Clear, 41Clear execute bit, 67Close, 40Close this document, 48Compare all attributes, 71Compare file creator and type, 71Compare file data, 71Compare file dates, 71Compare owner and group, 71Compare permissions, 71Compare selected attributes, 71Comparing files, 59Comparing files settings, 59Completion Options, 48Conflicts, 49Continue button, 25Copy, 41Copy ACLs, 69Copy ACLs settings, 69Copy Direction Arrow, 19Copy execute bit, 67Copy existing files only, 62Copy file permissions exactly, 66Copy folder permissions exactly, 67Copy locked state, 63Copy only files…, 52Copy only folders…, 55Copy owner and group, 67Copy permissions to all destination files, 66Copy permissions to all destination folders, 67Cut, 41

Index 84
DDefaultsPreferences, 30Delete files and folders not in the master folder, 20Disk Errors Preferences, 35Document windows, 18Don’t add AutoSync to the login list, 38Don’t archive certain files, 75Don’t archive files in certain folders, 75Don’t copy either file, 50Don’t copy empty folders, 62Don’t copy folders…, 56Don’t install AutoSync automatically, 38Don’t open Untitled window at startup, 28Don’t remove files from backups, 76Don’t resolve aliases, 78Don’t save anything in the log, 40Don’t set permissions of copied files and folders, 66Don’t show ‘no files to copy’ dialog, 29Don't check for conflicts, 50Don't copy any files…, 54Don't Start button, 47Down button, 26
EEdit menu, 41Eject disk, 49Extended attributes, 68Extended attributes settings, 68
FFast scan, 57Fast scan settings, 57Feedback, 82File Change Preferences, 34File Conflicts, 49File Errors Preferences, 36File menu, 40Files To Copy Preferences, 33Files to copy window, 21Finding previous versions of a file, 74Folder icon, 18Force unmount, 49
GGeneral Preferences, 28Group archive folders, 75
HHide after launch, 38

Index 85
IInclude file path, 40Install AutoSync, 38Installation, 4invisible files, 53
LLog all differences for each item, 72Log bytes that are different, 72Log file size, 39Log Preferences, 39Log the first difference, 72Log the names of copied files, 40Log window, 27Log Window Font, 39Log Window Size, 39
MMaster check box, 19Monitoring, 79Monitoring Preferences, 32Monitoring settings, 79Move files, 69Move the older file to the Conflicts Folder, 51Multiple Items, 76
NNew, 40
OOpen, 40Open button, 27Open in the background, 38Open the file, 49Options menu, 41Overwrite the older file, 51
PPaste, 41Pause button, 25PC Compatibility, 63PC Compatibility settings, 63Permissions, 65Permissions popup menu, 67Permissions popup menus, 67Preferences, 28Preserve free space, 75

Index 86
QQuit, 41, 49
RRemove archived files from backups, 75Remove button, 27Remove button – Multiple Items, 76Remove from list, 23Remove from list button, 26Reopen at startup, 20Requirements, 81Resolve aliases, 73, 77Resolve top-level aliases only, 78Retry, 36Retry button, 43Retry dialog box, 44Reversing copying direction, 23Revert, 41Run as ‘root’, 61
SSave, 40Save As, 41Seeing the path of an item, 77Set permissions of copied folders, 67Set privileges of permissions files, 67Setup type popup, 19Show files to copy, 20Show Log window at startup, 39Skip, 36Skip files, 62Skip immediately and log the error, 36Start, 24Start again every…, 47Start only on certain days, 47Start Options, 45Start Options dialog box, 45Start synchronization at a preset time, 47Start synchronization at login, 45Start synchronization before Quit, 46Start synchronization when disks become available, 46Start synchronization when document is opened, 46Start synchronization when folder changes, 46Status window, 24Stop button, 24Stop verifying after the first mismatch, 72Sync deleted files, 62Sync… button, 21Synchronize! Pro X menu, 28

Index 87
TTechnical Support, 82Triangle icons, 49
UUndo, 41Unmount disk, 49Up button, 26Upgrades, 82
VVerify all files and folders, 71Verify copied files and folders, 71Verify everything regardless of compare results, 72Verify files, 70
WWait forever, 36Waiting List window, 25Wake up computer A, 42Wake up computer B, 42Wake up settings dialog box, 42Warnings Preferences, 31When copying is complete, play, 29When copying is complete:, 48Windows menu, 80Windows, description of, 18