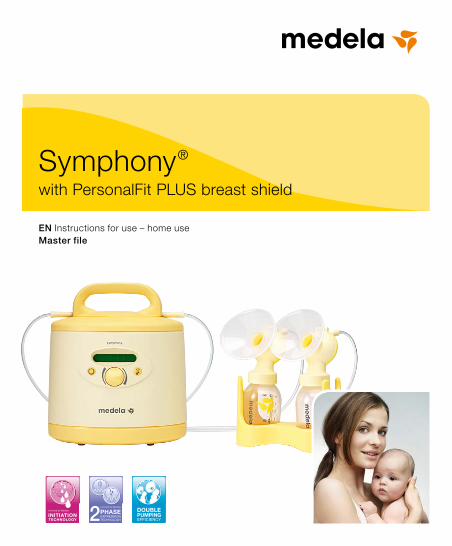
symphony - medela
TRANSCRIPT
EN Instructions for use – home useMaster file
EFFICIENCYINITIATION TECHNOLOGY
Symphony®
with PersonalFit PLUS breast shield
Thank you for choosing the Symphony breast pump. Breast milk is the natural choice for your baby, but there are reasons and situations where breastfeeding is not possible. For over 50 years, it has been Medela’s conviction that these mothers and babies can be supported. In close co-operation with breastfeeding experts, Medela, one of the market leaders, has researched and developed breast pumps that perfectly meet breastfeeding mothers’ needs. For mothers who insist on the best for their babies and themselves. Because you care.
EN04–41
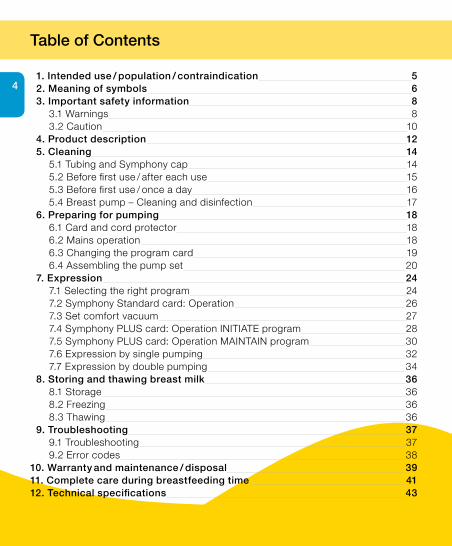
1. Intended use / population / contraindication 52. Meaning of symbols 63. Important safety information 8
3.1 Warnings 83.2 Caution 10
4. Product description 125. Cleaning 14
5.1 Tubing and Symphony cap 145.2 Before first use / after each use 155.3 Before first use / once a day 165.4 Breast pump – Cleaning and disinfection 17
6. Preparing for pumping 186.1 Card and cord protector 186.2 Mains operation 186.3 Changing the program card 196.4 Assembling the pump set 20
7. Expression 247.1 Selecting the right program 247.2 Symphony Standard card: Operation 267.3 Set comfort vacuum 277.4 Symphony PLUS card: Operation INITIATE program 287.5 Symphony PLUS card: Operation MAINTAIN program 307.6 Expression by single pumping 327.7 Expression by double pumping 34
8. Storing and thawing breast milk 368.1 Storage 368.2 Freezing 368.3 Thawing 36
9. Troubleshooting 379.1 Troubleshooting 379.2 Error codes 38
10. Warranty and maintenance / disposal 3911. Complete care during breastfeeding time 4112. Technical specifications 43
Table of Contents
4
1. Intended use / population / contraindication
5Intended useThe Symphony breast pump is intended to be used by lactating women in the hospital or home environment for expressing breast milk.
Indications for useThe Symphony breast pump is indicated to initiate, build and maintain a lactating woman’s milk supply. It is also indicated tol alleviate the symptoms of engorgement and milk stasis by expressing milk.l support the healing process in case of mastitis by removing breastmilk from
the affected breast. l relieve sore and cracked nipples.l bring out flat or inverted nipples.l provide breast milk for infants which are not able to directly breastfeed
(e.g. latch-on problems, cleft palate and premature infants).
ContraindicationsThere are no known contraindications for the Symphony breast pump and pump sets.
Product descriptionThe Symphony multi-user breast pump is provided with the Symphony PLUS program card, which generates the pump suction patterns. The program card contains two pump programs. The goal of the INITIATE program is to initiate milk production with Medela’s initiation technology. The MAINTAIN program is designed to build and maintain milk production with the 2-Phase Expression technology.
In some cases, the Symphony breast pump is provided with the Standard program card to generate the pump suction patterns. This program is designed to build and maintain milk production with 2-Phase Expression technology. While the Standard card can be used to initiate lactation, Medela recommends using the INITIATE program of the Symphony PLUS program card.
The 2-Phase Expression technology mimics the baby’s natural sucking rhythm. Short, stimulating cycles in the stimulation phase are followed by longer ones in the expression phase.
* Symphony is a trademark of Medela AG
6
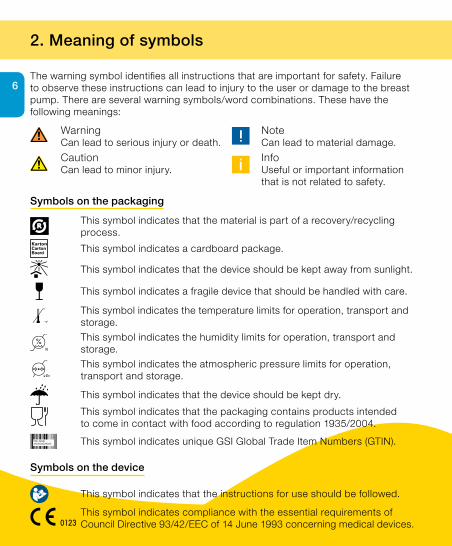
2. Meaning of symbols
The warning symbol identifies all instructions that are important for safety. Failure to observe these instructions can lead to injury to the user or damage to the breast pump. There are several warning symbols/word combinations. These have the following meanings:
Symbols on the packaging
This symbol indicates that the material is part of a recovery/recycling process.
This symbol indicates a cardboard package.
This symbol indicates that the device should be kept away from sunlight.
This symbol indicates a fragile device that should be handled with care.
This symbol indicates the temperature limits for operation, transport and storage.
This symbol indicates the humidity limits for operation, transport and storage.
This symbol indicates the atmospheric pressure limits for operation, transport and storage.
This symbol indicates that the device should be kept dry.
This symbol indicates that the packaging contains products intended to come in contact with food according to regulation 1935/2004.
This symbol indicates unique GSI Global Trade Item Numbers (GTIN).
Symbols on the device
This symbol indicates that the instructions for use should be followed.
This symbol indicates compliance with the essential requirements of Council Directive 93/42/EEC of 14 June 1993 concerning medical devices.
WarningCan lead to serious injury or death.
NoteCan lead to material damage.
CautionCan lead to minor injury.
InfoUseful or important information that is not related to safety.
i
i
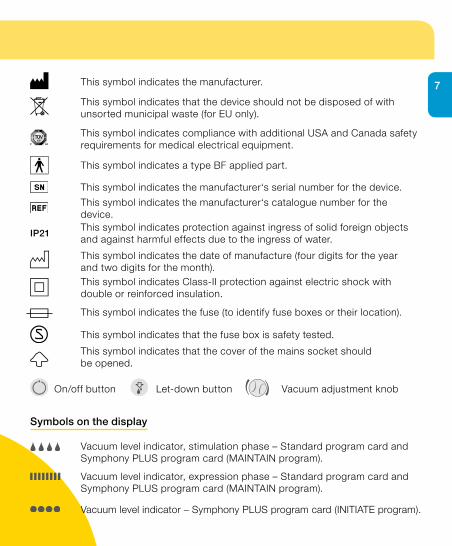
7This symbol indicates the manufacturer.
This symbol indicates that the device should not be disposed of with unsorted municipal waste (for EU only).
This symbol indicates compliance with additional USA and Canada safety requirements for medical electrical equipment.
This symbol indicates a type BF applied part.
This symbol indicates the manufacturer‘s serial number for the device.
This symbol indicates the manufacturer‘s catalogue number for the device.
IP21This symbol indicates protection against ingress of solid foreign objects and against harmful effects due to the ingress of water.
This symbol indicates the date of manufacture (four digits for the year and two digits for the month).This symbol indicates Class-II protection against electric shock with double or reinforced insulation.
This symbol indicates the fuse (to identify fuse boxes or their location).
This symbol indicates that the fuse box is safety tested.
This symbol indicates that the cover of the mains socket should be opened.
On/off button Let-down button Vacuum adjustment knob
Symbols on the display
Vacuum level indicator, stimulation phase – Standard program card and Symphony PLUS program card (MAINTAIN program).
Vacuum level indicator, expression phase – Standard program card and Symphony PLUS program card (MAINTAIN program).
Vacuum level indicator – Symphony PLUS program card (INITIATE program).
3. Important safety information
83.1 Warnings
Failure to follow the instructions/safety information below can lead to danger from the device. This information is subject to technical changes.
READ ALL INSTRUCTIONS BEFORE USE
WARNING: To reduce the risk of electrocution:
l Keep the device dry. Never immerse in water or other liquids!l Do not spray or pour liquid directly onto the pump unit.l Do not place or store the device where it can fall or be pulled into a sink or tub.l Do not use the Symphony breast pump while bathing or showering.l Do not reach for any electrical device if it has fallen into water. Unplug it
immediately.l Always unplug the Symphony breast pump immediately after use.
WARNING: To avoid fire, electrocution or serious burns:
l The Symphony breast pump is not heat-resistant: Keep it away from radiators and naked flames.
l Do not expose the motor unit to direct sunlight.I Do not operate the Symphony breast pump where aerosol (spray) products are
being used or where oxygen is being administered.I Do not use the device in the presence of a flammable anaesthetic mixture with air,
or with oxygen or nitrous oxide.I Do not thaw frozen breast milk and do not warm breast milk in a microwave or in a
pan of boiling water. Microwaving can cause severe burns to the baby’s mouth from hot spots that develop in the milk during heating. Microwaving can also change the composition of breast milk.
I Use only the power cord that comes with the Symphony breast pump. Make sure that its rated voltage is compatible with the power source.
l Never operate an electrical device if it has a damaged power cord, if it is not working properly, if it has been dropped or damaged, or dropped into water.
I Always inspect the power cord wires prior to use for damage or exposed wire. If any damage is found, stop using the power cord immediately. Contact the local Medela representative or rental agency.
9l The Symphony breast pump should never be left unattended when plugged into
a power source.l Separation from the mains is only assured by disconnecting the power cord
from the wall socket.l Position the pump unit such that it is easy to disconnect the power cord from
the wall socket.l Keep the power cord away from heated surfaces.
WARNING: To avoid health risks and reduce risk of injury:
I Clean all reusable parts that come in contact with the breast and breast milk prior to first use as shown in chapter 5.
I Clean parts that come in contact with the breast and breast milk immediately after use.
I The pump sets are personal care items intended for use by a single user only. They should not be shared between mothers.
I Do not continue pumping for more than two consecutive pumping sessions if no results are achieved.
I If problems or pain occur, consult a lactation specialist.I Never use the pump during pregnancy, unless prescribed/advised by a physician,
as pumping can induce labour. I For mothers who are infected with Hepatitis B, Hepatitis C or Human Immuno-
deficiency Virus (HIV): Pumping breast milk will not reduce or remove the risk of transmitting the virus to the baby through breast milk.
I Inspect all components of the Symphony breast pump as well as all parts of the pump set(s) before each use.
l Never use a device, components or parts that are damaged. l Never use a device, components or parts if dirt, mould or other contamination
is visible. l Replace mouldy, damaged or worn parts.l There are no user-serviceable parts inside the Symphony pump unit. Repairs must
be performed only by an authorised service agency. Do not repair the parts your-self! No modifications to the device are permitted.
l Use the Symphony breast pump only for its intended use as described in this manual.
3. Important safety information
WARNING: To avoid health risks and reduce risk of injury:
l Use only original Medela accessories.l Do not use attachments not recommended by Medela, as this may cause hazards.l Do not modify any parts of the pump or the pump set.l Do not use the Symphony breast pump while sleeping or overly drowsy.l Do not use the Symphony breast pump while operating a motor vehicle.l Do not drive while using hands-free pumping.l Never drop or insert any object into any opening or tubing.l Do not use the pump outdoors.l Supervision is necessary when the Symphony breast pump is used in the vicinity
of children.l Never leave packaging and components unattended. Keep them out of reach
of children.l The Symphony breast pump is EMC-tested in conformity with the requirements of
IEC 60601-1-2:2007 and 60601-1-2:2014 4th Edition according to clause 7 and 8.9. l Radio frequency communications equipment such as wireless home network
devices, mobile phones, cordless telephones and their base stations as well as walkie-talkies can affect the Symphony breast pump. Due to electromagnetic com-patibility (EMC), a distance of at least 30 cm between the Symphony breast pump and the wireless equipment is recommended.
l The Symphony electric breast pump should not be used adjacent to or stacked with other equipment. If adjacent or stacked use is necessary, the Symphony elec-tric breast pump should be monitored to verify normal operation in the configura-tion in which it will be used..
Important
l Plastic bottles and component parts become brittle when frozen and may break when dropped.
l Also, bottles and component parts may become damaged if mishandled, e.g. dropped, over-tightened, or knocked over.
l Take appropriate care in handling bottles and components.l Do not use the breast milk if bottles or components become damaged.
10
113.2 Caution
Failure to follow the instructions/safety information given below can lead to minor injury. This information is subject to technical changes.
CAUTION: To avoid risk of contamination:
I Wash your hands thoroughly with soap and water before touching the breast pump, the pump set(s) and breasts. Avoid touching the inside of containers or lids.
I Only use drinking-quality tap or bottled water for cleaning.I Do not store wet or damp parts, as mould may develop.
CAUTION: To avoid health risks and reduce risk of injury:
I Pump only with the breast pump in an upright position. I Pressing shields too firmly onto the breasts may affect the milk flow.I Do not express with a vacuum that is too high and uncomfortable (painful). The
pain, along with potential breast and nipple trauma, may decrease the milk output.I Do not attempt to remove the breast shield from the breast while pumping. Turn the
breast pump off and break the seal between the breast and the breast shield with a finger, then remove the breast shield from the breast.
I If pumping is uncomfortable or causing pain, turn the unit off, break the seal between the breast and the breast shield with a finger and remove the breast shield from the breast.
I Do not shorten the tubing between the breast shield and the pump.I Do not use abrasive washing-up liquids/detergents when cleaning the breast
pump, pump components or pump set parts.I Never put the breast pump unit in water, as this can cause permanent damage
to the breast pump.I Do not use Medela Symphony pump sets with a non-compatible breast pump.I Do not use the Medela Symphony breast pump with non-compatible pump sets.I Do not use the pump sets for any other purpose than expressing breast milk.
CAUTION: To reduce risk of electrocution:
I Plug the power cord into the breast pump first and then into the wall socket.I Unplug the breast pump before cleaning it.
4. Product description
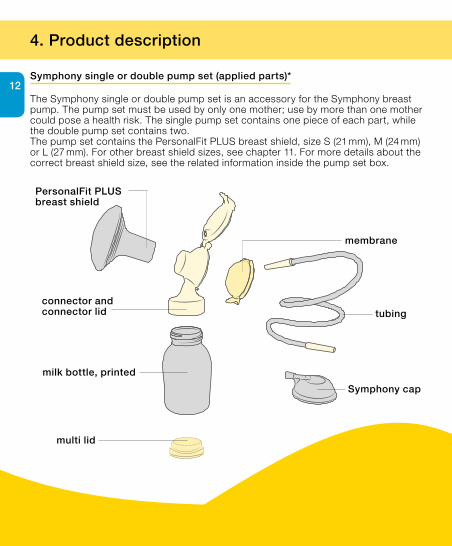
Symphony single or double pump set (applied parts)*
The Symphony single or double pump set is an accessory for the Symphony breast pump. The pump set must be used by only one mother; use by more than one mother could pose a health risk. The single pump set contains one piece of each part, while the double pump set contains two.The pump set contains the PersonalFit PLUS breast shield, size S (21 mm), M (24 mm) or L (27 mm). For other breast shield sizes, see chapter 11. For more details about the correct breast shield size, see the related information inside the pump set box.
PersonalFit PLUS breast shield
membrane
milk bottle, printed
tubing
multi lid
Symphony cap
12
connector and connector lid
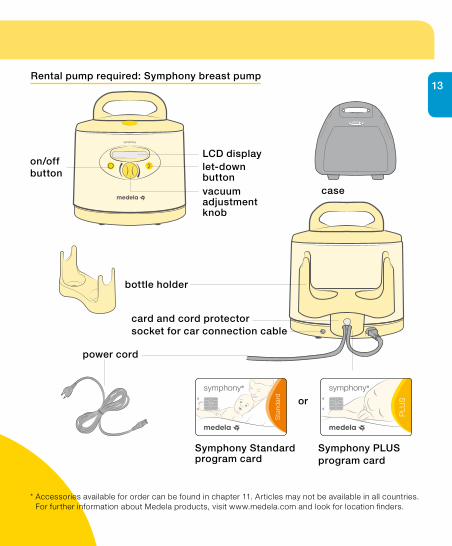
Rental pump required: Symphony breast pump
case
13
on/offbutton
LCD displaylet-down buttonvacuum adjustment knob
bottle holder
card and cord protectorsocket for car connection cable
power cord
Symphony Standard program card
Symphony PLUS program card
PLU
S
Sta
ndar
d
or
* Accessories available for order can be found in chapter 11. Articles may not be available in all countries. For further information about Medela products, visit www.medela.com and look for location finders.
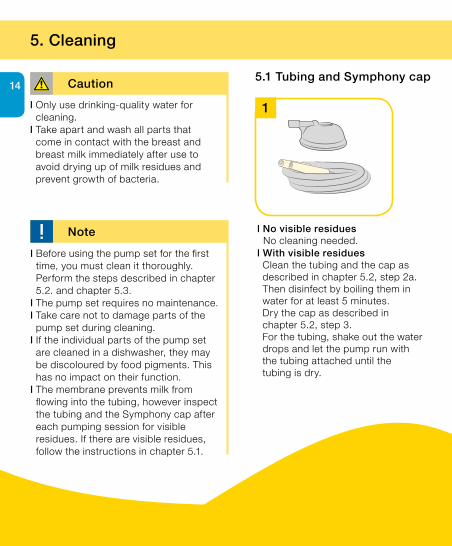
5.1 Tubing and Symphony cap
5. Cleaning
l Only use drinking-quality water for cleaning.
l Take apart and wash all parts that come in contact with the breast and breast milk immediately after use to avoid drying up of milk residues and prevent growth of bacteria.
Caution
i
l Before using the pump set for the first time, you must clean it thoroughly. Perform the steps described in chapter 5.2. and chapter 5.3.
l The pump set requires no maintenance.l Take care not to damage parts of the
pump set during cleaning.l If the individual parts of the pump set
are cleaned in a dishwasher, they may be discoloured by food pigments. This has no impact on their function.
l The membrane prevents milk from flowing into the tubing, however inspect the tubing and the Symphony cap after each pumping session for visible residues. If there are visible residues, follow the instructions in chapter 5.1.
Note
14
l No visible residues No cleaning needed.l With visible residues Clean the tubing and the cap as described in chapter 5.2, step 2a. Then disinfect by boiling them in water for at least 5 minutes. Dry the cap as described in chapter 5.2, step 3. For the tubing, shake out the water drops and let the pump run with the tubing attached until the tubing is dry.
1
As an alternative to the previous step 2a, you can also clean the pump set in the dishwasher. Place all parts on the top rack or in the cutlery section. Use a commercially available dishwashing detergent.
3
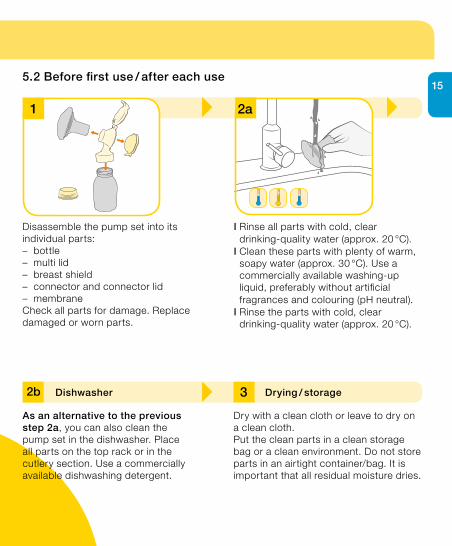
5.2 Before first use / after each use
1
Disassemble the pump set into its individual parts:– bottle– multi lid– breast shield– connector and connector lid– membrane Check all parts for damage. Replace damaged or worn parts.
2b
15
Dishwasher Drying / storage
Dry with a clean cloth or leave to dry on a clean cloth.Put the clean parts in a clean storage bag or a clean environment. Do not store parts in an airtight container/bag. It is important that all residual moisture dries.
2a
l Rinse all parts with cold, clear drinking-quality water (approx. 20 °C).
l Clean these parts with plenty of warm, soapy water (approx. 30 °C). Use a commercially available washing-up liquid, preferably without artificial fragrances and colouring (pH neutral).
l Rinse the parts with cold, clear drinking-quality water (approx. 20 °C).
1
5. Cleaning
5.3 Before first use / once a day
l Do not spray or pour liquid directly onto the pump.
l Only use drinking-quality water for cleaning.
l Take apart and wash all parts that come in contact with the breast and breast milk immediately after use to avoid drying up of milk residues and prevent growth of bacteria.
l For chapter 5.4 Breast pump – Cleaning and disinfection: Unplug the breast pump before cleaning.
Caution
i
l For chapter 5.3, step 2: When boiling, a teaspoon of citric acid may be added to the water to avoid a build-up of limescale.
Note
16
Disassemble the pump set into its individual parts:– bottle– multi lid– breast shield– connector and connector lid– membrane Check all parts for damage. Replace damaged or worn parts.
11
5.3 Before first use / once a day
3
Dry with a clean cloth or leave to dry on a clean cloth.Put the clean parts in a clean storage bag or a clean environment. Do not store parts in an airtight container/bag. It is important that all residual moisture dries.
Drying / storage
21
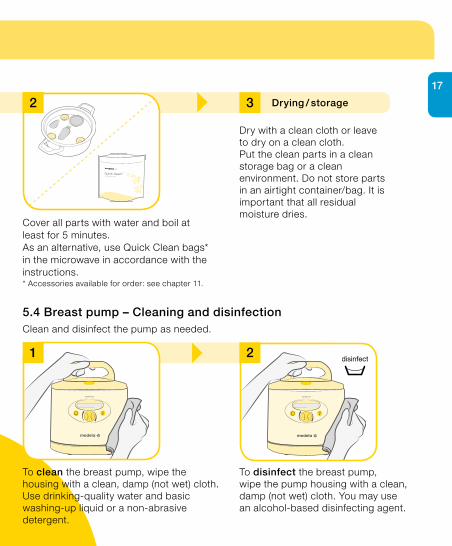
To disinfect the breast pump, wipe the pump housing with a clean, damp (not wet) cloth. You may use an alcohol-based disinfecting agent.
To clean the breast pump, wipe the housing with a clean, damp (not wet) cloth. Use drinking-quality water and basic washing-up liquid or a non-abrasive detergent.
5.4 Breast pump – Cleaning and disinfection
2
Cover all parts with water and boil at least for 5 minutes.As an alternative, use Quick Clean bags* in the microwave in accordance with the instructions.* Accessories available for order: see chapter 11.
17
Clean and disinfect the pump as needed.
2
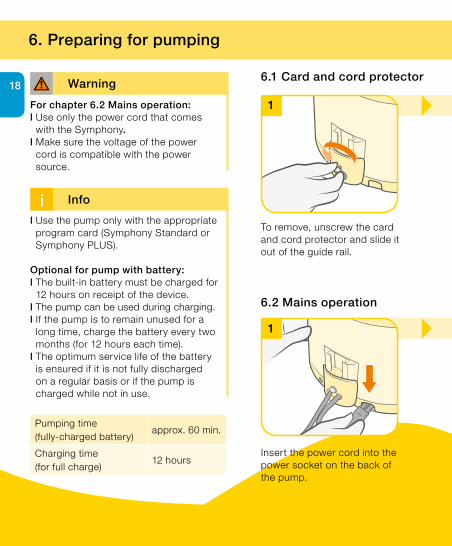
6. Preparing for pumping
For chapter 6.2 Mains operation:l Use only the power cord that comes
with the Symphony.l Make sure the voltage of the power
cord is compatible with the power source.
Warning
l Use the pump only with the appropriate program card (Symphony Standard or Symphony PLUS).
Optional for pump with battery:l The built-in battery must be charged for
12 hours on receipt of the device.l The pump can be used during charging.l If the pump is to remain unused for a
long time, charge the battery every two months (for 12 hours each time).
l The optimum service life of the battery is ensured if it is not fully discharged on a regular basis or if the pump is charged while not in use.
Infoi
1
6.1 Card and cord protector
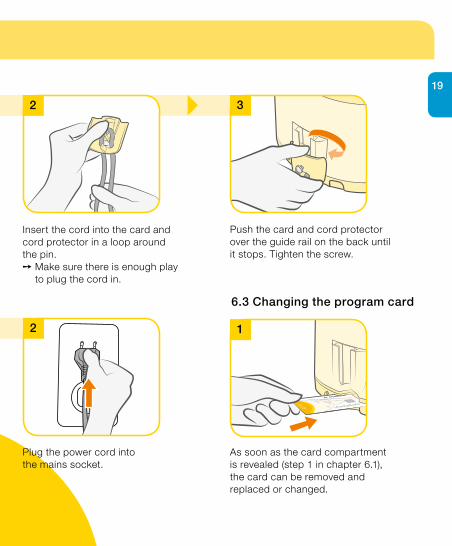
To remove, unscrew the card and cord protector and slide it out of the guide rail.
1
Insert the power cord into the power socket on the back of the pump.
6.2 Mains operation
Pumping time (fully-charged battery)
approx. 60 min.
Charging time (for full charge)
12 hours
18
6. Preparing for pumping
6.1 Card and cord protector
2 3
Insert the cord into the card and cord protector in a loop around the pin. Make sure there is enough play
to plug the cord in.
Push the card and cord protector over the guide rail on the back until it stops. Tighten the screw.
6.3 Changing the program card
PLUS
12
Plug the power cord into the mains socket.
19
As soon as the card compartment is revealed (step 1 in chapter 6.1), the card can be removed and replaced or changed.
6. Preparing for pumping
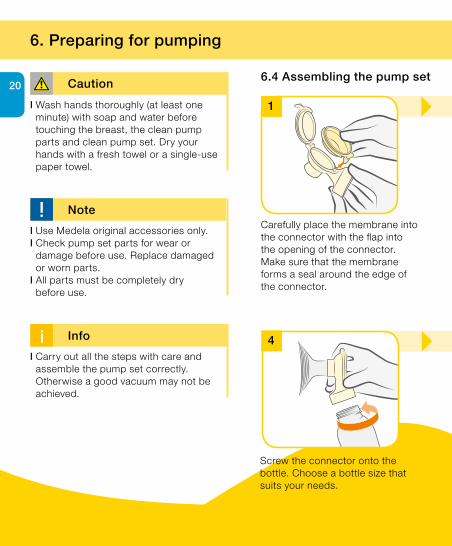
l Wash hands thoroughly (at least one minute) with soap and water before touching the breast, the clean pump parts and clean pump set. Dry your hands with a fresh towel or a single-use paper towel.
Caution
i
l Use Medela original accessories only.l Check pump set parts for wear or
damage before use. Replace damaged or worn parts.
l All parts must be completely dry before use.
Note
l Carry out all the steps with care and assemble the pump set correctly. Otherwise a good vacuum may not be achieved.
Infoi
206.4 Assembling the pump set
Carefully place the membrane into the connector with the flap into the opening of the connector. Make sure that the membrane forms a seal around the edge of the connector.
Screw the connector onto the bottle. Choose a bottle size that suits your needs.
1
4
21
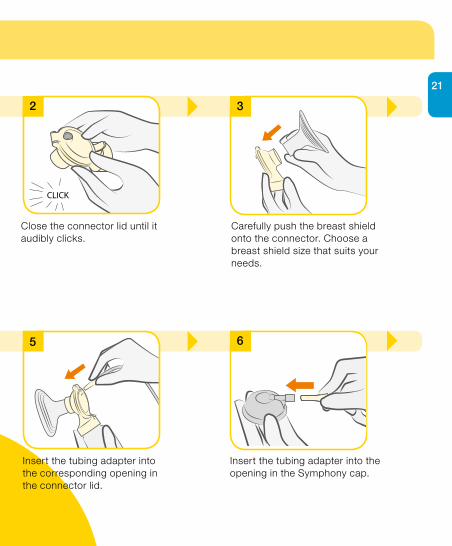
Close the connector lid until it audibly clicks.
Carefully push the breast shield onto the connector. Choose a breast shield size that suits your needs.
Insert the tubing adapter into the opening in the Symphony cap.
Insert the tubing adapter into the corresponding opening in the connector lid.
32
5 6
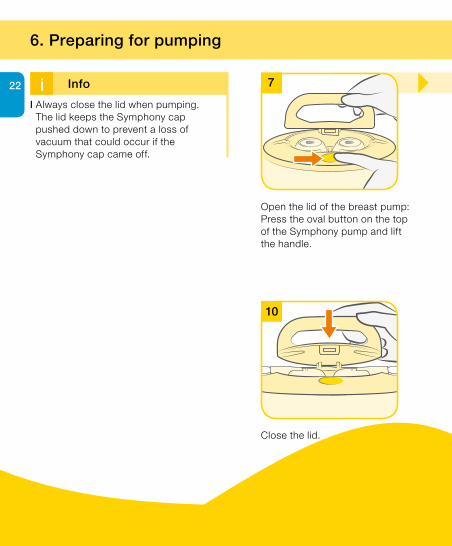
Open the lid of the breast pump: Press the oval button on the top of the Symphony pump and lift the handle.
7
6. Preparing for pumping
Close the lid.
10
l Always close the lid when pumping. The lid keeps the Symphony cap pushed down to prevent a loss of vacuum that could occur if the Symphony cap came off.
Infoi22
9
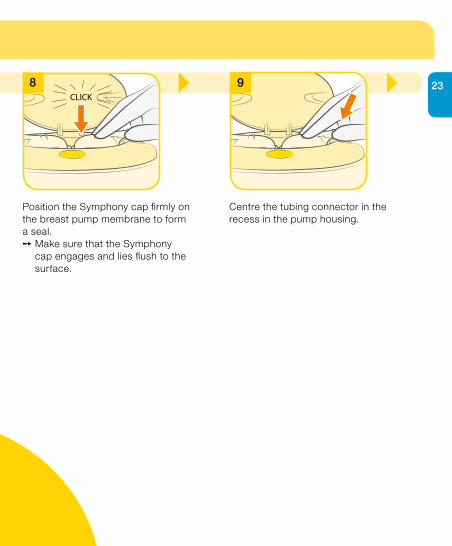
Centre the tubing connector in the recess in the pump housing.
8 23
Position the Symphony cap firmly on the breast pump membrane to form a seal. Make sure that the Symphony
cap engages and lies flush to the surface.
24
7. Expression
7.1 Selecting the right program
The Symphony breast pump is installed with either the Symphony PLUS program card or Symphony Standard program card which generate the pump suction patterns.
The Symphony PLUS program card contains two pump programs. The aim of the INITIATE program is to initiate milk production with Medela’s initiation technology. The MAINTAIN program is designed to build and maintain milk production with the 2-Phase Expression technology.
The Standard program card is designed to build-up and maintain milk production with the 2-Phase Expression technology. This program is identical to the MAINTAIN program. While the Standard card can be used to initiate lactation, Medela recommends using the INITIATE program of the Symphony PLUS program card.
Contact your midwife or breastfeeding and lactation consultant if you are experiencing difficulties in initiating lactation or for further information on which program to use.
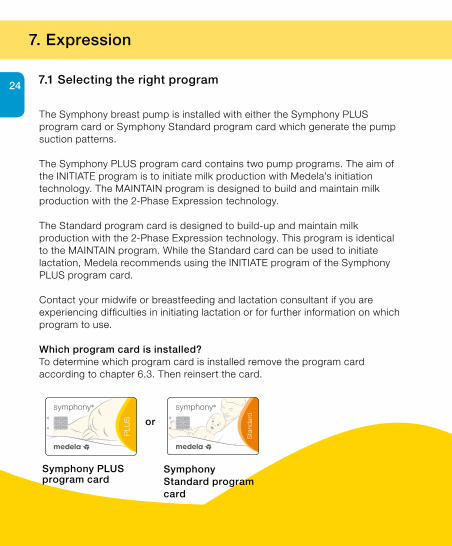
Which program card is installed?To determine which program card is installed remove the program card according to chapter 6.3. Then reinsert the card.
Symphony PLUSprogram card
Symphony Standard program card
or
Sta
ndar
d
PLU
S
7. Expression
25
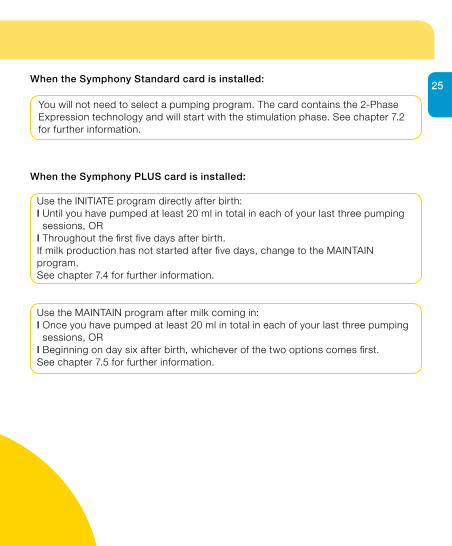
Use the INITIATE program directly after birth:l Until you have pumped at least 20 ml in total in each of your last three pumping
sessions, ORl Throughout the first five days after birth.If milk production has not started after five days, change to the MAINTAIN program.See chapter 7.4 for further information.
You will not need to select a pumping program. The card contains the 2-Phase Expression technology and will start with the stimulation phase. See chapter 7.2 for further information.
When the Symphony PLUS card is installed:
When the Symphony Standard card is installed:
Use the MAINTAIN program after milk coming in:l Once you have pumped at least 20 ml in total in each of your last three pumping
sessions, ORl Beginning on day six after birth, whichever of the two options comes first.See chapter 7.5 for further information.
26
7. Expression
i
l Always disconnect the Symphony from the power source after expression.
Note
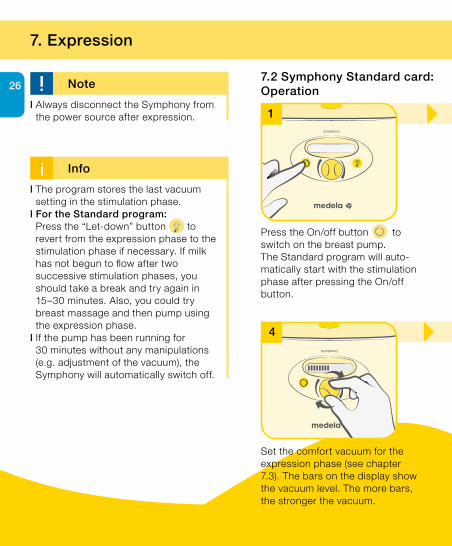
l The program stores the last vacuum setting in the stimulation phase.
l For the Standard program: Press the “Let-down” button to revert from the expression phase to the stimulation phase if necessary. If milk has not begun to flow after two successive stimulation phases, you should take a break and try again in 15–30 minutes. Also, you could try breast massage and then pump using the expression phase.
l If the pump has been running for 30 minutes without any manipulations (e.g. adjustment of the vacuum), the Symphony will automatically switch off.
Infoi
Press the On/off button to switch on the breast pump. The Standard program will auto-matically start with the stimulation phase after pressing the On/off button.
7.2 Symphony Standard card:Operation
1
4
Set the comfort vacuum for the expression phase (see chapter 7.3). The bars on the display show the vacuum level. The more bars, the stronger the vacuum.

7.2 Symphony Standard card:Operation 27
3
The pump will automatically switch to the expression phase after two minutes. If the milk starts to flow sooner, press
the Let-down button to change to the expression phase.
2
Set the comfort vacuum for the stimulation phase (see chapter 7.3).The drops on the display show the vacuum level. The more drops, the stronger the vacuum.
25
Continue pumping until the breast feels well drained and soft all over (Medela recommends a pumping time of at least 15 minutes). Switch off the pump by pressing the On/off button .
21
Set the comfort vacuum by rotating the vacuum adjustment knob. First rotate to the right to increase the vacuum until you feel a slight discomfort. Then rotate to the left to reduce the vacuum until it becomes comfortable.
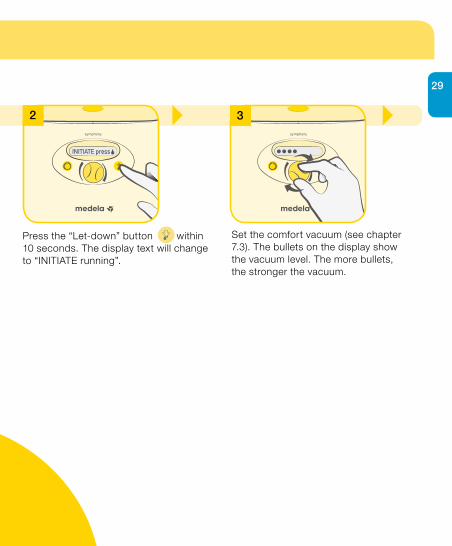
7.3 Set comfort vacuum
28
7. Expression
i
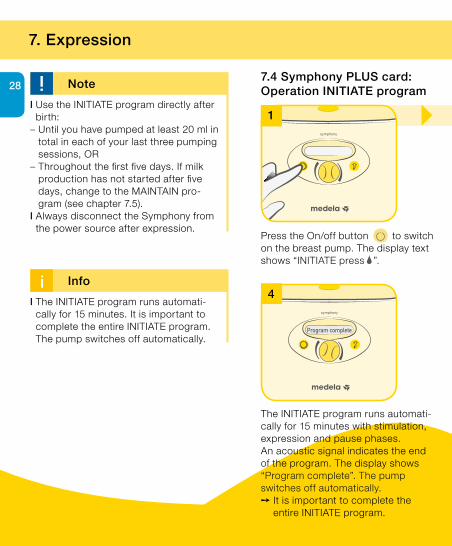
l Use the INITIATE program directly after birth:
– Until you have pumped at least 20 ml in total in each of your last three pumping sessions, OR
– Throughout the first five days. If milk production has not started after five days, change to the MAINTAIN pro-gram (see chapter 7.5).
l Always disconnect the Symphony from the power source after expression.
Note
l The INITIATE program runs automati-cally for 15 minutes. It is important to complete the entire INITIATE program. The pump switches off automatically.
Infoi
Program complete
4
The INITIATE program runs automati-cally for 15 minutes with stimulation, expression and pause phases. An acoustic signal indicates the end of the program. The display shows “Program complete”. The pump switches off automatically. It is important to complete the
entire INITIATE program.
Press the On/off button to switch on the breast pump. The display text shows “INITIATE press ”.
7.4 Symphony PLUS card:Operation INITIATE program
1
7. Expression
7.4 Symphony PLUS card:Operation INITIATE program 29
3
Press the “Let-down” button within 10 seconds. The display text will change to “INITIATE running”.
INITIATE press
32
Set the comfort vacuum (see chapter7.3). The bullets on the display showthe vacuum level. The more bullets,the stronger the vacuum.
7. Expression
30
i
l Use the MAINTAIN program after milk coming in:
– Once you have pumped at least 20 ml in total in each of your last three pumping sessions, OR
– Beginning on day six, whichever of the two options comes first.
l Always disconnect the Symphony from the power source after expression.
Note
l The program stores the last vacuum setting in the stimulation phase.
l For the MAINTAIN program: Press the “Let-down” button to revert from the expression phase to the stimulation phase if necessary. If milk has not begun to flow after two successive stimulation phases, you should take a break and try again in 15–30 minutes. Also, you could try breast massage and then pump using the expression phase.
l If the pump has been running for 30 minutes without any manipulations (e.g. adjustment of the vacuum), the Symphony will automatically switch off.
Infoi
4
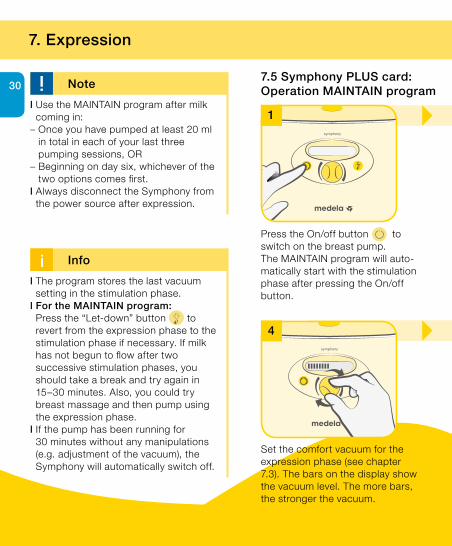
Set the comfort vacuum for the expression phase (see chapter 7.3). The bars on the display show the vacuum level. The more bars, the stronger the vacuum.
Press the On/off button to switch on the breast pump. The MAINTAIN program will auto-matically start with the stimulation phase after pressing the On/off button.
7.5 Symphony PLUS card:Operation MAINTAIN program
1
7. Expression
31
2
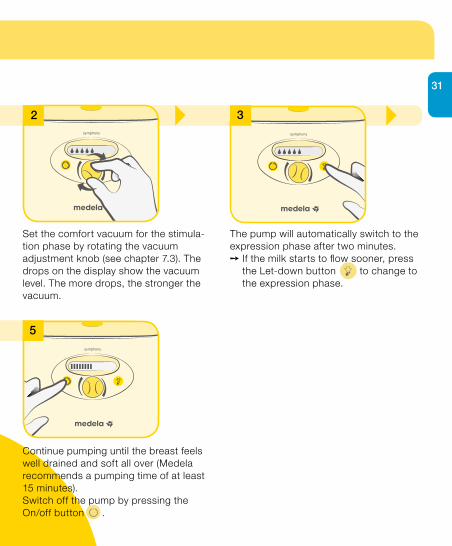
Set the comfort vacuum for the stimula-tion phase by rotating the vacuum adjustment knob (see chapter 7.3). The drops on the display show the vacuum level. The more drops, the stronger the vacuum.
3
The pump will automatically switch to the expression phase after two minutes. If the milk starts to flow sooner, press
the Let-down button to change to the expression phase.
5
Continue pumping until the breast feels well drained and soft all over (Medela recommends a pumping time of at least 15 minutes).Switch off the pump by pressing the On/off button .
7. Expression
l Wash hands thoroughly (at least one minute) with soap and water before touching the breast, the clean pump and the clean pump set parts. Dry your hands with a fresh towel or a single-use paper towel.
l Wipe the breast with a warm cloth (do not use alcohol) before pumping.
l Do not hold the pump set by the bottle during pumping. This can lead to blockage of the milk ducts and engorgement.
l Contact the midwife or breastfeeding and lactation consultant if only minimal or no milk can be expressed or if expression is painful.
Caution
i
l Always disconnect the Symphony from the power source after expression.
Note
l Do not kink the tubing during expres-sion.
Infoi
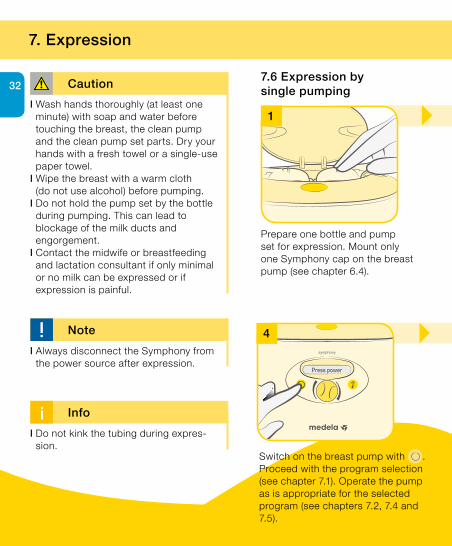
Prepare one bottle and pump set for expression. Mount only one Symphony cap on the breast pump (see chapter 6.4).
7.6 Expression by single pumping
1
32
Press power
Switch on the breast pump with . Proceed with the program selection (see chapter 7.1). Operate the pump as is appropriate for the selected program (see chapters 7.2, 7.4 and 7.5).
4
7. Expression
3
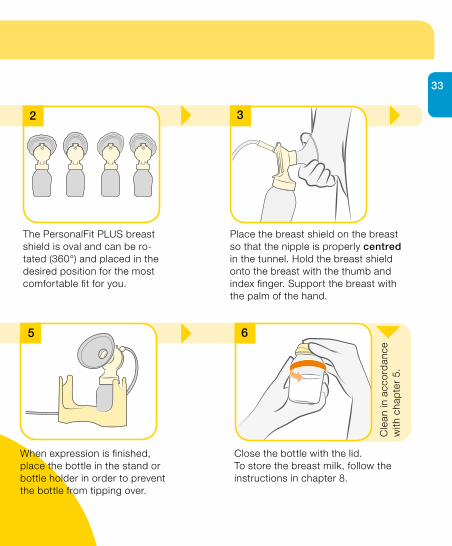
Place the breast shield on the breast so that the nipple is properly centred in the tunnel. Hold the breast shield onto the breast with the thumb and index finger. Support the breast with the palm of the hand.
Cle
an in
acc
ord
ance
w
ith c
hap
ter
5.
Close the bottle with the lid. To store the breast milk, follow the instructions in chapter 8.
33
65
When expression is finished, place the bottle in the stand or bottle holder in order to prevent the bottle from tipping over.
2
The PersonalFit PLUS breast shield is oval and can be ro-tated (360°) and placed in the desired position for the most comfortable fit for you.

7. Expression
Prepare two bottles and pump sets for expression. Mount the Symphony caps on the breast pump (see chapter 6.4).
7.7 Expression by double pumping
1l Wash hands thoroughly (at least one
minute) with soap and water before touching the breast, the clean pump and the clean pump set parts. Dry your hands with a fresh towel or a single-use paper towel.
l Wipe the breast with a warm cloth (do not use alcohol) before pumping.
l Do not hold the pump set by the bottle during pumping. This can lead to blockage of the milk ducts and engorgement.
l Contact the midwife or breastfeeding and lactation consultant if only minimal or no milk can be expressed or if expression is painful.
Caution
i
l Always disconnect the Symphony from the power source after expression.
Note
l Double pumping saves time and increases the energy content of the milk. Milk production may be increased and maintained over the long term. Medela recommends double pumping.
l Do not kink the tubing during expres-sion.
Infoi
Place the breast shield of the second bottle on the other breast so that the nipple is properly centred in the tunnel. Operate the pump as appropriate for the selected program (see chapters 7.3, 7.5 and 7.6).
4
34

7. Expression
Place the breast shield of one bottle on the first breast so that the nipple is prop erly centred in the tunnel. The PersonalFit PLUS breast shield is oval and can be rotated (360°) and placed in the desired position for the most comfortable fit for you. To learn how to hold the breast shield correctly see chapter 7.6, step 3.
5
When expression is finished, place the bottles in the stand or bottle holder in order to prevent the bottles from tipping over.
Cle
an in
acc
ord
ance
w
ith c
hap
ter
5.
Close the bottles with the lid.To store the breast milk, follow the instructions in chapter 8.
Press power
Switch on the breast pump with . Proceed with the program selection (see chapter 7.2).
3
35
6
2
8. Storing and thawing breast milk
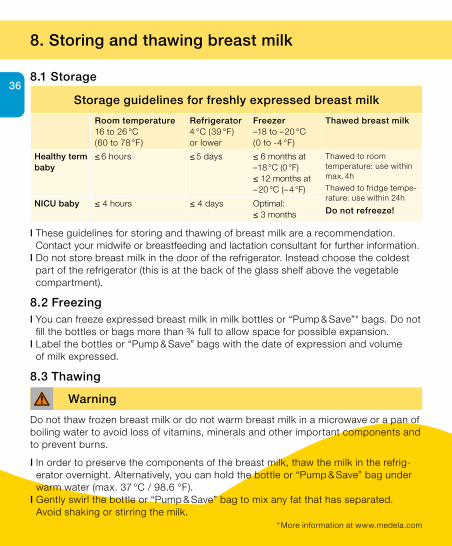
l These guidelines for storing and thawing of breast milk are a recommendation. Contact your midwife or breastfeeding and lactation consultant for further information.
l Do not store breast milk in the door of the refrigerator. Instead choose the coldest part of the refrigerator (this is at the back of the glass shelf above the vegetable compartment).
l You can freeze expressed breast milk in milk bottles or “Pump & Save”* bags. Do not fill the bottles or bags more than ¾ full to allow space for possible expansion.
l Label the bottles or “Pump & Save” bags with the date of expression and volume of milk expressed.
Do not thaw frozen breast milk or do not warm breast milk in a microwave or a pan of boiling water to avoid loss of vitamins, minerals and other important components and to prevent burns.
I ln order to preserve the components of the breast milk, thaw the milk in the refrig-erator overnight. Alternatively, you can hold the bottle or “Pump & Save” bag under warm water (max. 37 °C / 98.6 °F).
I Gently swirl the bottle or “Pump & Save” bag to mix any fat that has separated. Avoid shaking or stirring the milk.
8.2 Freezing
8.3 Thawing
Warning
368.1 Storage
Storage guidelines for freshly expressed breast milk
Room temperature16 to 26 °C ( 60 to 78 °F )
Refrigerator4 °C ( 39 °F ) or lower
Freezer–18 to – 20 °C ( 0 to -4 °F )
Thawed breast milk
Healthy term baby
≤ 6 hours ≤ 5 days ≤ 6 months at –18 °C (0 °F)≤ 12 months at – 20 °C (– 4 °F)
Thawed to room temperature: use within max. 4h
Thawed to fridge tempe-rature: use within 24h
Do not refreeze!NICU baby ≤ 4 hours ≤ 4 days Optimal:
≤ 3 months
* More information at www.medela.com
37
9. Troubleshooting
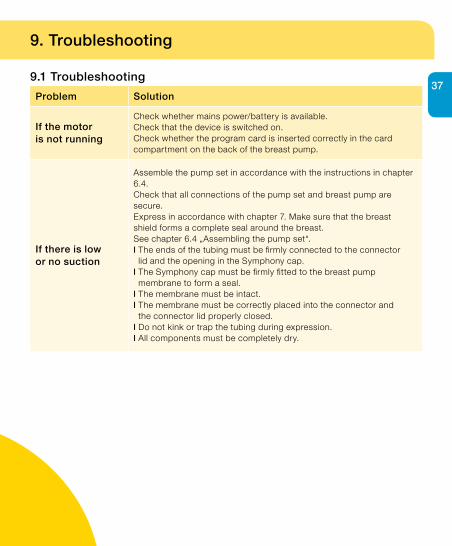
Problem Solution
If the motor is not running
Check whether mains power/battery is available.Check that the device is switched on.Check whether the program card is inserted correctly in the card compartment on the back of the breast pump.
If there is low or no suction
Assemble the pump set in accordance with the instructions in chapter 6.4.Check that all connections of the pump set and breast pump are secure.Express in accordance with chapter 7. Make sure that the breast shield forms a complete seal around the breast.See chapter 6.4 „Assembling the pump set“.l The ends of the tubing must be firmly connected to the connector
lid and the opening in the Symphony cap.l The Symphony cap must be firmly fitted to the breast pump
membrane to form a seal.l The membrane must be intact.l The membrane must be correctly placed into the connector and
the connector lid properly closed.l Do not kink or trap the tubing during expression.l All components must be completely dry.
9.1 Troubleshooting
38
9. Troubleshooting
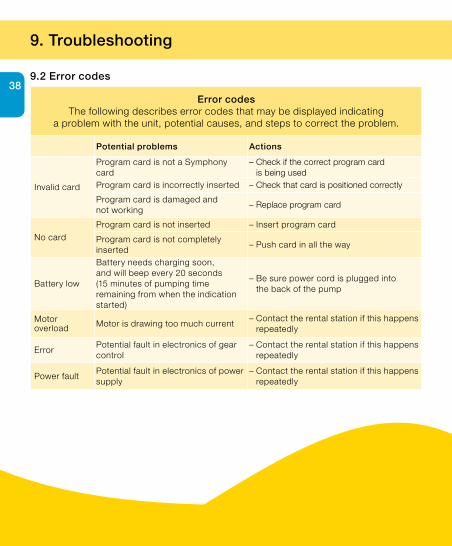
Error codesThe following describes error codes that may be displayed indicating
a problem with the unit, potential causes, and steps to correct the problem.
Potential problems Actions
Invalid card
Program card is not a Symphony card
– Check if the correct program card is being used
Program card is incorrectly inserted – Check that card is positioned correctly
Program card is damaged and not working
– Replace program card
No cardProgram card is not inserted – Insert program card
Program card is not completely inserted
– Push card in all the way
Battery low
Battery needs charging soon, and will beep every 20 seconds (15 minutes of pumping time remaining from when the indication started)
– Be sure power cord is plugged into the back of the pump
Motor overload Motor is drawing too much current
– Contact the rental station if this happens repeatedly
ErrorPotential fault in electronics of gear control
– Contact the rental station if this happens repeatedly
Power faultPotential fault in electronics of power supply
– Contact the rental station if this happens repeatedly
9.2 Error codes
39Warranty and maintenance
Three-year warranty for the unit from the date of purchase, excluding pump set and accessories. Six month warranty for the batteries. The manufacturer is not liable for any damage or consequential damage caused by incorrect operation, inappropriate usage or use by unauthorised persons. Routine checks, servicing and battery exchange may only be carried out by Medela authorised personnel.
The engineering of the Medela Symphony breast pump has been verified by independent test institutes for compliance with the EN/IEC 60601-1 standard. Copies of such certificates may be obtained on request. Because of the method of construc-tion used, Medela does not expect electrical safety to be affected at any time during the life of the product – provided that it is used properly in accordance with its intended use as well as these instructions for use, and that the device is serviced and repaired at an authorised service centre. There are no prescribed or recommended electrical safety checks or recurrent tests to be carried out.
Manufacturer’s information provided in accordance with EN/IEC 62353:2014 “Medical electrical equipment – Recurrent test and test after repair of medical electrical equipment”.
Besides the cleaning procedure(s) described in chapter 5 and battery charging for pumps with optional batteries as described in chapter 6, no further maintenance is required. Besides the inspection procedures described in chapter 3, e.g. visual signs of damage to the pump or power cord, pump dropped or dropped into water, no further inspections are required. As pointed out in chapter 3, service and repair may be performed only by an authorised service agency (centre) in full accordance with the Symphony Service Manual using original Medela spare parts mentioned therein. The service manual, wiring diagrams, and descriptions are available upon request from Medela.
Medela deems that the final production testing replaces on-site testing of the device before putting into service.
The operating life of the Symphony breast pump is 3000 hours. The service life is 7 years if used normally, including the life of the internal batteries. The service life of the accessories is two years.
10. Warranty and maintenance / disposal
40Disposal
The Symphony breast pump is made of metals and plastics and should be disposed of in accordance with European directives 2011/65/EU and 2012/19/EU. Additional local guidelines must also be observed. For the AC/DC versions, the electronic com-ponents and the rechargeable battery must be disposed of separately, in accord-ance with the local regulations. Please ensure that you dispose of the Symphony and its accessories in accordance with your local disposal guidelines. The accessories (pump set/bottles) are made of plastic and may be disposed of only in accordance with the local regulations.
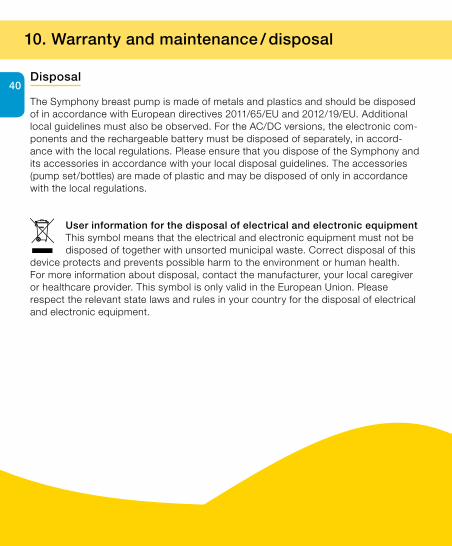
User information for the disposal of electrical and electronic equipmentThis symbol means that the electrical and electronic equipment must not be disposed of together with unsorted municipal waste. Correct disposal of this
device protects and prevents possible harm to the environment or human health. For more information about disposal, contact the manufacturer, your local caregiver or healthcare provider. This symbol is only valid in the European Union. Please respect the relevant state laws and rules in your country for the disposal of electrical and electronic equipment.
10. Warranty and maintenance / disposal
11. Complete care during breastfeeding time
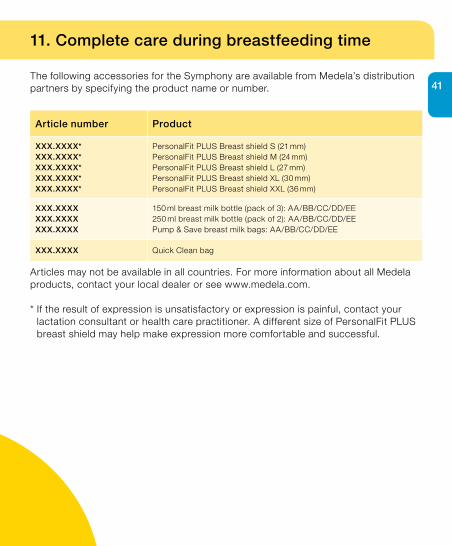
Article number Product
XXX.XXXX* XXX.XXXX*XXX.XXXX* XXX.XXXX*XXX.XXXX*
PersonalFit PLUS Breast shield S (21 mm)PersonalFit PLUS Breast shield M (24 mm)PersonalFit PLUS Breast shield L (27 mm)PersonalFit PLUS Breast shield XL (30 mm)PersonalFit PLUS Breast shield XXL (36 mm)
XXX.XXXXXXX.XXXXXXX.XXXX
150 ml breast milk bottle (pack of 3): AA/BB/CC/DD/EE250 ml breast milk bottle (pack of 2): AA/BB/CC/DD/EEPump & Save breast milk bags: AA/BB/CC/DD/EE
XXX.XXXX Quick Clean bag
Articles may not be available in all countries. For more information about all Medela products, contact your local dealer or see www.medela.com.
* If the result of expression is unsatisfactory or expression is painful, contact your lactation consultant or health care practitioner. A different size of PersonalFit PLUS breast shield may help make expression more comfortable and successful.
The following accessories for the Symphony are available from Medela’s distribution partners by specifying the product name or number. 41

42
12. Technical specifications
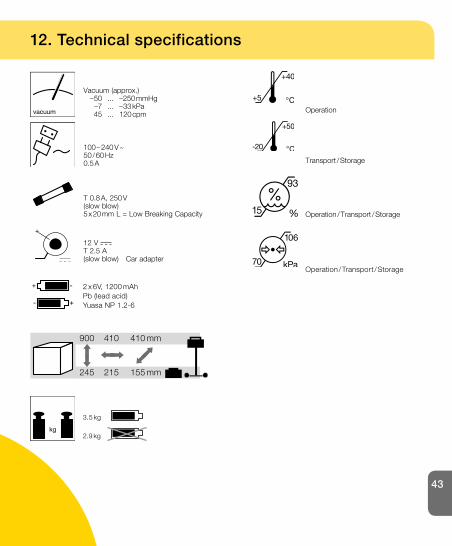
Operation / Transport / Storage
Vacuum (approx.) –50 ... –250 mmHg –7 ... –33 kPa 45 ... 120 cpm
100 – 240 V ~50 / 60 Hz0.5 A
T 0.8 A, 250 V(slow blow)5 x 20 mm L = Low Breaking Capacity
Car adapter
12 V T 2.5 A(slow blow)
Transport / Storage
Operation
900
245
410
215
410 mm
155 mm
3.5 kg
2.9 kg
2 x 6V, 1200 mAh Pb (lead acid)Yuasa NP 1.2-6
Operation / Transport / Storage
43
©M
edel
a A
G/2
01.0
316
/201
8-0
6/C
Medela AGLättichstrasse 4b6341 Baar, Switzerlandwww.medela.com
International SalesMedela AGLättichstrasse 4b6341 BaarSwitzerlandPhone +41 41 562 51 51 www.medela.com
Subject to modifications – Not intended for distribution in the USA