symantec™ storage foundation and high availability ... · pdf filesymantec™...
TRANSCRIPT
Symantec™ StorageFoundation and HighAvailability Solutions 6.2.1Installation Guide - AIX
Maintenance Release
AIX 6.1, 7.1
April 2015
Symantec Storage Foundation and High AvailabilityInstallation Guide
The software described in this book is furnished under a license agreement and may be usedonly in accordance with the terms of the agreement.
Product version: 6.2.1
Document version: 6.2.1 Rev 0
Legal NoticeCopyright © 2015 Symantec Corporation. All rights reserved.
Symantec, the Symantec Logo, the Checkmark Logo, Veritas, Veritas Storage Foundation,CommandCentral, NetBackup, Enterprise Vault, and LiveUpdate are trademarks or registeredtrademarks of Symantec Corporation or its affiliates in the U.S. and other countries. Othernames may be trademarks of their respective owners.
This Symantec product may contain third party software for which Symantec is required toprovide attribution to the third party (“Third Party Programs”). Some of the Third Party Programsare available under open source or free software licenses. The License Agreementaccompanying the Software does not alter any rights or obligations you may have under thoseopen source or free software licenses. See the Third-party Legal Notices document for thisproduct, which is available online or included in the base release media.
The product described in this document is distributed under licenses restricting its use, copying,distribution, and decompilation/reverse engineering. No part of this document may bereproduced in any form by any means without prior written authorization of SymantecCorporation and its licensors, if any.
THE DOCUMENTATION IS PROVIDED "AS IS" AND ALL EXPRESS OR IMPLIEDCONDITIONS, REPRESENTATIONS AND WARRANTIES, INCLUDING ANY IMPLIEDWARRANTY OF MERCHANTABILITY, FITNESS FOR A PARTICULAR PURPOSE ORNON-INFRINGEMENT, ARE DISCLAIMED, EXCEPT TO THE EXTENT THAT SUCHDISCLAIMERSAREHELD TOBE LEGALLY INVALID. SYMANTECCORPORATIONSHALLNOT BE LIABLE FOR INCIDENTAL OR CONSEQUENTIAL DAMAGES IN CONNECTIONWITH THE FURNISHING, PERFORMANCE, OR USE OF THIS DOCUMENTATION. THEINFORMATION CONTAINED IN THIS DOCUMENTATION IS SUBJECT TO CHANGEWITHOUT NOTICE.
The Licensed Software and Documentation are deemed to be commercial computer softwareas defined in FAR 12.212 and subject to restricted rights as defined in FAR Section 52.227-19"Commercial Computer Software - Restricted Rights" and DFARS 227.7202, "Rights inCommercial Computer Software or Commercial Computer Software Documentation", asapplicable, and any successor regulations. Any use, modification, reproduction release,performance, display or disclosure of the Licensed Software and Documentation by the U.S.Government shall be solely in accordance with the terms of this Agreement.

Symantec Corporation350 Ellis StreetMountain View, CA 94043
http://www.symantec.com
Technical SupportSymantec Technical Support maintains support centers globally. Technical Support’sprimary role is to respond to specific queries about product features and functionality.The Technical Support group also creates content for our online Knowledge Base.The Technical Support group works collaboratively with the other functional areaswithin Symantec to answer your questions in a timely fashion. For example, theTechnical Support group works with Product Engineering and Symantec SecurityResponse to provide alerting services and virus definition updates.
Symantec’s support offerings include the following:
■ A range of support options that give you the flexibility to select the right amountof service for any size organization
■ Telephone and/or Web-based support that provides rapid response andup-to-the-minute information
■ Upgrade assurance that delivers software upgrades
■ Global support purchased on a regional business hours or 24 hours a day, 7days a week basis
■ Premium service offerings that include Account Management Services
For information about Symantec’s support offerings, you can visit our website atthe following URL:
www.symantec.com/business/support/index.jsp
All support services will be delivered in accordance with your support agreementand the then-current enterprise technical support policy.
Contacting Technical SupportCustomers with a current support agreement may access Technical Supportinformation at the following URL:
www.symantec.com/business/support/contact_techsupp_static.jsp
Before contacting Technical Support, make sure you have satisfied the systemrequirements that are listed in your product documentation. Also, you should be atthe computer on which the problem occurred, in case it is necessary to replicatethe problem.
When you contact Technical Support, please have the following informationavailable:
■ Product release level
■ Hardware information

■ Available memory, disk space, and NIC information
■ Operating system
■ Version and patch level
■ Network topology
■ Router, gateway, and IP address information
■ Problem description:
■ Error messages and log files
■ Troubleshooting that was performed before contacting Symantec
■ Recent software configuration changes and network changes
Licensing and registrationIf your Symantec product requires registration or a license key, access our technicalsupport Web page at the following URL:
www.symantec.com/business/support/
Customer serviceCustomer service information is available at the following URL:
www.symantec.com/business/support/
Customer Service is available to assist with non-technical questions, such as thefollowing types of issues:
■ Questions regarding product licensing or serialization
■ Product registration updates, such as address or name changes
■ General product information (features, language availability, local dealers)
■ Latest information about product updates and upgrades
■ Information about upgrade assurance and support contracts
■ Information about the Symantec Buying Programs
■ Advice about Symantec's technical support options
■ Nontechnical presales questions
■ Issues that are related to CD-ROMs or manuals
Support agreement resourcesIf you want to contact Symantec regarding an existing support agreement, pleasecontact the support agreement administration team for your region as follows:
[email protected] and Japan
[email protected], Middle-East, and Africa
[email protected] America and Latin America
About Symantec ConnectSymantec Connect is the peer-to-peer technical community site for Symantec’senterprise customers. Participants can connect and share information with otherproduct users, including creating forum posts, articles, videos, downloads, blogsand suggesting ideas, as well as interact with Symantec product teams andTechnical Support. Content is rated by the community, and members receive rewardpoints for their contributions.
http://www.symantec.com/connect/storage-management
DocumentationProduct guides are available on the media in PDF format. Make sure that you areusing the current version of the documentation. The document version appears onpage 2 of each guide. The latest product documentation is available on the Symantecwebsite.
https://sort.symantec.com/documents
Your feedback on product documentation is important to us. Send suggestions forimprovements and reports on errors or omissions. Include the title and documentversion (located on the second page), and chapter and section titles of the text onwhich you are reporting. Send feedback to:
For information regarding the latest HOWTO articles, documentation updates, orto ask a question regarding product documentation, visit the Storage and ClusteringDocumentation forum on Symantec Connect.
https://www-secure.symantec.com/connect/storage-management/forums/storage-and-clustering-documentation
Technical Support ............................................................................................... 4
Section 1 Installing, upgrading, and removing SFHASolutions ..................................................................... 10
Chapter 1 About Symantec™ Storage Foundation and HighAvailability Solutions .................................................... 11
About Symantec™Storage Foundation and High Availability Solutions6.2.1 .................................................................................... 11
Supported operating systems and database software .......................... 12
Chapter 2 Installing the products for the first time ........................ 13
Supported types of Installation ........................................................ 13Installing the Symantec software using the Install Bundles
feature ................................................................................. 13
Chapter 3 Upgrading to 6.2.1 from releases earlier than6.2 .................................................................................... 15
Planning to upgrade to SFHA Solutions 6.2.1 ..................................... 15Supported upgrade types for SFHA Solutions 6.2.1 ....................... 15Supported upgrade paths ......................................................... 16Preparing to upgrade Volume Replicator ..................................... 17Downloading SFHA Solutions 6.2.1 ............................................ 19
Performing a full upgrade with Install Bundles .................................... 19Performing a full upgrade of VCS using Install Bundles .................. 20Performing a full upgrade of SFHA using Install Bundles ................ 21Performing a full upgrade of SFCFSHA using Install Bundles .......... 24Performing a full upgrade of SF Oracle RAC using Install
Bundles .......................................................................... 28Performing a phased upgrade using Install Bundles ............................. 35
Performing a phased VCS upgrade using Install Bundles ................ 35Performing a phased SFHA upgrade using Install Bundles .............. 50
Contents
Performing a phased SFCFSHA upgrade using InstallBundles .......................................................................... 65
Performing a phased SF Oracle RAC upgrade using InstallBundles .......................................................................... 73
Performing a rolling upgrade using Install Bundles .............................. 84Supported rolling upgrade paths ................................................ 85Performing a rolling upgrade of VCS, SFHA, and SFCFSHA with
Install Bundles ................................................................. 85Performing a rolling upgrade of SF Oracle RAC with Install
Bundles .......................................................................... 88Performing an automated upgrade using response files with Install
Bundles ................................................................................ 95Performing an automated upgrade using response files with Install
Bundles .......................................................................... 96
Chapter 4 Upgrading to 6.2.1 from 6.2 ............................................. 97
Prerequisites for upgrading to 6.2.1 .................................................. 97Downloading required software to upgrade to 6.2.1 ............................ 98Performing a full upgrade to 6.2.1 on a cluster .................................... 98
Performing a full upgrade to 6.2.1 on a Symantec ClusterServer ............................................................................ 98
Performing a full upgrade to 6.2.1 on an SFHA cluster ................... 99Performing a full upgrade to 6.2.1 on an SFCFSHA cluster ............ 102Performing a full upgrade to 6.2.1 on an SF Oracle RAC
cluster .......................................................................... 104Upgrading to 6.2.1 on a standalone system ...................................... 107Performing a rolling upgrade using the installer ................................. 109
About rolling upgrades ........................................................... 109Prerequisites for a rolling upgrade ............................................ 110Performing a rolling upgrade using the installer ........................... 110
Upgrading SFHA with the Veritas Web-based installer ........................ 119Verifying software versions ........................................................... 119
Chapter 5 Rolling back and removing Symantec StorageFoundation and High Availability Solutions .......... 120
About rolling back Symantec Storage Foundation and High AvailabilitySolutions 6.2.1 ..................................................................... 120
Rolling back using the uninstallmr script .......................................... 121Rolling back manually .................................................................. 121
Rolling back Storage Foundation or Storage Foundation and HighAvailability manually ........................................................ 122
8Contents
Rolling back Storage Foundation Cluster File System HighAvailability manually ........................................................ 124
Rolling back SF for Oracle RAC manually .................................. 126Rolling back Symantec Cluster Server manually .......................... 128Rolling back Dynamic Multi-Pathing manually ............................. 132
Removing the Symantec product ................................................... 134Removing 6.2.1 on Symantec Storage Foundation or Symantec
Storage Foundation Cluster File System HighAvailability ..................................................................... 134
Removing 6.2.1 on Symantec Storage Foundation for OracleRAC ............................................................................. 135
Rolling back 6.2.1 with the Web-based installer ................................. 136
Appendix A About the installation and the uninstallationscripts ............................................................................ 138
About the installation and the uninstallation scripts ............................ 138The installmr script options ..................................................... 138The uninstallmr script options .................................................. 143
9Contents
Installing, upgrading, andremoving SFHA Solutions
■ Chapter 1. About Symantec™Storage Foundation and High Availability Solutions
■ Chapter 2. Installing the products for the first time
■ Chapter 3. Upgrading to 6.2.1 from releases earlier than 6.2
■ Chapter 4. Upgrading to 6.2.1 from 6.2
■ Chapter 5. Rolling back and removing Symantec Storage Foundation and HighAvailability Solutions
■ Appendix A. About the installation and the uninstallation scripts
1Section

About Symantec™ StorageFoundation and HighAvailability Solutions
This chapter includes the following topics:
■ About Symantec™ Storage Foundation and High Availability Solutions 6.2.1
■ Supported operating systems and database software
About Symantec™ Storage Foundation and HighAvailability Solutions 6.2.1
Symantec™ Storage Foundation and High Availability Solutions 6.2.1 providespatch updates for the following products:
■ Symantec Dynamic Multi-Pathing (DMP)
■ Veritas Volume Manager (VxVM)
■ Veritas File System (VxFS)
■ Symantec Storage Foundation (SF)
■ Symantec Cluster Server (VCS)
■ Symantec Storage Foundation and High Availability (SFHA)
■ Symantec Storage Foundation Cluster File System and High Availability(SFCFSHA)
■ Symantec Storage Foundation for Oracle RAC (SF Oracle RAC)
■ Symantec ApplicationHA (ApplicationHA)
1Chapter
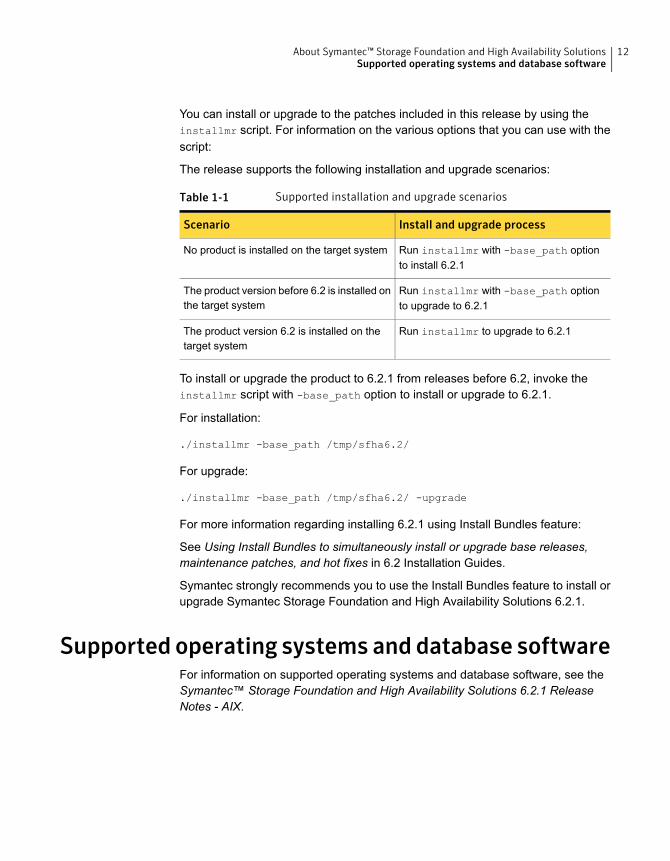
You can install or upgrade to the patches included in this release by using theinstallmr script. For information on the various options that you can use with thescript:
The release supports the following installation and upgrade scenarios:
Table 1-1 Supported installation and upgrade scenarios
Install and upgrade processScenario
Run installmr with -base_path optionto install 6.2.1
No product is installed on the target system
Run installmr with -base_path optionto upgrade to 6.2.1
The product version before 6.2 is installed onthe target system
Run installmr to upgrade to 6.2.1The product version 6.2 is installed on thetarget system
To install or upgrade the product to 6.2.1 from releases before 6.2, invoke theinstallmr script with -base_path option to install or upgrade to 6.2.1.
For installation:
./installmr -base_path /tmp/sfha6.2/
For upgrade:
./installmr -base_path /tmp/sfha6.2/ -upgrade
For more information regarding installing 6.2.1 using Install Bundles feature:
See Using Install Bundles to simultaneously install or upgrade base releases,maintenance patches, and hot fixes in 6.2 Installation Guides.
Symantec strongly recommends you to use the Install Bundles feature to install orupgrade Symantec Storage Foundation and High Availability Solutions 6.2.1.
Supported operating systems and database softwareFor information on supported operating systems and database software, see theSymantec™ Storage Foundation and High Availability Solutions 6.2.1 ReleaseNotes - AIX.
12About Symantec™ Storage Foundation and High Availability SolutionsSupported operating systems and database software

Installing the products forthe first time
This chapter includes the following topics:
■ Supported types of Installation
■ Installing the Symantec software using the Install Bundles feature
Supported types of InstallationSFHA Solutions 6.2.1 supports the following types of Installation:
■ Installing Symantec products with the script-based installer
Note: Symantec recommends you to install 6.2.1 with Install Bundles.
Installing the Symantec software using the InstallBundles feature
This section describes how to install a Symantec Storage Foundation and HighAvailability Solutions product of 6.2 and 6.2.1 using the Install Bundles feature inone step.
2Chapter
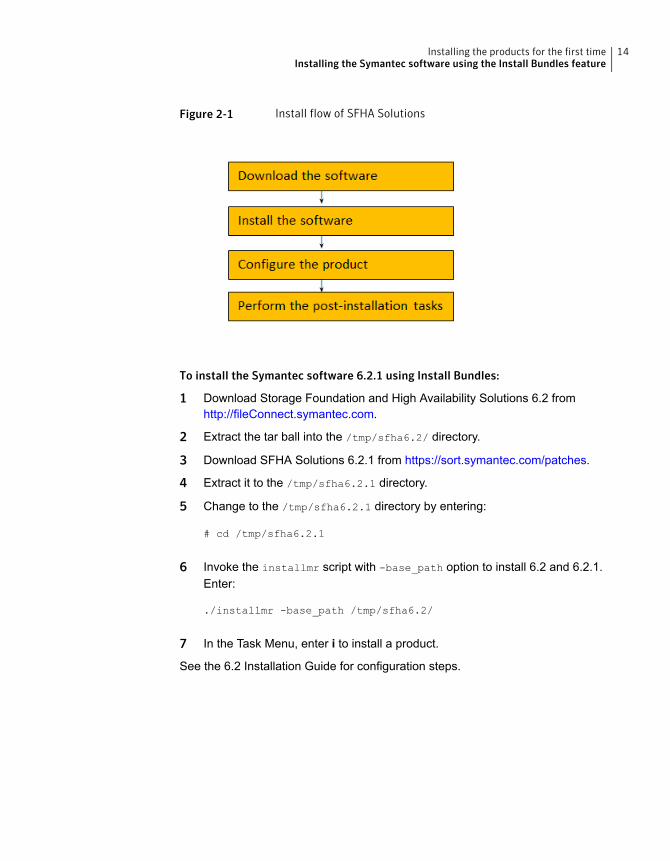
Figure 2-1 Install flow of SFHA Solutions
To install the Symantec software 6.2.1 using Install Bundles:
1 Download Storage Foundation and High Availability Solutions 6.2 fromhttp://fileConnect.symantec.com.
2 Extract the tar ball into the /tmp/sfha6.2/ directory.
3 Download SFHA Solutions 6.2.1 from https://sort.symantec.com/patches.
4 Extract it to the /tmp/sfha6.2.1 directory.
5 Change to the /tmp/sfha6.2.1 directory by entering:
# cd /tmp/sfha6.2.1
6 Invoke the installmr script with -base_path option to install 6.2 and 6.2.1.Enter:
./installmr -base_path /tmp/sfha6.2/
7 In the Task Menu, enter i to install a product.
See the 6.2 Installation Guide for configuration steps.
14Installing the products for the first timeInstalling the Symantec software using the Install Bundles feature
Upgrading to 6.2.1 fromreleases earlier than 6.2
This chapter includes the following topics:
■ Planning to upgrade to SFHA Solutions 6.2.1
■ Performing a full upgrade with Install Bundles
■ Performing a phased upgrade using Install Bundles
■ Performing a rolling upgrade using Install Bundles
■ Performing an automated upgrade using response files with Install Bundles
Planning to upgrade to SFHA Solutions 6.2.1This section includes the following topics:
■ Supported upgrade paths
■ Preparing to upgrade Volume Replicator
■ Downloading SFHA Solutions 6.2.1
Supported upgrade types for SFHA Solutions 6.2.1SFHASolutions supports various ways of upgrading your cluster to the latest version.Choose a method that best suits your environment and supports your plannedupgrade path.
Table 3-1 lists the supported types of upgrade.
3Chapter
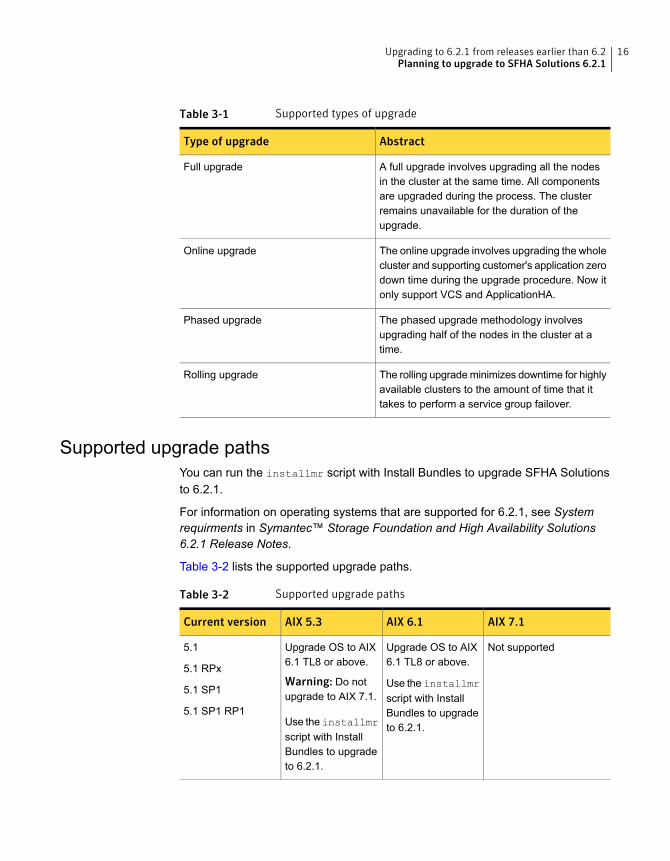
Table 3-1 Supported types of upgrade
AbstractType of upgrade
A full upgrade involves upgrading all the nodesin the cluster at the same time. All componentsare upgraded during the process. The clusterremains unavailable for the duration of theupgrade.
Full upgrade
The online upgrade involves upgrading the wholecluster and supporting customer's application zerodown time during the upgrade procedure. Now itonly support VCS and ApplicationHA.
Online upgrade
The phased upgrade methodology involvesupgrading half of the nodes in the cluster at atime.
Phased upgrade
The rolling upgrademinimizes downtime for highlyavailable clusters to the amount of time that ittakes to perform a service group failover.
Rolling upgrade
Supported upgrade pathsYou can run the installmr script with Install Bundles to upgrade SFHA Solutionsto 6.2.1.
For information on operating systems that are supported for 6.2.1, see Systemrequirments in Symantec™ Storage Foundation and High Availability Solutions6.2.1 Release Notes.
Table 3-2 lists the supported upgrade paths.
Table 3-2 Supported upgrade paths
AIX 7.1AIX 6.1AIX 5.3Current version
Not supportedUpgrade OS to AIX6.1 TL8 or above.
Use the installmrscript with InstallBundles to upgradeto 6.2.1.
Upgrade OS to AIX6.1 TL8 or above.
Warning: Do notupgrade to AIX 7.1.
Use the installmrscript with InstallBundles to upgradeto 6.2.1.
5.1
5.1 RPx
5.1 SP1
5.1 SP1 RP1
16Upgrading to 6.2.1 from releases earlier than 6.2Planning to upgrade to SFHA Solutions 6.2.1

Table 3-2 Supported upgrade paths (continued)
AIX 7.1AIX 6.1AIX 5.3Current version
Upgrade OS to AIX 7.1TL2 or above.
Use the installmrscript with Install Bundlesto upgrade to 6.2.1.
Upgrade OS to AIX6.1 TL8 or above.
Use the installmrscript with InstallBundles to upgradeto 6.2.1.
Upgrade OS to AIX6.1 TL8 or above.
Warning: Do notupgrade to AIX 7.1.
Use the installmrscript with InstallBundles to upgradeto 6.2.1.
5.1 SP1 RP2
5.1 SP1 RP3
5.1 SP1 RP4
Upgrade OS to AIX 7.1TL2 or above.
Use the installmrscript with Install Bundlesto upgrade directly to6.2.1.
Not supportedNot supported5.1 SP1 PR1
Upgrade OS to AIX 7.1TL2 or above.
Use the installmrscript with Install Bundlesto upgrade directly to6.2.1.
Upgrade OS to AIX6.1 TL8 or above.
Use the installmrscript with InstallBundles to upgradeto 6.2.1.
Not supported6.0
6.0 RPx
6.0.1
6.0.3
6.0.5
Upgrade OS to AIX 7.1TL2 or above.
Use the installmrscript with Install Bundlesto upgrade directly to6.2.1.
Upgrade OS to AIX6.1 TL8 or above.
Use the installmrscript with InstallBundles to upgradeto 6.2.1.
Not supported6.1
6.1.1
Use the installmrscript to upgrade to 6.2.1.
Use the installmrscript to upgrade to6.2.1.
Not supported6.2
Preparing to upgrade Volume ReplicatorBefore installing or upgrading Volume Replicator (VVR):
■ Confirm that your system has enough free disk space to install VVR.
■ Make sure you have root permissions. You must have root permissions toperform the install and upgrade procedures.
17Upgrading to 6.2.1 from releases earlier than 6.2Planning to upgrade to SFHA Solutions 6.2.1

See the Symantec™Storage Foundation and High Availability Solutions ReplicationAdministrator's Guide for more information.
See the Getting Started Guide for more information on the documentation.
Planning an upgrade from the previous VVR versionIf you plan to upgrade VVR from the previous VVR version, you can upgrade VVRwith reduced application downtime by upgrading the hosts at separate times. Whilethe Primary is being upgraded, the application can be migrated to the Secondary,thus reducing downtime. The replication between the (upgraded) Primary and theSecondary, which have different versions of VVR, will still continue. This featurefacilitates high availability even when the VVR upgrade is not complete on both thesites. Symantec recommends that the Secondary hosts be upgraded before thePrimary host in the Replicated Data Set (RDS).
See the Symantec™ Storage Foundation Release Notes for information regardingVVR support for replicating across Storage Foundation versions.
Replicating between versions is intended to remove the restriction of upgrading thePrimary and Secondary at the same time. VVR can continue to replicate an existingRDS with Replicated Volume Groups (RVGs) on the systems that you want toupgrade. When the Primary and Secondary are at different versions, VVR does notsupport changing the configuration with the vradmin command or creating a newRDS.
When you upgrade the VVR Primary site from any version before 5.1 to 6.2.1 andVVR is not configured under VCS, cfs datavolumes may not get mounted after theupgrade.In such a situation you need to pause replication and mount thedatavolumes and again resume the replication.
Also, if you specify TCP as the network protocol, the VVR versions on the Primaryand Secondary determine whether the checksum is calculated. As shown inTable 3-3, if either the Primary or Secondary are running a version of VVR prior to6.2.1, and you use the TCP protocol, VVR calculates the checksum for every datapacket it replicates. If the Primary and Secondary are at VVR 6.2.1, VVR does notcalculate the checksum. Instead, it relies on the TCP checksum mechanism.
Table 3-3 VVR versions and checksum calculations
VVR calculates checksumTCP connections?
VVR 6.2.1
(DG version >= 150)
VVR prior to 6.2.1
(DG version <= 140)
YesSecondaryPrimary
YesPrimarySecondary
18Upgrading to 6.2.1 from releases earlier than 6.2Planning to upgrade to SFHA Solutions 6.2.1

Table 3-3 VVR versions and checksum calculations (continued)
VVR calculates checksumTCP connections?
VVR 6.2.1
(DG version >= 150)
VVR prior to 6.2.1
(DG version <= 140)
YesPrimary and Secondary
NoPrimary and Secondary
Note:When replicating between versions of VVR, avoid using commands associatedwith new features. The earlier version may not support new features and problemscould occur.
If you do not need to upgrade all the hosts in the RDS simultaneously, you can usereplication between versions after you upgrade one host. You can then upgradethe other hosts in the RDS later at your convenience.
Note: If you have a cluster setup, you must upgrade all the nodes in the cluster atthe same time.
Downloading SFHA Solutions 6.2.1The following procedure describes how to upgrade to 6.2.1 with Install Bundlesfrom releases earlier than 6.2.
Note: If you are upgrading from releases earlier than 6.2, Symantec suggests youupgrade with Install Bundles.
1 Download Storage Foundation and High Availability Solutions 6.2 fromhttp://fileConnect.symantec.com.
2 Extract the tar ball into a directory called /tmp/sfha6.2
3 Download SFHA Solutions 6.2.1 from https://sort.symantec.com/patches.
4 Extract it to a directory called /tmp/sfha6.2.1
Performing a full upgrade with Install Bundles■ Performing a full upgrade of VCS using Install Bundles
■ Performing a full upgrade of SFHA using Install Bundles
■ Performing a full upgrade of SFCFSHA using Install Bundles
19Upgrading to 6.2.1 from releases earlier than 6.2Performing a full upgrade with Install Bundles

■ Performing a full upgrade of SF Oracle RAC using Install Bundles
Performing a full upgrade of VCS using Install BundlesYou can use the installer to upgrade VCS.
To upgrade VCS using the product installer
1 Log in as superuser.
2 Change to the /tmp/sfha6.2.1 directory.
3 Invoke the installmr script with -base_path option to upgrade to 6.2.1:
# ./installmr -base_path /tmp/sfha6.2/
4 From the opening Selection Menu, choose: G for "Upgrade a Product."
5 Choose 1 for Full Upgrade.
6 Enter the names of the nodes that you want to upgrade. Use spaces to separatenode names. Press the Enter key to proceed.
The installer runs some verification checks on the nodes.
7 When the verification checks are complete, the installer asks if you agree withthe terms of the End User License Agreement. Press y to agree and continue.
The installer lists the filesets to upgrade.
8 The installer displays the following question before it stops the productprocesses, if the cluster is configured in secure mode:
Do you want to grant read access to everyone? [y,n,q,?]
To grant read access to all authenticated users, type y.
To grant permissions to specific user group, type n.
Do you want to provide any usergroups that you would like to\
grant read access?[y,n,q,?]
To specify user groups and grant them read access, type y.
To grant read access only to root users, type n. Then the installer grants readaccess read access to the root users.
Enter the user group names that you want to grant read access and separatethem by spaces. If you want to grant read access to a user group on a specificnode, enter usergroup@node. If you want to grant read access to user groupson any cluster node, enter usergroup. If some user groups are not createdyet, create the user groups after configuration if needed.
20Upgrading to 6.2.1 from releases earlier than 6.2Performing a full upgrade with Install Bundles

9 The installer asks if you want to stop VCS processes. Press the Enter key tocontinue.
The installer stops VCS processes, uninstalls filesets, installs or upgradesfilesets, configures, and startsVCS.
The installer lists the nodes that Symantec recommends you to restart, ifneeded.
10 The installer asks if you would like to send the information about this installationto Symantec to help improve installation in the future. Enter your response.
The installer displays the location of log files, summary file, and response file.
Note: If you want to upgrade the application clusters that use CP server basedfencing to version 6.1 and later, make sure that you first upgrade VCS or SFHAon the CP server systems to version 6.1 and later. And then, upgrade allapplication clusters. The CP server with version 6.1 and later supportsapplication clusters on 6.1 and later (HTTPS-based communication) andapplication clusters before 6.1 (IPM-based communication).When you configurethe CP server, the installer asks the VIPs for HTTPS-based communication(to support clients on release version 6.1 and later) and VIPs for IPM-basedcommunication (to support clients on release versions before 6.1).
For instructions to upgrade VCS or SFHA on the CP server systems, refer tothe appropriate installation guide.
Performing a full upgrade of SFHA using Install BundlesThis section describes how to perform a full upgrade of SFHA using Install Bundles.
■ Upgrading SFHA to 6.2.1 with Install Bundles
Upgrading SFHA to 6.2.1 with Install BundlesThis section describes upgrading SFHA products to 6.2.1 with Install Bundles.
21Upgrading to 6.2.1 from releases earlier than 6.2Performing a full upgrade with Install Bundles
To upgrade SFHA
1 Log in as superuser.
2 Unmount any mounted VxFS file systems.
The installer supports the upgrade of multiple hosts, if each host is running thesame version of VxVM and VxFS. Hosts must be upgraded separately if theyare running different versions.
If any VxFS file systems are mounted with the QuickLog feature, QuickLogmust be disabled before upgrading. See the "Veritas QuickLog" chapter of theStorage Foundation Administrator’s Guide for more information.
3 If you are upgrading SFHA, take all service groups offline.
List all service groups:
# /opt/VRTSvcs/bin/hagrp -list
For each service group listed, take it offline:
# /opt/VRTSvcs/bin/hagrp -offline service_group \
-sys system_name
4 If replication using VVR is configured, verify that all the Primary RLINKs areup-to-date:
# /usr/sbin/vxrlink -g diskgroup status rlink_name
Note: Do not continue until the Primary RLINKs are up-to-date.
5 Change to the /tmp/sfha6.2.1 directory.
6 Run the installmr command.
# ./installmr -base_path /tmp/sfha6.2/
7 Enter G to upgrade and select the Full Upgrade.
22Upgrading to 6.2.1 from releases earlier than 6.2Performing a full upgrade with Install Bundles
8 You are prompted to enter the system names (in the following example, "sys1")on which the software is to be installed. Enter the system name or names andthen press Return.
Enter the system names separated by spaces on which to
install SFHA: sys1 sys2
Depending on your existing configuration, various messages and prompts mayappear. Answer the prompts appropriately.
9 The installer asks if you agree with the terms of the End User LicenseAgreement. Press y to agree and continue.
10 The installer lists the filesets to install or to update. You are prompted to confirmthat you are ready to upgrade.
11 The installer displays the following question before it stops the productprocesses, if the cluster is configured in secure mode:
Do you want to grant read access to everyone? [y,n,q,?]
To grant read access to all authenticated users, type y.
To grant permissions to specific user group, type n.
Do you want to provide any usergroups that you would like to\
grant read access?[y,n,q,?]
To specify user groups and grant them read access, type y.
To grant read access only to root users, type n. Then the installer grants readaccess read access to the root users.
Enter the user group names that you want to grant read access and separatethem by spaces. If you want to grant read access to a user group on a specificnode, enter usergroup@node. If you want to grant read access to user groupson any cluster node, enter usergroup. If some user groups are not createdyet, create the user groups after configuration if needed.
12 Stop the product's processes.
Do you want to stop SFHA processes now? [y,n,q] (y) y
If you select y, the installer stops the product processes and makes someconfiguration updates before upgrading.
13 The installer stops, uninstalls, reinstalls, and starts specified filesets.
14 If the product is licensed with a stale (old) key, the installer would prompt usersto update the key.
23Upgrading to 6.2.1 from releases earlier than 6.2Performing a full upgrade with Install Bundles
15 The SFHA software is verified and configured.
16 The installer prompts you to provide feedback, and provides the log locationfor the upgrade.
17 If you want to upgrade the application clusters that use CP server based fencingto version 6.1 and later, make sure that you first upgrade VCS or SFHA on theCP server systems to version 6.1 and later. And then, upgrade all applicationclusters. The CP server with version 6.1 and later supports application clusterson 6.1 and later (HTTPS-based communication) and application clusters before6.1 (IPM-based communication).When you configure the CP server, the installerasks the VIPs for HTTPS-based communication (to support clients on releaseversion 6.1 and later) and VIPs for IPM-based communication (to supportclients on release versions before 6.1).
For instructions to upgrade VCS or SFHA on the CP server systems, refer tothe appropriate installation guide.
Performing a full upgrade of SFCFSHA using Install BundlesThis section describes how to perform a full upgrade of SFCFSHA using InstallBundles.
■ Performing a full SFCFSHA upgrade with Install Bundles
Performing a full SFCFSHA upgrade with Install BundlesPerforming a full upgrade involves the following tasks:
■ Ensuring that the file systems are clean
■ Performing the upgrade
Ensuring the file systems are clean
Before upgrading to SFCFSHA 6.2.1, ensure that the file systems are clean. Toensure that the logs have been replayed and the file systems are marked clean:
24Upgrading to 6.2.1 from releases earlier than 6.2Performing a full upgrade with Install Bundles

To ensure the file systems are clean
1 Log in as superuser onto any node in the cluster.
2 Take the service group offline on each node of the cluster, which containsVxFS and CFS resources:
# hagrp -offline group -any
where group is the VCS service group that has the CVMVolDg and CFSMountresource.
Repeat this step for each SFCFSHA service group.
Note: This unmounts the CFS file systems.
3 Unmount all VxFS file systems not under VCS control:
# umount /mount_point
4 Check and repair each VxFS file system:
# fsck -V vxfs /dev/vx/dsk/diskgroup/volume
The fsck command in /opt/VRTS/bin accepts either the block or characterdevice (/dev/vx/dsk/dg/vol) or (/dev/vx/rdsk/dg/vol). The operatingsystem version of fsck may limit the device types it accepts.
For more information, see the fsck and fsck_vxfs man pages.
Repeat this step for each file system.
Performing the upgrade
To perform the upgrade
1 Log in as superuser.
2 Change to the /tmp/sfha6.2.1 directory:
# cd /tmp/sfha6.2.1
3 Change to the /tmp/sfha6.2.1 directory. Invoke the installmr script with-base_path option to upgrade to 6.2.1:
# ./installmr -base_path /tmp/sfha6.2/
25Upgrading to 6.2.1 from releases earlier than 6.2Performing a full upgrade with Install Bundles
4 Verify there are no VxFS file systems mounted on the nodes being upgraded:
# mount | grep vxfs
If any VxFS file systems are mounted, offline the group on each node of thecluster:
# hagrp -offline group -sys system01
# hagrp -offline group -sys system02
# hagrp -offline group -sys system03
# hagrp -offline group -sys system04
where group is the VCS service group that has the CVMVolDg and CFSMountresource.
If VxFS are not managed by VCS then unmount them manually:
# umount /mount_point
Repeat this step for each SFCFSHA service group.
5 From the opening Selection Menu, choose:G forUpgrade a Product. Choose1 for Full Upgrade.
6 You are prompted to enter the system names (in the following example, "sys1"and "sys2") on which the software is to be upgraded. Enter the system nameor names and then press Return.
Enter the system names separated by spaces on which to
install SFCFSHA: sys1 sys2
7 At the prompt, specify whether you accept the terms of the End User LicenseAgreement (EULA). Press y to agree and continue.
8 During the initial system check, the installer verifies that communication betweensystems has been set up.
If the installer hangs or asks for a login password, sertup passwordless ssh orsetup rsh from the system that run installmr to the system that need to beupgraded to 6.2.1. Then run the installer again.
9 After you accept EULA and the system checks complete, the installer displaysa list of the filesets that will be upgraded. Press Enter to continue with theupgrade.
26Upgrading to 6.2.1 from releases earlier than 6.2Performing a full upgrade with Install Bundles
10 The installer displays the following question before it stops the productprocesses, if the cluster is configured in secure mode:
Do you want to grant read access to everyone? [y,n,q,?]
To grant read access to all authenticated users, type y.
To grant permissions to specific user group, type n.
Do you want to provide any usergroups that you would like to\
grant read access?[y,n,q,?]
To specify user groups and grant them read access, type y.
To grant read access only to root users, type n. Then the installer grants readaccess read access to the root users.
Enter the user group names that you want to grant read access and separatethem by spaces. If you want to grant read access to a user group on a specificnode, enter usergroup@node. If you want to grant read access to user groupson any cluster node, enter usergroup. If some user groups are not createdyet, create the user groups after configuration if needed.
11 Output shows information that SFCFSHAmust be stopped on a running system.Enter y to continue.
12 The installer stops, uninstalls, reinstalls, and starts specified filesets.
13 Press Enter again for summary information about logs and reboots.
Do not remove the log files until the Symantec products are working properlyon your system. Technical Support will need these log files for debuggingpurposes.
Note: If you want to upgrade the application clusters that use CP server basedfencing to version 6.1 and later, make sure that you first upgrade VCS or SFHAon the CP server systems to version 6.1 and later. And then, upgrade allapplication clusters. The CP server with version 6.1 and later supportsapplication clusters on 6.1 and later (HTTPS-based communication) andapplication clusters before 6.1 (IPM-based communication).When you configurethe CP server, the installer asks the VIPs for HTTPS-based communication(to support clients on release version 6.1 and later) and VIPs for IPM-basedcommunication (to support clients on release versions before 6.1).
For instructions to upgrade VCS or SFHA on the CP server systems, refer tothe appropriate installation guide.
27Upgrading to 6.2.1 from releases earlier than 6.2Performing a full upgrade with Install Bundles
14 Find out which node is the CVM master. Enter the following:
# vxdctl -c mode
15 On the CVM master node, upgrade the CVM protocol. Enter the following:
# vxdctl upgrade
Performing a full upgrade of SF Oracle RAC using Install BundlesThis section describes how to perform a full upgrade of SF Oracle RAC using InstallBundles.
■ Preparing to perform a full upgrade to 6.2.1 on an SF Oracle RAC cluster
■ Upgrading to SF Oracle RAC 6.2.1
Preparing to perform a full upgrade to 6.2.1 on an SF OracleRAC clusterPerform the preparatory steps in this section if you are performing a full upgradeof the cluster. Before you upgrade, make sure that your systemsmeet the hardwareand software requirements for this release.
To prepare to upgrade SF Oracle RAC
1 Log in as superuser to one of the nodes in the cluster.
2 Back up the following configuration files on your system: main.cf, types.cf,
CVMTypes.cf, CFSTypes.cf, OracleTypes.cf, OracleASMTypes.cf,
PrivNIC.cf, MultiPrivNIC.cf, CRSResource.cf, /etc/llttab,
/etc/llthosts, /etc/gabtab, /etc/vxfentab, /etc/vxfendg,
/etc/vxfenmode
For example:
# cp /etc/VRTSvcs/conf/config/main.cf \
/etc/VRTSvcs/conf/config/main.cf.save
3 Installer verifies that recent backups of configuration files in VxVM privateregion have been saved in /etc/vx/cbr/bk.
If not, a warningmessage will be displayed after installmr upgrade prechecks.
Warning: Backup /etc/vx/cbr/bk directory.
28Upgrading to 6.2.1 from releases earlier than 6.2Performing a full upgrade with Install Bundles

4 Stop all applications that use VxFS or VxVM disk groups, whether local or CFS.
If the applications are under VCS control:
# hagrp -offline grp_name -any
If the applications are not under VCS control:
Use native application commands to stop the application.
5 For Oracle RAC 9i, log in as Oracle user on each node and stop the database:
■ If the gsd server is configured for Oracle RAC 9i using Oracle clustersoftware, run the srvctl command to stop the Oracle database:
$srvctl stop database -d db_name
Run the following command to stop the gsd server:
$ORACLE_HOME/bin/gsdctl stop
■ If the gsd server is unconfigured and the cluster is using the third partysoftware for Oracle RAC 9i, run the following command on each node fromSQL prompt:
shutdown immediate
6 Stop all Oracle RAC resources.
For Oracle RAC 10g, Oracle RAC 11g, and Oracle RAC 12c:
■ If the database instances are managed by VCS, take the correspondingVCS service groups offline. As superuser, enter:
# hagrp -offline oracle_group -any
■ If the database instances are not managed by VCS, then run the followingon one node:
■ For Oracle RAC 10g and Oracle RAC 11g:
$ srvctl stop database -d db_name
■ For Oracle RAC 12c:
$ srvctl stop database -db db_name
29Upgrading to 6.2.1 from releases earlier than 6.2Performing a full upgrade with Install Bundles

7 If the Oracle database is managed by VCS, set the AutoStart value to 0 toprevent the database service group from starting automatically when VCSstarts:
■
# haconf -makerw
# hagrp -modify oracle_group AutoStart 0
# haconf -dump -makero
■ If the Oracle database is not managed by VCS, change the managementpolicy for the database to MANUAL:
■ For Oracle RAC 10g and Oracle RAC 11g:
$ srvctl modify database -d db_name -y MANUAL
■ For Oracle RAC 12c:
$ srvctl modify database -db db_name -policy MANUAL
8 Stop VCS on all nodes:
# hastop -all
9 Unmount the VxFS file system, which is not under VCS control.
# mount |grep vxfs
# fuser -c /mount_point
# umount /mount_point
Make sure that no processes are running which make use of mounted sharedfile system or shared volumes.
# fuser -cu /mount_point
10 If you plan to continue using the Storage Foundation for Databases (SFDB)tools, you must prepare to migrate the SFDB repository database beforeupgrading to 6.2.1.
See “Pre-upgrade tasks for migrating the SFDB repository database”on page 31.
11 If you plan to upgrade the operating system, stop all ports.
# /opt/VRTS/install/installsfrac -stop
30Upgrading to 6.2.1 from releases earlier than 6.2Performing a full upgrade with Install Bundles

Pre-upgrade tasks for migrating the SFDB repository database
Perform the following before upgrading SF Oracle RAC.
Note: The Sfua_Base repository resource group will be removed from the main.cffile. It is not required as a separate service group for SF Oracle RAC 6.2.1.
To prepare to migrate the repository database
◆ Resynchronize all existing snapshots before upgrading. As Oracle user, enter:
$ /opt/VRTS/bin/dbed_vmsnap -S $ORACLE_SID \
-f SNAPPLAN -o resync
Warning: The Database Flashsnap clone database will not be able to be carriedover after upgrading. You must create a new Database Flashsnap clonedatabase after upgrading to 6.2.1.
Upgrading to SF Oracle RAC 6.2.1This section provides instructions for upgrading to SF Oracle RAC 6.2.1.
■ If required, upgrade the operating system.
■ Upgrade to SF Oracle RAC 6.2.1.
■ Bring the SF Oracle RAC online.
Upgrading the operating system
If you want to upgrade the operating system, perform the following steps:
1 Rename the /etc/llttab file to prevent LLT from starting automatically whenthe node starts:
# mv /etc/llttab /etc/llttab.save
2 Upgrade the operating system on all nodes in the cluster.
For instructions, see the operating system documentation.
3 After the system restarts, restore the /etc/llttab file to its original name:
# mv /etc/llttab.save /etc/llttab
31Upgrading to 6.2.1 from releases earlier than 6.2Performing a full upgrade with Install Bundles

Upgrading SF Oracle RAC using Install Bundles
Use the installmr script-based installation programs to upgrade SF Oracle RAC.
The installer performs the following tasks to upgrade SF Oracle RAC:
■ Verifies the compatibility of the systems before the upgrade.
■ Stops the SF Oracle RAC processes before the upgrade.
■ Uninstalls SF Oracle RAC.
■ Installs the SF Oracle RAC 6.2 filesets on the nodes.
■ Installs the SF Oracle RAC 6.2.1 patches on the nodes.
■ Starts the SF Oracle RAC processes after the upgrade.
■ Displays the location of the log files, summary file, and response file.
To upgrade to SF Oracle RAC 6.2.1 using the installmr program
1 Log in as superuser.
2 Change to the /tmp/sfha6.2.1 directory.
3 Invoke the installmr script with -base_path option to upgrade to 6.2.1:
# ./installmr -base_path /tmp/sfha6.2/
4 From the opening Selection Menu, choose: G for "Upgrade a Product."
5 Select 1 for Full upgrade.
The installer displays the copyright message and specifies the directory wherethe running logs are created.
The installer verifies the systems for compatibility.
Note: If had is stopped before upgrade, the installer displays the followingwarning:
VCS is not running before upgrade. Please make sure all the configurationsare valid before upgrade.
If the configuration files are valid, you may ignore the message.
Review themessages displayed andmake sure that youmeet the requirementsbefore proceeding with the upgrade.
32Upgrading to 6.2.1 from releases earlier than 6.2Performing a full upgrade with Install Bundles
6 Press Enter to continue with the upgrade.
Enter y to agree to the End User License Agreement (EULA).
The installer displays the list of filesets that will be uninstalled. Press Enter toview the list of filesets that will be upgraded.
7 The installer displays the following question before it stops the productprocesses, if the cluster is configured in secure mode:
Do you want to grant read access to everyone? [y,n,q,?]
To grant read access to all authenticated users, type y.
To grant permissions to specific user group, type n.
Do you want to provide any usergroups that you would like to\
grant read access?[y,n,q,?]
To specify user groups and grant them read access, type y.
To grant read access only to root users, type n. Then the installer grants readaccess read access to the root users.
Enter the user group names that you want to grant read access and separatethem by spaces. If you want to grant read access to a user group on a specificnode, enter usergroup@node. If you want to grant read access to user groupson any cluster node, enter usergroup. If some user groups are not createdyet, create the user groups after configuration if needed.
8 Enter y to stop the SF Oracle RAC processes.
Do you want to stop SF Oracle RAC processes now? [y,n,q,?] (y)
The installer stops the processes and uninstalls SF Oracle RAC. After theuninstallation, the installer installs SF Oracle RAC 6.2.1 and starts 6.2.1 on allthe nodes.
If the product is licensed with stale (old) key, the installer prompts users toupdate the key.
9 Relink the SF Oracle RAC libraries with Oracle:
The installer prompts a menu after upgrade. If you want the installer to relinkthe Oracle Database Binary, choose the optionRelinkOracle Database Binaryfrom the menu.
Complete the remaining tasks to finish the upgrade.
33Upgrading to 6.2.1 from releases earlier than 6.2Performing a full upgrade with Install Bundles
10 Find out which node is the CVM master. Enter the following:
# vxdctl -c mode
11 On the CVM master node, upgrade the CVM protocol. Enter the following:
# vxdctl upgrade
Bringing the Oracle database online
1 Bring the Oracle database service group online.
■ If the Oracle database is managed by VCS:
# hagrp -online oracle_group -any
■ If the Oracle database is not managed by VCS:
■ For Oracle RAC 10g and Oracle RAC 11g:
# srvctl start database -d db_name
■ For Oracle RAC 12c:
# srvctl start database -db db_name
2 Start all applications that are not managed by VCS. Use native applicationcommands to start the applications.
3 If the Oracle database is managed by VCS, reset the AutoStart value to 1to enable VCS to bring the database service group online automaticallywhen VCS starts:
■
# haconf -makerw
# hagrp -modify oracle_group AutoStart 1
# haconf -dump -makero
■ If the Oracle database is not managed by VCS, change the managementpolicy for the database to automatic:
■ For Oracle RAC 10g and Oracle RAC 11g:
$ srvctl modify database -d db_name -y AUTOMATIC
■ For Oracle RAC 12c:
$ srvctl modify database -db db_name -policy AUTOMATIC
34Upgrading to 6.2.1 from releases earlier than 6.2Performing a full upgrade with Install Bundles

4 Complete other post-upgrade steps.
For instructions, see the chapter Performing post-upgrade tasks in Symantec™Storage Foundation for Oracle RAC 6.2 Installation and Configuration Guide.
5 Upgrade Oracle RAC, if required.
For information on Oracle RAC support, see:
http://www.symantec.com/docs/DOC5081
For instructions, see the chapter Upgrading Oracle RAC in 6.2 SF Oracle RACInstallation Guide.
Note: The procedure for Oracle RAC 12c is the same as that for Oracle RAC11g Release 2.
6 If you want to upgrade all application clusters to version 6.2.1, make sure thatyou upgraded CP server systems that use VCS or SFHA to 6.2.1. Then,upgrade all application clusters to version 6.2.1.
For instructions to upgrade VCS or SFHA on the CP server systems, see the6.2 VCS or SFHA installation guide.
Performing a phased upgrade using Install BundlesThis section explains how to perform a phased upgrade of SFHA Solutions on fournodes with four service groups. Note that in this scenario, SFHA Solutions and theservice groups cannot stay online on the second subcluster during the upgrade ofthe second subcluster. Do not add, remove, or change resources or service groupson any nodes during the upgrade. These changes are likely to get lost after theupgrade.
■ Performing a phased VCS upgrade using Install Bundles
■ Performing a phased SFHA upgrade using Install Bundles
■ Performing a phased SFCFSHA upgrade using Install Bundles
■ Performing a phased SF Oracle RAC upgrade using Install Bundles
Performing a phased VCS upgrade using Install BundlesYou can perform a phased VCS upgrade with the following steps:
35Upgrading to 6.2.1 from releases earlier than 6.2Performing a phased upgrade using Install Bundles
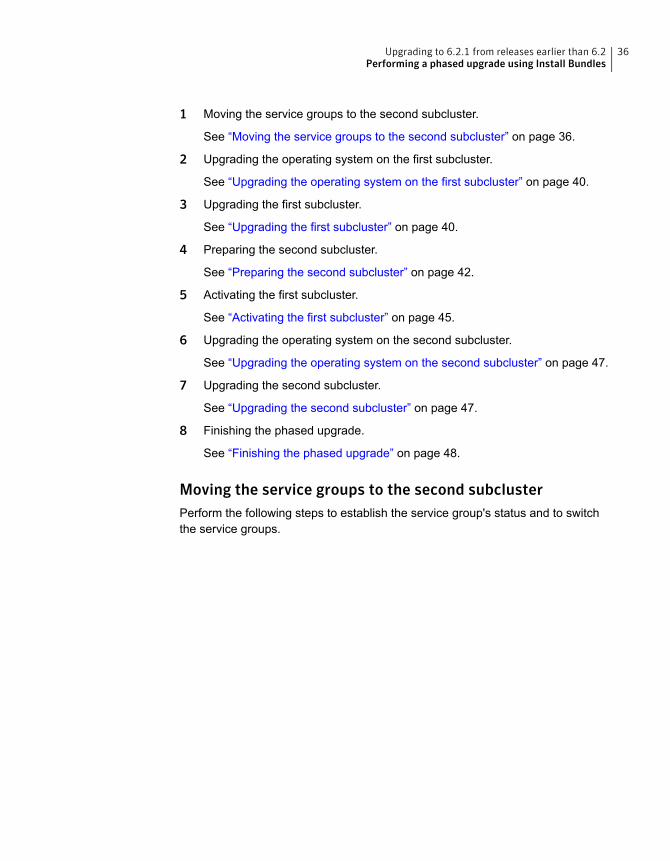
1 Moving the service groups to the second subcluster.
See “Moving the service groups to the second subcluster” on page 36.
2 Upgrading the operating system on the first subcluster.
See “Upgrading the operating system on the first subcluster” on page 40.
3 Upgrading the first subcluster.
See “Upgrading the first subcluster” on page 40.
4 Preparing the second subcluster.
See “Preparing the second subcluster” on page 42.
5 Activating the first subcluster.
See “Activating the first subcluster” on page 45.
6 Upgrading the operating system on the second subcluster.
See “Upgrading the operating system on the second subcluster” on page 47.
7 Upgrading the second subcluster.
See “Upgrading the second subcluster” on page 47.
8 Finishing the phased upgrade.
See “Finishing the phased upgrade” on page 48.
Moving the service groups to the second subclusterPerform the following steps to establish the service group's status and to switchthe service groups.
36Upgrading to 6.2.1 from releases earlier than 6.2Performing a phased upgrade using Install Bundles

To move service groups to the second subcluster
1 On the first subcluster, determine where the service groups are online.
# hagrp -state
The output resembles:
#Group Attribute System Value
sg1 State sys1 |ONLINE|
sg1 State sys2 |ONLINE|
sg1 State sys3 |ONLINE|
sg1 State sys4 |ONLINE|
sg2 State sys1 |ONLINE|
sg2 State sys2 |ONLINE|
sg2 State sys3 |ONLINE|
sg2 State sys4 |ONLINE|
sg3 State sys1 |ONLINE|
sg3 State sys2 |OFFLINE|
sg3 State sys3 |OFFLINE|
sg3 State sys4 |OFFLINE|
sg4 State sys1 |OFFLINE|
sg4 State sys2 |ONLINE|
sg4 State sys3 |OFFLINE|
sg4 State sys4 |OFFLINE|
2 Offline the parallel service groups (sg1 and sg2) from the first subcluster. Switchthe failover service groups (sg3 and sg4) from the first subcluster (sys1 andsys2) to the nodes on the second subcluster (sys3 and sys4). For SFHA, vxfensg is the parallel service group.
# hagrp -offline sg1 -sys sys1
# hagrp -offline sg2 -sys sys1
# hagrp -offline sg1 -sys sys2
# hagrp -offline sg2 -sys sys2
# hagrp -switch sg3 -to sys3
# hagrp -switch sg4 -to sys4
3 Make the configuration writable on the first subcluster.
# haconf -makerw
37Upgrading to 6.2.1 from releases earlier than 6.2Performing a phased upgrade using Install Bundles
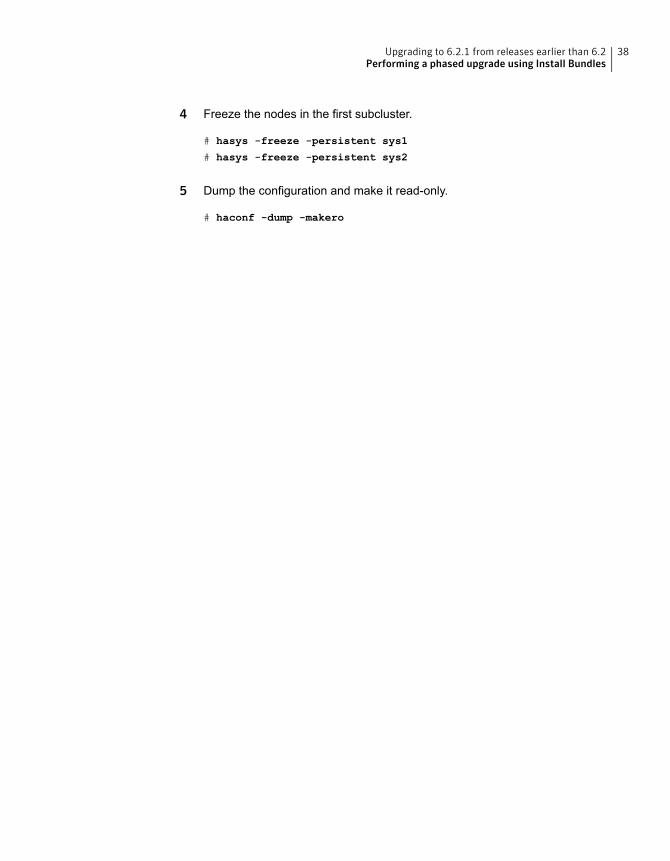
4 Freeze the nodes in the first subcluster.
# hasys -freeze -persistent sys1
# hasys -freeze -persistent sys2
5 Dump the configuration and make it read-only.
# haconf -dump -makero
38Upgrading to 6.2.1 from releases earlier than 6.2Performing a phased upgrade using Install Bundles

6 Verify that the service groups are offline on the first subcluster that you wantto upgrade.
# hagrp -state
Output resembles:
#Group Attribute System Value
sg1 State sys1 |OFFLINE|
sg1 State sys2 |OFFLINE|
sg1 State sys3 |ONLINE|
sg1 State sys4 |ONLINE|
sg2 State sys1 |OFFLINE|
sg2 State sys2 |OFFLINE|
sg2 State sys3 |ONLINE|
sg2 State sys4 |ONLINE|
sg3 State sys1 |OFFLINE|
sg3 State sys2 |OFFLINE|
sg3 State sys3 |ONLINE|
sg3 State sys4 |OFFLINE|
sg4 State sys1 |OFFLINE|
sg4 State sys2 |OFFLINE|
sg4 State sys3 |OFFLINE|
sg4 State sys4 |ONLINE|
7 Backup the llttab, llthosts, gabtab, types.cf, main.cf and AT configuration fileson the first subcluster.
# cp /etc/llttab /etc/llttab.bkp
# cp /etc/llthosts /etc/llthosts.bkp
# cp /etc/gabtab /etc/gabtab.bkp
# cp /etc/VRTSvcs/conf/config/main.cf \
/etc/VRTSvcs/conf/config/main.cf.bkp
# cp /etc/VRTSvcs/conf/config/types.cf \
/etc/VRTSvcs/conf/config/types.cf.bkp
# /opt/VRTSat/bin/vssat showbackuplist
/var/VRTSat/.VRTSat/profile/VRTSatlocal.conf
/var/VRTSat/.VRTSat/profile/certstore
/var/VRTSat/ABAuthSource
/etc/vx/vss/VRTSat.conf
Quiescing ...
Snapshot Directory :/var/VRTSatSnapShot
39Upgrading to 6.2.1 from releases earlier than 6.2Performing a phased upgrade using Install Bundles
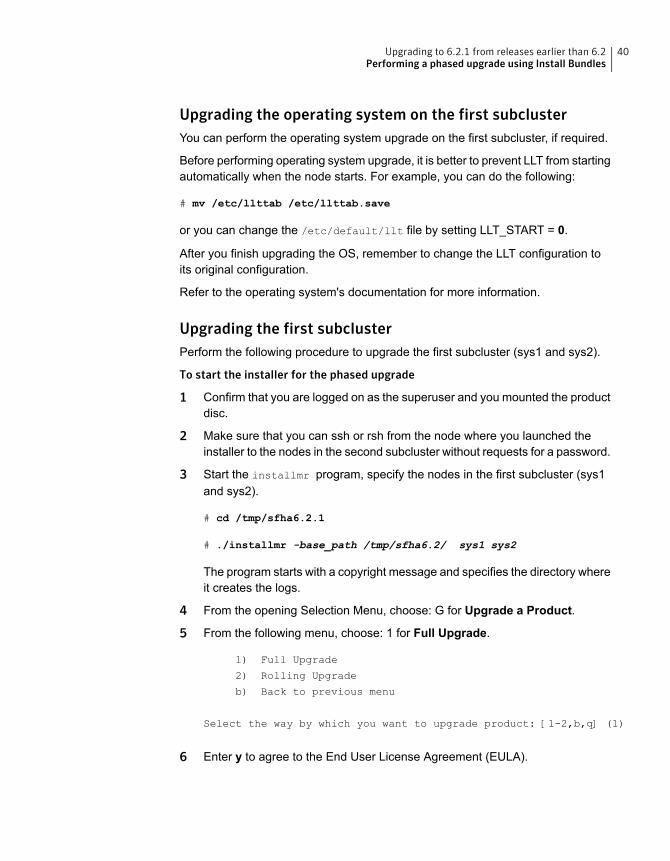
Upgrading the operating system on the first subclusterYou can perform the operating system upgrade on the first subcluster, if required.
Before performing operating system upgrade, it is better to prevent LLT from startingautomatically when the node starts. For example, you can do the following:
# mv /etc/llttab /etc/llttab.save
or you can change the /etc/default/llt file by setting LLT_START = 0.
After you finish upgrading the OS, remember to change the LLT configuration toits original configuration.
Refer to the operating system's documentation for more information.
Upgrading the first subclusterPerform the following procedure to upgrade the first subcluster (sys1 and sys2).
To start the installer for the phased upgrade
1 Confirm that you are logged on as the superuser and you mounted the productdisc.
2 Make sure that you can ssh or rsh from the node where you launched theinstaller to the nodes in the second subcluster without requests for a password.
3 Start the installmr program, specify the nodes in the first subcluster (sys1and sys2).
# cd /tmp/sfha6.2.1
# ./installmr -base_path /tmp/sfha6.2/ sys1 sys2
The program starts with a copyright message and specifies the directory whereit creates the logs.
4 From the opening Selection Menu, choose: G for Upgrade a Product.
5 From the following menu, choose: 1 for Full Upgrade.
1) Full Upgrade
2) Rolling Upgrade
b) Back to previous menu
Select the way by which you want to upgrade product: [1-2,b,q] (1)
6 Enter y to agree to the End User License Agreement (EULA).
40Upgrading to 6.2.1 from releases earlier than 6.2Performing a phased upgrade using Install Bundles
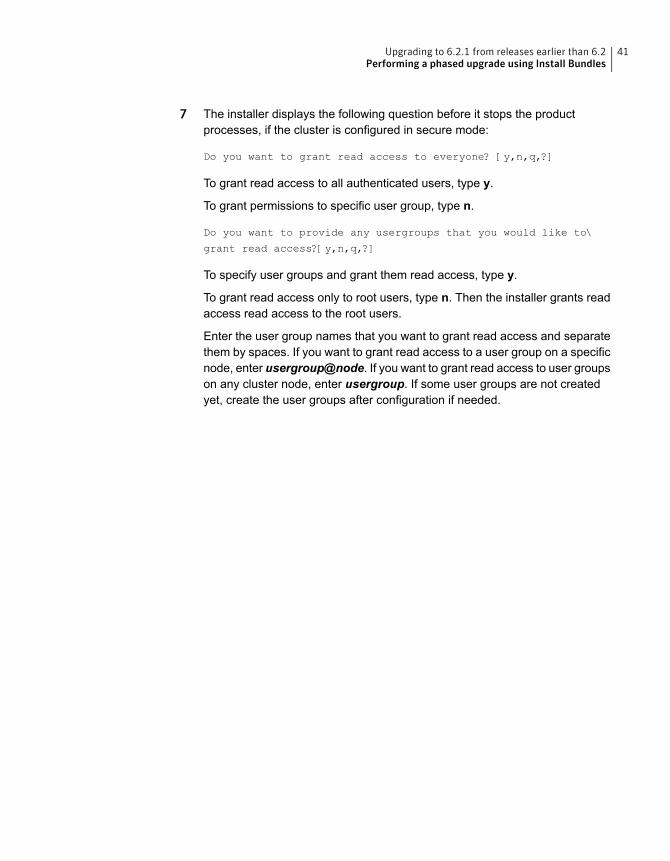
7 The installer displays the following question before it stops the productprocesses, if the cluster is configured in secure mode:
Do you want to grant read access to everyone? [y,n,q,?]
To grant read access to all authenticated users, type y.
To grant permissions to specific user group, type n.
Do you want to provide any usergroups that you would like to\
grant read access?[y,n,q,?]
To specify user groups and grant them read access, type y.
To grant read access only to root users, type n. Then the installer grants readaccess read access to the root users.
Enter the user group names that you want to grant read access and separatethem by spaces. If you want to grant read access to a user group on a specificnode, enter usergroup@node. If you want to grant read access to user groupson any cluster node, enter usergroup. If some user groups are not createdyet, create the user groups after configuration if needed.
41Upgrading to 6.2.1 from releases earlier than 6.2Performing a phased upgrade using Install Bundles
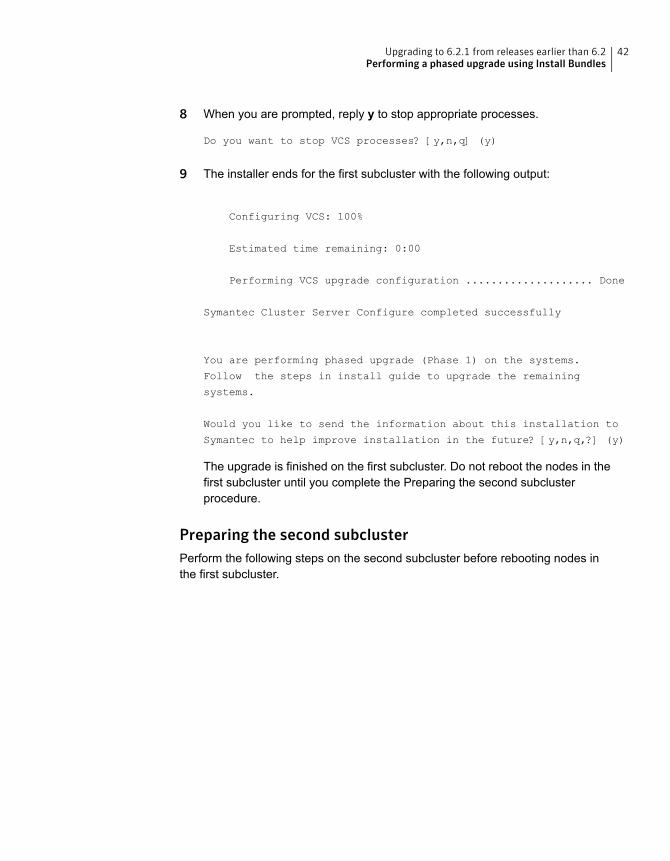
8 When you are prompted, reply y to stop appropriate processes.
Do you want to stop VCS processes? [y,n,q] (y)
9 The installer ends for the first subcluster with the following output:
Configuring VCS: 100%
Estimated time remaining: 0:00 1 of 1
Performing VCS upgrade configuration .................... Done
Symantec Cluster Server Configure completed successfully
You are performing phased upgrade (Phase 1) on the systems.
Follow the steps in install guide to upgrade the remaining
systems.
Would you like to send the information about this installation to
Symantec to help improve installation in the future? [y,n,q,?] (y)
The upgrade is finished on the first subcluster. Do not reboot the nodes in thefirst subcluster until you complete the Preparing the second subclusterprocedure.
Preparing the second subclusterPerform the following steps on the second subcluster before rebooting nodes inthe first subcluster.
42Upgrading to 6.2.1 from releases earlier than 6.2Performing a phased upgrade using Install Bundles
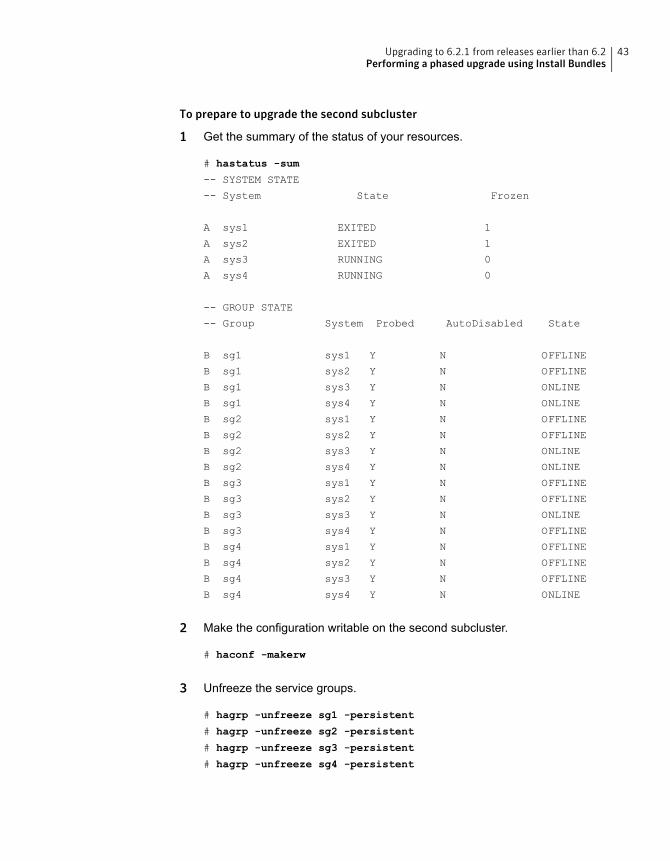
To prepare to upgrade the second subcluster
1 Get the summary of the status of your resources.
# hastatus -sum
-- SYSTEM STATE
-- System State Frozen
A sys1 EXITED 1
A sys2 EXITED 1
A sys3 RUNNING 0
A sys4 RUNNING 0
-- GROUP STATE
-- Group System Probed AutoDisabled State
B sg1 sys1 Y N OFFLINE
B sg1 sys2 Y N OFFLINE
B sg1 sys3 Y N ONLINE
B sg1 sys4 Y N ONLINE
B sg2 sys1 Y N OFFLINE
B sg2 sys2 Y N OFFLINE
B sg2 sys3 Y N ONLINE
B sg2 sys4 Y N ONLINE
B sg3 sys1 Y N OFFLINE
B sg3 sys2 Y N OFFLINE
B sg3 sys3 Y N ONLINE
B sg3 sys4 Y N OFFLINE
B sg4 sys1 Y N OFFLINE
B sg4 sys2 Y N OFFLINE
B sg4 sys3 Y N OFFLINE
B sg4 sys4 Y N ONLINE
2 Make the configuration writable on the second subcluster.
# haconf -makerw
3 Unfreeze the service groups.
# hagrp -unfreeze sg1 -persistent
# hagrp -unfreeze sg2 -persistent
# hagrp -unfreeze sg3 -persistent
# hagrp -unfreeze sg4 -persistent
43Upgrading to 6.2.1 from releases earlier than 6.2Performing a phased upgrade using Install Bundles
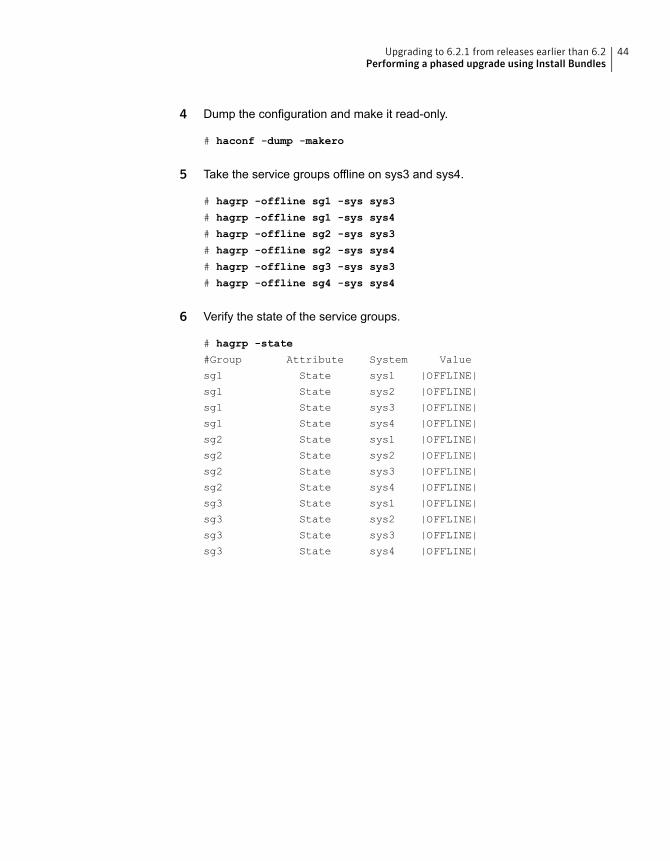
4 Dump the configuration and make it read-only.
# haconf -dump -makero
5 Take the service groups offline on sys3 and sys4.
# hagrp -offline sg1 -sys sys3
# hagrp -offline sg1 -sys sys4
# hagrp -offline sg2 -sys sys3
# hagrp -offline sg2 -sys sys4
# hagrp -offline sg3 -sys sys3
# hagrp -offline sg4 -sys sys4
6 Verify the state of the service groups.
# hagrp -state
#Group Attribute System Value
sg1 State sys1 |OFFLINE|
sg1 State sys2 |OFFLINE|
sg1 State sys3 |OFFLINE|
sg1 State sys4 |OFFLINE|
sg2 State sys1 |OFFLINE|
sg2 State sys2 |OFFLINE|
sg2 State sys3 |OFFLINE|
sg2 State sys4 |OFFLINE|
sg3 State sys1 |OFFLINE|
sg3 State sys2 |OFFLINE|
sg3 State sys3 |OFFLINE|
sg3 State sys4 |OFFLINE|
44Upgrading to 6.2.1 from releases earlier than 6.2Performing a phased upgrade using Install Bundles
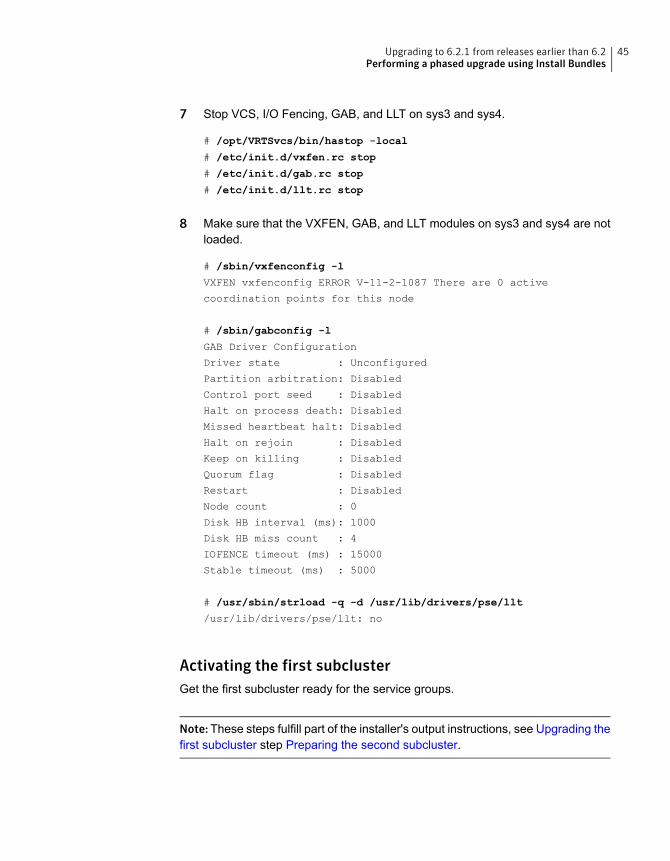
7 Stop VCS, I/O Fencing, GAB, and LLT on sys3 and sys4.
# /opt/VRTSvcs/bin/hastop -local
# /etc/init.d/vxfen.rc stop
# /etc/init.d/gab.rc stop
# /etc/init.d/llt.rc stop
8 Make sure that the VXFEN, GAB, and LLT modules on sys3 and sys4 are notloaded.
# /sbin/vxfenconfig -l
VXFEN vxfenconfig ERROR V-11-2-1087 There are 0 active
coordination points for this node
# /sbin/gabconfig -l
GAB Driver Configuration
Driver state : Unconfigured
Partition arbitration: Disabled
Control port seed : Disabled
Halt on process death: Disabled
Missed heartbeat halt: Disabled
Halt on rejoin : Disabled
Keep on killing : Disabled
Quorum flag : Disabled
Restart : Disabled
Node count : 0
Disk HB interval (ms): 1000
Disk HB miss count : 4
IOFENCE timeout (ms) : 15000
Stable timeout (ms) : 5000
# /usr/sbin/strload -q -d /usr/lib/drivers/pse/llt
/usr/lib/drivers/pse/llt: no
Activating the first subclusterGet the first subcluster ready for the service groups.
Note:These steps fulfill part of the installer's output instructions, see Upgrading thefirst subcluster step Preparing the second subcluster.
45Upgrading to 6.2.1 from releases earlier than 6.2Performing a phased upgrade using Install Bundles
To activate the first subcluster
1 Start LLT and GAB.
# /etc/rc.d/rc2.d/S70llt start
# etc/rc.d/rc2.d/S92gab start
2 Seed sys1 and sys2 in the first subcluster.
# gabconfig -x
3 On the first half of the cluster, start VCS:
# cd /opt/VRTS/install
# ./installvcs<version> -start sys1 sys2
Where <version> is the specific release version.
4 Make the configuration writable on the first subcluster.
# haconf -makerw
5 Unfreeze the nodes in the first subcluster.
# hasys -unfreeze -persistent sys1
# hasys -unfreeze -persistent sys2
6 Unfreeze service groups in the first subcluster.
# hagrp -unfreeze sg1 -persistent
# hagrp -unfreeze sg2 -persistent
7 Dump the configuration and make it read-only.
# haconf -dump -makero
8 Bring the service groups online on sys1 and sys2.
# hagrp -online sg1 -sys sys1
# hagrp -online sg1 -sys sys2
# hagrp -online sg2 -sys sys1
# hagrp -online sg2 -sys sys2
# hagrp -online sg3 -sys sys1
# hagrp -online sg4 -sys sys2
46Upgrading to 6.2.1 from releases earlier than 6.2Performing a phased upgrade using Install Bundles
Upgrading the operating system on the second subclusterYou can perform the operating system upgrade on the second subcluster, if required.
Before performing operating system upgrade, it is better to prevent LLT from startingautomatically when the node starts. For example, you can do the following:
# mv /etc/llttab /etc/llttab.save
or you can change the /etc/default/llt file by setting LLT_START = 0.
After you finish upgrading the OS, remember to change the LLT configuration toits original configuration.
Refer to the operating system's documentation for more information.
Upgrading the second subclusterPerform the following procedure to upgrade the second subcluster (sys3 and sys4).
To start the installer to upgrade the second subcluster
1 Confirm that you are logged on as the superuser and you mounted the productdisc.
2 Navigate to the folder that contains the SFHA Solutions 6.2.1 binary.
# cd /tmp/sfha6.2.1
3 Confirm that VCS is stopped on sys3 and sys4. Specify the nodes in the secondsubcluster (sys3 and sys4).
# ./installmr -base_path /tmp/sfha6.2/ sys3 sys4
The program starts with a copyright message and specifies the directory whereit creates the logs.
4 From the opening Selection Menu, choose: G for Upgrade a Product.
5 From the following menu, choose: 1 for Full Upgrade.
1) Full Upgrade
2) Rolling Upgrade
b) Back to previous menu
Select the way by which you want to upgrade product: [1-2,b,q] (1)
6 Enter y to agree to the End User License Agreement (EULA).
7 Monitor the installer program answering questions as appropriate until theupgrade completes.
47Upgrading to 6.2.1 from releases earlier than 6.2Performing a phased upgrade using Install Bundles

Finishing the phased upgradeComplete the following procedure to complete the upgrade.
To finish the upgrade
1 Verify that the cluster UUID is the same on the nodes in the second subclusterand the first subcluster. Run the following command to display the cluster UUID:
# /opt/VRTSvcs/bin/uuidconfig.pl
-clus -display sys1 [sys2 ...]
If the cluster UUID differs, manually copy the cluster UUID from a node in thefirst subcluster to the nodes in the second subcluster. For example:
# /opt/VRTSvcs/bin/uuidconfig.pl [-rsh] -clus
-copy -from_sys sys1 -to_sys sys3 sys4
2 On the second half of the cluster, start VCS:
# cd /opt/VRTS/install
# ./installvcs<version> -start sys3 sys4
Where <version> is the specific release version.
48Upgrading to 6.2.1 from releases earlier than 6.2Performing a phased upgrade using Install Bundles

3 Check to see if VCS and its components are up.
# gabconfig -a
GAB Port Memberships
===============================================================
Port a gen nxxxnn membership 0123
Port b gen nxxxnn membership 0123
Port h gen nxxxnn membership 0123
4 Run an hastatus -sum command to determine the status of the nodes, servicegroups, and cluster.
# hastatus -sum
-- SYSTEM STATE
-- System State Frozen
A sys1 RUNNING 0
A sys2 RUNNING 0
A sys3 RUNNING 0
A sys4 RUNNING 0
-- GROUP STATE
-- Group System Probed AutoDisabled State
B sg1 sys1 Y N ONLINE
B sg1 sys2 Y N ONLINE
B sg1 sys3 Y N ONLINE
B sg1 sys4 Y N ONLINE
B sg2 sys1 Y N ONLINE
B sg2 sys2 Y N ONLINE
B sg2 sys3 Y N ONLINE
B sg2 sys4 Y N ONLINE
B sg3 sys1 Y N ONLINE
B sg3 sys2 Y N OFFLINE
B sg3 sys3 Y N OFFLINE
B sg3 sys4 Y N OFFLINE
B sg4 sys1 Y N OFFLINE
B sg4 sys2 Y N ONLINE
B sg4 sys3 Y N OFFLINE
B sg4 sys4 Y N OFFLINE
49Upgrading to 6.2.1 from releases earlier than 6.2Performing a phased upgrade using Install Bundles
In this example, you have performed a phased upgrade of VCS. The service groupswere down when you took them offline on sys3 and sys4, to the time VCS broughtthem online on sys1 and sys2.
Note: If you want to upgrade the application clusters that use CP server basedfencing to version 6.1 and later, make sure that you first upgrade VCS or SFHA onthe CP server systems to version 6.1 and later. And then, upgrade all applicationclusters. The CP server with version 6.1 and later supports application clusters on6.1 and later (HTTPS-based communication) and application clusters before 6.1(IPM-based communication). When you configure the CP server, the installer asksthe VIPs for HTTPS-based communication (to support clients on release version6.1 and later) and VIPs for IPM-based communication (to support clients on releaseversions before 6.1).
For instructions to upgrade VCS or SFHA, see the VCS or SFHA Installation Guide.
Performing a phased SFHA upgrade using Install BundlesYou can perform a phased upgrade from any supported SFHA versions to SFHA6.2.1.
Performing a phased upgrade involves the following tasks:
1 Moving the service groups to the second subcluster.
See “Moving the service groups to the second subcluster” on page 51.
2 Upgrading the operating system on the first subcluster.
See “Upgrading the operating system on the first subcluster” on page 55.
3 Upgrading the first subcluster.
See “Upgrading the first subcluster” on page 55.
4 Preparing the second subcluster.
See “Preparing the second subcluster” on page 56.
5 Activating the first subcluster.
See “Activating the first subcluster” on page 60.
6 Upgrading the operating system on the second subcluster.
See “Upgrading the operating system on the second subcluster” on page 62.
50Upgrading to 6.2.1 from releases earlier than 6.2Performing a phased upgrade using Install Bundles
7 Upgrading the second subcluster.
See “Upgrading the second subcluster” on page 62.
8 Finishing the phased upgrade.
See “Finishing the phased upgrade” on page 63.
Moving the service groups to the second subclusterPerform the following steps to establish the service group's status and to switchthe service groups.
51Upgrading to 6.2.1 from releases earlier than 6.2Performing a phased upgrade using Install Bundles

To move service groups to the second subcluster
1 On the first subcluster, determine where the service groups are online.
# hagrp -state
The output resembles:
#Group Attribute System Value
sg1 State sys1 |ONLINE|
sg1 State sys2 |ONLINE|
sg1 State sys3 |ONLINE|
sg1 State sys4 |ONLINE|
sg2 State sys1 |ONLINE|
sg2 State sys2 |ONLINE|
sg2 State sys3 |ONLINE|
sg2 State sys4 |ONLINE|
sg3 State sys1 |ONLINE|
sg3 State sys2 |OFFLINE|
sg3 State sys3 |OFFLINE|
sg3 State sys4 |OFFLINE|
sg4 State sys1 |OFFLINE|
sg4 State sys2 |ONLINE|
sg4 State sys3 |OFFLINE|
sg4 State sys4 |OFFLINE|
2 Offline the parallel service groups (sg1 and sg2) from the first subcluster. Switchthe failover service groups (sg3 and sg4) from the first subcluster (sys1 andsys2) to the nodes on the second subcluster (sys3 and sys4). For SFHA, vxfensg is the parallel service group.
# hagrp -offline sg1 -sys sys1
# hagrp -offline sg2 -sys sys1
# hagrp -offline sg1 -sys sys2
# hagrp -offline sg2 -sys sys2
# hagrp -switch sg3 -to sys3
# hagrp -switch sg4 -to sys4
52Upgrading to 6.2.1 from releases earlier than 6.2Performing a phased upgrade using Install Bundles
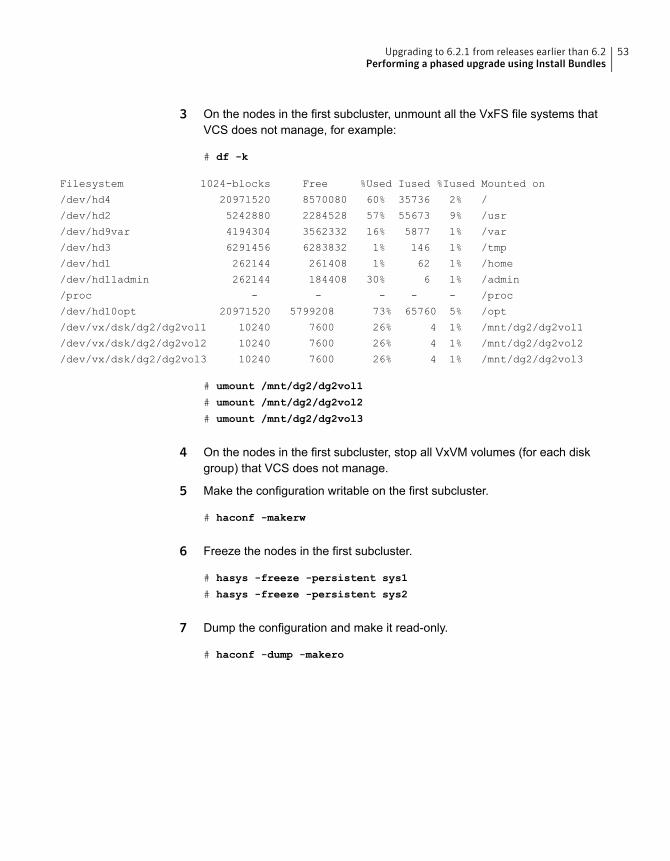
3 On the nodes in the first subcluster, unmount all the VxFS file systems thatVCS does not manage, for example:
# df -k
Filesystem 1024-blocks Free %Used Iused %Iused Mounted on
/dev/hd4 20971520 8570080 60% 35736 2% /
/dev/hd2 5242880 2284528 57% 55673 9% /usr
/dev/hd9var 4194304 3562332 16% 5877 1% /var
/dev/hd3 6291456 6283832 1% 146 1% /tmp
/dev/hd1 262144 261408 1% 62 1% /home
/dev/hd11admin 262144 184408 30% 6 1% /admin
/proc - - - - - /proc
/dev/hd10opt 20971520 5799208 73% 65760 5% /opt
/dev/vx/dsk/dg2/dg2vol1 10240 7600 26% 4 1% /mnt/dg2/dg2vol1
/dev/vx/dsk/dg2/dg2vol2 10240 7600 26% 4 1% /mnt/dg2/dg2vol2
/dev/vx/dsk/dg2/dg2vol3 10240 7600 26% 4 1% /mnt/dg2/dg2vol3
# umount /mnt/dg2/dg2vol1
# umount /mnt/dg2/dg2vol2
# umount /mnt/dg2/dg2vol3
4 On the nodes in the first subcluster, stop all VxVM volumes (for each diskgroup) that VCS does not manage.
5 Make the configuration writable on the first subcluster.
# haconf -makerw
6 Freeze the nodes in the first subcluster.
# hasys -freeze -persistent sys1
# hasys -freeze -persistent sys2
7 Dump the configuration and make it read-only.
# haconf -dump -makero
53Upgrading to 6.2.1 from releases earlier than 6.2Performing a phased upgrade using Install Bundles

8 Verify that the service groups are offline on the first subcluster that you wantto upgrade.
# hagrp -state
Output resembles:
#Group Attribute System Value
sg1 State sys1 |OFFLINE|
sg1 State sys2 |OFFLINE|
sg1 State sys3 |ONLINE|
sg1 State sys4 |ONLINE|
sg2 State sys1 |OFFLINE|
sg2 State sys2 |OFFLINE|
sg2 State sys3 |ONLINE|
sg2 State sys4 |ONLINE|
sg3 State sys1 |OFFLINE|
sg3 State sys2 |OFFLINE|
sg3 State sys3 |ONLINE|
sg3 State sys4 |OFFLINE|
sg4 State sys1 |OFFLINE|
sg4 State sys2 |OFFLINE|
sg4 State sys3 |OFFLINE|
sg4 State sys4 |ONLINE|
9 Back up the llttab, llthosts, gabtab, types.cf, main.cf and AT configuration fileson the first subcluster.
# cp /etc/llttab /etc/llttab.bkp
# cp /etc/llthosts /etc/llthosts.bkp
# cp /etc/gabtab /etc/gabtab.bkp
# cp /etc/VRTSvcs/conf/config/main.cf \
/etc/VRTSvcs/conf/config/main.cf.bkp
# cp /etc/VRTSvcs/conf/config/types.cf \
/etc/VRTSvcs/conf/config/types.cf.bkp
# /opt/VRTSat/bin/vssat showbackuplist
B|/var/VRTSat/.VRTSat/profile/VRTSatlocal.conf
B|/var/VRTSat/.VRTSat/profile/certstore
B|/var/VRTSat/ABAuthSource
B|/etc/vx/vss/VRTSat.conf
Quiescing ...
Snapshot Directory :/var/VRTSatSnapShot
54Upgrading to 6.2.1 from releases earlier than 6.2Performing a phased upgrade using Install Bundles
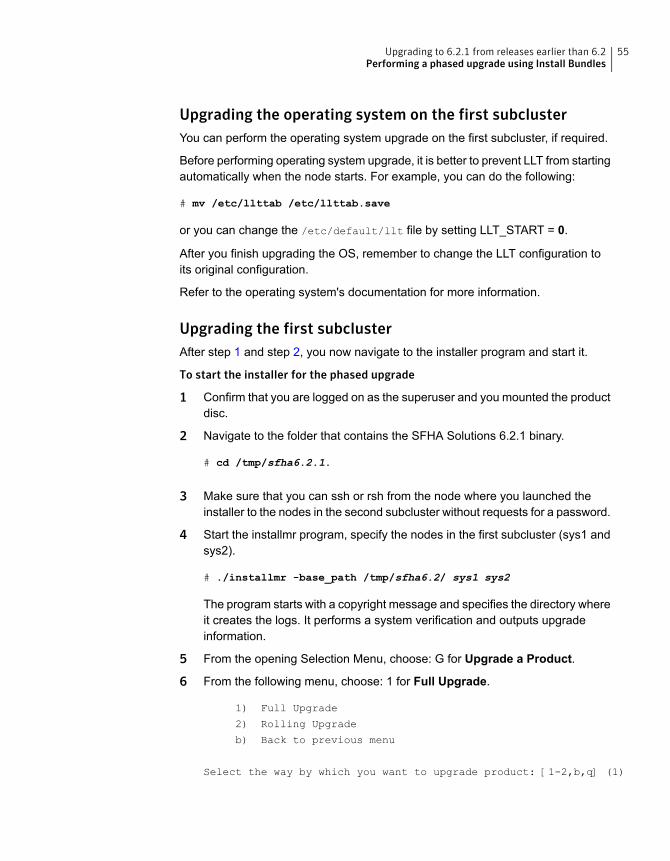
Upgrading the operating system on the first subclusterYou can perform the operating system upgrade on the first subcluster, if required.
Before performing operating system upgrade, it is better to prevent LLT from startingautomatically when the node starts. For example, you can do the following:
# mv /etc/llttab /etc/llttab.save
or you can change the /etc/default/llt file by setting LLT_START = 0.
After you finish upgrading the OS, remember to change the LLT configuration toits original configuration.
Refer to the operating system's documentation for more information.
Upgrading the first subclusterAfter step 1 and step 2, you now navigate to the installer program and start it.
To start the installer for the phased upgrade
1 Confirm that you are logged on as the superuser and you mounted the productdisc.
2 Navigate to the folder that contains the SFHA Solutions 6.2.1 binary.
# cd /tmp/sfha6.2.1.
3 Make sure that you can ssh or rsh from the node where you launched theinstaller to the nodes in the second subcluster without requests for a password.
4 Start the installmr program, specify the nodes in the first subcluster (sys1 andsys2).
# ./installmr -base_path /tmp/sfha6.2/ sys1 sys2
The program starts with a copyright message and specifies the directory whereit creates the logs. It performs a system verification and outputs upgradeinformation.
5 From the opening Selection Menu, choose: G for Upgrade a Product.
6 From the following menu, choose: 1 for Full Upgrade.
1) Full Upgrade
2) Rolling Upgrade
b) Back to previous menu
Select the way by which you want to upgrade product: [1-2,b,q] (1)
55Upgrading to 6.2.1 from releases earlier than 6.2Performing a phased upgrade using Install Bundles
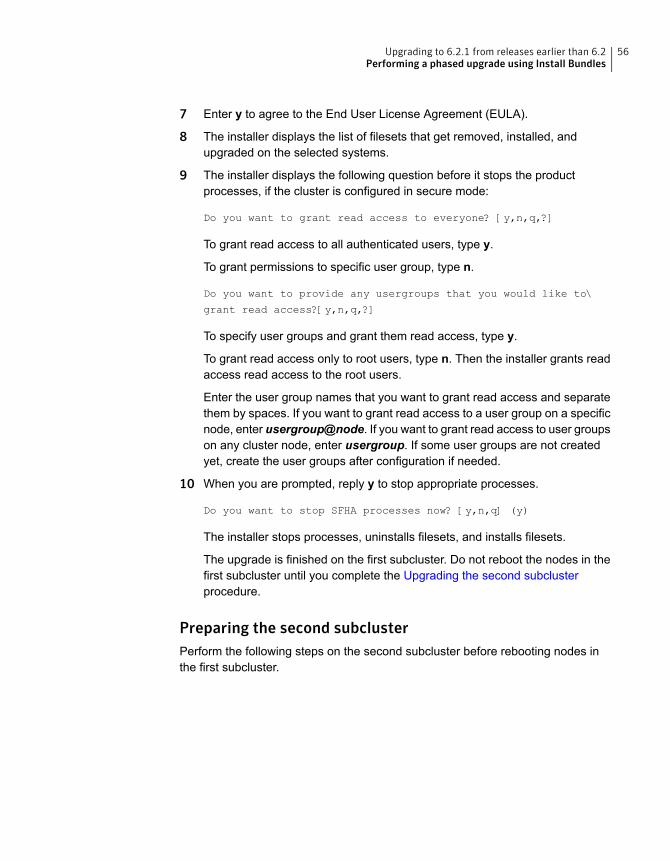
7 Enter y to agree to the End User License Agreement (EULA).
8 The installer displays the list of filesets that get removed, installed, andupgraded on the selected systems.
9 The installer displays the following question before it stops the productprocesses, if the cluster is configured in secure mode:
Do you want to grant read access to everyone? [y,n,q,?]
To grant read access to all authenticated users, type y.
To grant permissions to specific user group, type n.
Do you want to provide any usergroups that you would like to\
grant read access?[y,n,q,?]
To specify user groups and grant them read access, type y.
To grant read access only to root users, type n. Then the installer grants readaccess read access to the root users.
Enter the user group names that you want to grant read access and separatethem by spaces. If you want to grant read access to a user group on a specificnode, enter usergroup@node. If you want to grant read access to user groupson any cluster node, enter usergroup. If some user groups are not createdyet, create the user groups after configuration if needed.
10 When you are prompted, reply y to stop appropriate processes.
Do you want to stop SFHA processes now? [y,n,q] (y)
The installer stops processes, uninstalls filesets, and installs filesets.
The upgrade is finished on the first subcluster. Do not reboot the nodes in thefirst subcluster until you complete the Upgrading the second subclusterprocedure.
Preparing the second subclusterPerform the following steps on the second subcluster before rebooting nodes inthe first subcluster.
56Upgrading to 6.2.1 from releases earlier than 6.2Performing a phased upgrade using Install Bundles
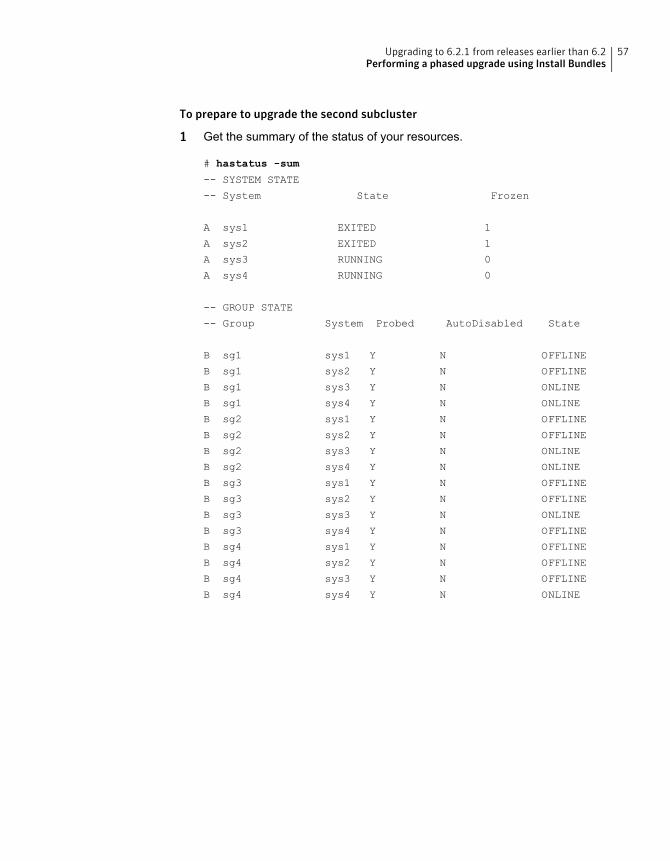
To prepare to upgrade the second subcluster
1 Get the summary of the status of your resources.
# hastatus -sum
-- SYSTEM STATE
-- System State Frozen
A sys1 EXITED 1
A sys2 EXITED 1
A sys3 RUNNING 0
A sys4 RUNNING 0
-- GROUP STATE
-- Group System Probed AutoDisabled State
B sg1 sys1 Y N OFFLINE
B sg1 sys2 Y N OFFLINE
B sg1 sys3 Y N ONLINE
B sg1 sys4 Y N ONLINE
B sg2 sys1 Y N OFFLINE
B sg2 sys2 Y N OFFLINE
B sg2 sys3 Y N ONLINE
B sg2 sys4 Y N ONLINE
B sg3 sys1 Y N OFFLINE
B sg3 sys2 Y N OFFLINE
B sg3 sys3 Y N ONLINE
B sg3 sys4 Y N OFFLINE
B sg4 sys1 Y N OFFLINE
B sg4 sys2 Y N OFFLINE
B sg4 sys3 Y N OFFLINE
B sg4 sys4 Y N ONLINE
57Upgrading to 6.2.1 from releases earlier than 6.2Performing a phased upgrade using Install Bundles
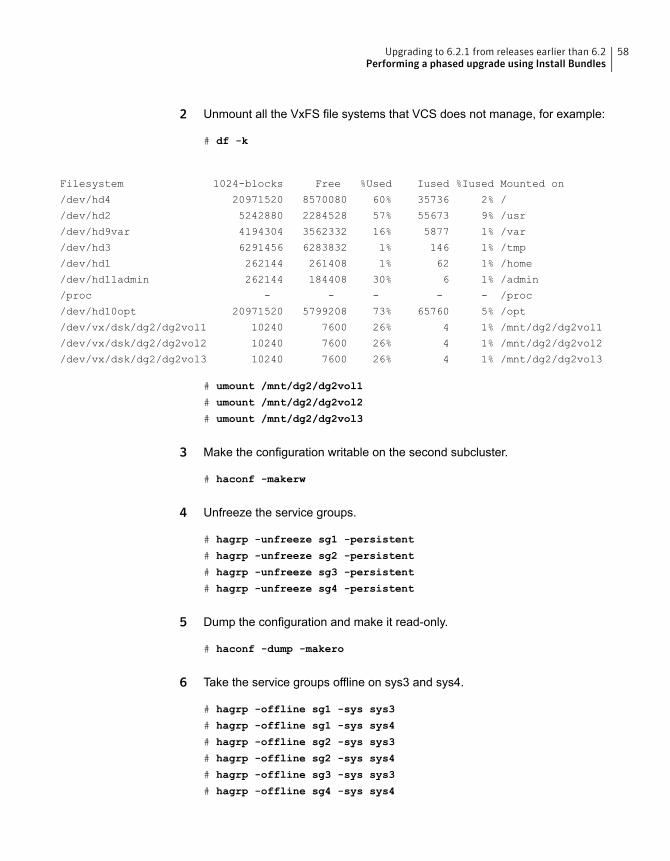
2 Unmount all the VxFS file systems that VCS does not manage, for example:
# df -k
Filesystem 1024-blocks Free %Used Iused %Iused Mounted on
/dev/hd4 20971520 8570080 60% 35736 2% /
/dev/hd2 5242880 2284528 57% 55673 9% /usr
/dev/hd9var 4194304 3562332 16% 5877 1% /var
/dev/hd3 6291456 6283832 1% 146 1% /tmp
/dev/hd1 262144 261408 1% 62 1% /home
/dev/hd11admin 262144 184408 30% 6 1% /admin
/proc - - - - - /proc
/dev/hd10opt 20971520 5799208 73% 65760 5% /opt
/dev/vx/dsk/dg2/dg2vol1 10240 7600 26% 4 1% /mnt/dg2/dg2vol1
/dev/vx/dsk/dg2/dg2vol2 10240 7600 26% 4 1% /mnt/dg2/dg2vol2
/dev/vx/dsk/dg2/dg2vol3 10240 7600 26% 4 1% /mnt/dg2/dg2vol3
# umount /mnt/dg2/dg2vol1
# umount /mnt/dg2/dg2vol2
# umount /mnt/dg2/dg2vol3
3 Make the configuration writable on the second subcluster.
# haconf -makerw
4 Unfreeze the service groups.
# hagrp -unfreeze sg1 -persistent
# hagrp -unfreeze sg2 -persistent
# hagrp -unfreeze sg3 -persistent
# hagrp -unfreeze sg4 -persistent
5 Dump the configuration and make it read-only.
# haconf -dump -makero
6 Take the service groups offline on sys3 and sys4.
# hagrp -offline sg1 -sys sys3
# hagrp -offline sg1 -sys sys4
# hagrp -offline sg2 -sys sys3
# hagrp -offline sg2 -sys sys4
# hagrp -offline sg3 -sys sys3
# hagrp -offline sg4 -sys sys4
58Upgrading to 6.2.1 from releases earlier than 6.2Performing a phased upgrade using Install Bundles

7 Verify the state of the service groups.
# hagrp -state
#Group Attribute System Value
sg1 State sys1 |OFFLINE|
sg1 State sys2 |OFFLINE|
sg1 State sys3 |OFFLINE|
sg1 State sys4 |OFFLINE|
sg2 State sys1 |OFFLINE|
sg2 State sys2 |OFFLINE|
sg2 State sys3 |OFFLINE|
sg2 State sys4 |OFFLINE|
sg3 State sys1 |OFFLINE|
sg3 State sys2 |OFFLINE|
sg3 State sys3 |OFFLINE|
sg3 State sys4 |OFFLINE|
8 Stop all VxVM volumes (for each disk group) that VCS does not manage.
59Upgrading to 6.2.1 from releases earlier than 6.2Performing a phased upgrade using Install Bundles
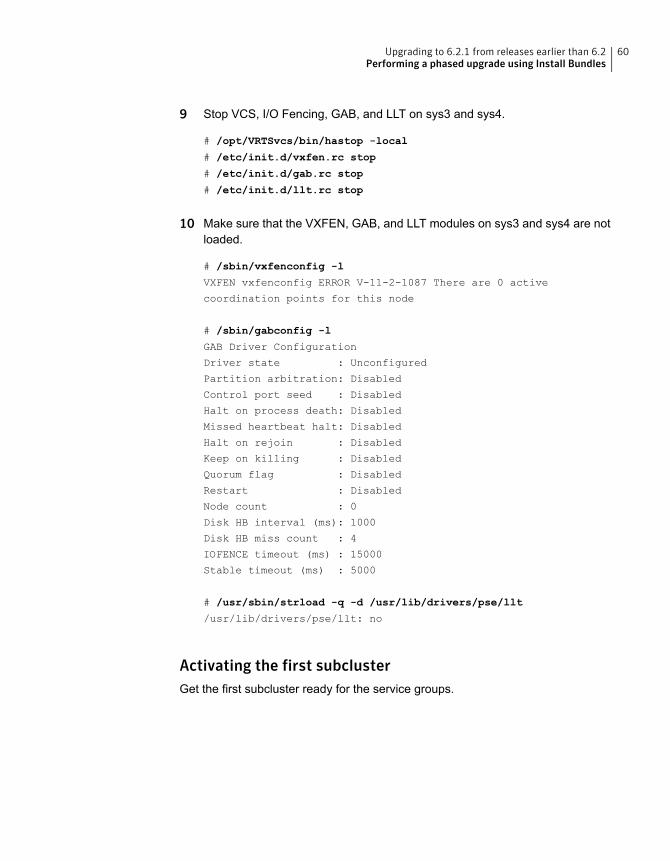
9 Stop VCS, I/O Fencing, GAB, and LLT on sys3 and sys4.
# /opt/VRTSvcs/bin/hastop -local
# /etc/init.d/vxfen.rc stop
# /etc/init.d/gab.rc stop
# /etc/init.d/llt.rc stop
10 Make sure that the VXFEN, GAB, and LLT modules on sys3 and sys4 are notloaded.
# /sbin/vxfenconfig -l
VXFEN vxfenconfig ERROR V-11-2-1087 There are 0 active
coordination points for this node
# /sbin/gabconfig -l
GAB Driver Configuration
Driver state : Unconfigured
Partition arbitration: Disabled
Control port seed : Disabled
Halt on process death: Disabled
Missed heartbeat halt: Disabled
Halt on rejoin : Disabled
Keep on killing : Disabled
Quorum flag : Disabled
Restart : Disabled
Node count : 0
Disk HB interval (ms): 1000
Disk HB miss count : 4
IOFENCE timeout (ms) : 15000
Stable timeout (ms) : 5000
# /usr/sbin/strload -q -d /usr/lib/drivers/pse/llt
/usr/lib/drivers/pse/llt: no
Activating the first subclusterGet the first subcluster ready for the service groups.
60Upgrading to 6.2.1 from releases earlier than 6.2Performing a phased upgrade using Install Bundles
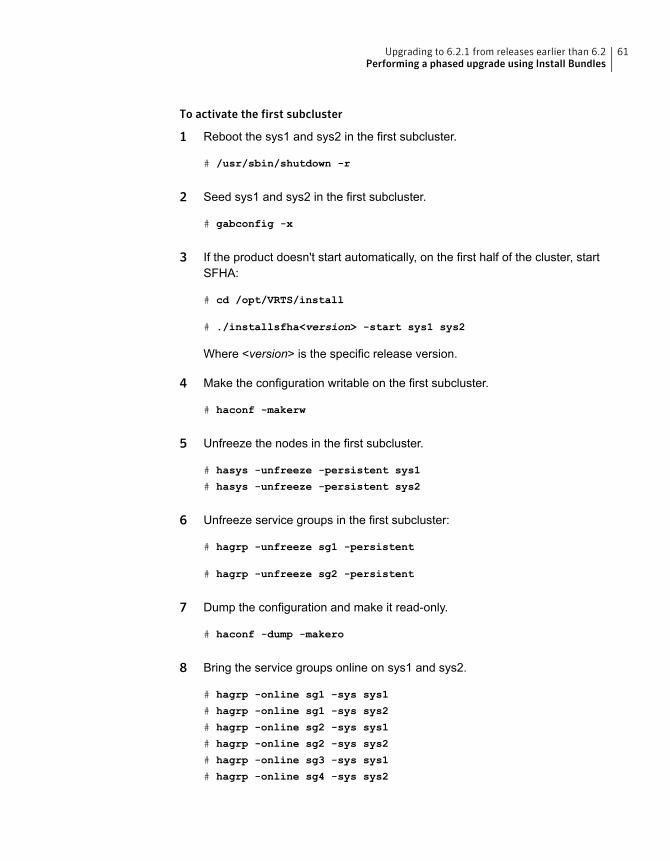
To activate the first subcluster
1 Reboot the sys1 and sys2 in the first subcluster.
# /usr/sbin/shutdown -r
2 Seed sys1 and sys2 in the first subcluster.
# gabconfig -x
3 If the product doesn't start automatically, on the first half of the cluster, startSFHA:
# cd /opt/VRTS/install
# ./installsfha<version> -start sys1 sys2
Where <version> is the specific release version.
4 Make the configuration writable on the first subcluster.
# haconf -makerw
5 Unfreeze the nodes in the first subcluster.
# hasys -unfreeze -persistent sys1
# hasys -unfreeze -persistent sys2
6 Unfreeze service groups in the first subcluster:
# hagrp -unfreeze sg1 -persistent
# hagrp -unfreeze sg2 -persistent
7 Dump the configuration and make it read-only.
# haconf -dump -makero
8 Bring the service groups online on sys1 and sys2.
# hagrp -online sg1 -sys sys1
# hagrp -online sg1 -sys sys2
# hagrp -online sg2 -sys sys1
# hagrp -online sg2 -sys sys2
# hagrp -online sg3 -sys sys1
# hagrp -online sg4 -sys sys2
61Upgrading to 6.2.1 from releases earlier than 6.2Performing a phased upgrade using Install Bundles
Upgrading the operating system on the second subclusterYou can perform the operating system upgrade on the second subcluster, if required.
Before performing operating system upgrade, it is better to prevent LLT from startingautomatically when the node starts. For example, you can do the following:
# mv /etc/llttab /etc/llttab.save
or you can change the /etc/default/llt file by setting LLT_START = 0.
After you finish upgrading the OS, remember to change the LLT configuration toits original configuration.
Refer to the operating system's documentation for more information.
Upgrading the second subclusterAfter step 4 to step 6, perform the following procedure to upgrade the secondsubcluster (sys3 and sys4).
To start the installer to upgrade the second subcluster
1 Confirm that you are logged on as the superuser and you mounted the productdisc.
2 Navigate to the folder that contains the SFHA Solutions 6.2.1 binary.
# cd /tmp/sfha6.2.1.
3 Confirm that SFHA is stopped on sys3 and sys4. Start the installmr program,specify the nodes in the second subcluster (sys3 and sys4).
# ./installmr -base_path /tmp/sfha6.2/ sys3
sys4
The program starts with a copyright message and specifies the directory whereit creates the logs.
4 From the opening Selection Menu, choose: G for Upgrade a Product.
5 From the following menu, choose: 1 for Full Upgrade.
1) Full Upgrade
2) Rolling Upgrade
b) Back to previous menu
Select the way by which you want to upgrade product: [1-2,b,q] (1)
62Upgrading to 6.2.1 from releases earlier than 6.2Performing a phased upgrade using Install Bundles
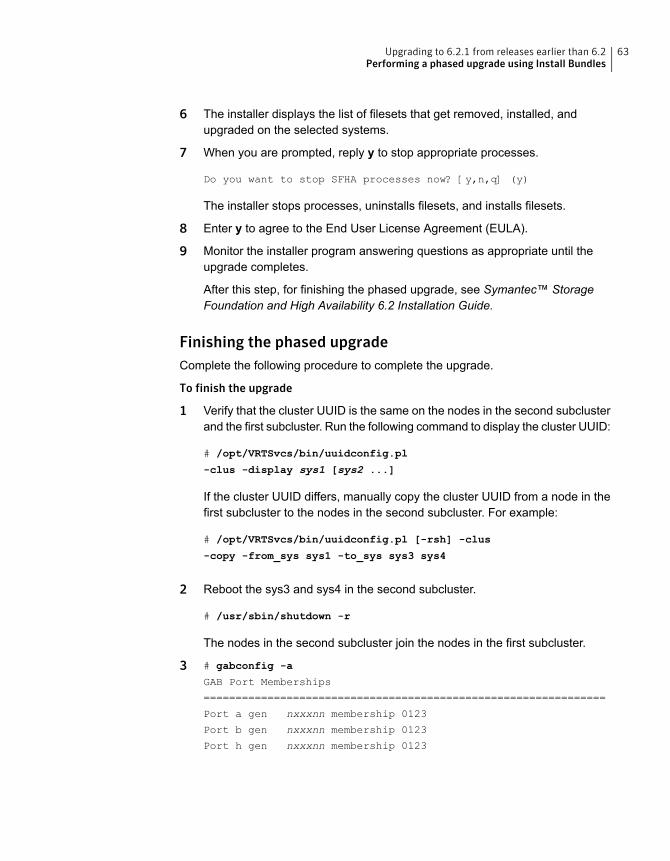
6 The installer displays the list of filesets that get removed, installed, andupgraded on the selected systems.
7 When you are prompted, reply y to stop appropriate processes.
Do you want to stop SFHA processes now? [y,n,q] (y)
The installer stops processes, uninstalls filesets, and installs filesets.
8 Enter y to agree to the End User License Agreement (EULA).
9 Monitor the installer program answering questions as appropriate until theupgrade completes.
After this step, for finishing the phased upgrade, see Symantec™ StorageFoundation and High Availability 6.2 Installation Guide.
Finishing the phased upgradeComplete the following procedure to complete the upgrade.
To finish the upgrade
1 Verify that the cluster UUID is the same on the nodes in the second subclusterand the first subcluster. Run the following command to display the cluster UUID:
# /opt/VRTSvcs/bin/uuidconfig.pl
-clus -display sys1 [sys2 ...]
If the cluster UUID differs, manually copy the cluster UUID from a node in thefirst subcluster to the nodes in the second subcluster. For example:
# /opt/VRTSvcs/bin/uuidconfig.pl [-rsh] -clus
-copy -from_sys sys1 -to_sys sys3 sys4
2 Reboot the sys3 and sys4 in the second subcluster.
# /usr/sbin/shutdown -r
The nodes in the second subcluster join the nodes in the first subcluster.
3 # gabconfig -a
GAB Port Memberships
===============================================================
Port a gen nxxxnn membership 0123
Port b gen nxxxnn membership 0123
Port h gen nxxxnn membership 0123
63Upgrading to 6.2.1 from releases earlier than 6.2Performing a phased upgrade using Install Bundles
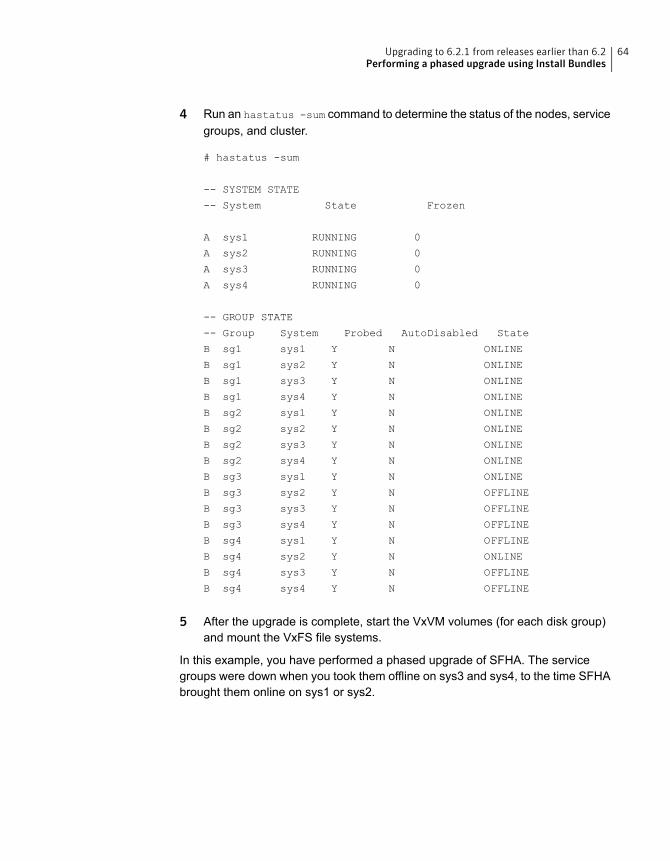
4 Run an hastatus -sum command to determine the status of the nodes, servicegroups, and cluster.
# hastatus -sum
-- SYSTEM STATE
-- System State Frozen
A sys1 RUNNING 0
A sys2 RUNNING 0
A sys3 RUNNING 0
A sys4 RUNNING 0
-- GROUP STATE
-- Group System Probed AutoDisabled State
B sg1 sys1 Y N ONLINE
B sg1 sys2 Y N ONLINE
B sg1 sys3 Y N ONLINE
B sg1 sys4 Y N ONLINE
B sg2 sys1 Y N ONLINE
B sg2 sys2 Y N ONLINE
B sg2 sys3 Y N ONLINE
B sg2 sys4 Y N ONLINE
B sg3 sys1 Y N ONLINE
B sg3 sys2 Y N OFFLINE
B sg3 sys3 Y N OFFLINE
B sg3 sys4 Y N OFFLINE
B sg4 sys1 Y N OFFLINE
B sg4 sys2 Y N ONLINE
B sg4 sys3 Y N OFFLINE
B sg4 sys4 Y N OFFLINE
5 After the upgrade is complete, start the VxVM volumes (for each disk group)and mount the VxFS file systems.
In this example, you have performed a phased upgrade of SFHA. The servicegroups were down when you took them offline on sys3 and sys4, to the time SFHAbrought them online on sys1 or sys2.
64Upgrading to 6.2.1 from releases earlier than 6.2Performing a phased upgrade using Install Bundles
Note: If you want to upgrade the application clusters that use CP server basedfencing to version 6.1 and later, make sure that you first upgrade VCS or SFHA onthe CP server systems to version 6.1 and later. And then, upgrade all applicationclusters. The CP server with version 6.1 and later supports application clusters on6.1 and later (HTTPS-based communication) and application clusters before 6.1(IPM-based communication). When you configure the CP server, the installer asksthe VIPs for HTTPS-based communication (to support clients on release version6.1 and later) and VIPs for IPM-based communication (to support clients on releaseversions before 6.1).
For instructions to upgrade VCS or SFHA, see the VCS or SFHA Installation Guide.
Performing a phased SFCFSHA upgrade using Install BundlesPerforming a phased upgrade involves the following tasks:
1 Moving the service groups to the second subcluster.
See “Moving the service groups to the second subcluster” on page 66.
2 Upgrading the SFCFSHA stack on the first subcluster.
See “Upgrading the SFCFSHA stack on the first subcluster” on page 67.
3 Preparing the second subcluster.
See “Preparing the second subcluster” on page 69.
4 Activating the first subcluster.
See “Activating the first subcluster” on page 70.
5 Upgrading the operating system on the second subcluster.
See “Upgrading the operating system on the second subcluster” on page 71.
6 Upgrading the second subcluster.
See “Upgrading the second subcluster” on page 71.
7 Finishing the phased upgrade.
See “Finishing the phased upgrade” on page 72.
65Upgrading to 6.2.1 from releases earlier than 6.2Performing a phased upgrade using Install Bundles

Moving the service groups to the second subclusterTo move the service groups to the second subcluster
1 Switch failover groups from the first half of the cluster to one of the nodes inthe second half of the cluster. In this procedure, sys1 is a node in the first halfof the cluster and sys4 is a node in the second half of the cluster. Enter thefollowing:
# hagrp -switch failover_group -to sys4
2 On the first half of the cluster, stop all applications that are not configured underVCS. Use native application commands to stop the applications.
3 On the first half of the cluster, unmount the VxFS or CFS file systems that arenot managed by VCS.
# mount | grep vxfs
Verify that no processes use the VxFS or CFSmount point. Enter the following:
# fuser -c /mount_point
Stop any processes using a VxFS or CFS mount point with the mechanismprovided by the application.
Unmount the VxFS or CFS file system. Enter the following:
# umount /mount_point
4 On the first half of the cluster, bring all the VCS service groups offline includingCVM group. Enter the following:
# hagrp -offline group_name -sys sys1
When the CVM group becomes OFFLINE, all the parallel service groups suchas the CFS file system will also become OFFLINE on the first half of the clusternodes.
5 Verify that the VCS service groups are offline on all the nodes in first half ofthe cluster. Enter the following:
# hagrp -state group_name
6 Freeze the nodes in the first half of the cluster. Enter the following:
# haconf -makerw
# hasys -freeze -persistent sys1
# haconf -dump -makero
66Upgrading to 6.2.1 from releases earlier than 6.2Performing a phased upgrade using Install Bundles

7 Verify that only GAB ports a, b, d and h are open. Enter the following:
# gabconfig -a
GAB Port Memberships
=======================================================
Port a gen 6b5901 membership 01
Port b gen 6b5904 membership 01
Port d gen 6b5907 membership 01
Port h gen ada40f membership 01
Do not stop VCS. Port h should be up and running.
8 In the first half of the cluster, stop all VxVM and CVM volumes. Enter thefollowing command for each disk group:
# vxvol -g diskgroup stopall
Verify that no volumes remain open. Enter the following:
# vxprint -Aht -e v_open
9 On first half of the cluster, upgrade the operating system on all the nodes, ifapplicable. For instructions, see the upgrade paths for the operating system.
When the node starts, prevent LLT from starting automatically with one of thefollowing methods. For example, . Or, change the /etc/default/llt file by settingLLT_START = 0. After you finish upgrading the OS, remember to change theLLT configuration to its original configuration.
■ Enter:
# mv /etc/llttab /etc/llttab.save
OR:
■ Set LLT_START = 0 in the /etc/default/llt file
Note: After upgrading the OS, change the LLT configuration to its originalconfiguration.
Upgrading the SFCFSHA stack on the first subclusterAfter step 1, you now navigate to the installer program and start it.
67Upgrading to 6.2.1 from releases earlier than 6.2Performing a phased upgrade using Install Bundles

To start the installer for the phased upgrade
1 Confirm that you are logged on as the superuser.
2 Navigate to the folder that contains the SFHA Solutions 6.2.1 binary.
#cd /tmp/sfha6.2.1
3 Make sure that you can ssh or rsh from the node where you launched theinstaller to the nodes in the second subcluster without requests for a password.
4 Start the installmr program, specify the nodes in the first subcluster (sys1 andsys2).
#./installmr -base_path /tmp/sfha6.2/ sys1 sys2
5 The program starts with a copyright message and specifies the directory whereit creates the logs. It performs a system verification and outputs upgradeinformation.
To upgrade the SFCFSHA stack on the first subcluster
1 From the opening Selection Menu, choose: G for Upgrade a Product.
2 From the following menu, choose: 1 for Full Upgrade.
1) Full Upgrade
2) Rolling Upgrade
b) Back to previous menu
Select the way by which you want to upgrade product: [1-2,b,q] (1)
68Upgrading to 6.2.1 from releases earlier than 6.2Performing a phased upgrade using Install Bundles

Preparing the second subclusterTo prepare the second subcluster
1 On the second half of the cluster, stop all applications that are not configuredunder VCS. Use native application commands to stop the application. [Downtimestarts now.]
2 On the second half of the cluster, unmount the VxFS and CFS file systemsthat are not managed by VCS. Enter the following:
# mount | grep vxfs
Verify that no processes use the VxFS and CFS mount point. Enter thefollowing:
# fuser -c /mount_point
Stop any processes using a VxFS and CFS mount point with the mechanismprovided by the application.
Unmount the VxFS and CFS file system. Enter the following:
# umount /mount_point
3 On the second half of the cluster, unfreeze all the VCS service groups on allthe nodes using the following commands:
# haconf -makerw
# hagrp -unfreeze group_name -persistent
# haconf -dump -makero
4 On the second half of the cluster, bring all the VCS service groups offline,including CVM group. Enter the following:
# hagrp -offline group_name -sys sys4
5 On the second half of the cluster, verify that the VCS service groups are offline.Enter the following:
# hagrp -state group_name
69Upgrading to 6.2.1 from releases earlier than 6.2Performing a phased upgrade using Install Bundles

6 Stop VCS on the second half of the cluster. Enter the following:
# hastop -local
7 On the second half of the cluster, stop the following SFCFSHAmodules: GLM,ODM, GMS, VxFEN, GAB, and LLT. Enter the following:
# /etc/methods/glmkextadm unload
# /etc/rc.d/rc2.d/S99odm stop
# /etc/methods/gmskextadm unload
# /etc/init.d/vxfen.rc stop
# /etc/init.d/gab.rc stop
# /etc/init.d/llt.rc stop
Activating the first subclusterTo activate the first subcluster
1 Restart the upgraded nodes in the first half of the cluster:
# /usr/sbin/shutdown -r
When the first half of the cluster nodes come up, no GAB ports are OPEN. Thefollowing command does not show any GAB ports:
# /sbin/gabconfig -a
GAB Port Memberships
===============================================================
2 If required, force GAB to form a cluster after the upgraded nodes are rebootedin the first half of the cluster.
# /sbin/gabconfig -x
GAB ports a, b, d, and h appear in gabconfig -a command output.
Note: If port b and h are not up, you need to bring fencing and VCS manuallyonline.
70Upgrading to 6.2.1 from releases earlier than 6.2Performing a phased upgrade using Install Bundles
3 If the product doesn't start automatically, on the first half of the cluster, startSFCFSHA:
# cd /opt/VRTS/install
# ./installsfcfsha<version> -start sys1 sys2
Where <version> is the specific release version.
4 Unfreeze the nodes in the first half of the cluster. Enter the following:
# haconf -makerw
# hasys -unfreeze -persistent node_name
# haconf -dump -makero
5 On the first half of the cluster, bring the VCS service groups online. Enter thefollowing:
# hagrp -online group_name -sys node_name
After you bring the CVM service group ONLINE, all the GAB ports u, v, w andf come ONLINE and all the CFS mounts service groups also come ONLINEautomatically. Only failover service groups need to be brought ONLINEmanually.
6 Manually mount the VxFS and CFS file systems that are not managed by VCS.[Downtime ends now.]
Upgrading the operating system on the second subclusterYou can perform the operating system upgrade on the second subcluster, if required.
Before performing operating system upgrade, it is better to prevent LLT from startingautomatically when the node starts. For example, you can do the following:
# mv /etc/llttab /etc/llttab.save
or you can change the /etc/default/llt file by setting LLT_START = 0.
After you finish upgrading the OS, remember to change the LLT configuration toits original configuration.
Refer to the operating system's documentation for more information.
Upgrading the second subclusterAfter step 3 to step 5, upgrade the second subcluster.
71Upgrading to 6.2.1 from releases earlier than 6.2Performing a phased upgrade using Install Bundles
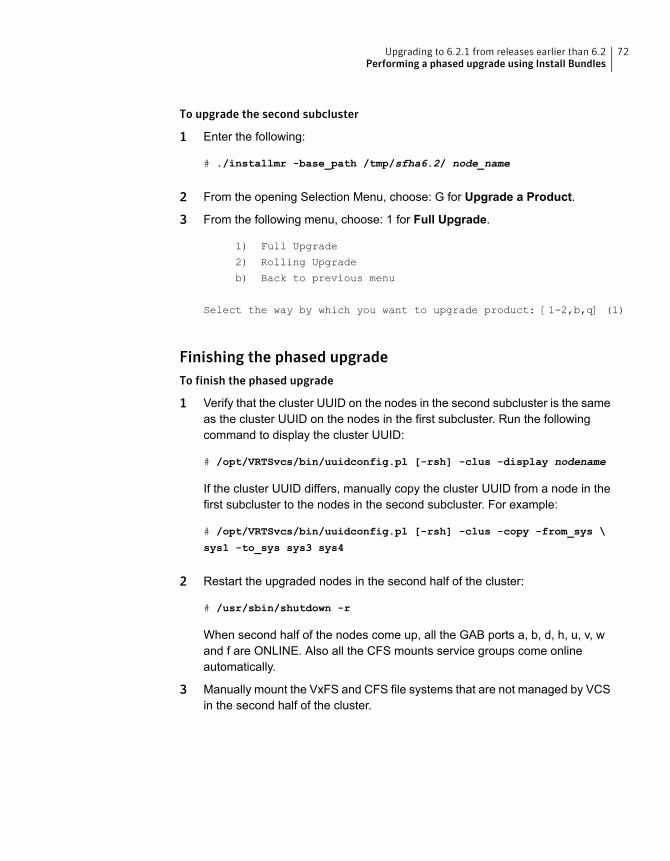
To upgrade the second subcluster
1 Enter the following:
# ./installmr -base_path /tmp/sfha6.2/ node_name
2 From the opening Selection Menu, choose: G for Upgrade a Product.
3 From the following menu, choose: 1 for Full Upgrade.
1) Full Upgrade
2) Rolling Upgrade
b) Back to previous menu
Select the way by which you want to upgrade product: [1-2,b,q] (1)
Finishing the phased upgradeTo finish the phased upgrade
1 Verify that the cluster UUID on the nodes in the second subcluster is the sameas the cluster UUID on the nodes in the first subcluster. Run the followingcommand to display the cluster UUID:
# /opt/VRTSvcs/bin/uuidconfig.pl [-rsh] -clus -display nodename
If the cluster UUID differs, manually copy the cluster UUID from a node in thefirst subcluster to the nodes in the second subcluster. For example:
# /opt/VRTSvcs/bin/uuidconfig.pl [-rsh] -clus -copy -from_sys \
sys1 -to_sys sys3 sys4
2 Restart the upgraded nodes in the second half of the cluster:
# /usr/sbin/shutdown -r
When second half of the nodes come up, all the GAB ports a, b, d, h, u, v, wand f are ONLINE. Also all the CFS mounts service groups come onlineautomatically.
3 Manually mount the VxFS and CFS file systems that are not managed by VCSin the second half of the cluster.
72Upgrading to 6.2.1 from releases earlier than 6.2Performing a phased upgrade using Install Bundles
4 Find out which node is the CVM master. Enter the following:
# vxdctl -c mode
5 On the CVM master node, upgrade the CVM protocol. Enter the following:
# vxdctl upgrade
Performing a phased SF Oracle RAC upgrade using Install BundlesThe phased upgrademethodology involves upgrading half of the nodes in the clusterat a time. The procedure involves the following tasks:
1 Performing pre-upgrade tasks on the first half of the cluster.
Step 1: Performing pre-upgrade tasks on the first half of the cluster
2 Upgrading the first half of the cluster.
Step 2: Upgrading the first half of the cluster
3 Performing pre-upgrade tasks on the second half of the cluster.
Step 3: Performing pre-upgrade tasks on the second half of the cluster
4 Performing post-upgrade tasks on the first half of the cluster.
Step 4: Performing post-upgrade tasks on the first half of the cluster
5 Upgrading the second half of the cluster.
Step 5: Upgrading the second half of the cluster
6 Performing post-upgrade tasks on the second half of the cluster.
Step 6: Performing post-upgrade tasks on the second half of the cluster
Step 1: Performing pre-upgrade tasks on the first half of theclusterPerform the following pre-upgrade steps on the first half of the cluster.
73Upgrading to 6.2.1 from releases earlier than 6.2Performing a phased upgrade using Install Bundles

To perform the pre-upgrade tasks on the first half of the cluster
1 Back up the following configuration files: main.cf, types.cf, CVMTypes.cf,
CFSTypes.cf, OracleTypes.cf, OracleASMTypes.cf, , PrivNIC.cf,
MultiPrivNIC.cf, /etc/llttab, /etc/llthosts, /etc/gabtab,
/etc/vxfentab, /etc/vxfendg, /etc/vxfenmodemain.cf, types.cf,
CVMTypes.cf, CFSTypes.cf, SybaseTypes.cf, /etc/llttab,
/etc/llthosts, /etc/gabtab, /etc/vxfentab, /etc/vxfendg,
/etc/vxfenmode
For example:
# cp /etc/VRTSvcs/conf/config/main.cf \
/etc/VRTSvcs/conf/config/main.cf.save
The installer verifies that recent backups of configuration files in the VxVMprivate region are saved in /etc/vx/cbr/bk.
If not, the following warning message is displayed: Warning: Backup
/etc/vx/cbr/bk directory.
2 Stop all applications that are not configured under VCS but dependent onOracle RAC or resources controlled by VCS. Use native application commandsto stop the application.
3 Stop the applications configured under VCS. Stop the Oracle database:
■ If the Oracle RAC instance is managed by VCS:
# hagrp -offline oracle_group -sys sys1
# hagrp -offline oracle_group -sys sys2
■ If the Oracle RAC instance is not managed by VCS, log in as the Oracleuser on one of the nodes in the first half of the cluster and shut down theinstances:For Oracle RAC 12c:
$ srvctl stop instance -db db_name \
-node node_name
For Oracle RAC 11.2.0.2 and later versions:
$ srvctl stop instance -d db_name \
-n node_name
For Oracle RAC 11.2.0.1 and earlier versions:
74Upgrading to 6.2.1 from releases earlier than 6.2Performing a phased upgrade using Install Bundles

$ srvctl stop instance -d db_name \
-i instance_name
4 If the Oracle database is managed by VCS, set the AutoStart value to 0 toprevent the database service group from starting automatically when VCSstarts:
■
# haconf -makerw
# hagrp -modify oracle_group AutoStart 0
# haconf -dump -makero
■ If the Oracle database is not managed by VCS, change the managementpolicy for the database to manual:For Oracle 12c:
$ srvctl modify database -db db_name -policy MANUAL
For Oracle RAC 10g and Oracle RAC 11g:
$ srvctl modify database -d db_name -y MANUAL
5 Unmount the CFS file systems that are not managed by VCS.
■ Make sure that no processes are running which make use of mountedshared file system. To verify that no processes use the CFS mount point:
# mount | grep vxfs | grep cluster
# fuser -cu /mount_point
■ Unmount the CFS file system:
# umount /mount_point
6 Stop the parallel service groups and switch over failover service groups oneach of the nodes in the first half of the cluster:
# hastop -local -evacuate
# hastop -local
7 Unmount the VxFS file systems that are not managed by VCS.
■ Make sure that no processes are running which make use of mountedshared file system. To verify that no processes use the VxFS mount point:
75Upgrading to 6.2.1 from releases earlier than 6.2Performing a phased upgrade using Install Bundles

# mount | grep vxfs
# fuser -cu /mount_point
■ Unmount the VxFS file system:
# umount /mount_point
8 Verify that no VxVM volumes (other than VxVM boot volumes) remain open.Stop any open volumes that are not managed by VCS.
# vxvol -g diskgroup stopall
# vxprint -Aht -e v_open
9 If a cache area is online, you must take the cache area offline before upgradingthe VxVMRPM. On the nodes in the first subcluster, use the following commandto take the cache area offline
# sfcache offline cachename
10 Verify that only ports a, b, d, and o are open:
# gabconfig -a
GAB Port Memberships
=======================================================
Port a gen 79c302 membership 0123
Port b gen 79c307 membership 0123
Port d gen 79c306 membership 0123
Port o gen 79c304 membership 0123
11 If you plan to upgrade the operating system, stop all ports.
# /opt/VRTS/install/installsfrac<version> -stop sys1 sys2
Step 2: Upgrading the first half of the clusterPerform the following steps to upgrade the first half of the cluster.
76Upgrading to 6.2.1 from releases earlier than 6.2Performing a phased upgrade using Install Bundles

To upgrade the first half of the cluster
1 If you plan to upgrade the operating system, rename the /etc/llttab file toprevent LLT from starting automatically when the node starts:
# mv /etc/llttab /etc/llttab.save
2 Upgrade the operating system, if required.
For instructions, see the operating system documentation.
3 If you upgraded the operating system, restart the nodes:
# shutdown -r
4 Rename the /etc/llttab file to its original name:
# mv /etc/llttab.save /etc/llttab
5 Make sure that you can run secure shell or remote shell from the node whereyou launched the installer to the nodes in the second subcluster withoutrequests for a password.
6 On the first half of the cluster, upgrade SF Oracle RAC by using the installmrscript. When you invoke the installer, select the Full Upgrade option. Theinstaller automatically detects the phased upgrade though you select the FullUpgrade option.
# cd /tmp/sfha6.2.1
# ./installmr -base_path /tmp/sfha6.2 sys1 sys2
If the product is licensed with stale (old) key, the installer prompts users toupdate the key.
7 Relink the SF Oracle RAC libraries with Oracle:
If you want the installer to relink the Oracle Database Binary, you can choosethe option Relink Oracle Database Binary from the menu.
Complete the remaining tasks to finish the upgrade.
8 Find out which node is the CVM master. Enter the following:
# vxdctl -c mode
9 On the CVM master node, upgrade the CVM protocol. Enter the following:
# vxdctl upgrade
77Upgrading to 6.2.1 from releases earlier than 6.2Performing a phased upgrade using Install Bundles
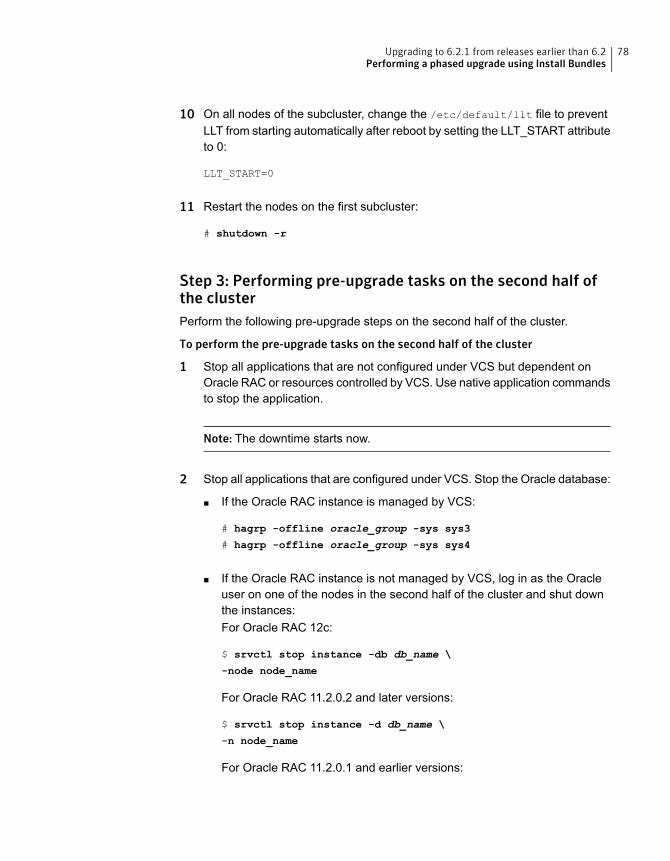
10 On all nodes of the subcluster, change the /etc/default/llt file to preventLLT from starting automatically after reboot by setting the LLT_START attributeto 0:
LLT_START=0
11 Restart the nodes on the first subcluster:
# shutdown -r
Step 3: Performing pre-upgrade tasks on the second half ofthe clusterPerform the following pre-upgrade steps on the second half of the cluster.
To perform the pre-upgrade tasks on the second half of the cluster
1 Stop all applications that are not configured under VCS but dependent onOracle RAC or resources controlled by VCS. Use native application commandsto stop the application.
Note: The downtime starts now.
2 Stop all applications that are configured under VCS. Stop the Oracle database:
■ If the Oracle RAC instance is managed by VCS:
# hagrp -offline oracle_group -sys sys3
# hagrp -offline oracle_group -sys sys4
■ If the Oracle RAC instance is not managed by VCS, log in as the Oracleuser on one of the nodes in the second half of the cluster and shut downthe instances:For Oracle RAC 12c:
$ srvctl stop instance -db db_name \
-node node_name
For Oracle RAC 11.2.0.2 and later versions:
$ srvctl stop instance -d db_name \
-n node_name
For Oracle RAC 11.2.0.1 and earlier versions:
78Upgrading to 6.2.1 from releases earlier than 6.2Performing a phased upgrade using Install Bundles
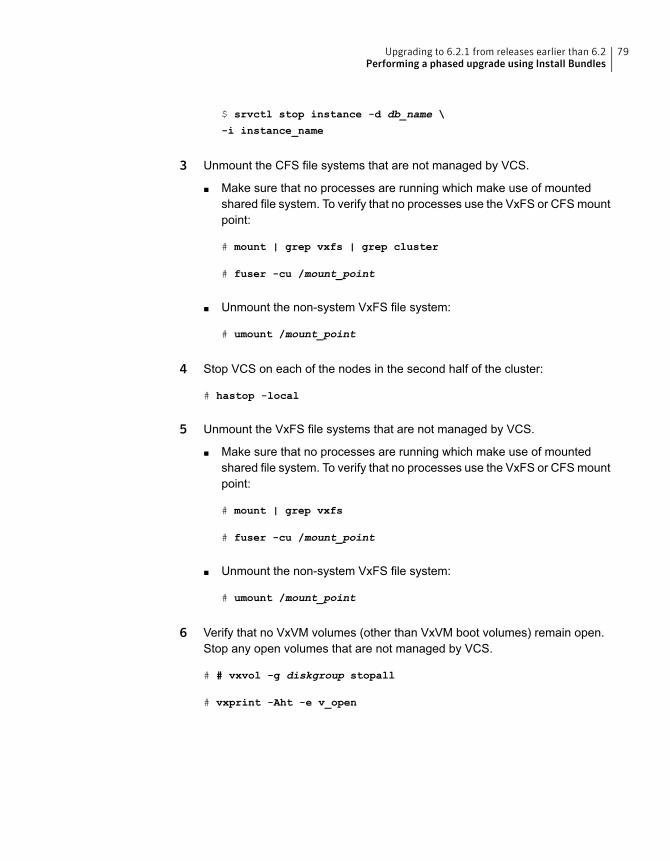
$ srvctl stop instance -d db_name \
-i instance_name
3 Unmount the CFS file systems that are not managed by VCS.
■ Make sure that no processes are running which make use of mountedshared file system. To verify that no processes use the VxFS or CFSmountpoint:
# mount | grep vxfs | grep cluster
# fuser -cu /mount_point
■ Unmount the non-system VxFS file system:
# umount /mount_point
4 Stop VCS on each of the nodes in the second half of the cluster:
# hastop -local
5 Unmount the VxFS file systems that are not managed by VCS.
■ Make sure that no processes are running which make use of mountedshared file system. To verify that no processes use the VxFS or CFSmountpoint:
# mount | grep vxfs
# fuser -cu /mount_point
■ Unmount the non-system VxFS file system:
# umount /mount_point
6 Verify that no VxVM volumes (other than VxVM boot volumes) remain open.Stop any open volumes that are not managed by VCS.
# # vxvol -g diskgroup stopall
# vxprint -Aht -e v_open
79Upgrading to 6.2.1 from releases earlier than 6.2Performing a phased upgrade using Install Bundles
7 If a cache area is online, you must take the cache area offline before upgradingthe VxVM RPM. On the nodes in the second subcluster, use the followingcommand to take the cache area offline:
# sfcache offline cachename
8 Stop all ports.
# /opt/VRTS/install/installsfrac -stop sys3 sys4
Step 4: Performing post-upgrade tasks on the first half of theclusterPerform the following post-upgrade steps on the first half of the cluster.
To perform the post-upgrade tasks on the first half of the cluster
1 Change /etc/default/llt to start LLT on the nodes by setting theLLT_START attribute to 1:
LLT_START=1
2 Start LLT and GAB.
# /etc/rc.d/rc2.d/S70llt start
# etc/rc.d/rc2.d/S92gab start
3 On any one node on the first half of the cluster, force GAB to form a cluster.
# gabconfig -x
4 On the first half of the cluster, start SF Oracle RAC:
# cd /opt/VRTS/install
# ./installsfrac<version> -start sys1 sys2
Where <version> is the specific release version.
5 On the first half of the cluster, manually mount the VxFS or CFS file systemsthat are not managed by VCS.
6 Relink the SF Oracle RAC libraries with Oracle:
Choose the option Relink Oracle Database Binary from the program menu.
80Upgrading to 6.2.1 from releases earlier than 6.2Performing a phased upgrade using Install Bundles
7 Bring the Oracle database service group online.
If the Oracle database is managed by VCS:
# hagrp -online oracle_group -sys node_name
If the Oracle database is not managed by VCS:
For Oracle RAC 12c:
$ srvctl start instance -db db_name \
-node node_name
For Oracle RAC 11.2.0.2 and later verions:
$ srvctl start instance -d db_name \
-n node_name
For Oracle RAC 11.2.0.1 and earlier versions:
$ srvctl start instance -d db_name \
-i instance_name
Note: The downtime ends here.
8 On the first half of the cluster, start all applications that are not managed byVCS. Use native application commands to start the applications.
Step 5: Upgrading the second half of the clusterPerform the following steps to upgrade the second half of the cluster.
To upgrade the second half of the cluster
1 If you plan to upgrade the operating system, rename the /etc/llttab file toprevent LLT from starting automatically when the node starts:
# mv /etc/llttab /etc/llttab.save
2 Upgrade the operating system, if required.
For instructions, see the operating system documentation.
3 If you upgraded the operating system, restart the nodes:
# shutdown -r
81Upgrading to 6.2.1 from releases earlier than 6.2Performing a phased upgrade using Install Bundles
4 Rename the /etc/llttab file to its original name:
# mv /etc/llttab.save /etc/llttab
5 Make sure that you can run secure shell or remote shell from the node whereyou launched the installer to the nodes in the second subcluster withoutrequests for a password.
6 On the second half of the cluster, upgrade SF Oracle RAC with the installmrscript.
When you invoke the installer, select the Full Upgrade option. The installerautomatically detects the phased upgrade though you select the Full Upgradeoption.
# cd /tmp/sfha6.2.1
# ./installmr -base_path /tmp/sfha6.2 sys3 sys4
If the product is licensed with stale (old) key, the installer prompts users toupdate the key.
7 Relink the SF Oracle RAC libraries with Oracle:
If you want the installer to relink the Oracle Database Binary, you can choosethe option Relink Oracle Database Binary from the menu.
Complete the remaining tasks to finish the upgrade.
8 Restart the nodes:
# shutdown -r
Step 6: Performing post-upgrade tasks on the second half ofthe clusterPerform the following post-upgrade steps on the second half of the cluster.
To perform the post-upgrade tasks on the second half of the cluster
1 Manually mount the VxFS and CFS file systems that are not managed by VCS.
2 Upgrade VxVM disk group version.
For instructions, see the chapter "Post-upgrade tasks" in the Symantec™Storage Foundation for Oracle RAC 6.2 Installation and Configuration Guide.
3 Upgrade disk layout version.
For instructions, see the chapter "Post-upgrade tasks" in the Symantec™Storage Foundation for Oracle RAC 6.2 Installation and Configuration Guide.
82Upgrading to 6.2.1 from releases earlier than 6.2Performing a phased upgrade using Install Bundles

4 Bring the Oracle database service group online.
If the Oracle database is managed by VCS:
# hagrp -online oracle_group -sys sys3
# hagrp -online oracle_group -sys sys4
If the Oracle database is not managed by VCS:
For Oracle RAC 12c:
$ srvctl start instance -db db_name \
-node node_name
For Oracle RAC 11.2.0.2 and later versions:
$ srvctl start instance -d db_name \
-n node_name
For Oracle RAC 11.2.0.1 and earlier versions:
$ srvctl start instance -d db_name \
-i instance_name
5 If the Oracle database is managed by VCS, reset the AutoStart value to 1to enable VCS to bring the database service group online automaticallywhen VCS starts:
■
# haconf -makerw
# hagrp -modify oracle_group AutoStart 1
# haconf -dump -makero
■ If the Oracle database is not managed by VCS, change the managementpolicy for the database to automatic:For Oracle RAC 12c:
$ srvctl modify database -db db_name -policy AUTOMATIC
For Oracle RAC 10g and Oracle RAC 11g:
$ srvctl modify database -d db_name -y AUTOMATIC
6 Start all applications that are not managed by VCS. Use native applicationcommands to start the applications.
7 Set or change the product license level, if required.
83Upgrading to 6.2.1 from releases earlier than 6.2Performing a phased upgrade using Install Bundles
8 Migrate the SFDB repository database.
As root, dump out the old Sybase Adaptive Server Anywhere (Sybase ASA)repository. If you are using SFHA or SF Oracle RAC, you only need to do thison one node.
# /opt/VRTSdbed/migrate/sfua_rept_migrate
9 Upgrade Oracle RAC, if required.
For information on Oracle RAC support, see:
http://www.symantec.com/docs/DOC5081
For instructions, see the chapter Upgrading Oracle RAC 6.2 SF Oracle RACInstallation Guide.
Note: The procedure for Oracle RAC 12c is the same as that for Oracle RAC11g Release 2.
Note: If you want to upgrade the application clusters that use CP server basedfencing to version 6.1 and later, make sure that you first upgrade VCS or SFHAon the CP server systems to version 6.1 and later. And then, upgrade allapplication clusters. The CP server with version 6.1 and later supportsapplication clusters on 6.1 and later (HTTPS-based communication) andapplication clusters before 6.1 (IPM-based communication).When you configurethe CP server, the installer asks the VIPs for HTTPS-based communication(to support clients on release version 6.1 and later) and VIPs for IPM-basedcommunication (to support clients on release versions before 6.1).
For instructions to upgrade VCS or SFHA, see the VCS or SFHA InstallationGuide.
Performing a rolling upgrade using Install BundlesYou can use rolling upgrades to upgrade one product from a release to the nextwith minimal application downtime.
■ Supported rolling upgrade paths
■ Performing a rolling upgrade of VCS, SFHA, and SFCFSHAwith Install Bundles
■ Performing a rolling upgrade of SF Oracle RAC with Install Bundles
84Upgrading to 6.2.1 from releases earlier than 6.2Performing a rolling upgrade using Install Bundles
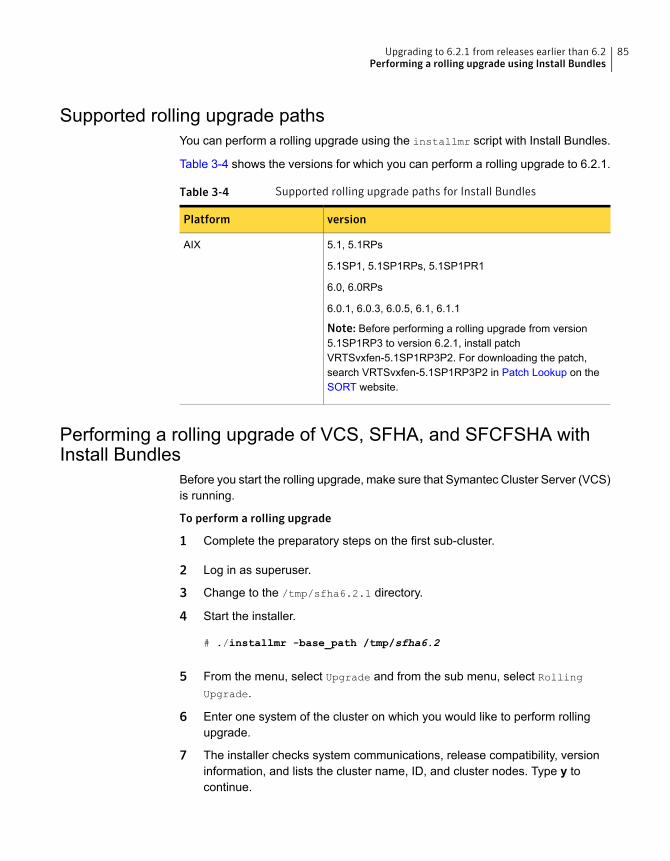
Supported rolling upgrade pathsYou can perform a rolling upgrade using the installmr script with Install Bundles.
Table 3-4 shows the versions for which you can perform a rolling upgrade to 6.2.1.
Table 3-4 Supported rolling upgrade paths for Install Bundles
versionPlatform
5.1, 5.1RPs
5.1SP1, 5.1SP1RPs, 5.1SP1PR1
6.0, 6.0RPs
6.0.1, 6.0.3, 6.0.5, 6.1, 6.1.1
Note: Before performing a rolling upgrade from version5.1SP1RP3 to version 6.2.1, install patchVRTSvxfen-5.1SP1RP3P2. For downloading the patch,search VRTSvxfen-5.1SP1RP3P2 in Patch Lookup on theSORT website.
AIX
Performing a rolling upgrade of VCS, SFHA, and SFCFSHA withInstall Bundles
Before you start the rolling upgrade, make sure that Symantec Cluster Server (VCS)is running.
To perform a rolling upgrade
1 Complete the preparatory steps on the first sub-cluster.
2 Log in as superuser.
3 Change to the /tmp/sfha6.2.1 directory.
4 Start the installer.
# ./installmr -base_path /tmp/sfha6.2
5 From the menu, select Upgrade and from the sub menu, select RollingUpgrade.
6 Enter one system of the cluster on which you would like to perform rollingupgrade.
7 The installer checks system communications, release compatibility, versioninformation, and lists the cluster name, ID, and cluster nodes. Type y tocontinue.
85Upgrading to 6.2.1 from releases earlier than 6.2Performing a rolling upgrade using Install Bundles
8 The installer inventories the running service groups and determines the nodeor nodes to upgrade in phase 1 of the rolling upgrade. Type y to continue. Ifyou choose to specify the nodes, type n and enter the names of the nodes.
9 The installer performs further prechecks on the nodes in the cluster and maypresent warnings. You can type y to continue or quit the installer and addressthe precheck's warnings.
10 Review the end-user license agreement, and type y if you agree to its terms.
11 After the installer shows the package list, it detects if there are online failoverservice groups on the nodes to be upgraded. If there are online failover servicegroups, the installer prompts you to do one of the following:
■ Manually switch service groups
■ Use the CPI to automatically switch service groups
The downtime is the time that it normally takes for the service group's failover.
12 The installer prompts you to stop the applicable processes. Type y to continue.
The installer evacuates all service groups to the node or nodes that are notupgraded at this time. The installer stops parallel service groups on the nodesthat are to be upgraded.
13 The installer stops relevant processes, uninstalls old kernel filesets, and installsthe new filesets.
The installer performs the upgrade configuration and re-starts processes.
If some processes fail to start, you may need to reboot the nodes and manuallycheck the cluster's status.
14 Complete the preparatory steps on the nodes that you have not yet upgraded.
86Upgrading to 6.2.1 from releases earlier than 6.2Performing a rolling upgrade using Install Bundles
15 The installer begins phase 1 of the upgrade on the remaining node or nodes.Type y to continue the rolling upgrade.
If the installer prompts to reboot nodes, reboot the nodes. Then, restart theinstaller.
The installer repeats step 8 through step 13.
For clusters with larger number of nodes, this process may repeat severaltimes. Service groups come down and are brought up to accommodate theupgrade.
Note: If there are Oracle Service Groups on your system, before you switchthe Oracle Service Groups to the target nodes, make sure you does the ODMrelink and ODMworks normally on the target nodes. See the topic ofConfiguringthe Veritas Extension for Oracle Disk Manager in SFHA environment inSymantec Storage Foundation for Oracle RAC Administrator's Guide.
16 When phase 1 of the rolling upgrade completes, begin phase 2 of the upgrade.Phase 2 of the upgrade includes downtime for the VCS engine (HAD), whichdoes not include application downtime. Type y to continue.
17 The installer determines the remaining filesets to upgrade. Press Enter tocontinue.
18 The installer displays the following question before it stops the productprocesses, if the cluster is configured in secure mode:
Do you want to grant read access to everyone? [y,n,q,?]
To grant read access to all authenticated users, type y.
To grant permissions to specific user group, type n.
Do you want to provide any usergroups that you would like to\
grant read access?[y,n,q,?]
To specify user groups and grant them read access, type y.
To grant read access only to root users, type n. Then the installer grants readaccess read access to the root users.
Enter the user group names that you want to grant read access and separatethem by spaces. If you want to grant read access to a user group on a specificnode, enter usergroup@node. If you want to grant read access to user groupson any cluster node, enter usergroup. If some user groups are not createdyet, create the user groups after configuration if needed.
87Upgrading to 6.2.1 from releases earlier than 6.2Performing a rolling upgrade using Install Bundles
19 The installer stops Symantec Cluster Server (VCS) processes but theapplications continue to run. Type y to continue.
The installer performs prechecks, uninstalls old filesets, and installs the newfilesets. It performs post-installation tasks, and the configuration for the upgrade.
20 A prompt message appears to ask if you would like to send the informationabout this installation to Symantec to help improve installation in the future?
Type y or n to help Symantec improve the installation.
21 If you have network connection to the Internet, the installer checks for updates.
If updates are discovered, you can apply them now.
22 A prompt message appears to ask if the user would like to read the summaryfile. You can choose y if you want to read the install summary file.
Note: If you want to upgrade the application clusters that use CP server basedfencing to version 6.1 and later, make sure that you first upgrade VCS or SFHAon the CP server systems to version 6.1 and later. And then, upgrade allapplication clusters. The CP server with version 6.1 and later supportsapplication clusters on 6.1 and later (HTTPS-based communication) andapplication clusters before 6.1 (IPM-based communication).When you configurethe CP server, the installer asks the VIPs for HTTPS-based communication(to support clients on release version 6.1 and later) and VIPs for IPM-basedcommunication (to support clients on release versions before 6.1).
For instructions to upgrade VCS or SFHA on the CP server systems, refer tothe appropriate installation guide.
Performing a rolling upgrade of SF Oracle RAC with Install BundlesUse a rolling upgrade to upgrade Symantec Storage Foundation for Oracle RACto the latest release with minimal application downtime.
Using the installmr script with Install Bundles, you can upgrade to 6.2.1 from releasesearlier than 6.2.
Note: If you need to upgrade operating system, upgrade the operating system onall nodes before upgrading the products.
■ Preparing to perform a rolling upgrade to SF Oracle RAC 6.2.1
■ Using Install Bundles to perform a rolling upgrade of SF Oracle RAC
88Upgrading to 6.2.1 from releases earlier than 6.2Performing a rolling upgrade using Install Bundles

Preparing to perform a rolling upgrade to SF Oracle RAC 6.2.1Perform the preparatory steps in this section if you are performing a rolling upgradeof the cluster. Before you upgrade, make sure that your systemsmeet the hardwareand software requirements for this release.
To prepare to upgrade SF Oracle RAC
Perform the steps on the subcluster.
1 Log in as superuser to one of the nodes in the subcluster.
2 Back up the following configuration files on your system: main.cf, types.cf,
CVMTypes.cf, CFSTypes.cf, OracleTypes.cf, OracleASMTypes.cf, ,
PrivNIC.cf, MultiPrivNIC.cf, CRSResource.cf, /etc/llttab,
/etc/llthosts, /etc/gabtab, /etc/vxfentab, /etc/vxfendg,
/etc/vxfenmode
For example:
# cp /etc/VRTSvcs/conf/config/main.cf \
/etc/VRTSvcs/conf/config/main.cf.save
3 Installer verifies that recent backups of configuration files in VxVM privateregion have been saved in /etc/vx/cbr/bk.
If not, a warningmessage will be displayed after installmr upgrade prechecks..
Warning: Backup /etc/vx/cbr/bk directory.
4 For Oracle RAC 10g, Oracle RAC 11g, and Oracle RAC 12c:
Stop the Oracle RAC resources on each node.
■ If the database instances are managed by VCS, take the correspondingVCS service groups offline. As superuser, enter:
# hagrp -offline oracle_group -sys node_name
■ If the database instances are not managed by VCS, then run the followingon one node:For Oracle RAC 12c:
# srvctl stop instance -db db_name -node node_name
For Oracle RAC 11.2.0.2 and later versions:
89Upgrading to 6.2.1 from releases earlier than 6.2Performing a rolling upgrade using Install Bundles
$ srvctl stop instance -d db_name \
-n node_name
For Oracle RAC 11.2.0.1 and earlier versions:
$ srvctl stop instance -d db_name \
-i instance_name
5 If the Oracle database is managed by VCS, set the AutoStart value to 0 toprevent the database service group from starting automatically when VCS
■
starts. Failing to perform this step results in the database attempting tocome online after the upgrade; the attempt fails due to the presence of oldlibraries on the system.
# haconf -makerw
# hagrp -modify oracle_group AutoStart 0
# haconf -dump -makero
■ If the Oracle database is not managed by VCS, change the managementpolicy for the database to manual:For Oracle RAC 12c:
$ srvctl modify database -db db_name -policy MANUAL
For Oracle RAC 10g and Oracle RAC 11g:
$ srvctl modify database -d db_name -y MANUAL
6 Unmount all the CFS file system which is not under VCS control.
# mount |grep vxfs | grep cluster
# fuser -c /mount_point
# umount /mount_point
Make sure that no processes are running which make use of mounted sharedfile system or shared volumes.
# fuser -cu /mount_point
7 Take all the parallel VCS service groups offline on each of the nodes in thecurrent subcluster:
# hagrp -offline grp_name -sys sys_name
90Upgrading to 6.2.1 from releases earlier than 6.2Performing a rolling upgrade using Install Bundles

8 Unmount all the VxFS file system which is not under VCS control.
# mount |grep vxfs
# fuser -c /mount_point
# umount /mount_point
9 If you plan to continue using the Storage Foundation for Databases (SFDB)tools, you must prepare to migrate the SFDB repository database beforeupgrading to SF Oracle RAC 6.2.1.
See “Pre-upgrade tasks for migrating the SFDB repository database”on page 31.
Using Install Bundles to performa rolling upgrade of SFOracleRACBefore you start the rolling upgrade, make sure that Symantec Cluster Server (VCS)is running.
To perform a rolling upgrade
1 Complete the preparatory steps on the first sub-cluster.
See “Preparing to perform a rolling upgrade to SF Oracle RAC 6.2.1”on page 89.
2 Log in as superuser.
3 Change to the sfha6.2.1 directory.
4 Start the installmr script.
# ./installmr -base_path /tmp/sfha6.2/
5 From the menu, select Upgrade a Product and from the sub menu, selectRolling Upgrade.
6 The installer suggests system names for the upgrade. Enter Yes to upgradethe suggested systems, or enter No, and then enter the name of any one systemin the cluster on which you want to perform a rolling upgrade.
7 The installer checks system communications, release compatibility, versioninformation, and lists the cluster name, ID, and cluster nodes. Type y tocontinue.
91Upgrading to 6.2.1 from releases earlier than 6.2Performing a rolling upgrade using Install Bundles
8 The installer inventories the running service groups and determines the nodeor nodes to upgrade in phase 1 of the rolling upgrade. Type y to continue. Ifyou choose to specify the nodes, type n and enter the names of the nodes.
See “Pre-upgrade tasks for migrating the SFDB repository database”on page 31.
9 The installer performs further prechecks on the nodes in the cluster and maypresent warnings. You can type y to continue or quit the installer and addressthe precheck's warnings.
10 Review the end-user license agreement, and type y if you agree to its terms.
11 After the installer shows the package list, it detects if there are online failoverservice groups on the nodes to be upgraded. If there are online failover servicegroups, the installer prompts you to do one of the following:
■ Manually switch service groups
■ Use the CPI to automatically switch service groups
The downtime is the time that it normally takes for the service group's failover.
12 The installer prompts you to stop the applicable processes. Type y to continue.
The installer evacuates all service groups to the node or nodes that are notupgraded at this time. The installer stops parallel service groups on the nodesthat are to be upgraded.
13 If the cluster has configured Coordination Point Server based fencing, thenduring upgrade, installer may ask the user to provide the new HTTPSCoordination Point Server.
The installer stops relevant processes, uninstalls old kernel filesets, and installsthe new filesets. The installer asks if you want to update your licenses to thecurrent version. Select Yes or No. Symantec recommends that you updateyour licenses to fully use the new features in the current release.
The installer performs the upgrade configuration.
Reboot the nodes on the sub-cluster being upgraded and restart the installerafter node comes up.
Note: The Oracle service group is offline as the AutoStart attribute is set to 0to prevent the service group from starting automatically. The service group isstarted later in the process.
14 Manually mount the VxFS and CFS file systems that are not managed by VCS.
92Upgrading to 6.2.1 from releases earlier than 6.2Performing a rolling upgrade using Install Bundles

15 Relink the SF Oracle RAC libraries with Oracle:
Choose the option Relink Oracle Database Binary from the program menu.
16 Bring the Oracle database service group online.
■ If VCS manages the Oracle database:
# hagrp -online oracle_group -sys node_name
■ If VCS does not manage the Oracle database:For Oracle RAC 10g and Oracle RAC 11g:
$ srvctl start database -d db_name
For Oracle RAC 12c:
$ srvctl start database -db db_name
17 Start all applications that are not managed by VCS. Use native applicationcommands to start the applications.
18 Complete the preparatory steps on the nodes that you have not yet upgraded.
19 If the nodes are rebooted, restart the installer and continue phase-1 for secondsub-cluster.Type y to continue the rolling upgrade.
The installer repeats step 6 through step 17.
For clusters with larger number of nodes, this process may repeat severaltimes. Service groups come down and are brought up to accommodate theupgrade.
This completes phase 1 of the upgrade.
20 If VCS manages the Oracle database, reset the AutoStart value to 1 toenable VCS to bring the database service group online when VCS starts:
■
# haconf -makerw
# hagrp -modify oracle_group AutoStart 1
# haconf -dump -makero
■ If VCS does not manage the Oracle database, change the managementpolicy for the database to automatic:For Oracle RAC 10g and Oracle RAC 11g:
$ srvctl modify database -d db_name -y AUTOMATIC
For Oracle RAC 12c:
93Upgrading to 6.2.1 from releases earlier than 6.2Performing a rolling upgrade using Install Bundles

$ srvctl modify database -db db_name -policy AUTOMATIC
21 Phase 2 of the rolling upgrade begins here. This phase includes downtime forthe VCS engine (HAD), which does not include application downtime.
22 Migrate the SFDB repository database.
As root, dump out the old Sybase Adaptive Server Anywhere (Sybase ASA)repository. If you are using SFHA or SF Oracle RAC, you only need to do thison one node.
# /opt/VRTSdbed/migrate/sfua_rept_migrate
23 Phase 2 of the upgrade begins here. This phase includes downtime for theVCS engine (HAD), which does not include application downtime. Type y tocontinue.
24 The installer determines the remaining filesets to upgrade. Press Enter tocontinue.
25 The installer displays the following question before it stops the productprocesses, if the cluster is configured in secure mode:
Do you want to grant read access to everyone? [y,n,q,?]
To grant read access to all authenticated users, type y.
To grant permissions to specific user group, type n.
Do you want to provide any usergroups that you would like to\
grant read access?[y,n,q,?]
To specify user groups and grant them read access, type y.
To grant read access only to root users, type n. Then the installer grants readaccess read access to the root users.
Enter the user group names that you want to grant read access and separatethem by spaces. If you want to grant read access to a user group on a specificnode, enter usergroup@node. If you want to grant read access to user groupson any cluster node, enter usergroup. If some user groups are not createdyet, create the user groups after configuration if needed.
26 The installer stops Symantec Cluster Server (VCS) processes but theapplications continue to run. Type y to continue.
The installer performs prechecks, uninstalls old filesets, installs the new filesets,and start the Symantec Cluster Server (VCS). It performs post-installationtasks, and the configuration for the upgrade.
94Upgrading to 6.2.1 from releases earlier than 6.2Performing a rolling upgrade using Install Bundles

27 When the following message appears, type y or n to help Symantec improvethe installation:
Would you like to send the information about this installation to
Symantec to help improve installation in the future?
28 If you have network connection to the Internet, the installer checks for updates.
If updates are discovered, you can apply them now.
29 A prompt message appears to ask if the user would like to read the summaryfile. You can choose y if you want to read the install summary file.
30 Complete the post-upgrade tasks.
31 Upgrade Oracle RAC to the supported version.
For information on Oracle RAC support, see:
http://www.symantec.com/docs/DOC5081
For instructions, see the chapter Upgrading Oracle RAC in SF Oracle RAC 6.2Installation Guide.
Note: The procedure for Oracle RAC 12c is the same with that for Oracle RAC11g Release 2.
Note: If you want to upgrade the application clusters that use CP server basedfencing to version 6.1 and later, make sure that you first upgrade VCS or SFHAon the CP server systems to version 6.1 and later. And then, upgrade allapplication clusters. The CP server with version 6.1 and later supportsapplication clusters on 6.1 and later (HTTPS-based communication) andapplication clusters before 6.1 (IPM-based communication).When you configurethe CP server, the installer asks the VIPs for HTTPS-based communication(to support clients on release version 6.1 and later) and VIPs for IPM-basedcommunication (to support clients on release versions before 6.1).
For instructions to upgrade VCS or SFHA on the CP server systems, refer tothe appropriate installation guide.
Performing an automated upgrade using responsefiles with Install Bundles
Depending on the installed product, use one of the following procedures:
95Upgrading to 6.2.1 from releases earlier than 6.2Performing an automated upgrade using response files with Install Bundles

■ Performing an automated upgrade using response files with Install Bundles
Performing an automated upgrade using response files with InstallBundles
Typically, you can use the response file that the installer generates after you performSFHA Solutions upgrade with Install Bundles on one system to upgrade SFHASolutions on other systems. You can also create a response file using themakeresponsefile option of the installer.
To perform automated upgrade using response files
1 Make sure the systems where you want to upgrade meet the upgraderequirements.
2 Copy the response file to one of the systems where you want to upgrade SFHA.
3 Edit the values of the response file variables as necessary.
4 Navigate to the folder that contains the installation program.
5 Start the upgrade from the system to the /tmp/sfha6.2.1 directory. Forexample:
# ./installmr -responsefile /tmp/response_file
Where /tmp/response_file is the response file’s full path name.
6 Find out which node is the CVM master. Enter the following:
# vxdctl -c mode
7 On the CVM master node, upgrade the CVM protocol. Enter the following:
# vxdctl upgrade
8 Complete the post upgrade task as mentioned in particular upgrade methodin 6.2 Installation Guides.
96Upgrading to 6.2.1 from releases earlier than 6.2Performing an automated upgrade using response files with Install Bundles
Upgrading to 6.2.1 from 6.2
This chapter includes the following topics:
■ Prerequisites for upgrading to 6.2.1
■ Downloading required software to upgrade to 6.2.1
■ Performing a full upgrade to 6.2.1 on a cluster
■ Upgrading to 6.2.1 on a standalone system
■ Performing a rolling upgrade using the installer
■ Upgrading SFHA with the Veritas Web-based installer
■ Verifying software versions
Prerequisites for upgrading to 6.2.1If you are upgrading from 6.2, see the following list for prerequisites for upgradingto the 6.2.1 release:
■ For any product in the Symantec Storage Foundation stack, you must have the6.2.1 release binaries.
■ Each system must have sufficient free space to accommodate patches.
■ The full list of prerequisites can be obtained by running ./installmr -precheck.
■ Make sure to download the latest patches for the installer.See “Downloading required software to upgrade to 6.2.1 ” on page 98.
For information on supported upgrade types, See “Supported upgrade types forSFHA Solutions 6.2.1” on page 15.
4Chapter

Downloading required software to upgrade to 6.2.1This section describes how to download the latest patches for the installer.
To download required software to upgrade to 6.2.1
1 Download SFHA 6.2.1 from https://sort.symantec.com/patches.
2 Extract it to a directory, say /tmp/sfha621.
Performing a full upgrade to 6.2.1 on a clusterPerforming a full upgrade on a cluster requires stopping cluster failover functionalityduring the entire procedure.
Depending on your cluster’s configuration, select one of the following proceduresto upgrade to 6.2.1:
■ Performing a full upgrade to 6.2.1 on a Symantec Cluster Server
■ Performing a full upgrade to 6.2.1 on an SFHA cluster
■ Performing a full upgrade to 6.2.1 on an SFCFSHA cluster
■ Performing a full upgrade to 6.2.1 on an SF Oracle RAC cluster
Performing a full upgrade to 6.2.1 on a Symantec Cluster ServerThe following procedure describes performing a full upgrade on a Symantec ClusterServer (VCS) cluster.
Note: If you want to roll back to the original product version, make sure all thepackages are committed before upgrade.
To upgrade VCS
1 Make sure you have downloaded the latest software required for the upgrade.
Refer to the appropriate 6.2 installation guide.
2 Log in as superuser.
Note: Upgrade the Operating System and reboot the systems if required.
98Upgrading to 6.2.1 from 6.2Downloading required software to upgrade to 6.2.1
3 Check the readiness of the nodes where you plan to upgrade. From the directorythat contains the extracted and untarred 6.2.1 rolling patch binaries, changeto the directory that contains the installmr script. Start the pre-upgrade check:
# ./installmr -precheck sys1 sys2 ... nodeN
4 Resolve any issues that the precheck finds.
5 Start the upgrade:
# ./installmr sys1 sys2 ... nodeN
6 After the upgrade, review the log files for any issues.
Performing a full upgrade to 6.2.1 on an SFHA clusterThe following procedure describes performing a full upgrade on an SFHA and VCScluster.
To perform a full upgrade to 6.2.1 on an SFHA cluster
1 Make sure you have downloaded the latest software required for the upgrade.
2 Log in as superuser.
3 Verify that /opt/VRTS/bin and /opt/VRTSvcs/bin are in your PATH so thatyou can execute all product commands.
4 On each node in the cluster, make the VCS configuration read only:
# haconf -dump -makero
5 Stop VCS.
To stop applications, unmount VxFS file systems and stop VxVM volumesmanaged by VCS.
# hastop -all
6 Stop all the applications that are using VxFS files systems and VxVM volumeswhich are not managed by VCS.
Use application’s native commands to stop applications.
99Upgrading to 6.2.1 from 6.2Performing a full upgrade to 6.2.1 on a cluster
7 On each node, enter the following command to check if any StorageCheckpoints are mounted:
# mount | grep vxfs
If any Storage Checkpoints are mounted, on each node in the cluster, unmountall Storage Checkpoints.
# umount /checkpoint_name
8 On each node, enter the following command to check if any VxFS file systemsare mounted.
Unmount the VxFS file systems that are not managed by VCS.
# mount | grep vxfs
If any VxFS file systems are present, on each node in the cluster, stop IOs onthe file systems, unmount all of the VxFS file systems:
# umount /filesystem
9 If you have created any Volume Replicator (VVR) replicated volume groups(RVGs) on your system, perform the following steps:
■ Stop all applications that are involved in replication. For example, if a datavolume contains a file system, unmount it.
■ Use the vxrvg stop command to stop each RVG individually:
# vxrvg -g diskgroup stop rvg_name
■ On the Primary node, use the vxrlink status command to verify that allRLINKs are up-to-date:
# vxrlink -g diskgroup status rlink_name
Caution: To avoid data corruption, do not proceed until all RLINKs areup-to-date.
10 Stop activity to all VxVM volumes that are not managed by VCS.
For example, stop any applications such as databases that access the volumes,and unmount any file systems that have been created on the volumes.Useapplication specific commands to stop the applications.
100Upgrading to 6.2.1 from 6.2Performing a full upgrade to 6.2.1 on a cluster

11 On each node, stop all VxVM volumes by entering the following command foreach disk group, which are not managed by VCS:
# vxvol -g diskgroup stopall
Verify that no volumes remain open:
# vxprint -Aht -e v_open
12 Deport all the disk groups which are not managed under VCS.
# vxdg deport diskgroup
13 If required, upgrade the Operating System and reboot the systems.
See IBM's documentation for the upgrade procedures.
14 On each node, stop the VCS command server:
# ps -ef | grep CmdServer
# kill -9 pid_of_CmdServer
pid_of_CmdServer is the process ID of CmdServer.
15 Check the readiness of the nodes where you plan to upgrade. From the directorythat contains the extracted and untarred 6.2.1 rolling patch binaries, changeto the directory that contains the installmr script. Start the pre-upgrade check:
# ./installmr -precheck sys1 sys2 ... nodeN
where sys1 and sys2 are nodes which are to be upgraded.
Resolve any issue that the precheck finds.
16 Start the upgrade.
# ./installmr [-rsh] sys1 sys2 ... nodeN
Review the output and follow the instructions to finish the upgrade.
17 Enter the following command on each node to take service groups online, ifthe groups are not in AutoStartList:
# hagrp -online service_group -sys nodename
18 If necessary, reinstate any missing mount points in the /etc/filesystem fileon each node.
19 Import all the diskgroups that are not managed by VCS:
# vxdg import diskgroup
101Upgrading to 6.2.1 from 6.2Performing a full upgrade to 6.2.1 on a cluster

20 Restart all the volumes by entering the following command for each disk groupthat are not managed by VCS:
# vxvol -g diskgroup startall
21 If you stopped any RVGs in step 9, restart each RVG:
# vxrvg -g diskgroup start rvg_name
22 Remount all VxFS file systems on all nodes, which are not managed by VCS:
# mount -V vxfs blockdevice mountpoint
23 Remount all Storage Checkpoints on all nodes:
# mount -V vxfs -o ckpt=name blockdevice checkpoint_name
24 Start all applications which are using VxFS files systems that are not managedby VCS.
Use application native commands to start the applications.
Performing a full upgrade to 6.2.1 on an SFCFSHA clusterThe following procedure describes performing a full upgrade on an SFCFSHAcluster.
To perform a full upgrade to 6.2.1 on an SFCFSHA cluster
1 Make sure you have downloaded the latest software required for the upgrade.
See “Downloading required software to upgrade to 6.2.1 ” on page 98.
2 Log in as superuser.
3 Verify that /opt/VRTS/bin is in your PATH so that you can execute all productcommands.
4 On each node, for mount points not controlled by VCS, enter the followingcommand to check if any Storage Checkpoints or VxFS file systems aremounted:
# mount | grep vxfs
If any Storage Checkpoints or VxFS file systems are mounted, on each nodein the cluster unmount all or VxFS file systems.
# umount /checkpoint_name
102Upgrading to 6.2.1 from 6.2Performing a full upgrade to 6.2.1 on a cluster
5 If you have created any Volume Replicator (VVR) replicated volume groups(RVGs) on your system, perform the following steps:
■ Stop all applications that are involved in replication. For example, if a datavolume contains a file system, unmount it.
■ Use the vxrvg stop command to stop each RVG individually:
# vxrvg -g diskgroup stop rvg_name
■ On the Primary node, use the vxrlink status command to verify that allRLINKs are up-to-date:
# vxrlink -g diskgroup status rlink_name
Caution: To avoid data corruption, do not proceed until all RLINKs areup-to-date.
6 Stop activity to all VxVM volumes.
For example, stop any applications such as databases that access the volumes,and unmount any file systems that have been created on the volumes.
7 On each node, stop all VxVM volumes by entering the following command foreach disk group:
# vxvol -g diskgroup stopall
Verify that no volumes remain open:
# vxprint -Aht -e v_open
8 If required, apply the OS kernel patches.
See IBM’s documentation for the procedures.
9 From the directory that contains the extracted and untarred 6.2.1 rolling patchbinaries, change to the directory that contains the installmr script.
# ./installmr sys1 sys2
where sys1 and sys2 are nodes which are to be upgraded.
10 After all the nodes in the cluster are upgraded, the processes restart. If theinstallmr script finds issues, it may require you to reboot the nodes.
11 If necessary, reinstate any missing mount points in the /etc/filesystems fileon each node. file on each node.
103Upgrading to 6.2.1 from 6.2Performing a full upgrade to 6.2.1 on a cluster

12 Bring the CVM service group online on each node:
# hagrp -online cvm -sys nodename
13 Restart all the volumes by entering the following command for each disk group:
# vxvol -g diskgroup startall
14 If you stopped any RVGs in step 5 , restart each RVG:
# vxrvg -g diskgroup start rvg_name
15 Remount all VxFS file system and Storage Checkpoints on all nodes:
# mount /filesystem
Performing a full upgrade to 6.2.1 on an SF Oracle RAC clusterThe following procedure describes performing a full upgrade on an SF for OracleRAC cluster.
To upgrade to 6.2.1 on a SF Oracle RAC cluster
1 Make sure you have downloaded the latest software required for the upgrade.
2 Log in as superuser.
3 Verify that /opt/VRTS/bin is in your PATH so that you can execute all productcommands.
104Upgrading to 6.2.1 from 6.2Performing a full upgrade to 6.2.1 on a cluster

4 If the Oracle database is managed by VCS, set the AutoStart value to 0 toprevent the database service group from starting automatically when VCSstarts:
# haconf -makerw
# hagrp -modify oracle_group AutoStart 0
# haconf -dump -makero
If the Oracle database is not managed by VCS, change the management policyfor the database to manual. Execute the following command with oracledatabase user credentials.
For Oracle RAC 10g and Oracle RAC 11g:
$ srvctl modify database -d db_name -y manual
For Oracle RAC 12c:
$ srvctl modify database -db db_name -policy MANUAL
5 From any node in the cluster, stop all Oracle RAC resources.
■ If the database instances are managed by VCS, take the correspondingVCS service groups offline. As superuser, enter:
# hagrp -offline group_name -any
■ If the database instances are not managed by VCS, run the following onone node:For Oracle RAC 10g and Oracle RAC 11g:
$ srvctl stop database -d db_name
For Oracle RAC 12c:
# srvctl stop database -db db_name
6 Stop all applications on the cluster that are not configured under VCS. Usenative application commands to stop the application.
7 Unmount the VxFS and CFS file systems that are not managed by VCS.
■ Ensure that no processes are running that make use of mounted sharedfile system or shared volumes. To verify that no processes use the VxFSor CFS mount point, enter the following commands:
# mount | grep vx
# fuser -cu /mount_point
105Upgrading to 6.2.1 from 6.2Performing a full upgrade to 6.2.1 on a cluster
■ Unmount the VxFS or CFS file system:
# umount /mount_point
8 Stop all VxVM and CVM volumes for each diskgroup that are not managed byVCS on the cluster:
# vxvol -g disk_group stopall
Verify that no volumes remain open:
# vxprint -Aht -e v_open
9 Stop VCS.
# hastop -all
10 From the directory that contains the extracted and untarred 6.2.1 rolling patchbinaries, change to the directory that contains the installmr script. Start theupgrade.
# ./installmr sys1 sys2 ...
11 Manually mount the VxFS and CFS file systems that are not managed by VCS.
12 Start all applications on the cluster that are not configured under VCS. Usenative application commands to start the application.
13 Relink the SF Oracle RAC libraries with Oracle.
Choose the option Relink Oracle Database Binary from the program menu.
14 Bring the Oracle database service group online.
■ If the Oracle database is managed by VCS, enter:
# hagrp -online Oracle_group -any
■ If the Oracle database is not managed by VCS:For Oracle RAC 10g and Oracle RAC 11g:
$ srvctl start database -d db_name
For Oracle RAC 12c:
$ srvctl start database -db db_name
106Upgrading to 6.2.1 from 6.2Performing a full upgrade to 6.2.1 on a cluster
15 If the Oracle database is managed by VCS, reset the AutoStart value to 1to enable VCS to bring the database service group online automaticallywhen VCS starts:
■
# haconf -makerw
# hagrp -modify oracle_group AutoStart 1
# haconf -dump -makero
■ If the Oracle database is not managed by VCS, change the managementpolicy for the database to automatic:For Oracle RAC 10g and Oracle RAC 11g:
$ srvctl modify database -d db_name -y AUTOMATIC
For Oracle RAC 12c
$ srvctl modify database -db db_name -policy AUTOMATIC
16 Complete other post-upgrade steps.
For instructions, see the chapter Performing post-upgrade tasks in Symantec™Storage Foundation for Oracle RAC 6.2 Installation and Configuration Guide.
17 Upgrade Oracle RAC, if required.
Note: Oracle RAC 11g Release 1 Clusterware is not supported. Make surethat you install Oracle RAC 11g Release 2 and later Grid Infrastructure in orderto use the Oracle RAC 11g Release 1 database. All database versions startingfrom Oracle RAC 10g Release 2 and later are supported.
For instructions, see the chapter Upgrading Oracle RAC in 6.2 SF Oracle RACInstallation Guide.
Note: The upgrade procedure for Oracle 12c is the same as Oracle 11g.
Upgrading to 6.2.1 on a standalone systemYou can use this procedure to upgrade on a standalone system that runs SF.
To upgrade to 6.2.1 on a standalone system
1 Make sure you have downloaded the latest software required for the upgrade.
2 Log in as superuser.
107Upgrading to 6.2.1 from 6.2Upgrading to 6.2.1 on a standalone system
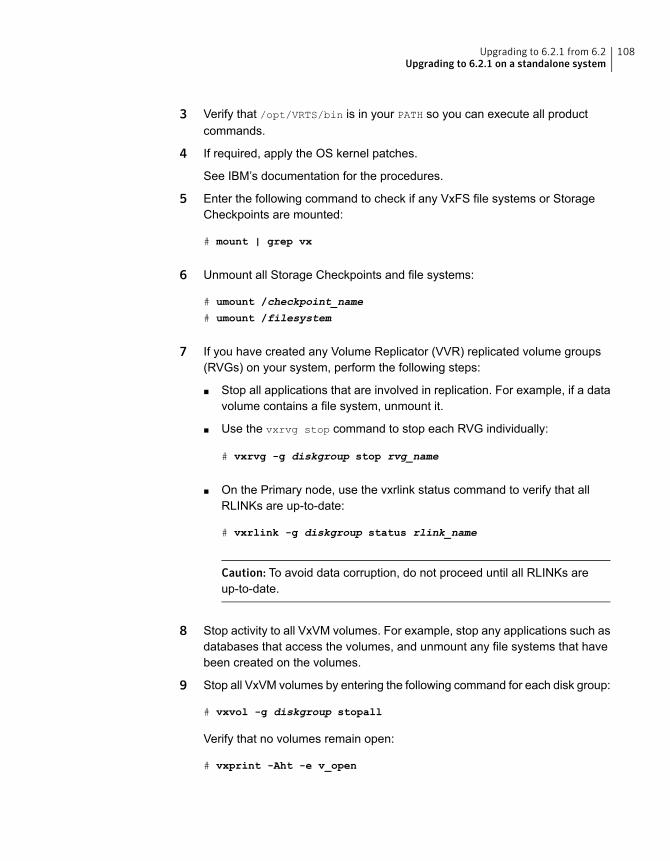
3 Verify that /opt/VRTS/bin is in your PATH so you can execute all productcommands.
4 If required, apply the OS kernel patches.
See IBM’s documentation for the procedures.
5 Enter the following command to check if any VxFS file systems or StorageCheckpoints are mounted:
# mount | grep vx
6 Unmount all Storage Checkpoints and file systems:
# umount /checkpoint_name
# umount /filesystem
7 If you have created any Volume Replicator (VVR) replicated volume groups(RVGs) on your system, perform the following steps:
■ Stop all applications that are involved in replication. For example, if a datavolume contains a file system, unmount it.
■ Use the vxrvg stop command to stop each RVG individually:
# vxrvg -g diskgroup stop rvg_name
■ On the Primary node, use the vxrlink status command to verify that allRLINKs are up-to-date:
# vxrlink -g diskgroup status rlink_name
Caution: To avoid data corruption, do not proceed until all RLINKs areup-to-date.
8 Stop activity to all VxVM volumes. For example, stop any applications such asdatabases that access the volumes, and unmount any file systems that havebeen created on the volumes.
9 Stop all VxVM volumes by entering the following command for each disk group:
# vxvol -g diskgroup stopall
Verify that no volumes remain open:
# vxprint -Aht -e v_open
108Upgrading to 6.2.1 from 6.2Upgrading to 6.2.1 on a standalone system
10 Copy the patch archive downloaded from the patch central to temporary locationand untar the archive and browse to the directory containing the installmrinstaller script. Enter the installmr script:
# ./installmr nodename
11 If necessary, reinstate any missing mount points in the /etc/filesystems file.
12 Restart all the volumes by entering the following command for each disk group:
# vxvol -g diskgroup startall
13 If you stopped any RVGs in step 7, restart each RVG:
# vxrvg -g diskgroup start rvg_name
14 Remount all VxFS file systems and Storage Checkpoints:
# mount /filesystem
# mount /checkpoint_name
Performing a rolling upgrade using the installerYou can use rolling upgrades to upgrade one product from a release to the nextwith minimal application downtime.
■ About rolling upgrades
■ Prerequisites for a rolling upgrade
■ Performing a rolling upgrade on kernel packages for VCS, SFHA and SFCFSHA:phase 1
■ Performing a rolling upgrade on non-kernel packages for VCS, SFHA andSFCFSHA: phase 2
■ Performing a rolling upgrade on kernel packages for SF Oracle RAC: phase 1
■ Performing a rolling upgrade on non-kernel packages for SF Oracle RAC: phase2
About rolling upgradesYou can use rolling upgrades to upgrade one product from a release to the next.Rolling upgrades require less downtime.
109Upgrading to 6.2.1 from 6.2Performing a rolling upgrade using the installer

Rolling upgrades take two discrete phases. In the first, you upgrade the kernelpackages with exception of VCS packages and agent packages. In the second,you upgrade the non-kernel packages, which are VCS packages and agentspackages.
You can perform a rolling upgrade for the following products:
■ Symantec Cluster Server
■ Storage Foundation and High Availability
■ Storage Foundation Cluster File System High Availability
■ Storage Foundation for Oracle RAC
Prerequisites for a rolling upgradeMeet the following prerequisites before performing a rolling upgrade:
■ Make sure that the product you want to upgrade supports rolling upgrades.
■ Make a plan on splitting up your clusters into sub-clusters for the purpose ofupgrade. A sub-cluster can include one or more nodes. This division helps tokeep service groups running during the upgrade.
■ Make sure you are logged in as superuser.
■ VCS must be running before performing the rolling upgrade.
■ Make sure you have downloaded the latest software required for the upgrade.
Limitation: During VCS and agents upgrade, you must bring down the applicationHigh Availability (HA) for several minutes. This does not affect the applicationrunning on the cluster. You can restore the application's high availability after VCSand the agent packages are upgraded.
Performing a rolling upgrade using the installerYou can use rolling upgrades to upgrade one product from a release to the nextwith minimal application downtime.
Performing a rolling upgrade on kernel packages for VCS, SFHAand SFCFSHA: phase 1Note that in the following instructions a sub-cluster can represent one or more nodesin a full cluster, but is represented by sys1.
110Upgrading to 6.2.1 from 6.2Performing a rolling upgrade using the installer
To perform the rolling upgrade on kernel: phase 1
1 Browse to the directory that contains the installmr script.
2 On the first sub-cluster, start the installer for the rolling upgrade with the-rollingupgrade_phase1 option.
# ./installmr -rollingupgrade_phase1 nodeA
You can also use the web-based installer to perform the upgrade. If you areusing the web-based installer, start the web-based installer with the./webinstaller start command, select Rolling Upgrade from the task list,make sure the Phase-1: Upgrade Kernel packages radio button is checked,and then click Next.
3 The installer checks system communications, package versions, productversions, and completes prechecks. It then upgrades applicable kernel patches.
If you are using the web-based installer, input one node of the cluster. Theweb-based installer detects the whole cluster, and then recommend somenodes (NodeA) as the subcluster to run the rolling upgrade phase 1. Theweb-based installer checks system communications, package versions, productversions, and completes prechecks. It then upgrades applicable kernelpackages.
4 The installer loads new kernel modules.
5 The installer starts all the relevant processes and brings all the service groupsonline.
111Upgrading to 6.2.1 from 6.2Performing a rolling upgrade using the installer

6 Before you proceed to phase 2, complete step 2 to step 5 on the secondsubcluster.
7 After phase 1 is completed on nodeA, the following message displays:
It is recommended to perform rolling upgrade phase 1 on the
systems nodeB in the next step.
Would you like to perform rolling upgrade phase 1 on the systems?
[y,n,q] (y)
If you choose y, it continues to run phase 1 of the rolling upgrade by itself onthe next node B.
If you choose n, you need to input the node which you want to perform rollingupgrade.
If you choose q, you need to complete step 2 to step 5 on the next node B.
After phase 1 is completed on all nodes in the cluster, the following messagedisplays:
It is recommended to perform rolling upgrade phase 2 on all the
cluster systems in the next step.
Would you like to perform rolling upgrade phase 2 on the cluster?
[y,n,q] (y)
If you choose y, it continues to run phase 2 of the rolling upgrade by itself.
If you choose n or q, you need to use the following steps to finish phase 2 ofthe rolling upgrade.
Performing a rolling upgrade on non-kernel packages for VCS,SFHA and SFCFSHA: phase 2In this phase installer installs all non-kernel packages on all the nodes in clusterand restarts VCS cluster.
112Upgrading to 6.2.1 from 6.2Performing a rolling upgrade using the installer
To perform the rolling upgrade on non-kernel packages: phase 2
1 Browse to the directory that contains the installmr script.
2 Start the installer for the rolling upgrade with the -rollingupgrade_phase2
option. Specify all the nodes in the cluster:
# ./installmr -rollingupgrade_phase2 nodeA nodeB nodeC nodeD
You can also use the web-based installer to perform the upgrade. If you areusing the web-based installer, select Rolling Upgrade from the task list, makesure the Phase-2: Upgrade non Kernel packages radio button is checked,and then click Next.
3 The installer checks system communications, package versions, productversions, and completes prechecks. It verifies completion of phase 1.
If you are using the web-based installer, input one node of the cluster, theweb-based installer detects the whole cluster to run the rolling upgrade phase2. The web-based installer checks system communications, package versions,product versions, and completes prechecks. It verifies completion of phase 1.
4 The installer upgrades non-kernel packages and will start HA daemon (had)on all nodes. HA will be available once HA daemon is up.
5 The installer loads the new kernel modules. It then starts all relevant processesand brings all the service groups online.
6 Verify the cluster's status:
# hastatus -sum
Performing a rolling upgrade on kernel packages for SF OracleRAC: phase 1Note that in the following instructions that a subcluster can represent one or morenodes in a full cluster, but is represented by nodeA, nodeB as subcluster1 andnodeC, nodeD as subcluster2.
Note: If you plan to upgrade the operating system, ensure that you upgrade allnodes before you start the rolling upgrade of SF Oracle RAC.
113Upgrading to 6.2.1 from 6.2Performing a rolling upgrade using the installer
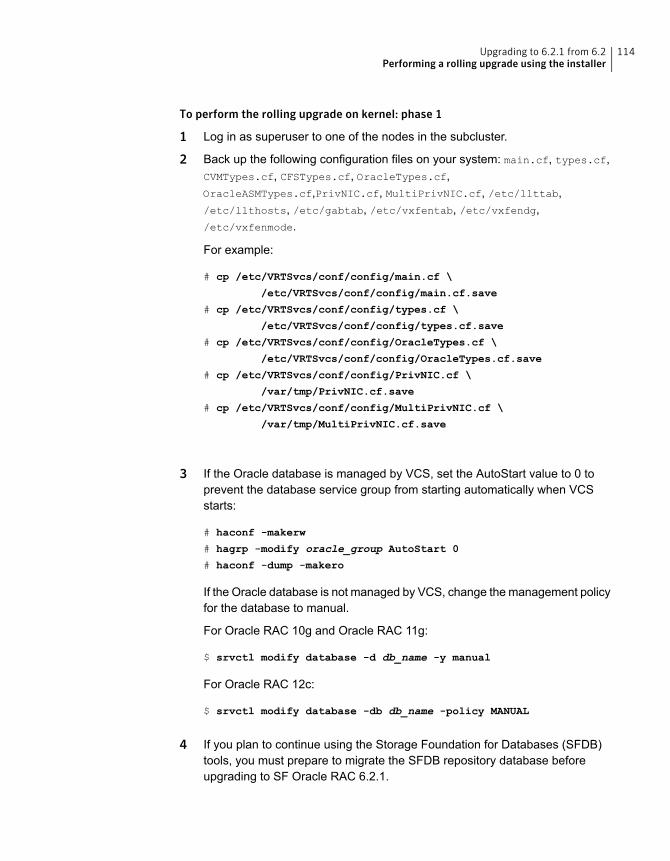
To perform the rolling upgrade on kernel: phase 1
1 Log in as superuser to one of the nodes in the subcluster.
2 Back up the following configuration files on your system: main.cf, types.cf,CVMTypes.cf, CFSTypes.cf, OracleTypes.cf,OracleASMTypes.cf,PrivNIC.cf, MultiPrivNIC.cf, /etc/llttab,/etc/llthosts, /etc/gabtab, /etc/vxfentab, /etc/vxfendg,/etc/vxfenmode.
For example:
# cp /etc/VRTSvcs/conf/config/main.cf \
/etc/VRTSvcs/conf/config/main.cf.save
# cp /etc/VRTSvcs/conf/config/types.cf \
/etc/VRTSvcs/conf/config/types.cf.save
# cp /etc/VRTSvcs/conf/config/OracleTypes.cf \
/etc/VRTSvcs/conf/config/OracleTypes.cf.save
# cp /etc/VRTSvcs/conf/config/PrivNIC.cf \
/var/tmp/PrivNIC.cf.save
# cp /etc/VRTSvcs/conf/config/MultiPrivNIC.cf \
/var/tmp/MultiPrivNIC.cf.save
3 If the Oracle database is managed by VCS, set the AutoStart value to 0 toprevent the database service group from starting automatically when VCSstarts:
# haconf -makerw
# hagrp -modify oracle_group AutoStart 0
# haconf -dump -makero
If the Oracle database is not managed by VCS, change the management policyfor the database to manual.
For Oracle RAC 10g and Oracle RAC 11g:
$ srvctl modify database -d db_name -y manual
For Oracle RAC 12c:
$ srvctl modify database -db db_name -policy MANUAL
4 If you plan to continue using the Storage Foundation for Databases (SFDB)tools, you must prepare to migrate the SFDB repository database beforeupgrading to SF Oracle RAC 6.2.1.
114Upgrading to 6.2.1 from 6.2Performing a rolling upgrade using the installer
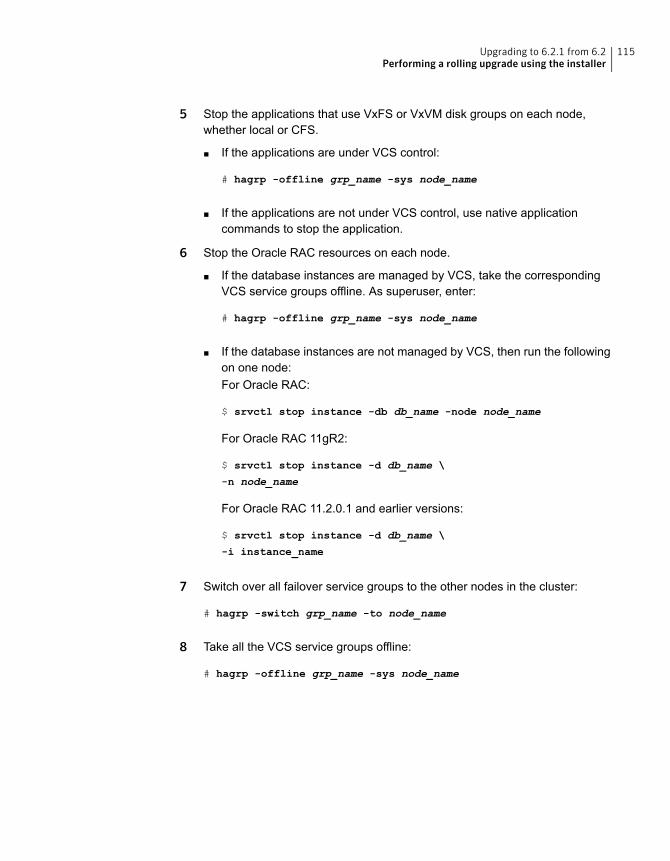
5 Stop the applications that use VxFS or VxVM disk groups on each node,whether local or CFS.
■ If the applications are under VCS control:
# hagrp -offline grp_name -sys node_name
■ If the applications are not under VCS control, use native applicationcommands to stop the application.
6 Stop the Oracle RAC resources on each node.
■ If the database instances are managed by VCS, take the correspondingVCS service groups offline. As superuser, enter:
# hagrp -offline grp_name -sys node_name
■ If the database instances are not managed by VCS, then run the followingon one node:For Oracle RAC:
$ srvctl stop instance -db db_name -node node_name
For Oracle RAC 11gR2:
$ srvctl stop instance -d db_name \
-n node_name
For Oracle RAC 11.2.0.1 and earlier versions:
$ srvctl stop instance -d db_name \
-i instance_name
7 Switch over all failover service groups to the other nodes in the cluster:
# hagrp -switch grp_name -to node_name
8 Take all the VCS service groups offline:
# hagrp -offline grp_name -sys node_name
115Upgrading to 6.2.1 from 6.2Performing a rolling upgrade using the installer
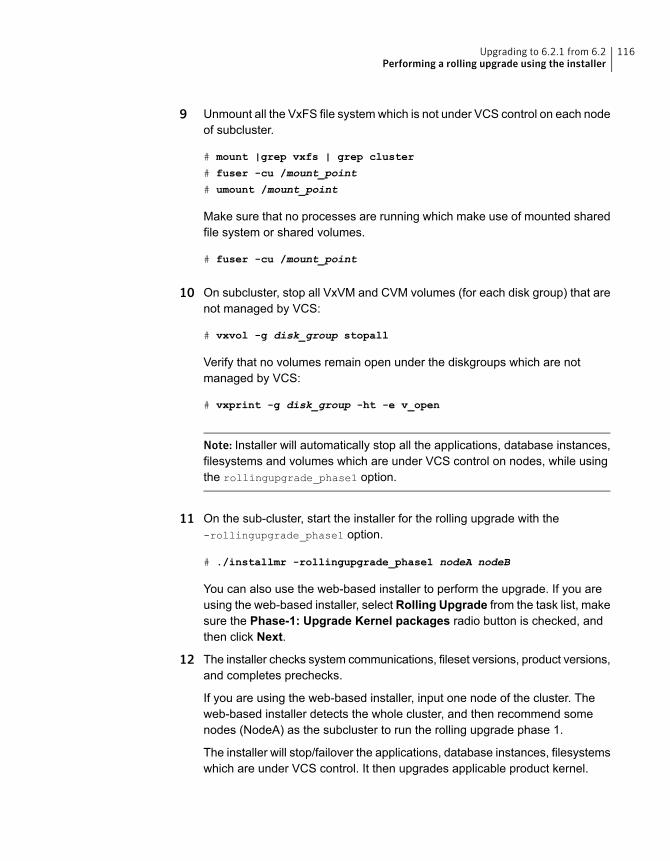
9 Unmount all the VxFS file systemwhich is not under VCS control on each nodeof subcluster.
# mount |grep vxfs | grep cluster
# fuser -cu /mount_point
# umount /mount_point
Make sure that no processes are running which make use of mounted sharedfile system or shared volumes.
# fuser -cu /mount_point
10 On subcluster, stop all VxVM and CVM volumes (for each disk group) that arenot managed by VCS:
# vxvol -g disk_group stopall
Verify that no volumes remain open under the diskgroups which are notmanaged by VCS:
# vxprint -g disk_group -ht -e v_open
Note: Installer will automatically stop all the applications, database instances,filesystems and volumes which are under VCS control on nodes, while usingthe rollingupgrade_phase1 option.
11 On the sub-cluster, start the installer for the rolling upgrade with the-rollingupgrade_phase1 option.
# ./installmr -rollingupgrade_phase1 nodeA nodeB
You can also use the web-based installer to perform the upgrade. If you areusing the web-based installer, select Rolling Upgrade from the task list, makesure the Phase-1: Upgrade Kernel packages radio button is checked, andthen click Next.
12 The installer checks system communications, fileset versions, product versions,and completes prechecks.
If you are using the web-based installer, input one node of the cluster. Theweb-based installer detects the whole cluster, and then recommend somenodes (NodeA) as the subcluster to run the rolling upgrade phase 1.
The installer will stop/failover the applications, database instances, filesystemswhich are under VCS control. It then upgrades applicable product kernel.
116Upgrading to 6.2.1 from 6.2Performing a rolling upgrade using the installer

13 Relink the SF Oracle RAC libraries with Oracle:
Choose the option Relink Oracle Database Binary from the program menu.
14 Restart the nodes on the sub-cluster that is being upgraded.
Note: The Oracle service group at this point will be offline as the AutoStartattribute is set to 0 to prevent the service group from starting automatically.
15 Manually mount the VxFS and CFS file systems that are not managed by VCS.
16 Bring the Oracle database service group online.
■ If VCS manages the Oracle database:
# hagrp -online oracle_group -sys node_name
■ If VCS does not manage the Oracle database:For Oracle RAC 12c:
$ srvctl start instance -db db_name -node node_name
For Oracle RAC 11.2.0.2 and later versions of 11g Release 2:
$ srvctl start instance -d db_name -n node_name
For Oracle RAC 11.2.0.1 and earlier versions:
$ srvctl start instance -d db_name -i instance_name
17 Start all applications that are not managed by VCS. Use native applicationcommands to start the applications.
18 Before you proceed to phase 2, complete step 5 to step 17 on the remainingsubcluster.
19 Perform one of the following steps:
■ If VCS manages the Oracle database, reset the AutoStart value to 1 toenable VCS to bring the database service group online automatically whenVCS starts:
# haconf -makerw
# hagrp -modify oracle_group AutoStart 1
# haconf -dump -makero
■ If the VCS does not manage the Oracle database, change the managementpolicy for the database to automatic:
117Upgrading to 6.2.1 from 6.2Performing a rolling upgrade using the installer
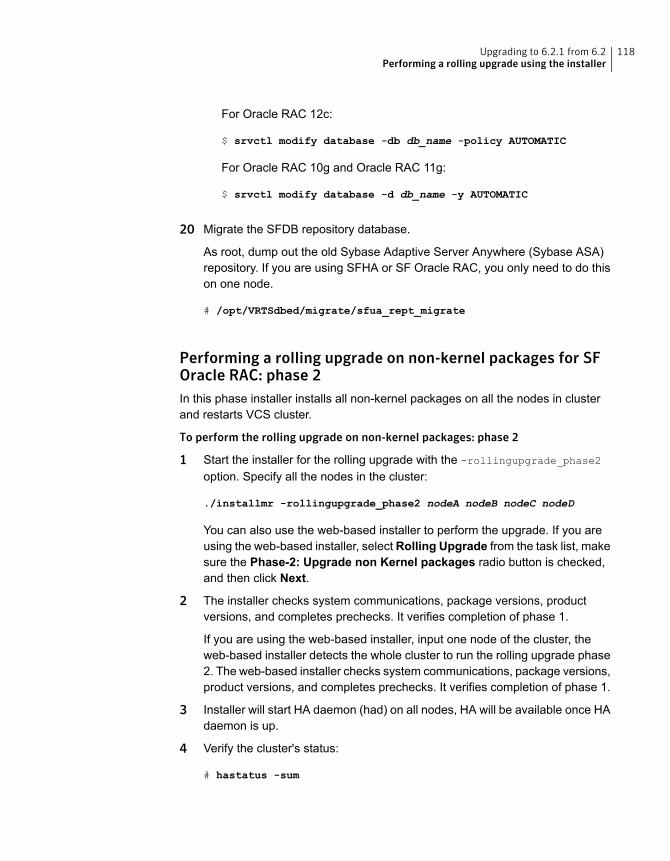
For Oracle RAC 12c:
$ srvctl modify database -db db_name -policy AUTOMATIC
For Oracle RAC 10g and Oracle RAC 11g:
$ srvctl modify database -d db_name -y AUTOMATIC
20 Migrate the SFDB repository database.
As root, dump out the old Sybase Adaptive Server Anywhere (Sybase ASA)repository. If you are using SFHA or SF Oracle RAC, you only need to do thison one node.
# /opt/VRTSdbed/migrate/sfua_rept_migrate
Performing a rolling upgrade on non-kernel packages for SFOracle RAC: phase 2In this phase installer installs all non-kernel packages on all the nodes in clusterand restarts VCS cluster.
To perform the rolling upgrade on non-kernel packages: phase 2
1 Start the installer for the rolling upgrade with the -rollingupgrade_phase2
option. Specify all the nodes in the cluster:
./installmr -rollingupgrade_phase2 nodeA nodeB nodeC nodeD
You can also use the web-based installer to perform the upgrade. If you areusing the web-based installer, select Rolling Upgrade from the task list, makesure the Phase-2: Upgrade non Kernel packages radio button is checked,and then click Next.
2 The installer checks system communications, package versions, productversions, and completes prechecks. It verifies completion of phase 1.
If you are using the web-based installer, input one node of the cluster, theweb-based installer detects the whole cluster to run the rolling upgrade phase2. The web-based installer checks system communications, package versions,product versions, and completes prechecks. It verifies completion of phase 1.
3 Installer will start HA daemon (had) on all nodes, HA will be available once HAdaemon is up.
4 Verify the cluster's status:
# hastatus -sum
118Upgrading to 6.2.1 from 6.2Performing a rolling upgrade using the installer

Upgrading SFHAwith the VeritasWeb-based installerThis section describes upgrading SFHA with the Veritas Web-based installer. Theinstaller detects and upgrades the product that is currently installed on the specifiedsystem or systems. If you want to upgrade to a different product, you may need toperform additional steps.
To perform a full upgrade for SFHA
1 Perform the required steps to save any data that you wish to preserve. Forexample, take back-ups of configuration files.
2 Start the Web-based installer.
3 On the Select a task and a product page, select Install 6.2.1 from the Taskdrop-down list, and click Next.Or select Rolling Upgrade to perform a rollingupgrade via the webinstaller
4 Stop all applications accessing the file system. Unmount all mounted filesystemsbefore installation.
5 Indicate the systems on which to upgrade. Enter one or more system names,separated by spaces. Click Next.
The installer detects the product that is installed on the specified system.
6 The installer stops the processes. Choose to restore and reuse the previousconfiguration on all systems. Click Next to start the processes.
7 Click Next to complete the upgrade.
After the upgrade completes, the installer displays the location of the log andsummary files. If required, view the files to confirm the installation status.
To perform a rolling upgrade with VeritasWeb-based installer, refer to 6.2 InstallationGuides for your products.
Verifying software versionsTo list the Symantec filesets installed on your system, enter the following command:
# lslpp -L VRTS*
119Upgrading to 6.2.1 from 6.2Upgrading SFHA with the Veritas Web-based installer
Rolling back and removingSymantec StorageFoundation and HighAvailability Solutions
This chapter includes the following topics:
■ About rolling back Symantec Storage Foundation and High Availability Solutions6.2.1
■ Rolling back using the uninstallmr script
■ Rolling back manually
■ Removing the Symantec product
■ Rolling back 6.2.1 with the Web-based installer
About rolling back Symantec Storage Foundation andHigh Availability Solutions 6.2.1
This section describes how to roll back either by using the uninstallmr script,web-based installer, or manually.
The uninstallmr script uninstalls all the patches associated with packages installed,and starts the processes.
5Chapter
The uninstallmr script uninstalls all the 6.2.1 patches. A scenario wherein the productis upgraded from 6.2 to 6.2.1, after you run the uninstallmr script, all the 6.2.1patches are uninstalled while the 6.2 packages are retained.
Note: If you upgraded the products to 6.2.1 from 6.2 or versions earlier than 6.2,the products roll back to 6.2.
Rolling back using the uninstallmr scriptUse the following procedure to roll back from any Symantec product to the previousversion using the uninstallmr script.
To roll back
1 Browse to the directory that contains the uninstallmr script.
2 Unmount all the Storage Checkpoints and the file systems.
# umount /checkpoint_name
# umount /filesystem
Verify that you unmounted the Storage Checkpoints and the file systems.
# mount | grep vxfs
3 Stop all the processes and services accessing the file systems. For each diskgroup enter:
# vxvol -g diskgroup stopall
Verify that no volumes remain open.
# vxprint -Aht -e v_open
4 Run the uninstallmr script to rollback patches, type:
# ./uninstallmr
5 The uninstallmr script removes 6.2.1 patches. After patch rollback completes,modules are loaded and processes are restarted. uninstallmr will also reportany warning happened during the rolling back.
Rolling back manuallyUse one of the following procedures to roll back to 6.2 manually.
121Rolling back and removing Symantec Storage Foundation and High Availability SolutionsRolling back using the uninstallmr script
■ Rolling back Storage Foundation or Storage Foundation and High Availabilitymanually
■ Rolling back Storage Foundation Cluster File System High Availability manually
■ Rolling back SF for Oracle RAC manually
■ Rolling back Symantec Cluster Server manually
■ Rolling back Dynamic Multi-Pathing manually
Note: You must reboot systems when you roll back manually at the end of the rollback procedure.
Rolling back Storage Foundation or Storage Foundation and HighAvailability manually
Use the following procedure to roll back to 6.2 manually.
To roll back SF or SFHA
1 Log in as superuser.
2 Verify that /opt/VRTS/bin is in your PATH so you can execute all productcommands.
3 Unmount all Storage Checkpoints and file systems:
# umount /checkpoint_name
# umount /filesystem
4 Enter the following command to check if any VxFS file systems or StorageCheckpoints are mounted:
# mount | grep vxfs
5 If you have created any Volume Replicator (VVR) replicated volume groups(RVGs) on your system, perform the following steps:
■ Stop all applications that are involved in replication. For example, if a datavolume contains a file system, unmount it.
■ Use the vxrvg stop command to stop each RVG individually:
# vxrvg -g diskgroup stop rvg_name
■ On the Primary node, use the vxrlink status command to verify that allRLINKs are up-to-date:
122Rolling back and removing Symantec Storage Foundation and High Availability SolutionsRolling back manually
# vxrlink -g diskgroup status rlink_name
Caution: To avoid data corruption, do not proceed until all RLINKs areup-to-date.
6 Stop activity to all VxVM volumes.
7 Stop all VxVM volumes by entering the following command for each disk group:
# vxvol -g diskgroup stopall
To verify that no volumes remain open, enter the following command:
# vxprint -Aht -e v_open
8 Stop VCS and its modules manually.
# hastop -all
9 Stop I/O fencing on each node:
# /etc/rc.d/rc2.d/S97vxfen stop
10 Stop GAB:
# /etc/rc.d/rc2.d/S92gab stop
11 Stop LLT:
# /etc/rc.d/rc2.d/S70llt stop
12 Unmount /dev/odm:
# umount /dev/odm
13 Unload the ODM module:
# genkex | grep odm
# vxkextadm vxodm unload
14 Create a file that contains all the 6.2.1 patches. In this example, it is called/reject.list.
■
■ Reject each patch from the patch list file, for example:
123Rolling back and removing Symantec Storage Foundation and High Availability SolutionsRolling back manually
# installp -rBf /reject.list
15 Reboot the systems. On each system, run the following command.
# /usr/sbin/shutdown -r now
Rolling back Storage Foundation Cluster File SystemHigh Availabilitymanually
Use the following procedure to roll back to 6.2 manually.
To roll back SFCFSHA manually
1 Log in as superuser.
2 Verify that /opt/VRTS/bin is in your PATH so you can execute all productcommands.
3 Unmount all Storage Checkpoints and file systems:
# umount /checkpoint_name
# umount /filesystem
4 Enter the following command to check if any VxFS file systems or StorageCheckpoints are mounted:
# mount | grep vxfs
5 If you have created any Volume Replicator (VVR) replicated volume groups(RVGs) on your system, perform the following steps:
■ Stop all applications that are involved in replication. For example, if a datavolume contains a file system, unmount it.
■ Use the vxrvg stop command to stop each RVG individually:
# vxrvg -g diskgroup stop rvg_name
■ On the Primary node, use the vxrlink status command to verify that allRLINKs are up-to-date:
# vxrlink -g diskgroup status rlink_name
Caution: To avoid data corruption, do not proceed until all RLINKs areup-to-date.
124Rolling back and removing Symantec Storage Foundation and High Availability SolutionsRolling back manually

6 Stop activity to all VxVM volumes. For example, stop any applications such asdatabases that access the volumes, and unmount any file systems that havebeen created on the volumes.
7 Stop all VxVM volumes by entering the following command for each disk group:
# vxvol -g diskgroup stopall
To verify that no volumes remain open, enter the following command:
# vxprint -Aht -e v_open
8 Stop VCS along with all the resources. Then, stop the remaining resourcesmanually:
# /etc/rc.d/rc2.d/S99vcs stop
9 Unmount /dev/odm:
# umount /dev/odm
10 Unload the ODM module:
# genkex | grep odm
# vxkextadm vxodm unload
11 Stop I/O fencing on each node:
# /etc/rc.d/rc2.d/S97vxfen stop
12 Stop GAB:
# /etc/rc.d/rc2.d/S92gab stop
13 Stop LLT:
# /etc/rc.d/rc2.d/S70llt stop
14 Remove the Storage Foundation Cluster File System High Availability 6.2.1patches.
■ Create a file that contains all the 6.2.1 patches. In this example, it is called/reject.list.
■ Reject each patch from the patch list file, for example:
125Rolling back and removing Symantec Storage Foundation and High Availability SolutionsRolling back manually

# installp -rBf /reject.list
15 Reboot the systems. On each system, run the following command.
# /usr/sbin/shutdown -r now
Rolling back SF for Oracle RAC manuallyUse the following procedure to roll back to 6.2 manually.
To roll back SF for Oracle RAC manually
1 Stop Oracle and CRS on each node of the cluster.
■ If Oracle Clusterware is controlled by VCS, log in as superuser on one ofthe cluster nodes and enter the following command:
# hastop -all
■ If Oracle Clusterware is not controlled by VCS, enter the following commandon each node of the cluster to stop Oracle Clusterware:
# crsctl stop crs -f
Unmount all VxFS file system used by a database or application and enterthe following command to each node of the cluster:
# hastop -local
2 Verify the output of the gabconfig -a command to ensure that VCS has beenstopped. In the gabconfig -a command output, the VCS engine or highavailability daemon (HAD) port h is not displayed. This indicates that VCS hasbeen stopped.
# /sbin/gabconfig -a
Sample output:
GAB Port Memberships
===============================
Port a gen 5c3d0b membership 01
Port b gen 5c3d10 membership 01
Port d gen 5c3d0c membership 01
Port o gen 5c3d0f membership 01
126Rolling back and removing Symantec Storage Foundation and High Availability SolutionsRolling back manually
3 Bring down the rest of the stack:
Stop vcsmm:
# /etc/rc.d/rc2.d/S98vcsmm stop
Stop lmx:
# /etc/rc.d/rc2.d/S71lmx stop
Stop odm:
# /etc/rc.d/rc2.d/S99odm stop
Stop vxgms:
# /etc/methods/gmskextadm unload
Stop vxglm:
# /etc/methods/glmkextadm unload
Stop vxfen:
# /etc/rc.d/rc2.d/S97vxfen stop
Stop gab:
# /sbin/gabconfig -U
# /etc/methods/gabkext -stop
Stop llt:
# /sbin/lltconfig -U
4 Remove the Storage Foundation for Oracle RAC 6.2.1 patches.
■ Create a file that contains all the 6.2.1 patches. For example,/tmp/reject.list:You can use the following list as the reject list for Storage Foundation forOracle components:
VRTScavf 6.2.1.0
VRTScps 6.2.1.0
VRTSdbed 6.2.1.0
VRTSfsadv 6.2.1.0
VRTSllt 6.2.1.0
VRTSperl 5.16.1.27
VRTSsfcpi62 6.2.1.0
127Rolling back and removing Symantec Storage Foundation and High Availability SolutionsRolling back manually

VRTSspt 6.2.1.0
VRTSvcs 6.2.1.0
VRTSvcsag 6.2.1.0
VRTSvcsea 6.2.1.0
VRTSvxfen 6.2.1.0
VRTSvxfs 6.2.1.0
VRTSvxvm 6.2.1.0
■ Reject each patch from the patch list file, for example:
# installp -rBf /tmp/reject.list
5 Reboot the systems. On each system, run the following command.
# /usr/sbin/shutdown -r now
Rolling back Symantec Cluster Server manuallyUse the following procedure to roll back VCS 6.2.1 to VCS 6.2 on your clustermanually. To uninstall VCS, see the Symantec Cluster Server 6.2 Installation Guide.
Note: Use this procedure only when rolling back VCS. Do not roll back VCS whenit is part of other products that rely on VCS, for example Storage FoundationClustered File System High Availability or Storage Foundation for Oracle RAC.
128Rolling back and removing Symantec Storage Foundation and High Availability SolutionsRolling back manually
To roll back 6.2.1:
1 Verify that all of the VCS 6.2.1 patches are in the APPLIED state. Create atext file called filesets.to.reject that contains the name and version of eachfileset, one per line, exactly as shown below.
VRTSvcs 6.2.1.0
VRTScps 6.2.1.0
VRTSvxfen 6.2.1.0
2 On each node, make a local copy of filesets.to.reject and then type:
# nohdr='^Z$'
# while read pkg ver; do
lslpp -l $pkg | egrep -v "$nohdr"
nohdr='^ Fileset +Level State '
done < filesets.to.reject
Note:Any updates that are in COMMITTED state cannot be rejected (undone).You must remove each one and then re-install it.
3 List the service groups in your cluster and their status. On any node, type:
# hagrp -state
4 If there is some service group is created, for example ClusterService servicegroup, take the ClusterService service group offline if it is running. On anynode, type:
# hagrp -offline -force ClusterService -any
5 Make the VCS configuration writable. On any node, type:
# haconf -makerw
129Rolling back and removing Symantec Storage Foundation and High Availability SolutionsRolling back manually

6 Freeze all service groups except the ClusterService service group. On anynode, type:
# hagrp -list | sort -u +0b -1 | \
while read grp sys ; do
hagrp -freeze $grp -persistent
done
You can safely ignore the warning about the failure to freeze the ClusterServicegroup.
7 Save the configuration (main.cf) file with the groups frozen. On any node, type:
# haconf -dump -makero
8 Make a backup copy of the current main.cf and all types.cf configuration files.For example, on one node in the cluster, type:
# cp /etc/VRTSvcs/conf/config/main.cf \
/etc/VRTSvcs/conf/main.cf.save
# cp /etc/VRTSvcs/conf/config/types.cf \
/etc/VRTSvcs/conf/types.cf.save
9 Shut down VCS. On any node, type:
# /opt/VRTSvcs/bin/hastop -all
10 Shut down CmdServer. On each node, type:
# /opt/VRTSvcs/bin/CmdServer -stop
11 Verify that VCS has shut down.
■ On any node, type:
# /sbin/gabconfig -a
The output resembles:
GAB Port Memberships
Port a gen 23dc0001 membership 01
Output for membership for port h does not appear.
■ On each node, run the command:
# ps -ef | egrep "had|hashadow|CmdServer"
130Rolling back and removing Symantec Storage Foundation and High Availability SolutionsRolling back manually
Terminate any instances of had, hashadow, or CmdServer that still run after60 seconds.
12 Stop AMF, fencing, GAB, and LLT.
# /etc/init.d/amf.rc stop
# /etc/init.d/vxfen.rc stop
# /etc/methods/vxfenext -stop
# /etc/init.d/gab.rc stop
# /etc/methods/gabkext -stop
# /etc/init.d/llt.rc stop
13 Preview the patch removal selection and validity tests. On each node, type:
# installp -pr -gXv -f filesets.to.reject
Confirm that the patches to be removed are exactly the same as those listedin the filesets.to.reject file that you created in step 1.
14 Perform the patch removal. On each node, type:
# installp -r -gXv -f filesets.to.reject
Review the summaries at the end of each run and confirm that all of theintended patches removed successfully.
15 Reboot all nodes in the cluster.
16 After VCS has started, perform the following steps:
■ Verify all resources have been probed. On any node, type:
# hastatus -summary
■ Unfreeze all service groups. On any node, type:
# haconf -makerw
# hagrp -list | sort -u +0b -1 | \
while read grp sys ; do
hagrp -unfreeze $grp -persistent
done
# haconf -dump -makero
131Rolling back and removing Symantec Storage Foundation and High Availability SolutionsRolling back manually

You can safely ignore the warning about the failure to unfreeze theClusterService group.
17 Bring the ClusterService service group online, if necessary. On any node, type:
# hagrp -online ClusterService -sys system
where system is the node name.
Rolling back Dynamic Multi-Pathing manuallyUse the following procedure to roll back to 6.2 manually.
To roll back DMP manually
1 Stop activity to all VxVM volumes.
2 Stop all VxVM volumes by entering the following command for each disk group:
# vxvol -g diskgroup stopall
To verify that no volumes remain open, enter the following command:
# vxprint -Aht -e v_open
3 Perform the following commands to determine whether root support or DMPnative support is enabled.
■ # vxdmpadm gettune dmp_native_support
■ If the command returns an "on" value, DMP native support is enabled onthe system. If the command returns any other value, DMP native supportis disabled.
■ Once you have determined if root support or DMP native support is enabled,go to step 4.
■ Once you have determined that root support and DMP native support isnot enabled, go to step 5.
4 If root support or DMP native support is enabled:
■ You must disable DMP native support.Run the following command to disable DMP native support and to disableroot support:
# vxdmpadm settune dmp_native_support=off
■ If only root support is enabled, run the following command to disable rootsupport:
132Rolling back and removing Symantec Storage Foundation and High Availability SolutionsRolling back manually
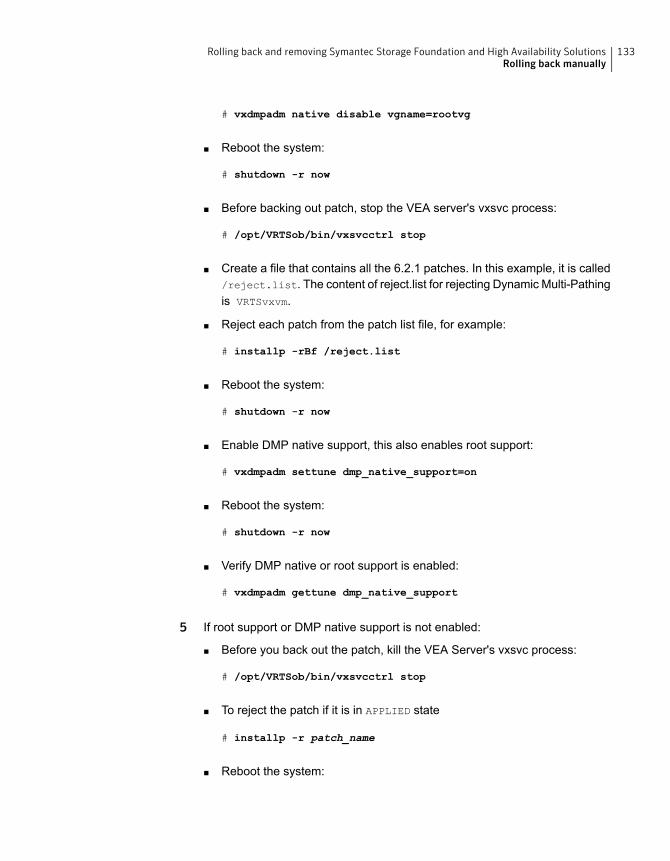
# vxdmpadm native disable vgname=rootvg
■ Reboot the system:
# shutdown -r now
■ Before backing out patch, stop the VEA server's vxsvc process:
# /opt/VRTSob/bin/vxsvcctrl stop
■ Create a file that contains all the 6.2.1 patches. In this example, it is called/reject.list. The content of reject.list for rejecting Dynamic Multi-Pathingis VRTSvxvm.
■ Reject each patch from the patch list file, for example:
# installp -rBf /reject.list
■ Reboot the system:
# shutdown -r now
■ Enable DMP native support, this also enables root support:
# vxdmpadm settune dmp_native_support=on
■ Reboot the system:
# shutdown -r now
■ Verify DMP native or root support is enabled:
# vxdmpadm gettune dmp_native_support
5 If root support or DMP native support is not enabled:
■ Before you back out the patch, kill the VEA Server's vxsvc process:
# /opt/VRTSob/bin/vxsvcctrl stop
■ To reject the patch if it is in APPLIED state
# installp -r patch_name
■ Reboot the system:
133Rolling back and removing Symantec Storage Foundation and High Availability SolutionsRolling back manually
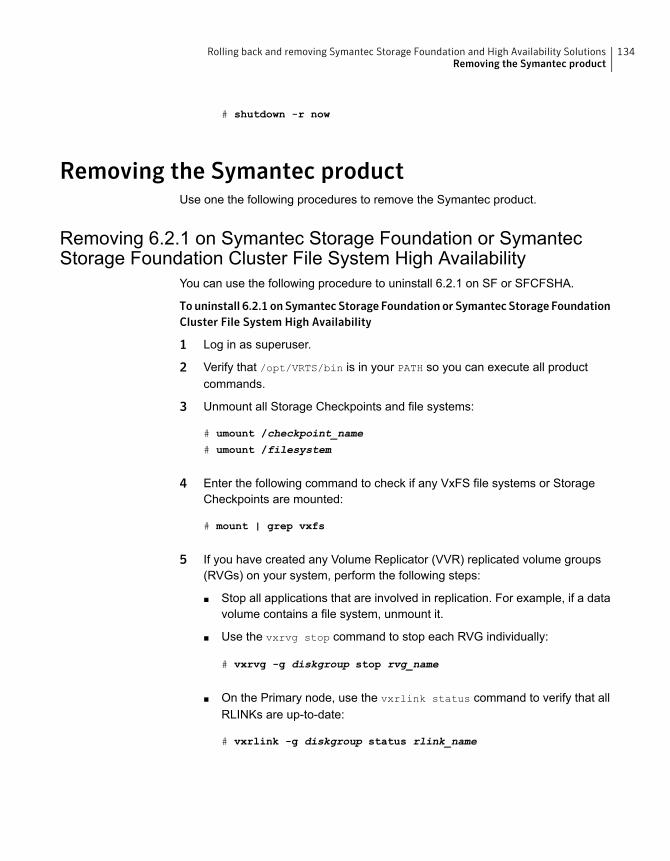
# shutdown -r now
Removing the Symantec productUse one the following procedures to remove the Symantec product.
Removing 6.2.1 on Symantec Storage Foundation or SymantecStorage Foundation Cluster File System High Availability
You can use the following procedure to uninstall 6.2.1 on SF or SFCFSHA.
Touninstall 6.2.1 onSymantec Storage Foundation or Symantec Storage FoundationCluster File System High Availability
1 Log in as superuser.
2 Verify that /opt/VRTS/bin is in your PATH so you can execute all productcommands.
3 Unmount all Storage Checkpoints and file systems:
# umount /checkpoint_name
# umount /filesystem
4 Enter the following command to check if any VxFS file systems or StorageCheckpoints are mounted:
# mount | grep vxfs
5 If you have created any Volume Replicator (VVR) replicated volume groups(RVGs) on your system, perform the following steps:
■ Stop all applications that are involved in replication. For example, if a datavolume contains a file system, unmount it.
■ Use the vxrvg stop command to stop each RVG individually:
# vxrvg -g diskgroup stop rvg_name
■ On the Primary node, use the vxrlink status command to verify that allRLINKs are up-to-date:
# vxrlink -g diskgroup status rlink_name
134Rolling back and removing Symantec Storage Foundation and High Availability SolutionsRemoving the Symantec product
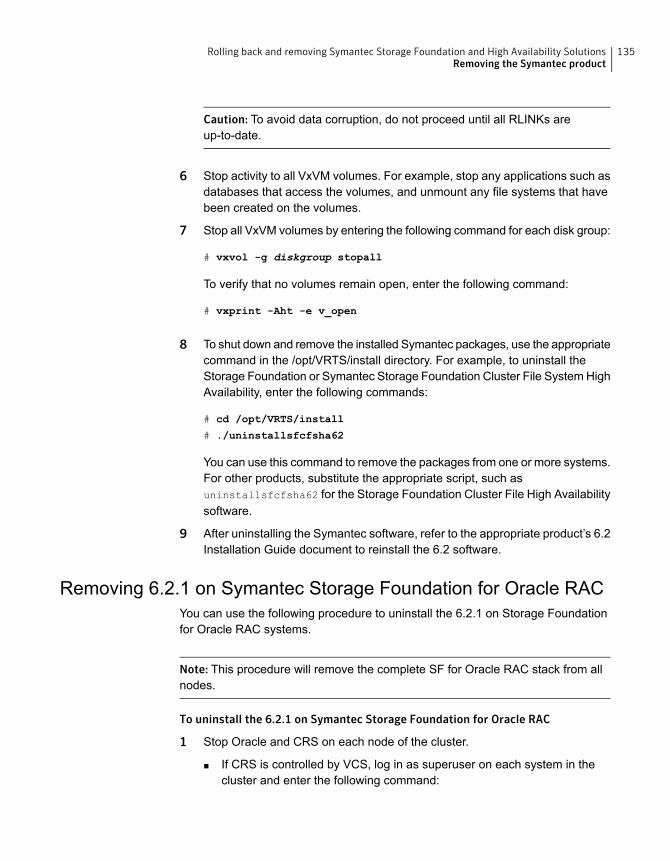
Caution: To avoid data corruption, do not proceed until all RLINKs areup-to-date.
6 Stop activity to all VxVM volumes. For example, stop any applications such asdatabases that access the volumes, and unmount any file systems that havebeen created on the volumes.
7 Stop all VxVM volumes by entering the following command for each disk group:
# vxvol -g diskgroup stopall
To verify that no volumes remain open, enter the following command:
# vxprint -Aht -e v_open
8 To shut down and remove the installed Symantec packages, use the appropriatecommand in the /opt/VRTS/install directory. For example, to uninstall theStorage Foundation or Symantec Storage Foundation Cluster File SystemHighAvailability, enter the following commands:
# cd /opt/VRTS/install
# ./uninstallsfcfsha62
You can use this command to remove the packages from one or more systems.For other products, substitute the appropriate script, such asuninstallsfcfsha62 for the Storage Foundation Cluster File High Availabilitysoftware.
9 After uninstalling the Symantec software, refer to the appropriate product’s 6.2Installation Guide document to reinstall the 6.2 software.
Removing 6.2.1 on Symantec Storage Foundation for Oracle RACYou can use the following procedure to uninstall the 6.2.1 on Storage Foundationfor Oracle RAC systems.
Note: This procedure will remove the complete SF for Oracle RAC stack from allnodes.
To uninstall the 6.2.1 on Symantec Storage Foundation for Oracle RAC
1 Stop Oracle and CRS on each node of the cluster.
■ If CRS is controlled by VCS, log in as superuser on each system in thecluster and enter the following command:
135Rolling back and removing Symantec Storage Foundation and High Availability SolutionsRemoving the Symantec product

# hastop -all
■ If CRS is not controlled by VCS, enter the following command on each nodeof the cluster to stop CRS:
# crsctl stop crs -f
Unmount all VxFS file system used by a database or application and enterthe following command to each node of the cluster:
# hastop -local
2 Verify the output of the gabconfig -a command to ensure that VCS has beenstopped. In the gabconfig -a command output, the VCS engine or highavailability daemon (HAD) port h is not displayed. This indicates that VCS hasbeen stopped.
# /sbin/gabconfig -a
Sample output:
GAB Port Memberships
===============================
Port a gen 5c3d0b membership 01
Port b gen 5c3d10 membership 01
Port d gen 5c3d0c membership 01
Port o gen 5c3d0f membership 01
3 Uninstall Storage Foundation for Oracle RAC.
# cd /opt/VRTS/install
# ./uninstallsfrac62 MyNode1 MyNode2
See the Symantec™ Storage Foundation for Oracle RAC 6.2 Installation andConfiguration Guide for more information.
4 After uninstalling the packages, refer to the Symantec™ Storage Foundationfor Oracle RAC 6.2 Installation and Configuration Guide to reinstall the 6.2software.
Rolling back 6.2.1 with the Web-based installerThis section describes how to roll back this release with the Web-based installer.
136Rolling back and removing Symantec Storage Foundation and High Availability SolutionsRolling back 6.2.1 with the Web-based installer
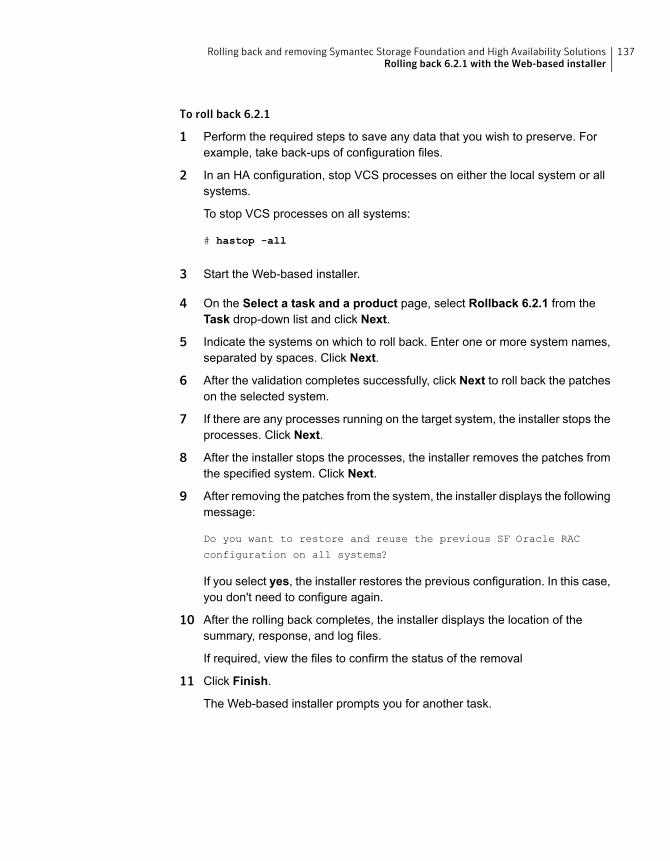
To roll back 6.2.1
1 Perform the required steps to save any data that you wish to preserve. Forexample, take back-ups of configuration files.
2 In an HA configuration, stop VCS processes on either the local system or allsystems.
To stop VCS processes on all systems:
# hastop -all
3 Start the Web-based installer.
4 On the Select a task and a product page, select Rollback 6.2.1 from theTask drop-down list and click Next.
5 Indicate the systems on which to roll back. Enter one or more system names,separated by spaces. Click Next.
6 After the validation completes successfully, click Next to roll back the patcheson the selected system.
7 If there are any processes running on the target system, the installer stops theprocesses. Click Next.
8 After the installer stops the processes, the installer removes the patches fromthe specified system. Click Next.
9 After removing the patches from the system, the installer displays the followingmessage:
Do you want to restore and reuse the previous SF Oracle RAC
configuration on all systems?
If you select yes, the installer restores the previous configuration. In this case,you don't need to configure again.
10 After the rolling back completes, the installer displays the location of thesummary, response, and log files.
If required, view the files to confirm the status of the removal
11 Click Finish.
The Web-based installer prompts you for another task.
137Rolling back and removing Symantec Storage Foundation and High Availability SolutionsRolling back 6.2.1 with the Web-based installer
About the installation andthe uninstallation scripts
This appendix includes the following topics:
■ About the installation and the uninstallation scripts
About the installation and the uninstallation scriptsSymantec™ Storage Foundation and High Availability Solutions 6.2.1 provides aninstallation and upgrade script. To install or upgrade the patches that are includedin this release, you can use the installmr script. The installmr script lets youinstall or upgrade all the patches that are associated with the packages installed.
For more information regarding installation,
Symantec has introduced a new Install Bundles feature to help you install or upgradedirectly to maintenance level with one execution. You can use the -base_path
option to install or upgrade base and maintenance bundles. There are a fewprerequisites for using Install Bundles feature for installation and upgrade of 6.2.1mentioned below:
The installmr script optionsThe following table lists the command line options for the installmr and upgradescript:
AAppendix
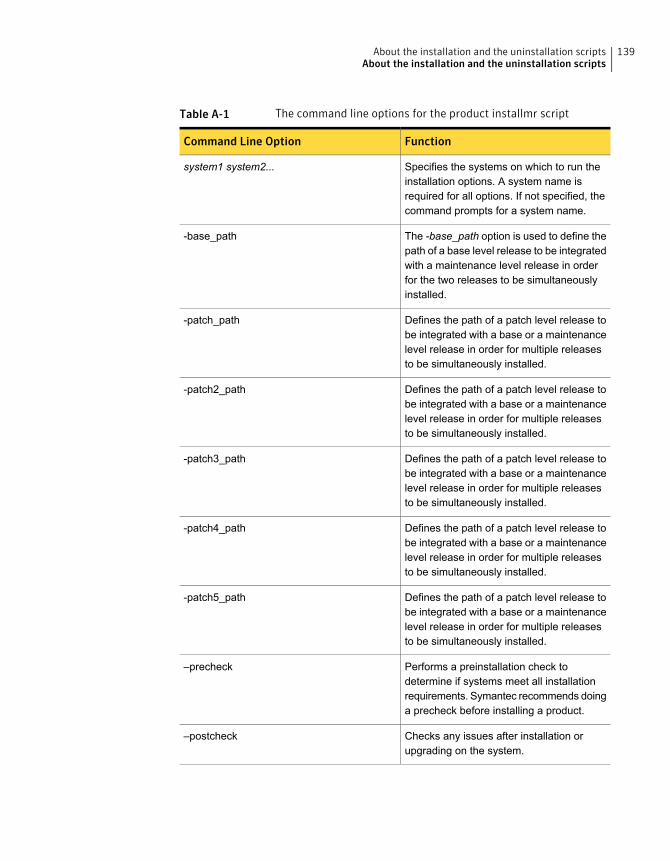
Table A-1 The command line options for the product installmr script
FunctionCommand Line Option
Specifies the systems on which to run theinstallation options. A system name isrequired for all options. If not specified, thecommand prompts for a system name.
system1 system2...
The -base_path option is used to define thepath of a base level release to be integratedwith a maintenance level release in orderfor the two releases to be simultaneouslyinstalled.
-base_path
Defines the path of a patch level release tobe integrated with a base or a maintenancelevel release in order for multiple releasesto be simultaneously installed.
-patch_path
Defines the path of a patch level release tobe integrated with a base or a maintenancelevel release in order for multiple releasesto be simultaneously installed.
-patch2_path
Defines the path of a patch level release tobe integrated with a base or a maintenancelevel release in order for multiple releasesto be simultaneously installed.
-patch3_path
Defines the path of a patch level release tobe integrated with a base or a maintenancelevel release in order for multiple releasesto be simultaneously installed.
-patch4_path
Defines the path of a patch level release tobe integrated with a base or a maintenancelevel release in order for multiple releasesto be simultaneously installed.
-patch5_path
Performs a preinstallation check todetermine if systems meet all installationrequirements. Symantec recommends doinga precheck before installing a product.
–precheck
Checks any issues after installation orupgrading on the system.
–postcheck
139About the installation and the uninstallation scriptsAbout the installation and the uninstallation scripts
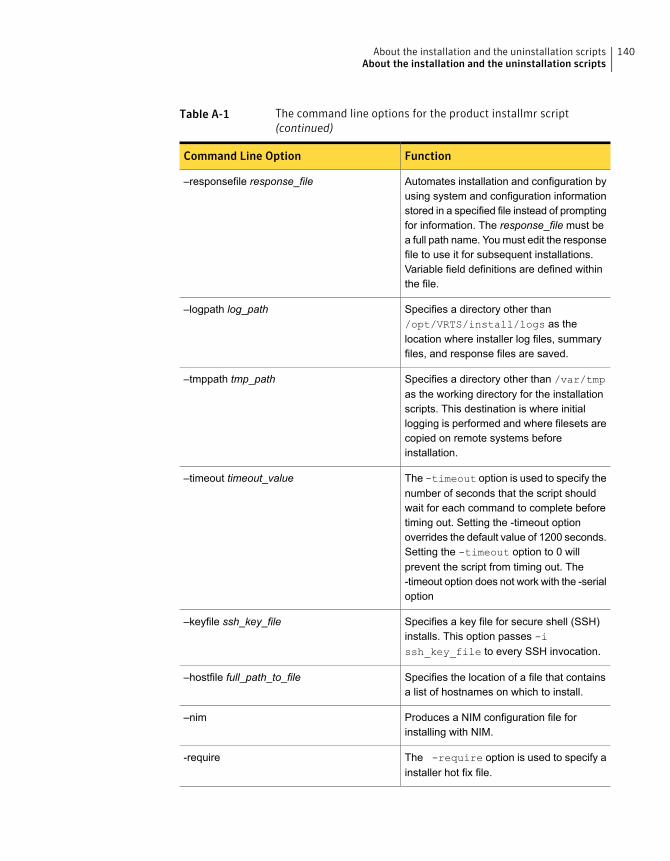
Table A-1 The command line options for the product installmr script(continued)
FunctionCommand Line Option
Automates installation and configuration byusing system and configuration informationstored in a specified file instead of promptingfor information. The response_file must bea full path name. Youmust edit the responsefile to use it for subsequent installations.Variable field definitions are defined withinthe file.
–responsefile response_file
Specifies a directory other than/opt/VRTS/install/logs as thelocation where installer log files, summaryfiles, and response files are saved.
–logpath log_path
Specifies a directory other than /var/tmpas the working directory for the installationscripts. This destination is where initiallogging is performed and where filesets arecopied on remote systems beforeinstallation.
–tmppath tmp_path
The -timeout option is used to specify thenumber of seconds that the script shouldwait for each command to complete beforetiming out. Setting the -timeout optionoverrides the default value of 1200 seconds.Setting the -timeout option to 0 willprevent the script from timing out. The-timeout option does not work with the -serialoption
–timeout timeout_value
Specifies a key file for secure shell (SSH)installs. This option passes -issh_key_file to every SSH invocation.
–keyfile ssh_key_file
Specifies the location of a file that containsa list of hostnames on which to install.
–hostfile full_path_to_file
Produces a NIM configuration file forinstalling with NIM.
–nim
The -require option is used to specify ainstaller hot fix file.
-require
140About the installation and the uninstallation scriptsAbout the installation and the uninstallation scripts
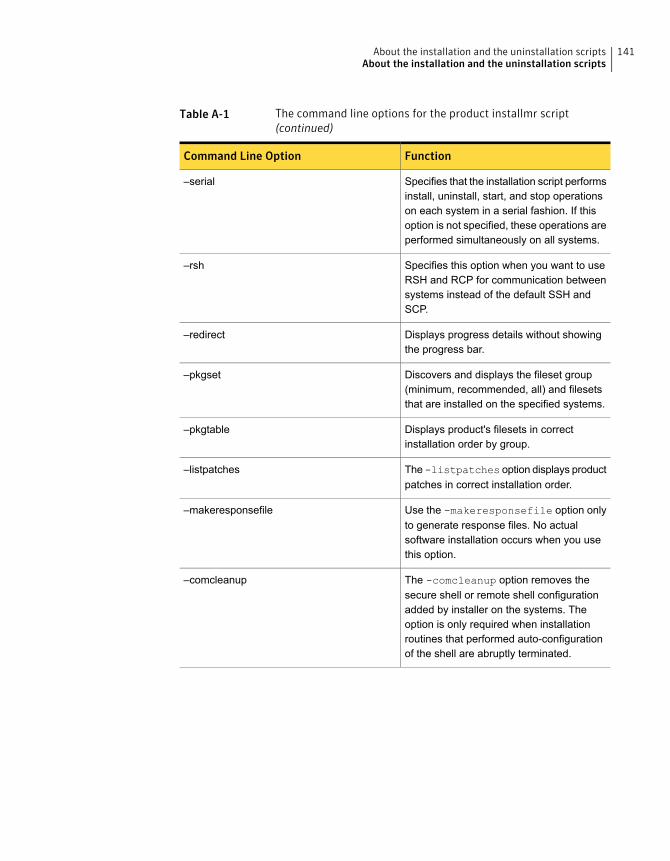
Table A-1 The command line options for the product installmr script(continued)
FunctionCommand Line Option
Specifies that the installation script performsinstall, uninstall, start, and stop operationson each system in a serial fashion. If thisoption is not specified, these operations areperformed simultaneously on all systems.
–serial
Specifies this option when you want to useRSH and RCP for communication betweensystems instead of the default SSH andSCP.
–rsh
Displays progress details without showingthe progress bar.
–redirect
Discovers and displays the fileset group(minimum, recommended, all) and filesetsthat are installed on the specified systems.
–pkgset
Displays product's filesets in correctinstallation order by group.
–pkgtable
The -listpatches option displays productpatches in correct installation order.
–listpatches
Use the -makeresponsefile option onlyto generate response files. No actualsoftware installation occurs when you usethis option.
–makeresponsefile
The -comcleanup option removes thesecure shell or remote shell configurationadded by installer on the systems. Theoption is only required when installationroutines that performed auto-configurationof the shell are abruptly terminated.
–comcleanup
141About the installation and the uninstallation scriptsAbout the installation and the uninstallation scripts
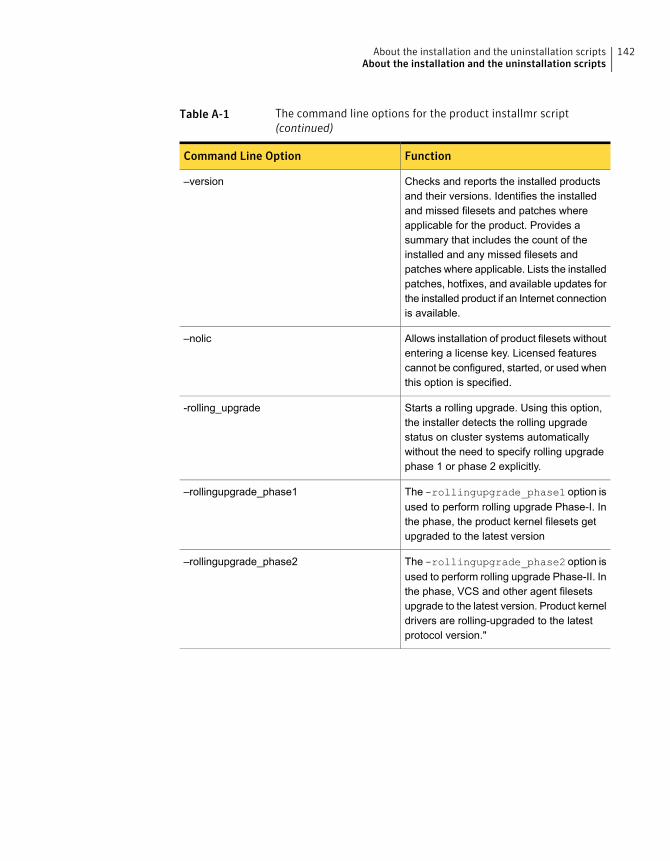
Table A-1 The command line options for the product installmr script(continued)
FunctionCommand Line Option
Checks and reports the installed productsand their versions. Identifies the installedand missed filesets and patches whereapplicable for the product. Provides asummary that includes the count of theinstalled and any missed filesets andpatches where applicable. Lists the installedpatches, hotfixes, and available updates forthe installed product if an Internet connectionis available.
–version
Allows installation of product filesets withoutentering a license key. Licensed featurescannot be configured, started, or used whenthis option is specified.
–nolic
Starts a rolling upgrade. Using this option,the installer detects the rolling upgradestatus on cluster systems automaticallywithout the need to specify rolling upgradephase 1 or phase 2 explicitly.
-rolling_upgrade
The -rollingupgrade_phase1 option isused to perform rolling upgrade Phase-I. Inthe phase, the product kernel filesets getupgraded to the latest version
–rollingupgrade_phase1
The -rollingupgrade_phase2 option isused to perform rolling upgrade Phase-II. Inthe phase, VCS and other agent filesetsupgrade to the latest version. Product kerneldrivers are rolling-upgraded to the latestprotocol version."
–rollingupgrade_phase2
142About the installation and the uninstallation scriptsAbout the installation and the uninstallation scripts
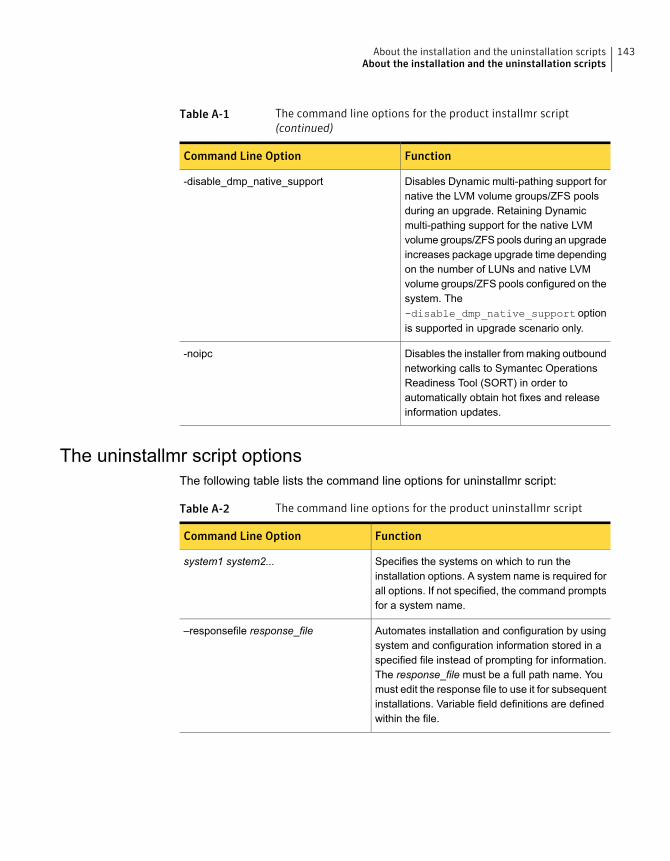
Table A-1 The command line options for the product installmr script(continued)
FunctionCommand Line Option
Disables Dynamic multi-pathing support fornative the LVM volume groups/ZFS poolsduring an upgrade. Retaining Dynamicmulti-pathing support for the native LVMvolume groups/ZFS pools during an upgradeincreases package upgrade time dependingon the number of LUNs and native LVMvolume groups/ZFS pools configured on thesystem. The-disable_dmp_native_support optionis supported in upgrade scenario only.
-disable_dmp_native_support
Disables the installer frommaking outboundnetworking calls to Symantec OperationsReadiness Tool (SORT) in order toautomatically obtain hot fixes and releaseinformation updates.
-noipc
The uninstallmr script optionsThe following table lists the command line options for uninstallmr script:
Table A-2 The command line options for the product uninstallmr script
FunctionCommand Line Option
Specifies the systems on which to run theinstallation options. A system name is required forall options. If not specified, the command promptsfor a system name.
system1 system2...
Automates installation and configuration by usingsystem and configuration information stored in aspecified file instead of prompting for information.The response_file must be a full path name. Youmust edit the response file to use it for subsequentinstallations. Variable field definitions are definedwithin the file.
–responsefile response_file
143About the installation and the uninstallation scriptsAbout the installation and the uninstallation scripts
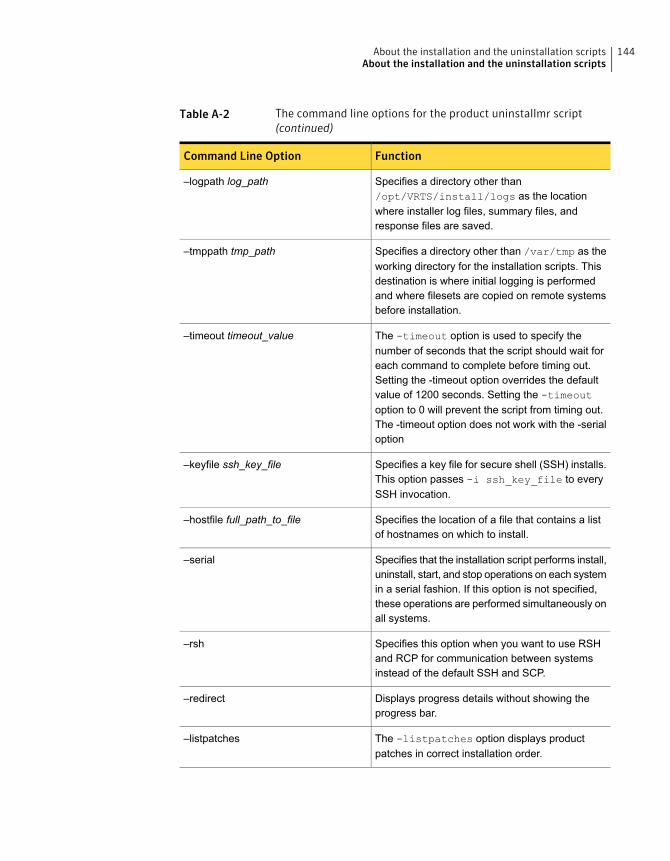
Table A-2 The command line options for the product uninstallmr script(continued)
FunctionCommand Line Option
Specifies a directory other than/opt/VRTS/install/logs as the locationwhere installer log files, summary files, andresponse files are saved.
–logpath log_path
Specifies a directory other than /var/tmp as theworking directory for the installation scripts. Thisdestination is where initial logging is performedand where filesets are copied on remote systemsbefore installation.
–tmppath tmp_path
The -timeout option is used to specify thenumber of seconds that the script should wait foreach command to complete before timing out.Setting the -timeout option overrides the defaultvalue of 1200 seconds. Setting the -timeoutoption to 0 will prevent the script from timing out.The -timeout option does not work with the -serialoption
–timeout timeout_value
Specifies a key file for secure shell (SSH) installs.This option passes -i ssh_key_file to everySSH invocation.
–keyfile ssh_key_file
Specifies the location of a file that contains a listof hostnames on which to install.
–hostfile full_path_to_file
Specifies that the installation script performs install,uninstall, start, and stop operations on each systemin a serial fashion. If this option is not specified,these operations are performed simultaneously onall systems.
–serial
Specifies this option when you want to use RSHand RCP for communication between systemsinstead of the default SSH and SCP.
–rsh
Displays progress details without showing theprogress bar.
–redirect
The -listpatches option displays productpatches in correct installation order.
–listpatches
144About the installation and the uninstallation scriptsAbout the installation and the uninstallation scripts

Table A-2 The command line options for the product uninstallmr script(continued)
FunctionCommand Line Option
Use the -makeresponsefile option only togenerate response files. No actual softwareuninstallation occurs when you use this option.
–makeresponsefile
The -comcleanup option removes the secureshell or remote shell configuration added byinstaller on the systems. The option is only requiredwhen installation routines that performedauto-configuration of the shell are abruptlyterminated.
–comcleanup
Checks and reports the installed products and theirversions. Identifies the installed andmissed filesetsand patches where applicable for the product.Provides a summary that includes the count of theinstalled and any missed filesets and patcheswhere applicable. Lists the installed patches,hotfixes, and available updates for the installedproduct if an Internet connection is available.
–version
The -require option is used to specify a installerhot fix file.
-require
Disables the installer from making outboundnetworking calls to Symantec OperationsReadiness Tool (SORT) in order to automaticallyobtain hot fixes and release information updates.
-noipc
Sets up the ssh or rsh communication betweensystems without requests for passwords orpassphrases.
-comsetup
145About the installation and the uninstallation scriptsAbout the installation and the uninstallation scripts