switchblade x3106 at-sbx31cfc - allied telesis · vcci class a, as/nzs class a immunity: en55024...
TRANSCRIPT

SwitchBlade x3106Access Edge Chassis Switch
AT-SBx31CFCController Fabric Card (R17.2.1)
AT-SBx3106 Chassis
AT-SBx31GT24 Line Card
AT-SBx31GT40 Line Card
AT-SBx31GP24 PoE Line Card
AT-SBx31GS24 SFP Line Card
AT-SBx31GC40 SFP CSFP BiDi Line Card
AT-SBx31XZ4 XFP Line Card
AT-SBx31XS6 SFP+ Line Card
AT-SBxPWRSYS1 and AT-SBxPWRSYS2 System Power Supplies
AT-SBxPWRPOE1 PoE Power Supply
Installation Guide
613-002215 Rev. A

Copyright © 2015 Allied Telesis, Inc.
All rights reserved. No part of this publication may be reproduced without prior written permission from Allied Telesis, Inc.
Allied Telesis and the Allied Telesis logo are trademarks of Allied Telesis, Incorporated. All other product names, company names, logos or other designations mentioned herein are trademarks or registered trademarks of their respective owners.
Allied Telesis, Inc. reserves the right to make changes in specifications and other information contained in this document without prior written notice. The information provided herein is subject to change without notice. In no event shall Allied Telesis, Inc. be liable for any incidental, special, indirect, or consequential damages whatsoever, including but not limited to lost profits, arising out of or related to this manual or the information contained herein, even if Allied Telesis, Inc. has been advised of, known, or should have known, the possibility of such damages.

Electrical Safety and Emissions Standards
This product meets the following standards.
EMI/RFI Emissions: FCC Class A, EN55022 Class A, EN61000-3-2, EN61000-3-3, CISPR Class A, VCCI Class A, AS/NZS Class A
Immunity: EN55024
Electrical Safety: EN60950-1 (TUV), UL 60950-1 (CULUS), EN60825
Safety Agency Approvals: CULUS, TUV, C-TICK, CE
U.S. Federal Communications Commission
Radiated Energy
Note: This equipment has been tested and found to comply with the limits for a Class A digital device pursuant to Part 15 of FCC Rules. These limits are designed to provide reasonable protection against harmful interference when the equipment is operated in a commercial environment. This equipment generates, uses, and can radiate radio frequency energy and, if not installed and used in accordance with this instruction manual, may cause harmful interference to radio communications. Operation of this equipment in a residential area is likely to cause harmful interference in which case the user will be required to correct the interference at his own expense.
Note: Modifications or changes not expressly approved of by the manufacturer or the FCC, can void your right to operate this equipment.
Industry Canada
This Class A digital apparatus complies with Canadian ICES-003.
Cet appareil numérique de la classe A est conforme à la norme NMB-003 du Canada.
European Union Restriction of the Use of Certain Hazardous Substances(RoHS) in Electrical and Electronic Equipment
This Allied Telesis RoHS-compliant product conforms to the European Union Restriction of the Use of Certain Hazardous Substances (RoHS) in Electrical and Electronic Equipment. Allied Telesis ensures RoHS conformance by requiring supplier Declarations of Conformity, monitoring incoming materials, and maintaining manufacturing process controls.
Warning: In a domestic environment this product may cause radio interference in which case the user may be required to take adequate measures.
Laser Safety EN60825
3

Translated Safety Statements
Important: The indicates that a translation of the safety statement is available in a PDF document titled “Translated Safety Statements” on our web site at http://www.alliedtelesis.com/support.
4

Contents
Preface ............................................................................................................................................................15Safety Symbols Used in this Document ...........................................................................................................16Contacting Allied Telesis ..................................................................................................................................17
Chapter 1: Overview of the Chassis and Power Supplies .........................................................................19SBx3106 Chassis .............................................................................................................................................20Slots for the Ethernet Line and Controller Cards..............................................................................................23Power Supplies and Power Supply Slots .........................................................................................................24
LEDs ..........................................................................................................................................................26AT-SBxFAN06 Module .....................................................................................................................................29
LED ............................................................................................................................................................29Power Supply Interfaces (Opto-couplers).........................................................................................................30
LED ............................................................................................................................................................30
Chapter 2: Overview of the Ethernet Line Cards ........................................................................................31Ethernet Line Cards..........................................................................................................................................32AT-SBx31GT24 Line Card................................................................................................................................33
LEDs ..........................................................................................................................................................33AT-SBx31GT40 Line Card................................................................................................................................35
LEDs ..........................................................................................................................................................36AT-SBx31GP24 PoE Line Card........................................................................................................................38
LEDs ..........................................................................................................................................................39AT-SBx31GS24 SFP Line Card .......................................................................................................................41
LEDs ..........................................................................................................................................................41AT-SBx31GC40 Line Card ...............................................................................................................................43
Port Numbers .............................................................................................................................................44LEDs ..........................................................................................................................................................46
AT-SBx31XZ4 XFP Line Card ..........................................................................................................................49LEDs ..........................................................................................................................................................49
AT-SBx31XS6 SFP+ Line Card........................................................................................................................51LEDs ..........................................................................................................................................................51
10/100/1000Base-T Twisted Pair Ports............................................................................................................53Connector Type..........................................................................................................................................53Speed.........................................................................................................................................................53Duplex Mode..............................................................................................................................................53Maximum Distance.....................................................................................................................................54Cable Requirements ..................................................................................................................................54Automatic MDIX Detection .........................................................................................................................55Straight-through or Crossover Cabling.......................................................................................................55Port Pinouts................................................................................................................................................56
Power over Ethernet on the AT-SBx31GP24 Line Card...................................................................................57Powered Device Classes ...........................................................................................................................57Power Budgeting........................................................................................................................................58PoE Wiring .................................................................................................................................................58
5

Contents
Chapter 3: Overview of the AT-SBx31CFC Controller Fabric Card .......................................................... 61Controller Fabric Cards for the AT-SBx3106 Chassis...................................................................................... 62Hardware Components on the AT-SBx31CFC Card........................................................................................ 64Guidelines ........................................................................................................................................................ 66Dual Controller Cards ...................................................................................................................................... 68SYS Status LEDs............................................................................................................................................. 69eco-friendly Button ........................................................................................................................................... 70SBx Linecard Status LEDs............................................................................................................................... 71Console (RS-232) Port..................................................................................................................................... 72NET MGMT Port .............................................................................................................................................. 73
NET MGMT Port LED................................................................................................................................ 75SD Card Slot .................................................................................................................................................... 76
SD Status LED .......................................................................................................................................... 76Reset Button .................................................................................................................................................... 78
Chapter 4: Safety Precautions and Site Preparation ................................................................................. 81Reviewing Safety Precautions ......................................................................................................................... 82Selecting a Site for the SwitchBlade x3106 ..................................................................................................... 86Installation Tools and Material ......................................................................................................................... 88
Chapter 5: Installing the Chassis on a Table or in an Equipment Rack .................................................. 89Unpacking the AT-SBx3106 Chassis ............................................................................................................... 90Installing the Chassis on a Table ..................................................................................................................... 92Installing the Chassis in an Equipment Rack................................................................................................... 93
Required Tools and Material ..................................................................................................................... 93Preparing the Equipment Rack.................................................................................................................. 93Removing the Rubber Feet ....................................................................................................................... 95Adjusting the Equipment Rack Brackets ................................................................................................... 96Installing the Chassis in the Equipment Rack ........................................................................................... 99
Removing the Shipping Brace ....................................................................................................................... 102Installing the Chassis Grounding Lug ............................................................................................................ 103
Chapter 6: Installing the Power Supplies ................................................................................................. 105Protecting Against Electrostatic Discharge (ESD) ......................................................................................... 106Installing the AT-SBxPWRSYS1 or AT-SBxPWRSYS2 AC System Power Supply....................................... 107Installing the AT-SBxPWRPOE1 AC Power Supply ...................................................................................... 113Installing the AT-SBxPWRSYS1 DC System Power Supply.......................................................................... 118
Chapter 7: Installing the AT-SBx31CFC Card and Ethernet Line Cards ................................................ 125Guidelines to Handling the Controller and Line Cards................................................................................... 126Installing the AT-SBx31CFC Controller Fabric Card...................................................................................... 128Installing the Ethernet Line Cards.................................................................................................................. 134Installing the Blank Slot Covers ..................................................................................................................... 138
Chapter 8: Installing the Transceivers and Cabling the Ports ................................................................ 141Guidelines to Cabling the Twisted Pair Ports on AT-SBx31GP24, AT-SBx31GT24, and AT-SBx31GT40 Line Cards...................................................................................................................................................... 142
Connecting Cables to the AT-SBx31GT40 Line Card ............................................................................. 143Guidelines to Installing SFP, SFP+, CSFP, and XFP Transceivers............................................................... 145Installing SFP Transceivers in the AT-SBx31GS24 Line Card ...................................................................... 146Installing SFP and CSFP Transceivers in the AT-SBx31GC40 Line Card..................................................... 149Installing SFP+ Transceivers in the AT-SBx31XS6 Line Card....................................................................... 154Installing AT-SP10TW Cables in the AT-SBx31XS6 Line Card..................................................................... 158Installing XFP Transceivers in the AT-SBx31XZ4 Line Card......................................................................... 160Cabling the NET MGMT Port on the AT-SBx31CFC Card............................................................................. 164
Chapter 9: Powering On the Chassis ........................................................................................................ 167Verifying the Installation................................................................................................................................. 168
6

SwitchBlade x3106 Chassis Switch and AT-SBx31CFC Card Installation Guide
Powering On the AT-SBxPWRSYS1 or AT-SBxPWRSYS2 AC System Power Supply ................................169Powering on the AT-SBxPWRPOE1 AC PoE Power Supply .........................................................................172Powering On the AT-SBxPWRSYS1 DC System Power Supply ...................................................................175
Choosing a Method for Attaching the Grounding Wire.............................................................................177Connecting the Grounding Wire with the Grounding Terminal.................................................................177Connecting the Grounding Wire with Bare Wire ......................................................................................180Choosing a Method for Attaching the Power Wires .................................................................................181Connecting the DC Power Wires with the Straight Terminals..................................................................182Connecting the DC Power Wires with the Right Angle Terminals............................................................189Connecting Bare DC Power Wires...........................................................................................................195
Monitoring the Initialization Process ...............................................................................................................199Using the LEDs to Monitor the Initialization Process ...............................................................................200Using the Console Port to Monitor the Initialization Process ...................................................................201
Chapter 10: Verifying the Hardware Operations of the Chassis .............................................................203Using the LEDs to Verify the Chassis.............................................................................................................204Using Local Management to Verify the Chassis.............................................................................................206
Starting a Local Management Session ....................................................................................................206Entering the Management Software Commands .....................................................................................207
Chapter 11: Troubleshooting .....................................................................................................................211AT-SBxPWRSYS1, AT-SBxPWRSYS2, or AT-SBxPWRPOE1 AC Power Supply........................................212AT-SBxPWRSYS1 DC System Power Supply ...............................................................................................214Ethernet Line Cards........................................................................................................................................216Twisted Pair Ports ..........................................................................................................................................218Power Over Ethernet ......................................................................................................................................220Fiber Optic Transceivers ................................................................................................................................222AT-SBx31CFC Controller Fabric Card ...........................................................................................................224AT-SBxFAN06 Fan Module ............................................................................................................................226Local (Out-of-Band) Management Session ....................................................................................................227Power Supply Interfaces (Opto-couplers).......................................................................................................228
Chapter 12: Replacing Modules .................................................................................................................229Replacing the AT-SBxPWRSYS1, AT-SBxPWRSYS2, or AT-SBxPWRPOE1 AC Power Supply .................230Replacing the AT-SBxPWRSYS1 DC Power Supply .....................................................................................236Replacing Ethernet Line Cards.......................................................................................................................248Replacing the AT-SBx31CFC Controller Fabric Card ....................................................................................251Replacing the AT-SBxFAN06 Fan Module .....................................................................................................254
Removing the AT-SBxFAN06 Fan Module ..............................................................................................254Installing a New AT-SBxFAN06 Fan Module ...........................................................................................257
Appendix A: Technical Specifications ......................................................................................................261Physical Specifications ...................................................................................................................................261Environmental Specifications .........................................................................................................................263Power Specifications ......................................................................................................................................264Safety and Electromagnetic Emissions Certifications ....................................................................................267Port Pinouts ....................................................................................................................................................268
7

Contents
8
Figures
Figure 1: AT-SBx3106 Chassis ....................................................................................................................... 20Figure 2: Front View of the AT-SBx3106 Chassis ........................................................................................... 21Figure 3: Rear View of the AT-SBx3106 Chassis............................................................................................ 21Figure 4: AT-SBx3106 Chassis with Line Cards, Controller Cards, and Power Supplies ............................... 22Figure 5: Slots for the Ethernet Line and Controller Cards.............................................................................. 23Figure 6: Power Supply Units .......................................................................................................................... 24Figure 7: Power Supply Slots .......................................................................................................................... 25Figure 8: AT-SBxFAN06 Module ..................................................................................................................... 29Figure 9: Power Supply Interfaces (Opto-couplers) ........................................................................................ 30Figure 10: Ethernet Line Cards ....................................................................................................................... 32Figure 11: AT-SBx31GT24 Line Card ............................................................................................................. 33Figure 12: Port LEDs on the AT-SBx31GT24 Line Card ................................................................................. 34Figure 13: AT-SBx31GT40 Line Card ............................................................................................................. 35Figure 14: Port LEDs on an RJ Point 5 Cable Connector for the AT-SBx31GT40 Line Card ......................... 36Figure 15: Link/Activity LED on an RJ Point 5 Cable Connector for the AT-SBx31GT40 Line Card............... 36Figure 16: AT-SBx31GP24 PoE Line Card ..................................................................................................... 38Figure 17: Port LEDs on the AT-SBx31GP24 PoE Line Card ......................................................................... 39Figure 18: AT-SBx31GS24 SFP Line Card ..................................................................................................... 41Figure 19: Port LEDs on the AT-SBx31GS24 SFP Line Card......................................................................... 42Figure 20: AT-SBx31GC40 Line Card ............................................................................................................. 43Figure 21: Port Numbers for Slots with CSFP Transceivers ........................................................................... 45Figure 22: Port Numbers for Slots with Standard SFP Transceivers .............................................................. 46Figure 23: LEDs for the AT-SBx31GC40 Line Card ........................................................................................ 46Figure 24: LEDs for the AT-SBx31GC40 Line Card, with CSFP Transceivers ............................................... 47Figure 25: LEDs for the AT-SBx31GC40 Line Card, with SFP Transceivers .................................................. 47Figure 26: AT-SBx31XZ4 XFP Line Card........................................................................................................ 49Figure 27: Transceiver Slot LEDs on the AT-SBx31XZ4 XFP Line Card ........................................................ 50Figure 28: AT-SBx31XS6 Line Card................................................................................................................ 51Figure 29: SFP+ Slot LEDs on the AT-SBx31XS6 Line Card.......................................................................... 52Figure 30: Controller Fabric Cards for the AT-SBx3106 Chassis.................................................................... 62Figure 31: AT-SBx31CFC Controller Fabric Card ........................................................................................... 64Figure 32: 100 - 125 VAC 125 V NEMA 5-20 Plug and Receptacle................................................................ 87Figure 33: AT-SBx3106 Chassis Items ........................................................................................................... 90Figure 34: AT-SBx3106 Chassis Items (Continued)........................................................................................ 91Figure 35: Reserving Vertical Rack Space...................................................................................................... 94Figure 36: Rack Mounting Hole Locations....................................................................................................... 95Figure 37: Turning the Chassis Upside Down ................................................................................................. 96Figure 38: Removing the Rubber Feet ............................................................................................................ 96Figure 39: Rack Mounting Bracket Locations.................................................................................................. 98Figure 40: Rack Bracket Locations for Reverse Position of Chassis .............................................................. 98Figure 41: Lifting the AT-SBx3106 Chassis into the Equipment Rack .......................................................... 100Figure 42: Installing the Rack Mount Screws ................................................................................................ 100Figure 43: Tightening the Rack Mount Screws.............................................................................................. 101Figure 44: Removing the Shipping Brace...................................................................................................... 102Figure 45: Stripping the Grounding Wire ....................................................................................................... 103
9

List of Figures
Figure 46: Removing the Grounding Lug....................................................................................................... 103Figure 47: Attaching the Grounding Wire to the Grounding Lug.................................................................... 104Figure 48: Installing the Grounding Lug and Wire ......................................................................................... 104Figure 49: ESD Socket and Wrist Strap......................................................................................................... 106Figure 50: Power Supply Slots....................................................................................................................... 107Figure 51: Removing the Blank Slot Cover from Power Supply Slot C.......................................................... 108Figure 52: Items Included with the AT-SBxPWRSYS1 or AT-SBxPWRSYS2 AC System Power Supply..... 109Figure 53: Raising the Handle on the Power Supply ..................................................................................... 110Figure 54: Inserting the AT-SBxPWRSYS1 AC or AT-SBxPWRSYS2 Power Supply................................... 110Figure 55: Lowering the Handle on the AT-SBxPWRSYS1 or AT-SBxPWRSYS2 AC Power Supply........... 111Figure 56: Removing the Blank Slot Cover from Power Supply Slot A .......................................................... 113Figure 57: Items Included with the AT-SBxPWRPOE1 Power Supply Module.............................................. 114Figure 58: Raising the Handle on the AT-SBxPWRPOE1 AC Power Supply ................................................ 115Figure 59: Inserting the AT-SBxPWRPOE1 AC Power Supply...................................................................... 115Figure 60: Locking the Handle on the AT-SBxPWRPOE1 AC Power Supply................................................ 116Figure 61: Removing the Blank Slot Cover from Power Supply Slot C.......................................................... 119Figure 62: Items Included with the AT-SBxPWRSYS1 DC System Power Supply Module ........................... 120Figure 63: Loosening the Handle locking Screw on the AT-SBxPWRPOE1 DC System Power Supply ....... 121Figure 64: Raising the Handle on the AT-SBxPWRPOE1 DC System Power Supply................................... 121Figure 65: Inserting the AT-SBxPWRSYS1 DC System Power Supply......................................................... 122Figure 66: Locking the Handle on the AT-SBxPWRSYS1 DC System Power Supply................................... 123Figure 67: Aligning a Card in a Slot ............................................................................................................... 127Figure 68: Slots 4 and 5 for the AT-SBx31CFC Card .................................................................................... 128Figure 69: Items Included with the AT-SBx31CFC Controller Fabric Card .................................................... 129Figure 70: Removing the AT-SBx31CFC Controller Fabric Card from the Anti-static Bag ............................ 129Figure 71: Opening the Locking Handles on the AT-SBx31CFC Controller Fabric Card............................... 130Figure 72: Removing the Battery Insulator .................................................................................................... 130Figure 73: Aligning the AT-SBx31CFC Card in the Chassis Slot................................................................... 131Figure 74: Closing the Locking Levers on the AT-SBx31CFC Controller Fabric Card................................... 132Figure 75: Tightening the Thumb Screws on the AT-SBx31CFC Card.......................................................... 133Figure 76: Removing an Ethernet Line Card from an Anti-static Bag ............................................................ 135Figure 77: Aligning an Ethernet Line Card in a Chassis Slot ......................................................................... 135Figure 78: Seating an Ethernet Line Card on the Backplane Connector ....................................................... 136Figure 79: Tightening the Thumb Screws on an Ethernet Line Card............................................................. 137Figure 80: Installing a Blank Slot Cover......................................................................................................... 138Figure 81: Tightening the Thumbscrews on a Blank Slot Cover .................................................................... 139Figure 82: RJ Point 5 Cable Connector for AT-SBx31GT40 Line Card ......................................................... 143Figure 83: Connecting Cables to Ports on the AT-SBx31GT40 Line Card .................................................... 144Figure 84: Removing the Dust Cover from an SFP Slot in the AT-SBx31GS24 Line Card ........................... 146Figure 85: Handle on SFP Transceiver.......................................................................................................... 146Figure 86: Inserting an SFP Transceiver in the AT-SBx31GS24 Line Card .................................................. 147Figure 87: Removing the Dust Cover from the SFP Transceiver in the AT-SBx31GS24 Line Card.............. 147Figure 88: Attaching a Fiber Optic Cable to an SFP Transceiver in the AT-SBx31GS24 Line Card ............. 148Figure 89: Removing the Dust Cover from a Transceiver Slot on the AT-SBx31GC40 Line Card ................ 149Figure 90: Labels on SFP and CSFP Transceivers ....................................................................................... 150Figure 91: Inserting an SFP or a CSFP Transceiver...................................................................................... 150Figure 92: Removing the Dust Cover from an SFP or a CSFP Transceiver .................................................. 151Figure 93: Attaching a Fiber Optic Cable ....................................................................................................... 152Figure 94: Removing a Dust Cover From an SFP+ Slot in the AT-SBx31XS6 Line Card ............................. 154Figure 95: Handle on SFP+ Transceiver........................................................................................................ 155Figure 96: Installing an SFP+ Transceiver in the AT-SBx31XS6 Line Card .................................................. 155Figure 97: Removing the Dust Cover from an SFP+ Transceiver in the AT-SBx31XS6 Line Card ............... 156Figure 98: Attaching a Fiber Optic Cable to an SFP+ Transceiver in the AT-SBx31XS6 Line Card ............. 157Figure 99: Release Tab on the AT-SBx31XS6 Line Card.............................................................................. 158Figure 100: Installing the AT-SP10TW Cable in the AT-SBx31XS6 Line Card.............................................. 159
10
SwitchBlade x3106 Chassis Switch and AT-SBx31CFC Card Installation Guide
Figure 101: Removing the Dust Cover From an XFP Slot on the AT-SBx31XZ4 Line Card ......................... 160Figure 102: Handle on the XFP Transceiver ................................................................................................. 161Figure 103: Installing an XFP Transceiver in the AT-SBx31XZ4 Line Card .................................................. 161Figure 104: Removing the Protective Cover from an XFP Transceiver in the AT-SBx31XZ4 Line Card ...... 162Figure 105: Attaching a Fiber Optic Cable to an XFP Transceiver in the AT-SBx31XZ4 Line Card ............. 163Figure 106: AC Sockets on the AT-SBx3106 Chassis Rear Panel ............................................................... 169Figure 107: Connecting the AC Power Cord for the AT-SBxPWRSYS1 or AT-SBxPWRSYS2 AC System Power Supply ................................................................................................................................................ 170Figure 108: Securing the Power Cord for the AT-SBxPWRSYS1 or AT-SBxPWRSYS2 AC System Power Supply to an Anchor ...................................................................................................................................... 171Figure 109: Connecting the AC Power Cord for the AT-SBxPWRPOE1 Power Supply ............................... 172Figure 110: Securing the Power Cord for the AT-SBxPWRPOE1 Power Supply to an Anchor .................... 173Figure 111: Dress and Secure AC Power Cords........................................................................................... 174Figure 112: Components of the AT-SBxPWRSYS1 DC Power Supply......................................................... 176Figure 113: Grounding Wire Terminal ........................................................................................................... 177Figure 114: Stripping the Stranded Grounding Wire ..................................................................................... 177Figure 115: Attaching the Stranded Grounding Wire to the Grounding Terminal.......................................... 177Figure 116: Removing the Nut and Washer from the Grounding Post .......................................................... 178Figure 117: Installing the Grounding Wire ..................................................................................................... 179Figure 118: Stripping the solid or Stranded Grounding Wire......................................................................... 180Figure 119: Attaching the Bare Grounding Wire to the Grounding Post........................................................ 180Figure 120: Securing the Bare Grounding Wire to the Grounding Post ........................................................ 181Figure 121: Power Wire Terminals ................................................................................................................ 181Figure 122: Stripping the Power Wires.......................................................................................................... 182Figure 123: Attaching the Power Wires to the Power Terminal Lugs ............................................................ 183Figure 124: On/Off Switch On the AT-SBxPWRSYS1 DC Power Supply ..................................................... 183Figure 125: Opening the Plastic Cover.......................................................................................................... 184Figure 126: Removing the Terminal Screws ................................................................................................. 184Figure 127: Connecting the Positive (+) Power Wire with a Straight Terminal.............................................. 185Figure 128: Connecting the Negative (-) Power Wire with a Straight Terminal ............................................. 186Figure 129: Closing the Plastic Cover over the Terminal Connectors........................................................... 187Figure 130: Tightening the Handle Locking Screw........................................................................................ 188Figure 131: Stripping the Power Wires.......................................................................................................... 189Figure 132: Attaching the Power Wires to the Right Angle Terminals........................................................... 189Figure 133: Removing the Plastic Cover ....................................................................................................... 190Figure 134: Removing the Terminal Screws ................................................................................................. 191Figure 135: Connecting the Positive (+) Power Wire with a Right Angle Terminal........................................ 192Figure 136: Connecting the Negative (-) Power Wire with a Right Angle Terminal....................................... 193Figure 137: Tightening the Handle Locking Screw........................................................................................ 194Figure 138: Stripping Solid or Stranded DC Power Wires............................................................................. 195Figure 139: Connecting the Positive Wire ..................................................................................................... 196Figure 140: Connecting the Negative Lead Wire........................................................................................... 197Figure 141: Switch Initialization Messages.................................................................................................... 201Figure 142: Switch Initialization Messages (Continued)................................................................................ 202Figure 143: Connecting the Management Cable to the Console RS-232 Port.............................................. 206Figure 144: SHOW PSU Command .............................................................................................................. 207Figure 145: SHOW FANMODULE Command ............................................................................................... 208Figure 146: SHOW CARD Command ........................................................................................................... 208Figure 147: Disconnecting the AC Power Cord from the AC Socket on the Back Panel .............................. 231Figure 148: Lifting the Locking Handle on the Power Supply........................................................................ 232Figure 149: Removing the Power Supply from the Chassis .......................................................................... 233Figure 150: Installing a Blank Power Supply Slot Cover ............................................................................... 234Figure 151: Lowering the Locking Handle on the Power Supply Slot Cover ................................................. 235Figure 152: Loosening the Screw on the Locking Handle ............................................................................. 237Figure 153: Opening the Plastic Window on the Terminal Block................................................................... 238
11

List of Figures
Figure 154: Removing the Negative Lead Wire ............................................................................................. 239Figure 155: Removing the Positive Lead Wire from the Terminal Block........................................................ 240Figure 156: Reinstalling the Screws on the Positive and Negative Terminals ............................................... 241Figure 157: Closing the Plastic Cover............................................................................................................ 242Figure 158: Removing the Grounding Wire ................................................................................................... 243Figure 159: Reinstalling the Nut and Washer on the Grounding Post ........................................................... 244Figure 160: Lifting the Locking Handle and Removing the Power Supply ..................................................... 245Figure 161: Installing a Blank Power Supply Slot Cover................................................................................ 246Figure 162: Lowering the Locking Handle on the Power Supply Slot Cover.................................................. 247Figure 163: Loosening the Screw on the AT-SBxFAN06 Fan Module........................................................... 255Figure 164: Loosening the AT-SBxFAN06 Fan Module from the Backplane Connector ............................... 255Figure 165: Withdrawing the AT-SBxFAN06 Fan Module 25 mm (1 in.) from the Chassis ........................... 256Figure 166: Removing the AT-SBxFAN06 Fan Module from the Chassis ..................................................... 257Figure 167: Installing a New AT-SBxFAN06 Fan Module .............................................................................. 258Figure 168: Securing the AT-SBxFAN06 Fan Module on the Backplane Connector..................................... 259Figure 169: Tightening the Screw on the AT-SBxFAN06 Fan Module........................................................... 259Figure 170: Pin Numbers for RJ-45 and RJ Point 5 Ports ............................................................................. 268
12

Tables
Table 1. LEDs on the AT-SBxPWRSYS1 and AT-SBxPWRSYS2 AC System Power Supplies .................... 27Table 2. LEDs on the AT-SBxPWRSYS1 DC System Power Supply ............................................................ 27Table 3. LEDs on the AT-SBxPWRPOE1 AC PoE Power Supply ................................................................. 28Table 4. AT-SBxFAN06 Module LED ............................................................................................................. 29Table 5. Power Supply Interface LED ............................................................................................................ 30Table 6. Port LEDs on the AT-SBx31GT24 Line Card ................................................................................... 34Table 7. Port LEDs for the AT-SBx31GT40 Line Card ................................................................................... 37Table 8. Port LEDs on the AT-SBx31GP24 PoE Line Card ........................................................................... 39Table 9. Port LEDs on the AT-SBx31GS24 SFP Line Card ........................................................................... 42Table 10. Transceiver Slot LEDs on the AT-SBx31GC40 Line Card ............................................................. 48Table 11. Transceiver Slot LEDs on the AT-SBx31XZ4 XFP Line Card ........................................................ 50Table 12. SFP+ Slot LEDs on the AT-SBx31XS6 Line Card .......................................................................... 52Table 13. Twisted Pair Cable for the AT-SBx31GT24 and AT-SBx31GT40 Line Cards ................................ 54Table 14. Twisted Pair Cable for the AT-SBx31GP24 Line Card ................................................................... 55Table 15. IEEE802.3af and IEEE802.3at Powered Device Classes .............................................................. 57Table 16. Maximum Number of Powered Devices ......................................................................................... 58Table 17. Differences Between the AT-SBx31CFC and AT-SBx31CFC960 Controller Fabric Cards ............ 62Table 18. Components on the AT-SBx31CFC Controller Fabric Card ........................................................... 64Table 19. SYS (System) Status LEDs ............................................................................................................ 69Table 20. SBx Linecard Status LEDs ............................................................................................................. 71Table 21. Management Features Requiring Network Access ........................................................................ 73Table 22. NET MGMT Port LED ..................................................................................................................... 75Table 23. SD Status LED ............................................................................................................................... 77Table 24. Front Panel to Rack Rail Dimensions ............................................................................................. 97Table 25. Switch Initialization Phases .......................................................................................................... 200Table 26. Product Dimensions ..................................................................................................................... 261Table 27. Product Weights ........................................................................................................................... 261Table 28. Environmental Specifications ....................................................................................................... 263Table 29. Acoustic Noise Test Components ................................................................................................ 263Table 30. AC Voltage and Frequency Requirements ................................................................................... 264Table 31. DC Voltage Requirement .............................................................................................................. 264Table 32. Typical Power Savings in eco-friendly Mode ................................................................................ 264Table 33. Maximum Power Consumption ..................................................................................................... 264Table 34. Maximum Power Efficiency .......................................................................................................... 265Table 35. Heat Dissipation ........................................................................................................................... 265Table 36. Available Power Over Ethernet with One PoE Power Supply ...................................................... 266Table 37. Available Power Over Ethernet with Two PoE Power Supplies ................................................... 266Table 38. PoE Mode ..................................................................................................................................... 266Table 39. Safety and Electromagnetic Emissions ........................................................................................ 267Table 40. MDI Pin Signals (10Base-T or 100Base-TX) ................................................................................ 268Table 41. MDI-X Pin Signals (10Base-T or 100Base-TX) ............................................................................ 268Table 42. 1000Base-T Connector Pinouts ................................................................................................... 269
13

List of Tables
14

Preface
This guide contains the hardware installation instructions for the SwitchBlade x3106 Chassis Switch. This preface contains the following sections:
“Safety Symbols Used in this Document” on page 16
“Contacting Allied Telesis” on page 17
NoteThis version of the installation guide applies to release 17.2.1 or later of the management software for the AT-SBx31CFC Controller Fabric Card. The latest release of the management software is available from the Restricted Software Downloads web page on the Allied Telesis web site, at www.alliedtelesis.com/support/software/restricted.
15

Preface
Safety Symbols Used in this Document
This document uses the following conventions.
NoteNotes provide additional information.
CautionCautions inform you that performing or omitting a specific action may result in equipment damage or loss of data.
WarningWarnings inform you that performing or omitting a specific action may result in bodily injury.
WarningLaser warnings inform you that an eye or skin hazard exists due to the presence of a Class 1 laser device.
WarningFan warnings inform you of danger from hazardous moving fan blades.
16

SwitchBlade x3106 Chassis Switch and AT-SBx31CFC Card Installation Guide
Contacting Allied Telesis
If you need assistance with this product, you may contact Allied Telesis technical support by going to the Support & Services section of the Allied Telesis web site at www.alliedtelesis.com/support. You can find links for the following services on this page:
24/7 Online Support — Enter our interactive support center to search for answers to your product questions in our knowledge database, to check support tickets, to learn about RMAs, and to contact Allied Telesis technical experts.
USA and EMEA phone support — Select the phone number that best fits your location and customer type.
Hardware warranty information — Learn about Allied Telesis warranties and register your product online.
Replacement Services — Submit a Return Merchandise Authorization (RMA) request via our interactive support center.
Documentation — View the most recent installation and user guides, software release notes, white papers, and data sheets for your products.
Software Downloads — Download the latest software releases for your managed products.
For sales or corporate information, go to www.alliedtelesis.com/purchase.
17

Preface
18

Chapter 1
Overview of the Chassis and Power Supplies
This chapter contains an overview of the hardware components of the AT-SBx3106 Chassis and power supplies. The sections in the chapter are listed here:
“SBx3106 Chassis” on page 20
“Slots for the Ethernet Line and Controller Cards” on page 23
“Power Supplies and Power Supply Slots” on page 24
“AT-SBxFAN06 Module” on page 29
“Power Supply Interfaces (Opto-couplers)” on page 30
NoteThis version of the installation guide applies to release 17.2.1 or later of the management software for the AT-SBx31CFC Controller Fabric Card. The latest release of the management software is available from the Restricted Software Downloads web page on the Allied Telesis web site, at www.alliedtelesis.com/support/software/restricted.
19

Chapter 1: Overview of the Chassis and Power Supplies
SBx3106 Chassis
The SBx3106 product is a modular Gigabit and 10 Gigabit Ethernet switch. The main components are the AT-SBx3106 Chassis, Ethernet cards, a controller card, a system power supply, a Power over Ethernet Plus (PoE+) power supply, and a fan module.
The chassis is shown in Figure 1.
Figure 1. AT-SBx3106 Chassis
The chassis has slots for the following components:
Four or five Ethernet line cards
Two AT-SBx31CFC Controller Fabric Cards
Two AC or DC system power supplies
Two Power over Ethernet Plus (PoE+) power supplies
One AT-SBxFAN06 Fan Module
NoteThe maximum number of Ethernet line cards depends on the number of controller cards. The chassis can accommodate four Ethernet line cards when there are two controller cards in the unit and five Ethernet line cards when there is one controller card.
The chassis components are identified in Figure 2 on page 21 and Figure 3 on page 21.
20

SwitchBlade x3106 Chassis Switch and AT-SBx31CFC Card Installation Guide
Figure 2. Front View of the AT-SBx3106 Chassis
NoteDo not remove the shipping brace from the front of the chassis until after the unit is installed in the equipment rack. You might bend the chassis and cause misalignment of the slots and card guides if you lift the chassis into the equipment rack without the shipping brace.
Figure 3. Rear View of the AT-SBx3106 Chassis
Slots for EthernetLine Cards andController Card
Slots for EthernetLine Cards andController Card
PoE PowerSupply Slots
System PowerSupply Slots
Shipping Brace AT-SBxFAN06Module
ESD Wrist StrapPlug
GroundingLug
AC PowerCord Sockets
Power SupplyInterfaces
(Opto-couplers)
21

Chapter 1: Overview of the Chassis and Power Supplies
Figure 4 is an example of a fully populated chassis.
Figure 4. AT-SBx3106 Chassis with Line Cards, Controller Cards, and Power Supplies
22

SwitchBlade x3106 Chassis Switch and AT-SBx31CFC Card Installation Guide
Slots for the Ethernet Line and Controller Cards
The chassis has slots for four Ethernet line cards and two controller cards or five Ethernet line cards and one controller card. The functions of the slots, which are numbered starting with 0, are predefined and may not be changed. Figure 5 identifies the slots.
Figure 5. Slots for the Ethernet Line and Controller Cards
Slots 0 to 3 are for the Ethernet line cards. Each slot can accommodate one card. You may install the cards in any order or variety in the slots. For more information on the cards, refer to Chapter 2, “Overview of the Ethernet Line Cards” on page 31.
Slots 4 is for the AT-SBx31CFC Controller Fabric Card. The chassis must have at least one controller card.
Slot 5 may be used with either an Ethernet line card or a second controller card. Installing a second controller card in the chassis provides these benefits:
Management redundancy.
Increased traffic bandwidth in the chassis.
For more information on the controller card, refer to Chapter 3, “Overview of the AT-SBx31CFC Controller Fabric Card” on page 61.
Slot 0 - Line Card
Slot 2 - Line Card
Slot 4 - Control Card
Slot 1 - Line Card
Slot 3 - Line Card
Slot 5 - Control orLine Card
23

Chapter 1: Overview of the Chassis and Power Supplies
Power Supplies and Power Supply Slots
There are four power supplies for the chassis. They are shown in Figure 6.
Figure 6. Power Supply Units
NoteAllied Telesis is discontinuing the AT-SBxPWRSYS1 AC Power Supply and replacing it with the AT-SBxPWRSYS2 AC Power Supply.
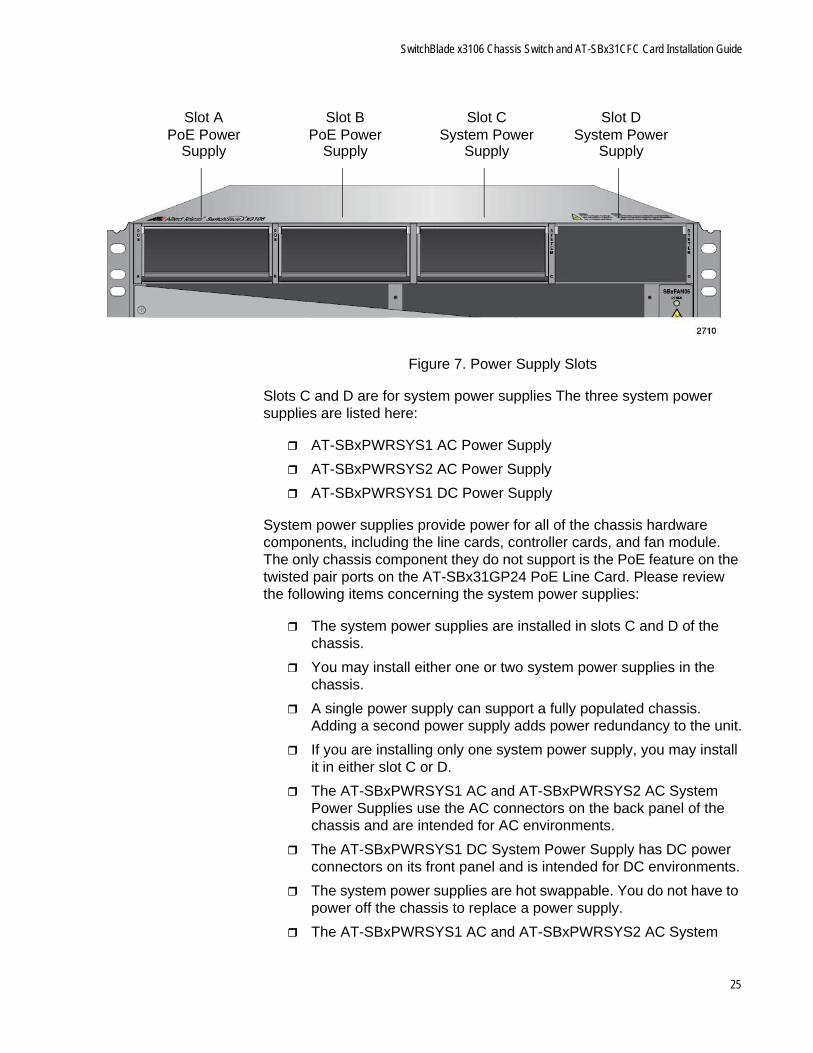
The power supplies are installed in the four slots across the top of the front of the chassis. The slots are labelled A to D. Refer to Figure 7 on page 25.
AT-SBxPWRSYS1 AC System Power Supply for the Ethernet line cards, controller cards, and fan module.
AT-SBxPWRPOE1 AC PoE Power Supply with 1200 W PoE budget for the ports on the AT-SBx31GP24 PoE Ethernet Line Card.
AT-SBxPWRSYS1 DC System Power Supply for the Ethernet line cards, controller cards, and fan module.
AT-SBxPWRSYS2 AC System Power Supply for the Ethernet line cards, controller cards, and fan module.
24
SwitchBlade x3106 Chassis Switch and AT-SBx31CFC Card Installation Guide
Figure 7. Power Supply Slots
Slots C and D are for system power supplies The three system power supplies are listed here:
AT-SBxPWRSYS1 AC Power Supply
AT-SBxPWRSYS2 AC Power Supply
AT-SBxPWRSYS1 DC Power Supply
System power supplies provide power for all of the chassis hardware components, including the line cards, controller cards, and fan module. The only chassis component they do not support is the PoE feature on the twisted pair ports on the AT-SBx31GP24 PoE Line Card. Please review the following items concerning the system power supplies:
The system power supplies are installed in slots C and D of the chassis.
You may install either one or two system power supplies in the chassis.
A single power supply can support a fully populated chassis. Adding a second power supply adds power redundancy to the unit.
If you are installing only one system power supply, you may install it in either slot C or D.
The AT-SBxPWRSYS1 AC and AT-SBxPWRSYS2 AC System Power Supplies use the AC connectors on the back panel of the chassis and are intended for AC environments.
The AT-SBxPWRSYS1 DC System Power Supply has DC power connectors on its front panel and is intended for DC environments.
The system power supplies are hot swappable. You do not have to power off the chassis to replace a power supply.
The AT-SBxPWRSYS1 AC and AT-SBxPWRSYS2 AC System
Slot A
SupplyPoE Power
Slot B
SupplyPoE Power
Slot C
SupplySystem Power
Slot D
SupplySystem Power
25

Chapter 1: Overview of the Chassis and Power Supplies
Power Supplies are compatible and can be used in the same chassis.
The AT-SBxPWRSYS2 AC System Power Supply was added to the management software in release 5.4.5-1. It will work with earlier releases, but Allied Telesis recommends updating the software on controller cards with previous versions to the latest release to ensure full compatibility.
NoteThe AT-SBxPWRSYS1 DC System Power Supply is not compatible with the other system and PoE power supplies and should not be operated in the same chassis with other power supplies. You may, however, operate the chassis for a short period of time with AC and DC power supplies if you are converting it from one type of power supply to another, such as from AC to DC.
Slots A and B are for the AT-SBxPWRPOE1 Power Supply. This module provides power for the PoE feature on the twisted pair ports on the AT-SBx31GP24 Line Card. Please note the following items concerning the PoE power supply:
PoE power supplies are installed in slots A and B of the chassis.
You may install either one or two PoE power supplies in the chassis.
If you are installing only one power supply, you may install it in either slot A or B.
A single PoE power supply provides up to 1200 watts of power for PoE. Two PoE power supplies provide up to 2,400 watts of power.
The PoE power supply is hot swappable. You do not have to power off the chassis to replace it.
The total number of powered devices the chassis can support on the ports on AT-SBx31GP24 PoE Line Cards depends on the number of AT-SBxPWRPOE1 Power Supplies in the chassis and the power requirements of the devices. For instance, a chassis can support 40 ports of Class 4, PoE+ (IEEE 802.3at) powered devices with one power supply or 80 ports with two power supplies. For further information, refer to “Power Budgeting” on page 58.
NotePower supplies are not included with the chassis and must be purchased separately.
LEDs The LEDs on the AT-SBxPWRSYS1 and AT-SBxPWRSYS2 AC System Power Supplies are described in Table 1 on page 27.
26

SwitchBlade x3106 Chassis Switch and AT-SBx31CFC Card Installation Guide
System
The LEDs on the AT-SBxPWRSYS1 DC System Power Supply are described in Table 2.
Table 1. LEDs on the AT-SBxPWRSYS1 and AT-SBxPWRSYS2 AC System Power Supplies
LED State Description
AC
Solid Green The power supply is receiving AC power that is within the normal operating range.
Off The power supply is not receiving power from the AC power source.
DC
Solid Green The DC power that the module is providing to the chassis components is within the normal operating range.
Off The power supply is not generating DC power or the power is outside the normal operating range.
Fault
Solid Amber The power supply has detected a fault condition, such as an under-voltage or over-temperature condition.
Off The power supply is operating normally or is powered off.
Table 2. LEDs on the AT-SBxPWRSYS1 DC System Power Supply
LED State Description
DC IN
Solid Green The power supply is receiving DC power that is within the normal operating range.
Off The power supply is not receiving power from the DC power source.
DC OUT
Solid Green The DC power that the module is providing to the chassis components is within the normal operating range.
Off The power supply is not generating DC power or the power is outside the normal operating range.
Fault
Solid Amber The power supply has detected a fault condition, such as an under-voltage or over-temperature condition.
Off The power supply is operating normally or is powered off.
27

Chapter 1: Overview of the Chassis and Power Supplies
The LEDs on the AT-SBxPWRPOE1 AC PoE Power Supply are described in Table 3.
Table 3. LEDs on the AT-SBxPWRPOE1 AC PoE Power Supply
LED State Description
AC
Solid Green The power supply is receiving AC power that is within the normal operating range.
Off The power supply is not receiving power from the AC power source.
DC
Solid Green The DC power provided by the module over the backplane to the AT-SBx31GP24 PoE Line Cards and the powered devices is within the normal operating range.
Off The power supply is not providing any DC power or the power is not within the normal operating range.
Fault
Solid Amber The power supply has detected a fault condition, such as an under-voltage or over-temperature condition.
Off The power supply is operating normally or is powered off.
28
SwitchBlade x3106 Chassis Switch and AT-SBx31CFC Card Installation Guide
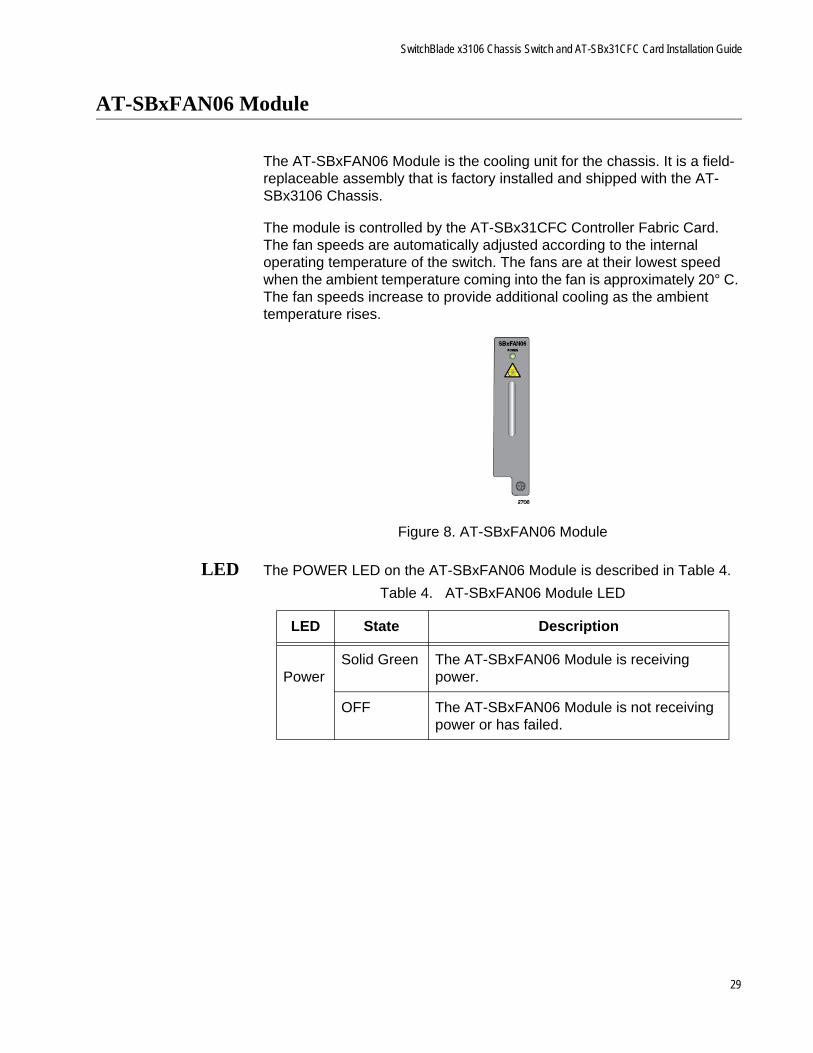
AT-SBxFAN06 Module
The AT-SBxFAN06 Module is the cooling unit for the chassis. It is a field- replaceable assembly that is factory installed and shipped with the AT-SBx3106 Chassis.
The module is controlled by the AT-SBx31CFC Controller Fabric Card. The fan speeds are automatically adjusted according to the internal operating temperature of the switch. The fans are at their lowest speed when the ambient temperature coming into the fan is approximately 20° C. The fan speeds increase to provide additional cooling as the ambient temperature rises.
Figure 8. AT-SBxFAN06 Module
LED The POWER LED on the AT-SBxFAN06 Module is described in Table 4.
Table 4. AT-SBxFAN06 Module LED
LED State Description
PowerSolid Green The AT-SBxFAN06 Module is receiving
power.
OFF The AT-SBxFAN06 Module is not receiving power or has failed.
29

Chapter 1: Overview of the Chassis and Power Supplies
Power Supply Interfaces (Opto-couplers)
The chassis has two power supply interfaces, also referred to as opto-couplers, in the lower right corner of the rear panel. Refer to Figure 9. The interfaces, labeled Power Supply Interface, are used by the active master controller card to obtain status information from the power supplies.
Figure 9. Power Supply Interfaces (Opto-couplers)
The active controller card uses the top interface to communicate with the power supplies in slots A and C, and the bottom interface to communicate with the power supplies in slots B and D.
The power supply interfaces are not hot swappable and should only be serviced by an authorized service technician.
LED Each interface has one LED, labeled Power. The LED is described in Table 5.
Table 5. Power Supply Interface LED
LED State Description
PowerSolid Green The interface is operating normally.
Off The possible states of the LED are listed here:
- The corresponding power supply slots of the interface are empty.
- The power supplies in the power supply slots are powered off or have failed.
- The power supplies are powered on and functioning normally, but the power supply interface has failed.
30
Chapter 2
Overview of the Ethernet Line Cards
The sections in this chapter describe the Ethernet line cards for the AT-SBx3106 Chassis:
“Ethernet Line Cards” on page 32
“AT-SBx31GT24 Line Card” on page 33
“AT-SBx31GT40 Line Card” on page 35
“AT-SBx31GP24 PoE Line Card” on page 38
“AT-SBx31GS24 SFP Line Card” on page 41
“AT-SBx31GC40 Line Card” on page 43
“AT-SBx31XZ4 XFP Line Card” on page 49
“AT-SBx31XS6 SFP+ Line Card” on page 51
“10/100/1000Base-T Twisted Pair Ports” on page 53
“Power over Ethernet on the AT-SBx31GP24 Line Card” on page 57
31

Chapter 2: Overview of the Ethernet Line Cards
Ethernet Line Cards
The Ethernet line cards are shown in Figure 10.
Figure 10. Ethernet Line Cards
AT-SBx31GT24 Ethernet Line Card with 24 10/100/1000Base-T twisted pair ports.
AT-SBx31GP24 Ethernet Line Card with 24 10/100/1000Base-T twisted pair ports, with PoE+.
AT-SBx31GS24 Ethernet Line Card with 24 slots for 100 or 1000Mbps, fiber optic or twisted pair SFP transceivers.
AT-SBx31GT40 Ethernet Line Card with 40 10/100/1000Base-T twisted pair ports, with RJ point 5 connectors.
AT-SBx31XZ4 Ethernet Line Card with four slots for 10Gbps, fiber optic XFP transceivers.
AT-SBx31XS6 Ethernet Line Card with six slots for 10Gbps, fiber optic SFP+ transceivers or Twinax direct connect cables.
AT-SBx31GC40 Ethernet Line Card with 20 slots for 1000Mbps standard SFP or compact SFP (CSFP) BiDi transceivers.
32

SwitchBlade x3106 Chassis Switch and AT-SBx31CFC Card Installation Guide
AT-SBx31GT24 Line Card
The AT-SBx31GT24 Line Card, shown in Figure 11, is a Gigabit Ethernet switch.
Figure 11. AT-SBx31GT24 Line Card
Here are the main features of the line card:
24 10/100/1000Base-T ports
RJ-45 connectors
100 meters (328 feet) maximum operating distance per port
Auto-Negotiation for speed and duplex mode
Automatic MDIX detection for ports operating at 10/100Base-TX, (Automatic MDIX detection does not apply to 1000Base-T operation.)
Port Link/Activity (L/A) LEDs
16K entry MAC address table
12 Mb buffer memory
Jumbo frame support:
– 10240 octets for tagged and untagged traffic between ports on the same line card
– 10232 octets for untagged traffic between ports on different line cards
– 10236 octets for tagged traffic between ports on different line cards
Non-blocking full-wire speed switching on all packet sizes, with two AT-SBx31CFC Controller Fabric Cards
Hot swappable
The cable requirements for the ports on the AT-SBx31GT24 Line Card are listed in Table 13 on page 54.
LEDs Each port on the AT-SBx31GT24 Line Card has two LEDs, but only one of them is used. The LEDs are shown in Figure 12 on page 34 and described in Table 6 on page 34.
33

Chapter 2: Overview of the Ethernet Line Cards
Figure 12. Port LEDs on the AT-SBx31GT24 Line Card
Table 6. Port LEDs on the AT-SBx31GT24 Line Card
LED State Description
L/A
Solid Green The port has established an 1000 Mbps link to a network device.
Flashing Green
The port is transmitting or receiving data at 1000 Mbps.
Solid Amber The port has established a 10 or 100 Mbps link to a network device.
Flashing Amber
The port is transmitting or receiving data at 10 or 100.
Off The port has not established a link with another network device or the LEDs are turned off. To turn on the LEDs, use the eco-friendly button on the controller card.
Right LED - This LED is not used.
34

SwitchBlade x3106 Chassis Switch and AT-SBx31CFC Card Installation Guide
AT-SBx31GT40 Line Card
The AT-SBx31GT40 Line Card, shown in Figure 13, is a Gigabit Ethernet switch.
Figure 13. AT-SBx31GT40 Line Card
Here are the main features of the line card:
40 10/100/1000Base-T ports
RJ point 5 connectors
100 meters (328 feet) maximum operating distance per port
Auto-Negotiation for speed
Full-duplex mode only
Automatic MDIX detection for ports operating at 10/100Base-TX, (Automatic MDIX detection does not apply to 1000Base-T operation.)
Port Link/Activity (L/A) LEDs
32K entry MAC address table
32 Mb buffer memory
Jumbo frame support:
– 10240 octets for tagged and untagged traffic between ports on the same line card
– 10232 octets for untagged traffic between ports on different line cards
– 10236 octets for tagged traffic between ports on different line cards
Non-blocking full-wire speed switching on all packet sizes, with two AT-SBx31CFC Controller Fabric Cards
Hot swappable
NoteThe ports on the line card do not support half-duplex operation.
The cable requirements for the ports on the AT-SBx31GT40 Line Card are listed in Table 13 on page 54.
35

Chapter 2: Overview of the Ethernet Line Cards
LEDs The LEDs for the ports on the AT-SBx31GT40 Line Card are found on the RJ point 5 cable connectors. The LEDs are shown in Figure 14.
Figure 14. Port LEDs on an RJ Point 5 Cable Connector for the AT-SBx31GT40 Line Card
Only the left LED on a connector is active. Refer to Figure 15. It displays link and activity status information about a port, as described in Table 7 on page 37. The right LED is not used.
Figure 15. Link/Activity LED on an RJ Point 5 Cable Connector for the AT-SBx31GT40 Line Card
LEDs
L/A LEDs
36

SwitchBlade x3106 Chassis Switch and AT-SBx31CFC Card Installation Guide
Table 7. Port LEDs for the AT-SBx31GT40 Line Card
LED State Description
L/A
Solid Green The port has established an 1000 Mbps link to a network device.
Flashing Green
The port is transmitting or receiving data at 1000 Mbps.
Solid Amber The port has established a 10 or 100 Mbps link to a network device.
Flashing Amber
The port is transmitting or receiving data at 10 or 100.
Off The port has not established a link with another network device or the LEDs are turned off. To turn on the LEDs, use the eco-friendly button on the controller card.
Right LED - This LED is not used.
37

Chapter 2: Overview of the Ethernet Line Cards
AT-SBx31GP24 PoE Line Card
The AT-SBx31GP24 PoE Line Card, shown in Figure 16, is a Gigabit Ethernet switch with Power over Ethernet Plus (PoE+) on all the ports.
Figure 16. AT-SBx31GP24 PoE Line Card
Here are the main features of the line card:
24 10/100/1000Base-T ports
RJ-45 connectors
100 meters (328 feet) maximum operating distance per port
Auto-Negotiation for speed and duplex mode
Automatic MDIX detection for ports operating at 10/100Base-TX, (Automatic MDIX detection does not apply to 1000Base-T operation.)
Port Link/Activity (L/A) and PoE+ LEDs
16K entry MAC address table
12 Mb buffer memory
PoE+ on all ports
Up to 30W per port for PoE+
PoE device classes 0 to 4
Jumbo frame support:
– 10240 octets for tagged and untagged traffic between ports on the same line card
– 10232 octets for untagged traffic between ports on different line cards
– 10236 octets for tagged traffic between ports on different line cards
Non-blocking full-wire speed switching on all packet sizes, with two AT-SBx31CFC Controller Fabric Cards
Hot swappable
The cable requirements of the PoE ports on the AT-SBx31GP24 Ethernet Line Card are given in Table 14 on page 55.
38

SwitchBlade x3106 Chassis Switch and AT-SBx31CFC Card Installation Guide
LEDs Each port on the AT-SBx31GP24 PoE Line Card has two LEDs. The LEDs are shown in Figure 17 and described in Table 8.
Figure 17. Port LEDs on the AT-SBx31GP24 PoE Line Card
Table 8. Port LEDs on the AT-SBx31GP24 PoE Line Card
LED State Description
L/A
Solid Green The port has established an 1000 Mbps link to a network device.
Flashing Green
The port is transmitting or receiving data at 1000 Mbps.
Solid Amber The port has established a 10 or 100 Mbps link to a network device.
Flashing Amber
The port is transmitting or receiving data at 10 or 100 Mbps.
Off The port has not established a link with another network device or the LEDs are turned off. To turn on the LEDs, use the eco-friendly button on the controller card.
PoE
Green The switch is detecting a powered device (PD) on the port and is delivering power to it.
Solid Amber The switch has shutdown PoE+ on the port because of a fault condition.
Flashing Amber
The switch is detecting a PD on the port but is not delivering power to it because the maximum power budget has been reached.
39

Chapter 2: Overview of the Ethernet Line Cards
PoE Off This LED state can result from the following conditions:
The port is not connected to a PD.
The PD is powered off.
The port is disabled in the management software.
PoE is disabled on the port.
The LEDs on the Ethernet line cards are turned off. To turn on the LEDs, use the eco-friendly button.
Table 8. Port LEDs on the AT-SBx31GP24 PoE Line Card (Continued)
LED State Description
40

SwitchBlade x3106 Chassis Switch and AT-SBx31CFC Card Installation Guide
AT-SBx31GS24 SFP Line Card
The AT-SBx31GS24 SFP Line Card, shown in Figure 18, is a Gigabit Ethernet switch.
Figure 18. AT-SBx31GS24 SFP Line Card
Here are the main features of the line card:
24 slots for small form-factor pluggable (SFP) transceivers
Supports 100Base-FX or 1000Base-SX/LX fiber optic transceivers
Supports 100Base-BX or 1000Base-LX bidirectional (BiDi) fiber optic transceivers
Supports 10/100/1000Base-T or 1000Base-T twisted pair transceivers
Port Link/Activity (L/A) LEDs
32K entry MAC address table
16 Mb buffer memory
Jumbo frame support:
– 10240 octets for tagged and untagged traffic between ports on the same line card
– 10232 octets for untagged traffic between ports on different line cards
– 10236 octets for tagged traffic between ports on different line cards
Non-blocking full-wire speed switching on all packet sizes, with two AT-SBx31CFC Controller Fabric Cards.
Hot swappable
Contact your Allied Telesis sales representative for a list of supported transceivers.
LEDs The SFP slots on the AT-SBx31GS24 SFP Line Card have one LED each, as shown in Figure 19 on page 42 and described in Table 9 on page 42.
41

Chapter 2: Overview of the Ethernet Line Cards
Figure 19. Port LEDs on the AT-SBx31GS24 SFP Line Card
Table 9. Port LEDs on the AT-SBx31GS24 SFP Line Card
LED State Description
Solid Green The SFP transceiver in the slot has established a link to a network device.
Blinking Green The SFP transceiver is transmitting and/or receiving data.
Off This LED state can result from the following conditions:
The transceiver slot is empty.
The SFP transceiver has not established a link to a network device.
The LEDs on the Ethernet line cards are turned off. To turn on the LEDs, use the eco-friendly button.
42

SwitchBlade x3106 Chassis Switch and AT-SBx31CFC Card Installation Guide
AT-SBx31GC40 Line Card
The AT-SBx31GC40 Line Card, shown in Figure 20, is a Gigabit Ethernet switch.
Figure 20. AT-SBx31GC40 Line Card
Here are the main features of the line card:
Twenty slots for 1000 Mbps, standard SFP or compact SFP (CSFP) bidirectional (BiDi) transceivers
Adheres to the CSFP Multi-Source Agreement (MSA) standard, Option 2, which defines support for both SFP and CSFP transceivers
Supports 1000Base-LX, BiDi compact SFP (CSFP), transceivers
Supports 1000Base-SX/LX, fiber optic SFP transceivers
Supports 10/100/1000Base-T twisted pair SFP transceivers
NoteStandard 10/100/1000Base-T twisted pair SFP transceivers are only supported at 1000 Mbps.
Port Link/Activity (L/A) LEDs
32K entry MAC address table
32 Mb buffer memory
Jumbo frame support:
– 10240 octets for tagged and untagged traffic between ports on the same line card
– 10232 octets for untagged traffic between ports on different line cards
– 10236 octets for tagged traffic between ports on different line cards
Non-blocking full-wire speed switching on all packet sizes, with two AT-SBx31CFC Controller Fabric Cards
Hot swappable
43
Chapter 2: Overview of the Ethernet Line Cards
NoteThe AT-SBx31GC40 Line Card does not support 10 or 100 Mbps transceivers.
The AT-SBx31GC40 Line Card has twenty slots for standard SFP or CSFP transceivers, and supports twenty or forty networking ports, depending on the types of transceivers. The line card has twenty ports when the slots have standard SFP transceivers, because each SFP transceiver functions as one port. In contrast, the line card has forty ports when the twenty slots have CSFP transceivers, because the two fiber connectors on a CSFP transceiver function as independent, bidirectional networking ports that can be connected to different network devices.
You do not have to install the same type of transceiver into all twenty slots in the line card. You may install a combination of SFP and CSFP transceivers.
Contact your Allied Telesis sales representative for a list of supported transceivers.
Port Numbers The AT-SBx31GC40 Line Card has two port numbers for each transceiver slot. The numbers are displayed on the front panel alongside and above the slots in the top row and alongside and below the slots in the bottom row. For instance, the first transceiver slot in the top row has the port numbers 0 and 2 and the slot beneath it has the port numbers 1 and 3. (The port numbers 2 and 4 are omitted from the first two slots in the top row on the faceplate to allow for the model name.)
A transceiver uses either one or both port numbers of a slot, depending on whether its a SFP or an CSFP transceiver. A CSFP transceiver is assigned two port numbers because its two connectors function as independent network connections. You may use the two port numbers of a transceiver to configure the ports independently. The left-hand fiber connector is assigned the lower number of a slot and the right-hand connector is given the higher port number. For example, the left-hand fiber connector of an CSFP transceiver in the first top slot is assigned the port number 0 and the right-hand connector is given the port number 2.
Figure 21 on page 45 illustrates the port numbers for the first two slots when they contain CSFP transceivers.
44

SwitchBlade x3106 Chassis Switch and AT-SBx31CFC Card Installation Guide
Figure 21. Port Numbers for Slots with CSFP Transceivers
In contrast, the two connectors on an SFP transceiver function as a single port, not as individual ports. Consequently, the switch assigns that type of module one port number instead of two.
The port number of an SFP module depends on whether the module is installed in a slot in the top or bottom row of the line card. An SFP module in a slot in the top row is assigned the lower of the two port numbers of a slot. For example, the port number of an SFP module installed in the first slot in the top row is port number 0 because it is the lower of the two port numbers of the slot. To configure the transceiver, you have to specify port 0 in the management software. The switch marks the unused port number of the slot, in this case port number 2, as masked or eclipsed to prevent you from using it to manage the transceiver.
In contrast, an SFP module in a slot in the bottom row is assigned the higher number of the slot’s two numbers. For instance, an SFP transceiver installed in the first slot in the bottom row is assigned the port number 3 by the switch. Port 1, the unused port number of the slot, is marked as masked by the switch and cannot be used to configure the device.
Figure 22 on page 46 illustrates the port numbers for the first four slots when they contain standard SFP transceivers.
Port 0 Port 2
Port 1 Port 3
45
Chapter 2: Overview of the Ethernet Line Cards
Figure 22. Port Numbers for Slots with Standard SFP Transceivers
LEDs The AT-SBx31GC40 Line Card has two LEDs for each slot. The LEDS, which display link and activity information, are located between the slots, in sets of four. The first and third LEDs of each set are for the bottom slot and the second and fourth LEDs are for the top slot, as shown in Figure 23.
Figure 23. LEDs for the AT-SBx31GC40 Line Card
When a slot contains a CSFP transceiver, both slot LEDS are active. Each LED displays link and activity status information for its respective BiDi connector on a module. As an example, if the first top and bottom slots of the line card contain CSFP transceivers, the first LED between the slots displays link and activity status for port 1, which is the left-hand fiber connector on the bottom transceiver. The second LED displays the same information for port 0, the left-hand fiber connector on the top transceiver.
Port 0 Port 4
Port 3 Port 7
Second LEDTop Slot
Fourth LEDTop Slot
First LEDBottom Slot
Third LEDBottom Slot
46

SwitchBlade x3106 Chassis Switch and AT-SBx31CFC Card Installation Guide
The third and fourth LEDs display the same information for ports 3 and 2, the right-hand connectors on the bottom and top transceivers, respectively. See Figure 24.
Figure 24. LEDs for the AT-SBx31GC40 Line Card, with CSFP Transceivers
When a slot has a standard SFP, only one LED of a pair is active. The other LED is not used. The active LED is different depending on whether the slot containing the transceiver is in the top or bottom row. When an SFP transceiver is installed in a slot in the top row, the first LED is active and the second inactive. When an SFP transceiver is installed in a slot in the bottom row, the first LED is inactive and the second active. See Figure 25.
Figure 25. LEDs for the AT-SBx31GC40 Line Card, with SFP Transceivers
The LED states are described in Table 10 on page 48.
Port 0L/A LED
Port 2L/A LED
Port 1L/A LED
Port 3L/A LED
Port 0L/A LED
Not used
Not UsedL/A LEDPort 3
47
Chapter 2: Overview of the Ethernet Line Cards
Table 10. Transceiver Slot LEDs on the AT-SBx31GC40 Line Card
LED State Description
L/A
Solid Green The SFP transceiver or CSFP transceiver fiber port has established a link with a network device.
Flashing Green
The SFP transceiver or CSFP transceiver fiber port is transmitting or receiving data.
Off This LED state can result from the following conditions:
The transceiver slot is empty.
The SFP transceiver or CSFP fiber port has not established a link to a network device.
The LEDs on the Ethernet line cards are turned off. To turn on the LEDs, use the eco-friendly button.
48

SwitchBlade x3106 Chassis Switch and AT-SBx31CFC Card Installation Guide
AT-SBx31XZ4 XFP Line Card
The AT-SBx31XZ4 XFP Line Card, shown in Figure 26, is a 10 Gigabit Ethernet switch.
Figure 26. AT-SBx31XZ4 XFP Line Card
Here are the main features of the line card:
Four slots for 10Gbps XFP transceivers
Supports 10GBase-SR/LR/ER fiber optic transceivers
Port Link/Activity (L/A) LEDs
32K entry MAC address table
16 Mb buffer memory
Jumbo frame support:
– 10240 octets for tagged and untagged traffic between ports on the same line card
– 10232 octets for untagged traffic between ports on different line cards
– 10236 octets for tagged traffic between ports on different line cards
Non-blocking full-wire speed switching on all packet sizes, with two AT-SBx31CFC Controller Fabric Cards
Hot swappable
Contact your Allied Telesis sales representative for a list of supported transceivers.
LEDs Each XFP slot on the AT-SBx31XZ4 XFP Line Card has one LED. The LED is shown in Figure 27 on page 50 and described in Table 11 on page 50.
49

Chapter 2: Overview of the Ethernet Line Cards
Figure 27. Transceiver Slot LEDs on the AT-SBx31XZ4 XFP Line Card
Table 11. Transceiver Slot LEDs on the AT-SBx31XZ4 XFP Line Card
LED State Description
L/A
Solid Green The XFP module has established a link with a network device.
Flashing Green
The XFP module is transmitting or receiving data at 10 Gbps.
Off The slot is empty or the XFP module has not established a link with a network device.
50

SwitchBlade x3106 Chassis Switch and AT-SBx31CFC Card Installation Guide
AT-SBx31XS6 SFP+ Line Card
The AT-SBx31XS6 Line Card, shown in Figure 28, is a 10 Gigabit Ethernet switch.
Figure 28. AT-SBx31XS6 Line Card
Here are the main features of the line card:
Six slots for 10Gbps SFP+ transceivers
Supports 10GBase-SR/LR fiber optic transceivers
Supports AT-SP10TW direct connect twisted pair cables with SFP+ transceiver-style connectors
Port Link/Activity (L/A) LEDs
32K entry MAC address table
16 Mb buffer memory
Jumbo frame support:
– 10240 octets for tagged and untagged traffic between ports on the same line card
– 10232 octets for untagged traffic between ports on different line cards
– 10236 octets for tagged traffic between ports on different line cards
Hot swappable
Contact your Allied Telesis sales representative for a list of supported transceivers.
LEDs The AT-SBx31XS6 Line Card has one LED for each SFP+ slot. The LED is shown in Figure 29 on page 52 and described in Table 12 on page 52.
51

Chapter 2: Overview of the Ethernet Line Cards
Figure 29. SFP+ Slot LEDs on the AT-SBx31XS6 Line Card
Table 12. SFP+ Slot LEDs on the AT-SBx31XS6 Line Card
LED State Description
L/A
Solid Green The transceiver has established a link with a network device.
Flashing Green
The transceiver is transmitting or receiving data at 10 Gbps.
Off The slot is empty or the transceiver has not established a link with a network device.
52

SwitchBlade x3106 Chassis Switch and AT-SBx31CFC Card Installation Guide
10/100/1000Base-T Twisted Pair Ports
This section applies to the 10/100/1000Base-T ports on the AT-SBx31GT24, AT-SBx31GT40, and AT-SBx31GP24 PoE Ethernet Line Cards.
Connector Type The ports on the AT-SBx31GT24 and AT-SBx31GP24 Line Cards have 8-pin RJ-45 connectors. The ports on the AT-SBx31GT40 Line Card have 8-pin RJ point 5 connectors. The ports use four pins at 10 or 100 Mbps and all eight pins at 1000 Mbps. The pin assignments are listed in “Port Pinouts” on page 268.
Speed The ports can operate at 10, 100, or 1000 Mbps. The speeds can be set automatically through Auto-Negotiation, the default setting, or manually with the management software.
NoteTwisted-pair ports have to be set to Auto -negotiation to operate at 1000 Mbps. You cannot manually set twisted-pair ports to 1000 Mbps.
Duplex Mode The twisted-pair ports on the AT-SBx31GT24 and AT-SBx31GP24 Line Cards can operate in either half- or full-duplex mode at 10 or 100 Mbps. Ports operating at 1000 Mbps can only operate in full-duplex mode. The twisted-pair ports are IEEE 802.3u-compliant and Auto-Negotiate the duplex mode setting.
You can disable Auto-Negotiation on the ports and set the duplex mode manually.
NoteSwitch ports that are connected to 10 or 100 Mbps end nodes that are not using Auto-Negotiation should not use Auto-Negotiation to set their speed and duplex mode settings, because duplex mode mismatches might occur. You should disable Auto-Negotiation and set the speed and duplex mode settings manually with the management software.
NoteThe ports on the AT-SBx31GT40 Line Card only support full-duplex mode.
53
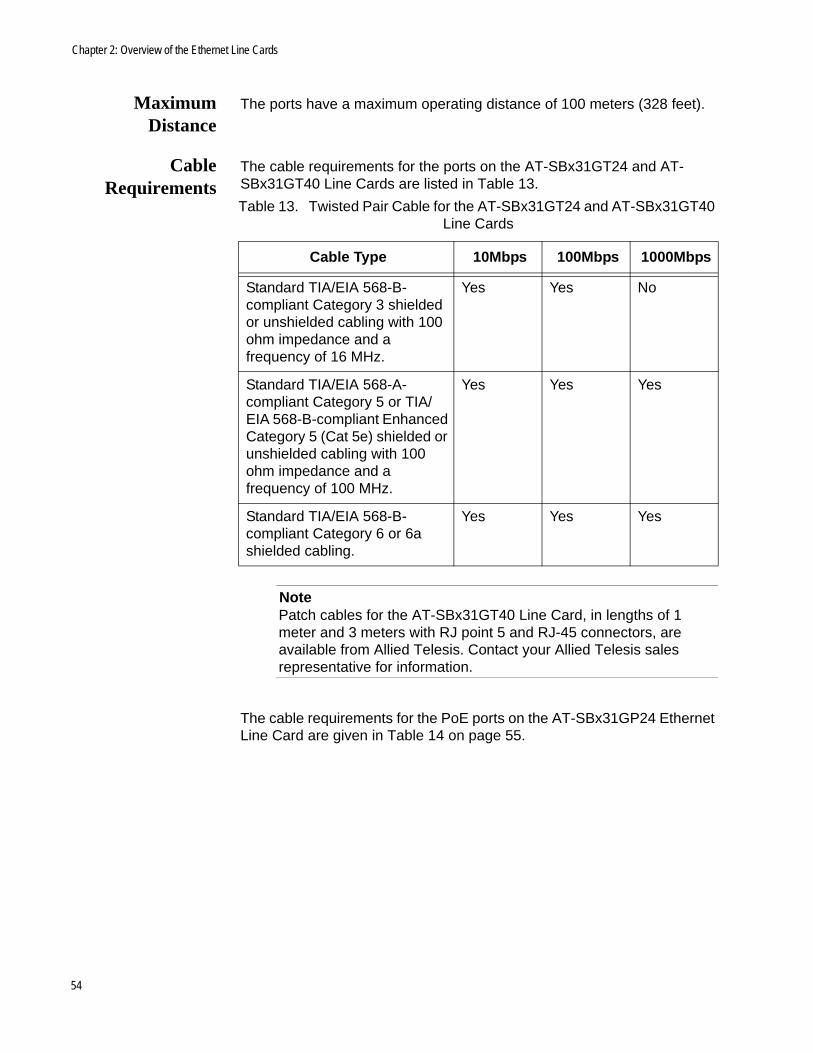
Chapter 2: Overview of the Ethernet Line Cards
MaximumDistance
The ports have a maximum operating distance of 100 meters (328 feet).
CableRequirements
The cable requirements for the ports on the AT-SBx31GT24 and AT-SBx31GT40 Line Cards are listed in Table 13.
NotePatch cables for the AT-SBx31GT40 Line Card, in lengths of 1 meter and 3 meters with RJ point 5 and RJ-45 connectors, are available from Allied Telesis. Contact your Allied Telesis sales representative for information.
The cable requirements for the PoE ports on the AT-SBx31GP24 Ethernet Line Card are given in Table 14 on page 55.
Table 13. Twisted Pair Cable for the AT-SBx31GT24 and AT-SBx31GT40 Line Cards
Cable Type 10Mbps 100Mbps 1000Mbps
Standard TIA/EIA 568-B-compliant Category 3 shielded or unshielded cabling with 100 ohm impedance and a frequency of 16 MHz.
Yes Yes No
Standard TIA/EIA 568-A-compliant Category 5 or TIA/EIA 568-B-compliant Enhanced Category 5 (Cat 5e) shielded or unshielded cabling with 100 ohm impedance and a frequency of 100 MHz.
Yes Yes Yes
Standard TIA/EIA 568-B-compliant Category 6 or 6a shielded cabling.
Yes Yes Yes
54

SwitchBlade x3106 Chassis Switch and AT-SBx31CFC Card Installation Guide
Automatic MDIXDetection
The 10/100/1000 Mbps twisted-pair ports on the AT-SBx31GT24, AT-SBx31GT40, and AT-SBx31GP24 Line Cards are IEEE 802.3ab compliant and feature automatic MDIX detection when operating at 10 or 100 Mbps. (Automatic MDIX detection does not apply to 1000 Mbps.) This feature automatically configures the ports to MDI or MDI-X depending on the wiring configurations of the end nodes.
You may not disable automatic MDIX detection on the ports. For automatic MDIX detection to work properly, it must also be present on the network devices. Ports connected to network devices that do not support automatic MDIX detection default to MDIX.
Straight-throughor Crossover
Cabling
Here are the guidelines on whether to use straight-through or crossover cables to connect network devices to the line cards:
You may use straight-through cables on ports that are connected to network devices that operate at 1000 Mbps.
Table 14. Twisted Pair Cable for the AT-SBx31GP24 Line Card
Cable Type
10Mbps 100Mbps 1000Mbps
Non-PoE
PoE PoE+Non-PoE
PoE PoE+Non-PoE
PoE PoE+
Standard TIA/EIA 568-B-compliant Category 3 shielded or unshielded cabling with 100 ohm impedance and a frequency of 16 MHz.
Yes No No Yes No No No No No
Standard TIA/EIA 568-A-compliant Category 5 shielded or unshielded cabling with 100 ohm impedance and a frequency of 100 MHz.
Yes Yes No Yes Yes No Yes No No
Standard TIA/EIA 568-B-compliant Enhanced Category 5 (Cat 5e) shielded or unshielded cabling with 100 ohm impedance and a frequency of 100 MHz.
Yes Yes Yes Yes Yes Yes Yes Yes Yes
Standard TIA/EIA 568-B-compliant Category 6 or 6a shielded cabling.
Yes Yes Yes Yes Yes Yes Yes Yes Yes
55

Chapter 2: Overview of the Ethernet Line Cards
You may use straight-through or crossover cables on ports that are connected to network devices that support automatic MDIX detection and that operate at 10 or 100 Mbps.
You must use straight-through cables on ports that are connected to network devices that have a fixed wiring configuration of MDI and that operate at 10 or 100 Mbps.
You must use crossover cables on ports that are connected to network devices that have a fixed wiring configuration of MDIX and that operate at 10 or 100 Mbps.
Port Pinouts Refer to Table 40 on page 268 for the port pinouts of twisted-pair ports that operate at 10 or 100 Mbps in the MDI configuration and Table 41 on page 268 for the MDI-X configuration. For port pinouts when a twisted-pair port operates at 1000 Mbps, refer to Table 42 on page 269.
56

SwitchBlade x3106 Chassis Switch and AT-SBx31CFC Card Installation Guide
Power over Ethernet on the AT-SBx31GP24 Line Card
This section applies only to the AT-SBx31GP24 PoE Line Card. The twisted-pair ports on the line card support Power over Ethernet (PoE). PoE is a mechanism by which the ports supply power to network devices over the twisted pair cables that carry the network traffic. This feature can simplify network installation and maintenance because it allows you to use the switch as a central power source for other network devices.
Devices that receive their power over Ethernet cables are called powered devices (PD), examples of which include wireless access points, IP telephones, web cams, and even other Ethernet switches. A PD connected to a port on the switch receives both network traffic and power over the same twisted-pair cable.
The AT-SBx31GP24 Line Card automatically determines whether a device connected to a port is a PD. A PD has a signature resistor or signature capacitor that the line card can detect over the Ethernet cabling. If the resistor or capacitor is present, the switch assumes that the device is a PD.
A port connected to a network node that is not a PD (that is, a device that receives its power from another power source) functions as a regular Ethernet port, without PoE. The PoE feature remains enabled on the port but no power is delivered to the device.
Powered DeviceClasses
The IEEE 802.3af and 802.3at standards define five powered device classes. The classes are defined by the power requirements of the powered devices. The classes are shown in Table 15. The AT-SBx31GP24 Line Card supports all five classes.
Table 15. IEEE802.3af and IEEE802.3at Powered Device Classes
Class Usage
Maximum Power Output
on the PoE Port
PD Power Range
0 Default 15.4W 0.44W to 12.95W
1 Optional 4.0W 0.44W to 3.84W
2 Optional 7.0W 3.84W to 6.49W
3 Optional 15.4W 6.49W to 12.95W
4 Optional 30.0W 12.95W to 25.9W
57

Chapter 2: Overview of the Ethernet Line Cards
Power Budgeting The power source for the PoE feature on the ports of the AT-SBx31GP24 Line Cards is the AT-SBxPWRPOE1 AC PoE Power Supply. The chassis can have two PoE power supplies. The AT-SBxPWRPOE1 AC PoE Power Supply has a power budget of 1200 watts for powered devices. Consequently, the chassis has a power budget of 1200 watts with one power supply and 2400 watts with two power supplies.
The number of powered devices the chassis can support at one time depends on the number of AT-SBxPWRPOE1 AC PoE Power Supplies in the chassis and the power requirements of the powered devices in your network. Table 16 lists the maximum number of powered devices by class, for one or two power supplies. The numbers assume that the powered devices require the maximum amount of power for their classes.
NoteThe maximum number of PoE ports in the SwitchBlade x3106 Switch is 240 ports.
PoE Wiring The IEEE 802.3af and 802.3at standards define two methods for delivering power to powered devices over the four pairs of strands that comprise a standard Ethernet twisted-pair cable. The methods are called Alternatives A and B. In Alternative A, power is supplied to powered devices on strands 1, 2, 3, and 6, which are the same strands that carry the 10/100Base-TX network traffic. In Alternative B, power is delivered on strands 4, 5, 7, and 8. These are the unused strands.
Note1000BASE-T cables carry the network traffic on all eight strands of the Ethernet cable.
Table 16. Maximum Number of Powered Devices
Class
Maximum Number of Ports with
One PoE PSU(1200 W)
Maximum Number of Ports with
Two PoE PSU’s(2400 W)
0 77 120
1 120 120
2 120 120
3 77 120
4 40 80
58

SwitchBlade x3106 Chassis Switch and AT-SBx31CFC Card Installation Guide
The PoE implementation on the AT-SBx31GP24 Line Card is Alternative A, in which power is transmitted over strands 1, 2, 3, and 6.
PDs that comply with the IEEE 802.3af and 802.3at standards typically support both power delivery methods. However, some legacy PDs support only one power delivery method. Legacy devices that only support Alternative B will not work with the AT-SBx31GP24 PoE Line Card. Legacy devices are nodes manufactured before the IEEE 802.3af and 802.3at standards were completed and, consequently, may not adhere to the standards.
59

Chapter 2: Overview of the Ethernet Line Cards
60

Chapter 3
Overview of the AT-SBx31CFC Controller Fabric Card
The sections in this chapter describe the AT-SBx31CFC Controller Fabric Card:
“Controller Fabric Cards for the AT-SBx3106 Chassis” on page 62
“Hardware Components on the AT-SBx31CFC Card” on page 64
“Guidelines” on page 66
“Dual Controller Cards” on page 68
“SYS Status LEDs” on page 69
“eco-friendly Button” on page 70
“SBx Linecard Status LEDs” on page 71
“Console (RS-232) Port” on page 72
“NET MGMT Port” on page 73
“SD Card Slot” on page 76
“Reset Button” on page 78
NoteFor instructions on how to upgrade a chassis to the AT-SBx31CFC960 Controller Fabric Card from the AT-SBx31CFC Card, refer to the SwitchBlade x3106 Chassis Switch and AT-SBx31CFC960 Card Installation Guide.
61

Chapter 3: Overview of the AT-SBx31CFC Controller Fabric Card
Controller Fabric Cards for the AT-SBx3106 Chassis
There are two controller fabric cards for the AT-SBx3106 Chassis. The cards are listed here:
AT-SBx31CFC Card
AT-SBx31CFC960 Card
The controller fabric cards are shown in Figure 30.
Figure 30. Controller Fabric Cards for the AT-SBx3106 Chassis
The main differences between the two cards are listed in Table 17.
AT-SBx31CFC Controller Fabric Card
AT-SBx31CFC960 Controller Fabric Card
Table 17. Differences Between the AT-SBx31CFC and AT-SBx31CFC960 Controller Fabric Cards
Component Description
SFP+ Slots The AT-SBx31CFC960 Card has four slots for SFP+ transceivers. You may use the slots to add four additional networking ports to the chassis. The AT-SBx31CFC Card does not have SFP+ slots.
62
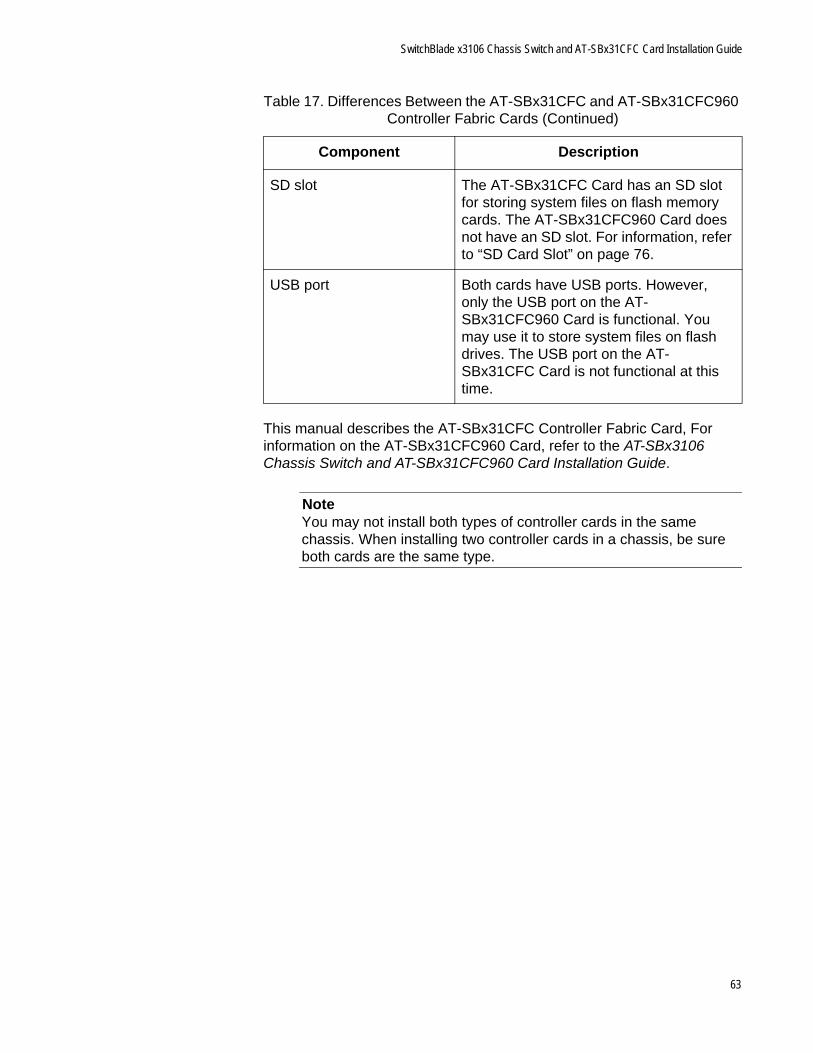
SwitchBlade x3106 Chassis Switch and AT-SBx31CFC Card Installation Guide
This manual describes the AT-SBx31CFC Controller Fabric Card, For information on the AT-SBx31CFC960 Card, refer to the AT-SBx3106 Chassis Switch and AT-SBx31CFC960 Card Installation Guide.
NoteYou may not install both types of controller cards in the same chassis. When installing two controller cards in a chassis, be sure both cards are the same type.
SD slot The AT-SBx31CFC Card has an SD slot for storing system files on flash memory cards. The AT-SBx31CFC960 Card does not have an SD slot. For information, refer to “SD Card Slot” on page 76.
USB port Both cards have USB ports. However, only the USB port on the AT-SBx31CFC960 Card is functional. You may use it to store system files on flash drives. The USB port on the AT-SBx31CFC Card is not functional at this time.
Table 17. Differences Between the AT-SBx31CFC and AT-SBx31CFC960 Controller Fabric Cards (Continued)
Component Description
63

Chapter 3: Overview of the AT-SBx31CFC Controller Fabric Card
Hardware Components on the AT-SBx31CFC Card
The components on the faceplate of the AT-SBx31CFC Controller Fabric Card are identified in Figure 31 and briefly described in Table 18.
Figure 31. AT-SBx31CFC Controller Fabric Card
eco-friendlyButton
SYS StatusLEDs
SBx LinecardStatus LEDs
ResetButton
USB Port
NET MGMT Port
Console RS-232Port
SD Card Slot
Table 18. Components on the AT-SBx31CFC Controller Fabric Card
Component Description
SYS Status LEDs Displays general status information about the controller card, power supplies, and fan module. For more information, refer to “SYS Status LEDs” on page 69.
eco-friendly Button Turns the LEDs on and off. For more information, refer to “eco-friendly Button” on page 70.
SBx Linecard Status LEDs Displays general information about the controller and Ethernet line cards. For more information, refer to “SBx Linecard Status LEDs” on page 71.
64

SwitchBlade x3106 Chassis Switch and AT-SBx31CFC Card Installation Guide
Console RS-232 Port Provides local management of the switch. The switch does not require an IP address configuration for local management. For more information, refer to “Console (RS-232) Port” on page 72.
NET MGMT Port Provides the controller card with access to your network for remote Telnet or SNMP management and other management functions. For more information, refer to “NET MGMT Port” on page 73.
USB Port Not supported at this time.
SD Card Slot Stores backup copies of the master configuration and database files on the controller card on an SD card. For more information, refer to “SD Card Slot” on page 76.
Reset Button Resets the controller and Ethernet line cards. For more information, refer to “Reset Button” on page 78.
Table 18. Components on the AT-SBx31CFC Controller Fabric Card
Component Description
65

Chapter 3: Overview of the AT-SBx31CFC Controller Fabric Card
Guidelines
Some of the functions of the controller card are listed here:
Chassis management — The controller card is used to manage the Ethernet line cards. You may manage the chassis locally through the Console RS-232 port on the controller card or remotely with Telnet, Secure Shell (SSH), and SNMP clients from workstations on your network.
Management software — The controller card stores the operating management software for itself as well as for the Ethernet line cards, and downloads the firmware to the cards over the backplane in the chassis when the chassis is powered on or reset, as part of the initialization process.
Configuration settings — The controller card also maintains a configuration database in which it stores its own settings as well as the settings of the Ethernet line cards. When a change is made to a configuration setting on a line card, the controller card transmits the change over the backplane to the appropriate line card and updates its configuration database. The database is retained even when the chassis is powered off because controller card stores it in nonvolatile memory. You may download the database to a management workstation or network server to maintain a history of configurations or to transfer a configuration to multiple chassis.
Backplane management — The controller card manages the backplane in the chassis, which the line cards use to forward traffic to each other when the ingress and egress ports of packets are located on different cards.
The amount of backplane bandwidth depends on the number of controller cards in the chassis. If the chassis has only one controller card and the card is installed in slot 4, line card slots 0 to 3 each have 20 Gbps of backplane bandwidth, while slot 5 has 40 Gbps, making that slot a good choice for a high speed uplink card, such as the AT-SBx31XZ4 XFP Line Card. If the chassis has two controller cards, line card slots 0 to 3 each have 40 Gbps of backplane bandwidth.
Here are the guidelines for the controller card:
The chassis must have at least one controller card. The line cards do not forward traffic without at least one controller card in the chassis.
The chassis may have either one or two controller cards.
Two controller cards are recommended for redundancy and to increase the per slot backplane bandwidth for slots 0 to 3 from 20 to 40Gbps.
66

SwitchBlade x3106 Chassis Switch and AT-SBx31CFC Card Installation Guide
The controller cards are installed in slots 4 and 5 in the chassis.
Here are other features of the controller card:
LEDs for monitoring the status of the Ethernet line cards.
Power-saving eco-friendly button for turning the port and status LEDs on and off on the line cards and controller cards.
Reset switch for resetting the chassis.
SD card slot for data storage and retrieval.
Console RS-232 for local management.
NET MGMT port and inband interface for remote Telnet, SSH, or SNMP management.
Hot swappable.
67

Chapter 3: Overview of the AT-SBx31CFC Controller Fabric Card
Dual Controller Cards
You may install either one or two controller cards in the chassis. Here are the advantages to having two controller cards in the chassis.
Having a second controller card improves the performance of the chassis by increasing the backplane bandwidth for the Ethernet line cards. The backplane bandwidth of slots 0 to 3 is increased from 20Gbps per line card slot with one controller card to 40Gbps per slot with two controller cards.
Installing a second controller card adds redundancy. If a controller card fails in the chassis, the second card enables the Ethernet line cards to maintain network operations.
Here are the guidelines for dual controller cards:
One card operates as the active master card and the other as the inactive master card. You can determine the state of a controller card by the M/S LED. For information, refer to “SYS Status LEDs” on page 69.
The controller cards automatically determine their states when the chassis is powered on or reset. The card that boots up first is designated as the active master card. If both cards boot up at the same time, the card in slot 4 is designated as the active master card.
All management sessions have to be conducted through the active controller card.
To establish a local management session, you have to use the Console RS-232 port on the active controller card.
When the chassis is powered on or reset, the two controller cards perform an initialization process, part of which involves the inactive card synchronizing its management files with the active card. During this phase of the initialization process, which may take several minutes. the inactive card does not participate with the active card in forwarding traffic over the backplane. After the inactive card has finished the initialization process, it joins with the active card in forwarding traffic on the backplane from the line cards. For more information, refer to “Monitoring the Initialization Process” on page 199.
68
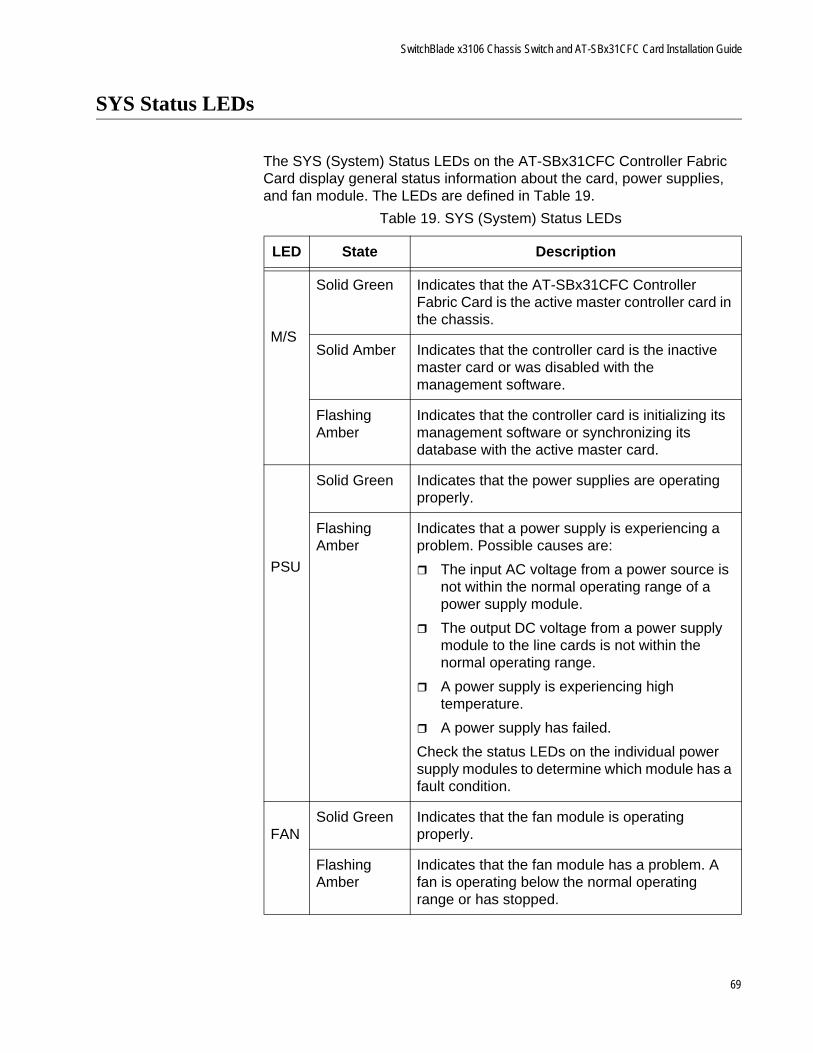
SwitchBlade x3106 Chassis Switch and AT-SBx31CFC Card Installation Guide
SYS Status LEDs
The SYS (System) Status LEDs on the AT-SBx31CFC Controller Fabric Card display general status information about the card, power supplies, and fan module. The LEDs are defined in Table 19.
Table 19. SYS (System) Status LEDs
LED State Description
M/S
Solid Green Indicates that the AT-SBx31CFC Controller Fabric Card is the active master controller card in the chassis.
Solid Amber Indicates that the controller card is the inactive master card or was disabled with the management software.
Flashing Amber
Indicates that the controller card is initializing its management software or synchronizing its database with the active master card.
PSU
Solid Green Indicates that the power supplies are operating properly.
Flashing Amber
Indicates that a power supply is experiencing a problem. Possible causes are:
The input AC voltage from a power source is not within the normal operating range of a power supply module.
The output DC voltage from a power supply module to the line cards is not within the normal operating range.
A power supply is experiencing high temperature.
A power supply has failed.
Check the status LEDs on the individual power supply modules to determine which module has a fault condition.
FANSolid Green Indicates that the fan module is operating
properly.
Flashing Amber
Indicates that the fan module has a problem. A fan is operating below the normal operating range or has stopped.
69

Chapter 3: Overview of the AT-SBx31CFC Controller Fabric Card
eco-friendly Button
The eco-friendly button on the controller card is used to turn the LEDs on or off and test the LEDs. You may turn off the LEDs to conserve electricity when you are not using them to monitor the controller and Ethernet line cards. When the LEDs are off, the overall power consumption of the chassis is slightly reduced, approximately 2 watts in a system with 120 active copper ports.
The button controls the LEDs on the ports on the Ethernet line cards and the LEDs on the controller card, except for the M/S (Master/Slave) LED, which is always on. The button does not control the LEDs on the fan module and the power supply systems.
The eco-friendly button is also used to test the LEDs. The LEDs perform a lamp test, flashing in alternating colors for three seconds, when you press the button.
70

SwitchBlade x3106 Chassis Switch and AT-SBx31CFC Card Installation Guide
SBx Linecard Status LEDs
The SBx Linecard Status LEDs display general status information about the controller and Ethernet line cards in the slots of the chassis. There are twelve LEDs, number 0 to 11. LEDS 0 to 5 represent the six slots in the AT-SBx3106 Chassis. LED 0 displays the status of the card in slot 0, LED 1 displays the status of the card in slot 1, and so on. The AT-SBx3106 Chassis does not use LEDs 6 to 11. If the chassis has two controller cards, the SBx Linecard Status LEDs are active on both cards. The states of the LEDs are defined in Table 20.
Table 20. SBx Linecard Status LEDs
LEDs State Description
0 to 11a
a. The AT-SBx3106 Chassis does not use LEDs 6 to 11.
Off Indicates that the slot is empty or the LEDs are turned off. To turn on the LEDs, use the eco-friendly button.
Solid Green Indicates that the controller or Ethernet line card is operating normally.
Flashing Green Indicates that the card is booting up, in test mode, or loading the configuration settings.
Solid Amber Indicates that the card is in an off-line, reset, or disabled state. You may remove the card from the chassis when it is in this state. If the LED is solid amber for an Ethernet line card, it may indicate that the card cannot boot up because the controller card does not have the appropriate load file and needs to be updated to the most recent release of management software.
Flashing Amber Indicates that the card is reporting a fault condition. Use the management commands to determine the specific problem.
71

Chapter 3: Overview of the AT-SBx31CFC Controller Fabric Card
Console (RS-232) Port
The Console Port on the front panel of the controller card is used to conduct local management sessions with the switch. Local management sessions are established with a terminal or PC with a terminal emulation program, and the management cable that comes with the card. The chassis does not need an IP address for local management.
Your initial management session with the switch must be a local management session. For instructions on how to start a local management session, refer to “Using Local Management to Verify the Chassis” on page 206 or the Software Reference for SwitchBlade x3100 Series Switches.
72

SwitchBlade x3106 Chassis Switch and AT-SBx31CFC Card Installation Guide
NET MGMT Port
You have to provide the controller card with access to your network if it is to perform any of the management features in Table 21. There are two ways you can do this. One way is by connecting the NET MGMT port on the front panel of the controller card to a switch or router on your network. Another way is by configuring the in-band interface. The inband interface allows the card to communicate with your network over the backplane and line cards in the chassis.
You may use either the NET MGMT port or in-band interface to provide the controller card with access to your network, but you may not configure both. The default is the NET MGMT port. For instructions on how to configure the NET MGMT port and inband interface, refer to the Software Reference for SwitchBlade x3100 Series Switches.
Table 21. Management Features Requiring Network Access
Feature Description
Ping Used to test for network connectivity to the chassis.
FTP client Used with an FTP server on your network to download files to or upload files from the controller card.
RADIUS client Used for remote management authentication and 802.1x port-based network access control.
RMON with SNMP Used with the RMON portion of the MIB tree on an SNMP workstation to remotely monitor the switch.
Secure Shell server Used to remotely manage the chassis with a Secure Shell client.
SNMPv1 and v2c Used to remotely manage the chassis with SNMP.
SNTP client Used to set the date and time on the controller card, from an NTP or SNTP server on your network or the Internet.
73

Chapter 3: Overview of the AT-SBx31CFC Controller Fabric Card
The NET MGMT port has a standard RJ-45 8-pin connector and operates at 10, 100, or 1000 Mbps in either half- or full-duplex mode. The cable requirements for this port are the same as the ports on the AT-SBx31GT24 Line Card, given in Table 13 on page 54. For the port pinouts, refer to “Port Pinouts” on page 268.
The port uses Auto-Negotiation to set its speed. You may not disable Auto-Negotiation. To avoid a speed or duplex mode mismatch, you should connect the port only to a device that also uses Auto-Negotiation. If connected to a network device that does not support Auto-Negotiation, it defaults to 10 Mbps, half-duplex mode.
The wiring configuration of the NET MGMT port is set automatically with automatic MDIX detection. You may not disable automatic MDIX detection. For automatic MDIX detection to work successfully, the port must be connected to a network device that also supports the feature. If the NET MGMT port is connected to a network device that does not support automatic MDIX detection, it defaults to MDIX. This may require the use of a crossover cable. Here are guidelines to choosing straight-through or crossover cabling for the port:
You may use a straight-through cable to connect the port to a network device that operates at 1000 Mbps.
You may use a straight-through or crossover cable to connect the port to a network device that supports automatic MDIX detection and that operates at 10 or 100 Mbps.
Syslog client Used to send the event messages from the controller card to syslog servers on your network for storage.
TACACS+ client Used with a TACACS+ server on your network for remote management authentication.
Telnet server Used to remotely manage the chassis with a Telnet client.
TFTP client Used with a TFTP server on your network to download files to or upload files from the controller card.
TRACEROUTE Used to determine the intermediate nodes (or hops) of network paths.
Table 21. Management Features Requiring Network Access (Continued)
Feature Description
74

SwitchBlade x3106 Chassis Switch and AT-SBx31CFC Card Installation Guide
You must use a straight-through cable to connect the port to a network device that operates at 10 or 100 Mbps and has a fixed wiring configuration of MDI.
You must use a crossover cable to connect the port to a network device that operates at 10 or 100 Mbps and has a fixed wiring configuration of MDIX.
NET MGMTPort LED
The Network Management (NET MGMT) port on the AT-SBx31CFC Controller Fabric Card has one Status LED. The states of the LED are described in Table 22.
Table 22. NET MGMT Port LED
LED State Description
L/A
Solid Green The port has a valid 1000 Mbps link.
Flashing Green
The port is transmitting or receiving data at 1000 Mbps.
Solid Amber The port has a valid 10 or 100 Mbps link.
Flashing Amber
The port is transmitting or receiving data at 10 or 100 Mbps.
75

Chapter 3: Overview of the AT-SBx31CFC Controller Fabric Card
SD Card Slot
The secure digital (SD) memory slot is used for these management functions:
Store backup copies of the master configuration and database files on the controller card to an SD card so that you can restore the current configuration or a previous configuration, if needed.
Transfer master configuration files between controller cards in different chassis that are to have similar configurations.
Transfer application load files between controller cards.
Store streaming log files.
An SD card is optional. The controller card can operate without a memory card.
The following SD flash memory cards are officially supported in this release.
SanDisk 2GB Flash card
SanDisk 4GB SDHC Flash card
NoteOther brands can be used but are not guaranteed to work.
For ordering information, contact your Allied Telesis sales representative or visit our web site.
SD Status LED The SD Status LED on the controller card is described in Table 23 on page 77.
76

SwitchBlade x3106 Chassis Switch and AT-SBx31CFC Card Installation Guide
CautionTo avoid losing data, do not remove an SD card when the SD status LED is flashing green. Use the DEACTIVATE MEDIA command in the management software to disable the SD card slot and wait for the SD status LED to turn off before removing an SD card.
Table 23. SD Status LED
LEDs State Description
SD
Off The SD slot is empty, the SD card is improperly installed, or the SD slot was deactivated in the management software.
Solid Green The SD card is properly installed in the slot and ready to transfer data.
Flashing Green The controller card is retrieving or storing data on the SD card.
Flashing Amber The controller card is detecting a problem with the SD card. The card may be installed improperly in the slot or there may be a problem with the card itself.
77

Chapter 3: Overview of the AT-SBx31CFC Controller Fabric Card
Reset Button
You may use the Reset button to reset either the controller card or all of the cards in the chassis. The action depends on the number of AT-SBx31CFC Controller Fabric Cards in the chassis and, if the chassis has two controller cards, whether you press the button on the active or inactive master card.
The possible actions are described here:
If the chassis has only one controller card, pressing the Reset button resets the controller card and all the Ethernet line cards in the chassis. You may perform this function if the chassis and line cards are experiencing a problem.
CautionThe controller and Ethernet line cards do not forward network traffic for a minimum of two minutes while they initialize their management software and configure their parameter settings. Some network traffic may be lost.
If the chassis has two controller cards, pressing the Reset button on the active master card resets the controller card, but not the Ethernet line cards. The inactive master controller card immediately becomes the new active master card and the Ethernet line cards continue to forward traffic. The reset controller card is unavailable for about two minutes while it initializes its management software, after which it becomes the inactive master card in the chassis.
NoteThe available backplane bandwidth for each line card slot is reduced from 40 to 20 Gbps for about two minutes while the reset controller card initializes its management software. This may reduce network performance.
If you want the active and inactive master controller cards to exchange roles without having to reset the active card, use the SWAP ACTIVITY command in the management software. Refer to the Software Reference for SwitchBlade x3100 Series Switches for information.
If the chassis has two controller cards, pressing the Reset button on the inactive master controller card resets that card, but not the active master controller card or the Ethernet line cards.
78

SwitchBlade x3106 Chassis Switch and AT-SBx31CFC Card Installation Guide
NoteThe available backplane bandwidth for each line card slot is reduced from 40 to 20 Gbps for about two minutes while the reset controller card initializes its management software. This may reduce network performance.
NoteTo reset individual line cards in the chassis, use the RESTART CARD command in the management software.
79

Chapter 3: Overview of the AT-SBx31CFC Controller Fabric Card
80

Chapter 4
Safety Precautions and Site Preparation
This chapter contains the safety precautions and guidelines for selecting a site for the chassis. The chapter contains the following sections:
“Reviewing Safety Precautions” on page 82
“Selecting a Site for the SwitchBlade x3106” on page 86
“Installation Tools and Material” on page 88
81

Chapter 4: Safety Precautions and Site Preparation
Reviewing Safety Precautions
Please review the following safety precautions before you begin to install the switch.
NoteThe indicates that a translation of the safety statement is available for viewing in the “Translated Safety Statements” document on our web site at http://www.alliedtelesis.com/support.
WarningClass 1 Laser product. L1
WarningDo not stare into the laser beam. L2
WarningTo prevent electric shock, do not remove the cover. No user-serviceable parts inside. This unit contains hazardous voltages and should only be opened by a trained and qualified technician. To avoid the possibility of electric shock, disconnect electric power to the product before connecting or disconnecting the LAN cables. E1
WarningDo not work on equipment or cables during periods of lightning activity. E2
WarningPower cord is used as a disconnection device. To de-energize equipment, disconnect the power cord. E3
WarningClass I Equipment. This equipment must be earthed. The power plug must be connected to a properly wired earth ground socket outlet. An improperly wired socket outlet could place hazardous voltages on accessible metal parts. E4
82

SwitchBlade x3106 Chassis Switch and AT-SBx31CFC Card Installation Guide
NotePluggable Equipment. The socket outlet shall be installed near the equipment and shall be easily accessible. E5
CautionAir vents must not be blocked and must have free access to the room ambient air for cooling. E6
WarningOperating Temperature. This product is designed for a maximum ambient temperature of 40° degrees C. E7
NoteAll Countries: Install product in accordance with local and National Electrical Codes. E8
WarningWhen installing this equipment, always ensure that the frame ground connection is installed first and disconnected last. E11
CautionCircuit Overloading: Consideration should be given to the connection of the equipment to the supply circuit and the effect that overloading of circuits might have on over current protection and supply wiring. Appropriate consideration of equipment nameplate ratings should be used when addressing this concern. E21
CautionRisk of explosion if battery is replaced by an incorrect type. Replace only with the same or equivalent type recommended by the manufacturer. Dispose of used batteries according to the manufacturer’s instructions.
Attention: Le remplacement de la batterie par une batterie de type incorrect peut provoquer un danger d’explosion. La remplacer uniquement par une batterie du même type ou de type équivalent recommandée par le constructeur. Les batteries doivent être éliminées conformément aux instructions du constructeur. E22
83

Chapter 4: Safety Precautions and Site Preparation
WarningMounting of the equipment in the rack should be such that a hazardous condition is not created due to uneven mechanical loading. E25
WarningThe AT-SBxFAN06 Fan Module has hazardous moving parts. Keep fingers away from moving fan blades. E48
WarningRemove all metal jewelry, such as rings and watches, before installing or removing a line card from a powered-on chassis. E26
WarningThe chassis may be heavy and awkward to lift. Allied Telesis recommends that you get assistance when mounting the chassis in an equipment rack. E28
WarningThis unit might have more than one power source. To reduce the risk of electric shock, disconnect all power sources before servicing the unit. E30
NoteIf installed in a closed or multi-unit rack assembly, the operating ambient temperature of the rack environment may be greater than the room ambient temperature. Therefore, consideration should be given to installing the equipment in an environment compatible with the manufacturer’s maximum rated ambient temperature (Tmra). E35
CautionInstallation of the equipment in a rack should be such that the amount of air flow required for safe operation of the equipment is not compromised. E36
84

SwitchBlade x3106 Chassis Switch and AT-SBx31CFC Card Installation Guide
WarningReliable earthing of rack-mounted equipment should be maintained. Particular attention should be given to supply connections other than direct connections to the branch circuits (e.g., use of power strips). E37
WarningTo reduce the risk of electric shock, the PoE ports on this product must not connect to cabling that is routed outside the building where this device is located. E40
WarningThis product may have multiple AC power cords installed. To de-energize this equipment, disconnect all power cords from the device. E41
CautionAn Energy Hazard exists inside this equipment. Do not insert hands or tools into open chassis slots or sockets. E44
WarningThis equipment shall be installed in a Restricted Access location. E45
WarningHigh Leakage Current exists in this chassis. Connect external ground wire before connecting AC power supply(s). E46
85

Chapter 4: Safety Precautions and Site Preparation
Selecting a Site for the SwitchBlade x3106
Please perform the following procedure to determine the suitability of the site for the chassis:
1. If you are installing the chassis in an equipment rack, check that the rack is safely secured so that it will not tip over. You should install devices starting at the bottom of the rack, with the heavier devices near the bottom.
2. If you are installing the chassis on a table, check that the table is level and stable and that it can safely handle the weight of the device. A fully loaded chassis can weight more than 30 kg (66.1 lb).
3. Verify that the power outlets for the chassis are located near the unit and are easily accessible.
4. Verify that the power sources are on different A/C circuits to protect the unit from a power circuit failure.
5. Verify that the site has dedicated power circuits or power conditioners to supply reliable electrical power to the network devices.
6. Verify that the site allows for easy access to the ports on the front of the chassis so that you can easily connect and disconnect the network cables, as well as view the unit’s LEDs.
7. Verify that the site allows for adequate air flow around the unit and through the cooling vents. The ventilation direction for the main section of the chassis is from left to right (when facing the front of the chassis), with the fan module drawing air out of the chassis. The power supplies have fans that draw air from the front to the back.
8. Verify that the site has a reliable and earth (grounded) power supply source, preferably dedicated and filtered.
9. Verify that the twisted pair cabling is not exposed to sources of electrical noise, such as radio transmitters, broadband amplifiers, power lines, electric motors, and fluorescent fixtures.
10. Verify that the site protects the chassis from moisture, water, and dust.
Here are other guidelines to consider:
Switch ports are suitable for intra-building connections, or where non-exposed cabling is required.
Do not place objects on top of the chassis.
The power cords provided with the AT-SBxPWRSYS1 and AT-SBxPWRPOE1 Power Supplies for some regions, including North
86

SwitchBlade x3106 Chassis Switch and AT-SBx31CFC Card Installation Guide
America, have 20 Amp, 125 V NEMA 5-20P plugs. The plug is only compatible with a NEMA 5-20R receptacle. See Figure 32.
Figure 32. 100 - 125 VAC 125 V NEMA 5-20 Plug and Receptacle
87

Chapter 4: Safety Precautions and Site Preparation
Installation Tools and Material
Here are the tools and material you need to provide to install the product:
Installing the chassis in an equipment rack requires the following items:
#2 Phillips-head screwdriver
Six equipment rack screws
Flat-head screwdriver
#2 Phillips-head 10 inch-lbs torque screwdriver (optional)
Installing the grounding wire requires the following items:
#2 Phillips-head screwdriver
Crimping tool
10 AWG stranded grounding wire
#2 Phillips-head 20 inch-lbs torque screwdriver (optional)
Installing the AT-SBxPWRSYS1 DC Power Supply requires the following items:
Two 8 AWG power wires
One 10 AWG stranded grounding wire
8 mm wrench
#1 Phillips-head screwdriver
#3 Phillips-head screwdriver
#3 Phillips-head 30 to 40 inch-lbs torque screwdriver (optional)
Installing the AT-SBx31CFC Controller Fabric Card and Ethernet line cards require the following items:
#2 Phillips-head screwdriver
#2 Phillips-head, 5 inch-lbs torque screwdriver (optional)
88

Chapter 5
Installing the Chassis on a Table or in an Equipment Rack
This chapter describes how to install the AT-SBx3106 Chassis on a table or in an equipment rack. This chapter contains the following sections:
“Unpacking the AT-SBx3106 Chassis” on page 90
“Installing the Chassis on a Table” on page 92
“Installing the Chassis in an Equipment Rack” on page 93
“Removing the Shipping Brace” on page 102
“Installing the Chassis Grounding Lug” on page 103
89

Chapter 5: Installing the Chassis on a Table or in an Equipment Rack
Unpacking the AT-SBx3106 Chassis
To unpack the AT-SBx3106 Chassis, perform the following procedure:
1. Remove all components from the shipping package.
2. Verify the contents of the shipping container by referring to Figure 33 here and Figure 34 on page 91. If any item is missing or damaged, contact your Allied Telesis sales representative for assistance.
Figure 33. AT-SBx3106 Chassis Items
One AT-SBx3106 Chassis
One AT-SBxFAN06 Module pre-installed in the vertical slot on the right side of the front panel
Four blank line card slot covers
Three blank power supply slot covers pre-installed in power supply slots A to C on the front panel
One grounding lug pre-installed on the left side on the back panel
90

SwitchBlade x3106 Chassis Switch and AT-SBx31CFC Card Installation Guide
Figure 34. AT-SBx3106 Chassis Items (Continued)
3. Do one of the following:
To install the unit on a table, go to “Installing the Chassis on a Table” on page 92.
To install the unit in an equipment rack, go to “Installing the Chassis in an Equipment Rack” on page 93
Two equipment rack brackets pre-installed on the sides of the chassis
One shipping brace pre-installed diagonally across the line card slots on the front panel
One wrist strap
91

Chapter 5: Installing the Chassis on a Table or in an Equipment Rack
Installing the Chassis on a Table
This section contains the procedure for installing the chassis on a table.
NoteThe rubber feet on the bottom of the chassis should be left on for table installation.
NoteDo not remove the shipping brace from the front of the chassis until after the unit is placed on the table. You might bend the chassis and cause misalignment of the slots and card guides if you lift the chassis without the shipping brace.
WarningDo not stack chassis on top of one another on a table because that could present a personal safety hazard if you need to move or replace units.
This procedure requires a #2 Phillips-head screwdriver.
To install the chassis on a table, perform the following procedure:
1. Review the procedure in “Selecting a Site for the SwitchBlade x3106” on page 86 to verify that the selected site is suitable for the unit.
2. Check to be sure that the table is strong enough to support the weight of the chassis. A fully loaded chassis can weigh more than 30 kg (67.1 lb).
3. Lift the chassis onto the table.
WarningThe chassis may be heavy and awkward to lift. Allied Telesis recommends that you get assistance when placing the chassis on the table. E30
4. Using a #2 Phillips-head screwdriver, remove the rack mount brackets from the sides of the chassis. The brackets are not required for table installation. This step is optional.
After placing the chassis on the table, go to “Removing the Shipping Brace” on page 102.
92

SwitchBlade x3106 Chassis Switch and AT-SBx31CFC Card Installation Guide
Installing the Chassis in an Equipment Rack
The following sections contain the procedures for installing the unit in an equipment rack:
“Required Tools and Material” on page 93
“Preparing the Equipment Rack” on page 93
“Removing the Rubber Feet” on page 95
“Adjusting the Equipment Rack Brackets” on page 96
“Installing the Chassis in the Equipment Rack” on page 99
Required Toolsand Material
You need the following tools and material to install the product in an equipment rack:
#2 Phillips-head screwdriver
Six equipment rack screws
Flat-head screwdriver
#2 Phillips-head 10 inch-lbs torque screwdriver (optional)
WarningThe chassis may be heavy and awkward to lift. Allied Telesis recommends that you get assistance when mounting the chassis in an equipment rack. E30
Preparing theEquipment Rack
To prepare the equipment rack for the installation of the AT-SBx3106 Chassis, perform the following procedure:
CautionThe chassis is heavy and should be mounted as low as possible in the equipment rack to maximize vertical stability.
1. Reserve 190.0 mm (7.5“) of vertical rack space for the installation of the AT-SBx3106 Chassis, as shown in Figure 35 on page 94.
2. Do not mount any other equipment within 152.4 mm (6”) above this space during installation. This additional vertical space is temporary and allows you enough room to lift and tilt the chassis into its position in the equipment rack without hitting other equipment, as shown in Figure 41 on page 100. You may use this additional space for other network equipment after the chassis is installed.
93

Chapter 5: Installing the Chassis on a Table or in an Equipment Rack
Figure 35. Reserving Vertical Rack Space
3. Identify the lowest 1/2” screw hole pattern on the rack mounting rails within the space reserved for the AT-SBx3106 Chassis.
4. Install one rack mount screw in each vertical rail, at the same height in the top screw hole of the lowest 1/2” hole pattern, as shown in Figure 36 on page 95. The screws are used to support the chassis while you secure it to the rack. Do not fully tighten the screws at this time. The screw heads should protrude from the rack approximately 6.4 mm (.25 in).
190.
0 m
m (
7.5“
)15
2.4
mm
(6”
0)
342
.4 m
m (
13.5
”)
94

SwitchBlade x3106 Chassis Switch and AT-SBx31CFC Card Installation Guide
Figure 36. Rack Mounting Hole Locations
5. After installing the two screws in the equipment rack, go to the next procedure, ”Removing the Rubber Feet”.
Removing theRubber Feet
The rubber feet on the bottom of the chassis are for tabletop installation and should be removed when installing the chassis in an equipment rack. To remove the rubber feet, perform the following procedure:
WarningThe chassis may be heavy and awkward to lift. Allied Telesis recommends that you get assistance when lifting the chassis.
NoteDo not remove the shipping brace from the front of the chassis until after the unit is installed in the equipment rack. You might bend the chassis and cause misalignment of the slots and card guides if you lift the chassis without the shipping brace.
1. Place the unit upside down on a level, secure surface, as shown in Figure 37 on page 96.
6.4 mm (.25 in)Screw head
Top screw hole of the lowest 1/2” hole pattern
away from rack
95

Chapter 5: Installing the Chassis on a Table or in an Equipment Rack
Figure 37. Turning the Chassis Upside Down
2. Using a flat-head screwdriver, pry the rubber feet from the bottom of the chassis, as shown in Figure 38.
Figure 38. Removing the Rubber Feet
3. Turn the chassis over.
Go to the next procedure, ”Adjusting the Equipment Rack Brackets”.
Adjusting theEquipment Rack
Brackets
You may change the positions of the two pre-installed equipment rack brackets so that the front of the chassis is flush with, extends beyond, or is recessed behind the front of the equipment rack. You may also install the chassis so that the rear panel is flush with the front of the equipment rack.
The different bracket positions are listed in Table 24 on page 97 and illustrated in Figure 39 on page 98 and Figure 40 on page 98. Please review the following information before moving the brackets:
Position A, the default position, positions the chassis so that the front of the unit is flush with the front of the equipment rack.
Position B recesses the front of the chassis by 27.39 mm (1.1 in).
Positions C to E extend the front of the chassis beyond the front of the rack from 27.39 mm (1.1 in) to 140.85 mm (5.545 in).
96

SwitchBlade x3106 Chassis Switch and AT-SBx31CFC Card Installation Guide
Position F installs the chassis with the rear panel flush with the front of the equipment rack.
To install the rack mount brackets in position “E,” you have to remove the two chassis screws from the bottom-middle section of the chassis and re-install them in front where the rack mount bracket screws were originally, as shown in Figure 39 on page 98.
The dimension (X) between the front panel and the rack rails is given for each rack mounting bracket position in Table 24.
Table 24. Front Panel to Rack Rail Dimensions
Figure # Front Panel PositionDimension X
Front Panel to Rack Rail
39 A (Factory Installed - Flush)
3.69 mm (0.145 in)
39 B(Recessed)
-27.39 mm (-1.078 in)
39 C 27.39 mm (1.078 in)
39 D 47.71 mm (1.878 in)
39 E 140.85 mm (5.545 in)
40 F(Reverse Position)
374.16 mm (14.731 in)
97

Chapter 5: Installing the Chassis on a Table or in an Equipment Rack
Figure 39. Rack Mounting Bracket Locations
Figure 40. Rack Bracket Locations for Reverse Position of Chassis
After adjusting the brackets, go to “Installing the Chassis in the Equipment Rack” on page 99.
Factory Installed - Flush with Rack Rails
A B
C D E
“Dim X”
“Dim X” “Dim X” “Dim X”
Front panel facingtowards the rear of the rack
F
98

SwitchBlade x3106 Chassis Switch and AT-SBx31CFC Card Installation Guide
Installing theChassis in the
Equipment Rack
The procedure in this section explains how to install the chassis in the equipment rack. The procedure requires the following items:
#2 Phillips-head screwdriver
Four equipment rack screws
#2 Phillips-head 10 inch-lbs torque screwdriver (optional)
CautionDo not remove the shipping brace from the front of the AT-SBx3106 Chassis until after the unit is securely mounted in the rack. The plate prevents twisting of the chassis frame and mechanical misalignment of the line card slots during shipping and installation.
WarningThe chassis may be heavy and awkward to lift. Allied Telesis recommends that you get assistance when mounting the chassis in an equipment rack. E30
WarningAllied Telesis recommends having a minimum of three people lift and secure the chassis in the equipment rack.
Before installing the chassis in the rack, review the following checklist:
Did you reserve sufficient space in the equipment rack for the chassis and install two screws in the rack on which to rest the chassis while securing it to the rack? If not, then perform “Preparing the Equipment Rack” on page 93.
Did you adjust the brackets so that the front of the chassis is positioned correctly for your installation? If not, then perform “Adjusting the Equipment Rack Brackets” on page 96.
To install the AT-SBx3106 Chassis in the equipment rack, perform the following procedure:
1. While facing the front of the chassis, tilt the top of the chassis toward you.
2. Lift the AT-SBx3106 Chassis into the equipment rack and set the bottom of the equipment rack brackets firmly on the two equipment rack screws installed in “Preparing the Equipment Rack” on page 93. Refer to Figure 41 on page 100.
99

Chapter 5: Installing the Chassis on a Table or in an Equipment Rack
Figure 41. Lifting the AT-SBx3106 Chassis into the Equipment Rack
3. With the bottom of the rack mount ears resting on the two rack mount screws, tilt the top of the chassis back until both rackmount brackets are flush and parallel with the vertical rack rails.
4. Install four rack mount screws (not provided) to secure the chassis to the equipment rack, as shown in Figure 42.
Figure 42. Installing the Rack Mount Screws
Screws
Screws
100

SwitchBlade x3106 Chassis Switch and AT-SBx31CFC Card Installation Guide
5. Tighten all six screws shown in Figure 43 to secure the chassis to the equipment rack. Allied Telesis recommends tightening the screws to 10 inch-lbs.
Figure 43. Tightening the Rack Mount Screws
6. Go to “Removing the Shipping Brace” on page 102.
Screws
Screws
101

Chapter 5: Installing the Chassis on a Table or in an Equipment Rack
Removing the Shipping Brace
Now that the chassis is installed on the table or in the equipment rack, you may remove the shipping brace from the front of the unit. To remove the shipping brace, remove the six mounting screws with a #2 Phillips-head screwdriver (not provided). See Figure 44.
Figure 44. Removing the Shipping Brace
After removing the shipping plate, go to “Installing the Chassis Grounding Lug” on page 103.
Shipping Brace Screws
102

SwitchBlade x3106 Chassis Switch and AT-SBx31CFC Card Installation Guide
Installing the Chassis Grounding Lug
This procedure explains how to connect a ground wire to the chassis. The chassis, line cards, and power supplies require a permanent connection to a good earth ground. The procedure requires the following items:
Grounding lug (pre-installed on the rear panel of the chassis)
#2 Phillips-head screwdriver (not provided)
Crimping tool (not provided)
10 AWG stranded grounding wire (not provided)
#2 Phillips-head 20 inch-lbs torque screwdriver (optional — not provided)
To connect the chassis to an earth ground, perform the following procedure:
1. Prepare an adequate length of stranded grounding wire (10 AWG) for the ground connection by stripping it as shown in Figure 45.
Figure 45. Stripping the Grounding Wire
2. Remove the two screws that secure the grounding lug to the rear panel of the chassis, as shown in Figure 46.
Figure 46. Removing the Grounding Lug
103
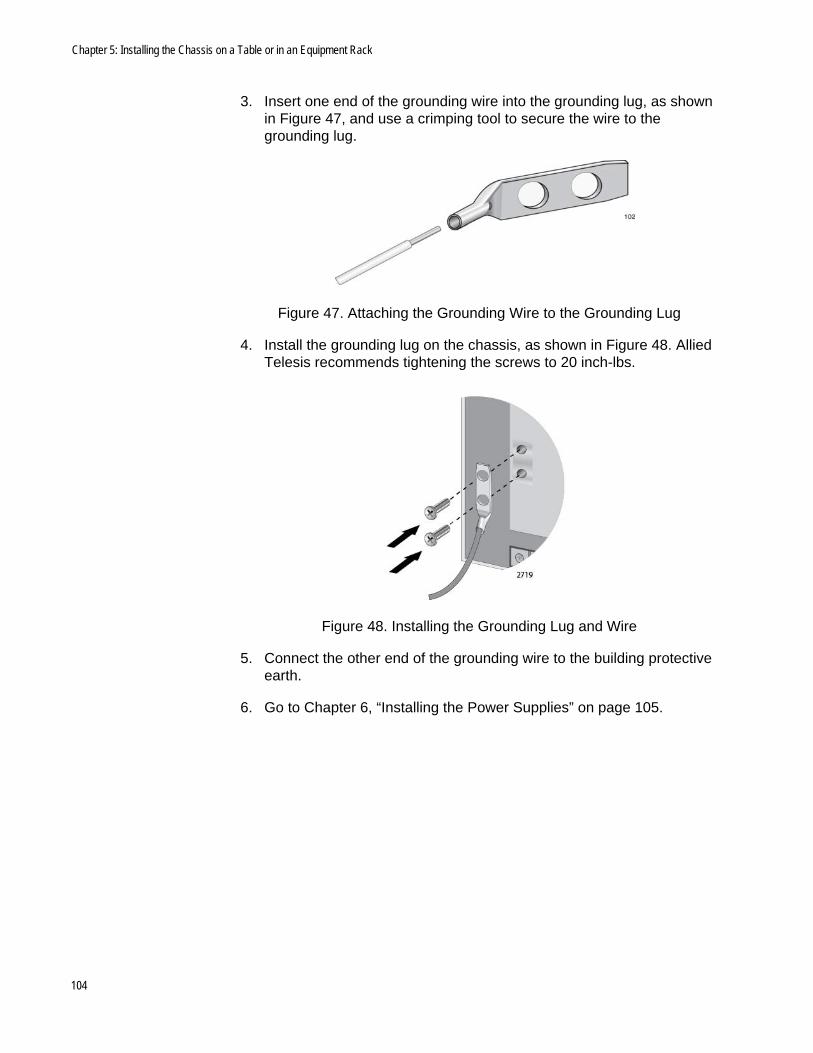
Chapter 5: Installing the Chassis on a Table or in an Equipment Rack
3. Insert one end of the grounding wire into the grounding lug, as shown in Figure 47, and use a crimping tool to secure the wire to the grounding lug.
Figure 47. Attaching the Grounding Wire to the Grounding Lug
4. Install the grounding lug on the chassis, as shown in Figure 48. Allied Telesis recommends tightening the screws to 20 inch-lbs.
Figure 48. Installing the Grounding Lug and Wire
5. Connect the other end of the grounding wire to the building protective earth.
6. Go to Chapter 6, “Installing the Power Supplies” on page 105.
104

Chapter 6
Installing the Power Supplies
This chapter explains how to install the power supplies. It has the following sections:
“Protecting Against Electrostatic Discharge (ESD)” on page 106
“Installing the AT-SBxPWRSYS1 or AT-SBxPWRSYS2 AC System Power Supply” on page 107
“Installing the AT-SBxPWRPOE1 AC Power Supply” on page 113
“Installing the AT-SBxPWRSYS1 DC System Power Supply” on page 118
105

Chapter 6: Installing the Power Supplies
Protecting Against Electrostatic Discharge (ESD)
To protect the equipment from damage by Electrostatic Discharge (ESD) during the installation procedure, observe proper ESD protection when handling the SwitchBlade x3106 line cards and power supplies. You should be properly grounded with a wrist or foot strap.
CautionElectrostatic Discharge (ESD) can damage the components on the SwitchBlade x3106 line cards and power supplies. Be sure to follow proper ESD procedures during the installation.
To guard against ESD, perform this procedure:
1. Verify that the chassis is electrically connected to earth ground.
2. Connect the wrist strap that comes with the chassis to the ESD socket below the AT-SBxFAN06 Fan Module, shown in Figure 49. This ensures that ESD voltages safely flow to ground.
Figure 49. ESD Socket and Wrist Strap
3. When you put on the ESD-preventive wrist strap, be sure it makes good contact with your skin.
106

SwitchBlade x3106 Chassis Switch and AT-SBx31CFC Card Installation Guide
Installing the AT-SBxPWRSYS1 or AT-SBxPWRSYS2 AC System Power Supply
For background information on the AT-SBxPWRSYS1 or AT-SBxPWRSYS2 AC System Power Supply, refer to “Power Supplies and Power Supply Slots” on page 24. The chassis must have at least one system power supply.
WarningThe electronic components in the power supply can be damaged by electro-static discharges (ESD). Follow the procedure in “Protecting Against Electrostatic Discharge (ESD)” on page 106 to guard against ESD damage when unpacking and installing the power supply.
To install the AT-SBxPWRSYS1 or AT-SBxPWRSYS2 AC System Power Supply, perform the following procedure:
1. Choose a slot in the chassis for the power supply.
You may install it in either slot C or D, shown in Figure 50. The first system power supply should be installed in slot D, because the slot does not come with a blank power supply panel.
Figure 50. Power Supply Slots
CautionThe AT-SBxPWRSYS1 and AT-SBxPWRSYS2 Power Supplies will not work in slot A or B.
PoE PowerSupply Slots
A B
System PowerSupply Slots
C D
107

Chapter 6: Installing the Power Supplies
2. If the chassis already has a power supply in slot D, remove the blank power supply panel from slot C by lifting the blank panel handle and sliding it out of the slot, as shown in Figure 51 on page 108.
Figure 51. Removing the Blank Slot Cover from Power Supply Slot C
3. Remove the new power supply from the shipping package and verify the package contents, listed in Figure 52 on page 109.
If any item is missing or damaged, contact your Allied Telesis sales representative for assistance.
108

SwitchBlade x3106 Chassis Switch and AT-SBx31CFC Card Installation Guide
Figure 52. Items Included with the AT-SBxPWRSYS1 or AT-SBxPWRSYS2 AC System Power Supply
NoteStore the packaging material in a safe location. You must use the original shipping material if you need to return the unit to Allied Telesis.
NoteThe tie wrap is used to secure the power cord to the chassis, as explained in “Powering On the AT-SBxPWRSYS1 or AT-SBxPWRSYS2 AC System Power Supply” on page 169.
4. Move the locking handle on the power supply to the unlocked or up position. See Figure 53 on page 110.
One AT-SBxPWRSYS1 or AT-SBxPWRSYS2 AC Power Supply Module
One regional AC power cord
One tie wrap
109

Chapter 6: Installing the Power Supplies
Figure 53. Raising the Handle on the Power Supply
5. Align and insert the power supply in the power supply slot. Figure 54 shows the power supply being installed in slot D.
Figure 54. Inserting the AT-SBxPWRSYS1 AC or AT-SBxPWRSYS2 Power Supply
6. Lower the power supply locking handle to secure the power supply to the chassis, as shown in Figure 55 on page 111.
110

SwitchBlade x3106 Chassis Switch and AT-SBx31CFC Card Installation Guide
Figure 55. Lowering the Handle on the AT-SBxPWRSYS1 or AT-SBxPWRSYS2 AC Power Supply
NoteIf the module does not fully seat in the chassis slot, check to be sure you are installing a system power supply and not a PoE power supply. The model name of the module is included on a label on the locking handle. Refer to “Power Supplies and Power Supply Slots” on page 24 for more information.
7. To install a second power supply, repeat this procedure.
8. After installing the AT-SBxPWRSYS1 or AT-SBxPWRSYS2 AC Power Supplies, do one of the following:
If you purchased the AT-SBxPWRPOE1 Power Supply for the PoE+ ports on the AT-SBx31GP24 PoE Line Cards, go to “Installing the AT-SBxPWRPOE1 AC Power Supply” on page 113.
Otherwise, go to Chapter 7, “Installing the AT-SBx31CFC Card and Ethernet Line Cards” on page 125.
111

Chapter 6: Installing the Power Supplies
NoteRetain the tie wrap that comes with the power supply. You will use it to secure the power cord to the chassis when you power on the unit in “Powering On the AT-SBxPWRSYS1 or AT-SBxPWRSYS2 AC System Power Supply” on page 169.
112

SwitchBlade x3106 Chassis Switch and AT-SBx31CFC Card Installation Guide
Installing the AT-SBxPWRPOE1 AC Power Supply
This section contains the installation procedure for the AT-SBxPWRPOE1 AC Power Supply. The module provides the power for the PoE+ ports on the AT-SBx31GP24 PoE Line Card. For background information, refer to “Power Supplies and Power Supply Slots” on page 24.
CautionThe electronic components in the AT-SBxPWRPOE1 AC Power Supply can be damaged by electro-static discharges (ESD). Follow the procedure in “Protecting Against Electrostatic Discharge (ESD)” on page 106 to guard against ESD damage when unpacking and installing the power supply.
To install the power supply, perform the following procedure:
1. Choose a slot for the AT-AT-SBxPWRPOE1 AC Power Supply in the chassis.
You may install it in either slot A or B. Refer to Figure 50 on page 107.
2. Raise the handle on the blank panel covering the selected slot and slide the panel from the chassis. Refer to Figure 56.
Figure 56. Removing the Blank Slot Cover from Power Supply Slot A
113

Chapter 6: Installing the Power Supplies
3. Remove the power supply from the shipping package and verify that the shipping package contains the items listed in Figure 57.
If any item is missing or damaged, contact your Allied Telesis sales representative for assistance.
Figure 57. Items Included with the AT-SBxPWRPOE1 Power Supply Module
NoteStore the packaging material in a safe location. You must use the original shipping material if you need to return the unit to Allied Telesis.
NoteThe tie wrap is used to secure the power cord to the chassis, as explained in “Powering on the AT-SBxPWRPOE1 AC PoE Power Supply” on page 172.
4. Raise the locking handle on the AT-SBxPWRPOE1 AC Power Supply, as shown Figure 58 on page 115.
One AT-SBxPWRPOE1 AC Power Supply Module
One regional AC power cord
One tie wrap
114

SwitchBlade x3106 Chassis Switch and AT-SBx31CFC Card Installation Guide
Figure 58. Raising the Handle on the AT-SBxPWRPOE1 AC Power Supply
5. Align and insert the AT-SBxPWRPOE1 Module into slot A or B. Figure 59 shows the power supply being installed in slot A.
CautionThe AT-SBxPWRPOE1 AC Power Supply will not work in slot C or D.
Figure 59. Inserting the AT-SBxPWRPOE1 AC Power Supply
115

Chapter 6: Installing the Power Supplies
6. Lower the locking handle of the power supply module to secure the module in the slot, as shown in Figure 60.
Figure 60. Locking the Handle on the AT-SBxPWRPOE1 AC Power Supply
NoteIf the module does not fully seat in the chassis slot, check to be sure you are installing a AT-SBxPWRPOE1 Power Supply and not a system power supply. The model name of the module is included on a label on the locking handle. Refer to “Power Supplies and Power Supply Slots” on page 24 for more information.
7. To install a second AT-SBxPWRPOE1 Power Supply, repeat this procedure.
8. After installing the AT-SBxPWRPOE1 Power Supplies, go to Chapter 7, “Installing the AT-SBx31CFC Card and Ethernet Line Cards” on page 125.
116

SwitchBlade x3106 Chassis Switch and AT-SBx31CFC Card Installation Guide
NoteRetain the tie wrap that comes with the power supply. You use it to secure the power cord to the chassis when you power on the unit in “Powering on the AT-SBxPWRPOE1 AC PoE Power Supply” on page 172.
117

Chapter 6: Installing the Power Supplies
Installing the AT-SBxPWRSYS1 DC System Power Supply
This section contains the installation procedure for the AT-SBxPWRSYS1 DC System Power Supply. For background information, refer to “Power Supplies and Power Supply Slots” on page 24.
Here is a list of the required material and tools:
Two 8 AWG power wires
One 10 AWG grounding wire
8 mm wrench
#1 Phillips-head screwdriver
#3 Phillips-head screwdriver
#3 Phillips-head 30 to 40 inch-lbs torque screwdriver (optional)
CautionThe electronic components in the AT-SBxPWRSYS1 DC System Power Supply can be damaged by electro-static discharges (ESD). Follow the procedure in “Protecting Against Electrostatic Discharge (ESD)” on page 106 to guard against ESD damage when unpacking and installing the power supply.
To install the power supply, perform the following procedure:
1. Choose a slot in the chassis for the AT-SBxPWRSYS1 DC System Power Supply.
You may install it in slot C or D, shown in Figure 50 on page 107. The first AT-SBxPWRSYS1 DC System Power Supply should be installed in slot D, because the slot does not have a blank power supply panel. If you are installing only one power supply, you may install it in either slot C or D.
CautionThe AT-SBxPWRSYS1 DC System Power Supply will not work in slot A or B.
2. If the chassis already has a power supply in slot D, remove the blank power supply panel from slot C by lifting the blank panel handle and sliding it out of the slot, as shown in Figure 61 on page 119.
118
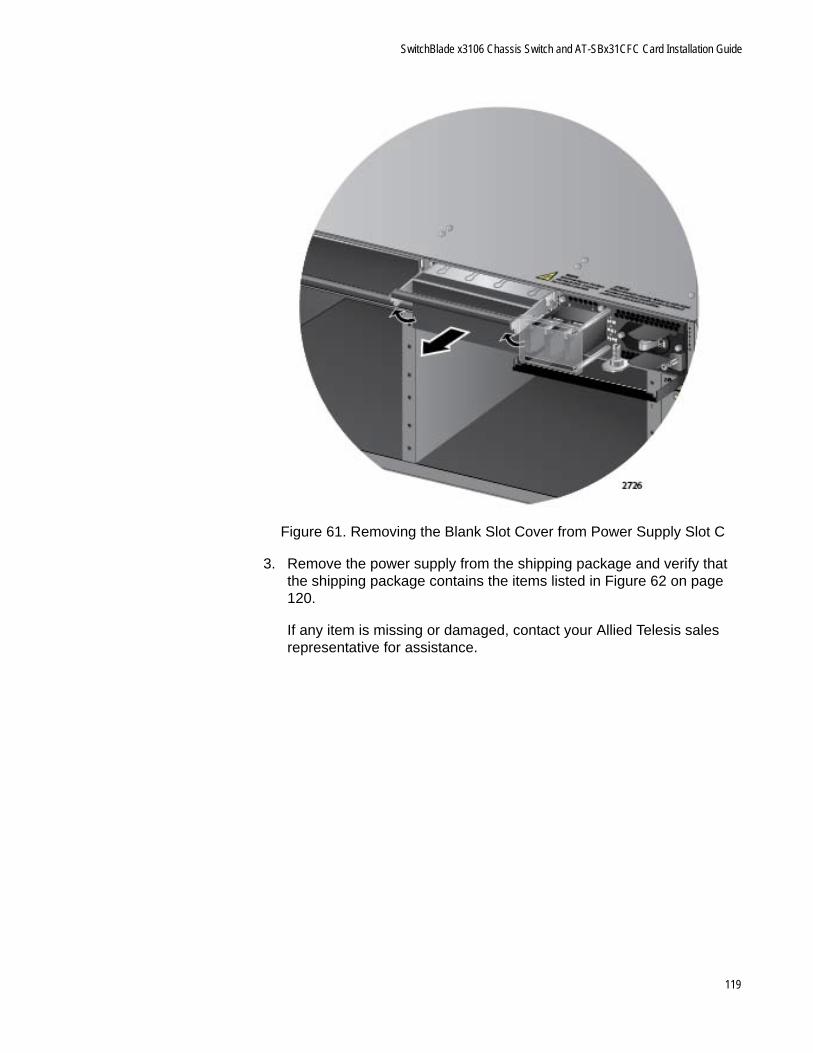
SwitchBlade x3106 Chassis Switch and AT-SBx31CFC Card Installation Guide
Figure 61. Removing the Blank Slot Cover from Power Supply Slot C
3. Remove the power supply from the shipping package and verify that the shipping package contains the items listed in Figure 62 on page 120.
If any item is missing or damaged, contact your Allied Telesis sales representative for assistance.
119

Chapter 6: Installing the Power Supplies
Figure 62. Items Included with the AT-SBxPWRSYS1 DC System Power Supply Module
NoteStore the packaging material in a safe location. You must use the original shipping material if you need to return the unit to Allied Telesis.
4. With a #2 Phillips-head screwdriver, loosen the handle locking screw on the power supply, as shown in Figure 63 on page 121.
One AT-SBxPWRSYS1 DC System Power Supply Module
Two straight power wire ring lugs
One grounding wire ring lug
Two right angle power wire ring lugs
120

SwitchBlade x3106 Chassis Switch and AT-SBx31CFC Card Installation Guide
Figure 63. Loosening the Handle locking Screw on the AT-SBxPWRPOE1 DC System Power Supply
5. Raise the locking handle on the AT-SBxPWRPOE1 DC System Power Supply, as shown Figure 64.
Figure 64. Raising the Handle on the AT-SBxPWRPOE1 DC System Power Supply
6. Align and insert the AT-SBxPWRSYS1 Module into slot C or D. Figure 65 on page 122 shows the power supply installed in slot D.
CautionThe AT-SBxPWRSYS1 DC System Power Supply will not work in slot A or B.
121

Chapter 6: Installing the Power Supplies
Figure 65. Inserting the AT-SBxPWRSYS1 DC System Power Supply
7. Lower the locking handle of the power supply module to secure the module in the slot, as shown in Figure 66 on page 123.
122

SwitchBlade x3106 Chassis Switch and AT-SBx31CFC Card Installation Guide
Figure 66. Locking the Handle on the AT-SBxPWRSYS1 DC System Power Supply
NoteDo not tighten the handle locking screw yet. You may need to slightly lift the handle to move the plastic guard panel when you wire the positive and negative wires in “Powering On the AT-SBxPWRSYS1 DC System Power Supply” on page 175.
8. To install a second AT-SBxPWRSYS1 DC System Power Supply, repeat this procedure.
9. After installing the AT-SBxPWRSYS1 DC System Power Supplies, go to Chapter 7, “Installing the AT-SBx31CFC Card and Ethernet Line Cards” on page 125.
NoteRetain the five wire ring lugs that come with the power supply. You use them to wire the power supply in “Powering On the AT-SBxPWRSYS1 DC System Power Supply” on page 175.
123

Chapter 6: Installing the Power Supplies
124

Chapter 7
Installing the AT-SBx31CFC Card and Ethernet Line Cards
This chapter describes how to install the controller and Ethernet line cards. The chapter has the following sections:
“Guidelines to Handling the Controller and Line Cards” on page 126
“Installing the AT-SBx31CFC Controller Fabric Card” on page 128
“Installing the Ethernet Line Cards” on page 134
“Installing the Blank Slot Covers” on page 138
125

Chapter 7: Installing the AT-SBx31CFC Card and Ethernet Line Cards
Guidelines to Handling the Controller and Line Cards
Please observe the following guidelines when handling the controller and Ethernet line cards:
The cards are hot swappable and can be installed or removed while the chassis is powered on.
Always wear an anti-static device when handling the cards.
CautionThe electronic components on the controller and line cards can be damaged by electro-static discharges (ESD). Follow the procedure in “Protecting Against Electrostatic Discharge (ESD)” on page 106 to guard against ESD damage when unpacking and installing the line cards.
Hold a card by its faceplate or edges.
Never touch the electronic components on the top or bottom of a card.
To avoid damaging the components on the bottom of a card, do not set it down on a table or desk. If you need to set down a card, return it to its anti-static bag and packaging container.
Do not remove a card from its anti-static bag until you are ready to install it in the chassis.
If you need to remove a card from the chassis, immediately return it in its anti-static bag and packaging container.
Never hold or lift a controller card by the handles on the front faceplate. You might bend or damage the handles.
CautionKeep a card level as you slide it into or out of the chassis. You might damage the components on the top or bottom of a card if you slide it at an angle. Refer to Figure 67 on page 127.
126

SwitchBlade x3106 Chassis Switch and AT-SBx31CFC Card Installation Guide
Figure 67. Aligning a Card in a Slot
CORRECT
INCORRECT
INCORRECT
127

Chapter 7: Installing the AT-SBx31CFC Card and Ethernet Line Cards
Installing the AT-SBx31CFC Controller Fabric Card
This section contains the installation procedure for the AT-SBx31CFC Controller Fabric card. You may install either one or two controller cards in the unit. The chassis must have at least one controller card. The cards are installed in slots 4 and 5 in the chassis.
NotePlease review “Guidelines to Handling the Controller and Line Cards” on page 126 before performing this procedure:
NoteFor instructions on how to upgrade a chassis to the AT-SBx31CFC960 Controller Fabric Card from the AT-SBx31CFC Card, refer to the SwitchBlade x3106 Chassis and AT-SBx31CFC960 Controller Fabric Card Installation Guide.
This procedure requires the following tools:
#2 Phillips-head screwdriver
#2 Phillips-head, 5 inch-lbs torque screwdriver (optional)
To install the AT-SBx31CFC Card, perform the following procedure:
1. Choose a slot in the chassis for the AT-SBx31CFC Controller Fabric card.
Slots 4 and 5 are for the controller cards. Slot 4 is dedicated for use with a controller card while slot 5 may be used with either a controller card or an Ethernet line card. If you are installing only one controller card, you should install it in slot 4. If you are installing two controller cards, you must install the second card in slot 5. Figure 68 identifies the slots in the chassis.
Figure 68. Slots 4 and 5 for the AT-SBx31CFC Card
Slot 4 Slot 5
128

SwitchBlade x3106 Chassis Switch and AT-SBx31CFC Card Installation Guide
2. Remove the new AT-SBx31CFC Card from the shipping package and verify the package contents, listed in Figure 69.
If any item is missing or damaged, contact your Allied Telesis sales representative for assistance.
Figure 69. Items Included with the AT-SBx31CFC Controller Fabric Card
NoteStore the packaging material in a safe location. You should use the original shipping material if you need to return the unit to Allied Telesis.
3. Carefully remove the controller card from the anti-static bag. Refer to Figure 70.
Figure 70. Removing the AT-SBx31CFC Controller Fabric Card from the Anti-static Bag
One AT-SBx31CFC Controller Fabric Card
One 2 m (6.6 ft) local management cable with RJ-45 (8P8C) and DB-9 (D-sub 9-pin) connectors.
129

Chapter 7: Installing the AT-SBx31CFC Card and Ethernet Line Cards
4. Move the locking handles on the front panel to the open position, as shown in Figure 71.
Figure 71. Opening the Locking Handles on the AT-SBx31CFC Controller Fabric Card
5. Remove the battery insulator tab on the controller card by sliding it out from between the battery and battery clip, as shown in Figure 72.
Figure 72. Removing the Battery Insulator
6. Align the edges of the AT-SBx31CFC Card with the internal chassis card guides in slot 4 or 5 of the AT-SBx3106 Chassis. Figure 73 on page 131 shows the AT-SBx31CFC Card aligned in slot 4.
130

SwitchBlade x3106 Chassis Switch and AT-SBx31CFC Card Installation Guide
Figure 73. Aligning the AT-SBx31CFC Card in the Chassis Slot
7. Slowly and carefully slide the card into the slot.
CautionKeep the card level with the chassis as you slide it into the slot. You might damage the components on the top or bottom of the card if you slide it in at an angle. Refer to Figure 67 on page 127.
CautionDo not force the AT-SBx31CFC Card into the slot. If you feel resistance, remove it and try again. Be sure that the edges of the card are properly aligned with the card guides.
8. When you feel the card make contact with the connector on the backplane of the chassis, carefully close the two locking levers on the front panel of the controller card to secure it in the chassis. Refer to Figure 74 on page 132.
131
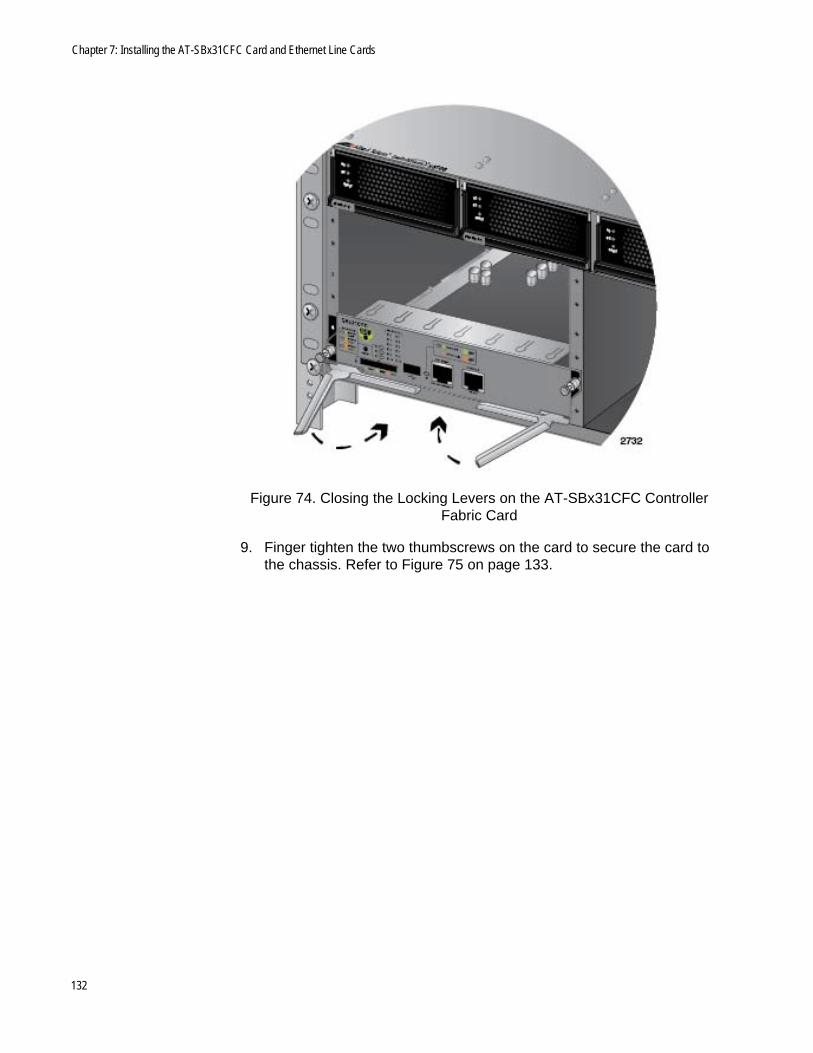
Chapter 7: Installing the AT-SBx31CFC Card and Ethernet Line Cards
Figure 74. Closing the Locking Levers on the AT-SBx31CFC Controller Fabric Card
9. Finger tighten the two thumbscrews on the card to secure the card to the chassis. Refer to Figure 75 on page 133.
132

SwitchBlade x3106 Chassis Switch and AT-SBx31CFC Card Installation Guide
Figure 75. Tightening the Thumb Screws on the AT-SBx31CFC Card
10. Tighten the screws with a # 2 Phillips-head screwdriver to secure the controller card to the chassis.
Allied Telesis recommends tightening the screws to 5 inch-lbs.
11. if you have a second AT-SBx31CFC Controller Fabric Card, repeat this procedure to install it in the chassis.
12. Go to “Installing the Ethernet Line Cards” on page 134.
133

Chapter 7: Installing the AT-SBx31CFC Card and Ethernet Line Cards
Installing the Ethernet Line Cards
This section contains the installation procedure for the Ethernet line cards. The illustrations show the AT-SBx31GP24 Line Card, but the procedure is the same for all the cards.
NotePlease review “Guidelines to Handling the Controller and Line Cards” on page 126 before performing this procedure:
This procedure requires the following tools:
#2 Phillips-head screwdriver
#2 Phillips-head, 5 inch-lbs torque screwdriver (optional)
To install the Ethernet line cards, perform the following procedure:
1. Choose a slot in the chassis for the Ethernet line card. Ethernet line cards may be installed in slots 0 to 3. You may also use slot 5 for an additional Ethernet line card if the chassis has only one controller card. (Slot 4 is reserved for the controller card.). Refer to Figure 5 on page 23.
2. Remove the line card from the shipping package. If it is missing or damaged, contact your Allied Telesis sales representative for assistance.
NoteStore the packaging material in a safe location. You should use the original shipping material if you need to return the unit to Allied Telesis.
3. Carefully remove the Ethernet line card from the anti-static bag. Refer to Figure 76 on page 135.
134

SwitchBlade x3106 Chassis Switch and AT-SBx31CFC Card Installation Guide
Figure 76. Removing an Ethernet Line Card from an Anti-static Bag
4. Align the line card with the internal chassis card guides in the selected slot of the AT-SBx3106 Chassis.
Figure 77 shows an Ethernet line card aligned in slot 0.
Figure 77. Aligning an Ethernet Line Card in a Chassis Slot
135
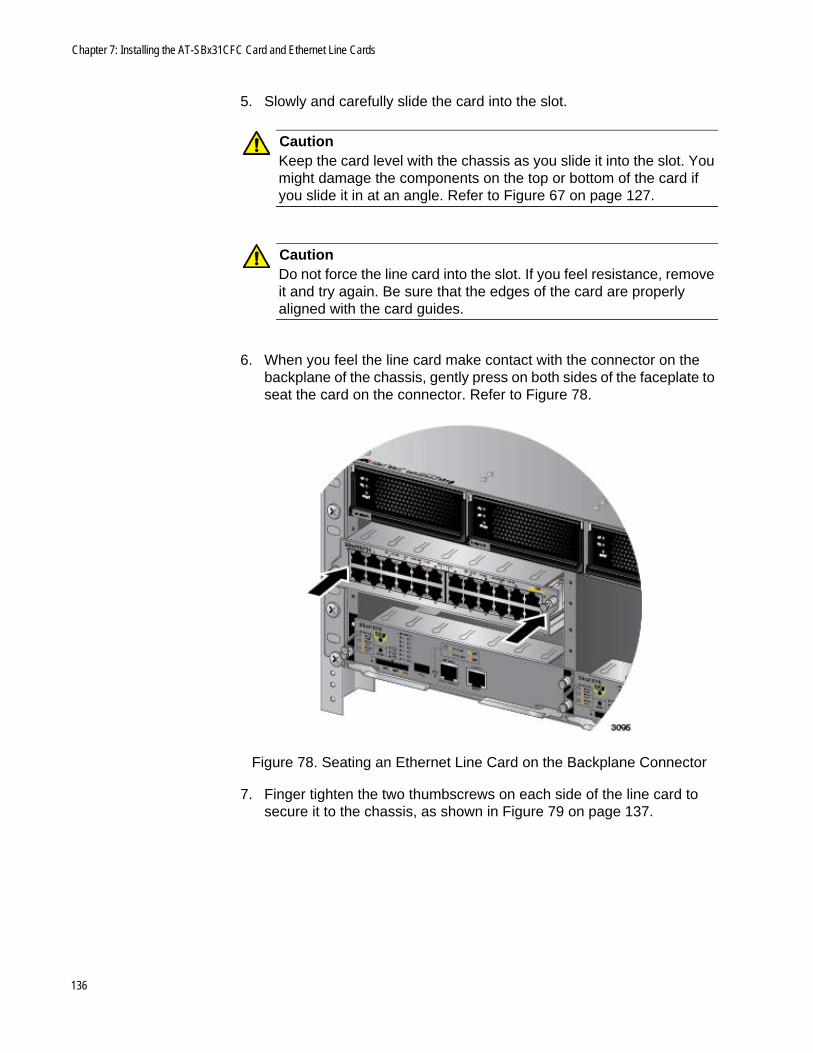
Chapter 7: Installing the AT-SBx31CFC Card and Ethernet Line Cards
5. Slowly and carefully slide the card into the slot.
CautionKeep the card level with the chassis as you slide it into the slot. You might damage the components on the top or bottom of the card if you slide it in at an angle. Refer to Figure 67 on page 127.
CautionDo not force the line card into the slot. If you feel resistance, remove it and try again. Be sure that the edges of the card are properly aligned with the card guides.
6. When you feel the line card make contact with the connector on the backplane of the chassis, gently press on both sides of the faceplate to seat the card on the connector. Refer to Figure 78.
Figure 78. Seating an Ethernet Line Card on the Backplane Connector
7. Finger tighten the two thumbscrews on each side of the line card to secure it to the chassis, as shown in Figure 79 on page 137.
136

SwitchBlade x3106 Chassis Switch and AT-SBx31CFC Card Installation Guide
Figure 79. Tightening the Thumb Screws on an Ethernet Line Card
8. Tighten the two screws with a # 2 Phillips-head screwdriver to secure the line card to the chassis.
Allied Telesis recommends tightening the screws to 5 inch-lbs.
9. Repeat this procedure to install the remaining Ethernet line cards.
10. After installing the line cards. go to “Installing the Blank Slot Covers” on page 138.
137
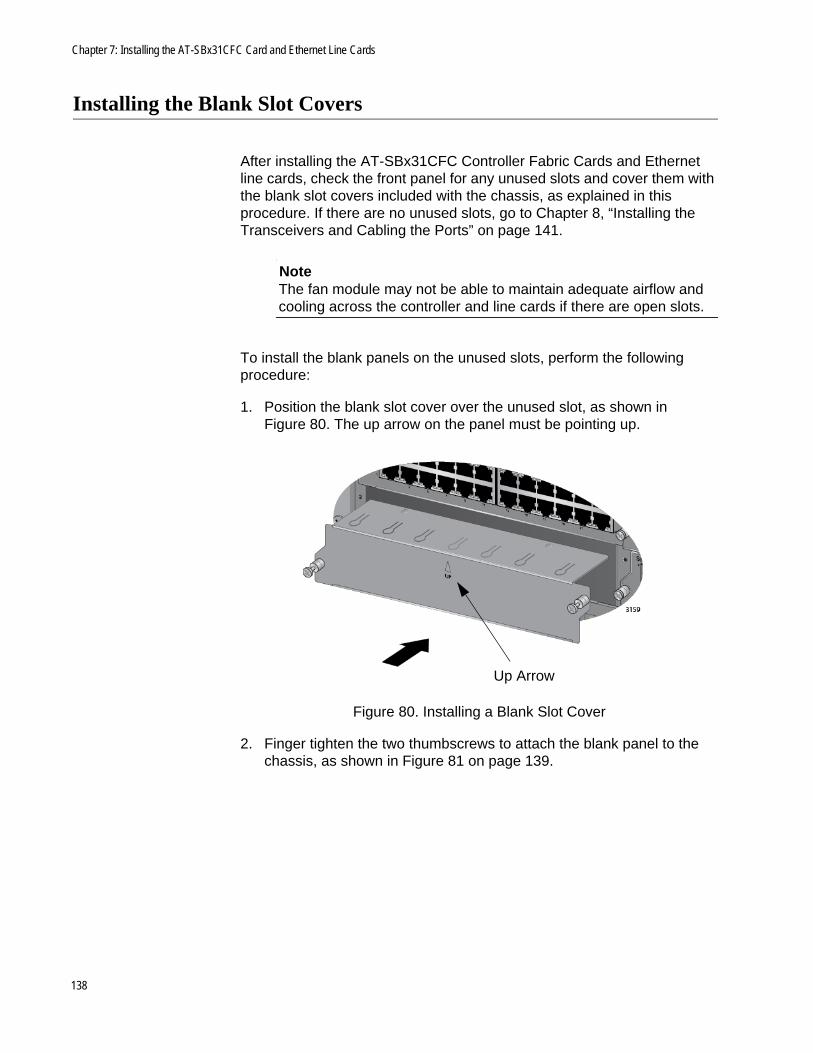
Chapter 7: Installing the AT-SBx31CFC Card and Ethernet Line Cards
Installing the Blank Slot Covers
After installing the AT-SBx31CFC Controller Fabric Cards and Ethernet line cards, check the front panel for any unused slots and cover them with the blank slot covers included with the chassis, as explained in this procedure. If there are no unused slots, go to Chapter 8, “Installing the Transceivers and Cabling the Ports” on page 141.
NoteThe fan module may not be able to maintain adequate airflow and cooling across the controller and line cards if there are open slots.
To install the blank panels on the unused slots, perform the following procedure:
1. Position the blank slot cover over the unused slot, as shown in Figure 80. The up arrow on the panel must be pointing up.
Figure 80. Installing a Blank Slot Cover
2. Finger tighten the two thumbscrews to attach the blank panel to the chassis, as shown in Figure 81 on page 139.
Up Arrow
138

SwitchBlade x3106 Chassis Switch and AT-SBx31CFC Card Installation Guide
Figure 81. Tightening the Thumbscrews on a Blank Slot Cover
3. Tighten the two screws with a # 2 Phillips-head screwdriver to secure the blank slot cover to the chassis.
Allied Telesis recommends tightening the screws to 5 inch-lbs.
4. Repeat this procedure to cover the remaining empty slots with blank slot covers.
5. Store any unused blank panels in a secure place for future use.
6. Go to Chapter 8, “Installing the Transceivers and Cabling the Ports” on page 141.
139

Chapter 7: Installing the AT-SBx31CFC Card and Ethernet Line Cards
140

Chapter 8
Installing the Transceivers and Cabling the Ports
This chapter describes how to install the fiber optic transceivers and attach the cables to the ports on the line cards. The chapter has the following sections:
“Guidelines to Cabling the Twisted Pair Ports on AT-SBx31GP24, AT-SBx31GT24, and AT-SBx31GT40 Line Cards” on page 142
“Guidelines to Installing SFP, SFP+, CSFP, and XFP Transceivers” on page 145
“Installing SFP Transceivers in the AT-SBx31GS24 Line Card” on page 146
“Installing SFP and CSFP Transceivers in the AT-SBx31GC40 Line Card” on page 149
“Installing SFP+ Transceivers in the AT-SBx31XS6 Line Card” on page 154
“Installing AT-SP10TW Cables in the AT-SBx31XS6 Line Card” on page 158
“Installing XFP Transceivers in the AT-SBx31XZ4 Line Card” on page 160
“Cabling the NET MGMT Port on the AT-SBx31CFC Card” on page 164
141

Chapter 8: Installing the Transceivers and Cabling the Ports
Guidelines to Cabling the Twisted Pair Ports on AT-SBx31GP24, AT-SBx31GT24, and AT-SBx31GT40 Line Cards
Here are guidelines to cabling the 10/100/1000Base-T twisted pair ports on AT-SBx31GT24, AT-SBx31GP24, and AT-SBx31GT40 Line Cards:
The 10/100/1000Base-T twisted pair ports on AT-SBx31GT24 and AT-SBx31GP24 Line Cards have 8-pin RJ45 connectors.
The 100/1000Base-T twisted pair ports on the AT-SBx31GT40 Line Card have 8-pin RJ point 5 connectors.
The cable specifications for the 10/100/1000Base-T twisted pair ports on AT-SBx31GT24 and AT-SBx31GT40 Line Cards are listed in Table 13 on page 54.
The cable specifications for the 10/100/1000Base-T twisted pair ports on the AT-SBx31GP24 Line Card are listed in Table 14 on page 55.
The connectors on the cables should fit snugly into the ports, and the tabs should lock the connectors into place.
The default setting for PoE on the ports on the AT-SBx31GP24 Line Card is enabled.
The default speed setting for the ports is Auto-Negotiation. This setting is appropriate for ports connected to network devices that also support Auto-Negotiation.
The default speed setting of Auto-Negotiation is not appropriate for ports connected to network devices that do not support Auto-Negotiation and have fixed speeds or 10 or 100 Mbps. For those switch ports, disable Auto-Negotiation and set the port’s speed manually to match the speeds of the network devices.
The 10/100/1000Base-T ports must be set to Auto-Negotiation, the default setting, to operate at 1000Mbps.
The default duplex mode setting for the ports is Auto-Negotiation. This setting is appropriate for ports connected to network devices that also support Auto-Negotiation for duplex modes.
The default duplex mode setting of Auto-Negotiation is not appropriate for ports connected to network devices that do not support Auto-Negotiation and have a fixed duplex mode. Disable Auto-Negotiation on those ports and set their duplex modes manually to avoid the possibility of duplex mode mismatches. A switch port using Auto-Negotiation defaults to half-duplex if it detects that the end node is not using Auto-Negotiation. This can result in a mismatch if the end node is operating at a fixed duplex mode of full-duplex.
The MDI/MDIX wiring configuration of the ports is set automatically with
142
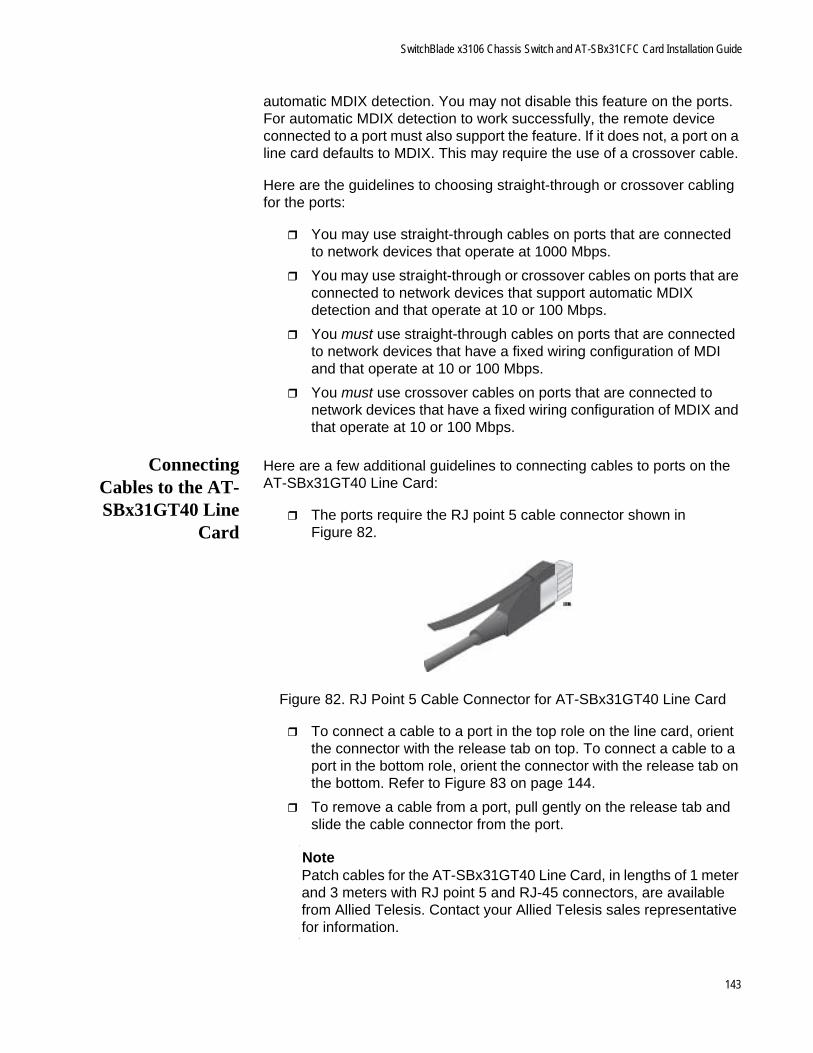
SwitchBlade x3106 Chassis Switch and AT-SBx31CFC Card Installation Guide
automatic MDIX detection. You may not disable this feature on the ports. For automatic MDIX detection to work successfully, the remote device connected to a port must also support the feature. If it does not, a port on a line card defaults to MDIX. This may require the use of a crossover cable.
Here are the guidelines to choosing straight-through or crossover cabling for the ports:
You may use straight-through cables on ports that are connected to network devices that operate at 1000 Mbps.
You may use straight-through or crossover cables on ports that are connected to network devices that support automatic MDIX detection and that operate at 10 or 100 Mbps.
You must use straight-through cables on ports that are connected to network devices that have a fixed wiring configuration of MDI and that operate at 10 or 100 Mbps.
You must use crossover cables on ports that are connected to network devices that have a fixed wiring configuration of MDIX and that operate at 10 or 100 Mbps.
ConnectingCables to the AT-SBx31GT40 Line
Card
Here are a few additional guidelines to connecting cables to ports on the AT-SBx31GT40 Line Card:
The ports require the RJ point 5 cable connector shown in Figure 82.
Figure 82. RJ Point 5 Cable Connector for AT-SBx31GT40 Line Card
To connect a cable to a port in the top role on the line card, orient the connector with the release tab on top. To connect a cable to a port in the bottom role, orient the connector with the release tab on the bottom. Refer to Figure 83 on page 144.
To remove a cable from a port, pull gently on the release tab and slide the cable connector from the port.
NotePatch cables for the AT-SBx31GT40 Line Card, in lengths of 1 meter and 3 meters with RJ point 5 and RJ-45 connectors, are available from Allied Telesis. Contact your Allied Telesis sales representative for information.
143

Chapter 8: Installing the Transceivers and Cabling the Ports
Figure 83. Connecting Cables to Ports on the AT-SBx31GT40 Line Card
Release tab
Connecting a cable to a port in the top row.
Connecting a cable to a port in the bottom row.
144

SwitchBlade x3106 Chassis Switch and AT-SBx31CFC Card Installation Guide
Guidelines to Installing SFP, SFP+, CSFP, and XFP Transceivers
Please review the following guidelines before installing fiber optic transceivers in AT-SBx31GS24, AT-SBx31GC40, AT-SBx31XS6, or AT-SBx31XZ4 Line Cards:
You should install a transceiver in a line card before connecting its network cable.
A fiber optic transceiver is dust sensitive. Always keep the protective cover in the optical bores when a fiber optic cable is not installed, or when you store the transceiver. When you do remove this cover, retain it for future use.
Your Allied Telesis sales representative can provide you with a list of supported transceivers for the line cards.
The operational specifications and fiber optic cable requirements of the transceivers are provided in the documents included with the devices.
The SFP, SFP+, CSFP, and XFP transceivers and AT-SP10TW cables are hot-swappable. You may install them while the chassis is powered on.
Unnecessary removal or insertion of transceivers can lead to premature failures.
WarningTransceivers can be damaged by static electricity. Follow the procedure in “Protecting Against Electrostatic Discharge (ESD)” on page 106 to guard against ESD damage when unpacking and installing the devices.
CautionThe temperature of an operational transceiver may exceed 70 C (158 F). Exercise caution when removing or handling a transceiver with unprotected hands.
145

Chapter 8: Installing the Transceivers and Cabling the Ports
Installing SFP Transceivers in the AT-SBx31GS24 Line Card
Please review the information in “Guidelines to Installing SFP, SFP+, CSFP, and XFP Transceivers” on page 145 before performing this procedure.
To install SFP transceivers in the AT-SBx31GS24 Line Card, perform the following procedure:
1. Remove the transceiver from its shipping container and store the packaging material in a safe location.
2. Remove the dust cover from the SFP slot chosen for the transceiver. Figure 84 shows the removal of the dust cover from transceiver slot 0 on the line card in chassis slot 0.
Figure 84. Removing the Dust Cover from an SFP Slot in the AT-SBx31GS24 Line Card
3. To install the transceiver in an SFP slot on the top row of the line card, orient the transceiver with the handle on top, as shown in Figure 85. To install it into a slot on the bottom row of the line card, orient it with the handle on the bottom.
Figure 85. Handle on SFP Transceiver
Handle
146

SwitchBlade x3106 Chassis Switch and AT-SBx31CFC Card Installation Guide
4. Slide the transceiver into the slot until it clicks into place, as shown in Figure 86.
Figure 86. Inserting an SFP Transceiver in the AT-SBx31GS24 Line Card
NoteIf you are ready to attach the fiber optic cable to the transceiver, continue with the next step. Otherwise, repeat steps 1 to 4 to install the remaining SFP transceivers in the line cards.
5. Remove the protective cover from the SFP transceiver, as shown in Figure 87.
Figure 87. Removing the Dust Cover from the SFP Transceiver in the AT-SBx31GS24 Line Card
147
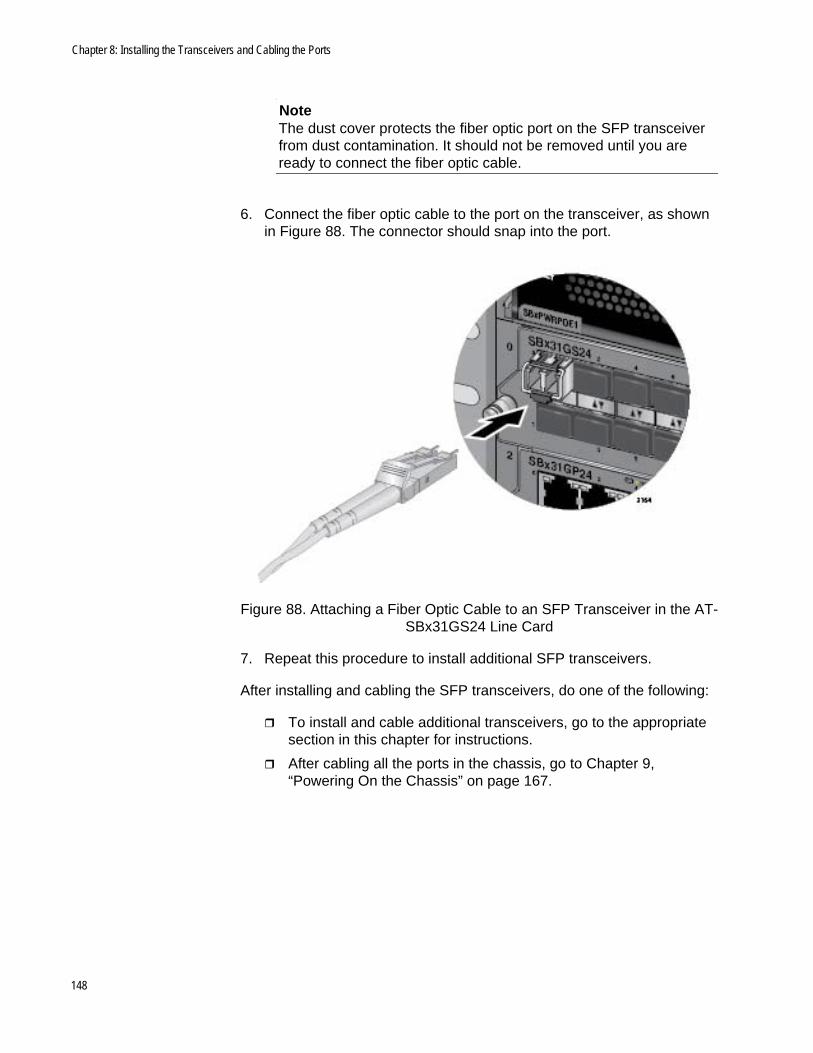
Chapter 8: Installing the Transceivers and Cabling the Ports
NoteThe dust cover protects the fiber optic port on the SFP transceiver from dust contamination. It should not be removed until you are ready to connect the fiber optic cable.
6. Connect the fiber optic cable to the port on the transceiver, as shown in Figure 88. The connector should snap into the port.
Figure 88. Attaching a Fiber Optic Cable to an SFP Transceiver in the AT-SBx31GS24 Line Card
7. Repeat this procedure to install additional SFP transceivers.
After installing and cabling the SFP transceivers, do one of the following:
To install and cable additional transceivers, go to the appropriate section in this chapter for instructions.
After cabling all the ports in the chassis, go to Chapter 9, “Powering On the Chassis” on page 167.
148

SwitchBlade x3106 Chassis Switch and AT-SBx31CFC Card Installation Guide
Installing SFP and CSFP Transceivers in the AT-SBx31GC40 Line Card
Please review the information in “Guidelines to Installing SFP, SFP+, CSFP, and XFP Transceivers” on page 145 before performing this procedure.
To install SFP and CSFP transceivers in AT-SBx31GS24 Line Cards, perform the following procedure:
1. Remove the transceiver from its shipping container and store the packaging material in a safe location.
2. Remove the dust cover from the slot chosen for the transceiver. Figure 89 shows the dust cover being removed from the first slot on the line card in slot 0 of the chassis.
Figure 89. Removing the Dust Cover from a Transceiver Slot on the AT-SBx31GC40 Line Card
3. To install an SFP or a CSFP transceiver in a slot on the top row of the line card, orient it with the label on top, as shown in Figure 90 on page 150. To install it into a slot on the bottom row of the line card, orient it with the label on the bottom.
149

Chapter 8: Installing the Transceivers and Cabling the Ports
Figure 90. Labels on SFP and CSFP Transceivers
4. Slide the transceiver into the slot until it clicks into place, as shown in Figure 91.
Figure 91. Inserting an SFP or a CSFP Transceiver
NoteIf you are ready to attach the fiber optic cable to the transceiver, continue with the next step. Otherwise, repeat steps 1 to 4 to install the remaining SFP and CSFP transceivers in the line cards.
5. Remove the protective cover from the ports on the transceiver, as shown in Figure 92 on page 151.
Label
150

SwitchBlade x3106 Chassis Switch and AT-SBx31CFC Card Installation Guide
Figure 92. Removing the Dust Cover from an SFP or a CSFP Transceiver
NoteThe dust cover protects the fiber optic ports on the transceiver from dust contamination. It should not be removed until you are ready to connect the fiber optic cable.
6. Connect the fiber optic cables to the port on the transceiver, as shown in Figure 93 on page 152. The connectors should snap into the ports. If you are connecting only one cable to a CSFP transceiver, you may connect it to either port.
151

Chapter 8: Installing the Transceivers and Cabling the Ports
Figure 93. Attaching a Fiber Optic Cable
7. Repeat this procedure to install additional SFP and CSFP transceivers.
After installing and cabling the SFP and CSFP transceivers, do one of the following:
To install and cable additional transceivers, go to the appropriate section in this chapter for instructions.
SFP Transceiver
CSFP Transceiver
152

SwitchBlade x3106 Chassis Switch and AT-SBx31CFC Card Installation Guide
After cabling all the ports in the chassis, go to Chapter 9, “Powering On the Chassis” on page 167.
153
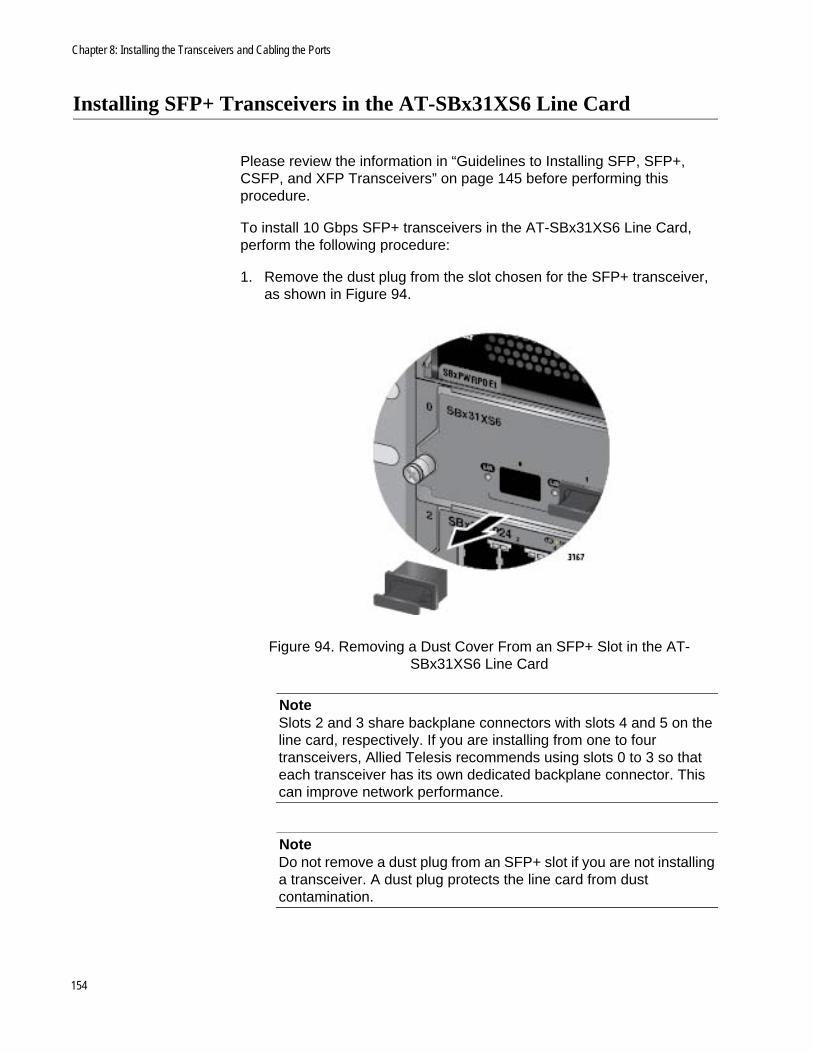
Chapter 8: Installing the Transceivers and Cabling the Ports
Installing SFP+ Transceivers in the AT-SBx31XS6 Line Card
Please review the information in “Guidelines to Installing SFP, SFP+, CSFP, and XFP Transceivers” on page 145 before performing this procedure.
To install 10 Gbps SFP+ transceivers in the AT-SBx31XS6 Line Card, perform the following procedure:
1. Remove the dust plug from the slot chosen for the SFP+ transceiver, as shown in Figure 94.
Figure 94. Removing a Dust Cover From an SFP+ Slot in the AT-SBx31XS6 Line Card
NoteSlots 2 and 3 share backplane connectors with slots 4 and 5 on the line card, respectively. If you are installing from one to four transceivers, Allied Telesis recommends using slots 0 to 3 so that each transceiver has its own dedicated backplane connector. This can improve network performance.
NoteDo not remove a dust plug from an SFP+ slot if you are not installing a transceiver. A dust plug protects the line card from dust contamination.
154

SwitchBlade x3106 Chassis Switch and AT-SBx31CFC Card Installation Guide
2. Orient the SFP+ transceiver with the handle on top, as shown in Figure 95.
Figure 95. Handle on SFP+ Transceiver
3. Slide the transceiver into the slot until it clicks into place, as shown in Figure 96.
Figure 96. Installing an SFP+ Transceiver in the AT-SBx31XS6 Line Card
NoteIf you are ready to attach the fiber optic cable to the transceiver, continue with the next step. Otherwise, repeat steps 1 to 3 to install the remaining SFP transceivers in the line cards.
4. Remove the protective cover from the SFP transceiver, as shown in Figure 97 on page 156.
Handle
155

Chapter 8: Installing the Transceivers and Cabling the Ports
Figure 97. Removing the Dust Cover from an SFP+ Transceiver in the AT-SBx31XS6 Line Card
NoteThe dust cover protects the fiber optic port on the SFP transceiver from dust contamination. It should not be removed until you are ready to connect the fiber optic cable.
5. Connect the fiber optic cable to the port on the transceiver, as shown in Figure 98 on page 157. The connector should snap into the port.
156

SwitchBlade x3106 Chassis Switch and AT-SBx31CFC Card Installation Guide
Figure 98. Attaching a Fiber Optic Cable to an SFP+ Transceiver in the AT-SBx31XS6 Line Card
6. Repeat this procedure to install additional SFP plus transceivers in the AT-SBx31XS6 Line Cards.
After installing and cabling the SFP+ transceivers, do one of the following:
To install and cable additional transceivers, go to the appropriate section in this chapter for instructions.
After cabling all the ports in the chassis, go to Chapter 9, “Powering On the Chassis” on page 167.
157

Chapter 8: Installing the Transceivers and Cabling the Ports
Installing AT-SP10TW Cables in the AT-SBx31XS6 Line Card
This procedure explains how to connect AT-SP10TW Cables to the AT-SBx31XS6 Line Card. The cables may be used in place of fiber optic cables and transceivers for 10 Gbps links of up to 7 meters.
NoteThe AT-SP10TW Cable is only supported in the AT-SBx31XS6 Line Card.
To install the AT-SP10TW Cable, perform the following procedure:
1. Remove the dust plug from the SFP+ slot chosen for the cable. Refer to Figure 94 on page 154.
NoteDo not remove the dust plug from a SFP+ slot if you are not installing the transceiver at this time. The dust plug protects the line card from dust contamination.
2. Orient the connector on the AT-SP10TW cable so that the release tab is on top, as shown in Figure 99.
Figure 99. Release Tab on the AT-SBx31XS6 Line Card
3. Slide the connector into the slot until it clicks into place, as shown in Figure 100 on page 159.
Release Tab
158
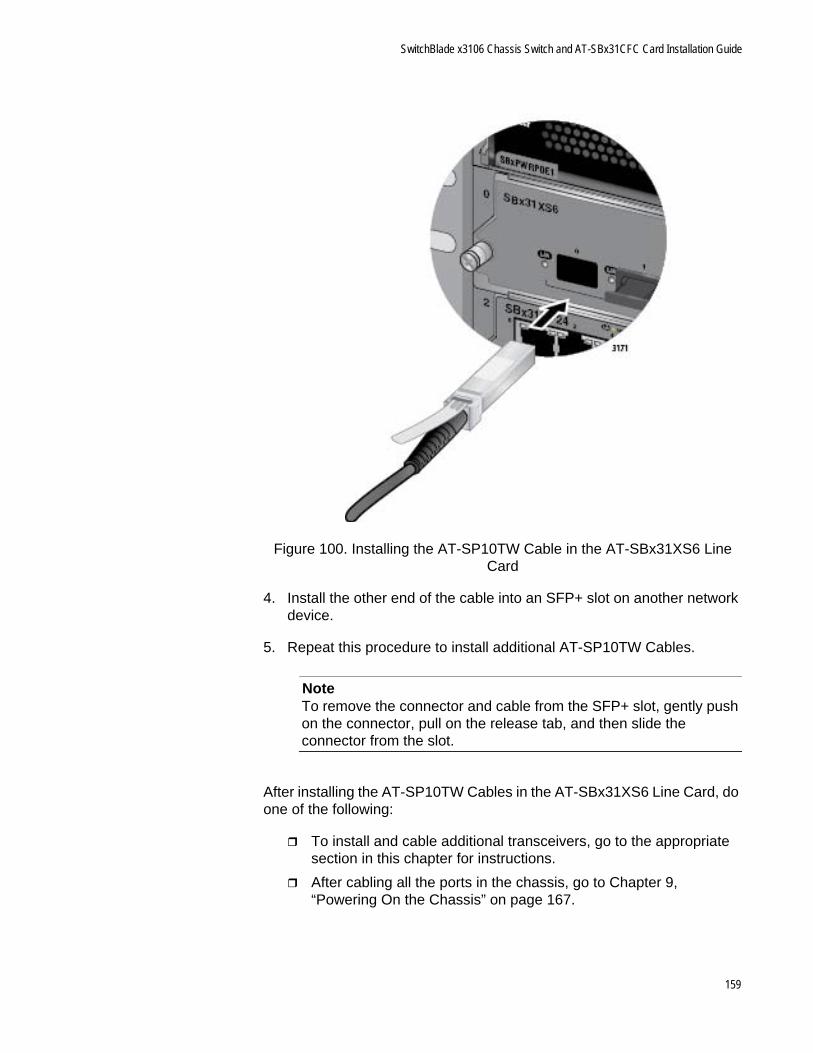
SwitchBlade x3106 Chassis Switch and AT-SBx31CFC Card Installation Guide
Figure 100. Installing the AT-SP10TW Cable in the AT-SBx31XS6 Line Card
4. Install the other end of the cable into an SFP+ slot on another network device.
5. Repeat this procedure to install additional AT-SP10TW Cables.
NoteTo remove the connector and cable from the SFP+ slot, gently push on the connector, pull on the release tab, and then slide the connector from the slot.
After installing the AT-SP10TW Cables in the AT-SBx31XS6 Line Card, do one of the following:
To install and cable additional transceivers, go to the appropriate section in this chapter for instructions.
After cabling all the ports in the chassis, go to Chapter 9, “Powering On the Chassis” on page 167.
159

Chapter 8: Installing the Transceivers and Cabling the Ports
Installing XFP Transceivers in the AT-SBx31XZ4 Line Card
Please review the information in “Guidelines to Installing SFP, SFP+, CSFP, and XFP Transceivers” on page 145 before performing this procedure.
To install XFP transceivers in the AT-SBx31XZ4 Line Card, perform the following procedure:
1. Remove the dust plug from the slot chosen for the transceiver, as shown in Figure 101.
Figure 101. Removing the Dust Cover From an XFP Slot on the AT-SBx31XZ4 Line Card
NoteDo not remove the dust plug from the XFP slot if you are not installing the transceiver at this time. The dust plug protects the line card from dust contamination.
2. Remove the transceiver from its shipping container.
3. Orient the transceiver with the handle on top, as shown in Figure 102 on page 161.
160

SwitchBlade x3106 Chassis Switch and AT-SBx31CFC Card Installation Guide
Figure 102. Handle on the XFP Transceiver
4. Slide the transceiver into the slot until it clicks into place, as shown in Figure 103.
Figure 103. Installing an XFP Transceiver in the AT-SBx31XZ4 Line Card
NoteIf you are ready to attach the fiber optic cable to the transceiver, continue with the next step. Otherwise, repeat steps 1 to 4 to install the remaining XFP transceivers.
5. Remove the protective cover from the fiber optic port on the XFP transceiver, as shown in Figure 104 on page 162.
Handle
161

Chapter 8: Installing the Transceivers and Cabling the Ports
Figure 104. Removing the Protective Cover from an XFP Transceiver in the AT-SBx31XZ4 Line Card
NoteThe dust cover protects the fiber optic port on the XFP transceiver from dust contamination and should not be removed until you are ready to connect the fiber optic cable.
6. Connect the fiber optic cable to the port on the transceiver, as shown in Figure 105 on page 163. The connector should snap into the port.
162

SwitchBlade x3106 Chassis Switch and AT-SBx31CFC Card Installation Guide
Figure 105. Attaching a Fiber Optic Cable to an XFP Transceiver in the AT-SBx31XZ4 Line Card
7. Repeat this procedure to install additional XFP transceivers.
After installing and cabling the XFP transceivers in the AT-SBx31XZ4 Line Cards, do one of the following:
To install and cable additional transceivers, go to the appropriate section in this chapter for instructions.
After cabling all the ports in the chassis, go to Chapter 9, “Powering On the Chassis” on page 167.
163

Chapter 8: Installing the Transceivers and Cabling the Ports
Cabling the NET MGMT Port on the AT-SBx31CFC Card
The controller card must have access to your network to support the management features in Table 21 on page 73. You can give the controller card access to your network either by configuring the Inband Interface, which allows the card to use the backplane and line cards to communicate with your network, or connecting the NET MGMT port to a network device, such as a switch, router, or workstation. (For instructions on how to configure the Inband Interface, refer to the Software Reference for SwitchBlade x3100 Series Switches.)
Here are the guidelines to using the NET MGMT port:
The cabling requirements of the port are the same as the ports on the AT-SBx31GT24 Line Card, in Table 13 on page 54.
If the chassis has two AT-SBx31CFC Controller Cards, connect the NET MGMT ports on both cards to network devices so that the inactive card can perform the management functions if it becomes the active card.
The port uses Auto-Negotiation to set its speed and duplex. You may not disable Auto-Negotiation. If you connect the port to a network device that does not support Auto-Negotiation, it defaults to 10 Mbps, half-duplex mode. To avoid a speed or duplex mode mismatch, connect the port only to a device that also uses Auto-Negotiation.
You may connect the NET MGMT port to a port on one of the Ethernet line cards in the chassis so that the controller card communicates with your network through the line cards. However, you can achieve the same result by configuring the Inband Interface instead, as explained in the Software Reference for SwitchBlade x3100 Series Switches.
The wiring configuration of the port is set automatically with automatic MDIX detection. You may not disable automatic MDIX detection. For automatic MDIX detection to work successfully, the network device you connect to the port must also support the feature. If it does not, the NET MGMT port defaults to MDIX. This may entail the use of a crossover cable. Here are the guidelines to choosing a straight-through or crossover cable for the port:
You may use a straight-through cable to connect the port to a network device that operates at 1000 Mbps.
You may use a straight-through or crossover cable to connect the port to a network device that supports automatic MDIX detection and that operates at 10 or 100 Mbps.
You must use a straight-through cable to connect the port to a network device that operates at 10 or 100 Mbps and has a fixed
164

SwitchBlade x3106 Chassis Switch and AT-SBx31CFC Card Installation Guide
wiring configuration of MDI.
You must use a crossover cable to connect the port to a network device that operates at 10 or 100 Mbps and has a fixed wiring configuration of MDIX.
After cabling the ports in the chassis, go to Chapter 9, “Powering On the Chassis” on page 167.
165

Chapter 8: Installing the Transceivers and Cabling the Ports
166

Chapter 9
Powering On the Chassis
This chapter contains procedures for powering on the chassis, monitoring the initialization process, and confirming the operational status of the components. The chapter contains the following sections:
“Verifying the Installation” on page 168
“Powering On the AT-SBxPWRSYS1 or AT-SBxPWRSYS2 AC System Power Supply” on page 169
“Powering on the AT-SBxPWRPOE1 AC PoE Power Supply” on page 172
“Powering On the AT-SBxPWRSYS1 DC System Power Supply” on page 175
“Monitoring the Initialization Process” on page 199
167

Chapter 9: Powering On the Chassis
Verifying the Installation
Please perform the following procedure before powering on the chassis:
1. Verify that the grounding lug on the back panel of the chassis is properly grounded. For instructions, refer to “Installing the Chassis Grounding Lug” on page 103.
2. Verify that all empty slots on the front panel of the chassis are covered with slot covers. To cover open slots, perform the procedure “Installing the Blank Slot Covers” on page 138.
3. Verify that dust plugs are installed in all empty SFP, SFP+, CSFP, and XFP slots on the Ethernet line cards.
4. Verify that dust covers are installed on all SFP, SFP+, CSFP, and XFP transceivers that do not have cables.
5. Verify that the chassis has at least one AT-SBx31CFC Controller Fabric Card installed in slot 4 or 5.
6. Verify that the chassis has at least one AT-SBxPWRSYS1 or AT-SBxPWRSYS2 Power Supply in slot C or D.
7. If the chassis has AT-SBx31GP24 Line Cards, verify that it has at least one AT-SBxPWRPOE1 Power Supply in slot A or B.
8. When you installed the AT-SBx31CFC Controller Fabric Card, did you remove the battery insulator, shown in Figure 72 on page 130? If not, remove the controller card from the chassis, remove the insulator from the battery, and reinstall the card.
You may now power on the chassis. For instructions, refer to the appropriate procedure:
“Powering On the AT-SBxPWRSYS1 or AT-SBxPWRSYS2 AC System Power Supply” on page 169
“Powering on the AT-SBxPWRPOE1 AC PoE Power Supply” on page 172
“Powering On the AT-SBxPWRSYS1 DC System Power Supply” on page 175
NoteIf the chassis has both system and PoE power supplies, you may power on the power supplies in any order or simultaneously.
168

SwitchBlade x3106 Chassis Switch and AT-SBx31CFC Card Installation Guide
Powering On the AT-SBxPWRSYS1 or AT-SBxPWRSYS2 AC System Power Supply
The procedure in this section explains how to power on the AT-SBxPWRSYS1 or AT-SBxPWRSYS2 AC System Power Supply in the chassis. System power supplies provide power for all of the hardware components of the chassis, including line cards, controller cards, and fan module. The only component that system power supplies do not support is the PoE feature on the ports on the AT-SBx31GP24 Line Cards. For installation instructions, refer to “Installing the AT-SBxPWRSYS1 or AT-SBxPWRSYS2 AC System Power Supply” on page 107.
NoteIf the chassis has both system and PoE power supplies, you may power on the power supplies in any order or simultaneously.
To power on the chassis, perform the following procedure:
1. Identify AC sockets C and D in the recessed panel on the back panel of the chassis, shown in Figure 106. The sockets are for the system power supplies in slots C and D on the front panel of the chassis.
Figure 106. AC Sockets on the AT-SBx3106 Chassis Rear Panel
2. Plug the AC power cord that comes with the power supply into a plug whose corresponding slot on the front panel has a system power supply.
If there are two system power supplies, you may power on either supply first. The illustration in Figure 107 on page 170 shows the AC power cord being connected to connector D for the power supply in slot D on the front panel.
A
D
C
B
169

Chapter 9: Powering On the Chassis
Figure 107. Connecting the AC Power Cord for the AT-SBxPWRSYS1 or AT-SBxPWRSYS2 AC System Power Supply
3. Use the twist tie included with the power supply to secure the cord to an anchor on the chassis to protect it from being accidentally pulled out, as shown in Figure 108 on page 171.
170

SwitchBlade x3106 Chassis Switch and AT-SBx31CFC Card Installation Guide
Figure 108. Securing the Power Cord for the AT-SBxPWRSYS1 or AT-SBxPWRSYS2 AC System Power Supply to an Anchor
4. Connect the power cord to an appropriate AC power source to power on the power supply.
5. If the chassis has two AT-SBxPWRSYS1 or AT-SBxPWRSYS2 AC System Power Supplies, repeat steps 1 to 4 to power on the second power supply.
6. After powering on the system power supplies, do one of the follow:
If the chassis has AT-SBxPWRPOE1 PoE Power Supplies, perform the procedure in “Powering on the AT-SBxPWRPOE1 AC PoE Power Supply” on page 172.
Otherwise, go to “Monitoring the Initialization Process” on page 199.
Anchor
171

Chapter 9: Powering On the Chassis
Powering on the AT-SBxPWRPOE1 AC PoE Power Supply
This section contains instructions on how to power on the AT-SBxPWRPOE1 AC PoE Power Supply. For installation instructions, refer to “Installing the AT-SBxPWRPOE1 AC Power Supply” on page 113. To power on the power supply, perform the following procedure:
1. Identify AC sockets A and B in the recessed panel on the back panel of the chassis, shown in Figure 106 on page 169. The sockets are for the AT-SBxPWRPOE1 Power Supplies in slots A and B on the front panel of the chassis.
2. Plug the AC power cord that comes with the power supply into a plug whose corresponding slot on the front panel has a PoE power supply.
If there are two PoE power supplies, you may power on either supply first. The illustration in Figure 109 shows the AC power cord being connected to connector A for the power supply in slot A on the front panel.
Figure 109. Connecting the AC Power Cord for the AT-SBxPWRPOE1 Power Supply
3. Use the twist tie that comes with the power supply to secure the cord to an anchor on the chassis, as shown in Figure 110 on page 173.
172

SwitchBlade x3106 Chassis Switch and AT-SBx31CFC Card Installation Guide
Figure 110. Securing the Power Cord for the AT-SBxPWRPOE1 Power Supply to an Anchor
4. Connect the power cord to an appropriate AC power source to power on the power supply.
5. If the chassis has two AT-SBxPWRPOE1 Power Supplies, repeat this procedure to power on the second power supply.
Figure 111 on page 174 is an illustration of the power cords for a chassis with four power supplies.
Anchor
173

Chapter 9: Powering On the Chassis
Figure 111. Dress and Secure AC Power Cords
6. After powering on the PoE power supplies, do one of the follow:
If you have not powered on the system power supplies, perform the procedure in “Powering On the AT-SBxPWRSYS1 or AT-SBxPWRSYS2 AC System Power Supply” on page 169.
Otherwise, go to “Monitoring the Initialization Process” on page 199.
174

SwitchBlade x3106 Chassis Switch and AT-SBx31CFC Card Installation Guide
Powering On the AT-SBxPWRSYS1 DC System Power Supply
This section contains instructions on how to power on the AT-SBxPWRSYS1 DC System Power Supply. For installation instructions, refer to “Installing the AT-SBxPWRSYS1 DC System Power Supply” on page 118.
The power supply unit has a ground connection and positive and negative DC terminals. You may install the ground and power lead wires using the terminal lugs that come with the unit. You may also use bare wire installation. The wire requirements are slightly different for terminal installation versus bare wire installation. Here are the wire requirements if you are using the terminals that come with the power supply:
Two 8 AWG stranded power wires (not provided)
One 10 AWG stranded grounding wire (not provided)
Here are the wire requirements for bare wire installation:
Two 8 AWG solid or stranded power wires (not provided)
One 10 AWG solid or stranded grounding wire (not provided)
Here is a list of the required tools:
Crimping tool (not provided)
8 mm wrench (not provided)
#1, #2, and #3 Phillips-head screwdrivers (not provided)
#3 Phillips-head 30 to 40 inch-lbs Phillips-head torque screwdriver (optional - not provided)
Here are the procedures for powering on the AT-SBxPWRSYS1 DC Power Supply:
“Choosing a Method for Attaching the Grounding Wire” on page 177
“Connecting the Grounding Wire with the Grounding Terminal” on page 177
“Connecting the Grounding Wire with Bare Wire” on page 180
“Choosing a Method for Attaching the Power Wires” on page 181
“Connecting the DC Power Wires with the Straight Terminals” on page 182
“Connecting the DC Power Wires with the Right Angle Terminals” on page 189
“Connecting Bare DC Power Wires” on page 195
175

Chapter 9: Powering On the Chassis
The components of the power supply are identified in Figure 112 on page 176.
Figure 112. Components of the AT-SBxPWRSYS1 DC Power Supply
WarningAs a safety precaution, install a circuit breaker with a minimum value of 50 Amps between the equipment and the DC power source.
Always connect the wires to the LAN equipment first before you connect the wires to the circuit breaker. Do not work with HOT feeds to avoid the danger of physical injury from electrical shock. Always be sure that the circuit breaker is in the OFF position before connecting the wires to the breaker. E9
WarningFor centralized DC power connection, install only in a restricted access area. E23
NoteA tray cable is required to connect the power source if the unit is powered by centralized DC power. The tray cable must be a UL listed Type TC tray cable and rated at 600 V and 90 degrees C, with two conductors, 8 AWG. E24
Positive (+) Terminal
Negative (-) Terminal
On/Off Switch
Locking Handle
Locking Handle Screw
Plastic Cover
Ground Post with Nut and Washer
176

SwitchBlade x3106 Chassis Switch and AT-SBx31CFC Card Installation Guide
Choosing aMethod for
Attaching theGrounding Wire
You may attach the grounding wire to the power supply using the supplied terminal, shown in Figure 113, or bare wire.
Figure 113. Grounding Wire Terminal
The two methods are described in the following sections:
“Connecting the Grounding Wire with the Grounding Terminal” next
“Connecting the Grounding Wire with Bare Wire” on page 180
Connecting theGrounding Wire
with theGrounding
Terminal
To attach a grounding wire to the power supply, perform the following procedure:
1. Prepare an adequate length of stranded 10 AWG grounding wire by stripping it as shown in Figure 114.
Figure 114. Stripping the Stranded Grounding Wire
NoteYou must use stranded wire when using the terminal to connect the ground wire to the grounding post. You may not use solid wire.
2. Insert the grounding wire into the grounding terminal provided with the power supply and use a crimping tool to secure it to the grounding terminal. See Figure 115,
Figure 115. Attaching the Stranded Grounding Wire to the Grounding Terminal
177

Chapter 9: Powering On the Chassis
3. Use an 8 mm wrench to remove the grounding post nut and washer, shown in Figure 116, from the power supply.
Figure 116. Removing the Nut and Washer from the Grounding Post
4. Attach the grounding lug and wire to the ground post and secure them with the nut and washer removed in the previous step, and an 8 mm wrench.
Review the following before installing the grounding wire:
You should angle the wire to the right so that you can open the plastic window to access the positive and negative terminals on the terminal block.
You may route the cable either above or below the locking handle.
The grounding wire is illustrated in Figure 117 on page 179.
Grounding post
178

SwitchBlade x3106 Chassis Switch and AT-SBx31CFC Card Installation Guide
Figure 117. Installing the Grounding Wire
5. Connect the other end of the grounding wire to the building protective earth.
WarningWhen installing this equipment, always ensure that the power supply ground connection is installed first and disconnected last. E11
NoteThis system will work with a positive grounded or negative grounded DC system. E13
Grounding wire
179

Chapter 9: Powering On the Chassis
Connecting theGrounding Wire
with Bare Wire
To attach the grounding wire to the power supply with bare wire, perform the following procedure:
1. Prepare an adequate length of solid or stranded 10 AWG grounding wire by stripping it as shown in Figure 118.
Figure 118. Stripping the solid or Stranded Grounding Wire
2. Use an 8 mm wrench to remove the grounding post nut and washer, shown in Figure 116 on page 178, from the grounding post on the power supply.
3. Wrap the grounding wire clockwise around the base of the grounding post, as shown in Figure 119.
Figure 119. Attaching the Bare Grounding Wire to the Grounding Post
4. Secure the wire with the nut and washer removed in step 2, and an 8 mm wrench, as shown in Figure 120 on page 181.
180
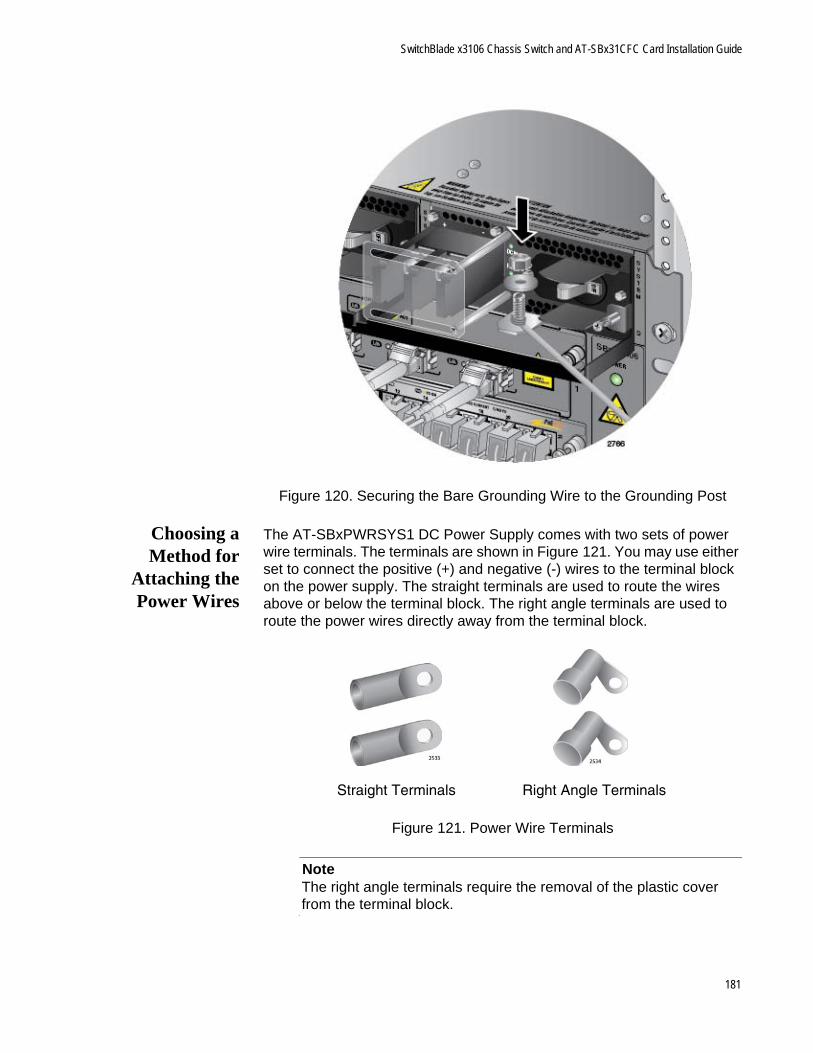
SwitchBlade x3106 Chassis Switch and AT-SBx31CFC Card Installation Guide
Figure 120. Securing the Bare Grounding Wire to the Grounding Post
Choosing aMethod for
Attaching thePower Wires
The AT-SBxPWRSYS1 DC Power Supply comes with two sets of power wire terminals. The terminals are shown in Figure 121. You may use either set to connect the positive (+) and negative (-) wires to the terminal block on the power supply. The straight terminals are used to route the wires above or below the terminal block. The right angle terminals are used to route the power wires directly away from the terminal block.
Figure 121. Power Wire Terminals
NoteThe right angle terminals require the removal of the plastic cover from the terminal block.
Straight Terminals Right Angle Terminals
181

Chapter 9: Powering On the Chassis
You may also install the wires using bare wires.
Here are the procedures to wiring the positive and negative terminal block on the power supply:
“Connecting the DC Power Wires with the Straight Terminals” next
“Connecting the DC Power Wires with the Right Angle Terminals” on page 189
“Connecting Bare DC Power Wires” on page 195
Connecting theDC Power Wireswith the Straight
Terminals
To use the straight terminals to connect the DC power wires to the positive and negative terminals on the power supply, perform the following procedure:
1. Prepare adequate lengths of two stranded 8 AWG power wires by stripping them as shown in Figure 122.
WarningDo not strip more than the recommended amount of wire. Stripping more than the recommended amount can create a safety hazard by leaving exposed wire on the terminal block after installation. E10
Figure 122. Stripping the Power Wires
NoteYou must use stranded wires with the terminal lugs. You may not use solid wires.
2. Insert the power wires into the terminals included with the power supply and use a crimping tool to secure the wires to the terminals. See Figure 123 on page 183.
182

SwitchBlade x3106 Chassis Switch and AT-SBx31CFC Card Installation Guide
Figure 123. Attaching the Power Wires to the Power Terminal Lugs
3. Verify that the On/Off switch on the AT-SBxPWRSYS1 DC Power Supply is in the Off position. Refer to Figure 124.
Figure 124. On/Off Switch On the AT-SBxPWRSYS1 DC Power Supply
4. Use a #1 Phillips-head screwdriver to loosen the two screws on the plastic cover over the positive and negative terminals on the power supply and slide the cover to the right, as shown in Figure 125 on page 184. You may need to lift the locking handle slightly to access the bottom screw.
On/Off Switch
183
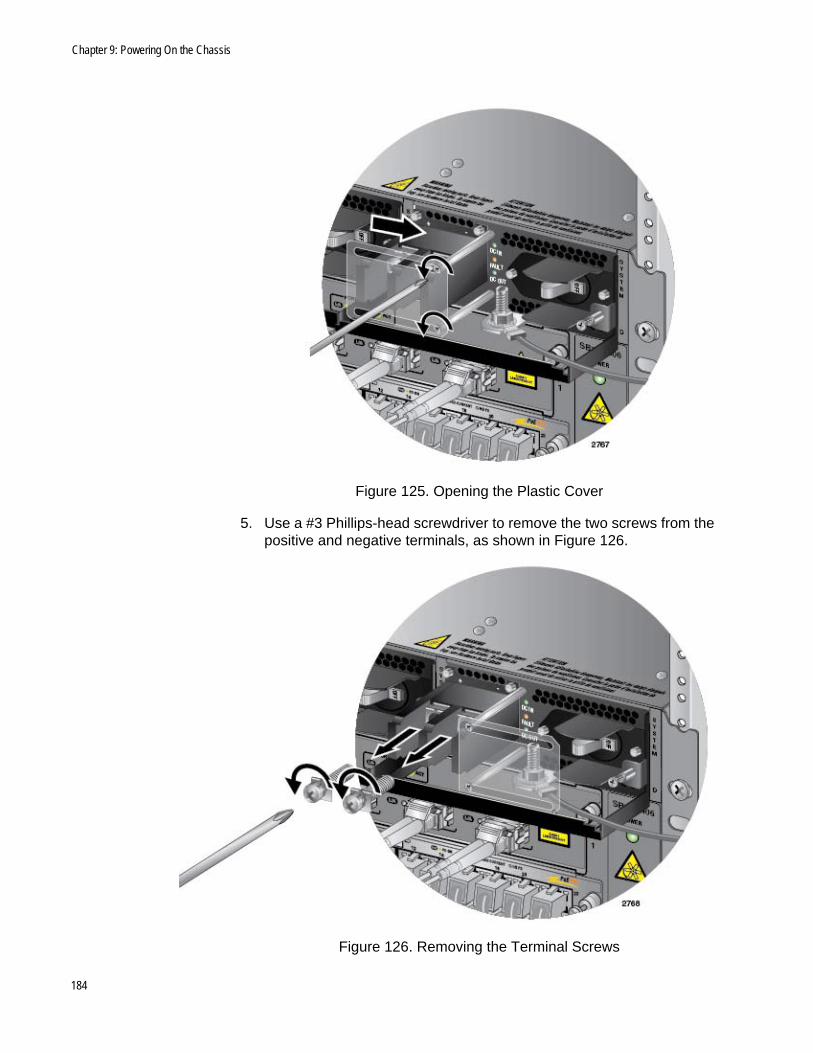
Chapter 9: Powering On the Chassis
Figure 125. Opening the Plastic Cover
5. Use a #3 Phillips-head screwdriver to remove the two screws from the positive and negative terminals, as shown in Figure 126.
Figure 126. Removing the Terminal Screws
184

SwitchBlade x3106 Chassis Switch and AT-SBx31CFC Card Installation Guide
6. With a #3 Phillips-head screwdriver, connect the positive (+) power lead wire to the positive terminal on the power supply, with one of the terminal screws removed in the previous step. The positive terminal is on the left. You may attach the terminals with the wires either above or below the terminal block. Figure 127 shows the positive wire above the terminal block.
Allied Telesis recommends tightening the screw to 30 to 40 inch-lbs.
Figure 127. Connecting the Positive (+) Power Wire with a Straight Terminal
7. With a #3 Phillips-head screwdriver, connect the negative (-) power lead wire to the negative terminal on the power supply, with the remaining terminal screw removed in the previous step 5. The negative terminal is on the right. You may attach the terminals with the wires either above or below the terminal block. Figure 128 on page 186 shows the wires above the terminal block.
Allied Telesis recommends tightening the screw to 30 to 40 inch-lbs.
185

Chapter 9: Powering On the Chassis
Figure 128. Connecting the Negative (-) Power Wire with a Straight Terminal
WarningCheck to see if there are any exposed copper strands coming from the installed wires. When this installation is done correctly there should be no exposed copper wire strands extending from the terminal block. Any exposed wiring can conduct harmful levels of electricity to persons touching the wires. E12
8. Slide the plastic cover to the left and lightly tighten the two screws with a #1 Phillips-head screwdriver to secure the cover. See Figure 129 on page 187. You might need to lift the locking handle slightly to access the bottom screw.
186

SwitchBlade x3106 Chassis Switch and AT-SBx31CFC Card Installation Guide
Figure 129. Closing the Plastic Cover over the Terminal Connectors
CautionDo not over tighten the screws or you may crack or break the plastic cover.
9. With a #2 Phillips-head screwdriver, tighten the handle locking screw to secure the power supply to the chassis. See Figure 130 on page 188.
187

Chapter 9: Powering On the Chassis
Figure 130. Tightening the Handle Locking Screw
10. Before attaching the power wires from the power supply to the circuit breaker in the wiring closet, check that the circuit breaker is off.
11. Connect the power wires to the circuit breaker.
12. Turn the circuit breaker on.
13. Turn the On/Off switch on the power supply in the chassis to the On position. See Figure 124 on page 183.
14. Do one of the following:
If the chassis has two AT-SBxPWRSYS1 DC Power Supplies, repeat this procedure to power on the second power supply.
Otherwise, go to “Monitoring the Initialization Process” on page 199.
Handle locking screw
188

SwitchBlade x3106 Chassis Switch and AT-SBx31CFC Card Installation Guide
Connecting theDC Power Wires
with the RightAngle Terminals
To connect the DC power wires to the positive and negative terminals on the power supply with the right angle terminals, perform the following procedure:
1. Prepare adequate lengths of two stranded 8 AWG power wires by stripping them as shown in Figure 131.
WarningDo not strip more than the recommended amount of wire. Stripping more than the recommended amount can create a safety hazard by leaving exposed wire on the terminal block after installation. E10
Figure 131. Stripping the Power Wires
NoteYou must use stranded wires with the terminal lugs. You may not use solid wires.
2. Insert the power wires into the right angle terminals included with the power supply and use a crimping tool to secure the wires to the terminals. See Figure 132,
Figure 132. Attaching the Power Wires to the Right Angle Terminals
3. Verify that the On/Off switch on the AT-SBxPWRSYS1 DC Power Supply is in the Off position. Refer to Figure 124 on page 183.
189

Chapter 9: Powering On the Chassis
4. Using a #1 Phillips-head screwdriver, remove the two screws that secure the plastic cover over the positive and negative terminals and remove the plastic cover from the power supply, as shown in Figure 133. You may need to lift the locking handle slightly to access the bottom screw.
Figure 133. Removing the Plastic Cover
NoteThe plastic cover is not used with the right angle terminals.
5. Use a #3 Phillips-head screwdriver to remove the two screws from the positive and negative terminals, as shown in Figure 134 on page 191.
190

SwitchBlade x3106 Chassis Switch and AT-SBx31CFC Card Installation Guide
Figure 134. Removing the Terminal Screws
6. With a #3 Phillips-head screwdriver, connect the positive (+) power lead wire to the positive terminal on the power supply, with one of the terminal screws removed in the previous step. The positive terminal is on the left. Refer to Figure 135 on page 192.
Allied Telesis recommends tightening the screw to 30 to 40 inch-lbs.
191

Chapter 9: Powering On the Chassis
Figure 135. Connecting the Positive (+) Power Wire with a Right Angle Terminal
7. With a #3 Phillips-head screwdriver, connect the negative (-) power lead wire to the negative terminal on the power supply, with the remaining terminal screw removed in step 5. The negative terminal is on the right. Refer to Figure 136 on page 193.
Allied Telesis recommends tightening the screw to 30 to 40 inch-lbs.
192

SwitchBlade x3106 Chassis Switch and AT-SBx31CFC Card Installation Guide
Figure 136. Connecting the Negative (-) Power Wire with a Right Angle Terminal
WarningCheck to see if there are any exposed copper strands coming from the installed wires. When this installation is done correctly there should be no exposed copper wire strands extending from the terminal block. Any exposed wiring can conduct harmful levels of electricity to persons touching the wires. E12
8. With a #2 Phillips-head screwdriver, tighten the handle locking screw to secure the power supply to the chassis. See Figure 137 on page 194.
193

Chapter 9: Powering On the Chassis
Figure 137. Tightening the Handle Locking Screw
9. Before attaching the power wires from the power supply to the circuit breaker in the wiring closet, check that the circuit breaker is off.
10. Connect the power wires to the circuit breaker.
11. Turn the circuit breaker on.
12. Turn the On/Off switch on the power supply to the On position. See Figure 124 on page 183.
13. Do one of the following:
If the chassis has two AT-SBxPWRSYS1 DC Power Supplies, repeat this procedure to power on the second power supply.
Otherwise, go to “Monitoring the Initialization Process” on page 199.
Handle locking screw
194

SwitchBlade x3106 Chassis Switch and AT-SBx31CFC Card Installation Guide
Connecting BareDC Power Wires
To attach bare lead wires to the positive and negative terminals on the power supply, perform the following procedure:
1. Prepare adequate lengths of two solid or stranded 8 AWG DC power wires by stripping them as shown in Figure 138.
Figure 138. Stripping Solid or Stranded DC Power Wires
2. Verify that the On/Off switch on the AT-SBxPWRSYS1 DC Power Supply is in the Off position. Refer to Figure 124 on page 183.
3. Use a #1 Phillips-head screwdriver to loosen the two screws on the plastic cover over the positive and negative terminals on the power supply and slide the cover to the right, as shown in Figure 125 on page 184. You may need to lift the locking handle slightly to access the bottom screw.
4. Use a #3 Phillips-head screwdriver to remove the two screws from the positive and negative terminals, as shown in Figure 126 on page 184.
5. Wrap the positive lead wire clockwise around one of the terminal screws and secure the screw and wire to the positive terminal connection on the terminal block with a #3 Phillips-head screwdriver. The positive terminal is on the left. You may attach the wire to the terminal so that it extends either above or below the terminal block. Figure 139 on page 196 shows the wire above the terminal block. Allied Telesis recommends tightening the screw to 30 to 40 inch-lbs.
195

Chapter 9: Powering On the Chassis
Figure 139. Connecting the Positive Wire
6. Wrap the negative lead wire clockwise around the remaining terminal screw and secure the screw and wire to the negative terminal connection on the terminal block with a #3 Phillips-head screwdriver, as shown in Figure 140 on page 197. The negative terminal is on the right.
196

SwitchBlade x3106 Chassis Switch and AT-SBx31CFC Card Installation Guide
Figure 140. Connecting the Negative Lead Wire
Allied Telesis recommends tightening the screw to 30 to 40 inch-lbs.
WarningCheck to see if there are any exposed copper strands coming from the installed wires. When this installation is done correctly there should be no exposed copper wire strands extending from the terminal block. Any exposed wiring can conduct harmful levels of electricity to persons touching the wires. E12
7. Slide the plastic cover to the left and lightly tighten the two screws with a #1 Phillips-head screwdriver to secure the cover. See Figure 129 on page 187. You might need to lift the locking handle slightly to access the bottom screw.
CautionDo not over tighten the screws or you may crack or break the plastic cover.
8. With a #2 Phillips-head screwdriver, tighten the handle locking screw to secure the power supply to the chassis. See Figure 130 on page 188.
197

Chapter 9: Powering On the Chassis
9. Before attaching the power wires from the power supply to the circuit breaker in the wiring closet, check that the circuit breaker is off.
10. Connect the power wires to the circuit breaker.
11. Turn the circuit breaker on.
12. Turn the On/Off switch on the power supply to the On position. See Figure 124 on page 183.
13. Do one of the following:
If the chassis has two AT-SBxPWRSYS1 DC Power Supplies, repeat this procedure to power on the second power supply.
Otherwise, go to “Monitoring the Initialization Process” on page 199.
198
SwitchBlade x3106 Chassis Switch and AT-SBx31CFC Card Installation Guide
Monitoring the Initialization Process
The control and line cards perform an initialization process when you power on or reset the chassis. The process may have up to three phases. The number of phases and their durations depend on the number of controller cards in the chassis. There are three possible configurations:
Configuration 1: Chassis with one controller card.
The initialization process for a chassis with only one controller card has two phases and takes approximately two minutes. In the first phase the controller card initializes its management software. In the second phase the line cards initialize their management software and receive their configuration settings from the controller card. The control and line cards begin forwarding network traffic at the completion of the initialization process.
Configuration 2: Chassis with two controller cards that have identical configuration databases and load files.
The initialization process for a chassis with two controller cards has three phases. The first two phases are the same as in configuration 1. At their completion, the Ethernet line cards begin to forward traffic from their ports and the active controller card starts to forward traffic across the backplane. At this point, each line card slot has 200Mbps of backplane bandwidth.
In the third phase the inactive controller card synchronizes its database and load files with the active card. If the databases and files are already the same, the third phase requires about thirty seconds, after which the inactive controller card begins to forward packets across the backplane, which increases the backplane bandwidth to 400Mbps for each line card slot.
Configuration 3: Chassis with two controller cards that have different configuration databases and load files.
The initialization process for a chassis with two controller cards has three phases. At the completion of the first two phases, which are the same as in configuration 1, the Ethernet line cards begin to forward traffic from their ports and the active controller card starts to forward traffic across the backplane. At this point, the backplane bandwidth is 200Mbps for each line card slot.
During the third phase, the inactive controller card synchronizes its configuration database and load files with the active controller card. The length of the third phase depends on the differences in the files, and may take several minutes to complete. During the synchronization, the inactive controller card does not forward traffic on the backplane. Only after it has fully synchronized its files with
199

Chapter 9: Powering On the Chassis
the active card does the inactive card begin to forward packets on the backplane.
The phases of the initialization processes and their approximate times are shown in Table 25.
Using the LEDsto Monitor the
InitializationProcess
There are two ways to monitor the phases of the initialization process. One way is to use the LEDs on the controller card. For phase 1, examine the M/S LED in the System Status LEDs on the controller card. It flashes amber while the card initializes its management software and changes to solid green at the completion of the phase. If the chassis has two controller cards, the M/S LED continues to flash amber on the inactive card until the card has synchronized its database with the active controller card.
To monitor phase 2, watch the SBx Status LEDs. There are twelve LEDs (numbered 0 to 11), one for each slot. The LED for a slot flashes green while the card initializes its management software and configures its settings in accordance with the settings from the active controller card. The LED changes to solid green when the corresponding line card completes the initialization process and begins forwarding traffic.
If there are two controller cards, you can monitor phase 3 by viewing the M/S LEDs on the controller cards. The LED on the active controller card turns solid green when the card is finished initializing its management
Table 25. Switch Initialization Phases
Phase Description Config 1 Config 2 Config 3
1 The controller card initializes its management software.
1 minute 1 minute 1 minute
2 The line cards reset, initialize their management software, and receive their configuration settings from the active controller card. At the completion of this phase, the Ethernet line cards begin to forward traffic from their ports and the active controller card forwards packets across the backplane. If the chassis has two controller cards, the inactive card does not begin to forward traffic across the backplane until it completes phase 3.
1 minute 1 minute 1 minute
3 The inactive controller card matches its database and load files with the active controller card. After completing this phase, it joins the active card in forwarding traffic on the backplane, increasing the backplane bandwidth to 40Gbps for each line card slot.
NA 30 seconds 30 seconds to 3 minutes
200

SwitchBlade x3106 Chassis Switch and AT-SBx31CFC Card Installation Guide
software. The same LED on the inactive LED continues to flash amber until it has synchronized its database with the active controller card, at which point it turns solid amber to indicate the inactive state of the card. However, the inactive card is forwarding traffic over the backplane.
Using the ConsolePort to Monitor
the InitializationProcess
Another way to monitor the initialization process of the chassis is to connect a terminal or PC with a terminal emulator program to the Console port on the controller card and watch the status messages. (The settings for the terminal or terminal emulator program are found in “Using Local Management to Verify the Chassis” on page 206.) Figure 141 here and Figure 142 on page 202 illustrate the messages. The chassis has completed phase 1 when it displays the “Username” prompt. To monitor phases 2 and 3, log in to the switch and use the SHOW CARD command. For instructions, refer to the Software Reference for SwitchBlade x3100 Series Switches.
Figure 141. Switch Initialization Messages
@@@@@@@@@@@@@@@@@@@@@@@@@@@@@@@@@@@@@@@@@@@@@@@@@@@@@@@@@@@@@@@@@@@@
ATI 200G Central Fabric Controller Boot Loader
Version 15.0.g.03
Created on Fri 01/14/2011 at 11:11 AM
Copyright Allied Telesis Inc., 2009
VxWorks Version 5.5.1 for MV78100 CFC200 LE MMU ARCH 5
BSP version 1.2/1.3.5_000
Copyright Wind River Systems, Inc., 1984-2002
@@@@@@@@@@@@@@@@@@@@@@@@@@@@@@@@@@@@@@@@@@@@@@@@@@@@@@@@@@@@@@@@@@@@
********************************************************************
* Warning: The password for the bootrom is the system default.
* The password should be changed to avoid a security risk.
********************************************************************
Press ^b to stop automatic loading of software image...
0
Automatically loading software image...
FPGA Version 16.0
Starting Application Software Loading
Attaching to Flash File System ... done.
/tffs/ - Volume is OK
Boot album is (current, attempt 1): 'cfc200_15.1.0.tar'
201

Chapter 9: Powering On the Chassis
Figure 142. Switch Initialization Messages (Continued)
Checking Album's integrity...done
Loading vxWorks.bin.gz...(10152360 bytes)
Starting at 0x10000...
Attaching interface lo0...done
Adding 49667 symbols for standalone.
@@@@@@@@@@@@@@@@@@@@@@@@@@@@@@@@@@@@@@@@@@@@@@@@@@@@@@@@@@@@@@@@@@@@@@@@@@@
;@ @@@@@@@@@@@@@@@@@ ====
,;@@@@ @@@@@@@@@@@@@@" ========
;@@@@@@@@ @@@@@@@@" ,@ ========
,;@@@@@@@@@@@ @@@@@@@" ,@@@ ========
;@@@@@@@@@@@@@@@ @@@@;" ,@@@@@@ ====,
,;@@@@@@@@@@" ;@@@@@ @@" @@@@@@@@@@@@"
@@@@@@@@@@@" "@@@@@ " @@@@@@@@@@@@@"
Allied Telesis, Inc.
ATI 200G Central Fabric Controller
Version 15.1.0.GAMMA.20111109 (Customer-Release Build)
Created on Wed 11/09/2011 at 06:19 PM
Copyright Allied Telesis Inc., 2009
VxWorks Version 5.5.1 for MV78100 CFC200 LE MMU ARCH 5
BSP version 1.2/1.3.5_000
Copyright Wind River Systems, Inc., 1984-2002
Memory Size: 511 MB
@@@@@@@@@@@@@@@@@@@@@@@@@@@@@@@@@@@@@@@@@@@@@@@@@@@@@@@@@@@@@@@@@@@@@@@@@@@
System Time is 2012-02-14 13:13:36.429
Last reset occurred due to a power interruption.
System initializing...
/tffs/ - Volume is OK
User Access Verification
Username:
202

Chapter 10
Verifying the Hardware Operations of the Chassis
This chapter describes how to verify the operations of the chassis. The chapter contains the following sections:
“Using the LEDs to Verify the Chassis” on page 204
“Using Local Management to Verify the Chassis” on page 206
NoteAllied Telesis recommends that you use both the LEDs and local management to confirm the initial operations of the chassis, controller cards, and Ethernet line cards.
203

Chapter 10: Verifying the Hardware Operations of the Chassis
Using the LEDs to Verify the Chassis
After powering on the chassis for the first time and waiting a minimum of two minutes for the line and controller cards to complete the initialization process, check the operational status of the various hardware components by examining the LEDs, as explained in this procedure:
1. Check the LEDs on the power supplies:
AT-SBxPWRSYS1, AT-SBxPWRSYS2, or AT-SBxPWRPOE1 AC Power Supply: The power supplies are operating properly when the AC and DC LEDs are solid green and Fault LEDs are off. If there is a problem with a power supply, refer to “AT-SBxPWRSYS1, AT-SBxPWRSYS2, or AT-SBxPWRPOE1 AC Power Supply” on page 212 for troubleshooting suggestions.
AT-SBxPWRSYS1 DC Power Supply: The power supply is operating properly when the DC IN and DC OUT LEDs are solid green and Fault LED is off. If there is a problem, refer to “AT-SBxPWRSYS1 DC System Power Supply” on page 214 for troubleshooting suggestions.
2. Check the Power LED on the AT-SBxFAN06 module. The module is operating normally when the LED is solid green. If the LED is off, the fan module has a problem or failed. Power off the chassis and contact your Allied Telesis representative for assistance. Do not operate the chassis without a fully operational fan unit.
3. If the chassis has one controller card, check its M/S LED. It should be solid green. If the LED is flashing amber, the card is still initializing its management software. If the LED is still flashing amber after another minute, the card may have encountered a problem completing the initialization process. Power off the chassis and replace the controller card.
NoteIf all the LEDs on the controller card are off, they may have been turned off. Try pressing the eco-friendly button on the card to turn them on.
4. If the chassis has two controller cards, check the M/S LEDs on both cards. The cards are operating correctly when the LEDs are green on one card and amber or flashing amber on the other. If both LEDs are flashing amber, the controller cards are still completing phase 1 of the initialization process. If neither LED changes to green after another minute, the cards have encountered a problem that prevents them from completing the initialization phase. Power off the chassis and replace the cards.
204

SwitchBlade x3106 Chassis Switch and AT-SBx31CFC Card Installation Guide
5. To check the status of the Ethernet line cards, inspect the SBx Status LEDs on the controller card. (If the chassis has two controller cards, you may use the LEDs on either the active or inactive card.) A line card is operating normally when it corresponding LED is solid green. The LED flashes green as the card initializes its management software. If an LED is flashing green after two minutes, the corresponding line card may have a problem. For example, the line card in slot 2 of the chassis is operating normally when the SBx Status 2 LED is solid green. (The AT-SBx3106 Chassis does not use SBx Status LEDs 6 to 11.) For troubleshooting suggestions, refer to “Ethernet Line Cards” on page 216.
6. To check the status of the links of the individual ports on the line cards, inspect the L/A LEDs on the cards. The LEDs should be solid or flashing green on ports that are connected to active network devices. If there is a problem with a link, refer to “Twisted Pair Ports” on page 218 and “Fiber Optic Transceivers” on page 222 for troubleshooting suggestions.
7. To check the status of PoE on the ports of the AT-SBx31GP24 Line Card, use the PoE LEDs, shown in Figure 17 on page 39 and described in Table 8 on page 39. The LEDs are solid green when ports are delivering power to powered devices on your network. If there is a problem, refer to “Power Over Ethernet” on page 220 for troubleshooting suggestions.
8. If the LEDs indicate that the chassis components are operating normally, you should perform the procedure in the next section to establish a management session with the chassis and confirm the hardware operations with the command line commands.
205

Chapter 10: Verifying the Hardware Operations of the Chassis
Using Local Management to Verify the Chassis
This section explains how to confirm the operations of the chassis with the commands in the management software on the controller card. The section has the following procedure:
“Starting a Local Management Session” on page 206
“Entering the Management Software Commands” on page 207
The initial management session must be a local management session. For instructions on how to configure the chassis for remote management with Telnet and Secure Shell clients, refer to Software Reference for SwitchBlade x3100 Series Switches.
Starting a LocalManagement
Session
To start a local management session, perform the following procedure:
1. Connect the RJ-45 end of the management card included with the AT-SBx31CFC Controller Fabric Card to the Console RS-232 port on the front panel of the AT-SBx31CFC Card, as shown in Figure 143. If the chassis has two controller cards, you must connect the cable to the Console RS-232 port on the active card. To determine which card is the active card, examine the M/S LEDs. The LEDs are green on the active card and amber on the standby card.
Figure 143. Connecting the Management Cable to the Console RS-232 Port
2. Connect the other end of the cable to an RS-232 port on a terminal or personal computer with a terminal emulation program.
3. Configure the VT-100 terminal or terminal emulation program as follows:
Baud rate: 115,200 bps
206

SwitchBlade x3106 Chassis Switch and AT-SBx31CFC Card Installation Guide
Data bits: 8
Parity: None
Stop bits: 1
Flow control: None
NoteThe port settings are for a DEC VT100 or ANSI terminal, or an equivalent terminal emulator program.
4. Press Enter. You are prompted for a user name and password.
5. Enter the default user name and password. They are “manager” and “friend” (without the quotes), respectively
NoteUser names and passwords are case sensitive.
The local management session starts and the command line interface (CLI) prompt is displayed.
Entering theManagement
SoftwareCommands
To confirm the operations of the chassis with the commands in the management software, perform the following procedure:
1. To display the status of the power supplies, enter the SHOW PSU command.
An example of the status information is shown in Figure 144. The power supplies are operating normally when the states are UP-UP. If there is a problem with a power supply, refer to “AT-SBxPWRSYS1, AT-SBxPWRSYS2, or AT-SBxPWRPOE1 AC Power Supply” on page 212 or “AT-SBxPWRSYS1 DC System Power Supply” on page 214 for troubleshooting suggestions.
Figure 144. SHOW PSU Command
2. To display the state of the fan module, enter the SHOW FANMODULE command.
SHOW PSU
--- Power Supply Units ---
Slot Type State Temp (C)A POE UP-UP 38B POE UP-UP 38C System UP-UP 38D System UP-UP 38
207

Chapter 10: Verifying the Hardware Operations of the Chassis
The module is operating normally when its state is UP-UP-ONLINE, as shown in Figure 145. If the state of the fan module is something other than UP-UP-ONLINE, power off the chassis and contact your Allied Telesis representative for assistance. Do not operate the chassis without a fully operational fan unit.
Figure 145. SHOW FANMODULE Command
3. To view the states of the controller and line cards in the chassis, use the SHOW CARD command.
An example of the status information is shown in Figure 146. A card is operating normally when its state is UP-UP-ONLINE. If there is a problem with a card, refer to “Ethernet Line Cards” on page 216 or “AT-SBx31CFC Controller Fabric Card” on page 224 for troubleshooting suggestions.
Figure 146. SHOW CARD Command
SHOW FANMODULE
--- Fan Module ---
Fan Module..................... FM2Module Number.................. AT-SBxFAN06Serial Number.................. A0428400008State.......................... UP-UP-Online
ActualFan SpeedFan 1.................. 3897 rpmFan 2.................. 3903 rpm
Cold Temperature Shutdown... Off
SHOW CARD
--- Card Information ---
ProvSlot Card Type State Faults---- --------- ------------------- ------0 GE24RJ UP-UP-Online -1 GE24RJ UP-UP-Online -2 GE24RJ UP-UP-Online -3 GE24RJ UP-UP-Online -4 CFC200 UP-UP-Online (Active) -5 - - -
208

SwitchBlade x3106 Chassis Switch and AT-SBx31CFC Card Installation Guide
NoteIf a controller card has a state of UP-UP-DEGRADED and a fault of Minor, you might not of removed the battery insulator when you installed the controller card in the chassis. (Refer to Figure 70 on page 129.) For troubleshooting information, refer to “AT-SBx31CFC Controller Fabric Card” on page 224.
4. To check the status of PoE on the ports of the AT-SBx31GP24 Line Card, use the SHOW POE INTERFACE=ALL command.
Ports that are delivering power to powered devices have the value Powered in the Power Status column of the display. If there is a problem, refer to “Power Over Ethernet” on page 220 for troubleshooting suggestions.
5. If the components of the chassis are operating normally, you are ready to manage the chassis with the command line interface through the Console RS-232 port. For instructions, refer to the Software Reference for SwitchBlade x3100 Series Switches on the Allied Telesis web site.
209

Chapter 10: Verifying the Hardware Operations of the Chassis
210
Chapter 11
Troubleshooting
This chapter contains information on how to troubleshoot the SwitchBlade x3106 product.
NoteIf you are unable to resolve a hardware problem with the instructions in this chapter, contact Allied Telesis Technical Support for further assistance. Refer to “Contacting Allied Telesis” on page 17 for contact information.
The following troubleshooting information is available:
“AT-SBxPWRSYS1, AT-SBxPWRSYS2, or AT-SBxPWRPOE1 AC Power Supply” on page 212
“AT-SBxPWRSYS1 DC System Power Supply” on page 214
“Ethernet Line Cards” on page 216
“Twisted Pair Ports” on page 218
“Power Over Ethernet” on page 220
“Fiber Optic Transceivers” on page 222
“AT-SBx31CFC Controller Fabric Card” on page 224
“AT-SBxFAN06 Fan Module” on page 226
“Local (Out-of-Band) Management Session” on page 227
“Power Supply Interfaces (Opto-couplers)” on page 228
211

Chapter 11: Troubleshooting
AT-SBxPWRSYS1, AT-SBxPWRSYS2, or AT-SBxPWRPOE1 AC Power Supply
A power supply is operating normally when its AC and DC LEDs are solid green and the Fault LED is off. Possible fault conditions and their solutions are described here:
Fault Condition 1: If the AC LED is off, the power supply is not receiving power, has overheated and been disabled, or has failed and needs to be replaced. Try the following:
Verify that the power supply is installed in the correct slot in the chassis. The AT-SBxPWRPOE1 Power Supply uses slots A and B and the AT-SBxPWRSYS1 and AT-SBxPWRSYS2 Power Supplies use slots C and D.
Verify that there is a power cord connected to the power supply’s connector on the back panel of the chassis. For example, if a power supply in slot C does not have power, check for a power cord on connector C on the back panel.
Verify that the power cord is securely connected to the chassis and the AC power source.
Verify that the AC power has power by connecting another device to it.
Verify that the power from the AC power source is within the required levels for your region.
If the chassis is still operating, use the SHOW PSU or SHOW PSU ALL command from a local or remote management session to determine if the power supply has overheated and shutdown.
Fault Condition 2: If the AC LED is solid green and the DC LED is off, the power unit is generating insufficient DC power. Replace the power supply.
Fault Condition 3: If the Fault LED is solid amber, try the solutions in Fault Condition 1. If they do not resolve the problem, replace the power supply.
NoteThe power supplies are hot swappable. You do not have to power off the chassis to replace a failed power supply or install a new power supply.
Fault Condition 4: If the LEDs on the power supply indicate normal operations but the PSU LED on the active master controller card is showing a fault condition, the problem may be with one of the two power supply interfaces (opto-couplers) on the rear panel of the chassis. For troubleshooting suggestions, refer to “Power Supply Interfaces (Opto-couplers)” on page 228.
212

SwitchBlade x3106 Chassis Switch and AT-SBx31CFC Card Installation Guide
CautionThe power supply interfaces are not hot swappable and should only be serviced by an authorized service technician.
213

Chapter 11: Troubleshooting
AT-SBxPWRSYS1 DC System Power Supply
If you suspect a problem with the DC power supply, examine its LEDs. The power supply is operating normally when the DC IN and DC OUT LEDs are solid green and the Fault LED is off. Possible fault conditions and their solutions are described here:
Fault Condition 1: If the DC IN LED is off, the power supply is not receiving power, has overheated and been disabled, or has failed and needs to be replaced. Try the following:
Verify that the power supply is installed in the correct slot in the chassis. The AT-SBxPWRSYS1 DC Power Supply has to be installed in slot C or D.
Verify that the On/Off switch on the power supply is in the On position.
Verify that the DC circuit breaker is on.
Verify that the positive and negative power wires are correctly and securely connected to the terminal block on the power supply and circuit breaker.
Verify that the DC circuit break has power by attaching another device to it.
Verify that the power from the DC circuit break is within the required levels of the power supply. Refer to “Power Specifications” on page 264.
If the chassis is still operating, use the SHOW PSU or SHOW PSU ALL command from a local or remote management session to determine if the power supply has overheated and shutdown.
Fault Condition 2: If the DC IN LED is solid green but the DC OUT LED is off, the power unit is generating insufficient DC power. Replace the power supply.
Fault Condition 3: If the Fault LED is solid amber, try the solutions in Fault Condition 1. If they do not resolve the problem, replace the power supply.
NoteThe AT-SBxPWRSYS1 DC Power Supply is hot swappable. If the chassis contains two power supplies and one unit fails, you do not have to power off the operational power supply when you replace the failed unit.
Fault Condition 4: If the LEDs on the power supply indicate normal operations but the PSU LED on the active master controller card is off or is showing a fault condition, the problem may be with one of the two power
214

SwitchBlade x3106 Chassis Switch and AT-SBx31CFC Card Installation Guide
supply interfaces (opto-couplers) on the rear panel of the chassis. For troubleshooting suggestions, refer to “Power Supply Interfaces (Opto-couplers)” on page 228.
CautionThe power supply interfaces are not hot swappable and should only be serviced by an authorized service technician.
215

Chapter 11: Troubleshooting
Ethernet Line Cards
A quick and easy way to check the overall heath of the Ethernet line cards in the chassis is by examining the SBx STATUS LEDs on the controller card. (If the chassis has two controller cards, you may use the LEDs on either card.) There are twelve LEDs, numbered 0 to 11, but the AT-SBx3106 Chassis uses only LEDs 0 to 5, (LEDs 6 to 11 are always off.) A solid green LED indicates that the card in the corresponding slot is operating normally. The Ethernet line card in slot 2 of the chassis, for example, is operating properly when the SBx STATUS LED 2 on the controller card is solid green.
If you suspect a problem with an Ethernet line card or controller card, try the following:
If all the L/A LEDs on the card are off, try pressing the eco-friendly button on the active master controller card to verify that the LEDs on the line cards are on.
Check the card’s status LED in the SBx STATUS LEDs on the controller card. If the LED is flashing amber, the card is initializing its management software. Wait one to two minutes for the card to complete the process. If the LED does not change to green, try installing the line card in a different slot. If the problem remains, the card cannot complete the initialization process. Try installing the card in another chassis with a different controller card.
If the card’s status LED in the SBx STATUS LEDs on the controller card is solid amber, the card might not be able to boot up because the controller card does not have its load file. This can happen if a line card requires a newer version of the management software than what is currently on the controller card. To correct the problem, update the management software on the controller card to the latest release.
A line card may not boot properly if the load file has not be set correctly with the SET CARD PREFLOAD command on the active master controller card.
Here are some other steps to try:
Check that the card is completely installed in the slot and that the front plate is flush with the front of the chassis.
Try resetting the card with the RESTART CARD command. The example of the command restarts the card in slot 2:
officer SEC>> restart card 2
You will be prompted as follows - enter y for YES:
Do you really want to restart card 2 (Y/N)? y
216

SwitchBlade x3106 Chassis Switch and AT-SBx31CFC Card Installation Guide
Command has been submitted
officer SEC>>
Try installing the card in a different slot. If it works in the new slot, the problem is with the previous slot.
Try installing the card in a different chassis. If it works in the new chassis, the problem is with the previous chassis. If the problem persists, the problem is with the card.
You can obtain card status information with the SwitchBlade x3106 Management Software and the SHOW CARD command, as shown in Figure 146 on page 208.
217

Chapter 11: Troubleshooting
Twisted Pair Ports
The ports on the AT-SBx31GT24 and AT-SBx31GP24 Line Cards have L/A LEDs that are solid or flashing green when the ports are operating at 1000 Mbps, and solid or flashing amber at 10 or 100 Mbps. If a port is cabled to a network device but the L/A LED is off, try the following:
If all of the L/A LEDs on the card are off, try pressing the eco-friendly button on the active master controller card to verify that the LEDs on the line cards are on.
Verify that the end node connected to the port is powered on and operating properly.
Check that the twisted pair cable is securely connected to the ports on the line card and the end node.
Make sure that the twisted pair cable does not exceed 100 m (328 ft).
Refer to Table 13 on page 54 and Table 14 on page 55 to verify the appropriate categories of twisted-pair cables for the AT-SBx31GT24 and AT-SBx31GP24 Line Cards, respectively.
Verify that the twisted-pair cable is not faulty by replacing it with a known good cable.
Make sure that the operating parameters of the port on the line card and the parameters of the end node are compatible.
Use the SHOW INTERFACE and ENABLE INTERFACE commands to be sure that the port is enabled.
If the L/A LED for a port is green, signalling a link to the network device, but link performance is poor or intermittent, the problem may be from a bad cable. Try replacing the cable, as explained in “Guidelines to Cabling the Twisted Pair Ports on AT-SBx31GP24, AT-SBx31GT24, and AT-SBx31GT40 Line Cards” on page 142.
Another source of poor or intermittent performance on a link can be a speed or duplex mode mismatch between a port and network device. Here are some items to consider when resolving this type of problem:
The default speed setting for the ports on the AT-SBx31GT24 and AT-SBx31GP24 Line Cards is Auto-Negotiation. This setting is appropriate for ports connected to network devices that also support Aut-Negotiation.
The default speed setting of Auto-Negotiation is not appropriate for ports connected to network devices that do not support Auto-Negotiation and have fixed speeds or 10 or 100 Mbps. For those switch ports, you should disable Auto-Negotiation and set the port’s speed manually to match the speeds of the network devices.
218

SwitchBlade x3106 Chassis Switch and AT-SBx31CFC Card Installation Guide
The ports must be set to Auto-Negotiation, the default setting, to operate at 1000Mbps.
The default duplex mode setting for the ports is Auto-Negotiation. This setting is appropriate for ports connected to network devices that also support Auto-Negotiation for duplex modes.
The default duplex mode setting of Auto-Negotiation is not appropriate for ports connected to network devices that do not support Auto-Negotiation and have a fixed duplex mode. Disable Auto-Negotiation on those ports and set the duplex modes manually to avoid the possibility of duplex mode mismatches. A switch port using Auto-Negotiation defaults to half-duplex if it detects that the end node is not using Auto-Negotiation, which can result in a mismatch if the end node is operating at a fixed duplex mode of full-duplex.
NoteThe AT-SBx31GT40 Line Card does not support half-duplex mode.
Yet another source for a poor or intermittent link can be a MDI/MDIX wiring configuration mismatch. The wiring configurations of the ports on the AT-SBx31GT24, AT-SBx31GT40, and AT-SBx31GP24 Line Cards are set automatically with automatic MDIX detection when the ports are operating at 10 or 100 Mbps. (Automatic MDIX detection does not apply to the ports when they are operating at 1000 Mbps.) You may not disable this feature on the ports. For automatic MDIX detection to work successfully, the network device connected to a port must also support the feature. If it does not, a port on the card defaults to MDIX. This may require the use of a crossover cable. Here are the guidelines to choosing straight-through or crossover cables for the ports:
You may use straight-through cables on ports that are connected to network devices that operate at 1000 Mbps.
You may use straight-through or crossover cables on ports that are connected to network devices that support automatic MDIX detection and that operate at 10 or 100 Mbps.
You must use straight-through cables on ports that are connected to network devices that have a fixed wiring configuration of MDI and that operate at 10 or 100 Mbps.
You must use crossover cables on ports that are connected to network devices that have a fixed wiring configuration of MDIX and that operate at 10 or 100 Mbps.
219

Chapter 11: Troubleshooting
Power Over Ethernet
This section applies only to the AT-SBx31GP24 Line Card. The ports on the line card have two LEDs each. The left LED provides port link and activity status and the right LED provides PoE status information. The PoE LED is solid green when a port is delivering power to a powered device (PD). The PoE LED of a port that is not delivering power will be flashing amber, steady amber, or off. If a powered device is not receiving power from a port on the line card, try the following:
If all the L/A LEDs on the line cards in the chassis are off, try pressing the eco-friendly button on the active master controller card to turn on the LEDs.
Check to be sure that the chassis has at least one AT-SBxPWRPOE1 Power Supply and that the unit is operating properly. The AC and DC LEDs should be solid green and the Fault LED should be off. For troubleshooting suggestions, refer to “AT-SBxPWRSYS1, AT-SBxPWRSYS2, or AT-SBxPWRPOE1 AC Power Supply” on page 212.
Review the PD’s documentation to confirm that it supports Mode A of the IEEE 802.3at standard. Mode A is one of two modes that define the connector pins that deliver the power from the port on the line card to the PD. In Mode A, the power is carried on pins 1, 2, 3, and 6 on the RJ-45 port, the same pins that carry the network traffic. The second mode, Mode B, defines pins 4, 5, 7, and 8 as the power carriers. The AT-SBx31GP24 Line Card does not support Mode B. Most powered devices are designed to accept power by either mode, but some legacy devices may only support one mode. This can be verified by reviewing the device’s documentation or data sheet. Legacy devices that only support Mode B will not work with this line card.
Check that the device’s power requirements do not exceed 30 W. This can be verified by reviewing the device’s documentation or data sheet.
Verify that you are using the appropriate category of twisted-pair cable by referring to Table 14 on page 55.
Try replacing the twisted-pair cable, as explained in “Guidelines to Cabling the Twisted Pair Ports on AT-SBx31GP24, AT-SBx31GT24, and AT-SBx31GT40 Line Cards” on page 142.
Use the SHOW POE INTERFACE command in the management software to determine whether PoE is enabled on the port. The default setting for PoE is enabled.
Use the SHOW POE INTERFACE command to determine whether the PoE power setting for the port has been reduced to a value below the power requirements of the device.
220

SwitchBlade x3106 Chassis Switch and AT-SBx31CFC Card Installation Guide
Use the SHOW POE CARD command to determine whether the switch has reach its maximum power budget.
Try connecting the PD to a port on a different AT-SBx31GP24 Line Card.
221
Chapter 11: Troubleshooting
Fiber Optic Transceivers
The L/A LEDs on the AT-SBx31GS24, AT-SBx31GC40, AT-SBx31XS6, and AT-SBx31XZ4 Line Cards are solid or flashing green when ports on fiber optic transceivers have links to end nodes. If a transceiver is cabled to an end node but the L/A LED is off, try the following:
If all of the L/A LEDs on the line cards in the chassis are off, try pressing the eco-friendly button on the active master controller card to turn on the LEDs.
Check that the fiber optic transceiver is firmly inserted into the slot on the line card.
Check that both ends of the fiber optic cable are securely connected to the ports on the transceiver and end node.
Verify that the end node is powered on and operating properly.
Review the operating specifications of the fiber optic transceiver and end node to verify that the devices have the same speed and duplex mode.
Check that the operating specifications, including wavelength and maximum operating distance, of the transceiver are compatible with the fiber optic port on the end node.
Make sure that you are using the appropriate type of fiber optic cable and that the cable length does not exceed the allowed maximum distance. The cable specifications for the transceivers are provided in the installation instructions that ship with the modules.
Use a fiber optic tester to test the whether the optical signal is too weak (i.e., sensitivity) or too strong (i.e., maximum input power). The operating specifications of the fiber optic transceivers are shipped with the units.
If the problem is with an XFP transceiver in the AT-SBx31XZ4 Line Card, be sure that the transceiver and end node are IEEE 802.3ae (10G Ethernet) and XFP MSA compliant. An XFP transceiver or port that meets a “Fiber Channel” standard may not link up properly with its counterpart device.
Try replacing the fiber optic cable.
For SFP and XFP transceivers, check the two strands of the fiber optic cable to be sure that the receive fiber connector is connected to the transmit connector on the remote end node, and that the transmit fiber connector is connected to the receive connector on the end node.
If a fiber port on a CSFP transceiver in the AT-SBx31GC40 Line Card cannot establish a link with a remote network device, compare the transmit and receive wavelengths of the transceiver
222

SwitchBlade x3106 Chassis Switch and AT-SBx31CFC Card Installation Guide
and network device. The devices must be transmitting and receiving on opposite wavelengths. For example, if the fiber port on the CSFP transceiver transmits at 1550 nm and receives at 1310 nm, than the port on the remote network device must transmit at 1310 nm and receive at 1550 nm.
223

Chapter 11: Troubleshooting
AT-SBx31CFC Controller Fabric Card
If the chassis has one controller card and it fails, all network operations stop. The Ethernet line cards do not forward network traffic until the controller card is replaced.
If the chassis has two controller cards and one fails, the Ethernet line cards continue to forward traffic, but the traffic bandwidth of each line card slot is reduced from 40 to 20Gbps, which may result in slower network operations.
The M/S LED on the controller card in a chassis that has only one controller card should be solid green to indicate normal operations. If the LED is flashing amber, wait one or two minutes for the card to complete the initialization process and check the LED again. If it has not changed to solid green, the card may have encountered a problem completing the initialization process. To resolve the problem, you might try moving the controller card to the other controller card slot, slot 4 or 5, to see if it works in the new slot, or connecting a terminal or PC with a terminal emulator program to the Console RS232 port to watch for error messages.
If the chassis has two controller cards, the M/S LEDs should be solid green on one card and solid or flashing amber on the other card. If both LEDs are flashing amber, wait one or two minutes for the cards to complete the initialization process and check the LEDs again. If both LEDs are still flashing amber, the cards may have encountered a problem completing the initialization process. Try replacing the cards.
Fault Condition 1: If all the LEDs on the controller card are off, try the following:
Press the eco-friendly button on the active master control card to verify that the LEDs on the cards are on.
Check that the card is completely installed in the slot and that the front plate is flush with the front of the chassis.
Fault Condition 2: If the controller card has a state of Up-Up-Degraded when you perform the SHOW CARD command in “Entering the Management Software Commands” on page 207, you might not of removed the battery insulator when you installed the card. (Refer to Figure 72 on page 130.) To confirm this, enter the SHOW CARD with the slot number of the controller card to display additional information: For example, to display information about the controller card in slot 4, you enter:
show card 4
The card still has the battery insulator if the Card Fault section of the window includes an “RTC Battery” fault. To resolve the problem, remove
224

SwitchBlade x3106 Chassis Switch and AT-SBx31CFC Card Installation Guide
the controller card from the unit and remove the insulator. The controller card is hot-swappable and can be removed while the chassis is powered on. For instructions, refer to “Replacing the AT-SBx31CFC Controller Fabric Card” on page 251.
Fault Condition 3: If you are unable to establish a local (out-of-band) management session with the switch through the Console RS-232 port on the front panel, do the following:
Check to be sure that the RJ-45 serial management cable is securely connected to the Console RS-232 port on the active master control card and the RS-232 port on the terminal or personal computer.
If the chassis has two controller cards, verify that the management cable is connected to the active master control card. You can identify the active master card by examining the M/S LED. The LED is solid green on the active master control card and solid or flashing amber on the inactive master card.
Check to be sure that the operating parameters on the terminal or the terminal emulation program have been set correctly. The default settings for the RJ-45 serial terminal port are located in “Using Local Management to Verify the Chassis” on page 206.
Check to be sure that the terminal emulator application is compatible with a VT-100 terminal.
Fault Condition 4: The controller card has an onboard battery that it uses to maintain the date and time when the chassis is powered off or reset. If you manually set the date and time but the card loses the information after you power off or reset the unit, you may have forgotten to remove the battery insulator when you installed the card in the chassis. The insulator is shown in Figure 72 on page 130. The only way to remedy the problem is to remove the controller card from the chassis and remove the battery insulator. For instructions, refer to “Replacing the AT-SBx31CFC Controller Fabric Card” on page 251.
225

Chapter 11: Troubleshooting
AT-SBxFAN06 Fan Module
The AT-SBxFAN06 Fan Module is operating correctly when the POWER LED on the module is solid green. If the LED on the fan module is off, check the FAN LED in the SYS STATUS section on the active master controller card. The LED should be green. If the FAN LED is off or flashing amber, one or more fans in the module are no longer operating properly. You may also view the status of the unit with the SHOW FANMODULE command in the management software.
You may notice changes in the fan speeds. This is normal. The active master controller card automatically adjusts the fan speeds according to the internal temperature of the chassis.
NoteThe AT-SBxFAN06 Fan Module is hot swappable. You do not have to power off the AT-SBx3106 Chassis to replace the module.
226

SwitchBlade x3106 Chassis Switch and AT-SBx31CFC Card Installation Guide
Local (Out-of-Band) Management Session
If you are unable to establish a local (out-of-band) management session with the switch through the Console RS-232 port on the front panel, do the following:
Check to be sure that the RJ-45 serial management cable is securely connected to the Console RS-232 port on the active master controller card and the RS-232 port on the terminal or personal computer.
If the chassis has two controller cards, verify that the management cable is connected to the active master controller card. You can discern the active master card by examining the M/S LED. The LED is solid green on the active master controller card and solid or flashing amber on the inactive master card.
Check to be sure that the operating parameters on the terminal or the terminal emulation program, if you are using a personal computer, have been set correctly. The default settings for the RJ-45 serial terminal port are located in “Using Local Management to Verify the Chassis” on page 206.
Check to be sure that the terminal emulator application is compatible with a VT-100 terminal.
227

Chapter 11: Troubleshooting
Power Supply Interfaces (Opto-couplers)
The two power supply interfaces in the lower right corner of the rear panel are used by the active master controller card to obtain status information from the power supplies. The interfaces are shown in Figure 3 on page 21.
Each power supply interface supports two power units. The top interface supports the power supplies in slots A and C. The bottom interface supports the supplies in slots B and D.
An interface is operating normally when its Power LED is solid green. The LED of an interface is off if the two corresponding power supply slots are empty or the power supplies are not powered on. For example, the LED for the bottom interface will be off if power supply slots B and D are empty or if the power supplies are off.
The network operations of the chassis are not affected If one or both of the interfaces fail. However. the active master controller card changes the PSU LED to flashing amber to signal the loss of communications to the power supplies.
NoteThe power supply interfaces are not hot swappable and can only be serviced by an authorized service technician.
If the Power LED on a power supply interface is off, do the following:
1. Check that there are power supplies in the corresponding slots in the front panel and that the power supplies are powered on. (The Power LED on an interface is off when the slots are empty or the power supplies are not powered on.)
2. Inspect the LEDs on the power supplies to check for a fault condition, If there is a fault condition, go to “AT-SBxPWRSYS1, AT-SBxPWRSYS2, or AT-SBxPWRPOE1 AC Power Supply” on page 212 for troubleshooting suggestions. If the LEDs indicate the power supplies are operating normally, go to step 3.
3. Check the PSU LED on the active master controller card. If the LED is solid green, the power supplies and interfaces are operating normally. No corrective steps are required. If the PSU LED is solid amber but the LEDs on the power supplies indicate normal operations, there may be a problem with a power supply interface. Contact your Allied Telesis sales representative for assistance.
228

Chapter 12
Replacing Modules
This chapter contains procedures on how to replace modules in the chassis. The chapter contains the following sections:
“Replacing the AT-SBxPWRSYS1, AT-SBxPWRSYS2, or AT-SBxPWRPOE1 AC Power Supply” on page 230
“Replacing the AT-SBxPWRSYS1 DC Power Supply” on page 236
“Replacing Ethernet Line Cards” on page 248
“Replacing the AT-SBx31CFC Controller Fabric Card” on page 251
“Replacing the AT-SBxFAN06 Fan Module” on page 254
229

Chapter 12: Replacing Modules
Replacing the AT-SBxPWRSYS1, AT-SBxPWRSYS2, or AT-SBxPWRPOE1 AC Power Supply
This section contains the procedure for replacing the AT-SBxPWRSYS1, AT-SBxPWRSYS2, or AT-SBxPWRPOE1 AC Power Supply in the AT-SBx3106 Chassis.
NoteThe illustrations in the procedure show the AT-SBxPWRSYS1 AC Power Supply. The procedure is the same for all AC power supplies.
NoteAllied Telesis recommends creating a backup copy of the database file of the chassis with the BACKUP DATABASE FILE command before removing or replacing a power supply. For instructions, refer to the Software Reference for SwitchBlade x3100 Series Switches.
NoteThe power supplies are hot swappable. You do not have to power off the chassis to replace a power supply.
To remove or replace the AT-SBxPWRSYS1, AT-SBxPWRSYS2, or AT-SBxPWRPOE1 AC Power Supply, perform the following procedure:
1. Disconnect the AC power cord for the failed power supply from the AC power source and the corresponding AC socket on the back panel of the chassis. The figure in Figure 147 on page 231 shows the removal of the power cord from connector D, which corresponds to slot D on the front panel.
230

SwitchBlade x3106 Chassis Switch and AT-SBx31CFC Card Installation Guide
Figure 147. Disconnecting the AC Power Cord from the AC Socket on the Back Panel
2. Lift the locking hand on the power supply. Refer to Figure 148 on page 232.
231

Chapter 12: Replacing Modules
Figure 148. Lifting the Locking Handle on the Power Supply
3. Carefully pull on the locking handle to slide the power supply from the chassis. Refer to Figure 149 on page 233.
WarningThe power supply is heavy. Use both hands to hold the module as you remove it from the chassis.
232

SwitchBlade x3106 Chassis Switch and AT-SBx31CFC Card Installation Guide
Figure 149. Removing the Power Supply from the Chassis
4. Do one of the following:
To install a new power supply, refer to Chapter 6, “Installing the Power Supplies” on page 105.
If you are not installing a new power supply, continue with the rest of this procedure to install a blank slot cover.
5. Place the locking handle on the slot cover in the up position and slide the cover into the empty power supply slot. Refer to Figure 150 on page 234.
233

Chapter 12: Replacing Modules
Figure 150. Installing a Blank Power Supply Slot Cover
6. Lower the locking handle to secure the slot cover in the slot. Refer to Figure 151 on page 235.
234

SwitchBlade x3106 Chassis Switch and AT-SBx31CFC Card Installation Guide
Figure 151. Lowering the Locking Handle on the Power Supply Slot Cover
235

Chapter 12: Replacing Modules
Replacing the AT-SBxPWRSYS1 DC Power Supply
This section contains the procedure for removing the AT-SBxPWRSYS1 DC System Power Supply from the AT-SBx3106 Chassis.
NoteAllied Telesis recommends creating a backup copy of the database file of the chassis with the BACKUP DATABASE FILE command before removing or replacing a power supply. For instructions, refer to the Software Reference for SwitchBlade x3100 Series Switches.
NoteThe power supply is hot swappable. If the unit has two AT-SBxPWRSYS1 DC Power Supplies and one of the units has failed, you do not have to power off the operational power supply to replace the failed unit.
To remove an AT-SBxPWRSYS1 DC Power Supply from the chassis, perform the following procedure:
1. Turn off the circuit breaker to the AT-SBxPWRSYS1 DC Power Supply to be replaced.
2. Turn off the On/Off switch on the front panel of the power supply. Refer to Figure 112 on page 176.
3. Use a #2 screwdriver to loosen the screw on the locking handle. Refer to Figure 152 on page 237.
NoteDo not lift the locking handle yet.
236

SwitchBlade x3106 Chassis Switch and AT-SBx31CFC Card Installation Guide
Figure 152. Loosening the Screw on the Locking Handle
NoteIf the power wires are connected to the terminal block with the right angle terminals, go to step 5.
4. Use a #1 screwdriver to loosen the two screws that secure the plastic cover over the terminal block and slide the cover to the right. You may need to slightly lift the locking handle to access the bottom screw. Refer to Figure 153 on page 238.
The plastic cover might not be present if the lead wires are connected to the terminal block with the right angle terminals. If this is the case, you may skip this step.
237

Chapter 12: Replacing Modules
Figure 153. Opening the Plastic Window on the Terminal Block
5. Use a #3 screwdriver to remove the negative (-) lead wire from the terminal block. The negative lead wire is on the right. Refer to Figure 154 on page 239.
238

SwitchBlade x3106 Chassis Switch and AT-SBx31CFC Card Installation Guide
Figure 154. Removing the Negative Lead Wire
6. Use a #3 screwdriver to remove the positive (+) lead wire from the terminal block. Refer to Figure 155 on page 240.
239

Chapter 12: Replacing Modules
Figure 155. Removing the Positive Lead Wire from the Terminal Block
7. Reinstall the two screws on the negative (-) and positive (+) terminals. Refer to Figure 156 on page 241.
240

SwitchBlade x3106 Chassis Switch and AT-SBx31CFC Card Installation Guide
Figure 156. Reinstalling the Screws on the Positive and Negative Terminals
8. Slide the plastic cover to the left and lightly tighten the two screws to secure it in place. Refer to Figure 157 on page 242.
CautionDo not over tighten the screws or you may crack or break the plastic cover.
The plastic cover may not be present if the lead wires were connected to the terminal block with the right angle terminals. If this is the case, you may either skip this step or reinstall the plastic cover on the power supply.
241

Chapter 12: Replacing Modules
Figure 157. Closing the Plastic Cover
9. Use an 8 mm wrench to remove the grounding wire from the grounding post. Refer to Figure 158 on page 243.
242

SwitchBlade x3106 Chassis Switch and AT-SBx31CFC Card Installation Guide
Figure 158. Removing the Grounding Wire
10. Reinstall the nut and washer on the grounding post. Refer to Figure 159 on page 244.
243
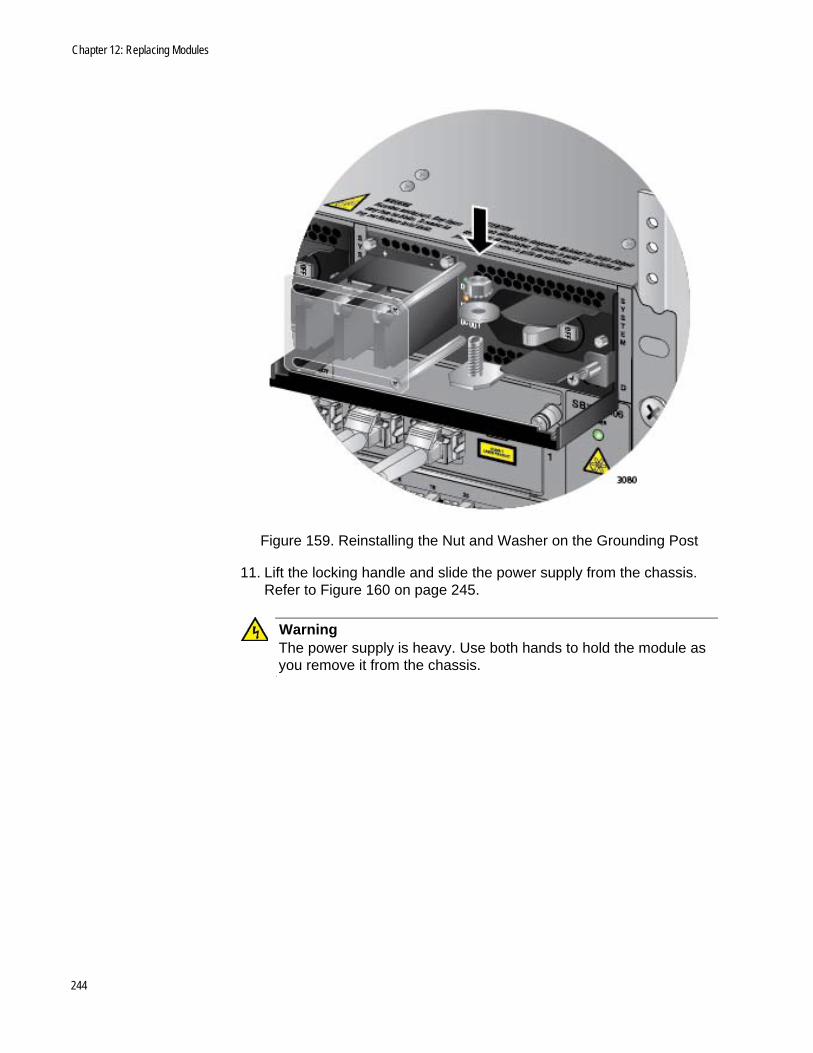
Chapter 12: Replacing Modules
Figure 159. Reinstalling the Nut and Washer on the Grounding Post
11. Lift the locking handle and slide the power supply from the chassis. Refer to Figure 160 on page 245.
WarningThe power supply is heavy. Use both hands to hold the module as you remove it from the chassis.
244
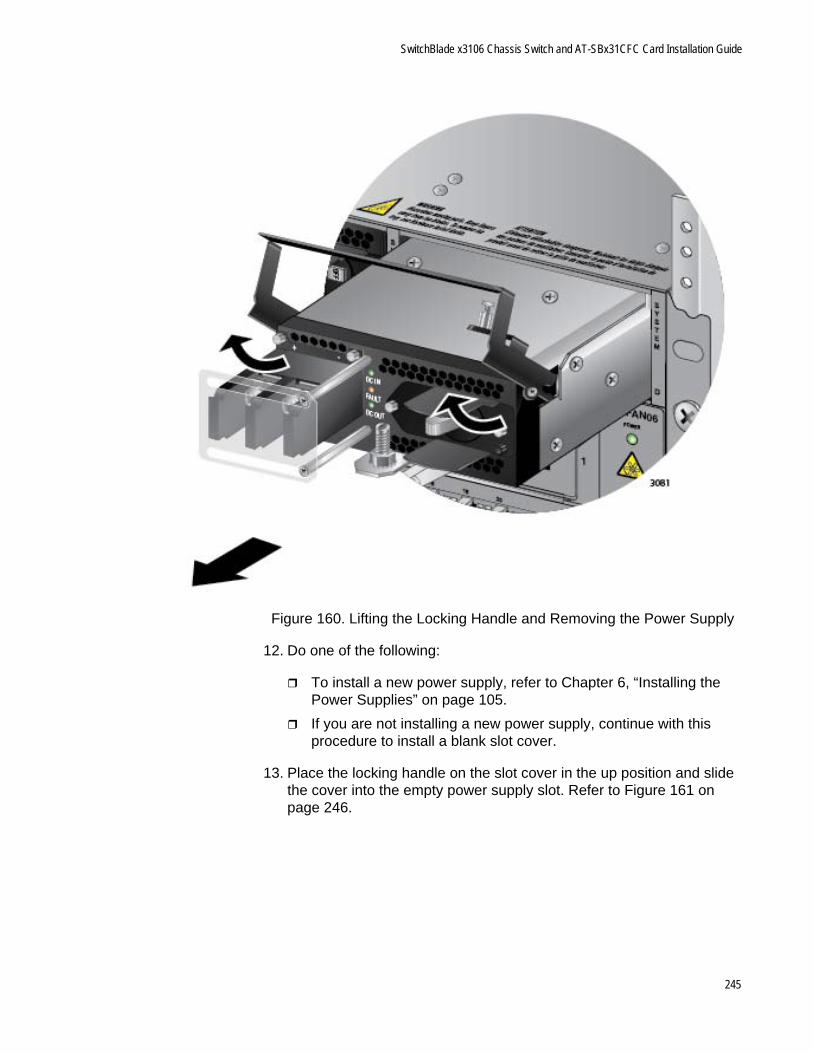
SwitchBlade x3106 Chassis Switch and AT-SBx31CFC Card Installation Guide
Figure 160. Lifting the Locking Handle and Removing the Power Supply
12. Do one of the following:
To install a new power supply, refer to Chapter 6, “Installing the Power Supplies” on page 105.
If you are not installing a new power supply, continue with this procedure to install a blank slot cover.
13. Place the locking handle on the slot cover in the up position and slide the cover into the empty power supply slot. Refer to Figure 161 on page 246.
245

Chapter 12: Replacing Modules
Figure 161. Installing a Blank Power Supply Slot Cover
14. Lower the locking handle to secure the slot cover to the slot. Refer to Figure 162 on page 247.
246

SwitchBlade x3106 Chassis Switch and AT-SBx31CFC Card Installation Guide
Figure 162. Lowering the Locking Handle on the Power Supply Slot Cover
247

Chapter 12: Replacing Modules
Replacing Ethernet Line Cards
This section contains the procedure for replacing Ethernet line cards in the chassis.
NotePlease review “Guidelines to Handling the Controller and Line Cards” on page 126 before performing this procedure.
This procedure requires the following tool:
#2 Phillips-head screwdriver (not provided)
The Ethernet line cards are hot swappable and can be removed while the chassis is powered on.
To remove an Ethernet line card from the chassis, perform the following procedure:
NoteSteps 1 to 3 are optional. They explain how to use the DISABLE CARD command to disable the Ethernet line card you are replacing so that the controller card does not generate an alarm when you remove the card.
1. Start a management session on the chassis. For instructions on how to start a local management session, refer to “Starting a Local Management Session” on page 206.
2. At the command prompt, enter the DISABLE CARD command with the slot number of the card you want to remove. For example, to disable the Ethernet line card in slot 1, you enter:
disable card=1
3. Log off to end your management session.
4. Label and remove the cables from the Ethernet line card.
5. If the line card has fiber optic transceivers, install dust covers on the ports.
6. If the line card has transceivers, remove and label the transceivers.
7. Use a #2 Phillips-head screwdriver to loosen the two screws on the faceplate of the card.
248

SwitchBlade x3106 Chassis Switch and AT-SBx31CFC Card Installation Guide
8. Carefully pull on the screws to disconnect the line card from the connector on the backplane.
9. Carefully slide the card from the chassis.
CautionKeep the card level as you slide it out of the chassis. You might damage the components on the top or bottom of the card if you slide it out at an angle. Refer to Figure 67 on page 127.\
If the new Ethernet line card is the same model as the card it is replacing, perform these additional steps:
1. Install the new line card. For instructions, refer to “Installing the Ethernet Line Cards” on page 134.
2. Start a management session on the chassis. For instructions on how to start a local management session, refer to “Starting a Local Management Session” on page 206.
3. At the command prompt, enter the ENABLE CARD command with the slot number of the new card. For example, to enable the Ethernet line card in slot 1, you enter:
enable card=1
4. Log off to end your management session.
5. Connect the network cables to the new line card. For instructions, refer to Chapter 8, “Installing the Transceivers and Cabling the Ports” on page 141.
If the new Ethernet line card is a different model than the card it is replacing, perform these additional steps:
1. Install the new line card. For instructions, refer to “Installing the Ethernet Line Cards” on page 134.
2. Start a management session on the chassis. For instructions on how to start a local management session, refer to “Starting a Local Management Session” on page 206.
3. At the command prompt, enter the DESTROY CARD command to delete the old card’s configuration from the database. For example, to destroy the card configuration for slot 1, you enter:
destroy card=1
249

Chapter 12: Replacing Modules
4. At the command prompt, enter the ENABLE CARD command to enable the slot with the new card. For example, to enable the Ethernet line card in slot 1, you enter:
enable card=1
5. Log off to end your management session.
6. Connect the network cables to the new line card. For instructions, refer to Chapter 8, “Installing the Transceivers and Cabling the Ports” on page 141.
If you are not replacing the line card at this time, you should cover the slot with a blank cover. For instructions, refer to “Installing the Blank Slot Covers” on page 138.
If you do not plan to install the removed line card in another slot or chassis, store the card in an anti-static bag and return it to its shipping container.
250

SwitchBlade x3106 Chassis Switch and AT-SBx31CFC Card Installation Guide
Replacing the AT-SBx31CFC Controller Fabric Card
This section contains the procedure for replacing a controller card in the chassis.
NotePlease review “Guidelines to Handling the Controller and Line Cards” on page 126 before performing this procedure.
NoteAllied Telesis recommends creating a backup copy of the database file with the BACKUP DATABASE FILE command before removing or replacing a controller card. For instructions, refer to the Software Reference for SwitchBlade x3100 Series Switches.
This procedure requires the following tool:
#2 Phillips-head screwdriver (not provided)
The controller card is hot swappable and can be removed while the chassis is powered on.
Here are the general steps if the chassis has only one controller card and the card has failed such that it is no longer responding to management commands and the Ethernet line cards have stopped forwarding traffic:
1. Power off the chassis.
2. Remove the failed controller card. For details, refer to the instructions later in this section.
3. Install the new controller card. You may install the new controller card in the same slot as the failed card or in the other controller card slot. For instructions, refer to “Installing the AT-SBx31CFC Controller Fabric Card” on page 128.
4. Power on the chassis.
5. Wait two minutes for the controller and line cards to complete the initialization process.
6. Start a management session on the management card. For instructions, refer “Starting a Local Management Session” on page 206.
251

Chapter 12: Replacing Modules
7. Verify that the management card has the desired version of the management software by performing the SHOW SYSTEM command, as explained in “Entering the Management Software Commands” on page 207. If necessary, update the software by referring to the Software Reference for SwitchBlade x3100 Series Switches.
8. Restore the configuration to the Ethernet line and controller cards by uploading the most recent backup database to the new controller card. If you do not have an archived copy of the backup database of the chassis, restore the configuration manually. For instructions, refer to Software Reference for SwitchBlade x3100 Series Switches.
Here are the general steps if the chassis has two controller cards and one cards fails:
1. If the chassis is powered off, power it on.
NoteYou should not replace a controller card in a chassis that has two controller cards while the unit is powered off, especially if the failed controller card is in slot 5. If you replace a failed controller card while the chassis is powered off, the Ethernet line cards might lose their configurations if the new controller card is designated as the active card when you power on the chassis.
2. If you just powered on the chassis, wait two minutes for the operational controller card to finish the initialization process. The M/S LED on the card changes to solid green at the completion of the initialization process.
NoteBy waiting for the operational controller card to complete its initialization process, you ensure that it is the active card when you replace the failed controller card with a new card.
3. Start a management session on the chassis. For instructions on how to start a local management session, refer to “Starting a Local Management Session” on page 206.
4. At the command prompt, enter the DISABLE CARD command to disable the failed controller card: Here is the command:
disable card=inactcfc
5. Log off to end your management session.
6. Remove the failed controller card. For details, refer to the instructions later in this section.
252

SwitchBlade x3106 Chassis Switch and AT-SBx31CFC Card Installation Guide
7. Install the new controller card. For instructions, refer to “Installing the AT-SBx31CFC Controller Fabric Card” on page 128.
8. Start a management session on the chassis.
9. At the command prompt, enter the ENABLE CARD command to enable the new controller card: Here is the command:
enable card=inactcfc
10. Log off to end your management session.
To remove a controller card from the chassis, perform the following procedure:
1. Disconnect the cables from the NET MGMT and Console ports on the controller card.
2. Use a #2 Phillips-head screwdriver to loosen the two screws on the faceplate of the card.
3. Carefully pull out the handles of the faceplate to disconnect the controller card from the connector on the backplane of the chassis.
4. Carefully slide the controller card from the chassis.
CautionKeep the card level as you slide it out of the chassis. You might damage the components on the top or bottom of the card if you slide it out at an angle. Refer to Figure 67 on page 127.
5. Do one of the following:
For instructions on how to install a new controller card in the chassis, refer to “Installing the AT-SBx31CFC Controller Fabric Card” on page 128.
If you do not plan to immediately install another controller card in the slot, cover the slot with a blank cover. For instructions, refer to “Installing the Blank Slot Covers” on page 138.
If you do not plan to immediately install the controller card in another chassis, continue with this procedure.
6. Store the controller card in an anti-static bag.
7. Return the card to its shipping container.
253

Chapter 12: Replacing Modules
Replacing the AT-SBxFAN06 Fan Module
This section contains the procedures for replacing the AT-SBxFAN06 Fan Module. The module is located in the slot on the right side of the front panel.
CautionAlthough the fan module is hot swappable and can be replaced while the chassis is powered on, the line cards and power supplies may overheat if the chassis is operated for more than one or two minutes without a fan module.
WarningThe fan module has hazardous moving parts. Keep fingers away from moving fan blades.
NoteOnly an authorized service technician should replace the fan module.
Removing theAT-SBxFAN06
Fan Module
To remove the fan module from the chassis, perform the following procedure:
NoteSteps 1 to 3 are optional. They disable the fan module with the DISABLE FANMODULE command so that the controller card does not generate an alarm when you remove the old module.
1. Start a management session on the chassis. For instructions on how to start a local management session, refer to “Starting a Local Management Session” on page 206.
2. At the command prompt, enter the DISABLE FANMODULE command to disable the module.
3. Log off to end your management session.
4. If necessary, disconnect or reroute network cables that are blocking access to the fan module.
5. Use a #2 Phillips head screwdriver to loosen the screw at the base of the fan module. Refer to Figure 163 on page 255.
254

SwitchBlade x3106 Chassis Switch and AT-SBx31CFC Card Installation Guide
Figure 163. Loosening the Screw on the AT-SBxFAN06 Fan Module
6. Carefully pull on the handle to disconnect the fan module from the connector on the backplane of the chassis. Refer to Figure 164.
Figure 164. Loosening the AT-SBxFAN06 Fan Module from the Backplane Connector
255

Chapter 12: Replacing Modules
7. Slowly pull the module out 25 mm (1 in.). Refer to Figure 165.
WarningThe fan module has hazardous moving parts. Keep fingers away from moving fan blades.
Figure 165. Withdrawing the AT-SBxFAN06 Fan Module 25 mm (1 in.) from the Chassis
8. Wait ten seconds for the fans to stop.
9. After the fans have stopped, slide the module from the chassis. Refer to Figure 166 on page 257.
25 mm(1 in.)
256

SwitchBlade x3106 Chassis Switch and AT-SBx31CFC Card Installation Guide
Figure 166. Removing the AT-SBxFAN06 Fan Module from the Chassis
Installing a NewAT-SBxFAN06
Fan Module
This procedure assumes that you have already removed the old fan module from the chassis and are continuing directly from the previous procedure, “Removing the AT-SBxFAN06 Fan Module” on page 254. To install the new fan module, perform the following procedure
1. Orient the new module with the LED and module name on top and carefully slide the module into the slot in the chassis. Refer to Figure 167 on page 258.
257

Chapter 12: Replacing Modules
Figure 167. Installing a New AT-SBxFAN06 Fan Module
2. When you feel the fan module make contact with the connector on the backplane, gently push on the top and bottom of the faceplate to seat the module on the connector. Refer to Figure 168 on page 259.
258

SwitchBlade x3106 Chassis Switch and AT-SBx31CFC Card Installation Guide
Figure 168. Securing the AT-SBxFAN06 Fan Module on the Backplane Connector
3. With a #2 Phillips-head screwdriver, tighten the screw at the base of the module to secure the module to the chassis. Refer to Figure 169.
Figure 169. Tightening the Screw on the AT-SBxFAN06 Fan Module
4. Reconnect any network cables you may have disconnected to access the fan module.
259

Chapter 12: Replacing Modules
NotePerform steps 5 to 7 to enable the new fan module if you disabled the old module with the DISABLE FANMODULE command prior to removing it.
5. Start a management session on the chassis. For instructions, refer to “Starting a Local Management Session” on page 206.
6. At the command prompt, enter the ENABLE FANMODULE command to enable the module.
7. Log off to end your management session.
260

Appendix A
Technical Specifications
Physical Specifications
Dimensions (W x D x H)
Weight (Kilograms)
Table 26. Product Dimensions
AT-SBx3106 Chassis 48.03 cm x 38.79 cm x 17.63 cm18.91 in x 15.27 in x 6.94 in)
AT-SBxPWRSYS1 AC System Power Supply
10.16 cm x 32.21 cm x 4.34 cm(4.00 in x 12.68 in x 1.71 in)
AT-SBxPWRSYS2 AC System Power Supply
10.16 cm x 32.21 cm x 4.34 cm(4.00 in x 12.68 in x 1.71 in)
AT-SBxPWRPOE1 AC PoE Power Supply
10.16 cm x 32.21 cm x 4.34 cm(4.00 in x 12.68 in x 1.71 in)
AT-SBxPWRSYS1 DC System Power Supply
10.16 cm x 34.2 cm x 4.34 cm(4.00 in x 13.46 in x 1.71 in)
AT-SBxFAN06 Tray Module 2.62 cm x 29.81 cm x 10.30 cm(1.03 in x 11.73 in x 4.05 in)
All CardsAT-SBx31GT24 Line CardAT-SBx31GT40 Line CardAT-SBx31GP24 PoE Line CardAT-SBx31GS24 SFP Line CardAT-SBx31GC40 Line CardAT-SBx31XZ4 XFP Line CardAT-SBx31XS6 SFP+ Line CardAT-SBx31CFC Controller Fabric Card
20.67 x 31.32 cm x 4.06 cm(8.14 in x 12.33 in x 1.6 in)
Table 27. Product Weights
AT-SBx3106 Chassis 14.42 kg (31.80 lb) with 3 power supply and 6 line card slot covers
261

Appendix A: Technical Specifications
AT-SBx31GT24 Line Card 0.93 kg (2.05 lb)
AT-SBx31GT40 Line Card 1.04 kg (2.30 lb)
AT-SBx31GP24 PoE Line Card 1.06 kg (2.34 lb)
AT-SBx31GS24 SFP Line Card 1.06 kg (2.34 lb)
AT-SBx31GC40 Line Card 1.11 kg (2.45 lb)
AT-SBx31XZ4 XFP Line Card 0.82 kg (1.80 lb)
AT-SBx31XS6 SFP+ Line Card 1.06 kg (2.34 lb)
AT-SBx31CFC Controller Fabric Card
1.09 kg (2.40 lb)
AT-SBxPWRSYS1 AC System Power Supply
2.75 kg (6.05 lb) with power cord
AT-SBxPWRSYS2 AC System Power Supply
2.70 kg (6.00 lb) with power cord
AT-SBxPWRPOE1 AC PoE Power Supply
2.73 kg (6.00 lb) with power cord
AT-SBxPWRSYS1 DC System Power Supply
1.9 kg (4.2 lb)
AT-SBxFAN06 Fan Module 1.82 kg (4.00 lb)
Table 27. Product Weights (Continued)
262

SwitchBlade x3106 Chassis Switch and AT-SBx31CFC Card Installation Guide
Environmental Specifications
NoteThe acoustic noise was measured at 40° C with the following products installed:
Table 28. Environmental Specifications
Operating Temperature -0° C to 40° C (32° F to 104° F)
Storage Temperature -25° C to 70° C (-13° F to 158° F)
Operating Humidity 5% to 90% non-condensing
Storage Humidity 5% to 95% non-condensing
Operating Altitude Range Up to 3,000 m (9,843 ft)
Acoustic Noise 72.8 dB
Table 29. Acoustic Noise Test Components
Product Quantity
AT-SBx3106 Chassis 1
AT-SBx31CFC Controller Fabric Card
1
AT-SBx31GP24 PoE Line Card 4
AT-SBx31GC40 XFP Line Card 1
AT-SBxPWRSYS1 AC System Power Supply
2
AT-SBxPWRPOE1 PoE Power Supply
2
AT-SBxFAN06 Tray Module 1
263

Appendix A: Technical Specifications
Power Specifications
AC Voltage, Frequency Requirements (Volts, Hertz)
DC Voltage Requirement
Typical power savings in eco-friendly mode (Watts)
Maximum power consumption (Watts)
Table 30. AC Voltage and Frequency Requirements
AT-SBxPWRSYS1 AC System Power Supply
100 - 120 / 200 - 240 VAC, 16/8A, 50/60 Hz, (per input)
AT-SBxPWRSYS2 AC System Power Supply
100 - 120 / 200 - 240 VAC, 18/8A, 50/60 Hz, (per input)
AT-SBxPWRPOE1 AC PoE Power Supply
100 - 120 / 200 - 240 VAC, 16/8A, 50/60 Hz, (per input)
Table 31. DC Voltage Requirement
AT-SBxPWRSYS1 DC Power Supply
40 - 60V dc (-0% - +20%), 36A (maximum per input)
Table 32. Typical Power Savings in eco-friendly Mode
AT-SBx31GT24 0.12 W
AT-SBx31GT40 0.79 W
AT-SBx31GP24 0.24 W
AT-SBx31GS24 0.20 W
AT-SBx31GC40 0.42 W
AT-SBx31XZ4 0.00 W
AT-SBx31XS6 0.10 W
AT-SBx31CFC 0.12 W
Table 33. Maximum Power Consumption
AT-SBx31GT24 34.4 W
AT-SBx31GT40 53.9 W
264

SwitchBlade x3106 Chassis Switch and AT-SBx31CFC Card Installation Guide
Maximum power supply efficiency (based on 100V input voltage)
Heat dissipation (British Thermal Units/hour)
AT-SBx31GP24 34.4 W
AT-SBx31GS24 56.3 W
AT-SBx31GC40 64.0 W
AT-SBx31XZ4 48.3 W
AT-SBx31XS6 54.8 W
AT-SBx31CFC 48.3 W
Table 34. Maximum Power Efficiency
AT-SBxPWRSYS1 AC Up to 90%
AT-SBxPWRSYS2 AC Up to 85%
AT-SBxPWRPOE1 Up to 90%
AT-SBxPWRSYS1 DC Up to 90%
Table 35. Heat Dissipation
AT-SBx31GT24 146.72 BTU/hr
AT-SBx31GT40 183.74 BTU/hr
AT-SBx31GP24 146.72 BTU/hr
AT-SBx31GS24 240.13 BTU/hr
AT-SBx31GC40 272.8 BTU/hr
AT-SBx31XZ4 206.01 BTU/hr
AT-SBx31XS6 233.73 BTU/hr
AT-SBx31CFC 206.01 BTU/hr
AT-SBxPWRSYS1 AC 5118.21 BTU/hr
AT-SBxPWRSYS2 AC 5118.21 BTU/hr
AT-SBxPWRPOE1 AC 5118.21 BTU/hr
AT-SBxPWRSYS1 DC 5118.21 BTU/hr
Table 33. Maximum Power Consumption (Continued)
265

Appendix A: Technical Specifications
Power supply heat dissipation is calculate at 80% power efficiency.
Available Power over Ethernet (Watts/port):
PoE Mode
Table 36. Available Power Over Ethernet with One PoE Power Supply
One PoE Power Supply Installed 1200 W @ 56 VDC
IEEE 802.3at Class 4 (30 W /port) 40 ports Maximum
IEEE 802.3af Class 3 (15.4 W /port) 77 ports Maximum
IEEE 802.3af Class 2 (7.3 W /port) 171 ports Maximum
IEEE 802.3af Class 1 (4.0 W /port) 240 ports Maximum
Table 37. Available Power Over Ethernet with Two PoE Power Supplies
Two PoE Power Supply Installed 2400 W @ 56 VDC
IEEE 802.3at Class 4 (30 W /port) 80 ports Maximum
IEEE 802.3af Class 3 (15.4 W /port) 155 ports Maximum
IEEE 802.3af Class 2 (7.3 W /port) 240 ports Maximum
IEEE 802.3af Class 1 (4.0 W /port) 240 ports Maximum
Table 38. PoE Mode
IEEE 802.3af / IEEE 802.3at: Alternative Mode A
266

SwitchBlade x3106 Chassis Switch and AT-SBx31CFC Card Installation Guide
Safety and Electromagnetic Emissions Certifications
Safety and Electromagnetic Emissions:
Table 39. Safety and Electromagnetic Emissions
EMI/RFI FCC Class A, EN55022 Class A, EN61000-3-2, EN61000-3-3, CISPR Class A, VCCI Class A,AS/NZS Class A
Immunity EN55024
Electrical Safety EN60950-1 (TUV), UL60950-1 (cULus), EN60825
Safety Agency Approvals cULus, TUV, C-TICK, CE
267
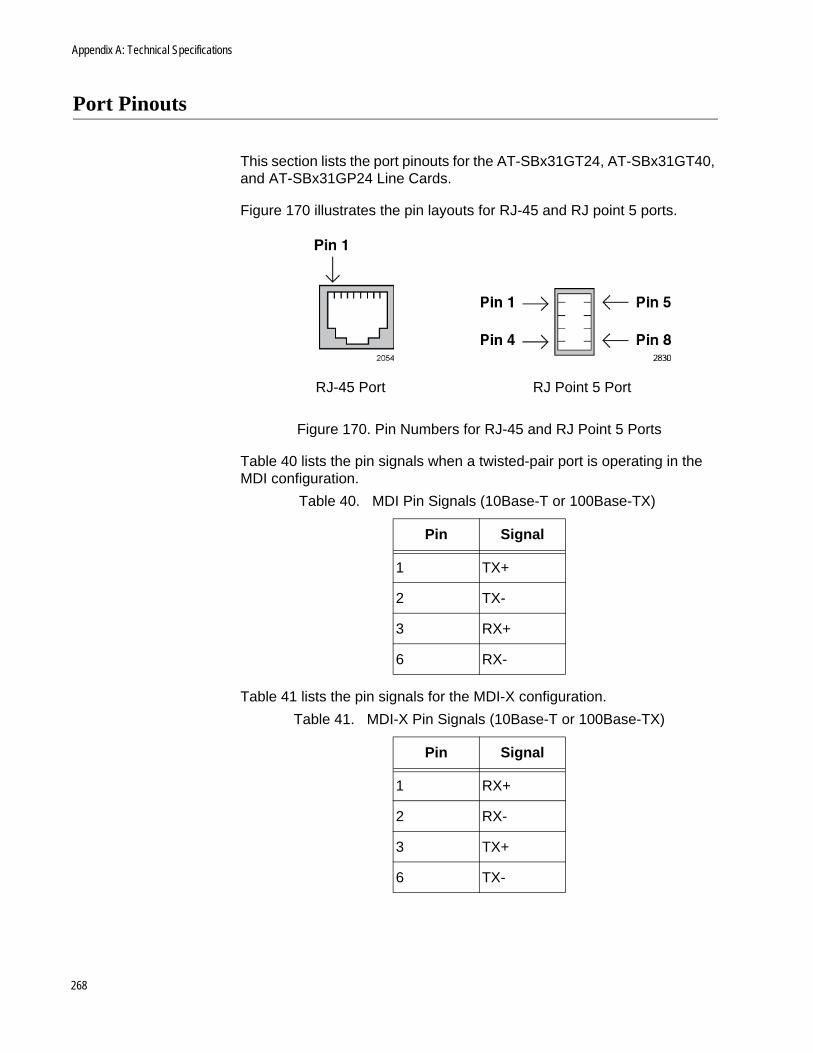
Appendix A: Technical Specifications
Port Pinouts
This section lists the port pinouts for the AT-SBx31GT24, AT-SBx31GT40, and AT-SBx31GP24 Line Cards.
Figure 170 illustrates the pin layouts for RJ-45 and RJ point 5 ports.
Figure 170. Pin Numbers for RJ-45 and RJ Point 5 Ports
Table 40 lists the pin signals when a twisted-pair port is operating in the MDI configuration.
Table 41 lists the pin signals for the MDI-X configuration.
Table 40. MDI Pin Signals (10Base-T or 100Base-TX)
Pin Signal
1 TX+
2 TX-
3 RX+
6 RX-
Table 41. MDI-X Pin Signals (10Base-T or 100Base-TX)
Pin Signal
1 RX+
2 RX-
3 TX+
6 TX-
RJ-45 Port RJ Point 5 Port
268

SwitchBlade x3106 Chassis Switch and AT-SBx31CFC Card Installation Guide
Table 42 lists the pin signals when a 10/100/1000Base-T port is operating at 1000 Mbps.
Table 42. 1000Base-T Connector Pinouts
Pin Pair Signal
1 1 TX and RX+
2 1 TX and RX-
3 2 TX and RX+
4 3 TX and RX+
5 3 TX and RX-
6 2 TX and RX-
7 4 TX and RX+
8 4 TX and RX-
269

Appendix A: Technical Specifications
270