swamp data management plan - home page ... · swamp data management plan: ba field data entry...
TRANSCRIPT

SWAMP DATA MANAGEMENT PLAN
Bioassessment Field Data Entry
Surface Water Ambient Monitoring Program
March 28, 2012

SWAMP Data Management Plan: BA Field Data Entry Revision Date: 03/28/12 Page 2 of 41
TABLE OF CONTENTS D. Field Data Entry ............................................................................................... 3
1. PROGRAMS NEEDED FOR SWAMP DATA ENTRY FORMS ................................................ 3 5. ENTERING NEW BIOASSESSMENT, PHYSICAL HABITAT AND ALGAE DATA ..................... 3
a. Bioassessment and Physical Habitat Field Data Sheets................................................. 3 b. Entering New Bioassessment and Physical Habitat Data .............................................. 9
i. Database Linking for Data Entry ................................................................................. 9 ii. Database Setup for Data Entry ................................................................................. 10 iii. Add a New Record .................................................................................................. 12 iv. Complete the Reach Documentation Information ................................................... 14 v. Enter Ambient Water Quality Measurements ........................................................... 16 vi. Enter Data Flags for the Ambient Water Quality Measurements ............................ 18 vii. Complete the Reach Length Information ............................................................... 20 viii. Enter Transect Data ............................................................................................... 21 ix. Enter Inter-Transect Data ........................................................................................ 26 x. Enter Slope and Bearing Data ................................................................................... 27 xi. Enter Discharge Measurements, Notable Field Conditions and Additional Habitat Characterization Data ................................................................................................... 29 xii. Enter Algae, Water Quality and BMI Samples ...................................................... 33 xiii. Continue Entering a New Record .......................................................................... 36
c. Check and Edit Bioassessment Data Using Queries ..................................................... 36 i. Using the SWAMP Bioassessment Field Data Entry Queries ................................... 36 ii. Using the Backend Database .................................................................................... 40
6. CHECKING DATA FOR QUALITY ASSURANCE .................................................................. 41

SWAMP Data Management Plan: BA Field Data Entry Revision Date: 03/28/12 Page 3 of 41
D. Field Data Entry This section of the SWAMP Database Manual will address the suggested method of data submission to the SWAMP Database, which is by form entry. There are also form data entry webinar trainings available on the SWAMP DMT website.
1. PROGRAMS NEEDED FOR SWAMP DATA ENTRY FORMS The programs needed for SWAMP Database data entry should be set up on the User’s computer and can be organized under a folder titled SWAMP Database for ease of use. For water quality and tissue field data entry, the three programs necessary to run the Database and Forms Entry Program are (1) the database itself SW_RegX_v25_DATE.mdb, where X refers to the SWAMP regional board number or agency where applicable and DATE refers to the most recent date of the database, (2) the SWAMP Query file SWAMP_SQL_Queries_v2.5_DATE, where DATE refers to the most recent date of the query file, and (3) a file called SWAMPsys_v25_DATE.mdw, where DATE refers to the most recent date of the permissions file which is responsible for maintaining permissions access to the other programs. For bioassessment field data entry, there are three programs necessary to run the Database and Forms Entry Program. If data entry is through a SWAMP replicated database, the user will need a SWAMP database itself (SW_RegX_v25_DATE.mdb, where X refers to the SWAMP regional board number where applicable and DATE refers to the most recent date of the database) and a file called SWAMPsys_v25_DATE.mdw where DATE refers to the most recent date of the permissions file which is responsible for maintaining permissions access to the other programs. If data entry is through a non-replicated SWAMP shell database, the user only needs the shell database and not the permissions file. Both scenarios require the front-end SWAMP Bioassessment (BA) Field Entry forms (SWAMP_BA_FieldForm_X_DATE where X is the version of the forms and DATE refers to the most recent date of the forms). When the SWAMP Database is initially installed on the user’s computer, the SWAMP DMT liaison will ensure that User Permissions files are set up correctly. Each time an updated version of the database program is received, the user may need to perform some set-up activity, see Database Usage - Microsoft Access Setup for instructions. Until further notice: Please do not use the Microsoft Access 2007 or 2010 version with any SWAMP applications. There is difficulty syncing with databases that have used the 2007 or 2010 version.
5. ENTERING NEW BIOASSESSMENT, PHYSICAL HABITAT AND ALGAE DATA All SWAMP-funded bioassessment studies shall follow the field protocols outlined in the standard operating procedure (SOP), Collecting Benthic Macroinvertebrate Samples and Associated Physical and Chemical Data for Ambient Bioassessments in California, that was finalized and released in February 2007. The SOP stipulates official procedures for the collection of bioassessment samples and associated physical habitat data. It outlines the process for sampling benthic macroinvertebrate assemblages and describes a suite of measures for sampling associated physical habitat and chemical conditions. The SOP is available for download on the DMT/QAT website http://swamp.mpsl.mlml.calstate.edu/resources-and-downloads/standard-operating-procedures#Bioassessment. If algae sampling is conducted, all SWAMP-funded bioassessment studies shall follow the field protocols outlined in the standard operating procedure (SOP), Collecting Stream Algae Samples and Associated Physical Habitat and Chemical Data for Ambient Bioassessments in California. The SOP stipulates official procedures for the collection of algae samples. The SOP is available for download on the DMT/QAT website http://swamp.mpsl.mlml.calstate.edu/resources-and-downloads/standard-operating-procedures#Algae.
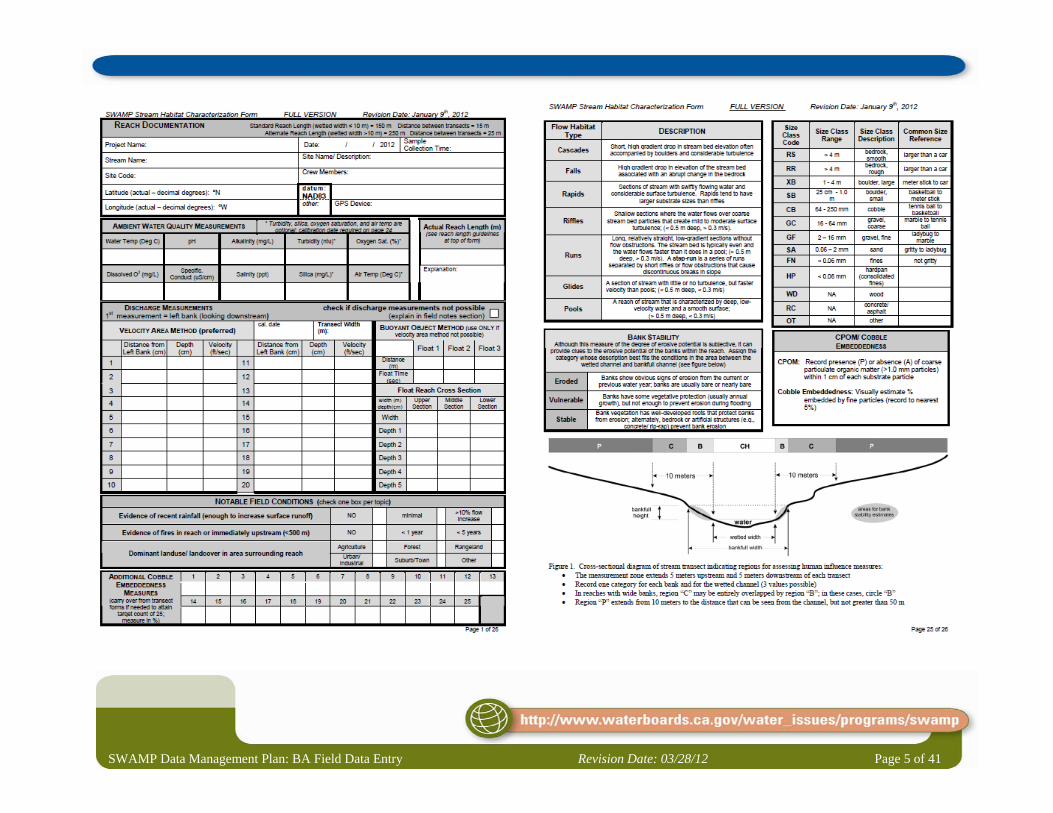
a. Bioassessment and Physical Habitat Field Data Sheets The purpose of the Field Data Sheets is to facilitate the recording of all pertinent data during sample collection. The SWAMP Data Management Team (DMT) has worked with the Department of Fish and Game Aquatic

SWAMP Data Management Plan: BA Field Data Entry Revision Date: 03/28/12 Page 4 of 41
Bioassessment Laboratory (DFG-ABL) and the Southern California Coastal Water Research Project (SCCWRP) to develop standard field data sheets for bioassessment, physical habitat, and algae sampling events. These data sheets correspond closely to the data entry forms and, therefore, should help to make data entry easier. Any changes or questions regarding the content of the data sheets as it pertains to the sampling protocol should be directed to the SWAMP Bioassessment Coordinator.
SWAMP Data Management Plan: BA Field Data Entry Revision Date: 03/28/12 Page 5 of 41

SWAMP Data Management Plan: BA Field Data Entry Revision Date: 03/28/12 Page 6 of 41
Transects A through K are similar in format. Only transects A, F, and K contain the “Take Photographs” box. The box is optional on the other transects and will appear if the box is checked. Also, transect K does not have an intertransect form.

SWAMP Data Management Plan: BA Field Data Entry Revision Date: 03/28/12 Page 7 of 41

SWAMP Data Management Plan: BA Field Data Entry Revision Date: 03/28/12 Page 8 of 41
Copies of the field data sheets are available online at http://swamp.mpsl.mlml.calstate.edu/resources-and-downloads/database-management-systems/swamp-25-database/templates-25/field-data-sheets#BAFieldData. Individual fields will be discussed below in the section entitled Entering New Bioassessment and Physical Habitat Data.

SWAMP Data Management Plan: BA Field Data Entry Revision Date: 03/28/12 Page 9 of 41
b. Entering New Bioassessment and Physical Habitat Data To begin entering bioassessment field data into the database, it is best to have completed Field Data Sheets available which contain the data to be entered. Data can also be entered into a field computer as sampling occurs as long as it has the SWAMP Bioassessment Field Data Entry forms and a SWAMP v2.5 backend (either replicated or non-replicated shell) database loaded onto it. These data entry forms are used primarily to record sample, probe, physical habitat, benthic macro invertebrates (BMI), and algae data. Some important things to keep in mind when entering bioassessment and physical habitat data:
Field data cannot be added via the SWAMP Steam Habitat database forms if a sample record already exists for the same station and date in the SWAMP v2.5 backend database. Doing so will result in an error message.
For SWAMP samples, field data should be entered via the SWAMP Bioassessment Field Data Entry forms and synced to the SWAMP Master database prior to sending BMI samples to DFG-ABL for processing/sorting and before water chemistry data are loaded.
i. Database Linking for Data Entry If it is the first time using a SWAMP replicated database, follow the steps under Database Usage - Microsoft Access Setup to link the SWAMP v2.5 backend database to a SWAMP permissions (SWAMPsys) file. If not, open the most recent SWAMP Bioassessment Field Data Entry forms and, if necessary login using your assigned information. The Menu screen should appear as follows:

SWAMP Data Management Plan: BA Field Data Entry Revision Date: 03/28/12 Page 10 of 41
Link the SWAMP Bioassessment Field Data Entry forms to the SWAMP v2.5 backend database through
the Switchboard. o Click on the BROWSE DATABASE button on the left of the Switchboard. o Browse to the backend database SW_RegX_v25_DATE.mdb file or to the non-replicated shell
database. o Click RE-LINK. o Click OK.
Refresh the static tables to create the necessary static tables. o Click the REFRESH TABLES button on the left of the Switchboard. o A window will appear to verify this action. Click YES to continue. o A message confirming a successful refresh should appear. Click OK.
Click the CLOSE FORM button on the bottom of the Switchboard. After a successful link to the SWAMP v2.5 backend database and refresh tables, the following SWAMP
Bioassessment Data Entry Program Main Menu screen should appear:
ii. Database Setup for Data Entry The SWAMP Bioassessment Data Entry Program Main Menu includes Data Entry, Data QA, and Data Maintenance sections. The Data Entry section is where the user begins entering new records through the forms or accessing suspended data entries if applicable. Details of this process will be addressed in the next section. The Data QA section is used to check and review the data after it has been entered. This will be addressed later in this document. The Data Maintenance section assists the user in setting up the forms to edit and, if applicable, add information for Agency, Project, Personnel, and Stations. It is highly recommended that the forms be customized for specific data entry prior to entering data. This makes data entry much more efficient. There are pull-down boxes in the forms that are used to add new records to the backend database. These pull-down boxes only show values that are checked as ‘Active’ and have the correct ‘Type’ (e.g., BA or Ben) in the individual tables. The Data Maintenance section assists the user to add/edit information for Agency, Project, Personnel, and Stations including making sure the applicable values are ‘Active’.

SWAMP Data Management Plan: BA Field Data Entry Revision Date: 03/28/12 Page 11 of 41
Existing Agencies, Projects, Personnel, and Stations can be made ‘Active’ through the Data Maintenance section.
Also, studies following a probabilistic (random) design may not have all possible stations in the database and new stations may need to be entered on the fly. New Stations and Personnel can be added, but all fields highlighted yellow for new stations (red text for personnel) are required and the user should populate as many other fields as

SWAMP Data Management Plan: BA Field Data Entry Revision Date: 03/28/12 Page 12 of 41
possible including the Station Detail, Station Alias and Station GIS tabs. All current, valid LookUp list values are available at http://checker.swamp.mpsl.mlml.calstate.edu/SWAMP_Checker/LookUpLists.php. Any other changes or additions to existing Agencies, Projects, and other lookup tables (e.g., CollectionDevice, Protocol, etc.) must occur through the appropriate SWAMP Liaison. If a non-replicated SWAMP shell database is used, new values can be entered into this database and they will be reviewed by the CEDEN Regional Data Center (RDC) when the data is submitted. If other lookup tables (other than those shown in the Main Menu) need active button checks, see the Customizing SWAMP Data Entry Forms section or your SWAMP or CEDEN RDC Liaison.
iii. Add a New Record Once the forms are customized for a particular data entry set, there are two options. A user may add a new record or continue entering a record that was not finished. In this section, add a new record will be discussed. When entering a new record, it is important to first be sure that the record has not already been entered into the database through local knowledge or by using the Data Review button and the Sample BA Information query under the BA Field Queries section. If the sample record is already in the backend database for a particular station and date, bioassessment data entry cannot occur using these forms unless one of the primary fields is changed. Doing so will result in an error message. The forms move through the general sampling sequence of station information, probe measurements, transects, slope, discharge (velocity), and collections (BMI, algae, water chemistry). Most, if not all, fields on the forms are required even though they may not be required in the SWAMP database. If the form is saved without all of the required fields populated, an error message will appear and the required cells will be highlighted red. Cells will not be required if a flag (ResQualCode) of NR, ND, or NA and the appropriate QACode are chosen. In general, flags are applied to the adjacent cell or cells depending on the form layout. If a flag is applied to a row, the user must use the appropriate query or form to go into the backend database and update all affected analytes so the flag is applied to the correct analyte. To begin entering a new record, all sample information on the Reach form must be entered first. The sample information is used to describe a unique sampling event taken in the field and/or analyzed in a laboratory. It refers to the unique combination of EventCode, ProtocolCode, StationCode, SampleDate, ProjectCode and AgencyCode. Click the ENTER NEW DATA button at the top of the Main Menu under Data Entry.
Use the pull down list to enter the Agency Code and Protocol Code of the sampling event. Then click GO TO REACH DOCUMENTATION.

SWAMP Data Management Plan: BA Field Data Entry Revision Date: 03/28/12 Page 13 of 41
Form Name LookUpList Description & Business Rules
Agency Code AgencyLookUp AgencyCode refers to the organization or agency that collected the sample. This should be listed on the Chain of Custody (COC) document that accompanies the samples from the field. BR: If an environmental sample is used to perform laboratory QC, i.e. a matrix spike or lab duplicate, the AgencyCode still refers to the agency that collected the native sample, not the agency that created the QC sample. See 'Special Circumstances' for LABQA business rules.
Protocol Code ProtocolLookUp ProtocolCode represents the sampling protocol used, which includes the set of methods, methodology, and/or specifications; e.g. MPSL-DFG_Field_v1.0 or SWAMP_WS_2007. Established protocols may be used or Regions may document their own sampling protocols. BR: It is preferable to combine protocols per StationCode and date so that all WaterQuality, Bioassessment, and Tissue data are combined under the same EventCode and Protocol. For example, if Tissue and WaterQuality are sampled at a station, the EventCode would be TI. If the protocols are different for Tissue and WaterQuality, the Tissue protocol would be used and the WaterQuality protocol would be listed in the SampleComments. If that is not preferable, separate EventCodes may be used with each individual protocol. Not Recorded is only used for historic data. All non-historic SWAMP projects require a true protocol reference. Not Applicable is used for LABQA and 000NONPJ samples only.

SWAMP Data Management Plan: BA Field Data Entry Revision Date: 03/28/12 Page 14 of 41
iv. Complete the Reach Documentation Information To enter the reach documentation information, tab through and enter data into the fields as follows:
Select the ProjectName from the pull-down next to ProjectName. Select the appropriate StationCode from the pull-down next to Site Code. This will populate the Site Name
and Site Description if one exists in the StationLookUp. Select the GPS Device from the pull-down and the appropriate datum if it is not the default NAD83. Enter the actual Latitude and Longitude where the sample was collected. Check the Distance from Target
field. If the distance of the actual Lat/Long is greater than 100 meters, the field will turn red. Double check the data entry for accuracy.
Enter the SampleDate, expressed as mm/dd/yy and the Start Time, expressed in military time as hh:mm. The current Date or Time can be added by double-clicking the cell. The Time should reflect the start time of the entire bioassessment sampling event.
Select the appropriate Personnel from the pull-down next to each cell for Crew Members. A minimum of two personnel are required.
Form Name LookUpList Description & Business Rules
Project Name ProjectLookUp ProjectCode is a unique code referencing a project which includes data from a single study design; e.g. RWB5_StS_FY0708, RWB2_Status_YR1, RWB7_Trend_2003, SWB_RCMP_2008. BR: ProjectCodes with FY in the name indicate samples were collected in a fiscal year calendar cycle, e.g. FY0708 would indicate fiscal year 2007-2008 which is July 1, 2007 through June 30, 2008. ProjectCodes without FY indicate samples were collected in a calendar year, e.g. 2003 would indicate calendar year 2003 which is January 1, 2003 through December 31, 2003. Each Project must have an associated QAPrP or Project QAPP listed. SWAMP moves data to the permanent side of the database by ProjectCode.
SWAMP Data Management Plan: BA Field Data Entry Revision Date: 03/28/12 Page 15 of 41
Form Name LookUpList Description & Business Rules
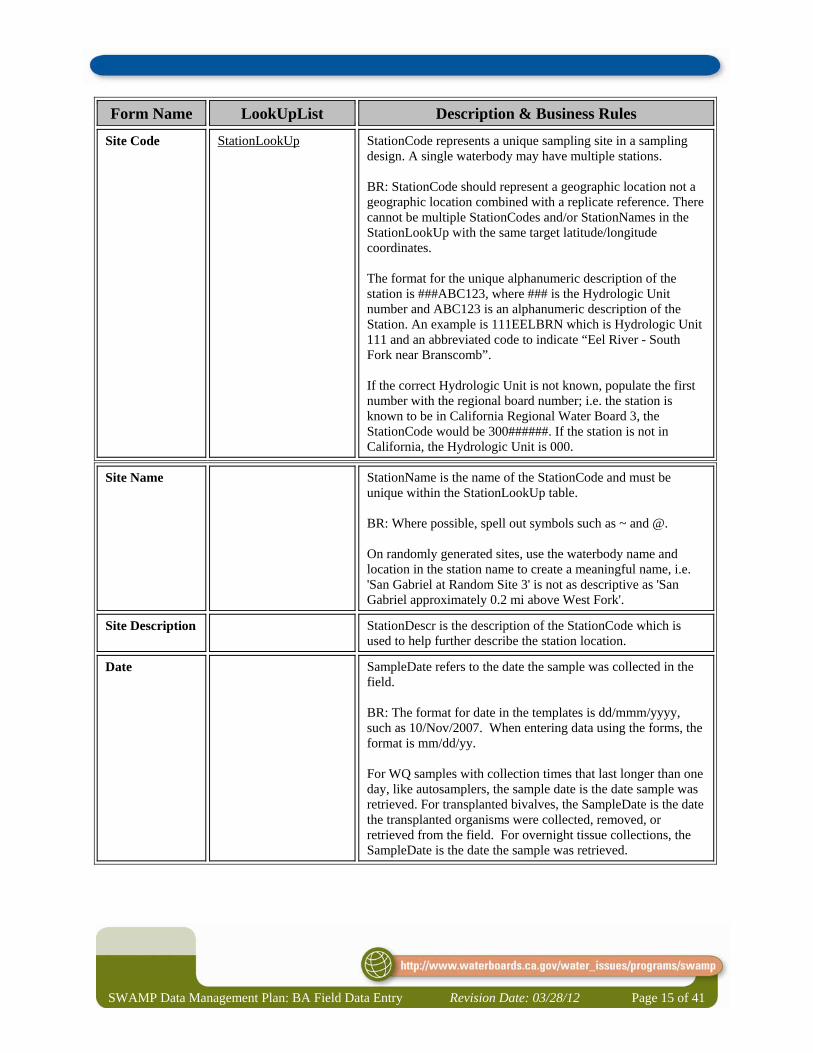
Site Code StationLookUp StationCode represents a unique sampling site in a sampling design. A single waterbody may have multiple stations. BR: StationCode should represent a geographic location not a geographic location combined with a replicate reference. There cannot be multiple StationCodes and/or StationNames in the StationLookUp with the same target latitude/longitude coordinates. The format for the unique alphanumeric description of the station is ###ABC123, where ### is the Hydrologic Unit number and ABC123 is an alphanumeric description of the Station. An example is 111EELBRN which is Hydrologic Unit 111 and an abbreviated code to indicate “Eel River - South Fork near Branscomb”. If the correct Hydrologic Unit is not known, populate the first number with the regional board number; i.e. the station is known to be in California Regional Water Board 3, the StationCode would be 300######. If the station is not in California, the Hydrologic Unit is 000.
Site Name StationName is the name of the StationCode and must be unique within the StationLookUp table. BR: Where possible, spell out symbols such as ~ and @. On randomly generated sites, use the waterbody name and location in the station name to create a meaningful name, i.e. 'San Gabriel at Random Site 3' is not as descriptive as 'San Gabriel approximately 0.2 mi above West Fork'.
Site Description StationDescr is the description of the StationCode which is used to help further describe the station location.
Date SampleDate refers to the date the sample was collected in the field. BR: The format for date in the templates is dd/mmm/yyyy, such as 10/Nov/2007. When entering data using the forms, the format is mm/dd/yy. For WQ samples with collection times that last longer than one day, like autosamplers, the sample date is the date sample was retrieved. For transplanted bivalves, the SampleDate is the date the transplanted organisms were collected, removed, or retrieved from the field. For overnight tissue collections, the SampleDate is the date the sample was retrieved.
SWAMP Data Management Plan: BA Field Data Entry Revision Date: 03/28/12 Page 16 of 41
Form Name LookUpList Description & Business Rules
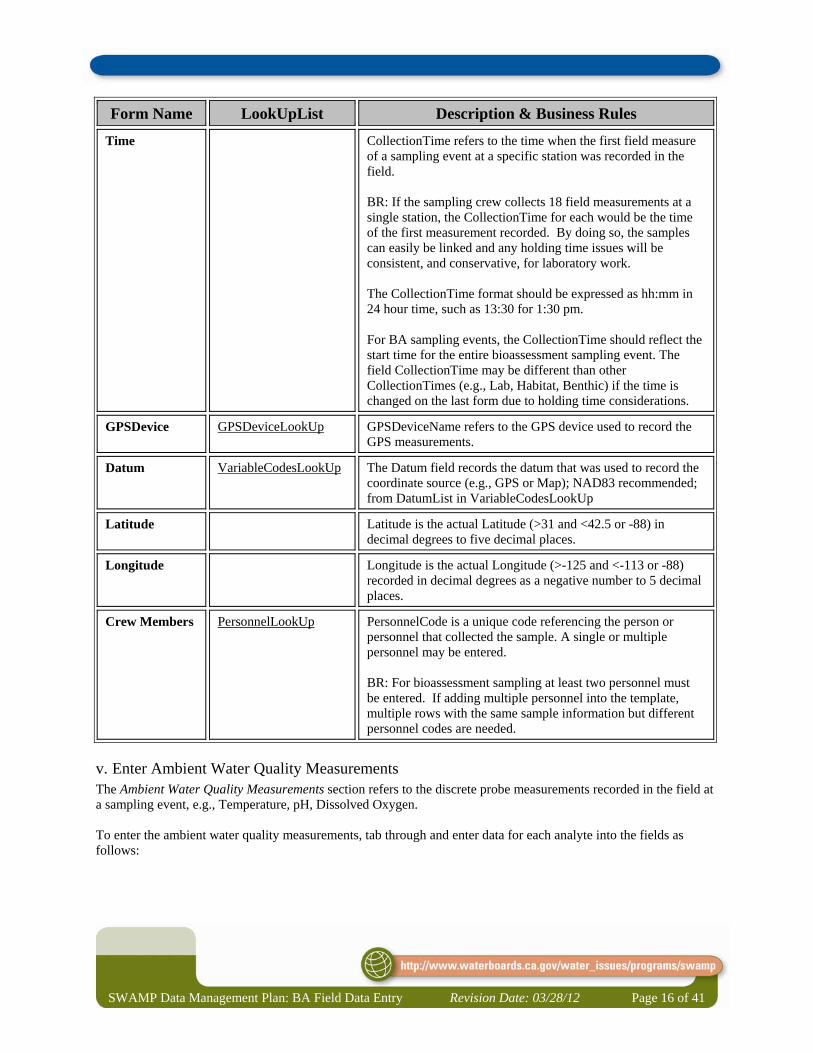
Time CollectionTime refers to the time when the first field measure of a sampling event at a specific station was recorded in the field. BR: If the sampling crew collects 18 field measurements at a single station, the CollectionTime for each would be the time of the first measurement recorded. By doing so, the samples can easily be linked and any holding time issues will be consistent, and conservative, for laboratory work. The CollectionTime format should be expressed as hh:mm in 24 hour time, such as 13:30 for 1:30 pm. For BA sampling events, the CollectionTime should reflect the start time for the entire bioassessment sampling event. The field CollectionTime may be different than other CollectionTimes (e.g., Lab, Habitat, Benthic) if the time is changed on the last form due to holding time considerations.
GPSDevice GPSDeviceLookUp GPSDeviceName refers to the GPS device used to record the GPS measurements.
Datum VariableCodesLookUp The Datum field records the datum that was used to record the coordinate source (e.g., GPS or Map); NAD83 recommended; from DatumList in VariableCodesLookUp
Latitude Latitude is the actual Latitude (>31 and <42.5 or -88) in decimal degrees to five decimal places.
Longitude Longitude is the actual Longitude (>-125 and <-113 or -88) recorded in decimal degrees as a negative number to 5 decimal places.
Crew Members PersonnelLookUp PersonnelCode is a unique code referencing the person or personnel that collected the sample. A single or multiple personnel may be entered. BR: For bioassessment sampling at least two personnel must be entered. If adding multiple personnel into the template, multiple rows with the same sample information but different personnel codes are needed.
v. Enter Ambient Water Quality Measurements The Ambient Water Quality Measurements section refers to the discrete probe measurements recorded in the field at a sampling event, e.g., Temperature, pH, Dissolved Oxygen. To enter the ambient water quality measurements, tab through and enter data for each analyte into the fields as follows:

SWAMP Data Management Plan: BA Field Data Entry Revision Date: 03/28/12 Page 17 of 41
Select the correct Collection Device from the pull-down. If the device does not show up, go back to the Database Setup section to determine how to add and/or make LookUp values available.
Enter the Calibration Date of the collection device. The current date can be added by double-clicking the cell. If unknown, leave the date as the default of 1/1/1950.
Enter the probe or meter result in the Measurement field. When typing the result, include the correct amount of significant figures. For example, if the result is 7.0, the only way to communicate the significance of the ‘.0’ in the SWAMP database is to type 7.0 and essentially have a trailing 0. If a required Measurement was not recorded, leave the Measurement field blank and enter a Flag of NR for ResQualCode and select the appropriate QACode; see the next section for how to apply flags to data. The CollectionDevice will revert to None. This should be changed back to the correct CollectionDevice.
Repeat the above steps for each measurement to be entered. Turbidity, Oxygen Saturation, Silica, and Air Temperature are optional measurements and can be left blank if they were not recorded.
Form Name LookUpList Description & Business Rules
Collection Device CollectionDeviceLookUp CollectionDeviceCode refers to the specific device used in the collection of the sample. BR: If the collection device failed, still enter the CollectionDevice with the appropriate QACode. If an intended analyte was not taken but is entered for consistency, enter None. If the analyte was collected but the CollectionDevice is not known, enter Not Recorded. When using the SWAMP Bioassessment Field Data Entry forms for BA sampling, if a ResQualCode of NR or ND is selected, the CollectionDeviceCode will default to None. The user may then change the CollectionDevice as appropriate, especially for ND results.

SWAMP Data Management Plan: BA Field Data Entry Revision Date: 03/28/12 Page 18 of 41
Form Name LookUpList Description & Business Rules
Calibration Date CalibrationDate is the date of the most recent instrument calibration in the dd/mmm/yyyy format. BR: Default value is 01/01/1950.
Measurement Result is the final numeric result of a given analyte, stored as text to retain trailing zeros. BR: The field Result is expressed as a real number rather than a calculation. The result should be reported with the appropriate number of significant figures. A result of 3.7266945 with 3 significant figures should be reported as 3.73. A result of 1.350 with 4 significant figures must display 1.350 in the Access form. If you only see 1.35, that is the result that will be loaded to the database and the 4th significant figure will be dropped.
vi. Enter Data Flags for the Ambient Water Quality Measurements Flags such as ResQualCode and QACode can be applied to the data as necessary. To enter the flags for the ambient water quality measurements, tab through and enter data into the fields as follows:
Select the first flag, ResQualCode, using the pull-down menu under the appropriate measurement. If a required measurement is blank because it was not collected, record the ResQualCode as NR.

SWAMP Data Management Plan: BA Field Data Entry Revision Date: 03/28/12 Page 19 of 41
Form Name LookUpList Description & Business Rules
Flag (Not Required)
ResQualLookUp The ResQualCode is the result qualifier code that qualifies the analytical result of the sample. BR: This field should have an equal sign (=) for results that are considered detected. The (=) sign does not show in the forms but it is defaulted to this value in the background and will be recorded properly in the database. When a result is Not Detected (ND), Greater Than (>), Field Estimated (JF), etc. a ResultQualCode is required and the appropriate code would be applied. When the result is null, a ResultQualCode is required. If the ResultQualCode value is NR for Not Recorded, then a reason for this code must be written into the FieldResultComments field and/or an appropriate QACode would be applied. When using the SWAMP Bioassessment Field Data Entry forms for BA sampling, there is no FieldResultComments field on the Reach form so an appropriate QACode should be applied.
Select the second flag, QACode, using the pull-down menu in the pop-up box. If a required measurement is blank because it was not collected, record the appropriate QACode as detailing the reason.
SWAMP Data Management Plan: BA Field Data Entry Revision Date: 03/28/12 Page 20 of 41
Form Name LookUpList Description & Business Rules
Flag (Not Required)
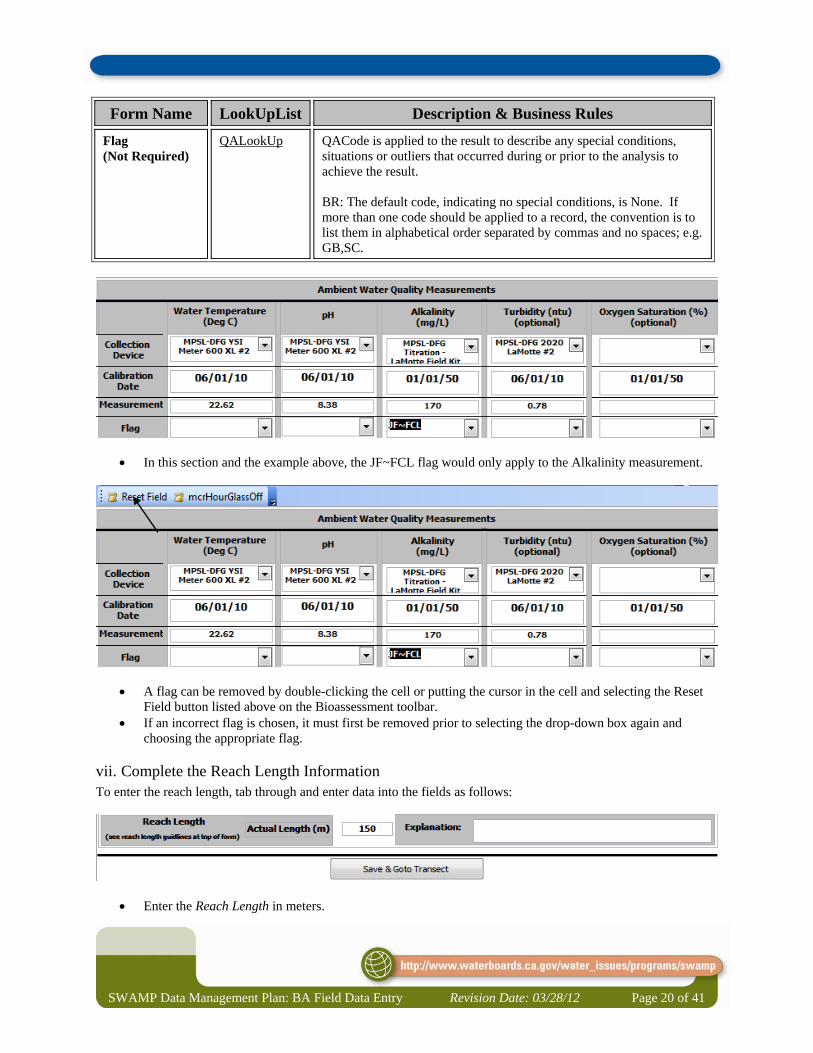
QALookUp QACode is applied to the result to describe any special conditions, situations or outliers that occurred during or prior to the analysis to achieve the result. BR: The default code, indicating no special conditions, is None. If more than one code should be applied to a record, the convention is to list them in alphabetical order separated by commas and no spaces; e.g. GB,SC.
In this section and the example above, the JF~FCL flag would only apply to the Alkalinity measurement.
A flag can be removed by double-clicking the cell or putting the cursor in the cell and selecting the Reset Field button listed above on the Bioassessment toolbar.
If an incorrect flag is chosen, it must first be removed prior to selecting the drop-down box again and choosing the appropriate flag.
vii. Complete the Reach Length Information To enter the reach length, tab through and enter data into the fields as follows:
Enter the Reach Length in meters.

SWAMP Data Management Plan: BA Field Data Entry Revision Date: 03/28/12 Page 21 of 41
If the reach length is not 150 m, an explanation regarding the reach length is required. Once all required fields are entered, click on the SAVE & GOTO TRANSECT button. If any required
fields are missing, they will be highlighted red after clicking the button. A box will appear after the data has been saved, click OK. This will save the data on this form and switch to the first transect form for data entry. After this button is pressed, you will not be able to go back to this form to review the data. Any changes to the data after it is saved will need to be done through the queries in the Data Review section.
viii. Enter Transect Data The Site Code (StationCode), Site Name and Date fields are pre-populated based on the previous form. If the channel was dry at the Transect, check the Dry Channel box to indicate that no data was collected within the wetted margins for this transect. The Human Influence, Densiometer Canopy Cover, Riparian Vegetation, Bank Stability, and, if applicable, Photograph sections should still be populated. To enter transect data, tab through and enter data into the fields as follows:
Enter the Wetted Width in meters. This will automatically populate the Distance from LB below. Check that the Left Bank measurement is 0 and the Right Bank measurement matches the Wetted Width. If the numbers do not match what was performed in the field, the user will need to correct the values through the corresponding transect query under the Data Review section.
Enter the Bankfull Width and Bankfull Height in meters. If necessary, enter the appropriate Flag, ResQualCode and QACode for each analyte. If a ResQualCode
flag of NR or ND is chosen for wetted width, existing values will be cleared for wetted width and the Distance from LB will be cleared.
If an incorrect flag is chosen or if a flag needs to be removed, it can be cleared by double-clicking the cell or putting the cursor in the cell and selecting the Reset Field button from the Bioassessment toolbar.
If algae parameters are not being measured, check the box above the Flag field in the Transect Substrates section.
Tab through and enter Transect Substrates data for the Left Bank. Keep tabbing through to enter the algae parameters data for the Left Bank if applicable.
Repeat the process for each Position.

SWAMP Data Management Plan: BA Field Data Entry Revision Date: 03/28/12 Page 22 of 41
If necessary, enter the appropriate Flag, ResQualCode and QACode. In this section, the flag applies to the data preceding it on the left for the Position but not the entire Position. Thus, a data flag on the Left Center Transect Substrate would not apply to the Left Center Algae Parameters. If only one of the measurements requires a flag, the flags that don’t belong can be removed using the appropriate Data Review query after this transect form has been saved. This will change the data in the backend database and update all affected measurements so the flag is only applied to the correct measurement.
If an incorrect flag is chosen or if a flag needs to be removed, it can be cleared by double-clicking the cell or putting the cursor in the cell and selecting the Reset Field button from the Bioassessment toolbar.
Enter the Human Influence data for the corresponding locations. There is a check box available that will default all values to 0 or N.
If necessary, enter the appropriate Flag, ResQualCode and QACode. In this section, the flag applies to the entire row for all three locations. If only one of the measurements requires a flag, the flags that don’t belong can be removed using the appropriate Data Review query after this transect form has been saved. This will change the data in the backend database and update all affected measurements so the flag is applied to the correct measurement.
If an incorrect flag is chosen or if a flag needs to be removed, it can be cleared by double-clicking the cell or putting the cursor in the cell and selecting the Reset Field button from the Bioassessment toolbar.

SWAMP Data Management Plan: BA Field Data Entry Revision Date: 03/28/12 Page 23 of 41
Enter the Instream Habitat Complexity data. If these measurements were not recorded, a flag of NR (ResQualCode) and the corresponding QACode should be applied to each row. In this section, the flag applies only to the corresponding instream habitat complexity.
If an incorrect flag is chosen or if a flag needs to be removed, it can be cleared by double-clicking the cell or putting the cursor in the cell and selecting the Reset Field button from the Bioassessment toolbar.
Enter the Collection Device if the default value is not correct. Enter the Densiometer readings for each position. Note that the Left and Right Bank readings are optional
and a flag is not needed if they are not populated. If necessary, enter the appropriate Flag, ResQualCode and QACode. In this section, the flag applies only to
the corresponding densiometer reading. If an incorrect flag is chosen or if a flag needs to be removed, it can be cleared by double-clicking the cell
or putting the cursor in the cell and selecting the Reset Field button from the Bioassessment toolbar.

SWAMP Data Management Plan: BA Field Data Entry Revision Date: 03/28/12 Page 24 of 41
Enter the Riparian Vegetation measurements for each bank. If necessary, enter the appropriate Flag, ResQualCode and QACode. In this section, the flag applies to the
entire row, both the Left Bank and Right Bank. If only one of the measurements requires a flag, the flags that don’t belong can be removed using the appropriate Data Review query or form after this transect form has been saved. This will change the data in the backend database and update all affected measurements so the flag is applied to the correct measurement.
If an incorrect flag is chosen or if a flag needs to be removed, it can be cleared by double-clicking the cell or putting the cursor in the cell and selecting the Reset Field button from the Bioassessment toolbar.
Enter the Bank Stability data for both the Left and Right Bank. If necessary, enter the appropriate Flag, ResQualCode and QACode. In this section, the flag applies only to
the corresponding bank stability measurement. If an incorrect flag is chosen or if a flag needs to be removed, it can be cleared by double-clicking the cell
or putting the cursor in the cell and selecting the Reset Field button from the Bioassessment toolbar.
SWAMP Data Management Plan: BA Field Data Entry Revision Date: 03/28/12 Page 25 of 41
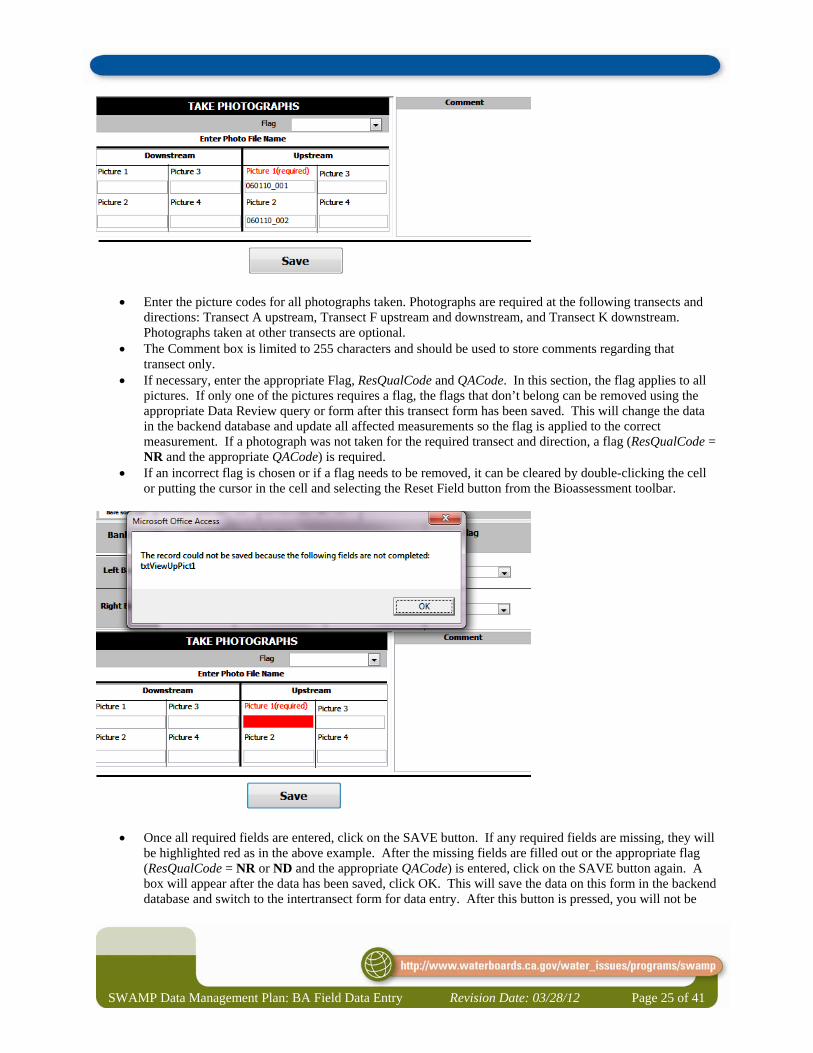
Enter the picture codes for all photographs taken. Photographs are required at the following transects and directions: Transect A upstream, Transect F upstream and downstream, and Transect K downstream. Photographs taken at other transects are optional.
The Comment box is limited to 255 characters and should be used to store comments regarding that transect only.
If necessary, enter the appropriate Flag, ResQualCode and QACode. In this section, the flag applies to all pictures. If only one of the pictures requires a flag, the flags that don’t belong can be removed using the appropriate Data Review query or form after this transect form has been saved. This will change the data in the backend database and update all affected measurements so the flag is applied to the correct measurement. If a photograph was not taken for the required transect and direction, a flag (ResQualCode = NR and the appropriate QACode) is required.
If an incorrect flag is chosen or if a flag needs to be removed, it can be cleared by double-clicking the cell or putting the cursor in the cell and selecting the Reset Field button from the Bioassessment toolbar.
Once all required fields are entered, click on the SAVE button. If any required fields are missing, they will be highlighted red as in the above example. After the missing fields are filled out or the appropriate flag (ResQualCode = NR or ND and the appropriate QACode) is entered, click on the SAVE button again. A box will appear after the data has been saved, click OK. This will save the data on this form in the backend database and switch to the intertransect form for data entry. After this button is pressed, you will not be

SWAMP Data Management Plan: BA Field Data Entry Revision Date: 03/28/12 Page 26 of 41
able to go back to this form to review or edit data. Any changes to the data after it is saved will need to be done through the queries.
ix. Enter Inter-Transect Data The Site Code (StationCode), Site Name and Date fields are pre-populated based on the Reach form. If the channel was dry at the Inter-Transect, check the Dry Channel box to indicate that no data was collected within the wetted margin for Inter-Transect substrates. The Flow Habitat section will still need to be populated. To enter inter-transect data, tab through and enter data into the fields as follows:
Enter the Wetted Width in meters. This will automatically populate the Distance from LB below. Check that the Left Bank measurement is 0 and the Right Bank measurement matches the Wetted Width. If the numbers do not match what was performed in the field, the user will need to correct the values through the corresponding transect query.
If necessary, enter the appropriate Flag, ResQualCode and QACode. In this section, the flag applies to only the Wetted Width.
If an incorrect flag is chosen or if a flag needs to be removed, it can be cleared by double-clicking the cell or putting the cursor in the cell and selecting the Reset Field button from the Bioassessment toolbar.
If algae parameters are not being measured check the box above the Flag field. Tab through and enter Inter-Transect Substrates data for the Left Bank. Keep tabbing through to enter the
algae parameters data for the Left Bank if applicable. Repeat the process for each Position. If necessary, enter the appropriate Flag, ResQualCode and QACode. In this section, the flag applies to the
data preceding it on the left for the Position but not the entire Position. Thus, a data flag on the Left Center

SWAMP Data Management Plan: BA Field Data Entry Revision Date: 03/28/12 Page 27 of 41
Transect Substrate would not apply to the Left Center Algae Parameters. If only one of the measurements requires a flag, the flags that don’t belong can be removed using the appropriate Data Review query after this transect form has been saved. This will change the data in the backend database and update all affected measurements so the flag is only applied to the correct measurement.
If an incorrect flag is chosen or if a flag needs to be removed, it can be cleared by double-clicking the cell or putting the cursor in the cell and selecting the Reset Field button from the Bioassessment toolbar.
Enter the Flow Habitats data. The total percentage must equal 100. If necessary, enter the appropriate Flag, ResQualCode and QACode. In this section, the flag applies to all
of the Flow Habitats. If an incorrect flag is chosen or if a flag needs to be removed, it can be cleared by double-clicking the cell
or putting the cursor in the cell and selecting the Reset Field button from the Bioassessment toolbar. Once all required fields are entered, click on the SAVE button. If any required fields are missing, they will
be highlighted red. After the missing fields are filled out or a ResQualCode of NR or ND and the appropriate QACode is applied, click on the SAVE button again. A pop up box will appear after the data has been saved, click OK. This will save the data on this form in the backend database and switch to the next transect form for data entry. After this button is pressed, you will not be able to go back to this form to review or edit data. Any changes to the data after it is saved will need to be done through the queries.
Continue filling out all Transect and Inter-Transect data.
x. Enter Slope and Bearing Data The Site Code (StationCode) and Date fields are pre-populated based on the Reach form. If slope was unable to be measured, check the box under the Slope and Bearing Form title and select the corresponding ResQualCode (NR) and appropriate QACode to indicate that no data was collected. This will allow the user to move on to the next form when the Save button is selected. To enter slope and bearing data, tab through and enter data into the fields as follows:

SWAMP Data Management Plan: BA Field Data Entry Revision Date: 03/28/12 Page 28 of 41
Enter the CollectionDevice used to measure slope or elevation difference. Enter Main Segment data by tabbing through. Under the Slope (%) or Elevation Difference column,
choose either cm or % using the pull-down. If the transect segment needs to be divided, use the Supplemental segment. Keep in mind the sum of
Segment Length should equal the Transect Length (e.g., 15 meters) and the Percent of Total Length should sum to 100%.
Values can be entered in the Stadia Rod columns for reference, but these values will not be recorded in the database.
If necessary, enter the appropriate Flag, ResQualCode and QACode. In this section, the flag applies to the entire row, thus the entire transect. If only one of the measurements requires a flag, the flags that don’t belong can be removed using the appropriate Data Review query or form after this transect form has been saved. This will change the data in the backend database and update all affected measurements so the flag is applied to the correct measurement.
If an incorrect flag is chosen or if a flag needs to be removed, it can be cleared by double-clicking the cell or putting the cursor in the cell and selecting the Reset Field button from the Bioassessment toolbar.

SWAMP Data Management Plan: BA Field Data Entry Revision Date: 03/28/12 Page 29 of 41
Enter the Cobble Embeddedness Measurements. The Cobble Count box records the number of embeddedness values during the transect assessments. If <25 cobbles were encountered, additional cobbles should be assessed and entered in this section until 25 total have been assessed.
Once all required fields are entered, click on the SAVE AND GOTO DISCHARGE button. If any required fields are missing, they will be highlighted red. After the missing fields are filled out or a ResQualCode of NR or ND and the appropriate QACode is applied, click on the button again. A box will appear after the data has been saved, click OK. This will save the data on this form in the backend database and switch to the next form for data entry. After this button is pressed, you will not be able to go back to this form to review and edit data. Any changes to the data after it is saved will need to be done through the queries.
xi. Enter Discharge Measurements, Notable Field Conditions and Additional Habitat Characterization Data The Site Code (StationCode), Site Name, and Date fields are pre-populated based on the Reach form. If discharge was unable to be measured, check the box under the Discharge Measurements title and select the corresponding ResQualCode (NR) and QACode to indicate that no data was collected. To enter discharge measurements data, tab through and enter data into the fields as follows:

SWAMP Data Management Plan: BA Field Data Entry Revision Date: 03/28/12 Page 30 of 41
Select Measurement Type, either Velocity Area or Buoyant Object Method. Only one section can be populated.
The following steps are for the Velocity Area measurement type. Select the appropriate Collection Device for the velocity meter and enter the Calibration Date. If the
calibration date is unknown, leave the default of 1/1/1950. Enter the Transect Width in meters. If necessary, enter the appropriate Flag, ResQualCode and QACode. In this section, the flag applies only to
the Transect Width. Tab through to enter the Discharge Measurements data for each row. Velocity should be recorded in feet per second (ft/sec) rather than meters per second. The other parameters
are measured in centimeters. If necessary, enter the appropriate Flag, ResQualCode and QACode. In this section, the flag applies to the
entire row. If only one of the measurements requires a flag, the flags that don’t belong can be removed using the appropriate Data Review query after this form has been saved. This will change the data in the backend database and update all affected measurements so the flag is applied to the correct measurement.
If an incorrect flag is chosen or if a flag needs to be removed, it can be cleared by double-clicking the cell or putting the cursor in the cell and selecting the Reset Field button from the Bioassessment toolbar.

SWAMP Data Management Plan: BA Field Data Entry Revision Date: 03/28/12 Page 31 of 41
The following steps are for measuring Discharge Measurements using the Buoyant Object Method. Tab through to enter the Discharge Measurements data. If necessary, enter the appropriate Flag, ResQualCode and QACode. In this section, the flag applies to the
entire row. If only one of the measurements requires a flag, the flags that don’t belong can be removed using the appropriate Data Review query after this form has been saved. This will change the data in the backend database and update all affected measurements so the flag is applied to the correct measurement.
If an incorrect flag is chosen or if a flag needs to be removed, it can be cleared by double-clicking the cell or putting the cursor in the cell and selecting the Reset Field button from the Bioassessment toolbar.
Complete the Notable Field Conditions section by clicking in the box to record the appropriate condition for each parameter.
If necessary, enter the appropriate Flag, ResQualCode and QACode. In this section, the flag applies only to the single notable field condition.
If an incorrect flag is chosen or if a flag needs to be removed, it can be cleared by double-clicking the cell or putting the cursor in the cell and selecting the Reset Field button from the Bioassessment toolbar.

SWAMP Data Management Plan: BA Field Data Entry Revision Date: 03/28/12 Page 32 of 41
In the Additional Habitat Characterization section, check the box to indicate whether High or Low Gradient thresholds were used. Then select the appropriate value for each analyte.
If necessary, enter the appropriate Flag, ResQualCode and QACode. In this section, the flag applies only to the single habitat characterization analyte.
If an incorrect flag is chosen or if a flag needs to be removed, it can be cleared by double-clicking the cell or putting the cursor in the cell and selecting the Reset Field button from the Bioassessment toolbar.
Once all required fields are entered, click on the SAVE button. If any required fields are missing, they will be highlighted red. After the missing fields are filled out or a ResQualCode of NR or ND and the appropriate QACode is applied, click on the SAVE button again. A box will appear after the data has been saved, click OK. This will save the data on this form and switch to the next form for data entry. After this button is pressed, you will not be able to go back to this form to review or edit data. Any changes to the data after it is saved will need to be done through the queries.

SWAMP Data Management Plan: BA Field Data Entry Revision Date: 03/28/12 Page 33 of 41
xii. Enter Algae, Water Quality and BMI Samples The Site Code (StationCode), Site Name, and Date fields are pre-populated based on the Reach form. If no algae, water chemistry, and/or BMI samples were collected and no comments need to be recorded, click the CLOSE (NO DATA COLLECTED) button at the bottom of the screen to complete the data entry for this sample. No other data can be entered for this sample except through queries in the Data Review form. To enter algae, water quality and/or BMI sample information, tab through and enter data into the fields as follows: Note that not every section needs to be completed. For example, if algae samples were not collected, skip that section and start with water chemistry.
If Algae samples were collected: o Select the appropriate Collection Method for the algae sampling. o Select Replicate number. o Enter the Number of Transects where the corresponding Collection Device was used. Note, the
Transect Total should not be greater than 11. o Check the box if Other collection devices were used and note in the Algae Comments the device,
number of transects where this device was used, and the sample area of the device.

SWAMP Data Management Plan: BA Field Data Entry Revision Date: 03/28/12 Page 34 of 41
o Enter the volumes collected in milliliters (mL) for each sample type. o If necessary, enter the appropriate Flag, ResQualCode and QACode. In this section, the flag
applies only to the single volume and method/replicate combination. o If an incorrect flag is chosen or if a flag needs to be removed, it can be cleared by double-clicking
the cell or putting the cursor in the cell and selecting the Reset Field button from the Bioassessment toolbar.
o Check the next box to indicate whether a qualitative sample was collected. If one was not collected, a pop-up box will appear where a comment can be recorded as to why it was not collected.
o Repeat the above steps for each method/replicate combination collected without duplicating the combination.
o Enter any comments about the algae sampling and collection.
If Water Chemistry samples were collected: o If the collection time for the water chemistry samples differs from the bioassessment collection
start time, enter the water chemistry collection time here. This is important for assessing holding time requirements.
o Check the next box if a Water Chemistry Grab Sample was collected. This will be replicate one. o Check the next box if a duplicate Water Chemistry Grab Sample was collected. This will be
replicate two. o Enter any comments regarding the water chemistry sampling and collection.

SWAMP Data Management Plan: BA Field Data Entry Revision Date: 03/28/12 Page 35 of 41
If Sediment Chemistry samples were collected: o If the collection time for the sediment chemistry samples differs from the bioassessment collection
start time and there is no water chemistry collection, enter the sediment chemistry collection time above in the Water Samples section. This is important for assessing holding time requirements.
o Select the appropriate Sediment Collection Device from the list. The check boxes below will then be available for editing.
o Enter a Collection Depth of 2 or 5 centimeters (cm) or type in an alternate value. o Check the next box if a Sediment Chemistry Integrated Sample was collected. This will be
replicate one. o Check the next box if a duplicate Sediment Chemistry Integrated Sample was collected. This will
be replicate two. o Enter any comments regarding the sediment chemistry sampling and collection.
If Benthic Macroinvertebrate (BMI) samples were collected: o Select the Replicate for the BMI sampling. o Select the Collection Method. o The Collection Device is defaulted to D-Frame Kick Net but a different device can be selected if
applicable. o The Number of Transects represents the number of transects sampled to attain that BMI sample
(e.g., 11 for BMI RWB, 8 for BMI TRC). o The Sieve Size represents the mesh size of the collection device and is defaulted to 0.5mm.. o The Number of Jars represents the number of jars that the sample was put into. If >4 jars were
used, type in the number. o Repeat the above steps for each method and replicate combination collected. o Enter any comments regarding the BMI sampling and collection.
Enter any general comments regarding the sampling event in the Field Notes/Comments section. Once all required fields are entered, click on the SAVE button. If any required fields are missing, they will
be highlighted red. After the missing fields are filled out or a ResQualCode of NR or ND and the appropriate QACode is used, click on the SAVE button again. A box will appear after the data has been saved, click OK. This will save the data on this form and the data entry for this sample will be complete. After this button is pressed, you will not be able to go back to this form to retrieve or edit data. Any changes to the data after it is saved will need to be done through the queries.
SWAMP Data Management Plan: BA Field Data Entry Revision Date: 03/28/12 Page 36 of 41
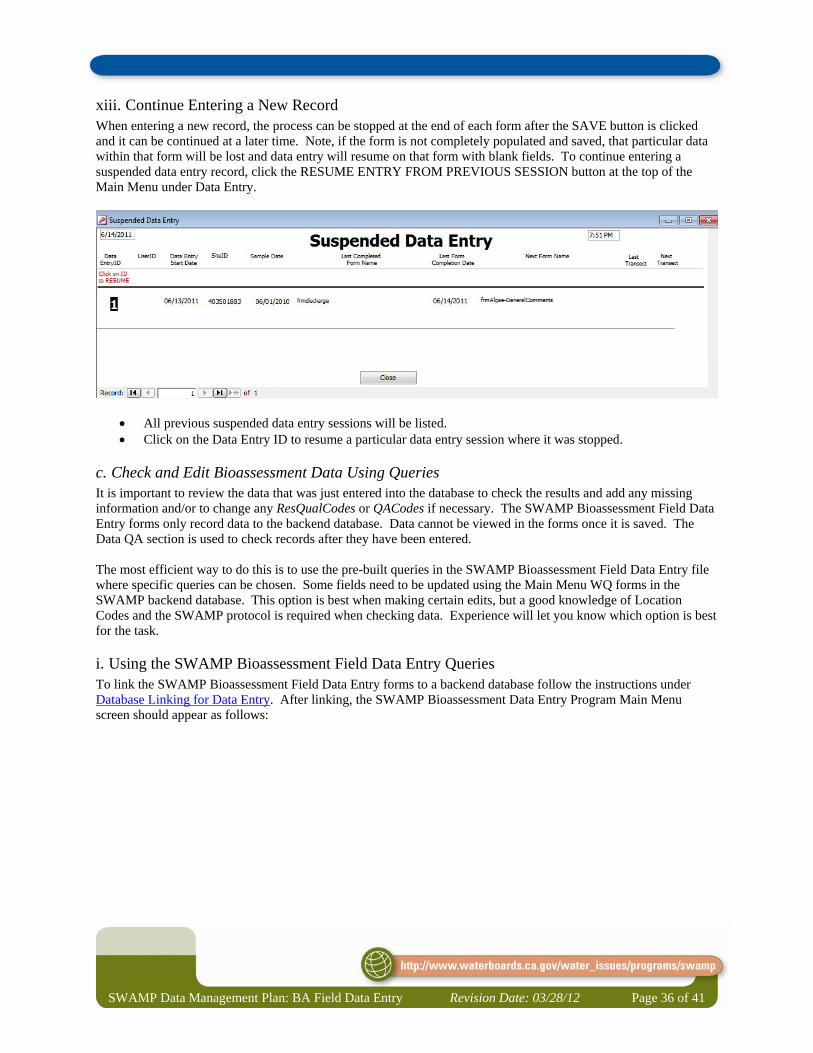
xiii. Continue Entering a New Record When entering a new record, the process can be stopped at the end of each form after the SAVE button is clicked and it can be continued at a later time. Note, if the form is not completely populated and saved, that particular data within that form will be lost and data entry will resume on that form with blank fields. To continue entering a suspended data entry record, click the RESUME ENTRY FROM PREVIOUS SESSION button at the top of the Main Menu under Data Entry.
All previous suspended data entry sessions will be listed. Click on the Data Entry ID to resume a particular data entry session where it was stopped.
c. Check and Edit Bioassessment Data Using Queries It is important to review the data that was just entered into the database to check the results and add any missing information and/or to change any ResQualCodes or QACodes if necessary. The SWAMP Bioassessment Field Data Entry forms only record data to the backend database. Data cannot be viewed in the forms once it is saved. The Data QA section is used to check records after they have been entered. The most efficient way to do this is to use the pre-built queries in the SWAMP Bioassessment Field Data Entry file where specific queries can be chosen. Some fields need to be updated using the Main Menu WQ forms in the SWAMP backend database. This option is best when making certain edits, but a good knowledge of Location Codes and the SWAMP protocol is required when checking data. Experience will let you know which option is best for the task.
i. Using the SWAMP Bioassessment Field Data Entry Queries To link the SWAMP Bioassessment Field Data Entry forms to a backend database follow the instructions under Database Linking for Data Entry. After linking, the SWAMP Bioassessment Data Entry Program Main Menu screen should appear as follows:

SWAMP Data Management Plan: BA Field Data Entry Revision Date: 03/28/12 Page 37 of 41
Click on the Data Review button under the Data QA header to open a list of queries used to view and edit data.
There are some fields in the queries that are not editable. If a field says ‘EDITHERE_...’, that cell may be edited. If the field says ‘DONOTEDIT_...’, that cell should not be edited.

SWAMP Data Management Plan: BA Field Data Entry Revision Date: 03/28/12 Page 38 of 41
Click the Design View button for Sample BA Information query.

SWAMP Data Management Plan: BA Field Data Entry Revision Date: 03/28/12 Page 39 of 41
o Enter the Criteria in the appropriate fields. Enter the StationCode of the sample to limit the subsequent queries. For example, if the
user wants to limit queries to the station that was recently entered into the database, enter that station code in the Criteria cell under the field StationCode.
Enter the month and/or year in DatePart of the previously entered data if desired. To enter a date range in the criteria instead of a single month and year, type
“>#mm/dd/yyyy# and <#mm/dd/yyyy#” in the SampleDate criteria to find samples that are greater than date one and less than date two. For example, to query all records in March and April of 2010 enter “>#02/29/2010# and <05/01/2010#”.
Save the query. This will save the criteria just entered and will limit subsequent queries to these samples.
Run the query to check that the criteria selected is narrow enough for future queries. Check the data in this query for data entry errors relating to the Sample.
o Repeat the above steps for the Sample Information query. Check the sample information. Check for completeness of results.
o Under the BA Queries header, run query Algae Sample Information. Check the sample details relating to Algae. Check for completeness of results.
o Run query Benthic/Algae Collection Information. Check the collection details relating to BMI and Algae samples. Check for completeness of results.
o Run query Distance Calculations. Check the distance from the actual lat/longs to the target lat/longs. Note, this query is not
based on the Sample BA Information query and the user will need to re-enter the criteria for limiting the query output by going into the design view of the Distance Calculations query.
o Under WQ Queries, run query Water Chemistry Collection. Check the collection details (e.g. time) relating to the water chemistry collection. Check for completeness of results.

SWAMP Data Management Plan: BA Field Data Entry Revision Date: 03/28/12 Page 40 of 41
o Under BA Field Queries, run query Probe and Velocity. Check accuracy of CollectionDevice. Check results including ranges, significant figures, and trailing 0’s. Check ResQualCodes and QACodes to be sure they were entered correctly
o Run query Discharge. Check accuracy of CollectionDevice. Check results including ranges, significant figures, and trailing 0’s. Check ResQualCodes and QACodes to be sure they were entered correctly.
o Run query Slope. Check accuracy of CollectionDevice. Check results including ranges, significant figures, and trailing 0’s. Check ResQualCodes and QACodes to be sure they were entered correctly.
o Run query Notable Field Conditions Additional Habitat Characteristics. Check variable results for the appropriate values. Check ResQualCodes and QACodes to be sure they were entered correctly.
o Run queries, Transect A through Transect K. Check results and variable results including ranges, significant figures, and trailing 0’s. Check ResQualCodes and QACodes to be sure they were entered correctly and applied to
the appropriate analyte and location code. o Run queries, InterTransect AB through InterTransect JK.
Check results and variable results including ranges, significant figures, and trailing 0’s. Check ResQualCodes and QACodes to be sure they were entered correctly.
After all the data entry is cleaned up and complete, run the following queries. o Run query Taxa Template to output the sample and benthic collection information necessary to
export into the SWAMP Taxonomy template prior to sending BMI and/or Algae samples to the lab(s).
o If the SWAMP eCOC template is used, run query COC Template Information to provide the basic information needed to populate the eCOC.
ii. Using the Backend Database Several fields need to be populated using the WQ forms in the SWAMP backend database after Bioassessment form entry is complete.
Open the SWAMP 2.5 backend database.

SWAMP Data Management Plan: BA Field Data Entry Revision Date: 03/28/12 Page 41 of 41
When the Main Menu opens, select BA under the Data drop-down field and click on the ADD/EDIT button.
In the Editing Entry BA Data form, perform the following steps: o Select BA event. o Select the correct Protocol (should be SWAMP_2007_WS in most cases). o Select the Station and Date of interest. o Click on the RETRIEVE button. o Once the correct Station is selected, click on the Edit button and make the following additions if
necessary: In the sample table (upper section) complete the following fields:
FundingID GroupSample
Changes can also be made to other data if the correct Location is retrieved. o Click on the SAVE button. o Click on the MAIN MENU button to exit.
6. CHECKING DATA FOR QUALITY ASSURANCE It is necessary to verify accuracy of the entered data periodically after it is entered. Although there is no official SWAMP guidance at this time, the recommended method for doing so is through the Data Review queries within the forms (see Check and Edit Bioassessment Data Using Queries section) or through the SWAMP Query Database.